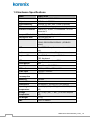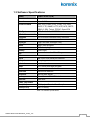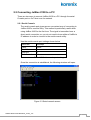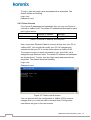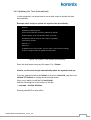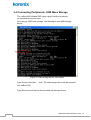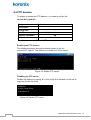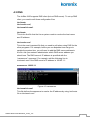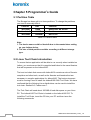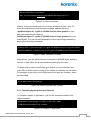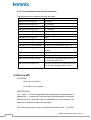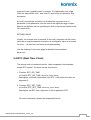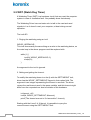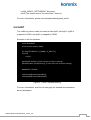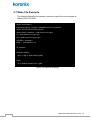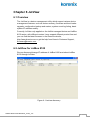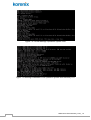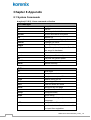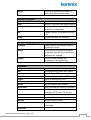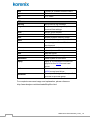
1
JetBox 8100 User Manual
Embedded Linux
Copyright@2007
Korenix Technology Co., Ltd.
All rights reserved.
Reproduction without permission is prohibited.
Customer Service: [email protected]
V1.0
JetBox 8100 User Manual_Linux_1.0
i
Copyright Notice
Copyright© 2007 Korenix Technology Co., Ltd.
All rights reserved.
Reproduction without permission is prohibited.
Information provided in this manual is intended to be accurate and reliable.
However, the original manufacturer assumes no responsibility for its use, or for
any infringements upon the rights of third parties that may result from its use.
The material in this document is for product information only and is subject to
change without notice. While reasonable efforts have been made in the
preparation of this document to assure its accuracy, Korenix assumes no
liabilities resulting from errors or omissions in this document, or from the use of
the information contained herein.
Korenix reserves the right to make changes in the product design without
notice to its users.
Acknowledgments
Korenix is a registered trademark of Korenix Technology Co., Ltd.
All other trademarks or registered marks in the manual belong to their
respective manufacturers.
ii
JetBox 8100 User Manaual_Linux_1.0
Table of Contents
JetBox 8100 User Manual Embedded Linux .................................................. i
Copyright Notice ............................................................................................... ii
Acknowledgments ............................................................................................ ii
Table of Contents..............................................................................................iii
Chapter 1 Overview .......................................................................................... 1
1.1 Introduction .................................................................................. 1
1.2 Hardware Specifications............................................................. 2
1.3 Software Specifications .............................................................. 3
Chapter 2 Getting Started................................................................................ 4
2.1 Powering on JetBox 8100 ........................................................... 4
2.2 Connecting JetBox 8100 to a PC ............................................... 5
2.2.1 Serial Console ..................................................................... 5
2.2.2 Telnet Console..................................................................... 6
2.2.3 SSH Console........................................................................ 7
2.2.4 JetView Console.................................................................. 8
2.3 Configuring the Ethernet Interface............................................ 9
2.3.1 Modifying Network Settings with the Serial Console..... 9
2.3.2 Modifying Network Settings over the Network ..............11
2.4 Test Program-Developing Hello.c ............................................13
2.4.1 Installing the Tool Chain (Linux) ......................................13
2.4.2 Compiling Hello.c...............................................................14
2.4.3 Uploading “test” to JetBox 8100 and Running the
Program ...............................................................................14
Chapter 3 Managing Embedded Linux .........................................................16
3.1 System Version Information......................................................16
3.2 Enabling and Disabling Daemons ............................................16
3.3.1 Setting the Time Manually ................................................19
3.3.2 NTP Client ...........................................................................20
3.3.3 Updating the Time Automatically ....................................21
3.4 Connecting Peripherals- USB Mass Storage ..........................22
Chapter 4 Managing Communications .........................................................23
4.1 Telnet daemon.............................................................................23
4.2 FTP daemon.................................................................................24
4.3 DNS ...............................................................................................25
4.4 Web Service- goahead ...............................................................26
4.5 IPTABLES.....................................................................................27
JetBox 8100 User Manual_Linux_1.0
iii
4.6 Dial-up Service-PPP ...................................................................28
4.7 PPPoE...........................................................................................28
4.8 SNMP ............................................................................................29
4.9 Open VPN.....................................................................................29
Chapter 5 Programmer’s Guide .....................................................................30
5.1 Partition Table .............................................................................30
5.2 Linux Tool Chain Introduction ..................................................30
5.2.1 Compiling Applications and Libraries ............................31
5.2.2 Tools Available in the Host Environment .......................32
5.3 Device API....................................................................................32
5.4 RTC (Real Time Clock) ...............................................................33
5.5 WDT (Watch Dog Timer).............................................................34
5.6 UART ............................................................................................35
5.7 Make File Example......................................................................36
Chapter 6 JetView............................................................................................37
6.1 Overview ......................................................................................37
6.2 JetView for JetBox 8100 ............................................................37
Chapter 7 Recovery CD...................................................................................38
7.1 Overview ......................................................................................38
7.2 Booting with Recovery CD ........................................................38
7.2.1 Plugging USB CD-ROM into USB port ............................38
7.2.2 Auto-Run Recovery Procedure ........................................39
Chapter 8 Appendix.........................................................................................42
8.1 System Commands ....................................................................42
8.2 Chart Index ..................................................................................45
8.3 Customer Service .......................................................................46
iv
JetBox 8100 User Manaual_Linux_1.0
Chapter 1 Overview
The Linux operating system that is pre-installed in the Jetbox8100 follows
the standard Linux architecture, making it easy to accept programs that
follow the POSIX standard. Program porting is done with the GNU Tool
Chain provided by Korenix. In addition to Standard POSIX APIs, device
drivers for the USB storage, buzzer and Network controls, and UART are
also included in the Linux OS. The Operating System, device drivers, and
the software you develop for your own application, can all be stored in
JetBox 8100’s Compact Flash card.
1.1 Introduction
The advantage of adopting Korenix JetBox series is ready-to-use. Korenix
is devoted to improve the usability of embedded computer in industrial
domain. Besides operating system (XP Embedded/WinCE/Linux), Korenix
provides device drivers, protocol stacks, system utilities, supporting
services and daemons in one Compact Flash card to make system
integration simple. Further, Korenix provides application development
toolkits for users to build up their own applications easily.
JetBox 8100 is a high performance, compact and rugged embedded
computer. All-in-one device with small volume, fanless design and a
capability to withstand a wide range of temperatures is suitable for
industrial severe environment. It is equipped with AMD Geode LX800
processor and 256MB SDRAM (512MB optional) and supports XP
Embedded, Linux and WinCE5.0 to meet requirements of industrial PC
applications. For better expansibility, it carries 2 USB ports, 1 RS-232 ports
and 1 RS-232/422/485 ports for versatile peripheral and interfaces and one
Compact Flash slot for system integration. It also supports VGA (up to
1280*1024) and audio to give users much flexibility in industrial
applications. In addition, it is equipped with 1 RJ-45 ports and supports
daemons and web server to accommodate to the network communication
environment today.
With complete software solution and excellent hardware design,
JetBox8100 is the best choice of industrial communication computer.
JetBox 8100 User Manaual_Linux_1.0
1
1.2 Hardware Specifications
Model
JetBox 8100
Processor
AMD Geode LX800 500MHz
Chipset
AMD Geode CS5536
System Memory
SDRAM 256 MB ,Max.512MB (Optional)
VGA
Up to 64MB sharing system memory
Ethernet Controller
Realtek RTL 8100C, 10/100Based-TX RJ45
connector*1
Compact Flash slot
Type II Compact Flash slot *1
Hard Driver Disk
2.5”HDD IDE slot *1
Serial Port
COM1: RS232
COM2: RS232/RS422/RS485 (JP2/BIOS
select)
USB
Two USB2.0 Compliant universal serial bus
port
Audio
MIC input connector , Earphone connector
Keyboard/Mouse
One PS/2 Port to support PS/2 Mouse and
PS/2 Keyboard
RTC
Battery backup external RTC
Reset Button
One
Power Button
One , Power ON/OFF Button
LED Indicator
PWR*1, HDD*1,ACT*1,LINK*1
Powe Input
+12VDC~+24VDC
Power
15W Max.
Consumption
Mounting
DIN Rail
Construction
Sheet metal case
Dimensions
120.0mm(D)* 44.2mm(W)*123.0mm(H)
5℉~158℉(-15℃ ~ 70℃), 5 to 95% RH(w/o
Operating
Temperature
HD)
Storage
-4℉~176℉(-20℃ ~ 80℃), 5 to 95% RH(w/o
Temperature
HD)
Net Weight
0.7 kg
EMC
CE/FCC class A
Table 1-1 Hardware specifications
2
JetBox 8100 User Manaual_Linux_1.0
1.3 Software Specifications
Model
JetBox 8100-L(LM)
Boot Loader
Grub
Kernel
Linux 2.6.18
Protocol Stack
ARP, PPP, CHAP, IPv4 , ICMP, TCP, UDP,
DHCP, FTP, SNMP, HTTP, NTP, NFS, SMTP,
SSH2.0, SSL, Telnet, PPPoE, OpenVPN
File System
NFS, Ext2, Ext3, VFAT/FAT
OS shell command
Bash
Busybox
Linux normal command utility collection
Utilities
tinylogin
Login and user manager utility
telnet
telnet client program
ftp
FTP client program
msmtp
email client
scp
Secure file transfer Client Program
Daemons
pppd
dial in/out over serial port daemon
snmpd
snmpd agent daemon
telnetd
telnet server daemon
inetd
TCP server manager program
ftpd
ftp server daemon
goahead
web server daemon
dropbear
secure shell server
openvpn
Open Source SSL VPN solution
openssl
open SSL
Linux Tool Chain
Gcc(4.1.1)
GNU project C and
Glibc(v2.3.6)
GNU C library
C++ Compiler
Table 1-2 Software specifications
JetBox 8100 User Manaual_Linux_1.0
3
Chapter 2 Getting Started
2.1 Powering on JetBox 8100
Connect the power line wire to the Terminal block located in the down side
of JetBox 8100, and power on it. It takes about 10 to 20 seconds for the
system to boot up.
Power Input
12VDC~24VDC
Figure 2-1 Power connector location
4
JetBox 8100 User Manaual_Linux_1.0
2.2 Connecting JetBox 8100 to a PC
There are two ways to connect JetBox 8100 to a PC: through the serial
Console port or via Telnet over the network
2.2.1 Serial Console
The serial console port gives users a convenient way of connecting to
JetBox 8100’s console utility. This method is particularly useful when
using JetBox 8100 for the first time. The signal is transmitted over a
direct serial connection, so you do not need to know either of JetBox’s
IP address in order to connect to the serial console utility.
Use the serial console port settings shown below.
Baud rate
9600bps
Parity
None
Data bits
8
Stop bits
1
Flow Control
None
Table 2-2 Serial console port setting
Once the connection is established, the following windows will open.
Figure 2-3 Serial console screen
JetBox 8100 User Manaual_Linux_1.0
5
To log in, type the Login name and password as requested. The
default values as following.
Login: root
Password: none
2.2.2 Telnet Console
If you know IP addresses and netmasks, then you can use Telnet to
connect to JetBox 8100. The default IP address and Netmask for each
port is given below:
LAN
Default IP address
Netmask
192.168.10.1
255.255.255.0
Table 2-4 Default IP address and Netmask
Use a cross-over Ethernet Cable to connect directly from your PC to
JetBox 8100. You should first modify your PC’s IP address and
netmask so that your PC is on the same subnet as JetBox 8100.
To connect to a hub or switch connected to your local LAN, use a
straight-through Ethernet cable. The default IP address and netmasks
are shown above. To login, type the Login name and password as
requested. The default values as following:
Login: root
Password: none
Figure 2-5 Telnet console screen
You can proceed with the configuration of JetBox 8100’s network
settings when you reach the bash command shell. Configuration
instructions are given in the next section.
6
JetBox 8100 User Manaual_Linux_1.0
2.2.3 SSH Console
JetBox 8100 supports an SSH Console to offer users with better
security options.
Click on the link
http://www.chiark.greenend.org.uk/%7Esgtatham/putty/ to download
PuTTy(freeware) to set up an SSH console for JetBox 8100 in a
Windows environment. The following figure shows a exmple of the
configuration that is required.
Figure 2-6 Windows PuTTy setting
JetBox 8100 User Manaual_Linux_1.0
7
2.2.4 JetView Console
The JetView is a device management utility which support various
device management features- such as device recovery, firmware and
boot loader upgrade, configuration backup and restore, system event
log listing, basic system IP address modify.
Install JetView to your PC from user manual CD which associated with
JetBox 8100 (You may download update JetView from Korenix
Website). The following figure shows a example of the configuration.
Figure 2-7 JetView setting
8
JetBox 8100 User Manaual_Linux_1.0
2.3 Configuring the Ethernet Interface
JetBox 8100’s network setting can be modified with the serial Console, or
online over the network.
2.3.1 Modifying Network Settings with the Serial Console
In this section, we use the serial console to modify JetBox 8100’s
network settings
2.3.1.1 Change Network Configuration
Follow the instructions given in a previous section to access JetBox
8100’s Console Utility via the serial Console port, and then type 'vi
/etc/network.conf' to edit network configuration file with vi editor.
Figure 2-8 Edit Network configuration file
2.3.1.2 Static and Dynamic IP address
Static IP address:
As shown below, 4 network addresses must be modified:
DHCP_CLIENT, IPADDR, DEFAULT_ROUTE and NETMASK. The
default IP addresses are 192.168.10.1.
JetBox 8100 User Manaual_Linux_1.0
9
Figure 2-9 Static IP address setting
Dynamic IP addresses:
By default, the Jetbox8100 is configured for “static” IP addresses. To
configure LAN ports to request an IP address dynamically, just change
DHCP_CLIENT=0 to DHCP_CLIENT=1.
Figure 2-10 Dynamic IP address setting
2.3.1.3 Static and Dynamic IP address
After the boot settings of the LAN interface have been modified, issue
the following command to activate the LAN settings immediately:
#/etc/init.d/10_networking.init
10
JetBox 8100 User Manaual_Linux_1.0
Figure 2-11 Restart Network setting
NOTE : After changing the IP settings, run the 10_networing.init script
to activate the new IP address.
2.3.2 Modifying Network Settings over the Network
IP settings can be activated over the network, but the new settings will
not be saved to the flash disk without modifying the file
/etc/network.conf.
For example, type the command #ifconfig eth0 192.168.10.2 to
change the IP address of LAN interface to 192.168.1.2.
JetBox 8100 User Manaual_Linux_1.0
11
Figure 2-12 Network Setting over the Network
12
JetBox 8100 User Manaual_Linux_1.0
2.4 Test Program-Developing Hello.c
In this section, we use the standard “Hello” programming example to
illustrate how to develop a program for the JetBox 8100. In general,
program development involves the following seven steps.
Step 1:
Connect the JetBox8100 to a Linux PC.
Step 2:
Install Tool Chain (GNU Cross Compiler & glibc).
Step 3:
Set the cross compiler and glibc environment variables.
Step 4:
Code and compile the program.
Step 5:
Download the program to the JetBox 8100 Via FTP or NFS.
Step 6:
Debug the program
If bugs are found, return to Step 4.
If no bugs are found, continue with Step 7.
Step 7:
Back up the user directory (distribute the program to additional JetBox
8100 units if needed).
2.4.1 Installing the Tool Chain (Linux)
The Linux Operating System must be pre-installed in the PC before
installing the JetBox 8100 GNU Tool Chain. Fedora core or compatible
versions are recommended. The Tool Chain requires approximately
203 MB of hard disk space on your PC. The JetBox 8100 Tool Chain
software is located on the JetBox 8100 CD. To install the Tool Chain,
insert the CD into your PC and then issue the following commands:
#mount /dev/cdrom /mnt/cdrom
#tar jxvf /mnt/cdrom/toolchain/jetbox8100-toolchain.tar.bz2 -C /
Ps. To install the toolchain you must grant root permission
The Tool Chain will be installed automatically on your Linux PC within
a few minutes. Before compiling the program, be sure to set the
JetBox 8100 User Manaual_Linux_1.0
13
following path first, since the Tool Chain files, including the compiler,
link, library, and include files are located in this directory.
PATH=/opt/Korenix/gcc-4.1.1-glibc-2.3.6/i686-korenix-linux-gnu/b
in/:$PATH
Setting the path allows you to run the compiler from any directory.
2.4.2 Compiling Hello.c
The JetBox 8100 CD contains several example programs. Here we use
Hello.c as an example to show you how to compile and run your
applications. Type the following commands from your PC to copy the files
used for this example from the CD to your computer’s hard drive.
# cd /tmp/
# mkdir example
# cp –r /mnt/cdrom/example/* /tmp/example
To compile the program, go to the helloworld subdirectory and issue the
following commands:
#cd example/helloworld
#make
You should receive the following response:
Figure 2-13 Compile example file “main.c”
The output executable file is the test.
2.4.3 Uploading “test” to JetBox 8100 and Running the Program
Use the following command to upload test to the JetBox 8100 via FTP.
1. From the PC, type:
14
JetBox 8100 User Manaual_Linux_1.0
#ftp xxx.xxx.xxx.xxx
2. Use bin command to set the transfer mode to Binary mode, and the put
command to initiate
the file transfer:
ftp> bin
ftp> put test
Figure 2-14 upload “test” to JetBox 8100
3. From the JetBox 8100. type:
# chmod +x test
# ./test
The word Helloworld will be printed on the screen.
Figure 2-15 run “test “ example file
JetBox 8100 User Manaual_Linux_1.0
15
Chapter 3 Managing Embedded Linux
This chapter includes information about version control, deployment,
updates, and peripherals. The information in this chapter will be particularly
useful when you need to run the same application on several JetBox 8100
units.
3.1 System Version Information
To determine the hardware capability of your JetBox 8100, and what kind
of software functions are supported, check the version numbers of your
JetBox 8100’s hardware, kernel, and user file system. Contact Korenix to
determine the hardware version. You will need the Production S/N (Serial
number), which is located on the JetBox 8100’s bottom label.
To check the firmware version, type:
#cat /etc/sysversion.
Figure 3-1 Firmware version
3.2 Enabling and Disabling Daemons
The following daemons are enabled when the JetBox 8100 boots up for the
first time.
snmpd ..........SNMP Agent daemon
telnetd ..........Telnet Server / Client daemon
inetd .............Internet Daemons
ftpd...............FTP Server / Client daemon
sshd ..............Secure Shell Server daemon
goahead ............ WWW Server daemon
16
JetBox 8100 User Manaual_Linux_1.0
Type the command “ps” to list all processes currently running.
Figure 3-2 daemons status
To run a private daemon, you can add a init file to /etc/init.d/ folder, as
follows:
#cd /etc/init.d
#vi 99_your_daemon.init
Figure 3-3
add init file
Next, use vi to open your application program. We use the example
program example program test-daemon, and put it to run in the
background
Figure 3-4 test-release example program
Change the file mode so it can be executed:
#chmod a+x 99_your_daemon.init
JetBox 8100 User Manaual_Linux_1.0
17
Figure 3-5 change file mode
18
JetBox 8100 User Manaual_Linux_1.0
3.3 Adjusting the System Time
3.3.1 Setting the Time Manually
The JetBox8100 has two time settings. One is the system time, and
the other is the RTC (Real Time Clock) time kept by the JetBox 8100’s
hardware.
Use the #date command to query the current system time or set a new
system time.
#date MMDDhhmmYYYY
MM = Month
DD = Date
hhmm = hour and minute
YYYY = Year
Use the following command to set the RTC time:
Use #hwclock to query the current RTC time or set a new
RTC time. Use the following command to query the system time:
#hwclock –w
Write current system time to RTC.
The following figure illustrates how to update thesystem time and set
the RTC time.
Figure 3-6 Setting the Time Manually
JetBox 8100 User Manaual_Linux_1.0
19
3.3.2 NTP Client
The JetBox 8100 has a built-in NTP (Network Time Protocol) client that is
used to initialize a time request to a remote NTP server.
Use #ntpdate to update the system time.
#ntpdate time.stdtime.gov.tw
#hwclock –w
Figure 3-7 NTP client request
Visit http://www.ntp.org for more information about NTP and NTP server
addresses.
NOTE Before using the NTP client utility, check your IP and DNS settings
to make sure that an Internet connection is available. Refer to Chapter 2 for
instructions on how to configure the Ethernet interface, and see Chapter 4
for DNS setting information.
20
JetBox 8100 User Manaual_Linux_1.0
3.3.3 Updating the Time Automatically
In this subsection, we show how to use a shell script to update the time
automatically.
Example shell script to update the system time periodically
#!/bin/sh
ntpdate time.stdtime.gov.tw
# You can use the time server’s ip address or domain
# name directly. If you use domain name, you must
# enable the domain client on the system by updating
# /etc/resolv.conf file.
hwclock –w
sleep 100
# Updates every 100 seconds. The min. time is 100 seconds. Change
# 100 to a larger number to update RTC less often.
Figure 3-8 System Time update automatically
Save the shell script using any file name. E.g., fixtime
How to run the shell script automatically when the system boots up
Copy the example shell script fixtime to directory /etc/init.d, and then use
chmod 755 fixtime to change the shell script mode.
Next, use vi editor to edit the file /etc/inittab.
Add the following line to the bottom of the file:
:: respawn : /etc/init.d/fixtime
Reboot jetbox8100 to take effect
JetBox 8100 User Manaual_Linux_1.0
21
3.4 Connecting Peripherals- USB Mass Storage
The JetBox 8100 disable PNP (plug-n-play) function to prevent
un-expected device mounted.
Once plug-in USB mass storage, use #dmesg to scan USB-storage
device.
Figure 3-9 usb-storage device scan status
Type # mount /dev/sdb1
into JetBox 8100.
/mnt/. The usb-storage device will be mounted
Type #umount /mnt/ before disconnected usb-storage device.
22
JetBox 8100 User Manaual_Linux_1.0
Chapter 4 Managing Communications
In this chapter, we explain how to configure JetBox 8100’s various
communication functions.
4.1 Telnet daemon
To enable or disable the Telnet server, you first need to edit the file
/etc/inetd.conf.
Program name
telnetd
Description
Config files
/etc/inetd.conf
Init file
/etc/init.d/50_inetd.init
Support command
Default
telnet
up
Table 4-1 telnet file path
Enabling the Telnet server
The following example shows the default content of the file /etc/inetd.conf.
The default is to enable the Telnet server:
telnet stream tcp nowait root /usr/sbin/telnetd telnetd –i –l /bin/login
Disabling the Telnet server
Disable the daemon by typing ‘#’ in front of the first character of the row to
comment out the line.
JetBox 8100 User Manaual_Linux_1.0
23
4.2 FTP daemon
To enable or disable the FTP daemon, you need to edit the file
/etc/init.d/51_ftpd.init.
Program name
ftpd
Description
--
Config files
Init file
/etc/init.d/51_ftpd.init
Support command
Default
ftp
up
Table 4-2 FTP daemon path
Enabling the FTP daemon
The following example shows the default content of the file
/etc/init.d/51_ftpd.init. The default is to enable the Telnet server:
Figure 4-3 Enable FTP server
Disabling the FTP server
Disable the daemon by typing ‘#’ in front of the first character of the row to
comment out the third line.
#!/bin/sh
# echo “initial FTPD”
#/sbin/ftpd -D
Figure 4-4 Disable FTP server
24
JetBox 8100 User Manaual_Linux_1.0
4.3 DNS
The JetBox 8100 supports DNS client (but not DNS server). To set up DNS
client, you need to edit three configuration files:
/etc/hosts,
/etc/resolv.conf,
/etc/nsswitch.conf.
/etc/hosts
This is the first file that the Linux system reads to resolve the host name
and IP address.
/etc/resolv.conf
This is the most important file that you need to edit when using DNS for the
other programs. For example, before you use #ntpdate time.nist.goc to
update the system time, you will need to add the DNS server address to
the file. Ask your network administrator which DNS server address you
should use. The DNS server’s IP address is specified with the
“nameserver” command. For example, add the following line to
/etc/resolv.conf if the DNS server’s IP address is 168.95.1.1:
nameserver 168.95.1.1
Figure 4-5 nameserver
/etc/nsswitch.conf
This file defines the sequence to resolve the IP address by using /etc/hosts
file or /etc/resolv.conf.
JetBox 8100 User Manaual_Linux_1.0
25
4.4 Web Service- goahead
The GoAhead WebServer is an open standard web server that is compliant
with all necessary standards to be an effective embedded web server.
Program name
webs
Description
/etc/server.pem
Config files
/etc/certs/cacert.pem
/etc/certs/cakey.pem
/web/index.html
/etc/init.d/52_httpd.init
Init file
Support command
Default
-up
Table 4-6 goahead webserver path
The GoAhead web server’s main configuration file is
/etc/init.d/52_httpd.init, with the default homepage located at /web
/index.html. Save your own homepage to the following directory:
/web
Before you modify the homepage, use a browser (such as Microsoft
Internet Explore or Mozilla (Firefox) from your PC to test if the goahead
Web Server is working. Type the LAN IP address in the browser’s address
box to open the homepage.
Visit http://goahead.com/products/webserver/specifications.aspx for more
information about GoAhead.
26
JetBox 8100 User Manaual_Linux_1.0
Figure 4-7 Default html page
4.5 IPTABLES
IPTABLES is an administrative tool for setting up, maintaining, and
inspecting the Linux kernel’s IP packet filter rule tables. Several different
tables are defined, with each table containing built-in chains and
user-defined chains.
Each chain is a list of rules that apply to a certain type of packet. Each rule
specifies what to do with a matching packet. A rule (such as a jump to a
user-defined chain in the same table) is called a “target.”
Since JetBoc 8100 has one network interface, it supports Filter table of
IPTABLES.
Filter Table—includes three chains:
INPUT chain
OUTPUT chain
FORWARD chain
NOTE
Jetbox8100 does NOT support IPV6 and ipchains.
JetBox 8100 User Manaual_Linux_1.0
27
4.6 Dial-up Service-PPP
PPP (Point to Point Protocol) is used to run IP (Internet Protocol) and other
network protocols over a serial link. PPP can be used for direct serial
connections (using a null-modem cable) over a Telnet link, and links
established using a modem over a telephone line. Modem / PPP access is
almost identical to connecting directly to a network through JetBox 8100’s
Ethernet port. Since PPP is a peer-to-peer system.
Program name
pppd
Description
Config files
/etc/options
/etc/pap-secrets
/etc/chap-secrets
Init file
Support command
-pppd
chat
pppdump
Default
down
Table 4-8 pppd service path
4.7 PPPoE
Point-to-Point Protocol over Ethernet is a network protocol for
encapsulating Poing-to-Point Protocol(PPP) frames inside Ethernet
frames.It is used mainly with ADSL services where individual users connect
to the ADSL transceiver over Ethernet.
Program name
pppoe
Description
Config files
/etc/ppp/pppoe.conf
Init file
Support command
-pppoe-connect
pppoe-setup
pppoe-start
pppoe-stop
pppoe-status
Default
down
Table 4-9 PPPoE service path
28
JetBox 8100 User Manaual_Linux_1.0
4.8 SNMP
JetBox 8100 has built-in SNMP V1, V2C(Simple Network Management
Protocol) agent software. It supports RFC 1213 MIB-II. The following snmp
file path.
Program name
snmpd
Description
Config files
/etc/snmp/snmpd.conf
Init file
--
Support command
snmpd
Default
up
Table 4-10 SNMP file path
4.9 Open VPN
OpenVPN is a full-featured SSL VPN which implements OSI layer 2 or 3
secure network extension using the industry standard SSL/TLS protocol,
supports flexible client authentication methods based on certificates, smart
cards, and/or username/password credentials, and allows user or
group-specific access control policies using firewall rules applied to the
VPN virtual interface.
Program name
openvpn
Description
Config files
/etc/openvpn/sample-scripts/
/etc/openvpn/sample-config-files/
/etc/openvpn/sample-keys/
Init file
--
Support command
openvpn
Default
down
Table 4-11 openvpn file path
JetBox 8100 User Manaual_Linux_1.0
29
Chapter 5 Programmer’s Guide
5.1 Partition Table
The Storage has been split into three partitions. To change the partitions,
you need to manually fdisk it.
Partition
Size
Contents
/dev/hda1
10MB
Bootloader && Kernel
/dev/hda2
100MB
Rootfs
/dev/hda3
1890MB~
Not in use
Table 5-1 Partition table
Note.
1. The device name could be /dev/sdb due to the master/slave setting
on your Jetbox device.
2. The size of third partition variable according to different storage
type.
5.2 Linux Tool Chain Introduction
To ensure that an application will be able to run correctly when installed on
Jetbox, you must ensure that it is compiled and linked to the same libraries
that will be present on the Jetbox8100.
The host tool chain that comes with Jetbox8100 contains a suite of Korenix
compilers and other tools, as well as the libraries and headers that are
necessary to compile applications for Jetbox8100. The host environment
must be running Linux to install the Jetbox8100 GNU Tool Chain. We have
confirmed that the following Linux distributions can be used to install the
tool chain: Redhat 9.0, Fedora core 7.
The Tool Chain will need about 200 MB of hard disk space on your Linux
PC. The Jetbox8100 Tool Chain is located on the Jetbox8100 CD. To
install the Tool Chain, insert the CD into your PC and then issue the
following commands:
30
JetBox 8100 User Manaual_Linux_1.0
#mount /dev/cdrom /mnt/cdrom
#tar –jxvf /mnt/cdrom/toolchain/jetbox8100-toolchain.tar.bz2 –C /
Figure 5-2 mount “toolchain”
Wait for a few minutes while the Tool Chain is extract on your Linux PC.
Once the host environment has been installed, add the directory
/opt/korenix/gcc-4.1.1-glibc-2.3.6/i686-korenix-linux-gnu/bin to your
path and optionally the directory
/opt/korenix/gcc-4.1.1-glibc-2.3.6/i686-korenix-linux-gnu/man/ to your
manual path. You can do this temporarily for the current login session by
issuing the following commands:
#export PATH=”/opt/korenix/gcc-4.1.1-glibc-2.3.6/i686-korenix-linux-gnu/bin:$PATH”
#export MANPATH=“/opt/korenix/gcc-4.1.1-glibc-2.3.6/i686-korenix-linux-gnu/man/”
Figure 5-3 add “toolchain” file path
Alternatively, you can add the same commands to $HOME/.bash_profile to
cause it to take effect for all login sessions initiated by this user.
To obtain help on Korenix toolchain gcc version, you can use the Linux
man utility to obtain help on many of the utilities provided by the tool chain.
For example to get help on the i686-korenix-linux-gnu-gcc compiler, issue
the command:
#man i686-korenix-linux-gnu-gcc
Figure 5-4 korenix toolchain gcc version
5.2.1 Compiling Applications and Libraries
To compile a simple C application, just use the compiler instead of the
regular compiler:
#i686-korenix-linux-gnu-gcc –o outfile –g -02 souce_code.c
# i686-korenix-linux-gnu-strip –s outfile
Figure 5-5 compiler C application
JetBox 8100 User Manaual_Linux_1.0
31
5.2.2 Tools Available in the Host Environment
The following cross compiler tools are provided:
i686-korenix-linux-gnu-ar
Manage archives (static libraries)
i686-korenix-linux-gnu-as
Assembler
i686-korenix-linux-gnu-c++
C++ compiler
i686-korenix-linux-gnu-cpp
C preprocessor
i686-korenix-linux-gnu-g++
C++ compiler
i686-korenix-linux-gnu-gcc
C compiler
i686-korenix-linux-gnu-gprof
Display call graph profile data
i686-korenix-linux-gnu-ld
Linker
i686-korenix-linux-gnu-nm
Lists symbols from object files
i686-korenix-linux-gnu-objcopy
Copies and translates object files
i686-korenix-linux-gnu-objdump
Displays information about object files
i686-korenix-linux-gnu-ranlib
Generates indexes to archives (static
libraries)
i686-korenix-linux-gnu-readelf
Displays information about ELF files
i686-korenix-linux-gnu-size
Lists object file section sizes
i686-korenix-linux-gnu-strings
Prints strings of printable characters from
files (usually object files)
i686-korenix-linux-gnu-strip
Removes symbols and sections from object
files (usually debugging information)
Table 5-6 cross compiler tools
5.3 Device API
SYNOPSIS
#include <sys/ioctl.h>
int ioctl(int d, int request, ...);
DESCRIPTION
The ioctl() function manipulates the underlying device parameters of
special files. In particular, many operating characteristics of character
special files (e.g. terminals) may be controlled with ioctl() requests. The
argument d must be an open file descriptor.
The second argument is a device-dependent request code. The third
32
JetBox 8100 User Manaual_Linux_1.0
argument is an untyped pointer to memory. It’s traditionally char *argp
(from the days before void * was valid C), and will be so named for this
discussion.
An ioctl() request has encoded in it whether the argument is an in
parameter or out parameter, and the size of the argument argp in bytes.
Macros and defines used in specifying an ioctl() request are located in the
file <sys/ioctl.h>.
RETURN VALUE
Usually, on success zero is returned. A few ioctl() requests use the return
value as an output parameter and return a nonnegative value on success.
On error, -1 is returned, and errno is set appropriately.
Use the desktop Linux’s man page for detailed documentation:
#man ioctl
5.4 RTC (Real Time Clock)
The device node is located at /dev/rtc. Jetbox supports Linux standard
simple RTC control. You must include <linux/rtc.h>
.
1. Function: RTC_RD_TIME
int ioctl(fd, RTC_RD_TIME, struct rtc_time *time);
Description: read time information from RTC. It will return the value on
argument 3.
2. Function: RTC_SET_TIME
int ioctl(fd, RTC_SET_TIME, struct rtc_time *time);
Description: set RTC time. Argument 3 will be passed to RTC.
For more information, please see example/rtc/rtc.txt
JetBox 8100 User Manaual_Linux_1.0
33
5.5 WDT (Watch Dog Timer)
A Watchdog Timer (WDT) is a hardware circuit that can reset the computer
system in case of a software fault. You probably knew that already.
The Watchdog Driver has one basic role: to talk to the card and send
signals to it so it doesn't reset your computer, at least during normal
operation.
The ioctl API:
1. Pinging the watchdog using an ioctl:
WDIOC_KEEPALIVE:,
This ioctl does exactly the same thing as a write to the watchdog device, so
the main loop in the above program could be replaced with:
while (1) {
ioctl(fd, WDIOC_KEEPALIVE, 0);
sleep(10);
}
the argument to the ioctl is ignored.
2. Setting and getting the timeout:
To modify the watchdog timeout on the fly with the SETTIMEOUT ioctl,
driver has the WDIOF_SETTIMEOUT flag set in their option field. The
argument is an integer representing the timeout in seconds. The driver
returns the real timeout used in the same variable, and this timeout might
differ from the requested one due to limitation of the hardware.
int timeout = 45;
ioctl(fd, WDIOC_SETTIMEOUT, &timeout);
printf("The timeout was set to %d seconds\n", timeout);
Starting with the Linux 2.4.18 kernel, it is possible to query the
current timeout using the GETTIMEOUT ioctl.
34
JetBox 8100 User Manaual_Linux_1.0
ioctl(fd, WDIOC_GETTIMEOUT, &timeout);
printf("The timeout was is %d seconds\n", timeout);
For more information, please see example/watchdog/wdt_test2.c
5.6 UART
The JetBox tty device node is located at /dev/ttyS0, /dev/ttyS1; ttyS0 is
mapped to COM1, and ttyS1 is mapped to COM2.
Example to set the baudrate:
int fd, BAUDRATE;
struct termios newtio, oldtio;
fd = open(TTYDEVICE, O_RDWR | O_NOCTTY );
if (fd <0)
exit(-1);
tcgetattr(fd, &oldtio); //save current serial port settings
bzero(&newtio, sizeof(newtio)); // clear struct for new port settings
BAUDRATE = B57600;
cfsetispeed(&newtio,BAUDRATE);
cfsetospeed(&newtio,BAUDRATE);
Figure 5-7 UART baudrate setting
For more information, see Linux’s man page for detailed documentation:
#man cfsetispeed
JetBox 8100 User Manaual_Linux_1.0
35
5.7 Make File Example
The following Makefile file example codes are copied from the example on
Jetbox8100’s CD-ROM.
export TOOLCHAIN :=
/opt/korenix/gcc-4.1.1-glibc-2.3.6/i686-korenix-linux-gnu/bin
export PATH=$(TOOLCHAIN):$(PATH)
export CROSS_COMPILE := i686-korenix-linux-gnuCC = i686-korenix-linux-gnu-gcc
CPP = i686-korenix-linux-gnu-gcc
SOURCES = example.c
OBJS =
$(SOURCES:.c=.o)
all: example
example: $(OBJS)
$(CC) -o $@ $^ $(LDFLAGS) $(LIBS)
clean:
rm -f $(OBJS) example core *.gdb
Figure 5-8 Makefile example
36
JetBox 8100 User Manaual_Linux_1.0
Chapter 6 JetView
6.1 Overview
The JetView is a device management utility which support various device
management features- such as device recovery, firmware and boot loader
upgrade, configuration backup and restore, system event log listing, basic
system IP address modify.
Currently, JetView only applied on the JetNet managed device and JetBox
8100 series, with different version it may support different product line and
you can find the latest firmware in the Korenix web site,
http://www.korenix.com or get the help from Korenix Customer Support,
[email protected] .
6.2 JetView for JetBox 8100
We can discovery/change IP address of JetBox 8100 and reboot JetBox
8100 through JetView.
Figure 6-1 Jetview discovery
JetBox 8100 User Manaual_Linux_1.0
37
Chapter 7 Recovery CD
7.1 Overview
In some severe circumstances, such as when a run-time image is
corrupted, it may be necessary to start your device from a bootable CD.
Korenix provides a bootable CD to rescue damaged JetBox 8100
Embedded Linux operation system.
7.2 Booting with Recovery CD
7.2.1 Plugging USB CD-ROM into USB port
Before use Recovery CD, User should power off JetBox8100 first.
Plugging USB CD-ROM into USB port.
Figure 7-1 Plug USB CD-ROM into USB port
38
JetBox 8100 User Manaual_Linux_1.0
Insert Recovery CD into the USB CD-ROM.
Figure 7-2 Insert Recovery CD into the USB CD-ROM.
7.2.2 Auto-Run Recovery Procedure
The Recovery CD runs recovery procedure after type recovery password
“ Korenix “ as following step.
Figure 7-3 Start Recovery Procedure
JetBox 8100 User Manaual_Linux_1.0
39
Figure 7-4 Format damage Operation System Disk
Figure 7-5 Booting Embedded Linux operation system with Recovery CD
40
JetBox 8100 User Manaual_Linux_1.0
Figure 7-6 Complete Recovery Procedure
JetBox 8100 User Manaual_Linux_1.0
41
Chapter 8 Appendix
8.1 System Commands
busybox(V1.8.2): Linux command collection
File Manager
cp
copy file
ls
list file
ln
make symbolic link file
mount
mount and check file system
rm
delete file
chmod
change file owner & group & user
chown
change file owner
chgrp
change file group
sync
Sync file system, let system file buffer
be saved to hardware
mv
move file
pwd
display now file directly
df
list now file system space
mkdir
make new directory
rmdir
delete directory
Editor
vi
text editor
cat
dump file context
zcat
compress or expand files
grep
search string on file
cut
get string on file
find
find file where are there
more
dump file by one page
test
test file exist or not
sleep
sleep(seconds)
echo
Echo string
awk
Pattern scanning and processing
language.
42
diff
compare two files or directories
sed
perform text transformations on a file
or input from a pipeline.
JetBox 8100 User Manaual_Linux_1.0
xargs
execute a specified command on
every item from standard input.
Archival Utilities
bzip2/bunzip2
Compress/Uncompress bzip FILE
cpio
Extract or list files from a cpio archive
gzip/gunzip
Compress/Uncompress FILE with
maximum compression.
tar
Create, extract, or list files from a tar
file
unzip
Extract files from ZIP archives
System logging
syslogd
Utility used to record logs of all the
significant events
klogd
Utility which intercepts and logs all
messages from the Linux kernel and
sends to the ‘syslogd’
logger
Utility to send arbitrary text
messages to the system log
Network
ping
ping to test network
arp
Manipulate the system ARP cache
arping
Ping host by ARP packets
ftpget
Retrieve a remote file via FTP
ftpput
Store a remote file via FTP
nslookup
Tool to query Internet name servers
pscan
Simple network port scanner
traceroute
Utility to trace the route of IP packets
wget
Utility for non-interactive download of
files from HTTP and FTP servers.
udhcpc
DHCP client
route
routing table manager
netstat
display network status
Ifconfig
set ip address and configure network
interfaces
tracerout
trace route
JetBox 8100 User Manaual_Linux_1.0
43
tftp
Trivial File Transfer Protocol client
telnet
Telnet client
ftp
FTP client
Others
dmesg
dump kernel log message
stty
stty is used to change and print
terminal line settings
zcat
dump .gz file context
mknod
make device node
free
display system memory usage
date
print or set the system date and time
env
run a program in a modified
environment
clear
clear the terminal screen
reboot
reboot / power off/on the server
halt
halt the server
du
estimate file space usage
hostname
show system’s host name
aplay
aplay is a command-line audio file
player for the ALSA sound card
driver.
amixer
Command-line audio mixer for the
ALSA sound card driver.
kill/killall
Send specified signal to the specified
process or process group
For complete command usage and explanation, please reference:
http://www.busybox.net/downloads/BusyBox.html
44
JetBox 8100 User Manaual_Linux_1.0
8.2 Chart Index
Table 1-1 Hardware specifications……………………………………………………………....2
Table 1-2 Software specifications………………………………………………….…………....3
Figure 2-1 Power connector location ……………………………………………………………4
Table 2-2 Serial console port setting ………………………………....................…………….5
Figure 2-3 Serial console screen …………………………….………………………………….5
Table 2-4 Default IP address and Netmask.........................................................................6
Figure 2-5 Telnet console screen …….………………………………….……………………...6
Figure 2-6 Windows PuTTy setting…….………………………………………………..…..…..7
Figure 2-7 JetView setting …………………………………………………..…………………...8
Figure 2-8 Edit Network configuration file ……………………..………….……………..……..9
Figure 2-9 Static IP address setting ……..…….……………………...………...…………….10
Figure 2-10 Dynamic IP address setting…….…………………………….…………………..10
Figure 2-11 Restart Network setting ……………………..………..…………………………..11
Figure 2-12 Network Setting over the Network……………………………………………….12
Figure 2-13 Compile example file “main.c”……………………….…………………………...14
Figure 2-14 upload “test” to JetBox 8100………..……………...…………………………….15
Figure 2-15 run “test” example file…………………………………………….……………….15
Table 3-1 Firmware version….......……………………………………………………………..16
Figure 3-2 daemons status……..………….…………………………………….……………..17
Figure 3-3 add init file ……………………………………………………………….….……….17
Figure 3-4 test-release example program………….………………………………………….17
Figure 3-5 change file mode…….................…………………………………………………..18
Figure 3-6 Setting the Time Manually………….…..…………………………………………..19
Figure 3-7 NTP client request …………………...………………...…………………………..20
Figure 3-8 System Time update automatically ……………………………………………….21
Figure 3-9 usb-storage device scan status ….……………………………..………………...22
Table 4-1 telnet file path …………………..………………………..…..................................23
Table 4-2 FTP daemon path ……………..………………………………………..…………...24
Figure 4-3 Enable FTP server ………………………...………..……………………………...24
Figure 4-4 Disable FTP server ……………………………………………………….…….…..24
Figure 4-5 nameserver ………………………………...……..………………………………...25
Table 4-6 goahead webserver path …………………………………………………………...26
Figure 4-7 Default html page ……........................……………………………………………27
Table 4-8 pppd service path …………...……………………………………………….……...28
Table 4-9 PPPoE service path………….….…………………………………………………..28
Table 4-10 SNMP file path …………..….….…………………………………………………..29
Table 4-11 openvpn file path ………..….….…………………………………………………..29
JetBox 8100 User Manaual_Linux_1.0
45
Table 5-1 Partition table ……..…..…..….….…………………………………………………..30
Figure 5-2 mount “toolchain”………..……………...…………………………………...……...31
Figure 5-3 add “toolchain” file path …………..……...……………………………………..….31
Figure 5-4 Korenix toolchain gcc version …….…..……….…………………………………..31
Figure 5-5 complier C application …............……………………...…………………………..31
Table 5-6 cross compiler tools …………………………..…...………………..……………....32
Figure 5-7 UART baudrate setting ……………..……………………………………………...35
Figure 5-8 Makefile example …………………..…………….………………………………...36
Figure 6-1 JetView discovery ……………………………………………….………………….37
Figure 7-1 Plug USB CD-ROM into USB port …………...…………………………………...38
Figure 7-2 Insert Recovery CD into the USB CD-ROM ……………………....……………..39
Figure 7-3 Start Recovery Procedure……………………...…….…………………………….39
Figure 7-4 Format damage Operation System Disk ………………………..………………..40
Figure 7-5 Recover Embedded Linux operation system …….………………………………40
Figure 7-6 Complete Recovery Procedure…………………....………………………………41
8.3 Customer Service
Korenix Technologies Co., Ltd.
9F, No. 100-1, Ming-Chuan Rd., Shing Tien City, Taipei, Taiwan
Tel:+886-2-82193000 Fax:+886-2-82193300
Business service : [email protected]
Customer service: [email protected]
Web Site: http://www.korenix.com
46
JetBox 8100 User Manaual_Linux_1.0