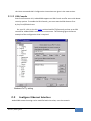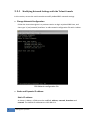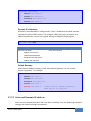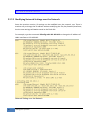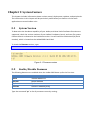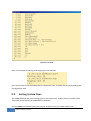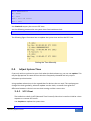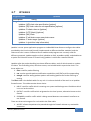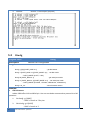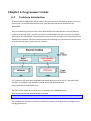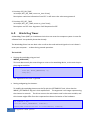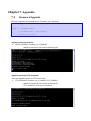
1
JetOS93 Lite User Manual www.korenix.com 0.0.3 Copyright Notice Copyright© 2013 Korenix Technology Co., Ltd. All rights reserved. Reproduction without permission is prohibited. Information provided in this manual is intended to be accurate and reliable. However, the original manufacturer assumes no responsibility for its use, or for any infringements upon the rights of third parties that may result from its use. The material in this document is for product information only and is subject to change without notice. While reasonable efforts have been made in the preparation of this document to assure its accuracy, Korenix assumes no liabilities resulting from errors or omissions in this document, or from the use of the information contained herein. Korenix reserves the right to make changes in the product design without notice to its users. Acknowledgments Korenix is a registered trademark of Korenix Technology Co., Ltd. All other trademarks or registered marks in the manual belong to their respective manufacturers. 2 Overview | Korenix Table of Content Copyright Notice .................................................................................................................... 2 Acknowledgments.................................................................................................................. 2 Table of Content .................................................................................................................... 3 Chapter 1 1-1 Chapter 2 2-1 Overview ........................................................................................................................ 5 Applied Models .............................................................................................................. 5 Getting Start ................................................................................................................... 6 System login ................................................................................................................... 6 2-1-1 Telnet Console ....................................................................................................... 6 2-1-2 SSH Console............................................................................................................ 7 2-2 Configure Ethernet Interface ......................................................................................... 7 2-2-1 Modifying Network Settings with the Telnet Console ........................................... 8 2-2-2 Static and Dynamic IP address ............................................................................... 9 2-2-3 Modifying Network Settings over the Network ................................................... 10 2-3 Test Program Developing – Hello.c .............................................................................. 11 2-3-1 Installing the Toolchain (Linux) ............................................................................ 11 2-3-2 Compiling Hello.c ................................................................................................. 12 2-3-3 Uploading “test” to JetBox3300 and Running the Program ................................ 13 Chapter 3 System Feature ............................................................................................................ 15 3-1 3-2 3-3 3-4 System Version............................................................................................................. 15 Enable/Disable Daemons ............................................................................................. 15 Setting System Time..................................................................................................... 16 Adjust System Time...................................................................................................... 17 3-4-1 NTP Client............................................................................................................. 17 3-4-2 NTP Server............................................................................................................ 18 3-5 Connect Peripherals ..................................................................................................... 19 Chapter 4 Network Feature .......................................................................................................... 21 4-1 Telnet ........................................................................................................................... 21 4-2 sshd .............................................................................................................................. 21 4-3 FTP ................................................................................................................................ 22 4-4 ProFTP .......................................................................................................................... 23 4-5 DNS............................................................................................................................... 23 4-6 Web Server................................................................................................................... 24 4-7 IPTABLES....................................................................................................................... 25 4-8 PPPd ............................................................................................................................. 26 4-9 4-10 4-11 PPPoE ........................................................................................................................... 26 SNMP............................................................................................................................ 28 OpenVPN ...................................................................................................................... 28 4-12 Chapter 5 5-1 5-2 Ser2net ......................................................................................................................... 29 Korenix Feature ............................................................................................................ 31 Ethertool ...................................................................................................................... 31 Diocfg ........................................................................................................................... 32 Chapter 6 6-1 Programmer’s Guide .................................................................................................... 34 Toolchain Introduction ................................................................................................ 34 6-1-1 Compiling Applications and Libraries................................................................... 35 6-1-2 Tools Available in the Host Environment............................................................. 35 6-2 External vs. internal naming ........................................................................................ 35 6-3 Device API .................................................................................................................... 37 6-4 RTC ............................................................................................................................... 37 6-5 Watch Dog Timer ......................................................................................................... 38 Chapter 7 Appendix ...................................................................................................................... 40 7-1 Firmware Upgrade ....................................................................................................... 40 7-2 JetView ......................................................................................................................... 41 7-2-1 Overview .............................................................................................................. 41 7-2-2 JetView for JetBox 3300 ....................................................................................... 41 7-3 Software Specification ................................................................................................. 43 7-4 Busybox command ....................................................................................................... 45 Chapter 8 Chapter 9 4 Reference: .................................................................................................................... 48 Customer Service ......................................................................................................... 48 Overview | Korenix Chapter 1 Overview The advantage of adopting Korenix JetBox series is ready-to-use. Korenix is devoted to improve the usability of embedded computer in industrial domain. Besides operating system, Korenix provides device drivers, protocol stacks, system utilities, supporting services and daemons to make system integration simple. Further, Korenix provides application development toolkits for users to build up their own applications easily. The stylish JetBox 3300 series is a compact-sized embedded Linux computer with low power consumption, designed to fit in small front-end controller system applications. With 16DIO channels in addition to the dual Ethernet, dual USB and dual serial ports, the embedded computers help users to extend the dataset to provide more flexible connection configurations for versatile control applications. 1-1 Applied Models JetBox3300 series *JetBox5300 series Note: SW features might be different according to different products Korenix | Overview 5 Chapter 2 Getting Start 2-1 System login Users can enter the JetBox Linux environment via the user name: root and no password is required. login : root password : (none) 2-1-1 Telnet Console The default IP address and Netmask for each port is given below: system naming Default IP address LAN1 eth1 192.168.10.1 LAN2 eth0 Netmask 255.255.255.0 DHCP Default IP address and Netmask Use a cross-over Ethernet Cable to connect directly from your PC to JetBox 3300. You should first modify your PC’s IP address and netmask so that your PC is on the same subnet as JetBox. To connect to a hub or switch connected to your local LAN, use a straight-through Ethernet cable. The default IP address and netmask are shown above. To login, type the Login name and password as requested. The default values as following: Login: root Password: none Telnet console screen You can proceed with the configuration of JetBox3300’s network settings when you reach 6 Getting Start | Korenix the Linux command shell. Configuration instructions are given in the next section. 2-1-2 SSH Console Start from firmware v1.8, JetBox3300 supports an SSH Console to offer users with better security options. To enable the SSH Console, you must start the SSH daemon first: # /etc/init.d/S50sshd start On your PC, click on the link putty to download PuTTy(freeware) and set up an SSH console for JetBox 3300 in a Windows environment. The following figure shows an example of the configuration that is required. Windows PuTTy setting 2-2 Configure Ethernet Interface JetBox3300 network setting can be modified with the telnet, over the network. Korenix | Getting Start 7 2-2-1 Modifying Network Settings with the Telnet Console In this section, we use the serial console to modify JetBox3300’s network settings Change Network Configuration Follow the instructions given in a previous section to login to jetbox3300 linux, and then type 'vi /etc/network/interfaces' to edit network configuration file with vi editor. Edit Network configuration file Static and Dynamic IP address Static IP address: As shown in below, 4 fields must be modified: address, netmask, broadcast and network. The default IP addresses are 192.168.10.1. 8 Getting Start | Korenix iface eth1 inet static address 192.168.10.1 netmask 255.255.255.0 broadcast 192.168.10.255 network 192.168.10.0 Dynamic IP addresses: By default, the Jetbox3300 is configured for “static” IP addresses on LAN1 interface and dhcp on LAN2 (eth0) interface. To configure LAN1 (eth1) port to request an IP address dynamically, remove the original settings and add the following line. iface eth0 inet dhcp Default setting for LAN1 port Default setting for LAN2 port iface eth1 inet static iface eth0 inet dhcp address 192.168.10.1 netmask 255.255.255.0 broadcast 192.168.10.255 network 192.168.10.0 Default Gateway: When static IP Address setting is used, add a default gateway is to set another keyword “gateway”. For example: iface eth0 inet static address 192.168.1.2 netmask 255.255.255.0 broadcast 192.168.1.255 network 192.168.1.0 gateway 192.168.1.1 # This will set default gateway to #192.168.1.1 on this port 2-2-2 Static and Dynamic IP address After the /etc/network/interfaces file have been modified, issue the following command to apply the network settings immediately: Korenix | Getting Start 9 /etc/init.d/network restart 2-2-3 Modifying Network Settings over the Network Same the previous section, IP settings can be modified over the network, too. There is another way to change the IP address without modifying the file /etc/network/interfaces, but the new settings will not be saved to the flash disk. For example, type the command #ifconfig eth1 192.168.10.2 to change the IP address of LAN1 interface to 192.168.10.2. Network Setting over the Network 10 Getting Start | Korenix NOTE For older version of firmware, please carefully edit the /etc/init.d/S50net to change the ip address. For example, if you want to change LAN1’s ip address to 192.168.10.2, add the following line to the end of S50net file. ifconfig eth1 192.168.10.2 To use dhcp to obtain LAN2’s ip address, add the following line to the tail of S50net file. udhcpc –i eth0 2-3 Test Program Developing – Hello.c In this section, we use the standard “Hello” programming example to illustrate how to develop a program for the JetOS93 lite. In general, program development involves the following seven steps. Step 1: Connect the JetBox3300 to a Linux PC. Step 2: Install Toolchain on the Linux PC. Step 3: Set the cross compiler and PATH environment variables. Step 4: Code and compile the program. Step 5: Download the program to the JetBox3300 via FTP. Step 6: Debug the program If bugs are found, return to Step 4. If no bugs are found, continue with Step 7. Step 7: Back up the user directory (distribute the program to additional JetBox3300 units if needed). 2-3-1 Installing the Toolchain (Linux) The Linux Operating System must be pre-installed in the PC before installing the JetOS93 lite Toolchain. Fedora core or compatible versions are recommended. The Toolchain Korenix | Getting Start 11 requires approximately 208 MB of hard disk space on your PC. The JetOs93 lite Toolchain is included with JetOS93 lite SDK, which can download from Korenix web site. To install the Toolchain, it is simply a matter of extracting a tarball at the proper place: tar jxvf jetbox9300-toolchains.tar.bz2 –C / NOTE To install the Toolchain, you must grant root permission. Toolchains used to not be relocatable! You must install them in the location they were built for. Install toolchain is simple, just extract to the /opt directory with the command. We have include the /opt dir in the tarball, so just uncompress it to /. Next, set up the PATH environment variable, add the toolchain path with export command. The PATH is a variable of your current SHELL. This is also the default search path of Linux command. export PATH=/opt/korenix/toolchains/jetbox9300/bin/:$PATH Setting the PATH allows you to run the compiler from any directory. 2-3-2 Compiling Hello.c If you have been compiling a program on X86, then you will find the only difference is the GCC command is start with arm-linux-. That is because we want to differentiate with the stand GCC compiler, and the prefix also tell you – it is for arm platform program. Below is a simple hello.c program: To compile the helo.c, use our Toolchain to compile the hello.c: 12 Getting Start | Korenix arm-linux-gcc hello.c -o helloworld The output executable file is the helloworld. 2-3-3 Uploading “test” to JetBox3300 and Running the Program Use the following command to upload helloworld to the JetBox3300 via FTP. 1. From the PC, type: # ftp xxx.xxx.xxx.xxx (the default username/password is ftp/ftp) 2. Use bin command to set the transfer mode to Binary mode, and the put command to initiate the file transfer: ftp> bin ftp> put test [root@server ~]# ftp 192.168.10.1 Connected to 192.168.10.1. 220 (none) FTP server (GNU inetutils 1.8) ready. Name (192.168.10.1:xyz): ftp 331 Guest login ok, type your name as password. Password: 230 Guest login ok, access restrictions apply. Remote system type is UNIX. Using binary mode to transfer files. ftp> cd /home/ 250 CWD command successful ftp> put helloworld local: helloworld remote: helloworld 227 Entering Passive Mode (192,168,1,176,19,6). 150 Opening BINARY mode data connection for helloworld 226 Transfer complete 4455 bytes sent in 4.1e-05 secs (108658.54 Kbytes/sec) ftp> exit 221 Goodbye. 3. From the JetBox3300 console, type: # chmod +x helloworld # ./helloworld The word hello world will be printed on the screen. Korenix | Getting Start 13 Please read Chapter 6 for more detail about Toolchain. 14 Getting Start | Korenix Chapter 3 System Feature This chapter includes information about version control, deployment, updates, and peripherals. The information in this chapter will be particularly useful when you need to run the same application on several JetBox units. 3-1 System Version To determine the hardware capability of your JetBox, and what kind of software functions are supported, check the version numbers of your JetBox’s hardware, kernel, and user file system. Contact Korenix to determine the hardware version. You will need the Production S/N (Serial number), which is located on the JetBox3300’s back label. To check the firmware version, type: # version Figure 3-1 Firmware version 3-2 Enable/Disable Daemons The following daemons are enabled when the JetBox 3300 boots up for the first time. Service name Description inetd internet daemons telnetd telnet daemon ftpd ftp daemon ser2net serial to ethernet proxy Type the command “ps” to list all processes currently running. daemons status Here is an example of starting and stopping the ssh daemon: You can start the service by adding the first argument start, and stop the service by adding the first argument stop 3-3 Setting System Time The JetBox3300 has two time settings. One is the system time, and the other is the RTC (Real Time Clock) time kept by the JetBox3300’s hardware. Use the #date command to query the current system time or set a new system time. 16 System Feature | Korenix #date MMDDhhmmYYYY MM = Month DD = Date hhmm = hour and minute YYYY = Year Use #hwclock to query the current RTC time Use the following command to set system time from hardware clock: #hwclock -s The following figure illustrates how to update the system time and set the RTC time. Setting the Time Manually 3-4 Adjust System Time If you only wish to synchronize your clock when the device boots up, you can use ntpdate. This may be appropriate for some devices which are frequently rebooted and only require infrequent synchronization. Using ntpdate at boot time is also a good idea for devices that run ntpd. The ntpd program changes the clock gradually, whereas ntpdate sets the clock, no matter how great the difference between a device's current clock setting and the correct time. 3-4-1 NTP Client The JetBox has a built-in NTP (Network Time Protocol) client that is used to initialize a time request to a remote NTP server. Use #ntpdate to update the system time. #ntpdate time.stdtime.gov.tw Korenix | System Feature 17 #hwclock –w NTP client request Visit http://www.ntp.org for more information about NTP and NTP server addresses. NOTE Before using the NTP client utility, check your IP and DNS settings to make sure that an Internet connection is available. 3-4-2 NTP Server NTP is configured by the /etc/ntp.conf file. Here is a simple example: server time.stdtime.gov.tw driftfile /var/db/ntp.drift The server option specifies which servers are to be used, with one server listed on each line. The driftfile option specifies which file is used to store the system clock's frequency offset. The ntpd program uses this to automatically compensate for the clock's natural drift, allowing it to maintain a reasonably correct setting even if it is cut off from all external time sources for a period of time. To start the server, execute the command: # ntpd To check the server status, execute the command: # ntpq –p 127.0.0.1 For more information, read the following links about setting up a NTP server: 18 System Feature | Korenix http://www.freebsd.org/doc/handbook/network-ntp.html 3-5 Connect Peripherals While plug-in a USB mass storage or a SD card, use #dmesg command can help showing USB-storage device status. usb-storage device scan status To mount the external storage, just use mount command as following: # mount –t vfat /dev/sda1 /mnt/card USB: Korenix | System Feature 19 As the picture shows, the usb-storage has been mounted on /mnt/card. You can access your data in the /mnt/card folder. SD card: To un-mount the usb-storage, execute #umount <mount path>. F NOTE To be able to unmount a device, you have to close all the open files in it. Type sync can help commits all pending writes, which can then be removed in a safe way. 20 System Feature | Korenix Chapter 4 Network Feature In this chapter, we explain how to configure JetBox various communication functions. 4-1 Telnet Service name telnetd Description A Telnet server Config files /etc/inetd.conf Start file /etc/init.d/rcS Start command -- Stop command -- Support command -- Default up Enabling the Telnet server The following example shows the default content of the file /etc/inetd.conf. The default is to enable the Telnet server: telnet stream tcp nowait root /usr/sbin/telnetd telnetd Disabling the Telnet server Disable the daemon by typing ‘#’ in front of the first character of the row to comment out the line. #telnet stream tcp nowait root /usr/sbin/telnetd telnetd 4-2 sshd Service name sshd Description A ssh server Config files /etc/sshd_config /etc/ssh_config /etc/ssh_host_dsa_key /etc/ssh_host_dsa_key.pub /etc/ssh_host_key /etc/ssh_host_key.pub /etc/ssh_host_rsa_key /etc/ssh_host_rsa_key.pub Start file /etc/init.d/S50sshd Start command /etc/init.d/S50sshd start Stop command /etc/init.d/S50sshd stop Support command up Default Re-generate sshd host keys The JetBox3300 comes with a set of default sshd host keys. To re-generate it, remove them and restart the ssh daemon. # rm –f /etc/ssh_host_dsa_key /etc/ssh_host_dsa_key.pub /etc/ssh_host_key /etc/ssh_host_key.pub /etc/ssh_host_rsa_key /etc/ssh_host_rsa_key.pub # /etc/init.d/S50sshd restart 4-3 FTP The JetBox3300 uses inetutils’s FTP daemon by default. Service name ftpd Description A ftp server Config file /etc/inetd.conf Default up Username ftp Password ftp The ftpd is listening on port 21. 22 Network Feature | Korenix 4-4 ProFTP The JetBox3300 uses inetutils’s FTP daemon by default. However, you can manually disable by editing the /etc/inetd.conf and use the Proftpd instead. Service name proftpd Description A Highly configurable FTP server Config files /etc/proftpd.conf Start file /etc/init.d/S50proftpd Start command /etc/init.d/S50proftpd start Stop command /etc/init.d/S50proftpd stop Support command Default Down Username Root Password ftp Enabling root login Edit the /etc/proftpd.conf and add the following line, then restart the FTP server. RootLogin on 4-5 DNS To set up DNS client, you need to edit two configuration files: /etc/resolv.conf, /etc/hosts (optional) /etc/hosts - The static table lookup for host names This is the first file that the Linux system reads to resolve the host name and IP address. /etc/resolv.conf – DNS resolver configuration file This is the most important file that you need to edit when using DNS for the other programs. For example, before you use #ntpdate time.nist.goc to update the system time, you will need to add the DNS server address to the file. Ask your network administrator which DNS server address you should use. The DNS server’s IP address is specified with the “nameserver” command. For example, add the following line to /etc/resolv.conf if the DNS server’s IP address is 168.95.1.1: Korenix | Network Feature 23 nameserver 168.95.1.1 Figure 4-5 nameserver 4-6 Web Server Service name webs Description web server for embedded system Config files -- Start file -- Start command -- Stop command -- Support command webs Default down The GoAhead WebServer is an open standard web server that is compliant with all necessary standards to be an effective embedded web server. The GoAhead web server’s command is webs, with the default root located at /web/. The web server default listening port is 80. Because the /web directory is not writable, you can either mount a memory to it: mount –t tmpfs tmpfs /web Or just mount a CF or SD card directory to the /web directory. For example: mount /mnt/card /web Start WEB server: webs & For more information, read the following links about GoAhead web server: http://www.goahead.com/products/webserver/specifications.aspx 24 Network Feature | Korenix 4-7 IPTABLES program name Description iptables nating Usage: iptables -[AD] chain rule-specification [options] iptables -[RI] chain rulenum rule-specification [options] iptables -D chain rulenum [options] iptables -[LFZ] [chain] [options] iptables -[NX] chain iptables -E old-chain-name new-chain-name iptables -P chain target [options] iptables -h (print this help information) iptables is a user space application program on JetBox3300 that allows to configure the tables provided by the Linux kernel firewall (implemented as different Netfilter modules) and the chains and rules it stores. Different kernel modules and programs are currently used for different protocols; iptables applies to IPv4, ip6tables to IPv6, arptables to ARP, and ebtables as a special for Ethernet frames. A firewall using iptables is said to be a stateful firewall. iptables splits the packet handling into three different tables, each of which contain a number of chains. The firewalling rules, which we create, are included within a particular chain. The three tables are: 1. filter: used for packet filtering 2. nat: used to provide packet modification capabilities; NAT/PAT and IP masquerading 3. mangle: used for setting packet options and marking packets for further filtering or routing The filter table is the default table for any rule. It is where the bulk of the work in an iptables firewall occurs. This table contains three chains: 1. INPUT: used for traffic which is entering our system and belongs to an IP address which is on our local machine 2. OUTPUT: used for traffic which originated on the local system, otherwise known as the firewall 3. FORWARD: used for traffic which is being routed between two network interfaces on our firewall There are three main targets for a rule within the filter table. 1. ACCEPT: allows the packet to be passed through the firewall without any noticeable interaction Korenix | Network Feature 25 2. DROP: simply drops the packet as if it has never been in the system 3. REJECT: drops the packet then sends a ICMP reply back to the client telling it why the connection failed Example: Add rules The basic syntax of an iptables command is: iptables -A INPUT -s 192.168.20.0/24 -j ACCEPT This would add a rule into the INPUT chain, which matches any packet with a source address in the 192.168.20.0 subnet. If a packet matches this criteria, then it would use the ACCEPT target, which simply allows the packet on through. Remove rules To delete the first rule in the chain, we would do: iptables -D INPUT 1 List rules To list the rules we have on our system use: iptables -L Flush rules To flush (drop) all the rules we can use: iptables -F A more complete tutorial can be found at: 32] 4-8 PPPd PPP (Point to Point Protocol) is used to run IP (Internet Protocol) and other network protocols over a serial link. PPP can be used for direct serial connections (using a null-modem cable) over a Telnet link, and links established using a modem over a telephone line. Usually pppd is called by other daemon, like PPPoE, PPTP, and Wvdial. 4-9 PPPoE Service name Description 26 pppoe Point-to-Point Protocol over ethernet Network Feature | Korenix Config files /etc/ppp/pppoe.conf Start file Start command Stop command Support command pppoe-connect pppoe-setup pppoe-start pppoe-stop pppoe-status Default down Point-to-Point Protocol over Ethernet is a network protocol for encapsulating Poing-to-Point Protocol (PPP) frames inside Ethernet frames. It is used mainly with ADSL services where individual users connect to the ADSL transceiver over Ethernet. You can just inpput pppoe-setup to configure the PPPoE. First you should obtain PPPOE username and password from your Internet provider. Second, filled in these parameters to pppoe-setup dialog: Ethernet Interface: wan User name: <from your ISP> Activate-on-demand: No Primary DNS: 168.95.1.1 Firewalling: NONE # pppoe-setup Welcome to the Roaring Penguin PPPoE client setup. First, I will run some checks on your system to make sure the PPPoE client is installed properly... Looks good! Now, please enter some information: USER NAME >>> Enter your PPPoE user name (default [email protected]): [email protected] INTERFACE >>> Enter the Ethernet interface connected to the DSL modem (default eth0): eth0 Korenix | Network Feature 27 Do you want the link to come up on demand, or stay up continuously? >>> Enter the demand value (default no): no DNS Please enter the IP address of your ISP's primary DNS server. >>> Enter the secondary DNS server address here: PASSWORD >>> Please enter your PPPoE password: Then use the pppoe-start command to start dial to connect network. 4-10 SNMP Service name snmpd Description SNMP Daemon Config files /etc/snmp/snmpd.conf Start file Start command Stop command Support command snmpget snmpset Default down Net-SNMP is a suite of applications used to implement SNMP v1, SNMP v2c and SNMP v3 using both IPv4 and IPv6. It supports RFC 1213 MIB-II. For more information, read the following links about NET-SNMP: http://www.net-snmp.org/wiki/index.php/Tutorials 4-11 OpenVPN Service name 28 Network Feature | Korenix openvpn Description A full-featured SSL VPN Config files /etc/openvpn/ /etc/openvpn/easy-rsa/ Start file /etc/init.d/openvpn Start command /etc/init.d/openvpn start Stop command /etc/init.d/openvpn stop Default down OpenVPN is a full-featured SSL VPN which implements OSI layer 2 or 3 secure network extension using the industry standard SSL/TLS protocol, supports flexible client authentication methods based on certificates, smart cards, and/or username/password credentials, and allows user or group-specific access control policies using firewall rules applied to the VPN virtual interface. For more information, download the step-by-step how to from Korenix website: http://www.korenixembedded.com/support/faqs/vpn 4-12 Ser2net program name ser2net Description ser2net is a Linux program which will connect a network to the serial port. It could be like a bridge between the ethernet cable and the serial cable. config file /etc/ser2net.conf Usage: -c <config file> - use a config file besides /etc/ser2net.conf -C <config line> - Handle a single configuration line. This may be specified multiple times for multiple lines. This is just like a line in the config file. This disables the default config file, you must specify a -c after the last -C to have it read a config file, too. -p <controller port> - Start a controller session on the given TCP port -P <file> - set location of pid file -n - Don't detach from the controlling terminal -d - Don't detach and send debug I/O to standard output Korenix | Network Feature 29 -u - Disable UUCP locking -b - Do CISCO IOS baud-rate negotiation, instead of RFC2217 -v - print the program's version and exit Example: Setup a TCP server with following operation parameter: Serial port : 1 TCP port : 62001 Baud rate : 9600 Data bits : 8 Parity : none Stop bit : 1 Hardware flow control : none State : raw state timeout : never timeout modem mode : none Edit /etc/ser2net.conf add the following line: 62001:raw:0:/dev/ttyS1:9600 NONE 1STOPBIT 8DATABITS LOCAL -RTSCTS Then run the ser2net program: ser2net & For more information, please see reference [1]. 30 Network Feature | Korenix Chapter 5 Korenix Feature 5-1 Ethertool program name Description ethtool LAN port configuration tool $ ethtool ethtool version 3 Usage: ethtool DEVNAME ethtool -s DEVNAME [ speed 10|100|1000 ] [ duplex half|full ] [ autoneg on|off ] Example: Auto Negotiation: When Ethernet device works on FORCE mode, user can use below command to setup device mode again. 1. AUTO mode: ethtool –s eth1 autoneg on 2 Force Speed and Duplex Mode: When Ethernet device works on AUTO NEGOTIATION mode, user can use below commands to setup device mode again. 1. FORCE mode: ethtool –s eth1 autoneg off 2. SPEED: ethtool –s eth1 speed [100/10] 3. 5-2 DUPLEX: ethtool –s eth1 duplex [full/half] Diocfg program name diocfg Get/Set DIO Configuration Description Usage: diocfg -g [I|O] [PORT_NUM: 0-7] - get DIO status. diocfg -s [PORT_NUM: 0-7] [PORT_MODE: 0|1] - set DO mode. - PORT_MODE: {0:OFF, 1:ON}. diocfg -M [PORT_NUM: 0-1] - get serial port mode. diocfg -m [PORT_NUM: 0-1] [PORT_MODE: 0-3] - set serial port mode. - PORT_MODE: {0:RS232, 1:RS422, 2:RS485-2w, 3:RS485-4w}. diocfg -f fw_ver - show firmware version. Example: 1 Get DIO status: JetBox 3300 offers 8 DI and 8 DO pin. User can use below commands to process DI or DO operation. 1. DI: diocfg –g I [PORT] 2. 32 - PORT is from 0 to 7 for pins. DO: diocfg –g O [PORT] - PORT is from 0 to 7. Korenix Feature | Korenix 2 Set DO mode: User can use below command to process DO operation. 1. DO: diocfg –s [PORT] [MODE] - PORT is from 0 to 7. - MODE is from 0 to 1 for pin status. 3 Set serial port mode: User can use below command to process serial mode operation. 1. SERIAL: diocfg –m [PORT] [MODE] - PORT is from 0 to 1 for serial port. - MODE is from 0 to 3. - MODE 0: RS-232 mode. - MODE 1: RS-422 mode. - MODE 2: RS-485 2-line mode. - MODE 3: RS-485 4-line mode. Korenix | Korenix Feature 33 Chapter 6 Programmer’s Guide 6-1 Toolchain Introduction To ensure that an application will be able to run correctly when installed on Jetbox, you must ensure that it is compiled and linked to the same libraries that will be present on the Jetbox3300. The cross-compiling toolchain that comes with JetOS93 Lite SDK contains a suite of Korenix compilers and other tools, as well as the libraries and headers that are necessary to compile applications for Jetbox3300. The build environment must be running Linux and install with the JetOS93 Lite Toolchain. We have confirmed that the following Linux distributions can be used to install the tool chain: Fedora Core 9, Centos 5. The Toolchain will need about 208 MB of hard disk space on your Linux PC. The JetOS 9300 toolchain is included in the JetOS93 Lite SDK, which can download from http://www.korenixembedded.com. The SDK can be extract at any directory, for example, your HOME directory. You can extract the SDK with following command: tar zxvf jetbox9300_sdk-<version>.tgz The README file will teach you how to install the Toolchain, and application examples are in the ap_src directory. 6-1-1 Compiling Applications and Libraries To compile a simple C application, just use the aremb-linux-gcc compiler instead of the regular one: arm-linux-gcc –g -02 source-code.c –o output 6-1-2 Tools Available in the Host Environment The following cross compiler tools are provided: arm-linux-ar Manage archives (static libraries) arm-linux-as Assembler arm-linux-c++ C++ compiler arm-linux-cpp C preprocessor arm-linux-g++ C++ compiler arm-linux-gcc C compiler arm-linux-gprof Display call graph profile data arm-linux-ld Linker arm-linux-nm Lists symbols from object files arm-linux-objcopy Copies and translates object files arm-linux-objdump Displays information about object files arm-linux-ranlib Generates indexes to archives (static libraries) arm-linux-readelf Displays information about ELF files arm-linux-size Lists object file section sizes arm-linux-strings Prints strings of printable characters from files (usually object files) arm-linux-strip Removes symbols and sections from object files (usually debugging information) 6-2 External vs. internal naming In Linux systems, a device file or special file is an interface for a device driver that appears in a file system as if it were an ordinary file. The JetOS93 use the following naming for hardware devices, the device names are colored with blue on the picture below. Korenix | Programmer’s Guide 35 36 Programmer’s Guide | Korenix 6-3 Device API ioctl Name ioctl - control device Library Standard C Library (libc, -lc) Synopsis #include <sys/ioctl.h> int ioctl( int d , unsigned long request , ... ); Description The ioctl() system call manipulates the underlying device parameters of special files . In particular, many operating characteristics of character special files (e.g. terminals) may be controlled with ioctl() requests. The argument d must be an open file descriptor. The third argument to ioctl() is traditionally named char *argp . Most uses of ioctl(), however, require the third argument to be a caddr _ t or an int . An ioctl() request has encoded in it whether the argument is an ‘‘in’’ argument or ‘‘out’’ argument, and the size of the argument argp in bytes. Macros and defines used in specifyin g an ioctl request are located in the file < sys/ioctl.h >. Return Values If an error has occurred, a value of -1 is returned and errno is set to indicate the error. Please use the desktop Linux’s man page for detailed documentation: #man ioctl 6-4 RTC The device node is located at /dev/rtc0. Jetbox supports Linux standard simple RTC control. You must include <linux/rtc.h> . Korenix | Programmer’s Guide 37 1. Function: RTC_RD_TIME int ioctl(fd, RTC_RD_TIME, struct rtc_time *time); Description: read time information from RTC. It will return the value on argument 3. 2. Function: RTC_SET_TIME int ioctl(fd, RTC_SET_TIME, struct rtc_time *time); Description: set RTC time. Argument 3 will be passed to RTC. 6-5 Watch Dog Timer A Watchdog Timer (WDT) is a hardware circuit that can reset the computer system in case of a software fault. You probably knew that already. The Watchdog Driver has one basic role: to talk to the card and send signals to it so it doesn't reset your computer ... at least during normal operation. The ioctl API: Pinging the watchdog using an ioctl: WDIOC_KEEPALIVE:, This ioctl does exactly the same thing as a write to the watchdog device, so the main loop in the program could be: while (1) { ioctl(fd, WDIOC_KEEPALIVE, 0); sleep(10); } The argument to the ioctl is ignored. Setting and getting the timeout: To modify the watchdog timeout on the fly with the SETTIMEOUT ioctl, driver has the WDIOF_SETTIMEOUT flag set in their option field. The argument is an integer representing the timeout in seconds. The driver returns the real timeout used in the same variable, and this timeout might differ from the requested one due to limitation of the hardware. int timeout = 45; ioctl(fd, WDIOC_SETTIMEOUT, &timeout); printf("The timeout was set to %d seconds\n", timeout); 38 Programmer’s Guide | Korenix Starting with the Linux 2.4.18 kernel, it is possible to query the current timeout using the GETTIMEOUT ioctl. ioctl(fd, WDIOC_GETTIMEOUT, &timeout); printf("The timeout was is %d seconds\n", timeout); Korenix | Programmer’s Guide 39 Chapter 7 Appendix 7-1 Firmware Upgrade Firmware upgrade can be done by the “firmware_up” command. # firmware_up Usage: -f [firmware file] -t [firmware file] [tftp server] -w [http or ftp url] Upgrade system by local file: 1. LOCAL UPGRADE: Firmware_up –f [IMAGE] - IMAGE is the kernel and system combining file. Upgrade system by TFTP download: User can upgrade system via TFTP server also. 1. TFTP UPGRADE: Firmware_up –t [IMAGE] [TFTP_SERVER] - IMAGE is the kernel and system combining file. - TFTP_SERVER is TFTP server IP address. Upgrade system by FTP or HTTP download: User can upgrade system via FTP or HTTP server also. 1. HTTP UPGRADE: Firmware_up -w [IMAGE_URL] 2. - IMAGE_URL is image URL path. FTP UPGRADE: Firmware_up -w [USER_P] @[IMAGE_FTP] - USER_P is user name and password, ex: “name:password”. - IMAGE_FTP is image path. 7-2 JetView 7-2-1 Overview The JetView is a device management utility which support various device management features- such as device recovery, firmware and boot loader upgrade, configuration backup and restore, system event log listing, basic system IP address modify. 7-2-2 JetView for JetBox 3300 Start from firmware v2.2, JetBox3300 can be discovered on LAN1, change IP address, firmware upgrade, and reboot through JetView. Korenix | Appendix 41 42 Appendix | Korenix 7-3 Software Specification Item Protocol Notes JetBox 93 lite Boot Loader uboot Kernel 2.6.21 ARP x PPP x CHAP x IPv4 PAP x x ICMP x TCP x UDP x File System JFFS2 Ext2 x x Ext3 x VFAT x FAT x Device Driver DIO x Ethernet x SD / Micro-SD card x UART x USB x Watchdog timer x Programming API GPIO access diocfg RS-232/422/485 configuration diocfg Watchdog API* driver auto control only Board ID control* diocfg Kernel LED control* diocfg Korenix | Appendix 43 Item Protocol Notes JetBox 93 lite Base SW package Shell OS shell command Busybox Linux normal command utility telnetd Telnet inetd udhcp DHCP 1.6.0 telnet server daemon x TCP server manager program x DHCP client/server x syslogd diocfg GNU ash x DIO DIO configure tool x lrzsz Tools for zmodem/xmodem/ymodem file transfer minicom Serial port terminal 2.3 microcom Serial port terminal 1.02 ncurses terminal-independent method of updating character screens 5.7 telnet and tcp sessions to be ser2net established with serial port setserial 0.12.20 2.7 RS-232 serial port setting tool 2.17 bridge-utils Ethernet bridge utility 1.0.6 ethtool Ethernet configure tool 3.1 Network related SW package goahead HTTP iptables 44 Web server 2.1.8 NAT and access control setting tool 1.3.7 net-snmp SNMP v1/v2c/v3 SNMP support package 5.1.2 ntp NTP NTP utility 4.2.0 modbusgw Modbus Modbus TCPto RTU/ASCII gateway openssh SSH1.0/2.0 SSH support package 3.9 openssl SSL SSL support package 0.9.7 pppd PPP PPP protocol for Linux 2.4.4 ftpd FTP ftp server daemon 0.9.8 rp-pppoe PPPoE PPPOE support package Appendix | Korenix (optional) 3.8 Item Protocol smtpclient wireless-tools 802.11 Notes JetBox 93 lite email client 1.0 Tools of WLAN card 29 *Supported by JB3300 series only 7-4 Busybox command busybox(V1.8.2): Linux command collection File Manager cp copy file ls list file ln make symbolic link file mount mount and check file system rm delete file chmod change file owner & group & user chown change file owner chgrp change file group sync Sync file system, let system file buffer be saved to hardware mv move file pwd display now file directly df list now file system space mkdir make new directory rmdir delete directory Korenix | Appendix 45 Editor vi text editor cat dump file context zcat compress or expand files grep search string on file cut get string on file find find file where are there more dump file by one page test test file exist or not sleep sleep(seconds) echo Echo string awk Pattern scanning and processing language. diff compare two files or directories sed perform text transformations on a file or input from a pipeline. xargs execute a specified command on every item from standard input. Archival Utilities bzip2/bunzip2 Compress/Uncompress bzip FILE cpio Extract or list files from a cpio archive gzip/gunzip Compress/Uncompress FILE with maximum compression. tar Create, extract, or list files from a tar file unzip Extract files from ZIP archives System logging 46 syslogd Utility used to record logs of all the significant events klogd Utility which intercepts and logs all messages from the Linux kernel and sends to the ‘syslogd’ logger Utility to send arbitrary text messages to the system log Appendix | Korenix Network ping ping to test network arp Manipulate the system ARP cache arping Ping host by ARP packets ftpget Retrieve a remote file via FTP ftpput Store a remote file via FTP nslookup Tool to query Internet name servers pscan Simple network port scanner traceroute Utility to trace the route of IP packets wget Utility for non-interactive download of files from HTTP, HTTPS, and FTP servers. udhcpc DHCP client route routing table manager netstat display network status Ifconfig set ip address and configure network interfaces traceroute trace route tftp Trivial File Transfer Protocol client telnet Telnet client ftp FTP client Others dmesg dump kernel log message stty stty is used to change and print terminal line settings zcat dump .gz file context mknod make device node free display system memory usage date print or set the system date and time env run a program in a modified environment clear clear the terminal screen reboot reboot / power off/on the server halt halt the server du estimate file space usage hostname show system’s host name kill/killall Send specified signal to the specified process or process group For complete command usage and explanation, please refer to following website: Korenix | Appendix 47 http://www.busybox.net/downloads/BusyBox.html Chapter 8 Reference: 1. ser2net(8) – Linux man page 2. iptalbes(8) – Linux man Page 3. Netfilter IPTables Mini Howto Chapter 9 Customer Service Korenix Technology Co., Ltd. Business service: [email protected], [email protected] Customer service: [email protected] Web Site: http://www.korenixembedded.com, http://www.korenix.com 48 Reference: | Korenix