1
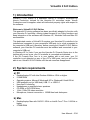
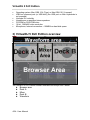
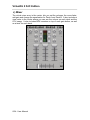
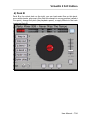
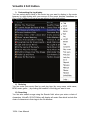
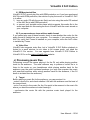
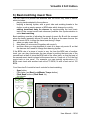
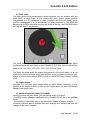
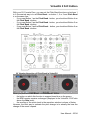
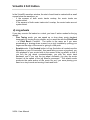
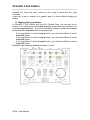
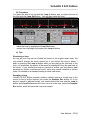
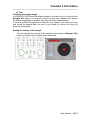
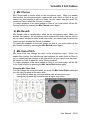
VirtualDJ 5 DJC Edition CONTENTS 1) INTRODUCTION ..................................................................................... 3 2) SYSTEM REQUIREMENTS .................................................................... 3 a) PC...................................................................................................... 3 b) Mac .................................................................................................... 3 3) VIRTUALDJ 5 DJC EDITION OVERVIEW .............................................. 4 a) Browser area ..................................................................................... 5 b) Deck A ............................................................................................... 5 c) Mixer .................................................................................................. 6 d) Deck B ............................................................................................... 7 e) Waveform area .................................................................................. 8 4) THE FIRST TIME YOU USE VIRTUALDJ 5 DJC.................................... 9 a) Serial number .................................................................................... 9 b) Browser area ..................................................................................... 9 i) Folder browser ......................................................................... 9 ii) File browser.............................................................................. 9 c) BPM (Beats Per Minute) rate of your music files ............................. 10 i) Analyze the BPM rate of your music files ............................... 10 ii) Run the BPM analysis in advance, not during a party ............ 10 iii) BPM rate display .................................................................... 11 d) Information on music tracks ............................................................. 11 i) Customizing the tag display ................................................... 12 ii) Ordering ................................................................................. 12 iii) Searching ............................................................................... 12 e) Playlist = Virtual folder ..................................................................... 13 5) PLAYING AUDIO FILES ....................................................................... 14 a) Loading and playing an audio file .................................................... 14 b) Supported audio formats ................................................................. 14 i) File extensions ....................................................................... 14 ii) DRM-protected files ............................................................... 15 iii) If you encounter an issue with an audio format ...................... 15 iv) Video files............................................................................... 15 c) Previewing music files ..................................................................... 15 i) Target ..................................................................................... 15 ii) Steps ...................................................................................... 16 d) Moving within a music track ............................................................. 17 e) Setting a Cue point .......................................................................... 18 i) Placing a Cue point ................................................................ 18 User Manual – 1/34 ii) iii) iv) Changing a Cue point position ............................................... 18 Going to a Cue point .............................................................. 18 Deleting a Cue point ............................................................... 18 6) BEAT MATCHING MUSIC FILES ......................................................... 19 a) Sync button ...................................................................................... 20 b) Pitch fader (and Master Tempo) ...................................................... 20 i) Master Tempo ........................................................................ 20 ii) Pitch scale .............................................................................. 21 iii) Centre detent ......................................................................... 21 iv) Action of the pitch fader in VirtualDJ ...................................... 21 c) Pitch Bend buttons (Pitch Bend - and Pitch Bend +)........................ 22 i) Using the Pitch Bend function ................................................ 22 ii) Mapping the Pitch Bend function ............................................ 22 iii) Viewing the action of Pitch Bend in VirtualDJ ......................... 23 d) Jog wheels ....................................................................................... 24 7) LOOPS, EFFECTS AND SAMPLES ..................................................... 25 a) Loops ............................................................................................... 25 i) Definition ................................................................................ 25 ii) Mapping the Loop function ..................................................... 26 iii) Procedure ............................................................................... 27 iv) Tips ........................................................................................ 27 b) Sampler ........................................................................................... 28 i) Function ................................................................................. 28 ii) Procedure ............................................................................... 28 iii) Key mapping .......................................................................... 28 iv) Tips ........................................................................................ 29 c) Backspin .......................................................................................... 30 d) Overloop .......................................................................................... 30 e) Beatgrid ........................................................................................... 30 f) Brake ............................................................................................... 31 g) Flanger............................................................................................. 32 h) Flipping double ................................................................................ 32 i) Mic Flanger ...................................................................................... 32 j) Mic Chorus ....................................................................................... 33 k) Mic Reverb ....................................................................................... 33 l) Mic Voice Pitch ................................................................................ 33 m) Scratching ........................................................................................ 34 i) Scratch mode ......................................................................... 34 ii) Action ..................................................................................... 34 iii) Tips ........................................................................................ 34 2/34 - User Manual VirtualDJ 5 DJC Edition 1) Introduction VirtualDJ 5 DJC Edition is a dedicated version of VirtualDJ, developed by Atomix Production, tailored for the Hercules DJ controllers series. Atomix Productions and its suppliers retain all intellectual property rights with respect to the software. Welcome to VirtualDJ 5 DJC Edition This powerful DJ mixing software has been specifically adapted to function with your Hercules DJ controller, offering instant access to key DJing functions and deep integration of the software with Windows XP, Windows Vista and Mac OS environments. This dedicated version of VirtualDJ 5 requires your Hercules DJ controller to be installed and connected to your computer's USB port (or to a hub connected to the computer's USB port); therefore, before running the VirtualDJ 5 DJC Edition software, your Hercules DJ controller must be installed and connected to your computer's USB port. In Windows XP or Vista: if you see the Hercules DJ Console Series icon in the taskbar with no red cross, your DJ controller is connected and detected, If the DJ Console Rmx icon is in your taskbar with a red cross, your DJ controller is not detected on any of your PC's USB ports, and you will not be able to run VirtualDJ 5 DJC Edition until the red cross has disappeared. 2) System requirements a) PC Desktop/laptop PC with Intel Pentium III/Athlon 1GHz or higher 512MB RAM Operating system: Microsoft Windows® XP or Windows® Vista® 32-bit USB powered port (or USB hub): USB 1.1 or USB 2.0 Hercules DJ controller Headphones or amplified stereo speakers CD-ROM or DVD-ROM drive 16-bit, 1024x768 video resolution Microphone, Internet connection + 100MB free hard disk space b) Mac Desktop/laptop Mac with G4/G5 1.5GHz or Intel® Core™ Duo 1.66GHz or higher 512MB RAM User Manual – 3/34 VirtualDJ 5 DJC Edition Operating system: Mac OS® 10.4 (Tiger) or Mac OS® 10.5 (Leopard) USB bus powered port (or USB hub) (the USB port on Mac keyboards is not powered) Hercules DJ controller Headphones or amplified stereo speakers CD-ROM or DVD-ROM drive 16-bit, 1280x800 video resolution Microphone, Internet connection + 100MB free hard disk space 3) VirtualDJ 5 DJC Edition overview The VirtualDJ 5 DJC Edition software interface can be split into 5 areas: z Browser area z Deck A z Mixer z Deck B z Waveform 4/34 - User Manual VirtualDJ 5 DJC Edition a) Browser area In this area, you can browse through your computer or network drives to select the audio files you will load and mix on both decks. The browser area consists of two sub-sections: z the folder browser on the left, where you can select a folder, disk or playlist, z the file browser on the right, where you can select the music track you want to load. b) Deck A Deck A is the virtual deck on the left: you can load music files on this deck, move within tracks, play music files, add a bookmark to a song position (called a Cue point), change the pitch (the playback speed), or apply effects to the track loaded on Deck A. User Manual – 5/34 VirtualDJ 5 DJC Edition c) Mixer The virtual mixer area, in the center, lets you set the volumes, the cross fader, add gain and change the equalization for Deck A and Deck B. It also includes a view meter in the center where you can see the volume on each deck and the CPU usage. It also includes BPM counters on top of each gain button, as well as a timer for each deck. 6/34 - User Manual VirtualDJ 5 DJC Edition d) Deck B Deck B is the virtual deck on the right: you can load music files on this deck, move within tracks, play music files, add a bookmark to a song position (called a Cue point), change the pitch (the playback speed), or apply effects to the track loaded on Deck B. User Manual – 7/34 VirtualDJ 5 DJC Edition e) Waveform area This area displays 2 waveforms (1 in red and 1 in blue) for the 2 audio tracks loaded on Decks A and B: the Deck A music track is in blue, while the Deck B track is in red. You can choose the resolution of the waveform area by selecting preset display modes 1, 2 or 3 to the right of the waveform. Preset 1 = Zoom In Preset 2 = Standard display Preset 3 = Zoom Out 8/34 - User Manual VirtualDJ 5 DJC Edition 4) The first time you use VirtualDJ 5 DJC a) Serial number The first time you run VirtualDJ 5 DJC Edition, you are asked to enter a serial number. This serial number is found on the paper envelope of your installation CD-ROM: this serial number belongs to you, you cannot change it, and you must not share it with any other user of VirtualDJ 5 DJC Edition, otherwise you won't be able to register on the VirtualDJ website which will prevent you from accessing VirtualDJ service updates, plug-ins, or upgrades. Keep the CD envelope and installation CD-ROM in a safe place, since both the installation CD and the serial number are required if you re-install the software on your system, or change your computer. b) Browser area When you run VirtualDJ 5 DJC Edition for the first time, the browser area displays no music files. i) Folder browser On the left of the browser area, you can see the list of folders: the active folder has a blue background. You can move within the folder area to access the directories where you store your music files by: pushing the buttons labeled Up or Down to change the active folder, expanding the active level by pushing the Load Deck A button. ii) File browser Once you have found the directory where you store your music files, you can move from the folder browser to the music file browser by pushing the Right button. You can then move within the file browser: by pushing the Up or Down buttons (to move line by line), by keeping one of the Up or Down buttons pressed down while turning the jog wheel. Once you reach the file you want to load on one of your virtual decks, press the Hercules DJ controller Load Deck A button to load the file on the left deck, or press the Load Deck B button to load the file on the right deck. User Manual – 9/34 VirtualDJ 5 DJC Edition c) BPM (Beats Per Minute) rate of your music files The BPM rate is the number of beats per minute in the music, which indicates how fast the music is: a BPM rate below 85 is slow, a BPM rate over 130 is fast. i) Analyze the BPM rate of your music files The first time you display your list of music files in the software, the Beats Per Minute rate is not calculated: we recommend that you analyze all of the music files you intend to mix in advance, so that you can then view the BPM (Beats Per Minute) rate in the browsing area, allowing you to load only music tracks matching the BPM rate you need. To analyze music files in a directory, select the music file(s) in the music list and right-click them with your mouse (or, on Mac with no right-click button, using Ctrl + click): the analysis menu lets you select the BPM analysis mode, either for Techno/House or for other music files, and run the BPM analysis. ii) Run the BPM analysis in advance, not during a party BPM analysis takes time (1 hour for 120 music files), so starting the BPM analysis of your complete library just before a party is a very bad idea. You should do it beforehand: it's easy, since you can analyze your entire hard drive and you don't need to remain in front of your computer while VirtualDJ 5 DJC is 10/34 - User Manual VirtualDJ 5 DJC Edition analyzing the music files. Since BPM analysis takes a lot of processing time, mixing while VirtualDJ 5 DJC is analyzing your full library is not recommend as your computer will not respond as fast as it should. The analysis is generally perfect but sometimes the BPM rate calculated is not accurate: sometimes the BPM calculated is double or half of the actual BPM rate (the BPM analyzer can count only 1 beat out of 2 in a track, or identifies an intermediary sound inside a beat as the start of another beat). If your file is not properly analyzed, you can correct it by manually entering the BPM rate. If a music file is not analyzed, loading the file on a deck analyzes it, and you can then read its BPM rate on the VirtualDJ skin, above the volume slider. iii) BPM rate display The BPM rate is displayed in 2 areas: in the file browser, if you have analyzed the files, in the mixer area, over the Gain button. d) Information on music tracks The text information inserted into each music file is called a "tag": your audio files are generally tagged automatically when you import an audio CD via iTunes or Windows Media Player, or when you buy MP3 files. The tag includes (but is not limited to) the song name, artist name, composer name, album name, music genre, the date on which the music was recorded, and the BPM. Once you analyze a music file in VirtualDJ, its BPM rate is added inside the tag. User Manual – 11/34 VirtualDJ 5 DJC Edition i) Customizing the tag display You can select which fields of the music tag you want to display in the music browser by right-clicking with your mouse on the music browser headlines (or Ctrl + click on Mac if you use a mouse without a right-click button). ii) Ordering You can order your music files by each tag item (by song name, artist name, BPM, music genre...) by clicking the headline of the tag you want to use. iii) Searching You can also search songs using the Search field: when you enter a chain of characters, VirtualDJ 5 DJC Edition will display all music files which include this chain of characters in their tags in the file browser. 12/34 - User Manual VirtualDJ 5 DJC Edition e) Playlist = Virtual folder You can create playlists in the folder area by clicking the blue + sign with a red folder in its background, near the Search field. This virtual folder is a playlist in which you can place bookmarks for music files. User Manual – 13/34 VirtualDJ 5 DJC Edition 5) Playing audio files a) Loading and playing an audio file When you have selected an audio file in your music browser, you can load it: on the left VirtualDJ deck by pressing the Load Deck A button on your DJ controller, or on the right VirtualDJ deck by pressing the Load Deck B button on your DJ controller. Once an audio file is loaded on a deck, you can: move within the audio file by turning the jog wheel on the deck where the file is loaded, move more quickly within the audio file using the rewind and fast-forward buttons. play it by pressing the Play button on your DJ Console Rmx on the deck where the file is loaded. b) Supported audio formats i) File extensions VirtualDJ 5 DJC Edition can play most digital audio formats including MP3 (PC/Mac), AAC (PC/Mac), AIFF (Mac), WAV (PC), WMA (PC), OGG (PC) and CD-Audio. 14/34 - User Manual VirtualDJ 5 DJC Edition ii) DRM-protected files VirtualDJ 5 DJC cannot play files with DRM protection, so if you have purchased AAC files with DRM protection, the solution to play the music in VirtualDJ 5 DJC is to either: 1) burn an audio CD with the music file(s) and mix using the audio CD instead of the AAC file(s) with DRM protection, 2) or connect your portable music player which supports this media file to the audio input and mix this analog source in VirtualDJ with the music stored on your computer. iii) If you encounter an issue with an audio format If you cannot play one of these formats, check to see whether the codec for this audio format is installed on your computer. For example, if you cannot play an AAC file, verify that iTunes is installed on your computer, since the AAC codec is installed by iTunes. iv) Video files VirtualDJ also supports video files, but in VirtualDJ 5 DJC Edition playback is limited to a small window: to mix video in full screen mode, you need the VirtualDJ 5 Pro version. You can upgrade from VirtualDJ 5 DJC Edition to VirtualDJ 5 Pro on the www.virtualdj.com website. c) Previewing music files Previewing a music file means playing it for the DJ only while playing another track for the audience. The most common way to preview a music file is to listen to the music on your headphones while playing another track for the audience over the public address speakers (you may also preview the music with near-field monitors while mixing another track for the audience, if the DJ booth is isolated from the audience). i) Target Before playing a music file for the audience, you can preview it to: - select a music file, and check whether it fits with the ambiance and the beat of the current track, - set a Cue point in the music file: the Cue point is the moment in the music file where you want the audience to start hearing it, - synchronize the music file with the previous music track played for the audience. User Manual – 15/34 VirtualDJ 5 DJC Edition ii) Steps To preview a music file, you must: 1) Connect headphones to your audio interface (with the DJ Console Rmx, on either the top or front face: preferably headphones with a low impedance, below 80 Ohms, in order to get a strong output level), or to an external mixer, 2) Set the Monitor Select knob to the Cue position on your DJ controller or your mixer, 3) Load the music file on the deck opposite the position of the cross fader (so that the audience cannot hear the preview), 4) Press the Cue Select button on this deck on your DJ controller (Cue Select means "select this deck as the audio source for your headphones"), 5) Preview the music file on your headphones, by pushing on the Play button. 16/34 - User Manual VirtualDJ 5 DJC Edition d) Moving within a music track You can move within a music track using 3 controls: Play the music track with your DJ controller's Play buttons. This is the easiest way: simply press the Play button on the selected deck of your DJ controller, and you can hear on your headphones where you are within the track, Move within the track by turning the DJ controller's jog wheels. This is the most precise way: you turn the jog wheel backward and forward and see your position in the waveform window, Move backward and forward by pressing the Fast forward and Rewind buttons. This is the fastest way: you can see your position inside the music track in the small waveform preview for each deck over the vinyl record image in the VirtualDJ 5 DJC skin. User Manual – 17/34 VirtualDJ 5 DJC Edition e) Setting a Cue point A Cue point is a bookmark of the moment in the music file where you start playing the file for the audience, for example to avoid a slower beginning of the track if it's too slow for dancing. This bookmark is intended to start playing the music file only once its beat is clear enough for dancing, to avoid a slow introduction of the music which may interrupt the rhythm of dancing. i) Placing a Cue point Once the music file is loaded on a deck, preview it for yourself only (on your headphones) up to the moment where you want to place the bookmark in your music file (you can get to the right point by playing the music file, by pressing the fast forward or rewind buttons or by turning the jog wheel), and then push the Cue button at the moment you want to place a cue point. VirtualDJ adds: - a marker with the label Cue 1 in the waveform display. - a white bar in the waveform in the waveform preview. ii) Changing a Cue point position Each time you press the Cue button, VirtualDJ 5 DJC Edition updates the Cue point position. iii) Going to a Cue point If a Cue point has been defined in a piece of music, you go to this Cue point when you load the music file on a deck. Each time you press the Stop button, you come back to the Cue point. iv) Deleting a Cue point If the music contains a Cue point, going to the start of the music file (using the Rewind button) and pushing the Cue button once you have reached the start of the music file deletes the previously recorded Cue 1 point. You cannot set multiple Cue points in a music file with VirtualDJ 5 DJC Edition, but this option is available in VirtualDJ 5 Pro, so you must upgrade to VirtualDJ 5 Pro to access this option. 18/34 - User Manual VirtualDJ 5 DJC Edition 6) Beat matching music files The DJ's task is to provide the audience with the music they need to dance, which includes: playing tracks adapted to the audience, keeping a dancing rhythm, with a good vibe and avoiding breaks in the rhythm, such as empty spaces or BPM rates which change too quickly, making transitions easy for dancers by synchronizing the next music track to the current music track wherever possible: this synchronization is called beat matching. Beat matching consists of adjusting the speed of music file B until the moment when the beats (generally drums) of music file B play at the same time as the beats of music file A, to keep the same beat during 3 steps: 1. when you play music file A, 2. then when you mix music B together with music A, 3. and then when you stop playback of music A to keep only music B, so that the dancers don't need to change their dancing rhythm. If the BPM rate of a piece of music is very far from the BPM rate of another track, you can also synchronize the two pieces by setting the beat rate of the second track at half or twice the BPM rate of the other track, so that the beat of the second music track is played at the same time as 1 beat out of 2 of the first music track or vice versa. For example, you can typically synchronize a 75 BPM music track with another track set at 75 BPM, or with a track set at 150 BPM. Your Hercules DJ controller has 4 controls for beat matching: Sync button, Pitch fader (and Beat Lock/Master Tempo button), Pitch Bend buttons (Pitch Bend -/+), Jog wheels. User Manual – 19/34 VirtualDJ 5 DJC Edition a) Sync button Pressing the Sync button on a deck instantly synchronizes the beat of the music file loaded on this deck with the beat of the music file on the other deck. Beat matching is done immediately and easily. You can synchronize a track with another track using the Sync button as long as the BPM difference between both tracks is within the limit of the pitch scale. The pitch scale is the percentage displayed below the VirtualDJ Pitch fader on the corresponding deck, and is set at 12% by default. The pitch scale can be changed by clicking the percentage figure displayed in VirtualDJ below the pitch fader: you can set a pitch scale of 5%, 8%, 10%, 12%, 16%, 20%, 25%, 33%, 50% or 100%. When you synchronize one track with another using the Sync button, you disable the action of the Pitch fader on your console, so if you want to control the pitch of your music with the Pitch fader, you must press the Sync button again to re-enable the Pitch fader. b) Pitch fader (and Master Tempo) The Pitch fader is a slider used to slow down/speed up playback of the music file. Moving the Pitch fader up slows down playback, Moving the Pitch fader down speeds up playback. i) Master Tempo In VirtualDJ 5 DJC Edition, the button labeled Beat Lock on your DJ Console Rmx activates the Master Tempo function: when this function is on, the pitch fader changes the music speed without changing the music tone, so that you can speed up music playback without making the music's tone higher pitched, and you can slow down music playback without making the music's tone lower pitched. 20/34 - User Manual VirtualDJ 5 DJC Edition ii) Pitch scale The pitch scale is the percentage of speed variation you can achieve with the pitch fader: a pitch scale of 6% means the pitch fader's upper position corresponds to a 6% slowdown in music playback, and the pitch fader's lower position corresponds to a 6% acceleration in music playback (a 100 BPM rate becomes a 94 BPM rate when moving the fader to the top, and 106 BPM when moving the fader to the bottom). The pitch variation scale can be changed by clicking the percentage figure displayed below the pitch fader on the VirtualDJ 5 DJC skin: you can set a pitch scale of 6%, 8%, 10%, 12%, 20%, 25%, 33%, 50% or 100%. The lower the pitch scale, the higher the precision of the pitch fader, so a low pitch scale makes the pitch fader more precise, but a low pitch scale limits your choice to music tracks whose BPM is close to the BPM of the currently loaded track. iii) Centre detent Hercules DJ controller pitch faders have a centre detent, meaning a click position at the center so that you feel in your fingers when you reach the default speed of the music track. iv) Action of the pitch fader in VirtualDJ When you move the pitch fader, you can see its action in 2 ways: - the BPM counter changes (displayed in the VirtualDJ 5 DJC skin over the Gain knob), - the scrolling of the music track in the waveform window is slower or faster, However, the best way to evaluate the pitch change is to actually the hear the change of the music's speed. User Manual – 21/34 VirtualDJ 5 DJC Edition In the VirtualDJ waveform window, the start of each beat is marked with a small square below the waveform, so: if the squares of both music tracks overlap, the music tracks are synchronized, if the squares of both music tracks don't overlap, the music tracks are not synchronized. c) Pitch Bend buttons (Pitch Bend - and Pitch Bend +) Pitch Bend –/+ functions slow down/accelerate playback of the music track loaded on a deck, but the difference between this function and the Pitch fader is that the Pitch Bend action is temporary: when you release the button, playback of the music file gradually returns to its previous speed. i) Using the Pitch Bend function To beat match 2 music files, you generally: set both music files at the same BPM with the pitch fader, then align the beats of one track with the beats of the other track other by slowing it down/speeding it up with the Pitch Bend buttons. ii) Mapping the Pitch Bend function The way to map a function such as Pitch Bend - or Pitch Bend + on one of the buttons 1 to 6 is to click with your mouse on the arrow next to the button on the VirtualDJ skin, which displays a list of functions, and then select the function you want to map on this button. 22/34 - User Manual VirtualDJ 5 DJC Edition With your DJ Console Rmx, you can set the Pitch Bend functions on buttons 1 to 6: the easiest way is to set Pitch Bend - on button 1, 2 or 3 and Pitch Bend + on the same line: If you map Button 1 as the Pitch Bend - button, you should set Button 4 as the Pitch Bend + button, If you map Button 2 as the Pitch Bend - button, you should set Button 5 as the Pitch Bend + button, If you map Button 3 as the Pitch Bend - button, you should set Button 6 as the Pitch Bend + button. iii) Viewing the action of Pitch Bend in VirtualDJ When you push the Pitch Bend - or Pitch Bend + button: the button on which this function is mapped turns blue on the screen, the BPM counter remains unchanged (displayed in the VirtualDJ 5 DJC skin above the Gain knob), the scrolling of the music track in the waveform window is slower of faster. However, the best way to evaluate the pitch change is to actually the hear the change of the music's speed. User Manual – 23/34 VirtualDJ 5 DJC Edition In the VirtualDJ waveform window, the start of each beat is marked with a small square below the waveform, so: if the squares of both music tracks overlap, the music tracks are synchronized, if the squares of both music tracks don't overlap, the music tracks are not synchronized. d) Jog wheels If you play a music file loaded on a deck, you have 2 action modes for the jog wheels: Fine Tuning mode: you can speed up or slow down music playback temporarily by turning the jog wheels, as you would do with the Pitch Bend - or Pitch Bend + buttons. The action is the same as if you were accelerating or slowing down a record on a vinyl turntable by putting your fingers on the edge of the record or giving it a little push Scratch mode: if the Scratch button is lit up (the button is located over the Up button on your DJ controller), then each time you move a jog wheel, you lock playback of your music track to the moves of the jog wheel, so that if you turn the jog wheel counterclockwise, you play the music track backward, and if you turn the jog wheel clockwise, you play the music forward, at the speed of the jog wheel's movement. This scratch mode produces the same action on the music file as if you were placing your hand on a vinyl record and moving it back and forth. 24/34 - User Manual VirtualDJ 5 DJC Edition 7) Loops, effects and samples The DJ's task is not only to play music tracks with no blank spaces, but also to tweak existing music tracks to enhance their energy to stimulate the dancers. The functions included in VirtualDJ 5 DJC Edition are: Loops Sampler Backspin Beatgrid Brake Flanger Flipping Double Overloop Scratch These functions can be mapped to Hercules DJ controller buttons 1 to 6. To map one of these functions to one of buttons 1 to 6: click with your mouse on the arrow next to the button on the VirtualDJ skin, which displays a list of functions, and then select the function you want to map on this button. a) Loops i) Definition A loop is the repeated playback of a moment in the music: the start of this moment is the Loop In point, and the end of the moment is the Loop Out point. Playback goes from the Loop In point to the Loop Out point and, when it has User Manual – 25/34 VirtualDJ 5 DJC Edition reached the Loop Out point, returns to the Loop In point and the cycle continues. Loops are a way to remain on a specific part of a track without stopping its rhythm. ii) Mapping the Loop function In VirtualDJ 5 DJC Edition with your DJ Console Rmx, you can set one of buttons 1 to 6 of the deck as the Loop In button and another one of buttons 1 to 6 as the Loop Out button. The most comfortable setting is to place the Loop In button and the Loop Out button on the same line: If you map Button 1 as the Loop In button, you should set Button 4 as the Loop Out button, If you map Button 2 as the Loop In button, you should set Button 5 as the Loop Out button, If you map Button 3 as the Loop In button, you should set Button 6 as the Loop Out button. By default, the loops are mapped to buttons 1 and 4. 26/34 - User Manual VirtualDJ 5 DJC Edition iii) Procedure You place the start of a loop with the Loop In button, and you place the end of the loop with the Loop Out button. You are then inside the loop. When you are inside a loop, you can: leave the loop by pressing the Loop Out button, reduce the loop length by pressing the Loop In button. iv) Tips Shortening a loop As long as your loop can be divided into beats of the original music track, the loop doesn't change the music speed; but if you reduce the loop to below 1 beat, by pushing the Loop In button while you are playing the last beat of the loop, you accelerate the speed of the music by making this loop the new beat of the music. If you shorten the loop to a fraction of a beat, you don't hear a beat anymore but rather a continuous sound, which may sound industrial or techno even if it is based on a standard analog musical instrument. Sampling a loop VirtualDJ 5 DJC Edition sampler mode by default records a 4-beat loop of the music on the fly at the moment you press the Sampler Rec button; so if you want to sample a different length, you should define the loop with the Loop In button and Loop Out buttons and once you are in the loop, press the Sampler Rec button, which will save this loop as a sample. User Manual – 27/34 VirtualDJ 5 DJC Edition b) Sampler i) Function The sampler mode is a mode where you record a loop of a music track, store it and assign it on a button, and play it back later in addition to your music file. This recorded loop is called a sample. Playing back a sample over a music track may add rhythm to the music, or make it sound more interesting, or keep a stable beat while you are busy preparing the next track. ii) Procedure The sampler uses 2 functions: You record a sample of the music currently playing on the deck by pressing the Sampler Rec button. You play back this sample by pressing the Sampler Play button. In VirtualDJ 5 DJC Edition, you can record only 1 sample per deck, so when you press the Sampler Rec button, you cancel the previously recorded sample. iii) Key mapping In VirtualDJ 5 DJC Edition, you must assign 2 functions: - the Sampler Rec function on one of the buttons 1 to 6 on this deck, - the Sampler Play function on another of the buttons 1 to 6 on the same deck. The easiest solution is to place Sampler Rec and Sampler Play on the same line: If you map Button 1 as the Sampler Rec button, you should set Button 4 as the Sampler Play button, If you map Button 2 as the Sampler Rec button, you should set Button 5 as the Sampler Play button, If you map Button 3 as the Sampler Rec button, you should set Button 6 as the Sampler Play button. 28/34 - User Manual VirtualDJ 5 DJC Edition iv) Tips Changing the sample length In VirtualDJ 5 DJC Edition the default sample is a 4-beat loop, so if you push the Sampler Rec button, you instantly record a 4-beat loop, whether you release the button immediately or whether you keep the button pressed down. To record a different length than 4 beats for your sample, you must set a loop and record the sample while you are in loop mode: you record the loop you have set as a sample. Setting the volume of the sample You can change the volume of the sample by pressing the Sampler Play button and turning the jog wheel at the same time. User Manual – 29/34 VirtualDJ 5 DJC Edition c) Backspin The backspin function sends an impulse backward on the music track, as if you had momentarily pushed a vinyl record counterclockwise. The backspin action must be short, otherwise you stop playback of the track. The backspin effect stops when you push the button again. Setting the backspin effect You can set the backspin effect by pressing the Backspin button and turning the jog wheel at the same time: the left jog wheel sets how long the backspin will last (shorter = counterclockwise, longer = clockwise), the right jog wheel sets how fast the backward impulse goes (slower = counterclockwise, faster = clockwise). d) Overloop The Overloop function sets a 4-beat loop of the current track and plays it in the background of the track's playback. To enable the Overloop function, press the Overloop button once, To disable the Overloop function, press the Overloop again. e) Beatgrid The Beatgrid is a beat repeater: it samples 4 beats of the current music track and play this 4-beat pattern over the music, during 4 beats, which adds intermediary beats to the music. If you keep the Beatgrid button pressed down, the 4-beat pattern is added continuously as a loop over the music track. th If you release the Beatgrid button, the 4-beat pattern stops at the 4 beat, while playback of the music track continues. 30/34 - User Manual VirtualDJ 5 DJC Edition f) Brake The Brake effect slows down playback, which gradually returns to its default speed when you release the Brake button, if you didn't push the Brake button long enough to completely stop the track's playback. Setting the Brake effect You can set the brake effect by pressing the Brake button and turning the left jog wheel at the same time: instant brake is at the maximum counterclockwise position, and a slow brake is at the maximum clockwise position. User Manual – 31/34 VirtualDJ 5 DJC Edition g) Flanger The flanger consists of adding a cycle of stretching and compressing on some frequencies of the music while keeping the other frequencies unchanged, so that you keep the tempo and the tone of the music but change its sound. Flanger is very frequently used in techno music. To enable the flanger, press the Flanger button; to stop it, press the button again. Changing the flanger You can change the flanger when you press the Flanger button and turn the jog wheel at the same time: the right jog wheel sets the delay of the flanger, the left jog wheel sets the frequency of the flanger. These 2 settings are represented as rotating knobs below the 6 buttons in the VirtualDJ 5 DJC Edition skin. h) Flipping double Flipping double repeats the music with half a beat delay: this sounds similar to as if you had 2 turntables that were playing the same track, one playing half a beat behind the other, and you moved the cross fader quickly to the second turntable at the end of each beat, creating a repetition of the rhythm. i) Mic Flanger Mic Flanger adds a flanger effect on the microphone input. When you enable this function, the microphone input replaces the audio track on Deck A so you cannot use this function in talk-over mode, as you cannot hear the music file loaded on Deck A when Mic Flanger is enabled. To restore playback of the track loaded on Deck A, you must switch off the Mic Flanger function by pressing the Mic Flanger button again. 32/34 - User Manual VirtualDJ 5 DJC Edition j) Mic Chorus Mic Chorus adds a chorus effect on the microphone input. When you enable this function, the microphone input replaces the audio track on Deck A so you cannot use this function in talk-over mode, as you cannot hear the music file loaded on Deck A when Mic Chorus is enabled. To restore playback of the track loaded on Deck A, you must switch off the Mic Chorus function by pressing the Mic Chorus button again. k) Mic Reverb Mic Reverb adds a reverberation effect on the microphone input. When you activate this function, the microphone input replaces the audio track on deck A so you cannot use this function in talk-over mode, you cannot hear the music file loaded on deck A when Mic Reverb is enabled. To restore the playback of the track loaded on deck A, you must switch off the Mic Reverb function by pressing the Mic Reverb button again. l) Mic Voice Pitch Mic Voice Pitch lets change the pitch of the microphone input. When you enable this function, the microphone input replaces the audio track on Deck A so you cannot use this function in talk-over mode, as you cannot hear the music file loaded on Deck A when Mic Voice Pitch is enabled. To restore playback of the track loaded on Deck A, you must switch off the Mic Voice Pitch function by pressing the Mic Voice Pitch button again. Changing Mic Voice Pitch You can change the voice pitch when you press the Mic Voice Pitch button and turn the right jog wheel at the same time: turning the jog wheel jog counterclockwise sets a lower tone voice, turning the jog wheel jog clockwise sets a higher tone voice. User Manual – 33/34 VirtualDJ 5 DJC Edition m)Scratching Scratching is the action of stopping a vinyl record playing on a turntable with your hand, and moving the record back and forth, creating a distinctive sound: the vinyl record moves at the speed of your hand instead of at the speed of the turntable (since the slip mat isolates it from the turntable's rotation). i) Scratch mode You can enable Scratch mode by pressing the Scratch button, located over the Up button on the DJ controller: the Scratch button lights up, and you can use the jog wheels to scratch. ii) Action Once you are in the Scratch mode, if you turn the jog wheel counterclockwise, you play the music track backward, and if you turn the jog wheel clockwise, you play the music forward, at the speed of the jog wheel's rotation. iii) Tips ASIO latency Scratching requires a short latency, so you must set a short latency in your audio interface. With your DJ Console Rmx, VirtualDJ 5.0 DJC Edition often has a better ASIO latency in 48KHz than in 44.1KHz mode, so setting your DJ Console Rmx in ASIO at 48KHz, 16-bit, with a 7ms buffer before running VirtualDJ 5 DJC should give you a satisfactory result. Jog wheel accuracy Scratching requires the best accuracy for the jog wheels, so you should select the standard jog wheel accuracy in the DJ Console Rmx control panel instead of one of the reduced accuracy modes. 34/34 - User Manual


![[English] 450 KB](http://vs1.manualzilla.com/store/data/005878868_1-e5f7783ea728201c5d3bf440f5f55954-150x150.png)

![[English] 2.2 MB](http://vs1.manualzilla.com/store/data/005801224_1-360c03496a849957940b8f23b39f430e-150x150.png)