1
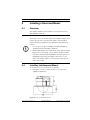
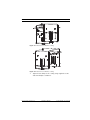
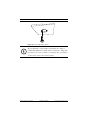
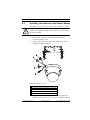
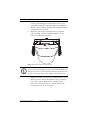
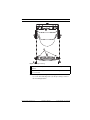
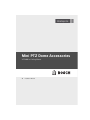
Mini PTZ Dome Accessories
VEZ-400 In-Ceiling Mount
en
Installation Manual
Mini PTZ Dome Accessories
Table of Contents | en
3
Table of Contents
1
Safety
4
1.1
Safety precautions
4
2
Unpacking
5
2.1
Parts List
5
2.2
Additional Tools/Supplies Required
5
3
Installation Overview
6
4
Installing a Recessed Mount
7
4.1
Overview
7
4.2
Installing the Recessed Mount
4.3
Installing the Camera to the Recess Mount
11
5
Connection
14
Bosch Security Systems, Inc.
Installation Manual
7
F.01U.261.808 | 1.0 | 2011.10
4
en | Safety
1
Mini PTZ Dome Accessories
Safety
Before installing any of the accessories, please read this manual
carefully.
1.1
Safety precautions
WARNING!
Medium risk: Indicates a potentially hazardous situation.
If not avoided, this could result in minor or moderate bodily
injury.
CAUTION!
Low risk: Indicates a potentially hazardous situation.
If not avoided, this could result in property damage or risk of
damage to the unit.
NOTICE!
This symbol indicates information or a company policy that
relates directly or indirectly to the safety of personnel or
protection of property.
F.01U.261.808 | 1.0 | 2011.10
Installation Manual
Bosch Security Systems, Inc.
Mini PTZ Dome Accessories
2
Unpacking | en
5
Unpacking
This equipment should be unpacked and handled with care. If
an item appears to have been damaged in shipment, notify the
shipper immediately.
Verify that all the parts listed in the applicable Parts List below
are included. If any items are missing, notify your Bosch
Security Systems Sales or Customer Service Representative.
The original packing carton is the safest container in which to
transport the unit and must be used if returning the unit for
service. Save it for possible future use.
2.1
Parts List
The following table lists the parts included in the In-ceiling
(recessed) mount (VEZ-A4-IC):
Quantity
1
1
1
1
1
2.2
Part
In-ceiling mount: VEZ-A4-IC
White trim ring with 2 (two) M3 captive screws
Black trim ring with 2 (two) M3 captive screws
Security Torx wrench
Installation manual (this booklet)
Additional Tools/Supplies Required
–
No. 2 Phillips screwdriver
–
Appropriate tool for cutting a hole in drywall or ceiling tile
–
4 in. x 4 in. junction box (optional)
–
LTC 9349MK mounting kit (optional) [for recessed
(if applicable)
mounts]
–
VEZ-400 Mini PTZ Dome (includes screws to mount the
camera)
–
Wire Puller tool
–
Suitable mounting screws/plugs to attach the wall/pipe
mount to the mounting surface
Bosch Security Systems, Inc.
Installation Manual
F.01U.261.808 | 1.0 | 2011.10
6
3
en | Installation Overview
Mini PTZ Dome Accessories
Installation Overview
The VEZ-400 Mini PTZ Dome camera comes with the hardware
and installation instructions necessary to mount the camera to
a concrete ceiling.
This following mounting accessories are available (and are
supplied with separate mounting instructions):
–
Wall mount, used in applications where the camera is
mounted to a vertical wall.
–
Pipe mount, used in applications where the camera is
–
In-ceiling mount, used in applications where the camera is
mounted to a horizontal (high) ceiling.
mounted into a recessed ceiling.
The installation should be made by qualified installation
personnel and conform to the National Electrical Code and
applicable local codes.
F.01U.261.808 | 1.0 | 2011.10
Installation Manual
Bosch Security Systems, Inc.
Mini PTZ Dome Accessories
Installing a Recessed Mount | en
4
Installing a Recessed Mount
4.1
Overview
7
This chapter details how to install a recessed mount for the
VEZ-400 Mini PTZ Dome.
NOTICE!
The image sensors in modern cameras are highly sensitive and
require special care for proper performance and extended
lifetime. Follow the guidelines for optimum results with your
camera:
–
Do not expose to direct sunlight or bright spotlights in
operating and nonoperating conditions.
–
Avoid bright lights in the field of view of the camera. Bright
lights cause a “smearing” effect, which is visible as white
lines above and below the highlight. Prolonged exposure to
bright lights may cause bleaching of the sensor's color
filters. This will be visible as colored spots in the picture
and is irreversible.
4.2
Installing the Recessed Mount
To mount to a recess mount, do the following:
1.
Determine a secure location for the recessed mount
(supplied separately).
Figure 4.1
Bosch Security Systems, Inc.
Recess Mount Dimensions
Installation Manual
F.01U.261.808 | 1.0 | 2011.10
8
en | Installing a Recessed Mount
Mini PTZ Dome Accessories
2.
Drill or cut a 7 in. hole with a tolerance of +/- 1/8 in.
3.
Optional: if installing the camera to a suspended ceiling
(177.8 mm +/- 2.2 mm).
tile or any other surface where additional support is
required, the LTC 9349MK mounting kit (sold separately)
is recommended. See the instruction book supplied with
the mounting bracket for installation instructions.
Figure 4.2
4.
Mounting bracket
Align holes of mounting plate (supplied with dome) with
mounting bracket and attach with screws. Ensure that
both the crescent shape of the mounting plate and the
crescent shape of the mounting bracket are aligned.
5.
Ensure that the clamping plates are angled inward by
6.
Insert mount through the hole and into the ceiling. Slide
pushing up and into the two slots.
clamps out and down so that the drywall is clamped in
between the clamps and the bracket flange, 41.7 mm
(1.64 in.) maximum ceiling thickness and 12.7 mm
(0.50 in.) minimum ceiling thickness).
F.01U.261.808 | 1.0 | 2011.10
Installation Manual
Bosch Security Systems, Inc.
Mini PTZ Dome Accessories
Installing a Recessed Mount | en
Figure 4.3
Attach Recess Mount to Ceiling
Figure 4.4
Attach Recess Mount to Ceiling
7.
9
Tighten both clamps to the ceiling using supplied screws
and a #2 Phillips screwdriver.
Bosch Security Systems, Inc.
Installation Manual
F.01U.261.808 | 1.0 | 2011.10
10
en | Installing a Recessed Mount
Figure 4.5
Mini PTZ Dome Accessories
Tighten Mounting Clamps
NOTICE!
Over torquing the ceiling clamps can damage the clamp or
ceiling. Only tighten the clamp until it contacts the ceiling and
you start to feel some resistance. If using a power screwdriver,
set the torque level to the lowest setting.
F.01U.261.808 | 1.0 | 2011.10
Installation Manual
Bosch Security Systems, Inc.
Mini PTZ Dome Accessories
4.3
Installing a Recessed Mount | en
11
Installing the Camera to the Recess Mount
To install the camera to the recess mount, follow these steps:
CAUTION!
All wires for installation applications must be routed through a
grounded conduit.
1.
Route wires on the side of mounting plate with the
crescent shaped cut-out.
2.
Connect the cables according to the instructions in the
VEZ-400 Installation Manual.
Figure 4.6
1
2
3
4
5
3.
Match Connectors
24 VAC power (black with 2p connector)
RS-485 (white/blue with 2p connector)
I/O (multi color with 8p connector)
Video (black with yellow connector)
Cutout for cable
Attach the camera to the recess mount by removing the
bubble from the camera (use the wrench supplied with the
Bosch Security Systems, Inc.
Installation Manual
F.01U.261.808 | 1.0 | 2011.10
12
en | Installing a Recessed Mount
Mini PTZ Dome Accessories
camera), and attaching the camera base to the mount
using 4 M4 mounting screws with rubber ring (supplied
with the camera). Ensure that the cable is aligned with the
cutout in the recess mount.
4.
Attach the camera base and make the necessary DIP
switch settings, and then install the bubble. (See the
camera User Manual for details.)
Figure 4.7
Attach Camera to Recess Mount
NOTICE!
The recessed mounting bracket is provided with an additional
safety tether point. To prevent injury, attach a safety wire from
a secure anchor point above the ceiling to this tether point.
5.
Align the trim ring so that the three alignment poles on the
trim ring (item 1, below) align with the three mounting
holes in the camera. Align the two mounting screws
attached to the trim ring (item 2, below) with the two
mounting holes in the recess mount.
F.01U.261.808 | 1.0 | 2011.10
Installation Manual
Bosch Security Systems, Inc.
Mini PTZ Dome Accessories
Figure 4.8
Installing a Recessed Mount | en
13
Align Trim Ring
1 Align these three poles with the three mounting holes in the
camera.
2 Align the mounting screws with the mounting holes in the
recess mount.
6.
Fit the plastic trim ring. Use the supplied T-10 Torx wrench
to secure the trim ring’s two (2) safety locking screws to
the mounting bracket.
Bosch Security Systems, Inc.
Installation Manual
F.01U.261.808 | 1.0 | 2011.10
14
5
en | Connection
Mini PTZ Dome Accessories
Connection
After the camera is mounted, connect the video, control, and
power cables.
CAUTION!
Do not connect power to the camera until all other connections
are made.
CAUTION!
Installation should only be performed by qualified service
personnel in accordance with the National Electrical Code or
applicable local codes.
CAUTION!
All wires for installation applications must be routed through a
grounded conduit.
CAUTION!
To prevent humidity problems, the camera must be installed in
dry conditions, and the cable leads should be sealed once
connected.
Please refer to the VEZ-400 User Manual for further instructions
on camera connections and configuration.
F.01U.261.808 | 1.0 | 2011.10
Installation Manual
Bosch Security Systems, Inc.
Bosch Security Systems, Inc.
850 Greenfield Road
Lancaster, PA 17601
U.S.A.
www.boschsecurity.com
© Bosch Security Systems, Inc., 2011