1
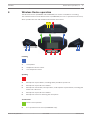
DICENTIS
Wireless Conference System
en
User manual
DICENTIS
Table of Contents | en
3
Table of contents
1
Safety
4
2
About this manual
5
2.1
Intended audience
5
2.2
Copyright and disclaimer
5
2.3
Document history
5
3
System introduction
6
4
Wireless Device operation
7
4.1
Power up
4.2
Single-use operation
10
4.3
Single-use indication
11
4.4
Chairperson operation
12
4.5
Chairperson indication
13
4.6
Dual-use operation
14
4.7
Dual-use indication
15
5
Troubleshooting
16
Bosch Security Systems B.V.
9
User manual
2015.02 | V1.0 |
4
en | Safety
1
DICENTIS
Safety
You should regularly check the equipment for wear and damage. Pay particular attention to
the following:
–
LCD screen: Check for cracks.
–
Cables: If the outer insulation is damaged, the cable must be replaced.
–
Connectors: Check for signs of stretching and damage.
If you think the equipment is damaged or presents a potential hazard, you should label the
equipment and put it to one side, so that no‑one else can use it. Then contact your local
technician for further advice.
2015.02 | V1.0 |
User manual
Bosch Security Systems B.V.
DICENTIS
2
About this manual | en
5
About this manual
The purpose of this manual is to provide information on operating the Wireless Device of the
DICENTIS Wireless Conference System.
This manual is available as a digital document in the Adobe Portable Document Format (PDF).
Refer to the product related information at: www.boschsecurity.com.
2.1
Intended audience
This manual is intended for users of a DICENTIS Wireless Device.
2.2
Copyright and disclaimer
All rights reserved. No part of this document may be reproduced or transmitted in any form by
any means, electronic, mechanical, photocopying, recording, or otherwise, without the prior
written permission of the publisher. For information on getting permission for reprints and
excerpts, contact Bosch Security Systems B.V..
The content and illustrations are subject to change without prior notice.
2.3
Document history
Release date
Documentation version
Reason
2015.02
V1.0
1st edition.
Bosch Security Systems B.V.
User manual
2015.02 | V1.0 |
6
en | System introduction
3
DICENTIS
System introduction
The DICENTIS Wireless Conference System is a “standalone” IP based system. It uses
WiFi IEEE 802.11n for wireless distribution and processing of audio and data signals.
2015.02 | V1.0 |
User manual
Bosch Security Systems B.V.
DICENTIS
4
Wireless Device operation | en
7
Wireless Device operation
The Wireless Devices (DCNM-WD and DCNM-WDE) are used to contribute to a meeting.
The extended version of the Wireless Device (DCNM-WDE) has a 4.3” capacitive touch screen,
which provides the user with additional information and control.
11 12
10
3
8
1
9
2
2
7
6
4
3
5
Listening
1
Loudspeaker.
2
Headphone volume control.
3
3.5” headphone socket.
Speaking
4
Microphone request button, including white possible-to-speak icon.
5
Microphone request bi‑color LED-bar.
6
Microphone mute button, Priority button, or Microphone request button, including two
white color LED icons.
7
Microphone request bi‑color LED-bar.
8
Microphone socket for attaching the microphone.
Touch‑screen
Touch-screen operation
9
Bosch Security Systems B.V.
4.3” capacitive touch screen (DCNM-WDE only).
User manual
2015.02 | V1.0 |
8
en | Wireless Device operation
DICENTIS
Identification
10
Area where Near Field Communication (NFC) tag is detected and read
(DCNM-WDE only).
Wireless signal (WiFi) and battery indicators
11
Red colored battery‑low LED indicator: When the LED is red, less than 1 hour
operation time is remaining. Charge or replace the Battery Pack.
12
Yellow colored out‑off‑range LED indicator: The LED is on (orange) when the Wireless
Device is not connected to the Wireless Access Point (DCNM-WAP). Place the Wireless
Device in the range area of the Wireless Access Point.
2015.02 | V1.0 |
User manual
Bosch Security Systems B.V.
DICENTIS
4.1
Wireless Device operation | en
9
Power up
Pre-conditions
–
Battery Pack is sufficiently charged.
–
Battery Pack is correctly inserted at base of Wireless Device.
1.
Press either one of the microphone request buttons on the front of the Wireless Device:
2.
Bosch Security Systems B.V.
–
The LED-bar above the microphone request buttons is lit green.
–
The LED in the microphone is lit red.
Wait until these LEDs go out. The Wireless Device is then ready for use.
User manual
2015.02 | V1.0 |
10
en | Wireless Device operation
4.2
DICENTIS
Single-use operation
Enable the microphone:
Push your microphone request button to enable the microphone.
–
If the white icon in the microphone request button is lit, the LED-bar above your
microphone request button will immediately turn red, and you can speak.
–
If the LED-bar above your microphone request button is green, your request-to-speak is
accepted. You cannot speak until the LED-bar above your microphone request button
turns red.
–
When the LED-bar above your microphone request button flashes green, you are first in
the waiting list. Your microphone will be enabled soon.
Cancel your request-to-speak:
When the LED-bar above your microphone request button is green or flashes green, you can
push your microphone request button to cancel the request-to-speak. Optionally: the clerk or
operator can disable the possibility to cancel the request-to-speak.
Disable the microphone:
When the LED-bar above your microphone request button is red, you can push the
microphone request button to disable the microphone. The LED-bar above your microphone
request button goes off. Optionally: the clerk or operator can disable the possibility to disable
the microphone.
Mute the microphone:
Your microphone is muted as long as you push the microphone mute button (left-hand
microphone request button).
Push-to-talk mode:
When your device is in the Push-To-Talk (PTT) mode, the microphone is enabled as long as you
push your microphone request button. You can only enable the microphone when the LED in
the microphone request button is lit.
Voice mode:
When your Wireless Device is in Voice mode, the microphone is always enabled. Push and hold
your microphone request button or mute button to temporarily mute the microphone.
In Voice mode, you cannot make a request-to-speak.
Find your seat:
The touch screen of the Wireless Device shows your name in the top line.
Identify yourself:
–
The touch screen will display instructions for identifying yourself.
–
Hold your NFC tag close to the left-hand side of the Wireless Device as indicated on the
touch screen.
Voting:
–
The clerk or operator opens a voting session. When the voting session is opened, your
blue present button is shown on the touch screen.
–
Push your blue present button to confirm your presence. Your vote buttons are displayed.
–
Cast your vote. You can change your vote until the clerk or operator has closed the voting
session.
The clerk or operator can temporarily hold the voting session. While the voting session is
on hold, you cannot cast or change your vote.
2015.02 | V1.0 |
User manual
Bosch Security Systems B.V.
DICENTIS
4.3
Wireless Device operation | en
11
Single-use indication
White possible-to-speak icon lit:
–
You can speak immediately by pressing the microphone request button.
LED-bars and microphone LED green or green flashing:
–
You have to wait to speak.
–
When the microphone flashes green, you are the first in the waiting list.
–
You can push the microphone request button to cancel the request to speak.
LED-bars and microphone LED lit red:
–
Your microphone is active; you can speak.
–
You can push the left microphone request button to temporarily mute the microphone.
–
You can turn off the microphone by pressing the right microphone request button.
Bosch Security Systems B.V.
User manual
2015.02 | V1.0 |
12
en | Wireless Device operation
4.4
DICENTIS
Chairperson operation
Enable your microphone:
When the white icon in the microphone button is lit, push your microphone button to enable
your microphone.
–
When the red light above your microphone button comes on, you can speak.
Disable your microphone:
When the LED-bar above your microphone button is red, push the microphone button to
disable the microphone. The red LED-bar above your microphone button goes off.
Priority function:
Press the priority button to temporarily disable the microphones of all participants. At the
same time, the priority button enables your own microphone. The system has the possibility
to:
–
play a chime when you push the priority button.
–
erase both the waiting and speakers list when you push the priority button.
When you release the priority button, the system disables your microphone.
When the speakers list is not erased, the system enables the microphones of the speakers
again.
Voice mode:
When your Wireless Device is in Voice mode, the microphone is always enabled. Push and hold
your microphone request button or mute button to temporarily mute the microphone.
Find your seat:
The touch screen of the Wireless Device shows your name in the top line.
Identify yourself:
–
The touch screen will display instructions for identifying yourself.
–
Hold your NFC tag close to the left-hand side of the Wireless Device as indicated on the
touch screen.
Voting:
–
The clerk or operator opens a voting session. When the voting session is opened, your
blue present button is shown on the touch screen.
–
Push your blue present button to confirm your presence. Your vote buttons are displayed.
–
Cast your vote. You can change your vote until the clerk or operator has closed the voting
session.
The clerk or operator can temporarily hold the voting session. While the voting session is
on hold, you cannot cast or change your vote.
2015.02 | V1.0 |
User manual
Bosch Security Systems B.V.
DICENTIS
4.5
Wireless Device operation | en
13
Chairperson indication
White priority icon and possible-to-speak icon lit:
–
You can speak immediately by pressing the microphone request button.
–
You can press the priority button to speak and temporarily disable the microphones of all
participants.
Priority icon lit. Right-hand LED-bar and microphone LED lit red:
–
Your microphone is active; you can speak.
–
You can press and hold in the priority button to continue speaking and temporarily
disable the microphones of all participants.
–
You can turn off the microphone by pressing the microphone request button .
Priority icon lit. LED-bars and microphone LED lit red:
–
Your microphone is active; you can speak.
–
The microphones of all participants are temporarily disabled until you release the priority
button.
Bosch Security Systems B.V.
User manual
2015.02 | V1.0 |
14
en | Wireless Device operation
4.6
DICENTIS
Dual-use operation
Enable the microphone:
Push your microphone request button to enable the microphone.
–
If the white icon in the microphone request button is lit, the LED-bar above your
microphone request button will immediately turn red, and you can speak.
–
If the LED-bar above your microphone request button is green, your request-to-speak is
accepted. You cannot speak until the LED-bar above your microphone request button
turns red.
–
When the LED-bar above your microphone request button flashes green, you are first in
the waiting list. Your microphone will be enabled soon.
Cancel your request-to-speak:
When the LED-bar above your microphone request button is green or flashes green, you can
push your microphone request button to cancel the request-to-speak. Optionally: the clerk or
operator can disable the possibility to cancel the request-to-speak.
Disable the microphone:
When the LED-bar above your microphone request button is red, you can push the
microphone request button to disable the microphone. The LED-bar above your microphone
request button goes off. Optionally: the clerk or operator can disable the possibility to disable
the microphone.
Push-to-talk mode:
When your device is in the Push-To-Talk (PTT) mode, the microphone is enabled as long as you
push your microphone request button. You can only enable the microphone when the LED in
the microphone request button is lit.
Voice mode:
When your Wireless Device is in Voice mode, the microphone is always enabled. Push and hold
your microphone request button or mute button to temporarily mute the microphone.
In Voice mode, you cannot make a request-to-speak.
Find your seat:
The touch screen of the Wireless Device shows your name in the top line.
Identify yourself:
–
The touch screen will display instructions for identifying yourself.
–
Hold your NFC tag close to the left-hand side of the Wireless Device as indicated on the
touch screen.
–
Select the side of the device you want to be seated at.
Voting:
–
The clerk or operator opens a voting session. When the voting session is opened, your
blue present button is shown on the touch screen.
–
Push your blue present button to confirm your presence. Your vote buttons are displayed.
–
Cast your vote. You can change your vote until the clerk or operator has closed the voting
session.
The clerk or operator can temporarily hold the voting session. While the voting session is
on hold, you cannot cast or change your vote.
2015.02 | V1.0 |
User manual
Bosch Security Systems B.V.
DICENTIS
4.7
Wireless Device operation | en
15
Dual-use indication
Both possible-to-speak icons lit:
–
Both participants can speak immediately by pressing their own microphone request
buttons.
Left possible-to-speak icon lit. Right LED-bar and microphone LED green or green flashing:
–
The participant on the left can speak immediately by pressing the microphone request
button.
–
The participant on the right is in the waiting list and has to wait to speak.
–
The participant on the right can cancel the request to speak by pushing the microphone
request button.
Left possible-to-speak icon lit. Right LED-bar and microphone LED lit red:
–
The participant on the left can speak immediately by pressing the microphone request
button.
–
–
The participant on the right can speak.
The participant on the right can turn off the microphone by pressing the right microphone
request button.
Bosch Security Systems B.V.
User manual
2015.02 | V1.0 |
16
en | Troubleshooting
5
DICENTIS
Troubleshooting
Notice!
For general troubleshooting, please contact your local system technician.
2015.02 | V1.0 |
User manual
Bosch Security Systems B.V.
Bosch Security Systems B.V.
Torenallee 49
5617 BA Eindhoven
The Netherlands
www.boschsecurity.com
© Bosch Security Systems B.V., 2015