1
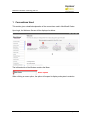
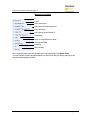
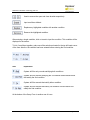
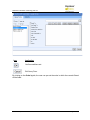
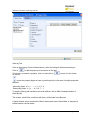
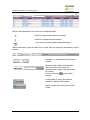
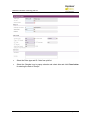
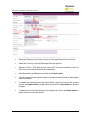
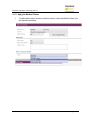
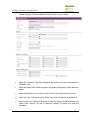
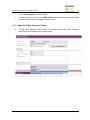
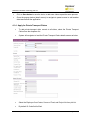
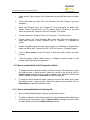
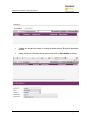
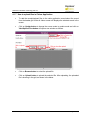
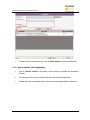
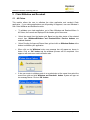
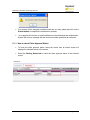
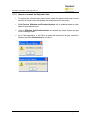
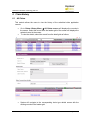
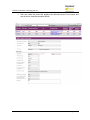
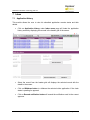
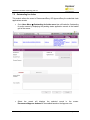
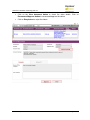
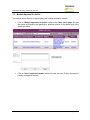
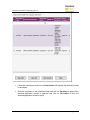
StarVision Information Technology Pte. Ltd. Mobile E-Commerce Web Intelligent Solutions for Enterprises MECWISE® CLAIMS User Guide For End User Developed & Published by User Manual | Version 1.0 Page 1 StarVision Information Technology Pte. Ltd. Table of Contents 1 CONVENTIONS USED ........................................................................................................................... 4 2 QUERY BUILDER .................................................................................................................................. 8 3 INTRODUCTION................................................................................................................................. 16 4 CLAIM APPLICATIONS ........................................................................................................................ 17 4.1 ALL CLAIMS ............................................................................................................................................... 17 4.1.1 Apply for Miscellaneous Claims .................................................................................................... 18 4.1.2 Apply for Medical Claims .............................................................................................................. 21 4.1.3 Apply for Public Transport Claims ................................................................................................. 23 4.1.4 Apply for Private Transport Claims ............................................................................................... 25 4.1.5 How to update/delete Claim Transaction Details ......................................................................... 26 4.1.6 How to add/update/delete the Routing list.................................................................................. 26 4.1.7 How to upload files in Claims Application .................................................................................... 28 4.1.8 How to submit Claim Application ................................................................................................. 29 5 CLAIM WITHDRAW AND RESUBMIT ................................................................................................... 30 5.1 ALL CLAIMS ............................................................................................................................................... 30 5.1.1 How to check Claim Approval Status ............................................................................................ 31 5.1.2 How to re-summit the Rejected Claim .......................................................................................... 32 6 CLAIM HISTORY ................................................................................................................................. 33 6.1 7 ALL CLAIMS ............................................................................................................................................... 33 INBOX ............................................................................................................................................... 35 7.1 7.2 7.3 7.4 APPLICATION HISTORY ................................................................................................................................. 35 OUTSTANDING FOR ACTION .......................................................................................................................... 36 MULTIPLE APPROVAL FOR ACTION ................................................................................................................. 38 DELEGATION .............................................................................................................................................. 40 User Manual | Version 1.0 Page 2 StarVision Information Technology Pte. Ltd. System Features MecWise® Claim Management System, part of the MecWise® Human Resource, is a fully integrated, Comprehensive claim management information /package which incorporates a complete range of business applications required in all areas of claim management . MecWise® Claim Management enables the processing of your claim Management efficiently, providing the built-in intelligence to assist managing claim functions Consistency and Simplicity: It is easy and simple to operate as menus and windows, together with on-line help messages govern the entire system. In addition each module is designed with the same operational procedure. New users need only to learn and be familiar with one module, and soon be familiar with all of them. Hence even users with no computer experience will find it easy to operate. Flexible: The system provides flexible master file maintenance for adding, modifying and deleting master file information respectively. Popup windows/tables: With the prompt windows, searches through files are made simple and it allows users to obtain prompt and accurate access data. Reports provided: Listing and statistical reports are provided too marking checking and reporting purposes much more efficient and effective. User Manual | Version 1.0 Page 3 StarVision Information Technology Pte. Ltd. 1 Conventions Used This section gives a detailed explanation of the conventions used in MecWise® Claims. Upon login, the Welcome Screen will be displayed as below. The left hand side of the Window contains the Menu. Menu Option When clicking on menu option, the option will expand to display sub-system’s modules. User Manual | Version 1.0 Page 4 StarVision Information Technology Pte. Ltd. User Manual | Version 1.0 Page 5 StarVision Information Technology Pte. Ltd. The Toolbar shows at the top of the screen when any of the modules are selected. It contains a row of icons for easy execution of commands. Below is the explanation of some of the commonly used icons: Toolbar Initiate a new record (Blank template). Update the existing information in the record. Deletes the current record. Search for records using a Query Builder. Search records for records with fields similar to that displayed on screen. If no fields are entered, system will display all available records under that module. Print current record in report form (If available). Access the previous/next record without having to exit from the current screen. Save most recent data entered in the record. Cancel the current operation. Return to header screen. This icon is usually displayed after the Cancel button is clicked on. If you have forgotten the functions any icon or come across an unfamiliar icon, place the mouse cursor over the icon for a few seconds. A description of the function will be displayed. The Collapsible Panel is located under the Toolbar. It displays a browser listing the different records according to the user’s specifications. Collapsible Panel (OR) User Manual | Version 1.0 Page 6 StarVision Information Technology Pte. Ltd. Add new detail Record Query Builder to query, filter and sort records for display in the browser. Export records from the browser to excel format. User Manual | Version 1.0 Page 7 StarVision Information Technology Pte. Ltd. 2 Query Builder The Query Form is for setting the criteria so as to display only a range of required records for viewing. Query Form These are some basic concepts and various signs used in the query form: For Alphabetical Values: a < b < c < ... < z. For values that contain 2 or more alphabets, always start comparing the values from left-toright. Example 1: ad < ar Reason: d is less than r Example 2: bd < d Reason: b is less than d Example 3: bcd < bcf Reason: d is less than f. For Numerical Values: User Manual | Version 1.0 Page 8 StarVision Information Technology Pte. Ltd. 1 < 2 < 3 < ... ... Using the Query form is essentially forming sentences specifying search criteria. Firstly select the subject criteria from the screen on the left. Select the desired condition from the column beside the subject screen. User Manual | Version 1.0 Page 9 StarVision Information Technology Pte. Ltd. Meaning of Condition Is Is not Value more than. Value more than and equals to. Value less than. Value less than and equal to. Containing. Have no values/Does not exist. Has values/Exists, Including. Not including. Next, enter the data in the field located in the top right hand of the Query Form. You can choose to enter the data manually or select from the pick list by clicking on the selection button beside the field. User Manual | Version 1.0 Page 10 StarVision Information Technology Pte. Ltd. Pick List To select the desired object, simply click once on it. Query Form Icons Icons Implication Open and Close Bracket. Used together in situations of multiple conditions. Conditions within brackets will be dealt with first. User Manual | Version 1.0 Page 11 StarVision Information Technology Pte. Ltd. Used to remove the open and close bracket respectively. Input conditions defined. Replace any highlighted condition with another condition. Remove the highlighted condition. After entering a single condition, click on Insert to input the condition. This condition will be displayed in the screen. To link 2 conditions together, make use of the selections located in the top left hand corner of the form after the 1st condition has been entered before entering the 2nd condition. Icon Implication System will filter only records satisfying both conditions. System will filter records satisfying the 1st condition and eliminate those that satisfy the 2nd condition. System will filter records that satisfy either condition. System will filter records that satisfy 1st condition or those that do not satisfy the 2nd condition. At the bottom of the Query Form is another row of icons. User Manual | Version 1.0 Page 12 StarVision Information Technology Pte. Ltd. Icon Implication Confirm conditions set. Exit Query Form. By clicking on the Order by tab, the user can pre set the order in which the records filtered will be listed. User Manual | Version 1.0 Page 13 StarVision Information Technology Pte. Ltd. Order by Tab Click on the property (From left hand screen), which the listing will be done according to. Click on to add the property to the screen on the right. Conversely, to unselect a property, click on it and click on on the left. to return it to the screen moves the property higher or lower in position/priority in the case of multiple properties selected. Ascending Order: a, b, c, ......, z / 1, 2, 3…9 Descending Order: z, y, x, ..., a / 9, 8, 7…1 To start the filtering with conditions and order defined, click on OK. (Located at bottom of Order By tab) The records, which fit the conditions laid down, will be listed in the Browser. A typical browse screen constitutes of titled columns and rows of stored data. A sample of a browse screen is shown below. User Manual | Version 1.0 Page 14 StarVision Information Technology Pte. Ltd. Browser Below is the explanation of the icons on the collapsible panel: Click this to expand the browser for viewing. Click this to collapse/hide the browser. To lock current browser status (Expanded/Hidden). Within the browser, there are other icons to view, filter and export the information from the browser. Browser Icons Navigator. To view next/previous screen of records. Search function. Select field from drop down list on the left and enter the data/keywords to search through records for a match. Click on the button process. to start search Query Builder to query, filter and sort records for display in the browser. Export records from the browser to excel format. User Manual | Version 1.0 Page 15 StarVision Information Technology Pte. Ltd. 3 Introduction MecWise® Claims is a fully automated HR claims processing solution that turns the laborious and document-heavy process into a streamlined process. It’s a web-based paperless claims management system which enables employees to submit the claim on-line with supporting documents attached and managers to approve/reject the claim request via email. Functions to be performed by the system: (a) Enables employees to submit their claim on-line. (b) Routes submissions to authorized verifier and the approver of claim application can Approve/Reject the claim request with sufficient details and supporting documents via email. (c) Calculates the Claim entitlement of all eligible employees every year (d) Enables employees to withdraw any claim applications prior to or after it has been approved; an approval of cancellation is sent to the approving officer. (e) Provides on-line enquiry facility to allow employees to check the status of their claim applications. (f) Interface with MecWise® Payroll allows posting the processed claim payment records to payroll and provide accurate results in payroll processing. (g) Generates relevant management and statistical reports. User Manual | Version 1.0 Page 16 StarVision Information Technology Pte. Ltd. 4 Claim Applications 4.1 All Claims This module allows the user to create/update/delete the claim application records and to submit their claim applications. Go to Claim Applications All Claims will displays the claim application screen in enquiry mode and displays the existing records in the header grid of the screen as follows. Click on Add button to add a new record. Select the Claim type from the dropdown list, the corresponding detail screen will launch in a popup window. User Manual | Version 1.0 Page 17 StarVision Information Technology Pte. Ltd. 4.1.1 Apply for Miscellaneous Claims To Add Miscellaneous Claims, select Miscellaneous Claims from dropdown list as follows. System navigates to load the Miscellaneous Claims details screen as follows. User Manual | Version 1.0 Page 18 StarVision Information Technology Pte. Ltd. Select the Claim type and GL Code from pick list. Select the Calendar Icon to popup calendar and select date and click Close button for entering the Date of Receipt. User Manual | Version 1.0 Page 19 StarVision Information Technology Pte. Ltd. Select the Employee Cost Centre, Source of Fund and Project No from pick list. Select the Currency Code and Exchange Rate from pick list. Enter the Claim + GST Amount and select GST Code from dropdown, then the GST Amount and Actual Claim Amount calculated. Enter Description and Remarks and click on the Save button. Close the popup window (detail screen) to navigate to parent screen to add another claim record save. To update the miscellaneous claim record details, select the record in the grid and click on the Update button, modify the fields and click on Save button to save the changes. To delete the record, select the record in the grid and click on the Delete button to delete the claim transaction details. User Manual | Version 1.0 Page 20 StarVision Information Technology Pte. Ltd. 4.1.2 Apply for Medical Claims To add medical claims records to all claims screen, select the Medical Claims from the dropdown as follows. User Manual | Version 1.0 Page 21 StarVision Information Technology Pte. Ltd. System navigates to load the Medical Claims details screen as below. Select the Treatment Type from dropdown. By default GL Code is filled based on Treatment Type. Select the patient from Patient dropdown. By default Relationship is filled based on patient. Select the Employee Cost Centre, Source of Fund, and Project No from pick list. Select the Clinic Code form pick list. Enter clinic Name, Receipt No and Remarks. Enter the amount in Medical Expense ($) field, by default Claimable Amount ($), Actual Claim Amount ($) and Co-Payment Amount ($) fields are filled are calculated. User Manual | Version 1.0 Page 22 StarVision Information Technology Pte. Ltd. Click on Save button to save the claim. To add more claims, click on the Add button and repeat the same process and close the detail screen to navigate to parent screen. 4.1.3 Apply for Public Transport Claims To add public transport claim records to all claims, select the Public Transport Claims from the dropdown list as shown below. User Manual | Version 1.0 Page 23 StarVision Information Technology Pte. Ltd. System will navigates to load the Public Transport Claims details screen as follows. Select the Employee Cost Centre, Source of Fund, and Project No from corresponding pick lists. By default GL Code field is filled. Enter all mandatory field information into fields. By default ‘Travel Expenses Btw. Home and Office’ field is setup based on start date selection (system will get the ‘Travel Expenses Btw. Home and Office’ from the Claim Master Setup->Transport Fare). Select the ‘Transport From’ and ‘Transport To’ from dropdowns. By default ‘Pls. Specify Places Travelled from’ and ‘Pls. Specify Places Travelled To’ are filled, when select the Transport From and Transport To as ‘Others’, write into multiline textboxes. System checks the ‘Transport From’ and ‘Transport To’ cannot be same. System checks, the ‘Travel Expenses Btw. Home and Office’ and calculate the actual claim amount, if either ‘Transport From’ or ‘Transport To’ is selected as ‘Home’. Enter ‘Amount Of Fares Paid’. By default Actual Claim Amount calculated. Actual Claim Amount = (‘Amount Of Fares Paid’ - ‘Travel Expenses Btw. Home and Office’) User Manual | Version 1.0 Page 24 StarVision Information Technology Pte. Ltd. Click on Save button to save the claim, to add more claims repeat the same process. Close the popup window (detail screen) to navigate to parent screen to add another claim/save/submit the application. 4.1.4 Apply for Private Transport Claims To add private transport claim records to all claims, select the Private Transport Claims from the dropdown list. System will navigates to load the Private Transport Claims details screen as below. Select the Employee Cost Centre, Source of Fund, and Project No from pick list. By default GL Code field is filled. User Manual | Version 1.0 Page 25 StarVision Information Technology Pte. Ltd. Select Vehicle Type from pick list. By default Amount per KM filled based on master setup. Select Start Date and Start Time from Calendar Icon and Payment Type from dropdown. Select the ‘Transport From’ and ‘Transport To’ from dropdowns. By default ‘Pls. Specify Places Travelled from’ and ‘Pls. Specify Places Travelled To’ are filled when user select the Transport From and Transport To as Home. System checks the ‘Transport From’ and ‘Transport To’ cannot be same. System checks, the ‘Travel Expenses Btw. Home and Office’ and calculate the actual claim amount, if either ‘Transport From’ or ‘Transport To’ is selected as ‘Home’. System calculates the actual claim amount based on the Mileage – Distance Btw. Home and Office (KM) * Amount Per KM + ERP/Toll Amount + Car park Charges. Click on Save button to save the claim, to add more claims repeat the same process. Close the popup window (detail screen) to navigate to parent screen to add another claim/save/submit the application. 4.1.5 How to update/delete Claim Transaction Details To update the claim transaction details, select the record in the details grid to open the details screen in popup window. Select the record in the grid and click on Update button change the screen mode to update mode. Modify the fields which open for update and click on Save button to save the changes. To delete the claim transaction details, select the record in the details grid to open the details screen in popup window. Select the record in the grid and click on Delete button to delete the selected record. 4.1.6 How to add/update/delete the Routing list We can add/update/delete the routing list from all claims screen. To add the routing list, select the record from all claims header grid will displays the selected record in the screen. Click on Update button to change the screen mode to update mode and click on Add New button as follows. User Manual | Version 1.0 Page 26 StarVision Information Technology Pte. Ltd. System will navigate the screen to routing list details screen. By default Application Id filled. Select the Role id, Recipient Id from pick list and click on Save button as follows. User Manual | Version 1.0 Page 27 StarVision Information Technology Pte. Ltd. 4.1.7 How to upload files in Claims Application To add the receipts/upload files to the claim application record,select the record from the header grid of the all claims screen will displays the selected record in the screen. Click on Update button to change the screen mode to update mode and click on View/Upload Files button will open a new window as follows. Click on Browse button to select the upload file. Click on Upload button to upload the selected file. After uploading, the uploaded file is showing in the grid, as shown in the below. User Manual | Version 1.0 Page 28 StarVision Information Technology Pte. Ltd. To delete the uploaded document, click on Delete button to delete uploaded file. 4.1.8 How to submit Claim Application Click on Submit button in the bottom of the screen to complete the Application Process. Your approver will receive an email notification of the Submit Application. System will return a message with the document number generated for reference. User Manual | Version 1.0 Page 29 StarVision Information Technology Pte. Ltd. 5 Claim Withdraw and Resubmit 5.1 All Claims This module allows the user to withdraw the claim application and resubmit Claim application. If your claims applications are still pending for approval, user can Withdraw it from Claim Withdraw and Resubmit module. To withdraw your claim application, go to Claim Withdraw and Resubmit Menu All Claims, the records are displayed in the header grid of the screen. Select the record from the header grid. Based on the claim status of the selected record then Withdraw/Withdraw and Resubmit/Print Preview buttons are enabled/ disabled. Select Pending for Approval Record from grid and click on Withdraw Button at the bottom to withdraw your application. When click on the Withdraw button one message box will appear as shown in below. Click on ‘OK’ button and the withdraw process will be completed. Your approver will receive an email notification also. If the user wants to withdraw and do a re-submission at the same time select the record from grid and click Withdraw and Resubmit button. System will pop out two message boxes. Click on ‘OK’ button. User Manual | Version 1.0 Page 30 StarVision Information Technology Pte. Ltd. Your screen will be changed to update mode and you may update and click on the Submit button to complete the resubmission process. Your approval will receive an email notification on the withdrawal and resubmission. System will return a message with the document number generated for reference. 5.1.1 How to check Claim Approval Status To know the claim approval status, select the record from all claims screen will displays the selected record in the screen. Select the Routing Status tab to check the claim approval status of the selected record. User Manual | Version 1.0 Page 31 StarVision Information Technology Pte. Ltd. 5.1.2 How to re-summit the Rejected Claim To resubmit the rejected claim status record, select the rejected claim status record from the all claims screen will displays the selected record in the screen. Print Preview, Withdraw and Resubmit buttons will be enabled based on claim status of the selected record. Click on Withdraw and Resubmit button to resubmit the claims. System will pop out two message boxes. Go to Claim application All Claims to select the record from the grid, modify the changes and click Submit button to re-submit. User Manual | Version 1.0 Page 32 StarVision Information Technology Pte. Ltd. 6 Claim History 6.1 All Claims This module allows the users to view the history of the submitted claim application records. Go to Claims History Menu All Claims screen will displays the records in the screen. Select the record from the header grid of the screen will displays the selected record in the screen. To view the details, select the record from the detail grid as follows. System will navigate to the corresponding claim type details screen with the existing records in the header grid. User Manual | Version 1.0 Page 33 StarVision Information Technology Pte. Ltd. User can select the record will displays the selected record in the screen and user is able to view the record as follows. User Manual | Version 1.0 Page 34 StarVision Information Technology Pte. Ltd. 7 Inbox 7.1 Application History This module allows the user to view his submitted application records status and their details. Click on Application history under Inbox menu page will loads the application history screen by displaying the records in the header grid of the screen. Select the record from the header grid will displays the selected record with the details in the screen. Click on Withdraw button to withdraw the selected claim application if the claim status is pending for approval. Click on Resend notification button will resend the notification email to the current approver. User Manual | Version 1.0 Page 35 StarVision Information Technology Pte. Ltd. 7.2 Outstanding for Action This module allows the users to Recommend/Deny OR Approve/Deny the submitted claim applications records. Go to Inbox Menu Outstanding for Action menu item will loads the Outstanding for action screen by displaying the pending status application records in the header grid of the screen. Select the record will displays the selected record in the screen. Recommend/Approve buttons will be enabled based on the Approver role. User Manual | Version 1.0 Page 36 StarVision Information Technology Pte. Ltd. Click on the View document button to check the claim details. Click on Recommend/Approve button to recommend/approve the claims. Click on Deny button to reject the claims. User Manual | Version 1.0 Page 37 StarVision Information Technology Pte. Ltd. 7.3 Multiple Approval for Action This module allows the user to approve/deny the multiple application records. Click on Multiple approvals for action screen under Inbox menu page will load the screen by displaying the pending for approval records in the header grid of the screen as follows. Click on Select application button which will loads the multi Picklist showing the pending for approval records. User Manual | Version 1.0 Page 38 StarVision Information Technology Pte. Ltd. Check the check boxes and click on Close button will displays the selected records in the screen. Enter the comments in the comments fields and click on Ok button to approve the selected application records to approver and click on NO button to deny the selected application records to reject. User Manual | Version 1.0 Page 39 StarVision Information Technology Pte. Ltd. 7.4 Delegation This module allows the user to assign delegations to employees for Claim application and approvals only. Go to Inbox Menu page Delegation menu item. Click on Delegation menu item will displays the screen in add mode. Select the Application Type from the drop down. Select the Delegate To from pick list to set the covering officer. Select the Delegation Type to set the officer to apply/approve on behalf. Select the Delegation Role if the Delegation Type is Approval. Select the Effective Start Date and End Dates to set a time period for the delegation to apply/approve. Click on the Toolbar Save button to save details. User Manual | Version 1.0 Page 40 StarVision Information Technology Pte. Ltd. To update the delegation record details, select the record in the grid, click on the Update button and modify the fields and click on Save button to save the changes. To delete the delegation record, select the record in the grid, click on the Delete button to delete the selected record from the screen. User Manual | Version 1.0 Page 41