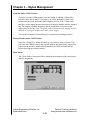
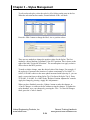
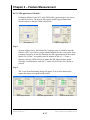
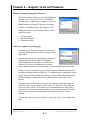
1
Geomet
User Guide
Version 6.66
December 2005
Covering:
Geomet 101, Geomet 101+, Geomet 301
Helmel Engineering Products, Inc
6520 Lockport Road
Niagara Falls, NY 14305
(716) 297-8644
(716) 297-9405 fax
www.helmel.com
www.geomet-cmm-software.com
Geomet
User Guide
Version 6.66
December 2005
Covering:
Geomet 101, Geomet 101+, Geomet 301
Helmel Engineering Products, Inc.
6520 Lockport Road
Niagara Falls, NY 14305
(716) 297-8644
(716) 297-9405 fax
www.helmel.com
www.geomet-cmm-software.com
Helmel Engineering Products, Inc.
www.helmel.com
Geomet Training Handbook
www.geomet-cmm-software.com
Geomet
Universal CMM Software
Information contained within this document is
subject to change without notice. No part of this
document may be reproduced or transmitted in
any form or by any means, electronic or
mechanical, for any purpose, without written
authorization from Helmel Engineering
Products, Inc.
This document contains trade secret subject
matter of Helmel Engineering Products, Inc. and
its receipt or possession does not convey any
right to reproduce, disclose its contents or to
manufacture, use or sell anything it may
describe. Reproduction, disclosure or use
without specific written authorization of Helmel
Engineering Products, Inc. is strictly forbidden.
©Helmel Engineering Products, Inc.
Geomet®, Microstar™, CheckMaster™, are
trademark of Helmel Engineering Products, Inc.
Windows™ is a trademark of Microsoft Corp.
Helmel Engineering Products, Inc.
6520 Lockport Road
Niagara Falls, NY 14305
(716) 297-8644
(716) 297-9405 fax
www.helmel.com
www.geomet-cmm-software.com
Helmel Engineering Products, Inc.
www.helmel.com
Geomet Training Handbook
www.geomet-cmm-software.com
Contents
Chapter 1 - Geomet
Geomet Program Levels
Geomet Options
Geomet Comparison Chart
Chapter 2 – Table of Contents
Geomet Installation Guide – Introduction ..........................................2.2
Changes to the Protection Device .................................................2.2
Geomet Installation Program Summary..............................................2.3
Microsoft Direct X........................................................................2.3
Drivers and System Support Files ................................................2.3
Installing Geomet – step-by-step Guide .............................................2.4
Installing the Crypkey License Driver..........................................2.7
Authorizing Geomet Software ......................................................2.8
Geomet System Options ...................................................................2.10
Enhanced Features ......................................................................2.10
Tolerance.....................................................................................2.13
Probes and Sensors .....................................................................2.14
File Locations .............................................................................2.15
Report States ...............................................................................2.17
Feature Characteristics................................................................2.18
CMM Characteristics ..................................................................2.19
Report Configuration ..................................................................2.21
Colors..........................................................................................2.24
Form Control...............................................................................2.25
SPC Formats ...............................................................................2.26
Tolerance Codes..........................................................................2.27
Graphic Controls.........................................................................2.28
CMM Scale Compensation ...............................................................2.30
Linear Compensation ..................................................................2.30
Non-Linear Compensation..........................................................2.34
Geomet Toolbar Control ...................................................................2.36
Interface Data Strip .....................................................................2.36
Working with Toolbars .....................................................................2.37
Geomet Toolbar Tables.....................................................................2.38
Helmel Engineering Products, Inc.
www.helmel.com
Geomet Training Handbook
www.geomet-cmm-software.com
Contents
Chapter 3 – Stylus Management
Stylus Manager .................................................................................. 3-2
Probe Qualification Process......................................................... 3-2
Stylus Manager Sub Menus ......................................................... 3-2
Deleting Stylus............................................................................. 3-3
Remove Pre-Qualified Stylus ...................................................... 3-6
Duplicate a Stylus ........................................................................ 3-7
Labeling a Stylus ......................................................................... 3-8
Qualifying a Ball Stylus..................................................................... 3-9
Qualifying Ball Styli in Multiple Positions ..................................... 3-10
Note on Reference Sphere Location .......................................... 3-10
Entering a Known Probe Diameter .................................................. 3-11
Stylus Tip Relationships .................................................................. 3-12
Qualifying with a Motorized Probe Head........................................ 3-13
Qualifying with a Stylus Change Rack............................................ 3-15
Qualifying a Motorized Probe Head and Stylus Change Rack........ 3-18
Stylus Database Manager................................................................. 3-19
Create a new Stylus Database .................................................... 3-20
Import a Stylus Database ........................................................... 3-20
Delete a Stylus Database Listing ............................................... 3-21
Set active a Stylus Database ...................................................... 3-21
Loading a Part Program ............................................................. 3-22
Renishaw SCR200/MCR 20 Stylus Rack Setup.............................. 3-24
Renishaw SCR200/MCR20 Maintenance Operations ..................... 3-31
Stylus Database Edit Control ........................................................... 3-35
Chapter 4 – Feature Measurement
Basic Features
Point ................................................................................................... 4-2
1D Point ....................................................................................... 4-3
Auto Direction Sensing and 1D Points ........................................ 4-4
2D Point ....................................................................................... 4-5
Inside Radial / Outside Radial 2D Point ...................................... 4-6
Helmel Engineering Products, Inc.
www.helmel.com
Geomet Training Handbook
www.geomet-cmm-software.com
Contents
3D Point ....................................................................................... 4-7
Inside Radial / Outside Radial 3D Point ...................................... 4-7
Vector Point ................................................................................. 4-8
Understanding Vector Points ....................................................... 4-9
Vector Point Technical Discussion............................................ 4-11
Vector Point Report Format....................................................... 4-12
Vector Point, XYZ/IJK Known ................................................. 4-13
Vector Point Unknown Data...................................................... 4-16
Vector Point IJK Known............................................................ 4-18
Vector Point XYZ Known ......................................................... 4-19
Vector Point Import File ............................................................ 4-21
Line .................................................................................................. 4-34
Circle................................................................................................ 4-37
Plane................................................................................................. 4-39
Upper / Lower Boundary Plane ................................................. 4-41
Sphere .............................................................................................. 4-43
Cylinder ........................................................................................... 4-44
Cone ................................................................................................. 4-46
Cone Offset ................................................................................ 4-47
Cone Diameter ........................................................................... 4-48
Cone Drop Ball Test .................................................................. 4-49
Macro Features
4 Point Intersect ......................................................................... 4-50
Slot/Web .................................................................................... 4-51
Oval Slot .................................................................................... 4-52
Feature Averaging............................................................................ 4-54
Chapter 5 – Coordinate Systems
Understanding Coordinate Systems................................................... 5-3
Machine Coordinate System – MCS............................................ 5-3
Part Coordinate System – PCS .................................................... 5-3
PCS Base Planes .......................................................................... 5-5
PCS versus MCS.......................................................................... 5-5
Fixture Coordinate System – FCS ............................................... 5-5
Interim Coordinate System – ICS ................................................ 5-6
Clearance Coordinate Systems – CCS......................................... 5-6
Helmel Engineering Products, Inc.
www.helmel.com
Geomet Training Handbook
www.geomet-cmm-software.com
Contents
Wobble Coordinate System – WCS............................................. 5-6
The PCS Setup Guide .................................................................. 5-7
Coordinate System Commands.......................................................... 5-8
ICS⇒PCS .................................................................................... 5-8
Orient ......................................................................................... 5-10
Align .......................................................................................... 5-11
Origin ......................................................................................... 5-12
Offset Align ............................................................................... 5-13
Editing an Offset Align.............................................................. 5-14
Pivot Align ................................................................................. 5-15
Rotate ......................................................................................... 5-16
Edit an Existing Rotation Value ................................................ 5-17
Translate..................................................................................... 5-18
Edit an Existing Translation Value ............................................ 5-19
PCS Program Examples................................................................... 5-20
#1, Basic Alignment................................................................... 5-21
#2, Plane-Line-Point .................................................................. 5-23
#3, Quick PCS............................................................................ 5-25
#4, Plane-Circle-Circle .............................................................. 5-27
#5, Plane-Cylinder-Circle .......................................................... 5-29
#6, Plane-Bisect Points-Circle ................................................... 5-31
#7, Cylinder-Circle-Point........................................................... 5-33
#8, Plane-Intersect Lines-Bisect Points-Circle .......................... 5-35
#9, Offset Alignment ................................................................. 5-38
#10, Pivot Alignment ................................................................. 5-39
#11, Translate............................................................................. 5-40
#12, Rotate ................................................................................. 5-41
Coordinate System Manager............................................................ 5-42
Recalling a Part Coordinate System .......................................... 5-42
Recalling the Machine Coordinate System................................ 5-42
Recalling a Fixture Coordinate System ..................................... 5-42
Recalling a Vector Drive System............................................... 5-43
Fixture Coordinate System Manager ............................................... 5-44
Import and Convert Pre-Geomet v 6.66 FCS Definitions.......... 5-45
Using the FCS Manager............................................................. 5-47
Adding a new FCS to the database ............................................ 5-48
Selecting a FCS Record ............................................................. 5-49
Attach Step................................................................................. 5-49
Updating..................................................................................... 5-49
Deleting...................................................................................... 5-50
Locking ...................................................................................... 5-50
Helmel Engineering Products, Inc.
www.helmel.com
Geomet Training Handbook
www.geomet-cmm-software.com
Contents
Details ........................................................................................ 5-50
Delete All ................................................................................... 5-50
Clearance Coordinate Systems ........................................................ 5-51
Chapter 6 – Tolerance
Introduction to Tolerance................................................................... 6-2
Linear Tolerance Theory.................................................................... 6-3
Working with Geomet Tolerance Windows ...................................... 6-5
Working with True Position Tolerance Windows ............................. 6-7
Interpreting Linear Tolerance in Geomet .......................................... 6-8
True Position Tolerance Theory ........................................................ 6-9
Datum Bonus Tolerance .................................................................. 6-11
Process Control Tolerance ............................................................... 6-12
Out-of-Tolerance Flash Message..................................................... 6-15
Vector Point Features – Apply Tolerance using Profile Bands ....... 6-16
GeoTol – Form Tolerance................................................................ 6-17
Runout: Cylinder/Plane.................................................................... 6-18
Chapter 7 – Constructions
Constructions – Brief Overview ........................................................ 7-2
Selecting Features ........................................................................ 7-2
Implicit Selection ......................................................................... 7-2
Targeted Highlighting.................................................................. 7-2
Feature Selection Tool ................................................................. 7-2
Bisect ................................................................................................. 7-3
Intersect.............................................................................................. 7-4
General Features – Single Point Solutions .................................. 7-4
Circle / Circle............................................................................... 7-4
Circle Line ................................................................................... 7-6
Helmel Engineering Products, Inc.
www.helmel.com
Geomet Training Handbook
www.geomet-cmm-software.com
Contents
Offset Features ................................................................................... 7-8
Offset Point .................................................................................. 7-8
Offset Line ................................................................................... 7-9
Offset Plane................................................................................ 7-10
Angle................................................................................................ 7-11
Distance ........................................................................................... 7-12
Extended Distance ........................................................................... 7-13
Reporting Format Control.......................................................... 7-13
Circle / Circle............................................................................. 7-14
Cylinder / Sphere ....................................................................... 7-16
3D Point / 3D Point.................................................................... 7-18
Boundary Planes .............................................................................. 7-19
Inscribed / Circumscribed Circle ..................................................... 7-20
Recall Feature .................................................................................. 7-21
Recall Feature Tool.................................................................... 7-21
On Demand Recall..................................................................... 7-21
Recall PCS Base Components ......................................................... 7-22
Chapter 8 – Support Tools and Features
Understanding Auto Direction Sensing ............................................. 8-3
Program Header ................................................................................. 8-5
Restart Program Header..................................................................... 8-7
Rerun Step Selection, Manual and DCC CMMs ......................... 8-7
Feature Selection Tool ....................................................................... 8-8
Using PCS Filters......................................................................... 8-8
Display only Measured and Constructed Features....................... 8-9
Column Sorting............................................................................ 8-9
Applying your Selections............................................................. 8-9
Math Function............................................................................ 8-10
Diameter Averaging................................................................... 8-11
Stylus Size Updating using a Ring Gage ................................... 8-11
DCC Option Menu..................................................................... 8-12
Rerun Feature Selector – Manual CMMs .................................. 8-13
Helmel Engineering Products, Inc.
www.helmel.com
Geomet Training Handbook
www.geomet-cmm-software.com
Contents
Text Features.................................................................................... 8-14
Manual Step Text Entry ............................................................. 8-14
Basic Text .................................................................................. 8-16
User Prompt with Image Support .............................................. 8-17
In-Line Text Entry ..................................................................... 8-18
Custom Ordered Reports ................................................................. 8-20
Concise Reports ............................................................................... 8-23
Report Control Center...................................................................... 8-25
Print Exception / SPC Tags.............................................................. 8-26
Report Offset.................................................................................... 8-30
Digital Readout ................................................................................ 8-31
Standard DRO............................................................................ 8-31
Full DRO.................................................................................... 8-33
In-Line Math Calculator .................................................................. 8-35
GeoPlus Library ............................................................................... 8-37
Inspection Program Editing Tools ................................................... 8-42
Undo........................................................................................... 8-42
Delete ......................................................................................... 8-42
Delete Permanently.................................................................... 8-44
Delete All After.......................................................................... 8-45
Edit History Tool ....................................................................... 8-46
Insert .......................................................................................... 8-48
Move .......................................................................................... 8-49
Copy and Append ...................................................................... 8-50
Jump to Feature Number............................................................ 8-51
Feature Properties ............................................................................ 8-52
Single Feature Selection Submenu ............................................ 8-52
Single Feature Property Tool ..................................................... 8-53
Multiple Selected Features Submenu......................................... 8-54
Report Navigation Keys................................................................... 8-56
File Archive ..................................................................................... 8-57
Helmel Engineering Products, Inc.
www.helmel.com
Geomet Training Handbook
www.geomet-cmm-software.com
Contents
Chapter 9 – Working with Motion Control
Introduction to Motion Control.......................................................... 9-2
Point Type Definitions................................................................. 9-2
Special Considerations when Teaching Motion .......................... 9-3
Motion Adjustment Tools .................................................................. 9-4
Feature Generators ............................................................................. 9-4
DCC Home Position .......................................................................... 9-5
DCC Variables ................................................................................... 9-6
Motion Control Ribbon...................................................................... 9-7
Motion Edit Tool ............................................................................... 9-8
One-Step Motion Edit ...................................................................... 9-15
Disable Motion on Features ............................................................. 9-17
Motion Map Test ............................................................................. 9-19
Chapter 10 – Offline Tools
Introduction...................................................................................... 10-2
Feature Generators – Common Tools and Controls ........................ 10-3
Offline IP Generator ........................................................................ 10-6
Circle Generator............................................................................. 10-11
Cylinder Generator......................................................................... 10-15
Line Generator ............................................................................... 10-20
Plane Generator.............................................................................. 10-22
Point Generator .............................................................................. 10-31
Bolt Hole Generator....................................................................... 10-35
Helmel Engineering Products, Inc.
www.helmel.com
Geomet Training Handbook
www.geomet-cmm-software.com
Contents
Chapter 11 – Reverse Engineering
Introduction...................................................................................... 11-2
Reverse Engineering for Surface Generation .................................. 11-2
Summary of Reverse Engineering Tools ......................................... 11-3
Choosing a Scan Method ................................................................. 11-4
Manual Free Scan ............................................................................ 11-5
GeoTracer ........................................................................................ 11-6
Line Auto Scan ................................................................................ 11-9
4 Point Boundary Surface Scan ..................................................... 11-11
Radial Boundary Surface Scan ...................................................... 11-16
Understanding the Data Cloud Structure ....................................... 11-17
Cardinal Spline .............................................................................. 11-18
Exporting ....................................................................................... 11-23
Technical Notes
Curved Surface Measurement with Vector Point .................... App 1 - 2
Multi-Point Feature and CMM Inherent Errors ....................... App 1 - 9
Helmel Engineering Products, Inc.
www.helmel.com
Geomet Training Handbook
www.geomet-cmm-software.com
Chapter 1 – Geomet
Geomet Version Comparison Chart
Geomet operates in three different levels designed to match your inspection
needs. These levels are known as:
•
•
•
Geomet Junior
Geomet 101
Geomet 301
NOTE: Keep current with the latest
changes in Geomet by visiting:
www.geomet-cmm-software.com
Geomet Junior
Geomet Junior is the entry-level full 3D-inspection system of the Geomet series,
yet it is packed with most of the functions needed for basic inspection. It favors
one touch access to all basic geometric elements in addition to a highly visible set
of icons on the screen for intuitive measuring without extensive training. Geomet
Junior includes a powerful set of Part Coordinate System (PCS) generation tools
that Geomet is famous for. You can customize Geomet Junior by adding the
options; Direct Computer Control, Programming, Advanced PCS and GeoPlus.
Geomet Junior is included with the purchase of all Helmel manual Coordinate
Measuring Machines.
Geomet 101
Geomet 101, our most popular package, offers great flexibility for inspecting
parts in the lab or on the production floor. The graphical area on the right side of
the display generates a pictorial representation of the measured features which
serves as a visual guide for part programs and as a link to the final inspection
results. Program writing is done in the self-teach mode, editing is easy and
efficient. Geomet 101 includes a full suite of reverse engineering tools. The
GeoPlus option expands Geomet 101 to include powerful features such as Vector
Point, customized tagging for printing and exporting and analytical tools for
circular features. Geomet 101 is designed for the production environment where
obtaining and tracking numerical solutions is preferred.
Geomet 301
Geomet 301, our most advanced system, offers the sophisticated user unbridled
measuring power with the typical user friendliness of Geomet. It contains all the
power of Geomet 101, GeoPlus and a host of other analytical tools to review and
manipulate your part inspections. The time proven and inherent quality of the
Geomet algorithms guarantee meaningful results when creating new and difficult
relationships out of measured features and PCS's. Geomet 301 offers an optional
expansion package to unlock the power of surface point analysis against a CAD
model. This power allows the user to align the CAD model with the part to be
inspected. Then capturing of data points can be calculated against the model to
obtain position within a profile zone.
Helmel Engineering Products, Inc.
www.helmel.com
Geomet Training Handbook
www.geomet-cmm-software.com
1-1
Chapter 1 – Geomet
Geomet Options
All levels of Geomet can be expanded to include advanced feature and hardware
support. Some options are universal and can be used by all levels of Geomet. The
following chart details the options available to Geomet.
Geomet Option Chart
1
2
3
4
5
6
7
8
9
10
11
12
Geomet
Junior
X
X (1)
X
Geomet Junior Plus
Direct Computer Control (DCC)
GeoPlus
Renishaw UCC Scanning Controller
Renishaw Stylus Racks
Motorized Probe Support
LDI Line Laser Scanner
Gauss Meter
CAD Modeling
Apollo Low Force Touch Probe
Robotic I/O Interface
CNC Tool Offset Interface
Geomet 101
Geomet 301
X
X
X
X
X
X (2)
X (2)
X (2)
X
X
X
X
X (2)
X (2)
X (2)
X
X
X
X
X
1 – DCC on Junior include Programming and Advanced PCS and Stylus options.
2 – Requires either DCC or UCC option.
Geomet Junior Plus
Geomet Junior does not "cycle" a part program and allows one qualified stylus
and one coordinate system, which can be redefined during inspections. This
option expands Junior to allow unlimited Coordinate Systems, unlimited Stylus
Support, Advanced PCS and Tolerance tools and program cycling.
Helmel Engineering Products, Inc.
www.helmel.com
Geomet Training Handbook
www.geomet-cmm-software.com
1-2
Chapter 1 – Geomet
GeoPlus
This option is designed to expand Geomet 101 by adding many popular features
without having to upgrade to the next full version. With GeoPlus you have access
to circular profiles, planar profiles and program library support. Custom printouts
and ASCII exporting are handled through feature attribute tagging.
GeoPlus Expansion Module
Circular Profile
Planar Profile
Vector Point
Geomet Gage R&R
Custom Print Tags
SPC ASCII Export
Feature Offset Reporting
Library
Fast Start Menus
Out-of-Tolerance Notification
Graphical Circle Reporting
Graphical Planar Reporting
Surface Vector Points
Link to Gage R&R External Program
Attribute Selection for Printing
Attribute Selection for Exporting
Applying an Offset Value to Results
Import / Export / Sharing Program Steps
On-Touch access to launching inspection Programs
On Screen notification when an Out-of-Tolerance condition exists.
Geomet Gage R&R is a separate program that is linked to pass results with Geomet.
Helmel Engineering Products, Inc.
www.helmel.com
Geomet Training Handbook
www.geomet-cmm-software.com
1-3
Chapter 1 – Geomet
Geomet Comparison Chart Tables
Measured Features
Points 1D/2D/3D
Points 2D/3D
Inside/Outside Radial
Surface Vector Points
Surface Vector Points
Surface Vector Points
Surface Vector Points
Surface Vector Points
Surface Vector Points
Gauss Meter Point
2D Lines
3D Constructed Lines
DCC Auto Line
2D Circles
DCC Auto Circles
Planes
Spheres
Cylinders
DCC Auto Cylinder
Cones
Slot / Web / Slot
Oval Slot
4 Point Intersect
Surface Point Analysis
Jr.
101
Std
Std
Std
Std
GeoPlus
GeoPlus
GeoPlus
GeoPlus
GeoPlus
Std
Std
DCC
Std
DCC
Std
Std
Std
DCC
Std
GeoPlus
301
Std
Std
Std
Std
Std
Std
Std
Std
Std
Std
Std
Std
CAD
Gauss
Std
Std
DCC
Std
DCC
Std
Std
Std
DCC
Std
Std
Std
Std
CAD
Gauss
Std
Std
DCC
Std
DCC
Std
Std
Std
DCC
Std
Std
Std
Std
XYZ/IJK Known
XYZ Known
IJK Known
All Unknown
Import Table
CAD Fitting
Std - Standard Feature.
GeoPlus – Requires GeoPlus option.
DCC – Requires Direct Computer Control.
Gauss – Requires the Gauss Meter Support option and hardware.
CAD – Requires CAD Interface option.
Reverse Engineering Tools
Hard Probe Drag Scanning
Touch Probe Data Clouds
Line Auto Scan
Radius Path Auto Scan
4 Point Boundary Scan
Radial Boundary Scan
Cardinal Spline Generation
Jr.
101
Std
Std
DCC
DCC
DCC
DCC
Std
Std
Std
DCC
DCC
DCC
DCC
Std
GeoPlus
301
Std
Std
DCC
DCC
DCC
DCC
Std
GeoTracer
Cylinder Ends
Std - Standard Feature.
DCC – Requires Direct Computer Control.
Helmel Engineering Products, Inc.
www.helmel.com
Geomet Training Handbook
www.geomet-cmm-software.com
1-4
Chapter 1 – Geomet
Coordinate System
Orient (Primary Datum)
Align (Secondary Datum)
Origin (Tertiary Datum)
Fixture Coordinate System
Wobble, Rotary Axis
Translate, Nominal Value
Translate, Measured Value
Rotate PCS
Pivot Align
Offset Align
Clearance CS
Unlimited PCSs
Edit PCS Translations
Edit PCS Rotations
Edit Offset Align
Edit FCS Features / Assignments
Jr.
101
Std
Std
Std
Std
Std
Std
Std
Std
Std
Std
Std
Std
Std
Std
Std
Std
Std
Std
Jr. Plus
GeoPlus
301
Std
Std
Std
Std
Std
Std
Std
Std
Std
Std
DCC
Std
Std
Std
Std
Std
Std
Std
Std
Std
Std
Unlimited No.
Offline Tools
Std - Standard Feature.
Jr. Plus – Requires Junior-Plus option.
DCC – Requires Direct Computer Control.
Feature Analysis
Circle Profile
Circular Paper Gauge
Planar Profile
Planar Data Point Report
Data Cloud Analysis
GeoSIM, Flexible Hard Gauge
Targeted Vector Point
Diameter Averaging
Min/Max/Spread Calculations
Inscribed Diameter
Feature Averaging
Jr.
101
GeoPlus
301
Jr. Plus
Jr. Plus
Jr. Plus
Jr. Plus
GeoPlus
GeoPlus
GeoPlus
GeoPlus
Std
Std
Std
Std
Std
Std
Std
Std
Std
CAD
CAD
CAD
Std
Std
Std
Std
Std
Std
Std
Math Support
Math Support
Inside/Outside
Std - Standard Feature.
Jr. Plus – Requires Junior-Plus option.
GeoPlus – Requires GeoPlus option.
Text and Image Features
Text Statements
User Prompts
Inline program Text Entry
Display Image prompts
Manual Entry Steps
Jr.
101
Std
Std
Std
Std
Std
Std
Std
Std
Std
GeoPlus
301
Std
Std
Std
Std
Std
Std – Standard Feature.
Helmel Engineering Products, Inc.
www.helmel.com
Geomet Training Handbook
www.geomet-cmm-software.com
1-5
Chapter 1 – Geomet
Constructions
Distance (1D, 2D, 3D)
Extended Distances
Bisector (2D/2D)
Bisector (3D/3D)
Intersection
Angle
Construct Offset Point
Construct Line
Construct Circle
Construct Plane
Construct Sphere
Construct Cylinder
Construct Cone
Recall Features
Attribute Changes
Cone Offset Diameter
Cone Diameter at Offset
Cone Drop Ball Fitting
Recall PCS Components
Cardinal Spline Generation
Random Feature Selections
Jr.
101
Std
Std
Std
Std
Std
Std
Std
Std
Std
Std
Std
Std
Std
Std
Std
Std
Std
Std
Std
Std
Std
Std
Std
Std
Std
Std
Std
Std
Std
Std
Std
Std
Std
Std
Std
Std
Std
GeoPlus
301
Std
Std
Std
Std
Std
Std
Std
Std
Std
Std
Std
Std
Std
Std
Std
Std
Std
Std
Std
Std
Std
All Features
All Features
Std - Standard Feature.
Tolerance
Bilateral
Positional RFS/LMC/MMC
Datum Bonus Tolerance
Circularity
Straightness
Perpendicularity
Parallelism
Cylindricity
Angularity
Concentricity
Flatness
Preset Tolerance Blocks
Process Control Tolerance
Out-of-Tol Interrupt
Profile Band on Data Clouds
Profile Color Surface Color Map
Cylinder/Plane Runout
Jr.
101
Std
Std
Std
Std
Std
Std
Std
Std
Std
Std
Std
Jr. Plus
Std
Std
Std
Std
Std
Std
Std
Std
Std
Std
Std
Std
Std
Jr. Plus
Std
Std
GeoPlus
301
Std
Std
Std
Std
Std
Std
Std
Std
Std
Std
Std
Std
Std
Std
CAD
CAD
Std
Feature / PCS
Feature / PCS
Feature / PCS
Feature / PCS
Tol. Ctrl Zones
Std - Standard Feature.
Jr. Plus – Requires Junior-Plus option.
CAD – Requires CAD Interface option.
Helmel Engineering Products, Inc.
www.helmel.com
Geomet Training Handbook
www.geomet-cmm-software.com
1-6
Chapter 1 – Geomet
Probes and Sensors
Hard Ball Probes
Electronic Ball Probes
Disc Probes
Taper Probes
Cylinder Probes
Video Cross Hair
Manual Entered Values
LDI Line Laser Scan Probe
SCR200 Stylus Rack
MCR20 Stylus Rack
Motorized Probe Heads
Manual Indexing Heads
Renishaw Scanning Heads
Manual Ball Re-Qualify
Auto Ball Re-Qualify
Reference Sphere Move
Unlimited Sensors
Apollo Low Force Stylus
Multiple Stylus db Support
Ring Gage Qualifications
Stylus db Edit Tool
Jr.
Std
Std
Std
Std
Std
Std
Std
DCC
Std
Std
Jr. Plus
LOW
101
Std
Std
Std
Std
Std
Std
Std
LDI
DCC
DCC
DCC
DCC
UCC
Std
DCC
Std
Std
LOW
Std
Std
Std
GeoPlus
101
Std
GeoPlus
Std
Std
Std
GeoPlus
GeoPlus
Std
Std
Std
Std
GeoPlus
301
Std
Std
Std
Std
Std
Std
Std
LDI
DCC
DCC
DCC
DCC
UCC
Std
DCC
Std
Std
LOW
Std
Std
Std
Renishaw
DCC CMMs
Recover
Std - Standard Feature.
Jr. Plus – Requires Junior-Plus option.
LDI – Laser Design RPS150/450.
ADV – Requires Advanced PCS and Stylus option.
LOW – Apollo Low Force CMM Touch Probe.
UCC – Requires Renishaw CMM Controller.
Reporting Formats and Controls
Selective Printing
Selective Printing
Inch / Metric
Radius / Diameter
Cartesian / Polar
SPC Export Selections
Report Offset Values
Feature Filtering/Sorting
Out-of-Tolerance Reports
Out-of-Tolerance Flash Msg.
Out-of-Tolerance WaterMark
Custom Ordered Reports
Jr.
Std
Jr. Plus
Std
Std
Std
Jr. Plus
Jr. Plus
Std
Std
Std
Std
301
Std
Std
Std
Std
Std
Std
Std
Std
Std
Std
Std
Std
By Feature
By Attribute
Std – Standard Feature.
Jr. Plus – Requires Junior-Plus option.
GeoPlus – Requires GeoPlus option.
Helmel Engineering Products, Inc.
www.helmel.com
Geomet Training Handbook
www.geomet-cmm-software.com
1-7
Chapter 1 – Geomet
Special Functions
Jr.
Import IGES CAD Model
Library Files
SPC ASCII Exporting
File Locking
Auto Load Robotic Interface
Digital I/O Interface
CNC Tool Offset Feedback
Multiple Stylus Probing
Export IGES Model
Export DXF Data Points
Geomet Gage R&R
GeoTracker
WWW Help Access
Triangle Calculator
Customized Fast Access Start
Menu
GeoStat – Real-time SPC
Part Program Tracking
In-Line Math Calculator
101
Jr. Plus
Jr. Plus
Jr. Plus
GeoPlus
GeoPlus
GeoPlus
GeoPlus
I/O
I/O
CNC
Std
Std
Std
Enh.
Enh.
Std
Std
GeoPlus
Std
Std
Std
Enh.
Enh.
Enh.
Std
Std
Jr. Plus
Std
Std
Std
Std
301
CAD
Std
Std
Std
I/O
I/O
CNC
Std
Std
Std
Enh.
Enh.
Std
Std
Std
Std
Std
Programmable
*Jr / 101 Requires
GeoPlus
Archives Files
Std – Standard Feature.
CAD – Geomet CAD option.
Jr. Plus – Requires Junior-Plus option.
GeoPlus – Requires GeoPlus option.
I/O - Input / Output Digital Programmable Interface.
CNC – CNC Tool Offset Digital Option.
Enh – Enhancement Program (Stand Alone).
Program Editing
Insert Features
Move Features
Delete / Un-Delete
Library Auto Link Update
Jump-To Navigation
Assign Feature Labels
Search on Feature Labels
Recalling Features
Recalling Features
Copy and Array Program Steps
Copy and Append Feature
Undo Last Feature
Edit History Tool
Jr.
101
Std
Std
Std
Jr. Plus
Std
Std
Jr. Plus
Std
Std
Std
Std
Std
GeoPlus
Std
Std
Std
Std
Std
GeoPlus
Std
Std
Std
GeoPlus
Std
Std
Std
301
Std
Std
Std
Std
Std
Std
Std
Std
Std
Std
Same PCS
New PCS
Std
Std
Std - Standard Feature.
Jr. Plus – Requires Junior-Plus option.
GeoPlus – Requires GeoPlus option.
Helmel Engineering Products, Inc.
www.helmel.com
Geomet Training Handbook
www.geomet-cmm-software.com
1-8
Chapter 1 – Geomet
Program Editing – Direct Computer Control Tools
Jr.
Optimize DCC Circles
Offline DCC Circles
Offline DCC Cylinders
DCC Clearance Planes
High Accuracy Motion Targeting
High Accuracy Feature
Averaging
Re-Teach Motion Path
Single Step Motion
Motion Parameter Control
Insert / Teach Motion Path
Offset and Copy Motion Path
Joystick in Part Coordinates
MP Capture on Specified Targets
Motion Path Test
Feature Specific Motion Disable
One-Step Motion Edit
ReRun Program Steps
Std
Std
Std
Std
Std
Std
Std
101
GeoPlus
301
Std
Std
Std
Std
Std
Std
Std
Std
Std
Std
Std
Std
Std
Std
Std
Std
Std
Std
Std
Std
Std
Std
Std
Std
Std
Std
Std
Std
Std
Std
Std
Std
Std
Test & Re-Run
Std – Standard Feature.
Helmel Engineering Products, Inc.
www.helmel.com
Geomet Training Handbook
www.geomet-cmm-software.com
1-9
Chapter 2 – System Setup
Chapter 2 – Table of Contents
Geomet Installation Guide – Introduction ..........................................2.2
Changes to the Protection Device .................................................2.2
Geomet Installation Program Summary..............................................2.3
Microsoft Direct X........................................................................2.3
Drivers and System Support Files ................................................2.3
Installing Geomet – step-by-step Guide .............................................2.4
Installing the Crypkey License Driver..........................................2.7
Authorizing Geomet Software ......................................................2.8
Geomet System Options ...................................................................2.10
Enhanced Features ......................................................................2.10
Tolerance.....................................................................................2.13
Probes and Sensors .....................................................................2.14
File Locations .............................................................................2.15
Report States ...............................................................................2.17
Feature Characteristics................................................................2.18
CMM Characteristics ..................................................................2.19
Report Configuration ..................................................................2.21
Colors..........................................................................................2.24
Form Control...............................................................................2.25
SPC Formats ...............................................................................2.26
Tolerance Codes..........................................................................2.27
Graphic Controls.........................................................................2.28
CMM Scale Compensation ...............................................................2.30
Linear Compensation ..................................................................2.30
Non-Linear Compensation..........................................................2.34
Geomet Toolbar Control ...................................................................2.36
Interface Data Strip .....................................................................2.36
Working with Toolbars .....................................................................2.37
Geomet Toolbar Tables.....................................................................2.38
Helmel Engineering Products, Inc.
www.helmel.com
Geomet Training Handbook
www.geomet-cmm-software.com
2-1
Chapter 2 – System Setup
Geomet Installation Guide - Introduction
Summary of basic steps
1.
2.
3.
4.
5.
6.
Uninstall the old Geomet.
Install the new Geomet.
Install the Crypkey license driver.
Run Geomet and Obtain Site Code.
Contact Helmel Engineering for the GeoSecure Code
Enter the GeoSecure Code to activate your Geomet products.
IMPORTANT: Changes to the Protection Device
With the introduction of Geomet version 6.66, the new protection scheme for the
Geomet family of software incorporates the Crypkey software license system.
Earlier versions of Geomet required the use of a hardware “dongle” that plugged
into the parallel port. This protection dongle will only be required if you are using
GeoCAD. Once Geomet version 6.66 is installed and running, the hardware
dongle should be returned to Helmel.
The Crypkey software protection scheme utilizes information from the PC to
generate the Geomet authorization codes. The codes are unique to your computer
system, and cannot be used on another system. The system will run with
Windows 98 SE and Windows 2000/XP. Windows 2000/XP systems need to have
the Crypkey license installed and running as a Windows service. On a Windows
98 SE system, the protection device runs as a system driver, not a service.
Helmel Engineering Products, Inc.
www.helmel.com
Geomet Training Handbook
www.geomet-cmm-software.com
2-2
Chapter 2 – System Setup
The Geomet Installation Program - Summary
The Geomet installation program will install Geomet, GeoClean, GeoStat, and
Gage R&R. When Geomet has been authorized, your GeoStat and Gage R&R will
also be authorized if those options have been purchased. Both GeoStat and Gage
R&R can be authorized without enabling Geomet, for stand alone cases in which
a PC separate from the CMM is to be used for data analysis.
Microsoft Direct X
Geomet uses Microsoft Direct X 9.0c for sound and image support. The
installation process will verify and install version 9.0c if required.
Additional Drivers and System Support Files
Driver and System Support files (*.sys, *.inf and *.ocx) for all Geomet operations
are installed. Changes have been made to the CMM interface drivers. Previously
there was an entry in the Windows Registry that no longer is required. The new
CMM drivers are registered with the Windows System. The installation process
will guide you to setting up your interface.
Helmel Engineering Products, Inc.
www.helmel.com
Geomet Training Handbook
www.geomet-cmm-software.com
2-3
Chapter 2 – System Setup
Before Installing Geomet
Uninstall Previous Geomet Versions
Before you run the installation program, it is important that you uninstall all
existing Geomet related programs. This includes GeoStat and Gage R&R. Use the
Control Panel tool provided in Windows to uninstall the Geomet software. In the
example below, we show the Control Panel on a Windows XP system.
Windows XP Control Panel
Locate the program Add or Remove Programs and start that application by
double clicking. A listing of all programs for which Windows has uninstall
options will be listed. Locate the Geomet listing, see figure 2, and select the
<Remove> button.
Windows XP Control Panel
You will be asked to confirm that Geomet should be removed. Answer by
accepting <Yes> and Geomet and all associated program files will be removed.
The uninstall process does not remove any Windows registry settings, inspection
programs, library pr stylus database files associated with Geomet. Therefore, the
updated Geomet will retain the preference settings previously active. We
recommend as a normal operating procedure that you always make a backup copy
of your inspection part programs. If required, repeat the uninstall process for
GeoStat and Gage R&R programs.
Helmel Engineering Products, Inc.
www.helmel.com
Geomet Training Handbook
www.geomet-cmm-software.com
2-4
Chapter 2 – System Setup
Installing Geomet – Step-by-Step Guide
To install Geomet, place the CD in your system’s drive. This CD does not contain
an auto run option and you should open and view the contents of the CD with
Windows Explorer or similar method. Please ensure all programs are closed
before performing the installation. On the root directory, there are several folders
and text files.
Geomet Installation CD Root Directory
Step 1 – Readme.pdf
Before you begin the installation please take a quick review of the Readme.pdf
latest instructions for any changes to the installation process not covered here.
Should your system not have Adobe Acrobat Reader installed, please see the
section on installing the Acrobat Reader later in this document.
To start the Geomet installation, double click on the file setup.exe. The setup
routine will launch and guide you through the required steps.
Step 2 – Welcome to the Installer
This first step is the welcome screen for the installer, press <Next> to proceed.
Step 3 – License Agreement
This step requires that you have read and agreed to the terms and conditions in
regard to using Geomet.
Step 4 – Customer Information
Complete the required fields as appropriate.
Step 5 – CMM Interface
Choose the CMM Interface as noted on the Geomet Software Security Code
sheet.
Helmel Engineering Products, Inc.
www.helmel.com
Geomet Training Handbook
www.geomet-cmm-software.com
2-5
Chapter 2 – System Setup
Step 6 – Custom Setup
Press the <Next> button to accept the defaults. By default all help files and driver
files are installed. You can choose to remove these files from the installation.
Step 7 – Ready to Install
The final step, when accepted by pressing the <Install> button, will begin the
installation of Geomet to your system. Installation also installs the files necessary
for the uninstall process.
Once completed, the installer will notify you of the success of the installation
process. Should any errors occur, you will be notified. The most common error
noted has been leaving Geomet active (open) while attempting to upgrade. This
will cause an error and the installation process will fail.
Helmel Engineering Products, Inc.
www.helmel.com
Geomet Training Handbook
www.geomet-cmm-software.com
2-6
Chapter 2 – System Setup
Installing the Crypkey License Driver
Before Geomet version 6.66 can be authorized, the Crypkey license service needs
to be installed and running on the computer. Open GeoClean through the
Windows⇒Start menu and locating:
[All Programs⇒HelmelEnginering⇒GeoClean].
When GeoClean is displayed use the drop-down menu to choose:
[Authorization⇒Install Authorization Service]
GeoClean Install Authorization Service
This will install and start the Crypkey license service. Three files are needed for
the service, and these are installed in:
c:\ Program Files\Helmel Engineering\Geomet 101
The files installed are Setupex.exe, cks.exe, and wckserve.exe.
To check if the Crypkey license service is working properly on a Windows XP or
Windows 2000 system, open the Control Panel and choose the Administrative
Tools function. Open the Services shortcut, and find the Crypkey License. It
should be listed as Started and Automatic.
Windows 2000/XP Services
If the Crypkey license has not started in the Services listing, check the file
setupex.xco also located in the Geomet 101 folder. It will contain either the error
code, or ‘0’ if the Crypkey license was started successfully. For Windows 98 SE,
the Crypkey license will be initiated each time needed, and there is no check in
the Windows Control Panel.
Helmel Engineering Products, Inc.
www.helmel.com
Geomet Training Handbook
www.geomet-cmm-software.com
2-7
Chapter 2 – System Setup
Authorizing the Geomet Software
The authorization process for Geomet will also provide the authorization for both
GeoStat and Gage R&R. Unlike previous versions, GeoClean no longer has the
responsibility for the authorization process. When launching Geomet v6.66 the
first time, a message will indicate that the authorization needs to be established.
Click the <OK> button to open the authorization dialog, as seen below.
Geomet Authorization Screen
The Site Code is automatically generated by the Crypkey License service and is
specific to your PC. This Site Code needs to be sent to Helmel Engineering so that
your GeoSecure Code can be generated.
It is the combination of Site Code and GeoSecure Code that will authorize the
Geomet software. Each time the Geomet Authorization screen is displayed, a new
Site Code will be generated. Since the Site Code must match the GeoSecure code,
do not close the Geomet Authorization dialog before entering the matching
GeoSecure Code. If the dialog is closed, a new Site Code will be needed.
Site Code Copy Button
GeoSecure Code Paste Button
Copy the Site Code and send it to Helmel Engineering at:
[email protected]
Please include the Copy of the Site Code (Edit⇒Paste) into the body of your
email and your Name, Phone Number, CMM Serial Number (99-99) and the
return email address if different.
Helmel Engineering Products, Inc.
www.helmel.com
Geomet Training Handbook
www.geomet-cmm-software.com
2-8
Chapter 2 – System Setup
We will contact you as soon as possible with a GeoSecure Code. When you
receive the return email, highlight the supplied GeoSecure Code and copy
(Edit⇒Copy) and Paste it into your Geomet Authorization dialog. Press
<Authorize> after the GeoSecure code has been entered.
If your email service is not on the same computer as the Geomet system, copy the
GeoSecure Code and enter it manually.
Once Geomet has been authorized, click the <OK> button to continue starting
Geomet. To check the enabled options while Geomet is running, press Ctrl-Alt-U
from the main screen of Geomet to show the Geomet Authorization dialog.
Should you want to change your options, you can generate a new Site Code from
this dialog, which can be sent to Helmel Engineering in order to change the
enabled levels and options.
If the authorization of Geomet included the options for GeoStat and Gage R&R,
these programs can be opened at any time. Otherwise when attempting to open the
program, an authorization screen similar to Geomet’s will be displayed, requiring
a GeoSecure code to enable the program.
Switching CMM Interfaces
By default, the Geomet installation creates a folder
in the Program Files\Helmel Engineering\Geomet
101 folder named Interfaces. This folder will
contain the CMM interface (Table Control file) for
each of the different systems. To switch from the
currently registered interface, close Geomet, open
GeoClean, and from the Registry pull-down menu,
choose Select Interface. Choose the desired
interface from the pull-down list, and hit the <OK>
button. Answer <Yes> to the confirmation screen, and GeoClean will register the
appropriate interface with Windows. Windows will provide a message indicating
the success of the registration. Open Geomet to see that the new interface has
been properly configured.
Since Geomet uses the interface registered with Windows, and ignores any setting
of the interface in the Geomet 101 SYSTEM SETTINGS registry, GeoClean will
only register the new interface with Windows. The registry will be unchanged.
Installing Acrobat
Run the AdbeRdr60_enu_full.exe file located on the Geomet CD under the
ACROREAD\Installers folder.
Helmel Engineering Products, Inc.
www.helmel.com
Geomet Training Handbook
www.geomet-cmm-software.com
2-9
Chapter 2 – System Setup
Geomet System Options
Keyboard:
F9
Menu:
System ⇒ System Options
The Geomet system has many options and system characteristics that control the
behavior of the system. These include optional hardware, file locations, default
features setting to name a few.
The System Options tool provides access to many of these internal settings.
Enhanced Features
Use Tool Tip Help
Default: Checked. When checked, activates the
mouse tool tip help. When active, the mouse can
be held over a button, image or other control and
after small period of rest, a help display will
appear to describe the control. NOTE: not all
controls in Geomet have tool tip help support.
Use Fast Access Menu
Default: Not Checked. The Fast Access Menu
option in Geomet allows the user to navigate
stored programs through a fixed menu system.
This allows single button access to load and start a
part program.
Enable DCC Motors
Available on DCC CMMs. When checked, this activates the auto drive systems.
When not checked, the drives systems are disabled and complete manual
inspections can take place. The ability to activate this option is controlled by the
GeoSecure system and requires authorization from Helmel Engineering.
Non-Linear Compensation
The use of non- linear compensation is set by the factory or by the technician
performing calibration on the CMM. This option involves the mapping of your
scales on the X, Y, and Z-axes. See Technical Note #2 for enhanced description.
NOTE: Do not uncheck this option! Your CMM calibration tables will be
deactivated and the accuracy of your CMM will be affected. The calibration
tables are stored in a separate file, "Lerror.dat" which is stored in your Windows
folder. If you inadvertently uncheck this option, just reset the check mark.
Helmel Engineering Products, Inc.
www.helmel.com
Geomet Training Handbook
www.geomet-cmm-software.com
2-10
Chapter 2 – System Setup
OptoDyne Laser Calibration
When activated this option will utilize the 3D volumetric calibration developed in
cooperation with OptoDyne Inc. This provides compensation not only to the
linear characteristics of the CMM, but also corrects for any squareness and
parallelism of the CMM superstructure. Obsolete function.
Skip Save Recover
Default: Not Checked. During normal operations, Geomet maintains a recovery
file. This file is updated after the completion of any feature or operation. This
requires time and resources to open the recovery file, write the file out to the hard
drive, then close the file with every feature. During long part runs or when
operating on systems with limited capabilities, this feature can be disabled saving
time during part program runs.
Enable Fixture Reporting
Default: Not Checked. On the Header page of a part program, there exists three
edit controls where the operator can enter alphanumeric fixture data. Under most
conditions, this is not required. When checked, the 3 fixture edit controls will
appear.
Enable Full DRO
Default: Not Checked. When checked, Geomet reconfigures the display to show a
large Digital Read Out in area reserved for the normal graphics. This provides a
large readout of the current position that can be viewed from a great distance such
as moving around the CMM. When the full DRO is active, the normal graphics
display is disabled, see Full DRO in Chapter 8.
Enable Auto Sensing
Default: Not Checked. When checked Geomet reconfigures to sense for the
current probe direction vector, see Auto-Direction in Chapter 8 for a complete
description. This option is only available on some CMM interfaces that allow
time based monitoring of CMM motion.
Enable IP Generation
Default: Not Checked. When checked, this activates a monitoring function that
will create a "memory" of your probe motions for each feature. This saved motion
becomes a motion map to the measured feature. This allows the teaching of the
full motion path in a part program on a manual CMM to be executed on a DCC
CMM.
Helmel Engineering Products, Inc.
www.helmel.com
Geomet Training Handbook
www.geomet-cmm-software.com
2-11
Chapter 2 – System Setup
Full Prec. GDT Calculations
Default: Checked. When checked, Geomet performs calculations on data are
based on full precision values eliminating rounding errors caused during reporting
at a fixed decimal place. For example, if the report decimal place is set at 3 places
and the reported values were transferred to manual calculations such as a
spreadsheet, there can exist a rounding error in excess of 0.00149 in the reporting
of a 2D true position value. By default, Geomet calculates at full decimal
precision for greater accuracy of results.
Applying your Selections
When finished making all your selections, press the <Apply> button and close the
System Options by pressing the <Ok> button.
Helmel Engineering Products, Inc.
www.helmel.com
Geomet Training Handbook
www.geomet-cmm-software.com
2-12
Chapter 2 – System Setup
Tolerance
Geomet maintains 5 tolerance pages where
defaults can be established. This concept is
designed to work with the tolerance section found
in the title block on most drawings.
For example, Geomet Tolerance Pages can be
configured by entering the + / - tolerance values
and precision settings for reporting against a page
number, see table 1.
When you apply the tolerance against a feature,
you can select the appropriate tolerance page and
the default values will be applied including
reconfiguring the results for any change in precision.
Tol. Page #
Precision
Tol. Value
Page 1
0.0
+/- 0.030
Page 2
0.00
+/- 0.010
Page 3
0.000
+/- 0.005
Table 1, Tolerance Page Assignement Example
Should you require resetting to the factory defaults, press the <Reset Defaults>
button and close the System Options.
Applying your Selections
When finished making all your selections, press the <Apply> button and close the
System Options by pressing the <Ok> button.
Helmel Engineering Products, Inc.
www.helmel.com
Geomet Training Handbook
www.geomet-cmm-software.com
2-13
Chapter 2 – System Setup
Probes and Sensors
Geomet supports a wide array of hard and
electronic probes and sensor systems. These
include basic hard probes, electronic touch
probes, stylus interchange racks and even laser
scanners to name a few.
Setting up the Probes and Sensors System Options
page instructs Geomet what systems are attached
and what support to provide.
Probe / Sensor Model
Building the hardware configurations starts with
the Probe / Sensor Model selections. Choose the
appropriate probe system from this drop down list. This list is dynamic and it
changes based on the settings of your system. For example, should you have
Direct Computer Control (DCC) you will have access to Stylus Racks.
Some choices such as manual indexing probes on DCC style systems offer two
selections. Manual indexing probes can be used on DCC systems, however the
motion during and inspection must be suspended providing an opportunity for the
operator to manually articulate the probe as needed.
To accomplish this, these probes can be selected with *No Prompt or *Auto
Prompt. The Auto Prompt option will suspend the execution of the inspection
program and display a message on the display when a probe change is required.
The operator will then release the pause and execution will continue. The No
Prompt option is used when manual probe articulation is not required during the
inspection process and suspending motion is not required.
Stylus Racks
The Stylus Rack Group will self configure based on the selection in Probe /
Sensor Model. For example is you have chosen the TPES, all choices inside the
Stylus Rack Group will be removed. Choose a PH5 and the option will appear.
Choose the appropriate Stylus Racks if one is to be used.
Available Options
Once the Probe Head and Stylus Rack choices have been made, the Available
Options choices will update to show all possibilities. Choose from the selections
the probe body that is installed on your CMM.
Reference Sphere Diameter
Enter the size of your nominal Reference Sphere Diameter.
Helmel Engineering Products, Inc.
www.helmel.com
Geomet Training Handbook
www.geomet-cmm-software.com
2-14
Chapter 2 – System Setup
File Locations
Geomet utilizes various path definitions to
organize and locate Geomet specific files. When
Geomet is first installed, the default directories
are created on your hard drive. If for any reason
these directories do not exist, Geomet will prompt
you to create them when accessing the System
Options⇒File Locations page.
To change the path for any listing, press the
button next to the listing. A “Browse for Folder”
dialog will appear.
Navigate to the path you would like to assign to
the selected listing and when located, select
<OK>. The path name will appear next to the
listing.
Reset to Factory Defaults
To reset the factory defaults for all directories,
press the <Reset Defaults> button on the File
Locations page.
Geomet System
This is the location where Geomet.exe is located.
Normally this path is not changed and should be
left at factory defaults. This path is the Geomet
link to the Geomet program, support program files, stylus databases and help
files. If this path is incorrectly set, Geomet will not run correctly.
Default: C:\Program Files\Helmel Engineering\Geomet 101\
Inspection Files
This is the path to your inspection files.
default: C:\My Documents\Geomet 101\Part Inspections\
GeoTracker
This is the path where Geomet will find the database files for the GeoTracker
management tool. GeoTracker must have been previously installed and authorized
for Geomet to access the files.
Default: C:\My Documents\Geomet 101\GeoTracker\
Helmel Engineering Products, Inc.
www.helmel.com
Geomet Training Handbook
www.geomet-cmm-software.com
2-15
Chapter 2 – System Setup
SPC Data
This is the path where Geomet will save the
ASCII generated results from all SPC Tagged
features. When you set the path for this listing,
you can also have the choice to change the default
extension for the file. By default, Geomet uses
".SPC" as the default extension. To change the
extension, move the cursor to the path opposite
"SPC Data" listing. The "Choose ASCII
Extension" control will appear with the current
selection. Change the selection to the new
extension you wish to use.
Default: C:\My Documents\Geomet 101\SPC Data\
GeoStat Prog
This is the path to the GeoStat SPC program. The GeoStat program must have
been installed and authorized before use.
Default: C:\Program Files\Helmel Engineering\GeoStat\
GeoStat Data
This is the path where Geomet will find the GeoStat database files for appending
after a part program run.
Default: C:\My Documents\Geomet 101\GeoStat Data\
CAD Import
This is the path where Geomet will find the CAD iges files for importing into
Geomet. NOTE: Geomet does not import these files at this level. This listing is
for future development.
Default: C:\My Documents\Geomet 101\CAD Import\
CAD Export
This is the path Geomet will export all iges, ASCII and DXF Data Point files to.
Default: C:\My Documents\Geomet 101\CAD Export\
Library
Geomet contains a unique function where program steps can be exported from an
existing part program and saved for future use. This is the location Geomet will
use to save the default Library files.
Default C:\My Documents\Geomet 101\Geomet Libraries\
Helmel Engineering Products, Inc.
www.helmel.com
Geomet Training Handbook
www.geomet-cmm-software.com
2-16
Chapter 2 – System Setup
Report States
The Report States page controls the reporting
formats used at startup or globally changed during
the self-teach mode.
Reporting Characteristics
Select the small button next to the reporting
characteristic.
Description
Unit of Measure
Angular Reporting
Reporting Format
Date Format
CAD Graphics
Digital Readout
Option 1
Inch
xx.xx°
Cartesian
mm/dd/yy
On
On
Option 2
Metric
dd mm ss°
Polar
dd/mm/yy
Off
Off
Activate these changes for current inspection
By selecting this option, all selections in Report States will activate immediately.
Under normal conditions, Report States control the behavior of the inspection
when it creates a new inspection report.
Display Font Size
Enter a font size here that will change the displayed results on the monitor. This
setting does not change the size on printed reports.
Helmel Engineering Products, Inc.
www.helmel.com
Geomet Training Handbook
www.geomet-cmm-software.com
2-17
Chapter 2 – System Setup
Feature Characteristics
Th Feature Characteristics page provides access to
establishing the minimum number of data points
for all multi-point features. For example, launch
the circle measurement function and the default
number of data points are provided, in this
example 4. If your inspection process require that
you need more than 4 data points on every circle,
enter a new value as the default.
It is recommended that on a multi point feature,
the minimum number of hits should be set 1
greater than the minimum allowed for solving for
that feature. This allows for form fit testing to
ensure the data points created a sound feature. The table below lists the minimum
and recommended number of data points required in Geomet for a feature.
Feature Type
Line
Circle
Plane
Cylinder
Cone
Sphere
Minimum
2
3
3
6
6
4
Recommended
2
4
4
6
7
5
NOTE: On Cylinder and Cone features, Geomet requires mimimum + 1 for its internal algorithim used to solve the feature.
Helmel Engineering Products, Inc.
www.helmel.com
Geomet Training Handbook
www.geomet-cmm-software.com
2-18
Chapter 2 – System Setup
CMM Characteristics
The CMM Characteristics page defines the
behavior of critical CMM operations. These
include scale directions, interface assignment and
touch probe positioning and settling times.
In-Position Zone
The In-Position Zone is used when the CMM
must be at a location before proceeding with the
next move or operation. For example, if the CMM
has a motorized probe, the position that was used
to articulate the probe becomes a target point.
During the inspection, Geomet will transition to
that point, and upon reaching it, will then
articulate the probe.
The In-Position Zone provides a 3D radial distance around the target point. Once
inside that radial distance it is considered on target. In the example of the
motorized probe, it is not necessary to be exactly on the target position, but be
within a radial distance of 0.25" will suffice. The extra time needed to transition
exactly to a XYZ position will add time, and in some cases, several seconds to the
inspection time.
In-Position Zone is applied only to non-critical positioning moves. It is designed
only for non-measurement moves.
Default: 1.000"
Pressing the <In-Position Zone:> button will display a help topic.
Data Point Dwell
The Data Point Dwell is a small time period after the capturing of a measurement
point. It disables further data points from being accepted by Geomet. It is
designed to assist manual CMM operations where the process of capturing data
points can lead to errant hits. For example, measuring in small details where the
operator will capture the data point and have the possibility to cause an errant hit
on retract.
Recommended time periods are 100 to 250. These values are millisecond where
1000 equals 1 second.
Default: 0.0
Pressing the <Data Point Dwell:> button will display a help topic.
Helmel Engineering Products, Inc.
www.helmel.com
Geomet Training Handbook
www.geomet-cmm-software.com
2-19
Chapter 2 – System Setup
CMM Vector Reverse
Geomet is designed to work with many CMMs. Not all CMMs place the scale on
the measuring machine the same way. The scale may read left negative too right
positive. Others can be reversed. Some CMM models by the same manufacturer
can be reversed.
This results in reverse direction sensing in the measuring process. To test your
directions, set Geomet up for Auto Direction Sensing, activate Auto Direction in
your System Options->Enhanced Features page.
To perform the test, set Geomet up to measure an Auto 1D-Point. Deflect the
probe manually while moving slowly in the +X direction. The point reported in
the inspection report should be a +X Point. Test all six directions and review the
report to determine if they are indeed backwards. A +X Point should not be
reported as an -X Point. If they are backwards, place (or remove) the check next
to CMM Vector Reverse.
4th Axis Activation
This option activates the 4th-Axis inside Geomet. This is commonly used on a
CMM that has the rotary motorized table installed or on Helmel's CrankShaft
CMM. By activating the 4th-Axis, additional commands are available such as the
Wobble Coordinate System and Motion Servo commands.
It is recommended that you do not activate this option without first checking with
Helmel Technical Support to determine if the motion controller attached to your
CMM has 4th Axis capability. If you add a rotary table, such as a Haas Rotary
Table with its own Servo Control, Geomet will be able to read and control the
positioning. However, before these capabilities can be activated, contact Helmel
Engineering to the proper software 4th-axis upgrade.
CMM Interface Driver
The current CMM interface is listed here. The actual configuration and activation
has been moved off the System Option page and now resides in GeoClean.
Show Mode
This option allows you to enter a cycle count that Geomet will use when
performing an inspection. Geomet will automatically cycle the inspection
program the number of time you request. The <Clear> button will reset the
counter to zero. This can be done even during the inspection run. The normal use
of this mode is for life endurance tests, repeatability tests and trade shows where
the CMM will cycle a predetermined number of inspections.
NOTE: It is imperative that the ending point of your inspection program has an
unobstructed path to the start of the program. Always ensure there is an exiting IP
in your part inspection program.
Helmel Engineering Products, Inc.
www.helmel.com
Geomet Training Handbook
www.geomet-cmm-software.com
2-20
Chapter 2 – System Setup
Report Config
The Report Configuration page controls the
Printed Report attributes and is a global setting.
Company Information
This data entry field is where you would put your
company name. This is printed on the top line of
the header block on all printed pages.
Report Characteristcs
Background Shaded Bars
During the printing of the inspection report,
Geomet shades the column header and on the
Concise Report format, shades every other line. Some printers do not reproduce a
smooth light gray that makes the readability difficult. Use this setting to control
whether to use shaded bars or not.
Print Lines
During the printing of the inspection report, Geomet inserts a line after every
feature to assist in reading the reports. Use this setting to control whether to use
separator lines or not.
Out-of-Tolerance WaterMark
The Geomet Report Generator can place a user-defined text in the report when an
Out-of-Tolerance (OOT) condition is reported. This OOT text statement is printed
in a light gray and behind the reported features. The purpose is to provide a bold
visual indicator on the printed report when an OOT condition exists.
OOT Watermark Example
Use OOT WaterMark. By placing a check here, the Report Generator will insert
the watermark into all reports. You can substitute the default OOT message by
changing the text in the control provided. The Report Generator will truncate the
message to 25 characters.
Helmel Engineering Products, Inc.
www.helmel.com
Geomet Training Handbook
www.geomet-cmm-software.com
2-21
Chapter 2 – System Setup
Print Report Summary
On the last page of a printed inspection report is a summary of totals for all
features that have a tolerance applied. The reported summary is broken down into:
•
•
•
Total Tested: A total count of all toleranced features.
Accepted: All features that are within the tolerance limits.
OOT: Total features that exceed the tolerance limits.
When Process Control Tolerance is active, the summary reports the total count
within each zone, see Process Control Tolerance in Chapter 6 for additional
details. To omit this summary line from being printed, uncheck the option Print
Report Summary.
Report Summary Example
Deviation from Nominal Report Method
This selection controls what reporting method will be used in the Deviation from
Tolerance column on the printed reports.
Values. No visual tools such as graphs or symbols are used. All “Deviation
Tolerance” values are reported in numerical form.
Tol Bar Graphs. The printed deviation is shown as a small scalable graph
showing the direction and magnitude of the deviation. These graphs are in the
“Deviation Tolerance” column. The graphs will always be shown, unless an Outof-Tolerance condition exists which will then print the value.
Values
Graphs
+/- Symbols
"+ - " Symbols. The printed deviation is represented by a series of Plus "+" or
Minus "-" symbols. The direction of the deviation is represented by the symbol
and the number of symbols represents the magnitude where each symbol is 25%
of the tolerance band. These symbols are in the “Deviation Tolerance” column.
The symbols will always be shown, unless an Out-of-Tolerance condition exists
which will then print the value.
Helmel Engineering Products, Inc.
www.helmel.com
Geomet Training Handbook
www.geomet-cmm-software.com
2-22
Chapter 2 – System Setup
PE and SPC Tag Symbols
When applying features tags to attributes within a feature, Geomet places a
symbol to the left of the attribute that provides a visual indicator of the tag. The
default symbols are:
•
§
Print Exception Tag
SPC Export Tag
You can change these symbols to any symbol or alphanumeric text up to 3
characters wide.
Default Tags
Custom Tags
To assign you own tags, enter the new tag in the
PE or SPC edit control. To reset the symbols to
the defaults, press <Reset PE> or <Reset SPC>.
Helmel Engineering Products, Inc.
www.helmel.com
Geomet Training Handbook
www.geomet-cmm-software.com
2-23
Chapter 2 – System Setup
Colors
The Colors page control the system colors used in
the graphics representation of the inspection.
To change the current color, select the appropriate
button controlling the feature type.
Color Type
Solid
Wireframe
Highlight
Run
Background
VP DRO
Description
Sets the color of features displayed in solid
mode.
Sets the color of features displayed in
wireframe mode.
Sets the color of features while selected
using the mouse point and click.
Sets the color of the current feature being
inspected durin an auto run.
Sets the background color.
Sets the color of XYZ position values while
targeting during Vector Point operations.
Saving Custom Colors
Geomet will retain custom colors that you have
selected. The Windows Color Selector requires
that you follow these steps.
1. Select a swatch location under “Custom colors”.
2. Choose or create a color.
3. Select <Add to Custom Colors>.
Helmel Engineering Products, Inc.
www.helmel.com
Geomet Training Handbook
www.geomet-cmm-software.com
2-24
Chapter 2 – System Setup
Form Ctrl
The Form Control page defines limits and feature
controls used during the self-teach and inspection
modes within Geomet.
Multi-Point Error Limit
This value is used during the measuring process to
validate the form of a multi-point feature before it
is committed to the inspection report. For
example, when measuring a circle, it is expected
that the circularity is better than the form error
limit. If during the measuring process the
circularity exceeds this form limit (0.001” by
default), then a warning is provided to allow the
operator to accept or re-measure the feature. This validation process helps to
minimize errant data points or poor fitting features.
Default: 0.001"
Use Multi-Point Check
When checked, Geomet performs the Multi-Point Error Limit test on all measured
multi-point features.
Default: Checked
Maximum Reported Limit
Sets a maximum value for all size and location values being reported. If this
exceeds this value, then the report will show "Exceeds Limit".
Default: 100000000.0
Feature Averaging
Default Cycles
Sets the default number of cycles used in Feature Averaging.
Default: 5
Default Limit
Sets the default test value for use with the Feature Averaging Tool.
Default: 0.0002"
For a complete explanation of Feature Averaging, please refer to Chapter 10,
Working with Motion Control.
Helmel Engineering Products, Inc.
www.helmel.com
Geomet Training Handbook
www.geomet-cmm-software.com
2-25
Chapter 2 – System Setup
SPC Formats
Geomet exports data using different formats to
accommodate your import software whether it is a
SPC Program or the Excel Spreadsheet.
Use 1-Plus Reporting
Adds one additional decimal place to the standard
reporting precision on the inspection report to the
exported value. This helps to eliminate rounding
errors when exporting data into spreadsheets and
spc packages.
Extended Format
The extended format was developed for GM and is formatted to have one
measured value per line.
Feature
Number
Feature ID
Axis /
Characteristic
87
ID Circle
Dia
Date
Time
dd/mm/yy hh:mm:ss
Inspection
File Name
Serial
Number
Actual
test.gmt
0123456
1.2356
Comma Delimited
The Comma Delimited format produces a complete inspection separated by
commas per line. This allows easy import into spreadsheets using columns to
accumulate the data.
Feature Number
0085
0085
Feature ID
ID XY Circle
ID XY Circle
Actual 1
2.12500
2.12510
Actual 2
1.50000
1.49998
Actual 3
1.98430
1.98425
In the above example we have two inspections recorded. No options are selected
in the System Options.
In this format you can specify:
•
•
•
•
•
Include File Name
Include Date and Time
Include Serial Number
Include Fixtures Used
Results Only
In Results only the data is stripped of all header data and is aligned in one
column. Each inspection will append to that column.
Helmel Engineering Products, Inc.
www.helmel.com
Geomet Training Handbook
www.geomet-cmm-software.com
2-26
Chapter 2 – System Setup
Tolerance Codes
The Tolerance Code page defines the behavior of
Process Control Tolerance in Geomet.
Default Tolerance Code Controls
To understand the limits assigned to each zone,
please read the Process Control Tolerance in
Chapter 6. The value entered for each zone is the
upper limit of control. For example: Zone A will
have a range of 0% - 70%, Zone B will have a
range of 70% - 80%. Zone D is implied as the
Upper limit of Zone C (90%) - Tolerance Limit.
Default: Zone A 70%, Zone B 80%, Zone C 90%
Use Defaults when opening
When assigning the tolerance to a feature and opening the PCT Dialog, Geomet
will automatically assign the individual zone values based on the defaults set in
Tolerance Codes defaults. Normally the opening of the PCT Dialog will leave the
limits blank.
Default: Off
Helmel Engineering Products, Inc.
www.helmel.com
Geomet Training Handbook
www.geomet-cmm-software.com
2-27
Chapter 2 – System Setup
Graphic Controls
The Graphic Options page defines the behavior of
CAD Graphics region in Geomet.
Activate Quick Zooms
This mode toggles the display between standard
layout where results and graphics share the
display equally. However, when you position the
mouse in the graphics area, the display changes
giving the graphics area 90% of the available
width. Move the mouse off the graphics area, and
the layout returns to equally shared regions.
Default: Off
Data Clouds as Points
Data Point Clouds, which are captured with the GeoTracer and other scanning
tools are displayed with connecting lines. When this option is selected, the display
of the data points is shown as points or dots on the display.
Default: Off
Add Wire Frame to Solids
When displaying the measured results in solid mode, edges are normally turned
off. When this option is selected, a complete wire frame edge is shown on top of
the solid features.
Default: OFF
Auto Zoom
Under normal operation, new features are added to the graphic lists, but if they are
outside of the current view port, they will not be seen. When this option is
selected, the view port is recalculated to show the total extents of all features as
they are added.
This includes the current coordinate system that may lead to an unusable graphic
presentation. For example if you are working in a coordinate system that has been
translated a great distance, such as car coordinates, the resulting measured feature
may display as a small group located in the corner of the display.
Default: Off
Helmel Engineering Products, Inc.
www.helmel.com
Geomet Training Handbook
www.geomet-cmm-software.com
2-28
Chapter 2 – System Setup
Snap Angle
The Snap Angle controls the dynamic positioning by positioning the rotations on
fixed positions. Dynamic positioning is available when selecting "Custom View"
and interacting with the graphics display with the mouse, see Graphic Views and
Controls.
Snap mode is available when performing this dynamic positioning and holding
the <Shift> key down.
Default: 15°
Point Size
This option controls the point size for export in IGES files.
NOTE: This value is not available at this time.
Default: 1
Graphic Cursor Selection
Choose the desired mouse cursor for use over the graphics region. The hand
cursor has a selection pixel of 8x8. The small box has a selection size of 8x8 and
the large box cursor is 16x16 pixels.
Default: hand
Helmel Engineering Products, Inc.
www.helmel.com
Geomet Training Handbook
www.geomet-cmm-software.com
2-29
Chapter 2 – System Setup
CMM Scale Compensation
Coordinate Measuring Machines utilize scales that are mounted to each axis of
motion will require compensation. This compensation will correct for any linear
deviations identified during CMM calibration.
A certified Master Scale or Laser system is used to compare against the reported
position from the CMM Digital Readout. This deviation can then be
mathematically corrected. This information must be supplied to your CMM
software to properly measure. There are two main types of scale comparison
technologies. These are Linear and Non-Linear Compensation.
For additional information refer to Technical Note #2, Inherent Errors located in
Appendix 1.
Linear Compensation
Linear Compensation is a single correction value used to compensate the full
length of travel. For example; if your CMM has a Y-axis travel of 10.0”, you
would test the reported position at its extent against the master scale.
Position Reported by Laser
10.00000
CMM Digital Readout
10.00235
Compensation value
0.99976505
The value, 0.99976505, would be entered in the Linear Setup Tool for the Y-axis
and that value becomes the multiplier for all positions. Geomet will use the
following formula to compensate for position:
XDRO Reported Value * XCompensation = XCorrected Position
YDRO Reported Value * YCompensation = YCorrected Position
ZDRO Reported Value * ZCompensation = ZCorrected Position
All reported values that pass into Geomet will be passed through the Linear
Compensation tool prior to being used for any calculations.
Helmel Engineering Products, Inc.
www.helmel.com
Geomet Training Handbook
www.geomet-cmm-software.com
2-30
Chapter 2 – System Setup
Activating the Linear Setup Tool
Keyboard:
<Alt + Ctrl + shift + F2>
Taking a Tour of the Linear Setup Tool
The controlled data is shown in the upper section of the tool where the entered
and calculated axis values are shown.
Calculate Compensation
When performing a calibration, there are three values per axis. Two of which
must be entered and the third will be calculated. In the example above, the
operator enters the Reference Length and reported Measured Length. The third
value, Compensation Value will be calculated.
Reference Length:
This is the reported position from the Master Scale or Laser.
Measured Length:
This is the reported uncompensated Digital Readout value scale position.
Compensated Value:
The compensated value is the result of Reference Length / Measured Length.
Position Comparison Group
Selecting the Active Axis
In this area choose the axis you wish to calibrate.
Helmel Engineering Products, Inc.
www.helmel.com
Geomet Training Handbook
www.geomet-cmm-software.com
2-31
Chapter 2 – System Setup
No Compensation
This data field shows the current position directly from the CMM scales with no
compensation applied.
With Compensation
As the name suggests, this is the reported position with the current compensation
applied. This is the result of (Using the x-axis as the example):
XNo Compensation Position * XCompensation = XWith Compensation Position
Difference
This reported value is the spread between the No Compensation and With
Compensation positions.
Min, Max, Spread
These values will update when the <Start / Stop Test> button has been pressed.
This reports the difference value while moving the CMM along the selected axis.
Use it to determine the total spread that will occur over the full length of travel.
Functions
<DRO>
Toggles the visible state of the standard Geomet Digital Readout.
<DRO Xfer>
Copies the current position into the Measured Length data field. This value is the
un-compensated position shown in the No Compensation data field.
<Zero Axis>
Sends an offset position to the internal counter that changes the current position to
0.000. This is used to zero the current position and is done in conjunction with the
setting of the zero position for the Master Scale or Laser making both devices
equal at that position.
When the zero option has been applied to an axis, there is a visual reminder,
“Zero Set”, next to the axis.
<Clear Zero>
Removes a previous zero offset value from the selected axis.
<Update Compensation>
This command transfers the calculated Compensation Value from the Setup Tool
into Geomet. This is used when displaying the Geomet DRO for comparison. This
command is optional.
Helmel Engineering Products, Inc.
www.helmel.com
Geomet Training Handbook
www.geomet-cmm-software.com
2-32
Chapter 2 – System Setup
<Enter Compensation Factors>
This command is a push-on / push-off button. It toggles the disabled state of the
Measured Length and Compensation Values columns. When providing the
Reference Length and Measured Value, this button is off which will disable the
Compensation Value. It is used when only the Compensation Value is provided
for calibration.
<Start / Stop Test>
The test is designed to capture the minimum, maximum and spread for the entire
length of the selected axis. To use, start the test by pressing the button once. A
message will appear indicating the test is active. Move the CMM along the
selected axis. The test values will display providing the variations along the
travel.
Setting the Compensation Value
The process of determining the compensation values requires the use of a Master
Scale or Laser system.
Master Scale
If used a master scale, a reader head is mounted on the CMM probe bar and the
certified scale is mounted inline with the axis to test. The reader head is adjusted
to read the scale over the full length of travel. Once the alignment has been
completed, move the CMM back to a starting point. For example in the Y-axis,
move the CMM to its most –Y position.
Zero the digital Readout that is used to report the position along the master scale.
In the Linear Setup Tool, ensure the correct axis is elected (Y Position) and press
the <Zero Axis> button. This action will result in the master scale and CMM
readout both reporting 0.000.
Move the CMM slowly in the +Y direction until you reach the furthest position.
The master scale will report a linear position, which is then entered into the Ref.
Lgth column for the y-axis. In the No Compensation position field you will find
the CMM readout value. Transfer this value into the Meas. Lgth column by
pressing the <DRO Xfer> button. When this is accomplished, the compensation
Value is automatically updated and the updated position in the With
Compensation field should match the master scale position.
Repeat this procedure for each axis. To verify the compensation value, use the
<Start / Stop Test> function.
Using a Laser
The procedure is the same as described for Master Scale.
Helmel Engineering Products, Inc.
www.helmel.com
Geomet Training Handbook
www.geomet-cmm-software.com
2-33
Chapter 2 – System Setup
Non-Linear Compensation Tables
This form of compensation provides a more accurate solution for determining
scale corrections using many segments over the axis of travel. A typical scale
when mounted to the CMM can stretch and shrink over its length. The
compensation required between 10.000” - 11.000” may be different than between
20.000” – 21.000”.
The method to determine the compensation is done by taking position readings
along the full travel, for example, every 1.000”. A table is built using the Master
Scale or Laser position and the reported CMM position.
Non-Linear Setup Tool
Non-Linear Setup Tool
Activating the Non-Linear Setup Tool requires that the Non-Linear Compensation
flag was checked in the [System Option⇒Enhanced Features].
Activating the Non-Linear Setup Tool
Keyboard:
<Alt + Ctrl + shift + F2>
Taking a Tour of the Linear Setup Tool
Calibration Data List
The list of Master Scale or Laser readings along with its corresponding DRO
positions are shown under Calibration Data. This list does not show the
compensation value, which is calculated as:
XReference Value / XDRO Reported Value = XCompensation Value
Helmel Engineering Products, Inc.
www.helmel.com
Geomet Training Handbook
www.geomet-cmm-software.com
2-34
Chapter 2 – System Setup
Selecting an entry in the data list will bring the position values down into edit
controls labeled DRO Value -> and Laser Value ->. From the edit controls
changes can be made when performing or editing a calibration.
<Append>
When building the data list, new entries are added by entering the reference and
DRO positions in the Step Value Group. Pressing <Append> will then transfer
that data into the list. This list performs a sort to keep the list in linear order.
<Delete>
Removes the selected position from the data list.
<Update>
When a position record is selected, changes can be made to the laser and DRO
position values. Once the changes have been completed, press <Update> to
transfer the changes into the data list.
<Graph>
Displays a graph of the position difference values. This graph can be printed for
the current axis or for all three axes.
<Disable Comp>
When <Disable Comp> is active, Non-Linear compensation is deactivated and the
CMM will use Linear Calibration. When pressing, the Non-Linear tables are
saved to the data file.
<Xfer DRO Val.>
Moves the current position displayed in the Active DRO Group into the edit
control labeled DRO Value ->.
Motion Jogger Group
The Motion Jogger Group is available on CMMs that have a motion controller.
<Abs. Move>
Positions the CMM under DCC to the absolute position entered in Jog Value.
<Rel. Move>
Positions the CMM under DCC to the relative step position entered in Jog Value.
<Motor On/Off>
Toggles the state of the motors between On or Off.
Helmel Engineering Products, Inc.
www.helmel.com
Geomet Training Handbook
www.geomet-cmm-software.com
2-35
Chapter 2 – System Setup
Geomet Toolbar Control
Geomet provides several toolbars for defined
functions. These toolbars can be activated, moved
and docked to your Geomet system.
There are two methods to toggle the state of your
toolbars. Through the drop down menus, locate
[View⇒Toolbar Status]. The Toolbar
Configuration Tool will appear. Change the
visible state of any toolbar as needed.
Based on the CMM configuration, the Motion
Control Ribbon will only be shown on DCC style
CMMs.
Right Click Toolbar Control
Through the use of the right click submenu, you
can toggle the state of a toolbar on or off. Place
your mouse pointer over an existing toolbar, or
on the banner at the very bottom of the Geomet
Window and right click. A submenu will appear
from which you can control the state of each
toolbar.
Interface Data Strip
The Interface Data Strip is a direct connection
with the CMM controller. It is located on the top of the actual inspection report as
shown here.
Interface Data Strip
This data strip provides direct visual reference to the raw data being received by
the Geomet system. Depending on your CMM configuration, other information is
displayed that shows the state of the controller, what record it is processing and
current global speed setting. This data is helpful when dealing with Helmel
Technical Support.
Helmel Engineering Products, Inc.
www.helmel.com
Geomet Training Handbook
www.geomet-cmm-software.com
2-36
Chapter 2 – System Setup
Working with Geomet Toolbars
Resizing Toolbars
Resizing a toolbar involves dragging a new shape out of a visible toolbar. As you
move your mouse over the border of a toolbar it changes shape to a double arrow.
Once you have this pointer, hold down your left mouse button, and upon moving
your mouse, will resize that toolbar. An outline will appear showing you the new
size once you release the left mouse button, see figure 1.
Resizing Toolbars
The buttons of the toolbar will reorder themselves according to the outline of the
new shape.
Moving and Docking Toolbars
Geomet toolbars can be moved to any location on the display. These toolbars can
also be docked to the top or right side of the Geomet main window. To move a
toolbar that currently is undocked, place your mouse in the Title area of your
toolbar or next to a toolbar button, inside the border, see figures 2 and 3.
Preparing to drag a toolbar
Hold you left mouse button down, which will take control of the toolbar and
allow you to move it to a new location. Once in place release the mouse button.
Docking a toolbar
Helmel Engineering Products, Inc.
www.helmel.com
Geomet Training Handbook
www.geomet-cmm-software.com
2-37
Chapter 2 – System Setup
If you move the toolbar in close proximity to the top or right side of the Geomet
LE view, it will “dock” to that location, see figure 4. This allows you to create a
clean working environment. A toolbar that is docked can be moved along the edge
using the same method as moving an undocked toolbar.
NOTE: double clicking on any toolbar frame of title will toggle its location
between the last stored position and its docked position.
Geomet Toolbar Tables
Graphic View Tools
Switch to the XY Plan View. Toggles between viewing from +Z and –Z.
Switch to the ZX Plan View. Toggles between viewing from +Y and –Y.
Switch to the YZ Plan View. Toggles between viewing from +X and –X.
Toggles between the four Isometric Plan Views.
Dynamic Viewing. Move the mouse over the graphic area and while holding
down the left mouse button, rotate the image to any position.
Zoom In.
Zoom Out.
Fit all features to graphic area.
Regenerate the graphic area.
Zoom Window. Left click to start window, move the mouse to create a
window. Left click to zoom in.
Select multiple features using a graphic window. All features within the
window are selected. Similar to Zoom Window.
Launch the Viewport Management Tool.
Helmel Engineering Products, Inc.
www.helmel.com
Geomet Training Handbook
www.geomet-cmm-software.com
2-38
Chapter 2 – System Setup
Coordinate System Tools
Activate the Coordinate System Manager.
Orient.
Align.
Origin.
Establish a 6-Point PCS.
Interim CS to Part Coordinate System (ICS⇒PCS).
Translate a PCS.
Rotate a PCS.
Fixture Coordinate Manager.
Helmel Engineering Products, Inc.
www.helmel.com
Geomet Training Handbook
www.geomet-cmm-software.com
2-39
Chapter 2 – System Setup
Feature Measurement Tools
Point.
Line.
Plane.
Circle.
Sphere.
Cylinder.
Cone.
Perform the selected Scan.
Undo.
Toggle Auto-Direction Sensing On/Off (requires activation in System Option).
Helmel Engineering Products, Inc.
www.helmel.com
Geomet Training Handbook
www.geomet-cmm-software.com
2-40
Chapter 2 – System Setup
Feature Construction Tools
Construct a Line.
Construct a Circle.
Construct a Plane.
Bisect two features.
Distance Bewteen two features.
Intersection of two features.
Angle between features.
Recall a feature.
Feature Selection Tool.
Toggle the CMM Online / Offline (not available at this time).
Helmel Engineering Products, Inc.
www.helmel.com
Geomet Training Handbook
www.geomet-cmm-software.com
2-41
Chapter 2 – System Setup
Edit Feature Tools
Toggle the delete and undelete flag on a feature.
Insert a new feature.
Move a Feature.
Activate System Options.
Activate the Edit Motion Tool.
Program Run and File Handling Tools
Open an inspection file.
Open the last inspection file.
Save or Save-As the current inspection files.
Print Full Inspection Report.
Start the Inspection Auto Run.
Stop the current Inspection Auto Run.
Pause at the completion of the current program step.
Helmel Engineering Products, Inc.
www.helmel.com
Geomet Training Handbook
www.geomet-cmm-software.com
2-42
Chapter 2 – System Setup
Expanded Graphics Toolbar
Not all features will be active with version 6.66. Many features
are designed to work with the future release offering CAD import
and Cad Inspect.
Summary of Features
Below are the definitions of the icons grouped by function. Some
icons are not available in version 6.66 and are shown with an X
next to the icon. These will be released in future versions of
Geomet.
Graphic View Tools
Display the XY Plan View, Toggles between +Z and –Z
Viewing.
Display the YZ Plan View, Toggles between +X and –X
Viewing.
Display the ZX Plan View, Toggles between +Y and –Y
Viewing.
Display in Isometric, Toggles between the 4 quarters.
Activate Dynamic Rotation Mode, Works by left click and hold
the mouse button, then rotate by moving the mouse.
Regenerate the graphic area.
Left click to zoom in.
Left click to zoom out.
Fit all features to graphic area.
X
Use a zoom window. Left click to anchor the zoom window,
move the mouse to the opposite corner of the area to zoom in
and left click to perform zoom.
Preview select mode. As you move your mouse over the
graphic area, any features touched by the pointer will
highlight.
Show in Wire Frame Mode.
Show in Solid Mode.
X
Show CAD in Wire Frame, Geomet features in Solid.
Helmel Engineering Products, Inc.
www.helmel.com
Geomet Training Handbook
www.geomet-cmm-software.com
2-43
Chapter 2 – System Setup
CAD Entity Controls
X
Identify and Analyze current selected CAD entities.
X
Reverse the surface normal vector for selected CAD entity.
CAD Coordinate System Tools
X
Establish an Orientation on the selected CAD feature.
X
Establish the Alignment on the selected CAD feature.
X
Establish an Origin on the selected CAD feature.
X
Activate the CAD Coordinate System Setup Mode.
X
Perform a 3 Point CAD Coordinate System selection.
X
Translate and establish a new CAD 3D Origin on selected
feature.
CAD Position Tools
X
Rotate the CAD model +90° in the XY plane.
X
Rotate the CAD model -90° in the XY plane.
X
Rotate the CAD model +90° in the YZ plane.
X
Rotate the CAD model -90° in the YZ plane.
X
Rotate the CAD model +90° in the ZX plane.
X
Rotate the CAD model -90° in the ZX plane.
X
Rotate about the X axis 180°.
X
Rotate about the Y axis 180°.
X
Rotate about the Z axis 180°.
Scanning Tools
Select scan method.
Perform selected scan.
Deleted individual data points from scanned data point cloud.
X
Fit data point cloud to CAD model to create Whisker Plot.
Helmel Engineering Products, Inc.
www.helmel.com
Geomet Training Handbook
www.geomet-cmm-software.com
2-44
Chapter 3 – Stylus Management
Chapter 3 – Stylus Management
Stylus Manager .................................................................................. 3-2
Probe Qualification Process......................................................... 3-2
Stylus Manager Sub Menus ......................................................... 3-3
Deleting Stylus............................................................................. 3-4
Remove Pre-Qualified Stylus ...................................................... 3-6
Duplicate a Stylus ........................................................................ 3-7
Labeling a Stylus ......................................................................... 3-8
Qualifying a Ball Stylus..................................................................... 3-9
Qualifying Ball Styli in Multiple Positions ..................................... 3-10
Note on Reference Sphere Location .......................................... 3-10
Entering a Known Probe Diameter .................................................. 3-11
Stylus Tip Relationships .................................................................. 3-12
Qualifying with a Motorized Probe Head........................................ 3-13
Qualifying with a Stylus Change Rack............................................ 3-15
Qualifying a Motorized Probe Head and Stylus Change Rack........ 3-18
Stylus Database Manager................................................................. 3-19
Create a new Stylus Database .................................................... 3-20
Import a Stylus Database ........................................................... 3-20
Delete a Stylus Database Listing ............................................... 3-21
Set active a Stylus Database ...................................................... 3-21
Loading a Part Program ............................................................. 3-22
Renishaw SCR200/MCR 20 Stylus Rack Setup.............................. 3-24
Renishaw SCR200/MCR20 Maintenance Operations ..................... 3-31
Stylus Database Edit Control ........................................................... 3-35
Helmel Engineering Products, Inc.
www.helmel.com
Geomet Training Handbook
www.geomet-cmm-software.com
3-1
Chapter 3 – Stylus Management
Stylus Manager
Geomet maintains a database of known, qualified styli. Each stylus used is
qualified against a standard reference sphere to identify the size and MCS
location. Knowing the size and location allows Geomet to properly apply
compensation to all measured features. Knowing the location allows the switching
of the styli between positions in a cluster or an articulating probe head such as the
motorized Renishaw PH10.
Stylus Management is handled by the Stylus Manager that contains all the tools
necessary for qualifying, re-qualifying and choosing a stylus for use in measuring.
The configuration of all your stylus hardware is maintained in the System Options
on the Probes and Sensors page.
The Stylus Manager is activated by:
Keyboard:
w
Menu:
Qualify->Stylus Manager
Probe Qualification Process
After qualifying the first stylus, Geomet maintains that position as the reference
position for the entire stylus database. When adding additional styli, Geomet
maintains the location relationship between the newly qualified stylus and the first
stylus. This relationship is applied when setting any stylus active and allows
correct compensation for any qualified position, even in the same feature, without
loss of accuracy.
Helmel Engineering Products, Inc.
www.helmel.com
Geomet Training Handbook
www.geomet-cmm-software.com
3-2
Chapter 3 – Stylus Management
Stylus Manager Sub Menu Tools
There exists a sub menu that can be called up to react directly with the list of
stylus records. To activate the sub menu, right-click in the list area and the sub
menu will appear.
Through the sub menu you have access to three functions. These are:
•
•
•
Delete Stylus
Duplicate Stylus
Edit Label
All three functions work on the highlighted stylus, but only the Delete Stylus has
more than one feature. When a stylus is highlighted, the delete function will
delete only that stylus. When there are no stylus selected, the delete will clear all
stylus information from the database.
Helmel Engineering Products, Inc.
www.helmel.com
Geomet Training Handbook
www.geomet-cmm-software.com
3-3
Chapter 3 – Stylus Management
Deleting Stylus from the Stylus Manager
Summary
Deleting a stylus will remove from the database all information regarding position
and size. Caution should be taken when deleting a stylus from the database.
Geomet will mark any styli missing as Pre-Qualify when opening an inspection
that requires the deleted tip.
•
•
•
Delete a single Stylus
Delete all Stylus
Remove all Pre-Qualified Stylus
Delete a Single Stylus
Step 1
Activating the Stylus Manager can be done through the use of the 'w' keystroke or
through the drop down menus [Qualify->Stylus Manager].
The Stylus Manager will display all current, qualified styli and pre-qualified styli.
The current active stylus is shown with an arrow located next to it.
Helmel Engineering Products, Inc.
www.helmel.com
Geomet Training Handbook
www.geomet-cmm-software.com
3-4
Chapter 3 – Stylus Management
Step 2
Highlight the desired stylus to delete and click on the <- Remove All> button, or
press the '-' <minus> key on the keyboard. You will be prompted to confirm your
request. To confirm the deletion of the selected stylus, click on the <- Remove
All> button a second time. Hint: To navigate through the qualified stylus, you can
use the Up and Down Arrow keys.
Delete all Stylus
Step 1
Activating the Stylus Manager can be done through the use of the 'w' keystroke or
through the drop down menus [Qualify->Stylus Manager].
Step 2
With no stylus highlighted in the selection, click on the <- Remove All> button or
press the '-' (minus) key on the keyboard. You will be prompted to confirm your
request. To confirm the deletion of the selected stylus, click on the <- Remove
All> button a second time.
Helmel Engineering Products, Inc.
www.helmel.com
Geomet Training Handbook
www.geomet-cmm-software.com
3-5
Chapter 3 – Stylus Management
Remove all Pre-Qualified Stylus
Step 1
Activating the Stylus Manager can be done through the use of the 'w' keystroke or
through the drop down menus [Qualify->Stylus Manager].
Pre-Qualified stylus are inserted into the stylus database only when opening a
previous part inspection file that uses styli that are not currently part of the active
stylus database. For example, if a part inspection was done that required the use of
stylus numbers 1, 2, 3, 4, and 5 those references are stored in the part inspection
file. Should the current stylus database be changed to have only stylus numbers 1,
2, and 3 qualified and the part inspection file was opened, Geomet would insert
stylus 4 and 5 and mark them as pre-qualified. You will not be allowed to proceed
with the inspection without first qualifying stylus 4 and 5.
However, should you want to just remove the pre-qualified stylus, the button
<Clean Up> will be made available.
Step 2
When there are 1 or more styli marked as Pre-Qualify, you can delete all of them
with the use of the <Clean Up> button.
Helmel Engineering Products, Inc.
www.helmel.com
Geomet Training Handbook
www.geomet-cmm-software.com
3-6
Chapter 3 – Stylus Management
Duplicate a Stylus
Summary
To create a copy of an existing stylus can be accomplished with the Duplicate
Stylus command. This command is especially helpful when creating a stylus
database on manual friction style probing systems where the need to re-qualify
multiple positions are required.
Procedure
To duplicate a stylus, start by highlighting an existing and qualified stylus tip.
Right-click to activate the sub-menu and choose the [Duplicate Stylus] command,
see figure below. An exact copy of the highlighted stylus is created and is labeled
"Copy of x" where 'x' is the original stylus reference number.
To see an example on the importance of this command, see Re-Qualify a Stylus.
Helmel Engineering Products, Inc.
www.helmel.com
Geomet Training Handbook
www.geomet-cmm-software.com
3-7
Chapter 3 – Stylus Management
Labeling Stylus
Labeling an individual stylus is helpful in identifying its unique characteristics. In
Geomet, when a new stylus is qualified, and by default, is given the next available
tip number. This is not very helpful in describing the characteristic of the stylus.
For example, the tip may be the "left tip" on a stylus cluster.
To attach a label on a single stylus, two methods can be employed. The first
involves the standard Windows interface where you highlight the desired tip by
left clicking once on the stylus under the Label column header. Then pause and
left-click on the stylus again, Windows acknowledges the second left-click, and
an edit box surrounds the current label and you can type directly into the Stylus
Manager list.
Should Windows not provide the edit label tool, you can activate the edit label
tool by selecting the stylus as described above and press the "l" <lowercase L>
key on the keyboard. This will start the edit process for that selected stylus. To
complete the labeling processes, press the <Enter> key on the keyboard, or
highlight another stylus.
Helmel Engineering Products, Inc.
www.helmel.com
Geomet Training Handbook
www.geomet-cmm-software.com
3-8
Chapter 3 – Stylus Management
Basic Ball Style Electronic Touch Probe
This Qualification process is based on the hardware configuration consisting of a
ball stylus touch probe on an electronic probe head. This configuration is similar
to a Renishaw TP-ES or a PH1 with a TP2 probe body.
Step 1
To start the qualification process, activate the stylus manager by pressing the "w"
key on the keyboard or the [Qualify->Stylus Manager] from the drop down
menus. To add a new stylus qualification, press the <Next> button found on the
Stylus Manager. Note: For more efficient operations, the <Next> button is also
activated by pressing the <Enter> key on the keyboard.
Step 2
This step will prompt you to enter the qualification type. This describes the type
of stylus attached to your system. The choices are ball, taper, cylinder, video cross
hair and manually entered diameter. By default the qualification type will show
"Ball". To continue the qualification process, press the <Next> button on this
dialog or press the <Enter> key on the keyboard.
Step 3
The final step will prompt you to proceed capturing the data points required to
solve the qualification of the stylus.
We are prompted to capture the current default number of data points required. At
this time, capture the data points on the reference sphere and the count required
would descend until all data points have been captured.
The process used to capture the data points will influence the quality of the
solution. If you were to capture your data points close together, or with
inconsistent speed, there can be error introduced in the end result of size and
location, so try to capture points spread evenly around the calibration sphere with
consistent probing speed.
Helmel Engineering Products, Inc.
www.helmel.com
Geomet Training Handbook
www.geomet-cmm-software.com
3-9
Chapter 3 – Stylus Management
We recommend that when using 5 data points, the first point should be taken on
the top of the reference sphere and the remaining 4 taken at the equator.
Should you require to abort a single data point that has been captured, press the
<F2> key on the keyboard and the required count of data points will increase as it
discards the last data point in the buffer.
Qualifying Ball Styli in Multiple Positions
This Qualification example is based on the hardware configuration consisting of a
ball stylus touch probe in different locations attached to one or more electronic
touch probes. One example would be a manual articulating electronic probe head
such as the Renishaw MIP. Another example would be a Cluster probe located on
an electronic probe with multiple ball styli installed.
The process of qualifying more than one physical location involves the same steps
as described above in Basic Ball Style Electronic Touch Probe. The first probe
should be qualified exactly as stated in steps 1-3. When the first probe has been
qualified, you will return to the main screen of the Stylus Manager. To add
another position on a cluster, or another location on an articulating probe, follow
steps 1-3 described above.
Geomet will qualify the MCS location and size and assign the next stylus tip
number to the stylus database. The location it stores is the XYZ variation from
stylus tip number 1.
NOTE on Reference Sphere Location
On DCC style CMMs there is a "Home" position which is repeatable for inspection
results. The MCS origin is the Home position of the CMM. This allows adding
additional stylus positions to the current stylus database without loss of position.
On manual CMMs that do not offer a Home procedure, the origin of the MCS is the
location the CMM was at the time of power up, or the location when Geomet was
launched. Therefore the origin position of the MCS is not reliable or repeatable.
When you qualify multiple positions, all qualifications should be done during one
session to ensure correct relationships between all the stylus centers. Should you
have to add positions after a system restart, you should always clear your stylus
database and add all positions required for your inspection..
Helmel Engineering Products, Inc.
www.helmel.com
Geomet Training Handbook
www.geomet-cmm-software.com
3-10
Chapter 3 – Stylus Management
Entering a Known Diameter
The Stylus Manager provides a process where you can enter the known size of the
stylus manually. This is often done when using hard probes or when you desire to
enter a specified diameter.
Caution should be taken when entering the size manually. The ball center location
is not established and therefore can not be used with other qualified styli in the
same coordinate system.
A manually entered diameter will not equal the reported diameter of the same
stylus when qualified against the reference sphere. This condition is a result of the
touch probe pre-travel distance. When an electronic touch probe comes in contact
with the reference sphere, it must travel a small distance after contact until the
trigger is activated. This results in a smaller diameter than one measured with a
micrometer.
Step 1
To start the qualification process, activate the stylus manager by pressing the "w"
key on the keyboard or the [Qualify->Stylus Manager] from the drop down
menus. To add a new stylus qualification, press the <Next> button found on the
Stylus Manager.
Step 2
On the Qualification Type page choose “Entered” from the drop down list. Press
<Next> to proceed.
Step 3
On the final page, enter the known diameter size in the space provided.
Helmel Engineering Products, Inc.
www.helmel.com
Geomet Training Handbook
www.geomet-cmm-software.com
3-11
Chapter 3 – Stylus Management
Stylus Multiple Tip Relationships
To ensure accurate and repeatable inspections, it is important to understand the
relationship between qualified stylus positions when you require more than one in
your inspection.
In your Stylus Database, the first stylus qualified is considered the primary or
reference position for all qualified styli. The first qualification will record the
center location in the MCS of the Reference Sphere and assign it to tip number 1.
All susequent qualifications will record the deviation to the primary tip. This
allows Geomet to use multiple styli in a single coordinate system without a shift
in position. Geomet also allows the use of multiple styli when measuring a single
feature such as a cylinder.
Therefore certain conditions must be met to allow safe requalifications and
modifications to the Stylus Database. The first rule is that any stylus can be
deleted, except stylus tip number 1. Should you delete stylus tip number 1, then
all styli should be removed and qualified again.
Helmel Engineering Products, Inc.
www.helmel.com
Geomet Training Handbook
www.geomet-cmm-software.com
3-12
Chapter 3 – Stylus Management
Qualifying with a Motorized Probe Head
The qualification of a motorized probe head such as the Renishaw PH10T or
similar involves one additional step which provides access to setting the A / B
position of the head. This step follows the Qualification Type step as described
earlier..
Renishaw PH10T
Angle Position Selection
Setting the articulated angle of the PH9/10 can be accomplished by using either
the Renishaw supplied hand control, or through the use of Geomet's dialog shown
above. Through the use of the dialog, you can use the sliders for the A / B angles
by left-clicking and holding down on the pointer associated with the angle you
wish to change and moving or "sliding" to a new location. An optional method
involves left clicking on the symbols +A, -A, +B, -B, and Home. With each click,
the probe angles will change one position. NOTE: The symbols are also mapped
to the number keypad on the keyboard. The table below shows all the mapped
keys:
Keystroke
2
4
5
6
8
Function
-B angle change
-A angle change
Return to define "Home"
+B angle change
+A angle change
Once you have articulated the probe head into the correct position, continue with
the qualification by selecting the <Next> button.
Helmel Engineering Products, Inc.
www.helmel.com
Geomet Training Handbook
www.geomet-cmm-software.com
3-13
Chapter 3 – Stylus Management
Summary
The necessary steps involved to qualify a stylus attached to the motorized probe
head are as follows:
Required Steps to Qualify with a Motorized Probe
Helmel Engineering Products, Inc.
www.helmel.com
Geomet Training Handbook
www.geomet-cmm-software.com
3-14
Chapter 3 – Stylus Management
Qualifying with a Stylus Change Rack
The example provided here involves the use of a Stylus change rack such as the
Renishaw MCR20 or SCR200 as shown in the figures below. The change rack
allows the use of several stylus configurations that are magnetically attached to
the corresponding probe body. The use of the stylus change rack is controlled
through the use of a graphical interface provided by Geomet to control the
location and orientation of the rack in the MCS. The setup procedure of a stylus
rack can be found in the [System Options->Probes and Sensors] page.
MCR 20 Stylus Change Rack
Helmel Engineering Products, Inc.
www.helmel.com
SCR200 Stylus Change Rack
Geomet Training Handbook
www.geomet-cmm-software.com
3-15
Chapter 3 – Stylus Management
During the qualification process, Geomet will display a bay selection setup page,
which instructs the operator to follow the necessary steps required to install a
module and qualify that position. This bay selection page is displayed after the
Qualification Type setup page, see Bay Selection.
Bay Selection
The Bay Selection page can be expanded to show the current assignments by
selecting the "Show Status" button. In left illustration, the graphic representation
of the stylus rack shows no modules pre-loaded in the stylus rack and no module
attached the probe. In right illustration, we see modules loaded in bay 1 and 5 and
a module loaded on the probe body, which is identified as having the module
from Bay 1.
No Assignments
Assigned Bays
Helmel Engineering Products, Inc.
www.helmel.com
Geomet Training Handbook
www.geomet-cmm-software.com
3-16
Chapter 3 – Stylus Management
During the qualification process, you are asked to identify the bay number used
for the selected stylus. To select a bay, left-click on the bay location directly on
the graphic, or use the corresponding number key on the number pad on the
keyboard.
If you select an empty bay, Geomet will prompt you to install the probe module
on the probe body. This is done manually and care should be exercised to align
the module based on the symbols on the module and probe body. Once the
module has been installed, select the <Next> button which will proceed to the
qualification page.
Should you select a bay that already has a module loaded, such as a module with a
stylus cluster attached to it, Geomet will proceed to the qualification page.
NOTE: If the module assigned to bay 1 is already installed on the probe when you
select bay 5 for qualification, Geomet will prompt you to unload the current
module and under DCC control will proceed to the safe staging area for
installation of the new module.
Summary
The necessary steps involved to qualify a stylus attached to the stylus change rack
are as follows:
Qualification Steps with Stylus Rack
Helmel Engineering Products, Inc.
www.helmel.com
Geomet Training Handbook
www.geomet-cmm-software.com
3-17
Chapter 3 – Stylus Management
Qualifying with a Motorized Probe and Stylus Change Rack
Qualifying with a probing configuration which includes a Motorized Probe Head
and a Stylus Change Rack requires 5 steps to complete. Please refer to Qualifying
with a Motorized Probe Head and Qualifying with a Stylus Change Rack above
for details on the individual steps required. The order in which the steps are
proved are as follows:
Qualification Step Order for Motorized Probe with Stylus Rack
Helmel Engineering Products, Inc.
www.helmel.com
Geomet Training Handbook
www.geomet-cmm-software.com
3-18
Chapter 3 – Stylus Management
Stylus Db Manager
The Stylus db Manager provides tools to maintain more than 1 stylus database.
Through the use of separate stylus database files, you can build specific stylus
configurations based on your inspection needs and keep your stylus database
manageable.
For example, it is not necessary to build one rather large stylus database that
covers all your part inspections. It is also not efficient to clear out and build the
stylus database with every unique part inspection. Therefore, Geomet can
maintain unique stylus database files assigned to each part inspection, group or
family, for example.
The Stylus db Manager performs a test to a part program file when it is opened.
This test looks for the original stylus database in use when the part program was
created and compares it against the current stylus database in use.
The Stylus Db Manager is activated by:
Keyboard:
Ctrl + Alt + w
Menu:
Qualify->Stylus Db Manager
Helmel Engineering Products, Inc.
www.helmel.com
Geomet Training Handbook
www.geomet-cmm-software.com
3-19
Chapter 3 – Stylus Management
Create a new stylus database
To create a new stylus database, the <Append> function is used. The default
stylus database is called "stylus.db". To create a new database and set it active,
enter the new name for the database in the controls "Enter Name ->". For example
we will use "Left Bank", note: it is not necessary to add ".db" to the file new
name.
Press the <Append> button and the current database will be copied and given the
name "Left Bank.db". The Stylus db Manager will update the registry and set
"Left Bank" as the new active stylus database.
Import a stylus database
The Import function allows you to copy and register an existing stylus database in
Geomet. For example, should you have more than 1 CMM and require a matching
stylus database to be used for all CMMs, you can create the stylus database on
CMM #1then copy it over to CMM #2.
Once the stylus database has been copied to the correct location on CMM #2, see
[System Options->File Locations], press the <Import> function and the file
navigation tool will produce a display which allows you to locate the file through
the network or from a disk. When you have located the stylus database file to be
copied, select <Open>. Geomet will add this database to the registry and set it
active.
Helmel Engineering Products, Inc.
www.helmel.com
Geomet Training Handbook
www.geomet-cmm-software.com
3-20
Chapter 3 – Stylus Management
Delete a Stylus Database Listing
The process of deleting a stylus database will remove the listing in the registry.
This will not delete the actual file. Geomet will no longer see the file.
Selecting a stylus database
To delete a stylus database from use in Geomet, drop down the list of files in the
"Existing Databases ->" control, see figure above. In this example, we will choose
"New2". To complete the delete process, press the <Delete> button.
Should you try to delete the current stylus database in use, the Stylus db Manager
will default to "Stylus.db" as the new active stylus database.
Set active a Stylus Database
Use the Stylus Db Manager to select which stylus database is available to be used.
To view the available database files, drop down the list of files in the "Existing
Databases ->" control. Locate the database to be set active and press the <Set
Active>. Geomet will now display and use the stylus configurations from this file
in your inspection report.
When you change stylus databases it is a good practice to re-qualify the individual
stylus tips. This should be done if you are not sure other changes have been made
such as re-mounting the probe head or changing stylus tips associated with
different configurations of a particular stylus database.
NOTE: You should not switch the stylus database during a part inspection. This
can cause loss of accurate data.
Helmel Engineering Products, Inc.
www.helmel.com
Geomet Training Handbook
www.geomet-cmm-software.com
3-21
Chapter 3 – Stylus Management
Loading a Part Program
When a part program is loaded, Geomet will perform a test to verify that the
current stylus database matches the stylus database used when the part program
was created. Should Geomet find that the part program requests a stylus database
that is different than the current stylus database, one of two warnings will appear.
Warning 1 - Switching Stylus Database
The first test looks for a match using the stylus database embedded in the part
program with the list of available stylus databases found registered with Geomet.
Should a match be found, Geomet will display the following available options.
Switch - Sets active the stylus database referenced in the part program.
Use Current - Continues opening the part program using the current stylus
database.
Cancel - Aborts the opening of the file.
Helmel Engineering Products, Inc.
www.helmel.com
Geomet Training Handbook
www.geomet-cmm-software.com
3-22
Chapter 3 – Stylus Management
Warning 2 - Embedded stylus database not found
In this condition, the stylus database embedded in the part program is not
registered with Geomet. This condition can happen when a previous stylus
database has been deleted through the Stylus Db Manager.
Geomet will display a warning that the part program references a stylus database
that is not registered in Geomet. The following options are offered.
Switch - Part programs contain a copy of the original stylus database when it was
first taught. This database information can be extracted to create a new database.
Select <Switch> if you want to create a stylus database file and set it active. In
this condition, it is recommended that a re-qualification be done to ensure
accuracy.
Use Current - Continues opening the part program using the current stylus
database.
Cancel - Aborts the opening of the file.
Helmel Engineering Products, Inc.
www.helmel.com
Geomet Training Handbook
www.geomet-cmm-software.com
3-23
Chapter 3 – Stylus Management
Renishaw SCR200 / MCR20 Stylus Rack Setup
Geomet provides support, through Direct Computer Control, of the Renishaw
MCR20 Stylus Rack. The MCR20 provides module bays to change styli using the
TP20 Touch Probe.
Hardware and Software Setup
The MCR20 Rack is considered a passive device. There exists no communication
between the operations of the rack and the host CMM software. Therefore it is the
responsibility of the CMM software to provide all actions and safeguards for your
probe system.
In order to activate the MCR20 support you must first activate the Geomet
System Options <f9> and select the “Probes and Sensors” tab, see example below.
Select the radio button labeled “MCR20” under Stylus Racks. In the “Probe /
Sensor Model:” field, choose the head attached to your system. In the “Available
Options:” choose TP20. Now you are ready to proceed with locating and run the
setup routine on the rack.
Helmel Engineering Products, Inc.
www.helmel.com
Geomet Training Handbook
www.geomet-cmm-software.com
3-24
Chapter 3 – Stylus Management
Setup Procedure
Orientation and Base Plane Selection
For proper operations Geomet must know the location and orientation of the
MCR20 Rack. To access this operation click on the <MCR20 Setup> button
located in [System Options->Probes / Sensors] as described above.
The first dialog you will encounter is used to identify the orientation and base
plane for the MCR20 rack.
Your CMM has three base planes XY, YZ and ZX. Within each base plane you
can orient your MCR20 to allow maximum access to the rack and your inspection
process. The location of the MCR20 must be completely within the motion cube
of you CMM.
For Example, this selection shows the MCR20 Rack located in
the rear of the CMM in the XY plane. The access to the bays is
in the +Y direction. The miniature symbols are selectable
buttons, which are selected by left clicking on the symbol with
your left mouse button. Once you have selected the proper
orientation, Geomet will configure the motion path required to
access each bay.
The twelve choices displayed are the most common positions
for the MCR20. However there are certain conditions such as having a CMM
with switched X-Y axis or positioning the rack on the left YZ plane versus the
right YZ plane that will require the use of the Axis Control check boxes. For
example, if you mount the rack in the YZ plane as shown in the selection graphics
it is assumed you are looking at it from the +X direction and the default motion
paths will be established accordingly. But if you mount the rack where you must
access it from the –X direction you will be required to check the Flip Z and Y
Axis Directions check box.
Helmel Engineering Products, Inc.
www.helmel.com
Geomet Training Handbook
www.geomet-cmm-software.com
3-25
Chapter 3 – Stylus Management
After you have made your selections press the <Next> button to continue the
setup.
Motion Path Coordinates
This dialog provides you direct access to the underlying motion coordinates
associated with the four positions for each bay.
Motion Path Editor
This dialog displays the coordinates in the MCR20 coordinate system for the four
positions associated with each bay. These positions are defined as the Bay Entry,
Bay Nominal, Pickup Staging and Set Stage.
Bay Nominal: This is the position where the probe has a module attached and is
in the bay.
Bay Entry: This position is directly above the Bay Nominal and has no module
attached. It is the position the probe head will move to disconnect from a module
when dropping off the module.
Pickup Staging: This position is outside the bay, before it moves to the Bay
Entry position.
Set Stage: Is the position after extracting the module outside the rack.
To switch between the values select the button associated with the position.
From here you can establish the speed the CMM will operate when performing
MCR20 operations. The Move Blending check box is used to allow smooth
operations during transitions between different positions. We do not recommend
the use of motion blending when you have speeds over 5 inches per second.
Helmel Engineering Products, Inc.
www.helmel.com
Geomet Training Handbook
www.geomet-cmm-software.com
3-26
Chapter 3 – Stylus Management
After reviewing the coordinates, press <Next> to proceed to the next phase of the
setup operations.
SCR200 / MCR20 Coordinate System Setup
From this dialog you will be prompted to perform the necessary steps. Those steps
are listed on the right side of the dialog.
To start the setup left click on the <Start Setup> button as indicated in the
message under the graphics of the rack.
Step 1 – Attach Stylus
You will be prompted to load a PS16R Stylus onto the Probe Head. It is important
that only this Stylus model be used with no extensions as the resulting coordinate
transformations are based on the specifics of this model.
When the correct stylus has been installed, press <OK> to proceed.
Helmel Engineering Products, Inc.
www.helmel.com
Geomet Training Handbook
www.geomet-cmm-software.com
3-27
Chapter 3 – Stylus Management
Step 2 – Set Staging Position
This is the safe position that is set for all MCR20 operations. This position should
be established that would allow safe transition to the bay staging coordinates and
allow rotation of any motorized probe head operation if you have one installed.
Move your probe to a safe stage location and press the <IP> button on the
joystick.
Step 3 – Establish Orientation – Measure Plane
At this time you should slide the access covers back on bay 1,2,5 and 6. Make
sure they are locked back exposing the bays.
A prompt will appear asking for the probing direction for the four points required
for establishing the orientation of the rack Once you have selected the direction,
the setup screen will flash in red the position you should capture.
Helmel Engineering Products, Inc.
www.helmel.com
Geomet Training Handbook
www.geomet-cmm-software.com
3-28
Chapter 3 – Stylus Management
Step 4 – Establishing Alignment – Measure a Line
After Orientation has been completed, you will be prompted to enter a probing
direction for alignment. You will capture two data points in the location shown by
the flashing points.
Step 5 – Establishing the Bay Depth Position
Next you will capture one data point on the front surface of the bay as shown
below.
Helmel Engineering Products, Inc.
www.helmel.com
Geomet Training Handbook
www.geomet-cmm-software.com
3-29
Chapter 3 – Stylus Management
Step 6 – Bay One Position
The final step required is to establish the center of Bay 1. To do this capture two
data points inside the bay as shown below.
Upon completion of these steps, Geomet will prompt you the press the <Finish>
button that will return you to the System Option dialog and your setup on the
MCR20 is complete.
Helmel Engineering Products, Inc.
www.helmel.com
Geomet Training Handbook
www.geomet-cmm-software.com
3-30
Chapter 3 – Stylus Management
SCR200 / MCR20 Maintenance Operations
Geomet provides access to MCR20 though Maintenance Operations and the
Stylus Manager. Each method has unique capabilities in the operation of Geomet.
The Maintenance mode is primarily used to test the rack and change assigned
locations, clean styli or replace damaged styli. It is important that the modules are
not placed into the bays by hand. Each module must be aligned accurately to
allow the probe head to reseat the module.
To start the Maintenance mode press the <Alt< + <w> keys on the keyboard.
From this dialog you can control the operations of the MCR20 outside of part
inspection programs.
This graphic shows a Touch Probe and the current status of the
module. The graphic on the left indicates that the module
assigned to a bay number one is attached to the touch probe.
The graphic on the right indicates that no module is attached to
the touch probe. You have the ability to change the module
assignment by left clicking on the graphic of the touch probe,
which will remove the module. Please note that this will not
perform the motion to park the module into the assigned bay, this will only
remove it and its reference from Geomet.
This manual adjustment should only be used under certain conditions such as
removing all bay assignments.
The two buttons shown <Maintenance> and <Show Status> provide additional
functions when selected.
Helmel Engineering Products, Inc.
www.helmel.com
Geomet Training Handbook
www.geomet-cmm-software.com
3-31
Chapter 3 – Stylus Management
Maintenance
This function will allow you direct access to performing motion in assigning and
pre-loading MCR20 bays.
When <Maintenance> has been selected the visual appearance of the graphic
changes to show you the current status of the bays. Two additional buttons will
appear <Load Bay> and <Pickup Tip>. These control the CMM operations in
accessing the MCR20 bays.
Change Bay Assignments without CMM Control
To assign or remove an assignment of a module to a bay without performing
motion left click on the bay graphic. For example to add a module to bay number
two, left click on bay two and a module will appear. To remove that module, left
click on the module and it will disappear.
Helmel Engineering Products, Inc.
www.helmel.com
Geomet Training Handbook
www.geomet-cmm-software.com
3-32
Chapter 3 – Stylus Management
Load Bay under CMM Controls
To load a bay under CMM control, select the button <LoadBay> followed by a
left click on the bay to load. If it is empty, you will be prompted to load a new
module onto the touch probe and when complete click on <OK>. Geomet will
then drive to the staging position and proceed to load the module into the assigned
bay. The module will then disconnect and the touch probe will extract to the
staging area for the bay. Note: The touch probe will not leave the staging area for
that bay as leaving the confines will cause a false trigger.
You can then continue to load other bays by repeating the loading procedure.
Pickup Modules under CMM Control
Select the <Pickup Tip> button followed by a left click on a bay selection. This
will cause the CMM to retrieve the selected module and return to the staging area.
If the touch probe has a module already attached, the CMM will park that tip
before retrieving the selected module.
Show Status
The <Show Status> button provides a graphical representation of the touch probe
and bay assignments.
Helmel Engineering Products, Inc.
www.helmel.com
Geomet Training Handbook
www.geomet-cmm-software.com
3-33
Chapter 3 – Stylus Management
NOTE on using the Maintenance Modes
These modes should be used with caution. It is primarily designed for the
experienced operator who wants to perform maintenance on installed modules such
as cleaning or replacing tips. The assigning of bays from this mode does not provide
any means to qualify the styli or provide access to motorized probe heads such as the
PH9.
It is not necessary to use this mode for populating and qualifying your styli. The
Stylus Manager will handle all operations of assignments and qualifying your styli.
Helmel Engineering Products, Inc.
www.helmel.com
Geomet Training Handbook
www.geomet-cmm-software.com
3-34
Chapter 3 – Stylus Management
Stylus Database Edit Control
The Stylus Database Edit Control provides access to the stored data that defines
the stylus calibration. This data includes the label, diameter and XYZ position for
each qualified stylus. Care should be taken when using this tool which, if used
incorrectly, will lead to erroneous measurement data.
When a stylus is qualified, the XYZ machine coordinates and the diameter of the
stylus sphere are stored. Stylus number 1 becomes the master position and all
other styli are referenced to that position. This allows interchangeability within
the measurement process when several styli are used.
The Stylus Edit Control provides a tool to change the diameter and the XYZ
center coordinates for any qualified stylus only when an offset, or bias, has been
determined. For example, qualify the same stylus twice against the reference
sphere and you will see a variance in both size and location. This is a result of the
inherent inaccuracies within the complete measuring system. The CMM and the
probe introduce a small error when calculating the solution, and the operator as
well can capture data points at various speeds, producing data point variations.
This alone can cause deviations of as much as 0.0002".
Procedure
To activate the Stylus Edit Control, select from the pull-down menus [Stylus Edit
Control]. The tool will display all current qualified styli.
Helmel Engineering Products, Inc.
www.helmel.com
Geomet Training Handbook
www.geomet-cmm-software.com
3-35
Chapter 3 – Stylus Management
To edit a selected stylus, select the stylus by left clicking on the entry in the list.
When the selection has been made, a button labeled <Edit> will show.
Press the <Edit> button to change the label, size or position values.
There are two methods to change the position values for the Stylus. The first
method is a direct Machine Coordinate Value XYZ position. This is shown to the
right of the label "Stylus MCS Position". The second option is to apply a relative
offset value to the MCS position.
To make a relative change, enter the desired value of the change. For example, if
the stylus tip #2 measures the location of a sphere consistently at X=0.0005, Y= 0.0002, Z=0.0003 relative to the same sphere measured with stylus tip #1, you can
apply a correction factor to bring Stylus Tip #2 in-line with Stylus Tip #1. Enter
X=-0.0005, Y=0.0002, Z=-0.0003 in the "Relative Position Adjustment" controls.
Apply the change by pressing <Apply Rel. Adjustment>.
When you have finished, press the <Update> button to make the changes, or
<Cancel Changes> to return to the list without saving the changes. To update the
stylus database, save your changes by pressing the <Ok>. To cancel all changes
made, press the <Cancel> button.
Helmel Engineering Products, Inc.
www.helmel.com
Geomet Training Handbook
www.geomet-cmm-software.com
3-36
Chapter 4 – Feature Measurement
Chapter 4 – Feature Measurement
Basic Features
Point ................................................................................................... 4-2
1D Point ....................................................................................... 4-3
Auto Direction Sensing and 1D Points ........................................ 4-4
2D Point ....................................................................................... 4-5
Inside Radial / Outside Radial 2D Point ...................................... 4-6
3D Point ....................................................................................... 4-7
Inside Radial / Outside Radial 3D Point ...................................... 4-7
Vector Point ................................................................................. 4-8
Understanding Vector Points ....................................................... 4-9
Vector Point Technical Discussion............................................ 4-11
Vector Point Report Format....................................................... 4-12
Vector Point, XYZ/IJK Known ................................................. 4-13
Vector Point Unknown Data...................................................... 4-16
Vector Point IJK Known............................................................ 4-18
Vector Point XYZ Known ......................................................... 4-19
Vector Point Import File ............................................................ 4-21
Line .................................................................................................. 4-34
Circle................................................................................................ 4-37
Plane................................................................................................. 4-39
Upper / Lower Boundary Plane ................................................. 4-41
Sphere .............................................................................................. 4-43
Cylinder ........................................................................................... 4-44
Cone ................................................................................................. 4-46
Cone Offset ................................................................................ 4-47
Cone Diameter ........................................................................... 4-48
Cone Drop Ball Test .................................................................. 4-49
Macro Features
4 Point Intersect ......................................................................... 4-50
Slot/Web .................................................................................... 4-51
Oval Slot .................................................................................... 4-52
Feature Averaging............................................................................ 4-54
Helmel Engineering Products, Inc.
www.helmel.com
Geomet Training Handbook
www.geomet-cmm-software.com
4-1
Chapter 4 – Feature Measurement
Point
Points are dimensionless locations in 3D space. Points have no size. The location
of a point is specified by its X, Y, and Z coordinates in a defined coordinate
system. There are many point types that Geomet supports. These include 1D, 2D
and 3D points.
Measured points consist of 1D, 2D and 3D style geometric elements. Keyboard
access to these points is done through the number keypad, see table below.
Keystroke
1
2
3+2
3+4
3+6
3+9
4
1D Point
-Z
-Y
2D Point
3D Point
XY IR
ZX IR
YZ IR
3D IR
-X
XY
ZX
YZ
5+2
5+4
5+6
5+7
5+9
6
7+2
7+4
7+6
7+9
8
9
Vector Pt
3D
+X
XY OR
ZX OR
YZ OR
3D OR
+Z
+Y
IR = Inside Radius / OR = Outside Radius
Table 1, Keyboard Access
Helmel Engineering Products, Inc.
www.helmel.com
Geomet Training Handbook
www.geomet-cmm-software.com
4-2
Chapter 4 – Feature Measurement
1D Point
1D Points report 1D locations. There are 6 1D point routines, designated ±X, ±Y
and ±Z PCS directions. Pressing one of assigned keys, see previous table,
prepares Geomet to measure a single point on a planar surface. The report consists
of the location of the center of the stylus corrected by the stylus radius in the PCS
probing direction. Problems arise if the planar surface is not parallel to a PCS
base plane.
+X MCS Point
+Y PCS Point
The illustrations above demonstrate a 1D-point measurement using the same
planar surface on the GeoWidget using two alignments. One based upon the MCS
and then referencing PCS 2. Although the stylus center is at the same XYZ
location in both cases, the calculated points P1 and P2 are quite different. P1 was
measured as a +X 1D Point and is calculated based on the probe radius correction
parallel to the X-axis of the MCS. P2 resulted from a probe radius correction
parallel to the Y-axis of PCS 2. This illustrates how measurements of a surface in
an unaligned PCS can produce erroneous results.
Single 1D Point measurements can only be used to determine the locations of
planar surfaces, which are parallel to the PCS base planes. Pairs of 1D Point
measurements on planar surfaces that are parallel to PCS base planes may serve to
determine the Distance between the surfaces or the location of the Bisector of
surfaces. Pairs of 1D Point measurements on simply skewed planar surfaces,
meaningless in themselves, may be used to define a Line on a surface or to Align
the current PCS to be parallel to the surface.
To measure a 1D Point, press the corresponding Point direction key and gather a
data point on your work piece. If you have Auto-Direction enabled, you will be
prompted "Measure Auto-Dir Point" and your approach vector to the work piece
will identify the probing direction.
Tolerancing of 1D Points is limited to Cartesian / Linear.
1D Points are available for use in building Part Coordinate Systems. Single 1D
points can establish the origin for a single PCS axis. For example: a +X Point can
establish the X axis origin. Two coplanar 1D Points can establish an alignment.
Helmel Engineering Products, Inc.
www.helmel.com
Geomet Training Handbook
www.geomet-cmm-software.com
4-3
Chapter 4 – Feature Measurement
Auto Direction Sensing and 1D Points
Using auto direction on 1D Points can lead to erroneous reported values if used
incorrectly. Auto direction relies on a smooth approach, from you the operator, in
capturing of a data point. The process of determining the approach vector
involves the CMM interface card (ProCounter, Tech 80 or PMAC) to maintain a
rolling IJK vector based on the last five reported values. These interface cards
update the current position in the MCS on a programmable time interval from 20
to 200 milliseconds.
Auto Direction Approach Vector
When you are approaching your work piece, it is required that you make contact
while remaining in a ±45° approach, see figure above. In this example, if we
remained in the approach zone we will capture a data point that will be reported
as a +Y point. If the operator did not remain in the approach zone the 1D Point
might report a + or - X Point from which we will have to correct the probe
compensation error. Most common occurrence of a erroneous data point comes
from operators who approach the surface, and then pause during the approach and
attempt to make contact under extremely slow speeds, which while approaching
causes variations in the path toward the surface.
To correct the reported direction of a 1D Point, highlight the feature by left
clicking on it, then right-click to bring up the feature menu, as shown in the figure
on the next page. Select [Point Direction], which will offer a sub-menu with all
six probing directions available. Choose the correct 1D Point direction and your
part inspection will update with the correct 1D Point.
Note: Once a feature has been referenced it can not be changed or edited. For
example, if a feature was used in the construction of a PCS , it will be locked
from changes. This is identified by the inclusion of a ¹ next to the feature number,
example " 12¹ ".
Helmel Engineering Products, Inc.
www.helmel.com
Geomet Training Handbook
www.geomet-cmm-software.com
4-4
Chapter 4 – Feature Measurement
1D Point Correction Sub-menu (both styles shown)
Using Auto-Direction with multi-point features such as circle, lines and planes
can also incorrectly report feature characteristics. This occurs when capturing data
points in an inconsistent method or by capturing data points at a high rate. As
previously mentioned, the calculation of the direction vector for the probe works
off the speed of the interface and should that rate of point capture be too high, the
changes in direction going toward, then backing off the data point will create a
poor direction vector.
Since touch probes can be effected by speed and our auto-direction tool is also
adversely effected by speed, we suggest the use of a smooth consistent approach
speed and rate when capturing data points.
2D Point
The 2D Point function is normally used in conjunction with a hard taper probe for
simple contact determination of the location of bores whose axes are parallel to
the PCS Z axis. It can also be used with hard ball stylus for single contact
determination of the location of bores whose axes are parallel to any PCS axis. In
these applications the 2D Point feature is referred to as the self-centering routine.
2D Bisect Point Application
The 2D Point feature can also be used with hard
or electronic trigger ball stylus to create 2D
Bisector Point features in slots or a web for
Aligning purposes as shown in PCS Example #6.
All 2D Points are automatically projected into the
requested PCS base planes. The example shown
in figure, demonstrates the use of 2 - 2D Points
on the outside of the GeoWidget bisected to
obtain a 2D Point on the centerline of the body.
Helmel Engineering Products, Inc.
www.helmel.com
Geomet Training Handbook
www.geomet-cmm-software.com
4-5
Chapter 4 – Feature Measurement
Measured features that create a 2D point entity include the 4 Point Intersect, Slot /
Web and Oval Slot Macro Features.
To measure a 2D Point press the 2D Point key, < 5 > from the number pad.
Geomet will prompt you for a PCS base plane the 2D Point will project into, see
figure below. Choose XY, YZ or ZX and begin your measurement.
2D Point Projection Plane Selector
Tolerancing of 2D Points is available in Cartesian, Polar or RFS Positional
Tolerance formats.
Inside Radial / Outside Radial 2D Points
The IR (Inside Radial) and OR (Outside Radial) Point features allow 2D ball
radius compensated probing of cylindrical surfaces. The probe vector is
determined as a vector from the current PCS origin through the ball center of the
stylus. Adding one radius along this vector compensates inside Radial features.
Outside Radial subtracts one probe radius.
Outside Radial 2D Point
An IR / OR measurement is ideal for measuring extremely large radial surfaces
that only offer a small segment to capture data points on. Translate your PCS
origin to the center of the radial feature and capture radial points along the
surface.
Helmel Engineering Products, Inc.
www.helmel.com
Geomet Training Handbook
www.geomet-cmm-software.com
4-6
Chapter 4 – Feature Measurement
3D Points
The 3D Point feature reports the current PCS location of the center of the ball
stylus used in the measurement. It is useful in conjunction with a hard ball stylus
to establish a point on the axis of an ID cone. An example is to establish the
centerline of a turned part using two 3D Points, one at each end in the conical
shaped turned datum used by the head and tail stock made with a center drill.
To measure 3D Point Features, press the 3D Point key, < 5 > + <9>from the
number pad and begin your measurement.
Inside Radial / Outside Radial 3D Points
The IR (Inside Radial) and OR (Outside Radial) Point feature allow 3D ball
radius compensated probing of spherical surfaces. The probe vector is determined
as a vector from the current PCS origin through the ball center of the stylus.
Adding one radius along this vector compensates inside Radial features. Outside
Radial subtracts one probe radius.
These features are ideal for measuring extremely large spherical surfaces that only
offer a small segment to capture data points on. Translate your PCS origin to the
centroid of the feature and capture radial points along the surface.
Tolerancing of 3D Points is available in Cartesian, Polar or RFS Positional
Tolerance formats.
Helmel Engineering Products, Inc.
www.helmel.com
Geomet Training Handbook
www.geomet-cmm-software.com
4-7
Chapter 4 – Feature Measurement
Vector Points
A Vector Point provides the capability to measure the deviation from nominal of a
target point on any arbitrary surface, given the XYZ location of the 3D target and
the nominal unit vector components I, I, and K at the target.
Geomet Vector Point Modes
Geomet offers several modes to capture Vector Points. Each mode is designed to
enhance your ability to capture surface data points from all or some known data.
These methods are:
•
•
•
•
•
Method 1 - No nominal are known
Method 2 - IJK Normal Vector is known
Method 3 - XYZ Nominal Target is known
Method 4 - XYZ Nominal Target and IJK Normal Vector are known
Method 5 - Vector Point Import
To activate the Vector Point screen, press the <5> + <7> keystroke on the number
keypad.
Vector Point Dialog – Manual CMM Operations
Helmel Engineering Products, Inc.
www.helmel.com
Geomet Training Handbook
www.geomet-cmm-software.com
4-8
Chapter 4 – Feature Measurement
Understanding Vector Points
For any point on a planar surface it is easy to understand that there can be a line
through that point that is perpendicular to the plane. Let’s give this line a start
point A, the surface point, and an end point B, and let’s agree that the line length
is always 1 unit of measure, so if we work in inches, the length A-B is always 1”.
Normal Vector off –Z Plane
Normal Vector off –X Plane
We can describe the position of point B relative to A by determining the X, Y,
and Z differences between the 2 points. In the example above left, it is clear that
both A and B have the same X values and the same Y values, so the difference in
X=0, and the difference in Y=0. Since it is given that the line has a length of 1,
the difference in Z=1.
Let’s consider another example above right. This time we’ll give point A the
coordinates X=8, Y=10, Z=1. Here we can see that the differences between points
A and B are:
X
Y
Z
Point A
10.000
-8.000
1.000
Point B
11.000
-8.000
1.000
B-A
1.000
0.000
0.000
We could describe the surface point A along with the information (like directions)
to locate point B together, such as 10,-8,1,1,0,0. This gives us the XYZ position
of A plus the differences in xyz from B to A. This is exactly the format of the
Vector Point: X,Y,Z,i,j,k, where the lower case letters i,j,k are the convention for
representing the x,y,z differences between points B and A.
Helmel Engineering Products, Inc.
www.helmel.com
Geomet Training Handbook
www.geomet-cmm-software.com
4-9
Chapter 4 – Feature Measurement
As surface angles move away from the base coordinate planes, the i,j,k values
must continue to describe the B-A offset differentials accurately. In the case
below, where A=1.5, 1, 1.5, and the surface is a 45° chamfer, the B-A differences
are ΔX=.7071…, ΔY=0, and ΔZ=.7071…. (Think Pythagorean Theorum –
remember the length B-A is always 1), Therefore, we would describe the Vector
Point A = 1.5, 1, 1.5, .7071, 0, .7071.
Notice that the Square Root of the sum of the Squares of i, j and k should always
equal 1 (the length of the Vector). For this reason we refer to the Vector as the
Unit Normal Vector. As viewed in the XZ plane, you have:
Vector Length2 = ΔX2 + ΔY2 + ΔZ2
-or12 = 0.7071…2 + 0.02 + 0.7071…2
ZX Plane as viewed from -Y
Calculation
The i,j,k vector values can be positive or negative, depending on the their
direction. In the case below, i will be negative because point B is offset in the -X
direction from point A, so it would appear as A = 1.5, 1, 1.5, -.7071, 0, .7071.
ZX Plane as viewed from -Y
For any point on a free form or contoured surface, an airfoil or auto body panel
for example, the concept of a line through any surface point that is
“perpendicular” to the contour at that point is less obvious. The 3D point on the
surface is easily described in terms of X, Y, and Z, but the associated ijk values
are not easy to calculate, and are generally derived from a 3D CAD model.
Vector Points are necessary in CMM measurement because they give us the
needed information to apply the probe radius correction in the proper direction,
that being the actual contacting point of tangency on the surface of the stylus
sphere. It is not possible to measure contoured surfaces accurately without this
information. A good example is to measure the Profile of a surface that is
contoured to a specified Profile Tolerance.
Helmel Engineering Products, Inc.
www.helmel.com
Geomet Training Handbook
www.geomet-cmm-software.com
4-10
Chapter 4 – Feature Measurement
Geomet provides tools when necessary to determine the ijk values for any surface
point, for example, when they are not available from other sources. By measuring
a small local plane around a designated surface point, a satisfactory estimation of
the vector angles can be derived for that point. Geomet DCC does this
automatically.
Vector Point Technical Discussion
To better understand the application of Vector Points, please refer to Technical
Note #1, "Curved Surface Measurement with Vector Point".
While the percentage of Geomet users who have made extensive use of the vector
point function is small, some have come to regard it as indispensable, and every
now and then another Geomet owner discovers the wonders of vector point.
Invariably, this discovery is followed by about two weeks of daily and lengthy
phone conversations between the user and our application support engineers,
during which the workings and benefits of the function gradually become clearer
to the user. In an attempt to shorten this process, we have written a Technical
Note, "Curved Surface Measurement with Vector Point", that contains a
description of its workings and some suggested experiments that might be used to
gain familiarity with the problems of curved surface measurement on a manual
CMM. This technical note is long and likely boring for anyone without a serious
interest in the problem.
Should your interest in vector point survive the reading of that technical note, you
may also be interested in learning Methods 1,2,3 and 5 in the Vector Point
chapters on the following pages. These methods detail the process used to create a
working solution to capture large vector point data clouds on complex surfaces.
Tolerancing of Vector Points is available in Cartesian, Polar or RFS Positional
Tolerance formats.
Helmel Engineering Products, Inc.
www.helmel.com
Geomet Training Handbook
www.geomet-cmm-software.com
4-11
Chapter 4 – Feature Measurement
Vector Point Reporting Format
All Vector Point methods provided by Geomet are designed to give the operator
the greatest flexibility to capture vector points with varying known data. The
reporting characteristics of vector points remain the same for all methods used.
Vector Point Report
In the vector point report, the XYZ actual surface point values, nominal deviation
and linear deviation from nominal are shown under the Actuals, Dev. Nom. and
Nominals columns respectively. Additional data reported include Normal
Deviation (N Dev.) and Probe Deviation (Pr Dev), see figure below.
Normal / Probe Deviations
Normal Deviation is the deviation along the Vector Normal from the actual data
point. When applying a profile tolerance on an arbitrary surface, the Normal
Deviation reports where in the profile band the actual point resides.
Probe Deviation is the distance from the actual data point to the axis of the Vector
Normal. This value provides an understanding of the quality of the actual data
point against the expected target point. Under normal conditions, this value
should be small, but can be adversely affected based quality of the drive along the
Vector Normal approach.
Helmel Engineering Products, Inc.
www.helmel.com
Geomet Training Handbook
www.geomet-cmm-software.com
4-12
Chapter 4 – Feature Measurement
Using Vector Point Tools
To begin, we will start with Method 4, where the XYZ Nominal Target and the
IJK Normal Vector are known.
This method requires that you know the XYZ target and the IJK surface vector
normal at that target point. In our examples, we will utilize a 1" diameter
reference sphere. Start by establishing an XYZ Origin on the center of the sphere.
Utilize the orient and alignment of the MCS by creating a PCS with the
ICS⇒PCS function.
Manual CMM application of Method 4
Step 1
Enter the nominal XYZ target and the IJK normal vector values, see example.
Enter XYZ / IJK Values
Step 2
Press the <Ok> button or press the <enter> key on the keyboard. The Target
Positioning dialog will show where the probe is currently in relationship to where
the probe should be to capture the vector point.
Target Window (XY are in Red)
Target Window on Target (XY are in Green)
Helmel Engineering Products, Inc.
www.helmel.com
Geomet Training Handbook
www.geomet-cmm-software.com
4-13
Chapter 4 – Feature Measurement
In the figures on the previous page, the distance to the position the CMM is
required to be at is shown under Target Position. In this example, there are
symbols next to X and Y showing a "closed lock". These are the suggested axes
Geomet has determined you should move and lock over the targeted XYZ point.
Should access to the target point be limited where another axis must be used to
approach the target, select the desired direction in the Approach Selector group.
The lock symbols and target values will update based on your selection.
NOTE: If the Full DRO is activated, the Full DRO will display the Targeting
Position to allow better visual appearance at a greater distance.
NOTE: The color of the XYZ Targeting display can be adjusted, see Geomet
[System Options⇒Colors].
Locate the probe over the target axis specified, lock
the CMM with the axis locks and use the fine adjust
knobs until the X and Y values approach 0.0000".
When inside the allowable position values as
determined by the probe deviation, the readout will
turn green in color as shown in Target Dialog on the
previous page.
Manual CMM Target Approach
Next, carefully move the probe down along the -Z
axis until you come in contact with the part. Geomet
will capture that point and report the actual XYZ location and deviations.
Upon completion, the vector point routine will return to the main vector point
dialog for additional instructions.
Helmel Engineering Products, Inc.
www.helmel.com
Geomet Training Handbook
www.geomet-cmm-software.com
4-14
Chapter 4 – Feature Measurement
DCC CMM application of Method 4
Step 1
Vector Point, DCC Version
Enter XYZ / IJK Values
Enter the nominal XYZ target and the IJK normal vector values.
Step 2
DCC Target Dialog
DCC Approach Vector
Press the <Ok> or <AutoRun> button or press the <enter> key on the keyboard.
The Target Positioning dialog will show where the probe is currently in
relationship to where the probe should be to capture the vector point.
Move the CMM teaching IPs until you are over the expected Stand Off, SO, on
the approach vector. Press the <AutoRun> button and the CMM will reposition
over the expected target point along the IJK surface normal vector at the standoff
location. When at the stand off location the probe will commence to capture the
vector point driving down the surface normal vector.
NOTE: The accuracy of moving along the approach vector is greatly influenced
by the speed of approach and length of approach. To obtain the greatest control, it
is better to have a slower approach speed, which is controlled by the probing
speed and is set in the DCC Options page. To increase the approach distance, the
value can be set on the Vector Point main page.
Helmel Engineering Products, Inc.
www.helmel.com
Geomet Training Handbook
www.geomet-cmm-software.com
4-15
Chapter 4 – Feature Measurement
Manual CMM application of Method 1
Method 1 offers the user a chance to obtain approximate IJK and arbitrary target
data build tools. This method is most likely to provide good results of planar
surface in any orientation. It is designed to allow the operator to perform a IJK
approximation by gathering 3 - 5 data points from which Geomet will calculate a
IJK to be used as the Vector Normal.
Method 1 - No Known Data
To begin Method 1, select the "No Data" choice in the Method group. The Vector
Point tool will reconfigure itself as shown above. The only data that can now be
entered is the Upper / Lower Tolerance and Probe Deviation.
Step 1
To begin the measuring process, press the <Ok> button. The Vector Point tool
will disappear replaced with a message in the Geomet Prompt area stating "IJK
Approximation" and a countdown of 3.
Capture 3 data points surrounding the target area for the vector point. These
points should be sufficiently spaced apart to assure confidence that the captured
data points will solve the algorithm for a plane. Should the points be too close
together, an error can be introduced caused by the influence of the repeatability of
the touch probe and CMM structure. If the surface you are working with is a
known flat plane, spread the data points out.
Step 2
After the IJK Approximation data points have been captured, the Geomet prompt
will now display "Measure Vector Point". Capture the vector point.
Geomet will cycle back to Step 1 waiting for the next IJK Approximation.
Helmel Engineering Products, Inc.
www.helmel.com
Geomet Training Handbook
www.geomet-cmm-software.com
4-16
Chapter 4 – Feature Measurement
DCC CMM application of Method 1
Performing Method 1 on a DCC style CMM offers a greater degree of accuracy
on arbitrary surfaces. The process still requires an IJK Approximation that
becomes a process that the CMM will perform.
DCC Method 1
Capture Target Point
Step 1
As seen in figure above, the Default DCC Settings group is available when the
CMM is a DCC style. Enter a proper standoff distance for the vector point. Enter
a number of points to be used to determine the IJK Approximation in the control
labeled 'No. of Hits". Acceptable value for number of hits is 3 - 5. Enter a
diameter value the CMM will use to capture the IJK Approximation points.
Normally a small diameter such as 0.3" works well. Press the <Ok> button to
proceed.
Step 2
The Vector Point Positioning dialog will appear. You are now instructed to
capture the target vector point on the surface.
Start Approximation
Calculate Approximation
Helmel Engineering Products, Inc.
www.helmel.com
Capture Vector Point
Geomet Training Handbook
www.geomet-cmm-software.com
4-17
Chapter 4 – Feature Measurement
Step 3
When the target point has been captured, you are instructed to move the probe
over the target point and press the <IP> button on the joystick.
Step 4
The CMM will calculate a motion path based on the diameter and number of hits
required for the IJK approximation. The CMM will then capture the data points
under DCC control.
Step 5
When the IJK Approximation has been completed, the CMM will move to the
stand off position on the new vector normal and capture the target vector point to
complete the process.
Manual CMM application of Method 2
Method 2 offers the user a chance to obtain vector points on surface that have a
known IJK surface normal. This method is designed for use on planar surfaces
and can be used to capture many vector points quickly.
Method 2 Known IJK, Unknown XYZ
Step 1
Enter the known IJK values in the edit controls and press <Ok>
Step 2
Geomet will prompt you to capture vector points on the designated surface. Upon
capturing the data point, Geomet recycles step 2.
Helmel Engineering Products, Inc.
www.helmel.com
Geomet Training Handbook
www.geomet-cmm-software.com
4-18
Chapter 4 – Feature Measurement
DCC CMM Application of Method 2
Method 2 on a DCC style CMM requires the same steps as on the manual CMM.
Please refer to Steps 1 and 2 listed above. It is important that a proper motion path
is built by using a proper stand off distance and IP points between vector points.
DCC CMM Application of Method 3
NOTE: Method 3 is only available on DCC style CMM and will be disabled on
manual CMMs.
This method requires that the target XYZ position of the vector point be supplied.
Geomet will build from that target an IJK approximation by capturing data points
on a diameter path around the target point and calculating an IJK vector normal.
Method 3 Vector Point figure
Start IJK Approximation
Step 1
As seen in the figure above, the Default DCC Settings group is available when the
CMM is a DCC style. Enter a proper standoff distance for the vector point. Enter
a number of points to be used to determine the IJK Approximation in the control
labeled 'No. of Hits". Acceptable value for number of hits is 3 - 5. Enter a
diameter value the CMM will use to capture the IJK Approximation points.
Normally a small diameter such as 0.3" works well. Press the <Ok> button to
proceed.
Helmel Engineering Products, Inc.
www.helmel.com
Geomet Training Handbook
www.geomet-cmm-software.com
4-19
Chapter 4 – Feature Measurement
Step 2
The Vector Point Positioning dialog will appear, see figure below. You are now
instructed to position the CMM probe over the target point and press the <IP>
button on the joystick.
Capturing Data Points to Calculate IJK
Capturing Vector Point
Step 3
The CMM will now calculate a motion path based on the IJK Approximation
diameter and number of hits centered on the target point and execute data point
capturing.
Step 4
Once the IJK Approximation has been calculated, the CMM will move to the
stand off point above the targeted vector point and commence capturing the actual
data point.
Helmel Engineering Products, Inc.
www.helmel.com
Geomet Training Handbook
www.geomet-cmm-software.com
4-20
Chapter 4 – Feature Measurement
Method 5 - Vector Point Import File
Method 5, when chosen sets Geomet up to read in an ASCII Vector Point data file
that contains all necessary targeting, vector normal and motion commands to
measure vector points.
Microsoft Excel and Microsoft WordPad have been used to demonstrate how to
build ASCII files to be used in Vector Point import. The samples are available for
download from the Geomet support site (www.Geomet-CMM-Software.com).
When building a table, Geomet uses keywords followed by a parameter list,
which describes an operation. These keywords can be found in the Vector Point
Import Table.
Vector Point Import Table
Block Constructors
Start In the Vector Point file you can have an unlimited number of blocks. This allows you
to group common data point clouds together, especially when running under DCC
control which will allow you run one point at a time or auto-run all points at once.
Each block must begin with a "Start" and end with a "Stop".
Stop The last statement of block.
N: Allows the naming of a block for better description. If no name is found in the block,
a sequential number will be assigned.
Syntax:
N: text
Example:
N:Top Surface from Datum -AText Statements
M: Text Statements are used to create a standard text statement in Geomet. This will
Text: create a new feature, which will become part of your part program.
Syntax:
m: text, text: text
Examples:
M:Sample Text
Text: Sample Text
Helmel Engineering Products, Inc.
www.helmel.com
Geomet Training Handbook
www.geomet-cmm-software.com
4-21
Chapter 4 – Feature Measurement
Probe Management
PROBE: Activates a stylus by calling the tip number and sets it active.
Syntax:
probe: integer_value
Example:
probe:2
Unit of Measurement
U: The filtering of this data occurs by extracting the first letter after the "U:". If the first
letter is a "m" then it switches to metric mode, otherwise it will default to inch.
Syntax:
u:word
Example:
u:inch, u:metric, u:mm
DCC Attributes
PROBESP: Change the probe speed to a new value.
Valid limits: 0.010" - 1.000" (0.254mm - 25.4mm)
Syntax:
probesp: value
Example:
probesp:0.025
TRAVSP: Change the traverse speed to a new value.
Valid limits: 0.010" - 20.0" (0.254mm - 508.0mm)
Syntax:
travsp: value
Example:
travsp:5.0
S: Stand off distance. This is a distance from the nominal XYZ contact point along the
IJK vector normal where the probe will begin the measurement point approach.
Valid Limits: 0.010" - 2.00" (0.254mm = 50.8mm)
Syntax:
S: value
Example:
s:0.25
Helmel Engineering Products, Inc.
www.helmel.com
Geomet Training Handbook
www.geomet-cmm-software.com
4-22
Chapter 4 – Feature Measurement
DCC Attributes
O: Over Travel Distance. The distance the probe will travel past the expected contact
point defined as the nominal XYZ. Should the probe reach this distance, motion will
stop.
Valid Limits: 0.010" - 10.0" (0.254mm - 254.0mm)
Syntax:
O: value
Example:
o:0.25
Tolerance Values
H: Establishes the upper tolerance value for the profile band. NOTE: This value is sign
sensitive.
Syntax:
H: value
Example: (based on a profile band of +0.250 / -0.250)
h:0.25
L: Establishes the lower tolerance value for the profile band. NOTE: This value is sign
sensitive.
Syntax:
L: value
Example: (based on a profile band of +0.250 / -0.250)
l:-0.25
E: Establishes the Probe Deviation or the probing error.
Valid Limits: > 0.0
Syntax:
E: value
Example:
e:0.25
Setting of Print Exception Tags
T: Attaches the Print Exception Tags on the reported values.
Valid Tags: X, Y, Z, XY, YZ, ZX, XYZ
Syntax:
T: tag
Example:
t:x
t:yz
Helmel Engineering Products, Inc.
www.helmel.com
Geomet Training Handbook
www.geomet-cmm-software.com
4-23
Chapter 4 – Feature Measurement
Clearance Motion Targets
I: Creates a clearance point for traversing in DCC control.
IP: NOTE: the XYZ values can be entered using a space, tab
IP= or comma character between the XYZ values.
IP = Example X Y Z -or- X, Y, Z -or- X <tab> Y <tab> Z.
Syntax:
i: x y z
i: x, y, z
ip: x y z
ip= x y z
ip = x y z
Example:
I: 1.234 2.345 3.456
IP= 1.234, 2.356, 3.456
Measurement Point Targets
XYZIJK : Creates the nominal contact point based on the XYZ target and IJK approach
XYZIJK= vector.
This command uses the labels to identify the XYZ IJK values, but, for backward
compatibility, the XYZ IJK values can also be entered without labels. These values
are interpreted as a column of six numbers separated by a space, comma or tab.
Syntax:
x.xxx y.yyy z.zzz i.iii j.jjj k.kkk (old style separated by a space, comma or tab)
X: value Y: value Z: value I: value J: value K: value
X= value Y= value Z= value I= value J= value K= value
X = value Y = value Z = value I = value J = value K = value
Example:
1.234 2.345 3.456 0.000 0.000 1.000
X: 1.234 Y: 2.345 Z: 3.456 I: 0.000 J: 0.000 K: 1.000
X= 1.234 Y= 2.345 Z= 3.456 I= 0.000 J= 0.000 K= 1.000
X = 1.234 Y = 2.345 Z = 3.456 I = 0.000 J = 0.000 K = 1.000
Notes:
1) Leading spaces are removed from each line of text before interpreting.
2) Labels that are followed by an equal sign can also be used with a space before the
equal sign. Example "X =" and "X=" are equivalent. This is not true for "X:".
3) Tabs can be used between values such as "X= <tab> value"
4) The import filter converts all text to uppercase prior to interpreting. Example x: is
equivalent to X:
Helmel Engineering Products, Inc.
www.helmel.com
Geomet Training Handbook
www.geomet-cmm-software.com
4-24
Chapter 4 – Feature Measurement
Vector Point ASCII Table
The table is made up of 2 main sections. These are the Header and Block
Descriptions. The Header is data that can set a global setting for use by all Blocks.
Block Descriptions contain the actual targeting data and supporting tolerance,
motion, probe and text data.
Keywords used in the table are not upper or lowercase sensitive and can be
entered in either. Geomet always interprets keywords in uppercase and performs
the operation automatically.
Vector Point ASCII Table Header
The header has limited keywords that control the global settings for their
respective features.
Keyword
U:
S:
O:
H:
L:
E:
Description
Unit of Measurement
Stand Off Distance
Over Travel Distance
Upper Tolerance Value
Lower Tolerance Value
Probe Deviation
An example of a header would be:
U: Inch
S: 0.50
O: 0.50
H: 0.001
L: -0.001
E: 0.0002
Should any of the header items be missing from the ASCII import file, Geomet
will prompt for a starting value when the file is opened. This does not apply to
Unit of Measure. The keywords shown above can also be used in Block
Descriptions.
Helmel Engineering Products, Inc.
www.helmel.com
Geomet Training Handbook
www.geomet-cmm-software.com
4-25
Chapter 4 – Feature Measurement
Vector Point ASCII Table Block Descriptions
An imported data file can contain many blocks of data defined by a 'start' and
'stop' keyword. This allows organization of common Vector Points. For example;
a block of vector points may contain all necessary points required for the top
surface of the part being inspected. A second block can be used to group all vector
points for the front surface.
The process of building blocks of data can be helpful for use on DCC style
CMMs. By grouping all common vector points, an auto run through the list can be
done without concern of positioning the probe around corners or other obstacles.
In example #3, we show how mixing vector points with interim points (IP) to
create a complete motion path to capture data points on more than a side of the
GeoWidget. Another use of blocks can be to group all common tolerance bands
together.
A block is always started by the keyword "start" followed by vector point
instructions and always ends with a "stop". An example might look like:
START
Keywords / Instructions......
Keywords / Instructions......
Keywords / Instructions......
STOP
Vector Point ASCII Table Creating in Excel
Creating the Vector Point ASCII data file in Excel is one method used where the
power of a spreadsheets internal math functions can assist in developing the
targeting tables.
For example, should you want to create a table of vector points that covers a large
area using a uniform grid of rows and columns, Excel would be used with the fill
range tools or copying formulas. In sample #4, you will see the spreadsheet uses
formulas to step the vector points in a column by changing the Y target value,
0.25" between each point.
Helmel Engineering Products, Inc.
www.helmel.com
Geomet Training Handbook
www.geomet-cmm-software.com
4-26
Chapter 4 – Feature Measurement
Vector Point ASCII Table Saving Data Files
Saving the spreadsheet in a form that Geomet will read can be accomplished by
saving in either file type:
•
•
Formatted Text (Space Delimited)(*.prn)
Text (Tab delimited)( *.txt)
To save into one of these formats from Excel use the drop down menu
[File⇒Save As], see example below.
Excel File Save As Options
Choose one of the acceptable formats (*.prn) or (*.txt) in the "Save as type" drop
down selections. Once the file type has been chosen, select <Save> and Excel will
prompt you with a warning that not all formatting can be saved in this file type.
Accept the warnings and continue saving.
Helmel Engineering Products, Inc.
www.helmel.com
Geomet Training Handbook
www.geomet-cmm-software.com
4-27
Chapter 4 – Feature Measurement
Vector Point ASCII Table Keyword Reference Table
Each keyword used in the Vector Point data file utilizes a fixed syntax for proper
application. In some cases there are more than one syntax for a keyword. The
tables below help to demonstrate the proper application.
keyword START
Identifies the beginning of a block. Must have a STOP keyword associated at the
end of the block. There are no parameters following the keyword.
usage START
keyword STOP
Identifies the end of a block. Must have a START keyword associated at the
beginning of the block. There are no parameters following the keyword.
usage STOP
keyword N:
Used within the START and STOP keywords to attach a label to the block. There
should be only 1 N: associated with each block. The naming of a block is optional
and should there be no name included, the label for the block will be a sequential
number starting with 1.
usage N: Top Surface of GeoWidget
keyword U:
Unit of Measurement. Prepares the data to be imported and reported in metric or
inch modes. This does not place a record in the current inspection report.
usage U:metric, U:mm, U:inch
keyword PROBE:
Activates a requested stylus. This feature will place a stylus record in the
inspection report.
usage PROBE: 2
Helmel Engineering Products, Inc.
www.helmel.com
Geomet Training Handbook
www.geomet-cmm-software.com
4-28
Chapter 4 – Feature Measurement
keyword M: -or- TEXT:
Places a standard Geomet text statement in the inspection report.
usage M: Top surface of the GeoWidget
usage TEXT: Top surface of the GeoWidget
keyword H:
Establishes the upper limit for the Vector Point profile band. The value attached
to this keyword is sign sensitive.
usage H: 0.001
keyword L:
Establishes the lower limit for the Vector Point profile band. The value attached
to this keyword is sign sensitive. Should you require a profile band of +0.001 / 0.001 you must enter -0.001 as shown below.
usage L: -0.001
keyword E:
Establishes the Probe Deviation or probing error limit. This value must be >
0.000.
usage E: 0.0002
keyword T:
Attaches Print Exception Tags on the reported Vector Point values based on the
parameters shown after the keyword. The available parameters are X, Y and Z
used alone or in any combination. for example, using the X alone will tag only the
X reported value. Using XZ or ZX will attach a tag to X and Z values.
usage T:XYZ
Helmel Engineering Products, Inc.
www.helmel.com
Geomet Training Handbook
www.geomet-cmm-software.com
4-29
Chapter 4 – Feature Measurement
keyword I:, IP:, IP=, IP =
Creates an Interim Point (IP) used during DCC operations to traverse between
XYZ locations. These values are entered in local Part Coordinate System values.
There are 4 variants to entering Interim points, see usage.
An interim point has 3 values; X, Y and Z. The import filter will accept a space
comma or tab between the values.
usage
I:
I:
IP:
IP=
IP =
X
1.234
1.234,
1.234
1.234,
1.234
Y
2.345
2.345,
2.345
2.345,
2.345
Z
3.456
3.456
3.456
3.456
3.456
keyword X: Y: Z: I: J: K:, X= Y= Z= I= J= K=
Creates the Vector Point target. This is the expected point of contact on a nominal
surface. This value also is inserted in the tolerance nominal of the vector point
being created. These values are entered in local Part Coordinate System values.
There are 4 variants to entering Interim points, see usage. NOTE: to ensure
compatibility with previous versions of Geomet, a target point can also be defined
without any prefix values. In these instances, the XYZ and IJK values are entered
in s columns and extracted into; column 1 = X, column 2 = y, etc.
An interim point has 3 values; X, Y and Z. The import filter will accept a space
comma or tab between the values.
usage
1.10
1.10,
X:
X=
X=
2.20 3.30 0.00 0.00 1.00
2.20, 3.30, 0.00, 0.00, 1.00
1.10 Y: 2.20 Z: 3.30
1.10 Y= 2.20 Z= 3.30
1.10 Y = 2.20 Z = 3.30
I:
I=
I=
0.00
0.00
0.00
J:
J=
J=
0.00
0.00
0.00
K:
K=
K=
1.00
1.00
1.00
keyword PROBESP:
Updates the current probe speed for use on DCC style CMMs.
Valid limits: 0.010" - 1.000" (0.254mm - 25.4mm)
usage PROBESP: 0.25
Helmel Engineering Products, Inc.
www.helmel.com
Geomet Training Handbook
www.geomet-cmm-software.com
4-30
Chapter 4 – Feature Measurement
keyword TRAVSP:
Updates the current traverse speed for use or DCC style CMMs.
Valid limits: 0.01" - 20.0" (0.254mm - 508.0mm)
NOTE: Some CMMs have internal limits on maximum traverse speeds maybe
less than the valid limit shown above.
usage TRAVSP: 10.0
keyword S:
Establishes the standoff distance for use with DCC style CMMs. This is the
distance along the vector point surface normal (IJK) above the expected target
point where the probe will position itself prior to commencing the measurement
move to capture the XYZ target. This point along the vector normal is referred as
a Stand Off point and is calculated at the time of executing the vector point data
file.
The smaller the stand off distance, the greater the chance of missing your target
points. This is caused by the instability of the vector motion approach from the
stand off point to the target point. The CMM will attempt to follow the IJK vector
to the target point but is influenced by the mass of the CMM, the speed prior to
starting the probe move, the speed of the probe move and the stability of the
motor tuning. It is suggested, that a minimum standoff distance of 0.50" and a
slower probe speed of 0.20" be used in all cases where possible.
One analogy to explain probe motion is to understand the physics of driving a car.
Most drivers when approaching a corner will slow down to make the turn smooth.
However, should you turn while driving too fast, your car will overshoot the
expected turning radius. The driver will then have to compensate to get back to
the center of the turning radius, or lane. The car will then overshoot the expected
lane due to the mass of the car pushing beyond the center point. The car will then
sway back and forth while stabilizing toward the center of the driving lane.
CMMs are no different. A heavy CMM will require slower speeds during tight
turns or to follow a projected path accurately.
usage S: 0.50
Helmel Engineering Products, Inc.
www.helmel.com
Geomet Training Handbook
www.geomet-cmm-software.com
4-31
Chapter 4 – Feature Measurement
keyword O:
Defines the Over Travel distance the probe will travel past the expected XYZ
measurement contact point. Should the probe movement reach this distance, all
motion stops as a safety precaution.
The over travel distance should be sufficient to allow safe passage of the probe
without allowing contact with the body or head of the probe.
usage O: 0.75
Vector Point ASCII Table Execution
When the vector point ASCII data file has been opened, the execution of that data
will depend on whether you have a manual or DCC style CMM. To execute, start
by selecting the block from the data file in the drop down tool labeled "Select
Block->", see example below.
Select Vector Point Block
To execute the vector point information contained in the block on a manual
CMM, select the <Ok> button. The behavior of the targeting will be the same as
defined in Manual Application of Method 4. However, the vector point import
tool will supply the XYZ and IJK values with every entry in the data block.
Executing the vector point data file on a DCC system can be done in 2 methods.
Depending on the information in the vector point data file, you can choose to
execute one point at a time, or run the entire block.
Executing one point at a time allows the building of the motion map by manually
teaching the probe path and entering IPs by pressing the IP button on the joystick.
Geomet will provide a targeting box to the standoff point before the expected
XYZ contact point, as described in DCC Application of Method 4. To perform
this method, press the <Ok> button. When each point has been completed, the
vector point import tool will advance to the next point in the data file and prompt
you to proceed with the next step.
Should you have data blocks that include all information necessary to allow safe
transition of the probe between vector points, select the <AutoRun> button from
the dialog. This will execute all vector points in the data block. In example #3,
you will find a data block that contains all the motion required to move the probe
safely around the GeoWidget and capture several vector points.
Helmel Engineering Products, Inc.
www.helmel.com
Geomet Training Handbook
www.geomet-cmm-software.com
4-32
Chapter 4 – Feature Measurement
Multi-Point Features in Geomet
All multi-point features in Geomet can be measured or constructed with more
than the default number of data points. Those defaults can be set in:
[System Options⇒Feature Characteristics]
The defaults set by Geomet are only minimum suggestions to solve the requested
feature. To obtain additional information, such as form, always add additional
data points.
The table below shows the corresponding keystroke, icon and menu access for
each feature.
Keyboard
Menu
Suggested
Minimum Data
Points
Line
m
[Measure⇒Line]
2
Circle
z
[Measure⇒Circle]
4
Plane
b
[Measure⇒Plane]
4
Cylinder
c
[Measure⇒Cylinder]
6
Cone
n
[Measure⇒Cone]
7
Sphere
v
[Measure⇒Sphere]
5
Feature Type
Icon
To request additional data points during the
inspection, press the <shift> key when selecting
your feature. For a circle use <shift + Z> and you
will be prompted to enter the data point count
required.
You can also increase the data point count by
pressing the feature key repeatedly. For example
if you are measuring a Circle and would like to
add two more data points, just press the <z> key
twice and the required count will increase. This can be done even when data
points have already been captured. To terminate and solve a feature before
capturing all data points, press the Terminate key, <F5>.
Helmel Engineering Products, Inc.
www.helmel.com
Geomet Training Handbook
www.geomet-cmm-software.com
4-33
Chapter 4 – Feature Measurement
Line
Keyboard:
m
Menu:
Measure ⇒ Line
A line is the trail left by a point that moves in a constant direction. Lines are
infinitely long and have no width. A point somewhere along its length and a
direction characterizes a line. In Geomet a line is reported as a pierce point with a
PCS base plane and two or three base plane projection angles. A 2D Line is
reported as the point where it intersects with a PCS axis. A 3D Line is reported as
the 2D Intersection with a PCS base plane.
The Line feature provides you with the means to measure multi-point 2D Lines.
2D lines are projected into a PCS base plane and report the angular deviation in
the current PCS base plane and a 1D pierce value of a PCS base axes, see figure
below. The line feature is multi-point consisting of 2 - 32767 data points.
Line projected into the PCS
Measure a Line
When starting the line tool <m>, you will be presented with a direction selector
dialog if Auto-Direction is turned off. The direction selection allows you to
choose the probing direction suited for the line to be measured.
Direction Selector
Projection Plane
Pierce Axis
After you select the probing direction, Geomet will prompt you to "Measure an X Line", for example. Should Auto-Direction be turned on, Geomet will display
"Measure a Auto-Line". Proceed to capture the required number of data points.
Helmel Engineering Products, Inc.
www.helmel.com
Geomet Training Handbook
www.geomet-cmm-software.com
4-34
Chapter 4 – Feature Measurement
The determination of the PCS base plane is supplied by the operator after the
capturing of the data points. Depending on the angle of the line, Geomet will
prompt for the selection of a PCS axis to report. Geomet uses an angle of ± 10°
between the line normal to a PCS axis to determine if the operator should be
prompted to select the pierce axis.
For example, if a line being measured crosses the PCS X axis at 1.000" and has a
reported angle of 85°, the operator will not be prompted to select a PCS axis.
Should the same line have a reported angle of 75°, then Geomet would prompt the
operator to select the pierce axis showing the solutions of both values as shown in
Pierce Axis figure on the previous page.
After completing the first measured line, Geomet auto-cycles preparing to
measure another line. Note: after the first measure line is completed, Geomet will
not prompt you for a projection plane. It is assumed that you will continue
measuring lines in the original selected plane. Should you require a new
projection plane, press <Esc> and select the line tool again.
The direction of the line is determined by the direction of the data points, from the
first data point to the second. In our example, the order the data points were
captured created a reported angle of -90° whereas should the order have been
reversed, the reported angle would be +90°. NOTE: see Switching the Reported
Angle Directions below. This is important when applying a tolerance value to the
angular component.
During the capturing of the data points, should you want to change the requested
number of data points you can press the line key repeatedly and the count will
increase by one with every depress without losing data points already captured.
If you have already captured sufficient data points to satisfy the line press <f5>,
Terminate, to solve the line without having to capture the remaining prompted
data points.
Tolerancing of Lines is available in Cartesian / Linear format.
Helmel Engineering Products, Inc.
www.helmel.com
Geomet Training Handbook
www.geomet-cmm-software.com
4-35
Chapter 4 – Feature Measurement
Switching of the Reported Pierce Axis
To switch the reported pierce axis of an already measured or
constructed line, highlight the line in the report area and rightclick. A sub menu will appear where you can choose [Switch PCS
Pierce Axis]. The option is available only when the line has not
been used as a PCS component and does not have a reference lock
attached to it.
Switching the Reported Angle Directions
As mentioned previously, the order the data points were taken in
will configure which angle will be reported. If you want to switch
the supplement angle with the normal reported angle, there exists
an option flag that can be set.
To switch the angles, highlight the line feature in the report section by left
clicking on it. Once the feature is highlighted, right-click to bring up the submenu. Choose [Switch Angles....]. The report will update and reflect the switch
has been applied. To change it back, toggle the switch again by selecting [Switch
Angles....] again.
Helmel Engineering Products, Inc.
www.helmel.com
Geomet Training Handbook
www.geomet-cmm-software.com
4-36
Chapter 4 – Feature Measurement
Circle
Keyboard:
z
Menu:
Measure ⇒ Circle
The Circle feature reports the center location and diameter or radius of bores and
bosses whose axes are parallel to a PCS axis. The circle feature will give
erroneous results on skewed bores and bosses. Circle center locations are
projected into a PCS base plane and are 2D in nature.
Circle projected into the PCS
To measure bores or bosses, press the Circle key < z > for the default number of
data points as set in System Options. Geomet will then prompt you for the type of
feature being measured, ID, OD, IR or OR. If you have Auto Direction enabled,
this prompt will not appear.
Inside/Outside Selector
Out-of-Form Warning
If you required additional data points, you can repeatedly press the Circle key
which increments the required number by one, or press < shift> + < Z > and you
will be prompted to enter the required number.
Geomet performs a form validation on your captured data points. This function is
called the Multi-Point Error Limit and is controlled by a setting in System
Options. In the event your circle exceeds this limit, Geomet will prompt you to
accept or re-measure the feature. If you elect < Re-Measure >, you will be
prompted to capture new data points for the same feature. Note: The Multi-Point
Helmel Engineering Products, Inc.
www.helmel.com
Geomet Training Handbook
www.geomet-cmm-software.com
4-37
Chapter 4 – Feature Measurement
Error Limit test is only performed in the self-teach mode, not during a part
program run.
Data points used to calculate a circle if not spread around the circle can cause
erroneous results. In the table below, we will use a 3 point circle with one point
.00014" off the nominal value for a 1.00" radius. The results are calculated to
show the error that is part of the reported values.
Arc(Degrees)
180
120
90
60
30
20
10
5
Center Error
0.00014
0.00028
0.00048
0.00104
0.00409
0.00914
0.03549
0.12823
Circle Deviations
Radius Error
0.00000
0.00014
0.00034
0.00090
0.00395
0.00899
0.03535
0.12810
Tolerancing of Circles is available in Cartesian, Polar or RFS, MMC and LMC
Positional Tolerance formats.
Switching between Radius and Diameter
Changing the reported characteristics of a previously
measured or constructed feature can be done directly on
the report. Select the circle feature in the report area and
right click to activate the feature sub menu. From the
available commands select [Switch Dia. / Rad.].
Feature Averaging
Feature Averaging provides the user with the tools to
evaluate a critical size dimension on a Circle. During the
part inspection, Geomet will review the Diameter or
Radius and compare it against the tolerance band. If it
exceeds the tolerance band and remains within an established evaluation zone,
Geomet will automatically rerun the feature up to the cycle limit and average all
the reported form values. Refer to Feature Averaging in this chapter for usage.
Helmel Engineering Products, Inc.
www.helmel.com
Geomet Training Handbook
www.geomet-cmm-software.com
4-38
Chapter 4 – Feature Measurement
Plane
Keyboard:
b
Menu:
Measure ⇒ Plane
Planes have locations, attitudes and directions. The location of a plane is defined
as the point at which it is pierced by a PCS axis. The attitude of a plane is defined
by the projection angle AX/Y, AY/Z and AZ/X of the plane normal in each of the
three PCS base planes, with range values from 0° to ± 180°.
Plane represented in the current PCS
The Plane feature may be used to measure non-skewed planes. The printed pierce
point of a measured plane is determined by the PCS axis that is most parallel to
the normal of the measured plane. Planes which are essentially parallel to PCS
base planes have only two attitude angles which are meaningful, the third is
printed in lower case, as for example "ax/y" to indicate its reduced significance.
AX/Y Projection
AY/Z Projection
AZ/X Projection
The vector normal defines the direction of a plane. The first figure above shows a
plane with its projection into each PCS base plane. The normal, when projected
into each PCS base plane provides the attitude in angles, see example above.
Helmel Engineering Products, Inc.
www.helmel.com
Geomet Training Handbook
www.geomet-cmm-software.com
4-39
Chapter 4 – Feature Measurement
Probe Direction Selector
Out-of-Form Warning
To measure Planes press the Plane key <b> for the default number of hits as
established in System Options, or < shift> + < B > for a multi-point plane. If you
required additional data points even during point capture, you can repeatedly
press the Plane key which increments the required number by one. If autodirection is not enabled, you will be prompted to enter the probing direction.
Upon completion of gathering your required number of data points, Geomet will
test the form error of the newly calculated plane. If the form error exceeds the
default setting, you will be prompted to < Accept > or < Re-Measure > the plane.
Pierce Point Reporting
It is important that your PCS be established close to the desired location where the
distance should be taken. As shown in figure below, should the PCS be outside
the effective location the distance is expected, the reported result will not
represent the actual distance.
Referring to figure below, we have two established Part Coordinate Systems. PCS
1, established on the base of the 2.000" gage block. PCS 2 is located 4.000"
inches in the X direction from the right side of the gage block.
Two planes were measured, one representing the lower base and one on top of the
gage block, The lower base plane was used to establish the XY PCS Base Plane
for both PCS 1 and 2. The top plane had an AZ/X of 89.9943° and the AY/Z was
Helmel Engineering Products, Inc.
www.helmel.com
Geomet Training Handbook
www.geomet-cmm-software.com
4-40
Chapter 4 – Feature Measurement
90.0000°. The intersection of the pierce point with the PCS1 Z-Axis, d1, is
reported at 1.9999". The reported pierce point on the Z-axis of PCS2, d2 is
1.9995". By not having PCS localized to the actual measured surfaces we
introduced 0.0004", d3, error!
Upper / Lower Boundary Planes
The definition of the Boundary Plane is a plane that passes through the minimum
or maximum extreme data point of a measured or constructed plane and parallel
to that reported plane. This plane can be used in all cases which a measured or
constructed plane is be used such as PCS components, constructions and
tolerance.
Boundary Plane Menu
Boundary Plane Visual Example
Geomet offers two directions from which you can choose, Upper and Lower. The
Upper Boundary Plane represents the plane constructed at the most positive side
of the reported pierce point. For example a plane reported at Z: +1.345 might have
an Upper Boundary Plane reported at +1.349.
To use the feature, measure or construct a plane, select the plane directly on the
report by left-clicking our mouse over the feature to highlight it . Activate the
feature menu by right clicking and a menu similar to the one shown above will
pop-up. Choose Upper or Lower Boundary Plane and the feature will recalculate
showing the new reported values.
It is suggested to recall the plane, then apply the Boundary plane change to the
recalled plane. This ensures the original plane is available for other construction
or tolerance requirements.
If you do not have the Upper/Lower menu selections in your pop-up, the plane
you have selected is referenced by another operation. You can only change the
reported values on planes that have no reference. However you can recall the
plane and then apply Upper/Lower Boundary Plane.
Helmel Engineering Products, Inc.
www.helmel.com
Geomet Training Handbook
www.geomet-cmm-software.com
4-41
Chapter 4 – Feature Measurement
One example in which this feature can be used is to determine the width of a slot,
see figure below. Where the effective distance is the closest two points as if a
gage block were used to identify the width of a slot. Select the plane representing
one side of the slot and report it as an upper boundary plane, then select the
opposite plane and report it as the lower. Obtain the distance <s> between the
planes and that distance will represent the closest points in the slot.
Boundary Plane Slot Example
Tolerancing of Planes is available in Cartesian / Linear format.
Helmel Engineering Products, Inc.
www.helmel.com
Geomet Training Handbook
www.geomet-cmm-software.com
4-42
Chapter 4 – Feature Measurement
Sphere
Keyboard:
v
Menu:
Measure ⇒ Sphere
A sphere is the trail left by a point traveling in every conceivable direction at a
constant distance from another point called its center. A sphere is also the surface
generated by a rotating circle about a coplanar axis through its center. The sphere
is characterized by its size as a Radius or Diameter and a three dimensional center
location.
Inside/Outside Selector
Out-of-Form Warning
To measure a sphere, press the < v > key for the default number of data points as
established in System Options, or < shift > + < V > for a multi-point sphere.
If auto-direction is not enabled, Geomet will prompt you for the characteristic of
the sphere, ID, OD, IR or OR. After the data points have been captured, Geomet
will test the form error and if exceed, will prompt you to < Accept > or < ReMeas >.
Tolerancing of Spheres is available in Cartesian / Linear format.
Switching between Radius and Diameter
Changing the reported characteristics of a previously
measured or constructed feature can be done directly on
the report. Select the sphere feature in the report area and
right click to activate the feature sub menu. From the
available commands select [Switch Dia. / Rad.].
Feature Averaging
Feature Averaging provides the user with the tools to
evaluate a critical size dimension on a Sphere. Refer to Feature Averaging in this
chapter for usage.
Helmel Engineering Products, Inc.
www.helmel.com
Geomet Training Handbook
www.geomet-cmm-software.com
4-43
Chapter 4 – Feature Measurement
Cylinder
Keyboard:
c, Shift + C
Menu:
Measure ⇒ Cylinder
A cylinder is the trail left by a line, which revolves around and at a constant
distance away from a parallel line called its axis. A cylinder is characterized by a
point and direction of its axis and by its diameter or radius.
Cylinder Projection in the current PCS
The cylinder feature determines the size, PCS pierce point and attitude of the axis
of bores and shafts. The attitude of a cylinder axis is expressed like the attitude of
the normal of a plane, using the characteristic identifiers AX/Y, AY/Z and AZ/X.
These angles can vary between 0° and ± 180°. The axis of a cylinder has a
direction as well as an attitude: its direction is from a group of points measured
near its bottom toward a group of points measured near its top.
The reporting of the position in the PCS is the point where the axis of the cylinder
intersects a PCS base plane, called its pierce point. Geomet determines which
PCS base plane to report by determining which PCS base plane the axis of the
cylinder is most normal to.
Inside/Outside Selector
Out-of-Form Warning
To measure bores or bosses press the Cylinder key <c> for the default number of
data points as established in System Options, or <shift> + < C > for a multi-point
cylinder.
Helmel Engineering Products, Inc.
www.helmel.com
Geomet Training Handbook
www.geomet-cmm-software.com
4-44
Chapter 4 – Feature Measurement
If auto-direction is not enabled, Geomet will prompt you for the type of cylinder,
ID, OD IR or OR.
Collect the first 3 data points at or near the "bottom" of the bore or boss. Collect
the last 3 data points at or near the "top". Should you require more than 6 data
points, the data points captured after first 3 and before the last 3 can be captured
anywhere on the bore or boss.
Collect the First 3 Data Points
Collect the Last 3 Data Points
The order in which these two 3 point end groups are collected determines the
direction of the axis of the cylinder. After the data points have been captured,
Geomet will test the form error and if exceeded, will prompt you to < Accept > or
< Re-Meas >.
The order in which these two 3 point end groups are collected determines the
direction of the axis of the cylinder. After the data points have been captured,
Geomet will test the form error and if exceeded, will prompt you to < Accept > or
< Re-Meas >.
Tolerancing of Cylinders is available in Cartesian, Polar or RFS, MMC and LMC
Positional Tolerance formats.
Switching between Radius and Diameter
Changing the reported characteristics of a previously
measured or constructed feature can be done directly on
the report. Select the cylinder feature in the report area
and right click to activate the feature sub menu. From the
available commands select [Switch Dia. / Rad.].
Feature Averaging
Feature Averaging provides the user with the tools to
evaluate a critical size dimension on a Cylinder. During
the part inspection, Geomet will review the Diameter or Radius and compare it
against the tolerance band. If it exceeds the tolerance band and remains within an
established evaluation zone, Geomet will automatically rerun the feature up to the
cycle limit and average all the reported form values. Refer to Feature Averaging
in this chapter for usage.
Helmel Engineering Products, Inc.
www.helmel.com
Geomet Training Handbook
www.geomet-cmm-software.com
4-45
Chapter 4 – Feature Measurement
Cone
Keyboard:
n, Shift + N
Menu:
Measure ⇒ Cone
A cone is the trail left by a line which rotates about another non-parallel and nonperpendicular, intersecting line called its axis. The intersection of the two lines is
called the apex. The cone is characterized by a point on its axis (PCS base plane
pierce point), the direction of its axis, its apex, its included angle and its radius at
the pierce point.
The attitude of a cone axis is expressed like the attitude of the normal of a plane,
using the characteristic identifiers AX/Y, AY/Z and AZ/X. These angles can vary
between 0° and ± 180°. The axis of a cone has a direction as well as an attitude:
its direction is from a group of points measured near its bottom toward a group of
points measured near its top.
To measure a Cone, press the < n > key for the default number of data points as
established in System Options, or < shift > + < N > for a multi-point cone. If autodirection is not enabled, Geomet will prompt you for the type of cone as either a
ID, OD IR or OR.
Inside/Outside Selector
Out-of-Form Warning
Collect the first 3 data points at or near the "bottom" of the cone. Collect the last 3
data points at or near the "top". Should you require more than 7 data points, the
data points captured after first 3 and before the last 3 can be captured anywhere
on the cone.
Collect the First 3 Data Points
Collect the Last 3 Data Points
The axis of a cone has a direction as well as an attitude: its direction is from the
group of points measured near its bottom toward the group of points measured
near its top. After the data points have been captured, Geomet will test the form
error and if exceeded, will prompt you to < Accept > or < Re-Meas >.
Helmel Engineering Products, Inc.
www.helmel.com
Geomet Training Handbook
www.geomet-cmm-software.com
4-46
Chapter 4 – Feature Measurement
Switching between Radius and Diameter
Changing the reported characteristics of a
previously measured or constructed feature can be
done directly on the report. Select the cone feature
in the report area and right click to activate the
feature sub menu. From the available commands
select [Switch Dia. / Rad.].
Cone Offset
The Cone Offset command produces a reported
diameter at a specified distance from the PCS
Base Plane. For example, what would the
diameter on the cone at –0.250” below the PCS? To obtain the value, highlight the
cone in the report and right click to activate the sub menu, choose [Cone Offset].
Cone Offset Setup Tool
Reported Cone Offset Diameter
Enter –0.250 in the Cone Offset Setup Tool and select <Ok>. The Offset Tool
will provide a range of available values. This starts at the apex of the cone. The
reported cone diameter is the solution of a parallel plane intersecting the cone at
the specified offset.
Reported results from a Cone Offset
Helmel Engineering Products, Inc.
www.helmel.com
Geomet Training Handbook
www.geomet-cmm-software.com
4-47
Chapter 4 – Feature Measurement
Cone Diameter
Another very powerful feature of the available
Cone analysis tools is the ability to locate the
height off the PCS Base Plane that a specified
diameter exists at. For example if measuring a
cone that defines the seating surface of a valve
and the dimensional requirement is to measure the
height where the cone has a diameter of 3.500”.
First we measure the cone the right click on the
cone to activate the sub menu. From the
commands, choose [Cone Diameter]. Enter 3.500
in the Cone Diameter Setup Tool and press <Ok>.
Cone Diameter Setup Tool
Reported Cone Diameter
In the graphics, a circle appears at the specified height. The reported value will be
shown in the report.
Reported results from a Cone Offset
In this example the measured height is called the Effective Depth and has a value
of 1.1792”.
Helmel Engineering Products, Inc.
www.helmel.com
Geomet Training Handbook
www.geomet-cmm-software.com
4-48
Chapter 4 – Feature Measurement
Cone Drop Ball Test
The Cone Drop Ball Test is used to place a test
ball in a cone and calculate the diameter and
position where the ball it intersects with the cone.
To use this test, right click on the cone in the
report and choose [Cone Drop Test] from the sub
menu.
Enter the diameter of the ball that will be dropped
into the cones open end.
Cone Drop Test Setup Tool
Showing the Ball Drop
By default the results of the calculation is the XYZ position of the center point of
the ball and its diameter on the cone where it makes contact. The reported
position can be switched to the top of the ball by right clicking on the Drop Test
record and from the sub menu choose [Switch Top <-> Center Reporting].
Cone Drop Test Sub Menu
Ball Drop Results
Helmel Engineering Products, Inc.
www.helmel.com
Geomet Training Handbook
www.geomet-cmm-software.com
4-49
Chapter 4 – Feature Measurement
4-Point Intersect
Keyboard:
. (period)
Menu:
Measure ⇒ 4 Point Intersect
The 4 Point Intersect routine is used to measure the included angle and 2D
location of corners and edges formed by the intersection of two planes both of
which must be perpendicular to one and the same PCS base plane. If this
condition is not met the results will be erroneous.
To measure corners or edges press the 4 Point Intersect
key < . >, choose the first probing direction. Should AutoDirection be turned on, the selections process for probing
direction will be skipped and Geomet will proceed directly
to the capture data point phase.
Direction Selector
Once the direction for the first pair of data points has been
chosen, Geomet will prompt you to "Select Next Probe Direction". Choose the
probing direction for the next pair of data points.
Geomet will prompt to capture the first pair of data points:
4 Point Intersect, Probe -X [1 of 4]
When Auto-Direction is active, the prompt will show:
4 Point Intersect, Probe Auto-Dir [1 of 4]
Capture the data points following the prompted direction. Upon completion of the
capturing 4 data points, Geomet will solve for the 2D location and included angle
between the two line.
The 4 Point Intersect uses two points
captured in the -X direction, Pt1 and
Pt2. Followed by capturing two +Y data
points, Pt3 and Pt4, to form the corner
intersect point.
The reported values include a 2D
projected location and the angle
between data points Pt1-Pt2 and Pt3Pt4.
4-Point Intersect Projection in the current PCS
Tolerancing of a 4 Point Intersect
feature is available in Cartesian, Polar or RFS Positional Tolerance formats.
Helmel Engineering Products, Inc.
www.helmel.com
Geomet Training Handbook
www.geomet-cmm-software.com
4-50
Chapter 4 – Feature Measurement
Slot / Web
Keyboard:
, (comma)
Menu:
Measure ⇒ Slot / Web
Slots and Webs consist of hollow or solid spaces between parallel planes. The
Slot / Web routine is only capable of measuring slots and webs whose boundary
planes are parallel to PCS base planes. The Slot / Web routine determines the
width of the feature and its center location in either X, Y or Z direction relative to
the current PCS Origin.
To measure a Slot or Web, press the < , > key. Geomet will
respond with the direction selector unless Auto-Direction is
active. Choose the appropriate probe direction. The Slot /
Web feature will automatically reverse the probe direction
for the second point at the time of capturing the data points.
For example, if you request a -X direction, that will become
the required probing direction for the first point. The second
point will then be captured in the +X direction.
Direction Selector
Take one -X data point inside the slot followed by a second +X data point
opposite the first data point. Geomet will calculate the width and centerline of the
slot and project the centerline to the PCS x-axis.
NOTE: If Auto-Direction is turned on it
is possible to measure 2 data points in
the same direction such as a step. For
example, establish a PCS by choosing
ICS⇒PCS followed by a -Z point on
the surface plate and set the Z origin.
Place a 1.000" gage block on the
surface plate and measure a Slot / Web
with Auto-Direction turned on. Take a
data point on the surface plate followed
by a data point on the top surface. The
reported values will show the Width as
1.000" and the Z mid-point at 0.500".
4-Point Intersect Projection in the current PCS
It is important to note that slots and webs that are not parallel to the PCS base
planes will report erroneous data and should not be attempted.
Tolerancing of Slot/Web is available only in Cartesian / Linear format.
Helmel Engineering Products, Inc.
www.helmel.com
Geomet Training Handbook
www.geomet-cmm-software.com
4-51
Chapter 4 – Feature Measurement
Oval-Slot
Keyboard:
shift + <
Menu:
Measure ⇒ Oval Slot
The Oval Slot feature is a routine that connects two circles and reports the centerto-center distance or outside width and slot width values as well as the 2D bisect
point between centers. An Oval Slot can be treated as any other 2D feature with
regard to constructions, tolerance and PCS components.
This feature can be activated either through the measure drop
down menu [Measure⇒Oval Slot] or by pressing the "Shift
+ <" keys on the keyboard. When activating, a prompt will
show allowing you to identify the feature characteristic.
Select Inside/Outside Radius or Diameter from the selection
tool.
Feature Type
Geomet will then prompt you to measure the first radius of the oval slot. Each
radius will require 3 data points; the prompt will step you through until all six
data points have been gathered.
Displayed Oval / Slot
Oval / Slot Definition
Measure Oval Slot [Rad 1(1/3)]
Graphically you will see a projected outline of the Oval Slot.
Reporting of a Oval Slot
The report generated when measuring an Oval Slot starts with a width value. This
value is the basic width between the two straight and parallel sides. Following the
width is the Extended Distance or Center-to-Center Distance, depending upon
which is selected. Extended distance is the outside length of the oval slot. Center
to Center is the distance between radius centers. The position is reported as a 2D
point. Standard tolerance tools are applied to all components.
An Oval Slot can be treated as a 2D Point feature when used as a PCS or
construction component.
Helmel Engineering Products, Inc.
www.helmel.com
Geomet Training Handbook
www.geomet-cmm-software.com
4-52
Chapter 4 – Feature Measurement
Switching between Extended and Center-To-Center Distances
The report default will show the extended length. You can toggle the report to
show the center-to-center length by highlighting the feature with a left-click.
Activate the report menu by right clicking.
Oval / Slot Sub-Menu
Choose the [Switch Ext. Length <-> Center Dist] command to toggle between
Extended Length and Center-to-center reporting, labeled “Distance”.
Consideration when using the Oval Slot
The Oval Slot routine is a macro function utilizing two circles and the bisect
feature packaged into one function. Graphically, it incorporates two lines to show
the outline for the width and two semi-circles for the ends. However, because the
radii were measured with only three data points, form can not be determined. The
width is the average of the two diameters; therefore each radius should be of
similar size to ensure greatest accuracy. This feature is not designed to identify
individual radii of dissimilar size.
Helmel Engineering Products, Inc.
www.helmel.com
Geomet Training Handbook
www.geomet-cmm-software.com
4-53
Chapter 4 – Feature Measurement
Feature Averaging
Feature Averaging provides the user with the tools to evaluate a critical size
dimension on Circle, Sphere and Cylinder features. During the part inspection,
Geomet will review the Diameter or Radius and compare it against the tolerance
band. If it exceeds the tolerance band and remains within the established
evaluation zone, Geomet will automatically rerun the feature up to the cycle limit
and average all the reported form values.
Establishing the Default Settings for Feature Averaging
You can establish the default guidelines for the
two parameters that Feature Averaging will use in
System Options. To create the defaults, go to the
System Options by pressing the < F9 > key. Select
Form Control from the various tabs available.
You can set defaults for the number of cycles
permitted and the evaluation zone outside of the
tolerance band, see example.
The default cycle instructs Geomet to rerun the
same evaluated feature up to this cycle count. The
default limit establishes a zone outside the
tolerance limits that if the measured feature falls
in this zone, then a rerun will automatically take
place. For example: if you are measuring a diameter with a nominal value of
1.000” and a tolerance of ± .001 your tolerance limits would be 0.999 - 1.001. The
evaluation zone entered as 0.0002" would be 0.9988 - 0.999 and 1.001 - 1.0012 or
.0002 outside tolerance limits. The default values entered here are only a starting
point, you can change the values on a feature by feature basis through the tagging
operation listed below.
Feature Average Tagging
To start the feature tagging process, measure a qualifying
feature complete with motion. Apply tolerance to the
feature size. Highlight the feature and right click your
mouse to pop-up the feature menu. Choose [Configure
Feature Averaging] and the Feature Averaging dialog will
appear.
Note: If you do not see a Configure Feature Averaging in
the menu, it can be caused by two conditions. First, the
feature must have a tolerance applied to the size attribute.
The second reason is that this tool requires Direct Computer
Control (DCC).
Helmel Engineering Products, Inc.
www.helmel.com
Geomet Training Handbook
www.geomet-cmm-software.com
4-54
Chapter 4 – Feature Measurement
Feature Averaging Setup Dialog
This setup dialog establishes the operating parameters for Feature Averaging on a
qualifying Circle, Sphere or Cylinder. There are three settings, which you can set
to control the rerun characteristics
Feature Average Setup Dialog
Evaluation Limit
The zone outside the tolerance limits where Geomet will determine whether to
rerun a feature. The chart below illustrates when Feature Averaging is activated.
Feature Limits
> 1.0012
>1.001
<= 1.0012
>= 0.999
<= 1.001
< 0.999
<= 0.9988
< 0.9988
Description / Action
Outside Tolerance plus Evaluation Limit. No action taken.
Between Upper Tolerance Limit plus Evaluation Zone. Feature
is measured again.
Acceptable in-Tolerance Zone. No action taken.
Between Lower Tolerance Limit minus Evaluation Zone.
Feature is measured again.
Outside Lower Tolerance minus Evaluation Limit. No action
taken.
Maximum Rerun Tries
The number of ReRun cycles Geomet will try to do on the feature. When Geomet
enters a rerun cycle it retains the previous actual dimension and adds it to the final
record. Once it completes the rerun cycle, Geomet will average out all runs to
determine if it falls inside the tolerance zone.
If the average falls inside the tolerance zone, Geomet will cease the reruns at the
current cycle and report the feature. If the average falls outside the evaluation
zone, Geomet will consider the feature out-of-tolerance and cease the rerun
cycles.
Helmel Engineering Products, Inc.
www.helmel.com
Geomet Training Handbook
www.geomet-cmm-software.com
4-55
Chapter 4 – Feature Measurement
Auto Reverse to SO
This check box is used to control the direction of motion back to the first Stand
Off (SO). The first SO is the starting point for the first measurement point in the
motion map for the feature. On most external features (OD / OR) you should
reverse direction by placing a check in this box. When Geomet completes the
feature and determines that a rerun is required it will backup though the motion
map through all SOs and IPs to the start of the first measurement point and then
rerun the feature.
If the check is not in place, Geomet will drive from the current location directly to
the first SO. On most internal features, this will not cause a problem.
Measurement Values
All currently stored actual measurements will be displayed here for review.
Activate in Feature
When this is checked, Feature Averaging is active for this feature.
Feature Averaging during a Part Inspection
During a part inspection, Geomet constantly monitors every feature for the
Feature Averaging tag. After gathering the required number of data points for the
feature, Geomet will calculate the diameter or radius and compare it to the
evaluation zone. If it is found that the result falls inside the evaluation zone,
Geomet will store the actual value in a feature list and display it on the monitor.
Then it will return to the first SO under DCC control and rerun the feature.
Once the rerun is completed, Geomet will then average the first and second actual
values and perform one of the following:
a) Average falls inside tolerance zone: The feature is completed and the results are
added to the report.
b) Average falls inside evaluation zone: Geomet adds the new actual to the list and
attempts another rerun. This process continues until either condition a) or c) have
been met, or until maximum allowed cycles has been reached. If the maximum
cycle count has been reached, the feature is reported as out-of-tolerance.
c) Average falls outside evaluation zone: The feature is completed and added to
the report as a feature out-of-tolerance.
The results shown in the report for the Diameter or Radius is the average of all
runs. However, the location reported is that of the last run. The averaging feature
is designed for use on critical size, not for position.
Helmel Engineering Products, Inc.
www.helmel.com
Geomet Training Handbook
www.geomet-cmm-software.com
4-56
Chapter 5 – Coordinate Systems
Chapter 5 – Coordinate Systems
Understanding Coordinate Systems................................................... 5-3
Machine Coordinate System – MCS............................................ 5-3
Part Coordinate System – PCS .................................................... 5-3
PCS Base Planes .......................................................................... 5-5
PCS versus MCS.......................................................................... 5-5
Fixture Coordinate System – FCS ............................................... 5-5
Interim Coordinate System – ICS ................................................ 5-6
Clearance Coordinate Systems – CCS......................................... 5-6
Wobble Coordinate System – WCS............................................. 5-6
The PCS Setup Guide .................................................................. 5-7
Coordinate System Commands.......................................................... 5-8
ICS⇒PCS .................................................................................... 5-8
Orient ......................................................................................... 5-10
Align .......................................................................................... 5-11
Origin ......................................................................................... 5-12
Offset Align ............................................................................... 5-13
Editing an Offset Align.............................................................. 5-14
Pivot Align ................................................................................. 5-15
Rotate ......................................................................................... 5-16
Edit an Existing Rotation Value ................................................ 5-17
Translate..................................................................................... 5-18
Edit an Existing Translation Value ............................................ 5-19
PCS Program Examples................................................................... 5-20
#1, Basic Alignment................................................................... 5-21
#2, Plane-Line-Point .................................................................. 5-23
#3, Quick PCS............................................................................ 5-25
#4, Plane-Circle-Circle .............................................................. 5-27
#5, Plane-Cylinder-Circle .......................................................... 5-29
#6, Plane-Bisect Points-Circle ................................................... 5-31
#7, Cylinder-Circle-Point........................................................... 5-33
#8, Plane-Intersect Lines-Bisect Points-Circle .......................... 5-35
#9, Offset Alignment ................................................................. 5-38
#10, Pivot Alignment ................................................................. 5-39
#11, Translate............................................................................. 5-40
#12, Rotate ................................................................................. 5-41
Coordinate System Manager............................................................ 5-42
Recalling a Part Coordinate System .......................................... 5-42
Recalling the Machine Coordinate System................................ 5-42
Helmel Engineering Products, Inc.
www.helmel.com
Geomet Training Handbook
www.geomet-cmm-software.com
5-1
Chapter 5 – Coordinate Systems
Recalling a Fixture Coordinate System ..................................... 5-42
Recalling a Vector Drive System............................................... 5-43
Fixture Coordinate System Manager ............................................... 5-44
Import and Convert Pre-Geomet v 6.66 FCS Definitions.......... 5-45
Using the FCS Manager............................................................. 5-47
Adding a new FCS to the database ............................................ 5-48
Selecting a FCS Record ............................................................. 5-49
Attach Step................................................................................. 5-49
Updating..................................................................................... 5-49
Deleting...................................................................................... 5-50
Locking ...................................................................................... 5-50
Details ........................................................................................ 5-50
Delete All ................................................................................... 5-50
Clearance Coordinate Systems ........................................................ 5-51
Helmel Engineering Products, Inc.
www.helmel.com
Geomet Training Handbook
www.geomet-cmm-software.com
5-2
Chapter 5 – Coordinate Systems
Understanding Coordinate Systems
Supported Geomet Coordinate Systems:
•
•
•
•
•
MCS - Machine Coordinate System
PCS - Part Coordinate System
FCS - Fixture Coordinate System
ICS - Interim Coordinate System
Clearance Coordinate Systems
MCS - Machine Coordinate System
The MCS is the XYZ position on the CMM with respect to the Home Position.
The MCS axes are mutually parallel with the movement of the CMM.
Most manual CMMs do not have a home position; therefore the home position is
the location of the CMM at the point of starting the system. Some manual CMMs
do offer a home position that requires the operator to manually move the CMM
over reference marks one axis at a time.
On a Direct Computer Control (DCC) system, the start-up procedure requires that
you "Home" the CMM. This process will drive the CMM one axis at a time, to the
designated home location and establish a repeatable XYZ zero point.
An MCS is therefore not a valid coordinate system to obtain reliable measured
values for your part inspection, unless the part is carefully aligned with the
machine axes.
PCS - Part Coordinate System
The PCS is the foundation that establishes the Orientation, Alignment and Origin
of your part inspection. PCSs are simply the frames of reference in which part
feature locations are defined.
Traditional drawings were made using 2D projections to represent 3D objects.
Each 2D view shared a common reference point and common axis of alignment
allowing the building of 3D features. In fact, a 3D dimensional PCS is implied.
Today, it is common to create machined parts using a 3D model created by many
popular CAD tools. These models may contain all necessary information for the
machinist to create the part and for the inspector to validate the final production.
However, the PCS is still implied using the same procedures as if measured from
a 2D drawing.
Helmel Engineering Products, Inc.
www.helmel.com
Geomet Training Handbook
www.geomet-cmm-software.com
5-3
Chapter 5 – Coordinate Systems
The established method for creating and using a datum frame reference can be
found in the ASME Y14.5M - Dimensioning and Tolerancing manual. Geomet
uses these accepted practices in the application of PCS. To better understand this
let us consider the multi-projection part shown below:
In order to measure this part on a coordinate measuring machine we shall need to
contact it with probes on all sides. In planning to do this it is helpful to visualize
the 3D coordinate system of the part. Let us do this by making a perspective
drawing from one possible direction and then overlaying a 3D PCS. The figure
below is one possible view of the 3D dimensional PCS applied to the GeoWidget.
The way in which the PCS is overlaid on the part is determined by the datums
defined in the drawing. Notice that each datum can be represented by a standard
measured feature; The datum -A- is the ZX plane, datum - B - is the YZ plane and
datum - C - is the XY plane. The XY, YZ and ZX planes are orthogonal to one
another.
The important point to remember is that the two dimensional drawings we deal
with represent three dimensional concepts, and in order to effectively measure a
3D part with a coordinate measuring machine we must "see" the 3D PCS
associated with the part. This is made easier by looking at the actual part,
referring to the drawing and making a habit of imagining the datums as we view
the part.
Helmel Engineering Products, Inc.
www.helmel.com
Geomet Training Handbook
www.geomet-cmm-software.com
5-4
Chapter 5 – Coordinate Systems
PCS Base Planes
PCS Base Planes are the extracted XY, YZ or ZX datum planes of an established
Part Coordinate System. When extracted through the Recall Component tool, they
become constructed planes and are given a feature number in the inspection
report.
PCS versus MCS
Since features of machine parts are defined in terms of their datum references, we
must create Part Coordinate Systems reflecting those datums before the features
can be measured. Since coordinate measuring machines have their own coordinate
system, namely a system of mutually orthogonal axes of motion referred to as the
Machine Coordinate System (MCS), the first problem we face is to create the PCS
within the MCS. This is not trivial.
One way to create a PCS within a coordinate measuring machine is to make the
PCS coincide with the MCS. The procedure consists of physically aligning the
datum surfaces of the part parallel to the axes of motion of the machine and
setting the X, Y and Z readout display to the datum of the part. Once the MCS
and the PCS have been made to coincide, all dimensions found on the display of
the coordinate measuring machine are also feature locations on the part.
Making the PCS and MCS coincide physically can be extremely time consuming,
and sometimes impossible. We can eliminate the problem by using Geomet to
create and store a skewed PCS. Once a PCS has been established, the computer
converts raw data collected in the machine coordinates into measurement results
in part coordinates. Once the PCS has been established, you will see a part
coordinate system with X, Y and Z axes nested inside a machine coordinate
system with its own X, Y and Z axes.
The MCS and the PCS are totally skewed relative to each other. With the help of
Geomet any point in the MCS can be expressed in the PCS.
As Geomet can manage the link between an MCS and a totally skewed PCS we
no longer need to physically align the parts to the machine. BUT...we need to
create the skewed PCS in Geomet before it can manage the link. The job of
creating the PCS will be simple once we understand a few fundamental principles.
FCS - Fixture Coordinate System
A FCS is a previously measured coordinate system saved away for recall and used
in part inspection programs. The use of a FCS allows a repeatable location in the
CMM measuring cube where inspections take place. An example would be a
cradle fixture that holds a production part in one orientation and fixed location.
Helmel Engineering Products, Inc.
www.helmel.com
Geomet Training Handbook
www.geomet-cmm-software.com
5-5
Chapter 5 – Coordinate Systems
The use of a FCS requires that the CMM has a known home position, which is
common on all DCC CMMs and on few manual CMMs.
The process of creating an FCS entails establishing a PCS on the fixture and then
activating the FCS Manager to append the specific geometry values associated
with the established PCS to the FCS database. Using an FCS requires recalling the
FCS by the assigned number through the Coordinate System Manager.
ICS - Interim Coordinate System
The ICS is a coordinate system that has not been completed to the status of a PCS.
For example, when Geomet begins a part inspection, the only coordinate system
available is the MCS. Should the part to be inspected have the orient applied to it,
Geomet creates an ICS based on the orient vector data and brings forward the
alignment and origin data from the MCS.
During the inspection process, reported results on features are hidden until the
PCS is completed. Only then will the reported data be meaningful.
CCS - Clearance Coordinate Systems
A Clearance Coordinate System creates safe zones around the part being
inspected and around any fixtures associated with the inspection. The Clearance
CS contains 3 clearance planes, identified as XY, YZ and ZX base planes and an
origin. These clearance planes are used as safe transition planes where the CMM
can perform DCC moves without concern of accidental probe encounters.
Clearance CSs are used with Auto-IPs and Entry / Exit IPs in auto features.
WCS – Wobble Coordinate System
The Wobble Coordinate System is used exclusively with a rotary motorized axis
mounted on a 3-Axis CMM providing 4-axes of control. The use of a WCS allows
the PCS to be rotated as the part is rotated without having to reestablish the PCS.
Helmel Engineering Products, Inc.
www.helmel.com
Geomet Training Handbook
www.geomet-cmm-software.com
5-6
Chapter 5 – Coordinate Systems
Part Coordinate System Setup Guide
In order to ensure that a complete PCS has been established Geomet provides a
visual PCS Setup Guide to remind you of the missing components of the current
PCS under construction. In the sample below, we show the setup guide with all
axis and origins still requiring definition.
When you establish one of the PCS components, such as the Z primary axis
derived from the Orient function on a measured or recalled qualifying feature, the
setup guide will reflect the completion by "signing- off" that component with a
series of "*******" as shown above. During the building of a PCS, Geomet
maintains an Interim Coordinate System, ICS, which contains the resolved
transformations and carries forward the missing components from the MCS.
During the inspection process, additional PCSs may be required. Should you want
to create another PCS by starting with the Orient function, the PCS Setup Guide
will reappear and further results will be suppressed until the ICS is resolved into a
completed PCS. The setup guide will not reappear with basic transformations on a
current, completed PCS that results in a new PCS. These commands are:
•
•
•
•
•
•
Alignment
Origin
Translate
Rotate
Pivot Align
Offset Align
Each of these commands when applied to a complete PCS results in the creation
of a new PCS.
It should be noted that as long as a PCS is under construction, no results are
displayed with each measured feature. When the PCS is completed, the PCS
Guide Box will disappear from view and the suppression of results is removed.
Helmel Engineering Products, Inc.
www.helmel.com
Geomet Training Handbook
www.geomet-cmm-software.com
5-7
Chapter 5 – Coordinate Systems
Coordinate System Commands
ICS ⇒ PCS, Interim Coordinate System
The ICS is a coordinate system that has not been completed to the status of a PCS.
For example, when Geomet begins a part inspection, the only coordinate system
available is the MCS. Should the part to be inspected have the orient applied to it,
Geomet creates an ICS based on the orient vector data and brings forward the
alignment and origin data from the MCS. During the inspection process, reported
results on features are hidden until the PCS is completed. Only then will the
reported data be meaningful.
The ICS ⇒ PCS Command is activated by:
Keyboard:
shift + “
Menu:
PCS ⇒ “ICS ⇒ PCS"
The ICS⇒PCS routine converts the status of an interim coordinate system from
interim to complete. The effect of this routine is to permit the user to obtain
printed results from what would normally be suppressed data.
For example ICS⇒PCS might be used when establishing the first coordinate
system on a sample part such as shown in figure 1. In this example, we have the
GeoWidget laying on the surface plate of the CMM with the OD cylinder pointing
in the -X direction. The required dimension to inspect is the distance between the
two bores as shown in figure 1.
figure 1
Helmel Engineering Products, Inc.
www.helmel.com
Geomet Training Handbook
www.geomet-cmm-software.com
5-8
Chapter 5 – Coordinate Systems
Step 1
Our first operation would be to measure the circle designated A/4 using an ID
Circle, see figure 2.
figure 2
Step 2
Select Origin, Geomet will prompt you to establish the X and Y origins, which
you answer <Yes>, to both. This will create an ICS with the X and Y origin in the
center of A/4.
Step 3
Select the ICS⇒PCS command. This will bring forward the Orient, Alignment
and the Z origin from the ICS. A completed part coordinate system will be
established as shown in figure 3.
figure 3
Step 4
Switch Geomet to Polar reporting mode if it is not already there. Press the key
<e> to toggle between Cartesian and Polar modes.
Step 5
Measure circle B/4 using the circle command. The reported values will be
straight-line values satisfying the requirements as shown in figure 1.
Helmel Engineering Products, Inc.
www.helmel.com
Geomet Training Handbook
www.geomet-cmm-software.com
5-9
Chapter 5 – Coordinate Systems
Orient
Keyboard:
j
Menu:
PCS ⇒ Orient
Orient establishes the direction of the primary PCS axis, with the selection of X,
Y or Z determined by the MCS X, Y or Z-axis to which the directed feature axis
is most parallel. Orient acts on the last measured or recalled 3D directed feature or
pair of non-directional features, which could serve to create a 3D, directed
feature. Orient sees through transparent operations such as other PCS formation
commands, distance and angles, etc. Orient will be disabled for feature(s) that are
not validated as having the required components to establish a primary datum.
The Orient command destroys the axis and origin references of the previous PCS
and, if not already visible, invokes the PCS Setup Guide. For proper function, the
Orient must be followed by the Align command with one exception, after
performing the orient command; you can establish the origin on the characteristics
of the feature. An example might be the measuring of an XY plane, which is used
to establish the primary datum through the orient command along the Z-axis.
Once the orient has been completed, you can establish the Z origin on that plane.
Another example might be establishing the primary axis through two spheres.
When the Orient command is activated, Geomet will look at the last feature in the
inspection report to determine whether it has the necessary information to form
the Primary datum. Should Geomet determine that the last feature requires a
second feature to solve for a primary datum, then it will continue to look back in
the inspection report until the next feature is found. If the validation tests fail,
Geomet will then inform the operator that the orient command has failed and will
abort the operation.
Helmel Engineering Products, Inc.
www.helmel.com
Geomet Training Handbook
www.geomet-cmm-software.com
5-10
Chapter 5 – Coordinate Systems
Align
Keyboard:
k
Menu:
PCS ⇒ Align
Align establishes the directions of the secondary and tertiary PCS axes, with the
selection of X, Y and Z determined by the MCS X, Y or Z axis to which the
directed feature axis is most parallel. Align acts on the last measured or recalled
3D or 2D directed feature or pair of non-directed features which could serve to
create a 2D or a 3D directed feature. For example, a pair of 1D co-directional
points, pairs of coplanar 2D points, or pairs of 3D points. The Align command
will see through transparent operations such as other PCS formation commands,
distance, angle commands, etc. Geomet will validate the last feature(s) to
determine whether they are capable of providing a secondary datum.
Align, when executed in an ICS directly after the orient has been established,
makes an automatic choice for the alignment axis. For example, if the orient
command resulted in establishing the Z-axis, then the Align command will rotate
about the Z to establish the secondary datum.
When the Align command is executed in an established PCS, the resulting
operation creates a new PCS by aligning to the requested feature. The Align
command will determine the alignment axis when a pair of co-directional 1D
points or coplanar 2D features is used. When using a pair of 3D features or a 3D
axial feature, Geomet will prompt for the PCS base plane to align in.
Helmel Engineering Products, Inc.
www.helmel.com
Geomet Training Handbook
www.geomet-cmm-software.com
5-11
Chapter 5 – Coordinate Systems
Origin
Keyboard:
l (lower case L)
Menu:
PCS ⇒ Origin
The Origin command builds the tertiary datum on the location of the last
measured or recalled feature. In the case of features with 1D locations such as 1D
points and planes the origin is established for the reported direction of the feature.
Using a +X 1D Point, the Origin command will set the reported position along the
X-axis as the new X-axis origin leaving Y and Z untouched. For a –Z Plane, the
Z-axis Origin is set where the plane crosses the existing Z-axis.
For 2D and 3D features, the Origin command will prompt you to choose which
axis to set. On a 2D XY Circle, you may elect to set the X-axis and not the Yaxis.
Helmel Engineering Products, Inc.
www.helmel.com
Geomet Training Handbook
www.geomet-cmm-software.com
5-12
Chapter 5 – Coordinate Systems
Offset Align
Keyboard:
shift + K
Menu:
PCS ⇒ Offset Align
Offset align acts exclusively on the last measured or recalled pair of coplanar 2D
features. Offset align requires that you are in an established PCS. Geomet will
validate the last two features to determine if they are compatible for the Offset
Align command. The offset align command will establish a new PCS by
performing a re-alignment of the current PCS.
Step 1
Establishing the offset align requires two co-planar 2D features which are
measured or recalled. In the example shown in above we will use two XY circles
identified as F1 and F2. The order in which they are reported in the part program
will determine the re-alignment order. In this example F2 was measured or
recalled after F1. To perform the offset align, press the keys <shift> + < K > and
the Enter Values control will appear.
Enter the sign and magnitude of the nominal offset applied to feature F2, relative
to an imaginary axis through the second feature, F1. In the example above, the
offset axis passes through F1 and is created -0.50" from F2. Should you want the
Offset Align to be created above F2, you would enter +0.50" It is not mandatory
for the first feature, F1, to be on a PCS axis, or a PCS component.
Helmel Engineering Products, Inc.
www.helmel.com
Geomet Training Handbook
www.geomet-cmm-software.com
5-13
Chapter 5 – Coordinate Systems
Editing an Offset Align Feature
An Offset Alignment procedure once applied creates a new Part Coordinate
System. You may edit the existing offset value when there are features using the
PCS created by an offset align, but a warning is provided to rebuild all coordinate
systems by running the program from the beginning.
To edit the existing offset value, highlight that feature in the report, and bring up
the right-click sub menu. The ability to edit a translated feature is only available
when the translate feature has absolute entered values, not values derived from the
last feature option.
Enter the new offset value in the space provided and press the <Ok> button.
Geomet will display a warning that the features will no longer have valid
positional data after the Offset Align editing is completed. At this time, save the
part inspection file and run the file to rebuild the Part Coordinate Changes before
adding any new steps to the program.
Helmel Engineering Products, Inc.
www.helmel.com
Geomet Training Handbook
www.geomet-cmm-software.com
5-14
Chapter 5 – Coordinate Systems
Pivot Align
Keyboard:
Ctrl + k
Menu:
PCS ⇒ Pivot Align
Pivot Align acts exclusively on the last 2D or 3D measured or recalled feature.
Pivot align requires that you are not in an ICS and through Geomet validation
procedures, this command will be disabled. The pivot align command will
perform a re-alignment of the current PCS.
Pivot Align with 2D Features
To perform a pivot align using a 2D feature, press the pivot align key < Ctrl + k >.
Geomet will automatically re-align the current PCS through the existing origin
and the last 2D feature in your report database. In the example shown below, the
last feature is an XY circle identified as F1. The re-alignment takes place through
the current PCS origin and the center of the circle, F1.
Pivot Align with 3D Features
To perform a pivot align using a 3D feature such as a 3D point or sphere, press
the pivot align key < Ctrl > + < k >. Geomet validates the last feature and after
identifying it as a 3D feature, prompts you to select a PCS base axis to rotate
about. For example, if you are to perform a pivot align using a sphere, you will be
prompted to select a PCS base axis. The base axis represents the normal axis to
the base plane the re-alignment will take place in. If you selected the Z, The pivot
align will take place in the XY base plane and the projected XY components of
the sphere will act as the 2D point through which the re-alignment will take place.
Helmel Engineering Products, Inc.
www.helmel.com
Geomet Training Handbook
www.geomet-cmm-software.com
5-15
Chapter 5 – Coordinate Systems
Rotate
Keyboard:
shift + :
Menu:
PCS ⇒ Rotate
Rotate permits an existing PCS to be rotated in space about one of its own axes. A
PCS can only be rotated about one axis at a time. Compound rotations must be
done in two or more successive steps. It is important to note the following rotation
conventions:
Rotate about the X-Axis - a positive angle produces a counter-clockwise rotation
when looking in the -X direction.
Rotate about the Y-Axis - a positive angle produces a counter-clockwise rotation
when looking in the +Y direction.
Rotate about the Z-Axis - a positive angle produces a counter-clockwise rotation
when looking in the -Z direction.
In the Rotate PCS Dialog, see figure below, we show a request to rotate the
current PCS 25° around the X-axis. To ensure only one axis of rotation, any entry
in Y or Z, would result in clearing the entered value in X. In the examples shown
below, a rotation is applied to each axis with its corresponding change in
relationship to the sample part.
Note that the sense of directional measurements made by specifying a direction
using directional keys; +X, -Y, etc. rotates with a PCS rotation. After rotating a
PCS whose axes are essentially aligned with the MCS axes by 90º about the PCS
Y axis, a +X measurement is understood to be directed upward instead of to the
right, since that is now the direction of the +X axis.
Helmel Engineering Products, Inc.
www.helmel.com
Geomet Training Handbook
www.geomet-cmm-software.com
5-16
Chapter 5 – Coordinate Systems
Edit an Existing Rotation Value
A Rotate PCS feature once applied creates a new Part Coordinate System. You
may edit the existing rotation value when there are features using the rotated PCS,
but a warning is provided to rebuild all coordinate systems by running the
program from the beginning.
To edit the existing rotation feature, highlight that feature and bring up the rightclick sub menu. From the sub menu, select Edit Rotate Values. NOTE: The ability
to edit a translated feature is only available when the translate feature has absolute
entered values, not values derived from the last feature option.
Enter the new rotate value in the space provided and press the <Ok> button.
Geomet will display a warning that the features will no longer have valid
positional data after the edit of the rotation values is completed. At this time, save
the part inspection file and run the file to rebuild the Part Coordinate Changes.
Helmel Engineering Products, Inc.
www.helmel.com
Geomet Training Handbook
www.geomet-cmm-software.com
5-17
Chapter 5 – Coordinate Systems
Translate
Keyboard:
;
Menu:
PCS ⇒ Translate
Translate permits an existing PCS origin to be shifted by nominal amounts in all
three directions. Translation creates a new complete PCS whose axes are parallel
to those of the preceding PCS but shifted by the input values.
To perform a Translate, activate the Translate tool using the keyboard “;” or [PCS
⇒ Translate] from the drop down menus. Geomet offers two methods to perform
a PCS Origin Translation. The first method uses XYZ incremental values to
translate the current origin, which are entered by the operator. To use this method,
place a bullet next to the "Enter Values" entry in the Translation Source group
box.
To translate absolute values, enter the required absolute values in the X, Y and Z
edit controls provided. You can translate 1, 2 or 3 axis with one translate
command. Upon completion, a new PCS is established using the next available
PCS ID number.
In the “Use Last Feature” method, we can obtain a feature specific value such as
the radius of the previously measured circle. Qualifying features include Circle,
Cylinder, Cone and Sphere. When you place a bullet next to "Use Last Feature",
Geomet will show the radius value in the Translation Source box under "Use Last
Feature".
The ( - ) and ( + ) column will become active next to the data fields. You can then
check the appropriate directions you wish to translate in. Should you not want to
translate in any axis, leave the check marks unchecked.
An example would be when the origin is called out on a tangent point of a circle.
After you have established the Orient and Align Axis, measure the circle and
place the origin in the center. Then perform a PCS Translate using the last feature
option. Select the appropriate direction under the ( - ) and ( + ) columns. After
accepting the translation, the new origin will be on the tangent point of the circle.
Helmel Engineering Products, Inc.
www.helmel.com
Geomet Training Handbook
www.geomet-cmm-software.com
5-18
Chapter 5 – Coordinate Systems
Both methods will create a new PCS. To summarize the methods, when "Enter
Values" is selected, the values entered by the operator are considered absolute and
will carry forward with each successive inspection run. Selecting "Use Last
Feature" the translation values will recalculate with each inspection run and are
considered dynamic to the current inspection run.
Edit an Existing Translation Value
A Translate feature once applied creates a new Part Coordinate System. You may
edit the existing translation values when there are features using the translated
PCS, but a warning is provided to rebuild all coordinate systems by running the
program from the beginning.
To edit the existing translation feature, highlight that feature and bring up the
right-click sub menu. NOTE: The ability to edit a translated feature is only
available when the translate feature has absolute entered values, not values
derived from the last feature option.
Enter the new translation values in the space provided and press the <Ok> button.
Geomet will display a warning that the features will no longer have valid
positional data after the editing of translation values has been completed. At this
time, save the part inspection file and run the file to rebuild the Part Coordinate
Changes.
Helmel Engineering Products, Inc.
www.helmel.com
Geomet Training Handbook
www.geomet-cmm-software.com
5-19
Chapter 5 – Coordinate Systems
PCS Program Examples
Here you will find 12 Part Coordinate Examples to assist your learning of the
processes used for measuring features and applying them to the building of a Part
Coordinate System. On the Geomet web site, these examples can be downloaded
to view the end results on your system.
Try each example and compare your final results with that of our supplied
examples.
PCS Program Examples
#1, Basic Alignment
#2, Plane-Line-Point
#3, Quick PCS
#4, Plane-Circle-Circle
#5, Plane-Cylinder-Circle
#6, Plane-Bisect Points-Circle
#7, Cylinder-Circle-Point
#8, Plane-Intersect Lines-Bisect Points-Circle
#9, Offset Alignment
#10, Pivot Alignment
#11, Translate
#12, Rotate
Helmel Engineering Products, Inc.
www.helmel.com
Geomet Training Handbook
www.geomet-cmm-software.com
5-20
Chapter 5 – Coordinate Systems
PCS Building Example #1: Basic Alignment
Most CMMs offer a machine coordinate system that is true to the working
surface. This allows the operator to establish simple, and fast, part coordinate
system by eliminating steps normally required to ensure accurate alignments. The
following example assumes the part orient in the Z axis is parallel to the Z axis of
the CMM and the cylinder of the Widget is pointing in the -X direction.
Step 1
Request a -X Point feature <4>, You will then be prompted to "Measure -X
Point". Capture points A-1 and A-2; refer to the figure above. Note: if your
system is active for auto-direction sensing then your prompt will display
"Measure Auto-Dir Point". See System Options for controlling Auto-Direction
Sensing.
Step 2
Select Align <j>. Note: when you elect to perform an alignment without first
establishing the orient, Geomet will assume the orient axis is parallel to the
machine coordinate system. For example, aligning in the XY plane will force the
Z-axis of the MCS to establish the Z-axis of the ICS.
Step 3
Select Origin <l>. This will establish the X origin as defined by the selected
direction of the -X Point features. Note: always perform the alignment prior to
origin, as the alignment will effect the probe compensation on features such as 1D
Points.
Step 4
Request a -Z Point feature <2>, You will then be prompted to "Measure -Z Point".
Capture point B-1.
Helmel Engineering Products, Inc.
www.helmel.com
Geomet Training Handbook
www.geomet-cmm-software.com
5-21
Chapter 5 – Coordinate Systems
Step 5
Select Origin <l>. This will establish the Z origin and your PCS Setup Guide will
now reflect that only the Y origin is still required.
Step 6
Request a +Y Point feature <9>, You will then be prompted to "Measure +Y
Point". Capture point C-1.
Step 7
Select Origin <l>. This will establish the Y origin and complete the ICS to a full
part coordinate system. The PCS Setup Guide will disappear and you are now
ready to take feature measurements.
Summary
With a minimum of four data points and four command requests administered in
the proper sequence you have completed a full part coordinate system, see figure
above. This method of establishing a PCS is not meant to work with all
production parts, but it does work with parts that have a surface that is capable of
providing the orientation, or primary datum, and can lay flat on your CMM.
Helmel Engineering Products, Inc.
www.helmel.com
Geomet Training Handbook
www.geomet-cmm-software.com
5-22
Chapter 5 – Coordinate Systems
PCS Building Example #2: Basic PCS Plane - Line - Point
In this exercise, we will create a basic part coordinate system utilizing a plane,
line and point for establishing the axes and origins. The following example
assumes the part is placed on your CMM where the cylinder of the Widget is
pointing in the -X direction.
Step 1
Request a -Z plane <b>, if auto-direction is not activated, you will be prompted
for the probing direction which you should select as -Z. You will then be
prompted to "Measure -Z Plane", (if auto-direction is active "Measure Auto-Dir
Plane"). Capture points A-1, A-2, A-3 and A-4 as shown in the figure above.
Step 2
Select Orient <j>. The orient command will create the primary datum on the axis
that is most normal to the machine coordinate system. For example, if the plane
used by orient was determined to be a XY plane then the normal will most closely
align with the Z-axis. In your PCS Setup Guide, the Z-Axis will be signed off.
Step 3
Select Origin <l>. This will establish the Z origin that is determined by the normal
direction of the -Z plane.
Step 4
Request a Line feature <m>, You will then be prompted to select the probing
direction, enter -X (if auto-direction is not active). The prompt will update to
display "Measure -X Line" (or "Measure Auto-Dir Line"). Capture points B-1 and
B-2. When the points have been captured, you will be asked which projection
plane to use, select XY. A secondary request may be made to determine the pierce
axis, select X, see Measured Features - Line for explanations.
Helmel Engineering Products, Inc.
www.helmel.com
Geomet Training Handbook
www.geomet-cmm-software.com
5-23
Chapter 5 – Coordinate Systems
Step 5
Select Align <k>. Your ICS will update to include the secondary datum that is
derived from the XY line feature.
Step 6
Select Origin <l>. This will establish the X origin that is determined by the
reported direction of the XY Line.
Step 7
Request a +Y Point feature <9>, You will then be prompted to "Measure +Y
Point". Capture point C-1.
Step 8
Select Origin <l>. This will establish the Y origin and complete the ICS to a full
part coordinate system. The PCS Setup Guide will disappear and you are now
ready to take feature measurements.
Summary
The Plane-Line-Point combinations of features are commonly used for most
machined parts to set the part coordinate system. It is important to remember that
the features in these exercises are utilizing minimum data points to achieve a
complete PCS. There are several factors that can negatively effect the quality of
your data points. These include probing speed and distance between data points
just to name two.
In the case of the alignment, we used two points to calculate the line. The
repeatability of the electronic trigger probe can be as much as .00014" with a
standard 20 mm extension. If the two points for the line were taken 0.500" apart,
the possibility exists of .00028" error per inch, when applied to the PCS effects all
features being measured. It is therefore important that you select the most stable
features to establish your PCS and balance the number of data points to help
reduce inherent CMM and operator errors. When possible, use more data points to
help define the feature, especially when these features are used for establishing
datum features.
Helmel Engineering Products, Inc.
www.helmel.com
Geomet Training Handbook
www.geomet-cmm-software.com
5-24
Chapter 5 – Coordinate Systems
PCS Building Example #3: Quick PCS
In this exercise, you will utilize Geomet’s automatic part coordinate system tool,
known as the Quick PCS. Quick PCS requires that you have auto-direction
capabilities and that it is active through [System Options⇒Enhanced Features].
The premise of Quick PCS is to perform the basic Plane and 3 - 1D Point setup to
create a PCS without the operator commanding any feature requests. When you
start Geomet and establish the working stylus, Geomet is waiting for a data point.
If it acknowledges an incoming data point and is not currently setup for a feature,
it assumes you are invoking the Quick PCS option.
Step 1
Using the datum targets as shown in the figure above, gather data points A-1
through A-4. Geomet will automatically establish a plane, orient and origin after
the forth point has been captured.
Step 2
Gather data points B-1 and B-2 making sure you follow the rules on probing 1D
points using auto-direction, see Measured Features - Points. Once these two
points are captured, Geomet will establish the alignment and origin based on the
point directions.
Should the points be captured in such a way as to misidentify the direction, the
Quick PCS tool will abort the auto sequence and return you to normal inspections.
If this occurs, correct the point direction (see Measured Features - Points) and
continue with the setup as described in exercise 2, steps 5 - 8.
Step 3
Capture the final data point, C-1 and Geomet will complete the final origin and
establish PCS 1.
Helmel Engineering Products, Inc.
www.helmel.com
Geomet Training Handbook
www.geomet-cmm-software.com
5-25
Chapter 5 – Coordinate Systems
Summary
With the Quick PCS feature of Geomet, you were not required to press any
feature key or in any other way instruct Geomet of the next feature or action.
Helmel Engineering Products, Inc.
www.helmel.com
Geomet Training Handbook
www.geomet-cmm-software.com
5-26
Chapter 5 – Coordinate Systems
PCS Building Example #4: Plane - Circle - Circle
In this exercise, we will create a basic part coordinate system utilizing a plane and
two circles for establishing the axes and origins. The following example assumes
the part is placed on your CMM where the cylinder of the Widget is pointing in
the -X direction.
Step 1
Request a -Z plane <b>, if auto-direction is not activated, you will be prompted
for the probing direction which you should select as -Z. You will then be
prompted to "Measure -Z Plane", (if auto-direction is active "Measure Auto-Dir
Plane"). Capture points A-1, A-2, A-3 and A-4 as shown in the figure above.
Step 2
Select Orient <j>. The orient command will create the primary datum on the axis
that is most normal to the machine coordinate system. For example, if the plane
used by orient was determined to be a XY plane then the normal will most closely
align with the Z-axis. In your PCS Setup Guide, the Z-Axis will be signed off.
Step 3
Select Origin <l>. This will establish the Z origin that is determined by the normal
direction of the -Z plane.
Step 4
Select Circle <z>, if auto-direction is not activated, you will be prompted for the
Circle types, ID OD IR OR, choose ID. Capture the four data points identified as
B-ID/4. Continue with the data points for the next circle, C-ID/4.
Helmel Engineering Products, Inc.
www.helmel.com
Geomet Training Handbook
www.geomet-cmm-software.com
5-27
Chapter 5 – Coordinate Systems
Step 5
Select Align <k>. Your ICS will update to include the secondary datum that is
derived from the two XY circles. The alignment takes place through the reported
XY position of the circles, which are projected, into the orient plane.
Step 6
Select Origin <l>. Circles, which are 2D, provide two directions when
establishing an origin. In our example, the circle can be used for the X and/or the
Y directions. The origin command will prompt you whether to use the X and then
the Y. For our example you should answer Yes to both requests. Upon
completion, you will have established PCS 1.
Summary
In this exercise, we utilized two coplanar XY features for the alignment and
subsequent origin. As with many feature characteristics, the circles could have
been replaced with any feature that reports a 2D solution. These include 2D
points, cylinder and cone pierce points, etc. Through the proper selection of
features, you can establish a part coordinate on nearly any type of manufactured
part.
Helmel Engineering Products, Inc.
www.helmel.com
Geomet Training Handbook
www.geomet-cmm-software.com
5-28
Chapter 5 – Coordinate Systems
PCS Building Example #5: Plane - Cylinder - Circle
In this exercise, we will create a part coordinate system utilizing a plane for the
orient and origin, a cylinder for the alignment followed by a circle for the last
components of the origin. The following example assumes the part is placed on
your CMM where the cylinder of the Widget is pointing in the -X direction.
Step 1
Request a -Z plane <b>, if auto-direction is not activated, you will be prompted
for the probing direction which you should select as -Z. You will then be
prompted to "Measure -Z Plane", (if auto-direction is active "Measure Auto-Dir
Plane"). Capture points A-1, A-2, A-3 and A-4 as shown in the figure above.
Step 2
Select Orient <j>. The orient command will create the primary datum on the axis
that is most normal to the machine coordinate system. In your PCS Setup Guide,
the Z-Axis will be signed off.
Step 3
Select Origin <l>. This will establish the Z origin that is determined by the normal
direction of the -Z plane.
Step 4
Select Cylinder <c>, if auto-direction is not activated, you will be prompted for
the cylinder type: ID OD IR OR, choose OD. Capture the six data points
identified as B-OD/6.
Helmel Engineering Products, Inc.
www.helmel.com
Geomet Training Handbook
www.geomet-cmm-software.com
5-29
Chapter 5 – Coordinate Systems
Step 5
Select Align <k>. A cylinder offers the possibility of more than one alignment
solution. In our example, you have solved the Z-axis orient by utilizing the
previous plane; therefore you are attempting to align the remaining axis, or XY.
Select the XY button from the Select Axis dialog that is displayed during the
Alignment process.
Your ICS will now update to include the secondary datum that is derived from the
longitudinal axis of the cylinder. In this example, the cylinder was reported as
piercing the YZ ICS base plane, therefore the normal to that plane is X with a
direction of -X. The PCS Setup Guide will update to reflect the XY Axis have
been solved.
Step 6
Select Circle, if auto-direction is not activated, you will be prompted for the
Circle type: ID OD IR OR, choose ID. Capture the four data points identified as
C-ID/4.
Step 7
Select Origin. The Circle, which is 2D, provides two directions when establishing
an origin. In our example, the circle can be used for the X and/or the Y direction.
The origin command will prompt you whether to use the X and then the Y. For
our example you should answer Yes to both requests. Upon completion, you will
have established PCS 1.
Summary
There are times when you are required to utilize more than one 3D feature to
solve for the part coordinate system. In this example we used a 3D feature, a
cylinder, from which the alignment is derived, therefore you are prompted to
solve which part coordinate system component to solve.
From this example you should note that the data point spread on the cylinder is
approximately 1.25"in the X-axis and the width of the part is 4.50". This can be a
cause of concern as it is poor inspection practice to have your data point spread
ratio to the width of the part less than 50%, in this case only 28%. The possibility
of skewing your part coordinate system increases dramatically as your ratio is
reduced.
However, conditions do arise that do not allow for proper setup and as the
inspector, you are challenged to determine the best data point spreads with the
features available that will produce a sound part coordinate system.
Helmel Engineering Products, Inc.
www.helmel.com
Geomet Training Handbook
www.geomet-cmm-software.com
5-30
Chapter 5 – Coordinate Systems
PCS Building Example #6: Plane - Bisect Points - Circle
In this exercise, we will create a part coordinate system utilizing a plane for the
orient and origin, two 2D points from which we will obtain a constructed 2D
point through the bisect command then followed by a circle for alignment and
origin. The following example assumes the part is placed on your CMM where
the cylinder of the Widget is pointing in the -X direction.
Step 1
Request a -Z plane <b>, if auto-direction is not activated, you will be asked for
the probing direction which you should select as -Z. You will then be prompted to
"Measure -Z Plane", (if auto-direction is active "Measure Auto-Dir Plane").
Capture points A-1, A-2, A-3 and A-4 as shown in the figure above.
Step 2
Select Orient <j>. The orient command will create the primary datum on the axis
that is most normal to the machine coordinate system. In your PCS Setup Guide,
the Z-Axis will be signed off.
Step 3
Select Origin <l>. This will establish the Z origin that is determined by the normal
direction of the -Z plane.
Step 4
Select a 2D XY Point <5> + <2>. The selection of a 2D point requires two
commands. The first command is activated by pressing the < 5 > key, which will
display the 2D and 3D point selection tool, next select the PCS base plane you
would like to point to be projected into. After the selection has been completed,
Geomet will prompt you to "Measure XY Point". Capture points B-1 and C-1.
Helmel Engineering Products, Inc.
www.helmel.com
Geomet Training Handbook
www.geomet-cmm-software.com
5-31
Chapter 5 – Coordinate Systems
Step 5
Select the Bisect command <a>. This command will take the two projected XY
points and solve for the 2D XY bisect point.
Step 6
Select Circle <z>, if auto-direction is not activated, you will be prompted for the
Circle type: ID, OD, IR, or OR, choose ID. Capture the four data points identified
as D-ID/4.
Step 7
Select Align <k>. This will take the just measured circle center and the previous
2D point created by the bisect routine and perform an alignment. Your ICS will
update to include the secondary datum.
Step 8
Select Origin <l>, the Circle, which is 2D, provide two directions when
establishing an origin. In our example, the circle can be used for the X and/or the
Y direction. The origin command will prompt you whether to use the X and then
the Y. For our example you should answer <Yes> to both requests. Upon
completion, you will have established PCS #1.
Summary
In this exercise, we used a constructed feature, an XY point, as part of the
alignment solution. It is important that you choose the correct features to be used
for alignment based on the completeness of the ICS. The XY points for B-1 and
C-1 were chosen as the ICS lacked an alignment. If two 1D points were chosen,
then there would exist an error caused by the part skewed to the MCS base axis,
see Measurement Features ⇒ Points.
This does not preclude conditions where 1D points could have been used. For
example, if we were working in the PCS that was created in exercise 1, then we
would have the correct probe compensation vector and we could select -X and +X
1D points for B-1 and C-1 respectively. The resulting bisect would create a 1D
point on the centerline of the slot.
A 1D point followed by a circle can not be combined to form an alignment.
Geomet does not accept this as it causes potential repeatability problems when the
slot is not aligned with the current PCS. Therefore you could repeat the bisect of
two additional 1D points captured on the width of the part at the other end from
the slot points C and D. The resulting 1D point derived from the bisect combined
with the previous recalled constructed point could produce the alignment.
Helmel Engineering Products, Inc.
www.helmel.com
Geomet Training Handbook
www.geomet-cmm-software.com
5-32
Chapter 5 – Coordinate Systems
PCS Building Example #7: Cylinder - Circle - Point
In this exercise we will utilize a cylinder to provide the primary datum and the
pierce point from the cylinder as the origin. The alignment will be supplied
through a circle and the previous cylinder. Finally a 1D point will complete the
part coordinate system by providing the last component of the origin. The
following example assumes the part is placed on your CMM where the cylinder of
the Widget is pointing in the -X direction.
Step 1
Select Cylinder <c>, if auto-direction is not activated, you will be prompted for
the cylinder type ID, OD, IR, or OR, choose ID. Capture the six data points
identified as A-ID/6, see the figure above.
Step 2
Select Orient <j>. The orient command will create the primary datum on the axis
of the cylinder that is most parallel to the machine coordinate system. In your
PCS Setup Guide, the Z-Axis will be signed off.
Step 3
Select Origin <l>. This will establish the origin reported as the pierce point of the
cylinder. In this example, the cylinder pierces the XY base plane and the origin
command will prompt you whether or not to set the origin on the X and/or the Y.
Answer yes to establish the XY origin.
Step 4
Select Circle <z>, if auto-direction is not activated, you will be prompted for the
Circle type: ID, OD, IR, or OR, choose ID. Capture the four data points identified
as B-ID/4.
Helmel Engineering Products, Inc.
www.helmel.com
Geomet Training Handbook
www.geomet-cmm-software.com
5-33
Chapter 5 – Coordinate Systems
Step 5
Select Align <k>. Your ICS will update to include the secondary datum which is
derived from the XY circle and the previous XY pierce point from the cylinder.
Step 6
Select -Z Point <2>. The final component missing for your complete PCS is the Z
origin. You will then be prompted to "Measure -Z Point". Capture point C-1.
Step 7
Select Origin <l>. This will solve the Z-axis Origin and complete PCS #1.
Summary
When using a through bore as the primary datum, we must be careful that the data
point spread is sufficient to allow for a stable feature. In this example we would
place an extension on the stylus to allow for a greater reach into the cylinder.
Helmel Engineering Products, Inc.
www.helmel.com
Geomet Training Handbook
www.geomet-cmm-software.com
5-34
Chapter 5 – Coordinate Systems
PCS Building Example #8: Plane - Intersect Lines - Bisect Points - Circle
In this exercise we will combine two constructed features to create the secondary
datum. These constructed features are derived from two lines intersected and two
2D points bisected. The following example assumes the part is placed on your
CMM where the cylinder of the GeoWidget is pointing in the -X direction.
Step 1
Request a -Z plane <b>, if auto-direction is not activated, you will be prompted
for the probing direction which you should select as -Z. You will then be
prompted to "Measure -Z Plane", (if auto-direction is active "Measure Auto-Dir
Plane"). Capture points A-1, A-2, A-3 and A-4 as shown in the figure above.
Step 2
Select Orient <j>. The orient command will create the primary datum on the axis
that is most normal to the machine coordinate system. In your PCS Setup Guide,
the Z-Axis will be signed off.
Step 3
Select Origin <l>. This will establish the Z origin that is determined by the normal
direction of the -Z plane.
Step 4
Request a Line feature <m>, You will then be prompted to select the probing
direction, enter -X (if auto-direction is not active). The prompt will update to
display "Measure -X Line" (or "Measure Auto-Dir Line"). Capture points B-1 and
B-2. When the points have been captured, you will be asked which projection
plane to use, select XY. A secondary request may be made to determine the pierce
axis, select X, refer to Measured Features, Line for more information.
Helmel Engineering Products, Inc.
www.helmel.com
Geomet Training Handbook
www.geomet-cmm-software.com
5-35
Chapter 5 – Coordinate Systems
Step 5
Clear the current mode by pressing the < Esc > key. Request a Line feature <m>,
You will then be prompted to select the probing direction, enter +X (if autodirection is not active). The prompt will update to display "Measure +X Line" (or
"Measure Auto-Dir Line"). Capture points C-1 and C-2. When the points have
been captured, you will be asked which projection plane to use, select XY.
Step 6
Select the Intersect <d> command. This command will take the two projected
lines and solve for the intersection between them. The result will be a 2D XY
point.
Step 7
Select a 2D XY Point <5> + <2>. The selection of a 2D point requires two
commands. The first command is activated by pressing the < 5 > key, 2D and 3D
point selection, which will then prompt which current base plane you will project
into. After the selection has been completed, Geomet will prompt you to
"Measure XY Point". Capture points D-1 and E-1.
Step 8
Select the Bisect <a> command. This command will take the two projected XY
points and solve for the bisect between them resulting in a 2D XY point.
Step 9
Select in the report display feature number 7 by left clicking on it (2D point
formed by the intersect command). Right-click your mouse and select from the
popup sub menu, <Recall Feature>. This will recall the feature and create new
feature number 11.
Alternatively you can recall a feature by pressing the Recall Feature <h>
command from the keyboard. In the control labeled "<- Enter Feature No. to
Recall, enter 7 and press the <Ok> button or the <Enter> key on the keyboard.
Step 10
Select Align <k>. Your ICS will update to include the secondary datum which is
derived from the recalled 2D XY point and the previous 2D XY point created
from the bisect command.
Helmel Engineering Products, Inc.
www.helmel.com
Geomet Training Handbook
www.geomet-cmm-software.com
5-36
Chapter 5 – Coordinate Systems
Step 11
Select Circle <z>, if auto-direction is not activated, you will be prompted for the
Circle type: ID, OD, IR, or OR, choose ID. Capture the four data points identified
as F-ID/4.
Step 12
Select Origin <l>, the Circle, which is 2D, provides two directions when
establishing an origin. In our example, the circle can be used for the X and/or the
Y direction. The origin command will prompt you whether to use the X and then
the Y. For our example you should answer Yes to both requests. Upon
completion, you will have established PCS 1.
Summary
In this exercise we had combined features to create constructed features which are
then used to create part coordinate system components. In part production we will
find numerous cases where one or more part coordinate system datums are
symmetry lines or points where no features exist.
When performing constructions in an ICS, it is important to remember the
established projection base planes that are valid. For example, in this exercise it
would not have produced acceptable results if we established 2 ZX points, one
each on the top and bottom surfaces of the widget and then perform the bisect.
The resulting 2D point would be projected into the alignment of the machine
coordinate system and therefore would not represent a valid point feature for the
part coordinate system.
Helmel Engineering Products, Inc.
www.helmel.com
Geomet Training Handbook
www.geomet-cmm-software.com
5-37
Chapter 5 – Coordinate Systems
PCS Building Example #9: Offset Alignment
In this exercise we will perform an offset alignment to create a secondary datum.
The offset align function performs a realignment of an existing part coordinate
system. As you must have a complete coordinate system defined, please setup
your part described in PCS Example 5.
Step 1
From the established PCS as defined in PCS Example #5, recall feature number 6
ID XY Circle. We perform this step in preparation of the realignment. The offset
align required two features which both must be in the same PCS and stacked
together in the report, see Recalling Features.
Step 2
Select Circle <z>, if auto-direction is not activated, you will be prompted for the
Circle type: ID, OD, IR, or OR, choose ID. Capture the four data points identified
as A-ID/4.
Step 3
Select Offset Align, press <shift> + <K >. Note for Junior users, if you do not
have the Advanced PCS and Stylus option, you will be prompted whether to
realign PCS 1 or cancel, select < Ok >. A request will be displayed where you
enter your offset value. Enter .70711 and press < Accept >.
Summary
This will realign the current PCS to the plus (+) side of the last feature. A
negative (-) will realign to the left side of the feature. The value you enter controls
the realignment direction based on the sign of the value, see figure 2 for
completed PCS.
Helmel Engineering Products, Inc.
www.helmel.com
Geomet Training Handbook
www.geomet-cmm-software.com
5-38
Chapter 5 – Coordinate Systems
PCS Building Example #10: Pivot Alignment
In this exercise we will perform a realignment of
the current PCS by pivoting around the origin
through the last measured or recalled feature. The
pivot function performs a realignment of an
existing part coordinate system. As you must have
a complete coordinate system defined, please
setup your part as described in PCS Example #5.
Step 1
Select Circle <z>, if auto-direction is not
activated, you will be prompted for the Circle type: ID, OD, IR, or OR, choose
ID. Capture the four data points A-ID/4.
Step 2
Select the Pivot Align command, press < Ctrl > + < k >. Note for Junior users, if
you do not have the Advanced PCS and Stylus option, you will be prompted
whether to realign PCS 1 or cancel, select < Ok >. The current PCS will realign
through the last feature.
Summary
In this exercise, we choose to realign by pivoting though a feature that lies at 45°
to the current PCS. This can cause unexpected results during part program runs.
For example, if the feature was at 44.99° from the X-axis during self teach it
would realign by rotating counter-clockwise 44.99° about the Z-axis. However, if
during self-teach the feature was 45.01° the realignment would take place by
rotating 44.99° clockwise causing a 90° shift in the expected PCS.
We recommend that caution should be taken where unexpected results can occur,
as is the case of any 45° rotations or pivots. To ensure the rotation of the PCS
behaves correctly when working near 45°, perform a temporary rotation to the
current PCS before measuring or recalling the feature at 45°. For example,
perform a 30° rotation, and then measure the circle in the example above.
Complete your step by performing the Pivot Alignment. This will ensure
predicable results with every inspection run.
Helmel Engineering Products, Inc.
www.helmel.com
Geomet Training Handbook
www.geomet-cmm-software.com
5-39
Chapter 5 – Coordinate Systems
PCS Building Example #11: Translate
In this exercise we will take an existing part coordinate system and translate it by
nominal amounts in the X and Y-axis. The Translate command can be performed
on X, Y and/or Z individually or any combination. As you must have a complete
coordinate system defined, please setup your part described in PCS Example #2.
Step 1
Select the Translate command <;>. When you activate this command, Geomet
will display a dialog where you can enter your translation values. Enter 2.125 for
X and 1.500 for Y and no entry for Z. Press <Accept> to perform the translation.
A new PCS will be established, or in the case of Junior, a translation of the
current PCS takes place.
Summary
In many conditions, it is required to translate the part coordinate system when you
are working with a datum that is derived from points that are not defined on your
part. For example you may be inspecting a cavity insert which was removed from
a progressive die where the datums are a common alignment pin not available at
inspection time. Another example is the focal point of an optical lens whose
surface radial may be projected 2,000" from the actual part.
Helmel Engineering Products, Inc.
www.helmel.com
Geomet Training Handbook
www.geomet-cmm-software.com
5-40
Chapter 5 – Coordinate Systems
PCS Building Example #12: Rotate
In this exercise we will take an existing part coordinate system and rotate it about
an axis by a nominal value. The rotate command can be perform only about one
PCS axis at a time. If you require performing compound rotations, the rotate
command must be repeated as separate steps. As you must have a complete
coordinate system defined, please setup your part described in PCS Exercise 2.
Step 1
Select the Rotate command, press <shift> + < : >. When you select this command,
the Rotate PCS Axis dialog will prompt you to enter a nominal value for an axis.
Rotations can only be applied to one axis at a time; therefore this rotation tool will
ensure you enter only one value prior to accepting the nominal value. For this
exercise, enter -5 in the X axis control and press the < Accept > button. A new
PCS will be established, or in the case of base Junior, a translation of the current
PCS takes place.
Summary
When we rotated the PCS -5° around the X-axis, our resulting PCS should be
parallel to the top surface of the tapered planes located on the taper end of the
GeoWidget. To verify that we performed the rotation correct, select a -Z Point
<2> feature and probe the top surface of the 5° plane. We should see a -Z point
value at .018 ± .005.
Helmel Engineering Products, Inc.
www.helmel.com
Geomet Training Handbook
www.geomet-cmm-software.com
5-41
Chapter 5 – Coordinate Systems
Coordinate System Manager
The CS Manager provides access to recall established Part Coordinate Systems,
Fixture Coordinate Systems, activate the Machine Coordinate System, and if
available establish a vector drive coordinate system for manual joystick controls
on CMMs with DCC controls.
Recalling a Part Coordinate System
Each time a completed PCS is established, it is given an ascending number
starting with 1. If you are requesting a PCS recall, activate the Coordinate System
Manager by pressing the key < ' > or through the menu [PCS ⇒ Recall PCS].
When the CS Manager appears ensure that the PCS button is pressed in the Select
Type group. Any existing PCS can then be made the current PCS by entering the
desired PCS number. Optionally you can utilize the slider control next to the
"Select Type" group to scroll through the available PCSs. If you were to enter a 0
for the desired PCS, you are in effect recalling the machine coordinate system.
Press the <Ok> button to complete the recall function.
Recalling the Machine Coordinate System
Recalling the Machine Coordinate System can be accomplished by activating the
Coordinate System Manager as described above and ensure that the MCS button
is pressed in the Select Type group. Press the <Ok> button to complete the recall
function.
Recalling a Fixture Coordinate System
To request an FCS recall, activate the Coordinate System Manager by pressing
the key < ' > and ensure that the FCS button is pressed in the Select Type group.
Any existing FCS can then be recalled and made the current PCS by entering the
desired FCS number. Optionally you can utilize the slider control next to the
"Select Type" group to scroll through the available FCSs. Press the <Ok> button
to complete the recall function.
Helmel Engineering Products, Inc.
www.helmel.com
Geomet Training Handbook
www.geomet-cmm-software.com
5-42
Chapter 5 – Coordinate Systems
Recalling a Vector Drive System
The recalling of a Vector Drive is available only on CMMs that have DCC
control. Normally, the joystick deflections in X, Y and Z move parallel to the
Machine Coordinate System. Vector Drive, when activated, moves parallel to a
specified Part Coordinate System.
To request a Vector Drive CS, activate the Coordinate System Manager by
pressing the key < ' > and ensure that the Vector button is pressed in the Select
Type group. The current range of numbered Part Coordinate Systems will be
displayed from which you can select the current Vector Drive CS. Optionally, you
can utilize the slider control next to the "Select Type" group to scroll through the
available PCSs. Press the <Ok> button to complete the recall function.
Any existing Part Coordinate System geometry can be recalled and made the
current Vector Drive CS, even if it is not the current PCS in your inspection setup.
This allows you to manually drive the CMM in one PCS, and measure in another.
This is helpful when motion is required to follow small details such as entering a
small slot that is not in line with the current PCS.
When you recall a Vector Drive CS, it is not recorded as a step in your part
inspection. The Vector Drive CS remains active until you select another Vector
Drive CS. Should you want to remove the current Vector Drive CS and return to
normal operations, select the MCS, or 0, in the Vector Drive CS recall procedure.
Helmel Engineering Products, Inc.
www.helmel.com
Geomet Training Handbook
www.geomet-cmm-software.com
5-43
Chapter 5 – Coordinate Systems
Fixture Coordinate System Manager
A Fixture Coordinate System (FCS) is a previously defined coordinate system
saved in a separate database available to all inspection programs for inclusion as a
PCS. The use of a FCS allows a repeatable location in the CMM measuring cube
where inspections take place. An example would be a cradle fixture that holds a
production part in one orientation and fixed location.
The use of a FCS requires that the CMM have a known home position, which is
common on all DCC CMMs and on few manual CMMs.
The process of creating a FCS entails establishing a PCS on the fixture and then
activating the FCS Manager to append to the database the specific geometry that
defines the FCS. Using a FCS requires recalling the FCS by the assigned number
through the Coordinate System Manager.
The FCS Manager also provides tools to create a program step within an
inspection program where the verification and update of existing FCSs can be
done programmatically. This provides the operator a means to rebuild existing
FCSs through the execution of a part program.
The FCS Manager is activated by:
Keyboard:
shift + L
Menu:
PCS ⇒ FCS Manager
Helmel Engineering Products, Inc.
www.helmel.com
Geomet Training Handbook
www.geomet-cmm-software.com
5-44
Chapter 5 – Coordinate Systems
IMPORTANT! Importing Previous FCS Definitions
With the release of Geomet version 6.66 in December 2005, Geomet no longer
utilizes the Windows Registry to save the data for Fixture Coordinate Systems.
Geomet now utilizes a separate data file with a default name of “Geomet.gcs”
which is located in the Geomet program folder where “Geomet.exe” has been
installed.
This change was made to allow greater flexibility for the future development and
to overcome limitation with multi-user operating systems such as Windows XP.
In a multi-user system, each operator has his or her own Windows Registry. In the
case of FCSs, if Operator-A created a FCS, it was not available to Operator-B.
To overcome this, Geomet provides an automatic one-time Import and Convert
process to extract all FCS data from the Windows Registry and build the new FCS
database file. This process activates when one of the following actions occur:
•
•
•
•
Activating the Fixture Coordinate Manager.
Editing the FCS to PCS Inspection Step.
Using the PCS Recall Manager.
Running an Inspection Program with a FCS Inspection step.
It is recommended that when you run Geomet version 6.66 for the first time,
launch the FCS Manager and the Import and Convert function will process your
FCSs into the new database. This will occur only once.
Performing the Import and Convert
Upon launching the FCS Manager, Geomet will test the Windows Registry if
there are any FCS definition data. Should FCS data be found, you will be
prompted to import the data.
The recommended response is <Yes>. Upon selecting <Yes> Geomet will import
all FCS data into the database and delete all entries in the Windows Registry. The
FCS Manager will be launched and your FCS data will be displayed.
Helmel Engineering Products, Inc.
www.helmel.com
Geomet Training Handbook
www.geomet-cmm-software.com
5-45
Chapter 5 – Coordinate Systems
FCSs found in the Registry that have been tagged as “Deleted” have the
description:
“--- Not Assigned ---“
The Import and Convert function will locate these records and create an entry in
the database and set a new control flag. You will find these records in the FCS
Manager with a description of “--- Not Assigned ---“ and a <Deleted> note. See
descriptions of Control Flags later in this section.
Selecting <No> from the Import and Convert Prompt.
Geomet will prompt you one more time to confirm your selection.
CAUTION: All your inspection programs that have references to FCSs will now
look into the new FCS database. If you do not allow the Import and Convert
function to proceed, all your inspection files will NOT run.
Final Step - FCS Windows Registry Clean-Up
Selecting <Yes> or <No> to the Import and Convert function, will result in
deleting all entries in the Windows Registry.
Helmel Engineering Products, Inc.
www.helmel.com
Geomet Training Handbook
www.geomet-cmm-software.com
5-46
Chapter 5 – Coordinate Systems
Using the Fixture Coordinate System Manager
Through the FCS Manager, you can:
•
•
•
•
•
•
•
•
Adding new FCS definitions.
Update existing FCS definitions.
Deactivate a FCS by tagging it as “Deleted”.
Remove a Deleted flag.
Lock a FCS record preventing any changes.
Unlock a FCS record allowing changes to be made.
View the details of a FCS.
Attach an Inspection Step to update FCS definitions automatically.
Helmel Engineering Products, Inc.
www.helmel.com
Geomet Training Handbook
www.geomet-cmm-software.com
5-47
Chapter 5 – Coordinate Systems
Adding new FCS definitions
To add a new FCS definition to the database, the Append button is the required
command. Start by building a Part Coordinate System on the fixture installed on
your CMM. Upon completion of the PCS, activate the FCS Manager.
When the FCS Manager is activated, the current PCS number will be displayed in
the edit control labeled "PCS Number->". Should this be the PCS you want saved
as a FCS, move to the description field and enter a brief note describing this FCS.
Once the description has been completed, add the data to the FCS database by
pressing the <Append> button. If there are no deleted FCSs, the append function
will add the new FCS to the bottom of the database. Should a deleted FCS exist,
the FCS Manager will prompt you whether to add the new FCS to the bottom of
the database or insert the FCS where the first deleted FCS has been found.
Choose <Yes> to use the first available spot, which is the first Deleted entry in
the database, or choose <No> to append the record to the database.
CAUTION: FCSs that have been “Deleted” which still have Inspection Programs
referencing that FCS number may have undesirable behavior when changing the
FCS definitions.
Helmel Engineering Products, Inc.
www.helmel.com
Geomet Training Handbook
www.geomet-cmm-software.com
5-48
Chapter 5 – Coordinate Systems
Selecting a FCS Record
Selecting a FCS Record in the FCS Manager requires a single left-click with your
mouse. Locate the desired record, and click on it, which will highlight that record
and activate record specific operations.
As shown above, FCS #7 has been selected. By doing this, the functions <Attach
Step>, <Update>, <(Un)Delete>, <Lock Record> and <Details> activate.
Attach Step
The ability to update existing FCS definitions under part program control can be
handled by <Attach Step>. To utilize this feature, build a part program that
establishes a PCS on the fixture. Activate the FCS Manager and highlight the FCS
you want to update. Enter the PCS in the edit control "PCS Number->". Then
press the <Attach Step> button and an entry will be made in your part program
that states:
"Updating FCS2 (description) with PCS 1"
Save your part program under a unique name. You will now have a part program
that will rebuild your FCS during a part program. To see an example part program
file, download the example FCS Update.gmt from the Geomet web site.
Update
The Update command allows you to change the definitions stored in the FCS
database for a previously established FCS. For example, should you be required to
update the definitions assigned to FCS#3, start by building a new PCS on the
fixture.
When the PCS is completed, activate the FCS Manager and highlight fixture #3.
In the PCS Number control, enter the PCS number you just created and select
Helmel Engineering Products, Inc.
www.helmel.com
Geomet Training Handbook
www.geomet-cmm-software.com
5-49
Chapter 5 – Coordinate Systems
<Update>. FCS #3 will be updated with the latest coordinate system data from the
PCS.
Delete / Un-Delete
To delete a FCS from being available in the database, highlight the FCS and click
on <(Un) Delete>. The FCS number will remain in the list and control flag will be
set to Delete. Under the Note column, the FCS Manager will display <Deleted>.
All part programs that reference this FCS will prompt with a warning about a
missing FCS when it is opened.
The Delete command does not remove the FCS definitions from the database only
makes them unavailable. The Delete command can also remove the delete flag
making it available again.
If a FCS has been “Locked”, the Delete command will not be allowed.
Lock Record
The ability to Lock a FCS is new to Geomet version 6.66. Locking a record
prevents changes from being made. These include Deleting and Updating. To
attach a Lock, locate the FCS in the FCS Manager and select it. Press the <Lock
Record> button and the record will be locked. Under the Note column, you will
see the entry <Locked>.
NOTE: You can not apply a Lock to a record that has been deleted.
Details
To view the definitions of a selected FCS, highlight the FCS in the list and select
<Details>. The data shown is the XYZ axis vectors followed by the MCS origin.
The information provided by Details can be helpful in locating the origin and the
directional vectors for each FCS axis. You should have a complete knowledge of
coordinate system components in order to fully understand the values shown.
Delete All
The <Delete All> button clears out the entire FCS database.
Helmel Engineering Products, Inc.
www.helmel.com
Geomet Training Handbook
www.geomet-cmm-software.com
5-50
Chapter 5 – Coordinate Systems
Clearance Coordinate System
The clearance CS is a tool that allows you to build clearance coordinate systems
around your part where you can move your probe without interfering with the part
or have accidental probe trips. The clearance CS tool is most often used when
creating auto features such as lines and circles while in offline mode.
There can be any number of clearance CSs created, but only 1 can be active at any
time. The clearance CS contains 3 base planes and an origin. They have the same
composition as any Part Coordinate System.
Creating a Clearance CS
To start the Clearance CS tool, click on the <Clearance CS> button from any
auto-feature tool, or from the PCS drop down menu, [PCS⇒Build Clearance CS].
Clearance CS within a Feature Generator
Clearance CS Setup Tool
The clearance CS tool has two display lists, one identified as Available
Coordinate Systems (PCS) the second Available Clearance CS. The first list as
defined shows all PCSs in your current inspection. The second list shows all
created clearance CSs already associated with the inspection.
Helmel Engineering Products, Inc.
www.helmel.com
Geomet Training Handbook
www.geomet-cmm-software.com
5-51
Chapter 5 – Coordinate Systems
Selecting a PCS
Clearance CS to PCS Relationship
To create a Clearance CS, start by highlighting a PCS in the available list, see
figure above where PCS #1 is highlighted. Click the <Select PCS> button or
double click on the PCS name in the list. Control will pass to the "Offset /
Translate Values" group allowing you to enter XYZ offset values. These values
should be carefully understood, as they will directly affect the motion of your
system. The 1-2-3 block example in the figure above right, shows that the part
coordinate system is established on the top surface and lower left corner.
We will enter offset values of:
X Offset:
Y Offset:
Z Offset:
-0.500
2.500
0.500
After entering the values, press the <Create> button and a new Clearance CS will
appear in the list with the next available number. As shown in figure above, the
Clearance CS has its origin outside the part creating three planes that will allow
motion within those planes that will not intrude into the part.
You can create as many Clearance CSs that are required to provide zone transition
planes around your part and any fixtures being used.
Helmel Engineering Products, Inc.
www.helmel.com
Geomet Training Handbook
www.geomet-cmm-software.com
5-52
Chapter 5 – Coordinate Systems
Translate an Existing Clearance CS
Translate allows you to quickly take an existing Clearance CS and create a new
Clearance CS based on XYZ Offset values. To illustrate, we will take clearance
CS #1 and create a second clearance CS 3.000" in the –Y direction. Start by
highlighting the name "Clearance CS #1", the current values will display in the
Offset / Translate Group. Edit the XYZ translation values to:
X Offset:
Y Offset:
Z Offset:
-0.000
-3.000
0.000
Press the <Translate> button and a new clearance CS is created and entered into
the available list.
Update an Existing Clearance CS
This feature allows you to update the current offset values for an existing
clearance CS. In some cases it may be required to extend an offset for better
motion path generation. To update an existing clearance CS, highlight that
Clearance CS in the list and when the current entered values are displayed in the
Offset / Translate Group, you can then edit them. Make the changes to the
clearance CS by pressing The <Update> button.
NOTE: Any feature that currently uses the Clearance CS being updated will have
all motion relating to the Clearance CS updated automatically.
Deleting a Clearance CS
Deleting a clearance CS will remove all references to the clearance planes defined
in the selected clearance CS. To delete, highlight the name in the Available
Clearance Plane CS list. Click on the button <Delete> and it will be removed
permanently from the inspection program.
NOTE: Any features that refer to the deleted clearance CS must be reviewed and
corrected manually.
Helmel Engineering Products, Inc.
www.helmel.com
Geomet Training Handbook
www.geomet-cmm-software.com
5-53
Chapter 5 – Coordinate Systems
Clear All Existing Clearance CSs
This feature will remove all clearance CSs from you part program. Caution should
be taken when using this feature. If your part program has any Auto-IPs, they will
lose reference to the Clearance CS and motion behavior can be greatly affected.
NOTE: Unlike Part Coordinate Systems, clearance CSs contain relative offset
values based on a recalculated PCS. Every time a part inspection is performed,
any PCSs are rebuilt based on current features. Clearance CS is then build against
the assigned PCS and therefore it is considered dynamic during the part
inspection.
Activating a clearance CS
Activating a clearance CS will allow all other editing tools to use the clearance
planes defined in the Clearance CS. To set it active, highlight the name in the
Available Clearance Plane CS list. Click on the button <(de)Activate> to change
its status.
Helmel Engineering Products, Inc.
www.helmel.com
Geomet Training Handbook
www.geomet-cmm-software.com
5-54
Chapter 6 – Tolerance
Chapter 6 – Tolerance
Introduction to Tolerance................................................................... 6-2
Linear Tolerance Theory.................................................................... 6-3
Working with Geomet Tolerance Windows ...................................... 6-5
Working with True Position Tolerance Windows ............................. 6-7
Interpreting Linear Tolerance in Geomet .......................................... 6-8
True Position Tolerance Theory ........................................................ 6-9
Datum Bonus Tolerance .................................................................. 6-11
Process Control Tolerance ............................................................... 6-12
Out-of-Tolerance Flash Message..................................................... 6-15
Vector Point Features – Apply Tolerance using Profile Bands ....... 6-16
GeoTol – Form Tolerance................................................................ 6-17
Runout: Cylinder/Plane.................................................................... 6-18
Helmel Engineering Products, Inc.
www.helmel.com
Geomet Training Handbook
www.geomet-cmm-software.com
6-1
Chapter 6 – Tolerance
Introduction to Tolerance
Before we discuss how Geomet applies tolerance to a feature, it is useful to
review the various reporting formats available. These formats include Linear or
True Position tolerance reported in either Cartesian or Polar formats. All feature
locations are reported against a Datum Frame Reference or PCS (Part Coordinate
System). A two-dimension feature will report its location in one PCS base plane.
An example would be an XY Point consisting of an X-axis, a Y-axis and an
origin, see example below.
The example above illustrates how the location of a point Pt1, (example would be
a center of a bore) can be expressed in either Cartesian (X, Y) or Polar (r, AX/Y)
coordinates. In the Cartesian format the coordinates X and Y are the distances
between Pt1 and the origin as measured along the X and Y-axis respectively. In
the Polar format, r represents the straight-line distance between Pt1 and the
origin, and AX/Y represents the angle that the radius line makes with the X-axis.
Geomet defaults to Cartesian format, which can be changed in the System
Options. To change the reporting format during the teaching of a part inspection,
press the <e> (Cart/Pol) key on the keyboard. To change the reporting format of a
single feature, highlight the feature and activate the sub menu with a right click.
Choose either Cartesian or Polar from the Feature Characteristics command.
Helmel Engineering Products, Inc.
www.helmel.com
Geomet Training Handbook
www.geomet-cmm-software.com
6-2
Chapter 6 – Tolerance
Linear Tolerance Theory
The purpose of measurement is to determine the locations and sizes of features
relative to their specified upper and lower tolerance limits. The space between
these limits is called the Tolerance Zone.
Linear tolerance is sometimes referred to as Unilateral or bilateral tolerance.
Typical linear tolerance call outs are shown in the figure below.
Plus and Minus Tolerance
The shape of a linear tolerance zone depends on the dimensionality of the feature
in question and on whether the reporting format is Cartesian or Polar. The figures
below demonstrate a bilateral tolerance zone for a one-dimensional and twodimensional feature reported in Cartesian format.
1D Bilateral Tolerance
Helmel Engineering Products, Inc.
www.helmel.com
Geomet Training Handbook
www.geomet-cmm-software.com
6-3
Chapter 6 – Tolerance
2D Bilateral Tolerance
The next figure demonstrates the tolerance zone of a 2D feature in polar format. A
3 dimensional feature will have a cubic tolerance zone surrounding the XYZ
nominal point.
Bilateral Tolerance in Polar Format
Helmel Engineering Products, Inc.
www.helmel.com
Geomet Training Handbook
www.geomet-cmm-software.com
6-4
Chapter 6 – Tolerance
Working with Geomet Tolerance Windows
Tolerance 1D Points
Enter Feature Number
To activate the tolerance tool directly from the displayed report, highlight the
feature by left clicking on it. Activate the feature sub menu by right clicking and
select the [Edit Tolerance] command. To activate the tolerance tool using
keyboard short keys, press <Ctrl> + <t> which activates a dialog where the
feature number will be entered. In either method, the appropriate tolerance dialog
will appear with the current tolerance data displayed.
To apply tolerance nominal values, start by entering the nominal value for the
reported feature in the column labeled "Nominal". Next enter the Plus and Minus
values for the bilateral tolerance band.
NOTE: Geomet will assist by entering the sign of the nominal automatically. This
is accomplished by using the sign of the actual reported value that is added to the
first number entered eliminating keystrokes.
Additionally, when you enter the plus tolerance band value, Geomet automatically
adds the minus tolerance band value also eliminating extra keystrokes.
In some cases the bilateral tolerance band may not be equilateral, as with ±0.005.
An example might be where the tolerance band is +0.005/-0.002. Enter in the Plus
column "0.005" and in the Minus column "-0.002". The minus sign in the Minus
column must be entered to correctly calculate the actual position within the
tolerance band of +0.005/-0.002. The process of requiring the sign allows
tolerance bands such as +0.010/+0.002, or -0.002/-0.010, which are still in use on
assembly drawings.
To apply a Unilateral Tolerance, such as 10.0 +0.01 / 0.0 enter the 10.0 in the
nominal column, 0.01 in the plus column and 0.0 in the minus column.
To support Limit Dimensioning where the feature has a tolerance using hard
values such as 10.0 / 10.2, we suggest entering either 10.0 +0.02/0.0 or 10.1
±0.01.
Helmel Engineering Products, Inc.
www.helmel.com
Geomet Training Handbook
www.geomet-cmm-software.com
6-5
Chapter 6 – Tolerance
On every tolerance dialog, there exists radio buttons to assign a Tolerance Preset.
It would only be required that the nominal value be entered followed by the
selection of a tolerance preset. For further explanation on tolerance presets, please
refer to System Options. To assign a tolerance preset, press the <Alt> + <2> key
combination to assign tolerance preset #2 or left click with the mouse on the
selection.
Not all data fields are required to contain data. If you are required only to
tolerance the X value on a XY Point feature, enter the X nominal and leave the Y
nominal blank. Geomet will then report only the tolerance data on the X-axis
values.
TIP: It is more efficient to move between edit controls using the tab key or the up
and down arrow keys on the keyboard. The order of movement on the tolerance
dialog utilizing the tab key is Nominal⇒Plus⇒Minus with each press of the
<tab> key. Should you want to reverse that order, press <Shift> + <tab>. The
<Enter> key at any time solves the application of the tolerance data and closes
the tolerance tool. To navigate only between the edit controls in the Nominal
column, use the up and down arrow keys. It is not necessary to locate the mouse,
which in this case, makes the tolerance tool very inefficient.
Helmel Engineering Products, Inc.
www.helmel.com
Geomet Training Handbook
www.geomet-cmm-software.com
6-6
Chapter 6 – Tolerance
Working with True Position Tolerance Windows
On valid features, True Position Tolerance may be applied through the standard
Tolerance Window. Activating the True Position Window is accomplished by
selecting the tab assigned to True Position and labeled “Tolerance – MMC / LMC
/ RFS”.
3D Point True Position
2D Circle True Position
The example above shows the True Position Windows for a 3D Point and a 2D
Circle. The Tolerance Window will show data fields specific to the feature. In
some cases, such as a 3D Point where no form is provided, the MMC and LMC
options will not be available.
To obtain the correct True Position reporting, it is important that all data fields are
completely filled out.
To switch between MMC, LMC and RFS, left click on the appropriate symbol. If
your current PCS contain a Datum Bonus Tolerance, that value will be reported to
the right of the check box labeled “Apply DBT”. To use the DBT value in the
final solution, place a check mark next to the “Apply DBT”
Helmel Engineering Products, Inc.
www.helmel.com
Geomet Training Handbook
www.geomet-cmm-software.com
6-7
Chapter 6 – Tolerance
Interpreting Linear Tolerance in Geomet
Using a 3D Point as an example, the figure below demonstrates what Geomet
reports on the computer display and the next figure the printed result. Please pay
special attention to the manner in which "Dev. Tol." (Deviation from Tolerance)
is expressed. Geomet displays an actual deviation value when an out-of-tolerance
condition exists. This number is the actual deviation from the upper or lower
tolerance limit. By contrast, plus and minus symbols are used to indicate an "In
tolerance" condition and simultaneously provide a measure of tolerance
bandwidth utilization. In particular, each plus or minus sign represents 25% of the
upper or lower tolerance bandwidth respectively.
The following table illustrates examples of the Dev. Tol. column with symbols
and out-of-tolerance conditions
+
the actual lies between 0 and 25% of
the plus tolerance bandwidth.
--
the actual lies between >25% and <=
50% of the minus tolerance bandwidth.
+++
the actual lies between > 50% and <=
75 % of the plus tolerance bandwidth.
0.0055
the upper tolerance limit has been
exceed by 0.0055.
When Geomet prints a report, the "Dev. Tol." column provides a scalable graph,
which represents the location within the tolerance bandwidth, that the actual is
placed.
Helmel Engineering Products, Inc.
www.helmel.com
Geomet Training Handbook
www.geomet-cmm-software.com
6-8
Chapter 6 – Tolerance
When an out-of-tolerance condition exists, the "Dev. Tol" column prints a value
that represents the deviation from either the plus or minus limit. The "Dev. Tol."
graph is available by default on all printed reports. Should you elect to always
display the deviation value, the setting can be found in System Options, Report
Config page.
True Position Tolerance Theory
Geomet provides True Position tolerance support for qualifying features in RFS,
MMC and LMC formats. Additionally, Datum Bonus Tolerance is available when
building a Datum Frame Reference (PCS) using a bore and an origin feature.
Definitions for most functions can be found in the ASME y14.5M-xxxx
specification. The manual is provided by ASME and can be found on their web
site:
http://www.asme.org
The Linear tolerance zones previously discussed were found to have widely
varying shapes depending on the print-out format, Cartesian or Polar and on the 1,
2 or 3 dimensional nature of the feature. Positional Tolerance Zones are much
simpler by comparison being circular, cylindrical, spherical or conical in shape.
In Geomet, Positional Tolerance is limited to circular and spherical zones only
and operates on the following features:
1D Pt
2D Pt
3D Pt
Circle
Line
Pos. Tol.
X
X
X
Notes:
1 – Positional Tolerance is applied to the 2D Reported Pierce Point only.
Plane
Sphere
X
Cylinder
(1)
X
Cone
(1)
X
table 1, Positional Tolerance Application Chart
A typical MMC positional tolerance zone, greatly magnified, is shown in the
figure below followed by a definition of terms:
MMC Positional Tolerance Zone Definitions
Helmel Engineering Products, Inc.
www.helmel.com
Geomet Training Handbook
www.geomet-cmm-software.com
6-9
Chapter 6 – Tolerance
Positional Zone
P
P’
NPD/M
EPD/M
APD/M
PAX/Y
Definitions:
Nominal Point Location
Actual Point Location
Nominal Position Diameter MMC
Effective Position Diameter MMC
Actual Position Diameter MMC
Position Angle relative to the X axis
Whereby the effective position diameter (EPD/M) is the sum of the nominal
position diameter (NPD/M) and the tolerance bonus from the measured feature.
In this example, the feature is obviously in tolerance, because the actual position
diameter (APD/M) is less than the Effective position diameter (EPD/M).
Note that the position angle (PAX/Y) records the direction in which the actual
point is offset relative to the nominal point. The APD/M and the PAX/Y
completely define the location of the actual point. A typical positional tolerance
printout for a Circle is shown on the following examples.
Geomet On-Screen Position Tolerance display
Geomet Printed Report
Helmel Engineering Products, Inc.
www.helmel.com
Geomet Training Handbook
www.geomet-cmm-software.com
6-10
Chapter 6 – Tolerance
Datum Bonus Tolerance
Datum Bonus Tolerance, (DBT) is available in a Part Coordinate System that has
been built using a diameter as the origin. The DBT process will determine the
amount of MMC or LMC available from the measurement of the diameter. This
DBT value is then included when working with positional tolerance related
features.
Determining DBT
To determine the value of DBT available in Geomet it is mandatory to follow
these steps. Our example will use a 2D XY bore as the origin for our PCS being
built. Measure the bore as a Circle and apply a tolerance to the size. By applying
the tolerance, Geomet can then determine the LMC or MMC value from the
tolerance limits.
When the tolerance has been applied, press the Origin key, <l> or the menu [PCS
⇒ Origin]. Set the origin on both the X and Y directions. During the origin
process, Geomet will assign the DBT value to the projection plane, in our case the
XY plane.
Applying DBT
Applying Datum Bonus Tolerance
Applying DBT to a qualifying feature is accomplished during the tolerance
process. In the feature tolerance dialog, the value of DBT is displayed in the
group titled "Datum Bonus Tolerance". Place a check next to the "Apply DBT"
and the Total Tolerance Zone will update with the new value.
Helmel Engineering Products, Inc.
www.helmel.com
Geomet Training Handbook
www.geomet-cmm-software.com
6-11
Chapter 6 – Tolerance
Process Control Tolerance
As the name implies, Process Control Tolerance (PCT) is a form of controlling
the manufacturing process by monitoring production and automatically reporting
conditions that require correction to the process before non-compliance issues
arise. Traditionally a feature attribute has a single tolerance value that, when
exceeded, was reported only as non-conforming. By the time a non-conformance
had been identified, the manufacturing process may have produced parts that may
now require expensive repairs.
Using PCT allows the inspector to establish different
but simultaneous tolerance zones for position and size
of features. For example the size of a bore might be
specified as 1.000 +/- .001. Under PCT controls the
controls values might look like:
Nominal [Zone A] / [Zone B] / [Zone C] / [Zone D]
- or 1.000 [+/-.0007] / [+/-.0008] / [+/-.0009] / [+/-.001]
PCT Tolerance Zones
As shown in figure – PCT Tolerance Zones, We break down the tolerance band
into zones of control. Each zone is identified by Geomet as Zone A / Zone B /
Zone C and Zone D.
PCT Tolerance Zone Suggested Descriptions
Zone A - action trigger level
This portion of the tolerance zone is considered in compliance and requires no
action. The default value for this zone is 70% of the allowable tolerance, but may
be changed to any desirable percent of tolerance.
Zone B
Zone B is the portion of the tolerance zone that exceeds the limit established by
Zone A. It is monitored as a first response to provide corrective action to bring the
production process back under the trigger limit. Production is still within
tolerance limits. The default limit of this zone is 70% - 80% of the allowable
tolerance zone.
Zone C
This portion of the tolerance zone requires immediate action to correct a potential
production problem. The production is still within the tolerance limit, but beyond
a trigger zone that requires immediate attention. The default limit for this value is
80% - 90% of the allowable tolerance zone.
Helmel Engineering Products, Inc.
www.helmel.com
Geomet Training Handbook
www.geomet-cmm-software.com
6-12
Chapter 6 – Tolerance
Zone D
This level equals 90% of the allowable tolerance zone and identifies the
production as non-conforming that requires a material review.
Zone
A
B
C
D
Suggested Action
No action required.
Notify Manufacturing and monitor.
Notify Manufacturing and review process.
Notify Management and adjust process.
Applying Process Control Tolerance
You access the PCT dialog when you apply standard tolerance from within
Geomet. In our example, the feature being toleranced is a standard 2D circle. The
tolerance box will have a buttons next to all Actual values. The “<<” is the access
button to start the PCT Dialog.
Feature Tolerance Dialog
PCT Dialog
Process Control Tolerance Application Dialog
Each zone can be edited with a custom value or the <Use Default> button can be
selected to use the predefined percentages for each zone. There exists a validation
to exit this dialog. The zones must be A < B < C <= D to prevent zone
overlapping.
If you require a tighter control, select <Use 3 Level> which will compress the
allowable tolerance limit by eliminating Zone C and defining it as the nonconformance limit. This will have the same effect as removing the first
notification level when the trigger value has been exceeded.
Helmel Engineering Products, Inc.
www.helmel.com
Geomet Training Handbook
www.geomet-cmm-software.com
6-13
Chapter 6 – Tolerance
Reporting Process Control Tolerance
When a feature is being reported, the Dev. Tol. column will indicate which zone
the results fall within. When a value is in Zone B you will see a number
representing the amount beyond the trigger value. If in Zone C then the value will
be tagged with a symbol: <. If the value is in Zone D, then the symbol is: << and
special care should be taken to segregate the production.
Nominal
Value
Reported
Value
Deviation
PCT
Symbol
Zone A
Zone B
Zone C
none
<
<<
+/-0.0035
+/-0.0035
+/-0.0035
+/- 0.0040
+/- 0.0040
+/- 0.0040
+/- 0.0045
+/- 0.0045
+/- 0.0045
PCT Report Symbol by Zone
2.1036
1.0141
1.0046
2.1000
1.0100
1.0000
0.0036
0.0041
0.00046
<
<<
Zone D
Standard
OOT
Reporting
+/- 0.0050
+/- 0.0050
+/- 0.0050
Example of a Geomet Report using PCT
In the footer of the report, there will be an assigned classification showing a large
letter corresponding to the maximum zone reached. There will also be a summary
line listing the total count of all attributes that have PCT applied. The summary
line will report the total inspected count followed by a count for each zone.
PCT Report Summary
The printing of the summary line can be toggled
between printing and not printed by accessing the
Report Config tab in System Options, see System
Options for a complete description.
To print, place a check next to Print Report
Summary.
Helmel Engineering Products, Inc.
www.helmel.com
Geomet Training Handbook
www.geomet-cmm-software.com
6-14
Chapter 6 – Tolerance
Out-of-Tolerance Flash Message
The Out-of-Tolerance Notification function provides a flash message to the
primary system monitor at the end of an Inspection Run only when an Out-ofTolerance condition exists.
The OOT Setup tool is located in the pull down menus [Tolerance->Out-of-Tol
Notification].
OOT Setup Box
OOT Setup Message
To activate, place a check next to "Send a Flash to the Monitor". Upon accepting
the change, <Ok>, you will be reminded where the message exists. The message
is in a Rich Text File format (*.rtf) and has a default file name of "OotToMon.rtf"
and resides in the program folder where Geomet.exe is installed. In normal
installations, the folder for Geomet is located at:
C:\Program Files\Helmel Engineering\Geomet 101
This file can be changed with Microsoft Word, WordPad or any application that
support RTF files. When saving, write
over the same file name and save as "rtf"
format.
To create a high visibility for the Flash
Message, select the <Set Bk Color>
button and assign a new background color
to your message.
The activation of the OOT Notification and color settings becomes part of your
current inspection program, not a global state for all programs. After making your
changes, save your current inspection file to ensure the changes become part of
the inspection program.
Program Execution
Upon completion of an inspection run, Geomet will review all results that have a
tolerance applied and should it find one or more out-of-tolerance conditions,
Geomet will flash the OOT Notification message to the screen.
Helmel Engineering Products, Inc.
www.helmel.com
Geomet Training Handbook
www.geomet-cmm-software.com
6-15
Chapter 6 – Tolerance
Vector Point Features – Apply Tolerance using Profile Bands
Tolerancing of Vector Point features is possible only in Cartesian reporting
formats. In addition to standard tolerance, Vector Points are evaluated where they
exist in a profile band that surrounds the inspection piece.
Tolerance VP Profile Band
VP Tolerance Sub Menu
When Vector Points were measured, the complete Tolerance data was inserted as
part of the reported feature. However, you may elect to update the Tolerance data
on one or more features.
To activate the tolerance tool see Working with Geomet Tolerance Windows,
earlier in this chapter. The Tolerance Window for Vector Points show the
standard Nominal XYZ position but also the Profile Band and Probe Deviation
+/- values. Editing can be done on a feature-by-feature basis using the standard
Edit Tolerance sub menu command.
However, it is efficient to update the profile band limits on multiple Vector Point
features with just one operation. To accomplish this, highlight all the Vector Point
features in the report that share a common profile band limit and right-click to
activate the sub menu. Choose [Edit VP Profile] and the standard "Vector Point
Profile Band" dialog will appear. You can then enter new plus/minus values for
the Profile Band and Probe Deviation. When accepted, all highlighted Vector
Point features will reflect the new values.
Since this method works on multiple Vector Point features, the Nominal XYZ
data fields will be protected and no changes can be made.
Helmel Engineering Products, Inc.
www.helmel.com
Geomet Training Handbook
www.geomet-cmm-software.com
6-16
Chapter 6 – Tolerance
GeoTol – Form Tolerance
Keyboard:
t
Menu:
Tolerances ⇒ GeoTol Form Tolerance
All GeoTol functions are combined in the single function which when activated
determines the appropriate geometric element based on the feature type. The
following table lists the available geometric elements for each feature type.
Geometric Element
Angularity
Circularity
Concentricity
Cylindricity
Flatness
Parallelism
Perpendicularity
Straightness
Associated Feature Type
Line, Plane, Cylinder, Cone
Circle, Cylinder
Cone, Sphere
2D Points, Circle, Cylinder, Cone,
Line, PCS Origin, Related Feature
Cylinder
Plane
Line, Plane Cylinder, Cone,
PCS Base Planes
Line, Plane, Cylinder, Cone,
PCS Base Planes and Axes
Line
The GeoTol wizard can be configured to work in the following modes:
Current PCS: In this mode, GeoTol references the last measured or constructed
feature to the current PCS. Example; if the last feature is a circle, then GeoTol
will validate the choices to Circularity and Concentricity to the PCS Origin. If the
last feature was a cylinder, then GeoTol validates the choices to include
Angularity, Concentricity, Cylindricity, Perpendicularity and Parallelism.
Last Feature: In this mode, GeoTol references the last measured or constructed
feature to the previous compatible feature. For example; if the last two features in
your inspection report are two XY Circles, the GeoTol tool will validate
Circularity and Concentricity.
Other Feature: This mode is similar to Last Feature, however it allows you the
choice of selecting a feature by number. For example, if your last feature is #29
and is a 2D Circle you can reference it to #12 also a 2D Circle to obtain
Concentricity. It is not necessary to work exclusively on the last two features in
your inspection report.
Circularity, Cylindricity and Flatness work exclusively on the last measured
feature without regard to the mode selected.
Helmel Engineering Products, Inc.
www.helmel.com
Geomet Training Handbook
www.geomet-cmm-software.com
6-17
Chapter 6 – Tolerance
A well thought out process should be considered when using GeoTol functions to
obtain results. To ensure sound results always consider using a large set of data
points for defining the feature. For example taking 4 data points to define a circle
may deliver acceptable results for size and location, but is insufficient to provide a
circularity result. At the minimum, Geomet suggests a minimum of 16 data points
on smaller circles from which you want GeoTol results.
RunOut – Cylinder / Plane
Menu:
Tolerances ⇒ RunOut ⇒ Cylinder/Plane
Not all GeoTol functions are accessed through
the GeoTol wizard. Some special cases are
separate functions such as the RunOut between
and Plane and Cylinder. The Cylinder / Plane
Runout routine is designed to calculate the
runout deviation of a Cylinder that is
perpendicular to a plane at a given radial
distance. This calculation would be similar to
placing a test indicator on the end of a cylinder whose lateral position is fixed.
The indicator would be placed in a fixed position identified as the radial distance.
The part would be turned slowly and the Total Indicator Reading (TIR) would be
recorded, see figure.
Setup for a Runout
The first requirement to making this routine successful is to measure a cylinder
and plane with sufficient data points. Under these conditions the cylinder and
plane should be measured with at least 30 points, more if necessary to locate a
representation of the variances within the surface.
When performing the Runout test manually, as shown in the example above, you
are actually capturing millions of data points while rotating the part. The indicator
will show a displacement from the highest to the lowest reading. This spread will
represent the Runout.
A CMM, which builds features using discrete numbers of data points will often
never locate the total spread. The features are created using a best-fit algorithm.
The result will contain a small uncertainty between the reported feature and the
actual work piece. Therefore the higher the number of data points used, the
greater the chance you will return a runout that resembles the manual method.
Helmel Engineering Products, Inc.
www.helmel.com
Geomet Training Handbook
www.geomet-cmm-software.com
6-18
Chapter 6 – Tolerance
Determining the RunOut Value
Once you have completed measuring the Cylinder and Plane, activate the Runout
routine, through the main drop down menus
[Tolerances⇒RunOut⇒Cylinder/Plane]. The Runout tool will appear.
Cylinder/Plane Runout Tool
Feature Selection Tool
Step 1 – Select Cylinder
Press the <Choose Cyl> button and the Feature Selector will appear with a filter
activated to show only Cylinders in your inspection report, see figure Feature
Selection Tool. Highlight the cylinder required for the Runout routine and press
<Ok>.
Step 2 – Select Plane
Press the <Choose Plane> button and the Feature Selector will appear with a filter
activated to show only Planes. Highlight the plane required for the Runout routine
and press <Ok>.
Step 3 – Set the Radial Test Length
In this step, enter the radial distance from the axis of the cylinder you would like
the runout to be calculated at. This can be explained as the location you would set
the test indicator at.
Step 4 – Allowable Tolerance Zone
This runout tolerance value is the total allowable deviation of the actual TIR
value. If the calculated deviation exceeds this amount, it is considered out-oftolerance.
Helmel Engineering Products, Inc.
www.helmel.com
Geomet Training Handbook
www.geomet-cmm-software.com
6-19
Chapter 6 – Tolerance
<Calculate> Button
The Calculate button updates the Actual: data field and is an optional step before
building the inspection step.
<Auto PE> Button
The <Auto PE> button is a push-on, Push-off button. When locked in the down
state, as shown in example on the previous page, Geomet will automatically
attach a Print Exception flag on the result when it attaches the inspection step, see
Print Exceptions for additional information.
<Ok> Button
To record the results in the inspection report, press the <Ok> button. An entry
will be made, see figure below.
Runout Reported Results
Adjusting the Tolerance Limit
You can at any time adjust the
maximum allowable tolerance limit. To
start, highlight the feature in the
inspection report area and right-click to
activate the feature sub-menu. Choose
Edit Tolerance from the list and the
Tolerance Dialog will appear, see
figure. After making any necessary
changes, press the <Ok> button and the
reported results will be updated.
Helmel Engineering Products, Inc.
www.helmel.com
Geomet Training Handbook
www.geomet-cmm-software.com
6-20
Chapter 7 – Constructions
Chapter 7 – Constructions
Constructions – Brief Overview ........................................................ 7-2
Selecting Features ........................................................................ 7-2
Implicit Selection ......................................................................... 7-2
Targeted Highlighting.................................................................. 7-2
Feature Selection Tool ................................................................. 7-2
Bisect ................................................................................................. 7-3
Intersect.............................................................................................. 7-4
General Features – Single Point Solutions .................................. 7-4
Circle / Circle............................................................................... 7-4
Circle Line ................................................................................... 7-6
Offset Features ................................................................................... 7-8
Offset Point .................................................................................. 7-8
Offset Line ................................................................................... 7-9
Offset Plane................................................................................ 7-10
Angle................................................................................................ 7-11
Distance ........................................................................................... 7-12
Extended Distance ........................................................................... 7-13
Reporting Format Control.......................................................... 7-13
Circle / Circle............................................................................. 7-14
Cylinder / Sphere ....................................................................... 7-16
3D Point / 3D Point.................................................................... 7-18
Boundary Planes .............................................................................. 7-19
Inscribed / Circumscribed Circle ..................................................... 7-20
Recall Feature .................................................................................. 7-21
Recall Feature Tool.................................................................... 7-21
On Demand Recall..................................................................... 7-21
Recall PCS Base Components ......................................................... 7-22
Helmel Engineering Products, Inc.
www.helmel.com
Geomet Training Handbook
www.geomet-cmm-software.com
7-1
Chapter 7 – Constructions
Constructions
Geomet has the capability to create new features derived from other measured or
constructed entities. During the inspection process, features are often created to
solve complex solutions. The constructions available include:
Bisect
Intersect
Offset Features
Angles
Distances
Selecting Features for Constructions
The process of selecting compatible features from your inspection for use with a
Construction command can be accomplished through three methods.
Method 1- Implicit Selection
This method assumes there are no highlighted features in your inspection report.
The construction command will then work exclusively on the last two compatible
features in your inspection report. The construction command will look through
transparent features such as state changes, text and other non-geometry entries
and extract two measured or constructed features for use in the construction.
Method 2 – Targeted Highlighting
The operator may elect to highlight two random features then invoke the
construction command. The construction command will extract those highlighted
features to solve for a solution. Care should be taken when selecting random
features to follow the rules of compatibility. These rules vary based on the
construction command being applied. Where utilizing 1D and 2D features, the
selected features must share the same PCS, which is also the current PCS.
Method 3 – Feature Selection Tool
Geomet has a selection tool that is invoked with the <~> key press or menu
command [Construct ⇒ Feature Selector]. This is a tool that extracts a listing
from the current inspection of all, or filtered features. Select from this list the
features you would like the construction command to work with. For more
information regarding the Feature Selector, please refer to chapter 8.
Helmel Engineering Products, Inc.
www.helmel.com
Geomet Training Handbook
www.geomet-cmm-software.com
7-2
Chapter 7 – Constructions
Bisect
The Bisector routine determines the bisecting or symmetry feature between
compatible features. For example, bisecting two non-parallel planes will result in
two alternative bisecting planes (90° apart). The operator may then select one.
The Bisect Command is activated by:
Keyboard:
a
Menu:
Construct ⇒ Bisect
The Bisect command requires two compatible features to create a solution. Should
it determine the features do not follow the compatibility rules an error message
will display and the command will abort.
1D Pt.
2D Pt.
3D Pt.
2D Line
1D
1D Pt.
Points
2D
3D
Line
2D Pt.
3D Pt.
3D Pt.
3D Pt.
2D
3D
Circle
Plane
2D Pt.
3D Pt.
2D Line
2D Line
3D Line
3D Line
Circle
Plane
Cyl
2D Pt.
3D Pt.
2D Pt.
3D Pt.
Cone
2D Pt.
3D Pt.
Sphere
3D Pt.
3D Pt.
Cyl
Cone
Sphere
2D Pt.
3D Pt.
2D Pt.
3D Line
2D Pt.
3D Line
2D Pt.
2D Pt.
3D Pt.
2D Pt.
3D Line
2D Pt.
3D Line
2D Pt.
3D Pt.
3D Pt.
2D Pt.
3D Line
2D Pt.
3D Line
3D Pt.
2D Pt.
3D Line
2D Pt.
3D Line
3D Pt.
3D Pt.
3D Pt.
Plane
2D Pt.
3D Line
2D Pt.
3D Line
2D Pt.
3D Line
2D Pt.
3D Line
2D Pt.
2D Pt.
3D Pt.
Helmel Engineering Products, Inc.
www.helmel.com
3D Pt.
3D Pt.
Geomet Training Handbook
www.geomet-cmm-software.com
7-3
Chapter 7 – Constructions
Intersect
The Intersect Command is activated by:
Keyboard:
d
Menu:
Construct ⇒ Intersect
The Intersect command determines the characteristics of the intersection of two
compatible features. Intersection works with the following combinations:
Points
2D
1D
Line
3D
1D Pt.
2D Pt.
3D Pt.
2D Line
2D
3D
2D Pt.
3D Line
Circle
Plane
Circle
Plane
2D Pt.
1D Pt.
3D Pt.
3D Pt.
3D Pt.
2D Pt.
1D Pt.
3D Pt.
Cyl
Cone
Sphere
3D Pt.
3D Pt.
2D Pt.
Cyl
Cone
Sphere
3D Line
3D Pt.
3D Pt.
3D Pt.
3D Pt.
2D
Circle
3D Pt.
3D Pt.
3D Pt.
3D Pt.
3D Pt.
3D Pt.
2D
Circle
3D Pt.
3D Pt.
The Intersect command requires two compatible features to create a solution.
Should it determine the features do not follow the compatibility rules an error
message will display and the command will abort.
Special Intersection Applications
Circle / Circle
The intersection between two Circles provides 1, 3 or 5 possible solutions. All
solutions are 2D Point features in the same PCS projection plane as the circles. In
left figure, we have two circles that intersect. In the right figure, we have two
circles that do not intersect, but can have valid solutions.
Intersecting Circles
Non-Intersection Circle
Helmel Engineering Products, Inc.
www.helmel.com
Geomet Training Handbook
www.geomet-cmm-software.com
7-4
Chapter 7 – Constructions
The chart below demonstrates the 2D Point assignment to the nodes shown in
figures on the previous page.
Intersecting Circles
Non-Intersecting Circle
Node 1
Tangent Point on Circle 1
Node 2
Tangent Point on Circle 2
Node 3
Mid Point between Centers, or
Single contact point on the circles.
Node 4
Node 5
Intersection Point 1
Intersection Point 2
Notes
Reported as 2D Point and
a miss distance.
Reported as 2D Point and
a miss distance.
Mid Point is reported as
2D Point and a miss
distance.
N/A
N/A
When the node selection is obscured in the graphics display, press the <Zoom In>
button will redraw the graphics to encompass only the nodes for easier selection,
see figure below.
Zoom-In Function
Selecting a Node
Selecting a node can be accomplished through various means. The simplest
method is to move your mouse over a node in the graphics area. When the mouse
pointer touches a node, a small display is shown which will indicate the XYZ
position and node ID number. Left-click on the node and it changes into a circle
indicating that is the selected node. Press the <Select> button and the solution will
be inserted into the inspection report.
To view all possible point solutions, press the
<Show Points> button. The display will expand
to show the 3 or 5 possible solutions, see figure
5. You can select a node in the list by placing a
bullet next to the corresponding node ID.
Helmel Engineering Products, Inc.
www.helmel.com
Geomet Training Handbook
www.geomet-cmm-software.com
7-5
Chapter 7 – Constructions
Circle / Circle - Single Point Solution
There exists one condition that results in one intersect solution. That is where the
circles touch at only one point. When asking for the Intersection, the system will
report the one solution in your inspection report. This point corresponds to node
ID number 3 from the table above.
However, when capturing measured results this condition is rare. When Geomet
determines the two circle do not repeat the touching in only the one selected
point, or may not even intersect, the solution will default to the mid point and
miss distance.
Circle / Circle - Default Reporting
When teaching a part for auto-inspection, variances to the part during
manufacturing may affect the reported intersection solution. For example, the
circle may intersect resulting in 5 possible solutions during the self-teach phase,
but later during the inspection routine they fail to intersect resulting in 3 possible
solutions.
If the original solution to report was node #4 or #5 when they intersected, they
will report as node #3 during inspection.
Circle / Line
The intersection between a Circle and Line provides 1, 3 or 5 possible solutions.
All solutions are 2D Point features in the same PCS projection plane as the
features. In figure 6, we have two circles that intersect. In figure 7, we have two
circles that do not intersect, but can have valid solutions.
Intersecting Line/Circle
Non- Intersecting Line/Circle
Helmel Engineering Products, Inc.
www.helmel.com
Geomet Training Handbook
www.geomet-cmm-software.com
7-6
Chapter 7 – Constructions
The behavior of the graphic intersection tool for Circle/Line is the same as
described in Circle/Circle above. Please refer to that section for assistance.
Intersecting Circle/Line
Node 1
Node 2
Node 3
Node 4
Node 5
Non-Intersecting
Circle/Line
Tangent Point on Circle
Tangent Point on Line
Mid Point between Node 1 and 2, or
Single tangent point.
Intersection Point 1
Intersection Point 2
Notes
Reported as 2D Point.
Reported as 2D Point.
Mid Point is reported as
2D Point and a miss
distance.
N/A
N/A
Circle / Line - Single Point Solution
There exists one condition when there can be one solution. That is where the
circle and line touch only at the tangent point. When asking for the Intersection,
the system will report the one solution in your inspection report. This point
corresponds to node ID number 3 from the table above.
However, when performing repeated inspections this condition is rare. When
Geomet determines the two features do not repeat the touching in only the one
selected point, or may not intersect, the solution will default to the mid point and
miss distance.
Circle / Line - Default Reporting
When teaching a part for auto-inspection, variances to the part during
manufacturing may affect the reported intersection solution. For example, the two
features may intersect resulting in 5 possible solutions during the self-teach phase,
but later during the inspection routine they fail to intersect resulting in 3 possible
solutions.
If the original solution to report was node #4 or #5 when they intersected, they
will report as node #3 during inspection.
Helmel Engineering Products, Inc.
www.helmel.com
Geomet Training Handbook
www.geomet-cmm-software.com
7-7
Chapter 7 – Constructions
Offset Features
An offset feature command is a tool used to create a similar feature at a known
offset distance from a previously measured or constructed Point, Line or Plane.
Offset Point
The Offset Point command creates a new 3D point that has an absolute XYZ
offset distance from an existing Point feature in the inspection report. The
reference point can be a 1D, 2D or 3D reported point.
The Offset Point Command is activated by:
Menu:
Construct ⇒ Offset Point
To create an Offset Point, start by highlighting in the
inspection report the point feature that will serve as the
reference location. An XYZ Edit Value dialog will appear
where you can enter the offset distance in local PCS
values, see figure. Upon accepting the dialog, a new Point
feature will be created.
There is one basic rule that applies to creating an Offset
Point. That rule requires that the PCS of the reference
Point must be the same as the current PCS.
When applying an offset to a 1D Point, there
exist two possible solutions, a 1D or 3D Point.
For example, if the offset value is applied only
to one axis, any axis, then you will have the
chance to construct a 1D or 3D Point.
When you perform the offset on the 1D Point,
you will be prompted whether the resulting new
feature should remain a 1D Point, or be reported as a 3D Point, see message. If
enter 2 or more offset values, for example X and Y, then the new point
constructed will be a 3D Point, see sample inspection report.
1D and 2D Constructed Points from Offset Point
Offset Points can be used in all constructions and have a tolerance applied to it.
Helmel Engineering Products, Inc.
www.helmel.com
Geomet Training Handbook
www.geomet-cmm-software.com
7-8
Chapter 7 – Constructions
Offset Line
The Offset Line command creates a new 2D-line that has an absolute offset
distance from an existing line feature in the
inspection report.
The Offset Line Command is activated by:
Menu:
Construct ⇒ Offset Line
To create an Offset Line, start by first identifying
in your part inspection one measured or
constructed 2D Line feature that will serve as the
reference feature. Highlight the Line and choose
from the main drop down menus
[Construct⇒Construct an Offset Line]. Should Geomet not be able to identify the
highlighted feature as a compatible Line or more than one feature is selected,
Geomet will display a warning. Geomet also validates that the highlighted Line is
in the current Part Coordinate System.
A dialog will appear that allows the entry of a single signed value where you can
enter the offset distance. Upon accepting the dialog, a new 2D-line feature will be
created that has the same projection plane and reporting PCS pierce axis. The line
will be parallel to the reference line and the distance between the line will be the
absolute offset value.
NOTE: As noted, the offset value is a signed value where a negative number will
create a new line in the negative direction in the PCS.
Reported new Offset Line
Helmel Engineering Products, Inc.
www.helmel.com
Geomet Training Handbook
www.geomet-cmm-software.com
7-9
Chapter 7 – Constructions
Offset Plane
A previously measured or constructed plane can be used to create a parallel plane
specified at a known distance. The offset plane can be used in all PCS
constructions, tolerance or other construction
related activities.
The Offset Plane Command is activated by:
Menu:
Construct ⇒ Offset Plane
To create an Offset Plane, start by selecting in
the inspection report the plane feature that will
serve as the reference feature. Highlight that
plane and choose from the drop down menus
[Construct⇒Construct an Offset Plane]. A dialog will appear that allows the
entry of a single signed value where you can enter the offset distance. Upon
accepting the dialog, a new plane feature will be created that has the same
projection angles and reporting PCS pierce axis. The plane will be parallel to the
reference plane and the distance between the line will be the absolute offset value.
The Offset Plane command does not require that the PCS of the reference plane is
the same as the current PCS.
NOTE: As noted, the offset value is a signed value where a negative number will
create a new plane in the negative direction of the PCS.
Reporting of an Offset Plane
Helmel Engineering Products, Inc.
www.helmel.com
Geomet Training Handbook
www.geomet-cmm-software.com
7-10
Chapter 7 – Constructions
Angle
The Angle routine determines the angle between two reference features. Angle
works with the following combinations:
Line ⇒ Line
Plane ⇒ Plane
Cylinder ⇒ Plane
Cylinder ⇒ Cylinder
Line ⇒ Plane
Cone ⇒ Plane
Cone ⇒ Cone
The Angle Command is activated by:
Keyboard:
f
Menu:
Construct ⇒ Angle
The Angle command requires two compatible features to create a solution. Should
it determine the features do not follow the compatibility rules an error message
will display and the command will abort.
The reported value between two features where one or more features are 2D
results in a single projection value. For example, the angle between a 2D XY Line
and ZX Plane, results in an angle reported in the XY PCS base plane.
Angle derived
from :
2D Line
Projected
Line Vector
into the PCS
3D Line
Plane
Cylinder
Cone
Line Direction
Vector
Normal
Vector
Axis
Axis
The angle between two 3D features, such as a plane and cylinder reports the theta
angle, or if elected, the 3 projection angles.
To switch between theta and projection angles, highlight the angle feature in the
inspection report and right-click to activate the menu. Choose [Projection Angles]
when the current state is theta, or choose [Theta] when the current state is
projection angles.
Reported angles can be shown either as degree.decimal format or degree-minutesseconds.
Helmel Engineering Products, Inc.
www.helmel.com
Geomet Training Handbook
www.geomet-cmm-software.com
7-11
Chapter 7 – Constructions
Distance
The Distance Command is activated by:
Keyboard:
s
Menu:
Construct ⇒ Distance
Features must share a common axis and are contained in the current Part
Coordinate System. For example a 2D XY Circle shares a common axis of Y with
a 2D line reporting the Y-axis pierce value. The XY Cylinder Axis Pierce Point
shares both the X and Y with the reported position of a 3D Sphere.
Should the distance routine determine there are no shared axes between the two
features, an error will be reported. The Distance routine utilizes the current
Reporting Format under the following conditions.
Reporting Formats
Cartesian: Calculates the results in X, Y, and/or Z values that are parallel to the
current Part Coordinate System.
Polar: Calculates the results in Radius and project angle components of 2D and
3D distance solutions. Should the distance routine determine only a 1D solution is
possible, the reporting format will default to Cartesian.
Special considerations should be taken when using the Distance function. For
example the distance between two -Z planes is calculated along the Z-axis of the
current Part Coordinate System. This may not reflect the desired results when the
data points used to calculate the planes are taken a distance from the PCS Origin.
Any parallel deviation between the planes will accentuate the distance value when
projecting to the Z-axis of the PCS.
The chart below illustrates the feature characteristics used in distance reporting.
Feature
Type
1D Point
2D Point
3D Point
2D Circle
2D Line
3D Line
Plane
Cylinder
Cone
Sphere
Reporting Characteristics
Reported position along the Current PCS Axis.
Projected 2D Point in the reported PCS Base plane.
Center XYZ Reported Position.
Projected 2D Point in the reported PCS Base plane.
Projected PCS Axis Pierce Point.
PCS Base Plane Pierce Point.
Project PCS Axis Pierce Point.
PCS Base Plane Pierce Point.
PCS Base Plane Pierce Point.
Center XYZ Reported Position.
Helmel Engineering Products, Inc.
www.helmel.com
Reporting
Axis
1D
2D
3D
2D
1D
2D
1D
2D
2D
3D
Geomet Training Handbook
www.geomet-cmm-software.com
7-12
Chapter 7 – Constructions
Extended Distance
The Distance Command is activated by:
Keyboard:
shift + s
Menu:
Construct ⇒ Extended Distance
The Extended Distance routine expands the choices that can be used in
determining common axis distances between features with form. An example
would be the outer distance between two circles, which result in a reported value
equal to the center-to-center distance plus the two radii.
The routine requires that features sharing reporting axis be used. For example two
XY Circles are acceptable, but a XY circle and a YZ circle are not. The only
notable exceptions are a Cylinder/Sphere and two 3D Points. The explanation on
these special relationships is provided below.
Feature 1
Circle
Feature 2
Circle
Cylinder
Sphere
3D Point
3D Point
Notes:
Must be coplanar, distance
reported is in the common
PCS base plane.
Distance reported is
perpendicular to the Cylinder
axis, through the center of the
Sphere.
Distance is reported as direct
line between 3D Points. The
form of the 3D Points is the
size of the Stylus used during
measuring.
Helmel Engineering Products, Inc.
www.helmel.com
Geomet Training Handbook
www.geomet-cmm-software.com
7-13
Chapter 7 – Constructions
Extended Distance Options
There are two basic controls that direct behavior of the
Extended Distance tool. These are Reporting Formats and
Alignments, see figure.
Reporting Formats:
Cartesian: Calculates the results in XYZ values that are
parallel to the current Part Coordinate System.
Polar: Calculates the results in Radius and projection
angle components. The radius equals a direct line distance
between the selected nodes. The angle is the projected
PCS base plane angle in the XY, ZX or YZ base plane.
Alignments:
Align in PCS: The calculated nodes are inline with the current Part Coordinate
System. All reported results will be in PCS XYZ values.
Align with Features: The calculated nodes are inline with the direction vector
passing through the center positions of the features. This method is commonly
used when combined with Polar reporting to show the inner or outside distances
of the features.
Tangent Points: The calculated nodes represent the point of contact of a line
touching both features simultaneously.
Using the Extended Distance Tool with Two Circles
Extended Distance works with the last two features measured or constructed, or
with two previously selected features in the inspection report.
Activating the Extended Distance Tool will show the two features in their
respective orientation, see figure 1. Each circle will be shown with five nodes
assigned corresponding to the top, bottom, right and left extreme positions, plus a
center point node. Between the two circles will exist a node that lies on a direct
line between the circle centers and its mid point.
Helmel Engineering Products, Inc.
www.helmel.com
Geomet Training Handbook
www.geomet-cmm-software.com
7-14
Chapter 7 – Constructions
Basic Extended Distance Tool
These nodes can be selected, one from each circle on the radius or the center node
to obtain the required distance. To select a node, pass your mouse pointer over a
node and the node will expand indicating you can select it, see figure. Left click
on the expanded node and that becomes one of the required nodes to be used in
determining the distance.
Node Selection
Locking on Nodes
When the first node is selected, the node shape changes into a small Circle where
green is the color for node one and blue is the color for node two. Selecting node
two is similar to node one except the selection process using a right-click.
In the figure Locking on Nodes, we show two selected nodes. The alignment of
the nodes is in line with the current PCS axis. Leader lines are drawn to represent
the distances that will be reported. We are reporting in Cartesian coordinates with
the reported values parallel to the current PCS axis. The reported results are
shown for reference.
To illustrate how we get a minimum distance,
or inner distance value, we switch the
Alignment choice to Align with Features. This
will recalculate the nodes using the center-tocenter alignment, see figure Inside Minimum
Distance.
Inside Minimum Distance
The Reporting Format selection was changed to Polar to allow for direct distance
between nodes. We choose our two required nodes and the distance leader will be
drawn directly between the nodes.
Helmel Engineering Products, Inc.
www.helmel.com
Geomet Training Handbook
www.geomet-cmm-software.com
7-15
Chapter 7 – Constructions
If we did not switch to Align with Features
and attempted to retrieve the inner distance,
we would get a poor reading as shown in
figure 6, Incorrect Alignment.
Incorrect Alignment
Working with Tangent Points
Working with tangent points can be
accomplished when selecting Tangent Points
under the Alignment group. The features will
be redrawn to show the available nodes, see
figure.
Tangent Points
Select the two nodes as described above to
obtain the distance. Under most conditions, have your Reporting Format set to
Polar. This routine is helpful when working with oval slots and between fillets in
corners to report the straight-line distance and angle.
Cylinder / Sphere Extended Distance
The Extended distance routine can be applied to a Cylinder and Sphere
combination. When Geomet sees that you have selected these features, the
Extended Distance tool reconfigures itself to those pairings, see figure below.
Cylinder / Sphere Extended Distance Tool
Inside Nodes Selected
The graphic illustration of the two features is not shown in their respective
relative position or size. This was done to accommodate more effective use in
selecting nodes. For example if the cylinder axis would pass through the center
point of the sphere, such as a rounded end of a shaft, the nodes would overlap and
it becomes difficult to separate for clarity.
Helmel Engineering Products, Inc.
www.helmel.com
Geomet Training Handbook
www.geomet-cmm-software.com
7-16
Chapter 7 – Constructions
Choose the nodes using a left-click only on each feature. When one node has been
selected on each feature, a leader line is drawn with its corresponding value, see
figure. In this example, the inner nodes were selected reporting the distance
between features at the closest point of approach. In the figures below we
illustrate various selected nodes for reporting.
External Nodes Selected
Outside the Cylinder to center of Sphere
Helmel Engineering Products, Inc.
www.helmel.com
Geomet Training Handbook
www.geomet-cmm-software.com
7-17
Chapter 7 – Constructions
3D Point / 3D Point Extended Distance
The Extended Distance routine can be applied to a pair of 3D Points one of which
must be a measured point. Normally a 3D Point has no form or feature size. In the
Extended Distance routine, the size of a measured 3D point is the size of the
stylus used when capturing. Constructed 3D Points, when used with the Extended
Distance routine has no size. In the left figure, we illustrate two measured 3D
Points being displayed. In the right figure, we have one measured 3D Point and
one constructed 3D Point.
Two Measured 3D Points
One Measure / One Constructed 3D Points
The behavior of selecting nodes is similar as described in the Cylinder / Sphere
section above. The distance reported is calculated along a direction vector
crossing through the centers of the 3D Points.
Inside Distance
Inside Distance between a Measured and
Constructed Points
In the left figure above, the distance reported is the inner distance between two
measured 3D points. In the right figure above, we illustrate the inner distance
between one measured 3D Point and a constructed 3D Point which is derived
from the intersection of two 3D Lines.
Helmel Engineering Products, Inc.
www.helmel.com
Geomet Training Handbook
www.geomet-cmm-software.com
7-18
Chapter 7 – Constructions
Boundary Planes
The definition of the Boundary Plane is a plane that passes through the minimum
or maximum extreme data point of a measured or constructed plane and is parallel
to that reported plane. This plane can be used in all cases in which a measured or
constructed plane is to be used such, as PCS components, constructions and
tolerance.
Geomet offers two directions from which you can choose, Upper and Lower. The
Upper Boundary Plane represents the plane constructed at the most positive side
of the reported pierce point. For example a plane reported at Z: +1.345 might have
an Upper Boundary Plane reported at +1.349.
To use the feature, measure or construct a plane, select the
plane directly on the report by left-clicking the mouse over
the feature to highlight it. Activate the feature sub menu by
right clicking. Choose [Upper Boundary Plane] or [Lower
Boundary Plane] and the feature will recalculate showing the
new reported values.
It is suggested to recall the plane, then apply the Boundary
plane change to the recalled plane. This ensures the original
plane is available for other construction or tolerance
requirements.
If you do not have the Upper/Lower menu selections in your pop-up, the plane
you have selected is referenced by another operation. You can only change the
reported values on planes that have no reference. However you can recall the
plane and then apply Upper/Lower Boundary Plane.
One example in which this feature can be used is to determine the width of a slot,
see figure above. Where the effective distance is the closest two points as if a
gage block were used to identify the width of a slot. Select the plane representing
one side of the slot and report it as an upper boundary plane, then select the
opposite plane and report it as the lower. Obtain the distance <s> between the
planes and that distance will represent the closest points in the slot.
Helmel Engineering Products, Inc.
www.helmel.com
Geomet Training Handbook
www.geomet-cmm-software.com
7-19
Chapter 7 – Constructions
Inscribed / Circumscribed Circle
The Inscribed Circle function evaluates the data points used to measure the circle
and locates the inscribed and circumscribed circle solutions. The inscribed Circle
is best used to illustrate a gage pin being inserted into a bore. The gage pin, when
sized to the largest pin available to fit in the bore, will represent the maximum
inscribed circle. The pin will contact the bore at three points representing the
closest points of contact.
The minimum Circumscribed Circle is best suited for use on outside features such
as a boss. This feature is best illustrated when using a ring gage to measure an
outside diameter. The solution is the smallest ring gage that will fit over the
outside diameter. The ring gage will contact the diameter at the three greatest
points.
In both cases, the diameter reported will reflect these conditions. The position will
also vary from the normal best-fit solution of a circle.
Using the Inscribed / Circumscribed Circle Command
These features are a post operation on an already measured or constructed 2D
circle. To use, highlight the circle in the inspection report and right click to
activate the sub menu. Locate either the Minimum or Maximum Inscribed Circle
feature as required.
Once you select your choice, the circle will appear in the inspection report as an
Inscribed Circle. In most cases, we recommend that you perform a recall on the
original circle, then apply the Inscribed Circle feature. That will preserve the
original values for comparison.
If you require removing the Inscribed Circle feature and revert it back to a normal
best-fit circle highlight the Inscribed Circle in the report and right click to activate
the sub menu. Choose [Remove Inscribed Circle].
Helmel Engineering Products, Inc.
www.helmel.com
Geomet Training Handbook
www.geomet-cmm-software.com
7-20
Chapter 7 – Constructions
Feature Recall
The Feature Recall Command is activated by:
Keyboard:
h
Menu:
Construct ⇒ Recall Feature
The Feature Recall Tool is designed to copy an
existing feature and append it to the inspection
report. The newly created feature is considered a
constructed feature and is not measured during the
inspection.
Some of the benefits of recalling a feature is that
the original feature is not manipulated where the
recalled feature can be changed to show other attributes or even to project it into a
different PCS.
Care should be taken where recalling features into a different PCS from which it
was originally built in. For example to recall a 2D feature and force it to be
projected into a skewed PCS can result in erratic results.
Feature Recall Tool
The Feature Recall Tool provides access to the most common conversion tools
available during a recall. In the example above, selecting a 2D Circle provides
conversion tools to report the position in another PCS base plane, or as a 3D
Point. Additionally, 2D Points can be derived from the circle where it is
considered Tangent with a PCS axis.
<Ok>
To complete the recall procedure, press the <Ok> button and a new feature will be
appended to the inspection report. Should you try to recall features into a different
PCS, you will be prompted with instructions. These instructions will guide you to
force a recall or recall the reported position as a 3D Point which will eliminate
projection errors.
On Demand Recall
You can select a feature in the inspection report and right click to activate the sub
menu. Select [Recall Feature] or [Recall Features] is more than one feature is
selected. This will perform the recall on demand.
Helmel Engineering Products, Inc.
www.helmel.com
Geomet Training Handbook
www.geomet-cmm-software.com
7-21
Chapter 7 – Constructions
Recall PCS Base Components
The Recall PCS Base Components Command is activated by:
Keyboard:
shift + H
Menu:
Construct ⇒ Recall PCS Base Components
Part Coordinate Systems contains 3 orthogonal planes that define the XY, YZ and
ZX base planes. There is also a 3D Point that defines the origin. These
components can be recalled as constructed features.
Select a PCS
Choose Component
When you activate the command you will be prompted to choose a PCS by its
number. If there is only one PCS, this step will be skipped automatically. The next
tool will allow you to choose one of the PCS components. Your choices are:
Button
XY
YZ
ZX
3D
Description
Recalls a XY Plane
Recalls a YZ Plane
Recalls a ZX Plane
Recalls a the Origin as a 3D Point
The features created are compatible with all construction and tolerance tools.
Helmel Engineering Products, Inc.
www.helmel.com
Geomet Training Handbook
www.geomet-cmm-software.com
7-22
Chapter 8 – Support Tools and Features
Chapter 8 – Support Tools and Features
Understanding Auto Direction Sensing ............................................. 8-3
Program Header ................................................................................. 8-5
Restart Program Header..................................................................... 8-7
Rerun Step Selection, Manual and DCC CMMs ......................... 8-7
Feature Selection Tool ....................................................................... 8-8
Using PCS Filters......................................................................... 8-8
Display only Measured and Constructed Features....................... 8-9
Column Sorting............................................................................ 8-9
Applying your Selections............................................................. 8-9
Math Function............................................................................ 8-10
Diameter Averaging................................................................... 8-11
Stylus Size Updating using a Ring Gage ................................... 8-11
DCC Option Menu..................................................................... 8-12
Rerun Feature Selector – Manual CMMs .................................. 8-13
Text Features.................................................................................... 8-14
Manual Step Text Entry ............................................................. 8-14
Basic Text .................................................................................. 8-16
User Prompt with Image Support .............................................. 8-17
In-Line Text Entry ..................................................................... 8-18
Custom Ordered Reports ................................................................. 8-20
Concise Reports ............................................................................... 8-23
Report Control Center...................................................................... 8-25
Print Exception / SPC Tags.............................................................. 8-26
Report Offset.................................................................................... 8-30
Digital Readout ................................................................................ 8-31
Standard DRO............................................................................ 8-31
Full DRO.................................................................................... 8-33
In-Line Math Calculator .................................................................. 8-35
GeoPlus Library ............................................................................... 8-37
Helmel Engineering Products, Inc.
www.helmel.com
Geomet Training Handbook
www.geomet-cmm-software.com
8-1
Chapter 8 – Support Tools and Features
Inspection Program Editing Tools ................................................... 8-42
Undo........................................................................................... 8-42
Delete ......................................................................................... 8-42
Delete Permanently.................................................................... 8-44
Delete All After.......................................................................... 8-45
Edit History Tool ....................................................................... 8-46
Insert .......................................................................................... 8-48
Move .......................................................................................... 8-49
Copy and Append ...................................................................... 8-50
Jump to Feature Number............................................................ 8-51
Feature Properties ............................................................................ 8-52
Single Feature Selection Submenu ............................................ 8-52
Single Feature Property Tool ..................................................... 8-53
Multiple Selected Features Submenu......................................... 8-54
Report Navigation Keys................................................................... 8-56
File Archive ..................................................................................... 8-57
Helmel Engineering Products, Inc.
www.helmel.com
Geomet Training Handbook
www.geomet-cmm-software.com
8-2
Chapter 8 – Support Tools and Features
Understanding Auto Direction Sensing
Using auto direction on 1D Points can lead to erroneous reported values if used
incorrectly. Auto direction relies on a smooth approach, from you the operator, in
capturing of a data point. The process of determining the approach vector
involves the CMM interface card to maintain a rolling IJK vector based on the last
five reported values. The interface card updates the current position in the MCS
on a programmable time interval from 20 to 200 milliseconds.
Auto Direction Approach vector
When you are approaching your work piece, it is required that you make contact
while remaining in a ±45° approach, see figure above. In this example, if we
remained in the approach zone we will capture a data point that will be reported
as a +Y point. If the operator did not remain in the approach zone the 1D Point
might report a + or - X Point from which we will have to correct the probe
compensation error. Most common occurrence of an erroneous data point comes
from operators who approach the surface, and then pause during the approach and
attempt to make contact under extremely slow speeds, which causes variations in
the path toward the surface.
1D Point Correction Sub-menu (both styles shown)
Helmel Engineering Products, Inc.
www.helmel.com
Geomet Training Handbook
www.geomet-cmm-software.com
8-3
Chapter 8 – Support Tools and Features
To correct the reported direction of a 1D Point, highlight the feature by left
clicking on it, then right-click to bring up the feature menu, as shown in the
previous figure. Select [Point Direction], which will offer a sub-menu, with all
six probing directions available. Choose the correct 1D Point direction and your
part inspection will update with the correct 1D Point. Note: Once a feature has
been referenced it can not be changed or edited. For example, if a feature was
used in the construction of a PCS, it will be locked from changes. This is
identified by the inclusion of a ¹ next to the feature number, example " 12¹ ".
Using Auto-Direction with multi-point features such as circle, lines and planes
can also incorrectly report feature characteristics. This occurs when capturing data
points inconsistently or by capturing data points at a high rate. As previously
mentioned, the calculation of the direction vector for the probe works off the
speed of the interface and should that rate of point capture be too high, the
changes in direction going toward, then backing off the data point will create a
poor direction vector.
Since touch probes can be effected by speed and our auto-direction tool is also
adversely effected by speed, we suggest the use of a smooth consistent approach
speed and rate when capturing data points.
Activate Auto Direction Sensing
Activate the Auto Direction sensing by going to the System Options, <F9> or
[System⇒System Options] from the drop down menu. Locate the Enhanced
Feature tab and place a check next to Enable Auto Sensing. If your CMM
interface does not supports Auto Direction Sensing, the check mark will clear
automatically.
During the inspection process you may require to control the Auto Direction
sensing manually. This can be accomplished through the Feature Measurement
Toolbar or by pressing the <u> key on the keyboard. The iconic button on the
toolbar will indicate the status of the sensing option. In right figure below, the
button shows an "X" through the button. This indicates that if the button was
pressed, you will take sensing off.
Turn Auto Direction Off
Turn Auto Direction On
Although the visual appearance of these iconic buttons appears to be backward it
actually represents what the button will do should it be pressed. The button is not
designed to represent the current state of the Auto Direction Sensing.
Helmel Engineering Products, Inc.
www.helmel.com
Geomet Training Handbook
www.geomet-cmm-software.com
8-4
Chapter 8 – Support Tools and Features
Program Header
The Program Header displays when Geomet is
first started, a new file has been requested or
when opening a file. The program header provides
the necessary fields to update the report header for
the inspection.
To activate the program header once the
inspection report has been started can be
accomplished through the drop-down menus
[Report Controls ⇒ Report Header] or by double
clicking in the report header area of the displayed
inspection.
There are additional functions the report header provides.
<Load Last>
Maintains a listing of the last five previously opened files which is located in a
drop down list next to the Load Last button. Once you select the file from the list,
press the button <Load Last> to open that file.
<Run File>
With an inspection file already opened, the <Run File> button enters auto-cycle
mode. To auto-cycle a file can also be done from the drop down menus [File ⇒
Run].
<Load Part File>
This operation performs the same function found in the drop down menus, [File
⇒ Open]. A test is performed to ensure you save any changes to the inspection
report already open.
<Recover File>
Geomet maintains a backup file of your current inspection report while in self
teach mode. With the completion of a program step, the complete inspection
program is written to the hard drive as a backup. Should any unexpected problem
occur that causes potential loss of data, such as a power failure, the Recover File
process will read in the backup file. You should then be able to continue your
inspection.
A note of caution on CMMs that do not have a home position, you should run the
complete program after a recover to rebuild the Part Coordinate Systems before
continuing your inspection.
Helmel Engineering Products, Inc.
www.helmel.com
Geomet Training Handbook
www.geomet-cmm-software.com
8-5
Chapter 8 – Support Tools and Features
Fixture Usage Data Fields
Geomet allows the tracking of up to 3 unique
inspection identifiers for a part being inspected.
We call these identifiers “Fixture Usage” from the
original purpose where a fixture ID was added to
the inspection report.
An example on using these Fixture fields would
be to identify what machining center a production
part was manufactured on. The manufacturing
department may have many machining centers all making the same part. We had
one company that used over 50 machining centers all making the same part!
When it came time to measure, the operator would type in the note section of the
header the machining center ID.
Unfortunately the notes section of the header does not provide any sorting
capabilities. The Fixture Usage fields do. When inspecting the production, enter
the machining center ID in the Fixture Usage fields and then sorting can be done
to group all production inspected on the machining center it was produced on.
This is helpful when performing SPC on production.
By default, Fixture Tracking is not active. To activate fixture support place a
check next to Enable Fixture Reporting on the [System Options ⇒ Enhance]
Features] page.
Helmel Engineering Products, Inc.
www.helmel.com
Geomet Training Handbook
www.geomet-cmm-software.com
8-6
Chapter 8 – Support Tools and Features
Restart Program Header
At the end of an inspection run, the Restart
Options dialog will appear. There are 5 options
available after the inspection run.
<Restart>
Restarts the current inspection starting from step
1.
<Run Steps>
This command works with both manual and DCC
systems. When you select this function, the
Feature Selection tool will display the features in
the inspection report. Choose the feature that
Rerun will continue from. Geomet will then
remove all steps from the last feature, up to and
including the feature you have selected.
On a DCC system, a Target Tool will appear to guide you safely to the starting
point. When you have placed the CMM at this starting point, press <Continue>
and the inspection will continue under DCC control from that location.
<New>
Starts a new inspection prompting you to save your current inspection file.
<Print Report>
Performs an On Demand printout of the complete inspection report in standard
format.
<Concise Report>
Performs an On Demand printout of the complete inspection report in Concise
format.
Helmel Engineering Products, Inc.
www.helmel.com
Geomet Training Handbook
www.geomet-cmm-software.com
8-7
Chapter 8 – Support Tools and Features
Feature Selection Tool
Feature Selection Tool provides expanded capabilities to Geomet through the use
of random feature selections. Geomet has been developed over the years as a
sequential part-programming tool. This means that operation normally take place
on the last sequence of features. For example if you want to obtain the distance
between two coplanar circles, press the distance key assuming the two circles
were the last two features in the report stack. If they are not, then recall the circles
to ensure they are the last two features in the report.
Feature Selection allows you to select these features anywhere in the report and
perform the distance function. From the Feature Selection dialog, you can
perform the following:
•
•
•
•
•
•
•
•
Distances
Intersections
Angles
Bisects
Fit Lines, Circles, Planes, Cylinders
Fit Cylinder from Circles
Basic Math Calculations
Edit Tolerance Values in Groups
To activate the Feature Selector anytime
during your inspection process, press the
< ~ >, key on your keyboard. You can also
highlight features in your inspection report and
through the right-click submenu, choose
[Feature Selection Tool].
How the feature selection tool displays features is dependent on whether features
were highlighted before starting the tool. If no features were highlighted, then the
tool will display all features in your report. Should you have previously
highlighted some features, then only those features will appear in the tool.
The tool is designed to provide you with a list of the current inspection. This list
can be sorted in many ways to assist in easier selection of features.
Using PCS Filters
There are several filters you can use in conjunction with viewing the features. The
first filter applies to Coordinate Systems. By default, the feature selection will
show all features regardless of PCS affiliation. If you want to choose a specific
PCS, use the drop down box to choose an existing PCS. There is a button labeled
<Current PCS> which will take you directly to the current PCS of the inspection
Helmel Engineering Products, Inc.
www.helmel.com
Geomet Training Handbook
www.geomet-cmm-software.com
8-8
Chapter 8 – Support Tools and Features
report. The selection dialog will update to show those features in the selected
PCS.
Display only Measured and Constructed Features
If you want to view only geometric features, place a check next to Display only
Features. The Feature Selection tool will extract only measured and constructed
features from the inspection report.
Column Sorting
Sorting of data is helpful to group
together common features. From the
Feature Selector, you can click on the
header for the column to sort. For
example: click on the <Feat> column
header to sort all 1D points together, 2D points, 3D point, etc.
Use the <Num> column to reorder the features in their respective measurement
order. The <Description> column will sort common features together such as all Z points and all XY ID Circles. To reverse the order of sorting, click a second
time on the same header and the sort will change from ascending to descending.
This can be very helpful especially in larger programs where you can sort on the
<Num> column twice to view the last features first.
Tip: Why is all this filtering and sorting available? First, we still apply the same
constraints to feature constructions as previous versions of Geomet. For example
a -Y point can not used with a +Z point to obtain distances. Second example: an
XY circle from PCS 3 can not be used with an XY Circle from PCS 5 to construct
a line. Sorting assists the operator in grouping common features or shared Part
Coordinate Systems.
Applying Your Selections
Once you have completed your feature selections choose
the icons next to the selector window. All relationship
functions, Distance, Angle, Intersect and Bisect require two
features. Fit features can have any number of features
selected greater than or equal to the required feature
minimum.
Then Geomet will perform your request after validating the
rules of constructions. A new feature or result will appear in
your inspection report showing the reference feature
numbers used in the calculations.
Helmel Engineering Products, Inc.
www.helmel.com
Geomet Training Handbook
www.geomet-cmm-software.com
8-9
Chapter 8 – Support Tools and Features
Math Functions
Math functions are designed to provide you with
capabilities of obtaining solutions such as the
Maximum, Minimum, Spreads and Average of
reported values. To access the math capabilities,
select the features to be used in the calculation and
press the math function button.
The Select Math Function selection box will appear
from which you choose the desired function. When
you select a function, a description of the function is shown providing you with
help on your choice.
Geomet applies certain rules to ensure that the results conform to standard
practices. Any feature can be selected, however, all features selected must be in
the same Part Coordinate System and the PCS must be the currently active PCS,
and share at least one common axis. An example would be selecting the following
features:
•
•
•
-Z 1D Point
YZ 2D Point
Sphere
The result would be a 1D Point reported in the Z direction, which is the only
common reporting axis to all three features.
The new features created during the calculation are common features that can be
used in other constructions such as relational functions (distances, bisects) or can
be used as a component in a Part Coordinate System.
The functions Average, Minimum and Maximum return a 1D, 2D or 3D Point
feature. The Spread function returns the range of smallest to largest in the data set.
To calculate the result, highlight the desired calculation and left-click on the
<OK> button. The Select Math Function will remain displayed for additional
calculations.
Helmel Engineering Products, Inc.
www.helmel.com
Geomet Training Handbook
www.geomet-cmm-software.com
8-10
Chapter 8 – Support Tools and Features
Diameter Averaging using Math Functions
The Math Functions tool will review the highlighted
features in the Feature Selection Tool. Should all
features share a common type, example a Circle, the
Math Functions will include "Diameter Averaging".
Diameter Averaging will take the diameters of all
highlighted features and record the following in the
inspection report:
•
•
•
Average Radius
Maximum Radius
Minimum Radius
Stylus Size Update using a Ring gage
This math tool is designed to update the size of the
current qualified stylus based on previously measure
Ring Gages.
Under normal operations, the ball stylus is qualified
against a known reference sphere. During this
qualification process the stylus size and location is
calculated. Under most conditions, the reference
sphere qualification process is sufficient for all general inspection requirements.
However, measure a known ring gage and the measured diameter normally will
be different than the stated ring gage size. This happens due to variations in probe
design and usage. When qualifying against a reference sphere, the bottom of the
probe will trigger at a different pre-travel distance than a point taken at its
equator.
The Ring Gage Re-Qualification tool uses only readings around the equator to
calculate a high accuracy diameter of the stylus. The result will only update the
size of the stylus, not the 3D location. It is recommended that the Ring Gage be
measured several times as separate records in your inspection report. The math
tool will then average all selected Ring Gage features for a more accurate
solution.
To start, active the stylus to be updated, see Choosing a Stylus, then follow these
steps:
Helmel Engineering Products, Inc.
www.helmel.com
Geomet Training Handbook
www.geomet-cmm-software.com
8-11
Chapter 8 – Support Tools and Features
1.
2.
3.
4.
5.
6.
7.
Create a Part Coordinate System on your Ring Gage.
Measure the Ring Gage as an ID or IR Circle.
Activate the Feature Selection Tool.
Highlight the Ring Gage features.
Select the Math button and from the choices select [Stylus Size Update].
Enter the Ring Gage Radius when prompted.
Geomet will report the change in stylus size and update the Stylus Manager.
NOTE: This process is designed for self teach operations only and will not create
an inspection record that becomes part of an automated inspection.
DCC Option Menu
Through this drop down menu you will
find access to commands that disable or
enable motion for selected features.
Use [Disable Motion] to set the flag for all
the current selected features. This instructs
Geomet that when running a part
inspection program to drop into manual CMM mode for the disabled features.
Geomet will resume DCC operations after the last disabled flag.
The [Clear all Disable Motion] command will remove all disable flags in the
entire part program. Additional information on disabling DCC motion can be
found in the Chapter 9 – Working with Motion Control.
NOTE: There are conditions that prevent a feature from being successfully ran
under DCC. An example would be a small diameter where the positional
tolerance is sufficiently large to interfere with the motion map. By disabling the
motion for that feature, the inspection program would drop into manual, or
joystick mode allowing the operator to measure the feature by hand. When the
feature is completed, DCC operations would resume.
Helmel Engineering Products, Inc.
www.helmel.com
Geomet Training Handbook
www.geomet-cmm-software.com
8-12
Chapter 8 – Support Tools and Features
Rerun Feature Selector
This feature is designed to work with manual
style CMMs only. During a part program
inspection run, you can backup in the part
program to rerun previously completed steps.
Activation
Keyboard:
ctrl + g
To activate the Rerun Feature Selector anytime
during your inspection process, press the <Ctrl +
g>, keys on your keyboard. The Feature Selector
Dialog will appear.
Selecting a Starting Feature
Select by left clicking in the displayed list the
feature to jump back too, or enter the feature
number directly in the Quick Jump field. When
the feature has been selected click on <Ok>.
Geomet will delete all program steps from the end
of the current inspection back to and including the
feature selected to start the rerun process.
Geomet will then prompt you with the selected feature and continue with the
inspection.
Helmel Engineering Products, Inc.
www.helmel.com
Geomet Training Handbook
www.geomet-cmm-software.com
8-13
Chapter 8 – Support Tools and Features
Text Features
Geomet offers several text and prompt support features for use within the
inspection program. This support varies based on inspection needs and includes
the ability to pause the inspection program during execution to allow the viewing
of an image or to change a manual-indexing probe. Choose from a topic below for
expanded support.
Manual Step Text Entry
Keyboard:
F11
Menu:
Measure ⇒ Manual Step Entry
Manual Steps provide a space on the printed report to allow the operator to enter
manual data. These text statements can be used for inspection report items such as
hand measurements.
Activating manual Steps can be found by pressing the function key <F11>.
Manual Step Entry Dialog
<Add without PE> / <Add with PE>
These buttons add one manual step to the inspection report. The difference
between the buttons is the addition of a Print Exception tag, see Using Print
Exceptions.
There are four components to the Manual Step text operations. These are:
<Header>
Draws a line on the report, which is used to identify the start of Manual Step text.
This is used only for appearance and is optional.
<Footer>
Draws a line on the report, which is used to identify the end of Manual Step text.
This is used only for appearance and is optional.
Helmel Engineering Products, Inc.
www.helmel.com
Geomet Training Handbook
www.geomet-cmm-software.com
8-14
Chapter 8 – Support Tools and Features
Enter a Description
The description field is used to enter a small note associated with the data to be
recorded.
Nominal Value
This is a value entered at the self teach stage which represents the target of the
measurement. An example involves the manual measurement of a boss using a 3point micrometer; the operator would compare to the nominal reading of 1.000.
This number is recorded as a text line in the report followed by an underlined
space where the operator could then enter the actual reading manually. The
Nominal Value entry is optional.
Manual Step Sample Output
In the output sample shown above, line 44 represents a Header, line 47 is the
footer. Line 45 shows an example where no nominal value is provided. Line 46
shows and example where a Nominal Value has been entered.
During the part inspection run, Geomet will place this text on the report. It is then
the responsibility of the operator to complete the inspection step by manually
entering the Actual value measured.
Helmel Engineering Products, Inc.
www.helmel.com
Geomet Training Handbook
www.geomet-cmm-software.com
8-15
Chapter 8 – Support Tools and Features
Basic Text
Keyboard:
y
Menu:
Measure ⇒ Text
The Basic Text routine permits comments to be written to the inspection report as
a feature step. This text is entered during the self-teach operation. When executing
the part program, the text is placed in the inspection report and proceeds to the
next step. During execution, the text can not be edited.
Manual Step Sample Output
Edit Text Features
All text features can be edited to revise the text or PE
tag. To start the editing process, highlight the text
statement in the inspection report and activate the
feature sub-menu by right clicking, see figure.
Choose <Edit Text> and the appropriate text dialog will appear from which you
can then edit the text.
Helmel Engineering Products, Inc.
www.helmel.com
Geomet Training Handbook
www.geomet-cmm-software.com
8-16
Chapter 8 – Support Tools and Features
User Prompt with Image Support
Keyboard:
shift + Y
Menu:
Measure ⇒ User Prompt
The User Prompt permit comments to be written to the inspection report and
images to be displayed during the part program execution.
User Prompt Opening Dialog
The advantage a User Prompt has over the Basic Text function is that it suspends
execution of the part program until the operator accepts the user prompt. This can
be very helpful when the operator must interact with the inspection process. For
example: The User Prompt may suspend execution and prompt the operator to
insert a thread gage before measuring the location of a threaded hole.
To use the Image support, press the <Image> button. A standard Windows file
location dialog will appear which you use to locate the image (BMP, JPG) to
view.
Open File Selection
User Prompt with attached Image
Once the image is loaded, the full path name is inserted in the text entry control.
You can type over this pre-entered text. If you want to preserve the path and file
name, position the cursor behind the text line and advance to the next line by
pressing <Ctrl+Enter>.
Helmel Engineering Products, Inc.
www.helmel.com
Geomet Training Handbook
www.geomet-cmm-software.com
8-17
Chapter 8 – Support Tools and Features
Images that are larger than the available area in the dialog box will automatically
be reduced to fit. Images that are smaller are displayed in their actual size. The
<ReSize> button will stretch smaller images to fit the available area. Geomet
maintains a link to the actual image file, therefore the image file should not be
moved from its original location on the hard drive.
When the inspection program is run, execution will pause when the User Prompt
is encountered. Execution will resume when the operator presses the <Ok>
button.
In-Line Text Entry
Keyboard:
alt + Y
In-Line Text Entry allows the user to suspend execution of a part program and
enter text. The behavior of the In-Line text feature is similar to the User Prompt
(without image support). When the pause in program execution occurs, the
operator then has an opportunity to enter new text. This text becomes part of the
final inspection report.
Enter instructions for In-Line Text
During run time.
In the examples above, the image on the left is the setup dialog for In-Line text.
Here the programmer would enter instructions, which at run time, will instruct the
operator to add comments responding to the request.
The image on the right is what the operator would see. Only upon completion,
will the inspection continue to the next step.
Text entry made in the final inspection report.
Helmel Engineering Products, Inc.
www.helmel.com
Geomet Training Handbook
www.geomet-cmm-software.com
8-18
Chapter 8 – Support Tools and Features
Edit Text Features
All text features can be edited to revise the text, and if
applicable, the attached image. To start the editing
process, highlight the text statement in the inspection
report and activate the feature sub-menu by right clicking with your mouse. If
only one feature is highlighted, the edit text dialog will appear. If more than one
feature is highlighted, the sub-menu does not provide access to editing the text
feature.
Helmel Engineering Products, Inc.
www.helmel.com
Geomet Training Handbook
www.geomet-cmm-software.com
8-19
Chapter 8 – Support Tools and Features
Custom Ordered Reports
Menu:
File ⇒ Custom Reports ⇒ Report Control Order
The Custom Ordered Report allows the operator to control the printing sequence
of features within Geomet 301. For example, a report may want to be built to
place similar features together, without regard when they were originally added to
the inspection sequence. In normal reports, the features are printed in the same
order they were added to the inspection.
Report Order Setup Screen.
The Report Order setup screen is organized with your current inspection shown in
the left panel, and the new report order shown in the right panel. To add items to
the right panel, there are two options, Append and Insert.
<Append>
To add a feature to the display list, highlight that feature in the left panel and
press the Append >> button. It places a copy of the highlighted feature into the
right panel at the end of the current list. An optional method to append an entry to
the ordered list is to highlight the feature in the left list, then double-left click with
the mouse.
Features being Appending to the right panel.
Helmel Engineering Products, Inc.
www.helmel.com
Geomet Training Handbook
www.geomet-cmm-software.com
8-20
Chapter 8 – Support Tools and Features
<Insert>
To add a feature at a specified location in the ordered list can be accomplished by
using the Insert command. To perform an insert, highlight a feature in the right
panel, which will add the insertion mark between the highlighted feature and the
previous feature, see example below.
Features being Inserted into the right panel.
To perform the insert, select a feature from the left panel and press the Insert >>
button. After the insert has taken place, the highlight and insert mark will clear
from the right panel. When there is no insert mark displayed, the insert command
will act similar to the append command.
<Remove>
To remove an entry in the right list, highlight the feature and press the Remove
button.
<Clear All>
This command will clear all entries from the right list.
<Save List>
The ordered list can be saved to the current inspection by selecting Save List. The
saving of the list is important should you want to print the report directly from the
inspection process during a part run. By default, the ordered list is not saved with
the part inspection.
<Read List>
Pressing this button will read into the right list the previously saved listing.
Print at end of inspection run
When checked a program step is added your inspection report to automatically
build and print the ordered report. Only one ordered report can be added to the
inspection report.
Helmel Engineering Products, Inc.
www.helmel.com
Geomet Training Handbook
www.geomet-cmm-software.com
8-21
Chapter 8 – Support Tools and Features
Use Print Tags
This check works with features that previously have been tagged for custom
printing using the Print Exception function. The setting of this option is saved
with the record. It works with the Print Now and Print at End of Inspection
functions.
<Print Now>
This command will print an ordered report based on the current displayed list. For
example, you may have a saved ordered list, but you require a new list to print
just a few features. Clear the right list <Clear All> and build a new list. Press
Print Now and Geomet will print a new report on demand.
<Ok>
This command will close the Report Order Control and if required, will prompt
you to save your ordered list.
Saving your Ordered List.
Helmel Engineering Products, Inc.
www.helmel.com
Geomet Training Handbook
www.geomet-cmm-software.com
8-22
Chapter 8 – Support Tools and Features
Concise Reports
Menu:
File ⇒ Custom Reports ⇒ Concise Report
Report Controls ⇒ Concise Report
The Concise Report format is an efficient and condensed printed report of your
inspection reports. This report format prints all standard essential inspection steps
such as measured and constructed features eliminating program steps that deliver
no final values such as stylus and changes to PCS components to name two.
The printout is designed to reduce paper usage by printing feature attributes up to
3 wide in a single row. This means a 2D Circle uses just one line of printed space.
Tolerance is handled through the use of a graphic icon, which indicates the
percentage of the tolerance band being used, or in the case of an out-of-tolerance
condition, a value is reported
Applying Concise Report
The Concise Report can be printed on demand or as a program step added to your
report. To print on demand, use [File⇒Custom Reports⇒Concise Format] from
the drop down menus.
To add a program step to your inspection report that will automatically print,
choose [Report Controls⇒Concise Report]. This action will add a program step
similar to:
29
Print Out Concise Report.
Concise Report Example
A closer look at the format of the Concise Report is presented in the example
below.
Sample of a Concise Report
Helmel Engineering Products, Inc.
www.helmel.com
Geomet Training Handbook
www.geomet-cmm-software.com
8-23
Chapter 8 – Support Tools and Features
The report starts with feature number 12, which is an -X Point. On the same line,
the actual result is followed by a Deviation from Nominal Graphic showing the
dimension is in tolerance. Another example can be found on #18 Cylinder. Here
we have Deviation from Nominal that is outside its limits. The Tolerance minigraph is omitted and replaced with a value of 0.0059 (in red). On a Cylinder the
Pierce Axis and the two identifying projection angles are included. The third
angle, normally considered non-essential, is omitted.
Each feature printed in Concise format is reduced to its most essential values
automatically reducing the size of the report.
Concise Report and Print Exception Tags
Print Exception Tags can control what features are added to the Concise Report
only during print on demand.
Step 1
Add Print Exception Tags to the features that are to be added to the report.
Step 2
Activate the Report Control Center by pressing <F8> or
[Report Controls⇒Report Control Center].
Step 3
Filter the current inspection by placing a check next to Print
Tags and press the <Ok> button.
Step 4
Print the Concise Report using [File⇒Custom Reports⇒Concise Format].
NOTE: This process will print all features that have a Print Exception tag set on
any attribute. Unlike the full report where only the feature name and tagged
attributes are printed, the Concise format prints all reportable attributes.
Helmel Engineering Products, Inc.
www.helmel.com
Geomet Training Handbook
www.geomet-cmm-software.com
8-24
Chapter 8 – Support Tools and Features
Report Control Center
Keyboard:
F8
Menu:
Report Controls ⇒ Report Control Center
The Report Control Center performs two main operations. The first is manual
control to print reports using the standard print format, but controlling whether
Print Exception, SPC Tags or Out-of-Tolerance conditions are set. The second
function is to add an automatic Print feature to the inspection report.
On Demand Printing
Activate the Report Control Center from the drop-down menu [Report
Controls⇒Report Control Center], when or press the function button <F8>.
To control the displayed and printed report, place a check next to the report
option.
Report Control Center
To view or print only features that have been tagged under Print Exception, place
a check next to Print Tags. To combine tags, you can place multiple checks
against an option.
Program Action Step
Configure your report by placing checks on the options to be included in the
printed report. Press the <Attach Step> button and an action feature will be added
to the inspection report. This new feature will automatically print the configured
report at the designated place in the inspection run.
Helmel Engineering Products, Inc.
www.helmel.com
Geomet Training Handbook
www.geomet-cmm-software.com
8-25
Chapter 8 – Support Tools and Features
Print Exception / SPC Tags
Keyboard:
p
Menu:
GeoPlus ⇒ Feature Tag
Feature Attribute Tags provide tools to customize printouts, assign feature
characteristics for ASCII exporting and build GeoStat database records. The most
common use for Tags is to produce inspection reports that contain only the feature
values you require.
Applying Feature Attribute Tags
The Feature Tag dialog provides the necessary tools to assign attribute tags. To
activate Feature Tags, highlight the feature in the inspection report and right-click
to activate the feature sub-menu. Choose [Feature Tag]. Optionally you may use
the keystroke <p> or menu options.
Feature Tag Control Panel
Right Click Activation
The Feature Tag dialog will appear configured to the highlighted feature. Within
the dialog, there are three columns of check boxes that are defined as:
PE: Print Exceptions. When a check is placed against an attribute, the Report
Control Center will add that feature and attribute to the printed inspection report.
Only tagged features will be printed allowing control over the printing process.
The symbol " • " is placed next to the attribute in the full displayed inspection
report indicating it has been tagged.
SPC: ASCII Export Control. When a check is placed against an attribute, Geomet
will export this attribute to an ASCII text file. The exporting process is automatic
during an inspection run, or can be done manually through the drop-down menu
selection [File⇒Export⇒Export ASCII SPC Data] The symbol " § " is placed
next to the attribute in the full displayed inspection report indicating it has been
tagged for SPC exporting. The configuration of the exporting formats is
controlled in the System Option, SPC Format page <F9> or [System⇒System
Options].
Helmel Engineering Products, Inc.
www.helmel.com
Geomet Training Handbook
www.geomet-cmm-software.com
8-26
Chapter 8 – Support Tools and Features
GS: GeoStat Exporting. These attribute controls are available when the Helmel
GeoStat program is active on your system. When selecting an attribute for export
to the GeoStat Database, a control header is displayed where the SPC header
control can be updated. For more information on using GeoStat, please review the
GeoStat Manual.
Button
Modify
Description
Commits the current changes made to attribute tags to the current record.
Next Feature
Retrieves the next feature from the inspection report and displays its current
values and attributes.
Clear
Clears all flags on the current feature, commits the changes with the Modify
button.
More / Less
Expands the Feature Tag dialog to show a slider which can be used to scroll
through the features in the inspection report.
1 Set Tags
Activates a Feature Tag Default tool that allows customized default setting for
using the one-touch controls, Apply Tags and Tag All.
Apply Tags
Applies the attribute tags to the current, highlighted feature for Print Exception
control based on the default tags set in the Feature Tag Default under 1 Set
Tags.
Tag All
Applies the attribute tags to all features in the inspection report for Print
Exception control based on the default tags set in the Feature Tag Default
under 1 Set Tags.
SPC
Applies SPC tags to all reportable attributes on the current highlighted
feature. Saves the changes and moves to the next available feature.
PE
Applies Print Exception tags to all reportable attributes on the current
highlighted feature. Saves the changes and moves to the next available
feature.
Auto PE/SPC
Applies SPC and Print Exception tags to all reportable attributes on the
current highlighted feature. Saves the changes and moves to the next
available feature.
Selecting Features
Report Control Center
There are several methods to move between inspection report features while in the
Feature Tag dialog. Using the <More> button will expand the dialog to show a
slider control, see example above. With your mouse, move the pointer which will
retrieve and display a feature in the tag dialog. If you want to hide the slider
control, press the <Less> button.
Helmel Engineering Products, Inc.
www.helmel.com
Geomet Training Handbook
www.geomet-cmm-software.com
8-27
Chapter 8 – Support Tools and Features
Using the keyboard left and right arrows will move the highlighted feature and
update the tag dialog. The left arrow moves to the previous feature with every
press. The right arrow moves forward. You can also type in a specific feature
number in the Feature Number control.
The <Next Feature> button behaves the same as the right arrow. NOTE: Use
<Modify> to commit the changes before moving to another feature.
Auto Tags Group
<SPC>, <PE>, <Auto SPC/PE>
This group of controls provides a single function to add checks for all attributes of
the current selected feature. Using a 3D Point in Cartesian format as an example,
press the <PE> button and two actions will occur. The first action will place a
Print Exception check on the X, Y and Z reported values. The second action will
move the feature pointer to the next feature available for tags.
Custom PE Tags Group
This group of controls applies a previously defined template of tags that controls
which attributes will receive a Print Exception tag. The application of this
template can be on a single feature, or the entire inspection report with one action.
<1 Set Tags>
This command provides access to the Feature Tag
Defaults Tool which is used to build a Print Exception
template shown at right. There are three selectable
attributes for features. These are Position, Size and
Attitudes.
The Position column controls the PE flags for X, Y, and
Z reported positions in Cartesian and the Polar-Radius,
Polar-Angle in Polar mode.
The Size column controls the PE flags for all reported Width, Radius and
Diameter sizes.
The Attitudes column controls the PE flags for all reported 2D and 3D projection
angles and Normal Vectors of features.
The Feature Tag Defaults Tool can also be started outside of the Feature Tags tool
through the menu [GEO-Plus©⇒Set Feature Tag Defaults].
Helmel Engineering Products, Inc.
www.helmel.com
Geomet Training Handbook
www.geomet-cmm-software.com
8-28
Chapter 8 – Support Tools and Features
<Apply Tags>
Selecting this command will apply the PE template on the current feature. Using
the template shown above on a measured plane will place a PE tag on the Pierce
Axis and will not place PE tags on the reported angles. After applying the tags,
the feature pointer will move to the next feature available for tags.
<Tag All>
This command will parse the entire inspection report and apply the defined PE
template to every feature. The command will not place tags on any feature that
does not show results. This includes features measured before a valid PCS is
established.
Tag Options Menu
Through this menu there are two commands. The
first command [Clear All Print Tags] will remove
all Print Exception tags in the entire inspection
report.
The second command [Clear All SPC Tags] will
remove all SPC tags in the entire inspection
report.
Helmel Engineering Products, Inc.
www.helmel.com
Geomet Training Handbook
www.geomet-cmm-software.com
8-29
Chapter 8 – Support Tools and Features
Report Offset
Keyboard:
ctrl + y
Menu:
GeoPlus ⇒ Apply Report Offset
The Report Offset Tool is used to apply a reference value to a reported attribute
on any feature. One example is the rotation of an angle to match the drawing. This
allows the printed inspection report to match the drawing. Using an example of a
2D XY Circle, we will apply an offset to the angle.
ID XY Circle [16 pts]
Cartesian Format
ID=
X=
Y=
Polar Format
0.5000”
4.3300”
2.5000”
ID=
Pol-R=
Angle=
0.5000”
4.9999”
30.0007°
Here we show the Cartesian and Polar formats for reference. The angle of
30.0007° is referenced off the x-axis going counter clockwise. The drawing
references the angle off the y-axis and has a nominal value of 60.0°. To make a
correction to the reported value, we can add a nominal offset value to the reported
angle.
Report Offset Tool
As shown in the Report Offset Tool, we entered a –90 in the Pol Angle: control.
The result to the reported angle is shown to the right.
ID XY Circle [16 pts]
Before
ID=
Pol-R=
Angle=
After
0.5000”
4.9999”
30.0007°
ID=
Pol-R=
Angle=
0.5000”
4.9999”
-59.9993°
The Report Offset can be applied to any feature and any reported position. It is
carried forward to inspection runs.
Helmel Engineering Products, Inc.
www.helmel.com
Geomet Training Handbook
www.geomet-cmm-software.com
8-30
Chapter 8 – Support Tools and Features
Digital Readout
Geomet has two digital readout (DRO) tools. The small DRO floats over Geomet
and can be repositioned. The large DRO anchors to the right half of Geomet and
replaces the graphic display.
Standard DRO
Keyboard:
ctrl + d
Menu:
View ⇒ On Screen DRO
Geomet offers an on screen Digital ReadOut. This
DRO is configured to show the location in the
current Part Coordinate System or in the Machine
Coordinate System on demand.
To toggle the Digital ReadOut on or off use the
keyboard by pressing <Ctrl + d> keys simultaneously. Through the drop down
menu choose [View ⇒On Screen DRO]. During the inspection process, the DRO
will automatically reconfigure itself to work in the latest PCS or ICS and in the
current reporting format, Inch/Metric and Cartesian/Polar.
To change the DRO from reporting in the current PCS, right click on the DRO
and a sub menu will popup. Select the "Always use MCS" option. To revert back
to the current PCS, activate the sub menu and select "Use PCS".
DRO Sub Menu
Setting Precision Depth
To change the precision depth shown on the DRO, right click on the DRO to
activate the popup sub menu and move your mouse over the [Digital Readout
Precision] option and choose a new decimal place value. This value will become
the new default when the DRO is activated again.
Helmel Engineering Products, Inc.
www.helmel.com
Geomet Training Handbook
www.geomet-cmm-software.com
8-31
Chapter 8 – Support Tools and Features
Relative Zero
To set a zero reference for any axis, toggle the button opposite the axis to control.
On first selection, the axis will zero out. Select the button again, and the DRO will
remove the zero reference and return to normal reporting.
Polar versus Cartesian Reporting
The DRO reports the location in reference to the current Part Coordinate System.
Should Geomet be set to report in Polar mode, the DRO will show the radial
length and polar direction to the current origin.
Helmel Engineering Products, Inc.
www.helmel.com
Geomet Training Handbook
www.geomet-cmm-software.com
8-32
Chapter 8 – Support Tools and Features
Full DRO
To assist the visual appearance of a Digital ReadOut at greater distances, Geomet
offers a large text Full DRO. The Full DRO position reporting defaults to the
XYZ location in the current Part Coordinate System. However, due to its size, it
replaces the drawing on the right portion of the Geomet display.
Starting the Full DRO
Keyboard:
shift + D
System Options:
Enhance Features Page
The Full DRO is activated through the [System Options⇒Enhance Features]
page by placing a check next to Enable Full DRO. Optionally you can use the
keyboard <Shift> + <D> keys.
Full DRO Placement
Using the Full DRO
Changing precision places and coordinate system assignments can customize the
Full DRO. This is accomplished through the use of a sub menu activated when
right clicking on the Full DRO.
The Full DRO sub menu controls the visual state of the Feature Measurement,
Editing, Constructions, PCS and Part Programming tool bars. Additional controls
include the setting of the display decimal place for both length and angular
reporting.
Helmel Engineering Products, Inc.
www.helmel.com
Geomet Training Handbook
www.geomet-cmm-software.com
8-33
Chapter 8 – Support Tools and Features
Relative Zero
To set a zero reference for any axis, toggle the button opposite the axis to control.
On first selection, the axis will zero out. Select the button again, and the DRO will
remove the zero reference and return to normal reporting.
Vector Point Targeting
The Full DRO displays the targeting position when performing a manual vector
point. The normal vector point targeting display offers smaller digital text size,
which has limited use on larger CMMs. The Full DRO will provide the targeting
position and because of its larger text size, allows efficient use even on large
CMMs.
Helmel Engineering Products, Inc.
www.helmel.com
Geomet Training Handbook
www.geomet-cmm-software.com
8-34
Chapter 8 – Support Tools and Features
In-Line Math Calculator
Geomet offers an In-Line Math calculator on supported Dialog Boxes. This
allows solving of simple math formulas when the operator enters data.
When a supported dialog box appears that has In-Line Math functionality it will
be identified by having a small calculator icon next to the supported control, see
figure below. Not all dialog boxes support the In-Line Math Calculator.
DRO Sub Menu
Setting Precision Depth
When you see this icon, the edit control directly to the left will offer simple math
solving function. To use, begin by entering your formula in the edit control. For
example enter "2.0" in the edit control, as shown above. Next we press the
addition key “+” and Geomet recognizes a math function is being requested and
displays a small calculator. NOTE: The In-Line Math Calculator will activate
when pressing one of the following:
•
•
•
•
Plus
Minus
Multiply
Divide
<+>
<->
<*>
</>
The initial value of "2.0" is passed into the calculator and the math symbol "+" is
displayed to the left of the lower edit control. Enter in the number to be added to
the upper number and press any of the math keys, " + - * / or =" which will solve
the current operation and transfer the new value into the upper display awaiting
another calculation.
To return the solution to the originating data field, press <Enter>.
Metric / Inch Conversion
The current value displayed in the upper display will be converted into metric
(mm) or inches by pressing the corresponding button. The In-Line math
Calculator makes no assignment to the values as they are calculated. By pressing
the <mm> button, the upper value will be multiplied by 25.4 and when pressing
<inch>, the upper values are divided by 25.4.
Helmel Engineering Products, Inc.
www.helmel.com
Geomet Training Handbook
www.geomet-cmm-software.com
8-35
Chapter 8 – Support Tools and Features
Complete Table of In-Line Math functions:
+
Description
(Plus) Solves the function X + Y and returns the result in X.
-
(Minus) Solves the function X - Y and returns the result in X.
*
(Multiply) Solves the function X * Y and returns the result in X.
/
(Divide) Solves the function X / Y and returns the result in X.
=
(Equal) Solves the current operation and transfers the result back to the X
position. This does not close the Calculator.
mm
Converts the upper value (X) by multiplying it by 25.4.
inch
Converts the upper value (X) by dividing it by 25.4.
Sqrt
Converts the upper value (X) by determining its square root.
-/+
Changes the sign of the lower value (Y).
MC
Clears any value stored in memory.
MR
Recalls the value stored in memory in the lower value (Y).
MS
Replace any value in memory with the upper value (X).
M+
Add the upper value (X) to the current value in memory.
C
CE
Clear X and Y, does not clear memory.
Clear the current lower value (Y).
Helmel Engineering Products, Inc.
www.helmel.com
Geomet Training Handbook
www.geomet-cmm-software.com
8-36
Chapter 8 – Support Tools and Features
GeoPlus Library
Keyboard:
ctrl + L
Menu:
GEO-Plus© ⇒ Libraries…
Geomet’s GeoPlus Library is a powerful set of storage, retrieval and array tools to
share previously written inspection steps with your current inspection. Just like a
real library, you check in and out program steps using a user-defined name.
GeoPlus Library Control Panel
Geomet maintains a separate database designated only for the library and is called
“LIBRARY.GML”. This database resides in the same folder as your Geomet.exe
program and should not be moved.
Touring the Library Tool
The library tool consists of tabbed pages with each page containing a list of
entries. Each entry contains all the features extracted from an inspection file. You
can have as little as 1 feature in an entry. There is no limit to the number of
features allowed in a single entry.
Adding, naming or removing tabbed pages is available in the group labeled
“Tab”. This assists in organizing your library entries for faster retrieval. For
example, you may elect to create a tab and label it “PCS Setups”. Then library
entries that contain the steps required to build PCS components are stored in one
location.
Helmel Engineering Products, Inc.
www.helmel.com
Geomet Training Handbook
www.geomet-cmm-software.com
8-37
Chapter 8 – Support Tools and Features
Adding a new entry
To add features to the library you would perform an Extract. Start by pressing
<Extract>, this command will display a selection dialog that shows all features in
your current inspection report, see example below.
Highlight the range of features you would like to place in the library. To highlight
a range of features, left click on the first feature and scroll down holding the shift
key down, and left click on the last feature. The entire range will highlight. In our
example, we highlighted features 1 through 11, which are the first steps required
to build a complete PCS.
Extract Selection Tool
New entry in the GeoPlus Library
Add a descriptive name in the space provided. We defined these 11 steps as
“Group One, PCS”. Pressing the <Export> button will create a new entry in your
library with the features you have
requested, see example above.
A validation is performed on the selected
features to ensure there will be no break
between a feature and a reference feature
associated with it.
For example, if the selected range of steps to extract starts at feature number 71
and ends at 85 and included in that range is a feature recall referring to number
46, the extract function will prompt the operator that a message of warning, see
message above.
The operator has two choices. The first choice is <Cancel> which will return to
the range selection tool and the operator will correct the selected range to include
feature number 46. If <Ok> was selected, the range will automatically expand and
the extract function will use the range 46 to 85.
Helmel Engineering Products, Inc.
www.helmel.com
Geomet Training Handbook
www.geomet-cmm-software.com
8-38
Chapter 8 – Support Tools and Features
Viewing an entry in the library
To view the features associated with a library entry, highlight the entry and press
the <View> button.
Viewing a Library Entry
Viewing the library entry also allows editing to the Library Name data field. To
edit the name, make your change and press the <Update> button.
Delete an entry in the libarary
To delete an entry, highlight the name in the list and press <Delete>.
Insert a library entry into an inspection report
To insert a set of features that are saved in the
library, highlight the entry in the list and press
the <Insert> button. A dialog will appear where
you can enter an offset value, number of inserts
and whether it is tracked with a GeoLib tag.
Tip: Using the previous example, the Library
entry saved was called “Group One, PCS” which
Viewing a Library Entry
contained all the necessary steps to setup the first
PCS. Start a new inspection in Geomet and use GeoPlus Libraries to build the
first 11 steps as defined in “Group One, PCS”. With that Library entry, you are
now done!
Every entry in the library has an origin that is based on the PCS associated with
the original inspection report at the time of extraction. For example, if our library
entry contained a single circle that was originally measured at X=1.00 and
Y=2.00 and inserted it using an offset of X=1.00, Y=1.00 the new feature would
be at X=2.00, Y=3.00.
Helmel Engineering Products, Inc.
www.helmel.com
Geomet Training Handbook
www.geomet-cmm-software.com
8-39
Chapter 8 – Support Tools and Features
The ability to insert many features with a repetitive pattern can be accomplished
by entering a number greater than 1 in the data field “No. in Pattern”. During the
insertion process, the offset value is applied, and incremented with each entry.
For example, if you require to measure a row of –Z points consisting of 25 points
incremented 0.500” between points, you would enter 25 in the “No. in Pattern”
field and 0.500” in the X data field.
Then when the <Ok> button is pressed, 25 new –Z data points would be created.
Each point would be updated, not only for its new position, but any associated
motion and tolerance nominal data would also be recalculated.
Auto GeoLib Update
During an insert operation you can add a tracking flag to the inserted features.
This is called a GeoLib tag. A flag and time/date stamp of the library entry will be
added to the inspection report receiving the new features. There will be additional
new features added, one at the beginning of the new feature set, and one at the
end.
The feature numbers will be enclosed in brackets such as [120], which indicates it
is a “locked” group of features. No changes such as inserting, deleting or moving
of this group of features will be allowed.
Each time the file is opened, a test is made against the GeoPlus Library to ensure
the library entry has not been changed. If the library entry has been updated, such
as a revision change, the open file process will ask if the new entry should be
inserted. This allows you the flexibility to insert inspection steps, such as inserts
that you know are subject to part revision changes.
Helmel Engineering Products, Inc.
www.helmel.com
Geomet Training Handbook
www.geomet-cmm-software.com
8-40
Chapter 8 – Support Tools and Features
Tab Controls
To organize your library, there are tab controls that allow adding new pages,
adding names to pages and deleting pages.
Viewing a Library Entry
Naming of Tabs
Example; you can create a library page and name it “Standard PCSs”. Extract
from your inspection report the necessary steps to the creation of a PCS. Then
when needed, just insert the entry into a new inspection and all steps required for
the creation of the PCS will be complete.
<New>
Pressing the New button adds a new page to your Library. The tab naming data
field appears allowing for custom naming.
<Delete>
The Delete command removes a page from the Library. Should the page contain
entries, you will be prompted whether to delete the page and all entries.
<Modify>
Opens the tab naming data fields to edit the page name.
Helmel Engineering Products, Inc.
www.helmel.com
Geomet Training Handbook
www.geomet-cmm-software.com
8-41
Chapter 8 – Support Tools and Features
Inspection Program Editing Tools
Some Geomet functions are active only in the self-teach and offline modes. These
tools are designed to modify the inspection program for feature placement, feature
modifications and report customizations.
Undo
Keyboard:
Ctrl + U
Menu:
Modify ⇒ Undo
The Undo command removes the last entry in the inspection report, and resets any
state changes that may have occurred. This command can be used repeatedly to
remove many features. It does not have a Redo option and therefore any features
removed can not be restored, see Edit History for advanced Undo options.
Delete
Keyboard:
i
Menu:
Modify ⇒ (Un)Delete
The Delete command marks a feature as being deleted in your inspection report.
A feature marked as delete is not acted upon in an inspection run. The Delete
command verifies that the feature has no references attached to it. These include
whether the feature was used in a recall, construction or is part of a PCS
component. When a feature has been marked as Deleted, The Delete command
will un-delete the feature and make it active again.
Accessing the Delete Command
There are several methods that can be used to activate the Delete Tool. Through
the keyboard, press < i >. To work directly in the inspection report, highlight the
feature and right click to activate the feature submenu and select [Feature
Properties].
Right Click Activation
Feature Properties
Helmel Engineering Products, Inc.
www.helmel.com
Delete Tool
Geomet Training Handbook
www.geomet-cmm-software.com
8-42
Chapter 8 – Support Tools and Features
Deleting a Feature
To delete a feature, activate the Delete tool. Enter a Feature Number that specifies
the feature to be deleted. Press the <Ok> button and the feature will be changed in
the inspection report and marked as deleted.
If you are deleting the feature through the Feature Properties tool, place a check
next to “Deleted”.
Un-Deleting a Feature
To un-delete a feature, activate the Delete Mode. Enter a Feature Number that
specifies the feature to be un-deleted. Press the <Ok> button and the feature will
be changed in the inspection report back to its original state.
Helmel Engineering Products, Inc.
www.helmel.com
Geomet Training Handbook
www.geomet-cmm-software.com
8-43
Chapter 8 – Support Tools and Features
Delete Permanently
Menu:
Modify ⇒ Delete Permanently
The Delete Permanently command removes a feature in your inspection report.
Unlike the Delete Command, the feature will be removed and the remaining
features will move up and be renumbered. The command verifies that the feature
has no references attached to it. These include whether the feature was used in a
recall, construction or is part of a PCS component.
Delete Permanently Tool
Validation Warning
Right Click Activation
To remove a feature, activate the Delete Permanently mode. Enter a Feature
Number that specifies the feature to be removed. Press the <Ok> button and the
feature will be validated to ensure there are no references attached it. If approved
it will be removed from the inspection report and all features after that will be
renumbered.
Removing a feature can also be done through the use of the mouse by highlighting
the feature in the inspection report and calling the submenu by right clicking.
Choose [Delete Permanently] to complete the operation.
NOTE: Geomet will prompt you with a warning that the delete operation will take
place. By accepting the warning, the feature will be deleted.
NOTE: If the feature has references attached to it, Geomet will prompt the
operator with a Validation Warning. The Delete Permanently command can not
delete any features that have references attached to it.
Helmel Engineering Products, Inc.
www.helmel.com
Geomet Training Handbook
www.geomet-cmm-software.com
8-44
Chapter 8 – Support Tools and Features
Delete All After
Menu:
Modify ⇒ Delete All Records After…
The Delete all Records After... command prompts for a feature number that will
become the last feature in the report. All features after that position will be
deleted.
Deleting Features from a Starting Point
To delete all features after a specified feature
number, activate the Delete All After Mode. Enter
a Feature Number, which specifies the last feature
to keep, and all features after this number will be
deleted. Press the <Ok> button and the inspection
report will update to reflect the command.
Tip: If you highlight your feature in the inspection
report then activate the Delete All After tool, the
feature number will transfer into the dialog automatically.
NOTE: When this command has been executed, the features are permanently
removed. Only through the use of the Advanced Edit History Tool can they be
retrieved.
Helmel Engineering Products, Inc.
www.helmel.com
Geomet Training Handbook
www.geomet-cmm-software.com
8-45
Chapter 8 – Support Tools and Features
Edit History Control
Menu:
View ⇒ Show Edit History
The Edit History Control provides an advanced Undo command. Under normal
conditions, the standard Undo command deletes the last record and resets the
Geomet with any changes to coordinate systems, reporting states and probe
changes. The Edit History Control maintains a list of the last 10 operations
Geomet has performed. This includes single features or group editing of several
features.
The Edit History list updates with one entry after every operation. When a new
feature is added, the history list will report that feature's line number and name. If
global edits have been done, such as changing the report decimal place on 15
features, an entry will be made "Edit Feature Characteristics".
Edit History Control – No Entries
Edit History Control Progress
To activate the Edit History Control, select from the main drop-down menus:
[Modify ⇒ Show Edit History]
The control will display, see figure above and is now looking at all activity such
as measuring features and editing existing features. In the next figure, we show
new features #15 and #16. The next entry is the result of Feature Characteristic
changes over a range of selected features. The history control does not display the
number or ID of all features changed, just a simple one line entry "Edit Feature
Characteristics". The last operation was the Edit Tolerance command.
NOTE: The maximum number of entries is limited to ten. The entries into the Edit
History control only take place when the control is active. If you close the control,
and reopen it, the control will contain no entries.
Helmel Engineering Products, Inc.
www.helmel.com
Geomet Training Handbook
www.geomet-cmm-software.com
8-46
Chapter 8 – Support Tools and Features
Using Advanced Undo
The Edit History control can Undo up to the last 10 operations. In our example,
we need to Undo the last two operations. To accomplish this, select the history
record you want the Undo command to work back towards. This selected record
will be the last record in your inspection report after you press the <Restore>
button.
Selecting a feature for the Undo Command
Undo Command completed
After the restore is completed, the Edit History Tool will show the results of the
Restore command. You selected record, #16 –Z Plane, is now the last entry in the
Edit History Tool and in your inspection report.
<Clear List>
The Clear List button will remove all exiting entries in the Edit History control.
Helmel Engineering Products, Inc.
www.helmel.com
Geomet Training Handbook
www.geomet-cmm-software.com
8-47
Chapter 8 – Support Tools and Features
Insert
Keyboard:
shift + I
Menu:
Modify ⇒ Insert
Selecting a feature to insert after
Insert Active Notice
Inserting a New Feature
To insert a new feature, activate the Insert Mode. Enter a Feature Number that
specifies where the insert will take place, see figure above. The new feature will
be after the feature number you have entered. Press the <Ok> button and the
Insert Notice will appear. When a new feature has been inserted, Geomet updates
all feature numbers and record links to ensure references to features remain intact.
Features that can be inserted:
•
•
•
•
Measured Feature
Constructed Feature
Text and User Prompt
Distance, Angle, Bisector and Intersect
Features that are blocked include:
•
•
PCS Components
Stylus Changes
Cancel the Insert Mode by pressing the Escape key.
NOTE: When inserting a new feature with a motion map attached to it, care
should be taken to ensure proper start and end IPs. After the new feature has been
added, review your motion map.
Helmel Engineering Products, Inc.
www.helmel.com
Geomet Training Handbook
www.geomet-cmm-software.com
8-48
Chapter 8 – Support Tools and Features
Move
Keyboard:
ctrl + i
Menu:
Modify ⇒ Insert
The Move command allows the repositioning of a feature to another location
within the inspection program. Assurances are provided to prevent moving to
another PCS, or when the current probe is not the same as the feature's active
probe.
Selecting a feature to move
Select a new position
To move a feature, enter a number of the feature to be moved, see figure above.
Press the <Ok> button then enter the location in the inspection report the feature
will be moved to. Press <Ok> and Geomet will validate your request and perform
the move.
When the feature has been moved, Geomet renumbers all feature numbers and
record links to ensure references to features remain intact.
TIP: Should you want to permanently delete a feature, such as feature number 15
of a 50 step inspection program. Start by moving the feature to the end of the
inspection report. Once this has been accomplished, Press <Ctrl + u> which is
the Undo command.
Helmel Engineering Products, Inc.
www.helmel.com
Geomet Training Handbook
www.geomet-cmm-software.com
8-49
Chapter 8 – Support Tools and Features
Copy and Append
The Copy and Append command allows you to create one or more copies of
selected features and append those to the inspection report.
Activating
The command to Copy and Append can be found on the sub-menu of a
Highlighted feature. To Activate, highlight in the Geomet report one or more
features and right-click to activate the sub menu. Select from this menu [Copy
and Append 'x' number of Features].
Single Feature Sub Menu
Multiple Features Sub Menu
Enter Number to Append
NOTE: When selecting features for Copy and Append you may select a single
feature, a range of features or random selections from your inspection report.
The right-click submenu must first pass through a validation process before it will
appear. The first validation is that the Part Coordinate System (PCS) attached to
the highlighted feature(s) must be the same as the current PCS and is a measured
or constructed geometry.
Upon selecting the command, a dialog will appear that allows you to enter the
number of new features to build. Upon accepting this dialog, new features will be
created and appended to the inspection report. All motion, tolerance and custom
settings will be retained in the newly created records.
Helmel Engineering Products, Inc.
www.helmel.com
Geomet Training Handbook
www.geomet-cmm-software.com
8-50
Chapter 8 – Support Tools and Features
Jump to Feature Number
Keyboard:
ctrl + i
Menu:
Modify ⇒ Insert
The Jump to Feature Number command repositions the report view by placing the
requested feature at the top of the display.
Jump To… Entry Dialog
Jump to a Feature Number
To reposition the inspection report to show a specific feature number, activate the
Jump to command, <Ctrl + g>. Enter the feature number that will become the top
feature in the display. Press <Ok> and Geomet will scroll the inspection report to
ensure the requested feature number is visible.
NOTE: There is a special use condition for the Jump To Command during a part
inspection run, see Re-Run Inspection Steps.
Helmel Engineering Products, Inc.
www.helmel.com
Geomet Training Handbook
www.geomet-cmm-software.com
8-51
Chapter 8 – Support Tools and Features
Feature Properties
Feature Properties tools in Geomet allows the changing of states, access to
tolerance values and other feature specific information. To activate the tool,
highlight one or more features and in the report area, right-click your mouse.
Single Feature Selection Submenu
Multiple Feature Selection Submenu
Single Feature Selection Submenu
When only one feature has been selected in the inspection report, activating the
Feature Properties tool provides an expanded set of commands, see left figure
above.
General Feature Commands
Feature Specific Commands
The expanded Feature Properties tool is constructed with common commands, see
left figure above, and feature specific commands, see right figure above. The
common tools are shared with all features. The feature specific commands change
to adapt to the selected feature.
In this example the selected feature is a 2D XY Circle and the CMM is a DCC
style which instructs the Feature submenu generator to add motion tools.
Helmel Engineering Products, Inc.
www.helmel.com
Geomet Training Handbook
www.geomet-cmm-software.com
8-52
Chapter 8 – Support Tools and Features
Here we show the feature specific commands available for a 2D Circle in the left
example and in the right figure the feature specific commands for a Plane.
Feature Specific Commands - Circle
Feature Specific Commands - Plane
Single Feature Properties Tool
The Feature Properties tool is available when one
feature is selected and provides a single source to
control several characteristics of the selected
feature.
Feature Label
Enter a feature label that will replace the default
name for that feature. For example: a measured
plane is provided the standard name "-Z Plane", to
change the name enter a label such as "Left Plane,
PCS Base". This provides a more descriptive text
to identify features.
<Remove>
When a feature label has been applied, the
<Remove> button returns the feature name to its
standard label.
Feature States Group
Within this group there are several reporting states that can be set for the selected
feature. Choose the state by clicking on the bullet next to the choice or placing a
check next to the command.
Deleted
The feature Deleted flag controls the inclusion of this feature into the inspection
report. This check box is acted upon when pressing the <Ok> button.
Helmel Engineering Products, Inc.
www.helmel.com
Geomet Training Handbook
www.geomet-cmm-software.com
8-53
Chapter 8 – Support Tools and Features
Display in Graphics
By default, all features will be displayed in the graphics area. To remove the
feature from the graphics, remove the check mark.
<Set Color>
The Set Color command allows a user defined
color to be assigned to this feature. Choose from
the Color dialog a new color for the selected
feature. This Sets one color for both solid and
wire frame graphic modes.
Precision
Select a new precision value to be used when displaying and printing the selected
feature.
<Reset>
The <Reset> command returns the decimal place precision to the current default
setting as defined in the [System Options⇒Tolerance] page.
Multiple Feature Selection Submenu
The Feature Properties can be changed on multiple records using the right-click
Sub-Menu command, see Multiple Feature Property Submenu. This method does
not provide controls to specific feature attributes.
Multiple Feature Property Submenu
Reporting States
A menu appears when you select Feature Properties, see Reporting States. This
menu provides access to report states and precision values.
To select a new precision value, select Decimal Precision and choose a new value,
see Precision Setting. To reset the precision value, select <#>.
Precision Setting
Helmel Engineering Products, Inc.
www.helmel.com
Geomet Training Handbook
www.geomet-cmm-software.com
8-54
Chapter 8 – Support Tools and Features
Geomet will update all highlighted features with your requested changes.
NOTE: If the highlighted features are mixed reporting states or precision values,
this command will over write all settings to the common choice being made.
[Recall Features]
When the Recall Feature command is selected, each selected feature will generate
its own programming step, or transaction file entry which is appended to the
inspection report and will be operated on as a unique entity by other Geomet
functions. For example, if features 16, 25, 26 and 32 are highlighted in an 89-step
program, they will be appended as 90, 91, 92 and 93.
As in all Geomet functions, feature validations are applied to ensure credible
recalls. These include ensuring the features being recalled are from the same PCS
as the current PCS to name just one. Feature links will be updated to reflect any
changes.
[Print Selected Items]
This command will generate a printed report consisting only of the highlighted
features. This is not a programmable step and is acted upon immediately.
[Feature Selection Tool]
Activates the Feature Selection tool and populates the tool only with the
highlighted features. This is helpful when performing constructions using random
features. For example we might highlight features 12, 15, 56, 57 which are 2D
points and construct a circle through them. Using this command the Feature
Selection tool will appear only with the four highlighted features. Within the
Feature Selection tool, choose Fit Circle.
Helmel Engineering Products, Inc.
www.helmel.com
Geomet Training Handbook
www.geomet-cmm-software.com
8-55
Chapter 8 – Support Tools and Features
Report Navigation Keys
There are several key presses that compliment the standard Windows interface to
scroll and reposition through the displayed inspection report. In Windows, a list,
or report that exceeds the boundaries of the display will provide scroll bars
normally located on the right and bottom of the view. Using these scroll bars
requires the use of the mouse that controls the positioning by sliding the "Scroll
Box". For further assistance on using scroll bars, please review Help in Windows.
Geomet provides shortcut key presses to control the positioning of the inspection
report in the available area on the display.
Geomet Inspection Report Navigation Keys
Down Arrow Moves the inspection report down one line.
Up Arrow
Left Arrow
Moves the inspection report up one line.
Moves the Inspection report to the left one character.
Right Arrow
Moves the Inspection report to the right one character.
Home
Scrolls the report to show the Header (focus required).
Ctrl + Home
Scrolls the report to show the Header (focus not required).
End
Scrolls the report to show the last feature (focus required).
Ctrl + End
Scrolls the report to show the last feature (focus required).
Ctrl + g
Jump to a specific feature number.
NOTE: Windows sends all key presses to the Window or Dialog that has "Focus",
considered the current topmost active window. For example, if you have Geomet
and another program, such as Excel active, the program that has "Focus" will
receive all key presses. If you press the <Home> key when the inspection report
is not the current "Focused" control, no response is seen.
To illustrate, open a long inspection report and click your mouse in the graphic
area. Press <Home> or <End> and the inspection report does not move. That is
because the graphic window has the current focus. Click your mouse in the report
area and repeat the key presses and the report will scroll according to your
commands.
Helmel Engineering Products, Inc.
www.helmel.com
Geomet Training Handbook
www.geomet-cmm-software.com
8-56
Chapter 8 – Support Tools and Features
File Archive
Menu:
File ⇒ File Archive Settings
File Archive is an option available in Geomet 301 to record each complete
inspection run in a sequentially numbered file. This process allows reviewing
each inspection in detail beyond the normal archived paper report.
When Geomet performs the archive function, a sequential number is attached to
the file name of your inspection file. For example, if your inspection file is saved
as SamplePart.gmt, the first archive file is SamplePart 0.gmt, the next would be
named, SamplePart 1.gmt.
Setting the Archive Directory
To activate the Archive process, there are three steps that should be completed to
ensure proper usage.
i
File Archive Setup Tool
Directory Navigation
The Archive Setup Tool is used for both the File Archive and Historical Database
tools. To setup the File Archive Tool, only the two upper groups are used. For an
explanation of the Historical Database, please review that section on the Geomet
web site and later in this manual.
File Archive Setup
Start by choosing a directory where the File Archive Tool will place the
sequentially numbered inspection files. Start by pressing <Choose Target
Directory> that will display a Directory Navigation Tool. Once a location has
been selected, press <Ok> to proceed.
NOTE: It is suggested to create a folder to contain your archived inspection
results separate from the default part program folder. This helps to organize your
files more efficiently.
Helmel Engineering Products, Inc.
www.helmel.com
Geomet Training Handbook
www.geomet-cmm-software.com
8-57
Chapter 8 – Support Tools and Features
Enabling File Archive
By default, a check is placed next to "Enable Saving Archive Files. This directs
Geomet to save every inspection into a separate file upon completion of a part
inspection run. Should you want to temporarily disable the archive process,
remove the check mark and save the inspection program.
Setting the Archive Counter Control
Geomet will maintain an index file in your designated target folder called
filename.txt where filename is derived from the name you have provided to your
inspection file such as “DX100.gmt”. Within this text file, the last index number
is recorded. There is no other information saved within this file.
Should you want to change this counter, activate the File Archive Setup Tool,
[File ⇒ File Archive Settings]. In the section titled "Archive Counter Control"
you will see the current setting which you can change directly. The value shown
represents the last index number used. To reset to zero, press the button <Reset to
0>.
When you press the <Ok> button in the File Archive dialog, the new value will be
written out to the index text file.
NOTE: By changing the index value, any archive files that already exist using that
index number will be overwritten without warning during the archive process.
Should you want to preserve those files that will be effected, transfer them to
another folder using standard Windows tools.
The Archive Process during Inspection
When a part program has been completed, Geomet will check if archiving is
active. If file archiving is activated for the part program, a complete copy of the
part program with the assigned index number will be saved in the designated
target folder. This process is fully automated and requires no operator
intervention.
Reviewing an Archive File
To review the archived file, use the file open command in Geomet. Locate the
folder where the files are stored and choose the file to open. The archive file is a
normal inspection file containing all results and coordinate systems and can even
be cycled in auto run.
Helmel Engineering Products, Inc.
www.helmel.com
Geomet Training Handbook
www.geomet-cmm-software.com
8-58
Chapter 9 – Working with Motion Control
Chapter 9 – Working with Motion Control
Introduction to Motion Control.......................................................... 9-2
Point Type Definitions................................................................. 9-2
Special Considerations when Teaching Motion .......................... 9-3
Motion Adjustment Tools .................................................................. 9-4
Feature Generators ............................................................................. 9-4
DCC Home Position .......................................................................... 9-5
DCC Variables ................................................................................... 9-6
Motion Control Ribbon...................................................................... 9-7
Motion Edit Tool ............................................................................... 9-8
One-Step Motion Edit ...................................................................... 9-15
Disable Motion on Features ............................................................. 9-17
Motion Map Test ............................................................................. 9-19
Helmel Engineering Products, Inc.
www.helmel.com
Geomet Training Handbook
www.geomet-cmm-software.com
9-1
Chapter 9 – Working with Motion Control
Introduction to Motion Control
Direct Computer Control, commonly known as DCC, is the process where
Geomet controls the motion of the CMM to perform part inspections and higher
level functions such as scanning operations. Every feature in Geomet can have
motion attached to it. For example a Point would contain the necessary motion to
traverse to the approach vector for the point to capture, slow to a probing speed
and capture the data point then retreat to a stand off position. All the information
for the moves is contained in a Motion Map that is attached to the measured
feature.
Geomet initially creates the motion map through a process of "learning" as the
operator measures the part being inspected the first time. On Helmel CMMs, this
process can be done either using the Joystick controls, or by turning the motors
off and moving the CMM by hand. All motion is considered Point-to-Point where
every start and end point consists of one of the following point types:
Point Type Definitions
IP - Interim Point. IP points are XYZ positions captured during the self-teach
process that are required to provide safe passage for the probe to clear obstacles.
IP points are also are used to establish the vector approach for measurement data
points, see figure below.
Example of a Motion Path
In this example, we show a motion map moving from IP1, which corresponds to
the retract position of the last feature, to the next Measurement Point (MP) of the
current feature. The operator would capture the current position (IP1) by pressing
the <IP> button on the joystick. The CMM would then be positioned to IP2 and
again the <IP> would be pressed. This continues until position IP4 has been
reached. The move after IP4 captures the data point MP.
The operator chose the path IP1 ⇒ IP2 ⇒ IP3 ⇒ IP4 to allow safe passage for the
probe around the part. The motion defined as IP4 to the MP is considered the
approach path. Geomet will calculate the Stand Off (SO) point based on the stand
off distance defined in the DCC parameter settings. If the distance from IP4 to
MP is greater than the stand off distance, the SO will be inserted. If the distance
Helmel Engineering Products, Inc.
www.helmel.com
Geomet Training Handbook
www.geomet-cmm-software.com
9-2
Chapter 9 – Working with Motion Control
from IP4 to MP is less than the distance define as the stand off distance, then IP 4
becomes the SO.
There are two Stand Off points created, one before the MP and one after. Both of
these SO points share the same XYZ location. The first SO is where Geomet will
switch from Traverse Speed to Probing Speed. The second SO which follows the
MP is the retract position and the completion of a normal feature motion map.
SO - Stand Off Point. This point brackets the Measurement Point. The
proceeding SO will act as the location the motion of the CMM will slow to the
Probe Speed. The SO that follows the Measurement Point is the location the probe
will retract towards after the MP point has been captured.
MP - Measurement Point. The MP point is the point of contact where the probe
contacts the part.
Auto-IP, Automatic IP. As the name suggests, the Auto-IP is calculated at the
moment it is used during motion. This point is used when Geomet has a Clearance
Coordinate System established. The Auto-IP is defined not by an XYZ location,
but by an axis of movement. If the Auto-IP is defined as using the Z-axis, then the
motion will calculate a direct path from the current location into the XY plane of
the current Clearance Coordinate System. The actual motion will be parallel to the
Z-axis of the Clearance CS.
Special Considerations when Teaching Motion
The teaching of the motion path can be accomplished when motors are on and the
operator uses the joysticks, or when the motors are switched off and the operator
moves the CMM by hand. Manual operation is often the preferred method of
teaching due to the speed and ease of movement when the operator moves the
CMM by hand. However manual or joystick motion can lead to erroneous IPs
when moving the CMM at a high speed.
For example, the CMM interface is responsible to control all communications
between Geomet and the PMAC motion controller. The Geomet interface polls
the PMAC motion controller at a variable rate such as 5 times per second and
transfers position and status data between Geomet and the PMAC motion
controller with each cycle. The buttons on the joystick are interpreted by CMM
interface and transferred to the motion controller at the interface-polling rate.
Therefore, when the IP button is pressed while moving 10 inches per second, the
actual capturing of data can happen at worse case, 0.2 seconds later, or 2 inches
after you pressed the IP button! The procedure of capturing an IP starts with the
IP button press, then the CMM interface acknowledges the button press and sets a
flag to inform the motion controller to capture an IP and return the XYZ position.
This requires one cycle. Therefore when teaching a motion path that requires
positional accuracy, slow down or stop at the IP positions.
Helmel Engineering Products, Inc.
www.helmel.com
Geomet Training Handbook
www.geomet-cmm-software.com
9-3
Chapter 9 – Working with Motion Control
The PMAC motion controller maintains the current position of the CMM at rates
higher than 8MHz per second. When a probe trigger occurs, PMAC latches that
position in memory and waits for the CMM interface to cycle around before
transmitting the positional data to Geomet.
Motion Adjustment Tools
Motion paths often require adjustments due to changes in the part or the need to
adjust motion to eliminate accidental collisions due to a missing IP or other
conditions. These adjustment tools are:
Motion Edit Tool
One-Step Edit
Clearance Coordinate
System
Offline IP
Allows full adjustment of the motion map by allowing access to adjust all
or a single motion point. Appending, Inserting and Moving of motion
points can be done.
This tool will provide access to adjust motion attributes (speeds and
distance) or move the entire motion map a desired relative distance.
Clearance Coordinate Systems (CS) are defined as an offset to an
existing PCS and is used to provide safe transition planes for CMM
movement.
The Offline IP generator allows the creation of Interim Points at the
beginning of a motion map. These points can be created as an XYZ
defined point or as an Auto-IP which utilizes a Clearance CS for safe
transition.
Feature Generators
Feature Generators are offline tools that can create features complete with motion
and tolerance data, and when connected to a CMM, will measure the feature
without operator involvement.
Point Generator
Line Generator
Circle Generator
Cylinder Generator
Creates 1D, 2D and 3D Point Features in offline and interactive modes.
Creates a 2D Line Feature in offline and interactive modes.
Creates a 2D Circle Feature in offline and interactive modes.
Creates a Cylinder Feature in offline and interactive modes.
Plane Generator
Creates a Plane Feature in offline and interactive modes.
Bolt Hole Pattern
Creates two or more 2D Circle Features surrounding a common center
point in offline and interactive modes.
Chapter 10 details all Feature Generator tools.
Helmel Engineering Products, Inc.
www.helmel.com
Geomet Training Handbook
www.geomet-cmm-software.com
9-4
Chapter 9 – Working with Motion Control
DCC Home Position
Keyboard:
shift + F9
Menu:
System ⇒ Home the System
On DCC Style CMMs, the Geomet system initializes the
motion controller and monitors the status of three Home
flags, one per axis. Should any flag not be set, Geomet
prompts the operator at startup to begin the Home sequence.
<Motors On>, <Motors Off>
These commands control the state of motor activation.
<Start Home>
Initiates the sequence of locating the Home Flags. The CMM will move each axis,
first in the +Z direction, then in the X direction and finally in the Y direction. The
movement will be under a controlled speed. When the Home Flag is located, the
CMM will instruct the motors to stop and slowly back off the Home Flag and
repeat the locating process.
NOTE: If the CMM is past the Home Flag, the motion will cause the CMM to
activate the over travel limit switch. When this occurs, the CMM will reverse
direction a distance sufficient to pass over the Home Flag and commence the
Home sequence again.
<Abort>
This causes an Escape sequence to be sent to the DCC controller and all motion
will stop. The controller will hold position with the motors on.
<Pause/Cont.>
This command has no effect at this time.
<Configure>
The Configure command launches a controller specific setup dialog. This setup
tool is used to establish communications between Geomet and the DCC
controller. Normally pre-set and should not be changed.
Auto Close When Homed
Should the "Auto Close When Homed" flag be checked, the dialog will
automatically close when Geomet senses the Home positions have been
established.
Helmel Engineering Products, Inc.
www.helmel.com
Geomet Training Handbook
www.geomet-cmm-software.com
9-5
Chapter 9 – Working with Motion Control
DCC Variables
Keyboard:
shift + F9
Menu:
System ⇒ Home the System
There are several variables that control the behavior of the motion map and CMM
motion characteristics. These are:
Traverse Speed
Probing Speed
Over Travel
Distance
Motion Characteristics
The CMM speed used between SO⇒IP, IP⇒IP and IP⇒SO position
pairings.
The CMM speed used between SO⇒MP and MP⇒SO position pairings.
The distance past the defined MP the CMM will continuing seeking.
Default value is 0.250”.
Stand Off
Distance
The distance between SO⇒MP and MP⇒SO. Default value is 0.200”
Joystick Backoff
Distance
The distance the probe will back off a part after capturing a data point
while under the operator’s control using the Joysticks.
Use Motion
Blending
Activated for improved performance by blending through IP and SO points.
When not active, the CMM will move to these points and stop before
proceeding to the next point. In blending, the motion controller will blend a
radius move past the SO allowing smooth motion by joining several motion
segments together. Default setting is off.
Setting of these values using the DCC Variable setup dialog sets the values as
“global”.
DCC Variable Setup Dialog
<0.020 – Backoff>
Using this button switched the current joystick backoff distance from its current
setting to 0.020” (0.5 mm). This button is a toggle, which will switch it back
when pressing it again.
Helmel Engineering Products, Inc.
www.helmel.com
Geomet Training Handbook
www.geomet-cmm-software.com
9-6
Chapter 9 – Working with Motion Control
Motion Control Ribbon
Motion Control Ribbon
The motion control ribbon provides a quick visual indication of the status of your
DCC style CMM as well as access to the most common controls.
Motion Ribbon Control Definitions
Toggles the Motor On and Motor Off state.
The button face is Red when off, Green when on,
This indicator provides a visual state between the 3 possible modes: [Man]:
for motors off, [Joystick] when motors are on and Joysticks are active and
[DCC] when system is under CNC control.
Single Step Mode – processes one leg of motion, then pauses.
CMM Homing function. When the CMM requires the homing proceedure, this
button will appear on the ribbon. When the CMM is homed, this button will
disappear.
Provides access to the DCC Variables Setup Tool.
This button toggles between three system level speeds defined as Normal,
Slow and Extra-Slow.
This drop-down tool controls the backoff distance of the joystick control. This
is the distance the CMM will retract after capturing a data point while under
the control of the manual joysticks.
This button inserts one Interim Point into the motion map for the current
position of the active stylus.
Helmel Engineering Products, Inc.
www.helmel.com
Geomet Training Handbook
www.geomet-cmm-software.com
9-7
Chapter 9 – Working with Motion Control
Motion Edit Tool
The Motion Edit Tool provides direct access to the CMM motion path associated
with any feature. With this tool, you can adjust all motion points through
appending or inserting new points or updating existing points.
There are 5 types of Motion Path Components available in Geomet:
IP
SO
Auto-IP
MP
ATT
Geomet Motion Path Components
Interim or motion path clearance points.
Stand Off points which are before and after a measurement point.
Interim points that are calculated at runtime and utilize the current Clearance
Coordinate System definitions.
Measurement Point.
Motion Attributes; Speeds, Stand Off and Over Travel Distances.
Activating the Motion Edit Tool
To start the Motion Edit Tool, highlight a feature in the inspection report and right
click to activate the sub menu. From the sub menu, choose [Edit Motion Points].
From the main drop down menu choose [Modify⇒Edit Motion Points] and you
will be prompted to enter the feature number to edit.
Activating Submenu
Motion Edit Tool
Helmel Engineering Products, Inc.
www.helmel.com
Geomet Training Handbook
www.geomet-cmm-software.com
9-8
Chapter 9 – Working with Motion Control
Summary of Features in the Motion Edit Tool
<ReCalc SO>
This feature will adjust all SO-MP-SO
relationships. When you build the motion map the
first time, the current stand off distance
established in DCC Settings will be used to
calculate the distance between the SO ⇒ MP and
MP ⇒ SO. Using this feature allows you to
update all SO-MP-SO triplets with a new value.
For example, if you taught the motion path with a
standoff of 0.200", you can change that distance
to 0.100" with this feature. There exists one rule
when using this tool, the MP must be bracketed by a leading SO a following SO.
<Attribute>
Through the use of this feature you can insert
changes in both traverse and measurement speeds
as well as over travel distance. These changes are
implemented where they exist in the motion path
until another attribute is encountered.
For example if you have a motion critical area on
your inspection piece that requires the CMM to capture the MP at a more
controlled slower rate, Highlight the SO before the MP and use the <Attribute>
command. Enter the new lower speeds for Traverse and Probing and press <Ok>.
A new motion record will be inserted before the highlighted SO and has the Type
ID “ATT”.
NOTE: Changes to Attributes remain active until another Attribute has been
encountered. You may elect to insert another Attribute when finishing your
critical MP to return to normal speeds.
<Run Feature>
The Run Feature function will execute the motion
path from the highlighted motion step to the end
of the current motion map. For example, if step
number 1 is highlighted, Geomet will prompt you
move to a safe location with a targeting box.
When you press continue, or use the <Enter>
button on the joystick, Geomet will run all
motion, including MPs through the end of the
motion map. If your highlight was on step 5, the
motion will start with that step.
Helmel Engineering Products, Inc.
www.helmel.com
Geomet Training Handbook
www.geomet-cmm-software.com
9-9
Chapter 9 – Working with Motion Control
<Single Step>
The Single Step function will execute motion for just that one highlighted step.
The motion will occur for all IP, SO and Auto-IP records and will not execute
MPs. If the motion record has an XYZ location beyond the in-position limit, then
the Target DRO (see Run Feature) will appear and the operator then has the
choice to manually move the CMM or use DCC to the target position. This added
step is used to prevent potential CMM crashes if the requested location is at a
distance from the current probe location.
When you highlight the leading SO, motion will take place to the XYZ location of
the SO. Pressing single step again will skip through the MP and move to the
trailing SO for that MP. The single step feature is the tool used most to correct
any motion path concerns.
<Re-Teach>
In the Re-Teach function, you can highlight a location in the motion map, press
<Re-Teach> and from that point down teach a new motion path creating new IPs,
and SO/MPs. This function is most useful when your part program has changed
and you require major changes to the motion path for the selected feature.
Start position of a ReTeach
End position for the ReTeach
When starting the re-teach process, Geomet will display the targeting dialog that
shows the last location in the motion map. This becomes your start position in
your re-teach process. Manually move to this location and press <Continue>.
From this point, you would create your new motion. A new target dialog will
replace the start target dialog and this new target is the next known location in
your motion map. This target will assist you in developing the new motion map.
As you re-teach your finish should be near this end location for smooth transition
between motion maps.
Helmel Engineering Products, Inc.
www.helmel.com
Geomet Training Handbook
www.geomet-cmm-software.com
9-10
Chapter 9 – Working with Motion Control
<Update>
The <Update > command is used to revise
selected entries in your Motion Edit Tool. To edit
an XYZ location of an IP, first highlight that IP in
the motion map list. Its XYZ values will transfer
into the edit control, see example.
Edit the XYZ location values and commit the
change by pressing <Update>. During the update
process you can change the Point Type designation by changing it from an IP to
an SO, or any Point Type.
NOTE: Remember to press <Update> before selecting another motion map
record!
Tip: Not only can you update existing features, but you may want to insert a new
motion map record using this process. To do this, highlight the selected record
and make any changes as needed to the XYZ location, then press <Insert> and a
new record will be placed before the highlighted record.
<Append>
As it sounds, the Append feature attaches a new motion map entry based on the
values in the XYZ edit controls to the bottom of the motion map. The type of
point, IP, SO, etc, will be assigned based on the current selection under Point
Type.
<Insert>
This feature will insert an entry in the motion map, just above the current
highlighted entry. The new record will reflect the current values in the XYZ edit
controls and Point Type.
<Delete>
This feature deletes the current highlighted entry in the motion map.
<Relative Adj.>
To move your entire motion map a specified distance, enter a relative distance in
the XYZ edit controls. For example if you need to move the motion map 0.025”
in the X-Axis to compensate for a part change, enter X=0.025, Y = 0.0, Z = 0.and
press the <Relative Adj.> button. All entries in the motion map will be offset by
0.025, 0.0, 0.0.
Helmel Engineering Products, Inc.
www.helmel.com
Geomet Training Handbook
www.geomet-cmm-software.com
9-11
Chapter 9 – Working with Motion Control
NOTE: In some cases the leading IPs should not be adjusted. The motion path
that leads from the previous feature, to the start of the current feature should be
reviewed carefully to ensure a relative adjustment does not cause unexpected
motion.
Geomet offers a single tool, One-Step Motion Edit Tool, that allows a relative
motion adjustment to the entire motion map while protecting the leading IPs.
<UnSelect>
This feature will drop the highlight in the motion map and clear all values in the
XYZ edit controls.
<Copy>
This feature takes the current highlighted motion map record and places a copy of
that record in a buffer. Once the record is in the buffer you can Append, Insert or
Update based on the following table:
Copy Functions
Append
Insert
Update
Pressing the <Append> button will attach a new motion record at the end of
the current motion map based on the copied record.
Highlight a location in your motion map and select <Insert>. A new record is
created and inserted before the highlighted record.
Highlight a record in your motion map and press <Update>. The copied
record will replace the highlighted record.
<Clear>
This will clear out all values in the X, Y, Z and Angle edit controls. If a motion
record was highlighted, it remains highlighted.
Disable Motion
When you place a check next to Disable Motion, Geomet will drop into manual
mode during the part inspection when it gets to this feature. This allows the
operator to capture data points for the selected feature under Joystick or manual
operations.
When the feature is completed, Geomet looks at the next feature and if it returns
to DCC control, a targeting window is displayed to let the operator know where
the next DCC point will start.
For a more detailed explanation, see Disable Motion and the Feature Selection
Tool.
Helmel Engineering Products, Inc.
www.helmel.com
Geomet Training Handbook
www.geomet-cmm-software.com
9-12
Chapter 9 – Working with Motion Control
Point Type Group
In this group, you have four type of motion points, IP, SO,
MP and Auto-IP. Next to each label will be the total count
in the current motion map of each type. The IP, SO and
MP point type utilize the XYZ edit control to change
values. When selecting Auto-IP, the XYZ edit controls are
disabled and the Auto-IP Setting group activates.
To change a Point Type classification on a motion record, highlight the record and
choose another Point Type. The total counts will update to reflect your change.
Auto IP Settings Group
Unlike IP, SO and MPs, an Auto-IP does not have implicit XYZ location data.
The Auto-IP works with a defined Clearance Coordinate System and a motion
axis.
Motion Edit Tool showing Auto-IPs
Highlighted Auto-IP
To activate the Auto-IP Group, highlight an Auto-IP motion record, see example
above. Within this group, you have access to the selected motion axis and
reference Clearance Coordinate System.
You can edit Auto-IP using the Update, Append and Insert commands.
Helmel Engineering Products, Inc.
www.helmel.com
Geomet Training Handbook
www.geomet-cmm-software.com
9-13
Chapter 9 – Working with Motion Control
Updating XYZ Data Directly from the CMM
The XYZ values shown in the edit controls, see figure below, will show the
current values of the highlighted motion point record in the list. Editing these
values can be accomplished either by entering new values directly by typing them
in, or by pressing the <IP> button on the joystick. By moving the CMM to a new
location and pressing the <IP> button you can quickly edit motion map data to
correct for any problems during motion.
XYZ Position Edit Controls
An example of using the XYZ edit control would be to add an exiting IP at the
end of the motion map assigned to an ID XY circle feature. The probe will stop at
the last SO of the feature which will be below the surface. To append a new IP
that will withdraw the probe to a safe location above the surface, follow these
steps:
1) Highlight the last SO in the motion map (normally the last record). In our
example the Z value is -0.25".
2) In the Z edit control, change the value to 0.50".
3) Press the <Append> button, which will add a new record to the motion map.
NOTE: The new record added will carry forward the same Point Type as the
original selected SO record.
4) Highlight the new record and select the IP bullet which will change the Point
Type from SO to IP.
Another example can be used to create an exit IP using the same ID Circle listed
above.
1) Move the CMM into a safe location above the circle. This position should have a
direct line from the last SO.
2) Press the <IP> button on the joystick. This will populate the XYZ edit controls
with the CMMs current position, see figure above.
3) Press the <Append> button in the Motion Edit tool and a new IP record will be
added at the bottom of the motion map.
In these two examples, you can start to see how easy it is to make changes to the
motion map of a feature.
Helmel Engineering Products, Inc.
www.helmel.com
Geomet Training Handbook
www.geomet-cmm-software.com
9-14
Chapter 9 – Working with Motion Control
One-Step Motion Edit
The One-Step Motion Edit tool provides access to adjust motion parameters and
motion path position on a feature with one operation.
One Step Motion Submenu
To activate the One-Step Motion Edit tool, highlight the feature in the report and
bring up the feature sub-menu by right clicking. The One-Step Motion Edit tool
will appear as long as there are motion path entries for the selected feature.
One Step Motion Submenu
One Step Motion
The motion map may contain previously defined attribute records. If the One-Step
Motion Tool identifies that attribute records exist, you will be prompted to choose
how the edit tool should handle them. In most cases, it is advisable to let the edit
tool override all attribute records.
<Clear Values>
This command will clear the XYZ values in the Adjust Motion Map Group.
<Recall Values>
The One-Step Edit Tool retains the last used XYZ offset values in the Windows
Registry. When you press <Recall Values> those values are retrieved from the
registry and entered into the edit controls.
Helmel Engineering Products, Inc.
www.helmel.com
Geomet Training Handbook
www.geomet-cmm-software.com
9-15
Chapter 9 – Working with Motion Control
Attribute Changes
The One-Step tool can adjust the motion attributes, Traverse Speed, Probing
Speed and Stand Off Distances.
Traverse and Probing Speeds. When a change is made to one of these values, an
Attribute record is inserted as the first record in the motion map. When the feature
is executed, these new values will be used for this feature and all features
following until another Attribute record is found.
If you require the new attribute change to work only with this one feature, place a
check next to "Change Applies Only To This Feature". Then the One-Step tool
will place an attribute at the head of the record and append an attribute record to
the end of the motion path returning it to the original attribute values. The
changes will then only act upon the selected feature.
Stand Off Distance Change. When a new distance is entered, the One-Step tool
will adjust all SO-MP-SO relationships. When you build the motion map the first
time, the current stand off distance established in DCC Settings will be used to
calculate the distance between the SO and MP and the return SO. Using this
feature allows you to update all SO-MP-SO triplets with a new value. For
example, if you taught the motion path with a standoff of 0.200", you can change
that distance to 0.100" with this feature. There exists one rule when using this
tool, the MP must be bracketed by a leading SO and followed by an SO.
If you activate the One-Step tool on a motion path that already contains Attributes
within the map, a warning will be shown. You have the choice to keep the current
attributes in the motion path, or replace them with a new attribute at the start of
the motion path as described above.
Adjust Motion Path
Under this section you can move the entire motion path by entering a relative
value for X, Y and/or Z. For example; should you require to move your motion
path for a circle along the X axis -0.050", enter in the X edit control -0.050. When
you press the <Ok> button, all motion will be offset in the X direction -0.050".
There are times you would not want to adjust the leading IPs. For example, the
motion map may start inside the previous circle. The motion would cycle through
the leading IPs to traverse to the first SO-MP. If you perform a relative move on
the entire motion path, the leading IPs would also be adjusted and may lead to an
improper path navigating from one feature to the next. To prevent this relative
adjustment on the leading IPs, place a check next to "Protect Leading IPs".
Helmel Engineering Products, Inc.
www.helmel.com
Geomet Training Handbook
www.geomet-cmm-software.com
9-16
Chapter 9 – Working with Motion Control
Disable Motion on Features
From time to time during the inspection process it is helpful to drop into manual
mode to capture data points on a designated feature. An example might be a
diameter of a bushing that is inserted into a forging and whose position has a large
variance.
In this condition it is helpful for a DCC CMM that is running a part inspection to
drop into manual mode to allow the operator to control the capturing of data
points. Then upon completion of the feature, return to DCC control and resume
the inspection.
Applying the Disable Motion Flag
Applying the Motion Disable flag can be done through two different methods.
The first of these methods involves the Motion Edit dialog previously discussed in
this chapter.
MotionEdit Tool
Festure Selection Tool
In the lower left corner of the Motion Edit Dialog, you will find a check box
labeled "Disable Motion". Place a check here to force this feature into manual
mode during the inspection process. All current motion assigned to this feature
will remain visible in the Motion Edit control and during program execution will
not be acted upon. This allows switching the Disabled Motion on and off
depending on conditions.
You can use the Feature Selection Tool, discussed in chapter 7, which will allow
you to attach many Disable Motion Flags in one operation.
When using the Feature Selection Tool, highlight in the displayed list the features
that will get a Disable Motion Flag. Once the highlighting is completed, open the
drop down menu and choose [DCC Option⇒Disable Motion]. It is important to
remember when selecting this command that it is a toggle, which sets or removes
the disabled flag.
Should you select the command [DCC Options⇒Clear all Disabled Motion], all
Disable Motion flags will be cleared from the entire part inspection regardless if it
was highlighted in the list or not.
Helmel Engineering Products, Inc.
www.helmel.com
Geomet Training Handbook
www.geomet-cmm-software.com
9-17
Chapter 9 – Working with Motion Control
How Disabled Motion Behaves at Inspection Time
When Geomet is executing a part inspection program, it is constantly looking for
the Disable Motion flag. Should a feature with the flag be found, Geomet will
drop into manual mode to allow the operator to control the capturing of the
required data points for the feature.
When the required number of motion disabled features have been completed,
Geomet will display a targeting tool that shows the location of the first motion
point of the next feature. The targeting tool shows the XYZ relative position to
that point and the operator should joystick or manually drive the CMM to where
the targeting box shows all zeros, or near zero. At that time, press the <Continue>
button on the target tool and Geomet will return to DCC and resume part
inspection.
Helmel Engineering Products, Inc.
www.helmel.com
Geomet Training Handbook
www.geomet-cmm-software.com
9-18
Chapter 9 – Working with Motion Control
Motion Map Test
The motion map test is designed to look for warnings or potential errors in the
motion path saved with the inspection report. This feature can be set active to test
the motion map before every run, or disable to be used only on demand. By
default, Geomet activates the Motion Map Test.
Activating or Disabling the Motion Map Test
To set the Motion Map Test to scan all part inspection programs
automatically at the start of inspection runs, choose from the
main drop down menus [System⇒Tests⇒Use Motion Map Test
on Run]. When it is active, a check mark is shown next to the
command in the drop down menu. When the test is disabled, or
not checked, the test will not run at the start of a part program
run.
Manual Testing of the Motion Map
To manually test the motion map, select from the drop down
menu [System⇒Test⇒Test Motion Map]. Geomet will scan all
features that contain motion entries and look for errors.
The Motion Map Test will look for the following conditions:
Missing IP or SO in first position - It is important that there is
a reference point that precedes the Measurement Point (MP).
The IP or SO before the MP will define the direction of
approach and distance to MP for transition into the Probe Speed
setting. When the preceding IP/SO is missing, Geomet will
default into the Measurement Point Mode, and move towards
the targeted MP at the slower probe speed.
Distance between Stand Off and Measuring Point - Under
normal conditions, the distance between the SO-MP and MP-SO
is controlled by the Standoff Distance value defined under DCC Settings. When
teaching the motion path, it is customary to capture an Interim Point (IP) before
you capture the Measurement Point. When this is done, Geomet will build an
approach vector starting at the IP and ending at the MP. A Standoff Point is
calculated along that approach vector using the length defined in DCC Settings or
the distance between the IP and MP which ever is less.
Should the distance between the SO-MP-SO point sequence be too small, the
touch probe may act erratically by not coming off the part after the measurement
point. The result of this condition is that the CMM will capture the Measurement
Point, then stop and not proceed further. The controller will stop at the SO
Helmel Engineering Products, Inc.
www.helmel.com
Geomet Training Handbook
www.geomet-cmm-software.com
9-19
Chapter 9 – Working with Motion Control
position and see that the probe has not reset. All motion stops as a safety. The
motion map test looks for a minimum of 0.005" (0.127mm).
Motion Attribute Records -The last test performed by the Motion Map Test will
look for proper speeds and distances within each attribute record inserted into the
motion map. An attribute record contains new values for Traverse Speed, Probing
Speed, Stand Off and Over Travel Distances. These minimum values are:
Traverse Speed 0.01" (0.254mm)
Probing Speed 0.001" (0.0254mm)
Stand Off Distance 0.005" (0.127mm)
Over Travel Distance 0.01" (0.254mm)
Reviewing the Motion Map Test
When the Motion Map test is performed on demand, a text document appears
reporting the results of the test, see sample.
The window that appears can be resized using the standard Windows drag
method. Should any condition be found that requires operator review, the feature
number and brief description is provided? The operator should use the Motion
Edit Tool to locate and correct any discrepancies.
When the Geomet system has been enabled to perform the test at every run, the
report will only show when a discrepancy has been detected.
Helmel Engineering Products, Inc.
www.helmel.com
Geomet Training Handbook
www.geomet-cmm-software.com
9-20
Chapter 10 – Feature Generators
Chapter 10 – Offline Tools
Introduction...................................................................................... 10-2
Feature Generators – Common Tools and Controls ........................ 10-3
Offline IP Generator ........................................................................ 10-6
Circle Generator............................................................................. 10-11
Cylinder Generator......................................................................... 10-15
Line Generator ............................................................................... 10-20
Plane Generator.............................................................................. 10-22
Point Generator .............................................................................. 10-31
Bolt Hole Generator....................................................................... 10-35
Helmel Engineering Products, Inc.
www.helmel.com
Geomet Training Handbook
www.geomet-cmm-software.com
10-1
Chapter 10 – Feature Generators
Introduction to Offline Auto Features
Motion Path
Offline features are used to build motion path using Clearance Coordinate
Systems, Offline IP Generators and the feature nominal data. For example, you
may know the location and the corresponding Part Coordinate System for a bore.
Using the Circle Generator, you can build the entire motion path and execute the
circle without involving any manual teaching.
Care should always be taken to ensure that motion commands given to
automatically traverse to the feature and then measure that feature remain clear of
all obstacles in its path.
Before you start using the feature generators, please review Clearance Coordinate
Systems detailed in chapter 5.
Stylus Handling
The offline tools take into account the current active stylus configuration to
calculate the motion path. To set or change the active stylus, always use the Stylus
Manager, refer to Chapter 3. The offline generators do not provide access to
controlling the active stylus. With this generation of offline tools, each feature is
built with a single stylus tip. To utilize more than one stylus within a single
feature, construction tools are provided.
Helmel Engineering Products, Inc.
www.helmel.com
Geomet Training Handbook
www.geomet-cmm-software.com
10-2
Chapter 10 – Feature Generators
Feature Generators – Common Tools and Controls
All Feature Generators in Geomet are designed with the same tools and controls.
These include:
•
•
•
•
•
•
•
•
•
•
Clearance Coordinate System
Offline IP Generation
<Update>
<Create Path>
<Execute>
<Ok>
Apply Tolerance
Auto Recalc
Draw Stylus Ball
Editing Existing Features
Clearance Coordinate Systems
One or more define coordinate systems you build surrounding your inspection
piece. The base planes of these coordinate systems are positioned to allow
unrestricted and safe motion where the CMM will traverse between features. For
a detailed explanation on setting up and using Clearance Coordinate System,
please refer to Chapter 5.
Offline IP Generator
The Offline IP Generator builds the motion required to start each feature. A
complete description of this tool follows this section.
<Update>
The Update function tests the current entered nominal data and redraws the
current Generator graphics. Should any nominal data be in error, the data will be
highlighted in red for correction.
<Create Path>
The Create Path function calculates the full motion path based on the current
entered nominal data and redraws the current Generator graphics. The Create Path
function will process the Update function if it was not previously completed.
Apply Tolerance
Checking this option causes the new feature to be fully toleranced based on the
bilateral tolerance format.
Helmel Engineering Products, Inc.
www.helmel.com
Geomet Training Handbook
www.geomet-cmm-software.com
10-3
Chapter 10 – Feature Generators
<Execute>
This command builds the complete motion map and instructs the CMM to
perform the inspection of the defined feature. When completed the new feature is
appended to your inspection report.
<Ok>
While the <Execute> button performs the measurement on demand, the <Ok>
command will process the feature record and append it to the current inspection.
The <Ok> command is used in offline mode, editing an existing feature or
building the inspection report without the need for immediate feedback.
Auto Recalc
Checking the Auto ReCalc option will force an Update function when a feature
variable setting has changed. In effect, you will see the graphics update instantly
with every change. It is most helpful when using slider controls on Angles and
data point spreads.
Draw Stylus Ball
Checking the Draw Stylus Ball option will show the relative size of the current
stylus and how it interacts with your new feature.
1.000” Diameter Circle
0.300” Diameter Circle
In the example on the left we show the relative stylus ball size as it relates to a
1.000” diameter ID circle. Here we see plenty of clearance for both the motion
path and the stylus. In the example on the right we have a 0.300” diameter ID
circle. The motion path is clipped to the center of the circle to prevent the stylus
from retracting toward the opposite side of the circle. The stylus size dominates
the motion path. The Stand Off distance is restricted. This feature can be
measured with the current stylus. When a conflict occurs due to the size of the
stylus, the Generator will prompt you with a warning.
Helmel Engineering Products, Inc.
www.helmel.com
Geomet Training Handbook
www.geomet-cmm-software.com
10-4
Chapter 10 – Feature Generators
Editing Existing Features
All Feature Generators can edit existing features whether they were create with a
Generator or manually taught.
To edit an existing feature, highlight that feature in the inspection report and right
click to activate the sub menu. Choose [Edit feature Measurement Points] (where
feature is the name of the feature type).
Use caution when applying the generator to manually taught features. The initial
MP layout will seldom conform to the ordered layout that the generator creates
and any IPs inserted between the first and last MP will be discarded.
With some practice, you will learn that feature Generators can effectively be used
to edit existing features and create a more efficient motion path.
Helmel Engineering Products, Inc.
www.helmel.com
Geomet Training Handbook
www.geomet-cmm-software.com
10-5
Chapter 10 – Feature Generators
Offline IP Motion Point Generator
The Offline IP Generator provides a simple tool to create, edit and manage
Interim Points within the motion map of a feature. Through this tool you can
designate absolute XYZ IP values, or create dynamic automatic IPs.
Automatic IPs requires Clearance Coordinate Systems for dynamic information.
An automatic IP is calculated at the time of execution and is not recorded in the
motion map with XYZ values. For example, when requesting a z-axis Automatic
IP, the CMM will move from its current location into the XY plane of the
Clearance CS. The move will be parallel to the z-axis of the Clearance CS.
The Offline IP tool manages the initial IPs before the first Standoff Point (SO) in
the motion path of a feature. It is not designed to create or edit IPs that have been
inserted after the first SO. To edit those IPs, the Motion Edit Tool is available.
Creating an Offline Interim Point
To start the Offline IP tool from inside any Feature Generator, click on the
<Offline IP> button, see figure below, or [Modify ⇒ Offline Motion Builder]
from the menu.
Access from a Generator for
Offline IP
Offline IP Tool
Offline IP Generated
In center example above, we show the Offline IP tool with no data points in the
display. Through the Offline IP tool, we have access to building all necessary IPs
required for safe CMM motion. In the right figure, we show that two IPs have
been inserted at the start of the motion map. The first point is an automatic IP
moving into Clearance CS XY base plane with motion parallel to the z-axis. The
second IP is a calculated IP over the first SO of the measured featured. Just
pressing the <Z Plane> button has done all this.
Helmel Engineering Products, Inc.
www.helmel.com
Geomet Training Handbook
www.geomet-cmm-software.com
10-6
Chapter 10 – Feature Generators
Offline IP Tool Layout
The Offline IP Tool contains three groups
of controls, plus a list of IPs that are
assigned. The first group belongs to
Manual IP Entry. From this control, you
can create absolute positioned XYZ IPs,
relative positioned IPs and obtain the XYZ
location of the first SO in the feature.
The next group accesses the Clearance Planes. All automatic IPs require that a
Clearance CS is defined and set active. The <Clearance CS> button activates the
Clearance CS tool to create, edit and activate a Clearance CS, see Clearance
Coordinate Systems in Chapter 5 for more detail.
The final group is called Create Auto IPs. There are six buttons that create
automatic IPs. The buttons labeled X, Y and Z-axis, which will create an
automatic IP that moves parallel to the selected Clearance CS axis into the
selected base plane. The buttons labeled X, Y and Z Plane creates two IPs. The
first is an Automatic IP and the second is a calculated IP over the measured
feature.
Manual IP Entry Group
Within the Manual IP Entry Group there are three edit controls for XYZ values.
These work with Absolute IPs, Relative IPs and Get 1st Point functions.
Absolute IPs
To create an IP with absolute coordinates enter the
XYZ PCS values in the edit control.
In this example, we entered:
X = 2.9672
Y = 1.500
Z = -0.05
To confirm and create the IP, Press the <Absolute> button. An entry of the newly
created IP will be shown in the display area.
Helmel Engineering Products, Inc.
www.helmel.com
Geomet Training Handbook
www.geomet-cmm-software.com
10-7
Chapter 10 – Feature Generators
Relative IPs
The Relative IP function creates a new IP at an offset distance from the
highlighted IP in the list. Start by selecting an IP in the display.
Entering a Relative IP Position
New Relative IP Position added
As shown in the left figure, we have selected the first IP. When the IP has been
selected, the <Relative> button becomes active. Enter the XYZ offset distance in
the edit controls. We show the example of entering:
X=1
Y=1
Z=0
Complete the process by pressing the <Relative> button. A new IP is created that
has an offset value of X=1.0, Y=1.0, Z=0.0 from the selected IP, see the right
figure.
Get 1st Point
This command retrieves the first Standoff position in the current motion path. As
shown in the illustration, the first Standoff Point is:
X = 2.9672
Y = 1.5000
Z = -0.0500
The XYZ location of the first Standoff Point is helpful when you are creating a
new IP. For example, if we are creating an XY Circle, with a probing depth that is
identified by the Z value (-0.0500). We would want an IP over the SO Point that
will allow for safe motion of the probe. We can change the Z value of the first
point to 0.5" and press the <Absolute> button. Now we have an IP directly over
the first SO Point. The probe will move to that point, then plunge into the hole to
commence measurement.
Helmel Engineering Products, Inc.
www.helmel.com
Geomet Training Handbook
www.geomet-cmm-software.com
10-8
Chapter 10 – Feature Generators
NOTE: The Get 1st Point command works with the motion path already
determined in the Feature Generator tool. In this example we are using a 2D XY
Circle. If you change the sweep start value, then the first SO will change. When
you change any path-generating variable, you should return to the Offline IP tool
to confirm the IP originally created is also updated.
Clearance Planes
This group provides a simple drop down control which lists all the current
Clearance CS systems in your inspection. Choose the Clearance CS you want
active before you start assigning Automatic IPs.
<Clearance CS>
The Clearance CS button provides access to the Clearance Coordinate System
Setup Tool. This tool allows you to update and create Clearance CS. For detailed
information on Clearance CS, see chapter 5.
Create Auto IPs
To create Auto IPs, you must first have a Clearance CS active. If the six Auto IP
generation buttons are disabled, there is no Clearance CS active.
<X Axis>, <Y Axis>, <Z Axis>
These commands will create an Automatic IP based on the axis selected. For
example, the X-axis command will create an IP that moves from the current
CMM location into the Clearance CS YZ Base plane by moving parallel to the xaxis.
<X Plane>, <Y Plane>, <Z Plane>
These commands create two-IPs in your motion path. If you press <Z Plane>, the
first IP created is an Automatic IP that moves from the current point parallel to
the z-axis of the Clearance CS into the XY Base plane. Similar to pressing the <Z
Axis> button.
The second IP created is the entry IP for your current feature. It is calculated by
taking the first SO in the motion path and projecting that into the Clearance CS
XY Base plane. In most applications, this is all that is needed to move safely from
one location to the start of the feature.
Helmel Engineering Products, Inc.
www.helmel.com
Geomet Training Handbook
www.geomet-cmm-software.com
10-9
Chapter 10 – Feature Generators
For example, if measuring two XY circles, to move from circle number 1 to circle
number 2, we would select the Z Plane command in the Offline IP tool. Upon
completion of measuring circle number 1, the probe is at the probe depth below
the surface of the part. The Z Plane command will first extract the probe in a pure
+Z direction into the XY Base plane of the defined Clearance CS, then transition
in the same XY Base plane until it is over the first point of the second feature.
From this point, the probe can now plunge into the second circle to commence
measuring.
Display List Controls
The display list showing the offline IPs has controls identified as <Delete>,
<Up>, <Dn> and <Insert - Up>. These allow you to control and position the IPs
as needed.
<Delete>
Allows you to delete from the list the current selected IP.
<Up>, <Dn>
These commands reposition the selected IP either Up or Down in the list.
<Insert – Up>
This command acts similar to the creating an IP using the Absolute command.
However, unlike the Absolute command which always appends a new point to the
bottom of the list, the <Insert - Up> command inserts a new absolute IP in the
same location as the selected IP and moves all other IPs down.
Helmel Engineering Products, Inc.
www.helmel.com
Geomet Training Handbook
www.geomet-cmm-software.com
10-10
Chapter 10 – Feature Generators
Circle Generator
Keyboard:
ctrl + z
Menu:
Measure ⇒ Auto Features ⇒ Circle Generator
The Circle Generator feature builds and tolerances 2D circle features. This allows
building of offline features when not connected to a coordinate measuring
machine or when the production part is not available. The Circle Generator
provides tools to build all motion paths and execute on demand the measuring of
the circle.
The Circle Generator provides complete access to size, location, sweep and
motion path required to measure the feature. The tool has two main functions; the
first is to create a new feature. The second provides access to editing an existing
feature whether created by the generator or manually taught.
Circle Generator
Using the Circle Generator to Create a New Feature
To create a new feature, activate the generator and follow these steps:
Step 1 - Feature Characteristics
Complete the selections in the Feature Characteristics Group
1.
2.
3.
4.
Select Inside or Outside feature type.
Choose reporting format, Radius or Diameter.
Choose probing direction, Clockwise or Counter-Clockwise.
Select the projection plane, XY, YZ or ZX.
Helmel Engineering Products, Inc.
www.helmel.com
Geomet Training Handbook
www.geomet-cmm-software.com
10-11
Chapter 10 – Feature Generators
Step 2 - Feature Parameters
Complete the values required in the Parameters Group
1.
2.
3.
4.
Enter the XYZ Circle Center.
Enter the Radius or Diameter nominal value.
Select the number of hits required.
Set the Start Angle and Stop Angle.
NOTE: when entering the XYZ center location it is important that you establish a
probing depth sufficient to clear chamfers and edges. For example: if a bore
being measured has nominal values of X=1.000, Y=1.000, Z=0.000. You would
define the circle with a Z component that would include clearance below the top
surface, such as a Z=-0.100". When the motion is executed, the data points will be
captured at a depth of -0.100" below the top surface ensuring the data points
clear all possible edge and chamfer conditions.
Step 3 - Motion Path Adjustments
There are several tools available to build motion paths to ensure clear motion
without collision into the inspection part, clamps and other obstacles. These
include Clearance Coordinate Systems, offline IPs and Automatic IPs.
Creating Offline IPs and Automatic IPs
Once the Clearance Coordinate System has been established and set active,
Offline IPs can be generated to build a motion path for safe CMM travel, see
Offline IPs in the beginning of this chapter.
Special Interim Point Commands
In most applications, the use of the command <Add Entry IP> and <Add Exit IP>
will ensure safe transition for your CMM into and out of features. The use of
these commands requires that a Clearance CS is currently set active.
The Add Entry IP command will calculate an IP directly over the feature in the
normal base plane. For example, in the XY circle example, the first Standoff Point
is extracted and projected into the XY Base plane of the active Clearance CS. The
motion will start directly over the hole and plunge to the first SO safely.
The Add Exit IP command creates a similar IP to Add Entry IP except it will use
the last SO as its reference. The combination of these two commands results in
the CMM moving directly over the first SO, perform the measurement and exit
the hole safely.
Helmel Engineering Products, Inc.
www.helmel.com
Geomet Training Handbook
www.geomet-cmm-software.com
10-12
Chapter 10 – Feature Generators
Miscellaneous Functions
<All Around>
This will recalculate the motion path to evenly distribute the data points around
the circle. When there are 4 data points, each data point will measure at:
Data Point #1 - 0°
Data Point #2 - 90°
Data Point #3 - 180°
Data Point #4 - 270°
The motion path generator will determine the optimal motion path including the
insertion of IPs between data points to prevent collision with the part. This is
especially important when measuring outside diameters.
<Defaults>
Geomet has built in defaults for feature generators. In the circle generator, the
Default command will create a 16-point feature using the All Around motion path
generator.
Relative Adjustment
The Relative Adjustment command will offset the current XYZ values a specified
distance. This is helpful when measuring similar features. An example would be a
series of five 0.375" diameter holes 1.00" apart in the X direction. Build and
execute the first hole using the Circle Generator. When the feature has been
completed, activating the Circle Generator will display the last known values, or
in this case, the parameters of hole number one. Enter 1,0,0 in the Relative
Adjustment group and press <Perform Adj>, the hole center XYZ values will
update and if you are using Entry and Exit IPs, just press the Execute command
and the CMM will transition and measure hole number two.
Helmel Engineering Products, Inc.
www.helmel.com
Geomet Training Handbook
www.geomet-cmm-software.com
10-13
Chapter 10 – Feature Generators
<Review>
This command is useful when learning to use
the Circle Generator. As shown in figure at
the right, the Review command displays the
current settings and highlights any potential
problems. Here we see a highlight
(***CAUTION***) indicating there are no
Entry or Exit IPs in the motion path.
The motion path does not show a clear path
into the circle and out of the circle. You have
to choose if this is acceptable based on your
part. To return to the graphic display, press
the <Review> button again.
Helmel Engineering Products, Inc.
www.helmel.com
Geomet Training Handbook
www.geomet-cmm-software.com
10-14
Chapter 10 – Feature Generators
Cylinder Generator
Keyboard:
ctrl + c
Menu:
Measure ⇒ Auto Features ⇒ Cylinder Generator
The Cylinder Generator will build and tolerance Cylinder features. This allows
building of offline features when not connected to a coordinate measuring
machine or when the production part is not available. The Cylinder Generator also
builds all motion paths and can execute on demand the measuring of the new
cylinder.
The Cylinder Generator provides complete access to size, location, start / stop
angles and motion path generators required to measure the feature. The tool has
two functions. The first is to create a new feature. The second provides access to
editing an existing feature whether created by the generator or manually taught.
Circle Generator
Using the Cylinder Generator to Create a New Feature
To create a new feature, activate the generator and follow these steps:
Step 1 - Feature Characteristics
Complete the selections in the Feature Characteristics Group
1. Select Inside or Outside feature type.
2. Choose reporting format, Radius or Diameter.
3. Choose probing direction, Clockwise or Counter-Clockwise.
Helmel Engineering Products, Inc.
www.helmel.com
Geomet Training Handbook
www.geomet-cmm-software.com
10-15
Chapter 10 – Feature Generators
Step 2 - Feature Parameters
Complete the values required in the Parameters Group
1.
2.
3.
4.
Enter the XYZ end points of the axis vector (Pt1 and Pt2).
Enter the Radius or Diameter nominal value.
Select the number of hits required.
Select the number of slices required.
NOTE: when entering the XYZ end points it is important that you establish a
probing depth sufficient to clear chamfers and edges. You can enter the XYZ end
points based on the total length of the boss, then use <Probe Auto Adjust
Clearance> which will reduce the end points along the axis vector 125% of one
probe radius. This ensures the probe will have clearance at the ends for the
probe.
Step 3 - Motion Path Adjustments
There are several tools available to build motion paths to ensure clear motion
without collision into the inspection part, clamps and other obstacles. These
include Clearance Coordinate Systems, offline IPs and
Automatic IPs.
Slice Control
The Cylinder Generator uses slices along the cylinder to
capture data points. If the hit count is set to 10 and the slice
count is at 5, then there are a total of 50 data points. The slices
are created equally over the distance from end point one to end
point two.
To change the slice count, use the Up/Down arrows in the slice
control, or enter a new value. As you click on the arrows, the
graphic will update showing the new slice count.
Slice Tools
If the cylinder has a groove in it, a slice may pass over that groove which would
create a poor fit. To prevent this, locate the slice in the list and press the
<Delete>/Add button, or double click. The slice will highlight and be removed
from the path generation.
Creating Offline IPs and Automatic IPs
Once the Clearance Coordinate System has been established and set active,
Offline IPs can be generated to build a motion path for safe CMM travel, see
Offline IPs in the beginning of this chapter.
Helmel Engineering Products, Inc.
www.helmel.com
Geomet Training Handbook
www.geomet-cmm-software.com
10-16
Chapter 10 – Feature Generators
Special Interim Point Commands
In most applications, the use of the command <Add Entry IP> and <Add Exit IP>
will ensure safe transition for your CMM into and out of features. The use of
these commands requires that a Clearance CS is currently set active. For a
cylinder, Entry and Exit IPs will move parallel to
the axis of the cylinder, see example.
The Add Entry IP command will calculate an IP
from the first SO along the axis of the cylinder
into the Clearance CS XY base plane. Referring
to the illustration at right, the first Standoff Point
is extracted and projected into the XY Base plane
of the active Clearance CS. The motion will start
directly over the hole and plunge to the first SO
safely.
Entry IP
The Add Exit IP command creates a similar IP to Add Entry IP except it will use
the last SO as the reference.
Miscellaneous Functions
<All Around>
This will recalculate the motion to measure all around the circle. When there are 4
data points, each data point will measure at:
Data Point #1 - 0°
Data Point #2 - 90°
Data Point #3 - 180°
Data Point #4 - 270°
The motion path generator will determine optimal path including the insertion of
IPs between data points to prevent collision with the part. This is especially
important when measuring outside diameters.
<Defaults>
Geomet has built in defaults for feature generators. In the cylinder generator, the
Default command will create a 24-point feature consisting of 4 slices and 6 points
per slice and uses the current Start and Stop Angle settings.
Helmel Engineering Products, Inc.
www.helmel.com
Geomet Training Handbook
www.geomet-cmm-software.com
10-17
Chapter 10 – Feature Generators
Translate Endpoints
The Translate Endpoint command is a relative adjustment
command which will offset the current XYZ values of each
endpoint a specified distance. This is helpful when measuring
similar features. An example would be a series of five 0.500"
diameter holes 1.00" apart in the X direction. Build and execute
the first hole using the Cylinder Generator. When the feature has
been completed, activate the Cylinder Generator and the last
nominal values will be displayed, or in this case, the parameters
of hole number one.
Translate
From the drop down selector, choose [Translate Endpoints]. Enter 1,0,0 in the
Relative Adjustment group and press <Ok>, the end points will translate by the
XYZ values. Follow that by updating the Entry and Exit IPs if required. Press the
<Execute> command and the CMM will engage motors and measure hole number
two following the motion path built by the Cylinder Generator.
Helmel Engineering Products, Inc.
www.helmel.com
Geomet Training Handbook
www.geomet-cmm-software.com
10-18
Chapter 10 – Feature Generators
Interpreting the Graphical Display
A Cylinder can be orientated in any direction within a 3D space. This makes it
difficult to use a 2D display to properly represent it.
As shown in the Generator.
As shown in the inspection report.
The figure at the left is shown in the Cylinder Generator. The figure at the right is
the final solution shown in the inspection report showing the motion path. As you
can see, there are two slices deleted and the path switches between CW and CCW
with each slice.
In the Generator, the CMM axis directions are shown, here they are +X / +Z and
the data points are captured on the top to allow clearance for the probe shank.
With some practice, you will understand the intricacies of building an efficient
and safe motion path.
<Review>
This command is useful when learning to use
the Circle Generator. As shown in figure at the
right, the Review command displays the current
settings and highlights any potential problems.
Here we see a highlight (***CAUTION***)
indicating there are no Entry or Exit IPs in the
motion path.
The motion path does not show a clear path into
the circle and out of the circle. You have to
choose if this is acceptable based on your part.
To return to the graphic display, press the
<Review> button again.
Helmel Engineering Products, Inc.
www.helmel.com
Geomet Training Handbook
www.geomet-cmm-software.com
10-19
Chapter 10 – Feature Generators
Line Generator
Keyboard:
ctrl + m
Menu:
Measure ⇒ Auto Features ⇒ Line Generator
The Line Generator tool builds and
tolerances 2D line features. This
allows building of offline features
when not connected to a coordinate
measuring machine or when the
production part is not available. The
Line Generator also provides tools to
build all motion paths that can be
executed on demand for the
measuring of the new line.
The Line Generator tool has two
functions. The first is to create a new
feature. The second provides access
to editing an existing feature whether
created by the generator or manually
taught.
NOTE: When editing a line feature
that was not created with the Line
Line Generator
Generator care must be taken to
account for IPs that may be inserted between the first and last Stand Off. The
Generator does not retain those IPs.
Using the Line Generator to Create a New Feature
To create a new feature, activate the generator and follow these steps:
Step 1 - Defining the Endpoints and Hit Count
Complete the selections in the Parameters Group
1. Enter the XYZ PCS Values for End Points 1 and 2.
2. Select the number of hits required.
Step 2 - Feature Characteristics
Complete the values required in the Feature Characteristics Group
1. Select the projection plane, XY, YZ or ZX.
2. Select the reported PCS Pierce Axis.
Helmel Engineering Products, Inc.
www.helmel.com
Geomet Training Handbook
www.geomet-cmm-software.com
10-20
Chapter 10 – Feature Generators
Step 3 - Probe Direction
In the Probe Direction Group, select the appropriate probing direction.
Step 4 - Motion Path Adjustments
There are several tools available to build motion paths to ensure clear motion
without collision into the inspection part, clamps and other obstacles. These
include Clearance Coordinate Systems, offline IPs and Automatic IPs
Creating Offline IPs and Automatic IPs
Once the Clearance Coordinate System has been established and set active,
Offline IPs can be generated to build a motion path for safe CMM travel, see
Offline IPs in the beginning of this chapter.
Special Interim Point Commands
In most applications, the use of the command <Add Entry IP> and <Add Exit IP>
will ensure safe transition for your CMM into and out of features. The use of
these commands requires that a Clearance CS is currently set active.
The Add Entry IP command will calculate an IP directly over the feature in the
normal base plane. For example, in the XY line example, the first Standoff Point
is extracted and projected into the XY Base plane of the active Clearance CS. The
motion will start directly over the line and plunge to the first SO safely.
The Add Exit IP command creates a similar IP to Add Entry IP except it will use
the last SO as its reference. The combination of these two commands results in
the CMM moving directly over the first SO, perform the measurement and exit
the line safely.
Exclusion Areas
The data points are distributed evenly between
the defined endpoints. There may exist an area
where the line is not continuous, such as a slot.
To remove data points from the path we can use
the <Delete> command.
Locate the data point using the slider to highlight
the point in the list and press <Delete> or double
click the entry in the list. That point will be
removed from the list and the graphics will
redraw to show the changes.
Helmel Engineering Products, Inc.
www.helmel.com
Geomet Training Handbook
www.geomet-cmm-software.com
10-21
Chapter 10 – Feature Generators
Plane Generator
Keyboard:
ctrl + b
Menu:
Measure ⇒ Auto Features ⇒ Plane Generator
The Plane Generator tool builds and
tolerances plane features. This
allows building of offline features
when not connected to a coordinate
measuring machine or when the
production part is not available. The
Plane Generator also provides tools
to build all motion paths that can be
executed on demand for the
measuring of the new plane.
The Plane Generator tool has two
functions. The first is to create a new
feature. The second provides access
to editing an existing feature
whether created by the generator or
manually taught.
Plane Generator
NOTE: When editing a plane feature
that was not created with the Plane Generator care must be taken to account for
IPs that may be inserted between the first and last Stand Off. The Generator does
not retain those IPs.
Using the Plane Generator to Create a New Feature
To create a new feature, activate the generator and follow these steps:
Step 1 - Defining the boundary of the plane
Complete the selections in the Parameters Group
1. Select the probing direction.
2. Enter the four XYZ corner end points.
3. Select the number of rows and columns.
Helmel Engineering Products, Inc.
www.helmel.com
Geomet Training Handbook
www.geomet-cmm-software.com
10-22
Chapter 10 – Feature Generators
Step 2 - Feature Characteristics
Complete the values required in the Feature Characteristics Group
1. Reverse IJK if required.
2. Select the reported PCS Pierce Axis.
Step 3 – Exclusion Zones
Exclusion Zones are added to the plane to account for portions of the surface
where a hole or slot may cut through. Data points defined by the row and column
positions may fall within these exclusion features. The Exclusion Zones removes
those data points from the final motion map.
Step 4 - Motion Path Adjustments
There are several tools available to build motion paths to ensure clear motion
without collision into the part, clamps and other obstacles. These include
Clearance Coordinate Systems, offline IPs and Automatic IPs
Creating Offline IPs and Automatic IPs
Once the Clearance Coordinate System has been established and set active,
Offline IPs can be generated to build a motion path for safe CMM travel, see
Offline IPs in the beginning of this chapter.
Special Interim Point Commands
In most applications, the use of the command <Add Entry IP> and <Add Exit IP>
will ensure safe transition for your CMM into and out of features. The use of
these commands requires that a Clearance CS is currently set active.
The Add Entry IP command will calculate an IP directly over the feature in the
normal base plane. For example, in the XY line example, the first Standoff Point
is extracted and projected into the XY Base plane of the active Clearance CS. The
motion will start directly over the line and plunge to the first SO safely.
The Add Exit IP command creates a similar IP to Add Entry IP except it will use
the last SO as its reference. The combination of these two commands results in
the CMM moving directly over the first SO, perform the measurement and exit
the line safely.
Helmel Engineering Products, Inc.
www.helmel.com
Geomet Training Handbook
www.geomet-cmm-software.com
10-23
Chapter 10 – Feature Generators
Defining the Corner End Points
The Plane Generator defines the boundary of planes as having four straight sides,
shown here are some examples:
Acceptable
Acceptable
Acceptable
Not Acceptable
The shape of the enclosed area can be a wide variety, however there is one rule
the shape must follow. That example can be seen in the right image where one
end point is inside a straight line drawn between its adjoining corners. The Plane
Generator will test for this condition and prompt you to correct it.
Entering End Points
Press the button <Set End Points> to launch the
Boundary Corner EndPoints dialog. The simplest
method is to enter the XYZ values for each
corner directly into the cells.
<Capture>
If you have a CMM attached and your part is
available you can use the <Capture>function. When you press <Capture> Geomet
will prompt you to take 4 data points. Capture the 4 data points around the
boundary of the surface where you want your plane measured. As you make
contact, the data points XYZ position will update in the dialog.
These Points are entered as surface points
When checked, the entered XYZ corner points are on the surface of the plane.
This is important when working off line of the CMM. When you capture the end
points using the CMM, the XYZ values are not compensated for the probe
direction. The information for the plane normal has not yet been developed.
<Recall Last>
The Plane Generator writes the 4 end points out to the registry for recall at a
future time.
Helmel Engineering Products, Inc.
www.helmel.com
Geomet Training Handbook
www.geomet-cmm-software.com
10-24
Chapter 10 – Feature Generators
Building the Motion Map Example
In our example, we will use a 1-2-3 Block with
the standard 6 holes through the part. The PCS
is defined on the part and its origin is located on
the lower left corner.
The four end points were manually entered and
are:
Endpoint 1
Endpoint 2
Endpoint 3
Endpoint 4
X
0.000
3.000
3.000
0.000
Y
0.000
0.000
2.000
2.000
Z
0.000
0.000
0.000
0.000
In the Boundary Corner End Points dialog, we placed a check on the “These
Points are entered as surface points” option. When this was finished, we pressed
the <Ok> button. The graphic area will now update showing the data point spread.
Rows are set at 20 and columns are set at 15. The Plane Generator will display the
data point distribution based on this data. Please note the calculated IJK values
are:
I
0.00000
J
0.00000
K
-1.00000
This indicates the plane vector normal is pointing downward from the surface of
the part. Our plane has a real vector normal of:
I
0.00000
J
0.00000
K
1.00000
To correct this, press the <Reverse IJK> button. It is important that the vector
direction is correct when building the motion path. With the vector normal now
pointing “up” the probe path will be generated above the part.
Incorrect IJK, Probing from the bottom
Correct IJK, Probing from the top
Helmel Engineering Products, Inc.
www.helmel.com
Geomet Training Handbook
www.geomet-cmm-software.com
10-25
Chapter 10 – Feature Generators
Data Point Edge Clearance
In our example we are using a 1-2-3 block and our
endpoints that define the plane boundary are the real
edges of the part. This is not a good practice as our
CMM will move to the exact edge and capture data
points. Since our stylus is a sphere, we will get
questionable data points that will give you an
erroneous result.
To remedy this condition we could have entered
corner points that are inside the physical boundaries,
or we can scale our endpoints using the <Scale>
tool.
Scale Button
Enter Scale Value
The value you enter in the Scale Dialog is a percentage of the total boundary area.
In this example, we entered 0.95. The scale function reduces the total area by
multiplying each axis by 0.95. The final corner points are then determined from
the original center point effectively shrinking the area to be used in the motion
path generation.
Endpt 1
Endpt 2
Endpt 3
Endpt 4
Original Entered Values
X
Y
Z
0.0000
0.0000
0.0000
3.0000
0.0000
0.0000
3.0000
2.0000
0.0000
0.0000
2.0000
0.0000
Values After Scaling
X
Y
Z
0.0750
0.0500
0.0000
2.9250
0.0500
0.0000
2.9250
1.9500
0.0000
0.0750
1.9500
0.0000
With the scaling operation completed, we now have a safe distance between the
edge of the physical part and where the data points are captured.
Exclusion Zones
To eliminate data points from the grid, the Plane Generator provides three tools.
Radial Exclusion Zone defined by a center point and radius. All data points that
fall within this zone will be removed from the motion map. The Radial Exclusion
Zone is a fixed position that does not scale.
Boundary Exclusion Zone is defined by 4 endpoints. All data points that fall
within this zone will be removed from the motion map. The Boundary Exclusion
Zone is a fixed position that does not scale.
This tool creates a small 0.05” radius Target Exclusion. The center position of the
zone is positioned with mouse. As you position over a existing data point, an
anchor shows, left click to set the zone.
Helmel Engineering Products, Inc.
www.helmel.com
Geomet Training Handbook
www.geomet-cmm-software.com
10-26
Chapter 10 – Feature Generators
Radial Exclusion Zone
The Radial Exclusion Zone is used to delete data
points from the motion map where a hole might
exist on the surface that would interfere with
measuring of a plane. There are many options available
in building Radial Exclusion Zones.
Basic Radial Exclusion Zone
Using our 1-2-3 block example we have 6 holes, or
areas where no data points should be taken. Enter the
XYZ center for the first hole:
X
0.50000
Y
0.50000
Z
0.00000
Now enter the radius of the hole, which is 0.250” and press <Ok>. The example
below shows the removal of data points for that one exclusion zone.
Enlarged Exclusion Zone
One Radial Exclusion Zone
Care should be taken when entering empirical sizes for the exclusion zone.
Although the radius of the hole is 0.250”, that will not take into account position
changes or a chamfer on the edge of the hole. To account for this use the tools
available in the Clearance Compensation Group. We could place a check next to
Add and enter a value of 0.035 in the Additional Amount control. This will be
added to the entered radius value and enlarge the exclusion zone as shown above,
right.
Should you have selected Subtract in the Clearance Compensation Group, the
radius would have been reduced by that amount.
Helmel Engineering Products, Inc.
www.helmel.com
Geomet Training Handbook
www.geomet-cmm-software.com
10-27
Chapter 10 – Feature Generators
Radial Exclusion Zone – continued~
Building these exclusion zones can be done efficiently
if you have your inspection piece on the CMM. Each
zone can be built by capturing data points around the
exclusion zone on the actual piece.
Place a check next to Multiple Capture and press the
<Capture> button. Geomet will respond with a prompt
for you to capture 4 data points. Capture data points
surrounding your remaining holes on the 1-2-3 block
example. When you finish with the exclusion zone, you
will be prompted to continue capturing data points on
the next zone.
When you have finished building all the exclusion zones using the CMM capture
method, press <Cancel> to stop the capturing process.
Mutiple Exclusion Zones
External Exclusion Zone
Plane on Tube End
External Exclude
When this option is checked, only the data points inside the radial zone are kept.
All data point outside are excluded, see center example above. This can be used
when measuring a plane on the end of a cylinder and if combined with an Internal
Radial Exclusion Zone, you can actually measure a plane on the end of a tube see
right example above.
<Clear Entries>
Deletes all entries in the Parameters Group and preserves the check states.
Helmel Engineering Products, Inc.
www.helmel.com
Geomet Training Handbook
www.geomet-cmm-software.com
10-28
Chapter 10 – Feature Generators
Boundary Exclusion Zone
The Boundary Exclusion Zone is used to
delete data points from the motion map where
a void might exist on the surface that would
interfere with measuring of a plane. There are many
options available in building Boundary Exclusion
Zones.
Basic Boundary Exclusion Zone
The simplest method to create a Boundary Exclusion Zone is by entering four
endpoints that correspond to the area on your part that should be excluded from
data points. In the left example below, we show a simple 0.5” x 0.5” exclusion
zone.
Basic Entered Exclusion Zone
Captured Exclusion Zones
Using the <Capture> option, we can utilize the CMM and capture 4 data points
that surround the area we want excluded, see right example above.
Helmel Engineering Products, Inc.
www.helmel.com
Geomet Training Handbook
www.geomet-cmm-software.com
10-29
Chapter 10 – Feature Generators
Target Exclusion
The Target Exclusion Zone is used to delete single data points from the
motion map where a void might exist on the surface that would interfere
with measuring of a plane. This method works interactively with the
graphic display to locate data points for removal.
When you activate the Target Exclusion mode, your mouse becomes the
pointing device to locate data points. Pass your mouse over the graphic
area and the pointer changes into a crosshair and arrow.
Selecting a Data Point for Exclusion
Target Exclusion Zones
Move the mouse over a data point and when over that data point, it changes into a
larger green symbol. Left click and that position is captured and a small Radial
Exclusion Zone is placed there.
Redraw Graphics
This command refreshes the graphic display.
Delete All Exclusion Zones
This command deletes all exclusion zones.
Display Data Point List
This command produces a window that contains the full list
of all data points.
Helmel Engineering Products, Inc.
www.helmel.com
Geomet Training Handbook
www.geomet-cmm-software.com
10-30
Chapter 10 – Feature Generators
Point Generator
Keyboard:
ctrl + 5 (Number Pad)
Menu:
Measure ⇒ Auto Features ⇒ Plane Generator
The Point Generator tool builds and tolerances
point features. This allows building of offline
features when not connected to a coordinate
measuring machine or when the production
part is not available. The Point Generator
provides tools to build all motion paths that
can be executed on demand for the measuring
of the new point.
All point types can be created: 1D, 2D, 3D
and Vector Points. The Point Generator can develop an array of data points based
on rows and columns. There are no Exclusion Zone tools within the Point
Generator.
Using the Point Generator to Create a New Feature
To create a new feature, activate the generator by pressing <Ctrl + 5>
simultaneously or by selecting [Measure ⇒ Auto Features ⇒ Point Generator]
from the drop down menu. NOTE: the key press "5" is located on the number pad,
not the row of numbers over the top of the keyboard.
Step 1 - Feature Characteristics
Complete the selections in the Feature Characteristics Group
1. Choose the Point type: 1D, 2D, 3D or Vector Point.
2. Apply <Auto IJK> if required, see note below.
3. Select Apply Tolerance if required.
When selecting a 1D Point type (-X, -Y, -Z, +X, +Y or +Z), a command button
labeled <Auto IJK> will become available. The <Auto IJK> command will apply
standard default values for IJK and enter those values in the Target Parameters
group.
Helmel Engineering Products, Inc.
www.helmel.com
Geomet Training Handbook
www.geomet-cmm-software.com
10-31
Chapter 10 – Feature Generators
Step 2 - Step and Repeat
The Step and Repeat function is available when 1D Point type has been selected.
Under The Step and Repeat group you have the
option to specify rows and columns of data
points that will be orthogonal to the current Part
Coordinate System. The number of data points
and spacing between the rows and columns are
separately controlled.
To activate the Step and Repeat tool, place a
check next to <Use Grid>. Additional
information will appear which allow you to abort
the execution when using on a DCC style CMM.
Enter the parameters for the row and column count and spacing. The value you
enter for Row and Column Spacing are sign sensitive. These spacing values are
applied against the XYZ position entered in Target Parameters group, which is
considered the starting point of the grid.
The grid is assumed to be parallel to a PCS base plane and does not perform any
contour walking capabilities. The Scanning Tools within Geomet better suit those
surfaces. For example: a -Z Point will expect a constant Z through the execution
of the grid.
During execution the first point captured is defined in the Target Parameters
Group. Upon capturing this data point, the Target XYZ positions will update to
reflect the next position. When there are Rows and Columns, the movement of the
CMM will complete a column then move over the row spacing and reverse
direction for the next column.
At any time you can abort the operation by pressing the <Abort Execution>
button. At this time there is no continue command.
Helmel Engineering Products, Inc.
www.helmel.com
Geomet Training Handbook
www.geomet-cmm-software.com
10-32
Chapter 10 – Feature Generators
Step 3 - Target Parameters
Complete the values required in the Parameters Group
1. Enter the XYZ contact point location
2. Enter the IJK approach vector
NOTE: The IJK approach vector is defined being perpendicular to the surface
and offers a direct line-of-sight path to the contact point. Using the surface plate
of your CMM as an example, we know the IJK surface vector is I=0.0, J=0.0,
K=1.0. Therefore when we specify a -Z 1D Point, the surface normal would be
I=0.0, J=0.0, K=1.0. If we select the <Auto IJK> command button, the IJK
controls will populate with these values for you.
Some IJK values will be difficult to calculate when the surface is not parallel to a
PCS Axis. If your inspection part has a CAD drawing associated to it, most CAD
programs can easily provide the IJK values.
It is not necessary to always approach the
contact point along the surface IJK vector.
When you teach an inspection program
manually you generally do not control the
CMM with such a high degree of motion
accuracy. Therefore the IJK values you enter
provide a direct line-of-sight approach to the
contact point. In the example above, we have
a condition where the surface we need to
Probe Approach vector
measure has a restriction on approach. We
must account for this by entering an IJK that provides a safe line-of-site approach
to the contact point.
Our inspection requires that a -X 1D Point be used to contact the step. Under
normal conditions, we would enter an IJK value of 1.0, 0.0, and 0.0. However to
clear the restricting surface, we used the approach vector 0.7, 0.8, 0.0. The StandOff Point would be created along that approach line.
To get a simple understanding, if we stood on the contact point, we would look at
a line from the contact point alongside the restricting surface. In this example, we
moved 0.7" along the x-axis and simultaneously, move 0.8" along the y-axis.
Helmel Engineering Products, Inc.
www.helmel.com
Geomet Training Handbook
www.geomet-cmm-software.com
10-33
Chapter 10 – Feature Generators
Vector Point
When the Point Type selected is Vector Point,
additional parameters will appear in the Target
Parameters group. These include Probe
Deviation, Plus and Minus Deviation.
Vector Points are executed one-at-a-time. If you
require a grid of Vector Points we suggest using
the Vector Point Generator found in Chapter 4 –
Feature Measurement. A good description of the
deviation fields and general information regarding Vector Points can be found in
Chapter 4 – Feature Measurement.
Helmel Engineering Products, Inc.
www.helmel.com
Geomet Training Handbook
www.geomet-cmm-software.com
10-34
Chapter 10 – Feature Generators
Bolt Hole Generator
Menu:
Measure ⇒ Macro Routines ⇒ Bolt Hole Pattern
The Bolt Hole Generator is a multi-feature tool
that can create 2 or more inside diameter or
radius 2D-circle features. These features
surround a common center point that is defined in
the current Part Coordinate System.
To begin the Bolt Hole Generator, select from the
main drop down menus, [Measure ⇒ Macro
Routines ⇒ Bolt Hole Pattern]. Geomet will
display the generator as shown in figure at the
right.
Using the Bolt Hole Generator
The generator can create new features by inserting program steps during the selfteach or offline modes. It can also create and execute the all motion required. This
directs the motorized CMM to measure all features associated with the Bolt Hole
Pattern.
Building a Bolt Hole Pattern
Step 1
Launch the Bolt Hole Generator. Main drop down menus; [Measure ⇒ Macro
Routines ⇒ Bolt Hole Pattern].
Step 2
Select the required Number of Holes in the pattern, the minimum is 2.
Step 3
Choose the center of the bolt hole pattern. Example: the bolt hole pattern is
centered at X=5.000", Y=4.500" in the PCS XY base plane. The Z component
controls the height of the surface where the Bolt Hole Pattern is taken from. In the
figure above, we show the Bolt Hole Pattern on a surface at Z= 1.000". The data
point depth will be controlled by a depth variable in step 9.
Step 4
Choose the reporting format, Diameter or Radius.
Helmel Engineering Products, Inc.
www.helmel.com
Geomet Training Handbook
www.geomet-cmm-software.com
10-35
Chapter 10 – Feature Generators
Step 5
Set the size of the holes in either Diameter or Radius based on the chosen
reporting format.
Step 6
Establish hole number 1 start position as an angle. In the example shown, the
angle is set at 11.25° and is represented by a blue dashed line from the pattern
center to the first feature.
Step 7
Choose the correct PCS Base Plane, XY, YZ or ZX.
Step 8
Set the number of hits per hole.
Step 9
Choose the depth the motion path generator will use to capture data points. In this
example, the probing depth would be set at -0.100" to allow safe probing below
the surface. In our example, we show the 15 circle Bolt Hole Pattern on the part at
Z= 1.000". Our probing depth will occur at 0.900". This is the result of the
nominal height (Z=1.000") adding the Probing Depth (-0.100").
Step 10
Choose a Clearance Height value that determines the safe height between holes
for the CMM. In our example, the probing height is set at Z= 0.900", the block
height is 1.000" and we will use a Clearance Height of 0.500". When the CMM
moves from one feature to the next, it will move to Z= 1.500” derived from the
Nominal Height (1.000") plus Clearance Height (0.500").
NOTE: See Special Interim Point Commands below for additional motion control.
Apply Tolerance
By placing a check next to this option, Geomet will attach relevant tolerance data
to each feature as they are created.
Helmel Engineering Products, Inc.
www.helmel.com
Geomet Training Handbook
www.geomet-cmm-software.com
10-36
Chapter 10 – Feature Generators
Program Step
When this option has been selected, all features created with the Bolt Hole
Generator are linked together to form one macro feature. When they are linked
together, they can be edited in the part program with the Bolt Hole Generator tool.
The Bolt Hole Generator will insert a program step "Bolt Hole Variable
Parameter" which contains the bolt hole pattern characteristics and links to all the
features associated with the pattern.
Bolt Hole Parameter
For example, in manufacturing the bolt hole pattern consisting of 36 holes might
require two operations. The first operation bores each hole at a diameter of
1.000". The second operation inserts a bushing reducing the diameter to 0.750".
Create an inspection program to measure the first operation using the Bolt Hole
Generator to build the 36 holes. Place a check next to Program Step and create all
features by choosing <Ok> to create the features offline, or <Execute/Close> to
instruct CMM to measure the feature immediately. Save your inspection with a
unique name identifying it as the first operation.
36 Feature Bolt Hole Pattern
Helmel Engineering Products, Inc.
www.helmel.com
Geomet Training Handbook
www.geomet-cmm-software.com
10-37
Chapter 10 – Feature Generators
Edit the Macro Program Step
To edit the parameters used to create the Bolt Hole Pattern
tagged with the Program Step operation, highlight the Bolt
Hole Parameter record, or any feature within the bolt hole
pattern and press the right mouse button. A sub menu will
appear, see example.
Choose [Macro Parameters] which will activate the Bolt Hole
Generator to allow setup parameters. Some details will be
protected such as number of holes and PCS projection plane.
Using our previous example, edit the diameter value changing
it from 1.000” to 0.750" and accept the change using the <Ok> button. The bolt
hole pattern will update with the new parameters. In this example the circle size
and all motion associated are updated. Save this change with a unique file name
referencing operation number two.
NOTE: The IPs that exist before the first feature of the pattern are protected and
carried forward when editing the bolt hole pattern. During the edit process, the
ability to change the motion using the <Add Entry IP>, <Add Exit IP> and
<Clearance CS> are blocked.
Special Interim Point Commands
In most applications, the use of the command <Add Entry IP> and <Add Exit IP>
will ensure safe transition for your CMM. These commands require a Clearance
CS is defined and set active.
The <Add Entry IP> command calculates an IP directly over the feature in the
normal base plane. For example, in the XY circle example, the first Standoff Point
is extracted and projected into the XY Base plane of the active Clearance CS. The
motion will start directly over the hole and plunge to the first SO safely.
The <Add Exit IP> command creates an IP at the end of the motion map which
use uses the last SO and calculates a transition path into the Clearance CS.
The combination of these two commands results in the CMM moving directly
over the first SO, perform the measurement and exit the hole safely.
In the Bolt Hole Generator, the Clearance Height value is sufficient to create
entry and exit IP points for each hole and provide for safe CMM operations. This
eliminates the need to establish a Clearance CS. If the <Add Entry IP> or <Add
Exit IP> option has been selected, then the Clearance Height will be disabled and
the IP will be calculated based on the existing Clearance CS.
Helmel Engineering Products, Inc.
www.helmel.com
Geomet Training Handbook
www.geomet-cmm-software.com
10-38
Chapter 11 – Reverse Engineering
Chapter 11 – Reverse Engineering
Introduction...................................................................................... 11-2
Reverse Engineering for Surface Generation .................................. 11-2
Summary of Reverse Engineering Tools ......................................... 11-3
Choosing a Scan Method ................................................................. 11-4
Manual Free Scan ............................................................................ 11-5
GeoTracer ........................................................................................ 11-6
Line Auto Scan ................................................................................ 11-9
4 Point Boundary Surface Scan ..................................................... 11-11
Radial Boundary Surface Scan ...................................................... 11-16
Understanding the Data Cloud Structure ....................................... 11-17
Cardinal Spline .............................................................................. 11-18
Exporting ....................................................................................... 11-23
Helmel Engineering Products, Inc.
www.helmel.com
Geomet Training Handbook
www.geomet-cmm-software.com
11-1
Chapter 11 – Reverse Engineering
Introduction
Geomet offers many tools to assist in reverse engineering. These tools include
feature data point scanning and exporting measured features and data clouds as
IGES entities. Capturing data is handled by a wide variety of common sensors
from hard probes, electronic touch probes, analog scanning probes to 3D laser
scanning probes.
Our Reverse Engineering tools have been developed to facilitate producing
accurate dimensional geometric CAD representations of unknown or
undocumented parts. Identifying prismatic features such as circles, planes, cones
and other defined geometric features combined with data clouds can then be
exported into a file format that a CAD system could read. The CAD system will
then analyze the information and form the solid objects or motion paths for CNC
tools.
Reverse Engineering for Surface Generation
The capturing of data points over an unknown surface utilizing a Coordinate
Measuring Machine produces a data point cloud of XYZ values. The values
represent the ball center of the stylus attached to the CMM. Touch probes are
triggered devices that do not provide information as to where on the stylus ball the
actual tangent point of the surface contact occurred.
Therefore, utilizing the data cloud in reverse engineering requires that the CAD
system must perform an offset surface command before the final solid is created.
To assist the CAD system, Geomet offers controlled data point collection tools
and the exporting of fitted B-Spline Curves through the data points.
Helmel Engineering Products, Inc.
www.helmel.com
Geomet Training Handbook
www.geomet-cmm-software.com
11-2
Chapter 11 – Reverse Engineering
Summary of Reverse Engineering Tools:
Manual Free Scan - Capturing of discreet data point clouds utilizing manual or
DCC CMMs. Includes support for electronic touch and hard probes.
GeoTracer – Hard probe drag scanning used on manual CMMs.
Line Auto Scan - Single line capturing of data points under DCC control. The
motion path adjusts to perform surface following.
Radius Auto Scan - Radial path capturing of data points under DCC control. This
is designed to work on ends of cylinders where the path must follow a rim. This
tool does not perform a contour following during motion and is intended for flat
surfaces.
4 Point Boundary Surface Scan - Creates a flexible 4 corner boundary with
rows and columns of data points for surface area scanning. Exclusion zones can
be defined to eliminate areas where data points should not be captured such as
holes or other obstacles. The captured data points conform to an accurate
row/column pattern designed for accurate surface fitting. This tool will follow
surface contours.
Radial Boundary Surface Scan - Radial boundary scan is similar to the 4 point
boundary scan but uses inside and outside a diametric boundaries for the scanned
rows and columns.
Cardinal Spline Generation - A cardinal spline is a series of individual curves
between points joined to form a larger curve. The spline is specified by an array
of points and a tension parameter. A cardinal spline passes smoothly through each
point in the array; there are no sharp corners and no abrupt changes in the
tightness of the curve. By passing through every point, there are no missed points
that can cause errors when fitting a surface over the splines.
Exporting IGES Entities - Export tool used to create an IGES file useful when
sending data to a CAD system.
Helmel Engineering Products, Inc.
www.helmel.com
Geomet Training Handbook
www.geomet-cmm-software.com
11-3
Chapter 11 – Reverse Engineering
Choosing a Scan Method
Keystroke:
shift + ?
Menu:
Measure ⇒ Select Scanning Method
Geomet offers several tools for the capturing of data
clouds. To choose a scanning method select from the
available list in the “Choose Scan Method” dialog.
The Choose Scan Method dialog will configure
itself for the style of CMM you have. The chart
below lists the scan methods available for a given
CMM type.
Manual
Single Line Scan
Radial Scan
Boundary Contour Scan
Radial Contour Scan
Manual Free Scan
2D Surface Scan
3D Surface Scan
RPS Line Surface Scan
•
CMM Style
DCC
•
•
•
•
•
•
• (1)
UCC
•
•
•
•
•
•(2)
•(2)
UCC – Renishaw Universal CMM Controller.
1 – Requires the Laser Design RPS System.
2 – Designed for use with the Renishaw SP600 or SP25 Scanning Heads.
From the Choose Scan Method dialog, choose the scanning method to activate.
When you close the dialog with the <Ok> button, your keyboard key < / > will be
remapped to perform that scan.
Helmel Engineering Products, Inc.
www.helmel.com
Geomet Training Handbook
www.geomet-cmm-software.com
11-4
Chapter 11 – Reverse Engineering
Manual Free Scan
Keystroke:
/
Menu:
Measure ⇒ Perform Selected Scan
This method requires the operator to perform the actual capturing of data. It can
be used with manual or DCC CMMs. On DCC systems, the Motors must be
disabled.
Capturing a Data Cloud
The operator manually captures data points by making contact with the surface.
Points are entered either using an electronic touch probe, or depressing the foot
switch when using hard probes. The XYZ recorded data represents the ball center
of the stylus.
Controlling the Data Cloud
This method does not produce a controlled capture of data. It relies on the
operator to capture the data cloud in some uniform procedure. If capturing with a
manual CMM, it is helpful to lock an axis, such as the x-axis, and capture data
points moving in the Y direction. Then unlock the X-axis and reposition to a new
X location and repeat the process to create a new column of data.
Creating columns of data points will be easier to manipulate by a CAD system if
it is required to build a surface.
When sufficient data points have been captured, press the < F5 > function key to
record the data points.
Helmel Engineering Products, Inc.
www.helmel.com
Geomet Training Handbook
www.geomet-cmm-software.com
11-5
Chapter 11 – Reverse Engineering
GeoTracer
Menu:
Measure ⇒ GeoTracer
GeoTracer is one member of the Geomet Suite of Reverse Engineering Tools.
GeoTracer is designed to capture large data point clouds using a hard ball probe
by dragging the probe over a surface.
When activating the GeoTracer tool, you will be presented with a dialog there you
set the performance characteristics.
GeoTracer Setup Tool
Target Distance between Points:
The value entered becomes the length Geomet will use to establish the minimum
distance between data points. When GeoTracer is in motion, the CMM sends a
constant stream of data points to Geomet. The first data point captured will be
stored and all incoming data points will be compared to the first point until the
distance between points exceeds the target distance. Once that minimum distance
has been met, the second point will be captured and the process repeats itself.
Maximum Data Points per Line:
The value entered here will limit the size of a single data cloud that is stored as a
single feature. Once the data cloud size equals this value, Geomet will create a
new feature in the inspection report that contains the captured data points. Geomet
will then recycle the GeoTracer allowing you to continue capturing data without
stopping. The purpose of limiting your data cloud size is only for convenience to
limit how much data will be included in one feature.
Capturing Data with GeoTracer
When you close the GeoTracer parameter dialog, you will be prompted to capture
data points.
Helmel Engineering Products, Inc.
www.helmel.com
Geomet Training Handbook
www.geomet-cmm-software.com
11-6
Chapter 11 – Reverse Engineering
GeoTracer Probe Disabled Prompt
When the prompt appears, the capturing of the data points is suspended allowing
you time to move the CMM into position on your part. This is indicated by the
*** Probe Disabled *** statement next to the Current Status prompt.
When you are ready to capture data, press the <space bar>, or depress the optional
foot switch. Geomet will now capture data when you start moving your probe
across the part. Pressing the space bar again will cause Geomet to return to a
Disabled Probe state and create a feature with the captured data points.
Capturing Data with GeoTracer on DCC style CMMs
The GeoTracer tool can be used on DCC style CMMs as long as you disable the
motion drive system. To disable the motion drive system within Geomet, activate
the System Options <F9>, locate the “Enhanced Feature” page and remove the
check from “Enable DCC Motors”.
The Captured Data Cloud
The data points being captured will be the XYZ location of the probe ball center.
Since probes do not offer vector feedback informing the host measuring software
where the contact point was on the ball, a determination of surface points is not
possible. This condition can be corrected by exporting the data clouds to most of
the popular CAD software systems and then constructing a surface followed by
offsetting that surface by the probe radius.
Useful Tips
If your intent is to take the data clouds and export them to a CAD system, it is
helpful to organize how you capture the data clouds. Most manual CMMs offer
locking mechanisms on the X, Y and Z-axes. This allows you to lock one axis and
drag the probe over your part to form a single line of data points. When you reach
the end of your captured data point line, press the <space bar>, this will create a
feature in the inspection report. Next, remove the lock and move to a new location
and reset the lock repeating the drag operation to create a parallel set of data
points.
Performance Considerations using GeoTracer
The quality of the data points can be affected by the speed of the CMM while
capturing the data points. A CMM interface captures the XYZ scale values based
on a timed cycle. Some interfaces cycle 30 times or more per second, such as the
Helmel Engineering Products, Inc.
www.helmel.com
Geomet Training Handbook
www.geomet-cmm-software.com
11-7
Chapter 11 – Reverse Engineering
Helmel ProCounter series. At this cycle speed you will capture a consistent set of
data points while dragging your hard probe at normal speeds between 2" (51mm)
and 5" (127mm) per second which translates to capturing approximately 20-50
points per second.
If your CMM interface cycles at a lower rate, such as most interfaces on Direct
Computer Control (DCC) CMMs, the cycle can be slowed down to as little as 3
cycles per second. On this style CMM the actual reading of the XYZ scales is
performed by the motion controller and forwarded to the host measuring software
as a status update. At the slower cycle rate, the drag speed required to produce a
uniform set of data points must be reduced to speeds around 1" (25mm) per
second.
Should the drag speed be too fast the spread between data points will be greater
than the requested distance set in the GeoTracer Parameters. If you find
undesirable results in the spread of your data points, slow down the drag speed.
Helmel Engineering Products, Inc.
www.helmel.com
Geomet Training Handbook
www.geomet-cmm-software.com
11-8
Chapter 11 – Reverse Engineering
Line Auto Scan
Keystroke:
/
Menu:
Measure ⇒ Perform Selected Scan
This method requires that the operator establish a start point, an end point and a
start direction. From this data the CMM will perform a walking path which
adjusts in variations along the probing direction axis.
For example in the illustrations below, the raw data is shown on the left and a
fitted spline is shown on the right for a Line scan that was completed on a shaft
with a detailed cutout.
Raw Data Points
Fitted Spline
Establishing the Parameters for a Line Scan
Step 1 – Probe Direction
In the Build/Run Group, open the choices of
probe direction and choose one. This becomes
the direction for all data points within the
scan.
Step 2 – Setting the Endpoints
Set the start and stop endpoints. To do this,
press <Teach>. The system will prompt you to
Capture 2 endpoints. Under manual or joystick control, contact the part to
establish these limits.
Step 3 – Establishing the distance between points
Enter the Grid Distance in the Linear Scan Parameters Group. For example, if you
choose +X as your probe direction, the Grid Distance controls the Y direction
distance between points.
Helmel Engineering Products, Inc.
www.helmel.com
Geomet Training Handbook
www.geomet-cmm-software.com
11-9
Chapter 11 – Reverse Engineering
Step 4 – Building the motion path
Build the initial motion map through the use of
<Build Path>. The Line Scan Tool will report
the total number of points that will be captured
based on the current settings.
Adjustments can now be made to the motion
path. These adjustments include changing the
Grid Distance and the building of exclusion
zones.
To change the point density, enter a new value in Grid Distance and press <Build
Path> again. This will discard the existing motion path and compute a new one
based on the changed Grid Distance value. NOTE: Making a change to the Grid
Distance and then computing a new motion path will delete any existing exclusion
zones.
Step 5 – Capturing the data cloud
The system has sufficient data that you can now
capture the data points. Press <Execute> and
you will be prompted to proceed back to
endpoint #1 and press the <IP> button the on
Joystick controller when ready to proceed.
The system will start capturing data points and
adjust for surface deviation with every hit. For
example, if you are capturing data in the –X
direction, the system will calculate the change in X between the current and
previous data points. That deviation will be added to the next data point to allow a
contour-walking path.
Exclusion Zones
Exclusion Zones for Line Auto Scan are not active in this release!
Helmel Engineering Products, Inc.
www.helmel.com
Geomet Training Handbook
www.geomet-cmm-software.com
11-10
Chapter 11 – Reverse Engineering
4 Point Boundary Surface Scan
Keystroke:
/
Menu:
Measure ⇒ Perform Selected Scan
The Boundary Surface Scan Tool is designed to
capture uniform row and column conforming data
point clouds while probing in the –Z direction. The
Scan Tool will “walk” the surface adjusting its Z
probing height between data points allowing data
clouds to be built on complex surfaces.
To enhance the scan capabilities, exclusion zones
can be added which will direct the motion path
generator to eliminate data points over areas you wish excluded from the surface.
Step 1 - Defining the boundary of the scan area
The Boundary Surface Scan Tool defines the boundary of the scan area as having
four straight sides, shown here are some examples:
Acceptable
Acceptable
Acceptable
Not Acceptable
The shape of the enclosed area is flexible, however
there is one rule the shape must follow. That
example can be seen in the right image where one
end point is inside a straight line drawn between its
adjoining corners. The Boundary Surface Scan
Tool will test for this condition and prompt you to
correct it.
To begin the capture process, press the <Teach>
button. You will be prompted to capture the 4 data
points. Upon completion, you will see the prompt
“The Boundary definitions have been established. To continue, press <Build
Path>.”
Helmel Engineering Products, Inc.
www.helmel.com
Geomet Training Handbook
www.geomet-cmm-software.com
11-11
Chapter 11 – Reverse Engineering
Step 2 – Establishing the grid density
Ensure the Grid Distance value has the proper
data point density value you want to scan. This
Grid Distance is the distance between columns
and rows.
Step 3 – Building the Motion Path
Build the initial motion map through the use of
<Build Path>. The Scan Tool will report the
total number of points that will be captured
based on the current settings.
Adjustments can now be made to the motion path. These adjustments include
changing the Grid Distance and the building of exclusion zones.
To change the point density, enter a new value in Grid Distance and press <Build
Path> again. This will discard the existing motion path and compute a new one
based on the changed Grid Distance value. NOTE: Making a change to the Grid
Distance and then computing a new motion path will delete any existing exclusion
zones.
Step 4 – Exclusion Zones
One very important feature of the Scan Tool is the ability to eliminate areas
within the defined scan boundaries. A common example might be a hole through
the surface you are scanning. There are two types of Exclusion Zones available.
Diameter Exclusion Zone: This tool works
well to define exclusion zones around holes.
Building a zone starts by pressing the <Teach
Dia> button which prompts you to capture data
points around the area to exclude.
When you have captured sufficient points, press
the terminate key, <F5>. The scan tool will
calculate the exclude area and determine the
number of data points that will be excluded.
Press <Remove> to complete the exclusion.
Confirm Removal of Data Points
Helmel Engineering Products, Inc.
www.helmel.com
Geomet Training Handbook
www.geomet-cmm-software.com
11-12
Chapter 11 – Reverse Engineering
4-Point Boundary Exclusion Zone: This
exclusion zone shape has the same
characteristics as the boundary definitions
in Step 1. To build the zone, press
<Teach4Pt> and then capture the 4 data
points.
After the last point was captured, The scan
tool will calculate the exclude area and
determine the number of data points that
will be excluded. Press <Remove> to
complete the exclusion.
The surface may require several exclusion
zones to be defined. You can create as
many exclusion zones as necessary to build
a proper scan.
Step 5 – Establish a Clipping Plane
If you require your scan boundary to extend beyond the surface, setting a Clipping
Plane will help clear unwanted data points. Here we have an example of a scan
that was done on a fan blade assembly. The boundary extended beyond the fan
and included the surface plate the fan was positioned on.
Clipping Plane Active
Clipping Plane Not Active
The added data points on the surface plate would interfere with spline operations
and result in poor surface generation by CAD systems.
To establish a Clipping Plane, press <Clipping Plane>. You will then capture one
data point on the surface that you want excluded from the final data cloud. During
the scan process, each captured point will be evaluated and if it has a Z value
equal to, or below, the Clipping Plane, if it does it will be discarded.
Helmel Engineering Products, Inc.
www.helmel.com
Geomet Training Handbook
www.geomet-cmm-software.com
11-13
Chapter 11 – Reverse Engineering
Step 6 – Use Z Clearance Height
The motion required to perform surface following by the scan tool involves the
comparing the Z component of the current data point to the previous data:
Zdelta = Zcurrent pt – Zprevious pt
That difference is then added to the next data point to be scanned.
Znext pt = Zcurrent pt + Zdelta
This is the simple explanation of contour following tool, there are other filters and
controls in place to enhance the surface following capabilities.
The Z Clearance Height setting takes over the Z component adjustment formula
and builds the motion path by using a constant Z height. Using the fan blade as an
example, the step from the surface plate to the upper edge of the blade was over
1.25”. The CMM would approach this large step and crash.
Using the Z Clearance Height, you would set the height sufficient to clear the
entire fan, then every data point would retract to that height before proceeding to
the next data point assuring full clearance for all steps.
Step – 7 Stand Off and Over Travel
From the drop down menu, choose [DCC Settings ⇒ Standoff Distance]. The
standoff distance should be sufficient to clear any vertical steps on the surface.
Under [DCC Settings ⇒ Over Travel Distance], should be sufficient to drop off a
vertical step and still locate the data point.
Step 8 – Execute
To begin the scanning operation, press <Execute>. The system will prompt you to
position the CMM over the first data point in the motion path. When you have the
CMM in that position, press the <IP> button on the joystick controller. Depending
upon whether the Z Clearance Height is in effect will determine how the scan
operation will take place.
Option 1: When using the Z Clearance Height, the motion is predetermined for
the entire scan operation and is downloaded into the motion controller as one
large block of instructions. The Run Tools Group will be disabled during the
scanning operations.
Helmel Engineering Products, Inc.
www.helmel.com
Geomet Training Handbook
www.geomet-cmm-software.com
11-14
Chapter 11 – Reverse Engineering
Option 2: When using the contour following mode, The
motion is sent down to the motion controller one point at
a time. This allows the calculation to be done between
points for contour following. The Run Tools Group will
be activated.
<Pause>: Causes the scanning operations to stop after
the current point has been captured. While stopped,
changes can be made to Standoff and Over Travel
distances.
<Complete>: This command is available when scanning
operations have been stopped by the Pause command.
Builds a data cloud record, inserts that record into the
inspection report and completes all scanning operations.
You can not continue scanning operations after a Complete has been issued.
<(Re)Start>: Available while scanning operations has been stopped by the Pause
command. Pressing this button will display three choices. <Restart Feature>
which will discard the current data point cloud and instruct you to move over the
first data point and restart scanning operations. <Continue> will resume scanning
operations from the current position. <Cancel> closes the (Re)Start Dialog
without taking any action.
Helmel Engineering Products, Inc.
www.helmel.com
Geomet Training Handbook
www.geomet-cmm-software.com
11-15
Chapter 11 – Reverse Engineering
Radial Boundary Surface Scan
Keystroke:
/
Menu:
Measure ⇒ Perform Selected Scan
The Radial Boundary Surface Scan Tool is
designed to capture uniform row and column
conforming data point clouds while probing in the
–Z direction. The Scan Tool will “walk” the
surface adjusting its Z probing height between data
points allowing data clouds to be built on complex
surfaces.
The Radial Boundary Surface Scan Tool behaves exactly like the Boundary
Surface Scan Tool described in the previous section. The differences between the
scan tools are the shape of the boundary. This scan tool has a circular boundary
area.
Step 1 - Defining the boundary of the scan area
To define the boundary, select <Teach>. You will
be prompted to capture points along the perimeter
of the scan area. When you have captured 3 or
more data points, press the Terminate key, <F5>.
The scan tool will calculate the diameter and
position then populates the cells in the Radial Scan
Parameters Group with the results.
Step 2 through Step 8
Refer to the previous section, Boundary Surface
Scan for full explanation.
Helmel Engineering Products, Inc.
www.helmel.com
Geomet Training Handbook
www.geomet-cmm-software.com
11-16
Chapter 11 – Reverse Engineering
Understanding the Data Cloud Structure
Data clouds produced by the 4-Point and Radial Boundary Scan Tools are built on
a Row and Column structure that is aligned with the Machine Coordinate System.
As shown below in the left example, we are looking directly over the data cloud
that was taken on a sphere. The rows and columns are consistent and aligned with
the X and Y-axes of the CMMs natural movement. The example on the right
shows the same data cloud rotated to show the Z-axis height.
Viewed from +Z
Viewed from +X, -Y, +Z
Another example is a close-up of the fan blade shown on page 10-13. When
viewed from +Z, the rows and columns are again uniform.
Fan Blade
The result of building uniform rows and columns allow for simple building of
splines and surfaces when imported into CAD system.
Helmel Engineering Products, Inc.
www.helmel.com
Geomet Training Handbook
www.geomet-cmm-software.com
11-17
Chapter 11 – Reverse Engineering
Cardinal Spline
A cardinal spline is a series of
individual curves between points
joined to form a larger curve. The
spline is specified by an array of
points and a tension parameter. A
cardinal spline passes smoothly
through each point in the array; there
are no sharp corners and no abrupt
changes in the tightness of the curve.
By passing through every point, there
are no missed points that can cause
errors when fitting a surface over the
splines.
The tension of a cardinal spline
determines the fitting of each curve
section in regards to the data points.
The range for the tension value is 0.0
to 1.0 where 1.0 would deliver
straight lines between the data points
and 0.0 would produce the most
flexible curves fitted through each
data point.
Starting the Cardinal Spline Tool
The Cardinal Spline feature works on data clouds captured through the various
scanning methods available in Geomet. To activate the feature, locate the data
cloud feature in the inspection report and highlight it using the left click of the
mouse. Then right click to bring up the sub menu. Locate [Cardinal Spline] in the
list and click on it.
Helmel Engineering Products, Inc.
www.helmel.com
Geomet Training Handbook
www.geomet-cmm-software.com
11-18
Chapter 11 – Reverse Engineering
Setting the Cardinal Spline Parameters
Cardinal Spline Setup Tool
There are three parameters used to tune the fitting process for splines. These are:
Tension, Grid Distance and Location Filter. Understanding these parameters will
greatly enhance your success in creating splines from data points.
Tension Parameter
This value controls how the spline is fitted between the data points. The valid
range is 0.0 to 1.0 where 0.0 produces the largest radius between data points and
1.0 will produce straight lines between data points. We recommend that 0.0 be
used as a default.
Grid Distance
This is the setting used when the original data points were scanned. Geomet
carries it over from the scanning operation. However, on earlier Geomet systems,
this value was not included in the original scan features and should be entered
manually.
When applying Cardinal Splines to data clouds that do not conform to a uniform
row / column configuration, undesirable results may occur. In this condition,
Geomet allows the selection of "Create Single Curve" and "Force Fit" which is
explained later in this document.
Helmel Engineering Products, Inc.
www.helmel.com
Geomet Training Handbook
www.geomet-cmm-software.com
11-19
Chapter 11 – Reverse Engineering
Location Filter
Geomet starts building rows and columns first by sorting the data points into row
and column order. The location filter is applied when Geomet moves down a
column and ‘looks’ for the next data point. For example: if the column has a start
point with a "Y" value of 1.000", it would look down the column and expect to
find the next point also with a "Y" value near 1.000". Since scanning operations
do not deliver exact position, the data point under the start point might have a "Y"
value of 1.012". The Location Filter is a factor of the grid distance where 0.15
would yield a search zone of 0.15 * Grid Distance (0.15 * 0.05 = .0075). This
value determines the zone around the original "Y" value of 1.000" and the column
sorting would not include the next point at 1.012.
In data clouds that have well-defined row and column structures, the Location
Filter can be low, such as 0.25. In poorly defined patterns, use a value between
0.5 and 0.9.
When the value is set too high, the splines created can "jump" to neighboring
points from other columns.
Spline Fitting and Display Options
Under the group designated as "Spline Fitting and Display Options", you can
establish the spline methodology and fitting behaviors.
Create Single Curve
This option will take all your data points without regard to rows and columns and
fit the curves through each point in the same order as the points were captured.
This option is designed to work with data points captured with GeoTracer where
you capture data points in a line with distinct start and finish end points. When
this option is checked, the display and export of one spline for this feature will
occur.
Rows / Columns
Row and Column selections are available when Single Selection is not chosen.
They are designed to work with data points gathered under the automatic scanning
tools in Geomet. These scanning tools capture the data points in organized Row
and Column formations that can be extracted to deliver uniform splines. When
selecting Row and/or Columns, Geomet will attempt to build straight lines in the
XY plane of the captured data points. Then rows and columns are extracted and
used to form the splines. It is important that these rows and columns are organized
in controlled positions. See Setup Parameters above.
Helmel Engineering Products, Inc.
www.helmel.com
Geomet Training Handbook
www.geomet-cmm-software.com
11-20
Chapter 11 – Reverse Engineering
Force Fit
This option is used when Rows and Columns are active. When calculating, some
data points might be skipped if they do not fall within the parameter settings. This
can cause a row to contain 2 or more splines. When selecting Force Fit, all data
points identified in the row or column will be used to fit one spline. Another use
for Force Fit is when there were exclusion zones used in data point scanning. This
will fit the spline over the exclusion zone.
Closed Path
When this option is checked, Geomet will attempt to close the path from the last
data point to the first.
Data Point
When selected, this option will display the complete set of data points in addition
to any splines selected for showing.
Export Options
These options, combined with Spline Fitting and Display Options control the
export characteristics. The selections of Row and Column for export are available
when Create Single Curve is NOT selected. NOTE: selecting Row and Columns
in the Display group does not automatically create exported rows and
columns!
NOTE: Cardinal Splines is exported in the IGES format only!
Rows
This selection will create and export splines derived from the data points that
conform to rows. The rows exported are controlled by the selections of Force Fit
and Closed Path.
Columns
This selection will create and export splines derived from the data points that
conform to columns. The columns exported are controlled by the selections of
Force Fit and Closed Path.
Data Points
This selection will export the data cloud in addition to any row and column
selection already made.
Helmel Engineering Products, Inc.
www.helmel.com
Geomet Training Handbook
www.geomet-cmm-software.com
11-21
Chapter 11 – Reverse Engineering
Executing the Cardinal Spline
Once the parameters have been set, highlight from the list of data clouds the
features you want the Cardinal Spline function to work with. Process the request
by press <Ok> to build the Cardinal Splines.
Captured Data Points
Fitted Cardinal Splines
The illustration above shows the application of Cardinal Spline to a raw set of
data points that have been captured with Radial Boundary Contour using a grid
spacing of 0.020".
Removing Cardinal Splines
To remove the Cardinal Splines from a feature, highlight the feature and press the
<Remove Spline> button.
Helmel Engineering Products, Inc.
www.helmel.com
Geomet Training Handbook
www.geomet-cmm-software.com
11-22
Chapter 11 – Reverse Engineering
Exporting
Menu:
File ⇒ Export ⇒ Export
Geomet can export features and data points in three formats.
ASCII and DXF: Exports data point clouds and 3D Point entities. On features,
such as a circle, only the data points used to calculate the feature would be
exported.
IGES: This format exports all features based on the following table.
Summary of IGES Supported Features
Type
Definition
Circular Arc Entity
100
Conic Arc Entity
104
Plane Entity
108
Line Entity
110
Point Entity
116
Rational B-Spline Curve Entity
126
Rational B-Spline Surface Entity
128
Trimmed (Parameteric) Surface Entity
144
Sphere Entity
158
Plane Surface Entity
190
Spherical Surface Entity
196
Edge Entity
504
Loop Entity
508
Face Entity
510
Helmel Engineering Products, Inc.
www.helmel.com
Geomet Training Handbook
www.geomet-cmm-software.com
11-23
Chapter 11 – Reverse Engineering
Exploring the Export Tool
The Export Tool displays a feature list of your current inspection. This list can be
sorted between Part Number or into common feature groups such as Circle and
Planes.
Sorted by Feature Number
Sorted into Groups
Selecting by Groups
Selecting Features for Exporting
Selecting features can be done in a random fashion or by using <Select All>.
When sorted by Feature Number, the selection process is accomplished on a
feature-by-features basis by placing a check next to the feature. When sorted by
Groups, the selection process can be done on a single feature basis by expanding a
group using the < + > button and checking the feature. To select all features
within a group, place a check next to the group name.
Setting the Decimal Precision
Setting the precision is done through the <Configure> button. Always set a
reasonable precision that will allow a well-defined exported feature. The default
for this value is 5.
Basic Export
With the selection of features, you can now proceed
to the export function. Press <Export> and the
standard Windows Save-As dialog will appear.
Locate the folder and assign a file name to your
export and press <Save>.
Helmel Engineering Products, Inc.
www.helmel.com
Geomet Training Handbook
www.geomet-cmm-software.com
11-24
Chapter 11 – Reverse Engineering
Enhanced Export Tools
There are two options available that will enhance the
exporting of features. These options control the Part
Coordinate System during the export process.
Under normal conditions, all features are exported in the
original position within the CMM envelope, commonly
referred to as the Machine Coordinate System. All
features will retain the position and orientation to other
features and in most cases this is sufficient. However, you
may want to export into a specific PCS making the
position and orientation local to the inspected part.
Specify Target PCS: This option allows a PCS to be specified that all features
would be projected into. This is commonly used when you want a coordinate
system locally on your part. When exported the misalignment to the MCS is
removed and the exported features are aligned true to the selected PCS.
Merge into Target: This option allows merging of all features that were
originally built in other PCSs into a common PCS for export. The result is an
assembly that can combine all features into a single file. Those features may have
been measured on the side, bottom or any orientation on the part.
Helmel Engineering Products, Inc.
www.helmel.com
Geomet Training Handbook
www.geomet-cmm-software.com
11-25
Appendix 1 – Technical Notes
Technical Notes
Curved Surface Measurement with Vector Point .................... App 1 - 2
Multi-Point Feature and CMM Inherent Errors ....................... App 1 - 9
Helmel Engineering Products, Inc.
www.helmel.com
Geomet Training Handbook
www.geomet-cmm-software.com
App 1-1
Appendix 1 – Technical Notes
Curved Surface Measurement with Vector Point:
Applies to: Geomet 101 with GeoPlus, Geomet 301, GeoCAD.
Last updated: Friday January 07, 2005.
NOTICE
Information contained within this document is subject to change without notice.
No part of this document may be reproduced or transmitted in any form or by any
means, electronic or mechanical, for any purpose without written authorization
from Helmel Engineering Products, Inc.
This document contains proprietary subject matter of Helmel Engineering
Products, Inc. and its receipt or possession does not convey any rights to
reproduce disclose its content or to manufacture, use or sell anything it may
describe. Reproduction, disclosure or use without specific written authorization of
Helmel Engineering Products, Inc. is strictly forbidden.
© Helmel Engineering Products, Inc. 1985 - 2006. All right reserved.
GEOMET®, MICROSTAR® are trademarks of
Helmel Engineering Products, Inc.
Helmel Engineering Products, Inc.
www.helmel.com
Geomet Training Handbook
www.geomet-cmm-software.com
App 1-2
Appendix 1 – Technical Notes
Introduction
Technical Note #1 - Curved Surface Measurement with Vector Point
First Published January, 21, 1987
Dr. Jon M. Baldwin - Vice President Geomet Systems,
a wholly owned division of Helmel Engineering Products, Inc.
Edited October 14, 2003 - Edward R. Yaris - Software Development Manager,
Helmel Engineering Products, Inc.
Why Have Vector Point on Manual Coordinate Measuring Machines?
The answer to this question is simple and short. It provides a capability for
manual CMMs in an area normally considered to be the exclusive province of
computer controlled CMMs, namely the inspection of profiles on simple (2D) and
compound (3D) curved surfaces without the use of sharply pointed probes.
Granted, the measurement process involves iteratively homing in on a target
location and thus can be tedious, but it is no more so than techniques that do use
pointed probes with all their disadvantages and dangers. A computer controlled
CMM capable of driving accurately along a specified vector to a specified target
is obviously the instrument of choice to solve this problem but is often not
available or is too expensive to justify for the occasional application; thus there
has been interest in providing this capability on manual CMMs.
Statement of the Problem
The nature of the problem to be solved is easily seen by referencing the figure
below, which, for simplicity shows a 2D example. The problem and its solution in
3D are identical, being merely complicated by the need for a proper probe radius
correction in space rather than in the plane.
figure 1 - Vector Point Problem
Helmel Engineering Products, Inc.
www.helmel.com
Geomet Training Handbook
www.geomet-cmm-software.com
App 1-3
Appendix 1 – Technical Notes
Shown in the figure is a nominal surface, n, along with the actual part surface, a,
and allowed profile limits, +t and –t. We wish to determine, at selected points, the
deviation of the actual surface from the nominal. Two pairs of axes, x and y, of
the machine coordinate system (MCS) and x1 and y1, of the part coordinate
system (PCS) are shown. Ideally, we would use a spherical probe and approach
the nominal point to be inspected, Pn, along the nominal normal vector, v.
Assuming the probe radius and errors in the actual surface both are small
compared to the radius of curvature at Pn, the probe would contact the actual
surface at point Pa, also along the normal vector v, the probe center would also
fall along v and the probe radius correction and thus the deviation of the actual
surface from ideality could be simply computed. This is, in fact, what is done
when one takes this measurement with a computer controlled CMM having vector
drive capability.
We will note in passing that the inspection requirement may call for reporting
either the total deviation, d, along the normal vector or its component, dy, parallel
to the part coordinate system (PCS) axis most nearly perpendicular to the surface.
This has no effect on the measurement process, but we will return to this matter
later on. We will also note in passing that the first assumption made above,
namely that the probe radius is small compared to the radius of curvature of the
part surface, is not particular to the manual CMM problem but applies as well to
at least some curved surface measuring algorithms designed for use with
motorized vector drive CMMs.
If we try this same measurement with a manual CMM we find that since the
CMM is not easily moved along the specified normal vector with any degree of
accuracy we have trouble making even the point of contact with the nominal
surface, never mind the point of contact with the actual surface, fall as it should.
Helmel Engineering Products, Inc.
www.helmel.com
Geomet Training Handbook
www.geomet-cmm-software.com
App 1-4
Appendix 1 – Technical Notes
A Solution to the Problem – Normal Vector Point
figure 2 – Approach Direction
figure 3 – Manual CMM
The only axis along which we can accurately drive on a manual CMM is one of
the MCS axes, see figure 3, so we will begin with that. Since we know the radius
of the measuring probe, it is easy to calculate a two dimensional location in the
MCS, to which we can drive the probe and, having locked the CMM axes on this
target, drive along the third CMM axis such that the first point at which the probe
contacts the nominal surface will be Pn.
Referring to figure 2, we are not out of the woods yet. Even if we are successful
in arriving at the desired point Pn on the nominal surface, we find that if the
actual surface is not ideal we will miss Pa and so will, in general, report an error
greater than actually exist. To illustrate, let us assume we have computed a target
point on an MCS axis as indicated above. We will generally want to move along
the MCS axis most nearly perpendicular to the surface and it does not really
matter how far away from the part we begin. We simply lock two of the machine
axes and approach the part surface along the vector labeled "approach axis",
arriving at the nominal location of the surface with the probe center and the
nominal contact point, Pn, both lying on the nominal normal vector, v. However,
we have yet to contact the actual surface, so we proceed further along the
approach axis until contact is made at point Pa1. Obviously, we have not ended
up exactly where we would like to be. We were hoping to get to point Pa and then
the sought-for-error would have been simply Pa-Pn, but we have missed. The
error is not anything we could have compensated for ahead of time since it is a
function of the actual surface location, a thing we were totally uninformed about
until just this minute. We now have some, rather limited, knowledge about the
actual location of the surface and can use that knowledge to refine our approach.
As a device to evaluate the extent to which we have accomplished the desired
objective, namely, to arrive at the actual surface with both the probe center and
the contact point on the normal vector, we will introduce the concept of the
probing error. The probing error will be defined as the normal distance from the
ball center at contact and the nominal normal vector, v, and is shown as e1 for the
Helmel Engineering Products, Inc.
www.helmel.com
Geomet Training Handbook
www.geomet-cmm-software.com
App 1-5
Appendix 1 – Technical Notes
first probing in Figure 2. We would compare e1 to some predetermined
acceptable value which we will call the probing error limit, e. (In the actual
implementation of vector point, a value for e =(+t + 1 - t1) / 5 is suggested but
may be changed by the user).
If e1 <= e then the attempt to measure the desired target point is considered to
have been successful and the measurement results are printed.
If e1 > e the value of e1 is displayed and the user is given the option to accept the
results or to attempt further refinement of the probing location. The new approach
is generated by projecting the current probe center location back onto the nominal
normal vector, v, to get a refined estimate of where we want the probe to be at the
time it contacts the actual surface. The machine axis vector passing through this
new point becomes the new approach axis, along which a new 2D target is
calculated, and the process is repeated to give a new point of contact, Pa2, and
associated probing error, e2. The process may be repeated indefinitely until either
the probing error limit criterion is satisfied or the user decides the disparity
between the actual and nominal surfaces is so large that the probing error limit
will always be exceeded.
The final contact point, in this case Pa2, is projected onto the normal vector, v,
and the distance, da2, along v from Pn to Pa2 is taken as the final estimate of the
normal deviation of the surface from its ideal location.
Helmel Engineering Products, Inc.
www.helmel.com
Geomet Training Handbook
www.geomet-cmm-software.com
App 1-6
Appendix 1 – Technical Notes
Paraxial Vector Point
The foregoing discussion was concerned with the
situation wherein the deviation is to be measured
along the direction of the nominal normal to the
surface at the target location. This is referred to,
naturally enough, as the normal deviation case. It
is also possible to encounter the situation where
the deviation to be taken in parallel to the PCS
axis that is most nearly perpendicular to the
nominal surface. We will refer to this as the
paraxial deviation case. The computations are
only slightly more complicated and are illustrated
in Figure 4.
figure 4 – Paraxial Vector Point
Once again, the nominal target point, Pn, is
defined in terms of its coordinates in the PCS and
of the nominal normal vector, v, to the surface at that point. The definition of the
initial approach axis is identical to the normal deviation case. The final objective
is different. We now wish to have the probe arrive at the actual surface such that
the contact point, P, lies along a vector, z’, that is parallel to the PCS axis most
nearly parallel to the nominal normal vector, v, and that passes through Pa. Once
again, since the surface is not ideal, the probe actually makes contact at Pt1, a
point we cannot locate exactly but must estimate. We can do this by making an
approximate correction for the probe radius parallel to the nominal normal vector
to get point Pa1. We can calculate a probing error, e1, by first constructing a
plane tangent to the probe and passing through Pa1 then intersecting that plane
with z’ to get point Pz1. The probing error e is the distance from Pa1 to Pz1.
Assuming that e1 > e and that the user elects to refine the measurement, a new
approach axis is constructed parallel to the first but passing through the probe
center location that corresponds to placing the probe surface at Pz1. Approaching
the actual surface along this (machine) axis results in a contact at Pt2, and
estimated contact at Paz and an improved probing error, e2. If this probing error
is judged small enough, the paraxial deviation, da2, is reported parallel to z’.
Helmel Engineering Products, Inc.
www.helmel.com
Geomet Training Handbook
www.geomet-cmm-software.com
App 1-7
Appendix 1 – Technical Notes
Experimenting with Vector Point
Before you get too serious about using vector point in a real application, it may be
helpful to you to play with it a bit. One easy way to do this is to use the reference
sample files found in the Geomet web site at:
http://www.geomet-cmm-software.com
Navigate by following the links:
Knowledgebase ⇒ Measured Features ⇒ Point
Choose Vector Point from the Feature Measurement Point Types. Following that
link, choose Method 5 – Vector Point Import. There are several examples to
follow to help in understanding the application of Vector Points on DCC and
manual style CMMs.
Helmel Engineering Products, Inc.
www.helmel.com
Geomet Training Handbook
www.geomet-cmm-software.com
App 1-8
Appendix 1 – Technical Notes
Multi-Point Feature and CMM Inherent Errors:
Applies to: All Levels of Geomet
Last updated: Monday December 13, 2005.
NOTICE
Information contained within this document is subject to change without notice.
No part of this document may be reproduced or transmitted in any form or by any
means, electronic or mechanical, for any purpose without written authorization
from Helmel Engineering Products, Inc.
This document contains proprietary subject matter of Helmel Engineering
Products, Inc. and its receipt or possession does not convey any rights to
reproduce disclose its content or to manufacture, use or sell anything it may
describe. Reproduction, disclosure or use without specific written authorization of
Helmel Engineering Products, Inc. is strictly forbidden.
© Helmel Engineering Products, Inc. 1985 - 2006. All right reserved.
GEOMET®, MICROSTAR® are trademarks of
Helmel Engineering Products, Inc.
Helmel Engineering Products, Inc.
www.helmel.com
Geomet Training Handbook
www.geomet-cmm-software.com
App 1-9
Appendix 1 – Technical Notes
Introduction
Technical Note #2 - Multi-Point Feature Inherent Errors
Published October, 14, 2003
Edward R. Yaris - Software Development Manager,
Helmel Engineering Products, Inc.
Commonly found Errors
•
•
•
•
CMM Calibration Errors
Probing Errors
Operator Influences
Data Point Spread
System Errors
In all multi-point features, the ability to report accurate and repeatable results are
subject to the quality of the gathered data points. Influencing your measured
results will be the stacking of inaccuracies within your measuring system
generated by the commonly found errors listed above.
Coordinate Measuring Machine
Scale Error
The CMM has inherent inaccuracies such as axial linear error and mechanical
limitations on squareness, parallelism and perpendicularity. Every CMM has a
scale attached to each axis of movement. This scale can be a mechanical / optical
or laser configuration. In the case of a mechanical / optical there exists positioning
error which CMM manufacturers will attempt to compensate for through
hardware or software.
For example when a scale is installed, it will be compared to a master scale or
laser. The CMM will be positioned along the scale at different points and the
reported position will be compared to the master. If the position reported by the
laser was 10.00000 and the CMM reported 9.99875 The difference will be the
linear inaccuracies of the scale at that position. In a single linear compensation, a
scale factor will be applied to the CMM’s position feedback to correct for the
error. However, this method of compensation works with the overall average and
does not correct for local inaccuracies along the scale.
Helmel Engineering Products, Inc.
www.helmel.com
Geomet Training Handbook
www.geomet-cmm-software.com
App 1-10
Appendix 1 – Technical Notes
Single Variable Linear Scale Compensation
Figure 1 demonstrates the Position Error measured compared to a Master Scale or
Laser. The scale along the left side illustrates the deviation error.
figure 1, Original Position Error
figure 2 – Single Linear Compensation
After single line compensation has been applied the deviation error has been
minimized to create a more accurate position.
One limitation in single line compensation is that the variances along the scale
can not be individually removed. Therefore the single line compensation method
only averages out the entire scale without regard to multiple position errors. When
the CMM is positioned along the scale, some error characteristic will still be built
in.
Non-Linear Scale Compensation
Another method to minimize scale-positioning error is the Non-Linear method.
This method builds a table of compensation values that can be measured and
created along the various undulations along the scale. It requires that the CMM
has a reproducible home position for all axes. The chart below illustrates a nonLinear method applied to the same scale shown above. The error has been reduced
further.
figure 3, Non-Linear Compensation Applied
As with any linear compensation method, if the scale is not mapped out over
every position, then an error will always be present influencing your results.
Helmel Engineering Products, Inc.
www.helmel.com
Geomet Training Handbook
www.geomet-cmm-software.com
App 1-11
Appendix 1 – Technical Notes
Mechanical Intrinsic Accuracy
The next error that a CMM can have is called intrinsic accuracy, the mechanical
accuracy of the CMM. These include Squareness, Perpendicularity and
Parallelism of the structure of your CMM. If the X-axis is not perpendicular to the
Y-axis, then when the probe is moved along the X-axis a deviation in Y will
occur. To test for this, place a certified square down on the CMM base. Place a
.0001” or better indicator on the probe bar and lock the Z and X-axes from
moving. Move the CMM in the Y-axis with the Indicator in contact with the
square. Set the square edge parallel with the Y-axis travel until no movement is
shown on the indicator. Unlock the X-axis and reposition the indicator so it
contacts the square and lock the Y-axis. Move the indicator along the X-axis and
you should not see movement on the indicator dial.
Repeat this procedure in the front and back location on your CMM to ensure the
X to Y-axis relationship is perpendicular thoughout the measuring envelope. An
additional test would be to raise the square to the highest point within your
measuring cube and repeat the procedure.
Should you see a deviation, then your CMM is not square in the XY plane. Any
measurements taken will have an inherent inaccuracy.
The Z-axis should be perpendicular to the CMM base. To test this, place a .0001”
or better indicator on the probe bar. Place a certified square on the CMM base
with the surface parallel to the Y-axis. Lock your X and Y-axis with the indicator
in contact with the square. Move your Z-axis up and down, you should not see
any movement on the indicator. Now repeat the test with the surface of the square
parallel to the X-axis.
Should you see a deviation, then your CMM is not square in the ZX and / or YZ
plane. Any measurements taken will have an inherent inaccuracy.
Helmel Engineering Products, Inc.
www.helmel.com
Geomet Training Handbook
www.geomet-cmm-software.com
App 1-12
Appendix 1 – Technical Notes
Ball Bar Test for CMMs
One method to accurately evaluate axis to axis relationships is found in the
B89.4.1, Methods for Performance Evaluation of Coordinate Measuring Machines
published by ASME International. This Standard establishes requirements and
methods for specifying and testing the performance of coordinate measuring
machines (CMMs) having three linear axes perpendicular to each other and up to
one rotary axis positioned arbitrarily with respect to these linear axes. In addition
to clarifying the performance evaluation of CMMs, this Standard seeks to
facilitate performance comparisons among machines by unifying terminology,
general machine classification, and the treatment of environmental effects.
The Ball Bar consists of a temperature-stabilized bar with two high precision
spheres mounted at each end, see figures 4 and 5. The length between the spheres
is not necessary to be known. In the B89.4.1 specification there is a recommended
length based on the size of the CMM. The Ball Bar is positioned within the
measuring area of the CMM in 28 different positions as described in ASME
B89.4.1.
figure 4, Ball Bar Test Set
figure 5 – Shown in Evelated State
The process of gathering data involves the measuring of each sphere and
calculating the direct line distance between them. One advantage of this method
over other methods, such as a step gage, is the averaging effect of the probe lobe
errors. In any given direction around the traditional touch probe, there exists a
lobing error that can be measured, but not effectively removed from a feature
calculation. By capturing data points evenly around the sphere, the lobe error
variations are not removed, but averaged out to obtain a closer size and location
reporting of the actual sphere.
Helmel Engineering Products, Inc.
www.helmel.com
Geomet Training Handbook
www.geomet-cmm-software.com
App 1-13
Appendix 1 – Technical Notes
Once all 28 positions have been calculated, they can be entered in an Excel
spreadsheet. The average of all 28 positions is first obtained and a companion
column of actual - average is calculated. These values are then plotted, as shown
in figure 6.
figure 6, Ball Bar Results
The Maximum and Minimum values are found from the deviation column. The
spread between these values is considered the working tolerance. This value is
often reported as the volumetric accuracy of a CMM. It should be noted that the
length of the ball bar is often a small fraction of the actual measuring area.
Therefore, the reported working tolerance only reflects the area the cubic size of
one ball bar length in the X, Y, and Z and should not be used to define the entire
CMM.
figure 7, X / Y Squareness Deviation
In figure 7, we can visualize how to interpret the Ball Bar tests. We can see the
direct effect of a squareness deviation of the X versus Y-axis. The measured
distance of the lengths, d1 and d2, should be equal when the CMM has been
properly setup. As the illustration shows, d1 being greater than d2 which
demonstrates that the relationship between the X and Y-axis are not
Helmel Engineering Products, Inc.
www.helmel.com
Geomet Training Handbook
www.geomet-cmm-software.com
App 1-14
Appendix 1 – Technical Notes
perpendicular. When properly interpreted by a trained calibration engineer, all 28
positions will effectively provide a picture of the intrinsic characteristics of your
CMM.
Many CMM manufacturers have abandoned building intrinsic accuracy in favor
of 3D software compensation. This allows building of a CMM with little attention
to the accuracy of the assembly. The accuracy is acomplished by mapping the
CMM with a known standard, such as a laser, then providing 3D compensation
algorithms to correct the inherent errors. However using only a laser does not
remove all the inherent inaccuracies within the entire measuring cube.
There is no correct answer as to which method delivers a more accurate CMM. In
both cases, the ability to perform field calibrations often becomes an economic
cost the user must absorb. To perform a field calibration by mapping the CMM
with a laser system is a higher cost than adjusting for intrinsic accuracy.
Probe System Errors
Every probe system introduces inaccuracies to
your data point gathering. These include capture
speed, lobe errors, stylus lengths and probe
contact pressure. Understanding the errors within
the probe system can be very difficult. Most
electronic touch probes have no index position
when installed on a CMM and can rotate to a new
location moving the lobe error. Additionally,
electronic touch probes are a simple switch and
can not determine the approach vector at the point
of contact. This simple fact makes it very difficult
to map out probe errors.
Helmel Engineering Products, Inc.
www.helmel.com
figure 8, Lobe Error Example
Geomet Training Handbook
www.geomet-cmm-software.com
App 1-15
Appendix 1 – Technical Notes
Lobe errors are mechanical limitations to the probe head. Lobes can have an error
in excess of .0001” deviation when capturing a point moving at 0° compared to
capturing a point at 60°. As shown in figure 8, the lobe error pattern is
triangulated based on the mechanical layout of the kinematics probe alignment,
see figure 9. The touch probe can be described as having low and high force
directions when capturing a trigger, see figures 10 and 11.
figure 9, Force Direction
figure 10, High Force Direction
figure 11, Low Force Direction
Stylus lengths will add additional error to your system. A short length of about
10mm will not influence your data points, however a 100mm length will increase
the error 10 fold to the lobe deviation. If you need to extend your stylus, we
recommend the Renishaw PEL family of extensions. These are extensions that
mount between the probe head and probe body.
When the Trigger Force pressure is set too high, the probe error will increase
exponentially! Most mechanical probes allow you to adjust the tension applied to
the trigger mechanism, see manufacturers technical manual. Some touch probe
models, such as the Renishaw TP20, offer interchangeable modules with a preset
trigger force. By increasing the pressure, you force the probe to trigger at a higher
pressure that introduces stress and deflections in the stylus tip and extension.
Strain-gauge or piezo designed probes, such as the Renishaw TP200, minimizes
the lobe error by eliminating the mechanical kinematics design. However, these
gauges are susceptible to speed changes and the actual contact speed should be
stable and consistent. Probes that use this technology should not be considered for
manual CMMs.
Helmel Engineering Products, Inc.
www.helmel.com
Geomet Training Handbook
www.geomet-cmm-software.com
App 1-16
Appendix 1 – Technical Notes
Operator Influences
Finally the operator will provide the greatest error. If the operator captures data
points with an inconsistent speed, repeatability errors are introduced. To test for
speed difference, lock the Z and X-axes on your CMM. Place a part on your
CMM and measure a +Y point. Increase the speed at which your capture points.
At a certain speed you will begin to see variances in the reported results.
Other operator related issues include where you hold the CMM. If you have a
large CMM, probing while holding the probe bar just above the probe will act
differently that when you are holding as far up the probe bar as possible. The
probe bar is a lever, and by moving that lever you are placing strain on the
superstructure of the CMM. If you gather data points before the CMM has
‘settled’ you will get unreliable data points.
Data Point Spread
When measuring multi-point features, how you spread the data points will be the
single greatest influence on the accuracy and repeatability of the feature. For
example, if you capture data points on a circle using only a 15° sweep, the results
are unreliable and not repeatable. If those same points were captured over a 300°
sweep, the results would be accurate, see figure 12. The same holds true for
Planes spheres, cylinders and cones. Cylinders and cones require a proper spread
over the length otherwise the axis of the feature will not be reliable.
Arc(Degrees) Center Error
Radius Error
180
0.00014
0.00000
120
0.00028
0.00014
90
0.00048
0.00034
60
0.00104
0.00090
30
0.00409
0.00395
20
0.00914
0.00899
10
0.03549
0.03535
5
0.12823
0.12810
figure 12, Circle Errors
Imagine capturing two points on a line only .25” apart with a probing error of
.0001”. The resulting line would have a repeatability error of .040” over 5.000” or
0.4584 degree! If that line were used as part of the Part Coordinate System, then
all subsequent features would have questionable accuracy.
Helmel Engineering Products, Inc.
www.helmel.com
Geomet Training Handbook
www.geomet-cmm-software.com
App 1-17