1
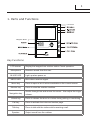
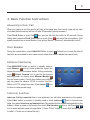
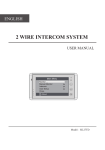
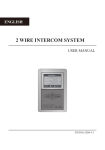
XT3TD5
Indoor Monitor
User Manual
Please read this manual carefully before using the product you purchase, and keep it well for future
use.We reserve the right to modify the specification in this manual at any time without notice.
1
1. Parts and Functions
LCD Screen
Navigation Button
Key Functions
LCD screen
Display the images from outdoor station.Touch operation.
Microphone
Receives sound from the user.
IN-USE LED
Light up when power on
MESG LED
Blink when receives signal
Menu key
Monitor key
Press to open a list of actions available on the current screen.
Press to view the outside condition.
Navigation key
Scrolls through lists and moves the cursor . Also adjust the ringer
volume.
Unlock key
Press to release the door for visitors during talking or monitoring.
Call key
Press to activate the intercom function page.
Talk key
Press to talk with the visitors while receiving a call.
Speaker
Output sound from the outdoor.
2
145~160 cm
2. Monitor Mounting
●● Use the screws to fix the Mounting Bracket on the wall.(accessories include a Bracket,
two 4X25 screws (use to fasten the Mounting Bracket), 2 wire cables (use to connect with
Monitor)).
●● Connect the system correctly. then hang the Monitor on the Mounting Bracket firmly.
3. About Home screen
The Home screen is your starting point for using all the applications on your monitor. You can
customize your Home screen to display applications, logos, and languages.
To open the home screen page, tap
anywhere twice.
Menu key twice on the monitor or press the LCD screen
Scroll to last month
Current time
Scroll to next month
Current date
Calendar
Home screen
Tap any icon to start using
the application
3
4. Basic Function Instructions
Answering a Door Call
When you receive a call, the monitor will ring, at the same time ,the visitor's image will be seen
on screen.(Note:the screen will turn off after 30 seconds if nobody answers.)
icon, you can talk with the visitor for 90 seconds. During
Press TALK Button or touch Talk
icon to end the conversation. If the
talking state, press the TALK Button again or press Close
system connects two or more Monitors, pick up any Monitor , others will automatically shut off.
Door Release
During the conversation, press UNLOCK Button or touch
Unlock icon to open the door.(if
two locks are connected to door camera,touch unlock 2nd icon to release the second lock )
Entrance Monitoring
Press MONITOR button on monitor in standby mode,or
touch Monitor
icon on home screen.the screen will
display the view of the outdoor station. During monitoring,
Select Camera icon to get into the camera
touch
switching mode, (or directly touch Manual Monitor
icon on home screen), if multi door stations are installed,
you can press the camera 1/2/3/4 to monitor the Door
icon
Station or CCTV camera you want. Press Home
to return to home screen page.
Intercom Function
Intercom Call by namelist:User in one apartment can call other apartments in the system.
Press CALL button on monitor in standby mode or touch Intercom
icon on home screen
page ,then select Intercom by Namelist item (the namelist will be created automatically by the
icon to call.Press
/
system). Select a name on the screen then touch Dial Number
icon to enter last/next name list page.(Note:1. Press "CALL" button or touch Dial Number again
to redial. 2. Touch icon to cancel the call.)
4
Inner Call: If multi Monitors are installed in one user, select and press the Inner Call item, the
other Monitors will ring at the same time, whichever Monitor answers the call, conversation is
started,and the other monitors will stop ringing at the same time.
Direct Dial Guard unit: A Monitor can be assigned as Guard Unit Monitor; when the Guard
Unit Monitor answers the call, conversation with the guard person is started..
5. Basic Setup Instructions
Ring Tone Setting
Total 12 pieces ring tones can be selected.
You can set different ring tones to identify different
calls from Door Station call,Intercom call or Door Bell
call.
To open ring tone setting page:
1. On the home screen, touch User Setup
icon.
2. Touch Door Station call tone/Intercom call
tone/Door Bell call tone.
3. Choose a ring tone you want , then touch
icon to save and exit, the ring tone will be performed
icon to unsave and exit.
immediately. Or touch
5
Ring Volume Setting
You can set a ring volume for day time,6:00
AM~18:00 PM is the day time by default.
To open ring volume setting page:
1. On the home screen, touch User Setup
icon.
2. Touch Ring Volume item.
3. Touch Adjust+ to increase the volume or touch
Adjust- to decrease the volume.
4. Touch
icon to save and exit, the setting will
be performed immediately.
Night Ring Volume Setting
You can active a ring volume for night time,18:00
PM~6:00 AM is the night time by default.
To open night ring volume setting page:
1. On the home screen, touch User Setup
icon.
2. Touch Night Ring Volume item.
3. Touch Adjust+ to increase the volume or touch
Adjust- to decrease the volume.
4. Touch
icon to save and exit, the setting will
be performed immediately.
Note: If you adjust the volume to 0, mute function will be activated. It's very useful when you
don't want to be disturbed.
6
Monitor Time Setting
90 seconds is the default monitor time.But you can
change the value at any time.
To open monitor time setting page:
1. On the home screen, touch Manual Monitor
icon.
2. Touch Monitor Time item.
3. A digital keypad will be shown,touch the keypad
to input the setting.
key to cancel the input,and touch
4. Touch
key to save the setting.
5. Touch Cancel
button to return last page.
Screen Setting
To open screen setting page:
1. When the Monitor is in monitoring or talking
icon.
state, Press Adjust
2. Touch Brightness/Color/Scene/Talk volume
item.
/
icon to decrease or increase the
3. Touch
value.Settings will be performed immediately.
7
Date and Time setting
You can reset the date and time shown on the
calendar page.
To open clock setting page:
1. On the home screen, touch User Setup
icon.
2. Touch Clock item.
3. Touch the digital keypad to input the correct time.
key to cancel the input,and touch
4. Touch
key to save the setting.
5. Touch Cancel
button to return last page
Restore to default setting
The restore to default function allows the user to
recover the settings to factory setting.Note that this
operation is irreversible and will not change the
time setting.
To open restore to default setting page:
1. On the home screen, touch User Setup
icon.
2. Touch Restore to default item,a message of
"Restore to default?" will be asked.
3. Touch Restore to default button again,setting
will be performed.
8
6. Monitor Parameter Setting
You can set the parameter setting on monitor
directly.
To open Installation setting page:
icon.
1. On the home screen, touch About
Some informations about the monitor will be shown.
2. In this information page,press Unlock
button and hold for approximately 3 seconds.
3. A digital keypad and some setting informations
will be shown.The setting informations are as right:
[0010] #: Remove all remote control
[0011] #: Add remote control
[8000] #: Set as master unit 0
[8001] #: Set as slaver unit 1
[8002] #: Set as slaver unit 2
[8003] #: Set as slaver unit 3
[8004] #: Set as guard unit
[8005] #: Set as Not guard unit
[8006] #: Panel on as slaver unit called
[8007] #: Panel off as slaver unit called
[8008] #: Date format:MM/DD/YYYY
[8009] #: Date format:DD/MM/YYYY
[8010] #: Set lock mode to 0
[8011] #: Set lock mode to 1
[8012] #: 12-Hour system
[8013] #: 24-Hour system
[8021]~[8029] #: Set the lock time of 1~9s
How to set the monitor as a Guard Monitor
A Monitor can be assigned as Guard Unit Monitor; when the Guard Unit Monitor answers the call,
conversation with the guard person is started..
The code number of 8004 is used to set the monitor as a guard unit monitor and 8005 is used to
cancel this function.
How to set the slave monitor address
Maximum 4 monitors can be connected in one apartment,one master monitor together with 3
slave monitors, so you should set the address correctly.(note:must have one monitor to be set as
master monitor)
The code of 8000 is used to set the master monitor.
The code of 8001 is used to set the first slave monitor .
The code of 8002 is used to set the second slave monitor .
The code of 8003 is used to set the third slave monitor .
Note:touch * button to cancel the input,touch # to save the settings.
9
How to set date and time format
The system offers two methods of date and time.
The code number of 8008 is used to set the date format as month/date/year
The code number of 8009 is used to set the date format as date/month/year
The code number of 8012 is used to set the time format as 12 hour system
The code number of 8013 is used to set the time format as 24 hour system
How to set the slave monitor panel on
In default mode,when receive a calling,the master and slave monitors will ring at the same
time,and just the master monitor can display the image while the slave monitors can not.But the
settings can be changed,you can set the master monitor and all the slave monitors to panel on at
the same time when receiving a call, just input the code number of 8006 on each slave monitor.
How to set the unlock parameter
Unlock mode:
There are two unlock modes: 1.power-on- to-unlock type:unlock mode=0(by default)
2.power-off-to-unlock:unlock mode=1.
The code number of 8010 is used to set the unlock mode to 0
The code number of 8011 is used to set the unlock mode to 1
Unlock time:
The unlock time can be changed by yourself at any time.it can be set from 1 to 9 seconds.
The code number from 8021 to 8029 are used to set the unlock time to 1~ 9 seconds.
10
7. TPC Function
The monitor has assigned with TPC function that
you can divert calls to the telephone.For more detail
information,please refer to TPC user manual.
To open TPC function page:
1. On the home screen, touch User Setup
2. Touch TPC
icon.
icon
3. Three telephone numbes are available,input
numbers by touching the digital keypad.
8. Specification
Power supply for indoor monitor: DC 24V
Power consumption: Standby15mA;
Monitor screen: 5 Inch digital color LCD
Display Resolutions: 640*3(R, G, B) x 480 pixels
Video signal: 1Vp-p, 75Ω, CCIR standard
Wiring:
2 wires, non-polarity
Dimension: 210(H)×160(W)×28(D)mm
Working 400mA
XT-ENG-XT3TD5-V1 2012W0110