1
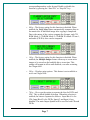
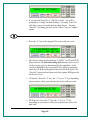
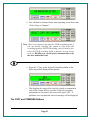
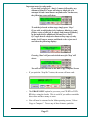
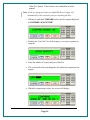
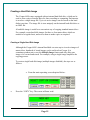
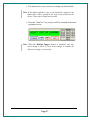
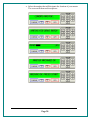
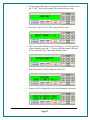
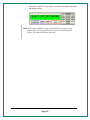
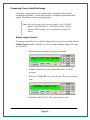
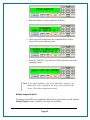
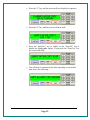
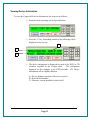
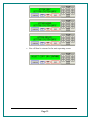
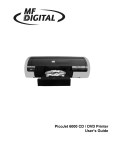
Cougar 6600
Asynchronous Duplicator
Operator’s Guide
Formats Unlimited, Inc.
155 Sherwood Avenue
Farmingdale, NY 11735
Tel: 001 631 249 9393
Email: [email protected]
http://www.mfdigital.com
©2003 - 2011 by Formats Unlimited, Inc
Page 1
Table of Contents
©2003 - 2011 BY FORMATS UNLIMITED, INC.................................................................................................................... 1
WELCOME TO THE COUGAR 6600 ASYNCHRONOUS DUPLICATOR......................................................... 3
END USER LICENSE AGREEMENT....................................................................................................................................... 3
ABOUT THIS MANUAL..................................................................................................................................................... 3
GETTING STARTED................................................................................................................................................... 3
WHAT’S IN THE BOX - YOUR NEW COUGAR 6600 ASYNCHRONOUS DUPLICATOR INCLUDES:..................................................... 3
PACKING MATERIALS....................................................................................................................................................... 3
REMOVING PACKING RESTRAINTS.................................................................................................................... 3
GENERAL OPERATION............................................................................................................................................ 4
INPUT OUTPUT SPINDLE OPERATION................................................................................................................................... 4
FUNCTION KEYS.............................................................................................................................................................. 4
THE COPY AND COMPARE BUTTONS............................................................................................................... 11
CREATING A HARD DISK IMAGE....................................................................................................................... 15
CREATING A SINGLE HARD DISK IMAGE........................................................................................................................... 15
CREATING MULTIPLE HARD DISK IMAGES......................................................................................................................... 18
COPYING FROM A HARD DISK IMAGE............................................................................................................. 21
MULTIPLE IMAGES DISABLED.......................................................................................................................................... 21
MULTIPLE IMAGES ENABLED........................................................................................................................................... 22
COMPARING FROM A HARD DISK IMAGE...................................................................................................... 25
MULTIPLE IMAGES DISABLED.......................................................................................................................................... 25
MULTIPLE IMAGES ENABLED........................................................................................................................................... 26
ENABLING VERIFY AFTER COPY...................................................................................................................................... 28
ERASING CD-RW/DVD-RW DISCS....................................................................................................................... 30
VIEWING DEVICE INFORMATION..................................................................................................................... 31
SETTING THE INTERNAL CLOCK...................................................................................................................... 32
Page 2
Welcome to the Cougar 6600 Asynchronous Duplicator
End User License Agreement
You have acquired a device (“Cougar 6600 Asynchronous Duplicator”) that includes software licensed by Formats
Unlimited, Inc. from Microsoft Licensing Inc. or its affiliates (“MS”). Those installed software products of MS
origin, as well as associated media, printed materials, and “online” or electronic documentation (“SOFTWARE”) are
protected by international intellectual property laws and treaties. The SOFTWARE is licensed, not sold. All rights
reserved.
About This Manual
This manual is written for both novice and experienced users. Please read through this Operator’s Guide from
beginning to end before using the unit. Once having read the manual, follow along chapter by chapter. This will
provide the necessary understanding of your new Cougar 6600 Asynchronous Duplicator .
Getting Started
Carefully remove the Cougar 6600 from the shipping container. Inspect the contents, and
verify them against the packing slip. Report any errors in shipping as soon as possible.
What’s In the Box - Your new Cougar 6600 Asynchronous Duplicator includes:
• Cougar 6600 Duplicator
• Power cord
• Manuals CD
• Hard Copy Cougar Manual
• Cougar Quick Copy Reference Card
Packing Materials
Please retain the original box and packaging in the event that the unit requires future
servicing. This will help to reduce the possibility of damage occurring in transit. Should
you lose or misplace your carton, a new one will need to be purchased from MF Digital.
Removing Packing Restraints
The Cougar 6600 ships with a picker arm restraint to reduce the possibility of damage in
transit. This restraint must be removed before operation or power-on. Gently remove the
zip tie and foam from around the transfer arm. Save the foam tube, as you will need to
return it to its place when transporting the unit in the future
Page 3
General Operation
The Cougar 6600 is extremely versatile and offers many useful and powerful
features.
•
It is time to turn start Cougar. A series of self-diagnostics will be
performed. The screen will now read in sequence:
• Once complete, the unit will display the main operating screen:
• Power Off only when the "SELECT COPY AND COMPARE"
screen is active.
Input Output Spindle Operation
Input Bin and Output Spindle: The input bins and the output spindle serve as the
containers for up to 600 discs. The input bins become output bins once the spindle
is full.
Function Keys
Various uses for the Cougar 6600 will be explained throughout this Operator’s
Guide. The following section explains the purpose of the function keys. When the
main operating screen is displayed, the numeric keys on the keypad have special
functions (Function keys
5
&
3
4
Page 4
are not used).
• Press the “0” key on the keypad. The screen will now read:
•
The factory setting for this function is “Copy”. The “Simulate”
mode is useful as a diagnostic tool and is used mainly for support
issues. It is also helpful for training purposes to experiment with
various system functions.
• Press the “1” key to select “Copy” or the “2” key to select
“Simulate”. After pressing either key, you will be returned to the
main operating screen.
• Press the “1” key on the keypad. Something similar to the
following will be displayed on the screen in sequence:
•
As indicated by the red square, this is the version information of
the firmware currently installed on the Cougar 6600.
• This displays the image size on the internal hard disk, time and
date.
Page 5
•
This displays the Verify after status of the Cougar 6600. The
Verify After function will verify a copied disc against the master
disc immediately after it has been copied.
•
This displays the Multiple Images status of the Cougar 6600. The
Multiple Images feature allows the user to store up to seven
separate active master images on the internal Hard Drive.
•
This displays the Installed Memory of the Cougar 6600.
• This displays the number of good and bad copies that were
produced to date on the system
•
Press the “2” key on the keypad. You will see several functions
scroll across the screen. Select a function by pressing the
Page 6
corresponding number on the keypad. Enable or disable the
function by pressing the “Start/Yes” or “Stop/No” key.
•
0 Key - The factory setting for this function is disabled. When
enabled, the Verify After feature automatically compares discs to
the master disc or hard disk image after copying is completed.
Due to the nature of the various compact disc formats, only CDROM Mode 1, CD-ROM Mode 2, CD-ROM XA Mode 2 Form 1,
and audio (CD-DA) discs can be compared.
•
1 Key - The factory setting for this function is disabled. When
enabled, the Multiple Images feature allows up to seven active
images to be stored on the hard disk drive at one time. This
setting will remain in effect until disabled, even after restarting
the Cougar 6600.
•
5 Key – Displays print options. This feature is not available or
active on Cougar 6600.
•
7 Key - Gives you the option to separate the bins for DVDs and
CDs. This is called Spindle Selection. When this selection is
enabled, the bins are separated as follows. Input Bin #1 is for
CDs, Input Bin #2 is for DVDs. Input #3 and Input #4 are
disabled. The main Output Spindle will be used for both CDs and
DVDs.
Page 7
When enabled, SHAKE DISC will perform a slight shaking motion with
each pick of disc from an input hopper. If the discs are somewhat sticky,
this can help in separating them. Only enable this in the event you have
sticky media.
• Press the “6” key on the keypad. Something similar to the
following will be displayed in sequence:
•
This display is the device information for each of the recorders
installed in the Cougar 6600. This includes their host number,
model name, and firmware version.
• Press the “7” key on the keypad. The screen will now read:
•
Press the “Start/Yes” key to clear the hard drive. If the “Stop/No”
key is pressed you will be prompted to set the “System Time.”
Page 8
•
Press the “Start/Yes” key to set the system time. If you press the
“Stop/No” key you will see “Set the Drive Order”
• Press the “Stop/No” key if you do not want to reset the drive
order. Press the “Start/Yes” key and you will then see the
following screen:
• All of the drives will open at this time:
• Close the drive tray of the drive you would like to be drive
number “1”. It can be any one of the drives. You will then see:
• Close the remaining drives in the order that you would like them
to read and the Cougar 6600 will reboot.
Page 9
• If you pressed “Stop/No” to “Set Drive Order”, you will be
prompted to “Change Network Settings”. Pressing “Start/Yes”
will allow you to set-up the network client feature. Pressing
“Stop/No” will bring you back to the “Select Copy or Compare”
screen.
• Press the “8” key on the keypad. The screen will now read:
•
The factory setting for this function is “MAX” for CD and DVD.
When selected, the Select Recording Speed feature allows you to
set the copying speed as determined by the capabilities of the
recorders installed in the Cougar 6600. You will be prompted to
select the CD-R Recording Speed first, then DVD-R Speed. The
“Stop/No” button will not function for this option. BD Speeds do
not need to be set.
• CD Speed = Press the “0” key, the “1” key or “2” key depending
on your choice. After your selection the screen will now read:
• DVD Speed = Press the “0” key, the “1” key or “2” key
depending on your choice. After your selection the screen will
now read:
Page 10
• You will then be returned to the main operating screen that reads,
“Select Copy or Compare”
Note: There is no option to skip past the CD-R recording speed, if
you are merely selecting this option to slow down the
recording speed for DVD-R Recording, you will need to first
select the CD-R recording speed to advance to next screen
to do so. BD (Blu-ray) record speed is automatically set by
the drive and media used).
• Press the “9” key on the keypad. Something similar to the
following will be displayed in sequence:
•
This displays the status of the last disc copied or compared in
each of the Cougar 6600’s recorders. If the last operation
performed was successful, the screen will report “OK”. If
problems were encountered, an error message will be displayed.
The COPY and COMPARE Buttons
Page 11
The Cougar 6600 has two main buttons which you will commonly use when
starting jobs. Understanding the options below will aid you in the correct method
how to use your system effectively.
•
When you push the COPY button, the first option displayed is
FROM HD?
•
The “FROM HD?” option lets you copy from a master that has
been already archived to the Cougar 6600 Internal Hard Drive.
See the section, Creating a Hard Disk Image later in Manual.
•
If you push the “Stop/No” button, the screen will now read.
•
The “TO HD?” option lets you archive a master disc (CD or
DVD) to the Cougar 6600 Internal Hard Drive. When the archive
is complete, the screen will read, “Archive Ok, Press Start” and
return you to the main operating screen, “Select Copy or
Compare”
•
If you push the “Stop/No” button, the screen will now read.
•
The “Copy in Relay Mode?” gives you the option to copy
multiple masters in sequence, hence the name, Relay mode. The
correct pecking order is as follows, [master 1] [blanks] [master 2]
[blanks] and so forth.
Page 12
Important notes for relay mode:
If you load a single job – that is 1 master followed by any
amount of blanks, Cougar will detect a single job as it
attempts to load a new master and finds none. In that case,
the following screen will show:
To end the job mode at that stage, simply press ‘Stop’.
If you wish to add further jobs, load more blanks to create
further copies of this job, or simply load [master2][blanks]
in the input bin for additional jobs and press ‘Start’.
If Cougar detects a defective master at any stage of relay
mode, it will remove master and blanks to the reject stack
and show the following display:
Pressing ‘Start’ will proceed with the next job.’Stop’ will
abort:
You will now be returned to the main Copy/Compare Screen
•
If you push the “Stop/No” button, the screen will now read:
•
The ERASE ONLY option let you erase your CD-RW or DVDRW discs using the loader. This is useful if you utilize rewritable
discs often and have many to erase.
• You will now be returned to the Main operating screen, “Select
Copy or Compare”. To use any of these features, push the
Page 13
“Start/Yes” button. These features are outlined later in this
manual.
Note: If you are using previously recorded RW discs, Cougar will
automatically erase each disc prior to recording the disc.
•
When you push the COMPARE button, the first option displayed
is COMPARE AGAINST HD?
•
Pushing the “Start/Yes” key will prompt you to enter a quantity to
compare.
• Enter the number of copies and press Start/Yes
• The screen with look something like this when the comparison has
begun:
• When the comparison is done, the screen will display:
Page 14
Creating a Hard Disk Image
The Cougar 6600 comes equipped with an internal hard disk drive, which can be
used to store copies of master discs for later recording or comparing. Each master
is saved as a single image file. Up to six active images can be stored on the hard
disk at one time. The image file is store uniquely on the internal hard disk drive as
an .IMG file.
A hard disk image is useful as a convenient way of copying standard master discs.
For example, create hard disk images for three or four master discs which are
needed on a regular basis, and access them to make copies as required.
Creating a Single Hard Disk Image
Although the Cougar 6600’s internal hard disk can store up to six active images of
master discs, hundreds of stored images can be archived on Cougar. It is
sometimes prudent not to use this Multiple Image feature and only allow one
image to be created and stored. For example, using a single image simplifies the
copying process.
To create a single hard disk image (multiple images disabled), the steps are as
follows:
• From the main operating screen depicted below:
•
Press the “COPY” key. The screen will now read:
Page 15
•
Press the “Stop/No” key. The screen will now read:
•
Press the “Start/Yes” key. The screen will now read in sequence:
Page 16
• The master disc is now stored as an image on the hard disk
Note: If the master failed to copy to the hard drive properly, the
master disc will be placed in the reject area in front of the
drives. These discs should not be used.
• Press the “Start/Yes” key, and you will be returned to the main
operating screen:
Note: When the Multiple Images feature is disabled, only one
active image is used. If a new active image is created, the
old active image is overwritten.
Page 17
Creating Multiple Hard Disk Images
The Multiple Images feature allows the Cougar 6600’s internal hard disk to store
up to six active master disc images. The factory setting for this function is
“disabled”. To enable it, and create multiple image files, proceed as follows:
• From the main operating screen depicted below:
•
Press the “2” key. The screen will display a scrolling menu of
options
•
Press the “1” key to select Multiple Images. The screen will now
read:
Page 18
• Press the “Start/Yes” key to enable Multiple Images.
• You will then be returned to the main operating screen:
• Press the “COPY” key. The screen will now read:
• Press the “Stop/No” key. The screen will now read:
• Press the “START/YES” key. The screen will now read:
Page 19
• Select the number that will designate the location of your master.
The screen will then read in sequence:
Page 20
Copying From a Hard Disk Image
Warning: If you have not already created a hard disk image, do
so now, as described in the previous section.
After a hard disk image has been created, it is used as the master source.
Multiple Images Disabled
To make copies from a hard disk image that was previously created with the
Multiple Images feature “disabled” (i.e. from a single hard disk image), the steps
are as follows:
• From the main operating screen depicted below:
•
Load as many blank discs as are required into the CD / DVD
recorders.
• Press the “COPY” key on the keypad. The screen will now read:
•
Press the “Start/Yes” key to begin copying from the hard disk
image, to the blank discs in the recorders. Depending on the
format type of the image, something similar to the following will
be displayed on the screen:
Page 21
• Enter the number of copies and press Start/Yes.
• Progress will be displayed on the screen during the operation:
• Press the “Start/Yes” key, and you will be returned to the main
operating screen:
Note: If the master failed to copy to the hard drive properly, the
master disc will be placed in the reject area in front of the
drives. These discs should not be used.
Multiple Images Enabled
To make copies from hard disk images that were previously created with the
Multiple Images feature “enabled”, the steps are as follows:
•
From the main operating screen depicted below:
Page 22
•
Load as many blank discs as are required into the recorders. Press
the “COPY” key on the keypad. The screen will now read:
•
Press the “Start/Yes” key. The screen will now read:
•
The Cougar 6600 defaults to the first image (1). For the purposes
of this example, press the “1” key to select this image, followed
by the “Start/Yes” key. The screen will now read:
•
Enter the number of copies and press Start/Yes.
•
Progress will be displayed on the screen during the operation:
Page 23
•
Press the “Start/Yes” key, and you will be returned to the main
operating screen:
Note: If the master failed to copy to the hard drive properly, the
master disc will be placed in the reject area in front of the
drives. This disc should not be used.
Page 24
Comparing From a Hard Disk Image
For quality control purposes, the Cougar 6600 is equipped with powerful
verification capabilities. Copied discs can also be compared against hard disk
images. This feature ensures copying integrity.
Note: Due to the nature of the various formats, only CD-ROM
Mode 1, CD-ROM Mode 2, CD-ROM XA Mode 2 Form 1,
and most DVD formats can be compared (including CD
Audio).
Multiple Images Disabled
To compare copied discs to a hard disk image that was previously created with the
Multiple Images feature “disabled” (i.e. from a single hard disk image), the steps
are as follows:
•
From the main operating screen depicted below:
•
Load the copied discs to be compared into the CD / DVD
recorders.
•
Press the “COMPARE” key on the keypad. The screen will now
read:
•
Press the “Start/Yes” key. The screen will now read:
Page 25
•
Enter the number of copies and press Start/Yes.
•
Upon successful completion, the compared disc(s) will be
ejected. The screen will now read:
•
Press the “Start/Yes” key, and you will be returned to the main
operating screen:
Note: If the master failed to copy to the hard drive properly, the
master disc will be placed in the reject area in front of the
drives. These discs should not be used.
Multiple Images Enabled
To compare copied discs to a hard disk image that was previously created with the
Multiple Images feature “enabled”, the steps are as follows:
Page 26
•
From the main operating screen depicted below:
•
Load the copied discs to be compared into the CD / DVD
recorders.
•
Press the “COMPARE” key on the keypad. The screen will now
read:
•
Press the “Start/Yes” key. The screen will now read:
•
Select image you would like to compare against by pressing 1, 2,
3, 4, 5 or 6.
•
Enter the number of compares and press Start/Yes.
Page 27
•
Upon successful completion, the compared disc(s) will be
ejected. The screen will now read:
•
Press the “Start/Yes” key, and you will be returned to the main
operating screen:
Note: If the master failed to copy to the hard drive properly, the
master disc will be placed in the reject area in front of the
drives. This disc should not be used.
Enabling Verify After Copy
•
From the main operating screen depicted below:
Page 28
•
Press the “2” key and the screen will now display in sequence:
•
Press the “0” key, and the screen will now read:
•
Press the “Start/Yes” key to enable, or the “Stop/No” key to
disable the Verify after option. If you press the “Start/Yes” key
the screen will read:
•
You will then be returned to the main operating screen which
now shows the following:
Page 29
Erasing CD-RW/DVD-RW Discs
•
From the main operating screen depicted below:
•
Press the “COPY” key on the keypad. You will then press the
“Stop/No” key until you reach the following screen:
•
Load the CD-RW or DVD-RW discs you would like to erase into
the input bin and wait for the green light on the front of the drive
to stop blinking.
•
Press the “Start/Yes” key on the keypad.
•
The Cougar 6600 will then erase the CD-RW/DVD-RW disc.
Note: If you are using previously recorded RW discs, Cougar will
automatically erase the each disc prior to recording the
disc.
Page 30
(fig. B) (fig.
(fig.B)C)
Viewing Device Information
To view the Cougar 6600 device information, the steps are as follows:
•
From the main operating screen depicted below:
•
Press the “6” key. Something similar to the following will be
displayed on the screen:
B
A
C
•
The device information is displayed for each of the DVD or CD
recorders installed in the Cougar 6600.
The information
displayed in this example is for DVD Records. CD Device
information will be slightly different.
A= Device Number (position of device in system)
B= Drive Model Number
C= Firmware version installed on drive itself.
Page 31
Setting the Internal Clock
The Cougar 6600’s internal clock is set at the factory for Eastern Standard Time
(observing daylight savings when applicable).
•
To set the internal clock, the steps are as follows:
•
Press the “7” key on the keypad. The screen will now read:
•
Press the “Stop/No” and you will be prompted to set the “System
Time.”
•
Press the “Start/Yes” key if you would like to set the system time.
The screen will then read:
•
Press the “Start/Yes” key after each entry.
Page 32
•
You will then be returned to the main operating screen:
Page 33