1
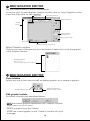
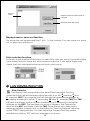
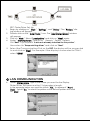
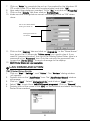
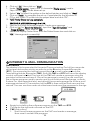
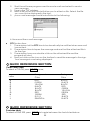
Default European characters table for select.
USER FONT MAKE
Select the char code where the
character you will change, and
then select font size. Click
to
add the item in the list box. Then
select this item to draw the font.
Repeat the process for the same
character with different font size,
example:U40-4x7,U40-5x7,U40-6x7.
Click Transfer|Transfer to Sign
to update the user font of the sign.
Click File|Save Font on this window
to save a file.
RECALL DEFAULT FONT
Use for recall the above default European characters font to the Sign and software.
Run Page
Link pages To Run
Set ID
: Run a specified page on the LED Display Board.
: Link some pages in order to Run more than one Page.
For example, type in 'abc', the sign will display
page A, page B, page C content consecutively.
: Set ID of the Led Display Board .
Note: ID00 represents global call. If yon hare more than one sign, you might
want to connect all the signs in a network, e.g. from ID01to ID05 you can
send message to any sign in the network by individual ID. To broadcast to all
the signs, use ID 00.
Set Clock
: Set the Date and Time the Display Board system Clock.
Delete Page
: Delete a specified page information on the sign.
Set Brightness
: Set Display brightness, there are 4 levels of brightness.
Display by Schedule : Schedule a message to be displayed.
you may make some pages display from sometime
to another time. max can set up to 5 Schedule items
one time.
Delete page
:Delete some pages in the running messages.
Delete Schedule
:Delete some items in Schedule table.
Delete All
:Delete all messages in the LED Display Board.
(Except system clock)
CONFIGURE SOFTWARE
1.
Go to File and Set Communication
Select the Com Port
2.
Click on OK when your settings are complete.
SENDING A MESSAGE
The Send Message icon is used to transmit the message to the sign.
1. In the Message Window, type in a test message such as 'Welcome to my
message".
2. Click on the icon on the Toolbar to bring up the
Message window.
Enter the Sign ID Number
** Select a page to send
your message to.
** You have pages A-Z available. Each page can be used to store a
different message.
3. Click on OK to send your message to the sign. If your sign did not
receive your message, try sending the message again.
15
BMP GRAPHIC EDITOR
Use the Graphic Editor to edit or create graphics of your own. To open the Edit Graphic window, click on bmp Graphics on the
menu bar, then click on Edit Graphics
Editor area
Edit erea selection
Editor tools box
Graphic
library
display zoom in
and zoom out
select color to edit
Graphic data function select
Select Graphic window
Click on any one of the graphics from the Select Graphic list to view the graphic
in the Graphic window.
Stored graphics list.
From G1 to G16
Max 16 pages graphic can be stored
BMP GRAPHIC EDITOR
Color window
Select any one of four colors to edit an existing graphic or to create a graphic.
Current selected color.
Colors to select from:
black, red, green, yellow
Edit graphic buttons
Functions of buttons are described below.
SAVE the current graphic displayed in the "Graphic" window.
Graphic will be saved in the "Library".
DELETE a graphic from the "Library".
INSERT the current graphic in the "Graphic" window into your
message.
16
Edit function
Editor tools box
Pen tool: Click this tool, and move the mouse to Editor Area. Press
and hold down the left button of your mouse, and move your mouse
to free hand draw.
Brush tool: Click this tool, and move the mouse to Editor Area.
Press and hold down the left button of your mouse and move your
mouse to get brushing function.
Line tool: Click this tool. Move your cursor to select the starting
point of the line. Then hold down the left button of your mouse,
moving your mouse to the end point of the line. Then release mouse
button.
Outline rectangle tool: Click this tool. To select the starting point
by moving your cursor and hold down the left botton of your mouse.
Then move at the end and release mouse button.
Rectangle tool: Same operation step as outline rectangle tool.
Outline ellipse tool: Same operation step as outline rectangle tool.
Ellipse tool: Same operation step as outline rectangle tool.
Pointer tool: Click this tool. Select the edit area by press and hold
down the left button of your mouse. Then the select area be round
by release your mouse button. Moving the round area by hold down
the left button of your mouse until the position you want. Then
release the mouse button. Right click to fix the position.
Polygon pointer tool: Same operation step as pointer tool.
Erase tool: Click this tool. Just press and hold down the left button
of your mouse and move your mouse to erase the area you want.
Clear tool: Click this tool and select the color. Then moving cursor
to edit area left click your mouse. That the whole edit area will turn
to that color. If you select black color, the whole edit area will be
covered by black in color. Same as clear function.
Text tool: Click this tool. Move cursor to the starting point you
want to put the text. Left click your mouse and text input will bring up.
That you can type in your words or use windows cut and Paste function
to input text. Then select the fonts and fonts size. Click OK Button
to finish the text input. Then move the object to the position you
want and right click your mouse to fix it.
17
After clicking the Ok button in dialog box, move the rectangle area
to proper position and right click the mouse to fix the information position.
Clear function key: Left click this button to clear the whole edit area.
Bmp file function key: Left click this button That can easily export the editing
content to Bmp file, or import Bmp file edited by other program.
18
Preview
screen
Output and save the whole screen to
a bmp file
Input bmp file to editing area
Display zoom in, zoom out function
The zoom size can be selected from 1 to 8. 1 is the smallest. You can zoom in or zoom
out to affect you edit job as
Color selection function
Just easily to left click the color button to select the color you want. If you edit a triple
color frame, then you have four color boxes to select as. If you edit a single color
frame, then you can select either red or black color box as
LAN COMMUNICATION
How it works
The display is first connected to the Serial Communication Port of a
computer in the LAN environment which we refer to as the R eceiving S lave
C omputer (RSC). The computer that will actually be transmitting messages to
the display is referred to as the T ransmitting M aster C omputer (TMC)
. The TMC
will have the display control software installed. It is not necessary to install the
software on the RSC . The next step is to set-up a Generic/ Text Only printer
driver on the RSC and share it with the TMC. Once the set-up is done and a
message created, a simple click on the button for "Send via Network" will bring
up the "PRINT" dialog window. You then select the Generic/Text Only printer
created and click on "OK" and your message is on its way.
19
RSC Printer Driver Set -Up
Begin by clicking on " Start ", " Settings ", and " Printer ". The " Printers " dialog window will appear.
2. Double-click on the " Add Printer " icon. The "Add
Add Printer Wizard
Wizard" window
will appear.
3. Click on " Next ". Select "Local
Local printer
printer" and click on " Next
Next" again.
4. Under " Manufacturers ", search for " Generic ". Select " Generic
ON "Next". lf prompted: "A driver is already installed for this printer",
then select to "Keep existing driver" and click on "Next".
5. Select the Communications Port on the RSC the display will be connected
to and click on "Next".
Next For Example: lf the display is connected to COM1,
select "COM".
COM
1.
LAN COMMUNICATION
6.
Under "Printer
Printer name
name", type in the name you want for the Display
Printer Driver. This name must be 12 characters in length.
In the example below we used the initials " F.D. " to represent " Front
Desk ". Select "No
No " to select the printer as the default printer and click
on " Next".
Next
20
7.
Click on "Finish
Finish " to complete the set-up. If prompted for the Windows 95
CD or disk, insert CD or disk into the proper drive and click " OK".
8. Now select the printer you created. Go to " File " and click on "Properties".
Properties
9. Click on the " Details " tab then click on "Port
Port Settings ".
10. Make sure the settings below are set accordingly. Click on "OK" when
done.
Set to the "BAUD RATE"
setting on PAGE 19.
Settings should be
as shown.
11. Click on the " Sharing
Sharing" tab and click on " Shared As ". In the "Share Name "
box, type in the 12 character "Printer
Printer name
name" you used in step 6. If you
want to "password protect" the use of the Display Printer Driver, type in a
password in the "Password
Password" box. Only the user with the password can
access the "Printer
Printer Driver " to send a message to the display.
12. RSC
.
Printer Driver set -up complete
LAN COMMUNICATION
TMC Printer Driver Set-Up
1.
2.
3.
4.
5.
Click on " Start ", " Settings ", and " Printer ". The " Printers " dialog window
will appear.
Double-click on the " Add
Add Printer
Printer" icon. The "Add
Add Printer Wizard
Wizard" window
will appear.
Click on " Next ". Select "Network
Network printer
printer" and click on " Next " again.
Select " No " to print from "MS-DOS-based
MS-DOS-based programs
programs". Click on " Browse".
Double-click on the name of the RSC on the network and select the Display
Printer Driver created.
21
6.
7.
Click on "OK
OK ". Now click on " Next".
Next
Under "Printer
Printer name
name", type in the 12 character "Printer
Printer name
name" used in
Step 6 of the RSC Printer driver set-up.
8. Select " No
No" to select the printer as the default printer and click on " Next".
Next
9. Click on "Finish
Finish " to complete the set-up. If prompted for the Windows 95
CD or disk, insert CD or disk into the proper drive and click "OK".
10. TMC Printer Driver set -up complete
1.
2.
3.
SENDING A MESSAGE through the LAN
Start the TruColorII Software program. Create your message.
Click on " "for "Send
Send via Network
Network". Input the " Sign ID Number " and
" Page Number
Number", Now click on "OK".
Select the Display Printer Driver from the Printer Name box and click on
"OK ". Message sent successfully!
INTERNET E-MAIL COMMUNICATION
How it works
The display is first connected to the serial Communication Port of the computer
at the remote location which we refer to as the Receive Transmit Computer
(RTC). The computer that will be transmitting the e-mail is referred to as the
Transmitting Master Computer(TMC). Both the TMC and RTC will have the display
control software installed. The user at the TMC will create a message using the
provided software and save it. Once the message is saved, the user can start
the software program used to send e-mail(such as Microsoft Exchange, outlook,
Eudora Pro, Netscape Mail etc) and attach the saved message file to the e-mail
message and send it. The recipient at the RTC is then notified that new mail has
arrived. The user can then open at attachment and send the message to the sign.
Begin by installing the software program on the TMC and RTC.
Configure the sign and software on the RTC.
TMC instructions
1. Start the software program on the TMC and create a message,
Now save it and exit the program.
22
2.
3.
4.
5.
Start the software program used to send e-mail and select to send a
new message.
Type in the "TO" address.
Now click on the icon that will allow you to attach a file. Select the file
you want to be displayed in the sign.
your e-mail message should look similar to the following:
6. Now send the e-mail message.
RTC instructions
1. The recipient at the RTC should automatically be notified when new mail
has arrived.
2. The recipient should open the message and see that the attached file is
for the sign.
3. The recipient can now double-click on the attached file and the
program will start.
4. Now just click on the icon on the toolbar to send the message to the sign.
Your message is now being displayed.
! QUICK REFERENCE SECTION
Color Code Table
To select a COLOR, press COLOR once,
Letter
A
B
C
D
E
F
G
H
I
J
Foreground
Color
Background
Color
RED
GREEN
YELLOW
BLACK
BLACK
BLACK
RED
GREEN
R/Y/G
RANDOM
BLACK
BLACK
BLACK
RED
GREEN
YELLOW
GREEN
RED
BLACK
BLACK
! QUICK REFERENCE SECTION
Font size table
To select a FONT SIZE, press FONT to toggle between the fonts listed below.
23
Letter
A
B
C
D
E
F
Character Font Size
NORMAL
BOLD
ITALIC
Narrow
High
Big
European Character Table
To display a EUROPEAN CHARACTER, press the Corresponding Letter, then
press the EUROP-CHAR key until the European letter of your choice is reached.
Once you see the European letter you which to use, press any other letter to
continue to type your message.
Letter in
Upper "PPER CASE"
Foreground
Color
Letter in
Lower "OWER CASE"
Foreground
Color
! QUICK REFERENCE SECTION
Special effects table
After you complete message editing, you can select the leading
and closing effect by and key and confirm by enter key.
Letter
Type
Effet
Description
A
L, T
Immediate
Image will be immediately appeared
24
B
C
D
E
F
G
L, T
L, T
L, T
L, T
L, T
L, T
Xopen
Curtain UP
Curtain Down
Scroll Left
Scroll Right
Vopen
H
L, T
I
J
K
L
L, T
L, T
L, T
L
Scroll Up
Scroll Down
Hold
Snow
M
N
L
L
Twinkle
Block Move
P
Q
R
L
L
L
Random
Pen writing
Pen writing
Vclose
Image will be shown from center and extend to 4 side
Image will be shown one line by one line from bottom to top
Image will be shown one line by one line from Top to Bottom
Image will be scrolled from Right to Left
Image will be scrolled from Right to Left
Image will be shown from center to top and Bottom one line
by one line
Image will be shown from Top and Bottom to Center one line
by one line
Image will be scroll from Bottom to Top
Image will be scrolled from Bottom to Top
Previous Screen will be kept
Pixels will be dropped down from top and stack up to build
the image
a blank diagonal line will be scrolling on the image
8 pixel width display block will be moved from right to left
one by one
Random Pixel will be appeared to build the image
Hello World
Welcome
L = Leading commands - how the text will appear.
T = Closing commands - how the text will disappear.
Display effect
A
B
C
D
E
Normal
Blinking
Play song 1
Play song 2
Play song 31
Moving speed
A
B
C
D
Fast
Medium 1
Medium 2
Slow
Bell duration
A Short
B Medium 1
C Medium 2
D Long
Display time
0.5sec - 25 sec
Date display format
DD/MM/YY
Time display format
hh/mm
25
? HELP SECTION - IR(Infrared Remote Keyboard)
Most Commonly Asked Questions
Can l run multiple pages when the SCHEDULE DISPLAY.
Yes, you can refer "page 8-adding schedule setting.
HOW CAN I CONTROL MORE THAN ONE SIGN FROM A CENTRAL LOCATION?
Set the different ID address. software will allow you to control up to 255 signs
by setting.
How do l remove the demo message on the sign?
The demo message is permanently programmed onto the sign and is designed
to run automatically when there are no messages programmed by the user.
When you program a message onto a page, the demo message will no longer
show.
How much text can l program onto each PAGE?
You can program up to 250 characters per page. there 26 pages text message
and 16 pages graphic can be programmed.
Will l lose my messages if l remove the power to the sign?
No, there is a built-in battery in the sign.
After l unplug my sign, l lose the current TIME and DATE setting. Why?
The battery on the cpu board is gone. you should replace with same
battery. The battery normally can keep 2 years.
How do I display lower-case letters?
Please refer to page 5 SHIFT key function.
I plugged the sign in but nothing comes ON?
Unplug the power to the sign and plug it in again.
Make sure the power adaptor plug is plugged into the sign and AC connect
firmly. Try using another wall outlet. Refer page 8 resetting system using the
FUNCT key.
? HELP SECTION - SOFTWARE
Most Commonly Asked Questions
How do l turn my sign OFF and ON automatically everyday.
Please refer page 15 under the function control display by schedule.
Trouble Shooting
My sign does not show after setting schedule display.
Clear the schedule display and reset the system.
Refer page 15 restting system using the DELECT all.
26
? HELP SECTION - SOFTWARE
Troubleshooting
The software is not communicating with the sign?
Use the checklist below to verify your settings.
I have found the ID setting of the sign and entered
them into the software. Page 15.
I am using the cable supplied by. Page 13.
NOTE: The cable may not be extended with any other cable. The cable must be
one complete cable from the 9-Pin connector to the sign.
"OPEN COM ERROR" .
If the error message is "OPEN COM ERROR", this means the Com Port you
have selected is not available for your use or is being used by an internal
device in your computer. A computer normally has 4 COM PORTS. Two external
ports which are available to connect external devices to the computer and two
Internal ports which are available, in most cases, for computer use only. Please
check the back of your computer to see if it is labeled COM1 or COM2. lf not,
please refer to your computer user' s manual or contact the computer manufactuer for more information.
My laptop does not have any Com Ports and only has support for USB
devices.
Some newer laptops do not have Com Ports and only support USB devices
(please reference your Laptop User's Manual to verify this). For this situation
you will need to purchase a USB Serial Adapter directly from or from your
local computer store. This device will convert one of your Available USB ports to a
working Com Port does not guarantee that this device will work with all
laptops due to other devices installed by user and varying manufacturers
equipment. Please contact the manufacturers support center directly for
questions regarding installation operation.
27