1
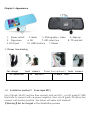
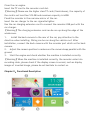
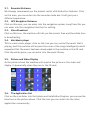
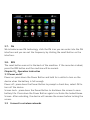
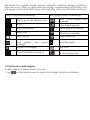
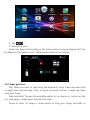
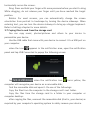
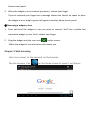
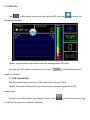
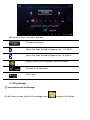
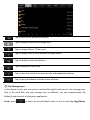
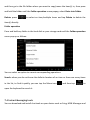
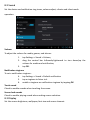
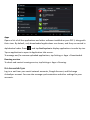
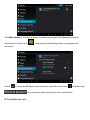
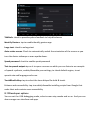
Android GPS Rearview Mirror Recorder
User Manual
Chapter I:Appearance .................................................... 错误!未定义书签
1.1 Power line drawing ...................................................... 错误!未定义书签
1.2Installation ................................................................ 错误!未定义书签
Chapter II:Functional Description ..................................... 错误!未定义书签
2.1 Recorder Entrance........................
错误!未定义书签
2.2 GPS Navigation Entrance .............................................. 错误!未定义书签
2.3 Voice Broadcast ...............................................................................
2.4 Mini Music player .............................................................................
2.5 Picture and Video Display ...................................................................
2.6 The Application list .........................................................................
2.7 FM
............................................................................................
2.8 RES
...........................................................................................
Chapter III:Operation Instruction ...........................................................
3.1 Power on/off ……………………………………………………………………….................
3.2 Connect to wireless networks ...............................................................
3.3 Bluetooth earphone ..........................................................................
3.4 Status and notifications.................................................................
3.5 Shortcuts to Add widgets ......................................................
3.6 Finger gestures.................................................................................
3.7 Coping files to and from the storage card .................................................
3.8 Searching the device and the web ..........................................................
Chapter IV Personalizing …………………………………………………………………………
4.1 Change the Notification ringtone ..........................................................
4.2 Change your wallpaper .......................................................................
4.3 Personalize your Home screen with widgets ..............................................
4.4 Rearrange or remove widgets and icons on your Home screen...............
Chapter V Web browsing ………………………………………………………………………………………
Chapter VI Manage Applications ………………………………………………………………………..
Chapter VII Typical applications introduction……………………………………………………
7.1 GPS Info .........................................................................................
7.2 FM Transmitter.........................................................................
7.3 File Manager ............................................................................
7.4 Instant Messaging tools .......................................................................
7.5 Emails.............................................................................................................................
Chapter VIII Settings …………………………………………………………………………………………..
Chapter IX Troubleshooting ………………………………………………………………………………
Chapter X Product Specifications…………………………………………………………………….
Chapter XI FAQ …………………………………………………………………………………….
Chapter I: Appearance
1. Power switch
5. Page down
9. AV IN port
2. Mode
3. Photography / video
6. OK
7. GPS inter face
10. USB interface
11.Reset
4. Page up
8. TF card slot
1.1 Power line drawing
Car charger
35. Yellow BAT
back camera
Power line (optional ) back camera
36. Red ACC+
37.Black GND-
1.2 Installation method II (time-lapse REC)
Cut off graph 36 ACC red line then connect with car ACC+, cut off graph 37 GND
black line to connect with car power negative, then cut off graph 35 yellow line
connect with battery positive .the follow will same with method I
【Warming】Not be charged in the installation process
Close the car engine.
Insert the TF card to the recorder card slot.
【Warming】Please use the higher class TF card (Class6 above), the capacity of
the card is not less than 512 MB and maximum capacity is 64GB.
Fixed the recorder in the rearview mirror of the car.
Insert the car charger to the car cigarette lighter.
Use the car charging extension cord to connect the recorder USB port with the
car charger.
【Warming】The charging extension cord can be run up along the edge of the
windscreen.
1.
Install the back camera to the rear of the car, pay attention to the
direction when installing. Wiring can be run along the vehicle roof. After
installation, connect the back camera with the recorder port which set for back
camera.
2. Adjust the camera position to make sure the camera keep parallel with the
ground.
3. Start the engine and check whether the machine is installed correctly.
【Warming】When the machine is installed correctly, the recorder enter into
recording state, please check if the display screen is normal, such as display
images of inverted image, please do not hesitate to contact us.
Chapter II:Functional Description
2.1. Recorder Entrance
We strongly recommend you the product which with distinctive features. Click
on this area, you can enter into the recorder mode and it will give you a
different experience.
2.2. GPS Navigation Entrance
Click on this area, you can enter into the navigation system. Long Press this you
can enter into the navigation Interface for setting.
2.3. Voice Broadcast
Click on this icon, the machine will tell you the correct time and the whole hour
in broadcasting.
2.4. Mini Music player
This is a mini music player, click on this icon you can control the music that is
playing. And the machine will acquire the cover of the songs intelligently which
requested that the music has been downloaded in the machine or the SD card.
Click the white space, you can enter into the music library.
2.5. Picture and Video Display
As the picture shows the machine will acquire the picture or the video and
display it dynamically when they are in the SD card.
2.6. The Application List
Click on the icon Enter into the System and Installation Program, you can see the
interface as the picture shows. Click the icon you can enter into the other
application conveniently.
2.7. FM
We introduce new FM technology, click the FM icon you can enter into the FM
interface and you can set the frequency by clicking the small button on the
interface.
2.8. RES
The reset button was set in the back of the machine. If the recorder crashed,
press the RES button and the machine will be normal.
Chapter III:Operation Instruction
3.1 Power on/off
Power on: press down the Power Button and hold for a while to turn on the
device when the battery is full enough
Power off: press down the Power Button to prompt a check box, select OK to
turn off the device
Screen Lock:press down the Power Button to shutdown the screen to save
battery life. Press down the Power Button again to activate the locked Home
Screen. After unlocking, the device will resume the screen before locking the
screen.
3.2 Connect to wireless networks
To connect to a wireless network, you should follow: tap Settings on the Home
screen;
1.
tap Wi-Fi;
2.
select ON;
the network names and security settings of detected Wi-Fi networks are
displayed in the Wi-Fi networks section;
tap a Wi-Fi network to connect. If you selected an open network, you will be
automatically connected to the network. If you selected a network that is
secured with WEP, enter the key and then tap Connect.
Depending on the network type and its security settings, you may also need to
enter more information or choose a security certificate.
after successful connection, the Wi-Fi connected icon will appears on the status
bar.
3.3 Bluetooth headset ( optional )
Power key
indicating lamp
Bluetooth headset with Bluetooth mobile phone connection, particularly
convenient for incoming and outgoing calls. Before using this function, please
turn Bluetooth on. Long press the Bluetooth headset power key 6-8 seconds, the
indicating lamp on the headset in the red and blue flashing alternately,
searching through mobile phone Bluetooth, name: GPS518. password 0000
pairs can be completed using the. After use, placed in the right headphone
adsorption and charge.
3.4 Status and notifications
Status and Notification Icons may appear
The status bar presents media volume, networks condition, battery condition,
time and so on. When an application is running, corresponding notification icon
will appear in the notification area. Icons you may often see are listed as follows:
Status icons and its meanings
Notification icons its meanings
Tap to go to the Home screen
New Gmail/Google Mail
message
Back
New Email message
Recently viewed
Music player is ongoing
Menu icon
SD card is mounted
Notification
Connected to a Wi-Fi network
and
display
the
signal
strength
Battery is charging
USB Connected
Search satellite is going on
Airplane mode
FM is on
Video recording is running
in the background
3.5 Shortcuts to Add widgets
To add widgets to Home screen, you can
1. tap
on the home screen to enter into all apps interface as follows
2. tap
3. select one item.
Slide your finger horizontally on the home screen to check widgets that can
be added to the home screen. Widgets selectable are as follows:
3.6 Finger gestures
Tap: When you want to type using the keyboard, select items onscreen such
as application and settings icons, or press onscreen buttons, simply tap them
with your finger.
Press and hold: To open the available option for an item (e.g. contact or link
in a web page), simply press and hold the item.
Swipe or slide: To swipe or slide means to drag your finger vertically or
horizontally across the screen.
Drag: Press and hold your finger with some pressure before you start to drag.
While dragging, do not release your finger until you have reached the target
position.
Rotate: For most screens, you can automatically change the screen
orientation from portrait to landscape by turning the device sideways. When
entering text, you can turn the device sideways to bring up a bigger keyboard.
Refer to Settings chapter for more details.
3.7 Coping files to and from the storage card
You can copy music, photos/pictures and others to your device to
personalize your device.
Use the USB cable that came with your device to connect it to a USB port on
your computer.
when the icon
appears in the notification area, open the notification
panel and tap USB Connected to popup the following screen:
tap
, when the notification icon
turns yellow, the
computer will recognize your device as a removable disk;
find the removable disk and open it. Do one of the followings:
Copy the files from the computer to the storage card’s root folder.
Copy the files from the storage card to a folder in your computer or
computer desktop.
after copying the files, unmount the removable disk (that is, your device) as
required by your computer’s operating system to safely remove your device.
disconnect your device from the computer.
If your want your device remain connecting to the computer and enable
reading its storage card, you can open the Notifications panel and tap
.
[Note]: you can also realize communication between the device and the
computer by tapping Settings> Developer options>USB Debugging.
3.8 Searching the device and the web
You can search for information on your device and on the Web by using the
Quick Search Box.
press
on the home screen to enter into all apps interface;
tap Search and then enter the search item in the Quick Search Box
As you type, matching items on your device and suggestions from Google
web search are shown as a list. The suggested items that appear will depend on
the options that you have selected in the search settings.
Do one of the following:
If what you’re searching for is in the list of suggestions, tap it in the list. The
item opens in the appropriate application.
If what you’re searching for is not in the list, tap
to open the search
option menu. Tap Web and then tap
to search the Web. The web browser
opens, displaying results of a Google search on the Web
Chapter IV Personalizing
4.1 Change the Notification ringtone
Choose from the available selections of notification ringtones on your
device. You can also download or copy notification ringtones or songs to your
device' storage card and choose one to use as your notification ringtone. To find
out how you can copy files to your storage card, see “Coping files to and from
the storage card”.
In the Home screen, tap Settings > Sound > Default notification.
Tap the notification ringtone you want to use. The notification ringtone
briefly plays when selected.
1. Tap OK.
4.2 Change your wallpaper
Personalizing your Home screen wallpaper with your favorite photo is a
quick and easy way to change the feel of your device and give it a fresh look.
Browse the collection of wallpapers included in your device or choose from
photos that you have taken with the camera.
To change your Home screen or lock screen wallpaper, you can:
1. tap Settings>Display
2. and then tap Wallpaper.
【Note】: you can also tap the menu icon on the home screen and then select
Wallpaper.
choose source of wallpaper
you can do one of the following:
Tap Super-HD Player to select a photo/picture that you have taken using
the camera or copied to your storage card. Tap Crop to crop the photo/picture
and set the cropped picture as wallpaper.
Tap Wallpapers gallery to choose from preset wallpapers and then tap Set
wallpaper.
Tap Live Wallpapers gallery to choose from preset wallpapers and then tap
Set wallpaper.
4.3 Personalize your Home screen with widgets
Widgets put at-a-glance important information and media content up front
on your Home screen. Some widgets are already added to your Home screen for
your convenience. You can add more from the available selections of widgets, or
download more widgets.
① adding a widget to your Home screen
For details on how to add a widget to your Home screen, please refer to
section 3.2 Shortcuts to Add widgets.
[Note]: To remove a widget, press and hold the widget until the icon
appears, drag the widget onto it and release your finger.
②Adding folders on your Home screen
Use folders to group related applications and other shortcuts to keep your
Home screen tidy and organized.
1. Press and hold the application shortcut and stack it onto another shortcut to create
a folder for the applications you want to file together, and then release your finger
to finish creating a folder. You can drag any other application shortcut into the new
folder.
To rename a folder:
2. Tap the folder to open it.
3. Tap Unnamed Folder to prompt the keyboard.
4. Enter a new folder name and then tap OK.
4.4 Rearrange or remove widgets and icons on your Home screen
Rearrange the widgets and icons on your Home screen to give room for adding more
items to the Home screen. You can also remove widgets and icons that you don’t
frequently use.
① Moving a widget or icon
1. Press and hold the widget or icon you want to move.
You’ll see a yellow box around the widget or icon. Don’t release your finger.
2. Drag the widget or icon to a new location on the screen.
Pause at the left or right edge of the screen to drag the widget or icon onto another
Home screen panel.
3. When the widget or icon is where you want it, release your finger.
If you’ve released your finger but a message shows that there’s no space to place
the widget or icon, drag it right or left again to another Home screen panel.
② Removing a widget or icon
1. Press and hold the widget or icon you want to remove. You’ll see a yellow box
around the widget or icon. Don’t release your finger.
2. Drag the widget onto the cross icon
on the screen.
When the widget or icon also turns red, release you
Chapter V Web browsing
User can connect to the network via the browser.
Tap the browser icon
on the Home screen to open it as follows:
Chapter VI Manage Applications
You can personalize and enrich your PE11 by installing a wide variety of free and
paid apps ranging from productivity apps, entertainment, to games. When you find a
program you want, you can easily download and install it on your PE11with just a few
steps as follows:
How to install Android third-party programs
1. download the programs you want from web sites and store them into your
storage card or local memory. You can also copy programs downloaded on your
computer into your storage card or local memory;
2. run the application File manager
3. find the third-party program you want, and then use functions of File manager
to install it to your device.
How to uninstall Android third-party programs
To dismount the program, you can also use functions of File manager and you can
also by tapping Settings > Apps> Downloaded to uninstall a third-party application.
Chapter VII Typical applications introduction
7.1 GPS Info
Tap
in the Home screen and the tap the GPS Info icon
to enter the
following interface:
[Note]: you can enter the above screen by tapping Navi> GPS Info.
To reset the GPS satellite receiver, you can tap
and a dialog box will
popup as follows:
7.2 FM Transmitter
FM Transmitter lets you listen to FM radio station on your PE11.
[Note]: To use the FM function, you need to insert power supply as an FM
transmitter.
To listen to an FM station, you should, tap the icon
to the FM Transmitter interface as follows
in the Home screen to go
Definition of icons is listed as follows:
FM radio frequency
Tap to fine tune the radio frequency by-0.1 MHz.
Tap to fine tune the radio frequency by +0.1 MHz.
Drag to tune in to a frequency on the FM band.
Turn off or on FM radio.
Tap to exit
7.3 File Manager
① Introduction to File Manager
On the Home screen, tap the file manager icon
to open it as follows:
Tap to back to the previous interface
Tap to display files in local storage card
Tap to display files in T Flash card
Tap to display files in other external storage device
Tap to display all pictures/photos
Tap to display all video files
Tap to open the tool box for process info and application backup
Tap to open/shutdown multiple choice of items
② File Management
In the above screen, you can search a wanted file quickly and you can also manage your
files in the local disk and your storage card. In addition, you can create/rename file
folder(s) and uninstall a third party application.
Paste: press
to select an item/multiple items in the list and tap Copy/Move,
and then go to the file folder where you want to copy/move the item(s) in, then press
and hold the folder until the Folder operation menu popup, select Paste into Folder.
Delete: press
to select an item/multiple items and tap Delete to delete the
item(s) directly.
Folder operation
Press and hold any folder in the local disk or your storage card until the Folder operation
menu pop up as follows:
You can select an option to execute corresponding operations.
Search: when you do not know the definite location of an item or there are many items
in the list, to find it quickly, you can tap the Menu icon
and then tap
to
open the keyboard to search it.
7.4 Instant Messaging tools
You can download and install chat tools on your device such as Fring, MSN Massager and
so on.
7.5 Emails
Tap the launcher icon
on the Home screen to display all icons, tap the
Email/Gmail icon to run it. You can:
1. set mail accounts
2. create new mails
3. receive and send mails
4. download or open the attached files
Chapter VIII Settings
Control and customize your device settings on the Settings screen.
To open the Settings screen, simply tap the Settings icon
on the Home screen.
You can scroll on the screen upwards/downwards to check the rest setting items.
8.1 Wireless & networks
Configure your device’s wireless connections, e.g., Wi-Fi, enable the Airplane mode, or
set the options for mobile networks, Virtual Private Networks, and more.
Wi-Fi
To turn on/off Wi-Fi, simply slide your finger rightward/leftward on the control bar.
8.2 Sound
Set the device and notification ring tones, volume adjust, vibrate and silent mode
operation.
Volume
To adjust the volume for media, games, and alarms:
1.
2.
tap Settings > Sound > Volume;
drag the control bar leftwards/rightwards to turn down/up the
volume for media and notification;
3. tap OK .
Notification ringtone
To set a notification ringtone:
4. tap Settings > Sound > Default notification
5. tap a ringtone to listen to it
6. enable a ringtone as notification ringtone by tapping OK.
Touch sound
Check to enable sounds when touching the screen.
Screen lock sounds
Check to enable playing sound when making screen selection.
8.3 Display
Set the screen brightness, wallpaper, font size and screen timeout.
Brightness
Use the slider to set a brightness level you want at all times when using the PE11. For
the best battery performance, use the dimmest comfortable brightness.
Wallpaper
Tap to select source of wallpaper and set wallpaper for the device.
Sleep
Opens a dialog where you can set how long to wait after you tap the screen or press a
button before the screen darkens. For the best battery performance, use the shortest
convenient timeout.
Font size
Opens a dialog where you can set font size.
Accelerometer coordinate system
Open a dialog where you can set the coordinate system for the device.
Screen adaption
Check to enable screen adaption.
8.4 Storage
Check the usage condition of the storage space on the internal l& external storage card.
You can erase all data on the SD card and unmount the external SD card for safety
removal.
Unmount the SD card: tap settings > storage > unmount shared storage > OK.
Tap
and then select USB computer connection to set the connection type, there are
3 modes provided: Media device, Camera and Mass storage
When the storage card remains in your device, you can tap Mount Storage to mount and
read data in the storage card.
8.5 Apps
Manage applications and installation of new programs.
Apps
Opens a list of all the applications and other software installed on your PE11, along with
their sizes. By default, only downloaded applications are shown, and they are sorted in
alphabetical order. Press
and tap Sort by size to display applications in order by size.
Tap an application to open its Application Info screen.
To manage and /or remove uploaded applications, tap Settings > Apps > Downloaded.
Running services
To check and control running service, tap Settings > Apps > Running.
8.6 Accounts& Sync
Log in or out from your social network accounts, Google Account, and Exchange
ActiveSync account. You can also manage synchronization and other settings for your
accounts.
Tap Add account in the above screen to add new accounts by following onscreen
instructions. Tap the icon
to prompt the following screen to manage your
accounts:
Check
to turn on/off data synchronization, press the menu icon
and then tap
to remove the selected account from your device.
8.7 Location service
Enable applications using data from sources such as Wi-Fi and mobile networks to
orientate your location and improve Google search results via check the options.
8.8 Security settings
Set the screen lock mode and owner information, encrypt your device, manage
password and administrate your device.
To set screen lock mode, tap Settings > Security> Screen lock to personalize the screen
lock mode for you device.
Unknown source
Check to permit installation of applications that you obtain from web sites, email, or
other locations other than Android Market.
8.9 Language & Keyboard setting
Use the Language & Keyboard settings to select the language for the text on your PE11
and for configuring the onscreen keyboard, including words that you’ve added to its
dictionary.
8.10 Backup &reset
You can enable or disable the automatic backup feature of the device and reset the
device.
[Note]: after factory data reset, you personalizing settings and the installed third-party
applications will be removed from your device. Before restoring default settings, it is
suggested to backup data/applications you want and remove your storage card safely in
case of data loss or damage during restoring factory default settings.
8.11Date & Time setting
Set the date and time, time zone, and date or time format. To turn off auto time
synchronization and be able to manually change time zone settings.
Automatic: Uncheck to set the date, time, and time zone on PE11 manually, rather than
obtaining the current time from the mobile network.
Set date: If Automatic is unchecked, opens a dialog where you can manually set PE11’s
date.
Select time zone : If Automatic is unchecked, opens a dialog where you can set PE11’s
time zone.
Set time: If Automatic is unchecked, opens a dialog where you can set PE11’s time.
Use 24-hour format: Check to display the time using 24-hour time format, for example,
13:00 rather than 1:00 pm.
Select date format: Opens a dialog where you can select the format for displaying dates
8.12Accessibility
TalkBack: check to provide spoken feedback to help blind users
Identify Gesture: tap to enable identify gesture app
Large text: check to enlarge text
Auto-rotate screen: Check to automatically switch the orientation of the screen as you
turn the device sideways or even upside down.
Speak password: check to enable speak password
Text-to-speech output:tap on it to open a screen on which you can listen to an example
of speech synthesis, enable/disenable your settings, to check default engine, to set
speech rate and language and so on.
Touch&hold delay: tap to select the time delayed for hold & touch.
Enhance web accessibility: tap to enable/disenable installing scripts from Google that
make their web contain more accessibility.
8.13Developer options
You can set the USB debugging mode, select screen stay awake and so on. And you can
also manage user interface and apps.
USB debugging: Check to permit debugging tools on a computer to communicate with
your PE11 via a USB connection.
Stay awake: Check to prevent the screen from dimming and locking when the PE11 is
connected to a charger or to a USB device that provides power. Don’t use this setting
with a static image on the PE11 for long periods of time, or the screen may be marked
with that image.
Allow mock locations: Check to permit a development tool on a computer to control
where the PE11 believes it is located, rather than using the PE11’s own internal tools for
this purpose.
8.14About Device
View the device status such as the network type, battery power level, and network
name. You can also check the battery use of individual applications or view the legal
information and software version of your PE11.
Chapter IX Troubleshooting
9.1 Force shutdown
Press the Power Button for about 5 seconds and the device will be forced shutdown
9.2 Restore default settings
To restore the factory default settings, you can tap Settings > Backup& reset> Factory
data reset.
Warning: data of your Google account, your personalized settings, installed appellations
will be removed from your device once you execute factory default settings, so please
make a careful decision whether to restore default settings. Before restoring default
settings, it is suggested to backup data/applications you want.
9.3 System updating
After system update/upgrade, it may occur that the uploaded third-party can not run or
its data loss/damage. This is normal phenomena rather than system fault. You just need
to upload and installed the third-party applications again in the device. It is
recommended to backup data of the third-party applications before system
update/upgrade.
9.4 Reset
When the system halts accidentally or does not response, please press the Reset key to
force the system stop or press and hold the power button for 8 seconds to turn off the
device forcibly.
[Note]: it is normal for the device feels hot during charging, please use at ease.
Chapter X Product Specification
Processors, Memory Characteristics
Processor Type
ALLWINNER A10 Android4.0.3
DDR
512MB DDRⅢ
NAND Flash
Built-in 8GB
Display Screen
Compatible with 7.0/4.3/5.0 inch hd
Screen Resolution
800X480 pixel
The Outer I/O Port
A USB 2.0 Port compatible with FM
Function
Expand memory card, TF card support up
to 64 GB capacity
A Earphone Port
A AV IN port,compatible automatic reverse
function
Speaker
Built-in
MIC
Built-in
Features
Camera with Pulled
Wire
Supported line length: 6 meters
Full screen touch
Supported both capacitive and resistive
touch
Remote
Function
Supported(For customer to choose)
Control
GPS Navigation
Supported and Built-in
AV OUT
Supported
FM
Supported
Photograph
Supported
Camera Rotation
Supported Manually Rotate 350 °
Video Chat
Supported
Bluetooth
Supported
Automatic Reversing
Visual
Supported
SENSOR
Samsung
S5K4EC
500W
SamsungS5K4AW 130W pixel
Camera Angle
140 ° Wide-Angle
Video Format
MP4
Image Format
JPEG
Storage
Compression Way
H.264
Battery Type
800mAh Polymer Lithium Battery
pixel/
Software Support
Language
Many countries' language
G-SENSOR
Supported
Motion Detecting
Supported
Delay Shutdown
Supported
Loop Video
Supported And No leakage seconds
Recording Function
Supported
Fill Light For Night
Supported
PIP
Supported
Parking Recording
Supported(For customer to choose)
Quality of Front
Camera's Video
Highest support 1920*1080 ( 20f/s )
HD1280x720(30f/s)
D1 720X480 30f/s
Quality of Back
Camera's Video
Photo resolution
Highest Support 5M
Chapter XI FAQ
If your system does not work, please do the following. If still not out of the
question, please contact with our company customer service center.
Fault
Reason
Solution
Startup failure
Low battery
Supply external power and charge
the battery.
System down
Reset the GPS navigator.
Sudden power cut
Low battery
Supply external power and charge
the battery.
No/ vague display
Low backlight
Turn up the backlight.
Backlight off
Tap the screen with the touch pen.
Incorrect tapping
response
Touch screen
calibrated
No sounds
Low volume
not Recalibrate the screen.
Poor
contact
earphone
Turn up the volume.
of Connect the earphone.
Communication with PC Poor USB connection Connect the USB cable.
GPS signals reception
failure
Weak GPS satellite
signal
About 3 minutes are needed for low
intensity of local GPS satellite
signal.
Loss of map data
Accidental deletion
Contact your agent or distributor.
Input a new password after
recovering the GPS data.
[tip]: 1. long press power button for 8 seconds, the device will force the shutdown.
1. original factory set and clear all data, please press the menu button →
settings → privacy → restore factory settings. Selection of resetting the
device will delete the Google account, system and application data and
settings, download the application, please use this carefully.
2. After the upgrade of the system, third party program installed will be unable to
use or data loss. this is a normal, not a system failure, you need to download
and install third party applications again. Backup before update.
Note: When charging the fuselage will be hot, which belongs to the normal
situation, Please Don 't worry