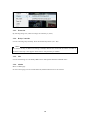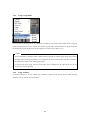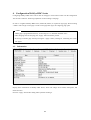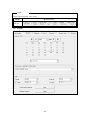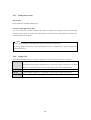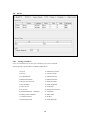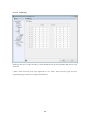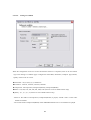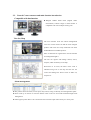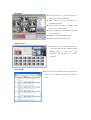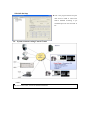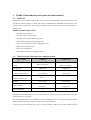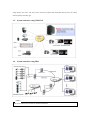
1
WebEye HDC Series User’s Guide HDC730 (v 1.2) - Caution As this equipment undergone EMC registration and suitable for business purpose, distributors and users are aware of this point. FCC Compliance Statement Caution : Any changes or modifications in construction of this device which are not expressly approved the party responsible for compliance could void the user's authority to operate the equipment. NOTE : This equipment has been tested and found to comply with the limits for a Class B digital device, pursuant to part 15 of the FCC Rules. These limits are designed to provide reasonable protection against harmful interference in a residential installation. This equipment generates, uses and can radiate radio frequency energy and, if not installed and used in accordance with the instructions, may cause harmful interference to radio communications, However, there is no guarantee that interference will not occur in a particular installation. If this equipment does cause harmful interference to radio or television reception, which can be determined by turning the equipment off and on, the user is encouraged to try to correct the interference by one or more of the following measures: - Reorient or relocate the receiving antenna. - Increase the separation between the equipment and receiver. - Connect the equipment into an outlet on a circuit different from that to which the receiver is connected. - Consult the dealer or an experienced radio/TV technician for help. Caution Change or Modifications not expressly approved by the party responsible for compliance could void the users authority to operate the equipment Warning 1. Danger of explosion if battery is incorrectly replaced. Replace only with the same or equivalent type. Disposal of used batteries according to the general recommendations against the environmental pollution. 2. Do not throw the batteries into a fire, and do not heat, short-circuit or attempt to disassemble the batteries. Important Notice 1. WebEye HDC Series is for indoor use, which is not weatherproof. Use WebEye HDC Series with referring to its environmental specifications (Temperature & Humidity). In case of using out of environmental specifications, use additional case to be available weaterproof control. To clean WebEye HDC Series, gently wipe the outside with a clean dry cloth. 2. WebEye HDC Series may harmful for the physical shocks, so DC power should be used with standard adapter provided by Webgate Inc. Please correctly connect polarity of DC adapter (Wrong connection may cause a fire, an electric shock, and out of order). 3. Be careful not to drop the WebEye HDC Series. Physical shocks may harm the product, so please be careful not to drop or throw WebEye HDC Series. 4. WebEye HDC Series is made of metal. Therefore you can hurt human beings if you throw it to them or hit on them. When installing WebEye HDC Series, be cautious to locate on safe places where children are unreachable. 5. If WebEye HDC Series does not operate properly, please contact the closest WEBGATE Inc. distributor for after sales service. Tampering or disassembling the product will void the warranty. 6. WebEye HDC Series sends real-time video image via network and can be used for surveillance depending on the installation location. Therefore, please contact the local region first to avoid any surveillance law violations. The contents of this manual can be modified in accordance with Firmware or Software upgrade. In the interest of continually improving products, approval & outlook can be modified without prior notice. Contents 1. 2. Overview................................................................................................................................. 9 1.1. WebEye HDC Series.......................................................................................................... 9 1.2. WebEye HDC Series Installation....................................................................................... 10 1.3. Recommended PC Environment ....................................................................................... 10 1.4. Control Center Lite-W Program Installation....................................................................... 11 1.5. Java Plug-in Installation ................................................................................................... 15 Accessing WebEye HDC Series homepage & viewing real-time image ................................... 16 2.1. 2.1.1. Login ...................................................................................................................... 16 2.1.2. Reset ....................................................................................................................... 17 2.2. 3. Login Page...................................................................................................................... 16 Single Viewer Page.......................................................................................................... 17 2.2.1. Select Channel ......................................................................................................... 17 2.2.2. Stream..................................................................................................................... 17 2.2.3. Extension ................................................................................................................ 18 2.2.4. Relay Controller....................................................................................................... 18 2.2.5. Mic ......................................................................................................................... 18 2.2.6. Admin ..................................................................................................................... 18 Using advanced function of WebEye HDC Series .................................................................. 19 3.1. Caption........................................................................................................................... 19 3.2. Stream ............................................................................................................................ 19 3.3. Recording Image ............................................................................................................. 20 3.3.1. Recording moving image .......................................................................................... 20 3.3.2. Recording still image................................................................................................ 20 3.4. Controlling PTZ .............................................................................................................. 20 3.4.1. Controlling Pan/Tilt.................................................................................................. 21 3.4.2. Controlling Zoom/Focus ........................................................................................... 21 3.4.3. Controlling Area Zoom ............................................................................................. 21 3.4.4. Controlling Preset .................................................................................................... 21 3.4.5. Using Group Mode................................................................................................... 22 3.4.6. Using Auxiliary........................................................................................................ 22 4 4. Configuration WebEye HDC Series....................................................................................... 23 4.1. Information ..................................................................................................................... 23 4.2. System............................................................................................................................ 24 4.2.1. Setting Date & Time ................................................................................................. 25 4.2.2. Setting NTP ............................................................................................................. 25 4.2.3. Default Setting ......................................................................................................... 26 4.2.4. Rebooting System .................................................................................................... 26 Network.......................................................................................................................... 26 4.3. 4.3.1. Setting Network ....................................................................................................... 27 4.3.1.1. In case of using Ethernet Network ...................................................................... 27 4.3.1.2. In case of using xDSL network........................................................................... 27 4.3.2. WRS (Dynamic IP Registration Sever)....................................................................... 28 4.3.3. Setting Port.............................................................................................................. 29 4.4. User ............................................................................................................................... 30 4.4.1. Setting User Account ................................................................................................ 30 4.4.2. Setting FTP User Account ......................................................................................... 31 4.5. Channel .......................................................................................................................... 32 4.5.1. Setting Video Channel .............................................................................................. 32 4.5.2. Setting PTZ ............................................................................................................. 34 4.5.3. Image Calibration..................................................................................................... 35 4.6. Security .......................................................................................................................... 35 4.7. E-mail/FTP ..................................................................................................................... 36 4.7.1. Setting E-mail Sending ............................................................................................. 36 4.7.2. Setting FTP sending ................................................................................................. 37 4.8. Device ............................................................................................................................ 38 4.8.1. Setting Serial Port .................................................................................................... 38 4.8.2. Setting Sensor Type .................................................................................................. 39 4.9. Sensor Preset................................................................................................................... 39 PTZ ............................................................................................................................ 40 4.10. 4.10.1. Setting Preset ........................................................................................................... 41 4.10.2. Setting Group Mode ................................................................................................. 41 4.10.3. Setting Auxiliary ...................................................................................................... 42 4.11. Video Control.................................................................................................................. 43 5 5. 4.12. Relay .......................................................................................................................... 45 4.13. Schedule ..................................................................................................................... 46 4.13.1. Setting Time Schedule .............................................................................................. 46 4.13.2. Setting Special Time................................................................................................. 46 Utility.................................................................................................................................... 47 5.1. Control Center Lite-W Configuration Tool......................................................................... 47 5.1.1. Site Tree .................................................................................................................. 47 5.1.1.1. My Units Registration & Deleting ...................................................................... 47 5.1.2. Menu....................................................................................................................... 47 5.1.3. Configuration Page................................................................................................... 48 5.1.3.1. System Setting .................................................................................................. 48 5.1.3.2. Camera ............................................................................................................ 49 5.1.3.2.1. Setting Video Channel .............................................................................................50 5.1.3.3. Time/Date ........................................................................................................ 52 5.1.3.3.1. Setting Date & Time ................................................................................................52 5.1.3.3.2. Setting NTP .............................................................................................................52 5.1.3.4. Connectivity ..................................................................................................... 53 5.1.3.4.1. In case of using Ethernet..........................................................................................53 5.1.3.4.2. In case of using xDSL..............................................................................................54 5.1.3.4.3. WRS (Dynamic IP Registration Sever) ...................................................................55 5.1.3.4.4. Setting a Port ...........................................................................................................55 5.1.3.5. COM Port ........................................................................................................ 56 5.1.3.5.1. Selecting device linking serial port..........................................................................56 5.1.3.6. PTZ ................................................................................................................. 57 5.1.3.6.1. Setting PTZ..............................................................................................................57 5.1.3.6.2. Setting Preset ...........................................................................................................58 5.1.3.6.3. Setting Group...........................................................................................................59 5.1.3.6.4. Setting Auxiliary......................................................................................................59 5.1.3.7. Audio............................................................................................................... 61 5.1.3.8. User Account .................................................................................................... 62 5.1.3.8.1. Setting User Account ...............................................................................................62 5.1.3.8.2. Setting FTP User Account .......................................................................................63 5.1.3.9. User Authority .................................................................................................. 64 5.1.3.10. IP Filtering ....................................................................................................... 65 5.1.3.11. Video Control ................................................................................................... 66 5.1.3.12. Time Scheduling ............................................................................................... 68 6 5.1.3.12.1. Setting Time Schedule ...........................................................................................69 5.1.3.12.2. Setting Special Time ..............................................................................................69 5.1.3.13. MD.................................................................................................................. 69 5.1.3.14. Input ................................................................................................................ 70 5.1.3.15. Relay ............................................................................................................... 71 5.1.3.16. FTP ................................................................................................................. 72 5.1.3.17. E-Mail ............................................................................................................. 73 5.1.3.18. SensorPreset ..................................................................................................... 74 5.2. Mini Player ..................................................................................................................... 75 5.3. Onetime Password ........................................................................................................... 76 5.4. File Converter2 ............................................................................................................... 78 5.4.1. How to use File Converter2 program.......................................................................... 78 5.4.1.1. Convert eye file(s) to jpg of bmp file(s) .............................................................. 79 5.4.1.1.1. Select Source ...........................................................................................................79 5.4.1.1.2. Output file Type .......................................................................................................80 5.4.1.1.3. Destination Folder ...................................................................................................81 5.4.1.1.4. Converting ...............................................................................................................82 5.4.1.2. Convert sequential eye files to a rec file. ............................................................. 83 5.4.1.2.1. Select Source and destination ..................................................................................83 5.4.1.2.2. Converting ...............................................................................................................84 5.4.1.3. Convert sequential eye files to a avi file. ............................................................. 85 5.4.1.3.1. Select Source and destination ..................................................................................85 5.4.1.3.2. Setting avi condition ................................................................................................86 5.4.1.3.3. Converting ...............................................................................................................87 5.4.1.4. Convert rec file to a avi file................................................................................ 88 5.4.1.4.1. Select Source ...........................................................................................................88 5.4.1.4.2. Password File Login ................................................................................................89 5.4.1.4.3. Select time interval and channel information for avi ...............................................90 5.4.1.4.4. Setting avi condtion .................................................................................................91 5.4.1.4.5. Destination Folder ...................................................................................................92 5.4.1.4.6. Converting ...............................................................................................................93 Appendix .................................................................................................................................... 94 1. Key Features per model ........................................................................................................ 95 2. Control Center series introduction and system construct....................................................... 96 2.1. Control Center................................................................................................................. 96 7 3. 4. 5. 6. 2.2. Control Center series function comparison table................................................................. 96 2.3. Control Center construct and main function introduction..................................................... 97 2.4. System construct using Control Center .............................................................................. 99 WinDVrS introduction and system structure method .......................................................... 100 3.1. WinDVrS ...................................................................................................................... 100 3.2. WinDVrS Series Main function comparison chart............................................................. 100 3.3. System structure using WinDVrS .................................................................................... 101 3.4. System structure using RDS ........................................................................................... 101 WESK introduction for more power use.............................................................................. 102 4.1. WESP(WEBGATE Embedded Standard Protocol) SDK ................................................... 102 4.2. WESP SDK usage sample .............................................................................................. 102 WebEye data page making process...................................................................................... 107 5.1. 4channel video image page making ................................................................................. 108 5.2. Moving picture of device making using Staic IP not via WRS ........................................... 109 Modification of product URL .............................................................................................. 110 6.1. Homepage modification ................................................................................................. 110 8 1. Overview 1.1. WebEye HDC Series WebEye HDC Series is the high resolution camera products based on MPEG-4 compression method. It displays images from remote site to the users at real time. This is network camera in one body including built-in Flash memory, internet server, and digital compressure. WebEye HDC Series Key Features Simultanous support for MPEG-4, JPEG 1280 x 720(720p) 30fps, 1280x960 22.5fps Supports Progrressive scan 1280 x 960, VGA, QVGA Resolution is supported. 1280 x 720, (x1/4), (x1/16) Resolution is supported. PoE(Power of Ethernet) 1.25M effective pixel color Exview HAD CCD Support 4.5MB memory for homepage Support simultaneous monitoring & setting Embedded Linux OS for excellent stability 2 External sensor input / 2 Alarm output support S/W motion detection Event triggered E-Mail & FTP sending function Two ways audio support Software management control (Control Center) Support static or dynamic IP for xDSL and cable-modem user Support RS232, RS422, RS485 port control Support WESP SDK for system unification and project management Certification : FCC, CE, MIC, RoHS <Note> Please refer to the “Key Features per Model“ of Appendix for more information. 9 1.2. WebEye HDC Series Installation (1) Connect power and local network to WebEye HDC Series (2) Install Control Center Lite-W program (3) Assign IP address to WebEye HDC Series and connect to homepage (4) Configure managing environment for WebEye HDC Series (5) Locate WebEye HDC Series at the station to manage and reconnect power & network wire <Note> Please refer to the “Installation and Connection“ per WebEye HDC Series model. 1.3. Recommended PC Environment Recommended CPU Intel Core™ 2 Duo 2.66Ghz Memory (RAM) 2GB VGA 256MB Resolution 1280ⅹ1024 HDD 1GB or higher OS Windows XP SP2 or above Browser Internet Explorer 6.0 SP2 or above Others WespController Java Plug-in 1.5.x DirectX 8.1 or higher WebEye HDC Series730 is optimized on the based of Windows XP (SP2 or above) and Internet Explorer 6.0 or above (SP2 or above). Above Jave Plug-in 1.5 x version shuld be installed in the system in case that user use web browser to configure or monitor instead of Control Center Lite-W. When using basic video driver that Microsoft supports, DirectX may cause abnormal display or low performance. In this case, do not use DirectX or install the newest video driver with searching for website. 10 1.4. Control Center Lite-W Program Installation (1) Run “Control Center Lite-W Setup v1.x.x.x.exe ” file in Seup CD included. (2) Select a language and click the “OK” button. (3) Press the “I Agree” button for agreement after read “License Agreement”, and next processing. 11 (4) In order to use all functions of WebEye, select “Control Center Lite-W”, “Playback”, “Config”, “WESP SDK”, “File converter”, “Onetime Password”, “Mini Player”. Control Center Lite-W It is the essential program to view video images via Webeye. Playback Program to playback quick recording files. Config Program for Webeye setting. WESP SDK Install WESP library file used in Webeye. Tools Install Mini Player, File Converter converter, Onetime Password Program. DirectX Setup Install DirectX. Startup ShortCut Run when registered at the startup program of windows 12 (5) Select a folder to install and press the “Install” button. (6) Complete the installation by click the “Close” button. 13 Check whether all programs below are installed. -. Control Center Lite-W Monitor -. Control Center Lite-W ConfigStation Tool -. Control Center Lite-W Playback -. Tool +. File Converter (Recording file conversion program) +. Mini Player (Recorded file playback program) +. Onetime Password (Password creating program for a single use) 14 1.5. Java Plug-in Installation To access at WebEye HDC Series from other browser environment rather than Internet Explorer or access at administratior’s configuration page for WebEye HDC Series, Java Plug-in 1.5.x over version should be installed. When accessing WebEye HDC Series for the first time from the PC installed Java Virtual Machine, it is downloaded and installed automatically with accessing a link page of Java Plug-in 1.5.x that is supplied in Sun Microsystems Inc. To install Java Plug-in 1.5.x, it should be connected to Internet. URL in which you can download Java Virtual Machine at the web page of Sun Microsystems Inc. is http://java.com/en/index.jsp, and you can also download and install J2SE(Java 2 Runtime Environment, Standard Edition) 1.5.x or above by linking to http://java.sun.com. 15 2. Accessing WebEye HDC Series homepage & viewing real-time image <Note> The following example is when accessing WebEye HDC Series at Microsoft’s Internet Explorer Run Internet Explorer and access WebEye HDC Series homepage by entering its IP address. If accessing at WebEye HDC Series normally, log-in page will be opened. 2.1. Login Page 2.1.1. Login Enter User ID & password, then press the “Enter” key or click the “Login” button. If ID & password are correct, Single Viewer page will be opened. The default user ID is “admin” and “guest.” The default password is the same as ID 16 <Note> WebEye HDC Series is secure from password leakage at the Internet to apply high level security code for user’s password when log-in. 2.1.2. Reset Use for resetting the entered User ID & Password. 2.2. Single Viewer Page 2.2.1. Select Channel Select channel to view 2.2.2. Stream Stream selection menu will come up on the screen after configuration of stream. The user is able to select the stream from the menu. 17 2.2.3. Extension By selecting image size, small size image can extend by 2 (1x/2x). 2.2.4. Relay Controller Use for controling relay manually. Press the related relay button. (R1 ~ R2) <Note> The number of relay is different according to WebEye HDC Series model and the number of button is the same as the relay it can support. Please refer to “Key Features per Model”. 2.2.5. Mic Use for transmitting voice to WebEye HDC Series. Microphone should be installed on PC. 2.2.6. Admin Move to admin page. In case of not loging in as the current admin ID, Admin link menu won’t be showed. 18 3. Using advanced function of WebEye HDC Series When clicking the right button of mouse on the image at viewer page, a pop-up menu will appear, which includes Caption, Select Stream, Recording Image, Controlling Audio, PTZ Control, and so on. 3.1. Caption 팝업 메뉴에서 Caption을 선택한다. 영상에 표시하고자 하는 Caption 정보를 선택한다. 3.2. Stream Stream selection menu will come up on the screen after configuration of stream. The user is able to select the stream from the menu. 19 <Note> The below table shows the number of channel by each resolution with MPEG4 Stream which can be monitoring from Control Center Program. Resolution Number of Channel QCIF 32 CIF 8 HALF 4 FULL 2 (* In case of each stream with 30ips) In case of MPEG4 Streaming from Control Center Monitor Program, It supports up to 60ips with full size monitoring. And it will output each picture per second In case of user request more than 3 with full resolution. The Control Center Program will not support maximum image output (support one picture per second), if the user’s PC has lack of performance. 3.3. Recording Image 3.3.1. Recording moving image When selecting “Rec Start” at pop-up menu, “REC 00:10” is displayed on image and recording is started. In order to stop recording, select “Rec Stop” at pop-up menu. Then a dialoge for saving a recorded file appears. Save it after assigning folder and file name. <Note> The type of recorded file is “re4”, and it can be played with MiniPlayer. The recording for one “re4” file can be recorded for max 10 minutes. 3.3.2. Recording still image When selecting “Save As File” of pop-up menu, a still image can be saved as a format of bitmap (*.bmp) or jpeg, eye file (*.eye). 3.4. Controlling PTZ If WebEye HDC Series is connected to PTZ device when logging-in with authotrity of controlling PTZ, PTZ is displayed in the pop-up menu. Tool for controlling PTZ will appear on the screen. As for product other than SPD, cross line (left) appears, and as for SPD rectangle (right) appears. Cross line means PTZ control mode, and rectangle means Area Zoom mode. 20 Z <Note> 1. When moving the mouse cursor to right or left margin of the screen, the slide bar for Zoom and Focus will appear. (Please refer to 3.3.2.). 2. The functions such as Pan, Tilt and Reverse can not be supported in Area Zoom In mode. 3.4.1. Controlling Pan/Tilt If PTZ is enabled, cross line appear on image. For controlling Pan, click left/right point. For controlling Tilt, click up/down point. When clicking the far point, Pan/Tilt speeds up. 3.4.2. Controlling Zoom/Focus If moving mouse cursor to right/left side after enabling PTZ, Zoom control bar will appear in left side and Focus control bar will appear in right side. If clicking “Z0” button of Zoom control the angle of camera will return to the angle of initial setting. Zoom/Focus can be controlled with using these bars. 3.4.3. Controlling Area Zoom WebEye SPD model supports Area Zoom function. If setting a specific zone with Area Zoom function, it shows the zone with controlling Pan/Tilt/Zoom/Focus automatically. When controlling mouse with pressing “Shift” key in Area Zoom mode, it is changed to normal PTZ mode. In order to change default setting as normal PTZ mode, select “Normal PTZ Mode” in pop-up menu after pressing right button of mouse. 3.4.4. Controlling Preset If preset is set, “Goto Preset” is added at pop-up menu. If selecting a preset list, camera moves to preset position. 21 3.4.5. Using Group Mode User can execute group mode or set it disabled according to each mode on the 'Enable Group' of popup menu if group mode was setup”. Also if user enables a group mode, relevant number for group mode will be turned into red and displayed on the right upper part of the screen (“GM(1,2,3)”). <Note> 1. Even If PTZ menu is disabled under condition that group mode is enabled, group mode will perform normally.(But relevant group number is not displayed) So if user wants group mode not to perform, he should select 'None' in the enable group mode. 2. If slecting the unset group, relevant group name will be displayed in the right upper part of the screen, but it will not perform. 3.4.6. Using Auxiliary If auxiliary function is set, the related sign “Auxiliary” appears in the pop-up menu. When selecting function, user can execute relevant function. 22 4. Configuration WebEye HDC Series Configuring WebEye HDC Series can be done at webpage or with Control Center Lite-W Configuration Tool exclusive software. Following explanation is about setting at webpage. In order to congifure WebEye HDC Series, admin ID (admin) is required at login page. When clicking “Admin” link at single viewer page or multi viewer page after login, the cofiguring page opens. <Note> 1. Admin page is programmed with Java, so Java Plug-in 1.5.x should be installed on PC. 2. After changing value at each page, the “Apply” button should be pressed. 3. If moving to another page without pressing the “Apply” button, a dialog for confirming new value will appear. 4.1. Information Display basic information of WebEye HDC Series, which can change Server Name, Description, and Install Location. Press the “Apply” button after editing them by double-clicking it. 23 Z <Note> <Menu structure depends on the model> Model Menu Structure HDC730 4.2. System 24 4.2.1. Setting Date & Time Date & Time Set date and time of WebEye HDC Series. Timezone & Daylight Saving Time It is to set time zone of where WebEye HDC Series is installed. If selecting a time zone that DST (Daylight Saving Time) is applied, the related menu is activated. When setting DST as On, DST runs same with Microsoft Windows. Z <Note> If Time zone is changed, it will add time as much as Timezone to current time. Ex) If user changes current time +01:00(Amsterdam) 01:25 into +09:00(Seoul), it will be changed into +09:00(Seoul) 10:25 4.2.2. Setting NTP NTP (Network Time Protocol) is a protocol designed to synchronizie time of devices via network - Mode : Select server/client/both mode. Server mode it to supply time, and client mode is to synchronize time with the designated server with receiving time from the server. Both mode is to synchronize time with server and supply time to client simultaneously - Interval : Select time supplying interval when NTP mode is Client. (1/3/6/12/24Hour.) - IP Type : Select whether NTP Server is in Internet or local Network. (Public IP/Local IP) - Local IP : Enter NTP Server IP when IP type is local. 25 4.2.3. Default Setting Use for changing to default setting. Z <Note> The setting values of system date, time, network, and video type (NTSC/PAL) does not change. 4.2.4. Rebooting System Use for rebooting WebEye HDC Series 4.3. Network 26 4.3.1. Setting Network 4.3.1.1. In case of using Ethernet Network When using dynamic IP, select “DHCP Enable”. When using static IP, set the assigned IP address, subnet mask, gateway address, and DNS server <Note> In case of using static IP address, please ask to your local network administrator or ISP about proper IP setting. 4.3.1.2. In case of using xDSL network In case of using xDSL (ADSL, HDSL, VDSL) network, select xDSL and set user’s ID & password. 27 <Note> 1. xDSL has three kinds; ADSL, HDSL, and VDSL It can be used, when using PPPoE protocol. 2. When setting Network with xDSL, WRS menu should be set. (except for using static IP) 3. If Network is set as xDSL type, Ethernet can’t be connected. 4. User’s ID and password is supplied from each xDSL ISP. 5. When using automatic connecting modem, even though Network line is xDSL type, a value should be set as Ethernet. 4.3.2. WRS (Dynamic IP Registration Sever) If WebEye HDC Series is installed on a network of dynamic IP address (floating IP address), administrator should register the WebEye HDC Series on dynamic IP registration server to give common users simple connectivity. If not, no one can access the WebEye HDC Series through Web browser. It is because that no one knows IP address which one can access the WebEye HDC Series with. To solve the problem, WebGate runs WRS (Dynamic IP Registration Sever). - Interval : In order to maintain continuous connectivity, ‘Registration Interval’ should be set. Dynamic IP addresses are updated to WRS server periodically according to time interval. When IP is changed frequently, it is recommended to set as 1 minute. (1 minute/1 hour/3 hours/6 hours/12 hours/24 hours) - Server Address : IP address of WRS, which is managed by ‘WebGate Inc.’, is ‘210.116.114.37’. In case of assigning additional server, type domain name of the corresponding server. - Password : Password to access at user’s WebEye HDC Series from the registered static IP list. It is for preventing abnormal case thet users access WebEye HDC Series. - Group ID : Group ID is for discriminating and managing the information of WebEye HDC Series belonging to group. It is recommended unique group ID to avoid other group ID’s WebEye HDC Series. - Add Public List : Add WRS’s public list for WebEye HDC Series, which can be searched by users. 28 <Note> 1. Static IP registration is following as: - In case of using DHCP at Ethernet - In case of using xDSL (Except for using static IP) 2. If you want to confirm registration status after finishing registration at WRS, please refer to registered WebEye HDC Series list of home page or exclusive software of WebEye Configuration Tool. 4.3.3. Setting Port - Service Port : When WebEye HDC Series can’t be accessed against firewall, port should be changed. When setting another port number except for port 80 (WebEye HDC Series uses HTTP protocol basically), the port number should be entered at URL Ex) When setting WebEye HDC Series as port 800 : http://211.53/133/197:800/ - Idle Time : It is to distinguish whether network status of client is normal or not. If the network of client is not recorvered within idle time, WebEye HDC Series disconnects to the client. The default value is 3 minutes. (0~3600 seconds) <Note> To change service port, WebEye HDC Series should be automatically rebooted. 29 4.4. User 4.4.1. Setting User Account User Account There are two kinds of user; one is administrator and the other is general user. Thr administrator can set or change all values of WebEye HDC Series, but user can have all authorities except setting value. Admin ID is fixed as “admin” and only password can be changed. Maximal 4 User IDs can be added, and its ID/Passowrd is “guest/guest”. ID and password can be set upto 15 English characters. Permission User can just set Microphone, PTZ, relay output, and video viewing by each channel. The default value of user’s authority is only to view all channels. 30 4.4.2. Setting FTP User Account WebEye HDC Series has 4.5MB flash memory for homepage customization, which is changeable. User can access FTP server, which WebEye HDC Series supplies, and download / upload a file. The FTP user account is for accssing WebEye HDC Series. - User ID : Set user ID for accessing WebEye HDC Series by FTP. The default ID is “userftp”. - Change Password : When pressing “Change” button, dialogue box will appear. To change the current password, new password should be typed for changing it. Default value is not set. - One Time Password : It can be used in order to prevent unexpected open of password via Internet. <Note> FTP One Time Password is assigned through a supplied “Onetime Password” program. 31 4.5. Channel 4.5.1. Setting Video Channel Basic information, PTZ control, stream functions are configured on this menu. Channel Information - On : Set channel enable/disable - Channel Name : Set the name of channel - Black&White : Set black & white. - Rotate (180) : Set camera angle when camera is installed reversely. - Quality : Set image 10 level quality between Q1 and Q10. -MD Sensitivity : Set MD sensitivity (Disabled ~ High sensitivity) * MD : Motion Detection 32 Aspect ratio You can configure the resolution for each stream as below by selecting either two aspect ratio, HD720 and SXGA. Aspect Ratio Encoding Resolution HD720 MPEG/JPEG HD720 HD720/4 HD720/16 SXGA MPEG/JPEG SXGA VGA QVGA Stream The user can configure various menus such as Encoding type, Resolution, Quality, ips at stream menu. Stream #1 is fixed to MPEG while Stream #2 is fixed to MJPEG encoding method. Resolution The resolution per each stream is divided by HD720 and SXGA mode according to Aspect ratio and it provides image as follows, Resolution Size(pixel) Resolution Size(pixel) HD720 1280 x 720 SXGA 1280 x 960 HD720/4 640 x 360 VGA 640 x 480 HD720/16 320 x 180 QVGA 320 x 240 Quality When the user configure stream in MPEG mode, he/she can differentiate the video quality from Q1~Q10. Higher G10 indicates higher video quality. Frame rate 6 levels of frame (1, 3, 5, 7, 15, Max frame/sec) for each stream is available. However, Max frame rate values are variable according to resolution configured as below. - HD720, HD720/4, HD720/16 : 30 frame/sec - SXGA, VGA, QVGA : 22.5 frame/sec The status of device is changed to recording mode The status is changed to recording mode in case that the WebEye M-Series with firmware over v2.1.0.0 version is registered at network video recorder, NVS04S. In this case, stream is fixed as total 3 MPEG-4 stream based on the configuration of NVS04S and the user can not change stream as above by blocking configuration page. 33 In addition, relay, FTP transmission, email delivery functions are limited to configure in the NVS04S menu only. However the rest of functions are still available to confgure or use without exception. Back to normal mode The user can let the unit to go back to normal mode from recording mode by rebooting the unit through disconnection with NVS04S <Note> 1. If multiple streams are used Frame Rate / Quality could be low. 2. Defulat image quality is Q6 4.5.2. Setting PTZ Set PTZ device connected with the corresponding channel. It is possible when serial port is set in “Device” tab. And for setting advanced menu of PTZ, set them in “PTZ” tab. - Port : It is to set serial port that PTZ device is connected. - Address : It is to set base address of PTZ device. Base address should be set as each value of PTZ device. -Use Give&Take : It is to give or take PTZ controlling authority to PTZ authorized user except administrator. - Service Time : When setting “User Give&Take” set the controlling time. - Reverse Pan/Tilt : It is for controlling Pan/Tilt to reverse direction. This function cannot be supported in the Area Zoom In mode. 34 4.5.3. Image Calibration Set Brightness, Contrast, Saturation, Hue for gaining the best image. 4.6. Security This is to filter a certain IP addresses from accessing WebEye HDC Series. IP filtering is the function to accept/deny access from the corresponding IP of WebEye HDC Series using If administrator allows anyone except a few users to access WebEye HDC Series, administrator should select default policy as ‘allow’ and register a few users as denied users. If administrator denies all users except a few users to access WebEye HDC Series, administrator should select default policy as ‘deny’ and register a few users as allowed users. Maximal 10 IP groups can be registered. 35 4.7. E-mail/FTP 4.7.1. Setting E-mail Sending When sensor or MD is triggered, the related event can be informed by e-mail. The IP address of related WebEye HDC Series is indicated as title of e-mail. - Recipient : It is to designate e-mail address of person to receive e-mail. - Sender : Default value is ‘[email protected]’, but if entering more information with e-mail address, recipient will know easily which WebEye HDC Series sends. - Mail Duration : It is to e-mail sending duration between 1 minute and 24 hours. - Relay Server : Generally, mail server always checks whether relay server is registered to DNS in order to block spam mail. In this case, e-amil can’t be received since WebEye is not registered to DNS. To solve this problem, this function is useful. - MD, Sensor Check : It is to run according to setting of MD and Sensor. (MD1~MD6, S1~S6) The number of MD and sesor is different according to model. 36 <Note> Relay function of WebEye HDC Series is not allowed mostly. In this case, IP address of WebEye HDC Series should be registered to the related server to enable relay. 4.7.2. Setting FTP sending When sensor or MD is triggered, the related image can be informed by FTP. - Server Address : Set IP address or domain name of FTP server. - Remote Directory : Designate directory of FTP server to send image. - User Account & password : Det login ID and password to access FTP server. - Using Period : Det image sending period between 1 frame and 5 frames per hour. - Image Resolution : This resolution is automatically configured to the same value with Steam #2(JPEG) and transmitted. - Channel : Det event source (MD, and sensor input) per channel. - Image File Naming : The defualt name is basically same as the server name of WebEye and the date&time, channel number can be added by selection. The extension name of the file is *.eye <Note> 1.Default value of WebEye HDC Series server name is ‘WebEye’, which can be changed in “Information” tab. 2. When the FTP sending and the use the port except standard port(21), input port number behind colon(:) of FTP server address or Domain name. Ex) In case of port number 1000 of FTP server(211.53.133.197), input 211.53.133.197:1000 37 4.8. Device 4.8.1. Setting Serial Port It is to set external device on each port. PTZ device, TP can be connected. Following table is about PTZ list of WebEye HDC Series. 1. Pelco P 13. Mitubishi CIT7300 2. Pelco D 14. LG LPT-A100L 3. AD SpeedDome 15. Mikami PTC107 4. BOSCH AutoDome 16. Mikami PTC203 5. Merit-Lilin Fast Dome 17. Elmo PTC200C 6. Sony EVI-D3x 18. STW SRX100B 7. Canon VC-C4 19. VIDO B01 8. VT VPT-4x 20. Sungjin SJ-100 Series 9. STW(SAMSUNG) SPD2500 21. LG-Multix 10. Honeywell ScanDome2 22. ORX-1000 11. CYSYS Fastrax2 23. D-Max 12. Samsung SCC641 24. STW SPD3300 38 4.8.2. Setting Sensor Type It is to set sensor type. (NC/NO) 4.9. Sensor Preset It is to move to preset position automatically when sensor is triggered. - Post Alarm Duration : Duration time after moved to preset position by sensor tgigger. (If Group Mode runs, the Group Mode doesn’t run during this duration.) - Swing Time For Mult- : Periodic swing time for moving to several preset positions in case two or alarm above sensors are triggered simultaneously. If Swing Time is 0, it moves to preset position that is designated by the last triggered sensor. 39 4.10. PTZ When a channel is connected to PTZ device, preset, group, and PTZ auxiliary function can be set. 40 4.10.1. Setting Preset Preset Saving and Deleting Select a preset to save and set a PTZ position. Then press the “Apply” button after naming preset. If pressing the “Delete” button after selecting preset, the saved preset position is deleted. <Note> 1. Open Pop-up menu and select ‘PTZ’ to control PTZ at the monitoring screen 2. If you move mouse cursor within video image enabled PTZ status, cross line will appear on the video image and Pan/Tilt control will be enabled. 3. If you move mouse cursor to left/right side video image, Zoom control will be in left and Focus control will be in right. Using preset Please check whether using preset or not to use the saved preset. 4.10.2. Setting Group Mode Group mode can rotate saved preset position at specific intervals. Maximal three groups can be registered. User can select one among 3 groups and use it. - Name : Enter group name. - Moving Period : Set preset duration between 5 seconds and 3600 seconds. - Preset List : Add sequence preset among 16 preset lists. (One preset can duplicate with another setting) - Group : Select group to use. When not using group mode, select “None”. 41 4.10.3. Setting Auxiliary PTZ device provides basic function as Pan/Tilt/Zoom and other auxiliaries (i.e, Controlling wiper). In case of using auxiliary function, dialog box to set 16 auxiliary function will be appeared by pressing “Add’ button. Setting auxiliary function can be used after selecting “PTZ’ -> “Auxiliary” from pop-up menu and 42 4.11. Video Control In Video control, user can configure DC LEVEL, White Balance, Gain, BLC, DSS of WebEye HDC Series camera. DC Level : it manage and control the aperture of the lense to manage the sun layer which go through the aperture. As the value goes bigger the image is brightened. It activates when the shutter mode is ALC and does not activate when it is ELC mode. ※ Please refer to the shutter part below for ALC and ELC. AGC(Auto Gain Control) : It automaticaaly control the video signal. When the magnifier ofcamera is too much it lower the level of signal and raise the level of signal to manage the 43 output level stable. The user can select Gain configuration limit from 0~36dB when the Gain is on. And the gain is fixed at relevant value automatically in the scope of gain configuration. However, it is set at 0dB when the gain is Off. Ex) When the AGC is on in a dark place, the image is brighter than AGC off but the image has more noise. DSS (Digital : It controls shutter speed according to light around subject automatically and this Slow Shutter) function enables photographong at low light. However, afterimage from moving subject can be appeared when DDS keeps working. BLC (Back : When there is light on the back side of subject, general camera focus its exposure Light to bright side and the subject turns to black. This function control exposure for best Compensation) shot at backlighting. Shutter : Function to adjust incoming light by electronical shutter of CCD and control video output level automatically. ALC mode : It should be applied for DC or Video lens. ELC mode : It should be applied for manual lens to activate electronic shutter. Manual mode: It can be used through setting specific shutter open and interoperating it with relevant strove signal. (for example, running Infrared LED) Day&Night : Function to monitor low Lux by automatically turing to B/W mode in the night and color high resolution in the day. White Balance : It is the function to play the white subject as white color automatically. - ATW(Auto Trace White Balance) : This is automatic control of color change according to enternal environment. It is useful at the location with changeable condition. - AWC(Auto White Balance Control) : IT memorize the color level selected by Push Lock button and it control the color level using color level selected previously. If the color level does not change at the location reset button should be pressed again for better use. 44 4.12. Relay In case of WebEye HDC Series Model which supports relay, the relay schedule could be set and events like sensor inputs, motion diction, etc.. could be synchronized with relay. Relay schedule is available to set divided by four time zones (Weekday, Weeknight, Weekend Day, Weekend Night). Four time zones schedule is set in “Schedule” Tab. - Select Time Schedule : Weekday(Day), Weekday(Night), Weekend(Day), Weekend(Night) - Select Relay Source : Select event source for running relay. - Disable in Special Time : Set when user wants not to use relay in special time zone. - Relay Post Time : Set relay post time between 1 second and 3600 seconds. <Note> 1. Time schedule is set in “Schedule” tab. 2. Maximal 4 special time zones can be set in “Schedule” tab. 3. When user controls relay of WebEye HDC Series manually, the already set value doesn’t run. 45 4.13. Schedule 4.13.1. Setting Time Schedule - Weekday : Set the range for “Weekday” between Monday and Sunday. “Weekend” is set automatically based on “Weekday” range. - Day : Set the range for “Day”. The “Night” range is set automatically based on “Day” range. 4.13.2. Setting Special Time Up to four zones can be designated as “Special Time.” Special time is a zone that user can set except normal scheduled time zone. 46 5. Utility 5.1. Control Center Lite-W Configuration Tool Above screen is Configuration Tool, and it is composed of 3 areas: Site Tree, Menu, and Configuration Page. 5.1.1. Site Tree Unit list in the Site Tree is registered in My Units of Mani view of Control Center and user can register/delete/revise it on Configuration Tool. Click specific unit to see detailed setting things in menu area, and default System Setting will appear in Configuration Page. 5.1.1.1. My Units Registration & Deleting Unit registration & deleting of WebEye HDC Series is controlled within Control Center Lite-W. Please refer to the manual of Control Center Lite. 5.1.2. Menu Details of Menu can be changed according to the unit model. Relevant setting page will appear in configuration page when clicking menu. 5.1.3. Configuration Page “Apply” button will be activated when changing values of setting page. Press this button to apply changed ones. Press “Apply” button after changing setting of each page. Dialogue box will appear to ask user whether new setting will be applied when moving to other page without pressing “Apply” button. 5.1.3.1. System Setting System Info It displays basic information of WebEye HDC Series such as blue-lettered site, description, and installed location can be edited with double clicking. Press “Apply” button after editing. 48 Reboot It is to reboot WebEye HDC Series. Factory Default It is to initialize all setting values as factory default values. Z <Note> Even though Factory Default runs, the setting values of system date, time, network, and video type (NTSC/PAL) are not changed. 5.1.3.2. Camera 49 5.1.3.2.1. Setting Video Channel Set basic information, stream and image calibration per each channel. Channel Information - Enable : Set to use channel - Channel Name : Inputs channel name - Rotate 180 : Rotate an image transmitted from camera which is established upside down - Aspect ratio : HD720, SXGA - Resolution : HD720,HD720/4, HD720/16, SXGA, VGA, QVGA - Frame Rate : 1, 2, 5,7, 15, MAX frame/sec - Quility : Q1~Q10 * Standard of Quality is set to Q6. Aspect ratio You can configure the resolution for each stream as below by selecting either two aspect ratio, HD720 and SXGA. Aspect Ratio Encoding Resolution HD720 MPEG/JPEG HD720 HD720/4 HD720/16 SXGA MPEG/JPEG SXGA VGA QVGA Stream The user can configure various menus such as Encoding type, Resolution, Quality, ips at stream menu. Stream #1 is fixed to MPEG while Stream #2 is fixed to MJPEG encoding method. Resolution The resolution per each stream is divided by HD720 and SXGA mode according to Aspect ratio and it provides image as follows, Resolution Size(pixel) Resolution Size(pixel) HD720 1280 x 720 SXGA 1280 x 960 HD720/4 640 x 360 VGA 640 x 480 HD720/16 320 x 180 QVGA 320 x 240 50 Quality When the user configure stream in MPEG mode, he/she can differentiate the video quality from Q1~Q10. Higher G10 indicates higher video quality. Frame rate 6 levels of frame (1, 3, 5, 7, 15, Max frame/sec) for each stream is available. However, Max frame rate values are variable according to resolution configured as below. - HD720, HD720/4, HD720/16 : 30 frame/sec - SXGA, VGA, QVGA : 22.5 frame/sec The status of device is changed to recording mode The status is changed to recording mode in case that the WebEye M-Series with firmware over v2.1.0.0 version is registered at network video recorder, NVS04S. In this case, stream is fixed as total 3 MPEG-4 stream based on the configuration of NVS04S and the user can not change stream as above by blocking configuration page. In addition, relay, FTP transmission, email delivery functions are limited to configure in the NVS04S menu only. However the rest of functions are still available to confgure or use without exception. Back to normal mode The user can let the unit to go back to normal mode from recording mode by rebooting the unit through disconnection with NVS04S Z <Note> 1. If multiple streams are used Frame Rate / Quality could be low. 51 5.1.3.3. 5.1.3.3.1. Time/Date Setting Date & Time Date & Time Set date and time of WebEye HDC Series. Timezone & Daylight Saving Time User can set time zone of the area where WebEye HDC Series is established. Controller of “Daylight Saving Time (DST)” will appear when user select time zone which summer time is applied to. If user set “DST “on, it will perform it’s duty the same way as Microsoft window. Z <Note> If you change Time zone, the time will be added the current time and Time Zone. Ex) If the current time is +01:00(Amsterdam) 01:25 and you change this time to local time of +9:00(Seoul), the time will be +9:00(Seoul) 10:25. 5.1.3.3.2. Setting NTP NTP (Network Time Protocol) is a protocol designed in order to synchronizie time of devices via network. 52 - Mode : Select server/client/both mode. Server mode it to supply time, and client mode is to synchronize time with the designated server with receiving time from the server. Both mode is to synchronize time with server and supply time to client simultaneously. - Interval : Select time supplying interval, when NTP mode is Client. (1/3/6/12/24Hour.) - IP Type : Select whether NTP Server is in Internet or local Network. (Public IP/Local IP) - Local IP : Enter NTP Server IP, when IP type is local IP. 5.1.3.4. 5.1.3.4.1. Connectivity In case of using Ethernet In case of dynamic IP, select “Use DHCP”. In case of static IP, set the assigned IP address, subnet mask, gateway, DNS server, and so on. <Note> In case of using static IP address, please ask network administrator or IPS about things. 53 5.1.3.4.2. In case of using xDSL Select xDSL if network is xDSL(ADSL, HDSL, VDSL) and set user ID, password.. <Note> 1.xDSL has various types such as ADSL, HDSL, VDSL, it can be used by PPPoE protocol. 2. Should be set WRS when using xDSL type. (except for using static IP address) 3. Cannot connect network by using ethernet xDSL. 4. User ID and password will be provided by xDSL ISP. 5. Network setting must be ethernet though network is xDSL type if user uses automatic connection modem. 54 5.1.3.4.3. WRS (Dynamic IP Registration Sever) If user registers WebEye HDC Series in WRS(Dynamic IP address registration server) managed by WEBGATE, user will be free from inconvenience. As user cannot know exact dynamic IP address at every moment user need something such as WRS that can give IP address of WebEye HDC Series. - Registration Interval : In order to maintain continuous connectivity, ‘Registration Interval’ should be set. Dynamic IP addresses are updated to WRS server periodically according to time interval. When IP is changed frequently, it is recommended to set as 1 minute. (1 minute/1 hour/3 hours/6 hours/12 hours/24 hours) - Server : WRS, which is managed by ‘WebGate Inc.’, is ‘210.116.114.37’. - Access Token : It is for preventing abnormal case thet anyone access WebEye HDC Series. Set a password for accessing. - Group ID : Group ID is for discriminating and managing the information of WebEye HDC Series belonging to group. It is recommended unique group ID to avoid other group ID’s WebEye HDC Series. - Add Public List : If setting this, WebEye HDC Series is registered at public list. <Note> 1. Dynamic IP registration is necessary in case of as follows. - In case of using DHCP in Ethernet - In case of using xDSL (except static IP address) 2. Refer to Configuration Tool or ‘Registered WebEye List’ in the WebGate home page to check the registration status. 5.1.3.4.4. - Port Setting a Port : User must change port number if user cannot connect WebEye HDC Series because of network problem such as firewall. User must input the port number in URL of browser if user sets any port number other than 80. Example) if port number 800 is set : http://211.53/133/197:800/ - Idle Time : It is to distinguish whether network status of client is normal. If the network of client is not recorvered within idle time, WebEye HDC Series disconnects to the client. The default value is 3 minutes. (0~3600 seconds) 55 <Note> User should reboot WebEye HDC Series if user changes network setting. 5.1.3.5. COM Port User can set com port and devices in com port page. Tab number, which means COM Port is same as port number. 5.1.3.5.1. Selecting device linking serial port The types of device to connect to serial port are PTZ, COM, and Serial TP. - PTZ : Select it when user wants to use PTZ. User can set details about PTZ in lower part of page. If user want to go to the PTZ set up page directly, just click “Go” button. - Modem : Select it when user wants to use modem. User can input Initialization command of modem in lower part of page. Refer to relevant manual about Initialization command. - Serial TP : Select it when user wants serial port to support “Transeparent Protocol”. “Transeparent Protocol” can be used if user wants to bypass serial data on network. - Audio : Select it when user wants to connect audio. 56 5.1.3.6. PTZ Tab number indicates camera channel number and shows which channel will be connected to PTZ. 5.1.3.6.1. Setting PTZ If PTZ device is connected, preset, group, and PTZ auxiliary functions are possible. <Note> 1. If PTZ device is connected, “Channel” and “Device” tabs should be set at first.. - Enable : Select it when user want channel to be linked to PTZ. - Port Dependency : Select the serial port which is linked to PTZ. (COM1~3) - Address : Set up Base Address of PTZ device. User must input setting figure of PTZ device. - Use Give&Take : Select it when user want to give only one user authority only one time among users who have authority of PTZ control except administrator ID (admin). - Service Time : Set period of time when user can have PTZ control. - Reverse Pan/Tilt : Set direction of Pan/Tilt. 57 5.1.3.6.2. Setting Preset Press “Preset” button to appear preset setting window. Saving and deleting Preset Input name and click on “set” button after selecting preset user want to save and adjusting its position. The preset position will be deleted if user selects preset and click on delete button. <Note> 1. PTZ adjustment can be done in pop up menu. 2.. User can control Pan/Tilt only when user place mouse cursor inside an image. 3. The zoom control will appear in left side and focus control will appear in right side when user move mouth cursor towards right or left edge of image. Using Preset To use saved preset, select check box of the corresponding preset from a list and highlight it. 58 5.1.3.6.3. Setting Group The window of group setup will appear if user clicks on “Group” button. User can go round preset position at a specific time intervals if user set group mode. Maximum 3 can be registered. User can use one out of three. - Name : Input group name. - Moving Period : The time to maintain each preset position, which can set between 5 ~ 3600 second. - Group Sequence : Add preset out of 16 presets according to the order user want. - Using : Select the group user want to use. User must select “None” if user do not use group mode. 5.1.3.6.4. Setting Auxiliary PTZ device provides various auxiliary functions including basic functions such as Pan/Tilt/Zoom (For example, controlling wiper). Press “Auxiliary” button to appear windows setting 16 auxiliary functions. After selecting “PTZ” from the popup menu of image, auxiliary function can be used to select at “Auxiliary”. 59 60 5.1.3.7. Audio Select channel in the Channel Dependency to play Audio 61 5.1.3.8. 5.1.3.8.1. User Account Setting User Account There are two kinds of user; one is administrator, the other is normal user. The administrator has especially authority relating to changing setting of WebEye HDC Series including all authority. Normal user can have all authority except for setting. The administrator ID is fixed as “admin”, which can change only password. Normal user can add maximum four of user ID. Initially ID is “guest” and password is also “guest”. ID and password can be typed no later than maximum 15 alpabet letters. 62 5.1.3.8.2. Setting FTP User Account WebEye HDC Series has 4.5MB homepage area, which can be changed by the user. User can use “FTP user ID” to edit relevant file when user want to change web page which is in WebEye HDC Series server.. . - User ID : Set ID to access from WebEye HDC Series. Initial User ID is “userftp”. - Change of password : Dialogue box will appear if user clicks on “Change” button. To change a password, type old password and new password. In case of changing a password as the first time, old password is not set. - One Time Password : In case of risk for password protection, it can be used. <Note> User can get FTP “One Time Password” by using “WebEye HDC Series One TimePW program”. 63 5.1.3.9. User Authority User can set user’s authority according to MIC, PTZ, relay out, and channel viewing. Registered guest has only authority of all channel viewing. 64 5.1.3.10. IP Filtering IP filtering function is to allow and deny a certain IP address from accessing WebEye HDC Series Using other’s IP. “Allow” means accessing of IP group registered at a list, “Deny” means other IP group except for registered IP group, which can be registered maximum 10. 65 5.1.3.11. Video Control Configure DC LEVEL, White Balance, Gain, BLC, DSS of WebEye HDC Series camera in Video Control. DC Level : it manage and control the aperture of the lense to manage the sun layer which go through the aperture. As the value goes bigger the image is brightened. It activates when the shutter mode is ALC and does not activate when it is ELC mode. ※ Please refer to the shutter part below for ALC and ELC. AGC(Auto Gain Control) : It automaticaaly control the video signal. When the magnifier ofcamera is too much it lower the level of signal and raise the level of signal to manage the output level stable. The user can select Gain configuration limit from 0~36dB when the Gain is on. And the gain is fixed at relevant value automatically in the scope of gain configuration. However, it is set at 0dB when the gain is Off. Ex) When the AGC is on in a dark place, the image is brighter than AGC off but the image has more noise. DSS (Digital : It controls shutter speed according to light around subject automatically and this 66 Slow Shutter) function enables photographong at low light. However, afterimage from moving subject can be appeared when DDS keeps working. BLC (Back : When there is light on the back side of subject, general camera focus its exposure Light to bright side and the subject turns to black. This function control exposure for best Compensation) shot at backlighting. Shutter : Function to adjust incoming light by electronical shutter of CCD and control video output level automatically. ALC mode : It should be applied for DC or Video lens. ELC mode : It should be applied for manual lens to activate electronic shutter. Manual mode: It can be used through setting specific shutter open and interoperating it with relevant strove signal. (for example, running Infrared LED) Day&Night : Function to monitor low Lux by automatically turing to B/W mode in the night and color high resolution in the day. White Balance : It is the function to play the white subject as white color automatically. - ATW(Auto Trace White Balance) : This is automatic control of color change according to enternal environment. It is useful at the location with changeable condition. - AWC(Auto White Balance Control) : IT memorize the color level selected by Push Lock button and it control the color level using color level selected previously. If the color level does not change at the location reset button should be pressed again for better use. 67 5.1.3.12. Time Scheduling 68 5.1.3.12.1. Setting Time Schedule - Weekday : Set start and end point of weekday, the remaining day is automatically included in weekend. - Day : Set start and end point of day, the remaining hour is automatically included in night. 5.1.3.12.2. Setting Special Time Up to four zones can be designated as “Special Time.” Special time is a zone that user can set except normal scheduled time zone. 5.1.3.13. MD Set “MD(Motion Detection)” according to each channel. User can also set sensitivity of MD. User cannot use MD if user sets sensitivity “None”. 69 5.1.3.14. Input Set sensor type (NC : Normal Close, NO : Normal Open) 70 5.1.3.15. Relay In case of WebEye HDC Series Model which supports relay, the relay schedule could be set and events like sensor inputs, motion diction, etc.. could be synchronized with relay. Relay schedule is available to set divided by four time zones (Weekday, Weeknight, Weekend Day, Weekend Night). Four time zones schedule is set in “Schedule” Tab. Relay schedule devides to four of time period such as weekday day, weekday night, weekend day, and weekday night, which can be set at “Time Scheduling” page. - Select Time Schedule : Weekday(Day), Weekday(Night), Weekend(Day), Weekend(Night) - Select Relay Source : Select event source for running relay. - Disable in Special Time : Set when user wants not to use relay in special time zone. - Relay Post Time : Set relay post time between 1 and 3600 seconds. 71 <Note> 1. Time schedule is set in “Schedule” tab. 2. Maximal 4 special time zones can be set in “Schedule” tab. 3. When user controls relay of WebEye HDC Series manually, the already set value doesn’t run. 5.1.3.16. FTP User can send an image of channel by using FTP when sensor is checked or motion is detected. - Server Address : Input IP address or domain name of FTP server. - Remote Directory : Designate directory to send image by accessing at FTP server. - User Account & Password : Input ID and password to access to FTP server. - Using Period : Set period of image transmission. (1 frame / hour ~ 1 frame / second) - Image Resolution : Be Transferred by JPEG of Stream #2. - Event Source : Set event only for user’s interests by transmitting its channel image. - Image file naming Basically, it is configured by server name of WebEye and user can select and add Date&Time, and channel. The extension name is eye. 72 <Note> 1.Default value of WebEye HDC Series server name is ‘WebEye’, which can be changed in “Information” tab. 2. When the FTP sending and the use the port except standard port(21), input port number behind colon(:) of FTP server address or Domain name. Ex) In case of port number 1000 of FTP server(211.53.133.197), input 211.53.133.197:1000 . 5.1.3.17. E-Mail User can receive email of event situation when sensor is checked or motion is detected. - Recipient : Input e-mail address to receive it. - Sender : Default is ‘[email protected]’, but if entering more information with email address, recipient will know more easily which WebEye sends. - Mail Duration : It is to e-mail sending duration between 1 minute and 24 hours. - Relay Server : Generally, mail server always checks whether relay server is registered to DNS 73 in order to block spam mail. In this case, e-amil can’t be received since WebEye HDC Series is not registered to DNS. To solve this problem, this function is useful. - MD, Sensor Check : It is to run according to setting of MD and Sensor. The number of MD and sesor is different according to model. <Note> Relay function of WebEye HDC Series is not allowed mostly. In this case, IP address of WebEye HDC Series should be registered to the related server to enable relay. 5.1.3.18. SensorPreset It is to move to preset position automatically when sensor is triggered. - Post Alarm : Duration time after moved to preset position by sensor tgigger. (If Group Mode Duration runs, it doesn’t run during this duration.) - Swing Time For : Periodic swing time for moving to several preset positions in case two or above Mult-alarm sensors are triggered simultaneously. If Swing Time is 0, it moves to preset position 74 that is designated by the last triggered sensor. 5.2. Mini Player Mini Player is a program for playing “.re4” file that is recorded with Quick Recording. (For information about saving image, refer to “3.2. Recording image”) If running Mini Player, the window for opening file will appear. Select the saved “re4” file. Play image with pressing the ▶ button. Move image to start point. Play image backward. Pause image. Play image. 75 Move image to end point. Save the still image. User’s memo, Date & Time, Event Info, and Channel Number can also be saved with image. Stil image can be saved as “.bmp” or “.eye” file. Print the still image. If entering user’s memo, it is also printed. Open a File. It is to use DirectX. If played image blinks or has some problem, make it disable and play again. Make Audio On/Off. Not used in WebEye model. Control audio volume. 5.3. Onetime Password In order to use “One time Password”, “Use Onetime Password” item in “FTP User Account” of “User Account” page should be checked. (Refer to “4.4.2 Setting FTP User Account” and “5.1.3.8.2 Setting FTP User Account”) Run Onetime Password. - ADDRESS : Enter IP address of WebEye. - PORT : Enter port number. 76 - FTP ID : Enter User ID that is set in “FTP User Account”. - PASSWORD : Enter Password that is set in “FTP User Account”. - Generator : Click the “Generator” button after entering FTP ID and PASSWORD. - One Time Password : If ADDRESS, PORT, FTP ID, and PASSWORD are same, One Time Password will be created. When accessing WebEye HDC Series via FTP program, enter User ID of FTP User Account and the One Time Password. <Note> If accessing with the created One Time Password once, it should be re-created in case of re-accessing. 77 5.4. File Converter2 FileConverter2 is the program to convert eye, rec(re3, re4) file to general file format such as bmp, jpg, avi. □ Convert eye file to jpg or bmp □ Convert eye file to re4 file □ Convert eye file to avi file □ Convert rec(re3,re4) file to avi file. 5.4.1. How to use File Converter2 program After File Converter2 installation go to START- PROGRAM – Digital Image World and click on FileConverter icon and below image comes up Convert eye file(s) to jpg of bmp file(s). Convert eye file to jpg or bmp Convert sequential eye files to a rec file. Convert eye file to re4 file Convert sequential eye files to a avi file. Convert eye file to avi file Convert a rec file to a avi file. rec(re3,re4) Convert rec(re3,re4) file to avi file. 78 5.4.1.1. 5.4.1.1.1. Convert eye file(s) to jpg of bmp file(s) Select Source Click on Start button of Convert eye file(s) to jpg of bmp file(s) and Select Source page turns up. Select eye file to convert. ▶ Add… : Add eye file (Double selection is available) ▶ Delete : Delete added eye file from the list (Double selection is available) 79 5.4.1.1.2. Output file Type Select the file to convert and click NEXT button to go to Output file Type page and choose either bmp or jpg format for eye file to convert. ▶to bmp : Convert eye file(s) to bmp file. ▶to jpg : Convert eye file(s) to jpg file.. ▶jpg compresstion quality : Control the quality of jpg to convert. (Control level is from 1~100 and the image quilty goes up at higer value) 80 5.4.1.1.3. Destination Folder . Select the file to convert among bmp or jpg and click NEXT button to go to destination folder and choose the location of the file to convert. ▶Same with source : the file to convert is saved where the original source file is located and the file name has the format (bmp, jpg) to convert. ▶Use the following folder : the file to convert is saved where the original source file is located and the file name has the format (bmp, jpg) to convert. 81 5.4.1.1.4. Converting Select the location to save the converted file and press Convert! Button and it goes to converting page andconverting is executed automatically. When converting is done, the location of converted file and Complete message is printed out. Converting step is completed when above process is done. Click Finish button to go to START page. 82 5.4.1.2. 5.4.1.2.1. Convert sequential eye files to a rec file. Select Source and destination Go to start screen and click START button of Convert sequential eye files to a rec file and Select Source and destination page come up. ▶eye folder : Select the directory including eye file to convert to re4. ▶rec file : Delect file location and name of re4 to convert. 83 5.4.1.2.2. Converting Select the directory of the eye file to convert and select location to save and file name and click NEXT button. IT will go to Converting page and execute converting automatically. Converting is done, Complete message will be printed out. Above step is completed, converting is also completed. Move to START page by clicking Finish button. 84 5.4.1.3. 5.4.1.3.1. Convert sequential eye files to a avi file. Select Source and destination From the start screen, click on the Start button of Convert sequential eye files to a avi file and above image pops up as below. ▶eye folder :Choose the directory to contain the eye file to convert to ▶avi file : Select location of avi to convert and choose the file name. 85 re4 format. 5.4.1.3.2. Setting avi condition Choose the directory of the eye file to convert and choose the location and file name to convert and click next button. Select avi condition page come up as shown in the picture. Configure Frame Rate, Resolution, Compress Type, Bitrate, Quality of the avi file to convert. ▶Frame Rate : 30,15,10,8,5,4,3,2,1 frames/sec ▶Resolution : 180x121, 360x243, 720x243, 720x486 ▶Compressed : UnCompressed, Compressed(XVID), Compressed(WISE) ▶Bitrate : 150, 200, 250, 300, 500, 900, 1000, 1500 (Activate for XVID selection only) ▶Quality : 0, 1, 2, 3, 4, 5, 6 (Activate for XVID selection only) ※When avi file made of Uncompressed, Compressed(XVID) is played, “XVID” codec or total codec should be installed. ※The avi file made of Compressed(WISE) needs ‘DWISEFilterInstall.exe’ to be installed to be played. 86 5.4.1.3.3. Converting ) Configure the information of avi file to convert and click on Next button, auto converting is executed. The file location and Complete message is printed out when Converting is completed. When above steps are finished, converting is done and move to the STRAT page by clicking Finish button. 87 5.4.1.4. 5.4.1.4.1. Convert rec file to a avi file. Select Source From the START screen, Click on the Start button of Convert a rec file to a avi abd Select Source page shown in the pircure. ▶.rec file : Select rec(re3,re4) to convert avi format. 88 5.4.1.4.2. Password File Login The password requesting window pops up for rec(re3,re4) file if it is needed. If not, it will go to the next step. 89 5.4.1.4.3. Select time interval and channel information for avi Select rec(re3,re4)file to convert and click on the Next button and the resording channel as shown in the picture will be activated. ▶From, To : Select section for the avi file to convert. ▶Select channel to backup : The recording channel of original rec(re3,re4) file will be activated and choose one channel activated to convert to avi format. ▶With Audio[If there is audio…] : When Audio is also recorded with original source, choose if audio will be also converted with avi convert. And the audio related to the selected cideo is also converted. If the user do not check on the audio, audio part is omitted when converting. 90 5.4.1.4.4. Setting avi condtion When the configuration of the avi section and channel selection is completed, click on the next button togo to the Setting avi condition page. Configure the Frame Rate, Resolution, Compress Type, Bitrate, Quality of the avi file to convert. ▶Frame Rate : 30,15,10,8,5,4,3,2,1 frames/sec ▶Resolution : 180x121, 360x243, 720x243, 720x486. ▶Compressed : UnCompressed, Compressed(XVID), Compressed(WISE) ▶Bitrate : 150, 200, 250, 300, 500, 900, 1000, 1500 (activate in case of XVID selction only) ▶Quality : 0, 1, 2, 3, 4, 5, 6 (activate in case of XVID selction only) ※When avi file made of Uncompressed, Compressed(XVID) is played, “XVID” codec or total codec should be installed. ※The avi file made of Compressed(WISE) needs ‘DWISEFilterInstall.exe’ to be installed to be played. 91 5.4.1.4.5. Destination Folder When avi file information is configured, go to the destination folder by clicking Next button and select the location and file name to convert. ▶Same with source : Save the file to convert at the location where the original source file is and the file name has convertor with avi. ▶Use the following folder : the user can select the file location and the file name has the avi convertor for original source file. 92 5.4.1.4.6. Converting Select the save location for the file to convert and auto converting is executed. When the converting is completed, the file location and complete message will be printed out. When above step is completed, the user will go to the START button by clicking Finish button. 93 Appendix 1. Key Features per model Model Video Channel Digital Serial Port Name WeyEye HDC730 Audio Input/Output 0/1 Pan/Tilt/Zoom Control In/Out 1*RS232 1*RS422/485 In/Out 2/2 Need P/T Actuator Need External Zoom 2. Control Center series introduction and system construct. 2.1. Control Center Control Center is the mass control software to manage max 1000 units efficiently in remote location. This SW provides real time video monitoring, search and backup, configuration function. It supports dualmonito and monitor max. 128 channels simultaneously. Also it select area to monitor and search by selected area, text search is also available. Real time report through various monitoring from the registered unit and save or search the events and relevant video image pops up when there is event. View set or map mode is also available for efficient management. 2.2. Control Center series function comparison table Series Lite-W Lite-D Standard Pro Enterprise 4 16 1024 1024 1024 1/4/9/13/26/25 1/4/9/13/26/25 1/4/9/13/26/25 1/4/9/13/16 1/4/9/13/16 36/49/64 36/49/64 36/49/64 Main function Unit registration number Screen division by monitor Max monitor 6 1 1 2 number 4+Remote Monitor - Layout Manager WebEye eDVR, i-Rec The entire Products The entire Products The entire Products products prodicts at Webgate at Webgate at Webgate Specific function Specific function compatible (sub-map, compatible (sub-map, section etc) section 등) None Available Available None Available Available Charge Charge Charge Compatible model Map, device Map mode None None registration Unit by user, layout None None management Error Search None None Unility Charge Free Free 2.3. Control Center construct and main function introduction Compatible with dual monitor Webgate WESP based DVS (Digital Video Surveillance) solution. Single or dual monitor is compatible with it for multiple security jobs. View Set, Map The user monitors from the central managerment server for various remote site and the entire webgate products with same are easily monitored with same bandwidth based on WESP protocol. Max. 64 channels are registered for viewset and units are managed throught it. The user can register and manage camera, sencor, relayout, audio out directly on the map. When there is an event, the status of the event is indicated using icon on the map and the user can control and manage the devices such as audio out, relayout etc. Alram management The present status of Camera, sensor input, relay outout, saving are directly seen through status panel. Event come up on the list in real time and the entire events are saved and searched through alarm management. Alarm pops up when there is an event and the user can make a plan where notify it or not by unit. Playback The user can access to the storage server or playback the files saved in the PC. Video, audio, txt, log information are immediately playback. Various searching method – Calendar, Time Line, Log, Test, Smart Search Max 16 channels are simultaneously payback by time/date/event Brightness and Zoom In/Out control File backup from the storage server Smart search Smart search is very convenient function to search files with specific condition among multiple efficiently files. than It saves detecting user’s via time Motion detection. Text search This is the searching function through efficient time duration or text. By double clicking the data file easily. Schedule backup This is the program that back up the data stored in DVR or DVrS with built-in harddisk according to pre scheduled plan into the hard disk at PC. 2.4. System construct using Control Center <Note> Refer the Control Center section for detailed information 3. WinDVrS introduction and system structure method 3.1. WinDVrS WinDVrS is a network base storage system. It saves the real time image data and event information from the network camera (Webeye) or DVR with built-in WESP(WebGate Enbedded System Protocol) and perform system configuration and real time monitoring and searching through remote management via control center. WinDVrS main feature effect □ Schedule storage function □ Pre / Post Alram storage funtion □ Network time synchronization using NTP □ Remote Playback/monitoring/configuration □ Easy system management using Configuration Tool □Improved searching method □Group user management □ Data image redistributin using RDS (option) 3.2. WinDVrS Series Main function comparison chart Spec / Model Max. storage channel number Storage speed Real time monitoring user number simultaneously Real time playback user number simultaneously Network Remote software RDS compatibility WinDVrS Max. 128 channels WinDVrS Pro Max. 128 channels 5 MByte/Sec 5 MByte/Sec Max 5 connection Max 1024 connection (5 by channels) (Total 1024) Max. 5 Max. 5 Above 100M Above 100M Control Center (Standard / Pro / Control Center (Standard / Pro / Enterprise) Enterprise) X O RDS(Image Redistrabution Service) means that billion of users receive data simultaneously using ISP (Information Service Provider). The Image Redistribution Service(RDS) provided by Webgate receive live data from WebEye HDC Series andredistribute them to billions of users who request the images. At that point, what the WebEye has to do is to transfer image to RDS only and this produces the best image quality. For user’s side, they receive the best resolution data from RDS directly, they can satisfy with the quality what they get. 3.3. System structure using WinDVrS 3.4. System structure using RDS <Note> Refer the WinDVrS user manual for detailed information 4. WESK introduction for more power use 4.1. WESP(WEBGATE Embedded Standard Protocol) SDK SDK(Software Sevelopment Kit) is the development tool to help software producer to produce software easily even they do not know the protocol. SDK is produced using the same language what is used for producing software then it takes short time to produce in easy way. The previous SDK had several problems even its merits. The user had to use different SDK even in a single brand and the devices provided sevral function only. This made difficulties to integrate them to use. To cope with situation, WEBGATE developed the WESP SDK which integrate all the protocols that were used in Network camera products and DVR products differently before. WESP SDK is firstly provides the same usage method for using all kinds of Network DVRor Network Camer, SDK provides secondly easy development environment and method, thirdly the entire function what device supports is compatible with SDK. Main feature of WESP SDK □ provides the same usage method regardless of device type. □ provides easy development environment and method. □ compatible with the entire function what device provide. 4.2. WESP SDK usage sample Live monitoring sample In case that the user wants to use the image sata on the existing software or develop the software to monitor the image provided by Network cameraor DVR, Monitor componentenables the function to view the video image easily. Below sample shows that if you put down Monitor componenton the screen and press “Live monitoring!” button, it will access to a specific device using IP address, port, ID, passwordand when access is successful the image of channel 1 is transeferred at 30ips. [visual basic 6.0] 'Try to access by clicking Private Sub Command_connect_Click() Call MonitorCtrl.Connect(“192.168.63.1”, 80, “guest”, “guest_password”) End Sub ‘ Request image data when access is completed Private Sub MonitorCtrl_AckReceived(ByVal ackCode As Long, ByVal param As Long) If AckCode = ACK_CONNECT Then Call MonitorCtrl.PlayVideo(1, RESOLUTION_NORMAL, 30) End If End Sub <sample code execution screen > Recording sample Below simple code enables user to record image data during monitoring. [visual basic 6.0] Private Sub start_recording_Click() Call MonitorCtrl.StartRecording("c:\quickRec\", "testRecording.re3") End Sub Private Sub stop_recording_Click() MonitorCtrl.StopRecording End Sub PTZ control sample The user can on/off the function to control PTZ device on the screen using simple code. [visual basic 6.0] Private Sub start_ptz_Click() 'Input channel number connected to PTZ on the parameter. Call MonitorCtrl.StartPTZ(1) End Sub Private Sub stop_ptz_Click() MonitorCtrl.StopPTZ End Sub Component compatibility sample This is the sample for conneting Sensor input and PTZ preset using Monitor , PTZ, Event component. It automatically transferred to a specific preset when there is sensor input. 1. Construct dome cameraand sensor as shown in the picture. 2. Select location of preset at Dome camera. (presetis related to configurationand the user can configure it using Config component) 3. Embody the software to transfer to relevant preset using following code according to sensor input. [visual basic 6.0] ‘Event, Monitor, PTZ ActiveX component access to a device by clicking start button. Private Sub Command_start_Click() Call Event1.Connect(“192.168.63.1”, 80, “guest”, “guest_password”, 0) Call Monitor1.Connect(“192.168.63.1”, 80, “guest”, “guest_password”) Call PTZ1.Connect(“192.168.63.1”, 80, “guest”, “guest_password”) End Sub Access is finished by clicking stop button. Private Sub Command_stop_Click() Monitor1.Disconnect PTZ1.Disconnect Event1.Disconnect End Sub ‘ 서버에서 이벤트가 발생했을 때 실행되는 함수입니다. ‘ Event category 가 1 이고 EventID 가 16 이면 Sensor Input 이 on 되었다는 신호입니다. ‘ 이 때 sensor input 번호와 동일한 해당 프리셋으로 이동 명령을 내립니다. Private Sub Event1_EventReceived(ByVal pIEvent As WESPEVENTLibCtl.IEvent) If pIEvent.EventCategory = 1 And pIEvent.EventID = 16 Then Call PTZ1.GotoPreset(pIEvent.NumberField) End If If pIEvent.EventCategory = 1 And pIEvent.EventID = 17 Then ‘ Sensor input 이 off 일때는 아무일도 하지 않습니다. End If End Sub ‘ Monitor component 가 접속에 성공하면 영상을 play 합니다. Private Sub Monitor1_AckReceived(ByVal AckCode As Long, ByVal Param As Long) If AckCode = ACK_CONNECT Then Monitor1.PlayVideo 1, 3, 15 End If 5. WebEye data page making process Moving picture can be easily produced and upload on the homepage using WebEye HTML Wizard provided by WEBGATE and the user can monitor those film through their own PC connected to internet. Go to http://www.webgateinc.com/nwizard/help/help.html for WebEye HTML Wizard guide and refer to the manual to produce moving picture. The user can make moving picture using WebEye HTML Wizard in URL or HTML format and edit the page using URL or HTML source. [1. Sample page making 4 channel viewer using URL made of WebEye HTML Wizard] As shown above, moving picture of one device by channel or other products can be made as one HTMLpage. The IP address of device that use dynamic IP is always changed and the user should register to WRS which is introduced ‘4.3.2 WRS (Dynamic IP Registration Server)’ to check the changed IP address using relevant part. If the user use the ‘WebEye Live Image Link’ of WebEye HTML Wizard for the device regiastered WRS, the URL where the user can see the produced data is created. And if the user paste the URL to the web browser address, the data is loding. The user can make it using HTML page and below is the instruction how to make it. 5.1. 4channel video image page making The product using dynamic IP should be registered to WRS(Dynamic IP Registration Server) and if the product using static IP uses ‘WebEye Live Image Link’ of WebEye HTML Wizard, should be registered to WRS. ‘URL is created using WebEye Live Image Link. The moving picture page is simply created using URLand IFRAME tag of HTML tag. Below URL was created by registering the Webgate product to WRS and using WebEye HTML Wizard. http://www.webgateinc.com/nwizard/wizard/url2/wg_link.php?dp=0&ch=1&sn=0000TEST0112&type=cs&nm=Z3Vlc3Q=& pw=Z3Vlc3Q=&vp=80&hp=80&an=0&rs=2&page=1' frameborder=0 marginheight=0 marginwidth=0 border=0 scrolling='no' width=360 height=243 If the user input the IFRAME of SRC for the above URL and save as HTML file, it is possible to see themoving picture right away. The IFRAME tag sample used for those 4 channel page will be following and all the user should do is to inout the URL created at SRC. <iframe src='INSERT LINK URL‘ frameborder=0 marginheight=0 marginwidth=0 border=0 scrolling='no' width=360 height=243></iframe> Refer HTML Reference for how to handle with IFRAME tag. 1 table with vertical2, horizontal 2 cell was created for 4 channel viewer and iframe tag was input in eachcell to link with moving picture. The user can check the complete cource via below URL and another viewchannel with more than 4 channels can be created using same method. http://www.webgateinc.com/sample/viewer/4ch_source.html The completed page is shown at Pic1. As shown above, the moving picture can be link using IFRAME tag and save as HTML file the user can open the file at the PC to monitor. 5.2. Moving picture of device making using Staic IP not via WRS WRS is the Webgate server service to access the IP of the device using dynamic IP(ADSL, Cable모뎀, DSL) as introduced at ‘4.3.2 WRS(dynamic IP Registration Server)’ in this manual. But the device which does not registered at WRS has different way to create moving picture URL. In this case, create HTML source to play video image data using ‘WebEye Image HTML Source Crator’ of WebEye HTML Wizard menu and create source to control the video data. And follow the IFRAME introduced at 2.1 the user can create moving picture page. device1 device 2 device 3 WebEye HTML Wizard WebEye a.html b.html Image device 4 HTML Source Creator c.html d.html Viewer.html * Create data using a.html~d.html iframe [Picture2. HTML page for Static IP device] HTML source is created using ‘WebEye Image HTML Source Crator’ and save it in voluntary name. In this case, this is the page for 1 channel only and if the user wants to see other channel or other data image of other devices, the user should follow the above step sacral times to create source and save them. As shown in pic 2 above, the user will save from a.html to d.html in each page and follow the instructionin menu 2.1 to create page. In the menu 2.1 the user had to input URL created at src of iframe tag in the menu 2.1 but the user type the saved file name above. 6. Modification of product URL WebEye has 4.5MB size of homepage domain and the user can change this domain voluntarily. The user access to the ftp sercer provided by WebEye and edit xxx.html , xxx.ml files in “htdocs” folder for their needs. However, the entire files in the FTP server are all needed to run the WebEye and do not voluntarily modify or delete. Also if the user access to the FTP server, there is a case that user can not access to the WebEye. Therefore, the user should disconnect with FTP sercer to use WebEye. 6.1. Homepage modification Below is the sample to remove company logo for WebEye B101M webpage. [Before modification] [After modification] 1) Access to WebEye server using FTP access program to the server to modify. FTP User Account ID and Password is needed to access. Please refer the ‘4.4.2 FTP User account’ in this manual. 2) FTP access is done and access to ‘htdocs’ folder among 3 folders and download ‘login.ml , single_viewer.ml’ file. 3) Open ‘login.ml , single_viewer.ml’ file and find below red letters to delete. Deletion of company logo in the login page [login.ml] <td><p><a href="javascript:open_window('win', 30, 30, 486, 314, 0, 0, 0, 0, 0);" target="_self">Download</a></p></td> </tr> --> <tr> <td><p>F/W Version - <? (print WEBEYE_VER_SW) ?></p></td> </tr> <tr> <td><p>Model - <? (print WEBEYE_MODEL) ?></p></td> </tr> </table> </td> </tr> </table> </td> </tr> <tr> <td width="100%" height="40"><p> </p> </td> </tr> <tr> <td width="680"> <div align="center"><a href="http://www.webgateinc.com" target="_blank"> <img src="images/logo1.gif" width=213 height=46 border="0"></a></div> ‘ In case the user delete the logo, delete above parts and if the user modify the logo image, the modified file name and image size should be modified.’ </td> </tr> </table></form></body> </html> Company logo deletion of single view page [single_viewer.ml] <table border="0" cellpadding="0" cellspacing="0" width="720"> <tr> <td><p> </p></td> </tr> <tr> <td> <div align="center"> <!-- Add by khlee 2006.03.20 --> <script language="JavaScript"> // p_id, p_classid, p_coadbase, p_data, p_align, p_border, p_width, p_height WriteObject('WESPSDKMonitor', 'clsid:B19147A0-C2FD-4B1F-BD20-3A3E1ABC4FC3', '', 'data:application/ x-oleobject;base64,oEeRsf3CH0u9IDo+GrxPwwADAAA1JQAAHRkAAA==', '', '', '360', '243'); </script> </div> </td> </tr> <tr height=15> <td></td> </tr> <? (if (= SET_RELAY "1") (print "<tr><td><div lign=center><script>WriteRelay();</script></div></td></tr>") true ) ?> <tr><td> <div align=center> <img src=images/logo1.gif width=213 height=46 border=0> </div> ‘ In case the user delete the logo, delete above parts and if the user modify the logo image, the modified file name and image size should be modified.’ </td></tr> </table> </div> </td> </tr> </table> </form> </body> </html> 4) When modification is completed, save the relevant file and upload at the location to download and overwrite and save. 5) If the user changes the Webgate logo image not to delete, access to “images’ folder and upload the image to modify and change the file name and modified image size value. <Note> If the device is accessed to FTP server webpage access is not available. Therefore, FTP access should be disconnected when the job is done. WEBGATE Inc. 6F, Hanlim Venture Town Bldg., 689-6, Geumjeong-dong, Gunpo-si, Gyeonggi-do, Korea (435-862) Tel : (82-31) 428-9300 Fax : (82-31) 428-3955 [email protected] www.webgateinc.com The contents of this manual can be modified in accordance with Firmware or Software upgrade. In the interest of continually improving products, approval & outlook can be modified without prior notic