1
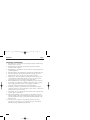
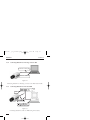
NetCam2 _ii_00592en.qxd 1/23/03 2:22 PM Page 1 NetCam2 Installation Instructions Eng Lens optional Default IP address: 211.53.133.92 Administrator login: Password: admin ID: admin User login: Philips Communication, Security & Imaging Password: guest ID: guest NetCam2 _ii_00592en.qxd NetCam2 1/23/03 2:22 PM Page 2 Safety IMPORTANT SAFEGUARDS 1. Read Instructions: All the safety and operating instructions should be read before the unit is operated. 2. Retain Instructions: The safety and operating instructions should be retained for future reference. 3. Heed Warnings: All warnings on the unit and in the operating instructions should be adhered to. 4. Follow Instructions: All operating and use instructions should be followed. 5. Cleaning: Unplug the unit from the outlet before cleaning. Do not use liquid cleaners or aerosol cleaners. Use a damp cloth for cleaning. 6. Power Sources: This unit should be operated only from the type of power source indicated on the marking label. If you are not sure of the type of power supply you plan to use, consult your appliance dealer. 7. Power-Cord Protection: Power-supply cords should be routed so that they are not likely to be walked on or pinched by items placed upon or against them, paying particular attention to cords and plugs, convenience receptacles, and the point where they exit from the appliance. 8. Power Line: An outdoor system should not be located in the vicinity of overhead power lines or other electric light or power circuits, or where it can fall into such power lines or circuits. 9. Overloading: Do not overload outlets and extension cords as this can result in a risk of fire or electric shock. 10. Object and Liquid Entry: Never push objects of any kind into this unit through openings as they may touch dangerous voltage points or short-out parts that could result in a fire or electrical shock. Never spill liquid of any kind on the unit. 11. Servicing: Do not attempt to service this unit yourself as opening or removing covers may expose you to dangerous voltage or other hazards. Refer all servicing to qualified service personnel. 2 NetCam2 _ii_00592en.qxd NetCam2 1/23/03 2:22 PM Page 3 Safety 12. Damage Requiring Service: Unplug the unit from the outlet and refer servicing to qualified service personnel under the following conditions. If liquid has been spilled, or objects have fallen into the unit. If the unit has been exposed to train or water. If the unit does not operate normally by following the operating instructions. Adjust only those controls that are covered by the operating instructions, as an improper adjustment of other controls may result in damage and will often require extensive work by a qualified technician to restore the unit to its normal operation. If the unit has been dropped or the cabinet has been damaged. When the unit exhibits a distinct change in performance - this indicates a need for service. 13. Replacement Parts: When replacement parts are required, be sure the service technician has used replacement parts specified by the manufacturer or have the same characteristics as the original part. Unauthorized substitutions may result in fire, electric shock or other hazards. 14. Safety Check: Upon completion of any service or repairs to this unit, ask the service technician to perform safety checks to determine that the unit is in proper operating condition. FCC INFORMATION Caution: Any changes or modifications to construction of this device which are not expressly approved by the party responsible for compliance could void the user’s authority to operate the equipment. Note: This equipment has been tested and found to comply with the limits for a Class B digital device, pursuant to part 15 of the FCC Rules. These limits are designed to provide reasonable protection against harmful interference in a residential installation. This equipment generates, uses and can radiate radio frequency energy and, if not installed and used in accordance with the instructions, may cause harmful interference to radio communications. However, there is no guarantee that interference to radio or television reception, which can be determined by turning the equipment off and on, the user is encouraged to try to correct the interference by one or more of the following measures: Reorient or relocate the receiving antenna. Increase the separation between the equipment and receiver. Connect the equipment into an outlet on a circuit different from that to which the receiver is connected. Consult the dealer or an experienced radio/TV technician for help. 3 NetCam2 _ii_00592en.qxd 1/23/03 2:22 PM Page 4 NetCam2 Safety SAFETY PRECAUTIONS This label may appear on the bottom of the unit due to space limitations. CAUTION RISK OF ELECTRIC SHOCK. DO NOT OPEN! CAUTION:TO REDUCE THE RISK OF ELECTRICAL SHOCK, DO NOT OPEN COVERS. NO USER SERVICEABLE PARTS INSIDE. REFER SERVICING TO QUALIFIED SERVICE PERSONNEL. The lightning flash with an arrowhead symbol, within an equilateral triangle, is intended to alert the user to the presence of un-insulated " dangerous voltage" within the product's enclosure that may be of sufficient magnitude to constitute a risk of electric shock to persons. The exclamation point within an equilateral triangle is intended to alert the user to presence of important operating and maintenance (servicing) instructions in the literature accompanying the appliance. ATTENTION: INSTALLATION SHOULD BE PERFORMED BY QUALIFIED SERVICE PERSONNEL ONLY IN ACCORDANCE WITH THE NATIONAL ELECTRICAL CODE OR APPLICABLE LOCAL CODES. Attention: Installation should be performed by qualified service personnel only in accordance with the National Electrical Code or applicable local codes. 4 NetCam2 _ii_00592en.qxd NetCam2 1/23/03 2:22 PM Page 5 Contents TABLE OF CONTENTS IMPORTANT SAFEGUARDS . . . . . . . . . . . . . . . . . . . . . . . . . . . . . . . . . . . . . . . . . . .2 FCC INFORMATION . . . . . . . . . . . . . . . . . . . . . . . . . . . . . . . . . . . . . . . . . . . . . . . . .3 SAFETY PRECAUTIONS . . . . . . . . . . . . . . . . . . . . . . . . . . . . . . . . . . . . . . . . . . . . . .4 TABLE OF CONTENTS . . . . . . . . . . . . . . . . . . . . . . . . . . . . . . . . . . . . . . . . . . . . . . .5 1 Introduction . . . . . . . . . . . . . . . . . . . . . . . . . . . . . . . . . . . . . . . . . . . . . . . . .7 1.1 Description . . . . . . . . . . . . . . . . . . . . . . . . . . . . . . . . . . . . . . . . . . . . . . . . . .7 1.2 Unpacking . . . . . . . . . . . . . . . . . . . . . . . . . . . . . . . . . . . . . . . . . . . . . . . . . . .8 1.3 NetCam2 Rear View and Descriptions . . . . . . . . . . . . . . . . . . . . . . . . . . . . .8 2 Installation . . . . . . . . . . . . . . . . . . . . . . . . . . . . . . . . . . . . . . . . . . . . . . . . .11 2.1 Installation summary . . . . . . . . . . . . . . . . . . . . . . . . . . . . . . . . . . . . . . . . . .11 2.1.1 System requirements . . . . . . . . . . . . . . . . . . . . . . . . . . . . . . . . . . . . . . . . . .11 2.1.2 Recommended PC display settings . . . . . . . . . . . . . . . . . . . . . . . . . . . . . . .11 2.1.3 Connecting Ethernet and power cables . . . . . . . . . . . . . . . . . . . . . . . . . . . .11 2.1.4 Connecting NetCam2 to a PC using crossover cable . . . . . . . . . . . . . . . . . .12 2.1.5 Connecting NetCam2 to a PC via a HUB . . . . . . . . . . . . . . . . . . . . . . . . .12 2.1.6 PSTN dial-in connection . . . . . . . . . . . . . . . . . . . . . . . . . . . . . . . . . . . . . .13 2.1.7 Location . . . . . . . . . . . . . . . . . . . . . . . . . . . . . . . . . . . . . . . . . . . . . . . . . . .13 2.2 Installing NetCam2 Setup program . . . . . . . . . . . . . . . . . . . . . . . . . . . . . . .13 2.3 Assigning IP Address and Starting Configuration . . . . . . . . . . . . . . . . . . . .14 2.4 Configuring NetCam2 . . . . . . . . . . . . . . . . . . . . . . . . . . . . . . . . . . . . . . . .14 2.5 Assigning IP Address with ARP command . . . . . . . . . . . . . . . . . . . . . . . . .14 3. Operation . . . . . . . . . . . . . . . . . . . . . . . . . . . . . . . . . . . . . . . . . . . . . . . . . .17 3.1 Starting Web browser . . . . . . . . . . . . . . . . . . . . . . . . . . . . . . . . . . . . . . . . .17 3.2 Installing NetCam2 Plug-in . . . . . . . . . . . . . . . . . . . . . . . . . . . . . . . . . . . .17 3.2.1 Netscape Users . . . . . . . . . . . . . . . . . . . . . . . . . . . . . . . . . . . . . . . . . . . . . .17 3.2.2 Microsoft Explorer Users . . . . . . . . . . . . . . . . . . . . . . . . . . . . . . . . . . . . . . .17 3.3 Various viewers in NetCam2 homepage . . . . . . . . . . . . . . . . . . . . . . . . . . .18 3.3.1 Login and homepage . . . . . . . . . . . . . . . . . . . . . . . . . . . . . . . . . . . . . . . . . .18 3.3.2 Real-time monitoring through Full viewer (single view) . . . . . . . . . . . . . . .20 3.3.3 Real-time monitoring through Full viewer (dual image) . . . . . . . . . . . . . . .23 3.3.4 Real-time monitoring through Lite Viewer (single view) . . . . . . . . . . . . . . .24 3.3.5 Real-time monitoring through Lite viewer (dual image) . . . . . . . . . . . . . . .25 3.3.6 Real-time monitoring through Server-push viewer . . . . . . . . . . . . . . . . . . .26 3.3.7 Real-time monitoring through Java applet Viewer . . . . . . . . . . . . . . . . . . . .27 4 Configuring Administrator’s Options . . . . . . . . . . . . . . . . . . . . . . . . . . . . .28 4.1 Login . . . . . . . . . . . . . . . . . . . . . . . . . . . . . . . . . . . . . . . . . . . . . . . . . . . . . .28 4.1.1 Accessing Administration from Setup program . . . . . . . . . . . . . . . . . . . . . .28 4.1.2 Accessing through Web browser . . . . . . . . . . . . . . . . . . . . . . . . . . . . . . . . .28 5 NetCam2 _ii_00592en.qxd NetCam2 1/23/03 2:22 PM Page 6 Contents TABLE OF CONTENTS 4.2 4.2.1 4.2.2 4.2.3 4.2.4 4.2.5 4.2.6 4.2.7 4.2.8 4.2.9 4.2.10 4.2.11 4.2.12 5 6 6 Administrator’s page . . . . . . . . . . . . . . . . . . . . . . . . . . . . . . . . . . . . . . . . . .29 System Configuration . . . . . . . . . . . . . . . . . . . . . . . . . . . . . . . . . . . . . . . . .29 User Configuration . . . . . . . . . . . . . . . . . . . . . . . . . . . . . . . . . . . . . . . . . . .31 Network Configuration . . . . . . . . . . . . . . . . . . . . . . . . . . . . . . . . . . . . . . . .32 Dynamic IP Registration Service for ISDN, XDSL Users . . . . . . . . . . . . . .35 Security Configuration . . . . . . . . . . . . . . . . . . . . . . . . . . . . . . . . . . . . . . . .35 Video Configuration . . . . . . . . . . . . . . . . . . . . . . . . . . . . . . . . . . . . . . . . .38 Application Configuration . . . . . . . . . . . . . . . . . . . . . . . . . . . . . . . . . . . . .41 Pan/Tilt/Zoom Configuration . . . . . . . . . . . . . . . . . . . . . . . . . . . . . . . . . .43 Serial Configuration . . . . . . . . . . . . . . . . . . . . . . . . . . . . . . . . . . . . . . . . . .44 Digital Input Configuration . . . . . . . . . . . . . . . . . . . . . . . . . . . . . . . . . . . .45 Alarm Configuration . . . . . . . . . . . . . . . . . . . . . . . . . . . . . . . . . . . . . . . . .46 User Custom Configuration . . . . . . . . . . . . . . . . . . . . . . . . . . . . . . . . . . . .47 Convenient Functions of Mouse . . . . . . . . . . . . . . . . . . . . . . . . . . . . . . . . .48 Adjusting Focus . . . . . . . . . . . . . . . . . . . . . . . . . . . . . . . . . . . . . . . . . . . . .50 NetCam2 _ii_00592en.qxd NetCam2 1/23/03 2:22 PM Page 7 Section 1 1 INTRODUCTION NetCam2 is a network-based high-resolution digital network camera for CCTV applications. It contains an integrated Internet server and connects directly to an Ethernet network. No other hardware is necessary. NetCam2 provides real-time color pictures from up to two cameras over the Internet using an image compression format. 1.1 Description The microprocessor-based NetCam2 contains a digital color camera, web server functionality, image compression hardware and physical Ethernet connection. It requires power and a LAN cable connection. Wavelet image format Images are generated in Wavelet format, which progressively generates pictures from low rates of resolution to reduce waiting time for users. The only software required is Netscape Navigator 4.7 or above and Microsoft Internet Explorer 5.x or above. Compatible with most systems and protocols NetCam2 supports TCP/IP networking, SMTP e-mail, HTTP and other Internet related protocols; and can be used in mixed operating system environments such as Windows, Unix, Macintosh and OS/2. It integrates with other WWW/Intranet applications. Web-based system management Using a standard Web browser, NetCam2 is configured and managed directly from its own Web pages. As new firmware release becomes available, NetCam2 camera products can be upgrade remotely via the network. Indoor/Outdoor use The operating temperature range of the camera supports indoor application only. Recommendation: Use a dedicated outdoor camera that connect to the NetCam2’s input for serving an external cameras. Also the internal camera can be disabled. That channel is then available for a second external camera. 7 NetCam2 _ii_00592en.qxd 1/23/03 2:22 PM Page 8 NetCam2 Section 1 1.2 Unpacking Unpack carefully and handle all electronic equipment with care to prevent damage. Check for the following items: • NetCam2 - Web Camera Server • Crossover cable, 1 m (red) • Direct cable 2 m (white) • Adapter & Power cable (12V DC, 1.5 A) • Software • Manual Note: Save the packaging materials for future use if the unit needs to be shipped for service or repair. 1.3 NetCam2 Rear View and Descriptions Zoom lens connector Video input/output Iris Lens Network DC 12V AC 24V DIP switch 8 RS232/RS422/RS485/Sensor Input NetCam2 _ii_00592en.qxd 1/23/03 2:22 PM NetCam2 Connector name Video Zoom Lens Network Iris Lens DIP switch Page 9 Section 1 Description Remark Output of internal camera or input for channel 2 as set by DIP switch To control zoom and focus adjustment. +/-6V drive voltage with common ground To connect 10 Base-T Ethernet cable Video Iris lens connector Left:To designate video signal termination of ‘Video Input’ BNC connector Right:To select BNC function as input or output To connect a power supply unit of 24V AC +/-10% or 12 V DC +/-10% To connect a power supply unit of 12V DC +/-10% AC 24V/DC 12 V DC 12V RS232/RS422/RS485/ Sensor Input To connect external devices (see detail below) RS232/RS422/RS485/Sensor Input Sensor Power RS-422 Connector name SEN -,SEN + POW RS-232 RS-422 RS-485 RS-232 Description To connect external sensor Power supply output (12 Vdc) These pins are for devices that satisfy RS-232C protocol, and they consist of TX, RX, and GND. Satisfies RS-422 protocol.They are half-duflex. It consists of R+, R-, T+, and T-. Satisfies RS-485 protocol.They consist of 485+ and 485-. Short R+ and R- with a wire to get RS422+ and short T+ and T- to get RS422-. 9 NetCam2 _ii_00592en.qxd 1/23/03 2:22 PM Page 10 NetCam2 Section 1 Description on LED of Ethernet Port Yellow LED: This LED indicates the status of Yellow LED Green LED data transmission. After power is supplied, it is on for the first 4-5 seconds and then it goes off. It blinks continuously when NetCam 2 transmits data. Green LED: This LED indicates the status of networking. After power is supplied, it is on for the first 1-2 seconds, and then it blinks once at every one second as long as the network is connected. Description of DIP Switches This is to designate the function of the BNC video connector. With the right hand dip switch in position Vout, the internal camera video output is supplied to the video BNC. With this dip switch in the V-in position, the video BNC is the input for video channel 2. The right hand dip switch sets the video input to 75 Ohm or high impedance. 10 DIP Switch 7 5 o hm V-OUT HI-Z V-IN NetCam2 _ii_00592en.qxd 1/23/03 2:22 PM Page 11 NetCam2 2 Section 2 INSTALLATION 2.1 Installation summary • Connect Ethernet and power to the NetCam2 on a local network for configuration (see 2.1.3). • Install the setup program for NetCam2 (see 2.2). • Assign an IP address to NetCam2 and configure its network settings (see 2.3). • Configure the operational settings (see 2.4). • Install NetCam2 in its location, and re-connect the power and Ethernet. • Adjust the focus (see section 6). 2.1.1 System requirements • Operating system: Windows 98, ME, NT4 or 2000 • CPU: Pentium II or above • Minimum RAM: 128MB (Windows 98 and ME), 192MB (windows NT4 and 2000) • Ensure that either Internet Explorer 5.0 (or above) or Netscape Navigator 4.7 (or above) web browsers are available 2.1.2 Recommended PC display settings Using the Windows ‘Setting / Control Panel / Display’ options, set: • Color option to ‘High color’ (16-bit) or above. • Screen resolution to 1024x768 pixels. 2.1.3 Connecting Ethernet and power cables • Connect an Ethernet LAN cable to the ‘Ethernet’ port (RJ-45 connector) on the rear panel. • Connect the power supply (12V, 1.5 A adaptor, supplied) to the connector marked ‘DC 12 V’ or use an alternative power supply unit on the AC 24 V or the DC 12 V connector. • Confirm that the green LED on the Ethernet port flashes every 1 to 2 seconds. Note it starts flashing 5 to 6 seconds after applying power. 11 NetCam2 _ii_00592en.qxd 1/23/03 2:22 PM Page 12 NetCam2 2.1.4 Section 2 Connecting NetCam2 to a PC using crossover cable Crossover cable (red) Select 'IP Address' FIgure 2-2 Connecting NetCam2 to a PC using a crossover (cross link) Network cable. 2.1.5 Connecting NetCam2 to a PC via a HUB HUB 2 FIgure 2-3 Connecting NetCam2 to a PC via a HUB, using ‘Direct’ cables. 12 NetCam2 _ii_00592en.qxd 1/23/03 2:22 PM NetCam2 Page 13 Section 2 2.1.6 PSTN dial-in connection 1. Connect a PSTN modem to the NetCam’s RS232 serial port. 2. Ensure that the modem is selected as connected device in the Serial Configuration screen of the Administrator’s pages. 3. On the client side use a recommended browser with dial-up connection. 4. In the dial screen enter username/password of the NetCam. (default is guest or admin). 5. To view the NetCam pages enter IP address 10.0.0.10 in the address bar. 2.1.7 Location • Place NetCam2 appropriately for your purpose. Caution: Do not expose the camera lens to direct sunlight. When operating NetCam2 in outdoor light, an auto iris lens is recommended. 2.2 • • • • Installing NetCam2 Setup program Insert the software CD-ROM (supplied) into the drive. Copy ‘NetCamSetup.exe’ to the PC’s desktop. Double click on ‘NetCamSetup.exe’ to activate the setup program. Follow the screen instructions. 13 NetCam2 _ii_00592en.qxd 1/23/03 2:22 PM Page 14 NetCam2 Section 2 2.3 Assigning IP Address and Starting Configuration It is possible to setup a NetCam2 that is either connected to a local network or directly connected to a PC using the red-colored crossover cable (supplied). When setup is executed, the table lists all NetCam2s connected to the local network. • Select the ‘MAC address’ of the NetCam2 requiring an IP address. • When a NetCam2 is selected, the ‘selected IP address’ is displayed the default IP address is ‘211.53.133.92’). • Enter a password in the ‘Admin’s Password’ box (the default password is ‘admin’). • To change the IP address, click the ‘Change IP Addr’ button. • Enter the new IP address and confirm it with the ‘OK’ button. Note: If NetCam2 has a problem, you can reboot it by clicking "Reboot". 2.4 Configuring NetCam2 After assigning a new IP address to the NetCam2, it is possible to enter the configuration options. • Click ‘Start Configuration’ button to be connected to the Administrator pages in the NetCam (see Chapter 4). 2.5 Assigning IP Address with ARP command If you fail to assign an IP address with the setup program, carry out the process with ARP command. NetCam2 IP address = IP address to be assigned to the NetCam2. NetCam2 Ethernet address = MAC printed on the bottom of the NetCam2. My PC IP address = IP address of the Network Interface Card in your PC> Note: The NetCam2 and PC IP addresses must be within the same IP address class. 14 NetCam2 _ii_00592en.qxd 1/23/03 2:22 PM Page 15 NetCam2 1. • Section 2 Using ARP in Windows 98 and NT Start a DOS window and type the following commands. arp -s <NetCam2 IP address> <NetCam2 _________ address> ping -t <NetCam2 IP address> • Example arp -s 200.243.232.178 00-40-8c-10-00-86 ping -t 200.243.232.178 2. • Using ARP in Windows 95 Start a DOS window and type the following commands. arp -s <NetCam2 IP add.> <NetCam2 Ethernet add.> <my PC IP add.> ping <NetCam2 IP address> • Example arp -s 200.243.232.178 00-40-8c-10-00-86 200.243.232.130 ping 200.243.232.178 3. Verifying installation After completion, the following message (or similar) will be displayed after the ping command: Request timed out : Request timed out Reply from 200.243.232.178: bytes=32 time=2ms TTL=255 Reply from 200.243.232.178: bytes=32 time=2ms TTL=255 Ping statistics for 200.243.232.178: Packets: Sent = 4, Received = 4, Lost = 0 (0% loss), Approximate round trip times in milliseconds: Minimum = 1ms, Maximum = 2ms, Average = 1ms • If you cannot receive the reply by the 'ping' command, try again by pressing 'F3' and 'Enter' keys again. Normally ‘Request timed out’ messages appear 7 times before you receive proper reply. 15 NetCam2 _ii_00592en.qxd NetCam2 • • 1/23/03 2:22 PM Page 16 Section 2 If you succeed in utilizing the above commands, you will receive a continuous connection. Stop the process by pressing <Ctrl>+<C> keys. If the statistic shows ‘100% loss’, you should check that the network line and connection status are stable; the IP address which is assigned to NetCam2; and whether a PC has the same local IP address as the NetCam2. (Same local IP address of C grade network means that the first 3 numbers are same but the fourth is different. For example 203.243.232.111 and 203.243.232.112 are the same local network IP addresses). MAC address The 12 digit MAC address of the NetCam is on a label on the bottom. For correct entering of this address using the ARP command, enter the “-” as separator to form a string of 6 two digit characters, i.e. 00408C100086 becomes 00-40-8C-10-00-86. 16 NetCam2 _ii_00592en.qxd 1/23/03 2:22 PM NetCam2 Page 17 Section 3 3. OPERATION This section looks at accessing the NetCam2’s homepage and monitoring realtime images. The NetCam2’s own web pages are accessed through one of the recommended Web browsers. 3.1 Starting Web browser • Start the browser and enter the NetCam2 IP address: http://<NetCam2 IP address>/ • Example – http://200.243.232.178/ Note: NetCam2 simultaneously supports up to 100 users. Additional users will receive the message ‘Server is full’. 3.2 Installing NetCam2 Plug-in The Plug-in and Active-X Control (licensed by WebGate Inc. and approved by Verisign) are required to enable a browser to read NetCam2’s image file format. 3.2.1 Netscape Users To view images transferred from a NetCam2, install the NetCam2 Plug-in. When NetCam2 is connected for the first time (or an old version of Plug-in is present) it is necessary to download the Plug-in. • The Plug-in Download screen is accessible from the various viewers and login screens by clicking on 'Plug-in'. • In the Plug-in Download screen, click on ‘Download Plug-In Now’. • Then click ‘Grant’ and ‘Install’ buttons respectively when prompted. 3.2.2 Microsoft Explorer Users Active-X Control is prepared for MS Explorer Users. It is installed as soon as NetCam2 is connected (by clicking ‘Yes’ when prompted for Active-X installation). If the NetCam2 Control file is not installed, repeat the installation procedure. If the file is already installed but an image is not seen, remove the file and re-install it. If images are not visible, check if the Active-X Control file is installed correctly in the C:\Windows\Download Program Files directory. 17 NetCam2 _ii_00592en.qxd 1/23/03 2:22 PM NetCam2 Page 18 Section 3 Note: Program installation takes less than 1 minute. Do not click any button until the ‘Active-X Control’ installation is completed. 3.3 3.3.1 Various viewers in NetCam2 homepage Login and homepage On the NetCam2 Login Page: • Enter your user name and password to log in (max 9 characters). • Click on 'Login' to connect the default viewer page (as set by the administrator) or click on one of the viewer links (see 'Home page' for a description of the viewers). • Enter the administrator's name and password and click on 'Administration' to connect directly to the administration pages. • Click on 'Home Page' to connect to the NetCam2's Home page. Note: The default user ID and password are ‘guest’. The administrator can change them at Admin page (refer to section 4). 18 NetCam2 _ii_00592en.qxd NetCam2 1/23/03 2:22 PM Page 19 Section 3 Homepage On the NetCam2 Homepage there are four viewing options. Users may monitor real-time images via these main viewers. The four viewers are: • Lite viewer: for real-time monitoring with simplified viewer with limited camera and image control (faster page download). • Full viewer: for real-time monitoring with full camera and image control. • Server-Push viewer: for real-time monitoring from behind a fire wall. • Java Applet viewer: for real-time monitoring on a computer that does not use a Microsoft Windows operating system (such as Macintosh). Further on the homepage, access is provided to: • Administration: goes to administration pages for setting passwords, etc. (refer to section 4). • Plug-in: loads a plugin required for Netscape Navigator (refer to section 3.2). • Help: connects to the help page. • Version: (details of software release level). 19 NetCam2 _ii_00592en.qxd 1/23/03 2:22 PM Page 20 NetCam2 Section 3 The homepage displays one image. The following can be selected using pulldown menus: • Select View – camera 1, 2 or all cameras. • Resolution – set image resolution to 720x486, 720x243, 360x243, 180x121 or 90x60. • Expansion – expand image 1x, 2x or 4x. • Frame rate – set frame rate. 3.3.2 Real-time monitoring through Full viewer (single view) • From the home page, click on ‘Full Viewer’. • The default view is shown. 20 NetCam2 _ii_00592en.qxd 1/23/03 2:22 PM NetCam2 Page 21 Section 3 Selecting and controlling cameras The user may select the following viewing options (active selection is highlighted in yellow): • ‘Camera selection’: Select camera icons 1 or 2 for viewing or controlling a camera. • ‘Camera View’: select the single view (one camera) or quad (both connected cameras) icon. • ‘Camera Control’: for adjusting the pan/tilt, zoom and focus of the camera selected in ‘Camera Select’. Note: Due to delays as a result of the image-refresh rate (3 to 4 seconds before a reaction is visible), panning and tilting is not seen in real time. • • ‘Fast/Slow’: control sets the rate of change for pan/tilt, focus and zoom (see note above). ‘Connection’: to Open or Close network connection (closing the connection reduces traffic in the network). Setting image quality Further on the Full viewer webpage there are pull-down lists and check boxes for: • ‘Resolution’: select image 720x486, 720x243, 360x243, 180x121, 90x60). Note: The higher the resolution, the slower the transmission rate. • ‘Expansion’: Select the image size of 1x, 2x or 4x. Note: Expanding an image by 2x or 4x does not increase the image resolution, but rather enlarges its size. Therefore, the quality of expanded image is not as clear as original image. However, the transmission rate is not slowed down. 21 NetCam2 _ii_00592en.qxd 1/23/03 2:22 PM NetCam2 • Page 22 Section 3 ‘Frame rate’: Select the image transmission speed. Note: Transmission speed depends on network capacity and PC performance. NetCam2 transmits a maximum of 30 frames per second, and total number of frames transmitted by all 4 channels cannot exceed this. • • ‘Greymode’: switches to monochrome images (reduces amount of data transmitted and therefore increases maximum frame rate. ‘Progressive’: builds up image from low- to high-resolution version. Note: Progressive mode allows a low-resolution image to be quickly displayed first, particularly when using dial-up lines. • ‘Single shot’: freezes the image after completion of the download (also used in combination with ‘Progressive mode’). Menu buttons The Full viewer has six menu buttons. They are: • Home: goes to the NetCam2 homepage. • Admin: goes to the administration pages for setting passwords, etc. (refer to section 4). • Help: goes to the help page. • Svr Push: for real-time monitoring from behind a fire wall. • Plug-in: loads a plug-in required for Netscape Navigator (refer to section 3.2). • Capture: saves a screen grab as a .BMP bitmap (for importing into Windows programs) or .EYE (for viewing in browser). 22 NetCam2 _ii_00592en.qxd 1/23/03 2:22 PM Page 23 NetCam2 3.3.3 Section 3 Real-time monitoring through Full viewer (dual image) To use the Full viewer in quad mode: • Click on the quad icon in ‘Camera Select’ Compared to full-screen mode, this viewer does not have the following controls: • Resolution • Expansion • Greymode • Progressive • Single shot Note: To select a camera in dual mode, click on one of the two camera select buttons. 23 NetCam2 _ii_00592en.qxd 1/23/03 NetCam2 2:22 PM Page 24 Section 3 3.3.4 Real-time monitoring through Lite Viewer (single view) The Lite Viewer has much of the functions of the Full Viewer, Its size is reduced to overcome low-speed transmission (although there is no difference in transmission time between Full Viewer and Lite Viewer for real-time images). To use the Lite Viewer: • From the homepage – click on 'Lite Viewer'. Compared to Full Viewer, the Lite Viewer does not have the following control: • Preset shots 24 NetCam2 _ii_00592en.qxd NetCam2 3.3.5 1/23/03 2:22 PM Page 25 Section 3 Real-time monitoring through Lite viewer (dual image) Compared to Lite Viewer in single shot mode, the dual mode does not have the following controls: • Resolution • Greymode • Singleshot • Expansion • Progressive mode 25 NetCam2 _ii_00592en.qxd 1/23/03 2:22 PM Page 26 NetCam2 Section 3 3.3.6 Real-time monitoring through Server-push viewer If there is a firewall on the network where the NetCam2 is connected, the NetCam2 can be accessed through the Server-push viewer to monitor real-time images. To use the Push Server Viewer: • From the homepage – click on 'Server Push Viewer'. • From Full Viewer or Lite Viewer – click on 'Svr Push' button. 26 NetCam2 _ii_00592en.qxd 1/23/03 2:22 PM NetCam2 Page 27 Section 4 3.3.7 Real-time monitoring through Java applet Viewer The Java applet viewer is for access to NetCam2 through a computer that does not use Microsoft Windows operating systems (such as a Macintosh computer, etc.). The Java applet viewer is run with Java virtual machine that is installed on the User’s computer. To use the Java applet Viewer: • From the homepage – click on 'Java applet Viewer'. • Enter ID. • Enter Password. 27 NetCam2 _ii_00592en.qxd 1/23/03 2:22 PM NetCam2 Page 28 Section 4 4 CONFIGURING ADMINISTRATOR’S OPTIONS 4.1 Login 4.1.1 Accessing Administration from Setup program • Click on the MAC address of the NetCam2. • Type in the administrator’s password and then click the ‘Start Configuration’ button. The setup program automatically connects to the Admin page of NetCam2's Homepage. 4.1.2 Accessing through Web browser • On the Web browser, key in the IP address of the NetCam2 to be configured. • At the login page, type in the administrator’s ID and password to access the Admin page. Note: An administrator may also access the NetCam2 real-time image viewer, and access the Admin page by clicking on ‘Admin’ button. Note: The default administrator’s ID and password are both set to ‘admin’. The administrator may change them (max 9 characters) on the Admin page. • 28 From the NetCam2 homepage, click on 'Administration'. NetCam2 _ii_00592en.qxd NetCam2 4.2 1/23/03 2:22 PM Page 29 Section 4 Administrator’s page 4.2.1 System Configuration This page is for setting name, date, location and description of the NetCam2 • NetCam Name – Type in the NetCam2 name. Note: The name is used to identify the NetCam2 at a certain server for dynamic IP address registration (if this function is available). It is therefore important to enter the correct name in order for a user to be able to find the NetCam2 in the dynamic IP registration list. 29 NetCam2 _ii_00592en.qxd NetCam2 • • • • 30 1/23/03 2:22 PM Page 30 Section 4 Chassis version – Click on 'Detailed H/W Information' to view the detailed hardware information such as maximum number of channels, serial port, digital output, etc. The Chassis serial number and S/W version are for service purposes only. Installation location – Type in the location of the NetCam2. This will appear as the second line of text in the Homepage header. Additional description – Type in any additional text information. This will appear as the third line of text in the Homepage header. Date and Time – there are three date and time menus: • ‘NetCam2 Current Date & Time’: the current date and time of the NetCam2's real-time clock appears. • ‘System(PC) Current Date & Time’: the current date and time in the administrator’s PC appears. You may copy the system (PC)’s date and time into NetCam2 by clicking on the ‘Time Synchronization’ button. • ‘Manual Date & Time Setting’: you may set the date and time manually. To synchronize the NetCam2 with the manually entered time, click on the ‘Time Synchronization’ button. NetCam2 _ii_00592en.qxd NetCam2 • • • 1/23/03 2:22 PM Page 31 Section 4 Administrator’s E-mail Address – type in the administrator’s e-mail address (this information is for information only). Initialize Flash Info – this resets the internal system setting to the factory defaults. Some settings, such as ‘Date & Time’, ’Model’, and ‘Serial Number’ in ‘System’ menu, ‘IP configuration’ in ‘Network’ menu, and all items in ‘Video’ menu, are not changed. Rebooting: If NetCam2 has any problem, use this button to reboot without switching off the power supply. It takes about 30 seconds. 4.2.2 User Configuration This page defines IDs, passwords and access rights for the administrator and up to five users. Note: If the NetCam2 should be open to everyone, do not change the default user IDs and passwords. Otherwise, you must change all user account names. 31 NetCam2 _ii_00592en.qxd NetCam2 • • • • 1/23/03 2:22 PM Page 32 Section 4 User Account – account names can be changed using unique names (max. 9 characters). The default administrator's name is 'Admin'. The default user names are 'guest'. Password – the passwords can be changed using unique names (max. 9 characters). The default administrator's password is 'Admin'. The default user passwords are 'guest'. Re-Type password – enter password again to confirm it is correctly typed. Access rights – it is possible to allow access rights to PTZ control (for access to Pan/Tilt/Zoom functions and focus sensitivity) and to video control (for access to quality options, QBOX settings, etc.). The Administrator has full authority to give a certain user access. Each of the 5 users can be assigned appropriate authorisation. Note: Change the administrator's name and password immediately for security purposes. 4.2.3 Network Configuration The IP address, Network Mask, Broadcast address, Gateway address, and DNS addresses are assigned from this page. 32 NetCam2 _ii_00592en.qxd NetCam2 • • 1/23/03 2:22 PM Page 33 Section 4 DHCP Client Protocol • If enabled, the NetCam2 automatically sets all addresses by detecting them from the DNCP server. The detected addresses are not shown on the screen. • If disabled, the administrator must configure all information on network addresses. Select Network Interface • Select 'Ethernet' if the NetCam2 is connected with Internet via a dedicated line, cable modem line or LAN environment. • Select 'xDSL(PPPoE)' if NetCam2 is connected to an xDSL line that needs a PPPoE process to connect to Internet. • Select PSTN(Dial Out) if NetCam2 is connected on a network with a PSTN modem. Ethernet Interface • IP Address – enter IP address. • Subnet mask – enter Subnet mask address. • Broadcast Address – click on ‘Get From Netmask’ button after assigning the IP address and Network Mask address and the broadcast address is automatically set. Note: If addresses are incorrectly assigned, the NetCam2 cannot be accessed. • DNS Server IP Address – this is used when NetCam2 is registered on the dynamic IP registration list of the Netcam registration server. 33 NetCam2 _ii_00592en.qxd NetCam2 1/23/03 2:22 PM Page 34 Section 4 xDSL Interface If the NetCam2 is connected to an xDSL line and uses PPPoE communication, select 'xDSL Interface' • User ID – enter the user password for PPPoE • Password – enter the user password for PPPoE PSTN Interface If the NetCam2 is connected to the Internet via an PSTN line (Public Switched Telephone Network) based on PPP, select 'PSTN(Dial-out)' In this case NetCam2 is connected to a dial-up modem with a serial cable (rather than a LAN cable). 34 NetCam2 _ii_00592en.qxd 1/23/03 2:22 PM Page 35 NetCam2 • • Section 4 User ID – enter the user password Password – enter the user password To configure the PSTN interface: • Enter user ID. • Enter the password thatr you have received from your Internet provider. • Enter the phone number of your Internet provider (do not forget to add a zero (0) if you have to dial a 0 to obtain an outside line). • Click on ‘Apply’. Note Only select ‘Script enable’ if your telephone line needs a special login script to contact ISP. 4.2.4 Dynamic IP Registration Service for ISDN, XDSL Users The dynamic registration function is a means to use the NetCam2 with a dynamically assigned IP address. The NetCam2 is registered under the name as defined in the 'System Configuration' page. The DCHP client Protocol on the 'Network Configuration' page will be enabled. In order to operate the Dynamic IP registration function, a separate server with dedicated software is required in the network. Contact your reseller for support on this function. Note: It is recommended to use the NetCam2 with a fixed IP address. If NetCam2 is installed on a network with a dynamic IP address (floating IP address), the NetCam2 must be registered to a ‘dynamic IP registration server’ to give connectivity using the NetCam2 name set in the System Configuration menu. If not done, no one can access the NetCam2 through the Web browser because the IP address access of the NetCam2 is unknown. 4.2.5 Security Configuration This page provides additional protection to restrict access to the NetCam2. An option is provided for activating a firewall function y filtering the IP addresses. An alternative option is to activate image encryption. 35 NetCam2 _ii_00592en.qxd NetCam2 • • 1/23/03 2:22 PM Page 36 Section 4 IP/Subnet Filtering Mode – to temporarily disallow a registered user accessing a NetCam2, the access IP addresses can be changed. If ‘IP/Subnet Filtering Mode’ is disable, anyone can access the NetCam2 through a Web browser with any PC. Select 'Enable' to activate the IP/Subnet filtering mode. Note: A Subnet is identified by entering 0’s in the Subnet section of the IP address e.g. entry 192.168.1.0 affects all users in the 192.168.1.x class C network. Default policy • Select 'Allow' to enable access to the NetCam2 for anyone. The filter rules define the IP addresses that are denied access. • Select 'Deny' to disable access to the NetCam2. The filter rules define the IP addresses that are allowed access. He administrator can always access the NetCam2 irrespective of IP filter settings. 36 NetCam2 _ii_00592en.qxd NetCam2 1/23/03 2:22 PM Page 37 Section 4 IP • • • Subnet filtering rules A total of 10 lines can be entered. Each line has the option of 'Allow' or 'Deny' access to a Subnet. Annotation of a Subnet is: IP address followed by / and extended network prefix. • The extended network prefix ranges from 0 to 31. • The value '0' identifies the IP address itself. • The numbers '1' to '31' define the bit length of the network prefix of the given IP address and is a representation of the Subnet mask. Examples: • IP address/8 defines a Subnet mask of 255.0.0.0 • IP address/27 defines a Subnet mask of 255.255.255.192. • Annotation 192.168.0.64/27 defines the Subnet with addresses ranging from 192.168.0.64 to 192.168.0.127. Note: The filter rules allow smaller Subnets to be set within a broader Subnet. In this case, the smaller Subnet has highest priority. Image Encryption Mode It is possible to prevent people from receiving images from the NetCam2, even though they can access it. • Select Enable ‘Image Encryption Mode’. • Assign a 'Encryption PIN Number' (max. 9 characters). Users have to key in the assigned PIN Number to see the image after accessing NetCam2 image viewers. 37 NetCam2 _ii_00592en.qxd NetCam2 4.2.6 • • • • • • 38 1/23/03 2:22 PM Page 38 Section 4 Video Configuration Video Channel Select – it is possible to configure each individual channel. Select the Camera to configure from the pull-down menu. Video Channel Status – Select 'Disable' or 'Enable' (a disabled channel will be black when selected). Camera Color Type – Select 'Color' or 'Black/White' (as appropriate). Video Signal Type – Select 'NTSC' or 'PAL' (as appropriate). Camera Installation Angle – Enables image rotation by 90°, 180° or 270°. Select ‘Apply' for one camera to save the information before configuring the next camera. NetCam2 _ii_00592en.qxd 1/23/03 2:22 PM Page 39 NetCam2 Section 4 Advanced configuration Advanced calibration parameters can be entered for each channel. Calibration Parameters • Adjust the screen settings to optimise for video gain, brightness, contrast, hue, saturation, horizontal line shift, and vertical line shift. 39 NetCam2 _ii_00592en.qxd NetCam2 1/23/03 2:22 PM Page 40 Section 4 Caption options • Select 'Black' for black text on a light background. • Select 'White' for white text on a dark background. • Select 'Time information' if current time to be displayed in the caption. • Select 'Channel information' if channel information is to be displayed in the caption. • User defined string – Enter a text caption (max. 102 characters for a 720pixel wide image. Smaller image sizes allow proportionally shorter text strings). Visual setting parameters QBOX Control To view specific area of the whole image at full contrast, enable the QBOX function. An area is set as a QBOX, outside this area the image is reduced contrast (to allow faster image transmission, by reducing data size). To set QBOX parameters: • Click the left-hand top corner of the QBOX. • Move the mouse pointer to the right-hand bottom corner of the QBOX. • Click to enable the QBOX. • Enable QBOX – Enable a QBOX once it is defined. • Disable QBOX – disables a defined QBOX. • Ambient level – sets the contrast level of the area surrounding the QBOX. '1' is transparent, '5' is fully opaque. Image Quality Level: • Select the image quality level from 0 to 9. In level 9, NetCam2 sends the best image (lowest compression). However, transmission speed will be reduced because of larger data. The image quality inside the ‘QBOX’ is set to the same level as specified in this menu. Focus Sensitivity Level: • Select the focus sensitivity level from 1 to 5: The higher the number, the larger the step of focus adjustment per mouse click. 40 NetCam2 _ii_00592en.qxd 1/23/03 NetCam2 4.2.7 • 2:22 PM Page 41 Section 4 Application Configuration Video Channel Selection - select a Camera to configure. The two channels shown are the same as in ‘Video Configuration’. Click on ' Apply' before switching to another channel. 41 NetCam2 _ii_00592en.qxd NetCam2 • • • 1/23/03 2:22 PM Page 42 Section 4 Recipient E-mail Address – designate a person to receive an e-mail after the event alarm triggers images. Sender E-mail Address – enter the 'sent by' e-mail address that should appear on the recipient's e-mail. Check E-Mail Options – some e-mail servers only pass e-mails with URLs such as [email protected] (to avoid receiving 'spam' or junk mail that does not have a URL). NetCam2 uses plain IP addresses. To solve the problem, NetCam2 has a function to relay its e-mail through an available e-mail server that only passes e-mail using URL addresses. After activating ‘User Relay Mail Server’, key in a server’s URL such as ‘@abcdefg.com’. Most Email servers support file ‘Quoted Printable’ format, but for servers that do not, the ‘Base64’ format can be selected. E-Mail Event Configuration • Event source - define when an e-mail is delivered. • Click on ‘Motion Detection’, and the e-mail is sent when motion is detected. • Click on ‘Sensor Input Detection for input Port 1’, and the e-mail is sent when the sensor 1 detects an event. (To utilize sensor input detection, connect a sensor to NetCam2). • Click on ‘Periodic sending’, and the e-mail is periodically sent at a user definable preset time. Valid entries range from 5 to 525,600 minutes. • File name: select how to name image files. Either a file with: • Date & time (DATETIME suffix). • Serial number (SEQNUM). • A fixed name (Manually assigned filename). • Image resolution: set the resolution of the image that is to be delivered by e-mail. The images attached to the e-mail have the .eye extension and can be viewed with the Web browser (with Active-X Control or Plug-in). Pre- and post alarm images have a 360x243 resolution by default. FTP information Assign the FTP server address, FTP user account, FTP user password, and FTP user path to receive files when events occur. Note that the path is the virtual path (alias) defined in the FTP server and shall start with ./ followed by the alias. 42 NetCam2 _ii_00592en.qxd 1/23/03 NetCam2 2:22 PM Page 43 Section 4 FTP event configuration Set the sending conditions for an FTP event. The setting methods for FTP are same as that for E-mail (see above). 4.2.8 • • • • • • • Pan/Tilt/Zoom Configuration Video Channel Selection – select a camera to control pan/tilt/zoom (the four channels shown are same as seen in ‘Video Configuration’). Pan Tilt Function – switch the pan/tilt control function on (Enable) or off (Disable). Built in zoom Function – more info required. Pan reverse mode function – Enable to reverse the direction of the right and left pan control arrows (for if a camera is mounted up-side-down). Tilt Reverse mode function – Enable to reverse the direction of the up and down tilt control arrows (for if a camera is mounted up-side-down). Select Serial Port – select an interface that satisfies a receiver (controller) box. NetCam2 has two interface options: RS232C interface or RS485 (Half-Duffel) interface. Select RS232 for Philips PTZ. Serial Port Base Address – it is possible to connect more pan/tilt/zoom receivers (controllers) to Serial #2 (RS485 (Half-Duplex)). In this case, configure the receiver’s (controller’s) address to control each pan/tilt/zoom respectively. Use the RS232 to bi-phase converter to connect more devices. 43 NetCam2 _ii_00592en.qxd NetCam2 4.2.9 • • 44 1/23/03 2:22 PM Page 44 Section 4 Serial Configuration Serial Port Selection – select a serial port to configure. NetCam2 has two serial ports. Serial #1 is a RS232C interface port, and Serial #2 is a RS485 (Half-Duplex) interface port. Select the RS232C interface port for the Philips (M) PTZ and AutoDome attached devices. Select Attached Device: selects a communication protocol that an attached external device uses. Any pan/tilt that satisfies the listed protocols may be used. The other choices are: • None – disables the serial port function. • Audio device – reserved for future use. • Modem – for connecting an external PSTN model. • Manual – to allow manual entry of PTZ commands (contact your supplier for assistance). • Selection for Philips PTZ: Baud: 9600, Parity: None, Stopbit: 1, Databit: 8 NetCam2 _ii_00592en.qxd 1/23/03 NetCam2 2:22 PM Page 45 Section 4 4.2.10 Digital Input Configuration The sensor (alarm) inputs comprise LED type photo-couplers. The specification of the input is 5 to 12 Vdc at 10 to 20 mA Recommendation: Activate the sensor inputs in one of the following ways; 1. Connect sensor input minus (SEN-) to ground (GND) and use a relay or switch to connect the sensor input plus (SEN+) to +12 V (POW). 2. Connect sensor input plus (SEN+) to +12 V (POW) and use a relay or switch to connect the sensor input minus (SEN-) to ground (GND). NetCam2 sends e-mails or/and files when connected external sensors detects an event. • Active State for Input Port 1 – define the normal state of connected input devices such as infrared sensors. • Current Status for Input Port 1 – NetCam2 shows the current state of the two connected digital devices. Their states are defined at ‘Active State for Input Port 1 and 2’ menus. 45 NetCam2 _ii_00592en.qxd NetCam2 1/23/03 2:22 PM Page 46 Section 4 4.2.11 Alarm Configuration • • Motion Detection Threshold – sets the threshold for the motion detection function. Threshold ‘0’ is the most sensitive state (low threshold) and ‘900’ is the least sensitive state (high threshold). Alarm Parameters for E-mail / FTP Application: - defines the imagerecording parameters for the NetCam2. If the NetCam2 detects events through motion detection function (MD Event) or external sensor (SID1 Event), image storage is triggered. Note: NetCam2 can record 2 images for 2 seconds before the event, one image of the event and 2 images for 2 seconds after the event. Its maximum recording rate is 1 frame per second. The NetCam2 records the 5 images to send them through E-mail or FTP. If an event lasts long, NetCam2 sends the images once only regardless of the overlapping time setting. Refer also to the 'Application Configuration' and 'Alarm Configuration' pages to set up other relevant parameters. 46 NetCam2 _ii_00592en.qxd 1/23/03 NetCam2 2:22 PM Page 47 Section 4 4.2.12 User Custom Configuration • • • Web Server TCP Port – assigns the TCP port of the NetCam2 through which people can access the NetCam2 and through which the NetCam2 sends data. Normally, port 80 is assigned as a Web Server TCP port. Video Server TCP Port – assigns a port through which the NetCam2 transmits images. Normally, port 8080 is assigned as a video server TCP port. Select Main Page - assigns a viewer as a main page to show real-time images. Six different viewers can be selected from the list: Note: Single Viewer shows image from Ch#0(Internal) and Multi Viewer shows all images from 4 cameras ‘Default Viewer’ is designed for users to easily edit. • Main Title – enter text to be displayed at the top of the Homepage The following items are reserved for future use: • Logo Image Source URL – designates a URL of a site from which a logo can be obtained. A space on the left top of the viewer is available. • Logo Image Link URL – links the logo to a defined web page 9for example, a company homepage or a personal page). • Background Color and Foreground Color – changes the default viewer background colors using RGB values. 47 NetCam2 _ii_00592en.qxd 1/23/03 2:22 PM Page 48 NetCam2 Section 5 5 CONVENIENT FUNCTIONS OF MOUSE A small window of 5 functions appears when you click the right mouse button in the video picture. Users who have the authorities can use functions such as ‘Image Info’, ‘Quality Box’, ‘Focus Sensitivity’, and ‘Image Quality’. 1 Video Information Setting This page is to change the color of the time shown on the left top of the image, or hide the time. 2 Configuration of High Qualified Image Area (Focusing Area) You can overcome the insufficient network bandwidth with this function. Click the right button of your mouse at any place on the picture. If you want to set a new focusing area, you choose ‘New QBOX’ button. First you place and click your mouse where you want to start and then click again where to stop. You can also use an existing area to focus again by clicking ‘Enable QBOX’. ‘Disable QBOX’ is to finish. You may set the quality of the out of focused area with ‘Ambient Level’. If you select ‘Level 1’, the quality is similar to focused area. If you select ‘Level 5’, the image of the out of focused area is shown as dark. 3 Focus sensitivity When you use zoom lens on the NetCam2, you can configure the moving range for each mouse click. The sensitivity is from Level 0 to Level 9. By selecting ‘Level 9’, you zoom in or out at the largest range. 48 NetCam2 _ii_00592en.qxd NetCam2 1/23/03 2:22 PM Page 49 Section 5 4 Image quality You set the image quality of the complete image per channel. If you choose ‘Level 9’, the NetCam2 sends the finest image. However, transmission speed will be reduced because of large sized data. If you choose ‘Level 0’, the NetCam2 sends lowst quality image but fast. 5 Save File As You can save a still image from real time images. A still image can be saved as a Wavelet method file (*.eye) or bitmap (*.bmp) file format. Wavelet compression image file can be decompressed and reproduced on Internet browsers such as Netscape or Explorer. 49 NetCam2 _ii_00592en.qxd 1/23/03 2:22 PM Page 50 NetCam2 6 Section 6 ADJUSTING FOCUS Screw 1 2 3 4 5 50 First, adjust focus of the NetCam2 by turning the front focus ring of the lens. If you cannot focus with the lens, loosen the screw in the back focus ring. Setting the lens at the middle range, focus by turning the back focus ring. When you have focused, tighten the screw. Complete the focus by turning the front focus ring of the lens. NetCam2 _ii_00592en.qxd 1/23/03 2:22 PM Page 51 NetCam2 51 NetCam2 _ii_00592en.qxd 9922 141 00592en 03-03 1/23/03 2:22 PM Page 52 2003 Philips Electronics N.V. Data subject to change without notice