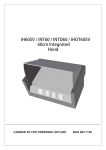
1
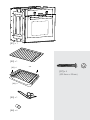
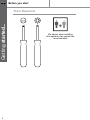
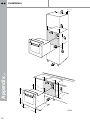
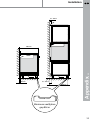
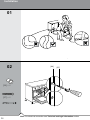
Built-in Single Oven with Digital Timer
Model Numbers: CAEFL60BK / CAEFL60W
GB
IE
[01] x 1
[02] x 1
[03] x 1
[07] x 4
(Ø3.9mm x 32mm)
[04] x 1
[05] x 1
[06] x 4
GB
IE
Built-in Single Oven with Digital Timer
Installation
04
32
3
GB
IE
Let's
get started...
Getting started...
05
Before you start
Safety
06
09
In more detail...
11
Product functions
Operation
Care and maintenance
Troubleshooting
Recycling and disposal
Technical and legal information
Guarantee
CE Declaration of conformity
12
16
20
24
25
26
29
31
Appendix
Installation
4
32
Getting
Started...
Before you start
06
Safety
09
IE
Getting started...
GB
5
GB
IE
Before you start
Getting started...
Before you start
To avoid the risks that are always present when you use
an electrical appliance it is important that this appliance is
installed correctly and that you read the safety instructions
carefully to avoid misuse and hazards. Please keep this
instruction booklet for future reference and pass it on to any
future owners. After unpacking the appliance please check
that it is not damaged. If in doubt, do not use the appliance
but contact Customer Services on 0344 800 1128 (UK),
0144 75261 (Ireland).
Check the package and make sure you have all of the
parts listed.
Decide on the appropriate location for your product.
or handling to prevent personal injury or damage to the
product.
ordering replacement parts.
If you sell the appliance, give it away, or leave it behind
when you move house, make sure you also pass on this
manual so that the new owner can become familiar with the
appliance and its safety warnings.
6
Before you start
GB
IE
Instructions
Before using the oven, carefully clean the inside with a
non-abrasive detergent and warm water. Position the grill
and tray in their respective runners. Once the operation is
complete, turn the oven on to the maximum temperature
for approximately 20 minutes to remove any traces of
manufacturing grease, oil or resins which may cause
unpleasant odours when cooking.
Prior start up of the appliance
WARNING: During this first use some smoke or unpleasant
odours may appear. Should this happen ventilate the room
suitably until the first operation is finalised.
Once this simple operation has been carried out the oven is
ready to use for cooking.
This appliance is exclusively for domestic use.
Getting started...
This user manual must be kept for future reference and use
by someone who is not familiar with the appliance.
Use the oven to cook food only.
Before cooking, make sure all oven accessories that are
not required are removed from the oven.
Pre-heat the oven to the cooking temperature before using it.
Place the cooking trays in the centre of the oven and leave
space in between when using more than one, so that the
air can circulate.
Do not put oven trays on the base of the oven or cover it
with aluminium foil. This will cause thermal accumulation.
The cooking and roasting times will not coincide and the
enamel may be damaged.
Try to open the oven door as little as possible to see the
food (the oven light remains on during cooking).
Take care when opening the door to avoid contact with hot
parts and steam.
7
GB
IE
Before you start
Getting started...
Tools Required
8
We advise when installing
this appliance two people are
recommended.
Safety
GB
IE
• All installation work must be carried out by a
competent person or qualified electrician.
• This appliance must be installed correctly by a
suitably qualified person, strictly following the
manufacturer’s instructions.
This appliance complies with all current European safety legislation,
however, the Manufacturer must emphasise that this compliance does
not prevent the surfaces of the appliance from heating up during use and
remaining hot during its operation.
Accessible parts may become hot during use. Young children should be kept
away. Care should be taken to avoid touching the appliance (e.g hob, cooker).
The Manufacturer highly recommends that this appliance be kept out of the
reach of babies and small children.
Children should be supervised to ensure that they do not play with the
appliance.
Getting started...
These instructions are for your safety. Please read through
them thoroughly prior to installation and retain them for
future reference.
This appliance is not intended for use by persons (including children) with
reduced physical sensory, or mental capabilities, or by those who lack
experience and knowledge, unless they have been given supervision and
instruction concerning the use of the appliance by a person responsible for
their safety.
Means for isolating the appliance must be incorporated in the fixed wiring
in accordance with the current wiring regulations. An all-pole disconnection
switch having a contact separation of at least 3 mm in all poles should be
connected in fixed wiring.
Do not allow the electric cables to touch the hot parts of the appliance.
Make sure that the power cord is not caught under or in the appliance and
avoid damage to the power cable.
Do not install the appliance outdoors in a damp place or in an area which
may be prone to water leaks such as under or near a sink unit. In the event
of a water leak allow the machine to dry naturally.
Please dispose of the packing material carefully.
Do not use flammable sprays in close vicinity to the appliance.
9
GB
IE
Safety
We also recommend that great care be taken during use and cleaning.
Read the cleaning and maintenance sections for this appliance carefully.
Getting started...
A steam cleaner is not to be used.
The appliance is not intended to be operated by means of external timer or
separated remote-control system.
The appliance is for domestic use only.
Do not place heavy objects on this oven or lean on the door when opening
it, as this may damage the hinges.
Do not leave hot oil or fats unattended as they may catch light.
Do not place oven dishes or trays of the base part of the oven or cover it in
aluminium foil.
Do not install the appliance near curtains or upholstered furniture.
Do not try to lift or move kitchen appliances by pulling any door or handle as
this may cause damage.
If the oven seal is very dirty, the door will not close properly when the oven
is working. The fronts of neighbouring furniture may be damaged. Keep the
oven seal clean.
Open the oven carefully as hot steam may escape.
Do not pour water inside a very hot oven. The enamel may be damaged.
Heat, vapour and humidity are produced during use, avoid all kinds of
personal damage and ensure that the room is suitably ventilated. If used for
a prolonged period of time, additional ventilation may be necessary. Consult
a qualified installer if you have any doubts about the necessary volume.
The Manufacturer declines all liability for personal or material damage as a
result of misuse or incorrect installation of this appliance.
10
GB
IE
Product functions
12
Operation
13
Care and maintenance
20
Troubleshooting
24
Recycling and disposal
25
Technical and legal information
26
Guarantee
29
CE Declaration of conformity
31
In more detail...
In more
detail...
11
GB
IE
Operation
Product functions
In more detail...
>>The oven is controlled by a thermostat between 50 ºC and 250 ºC,
depending on the temperature required. The thermostat pilot light turns
on and off to indicate the temperature control during use.
>>The required cooking mode is selected using the multi-functional control
button. The functions that may be selected are:
Oven Light
Turning control knob to this setting, the oven
light will illuminate in the oven cavity, and
will operate on all selected functions.
Defrost
Only the fan comes on and the food is
thawed by ventilation without heat.
True Fan
The circular rear element and fan come on
together and the is is dispersed by force
convection. The oven does not require preheating.
Maxi Grill
Grill element comes on and is dispersed by
radiant heat.
Fan Assisted Grill
Grill element comes on and is dispersed
by the rear fan. Even distribution of heat is
attained in the cavity.
>>Oven door should be open when using grill function
>>Read the information of the food packaging for the cooking
temperatures and times. Once familiar with the performance of the
appliance, the temperatures and times may be varied to adapt them to
your personal tastes.
>>Check that frozen food is completely thawed before cooking, unless
indicated otherwise.
The information given in the following charts is intended only
as a guide. Select the lowest temperature quoted and check
the food at the end of the shortest duration quoted.
12
Operation
GB
IE
Cooking instructions
TRUE FAN MODE
Cakes / biscuits
Temperature
(ºC)
Shelf Position
(Recommended)
from the bottom
Cooking Time
in min.
Sponge cake
150-170
1
60-70
Marble, nut cake (tin)
150-170
1
60-80
Fresh fruit cake (tray)
150-170
1
35-45
Flan base 3)
150-170
1
25-30
Biscuits 3) (tray)
150-170
1, 3
20-25
Sponge cake (3 to 6 eggs) 3)
160-180
1
25-35
Swiss roll 2)
160-180
1
20-25
Tart / flan base
150-170
1
20-25
Streusel cake
150-170
1
45-55
Cheesecake
150-170
1
70-90
Apple pie
150-170
1
50-70
Apricot tart with topping
150-170
1
55-75
Guglhupf
150-170
1
50-60
Streusel cake
150-170
1
35-45
Short Pastry Desserts in Moulds
Raised Dough Desserts in Moulds
White bread
160-180
1
40-50
Pizza (tray) 3)
170-190
1
35-45
Onion tart
170-190
1
35-45
Apple turnovers
150-170
1, 3
25-30
Choux pastry 3), Eclairs
160-180
1, 3
30-40
Puff pastry
170-190
1, 3
20-25
Meringues, Macaroons
120-140
1, 3
25-50
Poultry, approx. 4 kg
160-180
1
150-180
Fish, whole, approx. 1.5 kg
160-180
1
35-55
In more detail...
Cake Mixture Desserts in Moulds
1) Pre-heat the oven.
2) Unless otherwise stated, the times given are for an oven which has not been pre-heated.
13
GB
IE
Operation
Food to be
grilled
Recommended
shelf level
from the
bottom
GRILL
FAN GRILL
Temperature
setting
Total
grilling
Time in
min.
Temperature
setting
Total
grilling
Time in
min.
In more detail...
Thin cuts
Steak
3 or 42)
maximum
10-16
maximum
20-25
Kebabs
3
maximum
25-30
maximum
16-20
Chicken kebabs
3
maximum
20-25
maximum
23-27
Cutlets/schnitzel
3 or 42)
maximum
12-18
maximum
23-27
Liver
3 or 42)
maximum
8-12
maximum
12-15
Burgers
3 or 42)
maximum
14-20
maximum
18-22
Sausages
3 or 42)
maximum
10-15
maximum
9-13
Fish fillet
3 or 42)
maximum
12-16
maximum
13-18
Trout
3 or 42)
maximum
16-20
maximum
20-25
Toast
3 or 42)
maximum
2-4
maximum
3-6
Cheese toast
3 or 42)
maximum
7-9
maximum
5-8
Tomatoes
3 or 42)
maximum
6-8
maximum
8-10
Peaches
2
maximum
6-8
maximum
15-20
Chicken
(approx. 1 kg)
1 3)
maximum
50-60
maximum
60-85
Rolled meat, 7 cm
(approx. 1 kg)
1
maximum
75-85
maximum
100-110
Pork
(approx. 1 kg)
1
maximum
100-120
maximum
95-100
Sirloin
(approx. 1 kg)
1
-
-
maximum
25-35
Thicker cuts
1) Turn half way through the grilling time.
2) Select the appropriate shelf level for the thickness of the food.
3) Use the 2nd shelf level from the bottom for "Fan grill".
CAUTION
The oven door becomes hot during use of the grill.
14
Food
Temperature
in ºC *
Potato, pasta or
vegetable bake
250
Lasagne, cannelloni
Shelf level
from the
bottom *
Time
in min. *
Notes
1 or 2
20-25
Place in suitable dish.
190
1 or 2
35-40
Remove the lid.
Filled baguette,
panini
200
1 or 2
12-15
Place on baking paper,
directly on the rack.
Pre-cooked pizza
200
1 or 2
12-20
Place on baking paper,
directly on the rack.
Pre-cooked mini
pizza
220
1 or 2
8-10
Place on baking paper,
directly on the rack.
Potato pancakes,
Rösti, croquettes
220
1 or 2
12-20
Place on baking paper,
directly on the rack.
Pretzels
220
1 or 2
12-15
Place on baking paper,
directly on the rack.
* Please follow the manufacturer's instructions on the packaging.
Food
Temperature
in ºC
Time
in min.
Recommended shelf level
from the bottom
Lasagne
200
45-60
1
Potato gratin
190
55-65
1
Vegetable
190
55-65
1
Pasta bake
190
40-50
1
GB
IE
In more detail...
Operation
15
GB
IE
Operation
Operation instructions
Using the 6-button electronic timer
Description of the button functions:
Alarm
In more detail...
Automatic cooking (duration)
End of cooking time (end time)
Manual operation
Reducing number in all programmes
Adding number in all programmes
Auto: Automatic programme
AUTO
20 00
FIG.1
16
Operation
GB
IE
>>(Light on): Programmer in automatic position and programmed.
>>No symbol lit, except the clock numbers means that a waiting time is
programmed.
Electronic clock
>>Immediately after connection (also after a power cut) three flashing digits
will appear on the panel.
symbol and at the same time one of
>>To enter the correct time press
or
until the correct time is shown. There is a 5-second
the buttons
acceptance delay during which no button should be touched.
>>The speed that the marker changes will noticeably increase some
and
.
seconds after beginning to press the buttons
Manual cooking (without using the programmer)
>>To use the oven with the help of the programmer, the flashing "AUTO"
.
indication must be cancelled by pressing the button
>>If the "AUTO" indicator is not flashing (which means that the oven is
programmed) the programming must be cancelled first by pressing
and setting the marker to 0.
In more detail...
Programmer functions:
>>24-hour display clock.
>>Alarm (Maximum 23:59).
>>Automatic programming (start and end of cooking).
>>Semi-automatic cooking (only start or only end of cooking).
>>The timer only works when the appliance is connected to the electricity
supply.
Automatic cooking
Start of cooking:
1. Programme the cooking time using
.
2. Press the buttons
or
to select the cooking time.
3. Select the temperature and function required using the thermostat and
selector knobs.
End of cooking:
1. Programme the end of the cooking time using
.
2. Press the buttons
or
to select the cooking time.
3. Select the temperature and function required using the thermostat and
selector knobs.
17
GB
IE
Operation
Start and End of cooking:
1. Programme the cooking time using
.
2. Press the buttons
or
to select the cooking time.
3. Press
for programming the off time.
4. Select
or
to set the off time.
In more detail...
>>After these operations, the "AUTO" symbol will appear on the display,
indicating that the oven has been programmed.
Practical example:
We wish to cook for 45 minutes and that the cooking time ends at 2 p.m.
1. Pressing
we set 0.45 on the display.
2. Pressing
we set 14:00 on the display.
>>After these operations the current time will reappear on the display as
well as the "AUTO" symbol, indicating that our programming has been
understood and memorised.
>>At 13:15 (14:00 minus 45 minutes), the oven will automatically start, the
and "AUTO" appearing during cooking.
symbols
>>At 14:00 the cooking will automatically stop and the alarm will sound
intermittently.
to turn the alarm off.
>>Press
Pre-set cooking function
Programming the duration of the cooking:
>>Set the chosen cooking time using the button
and set the duration.
>>Cooking will start immediately, the symbols "AUTO" and
will appear
on the display. When the programmed time has passed the cooking will
stop and the alarm will sound intermittently.
>>Turn the alarm off as described above.
Programming the end of the cooking:
>>Set the chosen end time for the cooking using the button
and set the
end time. Cooking will start immediately and the symbols "AUTO" and
will appear on the display. Cooking will end at the set time and the alarm
will sound intermittently. Turn it off as indicated above.
>>The state of the programming can be checked at any time by pressing
the corresponding button.
18
Operation
GB
IE
Electronic alarm
>>The timer function consists solely of an alarm which can be adjusted for
a maximum period of 23:59. To adjust the time, press the button
and
or
until the desired time appears. Having made
at the same time
the adjustment, the real time will reappear next to the symbol
.
>>The countdown will begin immediately and can be viewed on the display
at any time by simply pressing the button.
>>When the time has ended, the symbol will disappear and the alarm will
sound intermittently, which may be turned off by pressing the button. The
alarm does not control any of the oven functions.
Notes:
>>If an error is made it will be indicated via an alarm and the "AUTO"
, and
symbol will flash. Cancel the adjustment by pressing the button
then re-programme to rectify it.
>>The alarm that sounds at the end of a programme will continue for seven
. However, at the end
minutes unless cancelled by pressing the button
of the seven minutes the "AUTO" symbol will continue flashing.
>>The alarm has three tone positions: low, medium and high. To adjust the
tone, check that the timer is in the manual mode, then press the button
and hold down to hear the tone selected. On releasing the button ,
press again and hold down to select another tone. Repeat the procedure
until the required tone is heard.
In more detail...
>>The programming can also be cancelled at any time by pressing
and
the oven will be ready for
setting the marker to zero. By then pressing
manual operation.
WARNING! A power cut will result in the programmed functions
to be cancelled, including the clock. Once the power returns three
flashing zeros will appear and the oven can be re-programmed.
19
GB
IE
Care and maintenance
Care and maintenance
In more detail...
Warning
IMPORTANT
!
Always
switch
off the electricity
supply before
As a safety precaution,
before beginning
to clean
performing
maintenance
work.
In
event
of a fault,
the oven always unplug it from thethe
power
supply
or
contact
an
official
distributor
or
authorised
dealer.
remove the appliance power lead.
20
FUSE
1
Cleaning an oven that does not have self-cleaning panels
must be done after use, when it is switched off but still
warm, not hot, so that the film of grease produced by the
cooking vapours on the walls is still easy to remove, as
well as the drips and splashes of fat that are not yet hard
and dry.
2
To clean the stainless steel external parts, use a soft cloth
with soap and water; do not use any powdered products
that contain abrasive substances.
OFF
Normally, wiping with a damp soft cloth and warm detergent is enough, but
for stubborn stains the following is recommended:
Cleaning the oven cavity
>>Spray a proprietary oven cleaner inside your oven and leave it to work
for the time specified in the manufacturers instructions. Then use a clean
sponge to wipe off the foam residue.
>>Wear rubber gloves to prevent the cleaner coming into contact with your
skin and make sure the kitchen is well-ventilated to disperse the fumes
produced by the cleaner. Repeat if necessary.
>>Also avoid the use of acid or alkaline substances (lemon juice, vinegar,
salt, tomatoes, etc.). Avoid using products containing chlorine, acid or
abrasive substances specially for cleaning the varnished walls. Do not
use thick steel wool or hard utensils, as they can damage the surface
finishes.
>>Do not use high pressure cleaners or steam appliances for cleaning the
oven.
>>Only use a recommended cleaner for this type of material – avoid
chloride-based products such as bleach.
Care and maintenance
GB
IE
WARNING
• Take care not to remove the hinge locking system when taking off the
door, as the hinge mechanism can spring back suddenly.
• Never submerge the door in water for any reason.
B
A
A
B
B
A
In more detail...
Removing the door from the oven (Fig.2)
>>To simplify cleaning the interior of the oven, the door can be removed.
The process of removing the door is shown below:
>>Open the door fully to position “C”
Lift the two mobile links "A" of the hinges, until fixing at point “B”.
>>Then close the door to the half-way position.
>>Next, lift the door upwards and remove it, sliding it outwards; hold the
door by the sides close to the hinges when doing this.
>>To replace the door, first slide the hinges into their grooves and open the
door completely.
>>Remember to turn the two moving links "B" used to engage the two
hinges before closing the door (Fig. 2).
FIG.2
C
21
IE
In more detail...
GB
Care and maintenance
Cleaning the glass door (Fig.3):
>>If possible, remove the oven door glass following the manufacturer's
instructions. Use warm water with a little detergent to clean the glass
sections of the door.
>>Do not use abrasive products which could damage the glass. Remember
that if the surface of the glass panel becomes scratched, it could cause a
dangerous failure.
>>To simplify the cleaning, the inner glass panel can be taken out of the
door. The method for removing the glass from the door is shown below.
>>After removing the screws fixing the glass, located on the inner face of
the door, lift the glass out carefully. In versions with three glasses the
intermediate glass can also be removed. The procedure is the same as
above.
FIG.3
22
Care and maintenance
GB
IE
Replacement of the oven light bulb (Fig. 3)
> Not covered by the appliance guarantee.
WARNING: Disconnect the appliance from the electricity
supply, open the oven door and remove the oven shelves.
The oven has a light with the following characteristics:
> 15 W or 25 W, 300 ºC and type E-14
1. During use the appliance becomes hot. Care should be taken to avoid
touching heating elements inside the oven
2. WARNING: Ensure that the appliance is switched off before replacing
the lamp to avoid the possibility of electric shock
3. Remove the glass cover that protects the light bulb by turning it
anti-clockwise.
4. Unscrew the old light bulb and dispose of it safely and ecologically,
In more detail...
90’
the cover.
Note: The glass cover may be tight and, therefore, may need a grip to
release it.
FIG.3
23
GB
IE
Care and maintenance
In more detail...
Troubleshooting
24
Fault
Cause
Solution
Oven doesn't work.
Something at the
connection is wrong, or
it's not connected.
Turn off main supply and
check if some wire has
been disconnected.
Power supply
connections are loose.
Turn off main supply and
check if some wire has
been disconnected.
Something at house
installation is wrong.
Turn off main supply and
check if some wire has
been disconnected.
Light bulb is blown.
Replace bulb as
described in the manual
in section "Care and
maintenance".
No function is selected.
Choose a cooking
function turning the
selector.
No temperature is
selected.
Choose a temperature
turning the selector.
The grill power set too
low.
Turn the temperature
control knob to
maximum.
Oven light doesn't
work.
Oven will not heat
Grill not heating
properly.
Care and maintenance
GB
IE
Recycling and Disposal
Environmental Protection
Waste electrical products should not be disposed of with household waste.
Please recycle where facilities exist. Check with your Local Authority or
retailer for recycling advice.
On ensuring that this product is disposed of correctly, you will help to
avoid possible negative consequences for the environment and public
health, which could occur if this product is not handled correctly. To receive
more detailed information about recycling this product, contact your local
government, domestic waste disposal services or the outlet where the
product was bought.
In more detail...
The symbol on the product or its packaging indicates that this
product cannot be treated as normal household waste. This
product must be handed over to an electric and electronic
equipment collection point for recycling.
25
GB
IE
Technical and legal
information
Technical Data
In more detail...
Interior dimensions:
Height:
340 mm
Width:
440 mm
Depth:
390 mm
Final
Model
Name
Gross
Volume
(LITRES)
Useable
Volume
(LITRES)
CAEFL60BK
59
49
CAEFL60W
59
49
Electrical information:
Nominal voltage:
220 V – 240 V ~ 50 Hz
Power connection:
13 A (automatic bipolar switch with protected socket,
with 3 mm separation between contacts)
Power absorption:
Base Resistance:
Roof Resistance:
Fan Resistance:
Grill Resistance:
1.30 kW
0.90 kW
2.30 kW
1.35 kW
Network power cable:
3 x 1.5 mm2 type H07RN-F <HAR>
Oven light bulb:
15 W – 25 W / 300 ºC screw type E-14
26
Technical and legal
information
GB
IE
All installation work must be carried out by a
competent person or qualified electrician.
Before connecting the mains supply ensure that
the mains voltage corresponds to the voltage on
the rating plate inside the cooker hood.
Warning: THIS APPLIANCE MUST
BE EARTHED.
Mains Supply could be connected to the Mains Voltage by Direct
Connection
UK
N(bleu)
N(bleu)
DOUBLE POLE SWITCHED
FUSED SPUR OUTLET
OFF
L(brun)
L(brun)
FUSE ON
USE A 133AMP FUSE
Direct Connection
If the appliance is being connected directly to the mains an
omnipolar circuit-breaker must be installed with a minimum
opening of 3mm between contacts.
In more detail...
EUR
If the cable is damaged or to be replaced, the operation must be
carried out the by a qualified electrician with dedicated tools to
avoid any accidents.
The installer must ensure that the correct electrical connection has
been made and that it complies with wiring diagram.
The cable must not be bent or compressed.
The cable must be checked regularly and replaced by authorized
technicians only.
27
GB
IE
Technical and legal
information
Electrical Requirements
Any permanent electrical installation must comply with the latest
I.E.E. Regulations and local electricity company regulations. For
your own safety a qualified electrician or contractor who is on the
roll of the National Inspection Council for Electrical Installation
Contracting (NICEIC) should undertake the electrical installation.
Electrical Connection
In more detail...
Before connecting the mains supply ensure that the mains
voltage corresponds to the voltage on the rating plate inside
the appliance.
WARNING: THIS APPLIANCE MUST BE EARTHED
The appliance is supplied with a 3-core mains cable and must be
connected to the electricity supply via a double pole switch having
a 3mm minimum contact gap on each connector.
For UK only
A Switched Fused Connection Unit to BS 1363 Part 4 is
recommended.
The fuse must be rated at 13 Amps.
The wires in the mains lead are coloured in accordance with the
following code:
Brown = L - Live
Blue = N - Neutral
- Earth
Green and Yellow =
The connection point must be placed in a position adjacent to the
appliance so as to be readily accessible for an engineer in the
event of a breakdown.
Disconnect the appliance from the mains supply before
carrying out any kind of maintenance or cleaning.
28
Guarantee
GB
IE
Manufacturer's Guarantee
This appliance is covered by a full manufacturers 2 year parts and 2 year labour
guarantee and covers all parts and labour costs assosciated with the repair of the
appliance in a domestic environment. We will repair any defect that arises due to
faulty materials or workmanship and use genuine manufacturers parts.
All claims must be supported with the original receipt or other reasonable proof
of purchase.
After an appliance has been repaired or replaced any remaining balance of the
Apelson Appliances UK Ltd guarantee will be valid and any further call outs during
this prescribed period will be covered by Apelson Appliances UK Ltd on the
replacement appliance.
Should any person other than an authorised engineer modify or attempt to repair
the appliance then the warranty will be invalid.
The guarantee applies to the UK and Ireland and is not transferable between other
EU countries.
This guarantee is non-transferable to any other person or product.
This guarantee is covered by UK law but does not diminish your legal rights.
EXTENDED PARTS ONLY WARRANTY
In more detail...
If, during the guarantee period, the appliance become irrepairable as agreed by the
engineer approved by Apelson Appliances UK Ltd then we reserve the right, at our
discretion, to exchange the defective product with a replacement appliance at
Apelson Appliances UK Ltd sole cost. If the same product is no longer available an
alternative will be offered with the same functions as the faulty item.
As testimony to our commitment to you as a valued customer of Apelson Appliances
UK Ltd, we will offer you an additional 3 years parts warranty absoultely free.
If during the extended parts warranty period the appliance fails and it is considered
uneconomical to repair our Customer Service Department will offer you the opportunity
to purchase the same or equivalent model at a discounted price.
All parts supplied free of charge under the extended warranty must be fitted by our
approved engineers and will be subject to a call out charge to fit the parts.
29
GB
IE
Guarantee
EXCLUSIONS TO THE GUARANTEE
This guarantee does NOT cover:
Appliances that have been damaged or neglected as a result of failure to store, assemble,
install, use or care for the products in accordance with the manufacturers instructions Apelson Appliances UK Ltd will not accept responsibility under this guarantee if a productis
damaged or becomes defective due to, misuse, neglect, wilful or accidental damage or act of
god.
Normal wear and tear.
Consumable items such as carbon filters and bulbs.
In more detail...
Claims arising from non-domestic use or commercial environment.
Any gas appliance not fitted by a gas safe qualified installer.
If no fault is found then Apelson Appliances UK Ltd reserves the right to charge for the
call out at the going rate of £55.00 plus VAT.
If in the course of the service work carried out it may be necessary to remove a built-in
appliance from its fitted position. If the appliance is glued, grouted or tiled in such a manner
that it cannot be removed, it is the responsibility of the customer / installer to remove and
reinstall the appliance to facilitate the repair.
This guarantee does not affect your statutory rights.
This guarantee is offered by Apelson Appliances UK Ltd, Unit 3 Normandy Landings,
Pope Street, Castleford, West Yorkshire, WF6 2AG.
USEFUL CONTACTS
SPARES
Apelson Appliances UK Ltd
Phone: 0344 800 1128
Email: [email protected]
Web: www.spareszone.co.uk
SERVICE AND GUARANTEE
Apelson Appliances UK Ltd
Phone: 0344 800 1128
Email: [email protected]
Web: www.spareszone.co.uk
30
Technical and legal
information
GB
IE
CE Declaration of Conformity
MANUFACTURER: CATA
ADDRESS:
C/Ter n° 2, Torelló 08570 – Barcelona (Spain)
MACHINE APPLICATION:
CAEFL60BK
,
CAEFL60W
TYPE:
OVEN
EC DIRECTIVES APPLIED:
EC Symbol - 2006/95/EEC Low voltage - 73/23
CEM-89/336
APPLIED HARMONIZED
STANDARDS:
Safety Rules - EN 60 335-1, EN 60 335 - 2 - 6
APPLIED INTERNATIONAL
TECHNICAL STANDARDS AND
SPECIFICATIONS:
ISO9001:2008
PLACE: Torelló
David Sala
Technical Manager
In more detail...
We hereby certify that the mentioned accessory complies with the essential requirements
ions and the corresponding
transpositions from the national law.
This appliance respects laws of the suppression of radio-interference.
As the Manufacturer has a policy of continuous product improvement, it reserves the right
31
GB
IE
Appendix...
Appendix...
Installation
32
Installation
GB
IE
Fitting the appliance
Important
>>The adjacent piece or furniture or cupboard and all the materials used
in the installation must resist a minimum temperature increase of 85 ºC
above the ambient temperature during use of the appliance.
>>Certain types of vinyl or laminated kitchen furniture are particularly
susceptible to damage due to decolouration at temperatures below those
indicated.
>>If the appliance is installed without paying attention to this temperature
limit or if it is placed less than 4 mm from the adjacent cupboards, liability
will belong to the owner.
Appendix...
Installation notes
1. The oven has to be installed in a standard gap of 600 mm, as indicated
in Fig. 4, whether under a hob or in a column.
2. On inserting the oven in a column, it is essential in order to ensure
there is enough ventilation, to remove the rear panel of the furniture
and have an opening of at least 85−90 mm as indicated in Fig. 4.
3. Check that the oven has been fixed securely in the housing.
Fixing the oven into the cupboard is done using 4 screws . One in each
corner of the oven door frame.
33
GB
IE
Installation
85mm - 90mm
560m
560m
m
525m
580mm - 583mm
m
595mm
Appendix...
580mm - 583mm
m
m
0m
58
IN
M
m
3m
53
595
mm
m
m
26
34
FIG.4
Installation
GB
IE
85 - 90mm
60 mm
85 - 90mm
550mm
Appendix...
600 mm
Minimum ventilation
2
gap 80cm
35
Installation
01
02
[06]
[07]
[06] x 4
[07] x 4
36
Note: For electrical connection see Technical and legal information section
Installation
03
B
A
B
A
Adjusting the shelf position
Note: For electrical connection see Technical and legal information section
37
Notes
38
Notes
39
GB
IE
Apelson Appliances U.K. Ltd
Unit 3 Normandy Landings
Pope Street
Castleford
West Yorkshire
WF6 2AG