1
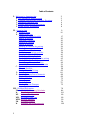
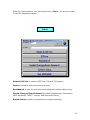
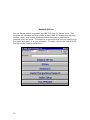
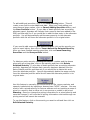
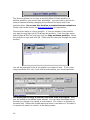
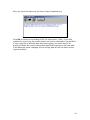
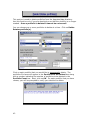
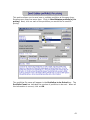
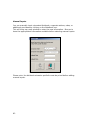
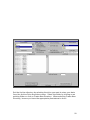
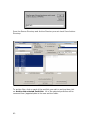
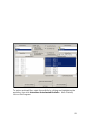
A Security Pricing System For:
Estate & Gift Tax Evaluations
Single Security Pricing & Portfolio Reporting
Reorganization Information
Cost Basis Accounting
IRS Mode
Evaluation Services, Inc.
180 Old Tappan Road, Bldg. 4
Old Tappan, NJ 07675
(201) 784-8500
www.appraisenj.com
Table of Contents
I. Welcome to Appraise.Asp
A. Pre-installation Requirements
B. Creating Appraise.Asp Directory Structure
C. Initializing Appraise.Asp
D. Setting Appraise.Asp Directories
E. Printer Driver Information
2
2
2
4
8
8
II. Appraise.Asp
A. System Setup
B. Estate & Gift Tax
Creating an Estate Portfolio
Adding a Security
Inserting a Security
Deleting a Security
Editing a Security
Sending a Portfolio for pricing
Printing/viewing a portfolio
Issue Research
Modifying an existing portfolio
Copying an Estate Portfolio
Deleting an Estate Portfolio
Sending Multiple Portfolios for pricing
Printing Estates Portfolios
Creating an Alternate Portfolio
Inventory Transactions on Alternate
C. Ezprice
Convert Portfolio
Foreign Security Pricing
D. Basis$earch
E. Capital Changes/Issue Research
Capital Changes
Dividend Data
Issue Research
Stock Split
Printing Capital Changes
9
10
17
20
20
20
20
24
30
34
38
40
42
43
45
49
51
58
59
62
64
68
69
72
73
75
75
III. Dividend Reinvestor
IV.
1040/1041 Income Calculator
V.
Florida Intangible Tax
VI.
Unitrust Pricing
VII. NJ Estate State Tax
VIII. Archive Manager
IX.
Universal Import
X.
Appraise.Asp Enhancements
76
84
89
89
89
90
94
100
2
Welcome to APPRAISE.Asp
This “WebTop” version of Appraise allows you full access to our complete
software package with one simple click of a button. Appraise.Asp offers
128-bit encryption, allows long filenames, and accepts both Ticker
Symbols and CUSIP™ numbers. Appraise.Asp (Application Service
Provider) means the application is running on the host computer. The
data is stored on your computer. When you logon with your username
and password, the appraise directory on your computer is uploaded to our
secure host computer. When the user is finished, the data is moved back
to the local computer and is deleted from the host computer.
Pre-Installation Requirements
Internet connection faster than 100kb (DSL, Cable, ISDN, T1)
Firewall Port 1494 open for inbound/outbound traffic
Creation of folder(s)
\Appraise
\Appraise\Data
\Appraise\Import
Full access to the appraise folder
Microsoft Internet Explorer 5 or greater
Ability to access www.appraisenj.com
Creating Appraise.Asp Directory Structure
Create the Appraise directories by clicking on the My Computer icon on
your desktop. Select the drive you want to store your data. Go to file;
select New, then Folder. Name this folder Appraise. Double click on the
Appraise folder, go to file, and select New, then Folder. Name this folder
Data. Do this once more and name the folder Import.
3
Initializing Appraise.Asp
Go to www.appraisenj.com
Under the Application tab select Appraise.Asp. Or click on Logon to
Appraise.Asp on the right-hand side beneath Contact Us.
Next, Click on Start Appraise.Asp Now
Citrix will attempt to download a file, click Yes.
Citrix will download and install on your computer the Citrix ICA Web Client;
this allows you to connect to our access server to run Appraise over the
Internet.
4
Upon successful download of the web client a Logon Window will appear.
Enter your User name and Password provided by Evaluation Services, Inc.
Your User name and Password are case sensitive and must be entered using
ALL CAPS.
This will bring you to a screen asking you to select a product.
5
The Appraise Program is used for Estate & Gift Tax, as well as Historical
Pricing, Cost Basis, Capital Changes, and Issue Research. The Dividend
Reinvestor Program is used for calculation of dividends that were
reinvested. Reorg From To collects all Reorganization data within a
specified date range. 1040/1041 Income Calculator provides the
necessary information to assign dividends to a decedent’s final income tax
return and to the estate or trust return, including capital changes. Florida
Intangible Tax provides closing prices on equities and bid pricing on bonds.
UniTrust provides mean pricing for UniTrust valuations. If this is your first
time using our service, select Appraise.
This message informs you that if you are ‘Idle” for 15 minutes during a session you
will be disconnected.
After selecting Appraise, a message about missing directories is displayed,
click OK.
6
This will bring you to the directory tab of the system setup. As you click on
the drive where your data will be stored, a file access window will pop up.
It is imperative to answer this question as Full Access. You may also want to
select ‘Never ask me again for this application’ to prevent other users from
selecting No, or Read Access.
7
Setting Appraise.Asp Directories
You are now ready to set the directories. Click on the Appraise Home
Directory button then click on the appraise folder located to the right in the
Local Disk Directory List. This will set Appraise as the Home directory. Next
click on the Appraise Data Directory button on top then select Data. Do the
same for the Import directory, then click Done. Note: the V:\ drive listed in
the Local Disk Directory List represents your drive on our Access Server.
Printer Driver Information
When a user logs on to our access server to run Appraise.Asp all the printer’s
on the user’s system will be mapped to our server, providing that the driver
is installed on our server. If a specific printer were not listed as a choice on
the Appraise.Asp program, we would need that printer’s driver information.
To determine which driver your printer uses, go to Start>Settings>Printers.
Next, right-mouse click on the printer icon and go to its properties.
Depending on your operating system look for the advanced or details tab and
8
find ‘print using the following driver.’ Provide this information to
[email protected] so we can ‘load’ the driver on our server.
Appraise.Asp
Now that you have initialized Appraise.Asp successfully, you are ready to use
the program.
Estate & Gift Tax is used for IRS Form 706 reports. EZPrice is used for
historical security pricing. If you need cost basis accounting information or
multiple date pricing, use Basis$earch. Click on Capital Changes/Issue
Research for reorganization information, stock dividends, issue research, and
stock split history. System Setup is used to customize your program settings
(methodology), to interface with accounting software (import/export), to set
print options (printing), to set data directories, and to change the
background and font colors (colors).
9
SYSTEM SETUP
The system setup section of the Appraise program allows you to customize
the program. The Appraise setup program consists of five sections:
methodology, printing, import/export, colors, and directories.
Methodology
Client Number: This number is assigned to you by Evaluation Services for
the use of this software and cannot be changed.
Client Name: By entering your firm’s name here the company name will
appear on all of your reports. If you do not wish to have your company’s
name appear on the reports, leave this section blank.
10
The following tabs allow you to toggle between two options.
Accrual Method: (1) Accrue up to and not including the date of death or (2)
Accrue up to and including the date of death. Please check the current IRS
regulations for the correct setting.
CMO/GNMA Factor: (F) Enter the face/par value for mortgage backed
securities or (P) Enter the paydown amount for mortgage backed securities.
TIP: Use (F) if you are entering whole numbers for bonds/GNMA’s such as
10,000. Use (P) if you are entering partial numbers such as 9000.56. A
partial number usually indicates that the paydown factor has already been
applied.
Enter Check Digit: (N) All CUSIP™ numbers will be entered with 8 characters
or (Y) All CUSIP™ numbers will be entered with 9 characters. The
ninth character of a CUSIP™ number is a check digit for the first eight
characters. If you choose option (N), Appraise will automatically input
the ninth character. Tip: Use (N) to help double-check the accuracy of
your entries.
Sort Portfolios: (F) Display the portfolio by portfolio file name or (N) Display
the portfolio by estate name. This option will determine whether your
portfolio selection will be displayed by using the portfolio’s file name or
by using the estate name. Our default setting is (F).
Common Trust Funds: (A) Use actual days between the price dates and the
valuation dates or (T) Use trade days between the price dates and the
valuation dates. This option will allow you to select either actual or
trade days (weekdays) when determining the number of days between
the valuation date & the pricing dates. Our default setting is (A).
Accrue Non-Priced: This option will allow you to print accruals for a nonpriced security. If this option is set to (N) any non-priced securities
will not calculate accrual data. Setting this option to (Y) will print and
calculate accrual data for non-priced securities. Our default setting is
(N).
Adjust For Stk. Splits: This option will allow you to adjust the shares on an
alternate portfolio for stock splits that occurred between the date of
death and the alternate. If this option is set to (Y) the alternate
shares will automatically be adjusted in the occurrence of a stock split.
If set to (N) Appraise WILL NOT adjust alternate portfolio shares for
stock splits. We highly recommend that this option be set to (Y).
Run IRS Appraise: (N) Do not run Appraise in the IRS mode with reported
values or (Y) run Appraise in the IRS mode with reported values. Use
this mode for value comparison.
11
Printing
Print ESI: This option allows you to select whether or not the name
Evaluation Services, Inc will be printed on the bottom of all the
Appraise reports.
Print Estimated Bill: This gives you the option to print an estimated bill of the
charges for each evaluated portfolio. The estimated bill is located at
the end of the portfolio. The actual bill is mailed at the end of each
month.
Print After Receive: This gives you the option to print each portfolio
immediately after it is received from pricing.
Print Processing Date: This option allows you to print the processing date in
the report headings.
Maximize Screens: This option allows you to maximize the window screens.
12
Import/Export
This section allows you to interface Appraise with 706 software
vendors including FPS, Faster Systems, and Lackner. Use the drop arrow
keys to scroll to the appropriate program and click in the box to select it.
Both the import and export boxes should refer to the accounting software of
your choice. If you have another proprietary system that is not included on
this list, you can use our Universal Import Program to import your
CUSIP™ numbers and shares.
13
Colors
This section allows you to change the colors used in the presentation
of the Appraise program. You can change the form background/foreground,
the button background/foreground, and the text background/foreground.
You have a choice of 48 colors. Experiment until you find the perfect
combination. To restore Appraise back to its original color scheme, click the
“restore defaults” button.
Directories
During the initialization of Appraise.Asp we set the directories found in this
section. Refer to Setting Appraise.Asp Directories if you need to change the
drive where you store the data.
14
When you have made all your selections click on Done. You are now ready
to use the Appraise program.
Estate & Gift Tax is used for IRS Form 706 and 709 reports.
Ezprice is used for historical security pricing.
Basis$earch is used for cost basis accounting and multiple date pricing.
Capital Changes/Issue Research provides reorganization information,
stock dividends, CUSIP™ Lookup, and stock split history.
System Setup is used to customize your program settings.
15
Estates & Gift Tax
Use our Estate module to prepare the IRS 706 Form for Estate taxes. This
program will calculate and then create a report that will display the high/ask,
low/bid, mean, and accrual dividend/interest information required to
complete your tax forms. The report is so thorough that you can simply print
the report and attach it to your schedule! To begin, click on the Estate & Gift
Tax tab on the Appraise Main Menu.
16
Creating an Estate Portfolio
In order to create an estate portfolio, click on the Create an Estate
portfolio tab.
You are initially prompted to enter a Portfolio ID. The Portfolio ID can be a
minimum of 4 and a maximum of 40 alphanumeric characters and may
include spaces and hyphens.
An Estate portfolio will normally price based on the mean price and show
dividend accruals. A Portfolio ID ending in “ZZ” or “YY” is a special case
where the pricing is based on the Closing price. A “ZZ” code will show
dividend accruals while an “YY” code will not show accruals.
17
After entering the Portfolio ID you are then prompted to enter the name of
the estate. When finished inputting the estate name hit the <ENTER> key.
The name of estate field is optional. If you do not choose to name an estate,
press enter to advance to the next field. Please note the decedents name is
not included during file transfer. The next field to complete is the valuation
date. Enter the date of death as mm/dd/yyyy. After the year is entered, a
screen will appear to enter the CUSIP™/Ticker and shares for the portfolio.
Appraise.Asp will accept CUSIP™ numbers or Ticker Symbols. Enter a ticker
symbol by typing the ticker in the CUSIP™/Ticker field. As you begin
entering, a list will appear with possible choices for that ticker. In the above
example, the ticker symbol for AT&T was entered. The box on the right
contains a list of ticker symbols that begin with the character(s) entered.
Double click on the ticker symbol you want to select, or press the <ENTER>
key to select the top security. If a ticker symbol does not appear on the list
you will need to enter a CUSIP™ number. Next enter the number of shares
then press the <ENTER> key. Enter the next CUSIP™/Ticker and the
shares/par values. Continue this until you are finished entering all of the
data, then click Save Portfolio.
18
You will now see a new screen with several new options.
Corrections: If you make an error and/or need to go back to any data
previously entered, click on the Save portfolio button before making
modifications. To correct a CUSIP™ number or shares, click on the
appropriate field. Use the backspace or delete buttons of your keyboard to
erase the incorrect data and then enter the correct data.
Some of the options may be grayed out. Clicking on a security can activate
most of the options. Click anywhere on a security line to select the security.
That security can now be modified, deleted, or another security inserted
before it.
CUSIP™ Lookup: If you need help finding CUSIP™ numbers to input into your
portfolio, use our Issue Research program. (Please refer to the Capital
Changes/Issue Research section for further details.)
19
To add additional securities, click on the Add Security button. This will
create a new field to enter additional data. When you finish adding your
securities and share values, click on Cancel Adding Securities button, and
the Save Portfolio button. If your date of death portfolio has an existing
alternate report, Appraise will indicate that a security has been added to the
DOD and then ask you if you would like to add this new entry to the alternate
portfolio. Yes will automatically add the same security to the alternate
portfolio while No will leave the alternate portfolio in its original state.
If you need to add a security to a specific location, click on the security you
wish to insert before, then click on Insert before the Selected Security.
After you have finished inserting securities, click on Cancel Inserting
Securities and the Save portfolio button.
To delete an entire security including the CUSIP™ number and the shares
along with all pricing data, click on the security and then click Delete
Selected Security. If your date of death portfolio has an existing alternate
portfolio, Appraise will indicate that a security has been deleted from the
date of death portfolio and then ask if you would like to delete this entry
from the alternate portfolio. Yes will automatically delete the same security
from the alternate portfolio while No will leave the alternate portfolio in its
original state.
Use this feature to manually price items such as CDs, money markets, and
sparsely traded stock by inputting a dummy/user CUSIP™ number. You may
want to edit a priced security for various reasons such as inputting a name or
price for a security that is either not in our service or unable to be priced.
Warning: Once you change the pricing information for a priced security and
save the changes, it will override all pricing information received through our
pricing service and cannot be reversed.
To use this feature, click on the security you want to edit and then click on
Edit Selected Security.
20
The first screen will display the ticker symbol/CUSIP™, shares, valuation
date, the status and item number. All of these items are grayed out and
cannot be modified from this screen. If you need to change any of these
items do so from the ‘modify an estate portfolio’ screen. If these items are
correct, click on price manually.
21
The top portion of the screen will indicate the CUSIP™ number, shares/par
value, valuation date, status, and item number. These items cannot be
changed. Click on the Security Name field and enter a description. Choose
a security type by clicking on the drop box of the Security Type field. Click
in the Security Type box to select the security type. This will change the field
to accommodate the kind of security type selected. We have a total of 18
security types to choose from. Here is a listing of security types available:
Common Stock
Corporate Bond
Municipal Bond
Preferred Issue
Mutual Fund
Demand/floating
rate note
Treasury Security
Promissory Note
Miscellaneous
Common Trust Fund
Text
GNMA type I pool
FHLMC Gold
FNMA
FHMLC 75 day
UIT
CMO
GNMA type II Pool
Remember that it is necessary to click on the actual security type
box to highlight the selection and to change the field.
22
Next fill in all the necessary information. The total security value will be
recalculated automatically to reflect the new prices without re-sending for
pricing. When all manual entries are complete, click on Save Security.
Cancel your entry by clicking on Cancel Changes. Click on the Finished
button to exit out of the edit security screen.
Users of Appraise commonly use the text entry to input items such as Cash,
Money Markets, and CDs. This will allow the user to enter a description of
the item and input the total security value and/or accrual information. Text
entries do not multiply security value by the number of shares; the value
that you input will be the value reflected on the valuation report.
If you do not need any accrual information and want to reflect the high/low
price, use any of the other options.
23
Before you send the portfolio for pricing the status column will indicate
UnPriced. To send a portfolio for pricing click on the Price Portfolio button
located on the lower right corner on the modify portfolio screen.
24
There are two pricing options available. Send for Pricing and Send for
Pricing with Detail Reorg. Send for Pricing will connect you to our
database instantly and all pricing data; the high, low and mean price,
including accrual and dividend data will be available within seconds. Send
for Pricing with Detail Reorg will connect to our database instantly and
include all the pricing data as above and also capital changes details for all
items in the portfolio in the date range of one-month prior and nine months
after the valuation date. There is an additional charge of $0.20 per security
for this feature. The process for sending is the same for either option. Click
on Send for Pricing.
25
Send for Pricing
While sending for pricing, you will see blue boxes at the bottom of the screen
along with messages summarizing the progress of your pricing. When
pricing is complete, the bar will reach 100%.
26
A new screen will indicate which portfolios are loaded (priced) successfully
along with any CUSIPS™ that were unsuccessfully priced. Any CUSIPS™ that
were unable to be priced will appear under Exceptions.
Click on the Download Complete button when highlighted. After clicking
on this button you will be placed back into your portfolio.
27
The status column will indicate whether or not a portfolio has been priced.
A security with Data in the status column denotes successful pricing.
User/Man in the status column indicates that the user provided pricing
information manually. An *0* means that the security was unable to be
priced. This could be caused by various factors such as mergers, name
changes, expiration dates, or invalid CUSIP™ numbers. Please check the
Appraise Capital Changes report that accompanies each valuation report that
you price. This report gives you a summary of corporate and municipal
capital changes up to (6) months prior to the valuation date.
28
Ex: Capital Changes Report
The Appraise Capital changes report (shown above) is available with all
Estate portfolios regardless of the pricing method you choose.
If you selected to Send for Pricing w/Detail Reorg you will receive the detail
reports at the end of the portfolio.
Example Detail Reorg
29
IMPORTANT: This is a feature in which the results are irreversible. If you
would like to unprice a security in order to re-send for pricing, you must click
on the security and then click on Unprice Security. If you need to unprice
the entire portfolio, click on Unprice Portfolio. Your entire portfolio, except
for manual entries, will lose all of its previous pricing information. Use this
feature only if necessary. Please note that modifying the valuation date also
unprices the entire portfolio.
To print a portfolio, click on Print Portfolio. The print portfolio screen offers
a wide variety of format options for the report. This screen allows you to
choose the printer, the paper orientation, and number of copies, sort
method, report type, and print method.
To change to a different printer, click on Change Printer and then use the
drop down arrow keys to indicate the desired printer. Next, highlight to
30
select the printer by clicking on the default printer box. To change any of the
other options, click on the appropriate boxes. The options are flexible and
reversible; they can be changed as many times, as you like, without
adversely affecting the pricing data. To print specific page numbers, refer to
the viewing a portfolio section.
To preview the report prior to printing click on View Portfolio. The view
default screen allows you to choose orientation, report type and sort method.
These view options are flexible and reversible. They can be changed without
adversely affecting pricing data. When all options have been selected, click
on View.
31
There are buttons located at the top of the screen that provide several
functions. View each page by clicking on Next Page or Previous Page.
Increase or decrease the viewing screen by clicking on the Size + or –
buttons. The view screen allows for single page printing by clicking Print
this Page, or Print All Pages to print the entire portfolio. To exit out of the
view screen, click on Finished.
32
Appraise allows you to attach a memo to your portfolio. You may find this
feature useful if there is important information associated with this portfolio
and would like to share with the recipient of the portfolio. This feature can
also be used to explain manual entries and “unpriced” securities. To use this
feature, click on Add Memo File.
To save the memo, click on Update Memo File. If you have a memo
already associated with the portfolio, you can edit or delete it by clicking on
the Edit Memo File button located on the modify screen. All Memo files are
listed on a separate page.
33
The Issue Research program contains common stocks, mutual funds, and
some corporate bonds from the NYSE, AMEX, & NASDAQ exchanges. This
feature gives you access to CUSIP™ numbers with the click of a button, and
will allow you to cut and paste the CUSIP™ number into the portfolio. The
Issue Research button is located on the upper-right of the “create” or
“modify” screen. When you click on Issue Research you will connect to our
Issue Research program automatically. Because of our fees, a special billing
feature has been added. Before you can enter any information, you must
first enter a six-character billing reference code in the Billing
Reference box. This code will appear on your invoice so that you can
identify the charges.
34
First enter your six-character billing reference and then enter a description or
a ticker symbol of the security you are researching. Next, click on Search.
If our program cannot find an adequate CUSIP™ based on the information
that you provided, you will be notified that “There are no records that match
your search criteria”.
35
If the search is successful, several records that match your search criteria
will appear on the bottom of the screen.
Using the up/down arrows, scroll down until you see the item that matches
your criteria. In this example, we are searching for AT&T common stock.
Choose the line that reads AT&T Corp Com New. Now, click on the item to
get its full description including the CUSIP™. If you would like this CUSIP™
included in the portfolio, click on Copy Cusip and then Exit. You will be
returned to the modify portfolio screen where you can Paste in the CUSIP™.
36
Click on Add Security and then click on Paste to insert the CUSIP™ from
the Issue Research program.
Next, enter the number of shares and continue to create your portfolio as
normal. When finished adding securities, click on Cancel Adding Securities
and then Save Portfolio. Please note you can only copy 1 CUSIP™ number
at a time! To print a list of CUSIPS™ researched, refer to the Capital
Changes/Issue Research section.
37
The main reasons for modifying an Estate portfolio are to create an alternate
valuation report, and to add, delete, or modify existing information. To
modify an existing portfolio, go to the Estates main menu and click on
Modify an existing Estate portfolio.
Choose the portfolio you want to modify by either typing in the file name or
scrolling the up/down arrows and highlighting the selected portfolio. All
date of death portfolios are indicated by an extension of .d and all
alternate portfolios are indicated by an extension of .a. When you
have made your selection, click OK.
38
You can change the name of the estate by highlighting the Estate Name
that is in the estate name field and input the new estate name. You will not
have to re-send the portfolio for pricing.
You can change the valuation date of the portfolio. Click in the date of death
field.
If you modify the date of death for this portfolio it will have to be
resent for pricing. If you want to change the date, click Yes. Next,
highlight the entire date and hit the delete key on your keyboard. Then,
enter the new valuation date. You will have to re-price the entire portfolio.
If you would like to keep all data for a portfolio based on a certain date and
price all the same securities as of another date, use the Copy feature. Refer
to the Copying an Estate portfolio section for detailed instructions.
To change a CUSIP™/Ticker or shares, simply click on the appropriate field
and re-enter the information, and then click Save Portfolio.
39
This function allows you to copy an existing Date of Death portfolio to
another portfolio; you cannot copy alternates. You may want to do this for
several reasons including changing the portfolios file name and/or the
valuation date. Do not use this function to create alternate valuations.
Please refer to the section on alternate portfolios for instructions.
There are two ways to copy a portfolio. If you are already in the portfolio
you want to copy then go to FilexCopy this portfolio. From the main menu
select Estate & Gift Tax, and then click on Copy an Estate portfolio. Select
the portfolio to copy and click OK. Either way will lead you through the same
process.
You will be prompted if this is the portfolio you want to copy. If this is the
correct portfolio click Yes, if not click No and reselect your correct portfolio.
You must give the copy a different file name from the original. Next,
you are placed at the estate name prompt. You can leave the estate name
the same or change it by typing in a new name. Hit <enter> to advance to
the date field. Delete the original date and enter a new date or if the date is
to remain the same hit <enter> at the date prompt.
40
After you input the date you will see a Copy Completed box.
Click OK to return to the Estate & Gift Tax Main Menu. Note: if you had
created the copy from the modify screen you will be returned to the portfolio.
If your copy has a different date than the original, you must send it for
pricing to obtain the correct values that specifically pertain to the new date.
If the date was never changed, all the pricing data will be the same as the
original portfolio.
41
This section is used to delete portfolios from the Appraise\data directory.
Use this function only if you are absolutely sure that the portfolio is no longer
needed. Once a portfolio is deleted it cannot be recovered!
You can choose one or more portfolios to delete at a time. Click on Delete
Estates portfolio(s).
Click on each portfolio that you would like to permanently delete. The
portfolios file name will appear in the Portfolios to be Deleted box along
with a number indicating the number of portfolios to be deleted in the
Portfolio Count box. Next, click on OK. For each portfolio that you have
chosen, you will be prompted to verify your decision to delete.
42
This section allows you to send one or multiple portfolios at the same time.
Sending more than one saves time. Click on Send Estates portfolio(s) for
pricing. Next, click on each of the portfolios you would like to send for
pricing.
The portfolios file name will appear in the Portfolios to be Priced box. The
Portfolio Count box indicates the number of portfolios to be sent. When all
the information is correct, click on OK.
43
Click, on Send for Immediate Pricing. While sending for immediate
pricing, you will see blue boxes at the bottom of the screen along with
messages summarizing the progress of your pricing. When pricing is
complete, the progress bar will reach 100%. The next screen will indicate
which portfolios were loaded (priced) successfully along with any CUSIPS™
that were unsuccessfully priced. Click on Download Complete located at
the bottom of the screen. You will be returned to the Estate & Gift Tax main
menu. You can now view, print or modify your portfolio(s).
44
This section allows you to print one or more portfolios at a time. Click Print
Estate portfolio(s).
Click each of the portfolios that you would like to print. The portfolio file
name will appear in the Portfolios to be Printed box. The Portfolio Count
box will indicate the number of portfolios to be printed. When all the
information is correct, click on OK.
45
The Estate Print Defaults screen is where you can choose a printer
(determined by the operating system), paper orientation (portrait or
landscape), number of copies (1 or more), report type, print method, and
sort method.
Selecting a Printer: When you print a portfolio, it will automatically print to
your system’s default printer. However, you have the option to change the
output media for your report by clicking on the Change Printer button and
using the drop down arrow keys to indicate the desired printer. You must
highlight to select the printer by clicking in the Default Printer box. This
printer change is only temporary; the program will always default back to
your system’s default printer.
Number of Copies: You also have the option of printing more than one copy
of the portfolio(s). To determine the number of copies, click on the plus + or
minus – signs to increase or decrease the number of copies.
Orientation: Select either Landscape or Portrait by highlighting your choice.
Our default setting is Landscape.
Print Method: The print method will default to Print the Report. This will
produce a Hard Copy of the report. This is the print method most often
used.
46
Appraise also offers two other print methods. Save the report to text file
saves the report in ASCII format. ASCII format gives you a facsimile of the
actual report. You can open the file using such programs as Microsoft™
Word, WordPad, Notepad, etc. Appraise will attach the extension .dut (for
date of death) or .aut (for alternate valuation) to the portfolio file name and
then save it in the \Appraise\data directory. Save the report to a data file
saves the report to a comma-delimited format, which you can use to import
into spreadsheets and accounting software. Appraise will attach the
extension .ddt (for date of death) or .adt (for alternate valuation) to the
portfolio file name and then save it in the \Appraise\data directory.
Report Type: The Estates program offers several report types. The type of
report determines the header to be used and how the valuation date is
classified. It also determines what information will be displayed in the
report.
Estate Valuation This report type is the most common and has a header of
Estate Tax Securities Valuation and lists the clients name under the heading
Name of Estate. The date is classified as Date of Death. It displays the high,
low, and mean price and security value including accrued dividends and
interest.
Distribution Report This report type displays the same information as the
estate valuation but has a header of Distribution Valuation. The client name
is listed under the heading Portfolio Name, and classifies the date as
Distribution Date.
Portfolio Valuation/Asset Percentage Report This report type displays
the same information as the two above reports but has a header of Portfolio
Valuation, lists the client name under the heading Portfolio Name, and
classifies the date as the Valuation Date. This report also prints out a
separate page that shows the allocation of the securities. For Example:
Gift Tax Valuation This report type displays all the information as an Estate
Valuation but has a header of Gift Tax Valuation and lists the client name as
Portfolio Name and the date is classified as Gift Date.
Valuation Report This report type displays all the information of an Estate
Valuation except the security value, and has a heading of Estate Report
Without Security Value. The client name is under the heading Name of
Estate.
Accrual Report This report type displays only the accrual/dividend
information: the prices and the security value are all excluded from this
47
report. The client name is displayed under the heading Name of Estate and
the date is classifies as Date of Death.
Sort Method: The sort method decides the order in which the securities will
be printed on the report. When you sort by Security type and CUSIP™
number, Appraise will divide the portfolio into sections based upon security
type; it will provide a header such as Common Stock, Mutual Fund, Corporate
Bonds, etc for that corresponding group of securities. It will also subtotal the
values of each security type (Total Common Stock) after each section while
still providing a grand total of all the securities at the end of the report. Sort
by CUSIP™ Number is in ascending order while Sort by Security
Description is in alphabetical order.
48
Creating An Alternate Portfolio
The alternate valuation date portfolio is always created from within the
original date of death portfolio. To create an alternate valuation portfolio,
click on the Modify an Estate Portfolio button and choose the estate portfolio
for which you need an alternate. While inside of the date of death portfolio,
click on Create Alternate Portfolio.
The Appraise program will automatically create an alternate portfolio with a
valuation date for 6 months after the date of death.
49
The alternate screen is similar to the date of death screen with a few
differences. The alternate screen will list the date of death and the alternate
valuation date. There is now a Switch to DOD/ALT Portfolio button on the
upper right, which allows you to toggle between the date of death and
alternate date portfolios. The alternate portfolio has an option to report any
activities between the date of death and alternate valuations.
Remember, the date of death portfolio and the alternate portfolios are two
separate reports. They do however; have the same file name distinguished
by the file extension. The date of death has a file extension of .D while the
alternate has an .A. Any additions to the portfolio should be entered in the
date of death portfolio. The Appraise program will then automatically include
the CUSIP™ and shares to the alternate portfolio.
50
Alternate Inventory Transactions
Activity Between Date of Death and Alternate Valuation
Sometimes certain transactions such as sales, mergers and name changes
occur between the date of death and the alternate date. You can account for
these occurrences by using our alternate inventory transaction feature.
Before proceeding to post transactions, please insure that you have all
required information such as dates, CUSIPS™, shares, and prices. To post
transactions, click on the specific CUSIP™ number and then click Sales,
Mergers, Etc.
There is a listing of 17 transaction types to choose from.
51
Below is an explanation of a few of our 17 transaction types:
Sold: This is our most popular feature. Use this to account for any sales of
securities between the date of death and alternate dates. You will be
prompted to input the date of the sale, the number of shares sold, and either
the price per share of the security value of the sale.
When you are prompted to enter a price, enter either the price per
share or the total security value. If you have the price per share, enter that
value and hit enter. You are then prompted to enter a security value.
Ignore that field by hitting enter. Appraise will then calculate the value for
you. Or vice versa, if you do not have the price per share but only the
security value, hit enter at the Price per Share field and enter the security
value only. Appraise will automatically calculate the price per share.
The sale transaction feature will adjust your alternate shares
accordingly. You can do multiple sales, sell partial shares or sell all shares.
However, you will not be allowed to sell more shares than what were owned
as of the date of death portfolio.
Spin-Off: Sometimes a company decides to “spin-off” part of the parent
company (sometimes a division or group) to form a new company.
Shareholders receive shares of the new company, resulting with owning
shares of both companies. This should be shown on the alternate report.
You will be prompted to give the date of the spin-off, the CUSIP™ for the
new company, and the shares now owned of the new company. The CUSIP™
and shares will be automatically added to the alternate portfolio.
Name Change: A company may undergo a name change. This transaction
feature will indicate this action. You will be prompted to give the date of the
name change along with the CUSIP™ number. Appraise will add the new
CUSIP™ number to the portfolio. The new CUSIP™ will have the same
number of shares as the original because the company simply changed their
name. Please do not confuse this transaction with a merger.
Note: If you need to post multiple transactions to a security that has
had a name change, you must post the name change last. Once you post a
name change transaction to a security, you will not be able to post, edit, or
delete any transactions for the security until you first delete the CUSIP™ that
was added as a result of the name change.
To delete or edit the name change transaction, you must first delete the new
CUSIP™ from the portfolio.
52
Merger: Many companies venture into acquisitions and/or merge to form
new companies. If a company is acquired it ceases to exist under its old
entity. Often a company may be acquired between the date of death and the
alternate valuation. In such a case, you may receive pricing information as
of the date of death but not on the alternate date. Appraise allows you to
show the merger and obtain pricing for the company of acquisition. Click on
the appropriate CUSIP™ and then click on Sales, Mergers, Etc. Select
merger from the transaction list box. The program will prompt you for the
acquisition date, the new CUSIP™, and the number of shares for the new
company. Next, click on Post Transaction and then Finished. Appraise will
then automatically add the new company to the portfolio.
53
Sometimes as a result of a merger, a shareholder will obtain shares of
a new stock and/or cash. Many times after the share conversion, you may
be left with partial shares. Most merger terms include cash in lieu rates for
fractional shares. If you received some form of cash along with shares of a
new company, you must post the cash on the merged company’s CUSIP™.
Highlight the new CUSIP™ and then click on Sales, Mergers, Etc. Select
cash in lieu from the transaction list box. The program will prompt you for
the cash received date and the fractional shares.
Before posting a merger or name change, verify that all information is
correct. Once a merger/name change is posted, the security cannot be
edited without first deleting the security that resulted from the transaction.
The merged company no longer exists and has been changed into the other
company. With name change, the company no longer exists under the old
name. All subsequent transactions should be done under the company’s new
name.
Fee: Use this option to account for fees such as broker commissions
or transaction costs. Appraise will prompt you for date cash received and
dollar amount. We also provide a field (required) to describe the origin of
the fee. After entering the description hit <enter> and then Post
Transaction. On the finished report, all fees are represented as a negative
number and will reduce the final security value.
54
You can add several transactions to a single security by continuing to
click on Add Transaction and then selecting a transaction. Exceptions are
Name Change and Merger as explained above.
If you need to delete or edit a transaction, click on the transaction and
then click either delete or edit transaction. The Delete Transaction will
delete all of its contents. Use the Edit Transaction to make modifications to
an existing transaction.
Try not to add a security to the alternate that did not exist on
the date of death report without using the Sales, Merger’s, Etc
button. This will help you explain all account changes that occurred
between the date of death and alternate valuation date.
55
IRS Mode
This option will allow you to enter reported values and reported accruals per
security and compare the differences between the actual values and the
reported values. To run the Appraise program in IRS Mode you must first
change the setting in system setup. From the Main Menu of Appraise, click
on System Setup. On the Methodology page click on the Run IRS Mode tab
and toggle to ‘Y’ and then click Done.
You will notice a truncated version of Appraise, limited to run Estate & Gift
Tax portfolios only in IRS Mode.
To begin, click on Estate & Gift Tax and then click on Create a new Estate
Portfolio. You are initially prompted to enter a portfolio ID. This file name
must be alphanumeric and between 4 and 40 characters including spaces and
hyphens. The estate name field is optional. Hit <enter> to advance to the
date of death field. Enter the date as MM/DD/YYYY. You are now ready to
enter the CUSIP™ and shares.
56
Enter the CUSIP™ for item number 1 Appraise will automatically advance the
cursor to the Shares/par field. Input the number of shares and hit <enter>.
The status of item number 1 is UnPriced. Next, enter the Reported value of
the security and the reported dividends or interest. Appraise supplies three
fields for dividends and interest. If you only have one dividend to report hit
<enter> in the subsequent reported dividend/interest fields to advance the
cursor. Next click on Save Portfolio. To receive the actual value of the
security, click on Price Portfolio located at the lower right. After pricing is
complete view the portfolio to compare the differences between the actual
security value and the reported security value.
57
If you’re interested in single security pricing and portfolio reporting, use
EZPrice. EZPrice has historical pricing for more than 3 million global
securities. When you price securities using EZPrice, you will create a report
that will supply the high/ask, low/bid, close/mean, security value, estimated
annual income, and yield percentage. EZPrice is also used to price foreign
securities.
From the Main Menu of Appraise, click on EZPrice. Next, click on Create
a new EZPrice portfolio.
You will be prompted to enter the portfolio’s ID. The Portfolio ID can be a
minimum of 4 and a maximum of 40 alphanumeric characters and may
include spaces and hyphens.
The Portfolio Name field is optional, hit <enter> to advance the cursor.
Enter the Valuation Date; Appraise will advance the cursor to the first item
CUSIP™ field. Continue to enter CUSIPS™ and shares and when finished
click Save Portfolio.
58
The basic usage of the EZPrice module is the same as the Estate & Gift
Tax module; please refer to that section for detailed instructions.
Please note: EZPrice portfolios do not provide dividends or accruals so if
you require that information use the Estate & Gift Tax module. What do you
do if you created an EZPrice portfolio but realize that you should have
created an Estate portfolio? Appraise has a Convert portfolio feature to
address such a need. Modify the portfolio you wish to convert.
At the upper left-hand corner click FileÄConvert to Estate.
59
Confirm that this is the portfolio you wish to convert by clicking Yes. If
not, click No and select another portfolio to convert. If Yes, you will be
prompted to enter the portfolio ID.
If you would like to keep the portfolio ID the same hit either the tab or
enter key. If you would like a different portfolio ID enter the new Portfolio ID
and hit the enter key to advance to the New Estate Name field. Hitting tab
or enter will advance the cursor, and then enter the valuation date.
Click OK at the Copy Complete message box.
60
Next, to modify or price the converted portfolio, go to SwitchÄSwitch to
Estates portfolio
This will return you to the Estate & Gift Tax main menu. The converted
portfolio will need to be sent for pricing. Click on Send an Estate portfolio for
pricing and then select the converted portfolio.
Next, send the portfolio for pricing.
61
Foreign Security Pricing
Appraise allows you to price foreign securities. To price a foreign
security using EZPrice, you must obtain the Sedol number associated with
the security. Sedol stands for Stock Exchange Daily Official List. Sedol
numbers represent foreign securities that have a CUSIP™ number and do not
trade in the US. Most Sedol numbers are six or seven digits. When inputting
a Sedol number, enter the first six digits and then add two zeros. For
example, if you have a foreign security with a Sedol number of 438713, you
would enter the first six characters (438713) followed by two zeros,
43871300. Appraise will automatically enter the check digit. Prices for
equities are in US Dollars. Foreign bond pricing is the price from the specific
exchange it is traded on and will need to be manually converted.
Continue to follow this procedure until all of your securities are entered.
When you are finished, save the portfolio and then send for pricing. If you
need foreign security pricing for an estate and gift tax portfolio, you would
first obtain the values in our EZPrice module and then manually add the
items into an Estate portfolio.
62
Exchange Rates
Appraise EZPrice can provide exchange rate data in U.S. Dollars. You must
have the country’s four digit currency code followed by four zeros.
In the above portfolio the currency codes for Great Britain Pound, Swiss
Franc, and Japanese yen have been entered. Next, click on Price Portfolio.
After receiving pricing data view the portfolio. In this example 1 Pounds
Sterling is worth $0.5586 U. S. Dollars.
63
Basis$earch is used for cost basis accounting. Use this program when you
need the original cost basis and know the current shares, or you need the
current basis but only know the original shares. Basis$earch also permits a
single portfolio to be priced using multiple issues and multiple pricing dates.
Basis$earch reports include the unit price and total price at date of purchase,
current split adjusted shares, the total split factor and cost basis.
From the main menu of Appraise, click on Basis$earch, and then click on
Create a Basis$earch portfolio.
You are initially prompted to enter the portfolio ID. The Portfolio ID can be a
minimum of 4 and a maximum if 40 alphanumeric characters and may
include spaces and hyphens. Enter the portfolio name and then click enter.
64
Enter the CUSIP™ and shares and then hit <enter>. You are prompted with
the following message.
You would select Yes if these were the amount of shares owned as of today.
For example, your client owns 45 shares of AT&T currently. You need to
know how many shares did they originally purchase in 1985 and what is the
cost basis.
You would select No if these were the amount of shares that was owned on
the requested pricing date. For example, your client purchased 45 shares of
AT&T in 1985. You need to know how many shares do they have now and
what is the cost basis.
65
After answering Yes or No, you are prompted to enter the pricing date. When
all data has been entered, click on Save Portfolio. Next, click on Send
Portfolio. This will send your portfolio to our database, when all processing
is done, click on Download Complete.
Basis$earch also allows you to price multiple issues on multiple dates.
Create a portfolio as before, and input the CUSIPS™, shares, and dates.
Click on Price Portfolio to send for pricing. When processing is done, click
Download Complete. Next, click on View Portfolio or Print Portfolio to
see the following report.
66
In the above example Merck had 50 original shares and 299.9400 current
adjusted shares. On April 10, 1992 the close/mean unadjusted price was
$152.370 and the adjusted current close/mean price is $25.4009. The
adjustment factor is 5.9988, which reflects the splits between the original
date and the current date. International Business Machines has 200 current
shares, the adjustment factor is 4 and the original shares are 50. The
unadjusted close/mean price of $121.00 is for the January 2, 1985 and the
current adjusted close/mean price is $30.25. Because the adjustment factor
of 1 for Home Depot represents no splits between the original date and the
current date the pricing is the same.
67
When accurate portfolio pricing depends on access to current reorganization
data, the first place to look is Appraise Capital Changes/Issue Research. This
feature includes:
Capital Changes (mergers, acquisitions, tenders, etc.)
Stock dividend and UIT principal payout history since 1992
Stock split history since 1968
Recent reorganization data (up to three months prior) for any issue
in your report
Reorganization data between Date of Death and Alternate Date
Issue Research/CUSIP™ Lookup
To begin, go to the Appraise Main Menu, and click on Capital Changes/Issue
Research. You will immediately connect to our access server.
All items are grayed out except for the Exit button. Because of our fees, a
special billing feature has been added. Before you can access Capital
Changes, Dividend Data, Issue Research, or Stock Splits, you must enter a
six-character billing reference code in the Billing Reference box. This
code will appear on your bill so that you can identify the LookUp charges.
The LookUp billing is done after you click the Exit button so only one
reference code can be used per Lookup session. After the billing code is
entered, you will be allowed full access to all the features of the program.
68
Capital Changes provides current or historical information for a company by
entering either the company’s name or CUSIP™. There are two options to
search for capital changes. (1) You can search for all years or (2) You can
set a range of years. By default, the program searches for reorganization
information for all years. To limit your search to specific years, click on the
circle marked Search Range of Years. Use the arrows to specify the high
year then click on it to select it. Next, specify the low year and click on it to
select it. If you would like Appraise to search all the years on the database,
no action is necessary.
Input either a CUSIP™ number or a description of the security that you are
researching. If you supplied sufficient data for a successful search, a Reorg
Data screen will appear displaying all the information that applies to that
company or CUSIP™ number as well as remarks summarizing each entry.
69
The letter U appearing under IND signifies the most up-to-date entry. To
view the entry’s detailed information, click on the line of the entry under the
CNT column. A Reorg data screen will appear describing the entry in detail.
70
In this example AT&T declared a one for five reverse stock split on November
18, 2002. Appraise provides all the pertinent information regarding dates,
rate, and the new CUSIP™ number. If you would like to save this
information, click on Print. If you do not wish to save this information, click
on Return to List to research other capital changes. When finished
researching capital changes, click Exit. Note: To print your selections you
must completely exit from Capital Changes/Issue Research. See Printing in
Capital Changes/Issue Research.
71
If you would like dividend information on a stock, click on Dividend Data.
Enter the CUSIP™ number to search for dividend data. The data includes the
security name and description, total number of dividends listed, the dividend
rate and the dividends ex, record, and pay date. FYI: A security’s price
drops on the ex date.
If you would like to save the report, click on Print, then Exit. You must exit
the program completely to print the report. See Printing in Capital
Changes/Issue Research.
72
This feature is used to research CUSIP™ numbers. Appraise will provide an
8-character CUSIP™ number; the ninth character which is the check digit is
not provided. To start, click on the Issue Research button. Enter either a
ticker symbol or a description of the security. Next, click Search.
At the bottom of the screen is a listing of all securities that match your
search criteria. Click on and highlight the security to display the detailed
information.
73
All the information related to that security would be displayed such as the
issue type, exchange, first/last pricing dates, SIC code, ticker symbol, and
CUSIP™.
Note: Each time you click on a security description, you will incur a
charge. When you are ready to research another security, click New
Search to clear the screen.
If you would like a list of the CUSIPS™ researched, click Print after each
search. When finished, click Exit. In order to print you must exit completely
from the Capital Changes/Issue Research program. See Printing in Capital
Changes/Issue Research.
74
This feature allows you to view the stock split history for a particular
security. Click on Stock Splits. Appraise will search our database for stock
split information. This data includes the security name and description, split
rate and the splits ex, record, and payment date. Any changes resulting
from a stock split are reflected on the ex date.
To save the Stock Split report, click on Print and then Exit. See Printing in
Capital Changes/Issue Research.
75
Printing Capital Changes/Issue Research
To print any information from Capital Changes/Issue Research, click on the
Print button. This function will place items in a clipboard fashion to file called
printlu.txt located in the Appraise directory. After you exit the Capital
Changes/Issue Research you will be prompted to indicate whether you want
to print the information.
If you would like to print your research click the OK button and then click
Print Data. You can change the default printer by clicking Change Printer
and then selecting a printer from the drop down menu by highlighting the
new printer. Next, click Print Data. All researched items will print at this
time.
76
Dividend Reinvestor calculates the cost basis and capital gains for dividend
reinvestment plans. Before using Dividend Reinvestor you must setup the
directories where you will store the data. Go to File and then select Settings.
Settings
Settings contain options for selecting directories,
changing company name, and email.
First click on the drive letter, then select the appraise
home directory, then the data directory located to the
left. This directory will be used to store working files,
temporary files, and other data. You will need full
access rights to this directory.
Change Company Name
You can change the firm name by clicking in the Change Company Name field
and typing in the new name.
Print Company Name in the Report
If you check this box your Company Name will appear on the printed
Dividend Reinvestor report.
77
Email
You can send us an email, without closing this program, using the Company
Information and Mail menu selection. There are two (2) options for sending
email:
1. Use your current email provider
2. Use the built in email function of the Dividend Reinvestor Program.
Your email will be sent when you send a portfolio for pricing.
Click on Save to save any settings, otherwise your changes would not be
saved.
Click on Exit to exit Dividend Reinvestor.
To Create a Dividend Reinvestor Portfolio:
Click on the new portfolio icon to create a new portfolio.
Enter a Portfolio name
Enter a unique six-character filename.
Enter a CUSIP™ number, or click on the button to the right of the CUSIP
Number field to search by ticker symbol or security description.
Select the significance number.
Select the dividend rule to use for calculating dividend data for this security.
Select the price rule, close, bid/low, or average price.
Enter the start and end dates. Our Dividend Reinvestor program can
calculate going forward or backward.
78
Enter the Price per share on the start date if known, then enter.
Enter the number of shares owned on the starting date.
The dollar amount will be calculated.
If you do not know the price per share on the start date or the dollar
amount, enter the share amount then click on the calculate value button
located to the right of the share amount field. Or if you do not know the
share amount but do know the total dollar amount, enter the dollar amount
and then click on the calculate value button located to the right of the dollar
amount field. Click on the Safe Icon to save the portfolio.
You are now at the view/modify screen. The start date is represented as Buy
and the end date as End Date in the Transaction Description field. You will
also see the dollar amount, share price, and share amount. You can change
the significance value and/or the price rule by clicking on the appropriate
drop down box.
79
You can edit portfolio information such as share price, share amount, and
dollar amount prior to sending, by clicking on the magnifying glass icon on
the toolbar. When all information is correct, click on the Telephone Icon on
the top toolbar to send your portfolio for pricing.
80
When the portfolio has finished processing you will be returned to the view
portfolio window. You will see each dividend reinvested, transaction date,
and the share price. The program will automatically calculate the share
amount of the reinvested dividend.
81
Manual Inputs
You can manually input reinvested dividends, corporate actions, sales, or
additional purchases by clicking on the Notebook icon.
This will bring up a new window to enter the new information. Be sure to
have the appropriated information available before selecting manual inputs.
Please note: the dividend reinvestor portfolio must be priced before adding
manual inputs.
82
Print or Print Preview
After pricing is complete you are returned to the view/modify screen.
Click on the Printer Icon located on the top toolbar. You are now at the print
preview screen.
Click on the Printer Icon on the lower toolbar to print the portfolio.
83
To Open an existing Portfolio
Click on the Open Icon
select Open.
located on the top toolbar or go to File then
A listing of existing portfolios appears. Click on the portfolio to select it, and
then click on Open.
To Delete a Portfolio
Open the portfolio by clicking on the Open Icon on the top toolbar or go to
File then select Open. A list of existing portfolios will appear. Select the
portfolio then click on Delete. You are asked “are you sure you want to
delete portfolio” click yes.
84
The Appraise 1040/1041 Income Calculator is a great time saving program.
It’s for trust tax professionals who are responsible for preparation of the
deceased’s personal income tax and estate or trust fiduciary income tax
returns. Appraise 1040/1041 Income Calculator provides the information
that’s necessary to assign dividends to a decedent’s final income tax return
and to the estate or trust return, including capital changes. Click on
1040/1041 Income calculator to begin.
To create a portfolio; enter a valuation date, Estate name, CUSIP™/Ticker,
and shares. Click on Save. This will save a listing of the securities not the
detailed report. To open this portfolio, click on Open then double click on the
portfolio to select it. Next click on Get Report.
85
Import an Existing Portfolio
To import an existing portfolio, click on Import and then select a portfolio
from the list by either typing the portfolio ID in the blue box or using the
scroll bar. Double click the portfolio and then click Open.
86
Securities with no dividends reported in the portfolio date range will not be
imported and a list of those securities will be displayed, click OK. Next, click
on Get Report.
87
The report will display on screen. Use the Up & Down buttons to resize the
screen if necessary. Be sure to save the report either to an Excel or Word
document before printing to ensure you are only billed once for the report.
This file will be saved to your \Appraise\Data directory. Click on the Back
button to exit the report.
88
A person who makes Florida his or her principal residence or domicile may have a duty to file an
intangible tax return with the Florida Department of Revenue no later than June 30 of each year.
The return must report all intangible personal property owned as of January 1 of that year which
is not exempt.
Shares of stock of corporations regularly listed on any public stock exchange or regularly traded
over-the-counter are subject to this intangible tax at the value as of the closing price on the last
business day of the previous calendar year.
Bonds regularly listed on any public stock exchange or regularly traded over-the-counter are
subject to this intangible tax at the value of their closing bid prices on the last business day of the
previous calendar year.
The Florida Intangible Tax program automatically provides the closing/bid price for each security.
See the section on EZPrice for instructions on using this service.
The fair market value of assets held in an Unitust are re-valued annually. Our UniTrust program
will provide the high, low, and mean price of securities held in the trust. See the section on
Estate & Gift Tax for instructions on using this service.
Our NJ State Estate Tax program will provide asset values for securities, compliant with the State
of New Jersey Estate tax regulations. See the section on Estate & Gift Tax for instructions on
using this service.
89
Archive Manager
Appraise.Asp clients will first have to download this free utility from our
website and then run the installation program.
Our Archive program will store your Appraise Portfolios to other directories,
allowing you to organize your data and free up space in your current
directory. This will greatly enhance performance during your Appraise.Asp
session.
To begin double click on Archive icon located on your desktop.
The first window will display your source drive and directory.
The source directory in the example above is C:\appraise\data. Click on the
Portfolio type you want to archive, Estate, EZPrice, or Basis$earch. Click on
the Sort Method, Last modified date or Portfolio name, and then click on View
Source Portfolios.
90
Set the Archive directory by selecting the drive you want to store your data
from the Archive Drive drop down menu. Select the folder by clicking on an
existing folder or click on Create New Directory. When selecting Create New
Directory, be sure you have the appropriate permissions to do so.
91
Once the Source Directory and Archive Directory are set check Save Archive
Directory.
To archive files, click on each of the portfolio you wish to archive then click
on Archive the selected Portfolios. All of the selected portfolios will be
removed from \appraise\data to the new archive folder.
92
To restore archived files, select the portfolio by clicking and highlighting the
portfolios, then click Unarchive the selected Portfolio. When finished,
click on Exit Program.
93
Universal Import
Appraise.Asp clients will have to download and install this free utility from
our web site.
Save time entering data with Appraise Universal Import utility. Universal
Import allows you to import CUSIPS™ and shares from another file into an
Appraise portfolio.
Start Universal Import by double clicking the UI icon located on your
desktop.
The first screen will allow you to select the disk drive that contains the file
you want to import into an Appraise portfolio. You can also save the drive
and folder as the default directory of import files. Next, double click on the
import file.
94
If your import file has a heading, use the list box to select the row of data
immediately after the heading, then click Next.
95
Follow the onscreen instructions for selecting fields.
If the format selected is not correct you can return to select another format
using the Back button. If all the fields are correctly selected, click the Next
button.
96
Follow the onscreen instructions to select the fields to import.
97
If clicking on the portfolio ID field, you may be prompted to further define
the field. Define the start position and the length of field then click Column
OK.
When all of the fields required for an Appraise portfolio have been selected,
click on the Finish button to create the Appraise portfolio.
98
Now, click on Create Portfolio(s).
The next screen lets you know that the Import File has been converted to an
Appraise portfolio. Click on the Yes button to import another file, or click on
the No button to exit the program.
To process the import file open the Appraise program, select the type of
portfolio created, Estate & Gift Tax or EZPrice, and then send the portfolio for
pricing. Refer to the portfolio type section for usage information.
The Import file in the above example is a fixed length file. Universal Import
supports file of type .dat, .txt, .prn, .csv, etc. The screens may vary
depending on the type of Import File. If you need assistance using this
utility contact Technical Support.
99
APPRAISE.ASP TIPS
PRINTING
This printing process can be greatly improved by printing to a text file, then
importing the file into Microsoft Word or Wordpad.
1. Select the portfolio you wish to print.
2. Choose print to a text file on the print default page.
3. Exit Appraise.Asp. The next steps do not require that you to be logged on
to Appraise.
4. Launch Microsoft Word or Wordpad.
5. Navigate to the Appraise\data directory and open your portfolio with the
file extension .dut (dod) or .aut (alt).
6. Select All (Control A) then Bold
7. Set font to ‘8’
8. File>Page setup>margins=0.5
9. File>Page setup>Select Landscape
10.Save As> Save as type: Word Document
100
Importing A Portfolio Into A Spreadsheet
Go to Appraise and select a portfolio to print. In the Print Method box, select
Save the Reports to Data file, then click print.
Do not save the printing defaults. Exit Appraise.
101
Next, open Microsoft Excel™. Open file, and then browse to the directory of
the file or type in the filename.
In this example Test01 was selected. Note the file extension of .ddt.
102
This brings you to the Text Import Wizard. Select Delimited, then click Next.
Check comma then click Next.
103
Select the fields and data format type. Click Finish. Arrange Cell as needed.
104
If you have any questions or concerns still remaining after reviewing
this manual, please contact Technical Support to set up a training
session customized to meet your needs.
Technical Support 201 784 8500 x 107
[email protected]
105