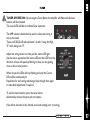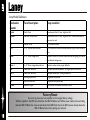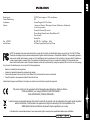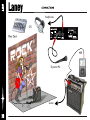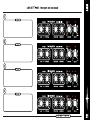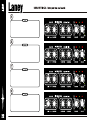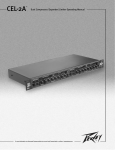
1
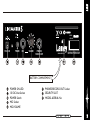
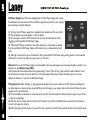
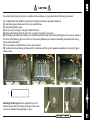
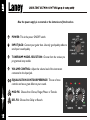
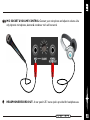
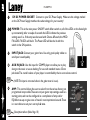
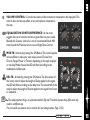
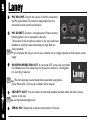
1). Read & Retain these Instructions carefully before installing or operating this product. 2). Comply with Warnings: All warnings and instructions for these products should be adhered to. 3). Unpacking: On unpacking your product please check carefully for any signs of damage that may have occurred whilst in transit from the Laney factory to your dealer. In the unlikely event that there has been damage, please repack your unit in its original carton and consult your dealer. We strongly advise you to keep your original transit carton, since in the unlikely event that your unit should develop a fault, you will be able to return it to you dealer for rectification securely packed. 4). Amplifier Connection: In order to avoid damage , it is advisable to establish and follow a pattern for turning on and off your system.With all system parts connected, turn on source equipment, CD/MP3 players, mixers/recorders, etc, BEFORE turning on your guitar amplifier. Many products have large transient surges at turn on and off which can cause damage to your speakers. By turning on your guitar amplifier LAST and making sure its level control is set to a minimum, any transients from other equipment should not reach your loud speakers.Wait till all system parts have stabilised, usually a couple of seconds. Similarly when turning off your system always turn down the level controls on your guitar amplifier and then turn off its power before turning off other equipment 5). Servicing: Refer all servicing to qualified service personnel. Servicing is required when the apparatus has been damaged in any way, such as when the DC Power Supply is damaged, liquid has been spilled or objects have fallen into the apparatus, the apparatus has been exposed to rain or moisture, does not operate normally, or has been dropped. 6).Placement: This electrical apparatus should not be exposed to dripping or splashing and care should be taken not to place objects containing liquids, such as vases, upon the apparatus. Do not install near any heat sources such as radiators, heat registers, stoves or other apparatus (including amplifiers) that produce heat. Do not block any of the ventilation openings. Use only with a cart, stand, tripod, bracket, or table specified by the manufacturer, or sold with the apparatus. When a cart is used, use caution when moving the cart/apparatus combination to avoid injury from tip-over. 7). When using the DC power Supply: Only use the DC power Supply provided by the manufacturer. Make sure that the line voltage at the installation matches the input voltage on the DC power Supply. Protect the power cord on the DC power Supply from being walked on or pinched, particularly at plugs, convenience receptacles, and the point they exit from the apparatus.(See notes on using the DC Power Supply page 10). 8). Batteries: Use only alkaline batteries (LR6) in the product. (See notes on fitting and replacing batteries page 10-11). 9).Sound Levels: Exposure to extremely high noise levels may cause a permanent hearing loss. Individuals vary Duration Per Sound Level dBA, considerably in susceptibility to noise-induced hearing loss, but nearly everyone will lose some hearing if exposed to Day in Hours slow response sufficiently intense noise for a sufficient time. 8 90 The U.S. Government’s Occupational Safety and Health Administration (OSHA) has specified the following 6 92 permissible noise level exposures: According to OSHA, any exposure in excess of the above permissible limits could 4 95 result in some hearing loss. Earplugs or protectors to the ear canals or over the ears must be worn when operating 3 97 this amplification system in order to prevent a permanent hearing loss, if exposure is in excess of the limits as set 2 100 forth above. To ensure against potentially dangerous exposure to high sound pressure levels, it is recommended that 1½ 102 1 105 all persons exposed to equipment capable of producing high sound pressure levels such as this amplification system ½ 110 be protected by hearing protectors while this unit is in operation. ¼ or less 115 10). Maintenance: Clean only with a dry cloth. Care of your Laney amplifier will prolong it's life.....and yours! 1). Lisez le & Maintenez ces instructions: soigneusement avant d'installer ou actionner ce produit. 2). Conformez-vous aux avertissements: Tous les avertissements et instructions pour ces produits devraient. 3). Déballage: Au déballage de votre produit vérifiez svp soigneusement tous les signes des dommages qui ont pu s'être produits tandis qu'en transit de l'usine de Laney à votre revendeur. Dans l'événement peu probable qu'il y a eu des dommages, réemballent svp votre unité dans son carton original et consultent votre revendeur. Nous vous conseillons fortement que pour garder votre carton original de passage, puisque dans l'événement peu probable que votre unité devrait développer un défaut, vous pourrez le renvoyer te revendeur pour la rectification solidement emballée. 4). Raccordement d'amplificateur: Afin d'éviter des dommages, il est recommandé d'établir et suivre un modèle pour tourner en marche et en arrêt votre système. Avec tout le système les pièces ont relié, allument l'équipement de source, CD/MP3 les joueurs, mélangeurs/enregistreurs, etc., AVANT DE mettre en marche votre amplificateur de guitare. Beaucoup de produits font tourner de grandes montées subites passagères à en marche et en arrêt qui peuvent endommager vos haut-parleurs. En mettant en marche votre BOUT d'amplificateur de guitare et en veillant sa commande de niveau est placé à un minimum, toutes les coupures de l'autre équipement ne devrait pas atteindre vos haut-parleurs forts. Attendez jusqu'à ce que toutes les pièces de système ont stabilisé, habituellement deux ou trois secondes. De même en arrêtant votre système déclinez toujours les commandes de niveau sur votre amplificateur de guitare et coupez alors son courant avant d'arrêter l'autre équipement 5). Entretien: Référez-vous tous qui entretiennent au personnel de service qualifié. L'entretien est exigé quand l'appareil a été endommagé de quelque façon, comme quand l'approvisionnement d'alimentation CC Est endommagé, liquide a été renversé ou les objets sont tombés dans l'appareil, l'appareil a été exposé à la pluie ou à l'humidité, ne fonctionne pas normalement, ou a été lâché. 6).Placement: Cet appareil électrique ne devrait pas être exposé à l'égoutture ou l'éclaboussement et le soin devraient être pris pour ne pas placer des objets contenant des liquides, tels que des vases, sur l'appareil. N'installez près d'aucune source de chaleur telle que des radiateurs, des registres de la chaleur, des fourneaux ou d'autres appareils (amplificateurs y compris) cette chaleur de produit. Ne bloquez pas les ouvertures l'unes des de ventilation. Employez seulement avec un chariot, un stand, un trépied, une parenthèse, ou une table spécifique par le fabricant, ou vendue avec l'appareil. Quand un chariot est utilisé, faites attention en déplaçant la combinaison de chariot/appareil pour éviter des dommages de incliner-au-dessus de. 7). En employant l'approvisionnement d'alimentation CC: Employez seulement l'approvisionnement d'alimentation CC Fourni par le fabricant. Assurez-vous que tension secteur à l'installation assortit la tension d'entrée sur l'approvisionnement d'alimentation CC. Protégez le cordon de secteur sur l'approvisionnement d'alimentation CC Contre être marchée dessus ou pincement, en particulier derrière les fiches, derrière les douilles de convenance, et derrière le point qu'ils sortent de l'appareil. (Voir les notes sur employer la page d'approvisionnement d'alimentation CC 10). 8). Batteries: Utilisez seulement les accumulateurs alcalins (LR6) dans le produit. (Voir les notes sur l'ajustage de précision et remplacer la page de batteries 10-11). Niveaux 9).Sound: L'exposition aux niveaux extrêmement élevés de bruit peut causer une perte d'audition permanente. Les individus Durée par Niveau sonore varient considérablement dans la susceptibilité à la perte d'audition due au bruit, mais presque chacun perdra une certaine Jour (heures) moyen (dBA) audition si exposé au bruit suffisamment intense pendant un temps suffisant. L'administration du gouvernement des États8 90 Unis (OSHA) a spécifié les expositions permises suivantes de niveau de bruit : Selon l'OSHA, n'importe quelle exposition au6 92 dessus des limites permises ci-dessus a pu avoir comme conséquence une certaine perte d'audition. Des boules quies ou les 4 95 protecteurs aux canaux d'oreille ou au-dessus des oreilles doivent être portés en actionnant ce système d'amplification afin 3 97 d'empêcher une perte d'audition permanente, si l'exposition est au-dessus des limites comme déterminé ci-dessus. Pour 2 100 s'assurer contre l'exposition potentiellement dangereuse aux niveaux élevés de pression acoustique, on lui recommande que 1½ 102 1 105 toutes les personnes aient exposé à l'équipement capable de produire les niveaux élevés de pression acoustique tels que ce ½ 110 système d'amplification soient protégées par les protecteurs auriculaires tandis que cette unité est en fonction. ¼ ou inférieur 115 10). Entretien: Nettoyez seulement avec un tissu sec. Le soin de votre amplificateur de Laney prolongera it' ; la vie de s ..... et vôtre ! LR5 4 1). Lesen Sie & Vor der Installierung oder dem Betrieb dieses Produktes behalten Sie diese Anweisungen sorgfältig. 2). Willigen Sie mit Warnungen ein: Alle Warnungen und Anweisungen für diese Produkte sollten an gehaftet werden. 3). Auspacken: Auf Auspacken Ihres Produktes überprüfen Sie bitte sorgfältig auf allen möglichen Zeichen des Schadens, die während bei dem Transport von der Laney Fabrik zu Ihrem Händler aufgetreten sein können. Im unwahrscheinlichen Ereignis, dass packen es Schaden gegeben hat, bitte Ihre Maßeinheit in seinem ursprünglichen Karton ein und konsultieren Ihren Händler. Wir beraten Sie stark, dass Ihren ursprünglichen Durchfahrtkarton halten, da im unwahrscheinlichen Ereignis, dass Ihre Maßeinheit eine Störung entwickeln sollte, Sie in der Lage sind, sie zu Ihnen zurückzubringen Händler für die sicher verpackte Korrektur. 4). Verstärker-Anschluss: Um Schaden zu vermeiden, ist es ratsam ein Muster für einschalten und weg von Ihrem System herzustellen und zu folgen. Mit allem System schlossen die Teile an, schalten Quellausrüstung, CD/MP3 Spieler, Mischer/Recorder, usw. ein, BEVOR sie Ihren Gitarrenverstärker einschielten. Viele Produkte lassen große vorübergehende Schwankungen an an und abstellen, die Schaden Ihrer Lautsprecher verursachen können. Indem man Ihr Gitarrenverstärker LETZTES einschält und seine waagerecht ausgerichtete Steuerung sicherstellt, wird auf ein Minimum, alle mögliche Ausgleichströme von anderer Ausrüstung sollte Ihre lauten Lautsprecher nicht erreichen eingestellt. Warten Sie bis alle Systemsteile haben stabilisiert, normalerweise ein paar Sekunden. Ähnlich wenn Sie Ihr System abstellen, drehen Sie immer unten die waagerecht ausgerichteten Kontrollen auf Ihrem Gitarrenverstärker und stellen Sie dann seinen Strom ab, bevor Sie andere Ausrüstung abstellen 5). Instandhaltung: Verweisen Sie alle, die auf qualifiziertes Service-Personal instandhalten. Die Instandhaltung wird, wenn der Apparat in jeder Hinsicht beschädigt worden ist, wie, wenn die Gleichstrom-Versorgung geschädigt wird, Flüssigkeit ist verschüttet worden angefordert, oder Gegenstände sind in den Apparat gefallen, ist der Apparat Regen oder Feuchtigkeit ausgesetzt worden, funktioniert nicht normalerweise oder ist gefallen worden. 6). Placement: Dieser elektrische Apparat sollte nicht Bratenfett ausgesetzt werden, oder das Spritzen und die Sorgfalt sollten angewendet werden, um die Gegenstände nicht zu setzen, die Flüssigkeiten, wie Vasen, nach dem Apparat enthalten. Bringen Sie nicht nahe irgendwelchen Wärmequellen wie Heizkörpern, Hitzeregistern, Öfen oder anderen Apparaten (einschließlich Verstärker) diese Erzeugnishitze an. Blockieren Sie nicht irgendwelche der Ventilationsöffnungen. Verwenden Sie nur mit einer Karre, einem Standplatz, einem Stativ, einem Haltewinkel oder einer Tabelle, die vom Hersteller spezifiziert wird oder mit dem Apparat verkauft ist. Wenn eine Karre benutzt wird, Vorsicht, wenn Sie die Karren-/Apparatekombination verschieben, um Verletzung von spitzen-über zu vermeiden. 7). Wenn die Gleichstrom-Versorgung verwendet wird: Benutzen Sie nur die Gleichstrom-Versorgung, die vom Hersteller bereitgestellt wird. Überprüfen Sie, ob die Linie Spannung an der Installation die Eingangsspannung auf der Gleichstrom-Versorgung zusammenbringt. Schützen Sie das Netzanschlusskabel auf der Gleichstrom-Versorgung vor an gegangen werden oder, besonders an den Steckern, an den Hilfsaufnahmewannen und am Punkt geklemmt werden, die sie vom Apparat herausnehmen. (Sehen Sie Anmerkungen über die Anwendung der Versorgungseite10). 8). Batterien: Benutzen Sie nur alkalische Batterien (LR6) im Produkt. (Sehen Sie Anmerkungen über Befestigung und das Ersetzen der Batterieseite10-11). Niveaus 9). Sound: Aussetzung zu den extrem hohen Geräuschpegeln kann einen dauerhaften Verlust der Hörfähigkeit GeräuschpegelldBA Dauer pro verursachen. Einzelpersonen schwanken beträchtlich in Anfälligkeit zum noise-induced Verlust der Hörfähigkeit, aber langsame Reaktion Tag in Stunden fast jeder verliert irgendeine Hörfähigkeit, wenn es genug intensiven Geräuschen während einer genügenden Zeit 90 8 herausgestellt wird. Die der US-berufliche Sicherheits-und Gesundheits-Verwaltung Regierung (OSHA) hat die 92 6 folgenden zulässigen Geräuschpegelbelichtungen spezifiziert: Entsprechend OSHA konnte jede mögliche Belichtung 95 4 mehr als notwendig die oben genannten zulässigen Begrenzungen etwas Verlust der Hörfähigkeit ergeben. 97 3 Ohrenpfropfen oder Schutze zu den Gehörgängen oder über den Ohren müssen getragen werden, wenn man dieses 100 2 Verstärkungssystem laufen lässt, um einen dauerhaften Verlust der Hörfähigkeit zu verhindern, wenn Belichtung mehr 102 1½ als notwendig die Begrenzungen ist, wie oben festgelegt. Um gegen möglicherweise gefährliche Aussetzung zu den 105 1 hohen Schalldruckpegeln sicherzustellen, wird es empfohlen dass alle Personen der Ausrüstung herausstellten, die 110 ½ zum Produzieren der hohen Schalldruckpegel wie dieses Verstärkungssystem fähig ist werden geschützt durch 115 ¼ oder weniger Hörschutze während diese Maßeinheit in Kraft ist. 10). Wartung: Säubern Sie nur mit einem trockenen Tuch. Sorgfalt Ihres Laney Verstärkers dehnt it' aus; s-Leben ..... und Ihr! 1). Lea el & Conserve estas instrucciones cuidadosamente antes de instalar o de funcionar este producto. 2). Confórmese con advertencias: Todas las advertencias e instrucciones para estos productos se deben adherir. 3). Desempaque: Al desempaquetar su producto compruebe por favor cuidadosamente para saber si hay cualquier muestra del daño que pudo haber ocurrido mientras que en tránsito de la fábrica de Laney a su distribuidor autorizado. En el acontecimiento inverosímil que ha habido daño, reembala por favor su unidad en su cartón original y consulta a su distribuidor autorizado. Le aconsejamos fuertemente que guardar su cartón original del tránsito, puesto que en el acontecimiento inverosímil que su unidad debe desarrollar una avería, usted podrá volverlela distribuidor autorizado para la rectificación llena con seguridad. 4). Conexión del amplificador: Para evitar daño, es recomendable establecer y seguir un patrón para dar vuelta por intervalos a su sistema. Con todo el sistema las piezas conectaron, giran el equipo de la fuente, CD/MP3 a los jugadores, mezcladores/registradores, etc, ANTES de girar su amplificador de la guitarra. Muchos productos hacen que las oleadas transitorias grandes en den vuelta por intervalos que pueden causar daño a sus altavoces. Girando su ÚLTIMO del amplificador de la guitarra y cerciorándose de su control llano se fija a un mínimo, cualquier transeúnte del otro equipo no debe alcanzar sus altavoces ruidosos. Espere hasta que todas las piezas del sistema se han estabilizado, generalmente uces par de segundos. Semejantemente al apagar su sistema rechace siempre los controles llanos en su amplificador de la guitarra y después corte su corriente antes de apagar el otro equipo 5). Mantenimiento: Refiera todos que mantienen a los personales de servicio calificados. Se ha derramado el servicio se requiere cuando el aparato se ha dañado de cualquier manera, por ejemplo cuando se daña la fuente de corriente continua, Líquido o los objetos han caído en el aparato, el aparato se ha expuesto a la lluvia o a la humedad, no funciona normalmente, ni se ha caído. 6).Placement: Este aparato eléctrico no se debe exponer al goteo o el salpicar y el cuidado se deben tomar para no poner los objetos que contienen líquidos, tales como floreros, sobre el aparato. No instale cerca de ninguna fuentes de calor tales como radiadores, registros del calor, estufas u otros aparatos (amplificadores incluyendo) ese calor del producto. No bloquee las aberturas unas de los de la ventilación. Utilice solamente con un carro, un soporte, un trípode, un soporte, o una tabla especificada por el fabricante, o vendida con el aparato. Cuando se utiliza un carro, tenga cuidado al mover la combinación del carro/del aparato para evitar lesión de inclinar-sobre. 7). Al usar la fuente de corriente continua: Utilice solamente la fuente de corriente continua Proporcionada por el fabricante. Cerciórese de que la línea voltaje en la instalación empareje el voltaje de entrada en la fuente de corriente continua. Proteja el cable eléctrico en la fuente de corriente continua Contra ser caminado encendido o sejeción, particularmente en de los enchufes, de los receptáculos de la conveniencia, y del punto que salen del aparato. (Véase las notas sobre usar la página de la fuente de corriente continua10). 8). Baterías: Utilice solamente los acumuladores alcalinos (LR6) en el producto. (Véase las notas sobre la guarnición y el reemplazo de la página de las baterías10-11). Niveles 9).Sound: La exposición a los niveles de ruidos extremadamente altos puede causar una pérdida de oído permanente. Los individuos varían considerablemente en susceptibilidad a la pérdida de oído inducida por el ruido, pero casi cada uno perderá una Nivel de Sonido Duración por cierta audiencia si está expuesta al ruido suficientemente intenso por un suficiente tiempo. La Occupational Safety dBA, Respuesta Lenta Día en Horas and Health Administration del gobierno de los E.E.U.U. (OSHA) ha especificado las exposiciones permitidas 90 8 siguientes del nivel de ruidos: Según el OSHA, cualquier exposición superior a los límites permitidos antedichos 92 6 podía dar lugar a una cierta pérdida de oído. Los auriculares o los protectores a los canales de oído o sobre los 95 4 oídos deben ser usados al gestionar este sistema de la amplificación para prevenir una pérdida de oído 97 3 permanente, si la exposición está superior a los límites según lo dispuesto arriba. Para asegurar contra la 100 2 exposición potencialmente peligrosa a los altos niveles de presión sana, se recomienda que todas las personas 102 1½ expusieron al equipo capaz de producir altos niveles de presión sana tales como este sistema de la amplificación 105 1 sean protegidas por los protectores de oído mientras que esta unidad es en funcionamiento. 110 ½ 10). Mantenimiento: Limpie solamente con un paño seco. 115 ¼ o menos El cuidado de su amplificador de Laney prolongará it' ¡vida de s ..... y la suya! The Linebacker series is a state of the art, processor-based design, enabling a wide range of different sounds to be created from your guitar. The 5W LR5 model, great for bedroom, practice or busking. Features a 6" custom driver, one instrument channel, one microphone channel, eleven built in amp models and range of "must have" effects like; chorus, phase, flange, tremolo, reverb and delay. Providing everything you need from clean tones to full-out overdrive. Also provided is a handy built in guitar tuner so you always have the best possible sound. On the rear panel can be found the controls & sockets for the Microphone & Headphones, along with the DC Power In socket and Power switch. The cabinet features an open back design enabling easy stowage of Power Supply, cables, etc. With its included Guitar Style strap, the amp is easily transported to wherever your sounds are needed the most. To enable you to get the most from your new Laney amp please read and retain this manual. Best wishes from all at Laney CRYSTAL 6E TI TI+ WRECK 3 7 8 2 1 9 0 10 4 6 3 7 8 2 1 9 0 10 5 6 3 FL 5 8 1 9 0 GE PHA S 10 ON AUX IN Jack AMP/TUNER Selector Control VOLUME Control CONTOUR Control PRESENCE Control AN 7 2 ORUS CRYSTAL+5A VOLT+ 4 6 TREMO LO VC 4D 5 CH VC+ 3G 4 VOLT ER HEART+ 1E HEART 2B TUNER & Button MOD FX LED TUNER LED DEL FX LED GUITAR INPUT Jack Socket ON POWER MOD FX on/off Button MOD FX Control-Chorus, Flanger, Phaser, Tremolo DEL FX on/off Button DEL FX Control-Delay, Reverb ON 4 OFF 5 N15039 6 3 MODEL: 7 LR5 SERIAL NO: 8 2 1 9 0 10 L Z B1 2 3 4 12V DC IN POWER MIC VOLUME PHONES/ RECORD OUT Power To The Music WWW.LANEY.CO.UK DESIGNED AND ENGINEERED IN THE UK MADE IN CHINA. FABRIQUE EN CHINE. BATTERY COMPARTMENT POWER ON LED 12V DC Inlet Socket POWER Switch MIC Socket MIC VOLUME PHONES/RECORD OUT Socket SECURITY SLOT MODEL & SERIAL No DC Power Supply: Your LR5 comes supplied with a 12V DC Power Supply, this is easily fitted between the mains outlet and the amp. When using the amp with the power supply a few precautions should be followed: 1). Only use the DC Power supply that is supplied by the manufacturer. The use of other DC Power Supplies may cause damage or other problems. 2). Turn the power switch to OFF and disconnect any other attached devices, before plugging in and turning ON the DC Power Supply. 3). When the DC Plug is connected to the socket, the battery compartment is isolated from the unit. Both the DC Power Supply and the battery tray are independent of each other. 4). Although no harm will come to the batteries if left in place whilst the DC Power supply is being used, it is recommended that they be removed. Use either one power source or the other. Batteries: The use of a DC Power Supply is recommended as the units main power source, however, should you prefer to use batteries, use only Alkaline type (LR6). Used continuously the batteries will last for approximately 13 hours. (This will vary greatly with the actual conditions of use). As the batteries run down, the power indicator on the fascia panel will become dim when the battery power is too low. Replace the batteries or revert to the DC Power Supply. Fitting Batteries: When installing or replacing batteries, always turn the power switch to the OFF position and disconnect any other devices you have may have connected. This prevents damage to your speaker and/or other devices. Follow the photo sequence to fit a set of batteries. 1). Turn the amplifier upside down to access the battery tray that is located under the chassis, place the amp on a piece of felt or cloth to avoid damage. 2). Push the catch to release, then lift out the lid of the battery tray and insert 6 AA batteries, ensure that the orientation is correct to the legend on the tray. 3). When closing the lid of the battery tray, insert the tabs opposite the catch first, then push the lid down until a click is heard. If used incorrectly batteries may leak or explode and cause damage or injury, please take the following precautions. 1). Carefully follow the installation instructions for fitting new batteries, especially the polarity. 2). Avoid mixing new batteries with old or part used batteries. 3). Avoid mixing battery types. 4). Do not try to recharge or take apart alkaline batteries. 5). Remove the batteries from the unit if it is not going to be used for a long time. 6). If batteries have leaked in the battery tray, remove the batteries and all traces of the discharge from the tray. Use caution so that none of the discharge gets near the skin or the eyes. Any affected areas should be immediately rinsed with cold running water, seek medical advice, 7). Do not dispose of used batteries in fire or water systems. 8). Used batteries should always be disposed of in compliance with the current regulations applicable to the country/region where you live. + - Attaching the Strap: Attach the supplied strap to the buttons on each side of the cabinet securely, so that it does not become detached causing damage or injury. Now the power supply is connected or the batteries are fitted read on. POWER: This is the power ON/OFF switch. INPUT JACK: Connect your guitar here. Use only good quality cables to avoid poor sound quality. TUNER/AMP MODEL SELECTION: Choose from the various pre programmed amp models VOLUME CONTROL: Adjust the volume level of the instrument connected to the Input Jack. EQUALISATION CONTOUR/PRESENCE: This set of tone controls can have a great effect on your sound. MOD FX: Choose from Chorus, Flanger, Phaser or Tremolo. DEL FX: Choose from Delay or Reverb. MIC SOCKET & VOLUME CONTROL: Connect your microphone and adjust its volume. Use only dynamic microphones, electret & condenser mic’s will not work. HEADPHONE/RECORD OUT: A rear panel 6.35” stereo jack is provided for headphone use. IN DEPTH 12V DC POWER SOCKET: Connect to your DC Power Supply. Make sure the voltage marked on the DC Power Supply matches the outlet voltage for your country! POWER: This is the main power ON/OFF switch. After switch on, all of the LED’s on the fascia light up momentarily, after a couple of seconds the LED’s indicate the previous settings used: i.e. If the amp was last used with Chorus & Reverb, the MOD FX & DEL FX LED’s will be lit. The Power LED will also be lit with the switch in the ON position.. INPUT JACK: Connect your guitar here. Use only good quality cables to avoid poor sound quality. AUX IN JACK: Use this input for CD/MP3 players to allow you to play along to the music or use as backing. For use with standard stereo 3.5mm jack leads. The overall volume of your player is controlled by the its own volume control. TIP (NOTE:This input is not muted when in the guitar tuner is in use). AMP: This control allows the user to select from the various factory pre programmed amp models.These are not just guitar amp settings, used as a starting point, each can be configured as a compilation of amp and/or EQ/effect set-ups to give some of music’s most inspirational sounds. There is a vast choice to suit your own style & taste. TIP (Descriptive table to follow Page 18) VOLUME CONTROL: Controls the volume of the instrument connected to the Input Jack. This control does not have any effect on any microphone connected to the amp. EQUALISATION CONTOUR/PRESENCE: As the name suggests this set of controls can have a great effect on your sound. Basically the Contour control is a mix of conventional Bass & Mid controls, and the Presence acts more as a Bright/Tone Control. MOD FX: Activate by pressing the ON Button. This control applies various effects to make your own unique sound. Choose from Chorus, Flanger, Phaser or Tremolo depending on the style required or the Amp Model chosen, the LED will flash according to the modulation of effect used. DEL FX: Activate by pressing the ON button. The first section of the rotary control adjusts the length of Delay applied to the signal, the LED will flash according to the delay time. The second half of the control adjusts the length of Reverb applied to the signal from Room to Cathedral. TIP The really important thing is to experiment with the EQ and FX controls, because they effect each amp model in a different way. The cool sounds you discover can be noted in the user settings section. (Page 21/22) MIC VOLUME: Controls the volume of the Mic connected to the Mic Input Socket. This control is independent from the instrument volume control on the fascia. TIP MIC SOCKET: Connect a microphone here. Please note the following when a mic is connected to the amp: The location of the microphone relative to the amp could cause feedback as could the volume level being too high. Both are easily remedied. Use a Dynamic Mic only, you can not use a condenser mic or a plug-in powered mic that requires a power supply. HEADPHONE/RECORD OUT: A rear panel 6.35” stereo jack is provided for headphone use. This output may also be used to connect to a mixing desk for recording if required. TIP TIP (The internal speaker is automatically disconnected when using phones. If your Phones have a 3.5mm jack an adaptor will be required) SECURITY SLOT: You can connect commercially available anti-theft cables and other security devices to the amp. See http://www.kensington.com/ SERIAL NO: Displays the model and serial number of the unit. TUNER OPERATION: By pressing the Tuner Button the amplifier will Mute and the tuner function will be activated. The round LED will flash to indicate Tuner operation. The AMP selector should then be used to select each string in turn to be tuned. These are E,B,G,D,A,E and numbered 1-6 with 1 being the High “E” and 6 being Low “E” Adjust the string tension to make just the centre LED light. (As the tune is approached, the centre LED and the LED from the direction of tune will speed up flashing to show you are getting close to the in tune position. When in tune the LEDs will stop flashing and only the Centre LED will be continuously lit. Repeat this for each string and then go back through them again to make final adjustments if required. To exit the tuner function press the tuner button. Alternatively remove the input jack and replace. (You will be returned to the channel and sound settings prior to tuning.) Amp Model Definitions Linebacker Sounds Tone Description Amp modelled Crystal Pure & Clean Clean channel of an LC amp - bright and full Crystal + Clean with Compression Clean channel of an LC amp - bright and full + a clean boost pedal to VC Clean & Warm A VC combo set clean VC+ 1 x 12" Combo Semi Distorted A VC combo with the drive channel switched to give a semi broken up give more low end tone Heart 1 x 12" Classic vintage tone Lionheart Combo on the clean channel pushed hard giving you a classic semi distorted vintage tone Heart + 1 x 12" Classic vintage distorted tone Lionheart combo with more gain dialled in Volt Classic rock distortion Tube head and cab combination - set to give you a crunch tone Volt + Classic rock solo tone Tube head driven hard - more gain dialled in TI Crushing rhythm tone TI signature head pushed TI + Hard rock solo tone TI signature head pushed hard Wreck Insane full on gain Drive channel of a modern valve head - full on! Factory Reset: You can at any time return the amplifier to all its original factory settings. With the amplifier in the OFF state, hold down the DEL FX Button, turn ON the power switch, continue holding down the DEL FX Button for a few seconds while all the LED’s flash, then as the LED’s become steady, release the DEL FX Button & the factory settings are restored. Power Supply Output Power Rating Loudspeaker Features Size (H*W*D) Included Items 12V DC Power Supply or 6 “AA” size Batteries 5W Custom Designed 6” 8 Ohm Driver 1 Instrument Channel, 1 Microphone Channel - (Balanced or Unbalanced) 11 built in amp models Contour & Presence EQ controls Chorus,Flanger, Phaser, Tremolo, Delay & Reverb FX Tuner Function Security Slot 301*285*176 Unit Weight 4.5Kg DC Power Supply, Guitar Style Carry Strap NOTE: This equipment has been tested and found to comply with the limits for a Class B digital device, pursuant to part 15 of the FCC Rules. These limits are designed to provide reasonable protection against harmful interference in a residential installation. This equipment generates, uses and can radiate radio frequency energy and, if not installed and used in accordance with the instructions, may cause harmful interference to radio communications. However, there is no guarantee that interference will not occur in a particular installation. If this equipment does cause harmful interference to radio or television reception, which can be determined by turning the equipment off and on, the user is encourage to try to correct the interference by one or more of the following measures: Reorient or relocate the receiving antena Increase the separation between the equipment and receiver Connect the equipment into an outlet on a circuit different from that to which the receiver is connected Consult the dealer or an experienced radio/TV technician for help Unauthorized changes or modification to this system can void the user’s authority to operate this equipment This product conforms to the requirements of the following European Regulations, Directives & Rules:CE Mark (93/68/EEC), Low Voltage (72/23/EEC), EMC (2004/108/EEC), RoHS (EU2002/95/EC), WEEE (EU2002/96/EC) In order to reduce environmental damage, at the end of its useful life, this product must not be disposed of along with normal Household waste to landfill sites. It must be taken to an approved recycling centre according to the recommendations of the WEEE (Waste Electrical and Electronic Equipment) directive applicable in your country. In the interest of continued development, Laney reserves the right to amend product specification without prior notification. Headphones OR 4 5 N15039 6 3 7 1 9 0 Mixer Desk SERIAL NO: 8 2 10 L Z B1 2 3 4 Power To The Music WWW.LANEY.CO.UK MP3 Dynamic Mic Guitar NOTES ISSUE: 1.0