1
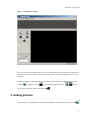
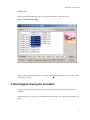
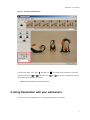
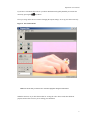
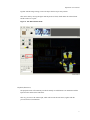
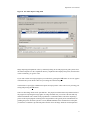
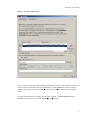
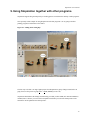
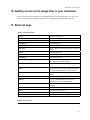
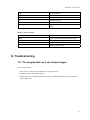
Stopmotion user manual
Fredrik Berg Kjoelstad
Bjoern Erik Nilsen
Sunday, 14 April 2005
1. What is Stopmotion? Where can I get it?
Stopmotion is a program for creating stop motion animation movies from pictures you already have on
your harddrive and from pictures you import live from a webcamera.
A stop motion animation is an animation which is built by taking many pictures of some object while
moving it a little between each picture. When these pictures are run you get an animation.
You can download the lates version of Stopmotion from the Stopmotion webpage
(http://developer.skolelinux.no/info/studentgrupper/2005-hig-stopmotion/index.htm).
2. Getting started
Once you have installed Stopmotion you can start it by typing stopmotion in a console or from menues:
•
In the KDE menues you can Stopmotion it by going to Edutainment−→Teaching
Tools−→Stopmotion
•
In the Debian menues Stopmotion lies under Apps−→Education−→Stopmotion
When the program is started you will se the following:
1
Stopmotion user manual
Figure 1. Stopmotion at startup
To the top you have the Framebar where you will see all the pictures in the animation. The center area is
the Frameview where you will get a closer look at your pictures, see the webcamera and preview your
animation.
The left area is the tools menu. On the top of this menu you have buttons for adding pictures from the
harddrive
, adding new scenes
as well as deleting frames and scenes
also start the webcamera with the camera button
. You can
.
3. Adding pictures
The next step is to try adding some pictures from the harddrive. You can do this by clicking on the
2
Stopmotion user manual
(Ctrl-F) button.
You will get the following dialog where you can select the pictures to add to the project:
Figure 2. The Add frames dialog
When you have selected some pictures you can click on the Open button and the pictures will be added
to the project as frames.
4. Running/previewing the animation
Now that you have added some test pictures to your animations wouldn’t you like to run them as an
animation?
Stopmotion allows you to preview your animation before exporting it. This can be done through the play
panel.
3
Stopmotion user manual
Figure 3. The Run Animation menu
The play panel allows you to play (
(K)) and stop (
move between frames (
(J),
(L)) and scenes (
the animation preview(frames per second).
) the running of the animation. You can also
(I),
(O)) as well as changing the speed of
Note: The camera has to be off to use this menu.
5. Using Stopmotion with your webcamera
The real value of using Stopmotion lies in working directly against a webcamera.
4
Stopmotion user manual
If you have a webcamera that works on your linux distribution and vgrabbj installed you can start the
camera by pressing the
(C) button.
If not you can go to the the next section “Changing the import settings” to set up your camera correctly.
Figure 4. The Camera menu
Note: For this to work you have to turn of all other programs using the webcamera.
When the camera is on you have three modes for viewing the video. These modes have different
purposes and are there to assist you in creating your animations.
5
Stopmotion user manual
Image mixing/Onionskinning (Shortcut: 1)
The image mixing is probably the view mode you will be using the most. This mode allows you to
view previous pictures (up to five) on top of the camera. This way you can position the figure in
relation to the previous frames so that you can create smooth motions.
Figure 5. The onionskinning/mixing mode
You can change the number of pictures to view on top of the camera with the “Number of mixes”
slider on the camera panel.
Image differentiation (Shortcut: 2)
The image differentiation mode is primarly meant as a tool for moving the figure back to a previous
position.
It displays the difference between the selected frame and the camera. This way if an object in front
off the camera has been involountairly moved (fallen, etc) you can use the differentiation mode,
6
Stopmotion user manual
together with the image mixing, to move the object back to its previous position.
This can be done by moving the figure until the picture is black, which means the selected frame
and the camera are “equal”.
Figure 6. The differentiation mode
Playback (Shortcut: 3)
The playback mode will continously run the the already recorded frames as an animation with the
input from the camera as the final frame.
This way you can see the camera input, which will become the next frame, together with the
previous frames as an animation.
7
Stopmotion user manual
Figure 7. The playback mode
You can specify how many frame backwards that should be played (up to 50) with the “Number of
images” slider on the camera panel, and you can set how fast they should played with the FPS
chooser on the preview panel.
6. Changing the import settings
If the video importing doesn’t work or if you want other settings you can change the way video is
imported in Stopmotion.
This is done through the configure menu (Settings−→Configure Stopmotion (Ctrl-P)) and you can
either choose from one of the predefined settings or create your own.
8
Stopmotion user manual
Figure 8. The Video Import config menu
Image importing in Stopmotion works by continously asking an external program to grab a picture from
the camera and place it in the .stopmotion directory. Stopmotion then displays this picture, and when this
is done continously you get live video.
If you want to add a new import program you can do this by pressing the Add button. A new row appears
in the table and you can fill in a name for your setting and a short description.
You then have to specify the command line options to import pictures. These can be set by selecting your
setting and pressing the Edit button.
There are three things which can be specified here. The prepoll, start deamon and stop deamon fields. If
the program for importing the images grabs one image and then exits you can leave the start and stop
deamon fields blank. The contents of the prepoll field is a command which is run before importing a
picture. If the import program is running in the foreground this will typically be the command line for
grabbing the picture. Note that you have to write (DEFAULTPATH) in the command line on the place
you otherwise would have speciefied the path to the file where the image should be stord. Stopmotion
9
Stopmotion user manual
will replace this tag with the correct path and file name.
If the program you use for importing the pictures is running as a background/deamon process you have
to specify command lines for starting and stoping the deamon. Again you should use the $importpath tag
instead of the path to the file (se above). Prepoll could still be used but is not required. One potential use
for the prepoll command when the grab program is running as a deamon process is to specify a command
line which performes a operation such as scaling or rotating the picture. This command will be called on
the pictures every time before importing them meaning the live video will be displayed with the effect.
7. Adding sound
You also can add sound to your animations. Before you can do this however you need to have a frame to
attatch the sound to. Therefore you should add some frames from the harddrive or webcamera first.
When you have one or more frames you can add a sound by double clicking with the mouse on the frame
to attatch the sound to. You will then get a menu where you can add sounds. When running the animation
the sound will be played from this frame and until the sound is completed or the animation is at an end.
Note: The only currently supported sound format is ogg.
8. Exporting to video
By now you should have a nice animation of your own. It’s time to make a video file of it. The first thing
you need to do is to install an video encoder. If you have mplayer installed you should already have one
you can use.
Go to the Configure menu (Settings−→Configure Stopmotion (Ctrl-P)). and press the Video Export
tab. You should now get a list of video export settings:
10
Stopmotion user manual
Figure 9. The Video Export menu
You can select one of these provided you have the programs they use or you can add one of your own. To
edit one of the present preferences press the Edit button, or use the Add button to add a new setting.
When you have set up a video export setting you can close the Configure menu by pressing the OK
button.
To export your animation to a video file just press File−→Export−→Video (Ctrl-Alt-V) and you
should have a video file of your exellent animation. Tell your friends!
11
Stopmotion user manual
9. Using Stopmotion together with other programs.
Stopmotion supports drag and drop and you can drag pictures to and from the desktop or other programs.
One especially useful example of using Stopmotion with other programs is to use gimp (or another
painting program) to add effects to the frames.
Figure 10. Adding effects with gimp
The best way to do this is to drag a frame/picture from Stopmotion to gimp. Change around with it in
gimp, then save the picture in gimp (File−→Save (Ctrl-S)) (not save as).
Stopmotion should detect the changes automatically, provided you have FAM (File Alteration Monitor)
installed, but if it doesn’t you can switch to Stopmotion and when you select the frame/picture in the
framebar it will be updated to the altered picture.
12
Stopmotion user manual
10. Getting access to the image files in your animation.
If you want access to the image files in your animation project you can open the project .sto file in your
file browser. The file is a tarball file and inside it you will find the images in the images directory.
11. Shortcut keys
Table 1. General shortcuts
Ctrl-N
Creates a New project.
Ctrl-O
Opens an excisting project.
Ctrl-S
Saves the project.
Ctrl-Shift-S
Saves the project as.
Ctrl-Alt-V
Opens a dialog to export the project as video.
Ctrl-Alt-C
Opens a dialog to export the project as a Cinerella
project.
Ctrl-Q
Quits the application.
Ctrl-Z
Undoes the last action.
Ctrl-Shift-Z
Redoes the last undo.
Ctrl-X
Cuts the selected frames out of the animation and
places them on the global clipboard.
Ctrl-C
Copies the selected frames to the global clipboard.
Ctrl-V
Paste pictures from the global clipboard and add
them to the animation after the selected frame.
Ctrl-G
Brings up a menu where you can select a frame to
jump to.
Ctrl-P
Opens the import and export preferences menu.
Shift-F1
Gives you a whatsthis arrow for querying
information about a user interface item.
Ctrl-F
Add one or several frames/pictures to the
animation.
Ctrl-E
Create a new scene
Delete
Deletes the selected frames.
Shift-Delete
Deletes the selected scene.
A
Selects all the frames in the opened scene.
Table 2. Play shortcuts
13
Stopmotion user manual
P, K
Play the animation.
Right, L
Go to the next frame.
Left, J
Go to the previous frame.
O
Go to the next scene.
I
Go to the previous scene.
Ctrl-L
Toggle whether the animation should loop when
playing.
Table 3. Camera shortcuts
C
Start the camera.
Space
Capture a frame from the camera video stream.
1
Switch to image mixing/onionskinning mode.
2
Switch to image differentation mode.
3
Switch to playback mode.
12. Troubleshooting
12.1. The program tells me it can’t import images
Have you checked that:
1. The camera is working in Linux and the driver is properly set up?
2. No other programs are using the camera?
3. The program used for importing pictures and video is installed and working. (See the preferences
menu (CTRL+P))?
14