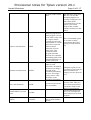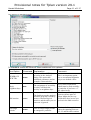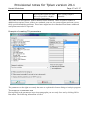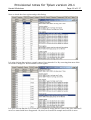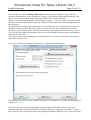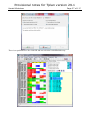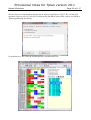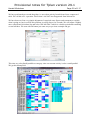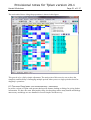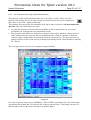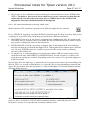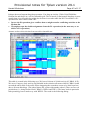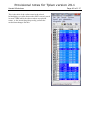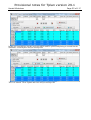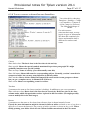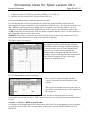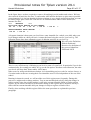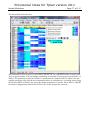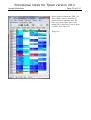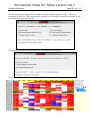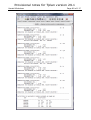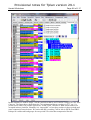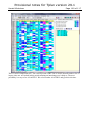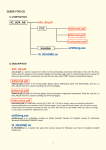
1
Provisional notes for Tplan version 29.1 By Harald Michalsen Provisional notes for Tplan version 29.1 Harald Michalsen Page 2 of 117 Content INTRODUCTION ............................................................................................................................................................ 3 START OF TPLAN.......................................................................................................................................................... 3 SELECT LANGUAGE.............................................................................................................................................................. 4 SELECT USER LEVEL ............................................................................................................................................................ 4 Importing data from version 28.6 to version 29.1 .............................................................................................................. 4 The run menu (Initial part of chapter 5 in old manual)...................................................................................................... 5 RUN MODE: (STANDARD OR INTERACTIVE) ....................................................................................................... 6 PHASES OF THE MAIN PROGRAM .......................................................................................................................................... 6 DIRECTIVES FOR MAIN PROGRAM ........................................................................................................................ 7 RUN OPTIONS ...................................................................................................................................................................... 8 Run options in beginner mode ............................................................................................................................................ 8 Run options in standard mode. ......................................................................................................................................... 11 THE START OF A TIMETABLE RUN ...................................................................................................................................... 13 LISTINGS FROM A TIMETABLE RUN .................................................................................................................................... 17 6 MANUAL ADJUSTMENTS OF TIMETABLES..................................................................................................... 18 INTRODUCTION .................................................................................................................................................................. 18 6.1 PRESENTATION OF A COMPRESSED TIMETABLE..................................................................................... 20 The normal colours in the in timetable are: ..................................................................................................................... 21 6.2 THE BASIC DRAG/DROP- AND SUPPLEMENTARY- OPERATORS ...................................................................................... 31 6.2.1 P4: Selection/Colouring (Advanced Selection)...................................................................................................... 32 SELECTION OF ACTIVITIES. ................................................................................................................................................ 33 Actual position.................................................................................................................................................................. 33 Empty actual position. ...................................................................................................................................................... 33 Filled in Actual position. .................................................................................................................................................. 34 6.2.2 P2: Move/Interchange an activity (table unit)....................................................................................................... 37 6.2.3 P1: Move an Activity (Table unit) FROM Kickout list to Timetable........................................................................ 42 6.2.4 P0: Move an Activity (Table unit) FROM Class Timetable to Kickout list.............................................................. 44 6.2.5 P6: Teacher and Room changes or interchanges. ................................................................................................... 46 6.2.6 F2: Editing in a timetable cell (The F2- dialog)...................................................................................................... 50 6.2.7 Major changes in a timetable .................................................................................................................................. 53 6.2.8 THE CELL CONTENT IN KOMPRGRID AND SKEMAGRID............................................................................................. 57 6.2.9 SPECIAL ACTIVITIES AND ROTATION OR CHANGE OF DAYS ...................................................................................... 58 6.2.9.1 Interchange days, rotate the periods on a day...................................................................................................... 59 6.2.10 DELETION OF MANY ACTIVITIES ............................................................................................................................. 59 6.2.11 Use of the Kickout list in other contexts. (Manual assignments) ........................................................................... 61 6.3 EXAMPLES OF ADJUSTING TIMETABLES USING DRAG/DROP – TECHNIQUES .................................................................. 65 6.3.1 Example 1 ................................................................................................................................................................ 65 6.3.2 Example 2 ................................................................................................................................................................ 69 6.3.3 Example 3 ................................................................................................................................................................ 71 6.3.4 Example 4 ................................................................................................................................................................ 80 6.3.5 Example 5 (A Danish Gymnasium).......................................................................................................................... 84 6.3.6 Example 7 (Module table)........................................................................................................................................ 90 6.4 SOME ADVANCED FACILITIES ....................................................................................................................................... 94 6.4.1 Component setting ................................................................................................................................................... 94 6.4.2 Cross Linking of Components................................................................................................................................ 112 6.4.3 Teacher Pools ........................................................................................................................................................ 113 Provisional notes for Tplan version 29.1 Harald Michalsen Page 3 of 117 Introduction We have decided to release version 29.1 forthcoming season, summer 2011. This requires some revisions of the current user manual for version 28. Due to time limits (Mid-April -11 now) this cannot be done in a satisfactory manner. What follows is a set of supplementary notes to current user manual, and we refer to parts of the manual where we have made modifications. Of course what we write here overrules older documentation. Mainly these notes are intended for users with some experience, but we also make a few comments to make the initial start of using Tplan simpler for the beginner. In quite a number of places we have tried to simplify the use both for beginners and more experienced users. By that we mean we eliminate facilities which you normally don’t need depending on how you judge your own experience level. (See later). Almost no one except System support should classify themselves as Advanced since some options here may have undesirable consequences if you are the least uncertain about what you are doing. Closing note (27/05-11): I don’t think that the content in this paper is too bad and this is badly needed. I am not too proud of the layout of this document, but considering this has been produced in 30 days I am not ashamed of it either. Start of Tplan There have been two main methods for the opening dialog in Tplan. Now we recommend all to use what we call New opening dialog where you save all your data in just one *.tpd – file. Assume you are going to enter new data from scratch. You open a blank data set and the very next thing you do is to click on the third button in your main button bar: Create a New school. The following dialog appears: Fill in this obligatory info and in particular try to define a school code which might be unique for your own school. I represent system support receiving data sets from quite a number of different schools, and I have to inspect the individual registers in your data. When all schools have the same default code (HMX), I get problems in keeping different school’s data apart. Please, save me from that quite unnecessary problem. By clicking Ok in the above dialog you enter the grid for obligatory school parameters filled with default values. Modify these to suit your own school data and you are ready for data entry as Provisional notes for Tplan version 29.1 Harald Michalsen Page 4 of 117 explained in the current user manual. These rules will not be changed here except from some very special timetabling mechanisms. SELECT LANGUAGE Before starting data entry you should do a little more initial work. Select tab sheet Functions and you get this dialog: Select the language you prefer. Go to Settings > Errors and select Complete. That produces considerable information which you normally need in the start, but you should reduce all this info when you finally have a complete and formal correct data set. SELECT USER LEVEL The following dialog appears: Select either 1 or 2 here while 3 almost assume you have discussed that with me. The reason for the choice above is to eliminate from the beginner some facilities which only might seem confusing in the initial stages. In particular you will notice the difference of your choice in the set of run options being available. (Advanced contains a set of options of a very special nature, and I will not document that for the moment.) Importing data from version 28.6 to version 29.1 If you have *.tpd –file from 28.6 all your basic data entry are automatically compatible with version 29.1 However the end result i.e. final table from 28.6 is not compatible with 29.1. The main reason for that is that we have completely reorganised the internal data structure. I didn’t think this would matter much, but there will surely be someone who wants last year’s table in version 29.1. I shall give a helping hand provided you have some data experience: • Unzip the desired *.tpd- file in the same folder as this file. • You will find here a file JUMOD.nnn (nnn= school key) in this folder. Enter the folder in DOSenvironment. Do this Copy-command: • COPY JUMOD.nnn JUMOD28.nnn • Start Tplan ver 29.1. Go to Functions>Settings>Save and Check: Use classic school opening dialog. Provisional notes for Tplan version 29.1 Harald Michalsen Page 5 of 117 • Go File Menu and click Open. You are transferred to the Old opening dialog. Click Add here and enter your school data. • Run: TRANSFER + ANALYSIS but don’t build on partial table. Now you have your basic situation in 28.6 transferred to 29.1. • Go to Run options and check Old Iteration + Import ver. 28 • Run ANALYSIS + Build on partial table. Now the file Jumod28.nnn you made are transferred to ver. 29.1 • Inspect Compressed and that should be your table from last year. Uncheck the options mentioned above. • Save your data as a zip-file. Restore to normal run conditions and open your saved zip- file • Save that as a *.tpd file and now you have the complete table from last year in version 29. (Perhaps Lasse could make that simple process automatic?) The run menu (Initial part of chapter 5 in old manual) The new simplified run menu looks like this: We have 3 distinct phases in run menu: Transfer registers. This part is similar to version 28 with a few exceptions: The checking of formal (grammatical) errors is now done by Wintp and not Hmtp. This check is either done by using the Inspect button or by a transfer run. Any formal error will stop a further run and you are transferred to a survey showing the errors and by clicking on an error, you are easily led to where the error occurred. There is just one way of forcing a transfer regardless of grammatical errors i.e. a specific run option for that. The inexperienced user should not use that possibility but concentrate on finding the errors to simplify what may happen in continued runs. However, there Provisional notes for Tplan version 29.1 Harald Michalsen Page 6 of 117 are few cases where the grammatical errors don’t tell what really goes wrong, and it may be necessary to force a transfer to get a better survey. The output file Lisy is split in two parts: Lisy and Lisys. Initially you will be interested in both files, but as you do quite a number of new transfers it is perhaps sufficient with the more compressed and vital info in file Lisy. Analysis Program The additional dialog here has been removed and the parameters here are now defined by a run option. We only need to specify if we a creating a table from scratch or continuing from a partial table already created. Main Program Here there is a set of additional parameters which must be specified: Run mode: (Standard or Interactive) In almost all cases you should use Standard mode. Earlier I had high hopes for the Interactive mode where timetabling is stopped temporarily at once when you get a kickout, and the intention is to adjust this immediately. That might often lead to dubious manual guesswork, but in some cases I have found the technique useful, say the last part of a large timetable where only pure class activities remained to be allocated. PHASES OF THE MAIN PROGRAM This is an important choice which you always must consider, and this is linked with a couple of important run options. The Allocation phase uses options: Indirect room allocation + New room allocation. The Adjustment phase substitutes this with Absolute room allocation. The first set of options is definitely the best options while you gradually build a complete timetable and possibly builds on a previous partial table. Sooner or later you reach a stage where all activities are assigned in time, but there are still problems with some teacher/room changes. Now you must definitely switch to Adjustment phase to keep firmly locked all the teacher/room changes you are going to make, and you in addition have to return to a new transfer/analysis/main run for continued runs. However, you risk that this continued run will not be as optimal as if you were in Allocation phase. On the other hand a return to this phase means that you lose all the efforts with room adjustments. So you have to make a choice!! To sum this up: Try to make a complete table in TIME using the Allocation phase and postpone as long as possible teacher/room- changes. When you eventually solve all kickouts switch to Adjustment phase, and you are stuck with that for the remainder of the process; in particular if you do many room changes. (It could happen that these are few, and you could produce a new table in the better Allocation phase starting from scratch with rooms.) Provisional notes for Tplan version 29.1 Harald Michalsen Page 7 of 117 Directives for main program This leads to the following dialog: This is a considerable simplification of earlier dialogs for main program and room allocation. We only use the most important parameters here and less frequent parameters may be defined by some additional option. Definition of parameters in above dialog: Steering Normally you use your own steering as explained in user manual. Alternatively you might initially use a standard steering. (I might modify these in the future.) Maximal Number of steps This is the standard way of creating a partial timetable from a set of directives as explained in user manual. Maximal Number of placements This is an alternative and less frequent way of only making only a partial timetable i.e. the main run is stopped after a fixed number of assignments. This is intended for the case where a specific steering directive refers to a large number of activities and you don’t want to assign all these in the same step. (This parameter might also be useful for system support.) Acceptable number of gaps For a medium complex timetable you will normally want to create tight teacher tables and you normally select a value in the region 2- 5. For other school structures you can’t afford to require or are not interested in requiring tight teacher tables. In that case use the value 99. If you use a value of 0 or 1, you trigger some very special mechanism which gives a considerable reduction in teacher gaps but which may have undesirable side effects like many more kickouts. In general I don’t recommend the use of these facilities. Principles for collection of rooms For traditional “class rooms” you want classes, teacher or subjects in the same room as much as possible. (That varies much from school to school.) This last principle means that you keep same subject in same room at the expense of having both classes and teachers to move more around than Provisional notes for Tplan version 29.1 Harald Michalsen Page 8 of 117 possibly needed ( There are also some options for allocating rooms like: Maximal packing where you will have fewer lacking rooms but which increases more movements of classes and teachers.) Strict requirements for rooms Normally I recommend you to check this parameter. If it turns out that get too many lacking rooms, rerun room allocation and uncheck this parameter and see how much the situation improves. RUN OPTIONS This is now a separate choice in Run dialog (and there is also a separate button for that in Main Bar) The content here depends on whether yourself say you are beginner or require standard use. Run options in beginner mode Run option Command Explanation Ignore syntax errors FORCE Forces a Transfer Run even if there are formal errors Follow run in DOS environment ch While running a DOS window will open showing info about the Comment As a beginner you should normally concentrate on correcting the formal errors to avoid later confusion. However there are cases where you need the option to get sensible info about what is going on. Definitely, I use this option almost obligatory. I can read much more from Provisional notes for Tplan version 29.1 Harald Michalsen Page 9 of 117 progress of the current run. Indirect room allocation Absolute room allocation RSKIP RKEEP New room allocation RNEW Same SUBJECT to same room FAGPRI Sudoku SUDOKU Used as a link between analysis program and main program. Current room table is only used as a logical matrix securing that all room requirements in various periods are respected while no direct allocation of room takes place. This secures the main program maximal freedom for continued timetabling while older manual adjustments of rooms will be lost This is the opposite of indirect room allocation. All manual teacher/room changes are kept in the continued timetabling process. This might easily remove some flexibility in the continued timetabling Creates from scratch a new room table Needed option in to play with the Sudoku puzzle. that than the average user. But ALL can see that something happens (or possibly not happens) For that reason alone I recommend all to use this option. (Our current Progress Bar is rather pointless and does not tell much) The recommended option to use when creating class/teacher tables and getting rid of the kickout list. Obligatory option in case you insist on preserving all manual teacher/room changes you have done till now Often a useful option to use once more when you have solved your kickout list and are ready for the final room adjustments. An unneeded option now since you can require the same in directives to main program. Provisional notes for Tplan version 29.1 Harald Michalsen Page 10 of 117 Provisional notes for Tplan version 29.1 Harald Michalsen Page 11 of 117 Run options in standard mode. In standard mode we mention these additional run options: Run Option Command Explanation TKPAR Creates additional TK’s just as before in the Analysis dialog. This option has additional parameters and an example is shown below. NABO The assignment of an activity on a day will block the activity on neighbour days Old iteration ITOLD The link between the analysis and main program is made by means of internal logical matrixes and the table you see onscreen is ignored. Join single periods DSPAN Tries to assign single periods in contiguous positions GENERATE NEW TKs Block neighbour days Comment This is an important option, but we recommend beginners only to use default values. A very strict requirement which must be used carefully: in particular if you have a 5day school week. The old way of linking between various parts of Tplan. Might also be very useful these days in case you get lost in the table onscreen. This is useful in a typical case where the spanning rules are 2-2-2-2 and the table consists Provisional notes for Tplan version 29.1 Harald Michalsen Page 12 of 117 of mainly multiple periods and few singles. In such a case the singles make up some “implicit” sequential which is important to consider. (If many singles don’t use this facility) New comp. rules MODULE TABLE STEPWISE ROOM ALLOCATION SPLIT SITE RULES Desires Week Balance COMP SVMOD TWOSTEP SPLIT4 WBAL These notes will show an alternative way of specifying components. To use that, this option is required. Till further notice we accept both old and new way of specifying components Tries to assign activities for classes in contiguous periods to reduce the possibility of potential gaps. Also considers the possibilities for assigning staggered lunch breaks If the teaching unit is small for instance 20 min., we get a rather particular timetable problem. The main bulk of the teaching will be large and varying multiple periods. Such tables will as a necessity contain some gaps in class tables, but we want to reduce these as much as possible. This option is VITAL for such timetables. Room allocation is done in two steps. In the first stage we only allocate rooms for multiples and the second stage is allocation of rooms to remaining singles. The idea is to fulfil more room requirements failing due to the period breakdown. This option covers the following split site situation: There is a geographical distance between 2 schools which shares teachers. Shift from A to B can only take place at a specific time of the day, and teachers shifting can’t teach in contiguous periods in different schools when the shift takes place. For 10 day week only. Originally we required that 10- day table had an even load of all subjects in the two weeks. That was initially an almost absolute requirement. This option tries to strengthen what we call Strict Requirements in Run menu. This option has parameters for defining when the shift shall take place and specification of what is school A and B. Other split site conditions may be defined and will also require a special run option. 10- Days tables relax in any case a complex timetable. By using this option in addition you relax the complexities further. Could be recommended if you Provisional notes for Tplan version 29.1 Harald Michalsen Page 13 of 117 By using this option we state have a really complex that even spread is a highly timetable desirable requirement This is the set of run options I wish to mention for the moment. There are quite a number of additional run options. Some of these are outdated, some are for system support and some covers fairly special timetabling problems. These latter might later be reintroduced and future additional run options must also be expected. Example of creating TK-parameters The parameters to the right are exactly the same as explained in former dialog to Analysis program THE START OF A TIMETABLE RUN Having filled in the parameters in previous paragraphs you are ready for a run by clicking OK in Run menu. The following information is listed: Provisional notes for Tplan version 29.1 Harald Michalsen Page 14 of 117 This is a survey of what run and run parameters you are using. It is strongly recommended that you ALWAYS check this info before running. ERROR CHECKING (Inspect button or Transfer program) In many years both Wintp and Hmtp have performed these “grammatical” checks. Sometimes this has given a little confusion when starting a Transfer being stopped completely unnecessary. We have changed the rules for that: • • Wintp alone is completely in charge of all “grammar” checking. Transfer is immediately stopped each time a formal error is detected. I have found these checks to be very reliable and even better you are easily transferred to the spot where there is an error. I personally use these checks to a large extent and am very glad for this thorough cleaning of data. The beginner or average user should be even happier by getting rid of the main bulk of errors before starting serious timetabling. It happens that HMTP must overrule all warnings coming from Wintp meaning that a transfer is attempted regardless which errors Wintp might detect. That is done with a run option (which ought to be used with some reservation.) The typical cases are these: a. In the odd case Wintp report about errors about things which Hmtp permits. b. In some cases Wintp reports correctly about errors which I know have no effect for the continued timetable run. Provisional notes for Tplan version 29.1 Harald Michalsen Page 15 of 117 c. In some cases there might occur grammatical errors of a complex nature for instance inconsistencies between block register and subject register. The only way to find such errors is to force a complete transfer and carefully check what really happened. As we gain more experience I expect the two first points above while I expect that we will have to live the last point. We will next show an example where we artificially have entered some formal errors: These looks scaring but wait a little. We click on the first error in teacher register and get this listing. We immediate see there is something wrong with teacher AB and AL. We remove the x’es here and continue. Provisional notes for Tplan version 29.1 Harald Michalsen Page 16 of 117 Next we check the class register and get this listing: It is quite obvious that we have wrongly entered 1aaa instead of 1a. By correcting that most of the errors above disappear. What remains is room register: It is quite obvious that the G for room 002 is completely wrong and we remove that. Now almost all errors we started with have disappeared. Ok, this was an artificial example and real life is more Provisional notes for Tplan version 29.1 Harald Michalsen Page 17 of 117 complex than that. However, having spent a lifetime looking for such rubbish errors, I consider the shown technique as an enormous improvement. LISTINGS FROM A TIMETABLE RUN By clicking on Tab sheet: Listings (and arrow for drop down box) you get access to the various listings from a timetable run: This is considerably modified compared with earlier versions of Tplan for several reasons: Since we have removed all ASCII output of complete tables, these are no longer needed. We have also removed some files which we expect that a standard user don’t needs. (These files may still be accessed if you classify yourself as Advanced User.) On the other hand we have split the older file Lisy in two files Lisy + LisyS and the older file Lian is split in 3 files Lian + LianS + LianW. The idea is to simplify life for the user. Earlier I noticed that since files Lisy and Lian could contain a lot of information, many users overlooked parts of info which were important. Hopefully this reorganization makes important information simpler to detect. The output listings from Tplan are for the moment: LIFEL: Latest result from Control Menu. LISY: Result from Transfer. If you ask for complete warnings this is all info from a Transfer LISYS: When the result of a Transfer is satisfactory we move supplementary info from transfer to this file and only keep vital info from Transfer in file Lisy. LIAN: Result from Analysis. If you ask for complete listings this is all info from an Analysis. LIANS: The initial info in LIAN might appear huge and difficult to survey. As soon as the Analysis appears to be rid of most errors, get most of the info to LIANS, and what remains in LIAN are vital info perhaps needing further checking. LIANW: Manual errors and/or compromises. Initially this file contains inconsistencies between Block/subject – register and Period – register. In the later adjustment phase this contains vital info about the various compromises you have made and which perhaps need further fine tuning. LIAN1: Analysis of timetable- Supplementary run. Very seldom used information. LISCH: Compressed tables for classes and teachers. Still an old favourite of mine and in old DOSdays the most important result from a timetable run. These days it offers you a fast way of creating a paper copy of the table you have onscreen. LISAL: Compressed tables for rooms and contains also info about lacking rooms (or the latter is moved to file LIANW) Provisional notes for Tplan version 29.1 Harald Michalsen Page 18 of 117 LIROM: Journal for the room allocation. Fairly seldom you need this information, but in case I feel that room allocation is lousy, I will inspect this file, and then I will often find what is wrong with the original room register. LIH: Assignment journal from main program. Shows step by step what happened in the previous main run. For the experienced user of Tplan this info might be very valuable and in many cases teaching you to give a better steering for an improved run. LIH1: Assignment journal from main program- Supplementary run. Less important information. It is normal that this file might contain a few additional assignments. In case there are many assignments here, I might suspect that something is wrong. LIO: Warnings after a full text adjustment. This is an older file, and it is in many ways an equivalent to the more recent file LIANW and should in theory contain the same information. Time has not permitted me to revise the file LIO and these days I rely more on the file LIANW. LISLUT: Timetable as a text file. The table onscreen is converted to a paper copy. To be honest I have never used this info since my preference is files like LISCH and LISAL. 6 Manual adjustments of timetables (Drag/drop – techniques) INTRODUCTION This chapter is a provisional replacement of Chapter 6 in current User Manual which is more or less outdated. The facilities explained here is perhaps the main reason for creating Tplan29.1, and the implementation of these facilities has also been by far the most time-consuming part of our recent developments of Tplan 29.1 Most of my professional work since the mid sixties has centred on the task of manual adjustment of (compressed) timetables since I had to make a living one way or another. I will not tell about the techniques of yester, but surely since the early 90-ties I dreamt about a facility which would allow me to point at some activity and then place it in a different place in the timetable. That would indeed speed up the manual work when adjusting a timetable. I wrote a routine for that in preWindows time, and confess that my effort was a disaster since the computing world was not that progressed at that point in time. Then we got Windows and I got other problems. We created Tplan 26 (no concern for drag/drop) and Tplan 28 (where drag/drop were superficially considered but skipped because of all other new facilities in 28.) Initially I was very pleased with the manual adjustment possibilities in Tplan 28, but as the years went by (say 2008) I felt a growing uneasiness as we still lacked drag/drop which now was common in almost any Windows software, Drag/drop with current standards is in itself a trivial operation, However, we had additional problems since the info we collected from a drag/drop had to be sent to a different program system, and there the info had to be converted to logical matrixes for evaluation of timetabling consequences and these results had to be presented onscreen to allow the timetabler to decide the continued action. One weak point in the former Tplan 28 was that it was fairly slow in the final adjustment phase and how could we consider a fast drag/drop within such a context? Lasse and I had both operating routines for the final part of Tplan, but both had overlooked the need for speed in that phase. (I.e. both had made lousy solutions.). There was just one way out of this mess: The internal data structure of Tplan (Wintp/Hmtp) had to be redefined. In 2008 we discovered an important additional facility. Provisional notes for Tplan version 29.1 Harald Michalsen Page 19 of 117 We could operate with a “floating” Kickout list meaning that the Kickout list may either be onscreen simultaneously as the timetable or it may be closed down with the table remaining. This opens a new world for doing drag/drop between Kickout list and the timetable. That was our starting point autumn -08 and finally in spring – 11 we are ready to present the result. (We have exceeded expected time limit, but it had to be done, and I am far from disappointed with the end result.) The facilities we explain in the continuation are in principle little new compared with version 28 which has similar facilities. But I have said version 28 runs slow when adjusting. Some of the dialogs are quite awkward to use and many has problems with using them in the best way. I know very well that old hands with timetables tries to use other methods for the last phase and beginners often get problems there.. The general progress in computing has reduced run times in version 29 with a factor 4 compared with older versions of 28. If you go to Functions > Settings>Compressed, you get the following dialog: By checking: Use 64-bit version of HMTP, and you have a 64-bit PC, you reduce the run time with a further 20 – 30 %. Version 29 has some improved algorithms and some improved facilities. However, far more important than that, is the drastic reduction in manual effort for completing a timetable. As said I have spent my entire professional work with adjusting timetables. Hopeless to give a factor for how Provisional notes for Tplan version 29.1 Harald Michalsen Page 20 of 117 much reduction in manual work using version 29, but surely I am willing to guess a factor of at least 4 here too. I guess that this last fact is more interesting for any average user with an average complex timetable than any algorithmic improvement in Tplan for the past 10-12 years. The presentation here will mainly mention the way I am using drag/drop and for all practical purposes this is how I work with KomprGrid (I.e. Compressed timetable) and KtempGrid (I.e. a subset or selection of columns in KomprGrid.) Skimming through the pages of older chapter 6 in Manual, I feel now that we were showing too many alternative ways of adjusting tables. I also found some of the examples longwinded and boring. Here I limit my scope to these things: • The environment (i.e. screen interface) where we are using drag/drop. • The mechanics of using drag/drop with some simple selected examples • How to apply drag and drop in real life. Again some examples more complicated and some general advice is given, but no attempt to complete a table. The rest is left to the reader’s imagination. Most of the thing I show is in KomprGrid and KtempGrid will also function in other grids, but here I can’t guarantee all is free of bugs. I have now spent thousands of hours debugging drag/drop in Tplan my way, and I have experienced more mess onscreen than I like to talk about. So therefore: If you insist on doing adjustments in a different way than me, the user is hereby warned!! When skimming through current chapter 6 in current User manual, I will mention that it was written when we introduced version 28. At that point in time I had high hopes that the simplest way to complete a timetable was to run the main program in what I call Interactive Mode (I.e. Stop a main run temporarily at once you get a kickout and adjust that immediately before continuing the main run.) Further experiences taught me that this could be a dubious technique in many cases as it often involved some manual guesswork, and I learnt that Tplan is usually far better than me for spotting problems in the continuation. Therefore I am now more in favour of tackling a complex table in a stage by stage manner by defining sensible steering directives and rank the priority levels as good as possible. 6.1 Presentation of a Compressed Timetable - And a few simple examples of drag/drop Fig. 1 Provisional notes for Tplan version 29.1 Harald Michalsen Page 21 of 117 The above figure shows a selection of a compressed timetable in manner which I strongly recommend you to use in a similar manner. The vital new thing in this figure is: You see onscreen simultaneously the compressed timetable to the left and the kickout list to the right. This latter may be onscreen or off-screen by clicking ctrl + F7. That is why we call it a “floating” kickout list (You would normally prefer to have the list onscreen as long as this list is not empty) The normal colours in the in timetable are: Black on cyan. This activity is lectured by only one teacher, meaning of course that these activities are easiest to move around. We name such activities Pure Class activities. White on light blue. “Small parallel” The sum of classes and teacher are 3 or 4. To some extent such activities may be moved around White on dark blue. “Large parallel” The sum of classes and teachers is at least 5. You can only in the early stages of the timetable move such activities with ease. In the later stages they are almost impossible to move. Notice also that the colours are used exactly the same way in the kickout list to show you what sort of kickout you have. Normally one kickout is represented by just one line in the kickout list. If you want to see all details in a kickout you “blow it up” by clicking on the + to the left of the activity and close that that by clicking on the – sign (see fig 1) In addition we might use the following special symbols: # The activity is preassigned *B Class/teacher/room is directly blocked in this position ** Class/teacher/room is indirectly blocked in this position § The activity is included in a sequence requirement. ¤ The activity is included in a same-day requirement \ The activity shall be assigned on the boundary (border) = An activity to be assigned evenly on two weeks has the same no. of periods in both weeks. + If this activity has 1 period more in week 1 (++ = 2 periods more) If this activity has 1 period more in week 2 (-- = 2 periods more) Furthermore I think there is a detail fig 1 which I feel is important: In the compressed table I have tried reduce the cell content as much as possible, but on the other hand I am interested in the special symbols just mentioned above. (The current User Manual explains how to define the cell content). Call this a personal preference, but I have been working with this for 50 years and know the importance of having as compressed presentation as possible while looking for a solution of your various kickouts. In the final stages I will remove special symbols but make the cell content more complete in other ways. An alternative way of presenting a partially finished timetable is as follows: Provisional notes for Tplan version 29.1 Harald Michalsen Page 22 of 117 Fig. 2 This user has preferred more complete cell content than I recommend in compressed tables but skipped the special symbols I like (but you don’t get a better survey to solve kickouts this way.) The kickout list to the right is no as scaring as it looks and it shows an important new convention: Each single period in a multiple period is listed as a separate kickout. When you then are inserting these periods back in the compressed table, a double would then require two operations but time loss here is very small compared with what you gain in FLEXIBILITY and SIMPLICITY. For instance to place a kickout of a double period might possibly be found by assigning it as two separate singles, and likewise a kickout of two singles of same activity might eventually be adjusted as a double period. In very many cases such compromises are quite acceptable (or needed) We give an explanation of the kickout list in fig 2: - 1AA NAT and 1AB NAT are 2 kickouts of single activities [1/1] - 1AC NO is a kickout of one double period [1/2] and [2/2] - 3PÅ MATNAT is also a double period and from the colour we see that this activity is a small parallel. We have blown up the first period to show the complete content of this activity. The remainder of the kickout list are several kickout of simple double periods making the list a lot less scaring; in particular since this school is not too strict about the period breakdown. For the moment our selection is 1AA NAT (notice black dot on this activity) To get a start with drag/drop we will adjust a few activities in fig 2 and start with 1AA NAT and click on the button named P4 in fig 1. We get the following dialog: Provisional notes for Tplan version 29.1 Harald Michalsen Page 23 of 117 Our selection from the kickout list is shown in upper left corner and our only action is to select in the right down corner: Pure class activities (since 1AA NAT self is a pure class activity). We click OK and get this selection of compressed table: Provisional notes for Tplan version 29.1 Harald Michalsen Page 24 of 117 We see that 1AA is available in TUE 7 while actual teacher POA is teaching elsewhere in TUE 7. We also see tables for other teachers in pure class activities in 1AA. From this figure it shouldn’t be too difficult to spot a possible compromise, but we will show how Tplan could lead you to a solution. (In the general case things may be far more complicated than in the above figure.). We click on the P4 button once more and get the same dialog as before: Provisional notes for Tplan version 29.1 Harald Michalsen Page 25 of 117 From a dropdown list we select TUE 7 (our actual period) in the upper right corner and click OK. We get this colour selection now: Provisional notes for Tplan version 29.1 Harald Michalsen Page 26 of 117 In the status bar (at the bottom of the screen) we see our selection 1AA NAT. Category: 4 (i.e. pure class) and actual period: TUE 7. The colours in figure show: Red: You can’t interchange/ move an act. from 1AA in this period to TUE 7 Green: You are permitted to interchange/ move this activity in 1AA to TUE 7 (For other reasons you are not allowed move the subject A-time in this example.) Yellow: You may interchange/move this period with TUE 7, but you will then break a day conflict. In the figure above we are most interested in the green periods and these periods should also have POA available to be able to place 1AA NAT here. That is fulfilled for FRI 6 and we have found a solution: Click on FRI 6 with left mouse and DRAG that to TUE 7 and DROP it here. Tplan reacts to this with this dialog: Provisional notes for Tplan version 29.1 Harald Michalsen There is no problem here. We click OK and our selection is modified this way: Page 27 of 117 Provisional notes for Tplan version 29.1 Harald Michalsen Page 28 of 117 We have done our first drag/drop and moved an activity from FRI 6 to TUE 7. We call this a P2operation. Next we click on 1AA NAT in kickout list and DRAG that to FRI 6 where we DROP it. Tplan responds with this dialog: No problem here. We click OK and KtempGrid is modified this way: Provisional notes for Tplan version 29.1 Harald Michalsen Page 29 of 117 We have performed our second drag/drop i.e. moved an activity from kickout list to compressed table. We call this a P1- operation. Notice that 1AA NAT has disappeared from kickout list We have done our first very simple adjustment. It required some figures and comments to explain what is going on, but in real life this problem is solved after a few seconds. We will adjust a slightly more complicated in kickout list and select 3PÅ MATNAT which is a double period and containing several teachers. We start with P4 button just same way as previous example and get: This time we select Small parallels as category since our current activity is also a small parallel. We get this KtempGrid: Provisional notes for Tplan version 29.1 Harald Michalsen Page 30 of 117 The interesting periods are TUE 8 and FRI 4 where 3PÅ is available but teacher JG is occupied here. There are several ways of solving this problem and it would require many figures to show all stages in this adjustment. Instead I will give a verbal description of one way of doing it: We notice that teacher AKO has many periods in subject NO in 3PÅ. He is also available in TUE 8 and FRI 4. There are reasons to believe that the period breakdown maybe modified for this subject. One possibility is: Move 3PÅ NO from TUE 5 to FRI 4. Move 3PÅ NO from TUE 6 to TUE 8. We do these adjustments with two P2 – operations JG and GM are both available in TUE 5- 6. With two P1- operations we move 3PÅ MATNAT from kickout list to respectively TUE 5 and TUE 6. Provisional notes for Tplan version 29.1 Harald Michalsen Page 31 of 117 The end result of these 4 drag/drop operations is shown in this figure: This proved to be a fairly simple adjustment. The main point of this exercise was to show the simplicity and flexibility of managing multiple periods when you use a single period as basis for drag/drop- operations. 6.2 THE BASIC DRAG/DROP- AND SUPPLEMENTARY- OPERATORS In earlier versions of Tplan each operator had specific buttons leading to dialogs for giving further information. We have the same functionality today, but drag/drop makes many buttons and dialogs unnecessary and things are now handled in a much simpler and faster way Provisional notes for Tplan version 29.1 Harald Michalsen 6.2.1 Page 32 of 117 P4: Selection/Colouring (Advanced Selection) This operator is still used in much the same way as in earlier versions. There is one P4 button for the kickout list. If you want to make a selection from an activity in compressed table, there is also a P4 – button in main bar. This operator does not modify the timetables itself, but in many ways this is the most important operator since it performs these two tasks: • It creates the selection of class/teacher/room tables in such a manner that you see various possibilities for assigning the next problematic activity. • The positions in the tables are coloured according to certain rules, and these colours tell a lot about which position to select for the next assignment.P4 is called in a number of different contexts, and we might define our selection criteria in a nuanced way. The most usual way of using P4 will be to select some activity in KomprGrid, KtempGrid or UtsGrid and next clicking P4 – button The next figure shows a section of a complete compressed table: Figure 6.1 For some reason we want to move 9B KRØ (i.e. PE) in WED 4 somewhere else. We click on that cell and then P4 in Main Bar. We enter the P4 –dialog as shown before. This dialog consists of 4 different parts, and we show here each part in a separate figure: Provisional notes for Tplan version 29.1 Harald Michalsen Page 33 of 117 SELECTION OF ACTIVITIES. This is the upper left corner, and this is of course the most important element in the dialog. Usually this defines one specific activity, but this selector is defined just as for period directives, and in the general case we might refer to any activity set. Actual position. Upper right corner. This is usually the position where we selected an activity, but these fields might also be blanks i.e. in the case we have selected some activity in UtsGrid. The selected tables we produce will contain colour codes and the interpretation of these is very different depending on whether actual position is empty or filled in. In the current case we have selected 9B in position WED 4 and the dialog above is automatically filled in. A drop down list allows you to modify selected period. The interpretation of the colour codes in the two cases are: Empty actual position. The colour codes are now telling something of the assignment possibilities for the selector i.e. usually one specific activity. Interpretation of colour codes is then • Dark green background black foreground. Tplan sees no problems with using this position for selected activity. • Light green background black foreground. Tplan knows that this position is available for selected activity, but due to various timetabling conditions these positions must be used for other activities • Deep red background white foreground. One of the resources of the activity is assigned here, and accordingly the activity is blocked here. • Light yellow background black foreground. The activity might be assigned here, but you are then breaking a day conflict i.e. the activity is already assigned on this day. • Pink background black foreground. The activity may be assigned here, but you are then ignoring some blockings in period directives. • Dark yellow background black foreground. The classes and teachers may be assigned here but there is some room requirement which is not satisfied. • Dark red background black foreground. Assignment is possible but you are then breaking a day conflict and some positional directive. • Yellow brown background black foreground. Assignment here breaks both a day conflict and some room requirement. • Olive background black foreground. Assignment here breaks both some positional directive and some room requirement Provisional notes for Tplan version 29.1 Harald Michalsen Page 34 of 117 Filled in Actual position. Now the colour codes tell something about the assignment/interchange possibilities of other activities in relation to actual position. The selected activity is possibly already assigned here. If not, we imagine it being assigned here, and then we make an interchange of actual position with all other positions in the table. Actual position will very often be an empty cell, and then the interchange process is reduced to move other activities to actual position. The interpretation of the colour codes is now: • Light green background black foreground. This position may be interchanged with or moved to actual position. • Light yellow background black foreground. This position may be interchanged with or moved to actual position, but we then break one or more day conflicts. • Pink background black foreground. This position may be interchanged with or moved to actual position, but we are then ignoring one or more blockings in positional directives. • Deep red background white foreground. This position cannot be interchanged with or moved to actual position. Regrettably the most common colour. • Dark red background black foreground. This position may be interchanged with or moved to actual position, but you are then breaking both day conflicts and initial blockings. • Dark lilac background black foreground. This position may be moved to actual position, but the selected activity cannot be moved back to this position. Both colour techniques are very important in various contexts, and it is important to recognize the different interpretations of colour codes in the two cases. 3. Category. This element is the bottom right part of the dialog, and defines the kind of selection we are requiring. We have these possibilities: 1. Only activity. We create a selection of timetable columns consisting only of the resources (classes, teachers, rooms) being included in selected activity. When working with large blocks in the initial timetabling stages, this is the only natural choice. Later in the timetabling process when assigning pure class activities, this choice gives you too few columns to get a proper survey of natural moves/interchanges, and we then prefer one of the other categories. This is the only selection which is completely dependent upon selected activity while the other categories depend only upon which class or teacher you select. Provisional notes for Tplan version 29.1 Harald Michalsen Page 35 of 117 2. All activities. We now get a selection for all resources having common activities with selected class (teacher).For most classes this becomes too many resources to get a proper survey. For primary schools with a small number of teachers’ pr. class this is a natural survey and is otherwise seldom used. 3. Pure class activities. We create a selection consisting of selected class and the teachers having pure class activities in the class (i.e. only one teacher alone in the class).These are the teachers which most likely may be moved or interchanged. Visually you now should have a good survey to assign activities for the class in question. This is very often the most usual category (in particular when working with components). 4. Small parallels. Now you get a selection of actual class and classes/teachers connected with the class in simple activities or small parallels i.e. activities consisting maximally of 4 resources. This category usually contains more teachers than the previous category. Still there should be fair chances for moving around the teachers you see onscreen. Teachers only included in larger block for the class (at least 5 resources) have few possibilities for being moved around. They are not included in the selection since they only create confusion in a survey which ought to be as compact as possible. My strong recommendation is to use the category: Only activity while working with large blocks. As soon as possible we switch to Small parallels. If this selection is too large or if there only is pure class activities remaining, I switch to that latter category. 4. Resources being unconditionally included in selection. Down left in the dialog there are three tab sheets where we can define which classes, teachers or rooms which is included in the selection regardless of which category you select. More seldom used facility but in some cases a very important facility. The most typical example is the following: We have assigned all large blocks and start assigning smaller activities which requires heavily used specialist rooms (P. E or Crafts might be a typical example). In this case it is very useful to get a survey of the gymnastic rooms and craft rooms regardless of selected category to investigate possibilities for moves/interchanges in these rooms. Another example for using this technique is if several classes are cross linked in a multitude of ways and having a dominant influence upon the whole timetable and ought to be watched at all times. Same is the case if teachers are teaching in several heavily used specialist rooms (example: P.E., Cooking and Crafts). Watch those combined teachers. This part of the dialog has been given some useful extensions: • You might require set of room groups to be included in a selection unconditionally Provisional notes for Tplan version 29.1 Harald Michalsen Page 36 of 117 • Even if you are not working with Teacher Pools you could fill in this table to be able to refer to set of teachers being problematic when adjusting your kickouts. By clicking OK in the P4 – dialog filled out as shown above, we get the following colour selection (KtempGrid): Notice in this screen the following: • All our PE- rooms (GYM1 etc.) are included in the selection unconditionally. • All specials symbols (B* etc.) are included in the selection. • Most periods in table are red i.e. impossible to use for an interchange. WED 2 seems to be acceptable and MON 3 may possibly be used by making other compromises. • By checking further you see that the use of WED 2 is a complete illusion since all PE- rooms are blocked here. The correct interpretation of the green colour here is: You may interchange these two periods if you only consider classes and teachers but not rooms. In some cases (not here) this could be an acceptable compromise. By checking MON 3 further you find the situation here is even worse since an interchange destroys presassignment of large blocks. Provisional notes for Tplan version 29.1 Harald Michalsen • Page 37 of 117 This is more or less a ridiculous example showing it is almost hopeless to move 9B KRØ from WED 2. The point of this exercise was to show how to create a selection, to show that the colour must be red with some reservation and to STRESS the fact the ALMOST all adjustment of kickouts should be handled in KtempGrid 6.2.2 P2: Move/Interchange an activity (table unit) (Earlier button for P2- operation, currently not in Tplan but might later be restored) P2 is a VERTICAL drag/drop- operation WITHIN a timetable grid. We drag an activity from period A and drop it in period B. Such a drag/drop may perform two different operations: • MOVEMENT from A to B: An activity is dragged from A and dropped in B. In case this result in conflicts, there is a further choice to be made. We may EITHER accept these conflicts OR we may transfer conflicting activities to the kickout list. • INTERCHANGE A with B: An activity is dragged from A and dropped in B. All conflicting activities are then moved from B and dropped in A. That might lead to a further choice from the user: We may EITHER accept new conflicts in period A OR we may transfer conflicting activities to the kickout list. • To sum this up: A vertical drag/drop in a class/teacher-column (NB not rooms) may perform two different actions: MOVEMENT or INTERCHANGE. In each case there is a choice to be made about accepting new conflicts. Depending on the user’s action a P2- operation might give 4 different results. We will show P2 in the table fig 6.1. Assume that we for some reason want to move/interchange 9A MUS in TUE 6 (i.e. period A) with MON 6 (i.e. period B). We give no timetabling reasons for that action. We just want to show the mechanics (i.e. what could happen). We do this drag/drop and the following dialog pops up: The heading shows what we are trying to do, followed with what would happen. This is the case where we move 9A MUS fro TUE 6 to MON 6 and then transfers conflicting activities to the kickout list. Assume we accept that and we end up with this result: Provisional notes for Tplan version 29.1 Harald Michalsen Page 38 of 117 9A MUS has been MOVED from TUE 6 to MON 6 and the two conflicting activities in MON 6 are transferred to the Kickout List. Assume we would accept these 2conflicts. We get this message: We accept this and get the following table: Provisional notes for Tplan version 29.1 Harald Michalsen Page 39 of 117 Notice here the symbol *DBL in MON 6 for both 9A teacher BRE. That notation conventionally means that there is a double assignment in this cell. By clicking F5 we can “blow up” the table and get the complete picture as shown in next table: The reason for doing this in two steps is two folded: The first table is most compressed and perhaps enough. The second table is more complete but the blowing up process may take a little time. Alternatively we might want to interchange 9A MUS in TUE 6 with 9A KRL and get the following warnings: Provisional notes for Tplan version 29.1 Harald Michalsen Page 40 of 117 Notice that these conflicts are in TUE 6 (i.e. in the period we started the drag i.e. period A). By accepting this we get this: table: The steps here are: 9A MUS is moved to MON 6 and 9A KRL and other conflicting activities are moved back to TUE 6. By blowing up this table (F5) we get: Provisional notes for Tplan version 29.1 Harald Michalsen Page 41 of 117 In the above we used TUE 6 as period A and interchanged with MON 6 = period B and accepted double assignments. Doing it the opposite way gives you something different. Assume you want to interchange 9A KRL in MON 6 (= period A) with TUE 6 (= period B) you get this message: If we accept the above, we get this table: This is very different from the previous table. The lesson here is: If you want to want to interchange something in period A with something in period B, it is some cases important what you call period A (I.e. where we start the drag) The last possibility when dragging 9A MUS from TUE 6 to MON 6, gives you this message: Provisional notes for Tplan version 29.1 Harald Michalsen Page 42 of 117 In this case you want to interchange TUE 6 with MON 6, and sending conflicting activities to the Kickout list this table is the result: My carefully selected example is plain rubbish from a timetabling point of view. However, a more sensible timetabling example would not show all possible warnings that might happen, and this is the main point of my example. To sum this up once more: A vertical drag/drop in a table from period A to period B is called a P2- operation. It might either perform a MOVEMENT of an activity or an INTERCHANGE of an activity with another activity. In both cases you have a choice of either accepting conflicts resulting from that or transfer conflicting activities to the Kickout list. A dialog shows you the results of the 4 different choices you can make. (In simpler cases with no conflicts you can just click on OK and proceed). In some cases it might matter what you call period A (i.e. start of drag) and period B. 6.2.3 P1: Move an Activity (Table unit) FROM Kickout list to Timetable (The older P1- button, still used in the heading in the heading in the Kickout list, but a drag/drop is much simpler) Provisional notes for Tplan version 29.1 Harald Michalsen Page 43 of 117 Perhaps the most frequent drag/drop operation: You drag an Activity (Table Unit) FROM the Kickout list and drop it in a cell in a timetable grid. This is lateral (or horizontal) drag/drop is most usually done in a class table but might also be done in a teacher table but NOT room table A P1operation has fewer choices than a P2: • In case the P1-operation gives conflicts then we might transfer conflicting activities to the Kickout list. • We might accept the double assignments from the P1- operation (in the same way as we did for a P2- operation.) Assume we have this selection from an earlier timetable run: This table is created in the following way: We have a kickout of a block activity 8C KRØ1 (P.E.). We use as Category: Only activity and included in the selection all rooms which 8C KRØ1 could use and the above table is the result. When inspecting the room there seems to be little hope here due to all room blockings. (The school shares PE- rooms with another school.) There are two red periods here (i.e. being blocked for 8C KRØ1), WED 6 and THU 6. The latter looks in particular little promising, but we make a try with WED 6. The result is the following dialog: Provisional notes for Tplan version 29.1 Harald Michalsen Page 44 of 117 Here we get the information why WED 6 is red: Both 8B KRØ1 and 8C KRØ1 are requiring the same room: SVØH. Assume we accept that conflict and we get this dialog: Surprise, surprise!! Now Tplan is telling us that this P1- operation may be done without conflicts while it is quite obvious that we are lacking a room in WED 6. The correct interpretation of the message above is: There are no conflicts with the intended P1- operation with respect to classes and teachers while room conflicts are ignored. In many cases rooms may be changed in another way and the above info is useful even if it not 100 % correct. (In real life I guess that the school would go along with this compromise.) We showed a few simpler P1- operations in our introduction and further explanation should not be needed. 6.2.4 P0: Move an Activity (Table unit) FROM Class Timetable to Kickout list P0 is exactly the reverse of P1 operation but works only in a Class Table (for lateral drags in teacher/room see next paragraph). A lateral drag of a class cell transfers that activity (table unit) from timetable to kickout list. This operation will never give new conflicts but you get this warning to confirm the transfer: Provisional notes for Tplan version 29.1 Harald Michalsen Page 45 of 117 You might say that the above dialog is unnecessary since you never get new conflicts. However, it very easily happens that you do a lateral drag of a class cell inadvertently and the above dialog gives you the chance to regret that. An identical way of transferring an activity to the Kickout list is to click: Ctrl + Del on a cell and this table unit are transferred to the kickout list. This operation works ALSO for a teacher or room cell. I very seldom do it, but the same drop technique may be used for Full Text Grid: Go to Functions> Settings > Timetable. You get this dialog: Down at the bottom you see: Use HMTP motor in clear text table. Provisional notes for Tplan version 29.1 Harald Michalsen Page 46 of 117 By checking this option P1, P2 and P4 will behave as explained for KomprGrid. I have not tested all possibilities here and don’t believe that this will be used much. If you uncheck this option, you are back to old interchange rules in Full Text Grid, like this: This technique was earlier very useful and explained in current user manual, but I regard the new drag/drop technique as considerable better. 6.2.5 P6: Teacher and Room changes or interchanges. In the previous paragraph we stated that a lateral drag of a class cell transferred that activity to the kickout list. However, a lateral drag of a teacher or room cell means a CHANGE or INTERCHANGE of this teacher or room. Assume we have a teacher table like this: Provisional notes for Tplan version 29.1 Harald Michalsen Page 47 of 117 For some reason the subject 8B SAF (4 periods) must change teacher from AUS to BRE. In return teacher AUS gets 4 periods in subject MUS. After a set of lateral drag/drops you get this situation: Provisional notes for Tplan version 29.1 Harald Michalsen Page 48 of 117 Such operations never give new conflicts and no messages are displayed. In THU 2 we notice an interchange of teachers. The remainder is a set of teacher changes. This is a fast and simple process. Assume we have a room table looking like this: Provisional notes for Tplan version 29.1 Harald Michalsen This is the table of the crafts rooms in the school. In hindsight you realize that teacher HØY can only teach in room VERK while the other teachers accept both rooms. A few lateral drag/drops easily perform the needed interchanges like this: Page 49 of 117 Provisional notes for Tplan version 29.1 Harald Michalsen A P6 – operation is a fast and simple process and highly to be recommended. It may be slightly awkward if there is some distance on the screen between the columns you want to change or interchange. Try therefore to have “similar” teachers or rooms in the same region in your basic data entry – or create a selection with the teachers in question. 6.2.6 F2: Editing in a timetable cell (The F2 dialog) We have a section of the timetable looking like this: Page 50 of 117 Provisional notes for Tplan version 29.1 Harald Michalsen Page 51 of 117 TV 1 in MON 5-6 is a block of classes’ 10A-10B-10C and several teachers. For some reason teacher AUS changes with teacher BRE and teacher XX changes with teacher BRU and these new teachers shall also use different rooms. Click on any of the TV 1- cells and click F2. You get this dialog: There is drop down list for teachers. Click that and substitute AUS with BRE. Later click on drop down list for rooms and select new room. You repeat that for teacher XX and BRU. This must be done both for both period MON 5 and MON 6. Eventually you end up with a table like this: The F2 –dialog is a completely general way to modify the cell content to what you prefer. F2 is a somewhat slower method than the lateral drags shown in previous paragraph but being more general and highly recommended for that reason. Lasse’s comment to the F2-dialog is given here: When working in the compressed table you can edit an activity by placing the cursor on the activity and pressing the F2 key. This has been the case for many years. The news in version 29 is that the dialog has been given a full makeover. Provisional notes for Tplan version 29.1 Harald Michalsen Page 52 of 117 First of all you see the combo box containing all the units included in the activity under consideration. This activity is made out of 4 units. Every unit can be edited in turn. Only one unit can be edited at a time. The “Display only available teachers and rooms” checkbox gives you the ability to select another available room and/or teacher for a unit in the activity. You can also edit the subject, the full name and select another reference class. When you are editing teacher and room it is mandatory that you have selected “Final adjustments” in the Options dialog. Provisional notes for Tplan version 29.1 Harald Michalsen Page 53 of 117 You will find the Options dialog either in the Run dialog or here: If you forget to set the phase of the main program, the timetable motor will reset any of the changes you have made which does not match the subjects and other registers. 6.2.7 Major changes in a timetable It happens that you have completed your timetable satisfactory and then something unforeseen happens like getting a different teacher than expected or you lose or receive additional classes. You hate to lose all the work you have invested in your current timetable and want to salvage as much as possible of this. This could maybe be tackled in a number of ways. I believe the most sensible method would be to modify your table cells in LIST FORMAT (i.e. KlarGrid). You have a table looking like this: Provisional notes for Tplan version 29.1 Harald Michalsen Page 54 of 117 Your music teacher is BRE will not appear and in addition you lose your music room MUSR and you shall use room KANT while teacher ØVR substitutes for BRE. This could give you a quite messy adjustment problem. A simple way is this: Go to Full Text Table. Go to Full Text List (= ctrl + F8). You then enter the table in List Format. Go to Edit menu and select Advanced Search and Replace. You enter this dialog: Provisional notes for Tplan version 29.1 Harald Michalsen Page 55 of 117 In this case you enter the teacher and room which shall be placed and placing in second line the substitutes. Click Replace and you end up with: This is as wanted. Click: Update and close and you end up with: Provisional notes for Tplan version 29.1 Harald Michalsen Page 56 of 117 Timetable has been adjusted completely in one simple step. I could easily complicate the above example, but hopefully I got the general idea presented. The next 2 paragraphs are a direct copy of current user manual since no modifications have been done here (but very definitely look on the last paragraph.) Provisional notes for Tplan version 29.1 Harald Michalsen Page 57 of 117 6.2.8 THE CELL CONTENT IN KOMPRGRID AND SKEMAGRID. You select this by choosing: Functions > Settings > Compr (or Timetable) > Content of cell in Compr (or Full text). The following dialogue is shown: For each resource (class/teacher/room) we may require 6 types of information. We show this completely for classes and mention what is different for teachers and rooms Classes Show basic class: The basic class is the first class in the activity. Show special: Shows the special symbols mentioned in previous paragraph. We might gradually introduce new special symbols. Show activity: Name of activity (you will normally want this) Show full name: Shows full name for corresponding subject. Normally you don’t want this in compressed table, but you may want full name in full text tables. Show teacher: Shows teacher initial. In KomprGrid not all teacher/room groups are shown but you get a complete survey in SkemaGrid. (Full text) Show room: Shows corresponding room for teacher. Teachers 5 parameters the same as for classes (teacher is lacking). In addition we get a new parameter: Show reference class: Basic class is the first class in an activity. Reference class is the class column under which this particular teacher is placed in full text tables. (We might possibly want to modify this in the final stages) Rooms 5 parameters are the same as for classes but reference class is shown instead of room. Exactly the same information might be shown for full text tables and make a note of you have a different cell content definition for the printing of tables and what is shown on the screen. When finally printing your tables check also the various facilities mentioned in the File- menu Provisional notes for Tplan version 29.1 Harald Michalsen Page 58 of 117 In the above figure I have indicated my own preference when working with compressed tables; in fact I might even remove some of the shown checkmarks to compress the survey. 6.2.9 SPECIAL ACTIVITIES AND ROTATION OR CHANGE OF DAYS We access this register through tab sheet: Various, and the menu selection gives transfer to this register: This is an alternative way for making movements/interchanges in compressed tables. We do as much as possible in compressed tables, but this register must be used in case the activity is not included in a class column in compressed tables. These cases are: 1. Conference activities (XXX) 2. Free time for teachers included in timetable. (As example half-day free for teachers), 3. LUNCH for teachers. The procedure for using the above register (Special activities) and also the register in next paragraph (Deletion of many activities) MUST be as follows: Enter the adjustments you require in these registers. 1. Run a new Transfer program (to let Hmtp get hold of these adjustments). 2. Rerun Analysis program and build of course on current timetable. 3. Such adjustments will frequently have consequences for the room allocation which should be rerun. (use Run option: New room allocation for that) 4. Check that your compressed table is adjusted as required. If there are errors, return to point 1-3 and correct. 5. When adjustments are as required, BLANK what you have entered in Special activities and Deletion of many activities. Finish the process with a final Transfer run to let Hmtp also have these registers blanked, and you may then continue with normal adjustments. Definition of register: 1. Class/Teacher Usually the basic class for the activity which shall be placed or deleted. The most frequent class symbol here will be XXX (conference class). A teacher initial here signifies we are adjusting LUNCH for a teacher. If BLANK field, we use class symbol from previous line. 2. Act.Name Activity name for the activity to be placed or deleted. If BLANK field, we use name from previous line. 3. OUT OF: DAY POS Day and position where the activity shall be deleted. We use these day symbols: MO, TU, WE, TH and FR. If day symbol is lacking and position is filled in, we use day symbol from previous line. At least one of the two position field must be filled in, to make this line effective. 4. IN TO: DAY POS Day and position where the activity shall be placed, and the rules are as above. You may perform deletion and placement in the same line. In the above figure we have done the following: Provisional notes for Tplan version 29.1 Harald Michalsen Page 59 of 117 1. Conference period, CONF2, is moved from MON 1-2 to TUE 5-6. 2. Half day free for teacher DOT is deleted from THU 4-6 6.2.9.1 Interchange days, rotate the periods on a day It is not unusual that we detect possibilities for improving some desirable requirements by interchanging two days completely or by rotating the periods on a day. (For instance in such a way that “difficult” subjects get better teaching time or to improve some teacher tables.) It is very difficult to do such adjustments the traditional way, and we use two conventions to achieve this *UKE If this name is entered in the field Act.Name it signifies that the next 5 (10) lines make up a unit, and defines the new order of the days. *ROTER If this name is entered in the field Act.Name and you enter a day symbol in the OUTfield, the next lines define the new order of the periods on that day. This figure shows an example: In the figure we have stated that we shall interchange Tuesday and Wednesday. We have rotated the periods on Friday completely making the last period the first etc. When finished data entry here, we rerun Transfer program and continue with an Analysis and build on current timetable. Check result and blank this register and rerun Transfer program. Follow exact same procedure as explained above. 6.2.10 DELETION OF MANY ACTIVITIES We access this register through tab sheet: Various. The menu selection transfer to this register: This register if defined exactly the same way as register for Activity References. The function of the register is: In the register we define in the usual way an activity set but we disregard activities being preassigned in positional directives. This complete activity set is removed from current timetable if we run: Transfer + Analysis + Build on partial table It is usually an advantage that such a removal does take effect for presassignment, but occasionally we will also remove these. This is achieved by entering the reserved identifier PRE in the ACT.REF field. Provisional notes for Tplan version 29.1 Harald Michalsen Page 60 of 117 In the figure above we have required to remove all teaching in social studies and science. We have also removed all activities for class 7A and teacher AKS and for the latter we also remove possible preassignments. It is obvious that this deletion technique is very simple and efficient when we want to remove larger parts. In the file Lian.nnn we are informed about what we have deleted; for instance like this: **** WARNINGS **** ACTIVITIES BEING REMOVED BY DEL-COMMAND: 8A TV 1 9A TV 1 9A TV 1 10A TV PREASSIGNEMENTS BEING REMOVED 10A TV 1 10A TV 1 1 10A TV 1 : A frequent situation is that some year levels have same timetable for a whole year while other year level changes tables on a half year basis. Assume the latter being the case for year level 1g. The following figure show three alternative ways of deleting activities in year level 1g: We refer to the Definition fields in Positional directives for definition of the reserved identifiers *NSP and *NGP This is a very efficient way of deleting a year level or parts of a year level. In particular if you in the continued runs for creating new tables for 1g use the run option: Absolute room allocation, the other year levels will keep their former tables 100% intact. Other cases for using such deletion technique is for timetabling project weeks for various classes, or if certain teacher teams are creating their own timetables more or less independent of the rest of the school. Running in interactive mode, we will need the use of this register more frequently: During this process we might need to change teachers. You are not much helped only by doing the change in subject register since the original teacher is still in the current timetable which overrules subject register. If you remove the activity with teacher change in the register above, then this activity is removed from current timetable and your changes in subject register will take effect. Finally, when working with this register follow the same procedure as explained in previous paragraph. Provisional notes for Tplan version 29.1 Harald Michalsen Page 61 of 117 6.2.11 Use of the Kickout list in other contexts. (Manual assignments) The heading of the Kickout list look like this: 99 % of the time you will need to display only the Kickout List. Normally you then select an activity in this list and perform a P4- operation as explained. If you click Select pos and do that, the next button will then show the P1symbol and you might use this dialog for P1. (My strong preference is to use directly a lateral drag/drop for P1). Alternatively you might want to modify the content of a Kickout by using the F2- button above. The S – button will be explained shortly. The check mark: Display not yet allocated activities allow you to inspect all activities remaining to be allocated. It could happen that you in the odd case needed to assign some of these activities manually. This is somewhat inconvenient since this list is usually very large. I must confess that I have not found the check mark: Display erased activities meaningful (It might get a meaning later) The check mark: Display parked activities is intended to cover the case where you only are working with a partial timetable; say you are working only with the upper forms of a table and disregard lower forms for the moment. By checking Parked activities you then also get access to lower forms and if needed you may manually assign some of these activities. The really exiting check mark is the last: Display selected activities combined with the use of the S- button. By clicking that you get this dialog: In the first line I can define the set of activities I am interested in. Next I check the button Mark all down left, and that lit an arrow pointing to the right. Click on that and the activities to the left are moved to the right like this: Provisional notes for Tplan version 29.1 Harald Michalsen Page 62 of 117 I am ready to make a different selection in the first line and get that to the left in the above figure, mark that and move these new activities to the right etc. (in case I make unfortunate selections I can mark parts of the right side and move that back to the left) . By then checking on the last check marker I might end up with something like this: Provisional notes for Tplan version 29.1 Harald Michalsen Page 63 of 117 That figure is the point of this exercise: In the current case I have selected all activities using the Craft rooms: VERK and TEGN. I am now in a position to “hand knit” those two rooms in whatever way I want. THE OUTLINED PROCESS MAKES WHAT WE EARLIER CALLED “OLD COMPRESSED TABLE” WHERE YOU COUL MANUALLY ENTER NEW ASSIGNMENTS AND BLOCKINGS, COMPLETELY REDUNDANT SINCE IT NOW CAN BE EASILY DONE BY A SET OF P1- OPERATIONS. To complete the picture you may notice there is some manually created blockings (B*) in the above figure. This is performed by right clicking on some cell and either use Shift + F2 (= B*) or Shift+ F7 (=b*) or you may use these function keys directly on this cell. In short we lack nothing which “Old Compressed” could do. For the past 10 years I have been the warmest defender of techniques like “Old Compressed” since I preferred simple and fast adjustment processes and not all the slowness from so called Windows operations in earlier versions of Tplan. I now wave a light-hearted good bye to my dear old friend: “Old Compressed”. I find it rather ironical when writing about the techniques in this paragraph: Here I have devoted all my life to find a complex logical solution of a timetable, and the very last thing I end up with is demonstrating a cute way of doing things manually. (Well I see the need for that in some cases.) I will give some concluding remarks about the work with P4, P1 and P2. For an operation with P1 and P2 to prove useful, you must nearly always make some compromise. If you only select some apparently available position, you may safely assume that Tplan is perfectly aware of that, and Tplan has its reasons for not using that position. One postpones or shifts the problem to some other activity, perhaps making the problem more complex by choosing such a position. (I do it regardless sometimes). The most common compromises in a conflict situation are: 1. Modify the period requirement for a subject (most usual) 2. Use undesirable rooms. 3. Ignore teacher blockings or other requirements to the timetable. Tplan could of course do such things automatically, however it is completely against my basic philosophy that Tplan shall do compromises on its own. I come from a time where the manual adjustments were done with paper, pencil and rubber. It could lead to enormous interchange chains to assign a kickout (I remember cases with 30 -50 steps). These days are now history due to the following: • The various selections you can do using P4, gives a dramatically improved survey compared with the techniques of yester. The forthcoming adjustment work is much simpler and easier to survey; in particular use KtempGrid rather than KomprGrid if you choose the correct selections. • The current level of the algorithmic foundation of Tplan has been improved to an extent where it is a question of marginal returns. Nobody is able to make a timetable considerably better than Tplan. • The typical adjustment work will be frequent use of P1 where the number of steps is very small. P2 will also be used. • Now if a number of operations with P1 and P2 lead to a gradually increasing chaos, it is high time to forget what you have done till now. Go back to the start and concentrate about: a. Try to make better steering directives. Try a number of complete runs, simply to get a better survey of the complexity in the timetable. b. Inspect carefully the logical analysis. Is the problem stated too ambitiously? Provisional notes for Tplan version 29.1 Harald Michalsen • Page 64 of 117 c. If you don’t see a solution through point 1 and 2, you will have to revaluate the basis for your desired school structure. Believe me, it goes much easier to forget the chaos you have created and start with blank pages and learn from the experiences you have made. Provisional notes for Tplan version 29.1 Harald Michalsen Page 65 of 117 6.3 EXAMPLES OF ADJUSTING TIMETABLES USING DRAG/DROP – TECHNIQUES The previous chapter showed the principles for using drag/drop in Tplan. Many examples were rather artificial from a timetabling point of view. Here we will show more realistic examples. This presentation has some practical problems: We need a lot of figures to show everything and the A4format is too small for complete screen dumps. I limit the no. of figures and work mainly with a selection (KtempGrid) or a part of a selection. I assume most is interested in learning the basics of drag/drop, while none is interested in the complete solution of the examples I am showing. I will do a lot of shortcuts here and there while I shall try to pinpoint what might be general in various operations. I could have wished to use more Danish examples and perhaps even a more varied set of school structures. But I have to adapt to A4 and Danish schools usually have a large time frame or they are just too simple for my examples. 6.3.1 Example 1 This is small infernal complex school (Look at all large blocks, large sequentials and same day-req.) We have ended up with a single pure class kickout : 8C KLT. Select that act. in kickout list and then click on P4 button just above (Use Category: Pure class). You get this selection: Provisional notes for Tplan version 29.1 Harald Michalsen Page 66 of 117 Actual teacher: SG is occupied in FRI 1 where 8C is available. Make the same selection again and use FRI 1 as actual position. You then get: Provisional notes for Tplan version 29.1 Harald Michalsen Page 67 of 117 From this figure we conclude that FRI 1 may be interchanged with TUE 3 or 4. We are not much helped by that since SG is also booked in TUE 3 and 4. Next attempt is to try to get SG available in FRI 1. Click on 8B KRL in FRI 1 in above figure and use P4 again (NB this time you use P4button in Main Bar since you are calling P4 from a Grid). This time you get: Provisional notes for Tplan version 29.1 Harald Michalsen Page 68 of 117 The figure above tells that 8B KRL might be interchanged with TUE 3 or WED 3. As luck will have it SG is available in WED 3. By all means select WED 3!!! I.e. You drag 8B KRL (for teacher SG in FRI 1 ) to WED 3 and drop it here. You are told that this is an Ok interchange operation. You accept and end up with: Provisional notes for Tplan version 29.1 Harald Michalsen Page 69 of 117 You have a nice green colour in FRI 1 for both 8C and SG. A simple drag from kickout list and drop in FRI 1 completes the timetable. SIMPLE! 6.3.2 Example 2 This example is slightly artificial. (since Tplan on its own would never produce such a result). The starting table is like this: Provisional notes for Tplan version 29.1 Harald Michalsen Page 70 of 117 We have kickouts of 3 periods of 10C SAF (pure class). We use P4 and get nice dark green colour in TUE 4 and THU 3. Two simple drag/drops from kickout list to these periods eliminate 2 kickouts. For the remaining kickout we use P4 with THU 4 as actual position. We get: There is currently no possibility of making BIR available in THU 4. Next attempt is to try to get BIR available in this period. Click on BIR in THU 4 and make a P4 (Again: Main bar here). We get this result: Provisional notes for Tplan version 29.1 Harald Michalsen Page 71 of 117 From this figure we see THU 1 may be interchanged with THU 4 and BIR is currently available in THU 1. We do this drag/drop and get this message: We accept that. Then we drag the last 10C SAF from kickout list to THU 4 and end up with: PROBLEM SOLVED 6.3.3 Example 3 This is the same school as example 1, but the starting point is slightly more complicated: Provisional notes for Tplan version 29.1 Harald Michalsen Page 72 of 117 This time we have 3 kickouts of pure class singles. I prefer always to start with the most complicated problem but in my presentation here I start with the simplest problem. I start with 9A SAF and use P4 to get this selection: Provisional notes for Tplan version 29.1 Harald Michalsen Page 73 of 117 This case is simple: 9A SAF may directly be assigned to FRI 6, but you are then breaking a day conflict. Looks peculiar, but investigating the block in 3 first periods on FRI includes a single per SAF. This is a minor compromise. We drag 9A SAF from kickout list to FRI 6 and drop it. Everything is ok. Next case is: Provisional notes for Tplan version 29.1 Harald Michalsen Page 74 of 117 We work with 8C KLT (teacher SG) and uses FRI 2 as actual pos. We see that we may interchange FRI 2 with WED 4. We are not much helped by that since SG is booked in WED 4. Our next attempt is to try to free SG in FRI 2. We select 8A NoM in FRI 2 and get this: Provisional notes for Tplan version 29.1 Harald Michalsen Page 75 of 117 We see that FRI 2 may be interchanged with WED 2 and we accept this interchange and get this new situation: Provisional notes for Tplan version 29.1 Harald Michalsen Page 76 of 117 We have a nice dark green colour in FRI 2. Simple to drag 8C KLT from kickout list to FRI 2. Provisional notes for Tplan version 29.1 Harald Michalsen Page 77 of 117 The last problem looks like this: The problematic period is WED 5 with teachers LH and TØ. LH is the main teacher in MAT while TØ is a support teacher. The interchange possibilities are minimal: EVE may move from MON 1 to WED 5. Not much help in that since MON 1 is problematic for both LH and TØ. FRI 6 is the last sensible possibility since LH (the most important teacher) is available here. A solution is then: Drag 9B NO from FRI 6 to WED 5 and accept the double assignment for teacher TØ in WED 5. 9B KRL may then be dragged from kickout list to FRI 6. We do this and get this selection: Provisional notes for Tplan version 29.1 Harald Michalsen Page 78 of 117 Notice double assignment (*DPL) for TØ in WED 5 and we intend to let teacher EG be a substitute here. We blow up (F5) the figure above and include EG in selection. Then we drag 9A MAT from TØ to EG. That gives: Provisional notes for Tplan version 29.1 Harald Michalsen Page 79 of 117 TIMETABLE COMPLETED! (With a few minor compromises.) Provisional notes for Tplan version 29.1 Harald Michalsen 6.3.4 Example 4 The results from a main run look like this: We start with adjusting 10A KRL, use P4 and gets this selection: Page 80 of 117 Provisional notes for Tplan version 29.1 Harald Michalsen We use P4 once more with THU 1 as actual period (Category= Small parallels) Page 81 of 117 Provisional notes for Tplan version 29.1 Harald Michalsen Page 82 of 117 We must find a period where LIE is available and which may be moved to THU 1. The most reasonable seems to be TUE 4 which makes a double of 10A NOMA 5 which is acceptable. We do this drag/drop and get this message: Next we drag 10A KRL from kickout list to TUE 4 and get this message: This problem is solved and we continue with 9C KRL and create this selection: Provisional notes for Tplan version 29.1 Harald Michalsen Page 83 of 117 The available period for 9C is TUE 6 being actual pos and Category: Small parallels. We are looking for a period where teacher HEL and BRY is available. A little inspection of the figure above shows: 9C NOMA1 may be moved from FRI 3 to TUE 6 breaking a day conflict which is acceptable. Then BRY and HEL are both available in FRI 3 and 9C KRL may be assigned here. Two drag/drop- operations complete the timetable. The total error warnings (LIANW) are: The broken blockings for teacher SAN is in the period register while the two first warnings are caused by our drag/drop operations. Provisional notes for Tplan version 29.1 Harald Michalsen Page 84 of 117 6.3.5 Example 5 (A Danish Gymnasium) The result of a partial main run looks like this: This is far from a simple table and we will only show a part of the adjustments. (There are 80 pos in the table and we can’t show complete screens.) . In the above figure it is natural to start with the double in 2p hiSP. From our selection we see that THU 6- 7 may apparently be used without problems. That is simply solved with 2 drag/drops from kickout list to those periods. You can safely assume that TPLAN is not using those periods due to other conflicts, but for the moment we see nothing better to do. Next we continue with: Provisional notes for Tplan version 29.1 Harald Michalsen Page 85 of 117 We next try to assign 3a hi and may be made by creating a double on thu. We accept that. We cannot show all details in the continuation. We concentrate to first to get rid of the small parallels in the kickout list (i.e.) we show it for the double in 1a mu: Provisional notes for Tplan version 29.1 Harald Michalsen Page 86 of 117 One of the periods may be assigned as a single in TUE 6. We accept that and our next selection shows: Provisional notes for Tplan version 29.1 Harald Michalsen Page 87 of 117 We have selected 1a mu and used fri 1 as actual period. Quit a number of periods may be moved to fri 1. We look for a period where PE is available. We end up with: Provisional notes for Tplan version 29.1 Harald Michalsen Page 88 of 117 We have moved 1a tyA from mon 6 to fri 1 (teacher AK) and inserted 1a mu in mon 6. Our error warnings (LianW) looks like this: This should be acceptable. The important thing now is the considerable simplified kickout list just containing pure class. Too much to show the remaining adjustments, but for fun I completed this timetable. I ended up with error warnings like this: (I will not comment further; hopefully this is acceptable from the school’s point of view.) Provisional notes for Tplan version 29.1 Harald Michalsen Page 89 of 117 Provisional notes for Tplan version 29.1 Harald Michalsen Page 90 of 117 6.3.6 Example 7 (Module table) The teaching unit here is small (20 min) but on the other hand the period lengths are multiple (typically 2, 3, 4 and often longer). This is an ideal situation for doing drag/drops as outlined since such a school is often willing to modify original period breakdown. (Within limits). The following school is in fact a no kickout school, but by artificial means I have succeeded in creating kickouts of 2 triples in practical subjects and they shall also be allocated as triples. The start situation is like this: If we could get rid of 9A NO in THU 12 we could assign 9B SL in THU 12-13-14. We attempt that: Provisional notes for Tplan version 29.1 Harald Michalsen Page 91 of 117 9A NO may be dragged to FRI 2 and 9B SL may be assigned on THU. We do this with 4 drag/drops and end up with: Next 9A BL: Provisional notes for Tplan version 29.1 Harald Michalsen Page 92 of 117 If we could get rid of 9A EN in THU 16 we could assign 9A BL in THU 16-17-18. We could try that: Provisional notes for Tplan version 29.1 Harald Michalsen Page 93 of 117 We could move 9A EN to FRI 18 (as a triple) and assign 9A BL on THU. We do this with 4 drag/drops and end up with: Provisional notes for Tplan version 29.1 Harald Michalsen Page 94 of 117 I hope this shows the general idea. I am not too proud of this example since I am still stuck with 2 single 20-min modules and further work may be needed. 6.4 SOME ADVANCED FACILITIES Preamble: The facilities mentioned here assume that you have some experience with using Tplan; in particular that you are familiar with the timetabling problems mentioned here. These notes are just some “emergency aid”. Due to lack of time, I cannot do more for the moment. 6.4.1 Component setting The traditional way of defining this mechanism is: A Line (Stream) consists of a set of components. In their turn these consist of a set of unique class groups. These groups must then be entered in the class register according to some strict rules. Activities (subjects) are then assigned to these classes. The vital component condition is then: Class groups belonging to different components in a LINE may NEVER be assigned to the same time period while class groups belonging to the SAME component may be assigned to the SAME time period if no other conflicts. • An alternative way of formulating the same timetabling requirement is as follows: • A Line (Stream) consists of a set of class groups. These groups are included in activities (subjects) just as traditional classes. However, these activities are given a component property specifying to which Line and which component where it belongs. The vital component condition is then: Activities belonging to the same LINE but different components here may NEVER be assigned to the same time period while activities also having the SAME line + component property may be assigned to the SAME period if no other conflicts Provisional notes for Tplan version 29.1 Harald Michalsen Page 95 of 117 From a mathematical (and also practical) point of view these definitions are identical. The first case is documented in current User Manual, and here we describe the second method for defining components. To use this method you must as a start use a special run option for that. Till further notice we will allow both methods for defining components. You check the new run option: New component rules to use the alternative data specification. Your class register will then look like the following this figure This is all classes if you have components in form 6 and 7. You only have as many class symbols as the maximum number of class groups in the various components. Notice further that you don’t use the Component column and in the column Positions you enter the sum of periods linked to the various class symbols. The data entry in the subject register will look like the next figure. Notice here the column Belongs to block (To be substituted with the heading: Component). This is more or less the same as the Component column in class register with the earlier method. Instead of stating that sets of class symbols belongs to different components, we are now saying to which component the individual activity belongs. The obvious advantage of this convention that you get rid of the vast number of class symbols using older conventions. Furthermore you are rid of all rigid rules of the relative order of these class symbols. You are allowed to enter component – activities in any way you like in subject register as long as you remember to link the subject to the proper component. There is however a small new restriction with the new rules and that is shown in the figure: Class 6AA has the subject PH belonging to component Y61. Further down you see that class symbol 6AA is getting the subject PH once more but now it is in the Y62 component. Tplan as a whole require that different subjects have different identifiers; accordingly you are “forced” to use the names PH1 and Ph1 for the Y62- subject. I believe this is a small price to pay for having much simpler conventions. Besides the error checking in Tplan easily detects use of same name for different subjects.(Use Inspect button) Provisional notes for Tplan version 29.1 Harald Michalsen Next figure shows a further advantage by using new conventions: Page 96 of 117 Provisional notes for Tplan version 29.1 Harald Michalsen Page 97 of 117 All subjects belonging to 6AA is nicely ordered in the same column as for all other component classes. With the older rules you had much less control over which subjects were allocated to the same column. To the right in the figure we have the Kickout list and we shall do a few adjustments: Provisional notes for Tplan version 29.1 Harald Michalsen Page 98 of 117 In this situation we want to assign 7AA MA and select that to use P4 and as Category we use: Pure Class act. The figure above then shows the 7AA column and the two teachers in Y73- act. (I.e. yellow brown cells) The possible periods are: WED 4, FRI 2 and thu 4. Both actual teachers are occupied in these positions. Normally it is “impossible” to free these teachers in these periods and some compromise must be done. We notice that KS is teaching 7AH in MA in WED 4 and FRI 2. Perhaps he could teach both groups for one period? We select that compromise like this: Provisional notes for Tplan version 29.1 Harald Michalsen Page 99 of 117 The above figure is created by one P1- drag and then blowing up (F5). Next we select 7AE Fr1 (Pure class) and get this selection: Provisional notes for Tplan version 29.1 Harald Michalsen Page 100 of 117 FRI 5 should be dark green in this figure and 7AE Fr1 may directly be assigned here. (The subject is probably lacking a suitable room to be found later. ). Next we investigate 7AG TM and get this selection: Provisional notes for Tplan version 29.1 Harald Michalsen Page 101 of 117 We must look for empty pink cells for 7AG. Those are found in THU 4 and mon 5. In both periods both KS and TR are in a option blocks in 5th form. (A not unfamiliar situation.) We must do a compromise and in the above figure we double assign TR in THU 4. Our kickout list has now been changed to: Provisional notes for Tplan version 29.1 Harald Michalsen Page 102 of 117 The compromises done till now is shown in LIANW: The double assignments here is the result of our drag/drop while the double period in 6AH is caused by presassignment in period register. To sort out remaining kickouts we could either start with pure class act. in form 4-5 or blocks in form 3. I prefer the latter. I start with 3E SC3 and get the following selection. (Category: Only activity): Provisional notes for Tplan version 29.1 Harald Michalsen Page 103 of 117 If we investigate this figure we find one reasonable possibility: wed 4. Here all actual teachers are available while actual classes have pure class act. which then is transferred to the kickout list. We then use the same technique for 3A TE and get this selection: Provisional notes for Tplan version 29.1 Harald Michalsen Page 104 of 117 Due to the actual teachers being involved in a lot of blocks, it is not easy to see a reasonable period for 3A TE. FRI 2 appear to be the simplest one: We transfer 3A RE to kickout list and then double assign teacher RH (to be adjusted later). Our current kickout list is now: Provisional notes for Tplan version 29.1 Harald Michalsen I am happier with this list than the previous one since we only have pure class activities remaining. It is to longwinded to show all steps in this adjustment, but I will show a few typical techniques. I start with subject 5AC Ph. I make a selection of this activity. (Category = Pure class for remaining examples in this chapter) Page 105 of 117 Provisional notes for Tplan version 29.1 Harald Michalsen Page 106 of 117 The interesting period is THU 1 where 5AC is available while LE is booked. ACO could possibly teach here. As luck would have it we immediately spot a solution: ACO in MON 1 may be interchanged with LE in THU1 (both are teaching pure class in 5AB in those periods).We does that interchange and 5AC Ph may be assigned in THU 1. I could show that this adjustment gives a room conflict. In any case it is more seldom you see directly a possibility and later examples will show a more general way of doing such adjustments. Next I try to adjust 3G IT and get this selection: Provisional notes for Tplan version 29.1 Harald Michalsen Page 107 of 117 The problematic period is TUE 3 where 3G is available while AO is booked. I make the same selection as above but include TUE 3 as Actual position. The result is: Provisional notes for Tplan version 29.1 Harald Michalsen Page 108 of 117 The green periods here are those which may be interchanged with TUE 3. In addition we want to find a green period where AO is available meaning that 3G IT may be assigned there. That is fulfilled for THU 5 (amongst several others) and we select that interchange and 3G IT is then assigned in THU 5. Next we select 1G IT and get this selection: Provisional notes for Tplan version 29.1 Harald Michalsen Page 109 of 117 This is a more complicated case. The critical period is FRI 2 but we notice that all teachers for 1G in pure class act. are booked in this period meaning an interchange won’t help us. The next possibility is to try to free AO in FRI 2. We select teacher AO in FRI 2 and get this selection: Provisional notes for Tplan version 29.1 Harald Michalsen Page 110 of 117 Green periods are the most interesting (while yellow ones could also be used breaking a day conflict). As luck would have it wed 1 is green and teacher AO is also available here and we of course do that interchange and then assign 1G IT in FRI 2 I will not show further adjustments, but I completed this timetable with these error messages (LIANW): Provisional notes for Tplan version 29.1 Harald Michalsen Page 111 of 117 There is still a way to go with some teacher changes and to find lacking rooms. I am far from ashamed of this result for a fairly large and complex UK school. I did not do the adjustments in the exact order as explained above and I also skipped some more trivial adjustments. My hope is to give the reader some understanding of how to use Tplan to solve any timetable problem. To sum it up I think that my two last adjustments of 3G IT and 1G IT are the ones teaching you most: For 3G IT I tried to interchange an available period for a class with some other period hoping to find a period where actual teacher was available. For 1G IT we also worked with an available period for a class, but here we tried to interchange actual teacher in such a way that he also was available in same period as actual class. Provisional notes for Tplan version 29.1 Harald Michalsen Page 112 of 117 In both cases the colour codes in Tplan told you easily about possible solutions and a few drag/drops adjusted the table. I know that both techniques are the fundamental principles for adjusting ANY timetable. You could of course find a compromise by some other method. However, think how fast proper selections, colour codes and a few drag/drops lead to a sensible solution! 6.4.2 Cross Linking of Components I have certain reservations with showing this possibility, but I know that such arrangements occur to some extent in real life. My reservations is due to I perfectly well that this might lead to very complex (hopeless?) timetabling if the total timetable data is not good organised. Well here we go. The subject register might look like this: The interesting rows here are the two first and the two last. The subject 6G MT is included in component Y62 and Y72 i.e. form 6 and form 7 is CROSSLINKED. The subject 6I MU is included in included in both Y64 and Y74 i.e. another CROSSLINK. We have a situation where form 6 and 7 is cross linked in both 2nd and 4th component. The school in question is perfectly organised regarding work load for teachers; in fact it is a no kickout school. We end up with a timetable like this: Provisional notes for Tplan version 29.1 Harald Michalsen Page 113 of 117 The grey cells (2nd component) are in parallel in 6th and 7th form. The pink cells (4th component) are also in parallel. Everything is nicely organised as requested. I have of course no objection to this data set, but I will stress that such organisation may be the start of a very slippery road where you could easily go astray. 6.4.3 Teacher Pools I have never officially documented this facility which I absolutely see could be a very useful tool in various contexts. The mechanism has not been my main concern while developing drag/drop in Provisional notes for Tplan version 29.1 Harald Michalsen Page 114 of 117 version 29.1. However, I would like to sum up the current situation and while developing the P4operator I realise that we could give Teacher Pools extended use by including these in sensible selections even if the school is not using pool teachers at all in their subject register. A Teacher Pool Register might look like this: A Teacher Pool is defind be 3 characters and the first one MUST be: #. Then follows the initials of the teachers included in various pools. These pool identifiers MUST ALSO be entered in Teacher register and Room register. The general idea is to require a pool identifier as teacher in subject register. This is more or less treated as a room group, and when you eventually do the room allocation you select the actual teacher for the various subjects. This teacher allocation is subject to VERY STRICT RULES about using as few teachers as possible for the same subject. There is more to Teacher Pools than that. The teacher register looks like this: The interesting column here is now Pos (i.e.). When using Teacher Pools this value states the MAXIMAL NO OF PERIODS a teacher may teach in ordinary teaching + periods being included in some pool. This limitation is quite obvious: Assume for instance that the headmaster or some parttimers with few periods are included in pools and without some limitation they are very tempting to use in Pool arrangements. Provisional notes for Tplan version 29.1 Harald Michalsen Page 115 of 117 The end result of using Teacher Pools might result in a table like this: In this case year 7 is the lowest form in this school and Teacher Pools are used to an extreme extent here. The green, yellow and red colours shall be interpreted this way: Green: This subject has same teacher in all periods. Yellow: Subject is lectured by two (or more) teachers. Provisional notes for Tplan version 29.1 Harald Michalsen Page 116 of 117 Red: This period is currently lacking a teacher We can continue with this table a little. We notice that 7S4 in lacking teacher in RE in FRI 4. We select this period and also all pools able to teach RE. We get this selection: We get the class 7S4, all teachers being able to teach RE and to the right we see all requirements to pools teaching RE and still not being assigned to some real teacher. We can easily solve FRI 4 by using teacher Rou and just drag 7S4 to Rou. The remainder is not solved by this figure and I skip continued work. However, there is a further important point with the above figure: Even if you are not using teacher pools at all you may be well served by creating selections like the one above to create survey of possible teachers in case you must do some teacher changes. As mentioned Teacher Pools has not been the focus of my interest while developing drag/drop. My current attitude to Teacher Pools is as follows: Provisional notes for Tplan version 29.1 Harald Michalsen Page 117 of 117 • I am a firm believer in the value of using Teacher Pools in some contexts. Currently the most typical case is as follows: In a UK school you have complex upper forms with components and many large blocks and several compromises must eventually be done. In the lower forms there is a lot of freedom for deciding the teacher work load and there are also a lot of pure class acts. Considerable freedom for the upper forms may be achieved by using Pool Teachers in lower forms; in particular in subjects with few periods. (For the moment I am very sceptical to Pools in subjects with many periods, but that might improve in the future.) • MY MAIN CONCERN FOR MORE THAN 3 YEARS HAS BEEN REORGANSATION OF INTERNAL DATA STRUCTURE AND DRAG/DROP TECHCIQUES WHILE TEACHER POOLS HAS DEFINITELY BEEN IGNORED. I DEFINITELY SEE THAT THE NEW DATA STRUCTURE WILL HAVE CONSIDERABLE POSITIVE EFFECTS ON THE TEACHER POOL – MECHANISM. TIME HAS NOT PERMITTED ME TO EXPLOIT THAT; JUST NOW I AM AFRAID THAT THERE MIGHT BE LOUSY BUGS. HOPEFULLY I MIGHT BE ALLOWED TO CHECK THAT IN THE NEXT FEW WEEKS (MONTHS). May 29, 2011 Harald Michalsen