
1
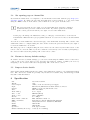
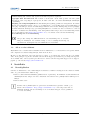
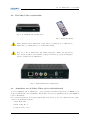
Streamit Lukas Video
Version:
Date:
v1.3
April 2012
c
2011
STREAMIT BV — All rights reserved
THE MATERIAL CONTAINED HEREIN IS COPYRIGHTED AND PROTECTED UNDER NATIONAL
AND INTERNATIONAL COPYRIGHT LAWS AS AN UNPUBLISHED WORK AND UNAUTHORIZED
REPRODUCTION OR MODIFICATION IS PROHIBITED WITHOUT WITHOUT THE EXPRESS PRIOR
WRITTEN CONSENT OF STREAMIT.
ENGLISH
ENGLISH
1 Introduction
1.1 Included materials . . . . . . . . . . . . . . . . . . . . . . . . . . . . . . . . . . . . . . . .
1.2 Introduction . . . . . . . . . . . . . . . . . . . . . . . . . . . . . . . . . . . . . . . . . . . .
1.3 If you do not succeed . . . . . . . . . . . . . . . . . . . . . . . . . . . . . . . . . . . . . . .
2
2
2
3
2 Installation
2.1 Preparing the Lukas Video
2.2 Connecting the Lukas Video
2.3 Connecting the Lukas Video
2.4 Connecting the Lukas Video
3
4
4
5
5
. . . . . . . . . . . . . . . . . . . . .
to the TV set . . . . . . . . . . . . .
to the mains outlet . . . . . . . . .
to the Ethernet connection or router
.
.
.
.
.
.
.
.
.
.
.
.
.
.
.
.
.
.
.
.
.
.
.
.
.
.
.
.
.
.
.
.
.
.
.
.
.
.
.
.
.
.
.
.
.
.
.
.
.
.
.
.
.
.
.
.
3 Registering the Lukas Video at EventCaster
5
4 Using the Lukas Video
4.1 Using the channel list . . . . . . . . . . . . . . . . . . . . . . . . . . . . . . . . . . . . . .
6
6
5 Adjust the settings of the Lukas Video
5.1 Image and sound settings for the TV set . . . . . . . . .
5.2 Network settings . . . . . . . . . . . . . . . . . . . . . .
5.2.1 Automatic (DHCP) or fixed IP network address
5.2.2 Connect to a wireless network (Wifi) . . . . . . .
5.2.3 Check the connection with a Wifi network . . . .
5.3 Set opening page or channel list . . . . . . . . . . . . . .
5.4 Return to factory default settings . . . . . . . . . . . . .
5.5 Inspect device details . . . . . . . . . . . . . . . . . . . .
6
6
7
7
7
7
8
8
8
.
.
.
.
.
.
.
.
.
.
.
.
.
.
.
.
.
.
.
.
.
.
.
.
.
.
.
.
.
.
.
.
.
.
.
.
.
.
.
.
.
.
.
.
.
.
.
.
.
.
.
.
.
.
.
.
.
.
.
.
.
.
.
.
.
.
.
.
.
.
.
.
.
.
.
.
.
.
.
.
.
.
.
.
.
.
.
.
.
.
.
.
.
.
.
.
.
.
.
.
.
.
.
.
.
.
.
.
.
.
.
.
.
.
.
.
.
.
.
.
.
.
.
.
.
.
.
.
.
.
.
.
.
.
.
.
.
.
.
.
.
.
.
.
.
.
.
.
.
.
.
.
6 Specification
8
7 Streamit support
9
NEDERLANDS
9
1 Voorwoord
10
1.1 Meegeleverde materialen . . . . . . . . . . . . . . . . . . . . . . . . . . . . . . . . . . . . . 10
1.2 Inleiding . . . . . . . . . . . . . . . . . . . . . . . . . . . . . . . . . . . . . . . . . . . . . . 10
1.3 Als u er niet uitkomt . . . . . . . . . . . . . . . . . . . . . . . . . . . . . . . . . . . . . . . 11
2 Installatie
2.1 Benodigdheden . . . . . . . . . . . . . . . . . . . . . . . . . . . . .
2.2 De Lukas Video voorbereiden . . . . . . . . . . . . . . . . . . . . .
2.3 Aansluiten van de Lukas Video op het televisietoestel . . . . . . .
2.4 Aansluiten van de Lukas Video op het lichtnet . . . . . . . . . . .
2.5 Aansluiten van de Lukas Video op de ethernetaansluiting of router
.
.
.
.
.
.
.
.
.
.
.
.
.
.
.
.
.
.
.
.
.
.
.
.
.
.
.
.
.
.
.
.
.
.
.
.
.
.
.
.
.
.
.
.
.
.
.
.
.
.
.
.
.
.
.
.
.
.
.
.
.
.
.
.
.
3 De Lukas Video aanmelden op EventCaster
11
11
12
12
13
13
13
4 De Lukas Video gebruiken
14
4.1 De kanalenlijst gebruiken . . . . . . . . . . . . . . . . . . . . . . . . . . . . . . . . . . . . 14
5 De instellingen van de Lukas Video aanpassen
5.1 Beeld- en geluidsinstellingen voor het televisietoestel . . . .
5.2 Netwerkinstellingen . . . . . . . . . . . . . . . . . . . . . . .
5.2.1 Automatisch (DHCP) of vast IP netwerkadres . . . .
5.2.2 Verbinding maken met een draadloos netwerk (Wifi)
5.2.3 Verbinding met een Wifi netwerk controleren . . . .
5.3 Openingspagina of kanalenlijst instellen . . . . . . . . . . .
5.4 Fabrieksinstellingen terugzetten . . . . . . . . . . . . . . . .
5.5 Apparaatgegevens bekijken . . . . . . . . . . . . . . . . . .
.
.
.
.
.
.
.
.
.
.
.
.
.
.
.
.
.
.
.
.
.
.
.
.
.
.
.
.
.
.
.
.
.
.
.
.
.
.
.
.
.
.
.
.
.
.
.
.
.
.
.
.
.
.
.
.
.
.
.
.
.
.
.
.
.
.
.
.
.
.
.
.
.
.
.
.
.
.
.
.
.
.
.
.
.
.
.
.
.
.
.
.
.
.
.
.
.
.
.
.
.
.
.
.
.
.
.
.
.
.
.
.
.
.
.
.
.
.
.
.
.
.
.
.
.
.
.
.
.
.
.
.
.
.
.
.
14
14
15
15
15
16
16
16
16
6 Specificaties
17
7 Streamit support
17
Version v1.3
April 2012
1 of 17
1. Introduction
User manual - English
1
Introduction
Thank you for purchasing the Streamit Lukas Video. The Lukas Video is an audio-video receiver with
which you can easily receive video and audio over the internet. It receives the video stream and converts
it to an analog audio- and video signal (RCA/Composite or HDMI). The method used (H264/AAC)
guarantees high quality audio and video with limited bandwidth use.
For more information about the products and solutions that Streamit offers, we would like to invite you
to our website: http://www.streamit.eu.
We hope you enjoy using your Lukas Video.
Streamit B.V.
1.1
Included materials
Check if the following parts are in the box when recieving it. If one or more parts are missing or damaged,
please contact your Streamit dealer or sales employee.
• Lukas Video audio/video receiver
• Power adapter
• Composite/RCA audio-video cable
• Ethernet cable
• Remote control with batteries
• User manual
With the help of this manual and the right equipment you are able to install and configure the Lukas
Video yourself, provided that you have some PC and internet knowledge.
The operation of the Lukas Video is very easy, using only the remote control that is included.
1.2
Introduction
In this user manual the following symbols will be used for important instructions. Always pay attention
to the instructions accompanied with these symbols.
Instructions which could cause injury to persons or damage to the device as result
of not following the instructions when operating the device. These instructions do
always need to be followed for safe operation.
Instruction which is required to understand the correct functioning of the device.
Version v1.3
April 2012
2 of 17
1.3
If you do not succeed
Trademark notes All trademarks and registered trademarks mentioned in this manual are the property
of their respective owners.
Copyright 2011 Streamit BV All rights reserved. No part of this publication may be transferred or
copied in any form without express written permission.
Disclaimer This manual has been carefully validated and reviewed. The instructions and descriptions
were correct for the Maven at the time this manual was printed. Newer Streamit Lukas Video devices
and manuals can be changed without notification. Streamit assumes no liability for damage which are
directly or indirectly related to errors or omisions in this manual, or discrepancies between this product
and the manual.
See the Streamit website (http://www.streamit.eu) for the latest version of this manual.
EU Declaration of Conformity
This product carries the CE-mark in conformation with the relevant European
guidelines. The responsibility for the allocation of this conformity lies with
Streamit BV, Verdunplein 10, 5627 SZ Eindhoven, Netherlands.
This is a class A product. In a domestic environment this product may cause radio
interference in which case the user may be required to take adequate measures.
FCC Compliance Statement
NOTE: This device complies with Part 15 of the FCC limits for Class B digital
devices FOR HOME OR OFFICE USE (home or office interference requirements are more stringent than outdoor requirements). Operation of this device
is subject to the following conditions: (1) This device may not cause harmful interference, and (2) this device must accept any interference received, including
interference that may cause undesired operation.
The Streamit Internet Radio device does not contain any user-serviceable parts.
Repairs should be made only by an authorized Streamit service center. Unauthorized repairs or modifications could result in permanent damage to the
equipment, and void your warranty and your authority to operate the device
under Part 15 regulations.
1.3
If you do not succeed
We can imagine that the installation of the Lukas Video for persons with limited knowledge of computers
and software can be difficult, but this is not necessary.
In case you cannot get it to work, we would like to ask you to contact the person from whom you bought
or received the Lukas Video. Streamit only supports (through telephone or email) customers who bought
the Lukas Video directly from Streamit. In addition we deliver free support via the support page on our
website http://www.streamit.eu/support/.
2
Installation
To receive video streams via the internet with the Lukas Video, you need the following in addition to
the Lukas Video:
• A broadband internet connection (ADSL, cable, or glass fibre). The minimum required download
speed depends on the video material on offer. In practice this varies between 300 kbps and 8
Mbit/s.
• A TV set.
Version v1.3
April 2012
3 of 17
2.1
Preparing the Lukas Video
An ADSL connection often does not deliver the advertised speed.
You
can check the actual speed of your connection easily on Visualware:
http://myspeed.visualware.com/ and get an indication whether your connection is
sufficient for streaming video.
2.1
Preparing the Lukas Video
Fig. 1: Front view of the Lukas Video
Fig. 2: Remote control
It is very important to place the Lukas Video such that the front of the Lukas Video
is well visible for the remote control.
Make sure that the Lukas Video can cool itself. E.g., do not place it in a closet
without ventilation openings. Do not in any case cover the ventilation holes in the
top of the Lukas Video.
Fig. 3: Back view of the Lukas Video
2.2
Connecting the Lukas Video to the TV set
To connect the Lukas Video to the TV set you can choose between an HDMI or a Composite/RCA
audio-video connection. If your TV set has both options, HDMI is recommended for better image
quality.
Version v1.3
April 2012
4 of 17
2.3
Connecting the Lukas Video to the mains outlet
When using the Composite/RCA audio-video cable, make sure that you put the right color in the right
connector (matching colors):
• Audio left: White
• Audio right: Red
• Composite video: Yellow
2.3
Connecting the Lukas Video to the mains outlet
Plug the power adaptor into the mains outlet and then plug the cord of the power adapter in the Lukas
Video.
• Never use wet hands to plug the power adapter in the mains and never remove
the power adapter from the mains with wet hands.
• Do not cut or damage the cord of the power adapter. Do not place heavy objects
on the cord. This can cause short-circuit, resulting in electrical shocks or even
fire.
• Pulling the cord can damage the wire and/or isolation causing electrical shocks
or fire.
• Using power adapters other than the one recommended for your Lukas Video
device, can result in overheating and damage your device. This can cause fire,
electrical shocks and other hazards. Only use the supplied power adapter.
• Exposing the Lukas Video to situations with rapid changing temperatures can
result in condensation (a small amount of water) on the inner and outer surface
of your device. To ensure a long lifetime of your Lukas Video, this should be
prevented. In case of such a scenario, wait until you device is dry before you
use it again.
2.4
Connecting the Lukas Video to the Ethernet connection or router
Connect the included Ethernet cable to the LAN connection on the Lukas Video. Connect the other end
of the Ethernet cable to the Ethernet connection of the local network or the router (ADSL, glass fibre,
cable, . . . ).
The yellow LED next to the LAN connector should light up continuously when the connection is made.
The green LED should start to flicker intermittently.
3
Registering the Lukas Video at EventCaster
When the Lukas Video is used in combination with EventCaster, the Lukas Video should be registered
there. When a different platform is used, follow the corresponding instructions for that platform. To
register the Lukas Video at EventCaster take the following steps:
• Note the MAC address of the Lukas Video. This is printed on the bottom of the Lukas Video and
starts with 24:cf:.
• Login on http://eventcaster.streamit.eu. If you have no account yet, please register first.
• Use the devices menu to add a new video device of the type Lukas Video.
• Add the stations that you would like to view with this Lukas Video.
• Ready! You can now start to use the Lukas Video.
Version v1.3
April 2012
5 of 17
4. Using the Lukas Video
4
Using the Lukas Video
The Lukas Video can be controlled with the remote control that is included. The following buttons can
be used:
Power
Cursor keys
0. . . 9 and CH+ en CHOK
Exit
VOL+ and VOLMute
4.1
The Lukas Video is switched on or off (standby).
Choose an option from the list, e.g. a station or recording. The effect of
the cursor keys is always shown on screen, except during playback of a video
stream.
Choose a station, this choice is always confirmed by pressing the ‘OK’ button.
Confirm a choice.
Cancel a choice.
Adjust the sound volume.
Mute the sound.
Using the channel list
The the person from whom you bought or received the Lukas Video may have configured it with a
pre-programmed channel list. You can get this list on the screen by using the ‘OK’ button.
and ‘Down’
to navigate through the list. Select a station from the list
Use the cursor keys ‘Up’
by using the ‘OK’ button. You can leave the channel list without choosing a different station by using
the ‘EXIT’ button.
When you switch off the Lukas Video, it will remember the last played station. This station will be
played again when you switch the Lukas Video back on.
5
Adjust the settings of the Lukas Video
Some settings can be adjusted via the menu of the Lukas Video. In most cases the factory default values
work just fine, but using the ‘MENU’ button on the remote control brings you in a menu where you can
inspect and adjust a number of things if necessary.
When you use the ‘MENU’ button, a password is requested. Enter the password 123123.
5.1
Image and sound settings for the TV set
Go to the device menu using the ‘MENU’ button on the remote control. In the menu ‘AV settings’ you
can configure the following:
• HDMI : Which HDMI signal the Lukas Video sends to the TV set (Check the manual of your TV
set to see what it supports):
– 720p 50Hz
– 1080i 50Hz
– 1080p 24Hz
– 1080p 25Hz
– 1080p 30Hz
– 1080p 50Hz
– 1080p 60Hz
– 720p 60Hz
– 1080i 60Hz
• Mode: The type of TV signal that the set-top box sends to the TV set (PAL or NTSC)
Version v1.3
April 2012
6 of 17
5.2
Network settings
• Audio channel : Which audio channel (left, right, or both) is sent to the TV set
• Screen ratio: 16:9 or 4:3 (e.g., for older TV sets)
• Zoom:
– Full (display video on full screen)
– LetterBox (display 16:9 material on a 4:3 TV set with black bars on top and below)
– PanScan (display 16:9 material on a 4:3 TV set by cropping the right and left side of the
image)
5.2
Network settings
5.2.1
Automatic (DHCP) or fixed IP network address
Go to the device menu using the ‘MENU’ button on the remote control. Choose the menu ‘Network
settings’, followed by the option ‘Ethernet’. Here you can configure how the Lukas Video should get its
IP network address:
• Automatic using DHCP: Choose the option ‘AUTO’.
• Manually configure a fixed address: Choose the option ‘Manual’ and use the cursor keys and
numbers to enter the necessary settings.
5.2.2
Connect to a wireless network (Wifi)
To connect the Lukas Video to a wireless network (Wifi), you need a USB Wifi dongle1 that you connect
to the back of the Lukas Video. Then take the following steps to make a connection:
• Go to the device menu using the ‘MENU’ button on the remote control
• Choose the menu ‘Network settings’
• Choose the option ‘WLAN’
• The Lukas Video automatically scans the available Wifi networks and shows them in a list
• Choose the desired wireless network from the list of wireless networks and press ‘OK’
• Press ‘OK’ again on the remote control to call up an on-screen keyboard to enter the password
• Enter the password of the chosen wireless network in the dialog window that appears
• Conclude by navigating to the on-screen ‘OK’ button and pressing ‘OK’ on the remote control
• The Lukas Video now makes connection to the chosen wireless network
The icon next to the description of the wireless network indicates if the Lukas Video is connected (green
symbol) or not (red symbol).
5.2.3
Check the connection with a Wifi network
The details of the wireless network connection are presented on the Wifi status page:
• Go to the device menu using the ‘MENU’ button on the remote control
• Choose the menu ‘Network settings’
• Choose the option ‘Wifi status’
1 This
USB Wifi dongle must have the Ralink RT3070 chipset and can be ordered from Streamit.
Version v1.3
April 2012
7 of 17
5.3
5.3
Set opening page or channel list
Set opening page or channel list
By default the Lukas Video is configured to use EventCaster and starts with the page http://av.
streamit.eu/stb. To change the page that the Lukas Video loads at startup, go to the device menu
using the ‘MENU’ button on the remote control. Then choose the option ‘Content source’.
The person from whom you bought or received the Lukas Video may have configured
it such that this option is not visible in the menu. If you have questions about this,
please contact person from whom you bought or received the Lukas Video.
• Start page: At startup, the Lukas Video will go to this page on the internet or local network
• Channel list: This is the list of pre-programmed stations. See section 4.1 on how to use this channel
list.
You can choose if the Lukas Video uses the start page or the channel list at startup. The contents of the
channel list cannot be configured using the device menu. Contact the person from whom you bought or
received the Lukas Video about this.
The start page can be configured using the device menu. Use the cursor keys and ‘OK’ button on the
remote control to enter the URL of your choice with the on-screen keyboard. Conclude by navigating to
the on-screen ‘OK’ button and pressing ‘OK’ on the remote control.
5.4
Return to factory default settings
To return to the factory default settings, go to the device menu using the ‘MENU’ button on the remote
control. Choose the option ‘Factory reset’ and enter the password: 123123. Confirm your choice by
navigating to the on-screen ‘OK’ button and pressing ‘OK’ on the remote control.
5.5
Inspect device details
If the sticker with the MAC address is not visible on the Lukas Video anymore, you can find this address
here. The other device details are generally only relevant for troubleshooting. Streamit support staff
may ask for this information.
6
Specification
Size
Weight
Power adapter
Input
Output
Video
Audio Analog
Video codecs
Audio codecs
Bit rate
Environment conditions
EMC conformance
Safety
RoHS
WEEE
Operation
Relative humidity in storage
Version v1.3
150 x 110 x 30 mm
330g
5VDC / 2.5A via external power supply
Ethernet 10/100 BaseT via RJ-45 shielded connector
HDMI or Composite/RCA audio-video
PAL and NTSC
stereo output
MPEG4 (H.264)
AAC / HE-AAC
0.3 - 8Mbps
ETS 300-019-1-3 Class 3.1
FCC Part 15 class B, 2004/108/EC EN55022
CAN/CSA-C22.2 No. 60950-1-03, EN60950
2002-95-EC
2002-96-EC
0-40 degrees Celsius
5-95% (non-condensing)
April 2012
8 of 17
7. Streamit support
7
Streamit support
With this manual we have tried to make the working of the Lukas Video as clear as possible. We can
imagine, however, that you may come across a question or problem that is not covered in this manual
That that case we recommend to see if there is information on this matter on the Streamit website:
http://nl.streamit.eu.
We appreciate your opinion on this product and your tips for improvement. So, feel free to drop by or
send us an email.
We wish you much pleasure using your Lukas Video.
Version v1.3
April 2012
9 of 17
1. Voorwoord
Gebruikshandleiding - Nederlands
1
Voorwoord
Wij danken u hartelijk voor uw aanschaf van de Streamit Lukas Video. De Lukas Video is een audio-video
ontvanger waarmee u eenvoudig video en audio ontvangt over internet.
Via het Streamit’s portal EventCaster is de Lukas Video eenvoudig in te stellen waarna met letterlijk
een druk op de knop de instellingen door de ontvanger overgenomen worden en de videostream omgezet
wordt naar een analoog audio- en videosignaal (RCA/Composiet of HDMI). De gebruikte methode
(H264/AAC) garandeert ook bij een bescheiden bandbreedte een hoge beeld- en geluidskwaliteit.
Voor meer informatie over de producten en oplossingen die Streamit kan leveren, nodigen we u uit om
onze website te bezoeken: http://nl.streamit.eu.
Tenslotte wensen wij u veel plezier met het gebruik van uw Lukas Video.
Streamit B.V
1.1
Meegeleverde materialen
Controleer of de volgende onderdelen in de doos aanwezig zijn. Als u een onderdeel mist of als een
onderdeel beschadigd is, neemt u contact op met uw Streamit-dealer of verkoopmedewerker.
• Lukas Video audio/video ontvanger
• Voedingsadapter
• Composiet/RCA audio-video kabel
• Ethernetkabel
• Afstandsbediening met batterijen
• Gebruikshandleiding
Met behulp van deze handleiding en de juiste apparatuur bent u, als u enige PC en internet kennis hebt,
in staat om zelf de Lukas Video in gebruik te nemen.
De bediening is uiterst eenvoudig: dit gaat volledig via de bijgeleverde afstandsbediening.
1.2
Inleiding
In deze gebruiksaanwijzing worden de volgende symbolen gebruikt voor belangrijke instructies. Houd
altijd rekening met de instructies die bij deze symbolen zijn vermeld.
Instructies die letsel aan personen of schade aan het apparaat tot gevolg kunnen
hebben wanneer u nalaat de instructies op te volgen bij de bediening van het apparaat.
Deze instructies moeten worden opgevolgd voor een veilige bediening.
Instructie die van belang is om de juiste werking van het apparaat te begrijpen.
Version v1.3
April 2012
10 of 17
1.3
Als u er niet uitkomt
Notities over handelsmerken Alle handelsmerken en gedeponeerde handelsmerken die in deze gebruiksaanwijzing zijn vermeld, zijn eigendom van hun respectieve eigenaren.
Copyright 2011 Streamit BV Alle rechten voorbehouden. Geen enkel gedeelte van deze publicatie mag worden overgedragen of gekopieerd, in welke vorm dan ook, zonder uitdrukkelijke schriftelijke
toestemming.
Afwijzing van aansprakelijkheid Deze handleiding is zorgvuldig gevalideerd en nagekeken. De aanwijzingen en beschrijvingen waren correct voor de Lukas Video op het tijdstip waarop deze handleiding ter
perse ging. Streamit producten en handleidingen kunnen echter zonder kennisgeving worden gewijzigd.
Streamit aanvaardt dientengevolge geen aansprakelijkheid voor schade die direct of indirect voortvloeit
uit fouten of omissies in de handleiding, of uit discrepanties tussen dit product en de handleiding. Raadpleeg de Streamit website http://nl.streamit.eu voor de laatste versie van deze handleiding.
EU-verklaring van overeenstemming
Dit product draagt het CE-keurmerk in overeenstemming met de relevante
Europese richtlijnen. De verantwoording voor de toewijzing hiervan ligt bij
Streamit BV, Verdunplein 10, 5627 SZ Eindhoven, Nederland.
1.3
Als u er niet uitkomt
Wij kunnen ons voorstellen dat het installeren van de Lukas Video voor mensen met een beperkte kennis
van computers en software lastig kan zijn, maar dit hoeft niet.
Mocht u er niet uitkomen, dan verzoeken wij u contact op te nemen met degene van wie u de Lukas
Video heeft gekregen of gekocht. Streamit verleent alleen support (telefonisch of per email) aan degenen
die de Lukas Video direct bij haar gekocht hebben. Verder verlenen wij gratis support via de support
pagina op onze website http://nl.streamit.eu.
2
Installatie
2.1
Benodigdheden
Om met de Lukas Video video-uitzendingen via internet te kunnen ontvangen, heeft u naast de Lukas
Video nog een aantal andere zaken nodig:
• Een breedband internetaansluiting (ADSL, kabel of glasvezel). De minimale downloadsnelheid is
afhankelijk van het aangeboden video-materiaal. Dit varieert in de praktijk tussen 300 kbps en 8
Mbit/s.
• Een televisietoestel.
Veelal wordt bij ADSL lijnen de geadverteerde snelheid niet gehaald. U kunt op de
website van Visualware: http://myspeed.visualware.com/ eenvoudig testen wat de
werkelijke snelheid van uw verbinding is en een indicatie krijgen of deze geschikt is
voor video streaming.
Version v1.3
April 2012
11 of 17
2.2
2.2
De Lukas Video voorbereiden
De Lukas Video voorbereiden
Fig. 4: Vooraanzicht van de Lukas Video
Fig. 5: Afstandsbediening
Bij het plaatsen van de Lukas Video is het van groot belang dat de voorkant van de
Lukas Video goed zichtbaar is voor de afstandsbediening.
Zorg ervoor dat de Lukas Video zijn warmte kwijt kan. Plaats deze dus niet in
bijvoorbeeld een kast zonder ventilatie-openingen. Bedek in geen geval de luchtgaten
aan de bovenzijde van de Lukas Video.
Fig. 6: Achteraanzicht van de Lukas Video
2.3
Aansluiten van de Lukas Video op het televisietoestel
Voor het aansluiten van de Lukas Video op het televisietoestel kunt u kiezen uit een HDMI of een
Composiet/RCA audio-video aansluiting. Als uw TV-toestel beide mogelijkheden heeft, geeft HDMI de
beste beeld-kwaliteit.
Let er bij het gebruik van de Composiet/RCA audio-video kabel op, dat u de juiste kleur in de juiste
connector steekt (kleur bij kleur):
• Audio links: Wit
• Audio rechts: Rood
• Composiet video: Geel
Version v1.3
April 2012
12 of 17
2.4
2.4
Aansluiten van de Lukas Video op het lichtnet
Aansluiten van de Lukas Video op het lichtnet
Steek het snoer van de voedingsadapter in de Lukas Video.
• Steek de voedingsadapter nooit met natte handen in het stopcontact en haal de
stekker nooit met natte handen uit het stopcontact.
• Zorg ervoor dat u het snoer van de voedingsadapter niet doorsnijdt, beschadigt
of wijzigt en plaats geen zware voorwerpen op het snoer. U kunt hierdoor kortsluiting veroorzaken, wat brand of elektrische schokken tot gevolg kan hebben.
• Trekken aan het flexibele gedeelte van het snoer kan de draad en de isolatie
beschadigen of blootleggen, waardoor kans op brand of elektrische schokken
ontstaat.
• Het gebruik van voedingsadapters die niet nadrukkelijk voor deze apparatuur
zijn aanbevolen, kan leiden tot oververhitting, aantasting van de apparatuur,
brand, elektrische schokken of andere gevaren. Gebruik alleen de bijgeleverde
voedingsadapter voor de stroomvoorziening.
• Gebruik, plaats of bewaar de apparatuur niet op plaatsen die aan sterk zonlicht
of hoge temperaturen blootstaan. Het apparaat kan hierdoor verkleuren en/of
vervormen. Zorg voor een goede ventilatie rondom de voedingsadapter en het
apparaat.
• Het blootstellen van de apparatuur aan snel wisselende temperaturen kan condensatie (kleine waterdruppels) aan de binnen- en buitenkant veroorzaken. Voor
een lange levensduur van het apparaat dient dit zoveel mogelijk voorkomen te
worden. Wacht tot het vocht volledig is verdampt voordat u het apparaat weer
in gebruik neemt.
2.5
Aansluiten van de Lukas Video op de ethernetaansluiting of router
Sluit de bijgeleverde ethernetkabel aan op de LAN aansluiting van de Lukas Video. Sluit het andere
einde van de ethernetkabel aan op de ethernet aansluiting van het lokale netwerk of op de router (ADSL,
glasvezel, kabel...).
Als het goed is gaat het gele lampje van de LAN connector bij het aansluiten continue branden. Het
groene lampje gaat onregelmatig knipperen.
3
De Lukas Video aanmelden op EventCaster
Wanneer de Lukas Video gebruikt wordt in combinatie met EventCaster, moet de Lukas Video daar
worden aangemeld. Wanneer van een ander platform gebruik gemaakt wordt, volg dan de aanwijzingen
van dat platform. Het aanmelden van de Lukas Video voor EventCaster gaat als volgt:
• Noteer het MAC-adres van de Lukas Video. Deze is op de onderzijde vermeld en begint met 24:cf:.
• Log in op http://eventcaster.streamit.eu. Als u nog geen account hebt, moet u zich eerst
inschrijven.
• Voeg in het apparaten-menu een nieuw video-apparaat van het type Lukas Video toe.
• Voeg de stations toe die u wilt kunnen bekijken met dit apparaat.
• Klaar! Nu kunt u de Lukas Video in gebruik nemen.
Version v1.3
April 2012
13 of 17
4. De Lukas Video gebruiken
4
De Lukas Video gebruiken
Met de bijgeleverde afstandsbediening kan de Lukas Video bediend worden. De volgende knoppen hebben
een functie:
Power
Cursor toetsen
0. . . 9 en CH+ en CHOK
Exit
VOL+ en VOLMute
4.1
de Lukas Video wordt aan of uit (standby) gezet.
Keuze van een optie uit de lijst, bijv. station of opname. Het effect van de
cursor toetsen staat altijd in beeld aangegeven, behalve tijden het afspelen van
een video stream.
Keuze van een station, deze wordt altijd bevestigd door op de ‘OK’ toets te
drukken.
Bevestigen van een keuze.
Een keuze ongedaan maken.
Het geluidsvolume wordt aangepast.
Het geluid wordt uitgezet.
De kanalenlijst gebruiken
Het kan zijn, dat degene van wie u de Lukas Video heeft gekregen of gekocht, deze een voorgeprogrammeerde kanalenlijst heeft gegeven. Deze lijst kunt u op het scherm krijgen door op de afstandsbediening
op ‘OK’ te drukken.
en ‘Omlaag’
om door de lijst te navigeren. Kies een station
Gebruik de pijltjes toetsen ‘Omhoog’
uit de lijst door op ‘OK’ te drukken. U kunt de kanalenlijst verlaten zonder een ander station te kiezen
door op ‘EXIT’ te drukken.
Wanneer u de Lukas Video uitzet, wordt het laatst gespeelde station onthouden. Dit zal weer afgespeeld
worden als u de Lukas Video weer aanzet.
5
De instellingen van de Lukas Video aanpassen
Het is mogelijk om via het menu op de Lukas Video een aantal instellingen aan te passen. In de meeste
gevallen werken de standaard instellingen prima, maar via de knop ‘MENU’ op de afstandsbediening
komt u in een menu terecht waar u een aantal dingen kunt inspecteren en eventueel aanpassen.
Wanneer u op de knop ‘MENU’ drukt, wordt u om een wachtwoord gevraagd. Voer hier het wachtwoord
123123 in.
5.1
Beeld- en geluidsinstellingen voor het televisietoestel
Ga via de knop ‘MENU’ op de afstandsbediening naar het apparaatmenu. In het menu ‘AV settings’
kunt u het volgende instellen:
• HDMI : Welk HDMI signaal de Lukas Video naar het televisietoestel stuurt (raadpleeg de handleiding van uw TV om te zien wat door uw TV wordt ondersteund):
– 720p 50Hz
– 1080i 50Hz
– 1080p 24Hz
– 1080p 25Hz
– 1080p 30Hz
– 1080p 50Hz
– 1080p 60Hz
– 720p 60Hz
– 1080i 60Hz
Version v1.3
April 2012
14 of 17
5.2
Netwerkinstellingen
• Mode: Het type TV signaal dat de set-top box naar het televisietoestel stuurt (PAL of NTSC)
• Audio channel : Welk audio kanaal (links, rechts, of beide) naar het televisietoestel moet worden
doorgegeven
• Screen ratio: 16:9 of 4:3 (voor bijv. oudere televisietoestellen)
• Zoom:
– Full (video op volledig scherm tonen)
– LetterBox (16:9 materiaal afspelen op een 4:3 televisiescherm met zwarte balken boven en
onder)
– PanScan (16:9 materiaal afspelen op een 4:3 televisiescherm door links en rechts beeld weg te
laten)
5.2
5.2.1
Netwerkinstellingen
Automatisch (DHCP) of vast IP netwerkadres
Ga via de knop ‘MENU’ op de afstandsbediening naar het apparaatmenu. Kies daar het menu ‘Network
settings’, gevolgd door de optie ‘Ethernet’. Hier kunt u instellen hoe de Lukas Video een IP netwerkadres
adres moet krijgen:
• Automatisch via DHCP: Kies de optie ‘AUTO’.
• Handmatig een vast adres instellen: Kies de optie ‘Manual’ en gebruik de cursortoetsen en cijfers
om de nodige instellingen te maken.
5.2.2
Verbinding maken met een draadloos netwerk (Wifi)
Om de Lukas Video te verbinden met een draadloos netwerk (Wifi), heeft u een USB Wifi dongle nodig2
die u achterin de Lukas Video steekt. Volg daarna onderstaande stappen om verbinding te maken:
• Ga via de knop ‘MENU’ op de afstandsbediening naar het apparaatmenu
• Kies het menu ‘Network settings’
• Kies de optie ‘WLAN’
• De Lukas Video brengt automatisch de beschikbare Wifi netwerken in kaart en toont deze in een
lijst
• Kies het gewenste draadloze netwerk uit de lijst en klik op ‘OK’
• Klik op nogmaals op ‘OK’ op de afstandsbediening om een schermtoetsenbord op te roepen voor
het wachtwoord
• Vul in het dialoogvenster wat nu verschijnt het wachtwoord in voor het gekozen draadloze netwerk
• Sluit af door naar de ‘OK’ toets te gaan en op ‘OK’ te klikken op de afstandsbediening
• De Lukas Video maakt nu verbinding met het gekozen draadloze netwerk
Het icoon achter de beschrijving van het draadloze netwerk geeft aan, of de Lukas Video verbinding heeft
(groen symbool) of niet (rood symbool).
2 Deze
USB Wifi dongle moet de Ralink RT3070 chipset hebben en is bij Streamit te bestellen.
Version v1.3
April 2012
15 of 17
5.3
5.2.3
Openingspagina of kanalenlijst instellen
Verbinding met een Wifi netwerk controleren
De gegevens van de draadloze netwerkverbinding worden weergeven op de Wifi status pagina:
• Ga via de knop ‘MENU’ op de afstandsbediening naar het apparaatmenu
• Kies het menu ‘Network settings’
• Kies de optie ‘Wifi status’
5.3
Openingspagina of kanalenlijst instellen
Standaard is de Lukas Video ingesteld om EventCaster te gebruiken en begint de Lukas Video met de
pagina http://av.streamit.eu/stb. Om de Lukas Video een andere pagina te laten laden bij het
opstarten, gaat u via de knop ‘MENU’ op de afstandsbediening naar het apparaatmenu. Daar kiest u
de optie ‘Content source’.
Het kan zijn, dat degene van wie u de Lukas Video heeft gekregen of gekocht, deze zo
heeft ingesteld, dat deze optie in het menu niet zichtbaar is. Als u hierover vragen
heeft, neemt u dan contact op met degene van wie u de Lukas Video heeft gekregen
of gekocht.
De eerste keuze die u hier te zien krijgt, is tussen ‘Start page’ en ‘Channel list’:
• Start page: Dit de pagina op het internet of lokale netwerk waar de Lukas Video naartoe zal gaan
bij het opstarten.
• Channel list: Dit is een lijst met voorgeprogrammeerde stations. Zie hoofdstuk 4.1 voor het gebruik
hiervan.
De inhoud van de kanalenlijst is niet instelbaar via het apparaatmenu. Neem hiervoor contact op met
degene van wie u de Lukas Video heeft gekregen of gekocht.
De startpagina kan wel aangepast worden via het apparaatmenu. Maak gebruik het schermtoetsenbord
door middel van de cursortoetsen en de ‘OK’ toets om de gewenste URL in te typen. Sluit af door naar
de ‘OK’ toets te gaan en op ‘OK’ te klikken op de afstandsbediening.
5.4
Fabrieksinstellingen terugzetten
Om de fabrieksinstellingen terug te zetten, gaat u via de knop ‘MENU’ op de afstandsbediening naar
het apparaatmenu. Daar kiest u de optie ‘Factory reset’ en voert het wachtwoord in: 123123. Bevestig
uw keuze door naar de knop ‘OK’ te gaan en op ‘OK’ te klikken op de afstandsbediening.
5.5
Apparaatgegevens bekijken
Mocht de sticker met het MAC-adres niet meer op de Lukas Video zitten, dan kunt u dit adres hier
vinden. Verder zijn de gegevens in dit scherm eigenlijk alleen van belang bij het oplossen van storingen.
Bij contact met Streamit support kan de medewerker naar deze gegevens vragen.
Version v1.3
April 2012
16 of 17
6. Specificaties
6
Specificaties
Afmetingen
Gewicht
Voeding
Ingang
Uitgang
Video
Audio Analoog
Video codecs
Audio codecs
Bit rate
Gebruiksomgeving
EMC conformance
Veiligheid
RoHS
WEEE
Bedrijfstemperatuur
Vochtigheidspercentage tijdens opslag
7
150 x 110 x 30 mm
330g
5VDC / 2.5A via externe power supply
Ethernet 10/100 BaseT via RJ-45 shielded connector
HDMI of Composiet/RCA audio-video
PAL en NTSC
stereo uit
MPEG4 (H.264)
AAC / HE-AAC
0.3 - 8Mbps
ETS 300-019-1-3 Class 3.1
FCC Part 15 class B, 2004/108/EC EN55022
CAN/CSA-C22.2 No. 60950-1-03, EN60950
2002-95-EC
2002-96-EC
0-40 graden Celsius
5-95% (niet-condenserend)
Streamit support
Met deze handleiding hebben wij gepoogd u zo duidelijk mogelijk uit te leggen hoe de Lukas Video werkt.
Maar wij kunnen ons voorstellen dat u een vraag hebt of probleem tegenkomt waarop het antwoord niet
in deze handleiding staat. In dit geval raden wij u aan om te kijken of over dit onderwerp iets op de
website van Streamit te vinden is: http://nl.streamit.eu.
Daarnaast vinden wij het prettig om uw mening over dit product te horen en/of tips voor verbetering
van u te vernemen, dus kom gerust eens langs of stuur ons een email.
Tot slot wensen wij u veel plezier in het gebruik van de Lukas Video.
Version v1.3
April 2012
17 of 17


![Streamit Maven user manual [firmware version 2.22.0]](http://vs1.manualzilla.com/store/data/006918496_1-ec2babbff5a065a03e66471e2de505b7-150x150.png)