1
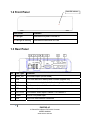
ENXDVR-4C Digital Surveillance in a Box 4 Channel Digital Video Recorder And 4 CCD Security Cameras with Night Vision User’s Manual Copyright © 2010 by Encore Electronics Inc. All rights reserved. No part of this document may be reproduced or transmitted in any form or by any means, electronic, mechanical, photocopying, recording, or otherwise, without prior written permission of Encore Electronics Inc. Encore Electronics Inc. reserves the right to make improvements in the products described in this manual at any time without notice. Information provided in this manual is intended to be accurate and reliable. However, Encore Electronics Inc. assumes no responsibility for its fair use, nor for any infringements of the rights of third parties, which may result from its use. To the maximum extent permitted by applicable law, under no circumstances shall Encore Electronics Inc. or any of its licensors be responsible for any loss of data or income or any special, incidental, consequential or indirect damages howsoever caused. The contents of this document are provided “as is”. Except as required by applicable law, no warranties of any kind, either express or implied, including, but not limited to, the implied warranties of merchantability and fitness for a particular purpose, are made in relation to the accuracy, reliability or contents of this document. Encore Electronics Inc reserves the right to revise this document or withdraw it at any time without prior notice. Reverse engineering of included software is prohibited to the extent permitted by applicable law. Insofar as this user guide contains any limitations on Encore Electronics Inc. representations, warranties, damages and liabilities, such limitations shall likewise limit any representations, warranties, damages and liabilities of Encore Electronics Inc licensors. Table of Contents 1 Overview .............................................................................................................2 1.1 Introduction .............................................................................................................. 3 1.2 Front Panel ............................................................................................................... 5 1.3 Rear Panel ............................................................................................................... 5 1.4 BALUN Adapter (Balance-Unbalance) ..................................................................... 6 1.5 Remote Control ........................................................................................................ 6 2 Hardware Setup ..................................................................................................8 2.1 Internal Hard Disk Installation .................................................................................. 9 2.2 External Device Installation ...................................................................................... 12 2.3 0Selecting Video Format .......................................................................................... 14 3 Initial Setup .........................................................................................................15 3.1 Initial Setup .............................................................................................................. 16 3.2 Onscreen Information ............................................................................................... 16 3.3 Main Menu ............................................................................................................... 18 3.4 Channel Setup ......................................................................................................... 19 3.5 Record Setup ........................................................................................................... 21 3.6 Detector Setup ......................................................................................................... 26 3.7 System Setup ........................................................................................................... 29 3.8 Hardware Setup ....................................................................................................... 35 3.9 Language Selection.................................................................................................. 45 3.10 Exit Main Menu....................................................................................................... 45 4 Data Backup .......................................................................................................47 4.1 Backing Up Data ...................................................................................................... 48 4.2 Backup to USB ......................................................................................................... 49 5 LAN & Online Viewing Setup .............................................................................50 5.1 Identify Router IP Address ....................................................................................... 51 5.2 DynDNS Service Overview ...................................................................................... 53 5.3 Register with DynDNS.............................................................................................. 54 5.4 Create DynDNS Account.......................................................................................... 54 5.5 Login and Host Service ............................................................................................ 56 5.6 Setup Router ............................................................................................................ 58 5.7 Setup DynDNS Setting on Encore ENXDVR-4C Surveillance DVR ........................ 58 5.8 Set PC Client Setting................................................................................................ 59 6 PC Client and PC Viewer ...................................................................................60 6.1 Main Menu ............................................................................................................... 61 6.2 PC Player ................................................................................................................. 65 6.3 Web Browser Viewer ................................................................................................ 75 6.4 Capturing Videos ...................................................................................................... 78 iii 7 Secuviewer .........................................................................................................81 7.1 Setup ........................................................................................................................ 82 7.2 Connecting to ENXDVR-4C Surveillance DVR ........................................................ 83 7.3 Login Setup .............................................................................................................. 86 7.4 Language ................................................................................................................. 87 7.5 Help .......................................................................................................................... 87 7.6 Exit ........................................................................................................................... 87 iv Packing List Check the package contents and make sure all the components listed below are present. If in case there is/are missing part/s, do not return the package to the store, contact our tech support, we will be more than happy to assist you. • • • • • • • • • • • 1 x 4-Channel Surveillance DVR (No Hard Drive in this model) 4 x Encore CCD All Weather and lightning proof cameras 4 x BALUN adapter 1 x Power adapter 1 x AC power cord 1 x USB Mouse 1 x IR Remote Control 1 x IR Receiver Extension Cable (for Remote Control) 2 x AAA Batteries for Remote Control (Optional) 1 x Quick Installation Guide 1 x Utility CD (includes user manual and software) Caution • • • • • • • • • Make sure to unplug the power adapter of the Encore 4-Channel Surveillance DVR before opening or hooking up any components Secure all cables and connectors before powering up the DVR Never leave loose parts or any foreign objects inside the DVR unit Do not open or install any internal components in a dusty and wet or extremely humid environment. Operate the Encore 4-Channel Surveillance DVR in a well ventilated areas to avoid overheating Do not block the air vents located on top of the housing Do not over expose the Surveillance DVR unit to a direct sunlight If you are unsure or in doubt of anything about running cables and connections during installation and upgrades, please contact a licensed technician No end user-serviceable parts inside except for the hard disk drive and the PAL/NTSC mechanical switch. Extra care must be followed to avoid electrical shock or permanent damage to the DVR. 1 ENXDVR-4C 4 Channel Surveillance DVR with 4 Cameras USER’S MANUAL www.encore-usa.com Chapter 1 1 Overview 2 ENXDVR-4C 4 Channel Surveillance DVR with 4 Cameras USER’S MANUAL www.encore-usa.com 1.1 Introduction Encore’s ENXDVR-4C Surveillance in a Box is a compact 4-channel surveillance DVR designed for home and small business use. It is easy to install. With its small compact size, it’s a space saver as well. The Encore’s Surveillance in a Box provides an intuitive onscreen menu to manipulate the DVR operations according to your likes and needs, it can be set to capture exactly what is most important to you and how it should capture, like motion detection. It stays idle until motion is detected and it start recording for a specific amount of time. This unique application gives you peace of mind knowing that you have the protection to places that are most important to you. The Mini-DVR offers a number of technical advantages. Video captures from up to four places is stored in a Motion JPEG format, a universal format readable not only on your DVR but also to almost any computer in the world. The ability to support one internal 2.5” SATA hard drive means that the system will run for days or weeks before running out of space or needing to re-write over the oldest video scenes. ENXDVR-4C Encore’s Surveillance DVR is fully equipped with the following: • • • • • • • Four channel RJ45 input. Four high-quality all weather and lightning proof Encore CCD cameras included in the package, these cameras are equipped with 24 night vision LED’s which make recording in the dark a daylight-like video quality. Dual compressions. MJPEG for video recording coupled with MPEG4 for network streaming. With these protocols there will be no freezing and limitations on what computer or operating system to use, most video player utility can play your recorded videos and with MPEG4 your network would not clogged your bandwidth that causes network hang-ups, etc. Compact Size, easy to hide to almost anywhere you like. Duplex operation with Half-D1 resolution recording Supports any brand of a 2.5” SATA hard drive of up to 1TB capacity for more video capturing Onscreen menu changeable with mouse and remote control. Easy and simple even for novice users Displays, monitors, playbacks, backup and records videos. Flexibility, you can playback specific video file or you can go by time and date stamped. 3 ENXDVR-4C 4 Channel Surveillance DVR with 4 Cameras USER’S MANUAL www.encore-usa.com • • • • • Motion detection with adjustable sensitivity area. You can select which areas to be monitored and captured when motion is detected. I can also be set to record on specific recording and duration time. Authentication management for easy users’ management. Create a backup admin user in case default admin is deleted by accident, or create a regular user with limited access rights to just monitoring job only and many more. Easy backup to USB flash drive device, select only the video capture you think is vital and save it in the USB flash drive, stick it in your computer’s USB port and playback for review or save to the hard drive for backup. Software upgradeable using USB pen drive. Software or Firmware can be easily updated using a flash drive. PC Player for Data Viewer on PC. Remote login or view your cameras even you are offsite, whether you are in the office or somewhere in Europe and want to view, change settings or playback remotely, not a problem. 4 ENXDVR-4C 4 Channel Surveillance DVR with 4 Cameras USER’S MANUAL www.encore-usa.com 1.2 Front Panel Red LED indicator LED Color Function ● Red light Indicates the system is turned on ● Red light & Blinking Indicates the hard drive is in use 1.3 Rear Panel No. Port Type Function 1 Audio_out For Audio output (not all model) 2 USB For USB flash drive backup and software upgrade only 3 USB For mouse use only (attach before turning on the system) 4 IR Extender For the remote control infrared cable extension 5 VGA For video output 6 CH1~CH4 For camera Video inputs Channel 1 to Channel 4 7 Power For DC12V power input 8 LAN For RJ45 LAN network connection 5 ENXDVR-4C 4 Channel Surveillance DVR with 4 Cameras USER’S MANUAL www.encore-usa.com 1.4 BALUN Adapter (Balance-Unbalance) Balun provides connection to the RJ45 Video-In connector using UTP or STP cable to a regular camera BNC connector using COAX cable. Picture below shows a simple connection diagram for BALUN and components. The Network cable shown above connects to the Video-In RJ45 port Channel 1 to Channel 4. Microphone requires special adapter RCA (female) to Microphone connector. Microphone only works on CH1 port. 1.5 Remote Control 6 ENXDVR-4C 4 Channel Surveillance DVR with 4 Cameras USER’S MANUAL www.encore-usa.com No Button / Name Function in DVR Mode 1 REC Start or stop recording / backup. 2 z DVR Switch to DVR mode 3 z PTZ Not Available in ENXDVR-4C 4 WW REW Rewind through video 5 STOP Stop playback or backup 6 II PAUSE Pause recording of playback 7 XX FF Fast forward through video 8 ► PLAY Start video playback 9 MENU Enter a menu or exit 10 ▲(UP) ▼(DOWN) W(LEFT) ►(RIGHT) Move through lists or change the settings of choices 11 (Enter/Select) Change and confirm values 12 4 AUTO Start automatic screen view rotation 13 MODE Changes to split-screen mode 14 - ZOOM OUT Not available in DVR mode 15 + ZOOM IN Not available in DVR mode 16 1,2,----16 (Channels) Selects the channel to view in full screen NOTE 1- Auto pan and line scan may be switched, depending on the camera’s internal setting. 7 ENXDVR-4C 4 Channel Surveillance DVR with 4 Cameras USER’S MANUAL www.encore-usa.com Chapter 2 2 Hardware Setup 8 ENXDVR-4C 4 Channel Surveillance DVR with 4 Cameras USER’S MANUAL www.encore-usa.com WARNING Make sure power cable is unplugged from the unit before starting! 2.1 Internal Hard Disk Installation Step 1 Remove the top housing. Unscrew four screws on the bottom side of DVR to remove the chassis’s top housing Step 2 Fix the HDD and Cables 9 ENXDVR-4C 4 Channel Surveillance DVR with 4 Cameras USER’S MANUAL www.encore-usa.com Step 3 Connect the SATA cable and power cable to the main board. 10 ENXDVR-4C 4 Channel Surveillance DVR with 4 Cameras USER’S MANUAL www.encore-usa.com Step 4 Screw the top housing back to the bottom side of DVR by four screws. 11 ENXDVR-4C 4 Channel Surveillance DVR with 4 Cameras USER’S MANUAL www.encore-usa.com 2.2 External Device Installation NOTE All devices must be connected first before turning the 4Channel Surveillance DVR system on. The following external devices can be connected to the Encore 4 Channel Surveillance DVR. The USB connector on the rear panel is for a USB mouse. 12 ENXDVR-4C 4 Channel Surveillance DVR with 4 Cameras USER’S MANUAL www.encore-usa.com 2.2.1 Mouse Connect a USB mouse to the USB connector labeled mouse (PS/2 compatible). Note that the USB port only supports USB mice, and no other USB devices. 2.2.2 LCD Display Connect an LCD monitor to the VGA output to view the video output. 2.2.3 Security Cameras Connect the included 4 Sony Standard IR Cameras to each of the BNC connector of the Balun then connect an RJ45 with twisted-pair cable to the Surveillance DVR. The included cameras don’t have microphone built-in. 2.2.4 Power Adaptor Connect the power adaptor plug to the DC-In port plug socket. Plug the other cable from the power adapter to the main wall outlet. 2.2.5 USB Flash Drive The USB flash drive is used for upgrading the firmware and for backing up recorded videos. This USB port only supports flash drives and do not support other regular USB devices. 2.2.6 IR Extender The IR extender cable allows an infra red head to be placed in a location where it can be in the line-of-sight of the remote control. 13 ENXDVR-4C 4 Channel Surveillance DVR with 4 Cameras USER’S MANUAL www.encore-usa.com 2.3 0Selecting Video Format The Encore Surveillance DVR can accept either PAL or NTSC video input. The correct video standard can be chosen using the jumper indicated below. 14 ENXDVR-4C 4 Channel Surveillance DVR with 4 Cameras USER’S MANUAL www.encore-usa.com Chapter 3 3 Initial Setup 15 ENXDVR-4C 4 Channel Surveillance DVR with 4 Cameras USER’S MANUAL www.encore-usa.com 3.1 Initial Setup After proper installation, the DVR is ready to use. After turning on the system, the DVR takes a few moments to startup. The main display screen is shown after the system is ready. 3.2 Onscreen Information 16 ENXDVR-4C 4 Channel Surveillance DVR with 4 Cameras USER’S MANUAL www.encore-usa.com 3.2.1 State Information Camera working No signal from camera Recording Stop recording Network connected Network disconnected USB disk connected Optical disk inserted Hard drive status 1st / 2nd drive active Hard drive overwrite enabled Channel display rotation enabled XX% Percentage of hard drive already used 2007/12/25 Current date 18:25:31 Current time 3.2.2 Icons 4-channel split view 9-channel split view Auto channel rotation Start recording Stop recording Enter main menu Playback menu Archive menu Event search Pan/Tile/Zoom control Recording information Hard drive information Network information 17 ENXDVR-4C 4 Channel Surveillance DVR with 4 Cameras USER’S MANUAL www.encore-usa.com 3.3 Main Menu Press then enter the password to enter the main menu. Default password is “123456”. Press to exit the password dialog. The main menu appears as shown below. • • • • • • • Channel Setup: selects the channel to change the settings for. Select “All” to set the settings the same for all channels. Record Setup: sets the recording status Detector Setup: sets the channel to detect and the detection/sensor status System Setup: sets up most of the system options Hardware Setup: for updating the firmware, setting up the hard drive, display and audio Language Selection: selects the language for the system menus Exit Main Menu: exits the main menu 18 ENXDVR-4C 4 Channel Surveillance DVR with 4 Cameras USER’S MANUAL www.encore-usa.com 3.4 Channel Setup Press to enter the “Channel setup” as following. 3.4.1 Channel Number Select the channel or channels to adjust. ” / ” (default) sets viewing to full screen mode. Select the channels to be viewed on the screen. 3.4.2 Active Channel Enables and disables video inputs ON – displays on screen and channel number changes to red OFF – doesn’t display on screen and channel number turns to white 3.4.3 Record Channel Sets the selected channels to record or not. ON – selected channels are recorded OFF – selected channels are not recorded 19 ENXDVR-4C 4 Channel Surveillance DVR with 4 Cameras USER’S MANUAL www.encore-usa.com 3.4.4 Hidden Channel Sets the selected channel as hidden, so it may be recorded, but not displayed on the screen. ON – the channel will be recorded, but not displayed on the screen OFF – the channel is both recorded and displayed on the screen 3.4.5 Channel Name Specify a readable name for the channel (up to 24 characters). Standard names include “Room”, “Hall”, “Door”, “Lift”, “Area”, “Floor”, “Entry” and “Point”. Alternatively, define a custom name by choosing the letters from the onscreen keypad. 3.4.6 Rotation Time Set the delay between screen changes in screen rotation mode (2~30sec) 3.4.7 Color Adjustment • • • • Brightness: Press “↵” button to change (1~20). Default is 10 Contrast: Press “↵” button to change (1~20). Default is 10 Hue: Press “↵” button to change (1~32). Default is 16 Saturation: Press “↵” button to change (1~32). Default is 16 20 ENXDVR-4C 4 Channel Surveillance DVR with 4 Cameras USER’S MANUAL www.encore-usa.com 3.5 Record Setup Move cursor to "Record Setup" and press “↵” to enter "Record Setup" as following. 3.5.1 Auto Record Set how long to wait before automatically recording after the system is turned on. • • • • • • • 0 s (no automatic recording) 10 s 20 s 30 s 40 s 50 s 60 s 3.5.2 Video Quality Three quality settings are available. • • • Low – Lower quality video, but more video can fit on the hard drive Medium – a balance between Low and High quality High – Higher quality video, takes more hard drive space 21 ENXDVR-4C 4 Channel Surveillance DVR with 4 Cameras USER’S MANUAL www.encore-usa.com 3.5.3 Record Frame Rate Setup the recording frame rate for each channel. 3.5.3.1 Auto Balance Dynamically sets the frame rate for each channel. After turning on, any channel that sets off the alarm or senses movement will be give a higher frame rate until the alarm stops 3.5.3.2 Record Total Frame Rate Setup the frame rate for each channel separately. 4-channels: 60/60FPS available, 15FPS per channel as default 8-channels: 56/60FPS available, 7FPS per channel as default 22 ENXDVR-4C 4 Channel Surveillance DVR with 4 Cameras USER’S MANUAL www.encore-usa.com 3.5.4 Record Schedule Each channel can be set to record at certain times or when certain events happen. 3.5.4.1 Channel Number Select the channel to change the schedule for. ” / ” sets the schedule for all of the channels. “1,2,3,4,5,6,7,8”: sets the schedule for an individual channel. 3.5.4.2 Recording Mode Select None Recording is off Time Indicates to record by time schedule Motion Indicates to record by motion detection Select the setting you would like to apply to the time slots on the calendar. To set everything to this setting press “” in the top left corner. 23 ENXDVR-4C 4 Channel Surveillance DVR with 4 Cameras USER’S MANUAL www.encore-usa.com Set the selection for a whole day by clicking the X to the left of the day. For example, Sunday is set to “Motion” mode and Saturday to “None Record mode” To set for the same time on everyday, click the T above that time slot. 24 ENXDVR-4C 4 Channel Surveillance DVR with 4 Cameras USER’S MANUAL www.encore-usa.com Each block on the calendar can also be individually set by just clicking on it. 25 ENXDVR-4C 4 Channel Surveillance DVR with 4 Cameras USER’S MANUAL www.encore-usa.com 3.6 Detector Setup Adjust the motion sensor sensitivity. 3.6.1 Channel Number Choose the channel to set. ” / ” applies the settings to all the channels Select “1,2,3,4” “1,2,3,4,5,6,7,8” to apply the settings to just the selected channel. 3.6.2 Video Loss Alarm To setup alarm mode when video loss by each/all channel: “Mute”: No sounds ever. “ Buzzer-Short”: sounds a small beep when the video signal stops “ Buzzer-Long”: sounds a long beep when the video signal stops 26 ENXDVR-4C 4 Channel Surveillance DVR with 4 Cameras USER’S MANUAL www.encore-usa.com 3.6.3 Motion Setup To select the motion sensitivity scale as “Sensitive OFF”, “Sensitive Low”, “Sensitive Normal”, “Sensitive High” or “Sensitive Highest”. “Sensitive OFF”: doesn’t detect any movement “Sensitive Low”: activates for the biggest movements “Sensitive Normal”: activates for normal movement “Sensitive High”: activates for very small movement “Sensitive Highest”: activates for almost any movement 3.6.4 Record Time Set how long the timed recording lasts. The following options are available: 5, 10, 15, 20, 25, 30, 45, 60, 90, 120, 150 or 180 seconds. 3.6.5 Alarm Mode To setup the alarm mode when motion is triggered. “Mute”: no beeping “ Buzzer-Short”: emit a small beep when something is detected. “ Buzzer-Long”: emit a longer beep when something is detected. “ Alarm-Short”: sound the external alarm for a short time when the alarm is triggered. “ Alarm-Long”: sound the external alarm for a short time when the alarm is triggered. 3.6.6 Alarm Time Sets how long recording lasts after the alarm. The following options are available: 5, 10, 15, 20, 25, 30, 35, 40, 45, 50, 55 or 60 seconds. 27 ENXDVR-4C 4 Channel Surveillance DVR with 4 Cameras USER’S MANUAL www.encore-usa.com 3.6.7 Trigger Full Screen When activated the channel that detected movement will be maximized to fill the whole screen. “ OFF”: It will not display in full screen when the channel is triggered. Also, the trigger area will turn to “red-color” 3.6.8 Trigger Type Initial Trigger and Continuous Trigger are available. Initial Trigger: timing starts when the first movement is detected, and stops when the allotted time is finished. Recording will start again if more movement is detected. Continuous Trigger: timing starts when the first movement is detected, but the amount of recording time elapsed is reset every time more movement is detected. 3.6.9 Motion Area Setup Select the motion detection area. This must be set for motion detection to work. If not set, no motion detection will occur. Use c(u), d(v), __ (W), ``(X) to adjust the area. Press “” or right-click to save. 28 ENXDVR-4C 4 Channel Surveillance DVR with 4 Cameras USER’S MANUAL www.encore-usa.com 3.7 System Setup To set up the Password, time, date and button beep…etc. 3.7.1 Query Error Message Display logs for all error messages. “ ”: Show error message with time stamp. “X”: Clear all error messages. 29 ENXDVR-4C 4 Channel Surveillance DVR with 4 Cameras USER’S MANUAL www.encore-usa.com 3.7.2 View Setup Set which items appear on the main in recording mode. 3.7.2.1 Icon Help When it is OFF, no icons will appear on the main recording screen. Alternatively, icons can be disabled individually as detailed in the sections below. 3.7.2.2 Error Message Information System will save all error messages, all messages will be cleared after reboot. “9 ON” - Display the error message. “X OFF” – Does not display the error message 30 ENXDVR-4C 4 Channel Surveillance DVR with 4 Cameras USER’S MANUAL www.encore-usa.com 3.7.2.3 State Information It includes record light, hard drive information, date/time information and rotate information. All information can be set separately to be seen or not. 3.7.2.4 Channel Information Channel information includes channel number, channel name, record light, video loss, record mode, detector mode and alarm view. All information can be set separately to be seen or not. . , , , , , : Recording status , Channel Number : Video Signal Status : Detection mode and status (Icon will blink when motion is triggered) : Alarm Active : Buzzer active 31 ENXDVR-4C 4 Channel Surveillance DVR with 4 Cameras USER’S MANUAL www.encore-usa.com 3.7.3 Date/Time Setup Setting up date and time 3.7.3.1 Date View Mode Sets the date display format Ex: DD/MM/YYYY, MM/DD/YYYY or YYYY/MM/DD. 3.7.3.2 Time Set To setup the day/time. i / j (K / L): change the number /(/): move selection left or right : exit 3.7.3.3 Time Zone Set the time zone where you are located. 32 ENXDVR-4C 4 Channel Surveillance DVR with 4 Cameras USER’S MANUAL www.encore-usa.com 3.7.3.4 Daylight Saving Time Set daylight savings time settings. 3.7.3.5 NTP Server Synchronize DVR day/ time to NTP server through internet. • • • • Server Active: “9Enable”-To set this function available. ” X Disable”Ignore this function Server IP: The IP address of NTP server Interval (Days): Set how many days to synchronize Synchronize Now: Select it to start Synchronizing the NTP server 33 ENXDVR-4C 4 Channel Surveillance DVR with 4 Cameras USER’S MANUAL www.encore-usa.com 3.7.4 Button Beep Setup The system beep will sound when certain events occur. Each can be set to mute, Sound A, Sound B or Sound C. (Keypad beep setting is available for the keypad equipped models) 3.7.5 Input Device Setup To setup the speed of input device: mouse, mouse repeat, keypad and IR remote as Slow, normal or fast 34 ENXDVR-4C 4 Channel Surveillance DVR with 4 Cameras USER’S MANUAL www.encore-usa.com (Keypad repeat speed is available for the keypad equipped models) 3.7.6 Auto Exit Menu Set the menu to automatically exit after a period of time. Set to OFF to only exit manually, otherwise exit after 10, 20, 30, 40, 50 or 60 seconds. 3.8 Hardware Setup 3.8.1 Authentication Setup Set user permissions. : create a new account or delete account. “__ (W), ``(X)”: set the permissions. A “9” indicates that user has permission. An “X” indicates that user does not have permission. 35 ENXDVR-4C 4 Channel Surveillance DVR with 4 Cameras USER’S MANUAL www.encore-usa.com (Account Active): The account is active. (Account Disable): The account is not active. Account ID (account name): Enter characters as account ID. Password (Password): By entering six characters or numbers as password. Remark: • • Settings that are disabled for all users can be freely adjusted without entering a password. If all accounts are disabled then all settings can be changed by anyone. 3.8.2 Hard Drive Setup To set up the hard drive information and the overwriting function. 3.8.2.1 Overwrite enable “9YES”: The hard drive automatically writes over the oldest video on the hard drive when it runs out of space for recording “X NO”: Recording will stop when the hard drive is full. 3.8.2.2 Hard Disk Info Summary It will display the Hard Drive model No. automatically. • • • Record Begin Time: The starting day/time of hard drive recording Record End Time: The latest day/time of hard drive recording Standard Record Size: The recorded Capacity / Total hard drive capacity by Mega-byte. Also show up the % of how much capacity has been used. 36 ENXDVR-4C 4 Channel Surveillance DVR with 4 Cameras USER’S MANUAL www.encore-usa.com • Standard Event Quantity: The capacity has been recorded of event / Total capacity for event. 3.8.2.3 Master Hard Disk • • • • • • Model: master hard drive model number Record Begin Time: The day and time this drive was first recorded onto Record End Time: The most recent day and time the drive was recorded onto Standard Record Size: The recorded Capacity / Total hard drive capacity by Mega-byte. Also show up the % of how much capacity has been used. Standard Event Quantity: The quantity has been record of event / Total quantity for event. Format Hard Drive: To format the hard drive. If the system is running at recording mode, it is not permitted to format the hard drive and shows a warning. 37 ENXDVR-4C 4 Channel Surveillance DVR with 4 Cameras USER’S MANUAL www.encore-usa.com 3.8.3 Network Setup To set up Network configurations 3.8.3.1 Network Active “9 Enable”: Network is permitted to be used “X Disable”: Network is not permitted to be used 3.8.3.2 Accept Client “9YES” to enable the network client function. “X NO” means there is no network client available. 3.8.3.3 Video Transmission Quality Setup the quality of Video Transmission as High, Normal or Low. 3.8.3.4 Audio Transmission “9ON”: Enable or “X OFF”: Disable audio transmission 3.8.3.5 Port Assign a communication port (a series of number). 3.8.3.6 IP Address Setup The IP address acts as a locator for one IP device to find another and interact with it. 38 ENXDVR-4C 4 Channel Surveillance DVR with 4 Cameras USER’S MANUAL www.encore-usa.com There are two kinds IP types: Static IP address and Dynamic IP address (DHCP and PPPoE) for selection. • • • • • • • Static IP Address: When a computer uses the same IP address every time it connects to the network, it is known as a Static IP address Static IP addresses are manually assigned to a computer by an administrator DHCP: With dynamic IP addresses, where an IP address is automatically assigned to a computer by a remote server which is acting as a Dynamic Host Configuration Protocol (DHCP) server PPPoE: Dial-up and some broadband networks do not use DHCP, but instead use the dynamic IP addressing capability of the Point-to-Point Protocol over Ethernet. GATEWAY: Gateway IP address, please check with your M.I.S staff or administrator to enter the setting. SUBNET MASK: Subnet mask is a range of logical addresses that is assigned to an organization. Please check with your M.I.S staff or administrator to enter the setting MAC Address: It is a number that acts like a name for a particular network adapter. It has been set at dedicated address even reset the DVR. 3.8.3.7 Server Setup • Default DNS Address: The Domain Name system (DNS) translate hostnames to IP addresses (default setting). If there is no customer DNS address setting or fail, DVR will go for Default DNS Address. 39 ENXDVR-4C 4 Channel Surveillance DVR with 4 Cameras USER’S MANUAL www.encore-usa.com • • Custom DNS Address: The Domain Name system (DNS) translate hostnames to IP addresses (customer setting). WEB Server: DVR WEB Server response the requests from browsers, and serve remote monitoring through IE Browser. • • • “Service Active”: Enable the Web Server service. “Port”: Assign a port as the Web Server “Upload IE ActiveX File”: Upload Active-X component to DVR for PC (IE Browser) using. To get Active-X component from CD as attached and save it into USB disk. Then plug the USB disk into DVR for installation. • Dynamic DNS: Dynamic DNS is a system which allows the domain name data held in a name server to be updated in real time. • • • • “Service Active”: Enable the Dynamic DNS service. “Provider”: The web site / IP Address of Dynamic DNS provider “Server Name”: To define a name of Dynamic DNS “Account”: The account name of Dynamic DNS 40 ENXDVR-4C 4 Channel Surveillance DVR with 4 Cameras USER’S MANUAL www.encore-usa.com • “Password”: Password for Dynamic DNS Please refer to DYNDNS Service 3.8.4 Screen Setup 3.8.4.1 Screen Border “9ON”: To enable the border, “X OFF”: To disable the screen border. 3.8.4.2 Video Adjustment Adjust the whole picture to right/left or up/down by pressing /(/) or i / j (K / L). “ / / ”: Set it as default location 41 ENXDVR-4C 4 Channel Surveillance DVR with 4 Cameras USER’S MANUAL www.encore-usa.com 3.8.4.3 VGA Resolution To set the resolution as 640x480, 800x600, 1024x768 or 1280x1024. 3.8.5 Audio Setup Sets up audio recording and playback options. 3.8.5.1 Audio Record “9ON”: Enable audio recording. “X OFF”: Disable audio recording 3.8.5.2 Audio Mute “9ON”: the audio is played through the audio output on the DVR “X OFF”: the DVR audio output is muted 3.8.5.3 Input Volume “X OFF”: Turn off the audio input volume 42 ENXDVR-4C 4 Channel Surveillance DVR with 4 Cameras USER’S MANUAL www.encore-usa.com “1,2,3,4…….10”: Adjust audio input volume from quiet to loud. 3.8.5.4 Output Volume “X OFF”: Turn off the audio output volume “1,2,3,4, …….10”: Adjust audio output volume from quiet to loud. 3.8.6 Firmware Update The firmware is updated by putting a USB pen drive with the flash file into the USB port. Plug the USB disk into the USB port on DVR rear panel After plug in USB disk, it shows” Read file Information” on the bottom line 43 ENXDVR-4C 4 Channel Surveillance DVR with 4 Cameras USER’S MANUAL www.encore-usa.com If there is a mistake or missing file on the pen drive, it will show: File not found or Disk Error on the bottom line. Please check USB disk or file and plug in again. After reading the firmware upgrade. is displayed. Click this button on begin the When DVR is updating the firmware, it shows “Firmware is updating, please wait”. After firmware update is completed, Firmware update is success, System will restart ----“ is displayed, and then the system restarts. 44 ENXDVR-4C 4 Channel Surveillance DVR with 4 Cameras USER’S MANUAL www.encore-usa.com 3.9 Language Selection The DVR supports the following languages (default language depends on regional settings) • • • • English Traditional Chinese Spanish Portuguese 3.10 Exit Main Menu Save or discard changes before exiting. 45 ENXDVR-4C 4 Channel Surveillance DVR with 4 Cameras USER’S MANUAL www.encore-usa.com 3.10.1 Exit & Save Changes Save all changes then exits. 3.10.2 Exit & Discard Changes Exits without saving any of the changes made. Confirm with “Yes” or go back to the menu by choosing “No”. 46 ENXDVR-4C 4 Channel Surveillance DVR with 4 Cameras USER’S MANUAL www.encore-usa.com Chapter 4 4 Data Backup 47 ENXDVR-4C 4 Channel Surveillance DVR with 4 Cameras USER’S MANUAL www.encore-usa.com 4.1 Backing Up Data Press “X” (or “IIX”) button to enter the Play menu. Use “(Ç/È)” buttons to select the data to backup. Press” “Backup Menu”. ” to enter the Disk information is shown in the top portion, recorded data information is shown in the bottom portion. • • • Hard Drive: shows the hard drive the data will be backup up to. Backup Device: shows the USB disk for data backup. Free Capacity: shows the amount of free space on the USB disk. 48 ENXDVR-4C 4 Channel Surveillance DVR with 4 Cameras USER’S MANUAL www.encore-usa.com 4.2 Backup to USB The DVR supports data backup by using a USB memory stick or flash drive using the USB port in the rear panel. You can change the time period of recorded data for backup by setting the “Start Time” and “End Time”. The “Free Capacity”, “Estimate Time”,”Backup Period” and “Backup Size” will be changed automatically. It will be showing the “Start Time” and “End Time” for the selected video recorded data. Press “ ”, it starts to backup data into USB disk. 49 ENXDVR-4C 4 Channel Surveillance DVR with 4 Cameras USER’S MANUAL www.encore-usa.com Chapter 5 5 LAN & Online Viewing Setup 50 ENXDVR-4C 4 Channel Surveillance DVR with 4 Cameras USER’S MANUAL www.encore-usa.com 5.1 Identify Router IP Address Please click “Start” and then “Run” option under Windows. Please enter “CMD” and then “OK” Please enter “ipconfig” on DOS prompt, and then record the Address Number of Default Gateway as shown: It is the Router’s IP Address. 51 ENXDVR-4C 4 Channel Surveillance DVR with 4 Cameras USER’S MANUAL www.encore-usa.com Finding your ENXDVR-4C Surveillance DVR IP address Because the Router IP address is 192.168.11.1 as we found out earlier, the network domain IP address would be 192.168.11.xxx (where x are variables). Generally the usable IP Address in this range would be between 192.168.11.2 ~ 192.168.11.253. The suggested range to be use should be from 192.168.11.160 to 192.168.11.199. Then search for an IP Address that is not being used at the present. Use the PING technique. At the DOS Prompt, type-in - ping 192.168.11.188 If it appears “Request timed out” as the resulted message that means this IP address is not being used at the moment and can be used for the DVR If it appears “Reply from 192.168.11.188: bytes=32 time<10ms TTL=128” messages, that means this IP Address [192.168.11.188] is being used and assigned to some network device, do not use this one or it will conflict with other device. Please try to find out another IP Address that is not being used. 52 ENXDVR-4C 4 Channel Surveillance DVR with 4 Cameras USER’S MANUAL www.encore-usa.com Then, go back to DVR menu: “Network Setup” to enter the FREE IP address. • • • • IP ADDRESS: Enter the DVR’s address [192.168.011.188] GATEWAY: Enter Router IP Address[192.168.011.001] NET MASK: 255.255.255.0 PORT: Enter the DVR’s port number [14338 14337] 5.2 DynDNS Service Overview For DVR only can set at static IP address and no support the dynamic IP. If you have to use dynamic IP that it recommend serving as DYNDNS service. DYNDNS is a service the maps internet domain names to IP address and works with dynamic IP address (assigned by ISP server). Remark: A router is needed as the interface between PC and DVR when DVR is under internal network environment. 53 ENXDVR-4C 4 Channel Surveillance DVR with 4 Cameras USER’S MANUAL www.encore-usa.com 5.3 Register with DynDNS There are three suggestions for DYNDNS: www.no-ip.com, www.changeip.com and www.dyndns.com The following will use DYNDNS website: http://www.dyndns.com as example. Create Account at the first beginning after entering DynDNS (DYNDNS service) website. 5.4 Create DynDNS Account Click the Create Account, and then start to create your own DynDNS Account and fill out all the blanks for account’s application as following: After you click "Create Account", it shows “Account Created”. 54 ENXDVR-4C 4 Channel Surveillance DVR with 4 Cameras USER’S MANUAL www.encore-usa.com Also, DynDNS will create a new account for you and send you an e-mail to the address you provided. It needs to confirm your account within 48 hours after receiving the e-mail or it will automatically delete your account. Just click the first link to confirm the account 55 ENXDVR-4C 4 Channel Surveillance DVR with 4 Cameras USER’S MANUAL www.encore-usa.com 5.5 Login and Host Service Login to DynDNS by entering your registered username and password. You have to register to acquire username and password. Then, go to “My Service” to get a host name Double click “Add New Hostname” as following: 56 ENXDVR-4C 4 Channel Surveillance DVR with 4 Cameras USER’S MANUAL www.encore-usa.com Specify the Hostname for DYNDNS IP which will be applied to the DVR’s DYNDNS setting. We take DVR-HOST.dyndns.biz as an example, and click “Create Host” Now, the DYNDNS service is completed. Well keep the User name, Password and Hostname 57 ENXDVR-4C 4 Channel Surveillance DVR with 4 Cameras USER’S MANUAL www.encore-usa.com 5.6 Setup Router Most of the setting of router is identical, here is the suggestion: • • • • Specify DYNDNS service provider: DnyDNS.org (dynamic) Specify DYNDNS IP by DYNDNS account (user name / password ) Specify DVR IP as private IP setting Specify one pair of connection port (control port / streaming port) , like”8841” 5.7 Setup DynDNS Setting on Encore ENXDVR-4C Surveillance DVR After completing the DYNDNS account application, go to DVR server setup menu and input the DYNDNS information for network connection. 58 ENXDVR-4C 4 Channel Surveillance DVR with 4 Cameras USER’S MANUAL www.encore-usa.com 5.8 Set PC Client Setting Enter the “Option” at PC Client to setup Network Options-DYNDNS configuration. 59 ENXDVR-4C 4 Channel Surveillance DVR with 4 Cameras USER’S MANUAL www.encore-usa.com Chapter 6 6 PC Client and PC Viewer 60 ENXDVR-4C 4 Channel Surveillance DVR with 4 Cameras USER’S MANUAL www.encore-usa.com 6.1 Main Menu 6.1.1 Playback Press “X” (or “IIX”) button or icon window. • • • • to enter Play menu in the live view Hard Drive Select: show the hard drive information Channel Select: select the channel to playback Play Begin Time: specify the beginning of the playback Play End Time: specify the end time of the playback The information below it shows the available recorded events. Option: Window switching as follows 61 ENXDVR-4C 4 Channel Surveillance DVR with 4 Cameras USER’S MANUAL www.encore-usa.com Play: Start playing the recorded data. After the data has been played, it will show “9” Backup: To backup the recorded data. Please refer to the “Backup” section Commands and Recorded Data status: • • S/N of Recorded Data: Series Number of recorded data provide by system Recording Configuration o o o / : Scrolls up/down one page of recorded data in the list window. : indicates the hard drive the data is stored in. : shows the recording mode : the data can be played. (Doesn’t show if no video recording is available) Recording Time: The date / time of recorded data. Status o 9 : The recorded video data has been played. o • • o : Power ON/OFF event occur. 62 ENXDVR-4C 4 Channel Surveillance DVR with 4 Cameras USER’S MANUAL www.encore-usa.com • Searching: A vertical scroll bar to search recorded data by mouse for more convenient. 6.1.2 Event Search Press “y” (or “S”) button or icon • • • • • • • • to enter Event Search Menu Hard Drive Select: show the hard drive status Channel Select: specify the channels to search Filter Type: filter by event type “General Event”, “Record Event”, Triggered Event”, “Hardware Event”, “Warning Event”, and “All Events” Filter Time Setup: Active Filter Time: Enable/Disable filter time of event Filter Begin Time: To specify the beginning time of event filter Filter End Time: To specify the end time of event filter Time Reset Range: To reset the event search time period according to all effective events as recorded 63 ENXDVR-4C 4 Channel Surveillance DVR with 4 Cameras USER’S MANUAL www.encore-usa.com Option: The top frame of search menu switching to event content display Play: Start to play the event which has been selected Backup: Backup the event which has been selected • • • • Event Name: show the name of the selected event Event Type: show the event type Triggered Channel: show the triggered channel Record End Time: shows the recording end time. 64 ENXDVR-4C 4 Channel Surveillance DVR with 4 Cameras USER’S MANUAL www.encore-usa.com 6.2 PC Player The PC player is for viewing recorded video, taking snapshots and converting video to AVI format on PCs that support Windows 2000/XP/Vista/Windows7. 6.2.1 Installation The PC Player software under the PC Viewer Utility Software help you play videos on to your PC under the Windows Environment, please refer to the CD. If you have not done so, click to install the “PC Viewer Utility Software” icon (see picture below) to install the program and follow the on-screen instructions. At the PDr4TLG Viewer screen, click on the “Player” tab to access the “PC Player” screen. 65 ENXDVR-4C 4 Channel Surveillance DVR with 4 Cameras USER’S MANUAL www.encore-usa.com Windows Vista® requires administrator user rights to run the installations. Follow the directions below for setting up the PC player in Windows Vista. • Find the PDvr4TLG shortcut either on your desktop or folder in your local hard disk drive then use the right button of your mouse to click it. Go to PC Player Properties setting, select the Shortcut tab then choose “Advanced”. • Enable “Run as administrator”; then, press OK to complete PC player properties setting.• 66 ENXDVR-4C 4 Channel Surveillance DVR with 4 Cameras USER’S MANUAL www.encore-usa.com 6.2.2 Overview Press or click the “Player” tab to see screens. No Name Function 1 Open Open file. To retrieve the desired video data. 2 __ Fast Backward Press to play backward faster. 3 W Reverse Press to playback backward 4 W I Previous frame Button for one single frame backward 5 I I Pause Pause the video playback 6 I X Next Frame Button for advancing one single frame 67 ENXDVR-4C 4 Channel Surveillance DVR with 4 Cameras USER’S MANUAL www.encore-usa.com No Name Function 7 X Playback Start video playback 8 `` Fast forward Press to play the recorded stream faster. 9 Still capture click to snapshot the data as BMP file 10 Mode (Full) 11 / To display each channel on full-screen To display 4/8channels on screen 12 Speaker Set Speaker On / OFF. 13 Speaker Volume To adjust the speaker’s volume 14 Video Video Play. 15 Player Press to act at PC Viewer environment 16 Client Press to act at PC Client environment 17 AVI Click to create a new file to save AVI file in PC and start to convert the data into AVI file and save. 6.2.3 Connect PC Client to DVR Press the “Client” tab, then press the “¨” button located in the leftmost bottom corner of the viewer screen. At the login screen, enter your login information Select “Connect” and click the “Login” button. 68 ENXDVR-4C 4 Channel Surveillance DVR with 4 Cameras USER’S MANUAL www.encore-usa.com IP Address / Port: Enter the IP address of the ENXDVR-4C, the default IP address is set to automatic or DHCP Password: The password is the same password that be used for formatting the DVR Hard Drive. The default is “123456”. Then press “Login” to connect to ENXDVR-4C Surveillance DVR “ connecting” This means the PC client is trying to connect to DVR. Once the PC and DVR connection is completed, the control bar below will show ” connected” on status bar. If connection fails or disconnected, it will show “ not connected” 69 ENXDVR-4C 4 Channel Surveillance DVR with 4 Cameras USER’S MANUAL www.encore-usa.com 6.2.4 Status information 6.2.5 Control Icons After connected, the DVR can be controlled from the remote site using the control icons. No Name Description 1 ¨/ § Connect/Disconnect the network within PC and DVR 2 Channel Mode: To display 4 split screen 3 Channel Mode: To display 9 split screen 5 Channel 1display at full screen (4ch DVR) To display Channel1, channel2….. channel4 by sequencing on 70 ENXDVR-4C 4 Channel Surveillance DVR with 4 Cameras USER’S MANUAL www.encore-usa.com No Name Description screen (8ch DVR) 6 Channel 2 display at full screen (4ch DVR) To display Channe5, channel6….. channel8 by sequencing on screen (8ch DVR) 7 Channel 3 display at full screen (4ch DVR) 4 split view the Channel1 ~ channel4 (8ch DVR) 8 Channel 4 display at full screen (4ch DVR) 4 split view the Channel5 ~ channel8 (8ch DVR) 10 MENU Enter menu or exit 11 UP Moves up through the list of menus or enter Search Manu 12 DOWN Moves down through the list of menus or starting auto rotation 13 SELECT Use this button to change or confirm values on main menu or sub menu setting. 14 Mute On/Off Set Speaker On / OFF. 15 Volume To adjust the speaker’s volume 71 ENXDVR-4C 4 Channel Surveillance DVR with 4 Cameras USER’S MANUAL www.encore-usa.com 6.2.6 Opening a previously recorded video file for Playback You can playback the recorded video file by using “Open File” function in two ways as following. The default path of local recording is C:\Capture, this is where all the recorded video files are saved unless the location was changed. Or you can change the path under hierarchical menu: “Option” 72 ENXDVR-4C 4 Channel Surveillance DVR with 4 Cameras USER’S MANUAL www.encore-usa.com Mouse Remote Control: To enable/discard the mouse operating on DVR when you use mouse operation at Client site. 6.2.7 Open Disk for Playback Plug the USB memory stick with data backup into PC. Press the right button of mouse to the “Player” tab, and then select “Open Disk”. Select the video file then, press “OK” to start playback the data in USB removable flash drive. 73 ENXDVR-4C 4 Channel Surveillance DVR with 4 Cameras USER’S MANUAL www.encore-usa.com 6.2.8 Capture When you want to capture a selected recorded video file, use the “Capture” function. First, select the video file you desired by using “Open File” then it will play automatically. Press “I I Pause” before using “Capture”. Use your mouse to select the starting point, then press the ”Mark In” button. Use your mouse again to select the end point, then press ”Mark Out” Then go back to the drop down menu and select “Export”. 74 ENXDVR-4C 4 Channel Surveillance DVR with 4 Cameras USER’S MANUAL www.encore-usa.com 6.3 Web Browser Viewer You can remote control the DVR unit through IE Browser Before starting to IE Browser, please make sure Active-X is installed. ActiveX can also be installed from the web site or directly from the DVR through the webpage. Or bring up your internet browser such as the Internet Explorer then type-in the DVR IP address to URL field bar (you may refer to section 7.3.6 IP Address Setup for more information). Then press “this file” located on the top section of the screen (see picture below) to download the Utility software bundled with the Active-X from DVR. The following is an example in connecting to the DVR using the web browser, Internet Explorer. Make sure you have done all the wirings most especially the LAN cable to you LAN: • In your Web Browser’s URL field enter the DVR IP address: <example 192.168.11.138> • Enter the “Port: 8841”, and “Password: xxxxxx” (123456 is the default password) • Then, click “Connect” You may get some screen messages, just follow screen instructions if it happens. All the settings and the operations can be done using your mouse and buttons, 75 ENXDVR-4C 4 Channel Surveillance DVR with 4 Cameras USER’S MANUAL www.encore-usa.com 6.3.1 Menu Control Name Function 0,1,2,----9,A,B,…F Numbers (0,1,2~9) and characters (A,B,…,F) for inputs ENTER Input Confirm / change values on main /sub menu setting. MENU Enter menu or exit. + Moves right / Channel change - Moves left / Channel change 76 ENXDVR-4C 4 Channel Surveillance DVR with 4 Cameras USER’S MANUAL www.encore-usa.com Name Function ▲ (UP) ▼ (DOWN) W (LEFT) ► (RIGHT) Moves up/down/left/right through the list of menus. Or use it to select / change the DVR configuration values. Select Use this button to change or confirm values on main menu or sub menu setting 6.3.2 Channel & Split Name Function CH01, CH02 ..CH08 Channel Number (Channel 1 ~ 8) 4 Split 4 split view on the screen 9 Split 9 split view on the screen All Channels Display all channel 4/8 on the screen 6.3.3 Play Control Name Function << REW Backward search through a time-shifted or recorded video. STOP Stop playback or backup. II PAUSE Pause recording or playback. ► PLAY Start video playback. ● REC Start or stop recording/backup. FF >> Forward search through a time-shifted or recorded video. 77 ENXDVR-4C 4 Channel Surveillance DVR with 4 Cameras USER’S MANUAL www.encore-usa.com 6.4 Capturing Videos Before doing the PC Capturing, please make sure K-Lite Codec Pack has already installed. You can refer to http://www.freecodecs.com/download/K_Lite_Codec_Pack.htm Or Insert the ENXDVR-4C Setup Disc and click on icon as seen in the Main Menu screen below. Make sure you have internet connection because this icon will bring you to the K-Lite web site where you can download the codec to run AVI and other videos. 78 ENXDVR-4C 4 Channel Surveillance DVR with 4 Cameras USER’S MANUAL www.encore-usa.com Press “AVI” on the top to capture video that is synchronous with DVR and save as a file on PC. Before PC starting to capture video from DVR, it asks will it lower down the internet speed. 79 ENXDVR-4C 4 Channel Surveillance DVR with 4 Cameras USER’S MANUAL www.encore-usa.com Also, you can setup the directory for file saving. Then, start to capture the video from DVR synchronously. When the video capture processing, the icon “AVI” will change as following: Press “AVI” again for stop/completing the video capture and save file. And icon “AVI” will back to normal. 80 ENXDVR-4C 4 Channel Surveillance DVR with 4 Cameras USER’S MANUAL www.encore-usa.com Chapter 7 7 Secuviewer 81 ENXDVR-4C 4 Channel Surveillance DVR with 4 Cameras USER’S MANUAL www.encore-usa.com 7.1 Setup You can remote view the ENXDVR-4C Surveillance DVR unit through 3G application software. Be sure that the following conditions are met before starting: • Move your mouse arrow to • then select from child popup menu for your 3G phone – generic or BlackBerry. Once download is complete, extract files to your PC. Make sure you know where to locate the extracted files on your PC hard disk drive. • Note: If you get an error reading the file message, this means you have no Zip file extractor software on your PC. You can download a Zip file extractor from the internet. Example: www.winzip.com Double click on the Secuviewer to extract the file, this will create a new folder with new files inside the folder Connect your 3G cell phone to your PC according to your cell phone’s instructions and the cell phone provided cable to PC’s USB port. Using the files you just extracted to your PC, you may now install the application software on your 3G mobile phone. It supports Java MIDP version 2.0 and above. Check your 3G cell phone’s instruction on how to install application software such as SecuViewer Utility Software from PC. • • icon from the Setup Disc Main Menu After SecuViewer is well setup, it will show the picture on mobile phone as in the below image: 82 ENXDVR-4C 4 Channel Surveillance DVR with 4 Cameras USER’S MANUAL www.encore-usa.com 7.2 Connecting to ENXDVR-4C Surveillance DVR Press “DVR Connect” to start connecting your cell phone to the ENXDVR-4C Surveillance DVR. WARNING Using this service requires a 3G data connection on your phone or device. Data charges may apply. Check with your service provider before using the Secuviewer. NOTE Some models of mobile phone will show a warning “Allow application to send to the Internet? “ Please enter “YES”. Once connected, the DVR operating screen will show up for the remote view. Mobile phone keypad usage: • ↑,2 - Up • ↓,8 - Down • ←,4 - Left • • • →,6 - Right Enter and 5 - Confirm 0 - Cancel [System] : Setup Keypad lock/unlock, Screen rotate, Disconnect and DVR info 83 ENXDVR-4C 4 Channel Surveillance DVR with 4 Cameras USER’S MANUAL www.encore-usa.com Keypad Lock / Unlock the operating keys on mobile phone. When the keypad is locked, it shows the icon: . Screen Rotate: Rotate the canvas 90deg clockwise for a larger viewing size. Or use hotkey "#" to rotate screen Disconnect: To disconnect the mobile phone and DVR. 84 ENXDVR-4C 4 Channel Surveillance DVR with 4 Cameras USER’S MANUAL www.encore-usa.com DVR Info: DVR information includes DVR model, Firmware version, video type. [Key] - The mobile is operated by keypad, there are buttons for DVR remote control [Key]- The mobile is operated by stylus, there are buttons for DVR remote control Operating keys: 85 ENXDVR-4C 4 Channel Surveillance DVR with 4 Cameras USER’S MANUAL www.encore-usa.com Number 0 - 9 : can be the number only or channel selection [*]: Main menu As connect to 4CH DVR : 1-4 => Switch Channel 0 => Quad Screen As connect to 8CH DVR : 1-8 => Switch Channel 0 => 9-Split Screen 41 => 4-Split Screen 1 42 => 4-Split Screen 2 99 => 9-Split Screen 7.3 Login Setup To login to the ENXDVR-4C Surveillance DVR, use the same procedure when logging-in on a regular PC network connection and password (123456 default password for default user “admin”. 86 ENXDVR-4C 4 Channel Surveillance DVR with 4 Cameras USER’S MANUAL www.encore-usa.com 7.4 Language Select the language of the software. 7.5 Help Provide online help and descript how to operate SecuViewer. 7.6 Exit Press “Exit” to leave the SecuViewer application. 87 ENXDVR-4C 4 Channel Surveillance DVR with 4 Cameras USER’S MANUAL www.encore-usa.com