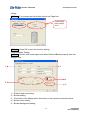
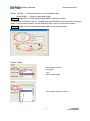
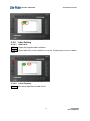
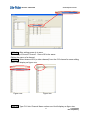
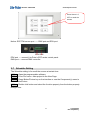
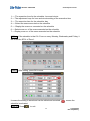
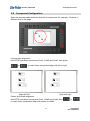
1
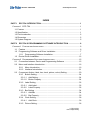
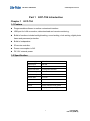
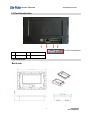
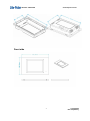
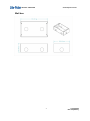
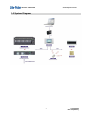
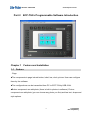
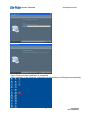
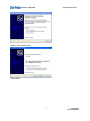
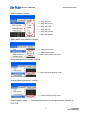
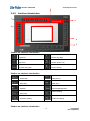
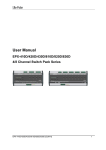
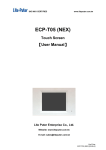
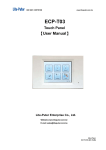
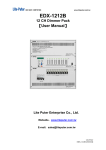
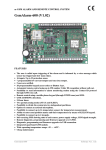
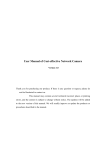
ISO 9001 CERTIFIED www.liteputer.com.tw ECP-T04 Touch Panel 【User Manual】 Lite Puter Enterprise Co., Ltd. Website:www.liteputer.com.tw E-mail:[email protected] LITE-PUTER ECP-T04 [EUM-C] ISO 9001 CERTIFIED www.liteputer.com.tw INDEX PART 1 ECP-T04 INTRODUCTION ............................................................................. 1 CHAPTER 1 ECP-T04 .................................................................................................. 1 1-1 Feature .............................................................................................................. 1 1-2 Specification ....................................................................................................... 1 1-3 Port Introduction................................................................................................. 2 1-4 Dimension .......................................................................................................... 2 1-5 System Diagram ................................................................................................ 5 PART 2 ECP-T04’S PROGRAMMING SOFTWARE INTRODUCTION ....................... 6 CHAPTER 1 FEATURE AND INSTALLATION ........................................................................ 6 1-1 Feature ............................................................................................................ 6 1-2 Programming Software and Driver Installation ................................................ 7 1-2-1 Programming Software Installation...................................................... 7 1-3 Device Driver Installation ............................................................................... 12 CHAPTER 2 PROGRAMMING SOFTWARE INTRODUCTION................................................. 15 2-1 Connection between Device and Programming Software ............................. 15 2-2 Menu and Interface Introduction .................................................................... 16 2-3 2-2-1 Menu Introduction.............................................................................. 16 2-2-2 Interface Introduction......................................................................... 21 Component (button, label, bar, clock, picture, value) Setting......................... 20 2-3-1 Button Setting .................................................................................... 24 2-3-1-1 Add Setting ................................................................................. 24 2-3-1-2 Button Property........................................................................... 24 2-3-2 Label Setting ..................................................................................... 32 2-3-2-1 Add Label ................................................................................... 32 2-3-2-2 Label Property ............................................................................ 32 2-3-3 Bar Setting ........................................................................................ 34 2-3-3-1 Add Bar ...................................................................................... 34 2-3-3-2 Bar Property ............................................................................... 35 2-3-4 Clock Setting ..................................................................................... 36 2-3-4-1 Add Clock ................................................................................... 36 2-3-5 Picture Setting ................................................................................... 36 LITE-PUTER ECP-T04[EUM-B] ISO 9001 CERTIFIED 2-4 2-5 2-6 2-7 2-8 2-9 www.liteputer.com.tw 2-3-5-1 Add Picture ................................................................................. 36 2-3-5-2 Picture Property .......................................................................... 37 2-3-6 Album Sertting ................................................................................... 37 2-3-7 Button,picture‘s IR remote control ..................................................... 37 2-3-8 Value Setting ..................................................................................... 43 2-3-8-1 Add Value ................................................................................... 43 2-3-8-2 Value Property ............................................................................ 43 Page Setting .................................................................................................. 44 2-4-1 Page Setting...................................................................................... 43 2-4-2 Built-in Function Setting .................................................................... 43 Button‘s Advanced Setting............................................................................. 50 Scene Setting ................................................................................................ 55 2-6-1 Scene editing .................................................................................... 54 2-6-2 Scene recall ...................................................................................... 63 Schedule Setting ........................................................................................... 65 Component Configuration.............................................................................. 69 File Download................................................................................................ 72 GUARANTEE ............................................................................................................... 76 LITE-PUTER ECP-T04[EUM-B] ISO 9001 CERTIFIED Part 1 Chapter 1 www.liteputer.com.tw ECP-T04 Introduction ECP-T04 1-1 Feature Programmable software to realize customized interface. USB port for LAN connection, data download and remote monitoring. Build-in functions include backlight setting, sound setting, clock setting, digital photo frame and password protection. Build-in loudspeaker. IR remote controller. Power consumption is 2W. DC 12V external power. 1-2 Specification Power supply DC: 12V Signal input RS-485 Signal output DMX512/1990 Signal connector 4 PIN green terminal Connection port USB/LAN RAM memory 256MB Screen size 5.7 inch Resolution 320*240 Color 262K colors screen 4-wire resistive touch panel Size 215(W)x140(H)x 39(D)cm 1 LITE-PUTER ECP-T04 [EUM-B] ISO 9001 CERTIFIED www.liteputer.com.tw 1-3 Port Introduction 1 2 3 4 3,4 Port introduction 1 USB port 3 EDX port 2 LAN port 4 DMX port 1-4 Dimension Back side 2 LITE-PUTER ECP-T04[EUM-C] ISO 9001 CERTIFIED www.liteputer.com.tw Front side 3 LITE-PUTER ECP-T04[EUM-C] ISO 9001 CERTIFIED www.liteputer.com.tw Wall box 4 LITE-PUTER ECP-T04[EUM-C] ISO 9001 CERTIFIED www.liteputer.com.tw 1-5 System Diagram 5 LITE-PUTER ECP-T04[EUM-C] ISO 9001 CERTIFIED Part 2 Chapter 1 www.liteputer.com.tw ECP-T04’s Programmable Software Introduction Feature and Installation 1-1 Feature -Page The components in page include button, label, bar, clock, picture. User can configure them by the software. The configurations can be transmitted from PC to ECP-T04 by USB /LAN. Button component can add photo (there is built-in photos in software). Picture component can add photo (you can choose any photo you like) and has text, shape and style options. 6 LITE-PUTER ECP-T04[EUM-C] ISO 9001 CERTIFIED www.liteputer.com.tw -Timer 50 timers. -Bulid-in function Clock setting(can be synchronized with PC) Backlight setting .(3 options: normal, turn off in 5mins and turn off in 20 mins) Voice setting. (turn on/off screen tap sound) Schedule setting/Preview function. Password protection. The above function can be link to the buttons on the page. 1-2 Programmable Software and Driver Installation 1-2-1 Programmable Software Installation STEP-1 Copy ECP-T04‘s installation program from the CD to desktop as below, STEP-2 Double click the icon, 7 LITE-PUTER ECP-T04[EUM-C] ISO 9001 CERTIFIED www.liteputer.com.tw Traditional Chinese Simplified Chinese Japanese English User can select the language from the list. STEP-3 After language selection and press Next, Next Press Next again, 8 LITE-PUTER ECP-T04[EUM-C] ISO 9001 CERTIFIED STEP-4 www.liteputer.com.tw Press Yes, Press Next in the following steps, 9 LITE-PUTER ECP-T04[EUM-C] ISO 9001 CERTIFIED www.liteputer.com.tw 10 LITE-PUTER ECP-T04[EUM-C] ISO 9001 CERTIFIED www.liteputer.com.tw Press Finish and then installation is completed After installation is ok, there are 2 shortcuts on the desktop and all programs separately, 11 LITE-PUTER ECP-T04[EUM-C] ISO 9001 CERTIFIED 1-3 www.liteputer.com.tw Device Driver Installation After programmable software installation, next step is device driver installation. STEP-1 After installing programmable software correctly, copy the driver folder in c:\Program Files\Lite-Puter\ECP-T04\Driver\ to the desktop. STEP-2 Connect the device with PC by USB cable and it pops up the dialogue box will be popped as below, 12 LITE-PUTER ECP-T04[EUM-C] ISO 9001 CERTIFIED www.liteputer.com.tw Select ―No, not this time‖ , Press Next , 13 LITE-PUTER ECP-T04[EUM-C] ISO 9001 CERTIFIED www.liteputer.com.tw Select the driver folder on the desktop. STEP-3 Press Next again, Press Finish and the driver is installed. How to install ECP-T04 USB Driver in Windows Vista 64 bit/ Windows 7 64 bit? Following are the steps to disable driver signature enforcement in 64 bit operating system 1. During boot-up press F8. 2. In the list of options that appear select “Disable driver signature enforcement”. 3. Connect ECP-T04 with your PC by USB cable. 4. Install driver in folder “C:\Program Files\Lite Puter\ECP-T04\driver\ win7-vista\x64” 14 LITE-PUTER ECP-T04[EUM-C] ISO 9001 CERTIFIED www.liteputer.com.tw Chapter 2.Programmable Software Introduction 2-1 Connection between Device and Programmable Software When the user opens the programmable software, it will display as below, Figure 1:Device is unconnected with programmable software. Figure 2:Device is connected with programmable software. Connected by USB Connected by Lan 15 LITE-PUTER ECP-T04[EUM-C] ISO 9001 CERTIFIED www.liteputer.com.tw 2-2 Menu and Interface Introduction 2-2-1 Menu Introduction File menu can create, open and save a file. ——Create new project ——Open file ——Save file ——Save as file ——Exit the programming software Component(c) menu can add button, label, clock picture and bar. ——Add button ——Add label ——Add value ——Add clock ——Add picture ——Add bar Format (F) menu can modify the component‘s position, size and space 16 LITE-PUTER ECP-T04[EUM-C] ISO 9001 CERTIFIED www.liteputer.com.tw Align submenu include: ——Align with left ——Align with center ——Align with right ——Align with top ——Align with middle ——Align with bottom Make same size submenu include: ——Make same width ——Make same height ——Make same width and height Horizontal Spacing submenu include: ——make horizontal spacing equal Vertical Spacing submenu include: ——make vertical spacing equal DownLoad(D) menu ——Download the data on the programmable software to ECP-T04. 17 LITE-PUTER ECP-T04[EUM-C] ISO 9001 CERTIFIED www.liteputer.com.tw ——Download all page ——Download current page ——Download current time Device-Set(s) setting includes: IP setting,device description,password settting and MAC address setting. ——IP set ——Device description ——Password set ——MAC address set Three languages can be selected in Language (L) menu. User can find software introduction in Help (H) menu. 18 LITE-PUTER ECP-T04[EUM-C] ISO 9001 CERTIFIED www.liteputer.com.tw 5 2-2-2 Interface Introduction 1 4 2 4 3 1button on interface introduction Open file Delete any page Save file Search device‘s IP Create new page Device setting 2button on interface introduction Add button Add picture Add label Add value Add bar Scene editing button Album setting Add clock Undo the setting Redo the setting 3button on interface introduction 19 LITE-PUTER ECP-T04[EUM-C] ISO 9001 CERTIFIED www.liteputer.com.tw Download all page data to device Download system time to device Download current page data to Download all data to device device Download album photo to device Download scene data to device 4.button on interface introduction Make component align with left Make component have same width Make component align with center Make component have same height Make component align with right Make component have same width and height Make component align with top Horizontal spacing equal Make component align with middle Vertical spacing equal Make component align with bottom Check select the page 5 — This area illustrates the component‗s edited effect. 2-3 Component (button, label, bar, clock, picture, value) Setting Page: A page is a friendly graphic user interface which includes components such as button, label, bar, clock and picture. Component: A graphic object displayed on a page. Component include button, label, bar clock and picture. There are 5 kinds of components: Button:The button is used for control something, you touch a button and something happens. You can turn on a light, recall a scene .A button can have the name of the device it controls written on it, or a picture. The buttons with different function, background, border can exit in same page. Please check the button examples as below, 20 LITE-PUTER ECP-T04[EUM-C] ISO 9001 CERTIFIED www.liteputer.com.tw Buttons can have 4 control functions: page link, scene recall, channel dimming value control. Page link: Link to another page. Scene control: Recall the scenes of the controller. Channel dimming value control has 2 methods: Two buttons (up and down): increase/decrease the dimming value. (The channel no. and zone no. are depended on the EDX system working with ECP-T04.) One button: Directly recall a preset dimming value, for example 50%. Label: Label is used for description \ Bar:A bar can be used to adjust the channel dimming value and display the value from 0%-100%. Picture: The function of picture is the same as the button. Clock: Display time on the ECP-T04 . Value:Display channel‘s dimming value.(from 0%-100%) 2-3-1 Button Setting 2-3-1-1 Add / Copy Button Add Button STEP-1 Open the programmable software, 21 LITE-PUTER ECP-T04[EUM-C] ISO 9001 CERTIFIED STEP-2 www.liteputer.com.tw Press button key on the interface or use the Component(c) menu to add a button, Copy Button Copy the border shape, border color, background color and Inactive, Active color setting of one button to another. STEP-1 After adding a button on the page and set the border shape, border color, background color and Inactive, Active color as below, 22 LITE-PUTER ECP-T04[EUM-C] ISO 9001 CERTIFIED STEP-2 www.liteputer.com.tw Then add another button on the page, Now, there are two buttons on the page: and . STEP-3 Select Meeting Room button and right click to select Format Copy, STEP-4 Select cmd2 button and right click to select Format Paste to copy the setting, 23 LITE-PUTER ECP-T04[EUM-C] ISO 9001 CERTIFIED www.liteputer.com.tw Now, double click the cmd2 button to check the property change. 24 LITE-PUTER ECP-T04[EUM-C] ISO 9001 CERTIFIED www.liteputer.com.tw 2-3-1-2 Button Property STEP-1 After adding a button then double click it, Dialogue box—define button property. Text Setting STEP-2 Select the Text property from the dialogue box, 3 1 4 2 1--- Text display when the button on inactive status 2--- Text display when the button on active status 3--- Align the text position 4--- The text color display when the button on the inactive and active status STEP-3 Key in the text into the inactive blank. For example, key in―ROOM ON‖, into inactive blank and―ROOM OFF‖ into active blank. 25 LITE-PUTER ECP-T04[EUM-C] ISO 9001 CERTIFIED Right click it to key in the text Select the text‘s font STEP-4 www.liteputer.com.tw Right click it to pop up the dialogue box and choose the color. Use text alignment to choose text‘s position on the button. When the position‘s chosen, it will mark as ―X‖. right click any block it will display as― x‖ STEP-5 Press OK to save the text setting , 26 LITE-PUTER ECP-T04[EUM-C] ISO 9001 CERTIFIED www.liteputer.com.tw Image Setting STEP-6 Double click button again and select images property from the dialogue box, Mark here STEP-7 Right click any image below, STEP-8 Use Image Alignment to choose image‘s position on the button. Please refer to the steps of text position setting. STEP-9 Press OK to save the image setting . 27 LITE-PUTER ECP-T04[EUM-C] ISO 9001 CERTIFIED www.liteputer.com.tw Function Setting STEP-10 Double click button again and select function property from the dialogue box. Select the function from the list. Define this button controlled by which key on IR remote controller Please refer the operation to step of 2-3-7. Function list as below, —— set as unused button ——set as page link button ——set as scene recall button ——set as up/down dimmer button ——set as dimmer button ——set as on/off button ——set as bell press button After select the function from the list, please refer to the steps of 2-5 for the advanced 28 LITE-PUTER ECP-T04[EUM-C] ISO 9001 CERTIFIED setting. STEP-11 www.liteputer.com.tw For example set the button function as Page Link. Those setting refer to steps of 2-5. STEP-12 Press OK to save the function setting. Position/Border Setting STEP-13 Double click button again and select Position/Border property from the dialogue box. 2 1 4 3 5 1--- Position and size setting 2--- Border setting 3--- The button color display when the button on the inactive and active status 4--- Border color setting 5--- Border background setting 29 LITE-PUTER ECP-T04[EUM-C] ISO 9001 CERTIFIED www.liteputer.com.tw Notice: Left/Top ——Button‘s position on the illustration area. Width/Height——Button‘s width and height. STEP-14 Right click Left/Top/Width/Height blank to edit the number. For example:Left/Top set as 0/0,Width/Height set as 80/60 and set the button as green when it on the inactive status; set the button as blue, when it on the active status. STEP-15 Right click Left/Top/Width/Height blank to key in the number. Border setting: Border Shape includes: Rectangle Oval Rounded Rectangle Select border width from the list 30 LITE-PUTER ECP-T04[EUM-C] ISO 9001 CERTIFIED www.liteputer.com.tw Border Style includes: Transparent Solid Dash Dot Dash Dot Dash-Dot- Dot Notice:Before the style selection, border width must be set as 1 at least. For example: Set the Border Shape as Oval, Border width as 6, and Border Style as Dash. STEP-16 Right click the Border Shape/Border width/Border Style list to choose the right item. Set Border Width as 6, Set Border Style as Dash STEP-17 Press OK to save the position /border setting , 31 LITE-PUTER ECP-T04[EUM-C] ISO 9001 CERTIFIED 2-3-2 www.liteputer.com.tw Label Setting 2-3-2-1 Add Label STEP-1 STEP-2 Open the programmable software. Press label key on the interface or use the Component(c) menu to add a Label. 2-3-2-2 Label Property STEP-1 After add a label then double click it. 32 LITE-PUTER ECP-T04[EUM-C] ISO 9001 CERTIFIED www.liteputer.com.tw Dialogue box—define label property. Text setting STEP-2 Select the Text property from the dialogue box. 1 2 4 3 1--- Text display on label 2--- Align the text position 3--- Background color setting 4--- Text color setting Please refer to the STEP-3 ~ STEP-5 of button‘s text setting to finish label‘s . Position/Border Setting STEP-3 Double click label again and select Position/Border property from the dialogue box. 33 LITE-PUTER ECP-T04[EUM-C] ISO 9001 CERTIFIED www.liteputer.com.tw 1 2 1--- Position and size setting 2--- Border setting Please refer to the STEP-15 ~ STEP-17 of button‘s Position/Border Setting to finish label‘s . Border Shape include: Rectangle Square Oval Circle Rounded Rectangle Rounded Square 2-3-3 2-3-3-1 Bar Setting Add Bar STEP-1 Open the programmable software. STEP-2 Press bar key on the interface or use the Component(c) menu to add a bar. 34 LITE-PUTER ECP-T04[EUM-C] ISO 9001 CERTIFIED 2-3-3-2 Bar Property STEP-1 Double click the bar on the page. www.liteputer.com.tw Channel‘s address. setting Bar position setting Dialogue box—define bar property. 1--- Position setting 2---Channel‘s address. Setting(from 1 to 512) STEP-2 Press OK to save the setting. 35 LITE-PUTER ECP-T04[EUM-C] ISO 9001 CERTIFIED 2-3-4 www.liteputer.com.tw Clock setting 2-3-4-1 Add Clock STEP-1 STEP-2 Open the programmable software. Press clock key on the interface or use the Component(c) menu to add a clock . The clock can only be synchronized with the system time.(user cannot set the time) 2-3-5 Picture Setting 2-3-5-1 Add Picture STEP-1 STEP-2 Open the programmable software. Press picture key on the interface or use the Component(c) menu to add a picture. 36 LITE-PUTER ECP-T04[EUM-C] ISO 9001 CERTIFIED 2-3-5-2 www.liteputer.com.tw Picture Property Position/Picture Setting STEP-1 After add a picture then double click it. 1 Press to load picture 2 4 3 1--- Position and size setting 2--- Inactive picture path: picture display when the picture on inactive status. 3--- Active picture path: picture display when the picture on active status. 4---make the photo as the same size as picture on the illustration area. Text Setting STEP-2 Double click picture again and select text property from the dialogue box. 1 2 3 37 LITE-PUTER ECP-T04[EUM-C] ISO 9001 CERTIFIED www.liteputer.com.tw 1--- Text display when picture on inactive status 2--- Align the text position 3--- Text color Function Setting STEP-3Double click picture again and select text property from the dialogue box. Select the function from the list. Define this button controlled by which key on IR remote controller Please refer the operation to step of 2-3-7. STEP-4 Press Ok to save the setting. Notice: User can change the button, Label, Bar‘s position and size directly. 2-3-6 Album Setting Album------Load the photo to Digital Photo Frame. (19 photos at most) STEP-1 Open the programmable software. 38 LITE-PUTER ECP-T04[EUM-C] ISO 9001 CERTIFIED STEP-2 Press www.liteputer.com.tw , It can load 19 photos at most; the last one is the size display only. STEP-3 Double click any frame to load the photo. 39 LITE-PUTER ECP-T04[EUM-C] ISO 9001 CERTIFIED www.liteputer.com.tw 3 1 1--- 2 Modify photo‗s position: remove the photo to last or next frame. 2--Tidy up the photo‘s sequence. (When cancel one or more photos, it can remake the sequence. ) 3--- 2-3-7 Exit the Album operation. Button, Picture‘s IR remote control Notice: Only button and picture components of ECP-T04 can accept IR remote control. The IR remote control setting of button and picture is the same, we only take button‗s IR remote control setting as an example, STEP-1 On the current Page, press button key on the interface or use the Component(c) menu to add a button . STEP-2 Double click the button, 40 LITE-PUTER ECP-T04[EUM-C] ISO 9001 CERTIFIED STEP-3 www.liteputer.com.tw Select function property from the dialogue box. Select the function from the list. Button‗s Key Function setting, please refer to step of 2-3-1. STEP-4 For example, select button‗s function as scene and choose the scene 01 of zone 1 to be controlled by this button. 41 LITE-PUTER ECP-T04[EUM-C] ISO 9001 CERTIFIED STEP-5 www.liteputer.com.tw Select the key on the IR remote controller corresponding to this button. For example, set this button corresponding to the FCN key on the IR remote controller. Press FCN key on the remote controller, ECP-T04 will recall the scene 01 of zone 1. STEP-6 Press OK to save the setting. Notice: The key on the IR remote controller can be set to recall any function of the button. The remake on the IR remote controller key is different from the actual function set in ECP-T04 it recalls. 42 LITE-PUTER ECP-T04[EUM-C] ISO 9001 CERTIFIED www.liteputer.com.tw IR Select All the key on the IR remote controller. 2-3-8 Value Setting Value——add channel‘s dimming value display (from 0%-100%) 2-3-8-1Add value STEP-1 STEP-2 Open the programmable software. Press Value key on the interface or use the Component(c) menu to add a Value. 2-3-8-2 Value property STEP-1 Double click the added value component. 43 LITE-PUTER ECP-T04[EUM-C] ISO 9001 CERTIFIED www.liteputer.com.tw Channel; Value‘s s DMX position address setting setting 1-512 回路 Dialogue box—define value property. 1---value‘s position setting 2---channel‘s DMX address setting (From 1 to 512) STEP-2 Press Ok to save the setting. 2-4 Page Setting 2-4-1 Page( User page) Setting STEP-1 Open the programmable software. STEP-2 STEP-3 From File menu—New project to the New Page. Then press to add more pages. 44 LITE-PUTER ECP-T04[EUM-C] ISO 9001 CERTIFIED www.liteputer.com.tw Select pages from the list. Every new page will show with the button ; By pressing it, can go back to Default page Take the New Page setting as example. STEP-4 From the list to shift to New Page and double click the page. Page Properties Dialogue Box Give a name to current page Add or clear the background picture of current page Set the page as default page STEP-5 Click the page name blank and change ―New Page‖ to ―SC1‖. Load picture Clear picture 45 LITE-PUTER ECP-T04[EUM-C] ISO 9001 CERTIFIED www.liteputer.com.tw STEP-6 Press STEP-7 Double click the picture name you want to load. , Press Clear to cancel the picture selection. STEP-8 Press OK to save the setting. 46 LITE-PUTER ECP-T04[EUM-C] ISO 9001 CERTIFIED www.liteputer.com.tw 2-4-2.Built –in Function (Special Page) Setting Notice: User page: the notion of user page is the same as the Page‘s. (Please refer to the explanation under 2-3 Component setting. Special page: The built-in function pages and can be set on the Button Property dialogue box. The special page can be linked by the button component. Built-in functions include backlight set, voice set, clock set, schedule set/preview and password protection. The built- in function pages as below, Take backlight set and voice set as an example. Backlight Setting STEP-1 Open the programmable software STEP-2 From File menu—New project to the New Page. STEP-3 Press button key on the interface or use the Component(c) menu to add a button. STEP-4 Double click the button and the button property dialogue box pops up. 47 LITE-PUTER ECP-T04[EUM-C] ISO 9001 CERTIFIED www.liteputer.com.tw STEP-5 Select the function property from the dialogue box. Select the function, it links to. Select page link STEP-6 Select the Page Link from key function list, mark the circle beside Special Page of Page Link column and select Backlight set from the page list. 48 LITE-PUTER ECP-T04[EUM-C] ISO 9001 CERTIFIED www.liteputer.com.tw The setting of Text, Images, Positon/Border Property, please refer to the steps of 2-3-1. The button can be linked to following built-in function pages, Backlight set page Voice set page Password protection page Clock set page Digital photo frame page Schedule set page STEP-7Press OK to save the setting. After downloading the setting to ECP –T04, the Backlight set page will show by pressing the button. Voice Set STEP-8Add one more button on the same page (New Page), then double click the button and the button property dialogue box pops up. STEP-9On the function property, select the Page Link from key function list, select ―Special Page‖ in Page Link and select Voice set from the page list. It displays as below, 49 LITE-PUTER ECP-T04[EUM-C] ISO 9001 CERTIFIED www.liteputer.com.tw STEP-10Press OK to save the setting. After downloading the setting to ECP-T04, the Voice Set page can be called by pressing the button. The setting of clock set page, password protection page and schedule set page, please refer to the steps backlight set and voice set. 2-5 Button’s Advanced Setting Button‘s advanced setting is the detailed description of the STEP-12to STEP-13 of 2-3-1 Button Setting Double click button and select function property from the dialogue box. It will display as below, 50 LITE-PUTER ECP-T04[EUM-C] ISO 9001 CERTIFIED www.liteputer.com.tw Select the function from the list. Function list as below, ——set as unused button ——set as page link button ——set as scene recall button ——set as up/down dimmer button ——set as dimmer button ——set as on/off button ——set as bell press button a.Unused ——set the Button as unused b. Page Link— Link to other pages Select Page Link from button function list, 51 LITE-PUTER ECP-T04[EUM-C] ISO 9001 CERTIFIED www.liteputer.com.tw Similar to User Page and Special Page on 2-4-2, user can select the pages that link to the buttons. By selecting select , user can select the pages from the list of Page Link column By selecting , user can select the built- in function pages from the list of Page Link column. 52 LITE-PUTER ECP-T04[EUM-C] ISO 9001 CERTIFIED www.liteputer.com.tw c. SCENE——Recall/turn off the corresponding scene by pressing the button. Select scene from key function list, 1 1---the scene‘s zone and status (ON/OFF) selection. The zone can be selected from 1-40 and scene from SC 1~SC 12 and SC OFF. d.Up/Down—— Increase/decrease the corresponding channel‘s dimming value by pressing the button. Select Up/Down from key function list, it will display as below, 53 LITE-PUTER ECP-T04[EUM-C] ISO 9001 CERTIFIED www.liteputer.com.tw 2 1 1----use to set the button to increase/ decrease the channel‘s dimming value. 2---channel selection. It can be any channel from 1~512 channel ) e. Dimmer——By pressing the button, the channel will be turned on at preset dimming value; By releasing the button , the channel will be turned off. Select Dimmer from key Function list, Set the Zone, Channel and Dimming Value on Channel Level column . f. ON/OFF——Set the button as ON/OFF button: press it once, the corresponding channel will be turn on ;press it twice, the corresponding channel will be turn off. For example, select the on/off function from the list, 54 LITE-PUTER ECP-T04[EUM-C] ISO 9001 CERTIFIED www.liteputer.com.tw Select the channel no. from the channel level column, and then press ok to save the setting. h. Bell press ——The same function as ON/OFF button. 2-6 Scene Setting Notice: Scene settings are edited on ECP-T04 directly, while page settings are edited by programmable software. (Please refer to 2-2-1 Menu Introduction to check the download method.) The following pages are example of user page. 2-6-1.Scene editing STEP-1 STEP-2 Open the programmable software. Create a new page and add 6 scene buttons (name as Scene1~5,Scene Off). 55 LITE-PUTER ECP-T04[EUM-C] ISO 9001 CERTIFIED www.liteputer.com.tw For example, define button SC1 STEP-3 Double click the button Scene1 and select the function property from the button property dialogue box, Set Key Function as Scene,Zone as 01,and Scene as 01. STEP-4 Then press on the interface. 1 2 3 4 5 6 56 LITE-PUTER ECP-T04[EUM-C] ISO 9001 CERTIFIED www.liteputer.com.tw 1----- The zone no. the scene belongs to. There are 40 zones for selection.( Zone1~Zone40) 2----- Scene no. selection(SC1~SC12,SC OFF) 3----- Scene editing 4-----Scene copy 5-----Scene paste 6-----close the scene edit dialogue box STEP-5 After zone and scene no. selection, press EDIT. 57 LITE-PUTER ECP-T04[EUM-C] ISO 9001 CERTIFIED www.liteputer.com.tw I H G A B F E C D A——scene name editing B——channel name editing C——512 channels‘ name editing area D——channels in scene editing area E——scene FADE time F——channel‘s dimming value selection (from 0%---100%) G——select all the channels in area D H——shift channel‘s dimming value from 0% and 100% I——directly type in the channel‘s dimming value STEP-6 Name the scene as SC1 and select channel 1-10 in to this scene. 58 LITE-PUTER ECP-T04[EUM-C] ISO 9001 CERTIFIED www.liteputer.com.tw Notice: There are 2 methods to select any channel from the 512 channels. Method 1: Press Ctrl and click any channel from the 512 channels , for example, select the following channels : channel 1, channel 3, channel 5, channel 7, channel 9, channel 12, channel 13, channel 15, channel 16, channel 17. Method 2: Press shift and click any continuous channels from the 512 channels. For 59 LITE-PUTER ECP-T04[EUM-C] ISO 9001 CERTIFIED www.liteputer.com.tw example, select channel 1-10 . STEP-7 Press to load the selected channels 1-10 into the channels in scene editing area . 60 LITE-PUTER ECP-T04[EUM-C] ISO 9001 CERTIFIED www.liteputer.com.tw Notice: -Load the selected channels to the channels in scene editing area. -Load all 512 channels to the channels in scene editing area. -Cancel the selected channels from the channels in scene editing area. -Cancel all channels from the channels in scene editing area. STEP-8 Press Ctrl and click the channel 1, channel 3, channel 5, channel 7, channel 9 in channels in scene editing area. STEP-9 Press above icons to adjust channel 1, channel 3, channel 5, channel 7 and channel 9‘s dimming value to 50% . 61 LITE-PUTER ECP-T04[EUM-C] ISO 9001 CERTIFIED STEP-10 www.liteputer.com.tw Refer to the STEP-8 and STEP-9 to adjust channel 2, channel 4, channel 6, channel 8 and channel 10‘s dimming value to 100%. STEP-11 Setting the channels in SC1‘s fade time from Ramp Rate drop-down For example, set channel 1, channel 3, channel 5, channel 7 and channel 9‘s fade time as 8 seconds: Press Ctrl and click the channel 1, channel 3, channel 5, channel 7, channel 9 in the channels in scene editing area. Then press the Ramp Rate drop-down list and select Over 8 Seconds. 62 LITE-PUTER ECP-T04[EUM-C] ISO 9001 CERTIFIED www.liteputer.com.tw STEP-12 After setting press ok to save. The setting of Scene2- Scene5,Scene Off is the same. Editing the name of a channel STEP-13 Select channel 001(or other channel) from the 512 channel‘s name editing Area, it will display as figure one. Figure one STEP-14 Figure two Type CH1 into Channel Name column and it will display as figure two, 63 LITE-PUTER ECP-T04[EUM-C] ISO 9001 CERTIFIED www.liteputer.com.tw STEP-15 Name channel 1 to 10 as CH1 to CH10 separately and it will display as below, STEP-16 After setting, press OK to save. 2-6-2.Scene recall STEP-1 Download edited page to the device and press Scene1~5 and SCOFF on the touch panel to recall the scenes . 64 LITE-PUTER ECP-T04[EUM-C] ISO 9001 CERTIFIED www.liteputer.com.tw Press Scene1~5, OFF to recall the scenes Notice: ECP-T04has two port ------DMX port and EDX port. EDX DMX EDX port -----connect Lite-Puter‘s ECP series control panel. DMX port-----connect DMX controller. 2-7 Schedule Setting The Schedule setting is for recall the scenes at certain time. STEP-1 Open the programmable software. STEP-2 From File menu—New project to the New Page. STEP-3 Press Button/Picture key on the interface or use the Component(c) menu to add a Button/Picture. STEP-4 Double click button and select the function property from the button property dialogue box. 65 LITE-PUTER ECP-T04[EUM-C] ISO 9001 CERTIFIED www.liteputer.com.tw Select Schedule Select Page Link The setting of Text, Images, and Position/Border property, please refer to the steps of 2-3-1. For example, we set a Button as below, STEP-5 Download this page to ECP-T04 and press this button, it will link to the build-in function page . 66 LITE-PUTER ECP-T04[EUM-C] ISO 9001 CERTIFIED www.liteputer.com.tw 9 8 7 6 1 2 3 4 5 1-----Activate/Deactivate sche (Yes: , No: ) 2-----Go to last or next schedule set page (ECP-T03 has 50 schedules; each page has 5 schedules, 10 pages in total.) 3-----Add schedule 4-----Edit schedule 5-----Cancel schedule 6-----Select schedule (the schedule can be edited and canceled, only after be selected; if the schedule‘s select, it will display as 7-----The scene to be called on the schedule 8-----The scene‘s zone to be called on the schedule 9-----The execution time of the schedule: hour and minute For example, STEP-6 Press . 7 6 1 5 2 4 3 67 LITE-PUTER ECP-T04[EUM-C] ISO 9001 CERTIFIED www.liteputer.com.tw 1------The execution time for the schedule: hour and minute 2-----The adjustment keys for hour and minute setting of the execution time 3----- The execution time for the schedule: day 4------Select the scene executed on the schedule 5------Display the scene no. executed on the schedule 6-----Select zone no. of the scene executed on the schedule 7-----Display zone no. of the scene executed on the schedule STEP-8 If the schedule is that 01:01 am on every Monday, Wednesday and Friday, it will recall the SC01 of Zone 1. STEP-9 After setting, press OK to save . It means the setting is saved and can be edited and canceled. schedule is activated. STEP-10 Press to exit. 68 means the LITE-PUTER ECP-T04[EUM-C] ISO 9001 CERTIFIED 2-8 www.liteputer.com.tw Component Configuration Open the programmable software, and add 3 components (for example, 3 buttons in different size on the page. Left and right alignment: Hold CTRL and select component Cmd1, Cmd2 and Cmd3, then press or to make those components align with left or right. Align with left Center and middle alignment: Align with right Hold CTRL and select component Cmd1, Cmd2 and Cmd3, then press to make those components align with center or middle. 69 or LITE-PUTER ECP-T04[EUM-C] ISO 9001 CERTIFIED www.liteputer.com.tw Align with center Align with middle Top and bottom alignment: Hold CTRL and select component Cmd1, Cmd2 and Cmd3,then press or to make those components align with top or bottom. Align with top Align with bottom Width and height Hold CTRL and select component Cmd1, Cmd2 and Cmd3,then press to make those components have same width and height. or Notice: If you want to make several components have same width and height, you need select the width and height of one as the standard. The component which was selected at the last time is the standard in our software. For example: in the graphs below, we select Cmd1 as the standard. 70 LITE-PUTER ECP-T04[EUM-C] ISO 9001 CERTIFIED www.liteputer.com.tw Make same width Make same width Press to make Cmd1, Cmd2 and Cmd3 has the same width and height. The component which was selected at the last time is the standard in our software. Horizontal Spacing Equal and Vertical Spacing Equal Horizontal Spacing Equal to Vertical Spacing Equal 71 LITE-PUTER ECP-T04[EUM-C] ISO 9001 CERTIFIED www.liteputer.com.tw to 2-9 File Download After the setting on the programmable software, you must download the file to the ECP-T04 . Button on interface introduction Download all page data to device Download system time to device Download current page data to device Download all data to device Download album photo to device Download scene data to device When the ECP-T04 connect with programmable software , press the above buttons and the download progress window will be shown. Download in progress Download is ok Please don’t do any setting while file’s downloading. Notice: 1.Press STEP-1 to search device‘s IP. (only after connecting with ECP-T04) Open the programmable software. 72 LITE-PUTER ECP-T04[EUM-C] ISO 9001 CERTIFIED STEP-2 Press www.liteputer.com.tw . 73 LITE-PUTER ECP-T04[EUM-C] ISO 9001 CERTIFIED STEP-3 www.liteputer.com.tw Press search. 1 2 3 1-----IP address display column 2----- column decides whether the device Information column display or not. display ; not display. 3-----device information column STEP-4 Double click the device information column 74 . LITE-PUTER ECP-T04[EUM-C] ISO 9001 CERTIFIED STEP-5 www.liteputer.com.tw Press OK to finish the connection between ECP-T03 and programmable software. 2. Device setting STEP-1 Open the programmable software, STEP-2 Press . 1 2 3 4 1-----IP address setting 2-----Device name setting 3-----Password setting 4---- MAC address setting 75 LITE-PUTER ECP-T04[EUM-C] ISO 9001 CERTIFIED www.liteputer.com.tw Guarantee Lite-Puter promises to fulfill the following acceptances: 1. Lite-Puter is only responsible for ECP-T04 itself. 2. Lite-Puter guarantees to keep Lite-Puter‘s fault products caused by techniques, materials and any other logical reasons in good repair for free within a year since the distributing date. 3. We do not offer door-visiting service. If the trouble appears in Lite-Puter‘s products, please deliver the equipment to local distributors or Taipei headquarter. *** Special Statement*** Any fault caused by false usage, imprudence (collision or inadequate installation) or force majeure factors are not in Lite-Puter‘s service. Revision Record Version A B C Record First version Add copy button function on 2-3-1-1 Add Windows 64bit driver Issued on: December, 2010 76 LITE-PUTER ECP-T04[EUM-C] ISO 9001 CERTIFIED www.liteputer.com.tw World Headquarters: Lite-Puter Enterprise Co., Ltd. Address: 11F, No. 189, Gangqian Rd., Neihu Dist., Taipei City 11494, Taiwan. Tel: +886-2-27998099 Fax: +886-2-27993828 Website: www.liteputer.com.tw E-mail: [email protected] Shanghai Factory: Lite-Puter Technology(Shanghai)Co.,Ltd. Address: Building B5, No. 298, Lane 3509, Hongmei S. Road, Shanghai, China Zip Code:201108 Tel: +86-21-54408210 Fax: +86-21-64978079 Shanghai Sales Center: Address: Room 701, Building Gem, No. 487, Tianlin Road, Shanghai, China Zip Code: 201103 Tel: +86-21-33674316 / 33674850 Fax: +86-21-33674013 Website: www.liteputer.com.cn E-mail: [email protected] 77 LITE-PUTER ECP-T04[EUM-C]