1
User Guide
Ruckus Wireless ZoneDirector
Release 7.0
Legal Information
Information to the User
Copyright © 2008 Ruckus Wireless, Inc. All rights reserved.
The user’s manual or instruction manual for an intentional or unintentional radiator shall caution the user that changes or modifications not expressly approved by the party responsible for
compliance could void the user’s authority to operate the equipment. In cases where the manual is provided only in a form other
than paper, such as on a computer disk or over the Internet, the
information required by this section may be included in the manual
in that alternative form, provided the user can reasonably be
expected to have the capability to access information in that form.
Trademarks
Ruckus Wireless ZoneDirector, ZoneFlex, 2825, BeamFlex, MediaFlex, MediaFlex 2900 Multimedia Access Point, MediaFlex 2501
Multimedia Wireless Adapter, 2825 Wireless Multimedia Router,
2111 Wireless Multimedia Adapter, and 2211 Metro Broadband
Gateway are trademarks of Ruckus Wireless, Inc.
All other brands and product names are registered trademarks of
their respective holders.
Part number: 820-72100-001
Published: August 2008
Statement of Conditions
In the interest of improving internal design, operational function,
and/or reliability, Ruckus Wireless, Inc. reserves the right to make
changes to the products described in this document without
notice.
Contact Information
Ruckus Wireless
880 West Maude Ave, Suite 101
Sunnyvale, CA 94085
Ruckus Wireless, Inc. does not assume any liability that may
occur due to the use or application of the product(s) or circuit layout(s) described herein.
USA
Support
http://support.ruckuswireless.com
Web
http://www.ruckuswireless.com
ii
Contents
Introducing ZoneDirector . . . . . . . . . . . . . . . . . . . . . . . . . . . . . . . . . . . . . . 1
ZoneDirector Physical Features . . . . . . . . . . . . . . . . . . . . . . . . . . . . . . . . . 2
Buttons, Ports, and Connectors . . . . . . . . . . . . . . . . . . . . . . . . . . . . . . 2
Front Panel LEDs . . . . . . . . . . . . . . . . . . . . . . . . . . . . . . . . . . . . . . . . 4
Overview of a Ruckus Wireless Network . . . . . . . . . . . . . . . . . . . . . . . . . . . 4
Ensuring That APs Can Communicate with ZoneDirector . . . . . . . . . . . . . . . . 5
How APs Discover ZoneDirector on the Network . . . . . . . . . . . . . . . . . . 5
How to Ensure That APs Can Discover ZoneDirector on the Network . . . . 6
Using the ZoneDirector Web Interface . . . . . . . . . . . . . . . . . . . . . . . . . . . 17
Navigating the Dashboard . . . . . . . . . . . . . . . . . . . . . . . . . . . . . . . . . 17
Using Indicator Widgets . . . . . . . . . . . . . . . . . . . . . . . . . . . . . . . . . . 19
About Ruckus Wireless WLAN Security . . . . . . . . . . . . . . . . . . . . . . . . . . . 20
Controlling Device Permissions: Blocking and ACLs . . . . . . . . . . . . . . . . . . 21
Configuring System Settings . . . . . . . . . . . . . . . . . . . . . . . . . . . . . . . . . . 22
Changing the Network Addressing . . . . . . . . . . . . . . . . . . . . . . . . . . . . . . 23
Changing the System Name . . . . . . . . . . . . . . . . . . . . . . . . . . . . . . . . . . 24
Configuring the Built-in DHCP Server . . . . . . . . . . . . . . . . . . . . . . . . . . . . 25
Enabling the Built-in DHCP server . . . . . . . . . . . . . . . . . . . . . . . . . . . 25
Viewing DHCP Clients . . . . . . . . . . . . . . . . . . . . . . . . . . . . . . . . . . . . 26
Updating the Internal Clock. . . . . . . . . . . . . . . . . . . . . . . . . . . . . . . . . . . 27
Changing the System Log Settings. . . . . . . . . . . . . . . . . . . . . . . . . . . . . . 28
Reviewing the Current Log Contents
. . . . . . . . . . . . . . . . . . . . . . . . . 28
Checking the Current Log Settings . . . . . . . . . . . . . . . . . . . . . . . . . . . 30
Setting Up Email Alarm Notification . . . . . . . . . . . . . . . . . . . . . . . . . . . . . 31
Customizing the Guest Login Page . . . . . . . . . . . . . . . . . . . . . . . . . . . . . . 32
Upgrading ZoneDirector and ZoneFlex APs . . . . . . . . . . . . . . . . . . . . . . . . 34
Working with Backup Files . . . . . . . . . . . . . . . . . . . . . . . . . . . . . . . . . . . 35
Backing Up a Network Configuration
. . . . . . . . . . . . . . . . . . . . . . . . . 35
Restoring Archived Settings to ZoneDirector . . . . . . . . . . . . . . . . . . . . 36
Restoring ZoneDirector to Default Factory Settings . . . . . . . . . . . . . . . . . . 36
Alternate Factory Default Reset Method . . . . . . . . . . . . . . . . . . . . . . . 37
Enabling Management via FlexMaster . . . . . . . . . . . . . . . . . . . . . . . . . . . . 37
Managing a Wireless Local Area Network . . . . . . . . . . . . . . . . . . . . . . . . 39
Overview of Wireless Networks . . . . . . . . . . . . . . . . . . . . . . . . . . . . . . . . 40
Customizing WLAN Security . . . . . . . . . . . . . . . . . . . . . . . . . . . . . . . . . . 40
iii
Reviewing the Initial Security Configuration . . . . . . . . . . . . . . . . . . . . 40
Fine-tuning the Current Security Mode . . . . . . . . . . . . . . . . . . . . . . . . 41
Switching to a Different Security Mode . . . . . . . . . . . . . . . . . . . . . . . . 41
Using the Built-in EAP Server . . . . . . . . . . . . . . . . . . . . . . . . . . . . . . 42
Authenticating with an External RADIUS Server . . . . . . . . . . . . . . . . . . 42
If You Change the Internal WLAN to WEP or 802.1x . . . . . . . . . . . . . . . 43
Setting Dynamic Pre-Shared Key Expiration . . . . . . . . . . . . . . . . . . . . . . . 44
Configuring Access Control Lists . . . . . . . . . . . . . . . . . . . . . . . . . . . . . . . 44
Creating a New WLAN . . . . . . . . . . . . . . . . . . . . . . . . . . . . . . . . . . . . . . 46
Creating a WLAN . . . . . . . . . . . . . . . . . . . . . . . . . . . . . . . . . . . . . . . 46
Client Authentication Configuration . . . . . . . . . . . . . . . . . . . . . . . . . . 50
Creating a New WLAN for Workgroup Use . . . . . . . . . . . . . . . . . . . . . . . . . 51
Adding New Access Points to the WLAN . . . . . . . . . . . . . . . . . . . . . . . . . . 52
Connecting the APs to the WLAN . . . . . . . . . . . . . . . . . . . . . . . . . . . . 52
Verifying/Approving New APs . . . . . . . . . . . . . . . . . . . . . . . . . . . . . . 52
Reviewing Current Access Point Policies . . . . . . . . . . . . . . . . . . . . . . . . . . 54
Editing Access Point Parameters . . . . . . . . . . . . . . . . . . . . . . . . . . . . . . . 54
Deploying ZoneDirector WLANs in a VLAN Environment . . . . . . . . . . . . . . . 56
Blocking Client Devices. . . . . . . . . . . . . . . . . . . . . . . . . . . . . . . . . . . . . . 58
Monitoring Client Devices . . . . . . . . . . . . . . . . . . . . . . . . . . . . . . . . . 58
Temporarily Disconnecting Specific Client Devices . . . . . . . . . . . . . . . . 58
Permanently Blocking Specific Client Devices
. . . . . . . . . . . . . . . . . . . 59
Reviewing a List of Previously Blocked Clients . . . . . . . . . . . . . . . . . . . 59
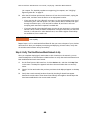
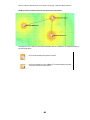
Optimizing Access Point Performance . . . . . . . . . . . . . . . . . . . . . . . . . . . . 59
Assessing Current Performance by Using the Map View
. . . . . . . . . . . . 59
Assessing Current Performance by Using the Access Point Table . . . . . . 60
Managing User and Guest Access . . . . . . . . . . . . . . . . . . . . . . . . . . . . . . . 61
Using an External Server for User Authentication. . . . . . . . . . . . . . . . . . . . 62
Adding New User Accounts to ZoneDirector. . . . . . . . . . . . . . . . . . . . . . . . 63
Managing Current User Accounts . . . . . . . . . . . . . . . . . . . . . . . . . . . . . . . 64
Changing an Existing User Account . . . . . . . . . . . . . . . . . . . . . . . . . . 64
Deleting a User Record . . . . . . . . . . . . . . . . . . . . . . . . . . . . . . . . . . . 64
Creating New User Roles. . . . . . . . . . . . . . . . . . . . . . . . . . . . . . . . . . . . . 65
Configuring System-Wide Guest Access Policy . . . . . . . . . . . . . . . . . . . . . . 66
Managing Guest Pass Access . . . . . . . . . . . . . . . . . . . . . . . . . . . . . . . . . . 67
Activating Guest Pass Access in ZoneDirector . . . . . . . . . . . . . . . . . . . 67
Controlling Guest Pass Generation Privileges . . . . . . . . . . . . . . . . . . . . 68
Creating a Guest Pass Generation User Role . . . . . . . . . . . . . . . . . . . . 69
Assigning a Pass Generator Role to a User Account . . . . . . . . . . . . . . . 69
Monitoring Generated Guest Passes . . . . . . . . . . . . . . . . . . . . . . . . . . 70
Restricting Guest Subnet Access . . . . . . . . . . . . . . . . . . . . . . . . . . . . 70
iv
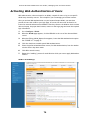
Activating Web Authentication of Users . . . . . . . . . . . . . . . . . . . . . . . . . . 72
Managing Automatically Generated User Certificates and Keys . . . . . . . . . . 73
Deploying a Wireless Mesh Network . . . . . . . . . . . . . . . . . . . . . . . . . . . . 74
Overview of Wireless Mesh Networking. . . . . . . . . . . . . . . . . . . . . . . . . . . 75
Mesh Networking Terms . . . . . . . . . . . . . . . . . . . . . . . . . . . . . . . . . . . . . 75
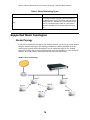
Supported Mesh Topologies. . . . . . . . . . . . . . . . . . . . . . . . . . . . . . . . . . . 76
Standard Topology . . . . . . . . . . . . . . . . . . . . . . . . . . . . . . . . . . . . . . 76
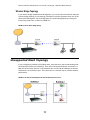
Wireless Bridge Topology . . . . . . . . . . . . . . . . . . . . . . . . . . . . . . . . . 77
Unsupported Mesh Topology . . . . . . . . . . . . . . . . . . . . . . . . . . . . . . . . . . 77
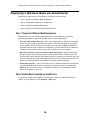
Deploying a Wireless Mesh via ZoneDirector . . . . . . . . . . . . . . . . . . . . . . . 78
Step 1: Prepare for Wireless Mesh Deployment . . . . . . . . . . . . . . . . . . 78
Step 2: Enable Mesh Capability on ZoneDirector . . . . . . . . . . . . . . . . . 78
Step 3: Provision and Deploy Mesh Nodes
. . . . . . . . . . . . . . . . . . . . . 79
Step 4: Verify That the Wireless Mesh Network Is Up . . . . . . . . . . . . . . 80
Using the ZoneFlex LEDs to Determine the Mesh Status . . . . . . . . . . . . . . . 82
WLAN/Wireless Device Association LED
. . . . . . . . . . . . . . . . . . . . . . . 82
Signal/Air Quality LED . . . . . . . . . . . . . . . . . . . . . . . . . . . . . . . . . . . 82
Understanding Mesh-related AP Statuses . . . . . . . . . . . . . . . . . . . . . . . . . 83
Setting Mesh Uplinks Manually . . . . . . . . . . . . . . . . . . . . . . . . . . . . . . . . 83
Troubleshooting Isolated Mesh APs . . . . . . . . . . . . . . . . . . . . . . . . . . . . . 85
Understanding Isolated Mesh AP Statuses . . . . . . . . . . . . . . . . . . . . . . 85
Recovering an Isolated Mesh AP . . . . . . . . . . . . . . . . . . . . . . . . . . . . 86
Monitoring Your Wireless Network. . . . . . . . . . . . . . . . . . . . . . . . . . . . . . 89
Reviewing the ZoneDirector Monitoring Options. . . . . . . . . . . . . . . . . . . . . 90
Importing a Map View Floorplan Image. . . . . . . . . . . . . . . . . . . . . . . . . . . 90
Requirements . . . . . . . . . . . . . . . . . . . . . . . . . . . . . . . . . . . . . . . . . 90
Importing the Floorplan Image . . . . . . . . . . . . . . . . . . . . . . . . . . . . . 91
Placing the Access Point Markers . . . . . . . . . . . . . . . . . . . . . . . . . . . . 91
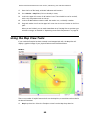
Using the Map View Tools . . . . . . . . . . . . . . . . . . . . . . . . . . . . . . . . . . . . 92
AP Icons . . . . . . . . . . . . . . . . . . . . . . . . . . . . . . . . . . . . . . . . . . . . . 94
Reviewing Current Alarms. . . . . . . . . . . . . . . . . . . . . . . . . . . . . . . . . . . . 94
Reviewing Recent Network Events . . . . . . . . . . . . . . . . . . . . . . . . . . . . . . 96
Clearing Recent Events/Activities . . . . . . . . . . . . . . . . . . . . . . . . . . . . . . . 96
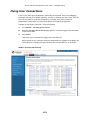
Reviewing Current User Activity. . . . . . . . . . . . . . . . . . . . . . . . . . . . . . . . 96
Monitoring Access Point Status . . . . . . . . . . . . . . . . . . . . . . . . . . . . . . . . 97
Detecting Rogue Access Points . . . . . . . . . . . . . . . . . . . . . . . . . . . . . . . . 97
Detecting Rogue DHCP Servers . . . . . . . . . . . . . . . . . . . . . . . . . . . . . . . . 98
Evaluating and Optimizing Network Coverage . . . . . . . . . . . . . . . . . . . . . .100
Moving the APs into More Efficient Positions . . . . . . . . . . . . . . . . . . . .100
v
Customizing Background Radio Frequency Scans . . . . . . . . . . . . . . . . . . . .100
Setting Administrator Preferences . . . . . . . . . . . . . . . . . . . . . . . . . . . . . 102
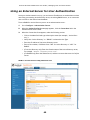
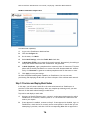
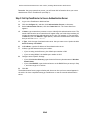
Using an External Server for Administrator Authentication . . . . . . . . . . . . .103
Step 1: Set Up Groups/Attributes on the Authentication Server . . . . . . .103
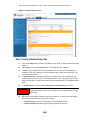
Step 2: Set Up ZoneDirector to Use an Authentication Server . . . . . . . .104
Step 3: Create an Administrator Role . . . . . . . . . . . . . . . . . . . . . . . . .105
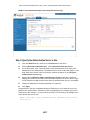
Step 4: Test Your Authentication Settings . . . . . . . . . . . . . . . . . . . . . .106
Step 5: Specify the Authentication Server to Use
. . . . . . . . . . . . . . . .107
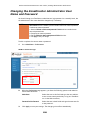
Changing the ZoneDirector Administrator User Name and Password . . . . . .108
Changing the Web Interface Display Language . . . . . . . . . . . . . . . . . . . . .109
Upgrading the License . . . . . . . . . . . . . . . . . . . . . . . . . . . . . . . . . . . . . .109
Troubleshooting . . . . . . . . . . . . . . . . . . . . . . . . . . . . . . . . . . . . . . . . . . . 111
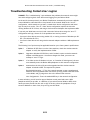
Troubleshooting Failed User Logins . . . . . . . . . . . . . . . . . . . . . . . . . . . . .112
Fixing User Connections . . . . . . . . . . . . . . . . . . . . . . . . . . . . . . . . . . . . .113
If WLAN Connection Problems Persist . . . . . . . . . . . . . . . . . . . . . . . . .114
Measuring the Wireless Network Throughput. . . . . . . . . . . . . . . . . . . . . . .114
Allowing Users to Measure Their Own Wireless Throughput . . . . . . . . . .117
Diagnosing Poor Network Performance . . . . . . . . . . . . . . . . . . . . . . . . . . .119
Starting a Radio Frequency Scan . . . . . . . . . . . . . . . . . . . . . . . . . . . . . . .120
Reviewing Self Healing and Intrusion Prevention Options . . . . . . . . . . . . . .121
Generating a Debug File . . . . . . . . . . . . . . . . . . . . . . . . . . . . . . . . . . . . .121
Restarting an Access Point . . . . . . . . . . . . . . . . . . . . . . . . . . . . . . . . . . .122
Restarting ZoneDirector . . . . . . . . . . . . . . . . . . . . . . . . . . . . . . . . . . . . .122
Index . . . . . . . . . . . . . . . . . . . . . . . . . . . . . . . . . . . . . . . . . . . . . . . . . . . 124
vi
CHAPTER 1
Introducing ZoneDirector
Ruckus Wireless ZoneDirector serves as a central control system for Ruckus ZoneFlex access
points (also referred to as APs). ZoneDirector provides simplified configuration and updates,
WLAN security control, RF management, and automatic coordination of Ethernet-connected
APs.
ZoneDirector also integrates network, radio frequency (RF), and location management
within a single system. User authentication is accomplished with an integrated captive
portal and internal database, or forwarded to existing AAA servers, such as RADIUS or Active
Directory. Once users are authenticated, client traffic is not required to pass through
ZoneDirector, thereby eliminating potential bottlenecks as higher speed Wi-Fi technologies,
such as 802.11n, emerge.
In addition, ZoneDirector supports rogue AP detection and the ability to blacklist client
devices from the network—all of which are easily configured and enabled system-wide.
When multiple APs are in close proximity, ZoneDirector automatically controls the power
and the channel settings on each AP to provide the best possible total coverage and
resiliency.
This user guide provides complete instructions for using the Ruckus Wireless Web interface,
the wireless network management toolbox for ZoneDirector. With the Web interface, you
can customize and manage all aspects of ZoneDirector and the network. You will find all
management tasks have been organized as categories and topics in the Contents page.
1
Ruckus Wireless ZoneDirector User Guide | Introducing ZoneDirector
FIGURE 1-1: ZoneDirector 3000
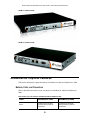
FIGURE 1-2: ZoneDirector 1000
ZoneDirector Physical Features
This section describes the physical features of ZoneDirector 1000 and ZoneDirector 3000.
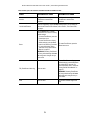
Buttons, Ports, and Connectors
Table 1 describes the buttons, ports, connectors on ZoneDirector 1000 and ZoneDirector
3000.
Table 1: Buttons, ports, and connectors on ZoneDirector 1000 and ZoneDirector 3000
Label
ZoneDirector 1000
ZoneDirector 3000
Power
(Located on the front panel)
Press this button to power on
ZoneDirector.
(Located on the rear panel)
Press this button to power on
ZoneDirector.
2
Ruckus Wireless ZoneDirector User Guide | Introducing ZoneDirector
Table 1: Buttons, ports, and connectors on ZoneDirector 1000 and ZoneDirector 3000
Label
ZoneDirector 1000
ZoneDirector 3000
Console
DB-9 port for accessing the
ZoneDirector command line
interface
RJ-45 port for accessing the
ZoneDirector command line
interface.
10/100/1000 Ethernet
Two auto negotiating 10/100/1000Mbps Ethernet ports. For information on
what the two Ethernet LEDs indicate, refer to Table 2, “Front Panel LEDs,”
on page 4
Use the Reset button to restart
ZoneDirector or to reset it to factory
default settings.
• To restart ZoneDirector, press the
Reset button once.
Reset
• To reset ZoneDirector to factory
default settings, press the Reset
button for at least five (5) seconds.
For more information, refer to
“Alternate Factory Default Reset
Method” on page 37.
To restart ZoneDirector, press the
Reset button once.
WARNING: Resetting ZoneDirector
to factory default settings will erase
all configuration changes that you
have made.
F/D (ZoneDirector 3000 only)
Does not exist
To reset ZoneDirector to factory
default settings, press the F/D button
for at least five (5) seconds. For
more information, refer to “Alternate
Factory Default Reset Method” on
page 37.
WARNING: Resetting ZoneDirector
to factory default settings will erase
all configuration changes that you
have made.
USB
Does not exist
For Ruckus Wireless Support use
only
3
Ruckus Wireless ZoneDirector User Guide | Introducing ZoneDirector
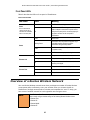
Front Panel LEDs
Table 2 describes the LEDs on front panel of ZoneDirector.
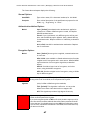
Table 2: Front Panel LEDs
LED Label
State
Meaning
Green
ZoneDirector is receiving power.
Off
ZoneDirector is NOT receiving power. If the power
cable or adapter is connected to a power source,
verify that the power jack is connected properly to
the power connector on the rear panel of
ZoneDirector.
Green
Normal state
Flashing Green
ZoneDirector has not yet been configured. Log in
to the Web interface, and then configure
ZoneDirector using the setup wizard.
Amber
ZoneDirector has shut down (but is still connected
to a power source).
Flashing Amber
ZoneDirector is starting up or shutting down.
Green
The port is connected to a device.
Flashing Green
The port is transmitting or receiving traffic.
Off
The port has no network cable connected, or is not
receiving a link signal.
Amber
The port is connected to a 1000Mbps device.
Green
The port is connected to a 100Mbps device.
Off
The port is connected to a 10Mbps device.
Power
Note: On ZoneDirector
1000, the Power LED is
embedded into the Power
button on the front panel.
Status
Ethernet Link
Ethernet Rate
Overview of a Ruckus Wireless Network
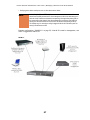
Your new Ruckus Wireless network starts when you disperse a number of Ruckus Wireless
access points (APs) to efficiently cover your worksite. After you connect the APs to
ZoneDirector (through network hubs or switches) and complete the “zero IT” setup, you
have a secure wireless network for both registered users and guest users.
NOTE
“Zero IT” refers to ZoneDirector’s simple setup and ease-of-use features, which allow end
users to easily configure wireless settings on the following Microsoft Windows clients:
• Windows Vista
• Windows XP
• Windows Mobile
• Windows CE
4
Ruckus Wireless ZoneDirector User Guide | Introducing ZoneDirector
After using the Web interface to set up user accounts for staff and other authorized users,
your WLAN can be put to full use, enabling users to share files, print, check email, and
more. And as a bonus, guest workers, contractors and visitors can be granted controlled
access to your Ruckus WLAN with a minimum of setup.
You can now fine-tune and monitor your network through the Web interface, which assists
you to customize additional WLANs for authorized users, manage your users, monitor the
network's safety and performance, and even expand your radio coverage, if needed.
Ensuring That APs Can Communicate with
ZoneDirector
Before ZoneDirector can start managing an AP, the AP must first be able to discover
ZoneDirector on the network when it boots up. This requires that ZoneDirector's IP address
be reachable by the AP (via UDP/IP port numbers 12222 and 12223), even when they are on
different subnets.
This section describes procedures that you can perform to ensure that APs can discover and
register with ZoneDirector.
NOTE
This guide assumes that APs on the network are configured to obtain IP addresses from a
DHCP server. If APs are assigned static IP addresses, they must be using a local DNS
server that you can configure to resolve the ZoneDirector IP address using
zonedirector.{DNS domain name} or zonedirector (if no domain
name is defined on the DNS server.
ALERT!
ZoneDirector and the ZoneFlex access points can communicate with each other via Layer 2
or Layer 3. If Layer 2 connectivity is desired, both ZoneDirector and the access points must
be on the same broadcast domain (VLAN) and the same IP subnet.
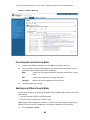
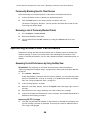
How APs Discover ZoneDirector on the Network
1
When an AP starts up, it sends out a DHCP discover packet to obtain an IP address.
2
The DHCP server responds to the AP with the allocated IP address. If you configured
DHCP Option 43 (see “Option 2: Customize Your DHCP Server” on page 7), the DHCP
offer response will also include (among others) the IP addresses of ZoneDirector
devices on the network or the DNS server that can help resolve the ZoneDirector IP
addresses.
• The AP will attempt to register with the ZoneDirector device that it previously registered with (if any). This ZoneDirector can be on the same local IP subnet or a different subnet. The AP will have a preference for a ZoneDirector device that it
previous registered with (over a locally connected ZoneDirector).
3
After the AP obtains an IP address, it first attempts to discover if there is a
ZoneDirector device on the same subnet by broadcasting an Ethernet discovery
request frame (Layer 2 LWAPP message).
• If the AP receives response from a single ZoneDirector device, it will attempt to
register with that ZoneDirector device.
5
Ruckus Wireless ZoneDirector User Guide | Introducing ZoneDirector
• If the AP receives response from multiple ZoneDirector devices, it will attempt to
register with the ZoneDirector device that it previously registered with (if any). If
this is the first time that the AP is registering with ZoneDirector, it will attempt to
register with the ZoneDirector device that has the lowest AP load. The AP computes the load by subtracting the current number of APs registered with ZoneDirector from the maximum number of APs that ZoneDirector can support.
4
If the AP does not receive a response on the L2 network, it builds a list of ZoneDirector
IP addresses that it received through Option 43 in the DHCP offer response in Step 2,
or it uses the DNS server information to resolve the host name zonedirector.{DNS
domain name}.
5
The AP sends out an IP discovery packet (Layer 3 LWAPP message) to the IP address list
to attempt to discover ZoneDirector devices on other subnets.
• If the AP receives response from a single ZoneDirector device, it will attempt to
register with that ZoneDirector device.
• If the AP receives response from multiple ZoneDirector devices, it will attempt to
register with the ZoneDirector device that it previously registered with (if any). If
this is the first time that the AP is registering with ZoneDirector, it will attempt to
register with the ZoneDirector device that has the lowest AP load. The AP computes the load by subtracting the current number of APs registered with ZoneDirector from the maximum number of users that ZoneDirector can support.
If the AP does not receive response from any ZoneDirector device on the network, it goes
into idle mode. After a short period of time, reattempt to discover ZoneDirector again by
repeating the same discovery cycle. The AP will continue to repeat this cycle until it
successfully registers with ZoneDirector.
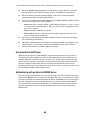
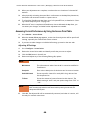
How to Ensure That APs Can Discover ZoneDirector on the Network
If you are deploying the AP and ZoneDirector on different subnets, you have three options
for ensuring successful communication between these two devices:
• Option 1: Perform Auto Discovery on Same Subnet, Then Transfer AP Intended to Subnet
• Option 2: Customize Your DHCP Server
• Option 3: Register ZoneDirector with a DNS Server
If the AP and ZoneDirector Are on the Same Subnet
If you are deploying the AP and ZoneDirector on the same subnet, you do not need to perform
additional configuration. Simply connect the AP to same network as ZoneDirector. When the AP
starts up, it will discover and attempt to register with ZoneDirector. Approve the registration
request, if auto approval is disabled.
Option 1: Perform Auto Discovery on Same Subnet, Then Transfer AP
Intended to Subnet
If you are deploying the AP and ZoneDirector on different subnets, let the AP perform auto
discovery on the same subnet as ZoneDirector before moving the AP to another subnet. To
do this, connect the AP to same network as ZoneDirector. When the AP starts up, it will
discover and attempt to register with ZoneDirector. Approve the registration request, if auto
approval is disabled.
6
Ruckus Wireless ZoneDirector User Guide | Introducing ZoneDirector
After the AP registers with ZoneDirector successfully, transfer it to its intended subnet. It
will be able to find and communicate with ZoneDirector once you reconnect it to the other
subnet.
NOTE
If you use this method, make sure that you do not change the IP address of ZoneDirector
after the AP discovers and registers with it. If you change the ZoneDirector IP address, the
AP will no longer be able to communicate with it and will be unable to rediscover it.
Option 2: Customize Your DHCP Server
To customize your DHCP server, you need to configure DHCP Option 43 (043 Vendor Specific
Info) with the IP address of the ZoneDirector device on the network. When an AP requests
for an IP address, the DHCP server will send a list of ZoneDirector IP addresses to the AP. If
there are multiple ZoneDirector devices on the network, the AP will automatically select a
ZoneDirector to register with from this list of IP addresses.
NOTE
The following procedure describes how to customize a DHCP server running on Microsoft
Windows. If your DHCP server is running on a different operating system, the procedure
may be different.
The procedure for configuring Option 43 on your DHCP server depends on whether both
ZoneDirector and FlexMaster exist on the network.
If Only ZoneDirector Exists on the Network
1
From Windows Administrative Tools, open DHCP, and then select the DHCP server you
want to configure.
2
If the Scope folder is collapsed, click the plus (+) sign to expand it.
3
Right-click Scope Options, and then click Configure Options. The General tab of the
Scope Options dialog box appears.
4
Under Available Options, look for the 43 Vendor Specific Info check box, and then
select it.
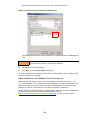
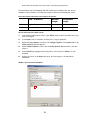
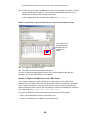
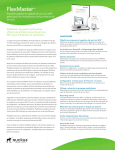
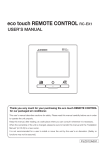
5
Under Data Entry, position the cursor in the ASCII text area, and then type the IP
address of the ZoneDirector device. In the figure below, the IP address of the
ZoneDirector device is 192.168.10.2.
7
Ruckus Wireless ZoneDirector User Guide | Introducing ZoneDirector
FIGURE 1-3: In the ASCII area, type the IP address of the ZoneDirector device
The hexadecimal equivalent of the ZoneDirector IP address appears in the Binary text
area.
NOTE
If there are multiple ZoneDirector devices on the network, type all the IP addresses in the
ASCII text area. Use commas (,) to separate the IP addresses.
6
Click Apply to save your changes.
7
Click OK to close the Scope Options dialog box.
You have completed customizing your DHCP server to automatically provide supported APs
with the ZoneDirector IP address.
If Both ZoneDirector and FlexMaster Exist on the Network
Before starting with this procedure, count the number of characters (including http or
https, back slashes, colon, and periods) in the FlexMaster server URL and ZoneDirector IP
address, and then convert these (decimal) values to hexadecimal. If there are multiple
ZoneDirector devices on the network, count the total number of characters.
You will need this information when you configure DHCP Option 43 for both FlexMaster and
ZoneDirector. You can use an online conversion Web site, such as
http://www.easycalculation.com/decimal-converter.php, to perform the conversion.
8
Ruckus Wireless ZoneDirector User Guide | Introducing ZoneDirector
The table below lists the FlexMaster URL and ZoneDirector IP address that are used as
examples in this procedure, including their length in decimal and hexadecimal values.
Table 3: URL/IP address values that are used as examples in this procedure
URL / IP Address
Decimal
Length
Hexadecimal
Length
FlexMaster
http://192.168.10.1/intune/server (URL)
33
21
ZoneDirector
192.168.10.2 (IP Address)
12
0C
Do the following on the DHCP server:
1
From Windows Administrative Tools, open DHCP, and then select the DHCP server you
want to configure.
2
If the Scope folder is collapsed, click the plus (+) sign to expand it.
3
Right-click Scope Options, and then click Configure Options. The General tab of the
Scope Options dialog box appears.
4
Under Available Options, look for the 43 Vendor Specific Info check box, and then
select it.
5
Under Data Entry, highlight the existing values, and then press <Delete> on your
keyboard.
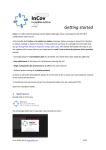
6
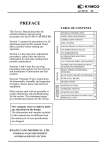
Position the cursor in the Binary text area, and then type 01, the subcode for
FlexMaster.
FIGURE 1-4: Type 01, the subcode for FlexMaster
9
Ruckus Wireless ZoneDirector User Guide | Introducing ZoneDirector
7
Under the Binary text area, position the cursor after the 01 subcode, and then type 21
– the hexadecimal equivalent of the FlexMaster server URL length that is used as
example in this procedure.
FIGURE 1-5: After the 01 subcode for FlexMaster, type 21 – the hexadecimal equivalent of the FlexMaster server URL length
10
Ruckus Wireless ZoneDirector User Guide | Introducing ZoneDirector
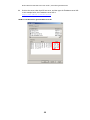
8
Position the cursor under the ASCII text area, and then type the FlexMaster server URL.
In the example below, the FlexMaster server URL is
http://192.168.10.1/intune/server.
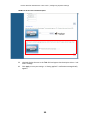
FIGURE 1-6: In the ASCII text area, type the FlexMaster server URL
11
Ruckus Wireless ZoneDirector User Guide | Introducing ZoneDirector
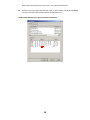
9
Position your cursor again after the last octet (in this example, 72) under the Binary
text area, and then type 03 (the subcode for ZoneDirector).
FIGURE 1-7Under the Binary text area, type 03 (the subcode for ZoneDirector)
12
Ruckus Wireless ZoneDirector User Guide | Introducing ZoneDirector
10
After the ZoneDirector subcode (03), type the hexadecimal equivalent of the length of
the ZoneDirector IP address length. For example, if the ZoneDirector IP address is
192.168.10.2, the length in decimal is 12 and the hexadecimal equivalent is 0C.
FIGURE 1-8: After the ZoneDirector subcode, type the hexadecimal equivalent of the ZoneDirector IP address length
13
Ruckus Wireless ZoneDirector User Guide | Introducing ZoneDirector
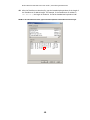
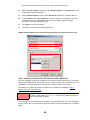
11
Position the cursor under the ASCII text area after the FlexMaster server URL, and then
type the ZoneDirector IP address. If you typed the hexadecimal equivalent of the
ZoneDirector IP address, there should be two bytes
In the example below, the ZoneDirector IP address is 192.168.10.2.
FIGURE 1-9: In the ASCII text area, type the ZoneDirector IP address (two bytes after the FlexMaster server URL)
There should be a twobyte gap between the
FlexMaster URL and
ZoneDirector IP
address
12
Click Apply to save your changes.
13
Click OK to close the Scope Options dialog box.
You have completed configuring DHCP Option 43 to provide supported APs with the
FlexMaster server URL and ZoneDirector IP address.
Option 3: Register ZoneDirector with a DNS Server
If you register ZoneDirector with your DNS server, supported APs that request for IP
addresses from your DHCP server will also obtain DNS related information that will enable
them to discover ZoneDirector devices on the network. Using the DNS information they
obtained during the DHCP request, APs will attempt to resolve the ZoneDirector IP address
(or IP addresses) using zonedirector.{DNS domain name}.
To register ZoneDirector devices with DNS server, perform the following tasks:
• Step 1: Set the DNS Domain Name on the DHCP Server
• Step 2: Set the DNS Server IP Address on the DHCP Server
14
Ruckus Wireless ZoneDirector User Guide | Introducing ZoneDirector
• Step 3: Register the ZoneDirector IP Addresses with a DNS Server
NOTE
The following procedures describe how to customize a DHCP server running on Microsoft
Windows Server. If your DHCP server is running on a different operating system, the
procedure may be different.
Step 1: Set the DNS Domain Name on the DHCP Server
1
From Windows Administrative Tools, open DHCP, and then select the DHCP server that
you want to configure.
2
If the Scope folder is collapsed, click the plus (+) sign to expand it.
3
Right-click Scope Options, and then click Configure Options. The General tab of the
Scope Options dialog box appears.
4
Under Available Options, look for the 15 DNS Domain Name check box, and then
select it.
5
In the String value text box under Data Entry, type your company’s domain name.
6
Click Apply to save your changes.
7
Click OK to close the Scope Options dialog box.
FIGURE 1-10: Select the 015 DNS Domain Name check box, and then type your company domain name in String value
Step 2: Set the DNS Server IP Address on the DHCP Server
1
From Windows Administrative Tools, open DHCP, and then select the DHCP server you
want to configure.
2
If the Scope folder is collapsed, click the plus (+) sign to expand it.
15
Ruckus Wireless ZoneDirector User Guide | Introducing ZoneDirector
3
Right-click Scope Options, and then click Configure Options. The General tab of the
Scope Options dialog box appears.
4
Under Available Options, look for the 6 DNS Servers check box, and then select it.
5
In the IP address box under Data Entry, type your DNS server’s IP address, and then
click Add. If you have multiple DNS servers on the network, repeat the same
procedure to add the other DNS servers.
6
Click Apply to save your changes.
7
Click OK to close the Scope Options dialog box.
FIGURE 1-11Select the 6 DNS Servers check box, and then type your DNS server’s IP address in the Data entry section
Step 3: Register the ZoneDirector IP Addresses with a DNS Server
After you complete configuring the DHCP server with DNS related information, you need to
register the IP addresses of ZoneDirector devices on the network with your DNS server. The
procedure for this task depends on the DNS server software that you are using.
Information on configuring the built-in DNS server on Windows is available at http://
support.microsoft.com/kb/814591.
IMPORTANT!
When your DNS server prompts you for the corresponding host name for each ZoneDirector
IP address, you MUST enter zonedirector. This is critical to ensuring that the APs can
resolve the ZoneDirector IP address.
After you register the ZoneDirector IP addresses with your DNS server, you have completed
this procedure. APs on the network should now be able to discover ZoneDirector on another
subnet.
16
Ruckus Wireless ZoneDirector User Guide | Introducing ZoneDirector
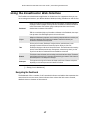
Using the ZoneDirector Web Interface
The ZoneDirector administrative application is divided into five components that you can
use to manage and monitor your Ruckus Wireless WLAN (including ZoneDirector and all APs).
Dashboard
When you first log into your ZoneDirector with the Web interface, the Dashboard appears,
displaying a number of widgets containing indicators and tables that summarize the network
and its current status. Each indicator, gauge or table provides links to more focused,
detailed views on elements of the network.
TIP: You can minimize (hide) any of the tables or indicators on the Dashboard, then reopen
them by means of the Add Widget options in the lower left corner.
Widgets
Widgets are Dashboard components, each containing a separate indicator or table as part
of the active dashboard. Each widget can be added or removed to enhance your
ZoneDirector Dashboard summary needs.
Tabs
Click any of the four tabs (Dashboard, Configure, Monitor, and Administer) to take
advantage of related collections of features and options. When you click a tab,
ZoneDirector displays a collection of tab-specific buttons*. Each tab's buttons are a starting
point for Ruckus Wireless network setup, management, and monitoring. Note: if you click
any of the three tabs, the Dashboard becomes available as a fourth tab.
Buttons
The left-side column of buttons varies according to which tab has been clicked. The buttons
provide features that assist you in managing and monitoring your network. Click a button to
see related options in the workspace to the right.
Workspace
The large area to the right of the buttons will display specific sets of features and options,
depending on which tab is open and which button was clicked.
[* = Except for the Dashboard.]
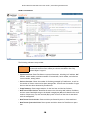
Navigating the Dashboard
The Dashboard offers a number of self-contained indicators and tables that summarize the
network and its current status. Some indicators have values that link to more focused,
detailed views on elements of the network.
17
Ruckus Wireless ZoneDirector User Guide | Introducing ZoneDirector
FIGURE 1-12 The Dashboard
The following indicators are provided:
NOTE
Some indicators may not be present upon initial view. The Add Widgets feature, located at
the bottom left area of the screen, enables you to show or hide indicators. See “Using
Indicator Widgets” on page 19.
• System Overview: Shows ZoneDirector system information, including its IP address, MAC
address, model number, maximum number of licensed APs, serial number, and software
version number, among others.
• Devices Overview: Shows the number of APs being managed by ZoneDirector, as well as
the number of clients connected to these managed APs. It also shows the number of rogue
devices that have been detected by ZoneDirector.
• Usage Summary: Shows usage statistics for the last hour and the last 24 hours.
• Most Active Client Devices: Identifies the most active clients by MAC address, IP address,
and user name. Bandwidth usage is calculated in megabytes (MB) and is based on the total
number of bytes sent (Tx) and received (Rx) by each client from the time it associated
with the managed AP.
• Most Recent User Activities: Shows activities performed by users on client machines.
• Most Recent System Activities: Shows system activities related to ZoneDirector operation.
18
Ruckus Wireless ZoneDirector User Guide | Introducing ZoneDirector
• Most Frequently Used Access Points: Lists the access points that are serving the most client requests.
• Currently Active WLANs: Shows details of currently active ZoneDirector WLANs.
• Currently Managed APs: Shows details of access points that ZoneDirector is currently
managing.
• Support: Shows contact information for Ruckus Wireless support.
NOTE
You can sort the information (in ascending or descending order) that appears on the
dashboard by clicking the column headers.
Using Indicator Widgets
Dashboard widgets represent the indicators displayed as part of the active dashboard.
Indicator widgets can be added or removed to enhance your ZoneDirector summary needs.
Adding a Widget
To add widgets:
1
Go to the Dashboard.
2
Click Add Widgets from the bottom left of the Dashboard page.
FIGURE 1-13
19
Ruckus Wireless ZoneDirector User Guide | Introducing ZoneDirector
The Widgets pane opens on the bottom left side of the Dashboard.
3
Select any Widget icon and drag and drop it onto the Dashboard to add the widget. If
you have closed a widget, it appears in this pane.
FIGURE 1-14
4
Click Finish in the Widgets pane to close it.
Removing a Widget
To remove an indicator widget, click the red x icon for any of the indicator widgets
presently open on the Dashboard.
About Ruckus Wireless WLAN Security
After your initial setup, your Ruckus wireless network connects all authorized users by
default to your internal WLAN. This WPA-based WLAN is configured to provide secure
coverage for all authorized users. (A companion “guest” WLAN provides cleartext but
controlled access for guest users.) But Ruckus offers other security options that can be
applied to the internal WLAN through ZoneDirector. These options range from a less-secure
WEP key-based configuration, through the default WPA passphrase-based configuration to a
higher-security, certificate-based 802.1x EAP configuration. Your choice mostly depends on
what kinds of client authentication your users' client devices support.
20
Ruckus Wireless ZoneDirector User Guide | Introducing ZoneDirector
For example, some of your WLAN users may be limited to a WEP-based security system by
their client devices (computer or wireless network adapter). With the Web interface, you do
have options: You can change the existing internal configuration from WPA to the lesssecure WEP, or add a custom WLAN with WEP options for those users who require WEP, while
retaining the original, more secure internal WPA configuration for the rest of your users. Or,
you can replace the default WPA setup with a secure authentication/encryption
methodology, 802.1x EAP.
One drawback to 802.1x is the more labor-intensive setup, requiring (among other tasks) the
transfer of root certificate copies to your users, who must then import the certificates into
their client devices. This will prove disruptive if you have a large user audience already
using your network.
ZoneDirector supports one or more WLANs, and if you need to add a WEP WLAN for those
users, in addition to your WPA internal WLAN, you can easily do so. User could utilize the
Zero-IT Activation to obtain the WEP key automatically or could manually enter the WEP key
in their client device wireless configuration.
If you like the security of the default configuration, you can take advantage of customizable
options that have no disruptive effect on your current users' connections.
All three basic options (WEP, WPA and 802.1x) are detailed in “Creating a New WLAN” on
page 46, and you can learn how to apply them to your Ruckus WLAN in the same section.
Controlling Device Permissions: Blocking and ACLs
ZoneDirector features a block list as well as access control list (ACL) functionality to control
network permissions.
• Block List: When users log into a ZoneDirector network, their client devices (for example,
laptop computers and PCs) are recorded and tracked. If, for any reason, you need to
block a client device from network use, you can do via the ZoneDirector Web interface.
For more on configuring the block list, see “Blocking Client Devices” on page 58.
• ACLs: Access control lists establish which devices based on their MAC addresses are
allowed to associate to a ZoneDirector-managed AP. By using the Configuration > Access
Control options, you define Layer 2 ACLs, also known as MAC address ACLs, which can
then be applied to one or more ZoneDirector WLANs. ACLs are either allow-only or denyonly; that is, an ACL can be set up to allow only specified clients or to deny only specified
clients. For more on configuring ACLs, see “Configuring Access Control Lists” on page 44.
Note the following ZoneDirector rules:
• The block list is system-wide and is applied to all WLANs in addition to the per-WLAN ACL.
If a MAC address is listed in the system-wide block list, it will be blocked even if it is an
allowed entry in an ACL. Thus, the block list takes precedence over an ACL.
• MAC addresses that are in the deny list are blocked at the AP, not at ZoneDirector.
21
CHAPTER 2
Configuring System Settings
Chapter Contents
• “Changing the Network Addressing” . . . . . . . . . . . . . . . . . . . . . . . . . . . . . 23
• “Changing the System Name” . . . . . . . . . . . . . . . . . . . . . . . . . . . . . . . . . 24
• “Updating the Internal Clock” . . . . . . . . . . . . . . . . . . . . . . . . . . . . . . . . . 27
• “Changing the System Log Settings” . . . . . . . . . . . . . . . . . . . . . . . . . . . . . 28
• “Setting Up Email Alarm Notification” . . . . . . . . . . . . . . . . . . . . . . . . . . . 31
• “Customizing the Guest Login Page”. . . . . . . . . . . . . . . . . . . . . . . . . . . . . 32
• “Upgrading ZoneDirector and ZoneFlex APs” . . . . . . . . . . . . . . . . . . . . . . . 34
• “Working with Backup Files” . . . . . . . . . . . . . . . . . . . . . . . . . . . . . . . . . . 35
• “Restoring ZoneDirector to Default Factory Settings” . . . . . . . . . . . . . . . . . 36
• “Enabling Management via FlexMaster” . . . . . . . . . . . . . . . . . . . . . . . . . . 37
22
Ruckus Wireless ZoneDirector User Guide | Configuring System Settings
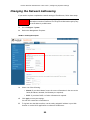
Changing the Network Addressing
If you need to replace or update the network settings of ZoneDirector, follow these steps.
ALERT!
As soon as the IP address has been changed (applied), you will be disconnected from your
Web interface connection to ZoneDirector. You can log into the Web interface again by using
the new IP address in your Web browser.
1
Go to Configure > System.
2
Review the Management IP options.
FIGURE 2-1: The Management IP options
3
Select one of the following:
• Manual: If you select Manual, enter the correct information in the now-active
fields (IP Address, Netmask, and Gateway are required).
• DHCP: If you select DHCP, no further information is required.
4
Click Apply to save your settings.
You will lose connection to ZoneDirector.
5
To log back into the Web interface, use the newly assigned IP address in your Web
browser or use the UPnP application to rediscover ZoneDirector.
23
Ruckus Wireless ZoneDirector User Guide | Configuring System Settings
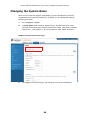
Changing the System Name
When you first worked through the Setup Wizard, you were prompted for a networkrecognizable system name for ZoneDirector. If needed, you can change that name by
following these steps:
1
Go to Configure > System.
2
In System Name (under Identity), delete the text, and then type a new name.
The name should be between 6 and 32 characters in length, using letters, numbers,
underscores (_) and hyphens (-). Do not use spaces or other special characters.
FIGURE 2-2: The Identity section on the System page
3
Click Apply to save your settings. The change goes into effect immediately.
24
Ruckus Wireless ZoneDirector User Guide | Configuring System Settings
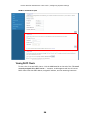
Configuring the Built-in DHCP Server
ZoneDirector comes with a built-in DHCP server that you can enable to assign IP addresses to
devices that are connected to it. Note that before you can enable the built-in DHCP server,
ZoneDirector must be assigned a manual (or static) IP address. If you configured
ZoneDirector to obtain IP address from another DHCP server on the network, the options for
the built-in DHCP server will not be visible on the System page.
Enabling the Built-in DHCP server
NOTE
Ruckus Wireless recommends that you only enable the built-in DHCP server if there are no
other DHCP servers on the network. Note that the DHCP server in ZoneDirector can support
only a single subnet.
If you enable the built-in DHCP server, Ruckus Wireless also recommends enabling the
rogue DHCP server detector. For more information, refer to “Detecting Rogue DHCP Servers” on page 98.
1
Click the Configure tab. The System page appears.
2
Under the DHCP Server section, select the Enable DHCP check box.
3
In Starting IP Address, type the first IP address that the built-in DHCP server will allocate to DHCP clients.
Note that the starting IP address must be on the same subnet as the IP address
assigned to ZoneDirector. If the value that you typed is invalid, an error message
appears and prompts you if you want ZoneDirector to correct the value. Click OK to
automatically correct the entry.
4
In Number of IP, type the maximum number of IP addresses that you want to allocate
to requesting clients. The built-in DHCP server can allocate up to 255 IP addresses,
including the one assigned to ZoneDirector. The default value is 200.
5
In Lease Time, select a time period during IP addresses will be allocated to DHCP clients. Options range from six hours to two weeks (default is one week).
6
Click Apply.
NOTE
If you typed an invalid value in any of the text boxes, an error message appears and prompts
you if you want ZoneDirector to automatically correct the value. Click OK to change it to a
correct value.
25
Ruckus Wireless ZoneDirector User Guide | Configuring System Settings
FIGURE 2-3: The DHCP Server options
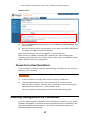
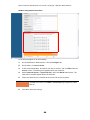
Viewing DHCP Clients
To view a list of current DHCP clients, click the click here link at the end of the “To see all
currently assigned IPs by DHCP server...” sentence. A table appears and lists all current
DHCP clients with their MAC address, assigned IP address, and the remaining lease time.
26
Ruckus Wireless ZoneDirector User Guide | Configuring System Settings
FIGURE 2-4: To view current DHCP clients, click the “click here” link
Updating the Internal Clock
The internal clock in ZoneDirector is automatically synchronized with the clock on your
administration PC during the initial setup. You can use the Web interface to check the
current time on the internal clock, which shows up as a static notation in the Configure tab
workspace. If this notation is incorrect, you can re-synchronize the internal clock to your PC
clock immediately.
Another option is to link your ZoneDirector to an NTP server (as detailed below), which
provides continual updating with the latest time.
1
Go to Configure > System.
2
In the System Time features you have the following options:
• Refresh: Click this to update the ZoneDirector display (a static snapshot) from
the internal clock.
• Synch Time with your PC Now: If needed, click this to update the internal
clock with the current time settings from your administration PC.
• Use NTP... (Enabled by default): Clear this check box to disable this option.
27
Ruckus Wireless ZoneDirector User Guide | Configuring System Settings
FIGURE 2-5: The System Time options
3
Click Apply to save the results of any resynchronization or NTP links.
Changing the System Log Settings
ZoneDirector maintains an internal log of current events and alarms. This file has a fixed
capacity; at a certain level, ZoneDirector will start deleting the oldest entries to make room
for the newest. This log is volatile, and the contents will be deleted if ZoneDirector is
powered down. If you want a permanent record of all logging activities, you can set up your
syslog server to receive log contents from ZoneDirector, and then use the Web interface to
direct all logging to the syslog server—as detailed in this topic.
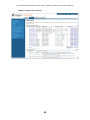
Reviewing the Current Log Contents
1
Go to Monitor > All Events/Activities.
2
Review the events and alarms listed here. See “FIGURE 2-6” on page 29.
NOTE
Log entries are listed in reverse chronological order (with the latest logs at the top of the list).
3
Click a column header to sort the contents by that category.
4
Click any column twice to switch chronological or alphanumeric sorting modes.
28
Ruckus Wireless ZoneDirector User Guide | Configuring System Settings
FIGURE 2-6: The All Events/Activities page
29
Ruckus Wireless ZoneDirector User Guide | Configuring System Settings
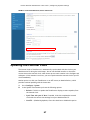
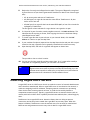
Checking the Current Log Settings
You can review and customize the log settings by following these steps:
1
Go to Configure > System.
2
Scroll down to Log Settings.
FIGURE 2-7: The Log Settings options
3
4
Make your selections from these syslog server options:
Event Log Level
Select one of the three logging levels— “Show More”, “Warning
and Critical Events”, or “Critical Events Only”.
Remote Syslog
To enable syslog logging, select the Enable reporting to remote
syslog server at check box, and then type the IP address in the
box provided.
Click Apply to save your settings. The changes go into effect immediately.
30
Ruckus Wireless ZoneDirector User Guide | Configuring System Settings
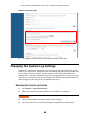
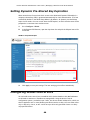
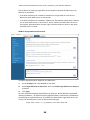
Setting Up Email Alarm Notification
If an alarm condition is detected, ZoneDirector will record it in the event log. If you prefer,
an email notification can be sent to a configured email address of your choosing. To enable
this option, follow these steps:
1
Go to Configure > Alarm Settings. The Email Notification form appears.
FIGURE 2-8: The Alarm Settings page
2
To enable email notification, select the Send an email message when an alarm is
triggered check box.
3
In Email Address, type the email address to which to send the alarm message.
4
In Mail Server IP Address, type the IP address of your mail server.
5
Click Apply. The email notification feature becomes active immediately.
31
Ruckus Wireless ZoneDirector User Guide | Configuring System Settings
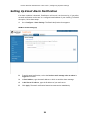
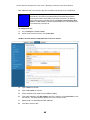
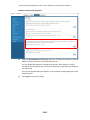
Customizing the Guest Login Page
You can customize the guest user login page, to display your corporate logo and to note
helpful instructions, along with a “Welcome” title. If you want to include a logo, you'll need
to prepare a Web-ready graphic file, in one of three acceptable formats (.JPG, .GIF or
.PNG). Make sure the logo is no bigger than two inches long on any side, or larger than
200kB.
1
Go to Configure > Guest Access.
2
Locate the Web Portal Logo options.
FIGURE 2-9: The Web Port Logo options
3
If your logo is ready for use, click Browse to open a dialog box that you can use to
import the logo file. (ZoneDirector will notify you if the file is too large—height or
width).
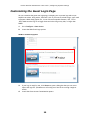
4
Locate the Guest Access Customization options.
32
Ruckus Wireless ZoneDirector User Guide | Configuring System Settings
FIGURE 2-10: The Guest Access Customization options
5
(Optional) Delete the text in the Title field and type a short descriptive title or “welcome” message.
6
Click Apply to save your settings. A “Setting applied!” confirmation message briefly
appears.
33
Ruckus Wireless ZoneDirector User Guide | Configuring System Settings
Upgrading ZoneDirector and ZoneFlex APs
Check the Ruckus Wireless Support Web site on a regular basis for updates that can be
applied to your Ruckus Wireless network devices — to ZoneDirector and all your ZoneFlex
APs. After downloading any update package to a convenient folder on your administrative
PC, you can complete the network upgrade (of both ZoneDirector and APs) by following the
steps detailed below.
NOTE
1
Upgrading ZoneDirector and the APs will temporarily disconnect them (and any associated
clients) from the network. To minimize network disruption, Ruckus Wireless recommends
performing the upgrade procedure at an off-peak time.
Go to Administer > Upgrade.
FIGURE 2-11: The Upgrade page
2
Under the Software Upgrade section, click Browse. The Browse dialog box appears.
3
Browse to the location where you saved the upgrade package, and then click Open.
4
When the upgrade file name appears in the text field, the “Browse” button is transformed into the “Upgrade” button.
5
Click Upgrade.
ZoneDirector will automatically log you out of the Web interface, run the upgrade, and then
restart itself. When the upgrade process is complete, the Status LED on ZoneDirector is
steadily lit. You may now log back into the Web interface as Administrator.
NOTE
The full network upgrade is successive in sequence. After ZoneDirector is upgraded, it will
contact each active AP, upgrade it, and then restore it to service.
ALERT!
The AP uses FTP to download firmware updates from ZoneDirector. If you have an access
control list (ACL) or firewall between ZoneDirector and the AP, make sure that FTP traffic is
allowed to ensure that the AP can successfully download the firmware update.
34
Ruckus Wireless ZoneDirector User Guide | Configuring System Settings
Working with Backup Files
After you have set up and configured your Ruckus wireless network, you may want to back
up the full configuration. The resulting archive can be used to restore your ZoneDirector and
network. And, whenever you make additions or changes to the setup, you can create new
backup files at that time, too.
Backing Up a Network Configuration
1
Go to Administer > Backup.
FIGURE 2-12: The Back Up Configuration option
2
Under the Backup Configuration sections, click Back Up. The File Download dialog box
appears.
3
Click Save.
4
When the Save As dialog box appears, enter a name for this archive file, pick a destination folder, then click Save.
5
Make sure the filename ends in a “.TGZ” extension.
6
When the Download Complete dialog box appears, click Close.
35
Ruckus Wireless ZoneDirector User Guide | Configuring System Settings
Restoring Archived Settings to ZoneDirector
ALERT
Restoring a backup file will automatically reboot ZoneDirector and all APs that are currently
associated with it. Users associated with these APs will be temporarily disconnected; wireless access will be restored automatically after ZoneDirector and the APs have completed
booting up.
1
Go to Administer > Backup.
2
Review the Restore Configuration instructions, and then click Browse.
3
Use the Browse dialog box to locate the backup file.
4
Select the file, and then click Open. Three restore options appear:
• Restore everything - Select this option if you want the device to use all the settings configured in the backup file (including the IP address, wireless settings, and
access control list, among others).
• Restore everything except system name/IP address - Select this option if you are
deploying a second ZoneDirector for failover purposes.
• Restore only configurations about WLANs, Access Controls, Roles, and Users Select this option if you want to use the backup file as a configuration template.
5
Click the Restore button.
ZoneDirector restores the backup file. During this process, ZoneDirector automatically
logs you off the Web interface. When the restore process is complete, ZoneDirector
automatically restarts and your wireless network will be ready for use again.
Restoring ZoneDirector to Default Factory Settings
In certain extreme conditions, you may want to reinitialize ZoneDirector, and reset it to the
“factory default” state. In such a state, the network is almost ready for use, but all your
user/guest/log and other records, accounts and configurations would need to be manually
reconfigured.
ALERT!
When this procedure is complete, you will need to redo a complete setup. If ZoneDirector is
on a live network, a new IP address may be assigned to the system. In this case, the system
can be discovered by a UPnP client application, such as Windows My Network Places. If
there is no DHCP server on the connected network, the system's default IP address is
“192.168.0.2” with subnet mask “255.255.255.0”. A complete set of instructions is available
in the Quick Start Guide (QSG). Before starting this “factory default settings” restoration, you
should open and print out the QSG pages. You can follow those instructions to set up ZoneDirector after a factory-default state has been restored.
To reset your ZoneDirector to factory default settings, follow these steps:
1
Go to Administer > Backup.
36
Ruckus Wireless ZoneDirector User Guide | Configuring System Settings
FIGURE 2-13: The Res
2
When the Backup/Restore page appears, look for Restore to Factory Settings, and
click the button.
3
Owing to the drastic effect of this operation, one or more confirmation dialog boxes
will appear. Click OK to confirm this operation.
When this process begins, you will be logged out of the Web interface.
When the reset is complete, the Status LED is a blinking red, then a blinking green,
indicating that the system is in the “factory default” state. After you complete the Setup
Wizard, the Status LED will be steady green.
Alternate Factory Default Reset Method
If you are unable to complete a software-based resetting of ZoneDirector, you can do the
following “hard” restoration:
NOTE
Do not disconnect ZoneDirector from any power source until this procedure is complete.
1
Look for a pinhole on the right side of the front panel of ZoneDirector.
2
Insert a straightened paper clip in the hole and press for at least 5 seconds.
After the reset is complete, the Status LED is a blinking red, then a blinking green,
indicating that the system is in a “factory default” state.
After you complete the Setup Wizard, the Status LED will be steady green.
Enabling Management via FlexMaster
If you have a Ruckus Wireless FlexMaster server installed on the network, you can enable
FlexMaster management to centralize monitoring and administration of ZoneDirector and
other supported Ruckus Wireless devices. This version of ZoneDirector supports the
following FlexMaster-deployed tasks:
37
Ruckus Wireless ZoneDirector User Guide | Configuring System Settings
• Firmware upgrade for both ZoneDirector and the APs that report to them
• Reboot
• Backup of ZoneDirector settings
When the FlexMaster management option is enabled, you will still be able to access the
ZoneDirector Web interface to perform other management tasks. By default, FlexMaster
management is disabled.
To enable FlexMaster management:
1
Click Configure > System.
1
Under FlexMaster Management (bottom of the page), select the Enable management
by FlexMaster check box.
2
In URL, type the host name or IP address of the FlexMaster server.
3
In Interval, type the time interval (in minutes) at which ZoneDirector will send status
updates to the FlexMaster server. The default interval is 15 minutes.
4
Click Apply. The message Setting Applied appears.
You have completed enabling FlexMaster management on ZoneDirector. For more
information on how to configure ZoneDirector from the FlexMaster Web interface, refer to
the FlexMaster documentation.
FIGURE 2-14 The FlexMaster Management options
38
CHAPTER 3
Managing a Wireless
Local Area Network
Chapter Contents
• “Overview of Wireless Networks” . . . . . . . . . . . . . . . . . . . . . . . . . . . . . . 40
• “Customizing WLAN Security” . . . . . . . . . . . . . . . . . . . . . . . . . . . . . . . . . 40
• “Setting Dynamic Pre-Shared Key Expiration” . . . . . . . . . . . . . . . . . . . . . . 44
• “Configuring Access Control Lists” . . . . . . . . . . . . . . . . . . . . . . . . . . . . . . 44
• “Creating a New WLAN” . . . . . . . . . . . . . . . . . . . . . . . . . . . . . . . . . . . . . 46
• “Creating a New WLAN for Workgroup Use” . . . . . . . . . . . . . . . . . . . . . . . . 51
• “Adding New Access Points to the WLAN” . . . . . . . . . . . . . . . . . . . . . . . . . 52
• “Reviewing Current Access Point Policies” . . . . . . . . . . . . . . . . . . . . . . . . . 54
• “Reviewing Current Access Point Policies” . . . . . . . . . . . . . . . . . . . . . . . . . 54
• “Blocking Client Devices” . . . . . . . . . . . . . . . . . . . . . . . . . . . . . . . . . . . . 58
• “Optimizing Access Point Performance” . . . . . . . . . . . . . . . . . . . . . . . . . . 59
39
Ruckus Wireless ZoneDirector User Guide | Managing a Wireless Local Area Network
Overview of Wireless Networks
When your ZoneDirector setup is complete, you have a fully functional wireless network,
based on two secure WLANs (“internal” and “guest”) with access for authorized users and
guests. The internal WLAN provides “zero IT” connectivity for “standard” client devices,
those computers running Windows XP/SP2 and utilizing WPA-ready NICs.
There are two scenarios in which you create additional WLANs, in addition to the internal
WLAN: (1) To limit certain WLANs to groups of qualified users, to enhance security and
efficiency. For example, an “Engineering” WLAN with a closed roster of users.) Or, (2) to
configure a specific WLAN with different security settings. For example, you may need a
WLAN that utilizes WEP encryption for wireless handheld devices that only support WEP-key
encryption.
In the first scenario, specific WLANs (esp. regarding authentication and encryption
algorithm) can be set up that support specific groups of users. This requires a two-step
process: (1) create the custom WLAN and link it to qualified user accounts by “roles”, and
(2) assist all qualified users to prepare their client devices for custom WLAN connection.
As a result, you will have the default internal WLAN, plus the needed WLANs that fulfill
different wireless security requirements.
Customizing WLAN Security
The default security environment for your internal WLAN incorporates a WPA-based
authentication passphrase and the TKIP encryption algorithm, and utilizes a dynamic preshared key. To review the default WLAN configurations and the available options, review the
following procedures.
Reviewing the Initial Security Configuration
1
Go to Monitor > WLANs.
2
When the WLANs workspace appears, a WLANs table lists the two default WLANs created in the setup process: corporate and guest. The internal WLAN, corporate, is the
one used by your authorized users, and you can review the details of its configuration
by clicking the WLAN name. See “FIGURE 3-1” on page 41.
3
You have three options with the internal WLAN: [1] continue using the current configuration, [2] fine-tune the existing WPA-based mode, or [3] replace this mode entirely
with either a WEP-based mode or an 802.1x mode. The two WLAN-editing processes
are described separately, in the following sections.
40
Ruckus Wireless ZoneDirector User Guide | Managing a Wireless Local Area Network
FIGURE 3-1: The Monitor > WLANs page
Fine-tuning the Current Security Mode
1
In the internal WLAN (corporate) row, click Edit (if you haven't done so).
2
You can choose from the following options, which will enhance the default “zero IT”
protection without disrupting the user's connections.
3
WPA2
Switch to this encryption method if you prefer the IEEE 802.11i standard.
AES
Switch to this algorithm for stronger encryption.
Passphrase
Replace the current passphrase with a new one.
Click OK to apply any changes.
Switching to a Different Security Mode
You also have the option of replacing the default internal WLANs’ WPA mode with one of two
other modes:
• The less-secure protection of a WEP key mode
• The more-secure protection of an 802.1x mode
Replacing your WPA configuration with 802.1x requires the users to make changes to their
Ruckus wireless connection configuration—including the importation of certificates.
1
Go to Configure > WLANs.
41
Ruckus Wireless ZoneDirector User Guide | Managing a Wireless Local Area Network
2
When the WLANs workspace appears, you will want to review, and then change the
security options for the internal network. To start, click Edit in the internal row.
3
When the Editing (corporate) features appear, look at the two main categories—
Authentication Options and Encryption Options.
4
If you click an Authentication Option Method such as Open, Shared, or 802.1x, different sets of encryption options are displayed:
• Open allows you to configure a WPA- or WEP-based encryption, or “none” if you're
so inclined. After selecting a WPA or WEP, you can then enter a passphrase or key
text of your choosing.
• Shared limits you to WEP-key encryption.
• 802.1x EAP allows you to choose from all available encryptions, but you do not
need to create a key or passphrase.
5
Depending on your Authentication Option Method selection, review and reconfigure
the related Encryption Options.
6
Review the Advanced Options to change any settings as needed. (For example, if you
switch to 802.1x, you'll need to choose an authentication server from the menu.)
7
When you are finished, click OK to apply your changes.
Using the Built-in EAP Server
(Requires the selection of “Local Database” as the authentication server.) If you are reconfiguring your internal WLAN to use 802.1x/EAP authentication, you normally have to
generate and install certificates for your wireless users. With the built-in EAP server and
Zero-IT Wireless Activation, certificates are automatically generated and installed on the
end user's computer. Users simply follow the instructions provided during the Zero-IT
Wireless Activation process to complete this task. Once it is done, users can connect to the
internal WLAN using 802.1x/EAP authentication.
Authenticating with an External RADIUS Server
You could use an external RADIUS server for your wireless client 802.1x/EAP authentication.
An EAP-aware RADIUS server is required for this application. Also, you might need to deploy
your own certificates for wireless client devices and for the RADIUS server you are using. In
this case, ZoneDirector works as a bridge between your wireless clients and the RADIUS
server during the wireless authentication process. ZoneDirector allows wireless clients to
access the networks only after successful authentication of the wireless clients by the
RADIUS server.
42
Ruckus Wireless ZoneDirector User Guide | Managing a Wireless Local Area Network
If You Change the Internal WLAN to WEP or 802.1x
If you replace the default WPA configuration of the internal WLAN, your users must
reconfigure the wireless LAN connection settings on their devices. This process is described
in detail and can be performed when logging into the WLAN as a new user.
If Switching to WEP-based Security:
1
Each user should be able to repeat the Zero-IT Wireless Activation process and install
the WEP key by executing the activation script.
2
Alternatively, they could manually enter the WEP key text into their wireless device
connection settings.
If Switching to 802.1x-based Security:
1
(Applies only to the use of the built-in EAP server.) Each user should be able to repeat
the Zero-IT Wireless Activation process and download the certificates and an activation script generated by ZoneDirector
2
Each user must first install certificates to his/her computer.
3
Each user must then execute the activation script, in order to configure the correct
wireless setting on his/her computer.
4
To manually configure 802.1x/EAP settings for non-Windows XP/SP2 client usage, use
the wireless settings generated by ZoneDirector.
43
Ruckus Wireless ZoneDirector User Guide | Managing a Wireless Local Area Network
Setting Dynamic Pre-Shared Key Expiration
When network users first activate their access to the WLAN with Dynamic PSK enabled, a
unique pre-shared key (PSK) is generated automatically for their authentication. (This was
activated by default in the WLAN Setup Wizard.) By default, all dynamic pre-shared keys
expire in two months. You can control when the PSK expires, at which time the users will be
prompted to re-activate their wireless access.
1
Go to Configure > WLANs.
2
In the Dynamic PSK features, open the drop-down list and pick the lifespan interval for
a new PSK.
FIGURE 3-2: The Dynamic PSK option
3
Click Apply to save your settings. The new settings go into effect immediately.
Configuring Access Control Lists
You can build access control lists to establish which devices based on their MAC addresses
are allowed to associate to ZoneDirector-managed APs. Using the Access Controls
configuration options, you define Layer 2 ACLs, also known as MAC address ACLs, which can
then be applied to one or more WLANs (upon WLAN creation or edit). ACLs are either allowonly or deny-only; that is, an ACL can be set up to allow only specified clients or to deny
only specified clients.
44
Ruckus Wireless ZoneDirector User Guide | Managing a Wireless Local Area Network
MAC addresses that are in the ACL deny list are blocked at the AP, not at ZoneDirector.
TIP
ZoneDirector also has a system-wide block list that is applied to all WLAN’s in addition to the
per-WLAN ACL. The entries of the system-wide block list are added when the admin
chooses to block clients from the Monitor/Current Active Clients panel. The admin can
remove entries from the system-wide block list via Configure > Access Control > Block
Clients list. If a MAC address is listed in the system-wide block list, it will be blocked even if
it is an allowed entry in other ACL list.
To configure an ACL:
1
Go to Configure > Access Control.
2
Under Access Control Policies, click Create New.
FIGURE 3-3: The Create New form for adding a MAC address to the access control list
3
Type a Name for the ACL.
4
Type a Description of the ACL.
5
Select the Restriction mode as either allow or deny.
6
Type a MAC address in the MAC Address text box, and then click Create New to save
the address. The added address appears next to the Stations field.
7
Repeat Step 5 to add additional MAC addresses.
8
Click OK to save the ACL.
45
Ruckus Wireless ZoneDirector User Guide | Managing a Wireless Local Area Network
9
To apply the ACL, see the Advanced Options section in “Creating a New WLAN” on
page 46.
Creating a New WLAN
There are cases in which you might want to create additional WLANs. For example, you
might want to create a WLAN for WEP-only client devices. Or you might want to create a
WLAN that utilizes 802.1x/EAP and certificates. The following shows how to create such
WLANs that utilize different security settings.
Creating a WLAN
To create a custom wireless LAN, follow these steps:
1
Go to Configuration > WLAN.
2
Click Create New.
FIGURE 3-4: The Create New form for adding a WLAN
46
Ruckus Wireless ZoneDirector User Guide | Managing a Wireless Local Area Network
The Create New workspace displays the following:
General Options
Name/ESSID
Type a short name (2–31 characters/numbers) for this WLAN.
Description
Enter a brief description of the qualifications/purpose for this
WLAN, e.g., “Engineering” or “Voice”.
Authentication Method Options
Open. [Default] No authentication mechanism is applied to
connections. If WPA or WPA2 encryption is used, this implies
WPA-PSK authentication.
Method
Shared: If you click Shared, only WEP encryption will be available, and the WEP Key option appears. Uses a shared WEP key
for authentication. Requires creation of a WEP key, as detailed
below.
802.1x EAP: Uses 802.1x authentication mechanism. Requires
use of certificates.
Encryption Options
Method
None: [Default] No encryption is applied; communications are
in clear text.
WPA / WPA2: (Not available to Shared authentication) Provides
a higher level of encryption and is more secure. WPA and WPA2
require selection of an encryption algorithm (as detailed
below).
WEP-64: Provides a lower level of encryption, and is less
secure, using 64-bit WEP encryption.
WEP-128: Provides a higher level of encryption, using a 128-bit
key for WEP encryption.
IMPORTANT
Algorithm
If you set the encryption method to WEP-64 (40 bit) or WEP-128 (104 bit) and you
are using an 802.11n AP for the WLAN, the AP will operate in 802.11g mode.
(Only for WPA or WPA2 encryption methods)
TKIP: [Default] This algorithm is effective. It is set as the
default since some client devices do not support AES.
AES: This algorithm provides a high degree of security.
IMPORTANT
• If you set the encryption algorithm to TKIP and you are using an 802.11n AP for the
WLAN, the AP will operate in 802.11g mode.
• If you set the encryption algorithm to TKIP, the AP will only be able to support up to 25 clients. When this limit is reached, additional clients will be unable to associate with the AP.
On the other hand, if you disable encryption or select AES, the AP will be able to support
up to 100 clients. If the wireless mesh network is also enabled, the AP will be able to support less than 100 clients.
47
Ruckus Wireless ZoneDirector User Guide | Managing a Wireless Local Area Network
WEP Key
WEP methods only. Click in the Hex field and type the required
key text. If the key is for WEP 64 encryption, the key text must
be up to 10 characters in length. If it is for WEP 128 encryption,
enter a key up to 26 characters in length.
Passphrase
WPA/WP2 PSK methods only. Click in this field and type the text
of the passphrase used for authentication.
Options
Guest Usage
If the WLAN being created is for Guest access, mark the This
WLAN is for Guest Access check box. When selected, the Wireless Client Isolation option is automatically selected and cannot
be unchecked.
Guest WLANs are subject to guest access policies, such as redirection and subnet access restriction.
Web Authentication
[Available only with “Open” or “Shared” authentication.] Click
the check box to require all WLAN users to complete a Webbased login to this network each time they attempt to connect.
Authentication Server
When “Web Authentication” is active, use this option to designate the server used to authenticate Web-based user login.
When “802.1x” authentication is active, use this option to designate either “Local Database” or a configured RADIUS server as
the authentication source.
Wireless Client Isolation Wireless client isolation enables subnet restrictions for guests.
When wireless client isolation is enabled for a WLAN, any stations associated to this WLAN will not be able to access the local
LAN; rather, they can only access the Internet. Also, stations
associated to this WLAN cannot communicate with each other,
regardless of which APs they are associated to. The behavior of
stations will be exactly as the stations that associate to a guest
WLAN. The only difference between a WLAN with wireless client
isolation enabled and a guest WLAN is that a guest WLAN
requires users to enter a guest pass before they can access the
network. Same guest policy will be applied to guest WLAN as
well as WLANs with wireless client isolation enabled.
Zero IT Activation
Leave this option active (the default state), as it activates the
Ruckus ZoneDirector's share in the automatic “new user” process, in which the new user's PC is efficiently (and speedily)
configured for WLAN use.
Advanced Options
See “FIGURE 3-5” on page 50.
Access Controls
Toggle this drop-down list to select the ACL to apply to this
WLAN. An ACL must be created before being available here. See
“Configuring Access Control Lists” on page 44.
48
Ruckus Wireless ZoneDirector User Guide | Managing a Wireless Local Area Network
Rate Limiting
Rate limiting controls fair access to the network. When
enabled, the network traffic throughput of each network device
(i.e., client) is limited to the rate specified in the traffic policy,
and that policy can be applied on either the uplink or downlink.
Toggle the Uplink and/or Downlink drop-down lists to limit the
rate at which WLAN clients upload/download data.
The "Disabled" state means rate limiting is disabled; thus, traffic
flows without prescribed limits.
VLAN
Select the Attach VLAN Tag check box to activate the VLAN
function, and then type the relevant VLAN ID assigned to users/
clients of your wireless network. (The ID should be a number
between 1 and 4094).
Hide SSID
Activate this option if you don't want the ID of this WLAN advertised at any time. This will not affect the performance or force
the WLAN user to perform any unnecessary tasks.
Tunnel Mode
Select this check box if you want to tunnel the WLAN traffic
back to ZoneDirector. Tunnel mode enables wireless clients to
roam across different APs on different subnets. If the WLAN has
clients that require uninterrupted wireless connection (for
example, VoIP devices and PDAs), Ruckus Wireless recommends
enabling tunnel mode.
NOTE
The tunnel mode feature requires an additional license. You need to upload the required
license file for the tunnel mode feature to work. For more information, see “Upgrading the
License” on page 109.
49
Ruckus Wireless ZoneDirector User Guide | Managing a Wireless Local Area Network
FIGURE 3-5: Advanced Options on the WLAN page
3
When you are finished, click OK to save the entries. This WLAN is ready for use.
4
You can now select from these WLANs when assigning roles to users, as detailed in
“Creating New User Roles” on page 65.
Client Authentication Configuration
If your users are connecting with computers running Windows XP SP2/Vista, an automatic
activation script is generated for them to install security settings of WLANs configured on
the Ruckus ZoneDirector. If your users are connecting with computers running early versions
of Windows, Mac OS X, Linux, or other operating systems, no activation script will be
provided for them. Instead, a detailed page containing all necessary wireless settings is
provided. Users must perform manual configuration on their computers based on these
settings. The following grid records the details.
Authentication Options
Encryption Options
Client Configurables
Open
WPA
WPA-2
WEP-64
WEP-128
User must (1) manually enter the text of
the same WEP key in their wireless network configuration, or (2) must manually
enter the WPA passphrase.
50
Ruckus Wireless ZoneDirector User Guide | Managing a Wireless Local Area Network
Authentication Options
Encryption Options
Client Configurables
Shared
WEP-64
WEP-128
User must manually enter the text of the
same WEP key stored in the Ruckus
ZoneDirector in their wireless network
configuration.
802.1x
WEP-64
WEP-128
WPA/WPA2
User must obtain and install certificates
generated on their computers. No key or
passphrase is required.
Creating a New WLAN for Workgroup Use
If you want to create an additional WLAN based on your existing internal WLAN and limit its
use to a select group of users (e.g, Marketing, Engineering), you can do so by following these
steps:
1
Make a list of the group of users (who ideally are using client devices running Windows
XP/SP2).
2
Go to Monitor > WLANs.
When the WLANs page appears, the default corporate and guest networks are listed in
the table (once you have created a WLAN, it will appear in this table).
3
If you have no need for custom authentication or encryption methodologies in this new
WLAN, locate the corporate WLAN record and click Clone.
A workspace appears, displaying the default settings of a new WLAN, using the same
zero-IT configuration settings as “Corporate”.
4
Type a descriptive name for this WLAN, and then click OK. This new WLAN is ready for
use by selected users.
5
You can now assign access to this new WLAN to a limited set of “corporate” users, you
can do so as detailed in “Creating New User Roles” on page 65
51
Ruckus Wireless ZoneDirector User Guide | Managing a Wireless Local Area Network
Adding New Access Points to the WLAN
If your staffing or wireless coverage needs increase, you can add APs to your network easily
and efficiently. Depending on your network security preferences, the new APs can be
automatically detected and activated, or new APs may require per-device manual approvals
before becoming active.
The “Auto-JOIN” automatic AP activation process is active by default. If you prefer, you can
disable Auto-JOIN. If this is your preference, ZoneDirector will detect new APs, alert you to
their presence, and then wait for you to manually “approve” their activation—as detailed in
this guide.
NOTE
For Auto-JOIN to work, the APs that you are adding must be on the same IP subnet or VLAN
as ZoneDirector.
Connecting the APs to the WLAN
1
Place the new APs in the appropriate locations.
2
Write down the MAC address (on the bottom of each device) and note the specific
location of each AP as you distribute them.
3
Connect the APs to the LAN with Ethernet cables.
4
Connect each AP to a power source.
NOTE
If the Ruckus Wireless APs that you are using are POE-capable and power sources are not
convenient, they will draw power through the Ethernet cabling if connected to a POE-ready
hub or switch.
Verifying/Approving New APs
1
Go to Monitor > Access Points. The Access Points page appears, showing the first 15
access points that have been approved or are awaiting approval. If ZoneDirector is
managing more than 15 access points, the Show More button at the bottom of the
page will be active. To display more access points in the list, click Show More. When
all access points are displayed on the page, the Show More button disappears.
2
Review the Currently Managed APs table. See FIGURE 3-6.
• If the Configure > Access Points > Access Points Policies > Approval check box is
checked, all new APs should be listed in the table, and their Status should be “Connected”.
• If the Auto-JOIN option is disabled, all new APs will be listed, but their status will
be “Approval Pending.”
3
Under the Action column, click Allow. After the status is changed from “Disconnected”
to “Connected”, the new AP is activated and ready for use.
4
Click Apply to save your settings.
TIP!
Use “Map View” (on the Monitoring tab) to place the marker icons of any newly approved
APs. See “Evaluating and Optimizing Network Coverage” on page 100 for more information.
52
Ruckus Wireless ZoneDirector User Guide | Managing a Wireless Local Area Network
FIGURE 3-6: The Monitor > Access Points page
53
Ruckus Wireless ZoneDirector User Guide | Managing a Wireless Local Area Network
Reviewing Current Access Point Policies
The Access Point Policy options include how new APs are detected and approved for use in
WLAN coverage. To review and revise the general AP policy, follow these steps:
1
Go to Configure > Access Points.
2
Review the current settings in Access Point Policies. You can change the following:
Approval
3
If you prefer, you can disable this option if you want to manually
review and approve the joining of new APs to the WLAN.
Click Apply to save your settings. This will affect only new/unapproved APs.
FIGURE 3-7: The Configure > Access Points page
Editing Access Point Parameters
You can add a description, or change the channelization, channel, or transmit power
settings of a managed access point by editing the APs parameters.
To edit the parameters of an access point:
1
Go to Configure > Access Points.
2
Find the AP to edit in the Access Points table, and then click Edit under the Action column.
54
Ruckus Wireless ZoneDirector User Guide | Managing a Wireless Local Area Network
3
NOTE
4
Edit any of the following:
Description
Enter a description for the AP, such as the location.
Channelization
(For 802.11n only) The “channel width” determines the manner
in which the spectrum is used during transmission.
Channel
This is the channel used by the APs network.
TX Power
Specifies the maximum transmit power level relative to the calibrated power.
When mesh is enabled, the TX Power option becomes inactive and is automatically set to
Full. This setting helps make the mesh network stable by ensuring that the mesh APs
always transmit at full power.
If the AP is currently connected to ZoneDirector, the Management IP options appear.
Use these options to configure the IP settings of the AP.
• If you want the AP to automatically obtain its IP address settings from a DHCP
server on the network, click the DHCP option in By-DHCP. You do not need to configure the other settings (netmask, gateway, and DNS servers).
• If you want to assign a static IP address to the AP, click the Manual option in ByDHCP, and then set the values for the following options:
• IP Address
• Netmask
• Gateway
• Primary DNS Server
• Secondary DNS Server
5
Under Advanced Options > Uplink Selection, select the Manual radio button. The
other APs in the mesh appear below the selection.
6
Select the check box for each AP that the current AP can use as uplink.
NOTE
7
If you set Uplink Selection for an AP to Manual and the uplink AP that you selected is off or
unavailable, the AP status on the Monitor > Access Points page will appear as Isolated
Mesh AP.
Click OK to save your settings.
55
Ruckus Wireless ZoneDirector User Guide | Managing a Wireless Local Area Network
FIGURE 3-8
Deploying ZoneDirector WLANs in
a VLAN Environment
You can set up a ZoneDirector wireless LAN as an extension of a VLAN network environment,
but certain qualifications must be met due to the fact that management traffic between
ZoneDirector and the APs is not VLAN-tagged. The WLAN-in-VLAN qualifications include the
following:
• Verifying that the VLAN switch supports native VLANs. A native VLAN is a VLAN that allows
the user to designate untagged frames going in/out of a port to a specific VLAN.
For example, if an 802.1Q port has VLANs 2, 3, and 4 assigned to it with VLAN 2 being the
Native VLAN, frames on VLAN 2 that egress (exit) the port are not given an 802.1Q header
(i.e., they are plain Ethernet frames). Frames which ingress (enter) this port and have no
802.1Q header are put into VLAN 2. Behavior of traffic relating to VLANs 3 and 4 is intuitive.
• Connecting ZoneDirector and any Access Points (APs) to VLAN trunk ports in the VLAN
switch
56
Ruckus Wireless ZoneDirector User Guide | Managing a Wireless Local Area Network
• Verifying that those trunk ports are on the same native VLAN
NOTE
All DNS, DHCP, ARP, and HTTP traffic from an unauthenticated wireless client will be
passed onto ZoneDirector from the AP via the management VLAN. If the client belongs to a
particular VLAN, ZoneDirector will add the corresponding VLAN tag before passing traffic to
the corresponding wired network. After client authentication is performed, client traffic will
directly go to the wired network from the AP, which will add the corresponding VLAN tag.
This explains why it is necessary to configure tagged VLANs for all VLAN switch ports connecting to ZoneDirector and APs.
Example configuration (“FIGURE 3-9” on page 57): VLAN ID 55 is used for management, and
wlan1 is tagged with VLAN ID 10.
FIGURE 3-9
57
Ruckus Wireless ZoneDirector User Guide | Managing a Wireless Local Area Network
Blocking Client Devices
When users log into a ZoneDirector network, their client devices (for example, laptop
computers and PCs) are recorded and tracked. If, for any reason, you need to block a client
device from network use, you can do so from the Web interface. The following subtopics
describe various tasks that you can perform to monitor, block and track client devices.
Monitoring Client Devices
1
Go to the Dashboard, if it's not already in view.
2
Under Devices Overview, look at # of Client Devices.
FIGURE 3-10
3
Click the current number, which is also a link. The Currently Active Clients page (on
the Monitor tab) appears, showing the first 15 clients that are currently connected to
ZoneDirector. If there are more than 15 currently active clients, the Show More button
at the bottom of the page will be active. To display more clients in the list, click Show
More. When all active clients are displayed on the page, the Show More button disappears.
4
When the Currently Active Clients page under the Monitor tab appears, review the
Clients table.
To block any listed client devices, follow the next set of steps.
Temporarily Disconnecting Specific Client Devices
Follow these steps to temporarily disconnect a client device from your WLAN. (The user can
simply reconnect manually, if they prefer.) This is helpful as a troubleshooting tip for
problematic network connections.
1
Look at the Status column to identify any “Unauthorized” users.
2
Click the Delete button in the Action column in a specific user row.
The entry is deleted from the Active/Current Client list, and the listed device is disconnected from your Ruckus WLAN.
NOTE
The user can reconnect at any time, which, if this proves to be a problem, may prompt you to
consider the following client option.
58
Ruckus Wireless ZoneDirector User Guide | Managing a Wireless Local Area Network
Permanently Blocking Specific Client Devices
Follow these steps to permanently block a client device from WLAN connections.
1
Look at the Status column to identify any unauthorized users.
2
Click the Block button in the Action column in a specific user row.
The status is changed to “Blocked”. This will prevent the listed device (and its user)
from using your Ruckus WLAN.
Reviewing a List of Previously Blocked Clients
1
Go to Configure > Access Controls.
2
Review the Blocked Clients table.
3
You can unblock any listed MAC address by clicking the Unblock button for that
address.
Optimizing Access Point Performance
ZoneDirector through the Web interface enables you to remotely monitor and adjust key
hardware settings on each of your network APs. After assessing AP performance in the
context of network performance, you can reset channels and adjust transmission power, as
needed.
Assessing Current Performance by Using the Map View
REQUIREMENT: The importing of a floorplan and placement of APs are detailed in
“Importing a Map View Floorplan Image” on page 90 and “Placing the Access Point Markers”
on page 91.
1
Go to Monitor > Map View.
If Map View displays a floorplan with active device symbols, you can assess the performance of individual APs, in terms of coverage. (For detailed information on the Map
View, see “Using the Map View Tools” on page 92.)
2
In the Coverage options, click Yes.
3
When the “heat map” appears, look for the Signal% scale in the upper right corner of
the map.
4
Note the overall color range, especially colors that indicate low coverage.
5
Look at the floorplan and evaluate the current coverage. You can make adjustments as
detailed in the following procedure.
Improving AP RF Coverage
1
Click and drag individual AP markers to new positions on the Map View floorplan until
your RF coverage coloration is optimized. There may be a need for additional APs to
fill in large coverage gaps.
59
Ruckus Wireless ZoneDirector User Guide | Managing a Wireless Local Area Network
2
When your adjustments are complete, note down the new locations of relocated AP
markers.
3
After physically relocating the actual APs in conformance to the Map View placements,
disconnect and reconnect the APs to a power source.
4
To refresh the ZoneDirector Map View, run a full-system RF Scan, as detailed in “Starting a Radio Frequency Scan” on page 120.
5
When the RF scan is complete and ZoneDirector has recalibrated the Map View, you
can assess your changes, and make further adjustments as needed.
Assessing Current Performance by Using the Access Point Table
1
Go to Monitor > Access Points.
2
When the Access Points page appears, review the Currently Active APs for specific AP
settings, especially the Channel and Clients columns.
3
If you want to make changes to individual AP settings, proceed to the next task.
Adjusting AP Settings
1
Go to Configure > Access Points.
2
Review the Access Points table and identify an AP that you want to adjust.
3
Click the Edit button in that AP row.
4
Review and adjust any of the following Editing (AP) options:
NOTE
MAC Address
This information is taken from the AP. It cannot be modified in
ZoneDirector.
Description
Enter a short description of this device and its current location.
Radio B/G Channel
Choose a specific channel for use by 802.11b/g devices from
this drop-down list.
TX Power
Choose the amount of power allocated to this channel. The
default setting is “Auto” and your options range from “Full” to
“1/8”.
NOTE
5
Some options are read-only depending on the approval status.
When mesh is enabled, the TX Power option becomes inactive and is automatically set to
Full. This setting helps make the mesh network stable by ensuring that the mesh APs
always transmit at full power.
Click OK. The adjusted AP will be automatically restarted, and when it is active, will
be ready for network connections.
60
CHAPTER 4
Managing User and
Guest Access
Chapter Contents
• “Using an External Server for User Authentication” . . . . . . . . . . . . . . . . . . 62
• “Adding New User Accounts to ZoneDirector” . . . . . . . . . . . . . . . . . . . . . . 63
• “Managing Current User Accounts”. . . . . . . . . . . . . . . . . . . . . . . . . . . . . . 64
• “Creating New User Roles” . . . . . . . . . . . . . . . . . . . . . . . . . . . . . . . . . . . 65
• “Configuring System-Wide Guest Access Policy” . . . . . . . . . . . . . . . . . . . . . 66
• “Managing Guest Pass Access” . . . . . . . . . . . . . . . . . . . . . . . . . . . . . . . . . 67
• “Activating Web Authentication of Users” . . . . . . . . . . . . . . . . . . . . . . . . . 72
• “Managing Automatically Generated User Certificates and Keys” . . . . . . . . . 73
61
Ruckus Wireless ZoneDirector User Guide | Managing User and Guest Access
Using an External Server for User Authentication
Once your wireless network is set up, you can instruct ZoneDirector to authenticate wireless
users using your existing Active Directory server, an existing RADIUS server, or to create new
user accounts on the internal user database.
To use a RADIUS or Active Directory server as an authentication server:
1
Go to Configure > Authentication Servers.
2
When the Authentication Servers page appears, click the Create New link in the
Authentication Servers table.
3
When the Create New form appears, make the following entries:
• Click in the Name field and type a descriptive name (for example, “Active Directory”).
• Verify that “Active Directory” or “RADIUS” is selected as the Type.
• Enter the IP Address of the Active Directory server.
• Enter a Port number, if different from “389” for Active Directory or “1812” for
RADIUS.
• (For Active Directory only) Enter the Domain name of the Active Directory server,
for example, “domain.ruckuswireless.com”.
• (For RADIUS only) Enter the Shared Secret, and then re-enter that secret in Confirm
Secret.
FIGURE 4-1: The Create New form for adding authentication servers
62
Ruckus Wireless ZoneDirector User Guide | Managing User and Guest Access
4
Click OK to save this server entry.
Test your connection to the Active Directory server by entering an existing user ID and password in the Test Authentication Settings panel.
TIP
Adding New User Accounts to ZoneDirector
Once your wireless network is set up, you can instruct the Ruckus ZoneDirector to
authenticate wireless users using an existing Active Directory server or RADIUS server, or to
authenticate users by referring to accounts that are stored in ZoneDirector's internal user
database. To use the internal user database as the default authentication source and to
create new user accounts in the database, follow the steps:
1
Go to Configure > Users.
2
In the Internal User Database table, click Create New.
FIGURE 4-2: The Create New form for adding users to the internal database
3
When the Create New form appears, fill in the text fields with the appropriate entries:
User Name
Enter a name for this user, up to 32 characters in length, using
letters, numbers and the period (.) character. User names are
case-sensitive.
63
Ruckus Wireless ZoneDirector User Guide | Managing User and Guest Access
Full Name
Enter the assigned user's first and last name.
Password
Enter a unique password for this user, using a combination of
letters and numbers, between 4 and 32 characters in length. Do
not incorporate any letter spaces. Passwords are case-sensitive.
Confirm Password
Re-enter the same password for this user.
4
If you have created roles that enable non-standard client logins or that gather staff
members into workgroups, open the Role menu, and then choose the appropriate role
for this user. For more information on roles and their application, see “Creating New
User Roles” on page 65.
5
Click OK to save your settings. Be sure to communicate the user name and password to
the appropriate end user.
Managing Current User Accounts
ZoneDirector allows you to review your current user roster on the internal user database and
to make changes to existing user accounts as needed.
Changing an Existing User Account
1
Go to Configure > Users.
2
When the Users features appear, locate the specific user account in the Internal User
Database panel, and then click Edit.
3
When the Editing [user name] form appears, make the needed changes.
4
If a role must be replaced, open that menu and choose a new role for this user. [For
more information, see “Creating New User Roles” on page 65.]
5
Click OK to save your settings. Be sure to communicate the relevant changes to the
appropriate end user.
Deleting a User Record
1
Go to Configure > Users.
2
When the Users Authentication features appear, review the “Internal Users Database”.
3
To delete one or more records, click the check boxes by those account records.
4
Click the now-active Delete button.
5
When the Deletion Confirmation dialog box appears, click OK to save your settings.
The records are removed from the internal users database.
64
Ruckus Wireless ZoneDirector User Guide | Managing User and Guest Access
Creating New User Roles
ZoneDirector provides a “Default” role that is automatically applied to all new user
accounts. This role links all users to the internal WLAN and permits any user to obtain guest
passes for on-site visitor use. As an alternative, you can create additional roles that you can
assign to selected wireless network users, to limit their access to certain WLANs, to allow
them to log in with non-standard client devices, or to grant permission to generate guest
passes. (You can then edit the “default” role to disable the guest-pass generation option.)
1
Go to Configuration > Roles. The Roles and Policies page appears, displaying a
“Default” role in the Roles table.
2
Click Create New (below the Roles table).
FIGURE 4-3: The Create New form for adding a role
3
Enter a Name and a short Description for this role.
4
Choose the options for this role from the following:
Group Attributes
This field is only available if you choose Active Directory as your
authentication server. Enter the Active Directory User Group
names here. Active Directory users with the same group attributes are automatically mapped to this user role.
Allow All WLANs
You have two options: (1) Allow Access to all WLANs, or (2)
Specify WLAN Access. If you select the second option, you must
specify the WLANs by clicking the check box next to each one.
65
Ruckus Wireless ZoneDirector User Guide | Managing User and Guest Access
This option requires that you create WLANs prior to setting this
policy. See “Creating a New WLAN for Workgroup Use” on page
28.
Guest Pass
If you want users with this role to have permission to generate
guest passes, enable this option.
5
When you are finished, click OK to save your settings. This role is ready for assignment
to authorized users.
6
If you want to create additional roles with different policies, repeat this procedure.
Configuring System-Wide Guest Access Policy
The Enable Guest Access (System-side) options enable the administrator to define the
system-wide guest access policy. You can require guests to validate their guest pass, accept
terms of use, and be redirected to a URL you specify.
1
Go to Configure > Guest Access. The Guest Access page appears.
FIGURE 4-4: The Guest Access page
2
Under Enable Guest Access, select the Authentication type to use:
• Use guest pass authentication: Redirect the user to a page requiring a valid guest
pass before allowing the user to use the guest WLAN.
66
Ruckus Wireless ZoneDirector User Guide | Managing User and Guest Access
• If you want multiple guests to be able to use the same guest pass simultaneously,
select the Allow multiple users to share a single guest pass check box.
• No authentication: Do not require redirection and guest pass validation.
3
Under Terms of Use, select the Show terms of use check box to compel the guest user
to read and accept your terms of use prior to use. Type (or cut and paste) your terms
of use into the large text box.
4
At Redirect, select one of the following radio buttons to use/not use redirection:
• Go to the original URL the user intended to: Allows the guest user to continue to
their destination without redirection.
• Redirect to the following URL: Redirect the user to a specified Web page (entered
into the text box) prior to forwarding them to their destination. When guest users
land on the redirected page(s), they are shown the expiration time for their guest
pass.
5
Click Apply to save your settings.
Managing Guest Pass Access
By default, all of your users are allowed to issue temporary “day use” guest passes for
visitors and contractors. Such a guest pass allows its user to connect to the WLAN.
You must decide whether or not to permit all—or some—users to generate guest passes.
Additionally, you may also want to review the default settings and policies that control
guest-pass use of the network. There are options you can fine-tune to fit your work
environment.
Activating Guest Pass Access in ZoneDirector
1
Go to Configuration > Guest Access.
The Guest Access page appears.
2
Scroll down to Guest Access > Guest Pass Generation.
67
Ruckus Wireless ZoneDirector User Guide | Managing User and Guest Access
FIGURE 4-5: The Guest Pass Generation section on the Guest Pass page
3
If you require a specific authentication server, toggle the Authentication Server dropdown list to select the appropriate server.
4
Set the guest pass expiration parameters by selecting the radio button by either of the
following:
• Guest Pass will expire in the amount of time specified after it is issued: This type
of guest-pass is valid from the time it is first created to the specified expiration
time, even if it is not being used by any end user.
• Guest Pass will expire in the amount of time specified after it is first used: This
type of guest pass is valid from the time the user uses it to authenticate with ZoneDirector until the specified expiration time. An additional parameter (A Guest Pass
will expire in X days) can be configured to specify when an unused guest pass will
expire regardless of use. The default is 7 days.
5
When you are finished, click Apply to save your settings and make this new policy
active.
Controlling Guest Pass Generation Privileges
To disable the “guest pass” generation privilege granted to all basic “default” role users,
follow these steps:
1
Go to Configure > Roles.
When the Roles and Policies page appears, a table lists all existing roles, including
“Default”.
68
Ruckus Wireless ZoneDirector User Guide | Managing User and Guest Access
2
Click Edit (in the “Default” role row).
3
In the Policies options, clear the check box by Allow Guest Pass Generation (if this
option is active).
4
Click OK to save your settings. Users with “default” roles no longer have guest-pass
generation privileges.
Creating a Guest Pass Generation User Role
To create a guest-pass generator role that can be assigned to authorized users, follow these
steps:
1
Go to Configuration > Roles.
2
In the Roles table, click Create New.
3
When the Create New features appear, make these entries:
4
Name
Enter a name for this role.
Description
Enter a short description of this role's application.
Group Attributes
This field is only available if you choose Active Directory as your
authentication server. Enter the Active Directory User Group
names here. Active Directory users with the same group attributes are automatically mapped to this user role.
Allow All WLANs
You have two options: (1) allow all users with this role to connect to all WLANs, or (2) limit this role's users to specific
WLANs, and then pick the WLANs they can connect to.
Guest Pass
If you want users with this role to have permission to generate
guest passes, check this option.
Click OK to save your settings. This new role is ready for application to authorized
users.
Assigning a Pass Generator Role to a User Account
This procedure details the procedure for assigning a guest-pass generator role to a user
account.
1
Go to Configuration > User.
2
At the bottom of the Internal Users Database, click Create New.
3
When the Create New form appears, fill in the text fields with the appropriate entries.
4
Open the Role menu and choose the assigned role for this user.
NOTE
5
You can edit an existing user account and reassign the pass-generator role, if you prefer.
Click OK to save your settings. Be sure to communicate the role, user name and password to the appropriate end user.
69
Ruckus Wireless ZoneDirector User Guide | Managing User and Guest Access
Monitoring Generated Guest Passes
Once you have generated a pass for a guest, you can monitor and (if necessary) remove it.
1
Go to Monitor > Generated Guest Passes.
2
View generated guest passes.
3
To remove a guest pass, select the check box for the guest pass.
4
Click the Delete button.
Restricting Guest Subnet Access
The Guest Pass > Restricted Subnet Access feature enables you to restrict guest access to
specified subnets. By default, guest pass users are automatically blocked from ZoneDirector
subnet (192.168.0.2/24) and the subnet of the AP to which the guest user is connected.
You can configure up to 5 IP subnets to be blocked to guest access. This subnet access policy
is enforced both on the ZoneDirector side (for tunneled/redirect traffic) and the AP side (for
local-bridging traffic).
NOTE
All guests share this same subnet access policy.
To prevent guests from accessing certain subnets:
1
Go to Configure > Guest Access.
2
Under Restricted Subnet Access, type the IP address and subnet mask (format:
A.B.C.D/M) of the subnet in a provided text field. See FIGURE 4-6.
3
Repeat Step 2 to add additional subnets (up to five).
4
Click Apply to enforce your settings.
70
Ruckus Wireless ZoneDirector User Guide | Managing User and Guest Access
FIGURE 4-6: The Restricted Subnet Access options
71
Ruckus Wireless ZoneDirector User Guide | Managing User and Guest Access
Activating Web Authentication of Users
Web authentication, when activated on an WLAN, compels all users to log in to a specific
WLAN every time they connect. This is helpful if you are managing an Internet hotzone.
After you activate Web authentication on your hotzone/hotspot WLAN, you must then
provide all users with a URL to your login page. Of course the users must be listed in an
internal or external authentication database. After they discover the WLAN on their wireless
device or laptop, they open their browser, connect to the Login page and enter the required
login information.
1
Go to Configure > WLANs.
2
When the WLANs page appears, click the Edit link in the row of the relevant WLAN
record.
3
When the Editing (WLAN_Name) form appears, locate the Web Authentication option.
See “FIGURE 4-7” on page 72.
4
Click the check box to enable portal/Web authentication.
5
Select the preferred authentication server (for Web Authentication) from the Authentication Server drop-down menu.
6
Click OK to save this entry.
7
Repeat this “enabling” process for each WLAN to which you want to apply Web authentication.
FIGURE 4-7: The Edit WLAN page
72
Ruckus Wireless ZoneDirector User Guide | Managing User and Guest Access
Managing Automatically Generated User
Certificates and Keys
With Ruckus Zero-IT wireless activation, a unique key or certificate is automatically
generated for a user during the activation process. More precisely, for a WLAN configured
with WPA-PSK/WPA2-PSK and Dynamic PSK enabled, a unique and random key phrase is
generated for each wireless user. Similarly, for a WLAN configured with 802.1X/EAP
authentication, a unique certificate for each wireless user is created. When using the
internal user database, automatically generated user certificates and keys are deleted
whenever the associated user account is deleted from the user database. In the case of
using Windows Active Directory Server or a RADIUS server as an authentication server, you
can delete the generated user keys and certificates by following these steps:
1
Go to Monitor > Generated PSK/Certs.
2
When the Generated PSK/Certs page appears, click on the check boxes next to the
PSKs and Certificates you like to delete.
3
Click Delete to delete the selected items.
The selected PSKs and Certificates are deleted from the system.
A user with a deleted PSK or a deleted certificate will not be able to connect to the wireless
network without obtaining a new key or a new certificate.
73
CHAPTER 5
Deploying a Wireless Mesh
Network
Chapter Contents
• “Overview of Wireless Mesh Networking” . . . . . . . . . . . . . . . . . . . . . . . . . 75
• “Mesh Networking Terms” . . . . . . . . . . . . . . . . . . . . . . . . . . . . . . . . . . . 75
• “Supported Mesh Topologies” . . . . . . . . . . . . . . . . . . . . . . . . . . . . . . . . . 76
• “Deploying a Wireless Mesh via ZoneDirector” . . . . . . . . . . . . . . . . . . . . . . 78
• “Understanding Mesh-related AP Statuses” . . . . . . . . . . . . . . . . . . . . . . . . 83
• “Setting Mesh Uplinks Manually” . . . . . . . . . . . . . . . . . . . . . . . . . . . . . . . 83
• “Troubleshooting Isolated Mesh APs” . . . . . . . . . . . . . . . . . . . . . . . . . . . . 85
74
Ruckus Wireless ZoneDirector User Guide | Deploying a Wireless Mesh Network
Overview of Wireless Mesh Networking
A wireless mesh network is a peer-to-peer, multi-hop wireless network wherein participant
nodes cooperate to route packets. In a Ruckus wireless mesh network, the routing nodes
(i.e., the Ruckus APs forming the network), or “mesh nodes”, form the network's backbone.
Clients (e.g., laptops, mobile devices) connect to the mesh nodes and use the backbone to
communicate with one another, and, if permitted, with nodes on the Internet. The mesh
network enables clients to reach other systems by creating a path that 'hops' between
nodes.
Mesh networking offers many advantages. Mesh networks are self-healing: If any one of the
nodes fails, the nodes note the blockage and re-route data. Wireless mesh networks are
self-organizing: When a new node appears, it becomes assimilated into the mesh network.
In the Ruckus mesh network, all traffic going through the mesh links is encrypted. A
passphrase is shared between mesh nodes to securely pass traffic.
When deployed as a mesh network, Ruckus Wireless APs communicate with ZoneDirector
through a wired LAN connection or through wireless LAN connection with other Ruckus
Wireless access points.
Mesh Networking Terms
Before you begin deploying your wireless mesh network, Ruckus Wireless recommends
getting familiar with the following terms that are used in this document to describe wireless
mesh networks.
Table 1: Mesh Networking Terms
Term
Definition
Mesh Node
A Ruckus ZoneFlex AP with mesh capability enabled. ZoneFlex
models that provide mesh capability include ZoneFlex 2942,
ZoneFlex 7942, and ZoneFlex 2925.
Root Access Point (Root AP)
A mesh node communicating to a ZoneDirector through its
Ethernet (that is, wired) interface.
Mesh Access Point (Mesh AP)
A mesh node communicating to a ZoneDirector through its
wireless interface.
Mesh Tree
Each Mesh AP has exactly one uplink to another Mesh AP or
Root AP. Each Mesh AP or Root AP could have multiple Mesh
APs connecting to it. Thus, the resulting topology is a tree-like
topology. There is no configurable limit to the depth of a mesh
tree.
A single ZoneDirector device can manage more than one mesh
tree. The only limitation of how many mesh trees it can manage
is dependent on the number of APs a ZoneDirector can
manage. For example, a ZD1006 can manage a mesh tree of 6
APs or two mesh trees of 3 APs each.
75
Ruckus Wireless ZoneDirector User Guide | Deploying a Wireless Mesh Network
Table 1: Mesh Networking Terms
Term
Definition
Hop
The number of wireless mesh links a data packet takes from
one Mesh AP to the Root AP. For example, if the Root AP is the
uplink of Mesh AP 1, then Mesh AP 1 is one hop away from the
Root AP. In the same scenario, if Mesh AP 1 is the uplink of
Mesh AP 2, then Mesh AP 2 is two hops away from the Root
AP.
Supported Mesh Topologies
Standard Topology
If you need to extend the coverage of your wireless network, you can set up a mesh network
using the standard topology. In this topology, ZoneDirector and the upstream router are
connected to the same wired LAN segment. You can extend the reach of your wireless
network by forming and connecting multiple mesh trees (see FIGURE 5-1) to the wired LAN
segment. All of the clients in each mesh tree function as wireless clients.
FIGURE 5-1: Mesh - Standard Topology
76
Ruckus Wireless ZoneDirector User Guide | Deploying a Wireless Mesh Network
Wireless Bridge Topology
If you need to bridge isolated wired LAN segments, you can set up a mesh network using the
wireless bridge topology. In this topology, ZoneDirector and the upstream router are on the
same wired LAN segment. You can bridge these two wired LAN segments by forming two
intersecting mesh trees, as shown in FIGURE 5-2.
FIGURE 5-2: Mesh - Wireless Bridge Topology
Unsupported Mesh Topology
If you are deploying a building-to-building mesh, note that APs in the second building must
all be Mesh APs (connected wirelessly). If any AP in the second building is connected to a
Mesh AP via the wired network, it will assume that it is a Root AP and attempt to discover
ZoneDirector via its Ethernet port. This could result in a network loop or unstable network
performance.
FIGURE 5-3: APs in the second building must be connected wirelessly to form a mesh
77
Ruckus Wireless ZoneDirector User Guide | Deploying a Wireless Mesh Network
Deploying a Wireless Mesh via ZoneDirector
Deploying a wireless mesh via ZoneDirector involves the following steps:
• “Step 1: Prepare for Wireless Mesh Deployment”
• “Step 2: Enable Mesh Capability on ZoneDirector”
• “Step 3: Provision and Deploy Mesh Nodes”
• “Step 4: Verify That the Wireless Mesh Network Is Up”
Step 1: Prepare for Wireless Mesh Deployment
Before starting with your wireless mesh deployment, Ruckus Wireless recommends
performing a number of tasks that can help ensure a smooth deployment.
• Plan Your Wireless Mesh Network - Survey your deployment site, decide on the number
of APs that you will deploy (including the number of Root APs and Mesh APs), and then
create a simple sketch of where you will deploy each Root AP and Mesh AP. Remember
that Root APs need to be connected to ZoneDirector via their Ethernet ports. Make sure
that the Root AP locations can be wired easily, if cabling is not yet available.
• Make Sure That Your Access Points Support Mesh Networking - ZoneFlex models that
provide wireless mesh networking support include ZoneFlex 2942, ZoneFlex 7942, and
ZoneFlex 2925. Verify that the access points that you are planning to include in your wireless mesh network all provide mesh capability. Note that only firmware versions 6.0.0.0.*
and above (for both ZoneFlex and ZoneDirector) support mesh networking.
• Enable Auto Approval - If you do not want to have to manually approve the join request
from each mesh AP when they start forming the wireless mesh, you can enable Auto
Approval. For instructions on how to enable Auto Approval, see “Adding New Access
Points to the WLAN” on page 52.
Step 2: Enable Mesh Capability on ZoneDirector
If you did not enable mesh capability on ZoneDirector when you completed the Setup
Wizard, you can enable it on the Configure > Mesh page.
78
Ruckus Wireless ZoneDirector User Guide | Deploying a Wireless Mesh Network
FIGURE 5-4: Enable Mesh in Configure > Mesh
To enable mesh capability:
1
Log in to the ZoneDirector Web interface.
2
Click the Configure tab.
3
On the menu, click Mesh.
4
Under Mesh Settings, select the Enable Mesh check box.
5
In Mesh Name (ESSID), type a name for the mesh network. Alternatively, do nothing to
accept the default mesh name that ZoneDirector has generated.
6
In Mesh Passphrase, type a passphrase that contains at least 12 characters. This passphrase will be used by ZoneDirector to secure the traffic between Mesh APs. Alternatively, click Generate to generate a random passphrase with 32 characters or more.
7
Click Apply to save your settings.
You have completed enabling mesh capability on ZoneDirector. You can now start
provisioning and deploying the APs that you want to be part of the wireless mesh network.
Step 3: Provision and Deploy Mesh Nodes
In this step, you will connect each AP to the same wired network as ZoneDirector to
provision it with mesh-related settings. After you complete provisioning an AP, you must
reboot it for the mesh-related settings to take effect.
To provision and deploy a mesh node:
1
Using one of the AP's Ethernet ports, connect it to the same wired network to which
ZoneDirector is connected, and then power it on. The AP detects ZoneDirector and
sends a join request.
2
If Auto Approval is enabled, continue to Step 3. If Auto Approval is disabled, log in to
ZoneDirector, check the list of currently active access points for the AP that you are
attempting to provision, and then click the corresponding Allow link to approve the
79
Ruckus Wireless ZoneDirector User Guide | Deploying a Wireless Mesh Network
join request. For detailed procedures on approving join requests, see “Verifying/
Approving New APs” on page 52.
3
After the AP has been provisioned, disconnect it from the wired network, unplug the
power cable, and then move the device to its deployment location.
• If you want the AP to be a Root AP, reconnect it to the wired network using one of
its Ethernet ports, and then power it on. When the AP detects ZoneDirector again
through its Ethernet port, it will set itself as a Root AP, and then it will start
accepting mesh association requests from Mesh APs.
• If you want the AP to be a Mesh AP, power it on but do not reconnect it to the wired
network. When it does not detect ZoneDirector through its Ethernet port within 90
seconds, it will search for other Mesh APs and, once mesh neighbor relationships
are established, form a mesh tree.
IMPORTANT
After an AP in its factory default state has been provisioned, you need to reboot it to enable
mesh capability.
Repeat Steps 1 to 3 for each Mesh AP and Root AP that you want to be part of your wireless
mesh network. After you complete provisioning and deploying all mesh nodes, verify that
the wireless mesh has been set up successfully.
Step 4: Verify That the Wireless Mesh Network Is Up
After you complete deploying all mesh nodes to their locations on the network, you can
check the Map View on the ZoneDirector Web interface to verify that mesh associations have
been established and mesh trees formed.
1
On the Zone Director Web interface, click the Monitor tab, and then click Map View
on the menu. The Map View appears and shows the mesh nodes that are currently
active.
2
Check if all the mesh nodes that you have provisioned and deployed appear on the Map
View.
3
Verify that a mesh network has been formed by checking if dotted lines appear
between the mesh nodes. These dotted lines identify the neighbor relationships that
have been established in the current mesh network.
80
Ruckus Wireless ZoneDirector User Guide | Deploying a Wireless Mesh Network
FIGURE 5-5: Dotted lines indicate that these APs are part of the wireless mesh network
The symbols next to the AP icons indicate whether the AP is a Root AP or a Mesh AP. Refer to
the following table:
An AP with the upward pointing arrow is a Root AP.
An AP with a number in a circle is a Mesh AP. The number indicates the number
of hops from the mesh AP to the Root AP.
81
Ruckus Wireless ZoneDirector User Guide | Deploying a Wireless Mesh Network
Using the ZoneFlex LEDs to Determine the Mesh
Status
In addition to checking the mesh status of ZoneFlex APs from the ZoneDirector Web
interface, you can also check the LEDs on the APs. The two LEDs on the ZoneFlex AP that
indicate mesh status are:
• WLAN/Wireless Device Association LED - Indicates downlink status and client association
status
• Signal/Air Quality LED - Indicates uplink status and the quality of the AP's wireless signal
WLAN/Wireless Device Association LED
The behavior of the WLAN LED is the same on both Root AP and Mesh AP. Refer to the table
below for a complete list of possible LED colors and behaviors for Root APs and Mesh APs,
and the mesh status that they indicate.
LED Color/Behavior
Root AP / Mesh AP
• No mesh downlink, and;
Green
• At least one client is associated with the AP
• No mesh downlink, and;
Amber
• No client is associated with the AP
• At least one mesh downlink exists, and;
Fast blinking green
• At least one client is associated with the AP
• At least one mesh downlink exists, and;
Slow blinking green
• No client is associated with the AP
Signal/Air Quality LED
LED Color/Behavior
Solid green
Root AP
Mesh AP
N/A
• Connected to a Root AP or
another Mesh AP
• Signal quality is good
Fast blinking green
• Connected to a Root AP or
another Mesh AP
N/A
• Signal quality is fair
Slow blinking green
N/A
AP is searching for an uplink
Off
This AP is a Root AP
N/A
82
Ruckus Wireless ZoneDirector User Guide | Deploying a Wireless Mesh Network
Understanding Mesh-related AP Statuses
In addition to using the Map View to monitor the status of the mesh network, you can also
check the Access Points page on the Monitor tab for mesh-related AP statuses. The table
below lists all possible AP statuses that are related to mesh networking, including any
actions that you may need to perform to resolve mesh-related issues.
Status
Description
Recommended Action
Connected
AP is connected to ZoneDirector, but
mesh is disabled
If mesh is enabled on the AP,
you may need to reboot it to
activate the mesh.
Connected (Root AP)
AP is connected to ZoneDirector via
its Ethernet port
Connected (Mesh AP, n hop)
AP is connected to ZoneDirector via
its wireless interface and is n hops
away from the Root AP.
Isolated Mesh AP
AP is disconnected from the
ZoneDirector mesh
• The AP may be configured
incorrectly. Verify that the
mesh SSID and passphrase
configured on the AP are correct.
• If Uplink Selection is set to
Manual, the uplink AP specified for this AP may be off or
unavailable.
Setting Mesh Uplinks Manually
In a wireless mesh network, the default behavior of Mesh APs is to connect automatically to
a mesh node (either Mesh AP or Root AP) that provides the highest throughput. This
automatic connection is called Smart Uplink Selection.
If you want to shape your mesh network or force a certain topology, you will need to disable
Smart Uplink Selection and manually set the mesh nodes to which an AP can connect.
83
Ruckus Wireless ZoneDirector User Guide | Deploying a Wireless Mesh Network
FIGURE 5-6: Setting Uplink Selection to Manual
To set the mesh uplink for an AP manually:
1
On the ZoneDirector Web interface, click the Configure tab.
2
On the menu, click Access Points.
3
In the Access Points table, find the AP you want to restrict, and click Edit under the
Actions column. The editing form appears below your selection.
4
Under Advanced Options > Uplink Selection, select the Manual radio button. The
other APs in the mesh appear below the selection.
5
Select the check box for each AP that the current AP can use as uplink.
NOTE
6
If you set Uplink Selection for an AP to Manual and the uplink AP that you selected is off or
unavailable, the AP status on the Monitor > Access Points page will appear as Isolated
Mesh AP.
Click OK to save your settings.
84
Ruckus Wireless ZoneDirector User Guide | Deploying a Wireless Mesh Network
Troubleshooting Isolated Mesh APs
Isolated Mesh APs are those that were once managed by ZoneDirector but are now
unreachable. They are up and running and constantly searching for mesh uplinks, but are
unable to connect to any root AP. You can check if you have any isolated mesh APs on the
network by checking the Monitor tab > Access Points page.
NOTE
A mesh network is dynamic in nature. Before attempting to resolve any mesh-related issue,
please wait 15 minutes to allow the mesh network to stabilize. Some mesh-related issues
are automatically resolved once the mesh network stabilizes.
Understanding Isolated Mesh AP Statuses
There are five possible reasons for a mesh AP to become isolated. The table below lists all
possible Isolated Mesh AP statuses that may appear on the Monitor > Access Points page,
and provides possible reasons for the isolation and the recommended steps for resolving the
issue.
Status
Possible Reason
No APs in manual uplink selection
You have set uplink selection to Manual, but none of the
uplink APs you specified is available or reachable.
To resolve this, go to the Configure > Access Points
page on the ZoneDirector Web interface, and then click
SmartSelection.
No APs within hop-limit
The AP cannot find other APs within the internally defined
hops. The hop limit mechanism helps ensure that mesh
APs maintain a reasonable network performance.
To resolve this, add additional wired APs between this
isolated Mesh AP and the closest Root AP.
Searching for uplinks
The AP is still searching for uplinks. This is usually a
temporary state and is typically resolved automatically
within 15 minutes as the mesh network stabilizes. If there
is a significant number of APs on the network, it might take
longer for the AP to resolve this.
Config error
The AP attempted to establish the mesh uplink but was
unsuccessful. If you recently updated the mesh SSID and
passphrase, it is likely that your changes have not
propagated correctly to this AP (for example, the AP was
offline when you updated the mesh SSID and passphrase).
To resolve this, follow the instructions in “Recovering an
Isolated Mesh AP” on page 86.
85
Ruckus Wireless ZoneDirector User Guide | Deploying a Wireless Mesh Network
Status
Possible Reason
No APs with matching radio type
The AP is unable to find another mesh AP with the same
radio type. In the current version of Ruckus Wireless'
SmartMesh technology, APs must use the same radio type
to be able connect to each other via the mesh network. For
example, an 802.11n Mesh AP will only connect to another
802.11n AP, and an 802.11b/g Mesh AP will only connect
to another 802.11b/g AP.
To resolve this, place additional wired APs or Mesh APs
that use the same radio type near this AP.
Recovering an Isolated Mesh AP
To perform these procedures, you will need:
• A notebook computer with wireless capability. If you are running Windows XP on the computer, make sure that either the WPA2 patch or Service Pack 3 is installed.
• The last known mesh configuration for the AP (steps for obtaining this information are
provided below).
• An SSH client, such as PuTTY and OpenSSH.
Step 1: Obtain the AP's Last Known Mesh Configuration
1
On the ZoneDirector Web interface, click the Monitor tab, and then click Access Points
on the menu.
2
Under Currently Managed APs, look for the status message Isolated Mesh AP (Config
error), and then click the Recover link that is on the same row.
86
Ruckus Wireless ZoneDirector User Guide | Deploying a Wireless Mesh Network
FIGURE 5-7: Click Recover to obtain the AP’s last known mesh configuration
A page appears, which shows the AP's last known mesh configuration. Mesh information
that appears on this page includes:
• AP's MAC Address
• Last Known Mesh SSID (mesh name)
• Last Known Mesh PSK (mesh passphrase)
3
Write down these details on a piece of paper. You will need them later in the next procedure.
Step 2: Set Up Your Computer for Wireless Connection to the AP
1
Assign the following static IP address settings to your computer:
• IP Address: 192.168.54.34
• Mask: 255.255.255.252
2
Create a wireless network from your computer. If you are running Windows XP, you can
use the Wireless Network Setup Wizard to create the wireless network. Configure the
wireless network with the following settings:
• Association mode: WPA2
• Encryption method: AES
• SSID: Type the AP's last known SSID (which you obtained in the previous section)
• PSK: Type the AP's last known PSK (which you obtained in the previous section)
87
Ruckus Wireless ZoneDirector User Guide | Deploying a Wireless Mesh Network
Step 3: Connect to the AP and Update its ESSID and Passphrase
1
After you create the wireless network, position the computer close enough to the AP
to allow association.
2
After your computer has associated with the AP, start the SSH client, and then connect
to 192.168.54.33 (the AP's IP address).
3
Log in to the AP via SSH using the same user name and password that you use to log in
to the ZoneDirector Web interface.
4
Enter the command set meshcfg ssid “current_ssid”, where current_ssid is
the SSID that the mesh network is currently using.
5
Enter the command set meshcfg passphrase “current_passphrase”, where
current_passphrase is the passphrase or PSK that the mesh network is currently using.
6
Close the SSH client.
You have completed recovering the isolated mesh AP. You should be able to manage this AP
again shortly. Please wait at least 15 minutes (to allow the mesh network to stabilize), and
then try managing this AP again via ZoneDirector.
88
CHAPTER 6
Monitoring Your
Wireless Network
Chapter Contents
• “Reviewing the ZoneDirector Monitoring Options” . . . . . . . . . . . . . . . . . . . 90
• “Importing a Map View Floorplan Image” . . . . . . . . . . . . . . . . . . . . . . . . . 90
• “Using the Map View Tools” . . . . . . . . . . . . . . . . . . . . . . . . . . . . . . . . . . 92
• “Reviewing Current Alarms” . . . . . . . . . . . . . . . . . . . . . . . . . . . . . . . . . . 94
• “Reviewing Recent Network Events”. . . . . . . . . . . . . . . . . . . . . . . . . . . . . 96
• “Clearing Recent Events/Activities” . . . . . . . . . . . . . . . . . . . . . . . . . . . . . 96
• “Reviewing Current User Activity” . . . . . . . . . . . . . . . . . . . . . . . . . . . . . . 96
• “Monitoring Access Point Status” . . . . . . . . . . . . . . . . . . . . . . . . . . . . . . . 97
• “Detecting Rogue Access Points” . . . . . . . . . . . . . . . . . . . . . . . . . . . . . . . 97
• “Evaluating and Optimizing Network Coverage” . . . . . . . . . . . . . . . . . . . . 100
• “Customizing Background Radio Frequency Scans” . . . . . . . . . . . . . . . . . . 100
89
Ruckus Wireless ZoneDirector User Guide | Monitoring Your Wireless Network
Reviewing the ZoneDirector Monitoring Options
The following highlights key ZoneDirector tab options and what you can do with them.
Dashboard
Every time you log in to ZoneDirector via the Web interface, this collection
of status surveys appears. Use it as your regular network-monitoring starting
point. Data are blue-colored links that you can use to further drill down to
focus on particular activities or devices.
Monitor
The Map View provides a fast scan of key network factors: APs (legitimate,
neighboring and rogue), client devices, and radio frequency (RF) coverage.
You can see what devices are where in your floorplan, and visually evaluate
network coverage.
Other Monitor tab options incorporated in the left column's buttons provide
numeric data on WLAN performance and individual device activity. As with
Dashboard, some data entries are links that take you to more detailed information. And, finally, the All Events log displays the most recent actions by
users, devices and network, in chronological order.
Configure
Use the options in this tab to assess the current state of WLAN users, any
restricted WLANs, along with the settings for guest access, user roles, etc.
You can also combine this tab's options with those in the Administer tab to
perform system diagnostics and other preventive tasks.
Importing a Map View Floorplan Image
If your Ruckus ZoneDirector does not display a floorplan for your worksite when you open
the Monitor tab Map View, you can import a floorplan and place AP markers in relevant
locations by following these steps.
There is no limit on the number of floor maps that can be imported. There is a limit on the
total size of all floor maps that are imported to the system: 2MB (an error message displays
if the total size of floor maps is more than 2MB).
Requirements
• A floorplan image in .GIF, .JPG or .PNG format
• The image should be monochrome or grayscale
• The file size should be no larger than 200Kb in size
• The floorplan image should be (ideally) no larger than 10 inches (720 pixels) per side.
90
Ruckus Wireless ZoneDirector User Guide | Monitoring Your Wireless Network
Importing the Floorplan Image
1
Go to Configure > Maps. The Maps page appears.
2
Click Create New. The Create New form appears.
3
In Name, type a name to assign to the floorplan image that you will be importing.
Type a description as well, if preferred.
FIGURE 6-1: The Create New form for importing a floorplan image
4
Click Browse. The Choose File dialog box appears.
5
Browse to the location of the floorplan image file, select the file, and then click Open
to import it. If the import is successful, a thumbnail version of the floorplan will
appear in the Current Image area.
6
Go to Monitor > Map View to see this image.
You can now use the Map View to place the Access Point markers.
Placing the Access Point Markers
After using the Configure > Maps options to import your floorplan image, you can use the
Monitor tab's Map View to distribute markers that represent the APs to the correct locations.
This will give you a powerful monitoring tool.
TIP
If you have imported multiple floor plans representing multiple floors in your building(s),
make sure you place the access point markers on the correct floorplan.
91
Ruckus Wireless ZoneDirector User Guide | Monitoring Your Wireless Network
1
Have the list of APs handy, with MAC addresses and locations.
2
Go to Monitor > Map View (if it's not already in view).
3
Look in the upper left corner for AP marker icons. There should be one for each AP,
with a tiny red question mark at the top.
4
Look at the MAC address notation under the marker icon, to identify a marker.
5
Drag each marker icon from the upper left corner into its correct location on the floorplan.
When you are finished, you can make immediate use of the Map View to optimize your
wireless coverage, as detailed in “Optimizing Access Point Performance” on page 59.
Using the Map View Tools
If your worksite floorplan has been scanned in and mapped with APs, the Map View will
display a graphical image of your physical Ruckus network AP distribution.
FIGURE 6-2
There are a number of helpful features built into the Map View, as noted here and marked in
the above illustration:
1
Map drop-down list: Select the floorplan to view from the Map drop-down list.
92
Ruckus Wireless ZoneDirector User Guide | Monitoring Your Wireless Network
2
Coverage and Show Rogue APs box: For Coverage, selecting Yes enables a signal
strength view of your placed APs. This opens the Signal (%) legend on the right side of
the Map View. See item number 8 below for the description of the Signal %. For Show
Rogue APs, selecting Yes displays the detected rogue APs in the floorplan.
3
Unplaced APs area: As noted in Importing a Map View Floorplan Image, when you first
open the Map View, newly placed APs appear in this area. If they are approved for use
(see “Adding New Access Points to the WLAN” on page 52), you can drag them into the
correct location in the floorplan. Unplaced APs are available across all of the floor
plans you upload. Thus, you can toggle between maps (see number 1) and place each
AP on the appropriate map. For the various AP icon types, see “AP Icons” on page 94.
4
Access Points, Rogue APs, and Clients box: This lower left corner box displays the
number of active APs, any rogue (unapproved or illegitimate) APs, and all associated
clients.
5
Search text box: Enter a string, such as part of an AP's name or MAC address, and the
map is filtered to show only the matching results. Clearing the search value returns
the map to its unfiltered view.
6
Floorplan area: The floorplan displays in this main area. You can manipulate the size
and angle of the floorplan by using the tools on this screen.
7
Note the following icons:
Click this icon and then click an AP from the floorplan to remove that
AP.
Click this icon to rotate the floorplan. When clicked, rotation crosshairs
appear in the center of the map; click and hold these crosshairs and
move your cursor to rotate the view.
Refresh the floorplan.
8
Signal (%): This colored legend displays the signal strength coverage when you
selected “Yes” for Coverage (see #2 above). See “Evaluating and Optimizing Network
Coverage” on page 100 for more information.
9
Upper Slider: The upper slider is a zoom slider, allowing you to zoom in and out of the
floorplan. This is helpful in exact AP marker placement, and in assessing whether physical obstructions that affect RF coverage are in place.
10
Lower slider: The bottom slider is the image contrast slider, allowing you to dim or
enhance the presence of the floorplan. If you have trouble seeing the floorplan, move
the slider until you achieve a satisfactory balance between markers and floorplan
details.
11
Scale legend: To properly assess the distances in a floorplan, a scaler has been provided so that you can place APs in the most precise location. The scale works best
when the floorplan view has not been zoomed in or out. The scale offers both feet and
meters as units of measure. Use a physical object as a reference to the scale in order
to judge distances on your floorplan. For example, cut a piece of paper to the length
of the scale, and then use that piece of paper on the floorplan to measure off distance
increments.
93
Ruckus Wireless ZoneDirector User Guide | Monitoring Your Wireless Network
12
Open Space Office drop-down list: Open Office Space refers to the methodology used
to compute RF coverage/signal % (i.e., heat map) based on the current environment.
AP Icons
Each AP marker has variable features that help indicate identity and status:
A normal AP marker displays this devices' Ethernet
MAC address below the icon. Above the icon is the
“Users” count that shows the number of currently
active client connections through this AP.
An unplaced AP marker displays a “?” (question mark)
above the icon.
A rogue AP displays a smaller red icon imprinted with
a “bug”.
An isolated AP displays a red “X” above the icon.
When the wireless mesh network is enabled, a circled
number appears next to the AP icon to indicate that it
is a Mesh AP. The number indicates the number of
hops from this Mesh AP to the Root AP.
When the wireless mesh network is enabled, a blue
square with an arrow indicates that it is a Root AP with
active downlinks. Dotted lines that connect this AP to
other APs indicate the active downlinks.
When the wireless mesh network is enabled, a gray
square (dimmed) with an arrow indicates that it is a
Root AP without any active downlinks.
Reviewing Current Alarms
If an alarm condition is detected, ZoneDirector will record it in the events log, which, if
configured, will send an email warning. To review the current alarms and clear all resolved
alarm records, follow these steps:
1
Go to Monitor > All Alarms.
2
When the All Alarms page appears, the Alarms table lists the unresolved alarms, the
most recent at the top.
94
Ruckus Wireless ZoneDirector User Guide | Monitoring Your Wireless Network
FIGURE 6-3: The All Alarms page
3
Review the contents of this table. The Activities column is especially informative.
4
If a listed alarm condition has been resolved, click the now-active Clear link to the
right. You also have the option of clicking Clear All to resolve all alarms at one time.
95
Ruckus Wireless ZoneDirector User Guide | Monitoring Your Wireless Network
Reviewing Recent Network Events
You have two options for reviewing events in your network: [1] open a complete list of all
events, or [2] look at specific lists of events in each Monitor tab workspace, such as the
WLANs workspace “Events/Activities” table.
1
Open the ZoneDirector Dashboard and look at the Most Recent User Activities table
and Most Recent System Activities table for summaries of activity in the network.
2
Go to the Monitor tab.
3
Click any of the specific options, such as WLANs, Access Points, or Currently Active
Clients.
4
Look for an All Events table that specifically focuses on the selected WLAN category.
5
Under the Monitor tab, click either All Alarms button or All Events/Activities button
to see a complete list, with all categories represented in chronological order.
Clearing Recent Events/Activities
To review the current events and, if appropriate, clear all resolved events, follow these
steps:
1
Go to Monitor > All Events/Activities.
2
When the All Events/Activities page appears, the Events/Activities table lists the
unresolved events, the most recent at the top.
3
Review the contents of this table. The Activities column is especially informative.
4
You can click Clear All at the bottom of the table to resolve and clear all events in the
view.
Reviewing Current User Activity
You can monitor current users of the network on a per-client-device basis by doing the
following:
1
Go to Monitor > Currently Active Clients.
2
When the Currently Active Clients page appears, review the table for a general survey.
3
Click any client device MAC address link to monitor that client in more detail.
4
To review blocked clients, go to Configuration > Blocked Clients.
96
Ruckus Wireless ZoneDirector User Guide | Monitoring Your Wireless Network
Monitoring Access Point Status
There are several ZoneDirector features you can take advantage of, to monitor the
performance and status of your Ruckus wireless APs:
1
Open the Dashboard for a snapshot view of the most active APs. Click the MAC address
link of any AP record to see more details.
2
Go to Monitor > Map View and click a radio frequency to see a heat-map rendering of
the current RF coverage.
3
Go to Monitor > Access Points and review the usage and coverage of your APs. Click
the MAC address link of any listed APs to see more details.
4
Click the System Info link to retrieve the support.txt file from an AP.
Detecting Rogue Access Points
As contrasted with “neighboring” access points (APs) that are parts of a neighboring WLAN,
“rogue” (unauthorized) APs pose problems for a wireless network. Usually, a rogue AP
appears in the following way: an employee obtains another manufacturer's AP and connects
it to the LAN, to gain wireless access to other LAN resources. This would potentially allow
even more unauthorized users to access your corporate LAN posing a security risk. Rogue APs
also interfere with nearby Ruckus APs, thus degrading overall wireless network coverage.
Your ZoneDirector rogue detection options include identifying the presence of a rogue AP,
and locating it on your worksite floorplan prior to its removal. You can also mark rogue APs
as “Known” if they are located in a neighboring network—outside your worksite—and pose no
threat. To detect a rogue AP, follow these steps:
1
Click the Dashboard tab (or go to Monitor > Rogue Devices).
2
Look under Devices Overview for “# of Rogue Devices”.
FIGURE 6-4
3
If there is at least once rogue device detected, click the number for more details.
4
When the Monitor > Rogue Devices page appears, two tables are listed:
• The Currently Active Rogue Devices table
• The Known/Recognized Rogue Devices table.
97
Ruckus Wireless ZoneDirector User Guide | Monitoring Your Wireless Network
5
Review the Currently Active Rogue Devices table. The types of Rogue APs recognized
by Zone Director are (an alarm is generated if ZoneDirector detects one of these rogue
APs):
• AP: An access point unknown to ZoneDirector.
• AP (SSID-spoof): A rogue AP that uses the same SSID as ZoneDirector’s AP, also
known as Evil-twin AP.
• AP (MAC-spoof): A rogue AP that has the same BSSID (MAC) of one of the virtual APs
managed by ZoneDirector.
The Encryption column indicates if a rogue device is encrypted or is open.
6
If a listed AP is part of another, nearby neighbor network, click Mark as Known. This
identifies the AP as posing no threat, while copying the record to the Known/Recognized Rogue Devices table.
7
To locate rogue APs that do pose a threat to your internal WLAN, click the MAC
Address of a device to open the Map View.
8
If your worksite floorplan is imported into the Map View window and your APs are positioned on the map, rogue APs can be generally identified with relative accuracy.
9
Open the Map View, and look for rogue APs that appear as shown here:
This provides a clue as to their location.
10
TIP
You can now find the rogue APs and disconnect them. Or, if a rogue AP is actually a
component in a neighboring network, you can mark it as “known”.
If your office/worksite is on a single floor in a multistory building, your upper- and lower-floor
neighbors' wireless access points may show up on the Map View, but seemingly in your site.
As Ruckus cannot locate them in vertical space, you may need to do a bit more research to
determine where the AP is located and if it should be marked as “Known”.
Detecting Rogue DHCP Servers
A rogue DHCP server is a DHCP server that is not under the control of network administrators
and is therefore unauthorized. When a rogue DHCP server is introduced to the network, it
could start assigning invalid IP addresses, disrupting network connections or preventing
client devices from accessing network services. It could also be used by hackers to
compromise network security. Typically, rogue DHCP servers are network devices (such as
routers) with built-in DHCP server capability that has been enabled (often, unknowingly) by
users.
ZoneDirector has a rogue DHCP server detection feature that can help you prevent
connectivity and security issues caused that rogue DHCP servers may cause. When this
feature is enabled, ZoneDirector scans the network every five seconds for unauthorized
DHCP servers and generates an event every time it detects a rogue DHCP server.
98
Ruckus Wireless ZoneDirector User Guide | Monitoring Your Wireless Network
The conditions for detecting rogue DHCP servers depend on whether ZoneDirector's own
DHCP server is enabled:
• If the built-in DHCP server is enabled, ZoneDirector will generate an event when it
detects any other DHCP server on the network.
• If the built-in DHCP server is disabled, ZoneDirector will generate events when it detects
two or more DHCP servers on the network. You will need to find these DHCP servers on
the network, determine which ones are rogue, and then disconnect them or shut down
the DHCP service on them.
FIGURE 6-5: The Rogue DHCP Server Detection option
To enable rogue DHCP server detection on ZoneDirector:
1
On the Configure tab, click Services on the menu.
2
Under Rogue DHCP Server Detection, select the Enable rogue DHCP server detector
check box.
3
Click Apply.
You have completed enabling rogue DHCP server detection. Ruckus Wireless recommends
checking the Monitor > All Events/Activities page periodically to determine if ZoneDirector
has detected any rogue DHCP server. If ZoneDirector detected any rogue DHCP server, you
will see the following event on the All Events/Activities page:
Rogue DHCP server on [IP_address] has been detected
99
Ruckus Wireless ZoneDirector User Guide | Monitoring Your Wireless Network
Evaluating and Optimizing Network Coverage
If there are gaps or dead spots in your worksite WLAN coverage, you can use ZoneDirector to
assess network RF coverage and then reposition APs to enhance coverage. Remember that a
Ruckus AP can cover an area with a radius of 30 to 50 feet using average broadcasting power
settings on any frequency. Local structural obstructions may limit coverage.
1
Go to Monitor > Map View.
2
If Map View displays a floorplan with active device symbols, you can assess the performance of individual APs, in terms of coverage. (See “Importing a Map View Floorplan
Image” on page 90 for information on setting up the Map View.)
3
For the Coverage option, click Yes.
4
When the “heat map” appears, look for a Signal% scale in the upper right corner of the
map.
5
Note the color range, especially colors that indicate low coverage.
6
Look at the floorplan and evaluate the current coverage.
Moving the APs into More Efficient Positions
You can now move the APs into more efficient positions.
1
To do so, click and drag individual AP markers on the Map View floorplan until your RF
coverage coloration is optimized. (You may need to acquire additional APs to fill in
large coverage gaps.)
2
To turn off the heat map and restore the floorplan to view, click No (in the Coverage
options).
3
Note down the new physical locations of relocated AP markers.
4
After physically relocating the actual APs in accordance with Map View repositioning,
disconnect and reconnect each AP to a power source.
5
When ZoneDirector has recalibrated the Map View after each AP restart, you can
assess your changes, and make further adjustments as needed.
Customizing Background Radio Frequency Scans
As a key element of your network monitoring, the Ruckus ZoneDirector regularly samples
the activity in all Access Points to assess radio frequency (RF) usage. The scans sample one
channel at a time in each AP, and do not interfere with network use. This information is then
applied in Map View and other ZoneDirector monitoring features.
1
Go to Configure > Services.
100
Ruckus Wireless ZoneDirector User Guide | Monitoring Your Wireless Network
FIGURE 6-6: The Background Scanning options
2
Select the Run background scan every check box, and type the interval (in seconds,
default is 20) that you want to set between each scan.
You can disable this feature by clearing the check box, which results in a minor
increase in AP performance, but removes the detection of rogue APs from ZoneDirector monitoring.
You can also decrease the scan frequency, as less frequent scanning improves overall
AP performance.
3
Click Apply to save your settings.
101
CHAPTER 7
Setting Administrator
Preferences
Chapter Contents
• “Using an External Server for Administrator Authentication” . . . . . . . . . . . 103
• “Changing the ZoneDirector Administrator User Name and Password” . . . . . 108
• “Changing the Web Interface Display Language” . . . . . . . . . . . . . . . . . . . . 109
• “Upgrading the License”. . . . . . . . . . . . . . . . . . . . . . . . . . . . . . . . . . . . 109
102
Ruckus Wireless ZoneDirector User Guide | Setting Administrator Preferences
Using an External Server for Administrator
Authentication
ZoneDirector software version 7.0 provides support for additional administrator accounts
that can be authenticated using an external authentication server such as RADIUS or Active
Directory. Two types of administrative privileges can be assigned to these administrator
accounts:
• Full Privileges – Allow all types of configuration and management tasks
• Limited Privileges – Allow monitoring operations only
This section provides basic instructions for setting up ZoneDirector to authenticate
additional administrator accounts with an external authentication server.
Step 1: Set Up Groups/Attributes on the Authentication Server
The tasks that you need to perform to set up groups/attributes on the authentication server
depend on whether you are using RADIUS or Active Directory.
NOTE
For specific instructions on how to complete these tasks, refer to the documentation that is
supplied with your authentication server.
If You Are Using RADIUS for Authentication
1
Set up one of the following vendor-specific attributes. Remember the attributes that
you set; you will enter this information when you create administrator roles in ZoneDirector (see Step 3).
• Ruckus Wireless private attribute
• Vendor ID: 25053
• Vendor Type/Attribute Number: 1 (Ruckus-User-Groups)
• Value Format: group_attr1,group_attr2,group_attr3,...
• Cisco private attribute (if your network is using a Cisco access control server)
• Vendor ID: 9
• Vendor Type / Attribute Number: 1 (Cisco-AVPair)
• Value Format: shell:roles=”group_attr1
2
group_attr2
group_attr3 ...”
Set up a shared secret on the RADIUS server. You will enter the same shared secret on
the ZoneDirector Web interface to enable ZoneDirector to communicate with the
RADIUS server for authentication.
If You Are Using Active Directory for Authentication
Set up two groups – one for administrators with Full Privileges and another for
administrators with Limited Privileges. Populate these groups with users to whom you want
to grant administrator access. One way to do this is to edit each user’s Member of profile
and add the group to which you want the user to belong.
103
Ruckus Wireless ZoneDirector User Guide | Setting Administrator Preferences
Remember the group names that you set; you will enter this information when you create
administrator roles in ZoneDirector (see Step 3).
Step 2: Set Up ZoneDirector to Use an Authentication Server
1
Log in to the ZoneDirector Web interface.
2
Click the Configure tab, and then click Authentication Servers on the menu.
3
Under Authentication Servers, click the Create New link. The Create New form
appears.
4
In Name, type a name that you want to use to identify this authentication server. The
actual authentication server name that will appear after you finish this procedure will
include this name and the authentication server type. For example, if you type HEDY
in Name and you click RADIUS in Type (below), the actual authentication server name
that you will see is HEDY RADIUS.
5
In Type, click the type of authentication server that you want to use. Options include
Active Directory and RADIUS.
6
In IP Address, type the IP address of the authentication server.
7
In Port, type the authentication port number.
• If you are using Active Directory, the default port number is 389.
• If you are using RADIUS, the default port number is 1812.
8
Configure server-specific settings:
• If you clicked Active Directory, type the Active Directory domain name in Windows
Domain Name.
• If you clicked RADIUS, type the shared secret on the RADIUS that you set up in Step
1, and then retype it to confirm.
9
Click OK.
The Authentication Servers page refreshes and the server that you have created appears in
the table. You have completed setting up ZoneDirector to use an external authentication
server.
104
Ruckus Wireless ZoneDirector User Guide | Setting Administrator Preferences
FIGURE 7-1: The Authentication Servers page
Step 3: Create an Administrator Role
1
Click the Configure tab, and then click Roles on the menu. The Roles and Policies page
appears.
2
Under Roles, click the Create New link. The Create New form appears.
3
In Name, type a unique name for this administrator role that you are creating. For
example, if you are creating this role for administrators with limited privileges, you
can type admin-limited.
4
In Group Attributes, type the group name or attribute that you configured on the
authentication server in Step 1. For authentication to work, the group name or attribute that you type in this box must exactly match the attribute on the authentication
server.
5
In Administration, select the Allow ZoneDirector Administration check box.
IMPORTANT
6
If you do not select the Allow ZoneDirector Administration check box, administrators that are
assigned this role will be unable to log in to ZoneDirector even if all other settings are configured correctly.
When the privilege options appear under the check box, click the type of privileges
that you want to grant this role. Options include:
• Full privileges (Perform all configuration and management tasks)
• Limited privileges (Monitoring and viewing operation status only)
105
Ruckus Wireless ZoneDirector User Guide | Setting Administrator Preferences
7
Configure other settings (Description, Policies, and Guest Pass) on the page as
required.
8
Click OK to save your changes.
You have completed creating an administrator role.
FIGURE 7-2: The Roles and Policies page
Step 4: Test Your Authentication Settings
Perform this task to ensure that ZoneDirector can connect to the authentication server and
retrieve the groups/attributes that you have configured for each user account.
1
Click the Configure tab, and then click Authentication Servers on the menu.
2
Under the Test Authentication Settings section, select the authentication server that
you want to use from the Test Against drop-down menu.
3
In User Name and Password, enter a RADIUS or Active Directory user name and password.
4
Click Apply.
If ZoneDirector was able to connect to the authentication server and retrieve the configured
groups/attributes, the information appears at the bottom of the page. The following is an
example of the message that will appear when ZoneDirector authenticates successfully with
the server:
Success! Groups associated with this user are “{group_name}”. This
user will be assigned a role of {role}.
106
Ruckus Wireless ZoneDirector User Guide | Setting Administrator Preferences
FIGURE 7-3: The Test Authentication Settings section on the Authentication Servers page
Step 5: Specify the Authentication Server to Use
1
Click the Administer tab, and then click Preferences on the menu.
2
Under Administrator Name/Password, click Authenticate with Auth Server.
3
On the drop-down menu, select the name of the authentication server with which
administrators will authenticate. The authentication server names that appear on the
drop-down menu are the same as the server names that appear on the Configure >
Authentication Servers page.
4
Verify that the Fallback to admin name/password if failed check box is selected.
Keeping this check box selected ensures that administrators will still be able to log in
to the ZoneDirector Web interface even when the authentication server is unavailable.
5
Change the administrator name and password, if preferred.
6
Click Apply.
Congratulations! You have completed setting up ZoneDirector to use external servers for
administrator authentication. Whenever a user with administrator privileges logs into the
ZoneDirector Web interface, an event will be recorded. The following is an example of the
event details that you will see:
Admin [user_name] login (authenticated by {Authentication Server}
with {Role}).
107
Ruckus Wireless ZoneDirector User Guide | Setting Administrator Preferences
Changing the ZoneDirector Administrator User
Name and Password
You should change your ZoneDirector administrator login password on a monthly basis, but
the administrator user name should be changed only if necessary.
NOTE
If authentication with an external server is enabled and the Fallback to admin name/password if failed check box is disabled, you will be unable to edit the user name and password.
To edit the user name and password:
1. Select the Fallback to admin name/password if failed check box to enable the user
name and password boxes.
2. Change the user name and password.
3. Clear the Fallback to admin name/password if failed check box.
4. Click Apply to save your changes.
To edit or replace the current name or password:
1
Go to Administer > Preferences.
FIGURE 7-4: The Preferences page
2
3
When the Preferences page appears, you have the following options under Administrator Name/Password:
Admin Name
Delete the text in this field and type the new administrator account name (used solely to log into ZoneDirector via the Web interface.)
Password/Confirm Password
Delete the text in both fields and type the same text for
a new password.
Click Apply to save your settings. The changes go into effect immediately.
108
Ruckus Wireless ZoneDirector User Guide | Setting Administrator Preferences
Changing the Web Interface Display Language
Depending on your preferences, you can change the language in which the Web interface is
displayed in your Web browser. The default is “English”.
This change only affects how the Web interface appears, and does not modify either OS/
system or browser settings (which are managed through other processes).
1
Go to Administer > Preferences.
2
When the Preferences page appears, open the Language menu and choose the preferred language. See “FIGURE 7-4” on page 108.
ALERT!
3
This only affects how the Web interface appears, and does not modify either system (OS) or
browser settings.
Click Apply to save your settings. The changes go into effect immediately.
Upgrading the License
Depending on the number of Ruckus Wireless APs you need to manage with your
ZoneDirector, you may need to upgrade your license. Once you load the license via the Web
interface, it takes effect immediately.
Current license information (description, PO number, status, etc) is displayed on the Web
interface.
NOTES
• The system does not reboot or reset after a license is imported.
• This version of ZoneDirector supports tunnel mode and Opportunistic PMK Caching
(OPC). If you want to use these features, you will need to import an additional license file
called Mobility License. To purchase a Mobility License, contact Ruckus Wireless or an
authorized reseller.
To import a new license, do the following:
1
Go to Administer > License.
109
Ruckus Wireless ZoneDirector User Guide | Setting Administrator Preferences
FIGURE 7-5: The License page
2
Click Browse to find your license.
3
Once you find your license and closed the Browse window, ZoneDirector immediately
attempts to validate and install the license.
110
CHAPTER 8
Troubleshooting
Chapter Contents
• “Troubleshooting Failed User Logins” . . . . . . . . . . . . . . . . . . . . . . . . . . . 112
• “Fixing User Connections” . . . . . . . . . . . . . . . . . . . . . . . . . . . . . . . . . . 113
• “Measuring the Wireless Network Throughput” . . . . . . . . . . . . . . . . . . . . 114
• “Diagnosing Poor Network Performance”. . . . . . . . . . . . . . . . . . . . . . . . . 119
• “Starting a Radio Frequency Scan” . . . . . . . . . . . . . . . . . . . . . . . . . . . . . 120
• “Reviewing Self Healing and Intrusion Prevention Options” . . . . . . . . . . . . 121
• “Generating a Debug File” . . . . . . . . . . . . . . . . . . . . . . . . . . . . . . . . . . 121
• “Restarting an Access Point” . . . . . . . . . . . . . . . . . . . . . . . . . . . . . . . . . 122
• “Restarting ZoneDirector” . . . . . . . . . . . . . . . . . . . . . . . . . . . . . . . . . . 122
111
Ruckus Wireless ZoneDirector User Guide | Troubleshooting
Troubleshooting Failed User Logins
SUMMARY: This “troubleshooting” topic addresses the problems that network users might
have with configuring their client devices and logging into your Ruckus WLAN.
At the end of the setup wizard, your Ruckus ZoneDirector automatically activates a default
internal WLAN for authorized users. A key benefit of the internal WLAN is the “zero IT”
configuration, which extends to new users, to make their device configuration and initial
login as easy as it can be. “Zero IT” client device configuration requires the client be
running Windows XP SP 2/Vista, and using a wireless network adapter that implements WPA.
If you and your WLAN users run into initial connection failures when using the “zero IT”
configuration and login, almost all of the problems have two key causes:
• Your users' client devices are running another OS, or running a version of Windows pre-XP/
SP2. (This includes XP/SP1.)
• Your users' client devices are using wireless network adapters without a WPA implementation.
The following list of options may be applicable based on your client system’s qualifications:
Option 1
If Windows XP SP2/Vista is on the client machine, check the wireless network
adapter to verify the implementation of WPA.
Option 2
Upgrade to Windows XP SP2/Vista, and if needed, acquire a wireless network
adapter with WPA support. Once these changes are made, your users can
attempt a “zero IT” login.
Option 3
If an older version of Windows is in use, or if another OS is being used, the user
must manually enter the Ruckus WPA passphrase in their network configuration.
Option 4
Assumes that the client OS cannot be upgraded and the wireless network
adapter is limited to WEP. This requires two phases:
Ruckus Administration— [1] You, the network manager, create a supplemental
WLAN for the non-standard client connections, then [2] create a Role that refers
to this WLAN, and [3] assign that role to the affected user account.
User Configuration— Enter the needed WEP key in the network configuration.
In most solutions, you will need to open a Windows control panel and enter a WPA
passphrase which you provide, or a WEP key (if you switch internal WLAN to WEP, which
means you must provide the user with a copy of the key.) Once the passphrase or key is
stored in Windows on their client, they can log into the WLAN.
112
Ruckus Wireless ZoneDirector User Guide | Troubleshooting
Fixing User Connections
If any of your users report problematic connections to the WLAN, here is one debugging
technique that may prove helpful. Basically, you will be deleting that user's client from the
Active Clients table in the Ruckus ZoneDirector, and when their client connection
automatically renews itself, any previous problems will hopefully be bypassed.
To debug an active user connection, follow these steps:
1
Go to Monitor > Currently Active Clients.
2
When the Currently Active Clients page appears, locate the buggy client connection
in the Clients table.
3
Click Delete.
That client will be automatically logged out of ZoneDirector.
After a minute or two, when the client has automatically re-logged into the WLAN, the
Client table will re-display the client and the user will have fewer or no problems.
FIGURE 8-1: The Currently Active Clients page
113
Ruckus Wireless ZoneDirector User Guide | Troubleshooting
If WLAN Connection Problems Persist
If the previous technique fails to resolve the user's client mis-connections, you may need to
guide them through a full re-setting of their WLAN configuration. This requires your deleting
the user record, then creating a new user record, at which time the user must repeat the
“new user connection” process, with the two-part login and the downloading and installing
of a new WLAN configuration.
1
Have the user log out of the WLAN until they receive notification from you.
2
Go to Configure > Users.
3
When the User Authentication features appear, locate and delete this user record from
the Internal Users Database table.
4
Add a new user account for this user, and send notification to that user, with instructions on how to re-configure their client and log into the WLAN again.
At the end of this process, the user should be reconnected. If problems persist, they
may originate in Windows or in the wireless network adapter.
Measuring the Wireless Network Throughput
A wireless performance tool is included in ZoneDirector that you can use to measure the
downlink throughput between a wireless client and the AP with which it is associated. When
performing a site survey, you can use this tool to help find the optimum location for APs on
the network with respect to user locations.
To measure the downlink throughput from a client:
1
Find out the MAC address of the wireless client that you want to use for this test procedure. On Windows, you can view this information by running ipconfig /all at the
command prompt.
2
Associate the wireless client with the AP that you want to test. Make sure that the client you are using is connected to the network only via the WLAN. If the client is also
connected to the wired network, unplug the network cable.
3
On the same wireless client, log in to the ZoneDirector Web interface.
4
Go to Monitor > Currently Active Clients.
114
Ruckus Wireless ZoneDirector User Guide | Troubleshooting
FIGURE 8-2: Go to Monitor > Currently Active Clients
5
On the Currently Active Clients page, look for the MAC address of the wireless client
that you are using, and then click the Test link that is on the same row. The Wireless
Performance Test interface loads, showing the IP address of the client that you are
using.
FIGURE 8-3: The Wireless Performance Test interface
115
Ruckus Wireless ZoneDirector User Guide | Troubleshooting
6
Click the Start button. The following message appears:
You don’t have zapd installed. Please download and run the zapd.
Zapd is a Ruckus Wireless proprietary application that simulates traffic between a client and the AP.
7
Click OK. Windows and Mac (Intel) download links for zapd appear on the Wireless Performance Test interface.
FIGURE 8-4: Click the download link for your client’s operating system
8
Click the zapd version that is appropriate for the client’s operating system, download
the zapd file, and then save it to the client’s local hard drive.
9
After downloading the zapd file, locate the file, and then double-click the file to start
the application. A command prompt window appears and shows the following message:
Entering infinite loop. Enjoy the ride.
This indicates that zapd was successfully started. Keep the command prompt window
open.
10
On the Wireless Performance Test interface, click the Start button again. A progress
bar appears below the speedometer as the tool generates traffic to measure the downlink throughput from the AP to the client. The test typically runs from 10 to 30 seconds.
116
Ruckus Wireless ZoneDirector User Guide | Troubleshooting
FIGURE 8-5: A progress bar appears as the tool measures the wireless throughput
When the test is complete, the results appear below the Start button. Information that is
shown includes the downlink throughput and the packet loss percentage during the test.
FIGURE 8-6: When the test is complete, the tool shows the downlink throughput and packet loss percentage
Allowing Users to Measure Their Own Wireless Throughput
ZoneDirector provides another version of the Wireless Performance Test application that
does not require authentication. This version can be accessed at
http://{zonedirector-ip-address}/perf.
If you want wireless users to be able to measure their own wireless throughput, you can
provide this link to them, along with the instructions below. Before sending out these
instructions, remember to replace the {zonedirector-ip-address} variable with the
actual ZoneDirector IP address.
117
Ruckus Wireless ZoneDirector User Guide | Troubleshooting
How to Measure the Speed of Your Wireless Connection
The following instructions describe how you can measure the speed of your wireless
connection to the wireless access point.
1
Make sure that your wireless device is connected only to the wireless network. If your
wireless device is also connected to the wired network, unplug the network cable.
2
Start your Web browser, and then enter the following in the address or location bar:
http://{zonedirector-ip-address}/perf
The Wireless Performance Tool interface loads in your browser.
3
Click the Start button. The following message appears:
You don’t have zapd installed. Please download and run the zapd.
Zapd is a Ruckus Wireless proprietary application that simulates traffic between a client and the AP.
4
Click OK. Windows and Mac (Intel) download links for zapd appear on the Wireless Performance Test interface.
5
Click the zapd version that is appropriate for the client’s operating system, download
the zapd file, and then save it to the client’s local hard drive.
6
After downloading the zapd file, locate the file, and then double-click the file to start
the application. A command prompt window appears and shows the following message:
Entering infinite loop. Enjoy the ride.
This indicates that zapd was successfully started. Keep the command prompt window
open.
7
On the Wireless Performance Test interface, click the Start button again. A progress
bar appears below the speedometer as the tool generates traffic to measure the downlink throughput from the AP to the client. The test typically runs from 10 to 30 seconds.
When the test is complete, the results appear below the Start button. Information that is
shown includes the downlink throughput (in Mbps) between your wireless device and the AP,
as well as the packet loss percentage during the test.
If the packet loss percentage is high (which indicates poor wireless connection), try moving
your wireless device to another location and run the tool again. Alternatively, contact your
network administrator for assistance.
118
Ruckus Wireless ZoneDirector User Guide | Troubleshooting
Diagnosing Poor Network Performance
You can try the following diagnostic and troubleshooting techniques to resolve poor network
performance.
1
Go to Monitor > Map View.
2
Look on the map for rogue APs. If there is a large number, and they belong to neighboring networks, proceed to the next task.
3
Go to Configure > Access Points.
4
Edit each AP record, to assign each device a channel that will not interfere with other
APs.
5
For example, if you have three Ruckus APs, open the Radio B/G Channel drop-down list
in each AP record and choose “1”, “6” and “11” in each of the three. However many
APs you have, make sure that each AP has a fixed channel number not too close to the
number of a nearby Ruckus AP.
119
Ruckus Wireless ZoneDirector User Guide | Troubleshooting
Starting a Radio Frequency Scan
This task complements the automatic RF scanning feature that is built into the Ruckus
ZoneDirector. That automatic scan assesses one radio frequency at a time, every 20 seconds
or so. To manually start a complete radio frequency scan that assesses all possible
frequencies in all devices at one time, follow these steps:
1
Go to Administer > Diagnostics.
FIGURE 8-7: The Diagnostics page
2
When the Diagnostics page appears, look for the Manual Scan options, and then click
Scan.
ALERT!
3
This operation will interrupt active network connections for all current users.
Open the Dashboard or go to Monitor > Map View to review the scanning results. This
will include rogue device detection, and an updated coverage evaluation.
120
Ruckus Wireless ZoneDirector User Guide | Troubleshooting
Reviewing Self Healing and
Intrusion Prevention Options
This Ruckus Wireless network feature adds automatic network adjustments to the existing
monitoring functions, so that the Ruckus ZoneDirector can efficiently shift AP-specific
settings and resources to improve coverage.
1
Go to Configure > Services.
2
Review and change the following self-healing options (which are all active by default):
3
4
Adjust AP radio power
If this capability is activated (default) and the tx power
of a radio is auto (default), the Ruckus APs automatically reduce or maximize the transmit power to provide
the best wireless service.
Adjust AP channel
If interference of any kind is detected in an AP, the
radio frequency will automatically be switched.
Review and change the following intrusion prevention options (which are all active by
default):
Excessive wireless requests
If this capability is activated (default), excessive 802.11
probe request frames and management frames launched
by malicious attackers will be discarded.
Repeat Authentication Failure
If this capability is activated, any clients that repeatedly fail in attempting authentication will be temporarily blocked for a period of time. Default is 30 seconds.
Click Apply to save your settings. The new settings go into effect immediately.
Generating a Debug File
ALERT!
Do not start this procedure unless asked to do so by technical support staff.
If requested to generate and save a debug file, follow these steps:
1
Go to Administer > Diagnostics.
2
Review the settings in the Debug Log options, and make the request adjustments with
the three Levels drop-down lists. (If no settings were specified, ignore this step.)
APD
For information between Ruckus AP and Ruckus ZoneDirector
ACD
For information on wireless clients activities
EMF
For information regarding Web interface operations
3
If you did change the Levels settings, click Apply to save your settings.
4
In the Save Debug Info options, click Save Debug Info.
5
When the File Download dialog box appears, click Save.
121
Ruckus Wireless ZoneDirector User Guide | Troubleshooting
6
When the Save As dialog box appears, pick a convenient destination folder, type a
name for the file, and click Save.
7
When the Download Complete dialog box appears, click Close.
After the file is saved, you can email it to the technical support representative.
NOTE
The debug (or diagnostics) file is encrypted and only Ruckus Wireless support representatives have the proper tools to decrypt this file.
Restarting an Access Point
One helpful fix for network coverage issues is to restart individual APs. To do so, follow
these steps:
1
Go to Monitor > Access Points.
2
When the Access Points page appears, look in the AP Summary table for the particular
Access Point record.
The Status column should display “Connected.”
3
Click Restart. The Status column now displays “Disconnected” along with the date and
time when ZoneDirector last communicated with the AP.
After restart is complete and the Ruckus ZoneDirector detects the active AP, the status
will be returned to “Connected.”
Restarting ZoneDirector
There are three “restart” options: [1] to disconnect and then reconnect the Ruckus
ZoneDirector from the power source, [2] to follow this procedure which simultaneously
shuts down ZoneDirector and all APs, then restarts all devices, and [3] a restart of individual
APs (detailed in Restarting an Access Point.)
To restart ZoneDirector (and all currently active APs), follow these steps:
1
Go to Administer > Restart.
2
When the Restart/Shutdown features appear, click Restart.
You will be automatically logged out of ZoneDirector. After a minute, when the Status
LED is steadily lit, you can log back into ZoneDirector.
122
Ruckus Wireless ZoneDirector User Guide | Troubleshooting
FIGURE 8-8: The Restart/Shutdown page
123
Index
Symbols
.TGZ file extension
backup files 35
Numerics
802.1x
Client Authentication option 51
user requirements 43
WLAN security 43
802.1x EAP
Authentication options 42
option values 47
Windows OS requirements 43
802.1x mode 41
A
Access Point Policy options 54
Access Point status
monitoring 97
Access Points
see also “APs”
Access Points Policy approval 52
Activating Guest Pass Access 67
Active Directory server 62
Adding new access points 52
Adjust AP channel 121
Adjust AP radio power 121
Adjusting AP Settings
Map View 60
Administrator
changing the admin password 108
AES 41
option values 47
Alarms
activating email notification 31
Algorithm
New WLAN creation 47
All Events/Activities (Logs) 28
AP markers
overview 94
APs
Access Points 52
detecting rogue devices 97
placing markers on a floorplan map 91
restarting 122
see also “Access Points”
verifying new APs 52
Archived ZoneDirector settings
restoring 35
Assigning a Pass Generator role to a user 69
Authentication Options 42
Authentication options
Active Directory 62
RADIUS 62
Authentication Servers
internal user database 63
Auto-JOIN automatic AP activation process 52
Auto-JOIN option 52
Automatically Generated User Certificates and
Keys
managing 73
B
Backing up ZoneDirector settings 35
Backup Files 35
Blocked clients
reviewing a list 59
Blocking specific client devices 59
Buttons (Web interface)
explained 17
C
changing 30
Changing an Existing User Account 64
Changing the Administrator password 108
Changing the event log level 30
Channel
Map View options 60
Client Authentication configuration 50
Client devices
monitoring 58
permanently blocking WLAN access 59
reviewing a list of blocked clients 59
temporarily disconnecting 58
Configure 90
Configuring client authentication 50
Controlling Guest Pass Generation Privileges
Create New options
124
68
Ruckus Wireless ZoneDirector User Guide | Index
Authentication Servers 62
Create New options (Authentication server)
Confirm Password 64
Full Name 64
Password/s 64
Username 63
Creating a Guest Pass Generation User role 69
Creating a new WLAN
Algorithm 47
Description 47
Hide SSID 49
Method 47
Name/ESSID 47
Passphrase 48
VLAN 49
WEP key 48
Zero IT Activation 48
creating additional WLANs 46, 51
Current Alarms
reviewing 94
Current User accounts
managing 64
Current user activity
reviewing 96
customizing 32
Customizing network security 40
Customizing RF scans 100
Email alarm notification
activation 31
Encryption Options 42
Event Log Level 30
Excessive wireless requests
D
H
Dashboard
overview 90
Dashboard (Web interface)
explained 17
Debug file
generating 121
Deleting a User Record 64
Description
Map View options 60
New WLAN creation 47
option values 47
Detecting rogue Access Points 97
DHCP
network address option 23
Diagnostics
generating a debug file 121
Disconnecting specific client devices 58
disconnecting users from the WLAN 112
Dynamic PSK
WLAN security option 44
E
EAP
using the built-in server
42
121
F
Factory default state
restoring ZoneDirector 36
failed user connections 112
Floorplan
Adding to Map View 59
G
graphic file formats
guest user login page 32
graphic file specifications
guest user login page 32
Guest Access Customization 32
Guest Pass Access
managing 67
guest user login page
adding a graphic 32
editing the welcome text 32
guest users
login page customization 32
Hide SSID
New WLAN creation
49
I
Importing the floorplan image 91
Improving AP RF coverage 59
Internal clock
synchronizing 27
updating/refreshing current settings 27
using NTP 27
Internal user database
using for authentication 63
Intrusion prevention options 121
Excessive wireless requests 121
Repeat Authentication Failure 121
L
Language
changing the Web interface language
Log settings
changing 28
overview 28
Login failures 112
Login page
125
109
Ruckus Wireless ZoneDirector User Guide | Index
guest use 32
Logs
sorting contents
28
M
MAC Address
Map View options 60
Managing current user accounts 64
Map View
Adding a floorplan 59
Adjusting AP positions and settings 60
importing a floorplan 90
placing AP markers on a floorplan 91
Requirements (graphics) 90
Tools 92
Maps
importing a floorplan image 91
Method
New WLAN creation 47
Microsoft Windows
EAP requirements 43
Monitor
overview 90
Monitoring AP status 97
Monitoring Client Devices 58
Monitoring ZoneDirector
overview 90
N
Name/ESSID
New WLAN creation 47
option values 47
Network addressing
changing 23
network performance
diagnosing 114
New User Accounts
adding new accounts 63
New User Roles
Creating 65
NTP
using with system clock 27
O
Open
Authentication options 42
Client Authentication option 50
Optimizing network coverage 100
overview 90
P
Passphrase
New WLAN creation 48
WLAN security setup 41
passwords
changing the Administrator password
Placing the Access Point markers 91
Policies
Access Point-specific 54
Poor network performance
diagnosis 119
Preference tab
use 108
Pre-shared key (PSK) 44
PSK
Setting key expiration 44
PSK lifetime settings 44
108
R
Radio Frequency scans
customizing the settings 100
Radio frequency scans
starting a scan 120
RADIUS
using an external server 42
using for authentication 62
Recent events
overview 96
Repeat Authentication Failure 121
Replacing a WPA configuration with 802.1x
restarting a ZoneDirector 122
Restarting an Access Point 122
Restoring archived settings 35
reviewing AP policies 54
Reviewing current alarms 94
RF
see also 'Radio frequencies'
RF background scans
customizing 100
Rogue APs
detecting 97
Roles options
Allow all WLANs 65
Description 65
Group attributes 65
Guest Pass 65
Name 65
S
scanning radio frequencies
Security
overview 20, 40
Security configuration
reviewing 40
Self healing options 121
126
120
41
Ruckus Wireless ZoneDirector User Guide | Index
Adjust AP channel 121
Adjust AP radio power 121
Setting Dynamic Pre-Shared Key expiration
Shared
Authentication options 42
Client Authentication option 51
Shared WEP key
option values 47
Switching to a different security mode 41
System name
changing 24
parameters 24
Using the built-in EAP server
Using the Map View 92
42
44
V
Verifying/Approving New APs 52
VLAN
New WLAN creation 49
VLANs
deploying a ZoneDirector WLAN
56
W
T
Tabs (Web interface)
explained 17
TKIP
option values 47
Tools
Map View 92
Troubleshooting
diagnosing poor network performance 119
diagnosing poor WLAN performance 114
generating a debug file 121
manually scanning radio frequencies 120
problems with user connections 112
restarting the ZoneDirector 122
reviewing current activity 96
reviewing current alarms 94
reviewing recent events 96
users cannot connect to WLAN 112
TX Power
Map View options 60
U
Upgrading
ZoneDirector software 34
ZoneFlex APs 34
Username 63
Users
Activating guest pass access 67
adding new accounts 63
creating new roles 65
disconnecting a user from the WLAN 112
failed WLAN logins 112
managing accounts 64
reviewing current activity 96
switching to 802.1x-based security 43
switching to WEP-based security 43
troubleshooting connection problems 112
Using Active Directory 62
Using an external RADIUS server 42
Using Map View to assess network performance 59
Web Authentication
activating 72
Web interface
changing the language 109
Generated PSK/Certs page 73
Roles and Policies 65
Web interface buttons
explained 17
Web interface Dashboard
explained 17
Web interface tabs
explained 17
Web interface workspaces
explained 17
Web Portal Logo 32
WEP
WLAN Security 43
WEP Key
New WLAN creation 48
WEP key mode 41
WEP-128
option values 47
WEP-64
option values 47
WEP-based security
user requirements 43
Windows XP/SP2
EAP requirements 43
Wireless networks
overview 4, 40
WLAN
adding new access points 52
diagnosing poor performance 114
optimizing coverage 100
Recent events (reviewing) 96
WLAN network security
customizing 40
WLAN performance
using Map View 59
WLAN security
client authentication 50
overview 20
127
Ruckus Wireless ZoneDirector User Guide | Index
switching modes 41
WLAN-in-VLAN qualifications 56
WLANs
blocking client devices 59
creating additional networks
failed user logins 112
Workspaces (Web interface)
explained 17
WPA and WPA2
option values 47
WPA2 41
46, 51
Z
Zero IT Activation
New WLAN creation 48
ZoneDirector
backing up settings 35
changing network addressing 23
changing system name 24
features 1
Monitoring options overview 90
overview 1
restarting the device 122
restoring backup file contents 35
restoring to a factory default state 36
upgrading software 34
WLAN security explained 20
ZoneDirector wireless LAN
deploying in a VLAN environment 56
ZoneFlex APs
upgrading software 34
128