1
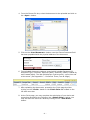
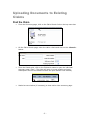
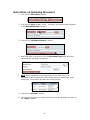
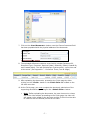
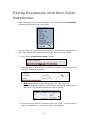
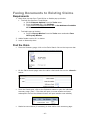
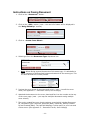
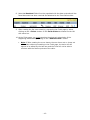
Volume DELAWARE CLAIMS PROCESSING FACILITY Trust Online BestPractices User Guide Table of Contents Introduction to Best Practice Guide .......................................... 1 Electronic Document Submission............................................. 2 Upload Documents with a New Claim Submission ......................... 3 Upload Documents to Existing Claims ............................................ 5 Faxing Documents with a New Claim Submission .......................... 8 Faxing Documents to Existing Claims...........................................10 Tips to Resolve Common Web-Related Issues ..................... 13 Appendix A - Status ............................................................... 15 Appendix B - Queues & Tanks ............................................... 16 Appendix C - Document Terms, Icon & Usage ....................... 17 Introduction to Best Practice Guide T he Delaware Claims Processing Facility has created this simple to use guide to help your firm perform some of the functions in an easy and detailed instructional format. With this reference document in hand, you’ll be able to submit a claim and the supporting documents in its entirety. What is covered in this manual? We have compiled some of the most useful information from all the feedback we have received from law firms around the country that currently use Trust Online. Our focus for this guide is to help you submit the most complete and accurate claim that you can, including but not limited to submitting supporting documents, understanding claim submission warnings and responding to deficiencies. Useful Tools and Indexes We have also provided some useful tips, hints and troubleshooting help. For definitions of statuses, queues or other terms used by the Trust see the appendix located at the back of this guide. . -1- Electronic Document Submissions Trust Online offers: 1. Two methods of electronically submitting supporting o medical; o exposure; and o legal documents. 2. The option of o uploading; or o faxing documents. Supporting documents that need to be submitted with the claim form can consist of medical, exposure and legal documentation. Medical documents consist primarily of Physical Exam, Chest x-ray, Pulmonary Function Test, B-Reader, CT-Scan and Pathology reports. Exposure documents consist primarily of Exposure Affidavits, Social Security Records, Work Histories and Economic reports. o Economic reports can consist of W-2’s, IRS Form 1040 or other relevant supporting economic documentation. Legal documents consist primarily of Death Certificate, Certificate of Official Capacity, and litigation documentation. Uploading documents was designed primarily for firms that have the capability to scan and store their documents electronically. Currently, Trust Online accepts uploaded documents in 167 different file formats. Trust Online has provided the firms with a spreadsheet listing all of the types of documents that can be uploaded. To view or download a copy of this file, simply go to the Downloads page located under the Resources link on www.bwasbestostrust.com. Faxing documents was designed primarily for firms who prefer to store their documents in a paper format. Trust Online accepts electronic submission of documents using a fax cover sheet. Firms may create multiple fax cover sheets, attach them to their respective documents and fax them all at once. Using this technique allows firms to submit multiple documents for multiple claims. The Electronic Bar Code on each fax cover sheet ensures that the faxed documents are attached to their respective claims. -2- Uploading Documents with New Claim Submission After entering all of the claim information, select the tab labeled Documents located on the left menu bar of the claim: From this page, all supporting documents can be electronically submitted with your claim. Repeat the following steps for each document that needs to be upload. 1. Click on the <Upload Document> button. 2. Select the type of document from the Document Type drop-down box, and enter any necessary comments. Note: When uploading several documents of the same type, it is advisable to add a comment to differentiate between documents of the same type. This will also facilitate the review process. 3. Click on the <Browse> button. -3- 4. From the Choose file box, select the document to be uploaded and click on the <Open> button. 5. Click on the <Send Document> button once the Choose Document field has been populated with the physical address of the document. 6. The uploaded document creates a record which includes Document ID, Document Type, Comment, Received (date), Edited By, Edited, Created By and Created (date). The last field displays a yellow pencil, a print icon and a blue arrow. (See Appendix C – Document Terms, Icon & Usage). 7. After uploading the documents, proceed to the Finish page by either clicking on the <Finish> button or the Finish Claim tab located on the left side menu bar. 8. At the Finish page, you may complete the submission of your claim and supporting documents by clicking on the <Submit Claim> button. You may also save the claim as a draft by clicking on the <Save Draft> button. -4- Uploading Documents to Existing Claims Find the Claim From the Summary page, click on the Claim Search link on the top menu bar: On the Claim Search page, enter the claim criteria and click on the <Search> button. From the Search grid, click on the Claimants name to open the individual summary page. (note – The claim will open in a new window and each subsequent click on the claimant’s name will open another new window) Maximize new window (if necessary) to view entire claim summary page. -5- Instructions on Uploading Document 1. Click on the <Document> button. 2. Click on the <Edit> button. (note – the user’s full name will be displayed in the ‘Being Edited by:’ section) 3. Click on the <Upload Document> button. 4. Select the type of document from the Document Type drop-down box, and enter any necessary comments. Note: When uploading several documents of the same type, it is advisable to add a comment to differentiate between documents of the same type. This will also facilitate the review process. 5. Click on the <Browse> button. 6. From the Choose file box, select the document to be uploaded and click on the <Open> button. -6- 7. Click on the <Send Document> button once the Choose Document field has been populated with the physical address of the document. 8. The uploaded document creates a record which includes Document ID, Document Type, Comment, Received (date), Edited By, Edited, Created By and Created (date). The last field displays a yellow pencil, a print icon and a blue arrow. (See Appendix C – Document Terms, Icon & Usage) 9. After uploading the documents, proceed to the Finish page by either clicking on the <Finish> button or the Finish Claim tab located on the left side menu bar. 10. At the Finish page, you must complete the electronic submission of the supporting documents by clicking on the <Submit Claim> button. Note: If after uploading the documents, the user times out or closes out of the claim without proceeding to the Finish page, the claim will still appear to be edited by the last user and the Trust will not be able to continue with the Review process of the claim. -7- Faxing Documents with New Claim Submission After entering all of the claim information, select the tab labeled Documents located on the left menu bar of the claim: From this page, all supporting documents can be electronically submitted with your claim. Repeat the following steps for each fax cover sheet needed. 1. Click on the <Create Cover Sheet> button. 2. Select the type of document from the Document Type drop-down box, and enter any necessary comments. Note: When faxing several documents of the same type, it is advisable to add a comment to differentiate between documents of the same type. This will also facilitate the review process. 3. Preview the cover sheet for accuracy and print it. (note – to edit the cover sheet, see Appendix C – Document Terms, Icon & Usage) -8- 4. Attached the document to the cover sheet and fax it to the number at the top of the cover page. (note – you may fax multiple documents using multiple cover sheets) 5. The newly created fax cover sheet creates a record which includes Document ID, Document Type, Comment, Received (date), Edited By, Edited, Created By and Created (date). The last field displays a yellow pencil, a print icon and a blue arrow. (See Appendix C – Document Terms, Icon & Usage) 6. Note that Received field will not be populated with the date received until the faxed document has been received by the Facility and attached to the Trust Online claim. 7. After creating all of the necessary fax cover sheets, proceed to the Finish page by either clicking on the <Finish> button or the Finish Claim tab located on the left side menu bar. 8. At the Finish page, you may complete the submission of your claim and supporting documents by clicking on the <Submit Claim> button. You may also save the claim as a draft by clicking on the <Save Draft> button. -9- Faxing Documents to Existing Claims Requirements 1. Must allow pop-ups from Trust Online or disable pop-up blocker. To allow pop-ups from Trust Online: a. Select Internet Options from the Tools menu. b. From the Privacy tab, click Settings. c. Type trustonline.bwasbestostrust.com in the Address of website to allow: and click Add. To disable pop-up blocker: a. Point to Pop-up Blocker from the Tools menu and select Turn Off Pop-up Blocker. 2. Adobe Reader version 6.0 or better. 3. Local or Network printer. Find the Claim From the Summary page, click on the Claim Search link on the top menu bar: On the Claim Search page, enter the claim criteria and click on the <Search> button. From the Search grid, click on the Claimants name to open the individual summary page. (note – The claim will open in a new window and each subsequent click on the claimant’s name will open another new window) Maximize new window (if necessary) to view entire claim summary page. - 10 - Instructions on Faxing Document 1. Click on the <Document> button. 2. Click on the <Edit> button. (note – the user’s full name will be displayed in the ‘Being Edited by:’ section) 3. Click on <Create Cover Sheet>. 4. Select type from the Document Type drop-down box. Note: When faxing several documents of the same type, it is advisable to add a comment to differentiate between documents of the same type. This will also facilitate the review process. 5. Preview the cover sheet for accuracy and print it. (note – to edit the cover sheet, see Appendix C – Document Terms, Icon & Usage) 6. Attached the document to the cover sheet and fax it to the number at the top of the cover page. (note – you may fax multiple documents using multiple cover sheets) 7. The newly created fax cover sheet creates a record which includes Document ID, Document Type, Comment, Received (date), Edited By, Edited, Created By and Created (date). The last field displays a yellow pencil, a print icon and a blue arrow. (See Appendix C – Document Terms, Icon & Usage) - 11 - 8. Note that Received field will not be populated with the date received until the faxed document has been received and attached to the Trust Online claim. 9. After creating the fax cover sheet(s), proceed to the Finish page by either clicking on the <Finish> button or the Finish Claim tab located on the left side menu bar. 10. At the Finish page, you must complete the electronic submission of the supporting documents by clicking on the <Submit Claim> button. Note: If after creating the cover sheets, the user times out or closes out of the claim without proceeding to the Finish page, the claim will still appear to be edited by the last user and the Trust will not be able to continue with the Review process of the claim. - 12 - Tips to Resolve Common Webrelated Issues Login and Account Access I’ve tried to login several times and I’m getting the “Login Failed” error message. Why am I getting this message? Trust Online incorporates Automatic Disabling as a security feature. After 3 consecutive unsuccessful attempts to login, the system will automatically disable your account. This feature is provided to prevent unauthorized personnel from accessing your secured account. If my account has become disabled, whom should I contact to re-enable my account? For Staff and Attorney accounts, you should contact your Firm Administrator. Trust Online is designed to allow only the Firm Administrator access to the firm’s user accounts. This Individual is responsible for creating new accounts, enable/disabling accounts and resetting passwords on these accounts. I received an error message stating “Please request access to one or more Trusts from your administrator” after attempting to login to Trust Online. What does this mean? When your account was created, the Firm Administrator failed to assign the account access to one or more of the Trusts. To correct this issue, contact your Firm Administrator to assign access to one or more of the Trust using Manage Access. After finally logging into Trust Online, I went to the Claim Search and can’t find any of our firm’s claims. What can I do about this? It is possible the Firm Administrator failed to assign attorney access to your staff account. On the Claim Search page, check to see if there are any attorneys listed in the Attorney list box. If there isn’t, have your Firm Administrator give you access to the desired attorney(s). Filing a Claim I started filing a claim, but realized that I was missing some information to submit a complete claim. Is there a way to save this information without submitting it? Trust Online offers firms the option of saving this information as a draft. Simply proceed to the finish page and click on <Save Draft>. - 13 - I saved a claim as a draft, but realized that we had already submitted this claim. How can I delete the draft? You can delete a draft claim if you choose not to submit it. After searching for the draft claim and opening the claim in a new window, click on <Claim Form>, <Edit>, <Finish> and <Cancel>. This will remove the draft claim from Trust Online. I saved a claim as a draft and want to edit the claim without submitting it. How do I proceed? After finding your claim on the Claim Search page, proceed to edit the claim as you would with a submitted claim. When editing a Draft claim, the user should be careful not to delete the claim. If the user has edited the draft claim, but wishes to discard these changes, he should not proceed to the Finish page and click <Cancel>, since this will delete the claim, but they should first remove the changes manually and save the claim as a draft once again. On the Finish page, I received the warning “Deceased and DeathDate are inconsistent”. How can I correct this? Trust Online currently defaults all new claims as deceased. To correct this, simply click on the Injured Party tab on the left menu bar and review questions 5 & 6. Edit the questions to reflect the correct status of the Injured Party. I’m trying to create a fax cover sheet, but when I click <Print Cover Sheet> nothing happens. What am I doing wrong? Your browser may have a pop-up blocker which would prevent some of the windows on Trust Online from being opened. You should first disable your pop-up blocker or allow pop-ups from Trust Online. How do I disable my pop-up blocker? Point to Pop-up Blocker from the Tools menu and select Turn Off Pop-up Blocker How do I allow pop-ups from Trust Online? To allow pop-ups from Trust Online: a. Select Internet Options from the Tools menu. b. From the Privacy tab, click Settings. c. Type trustonline.bwasbestostrust.com in the Address of website to allow: and click Add - 14 - Appendix A – Claim Status Draft – Claim information that has been entered and saved but not yet submitted to Trust Online. Intake Deficient – An incomplete claim submission. Ready to Review – A complete claim submission. Review – In the process of being reviewed and evaluated. Review Complete – A claim that has passed the review process. Review Deficient – A claim that has failed the review process and is awaiting a response from the firm. Ready to Re-Review – The Trust has received a response to the claim and is waiting to be reviewed again. Offer Issued – A claim for which an offer and release has been mailed. Release Verified – The Trust has received a signed release and the release has been verified. Release Deficient – The Trust has received a signed release but a Release Deficiency has been added to the claim. Paid – Payment has been issued. Deferred –A claim that has been deferred. Withdrawn – A claim that has been withdrawn by the law firm. Deemed Withdrawn – A claim that has been deemed abandoned by the firm and withdrawn by the Trust. Hold – A claim that has been placed on administrative hold and is currently being researched by the Trust. Research – A claim that is currently being researched by the Facility. - 15 - Appendix B – Queues & Tanks Queues – Claims in “Queues” are awaiting Facility action. Tank – Claims in “Tanks” are awaiting law firm action. Mailroom Tank – Claims that are saved as a Draft are placed in this tank awaiting submission of the claim by the law firm. Review Queue – Claims that are Ready to Review are placed in this queue and assigned a FIFO number. Audit Queue – Claims that have been reviewed and are waiting to be audited are placed in this queue. Deficient Tank – Claims that are Intake Deficient or Review Deficient are placed in this tank, awaiting a response from the firm. Deficiency Response Queue – Claims that are Review Deficient for which the law firm has provided a response are placed in this queue to be processed by the Trust’s Deficiency Response Unit (DRU). Re-Review Queue – Review Deficient claims for which the law firm has provided a response for all deficiencies, are placed in this queue to be rereviewed. Review Approval Queue – Claims that have passed the Review process and are awaiting manager approval are placed in this queue. Release Queue – Review Complete claims that have been audited and approved and are awaiting an offer and release to be issued by the Trust. Offer Issued Tank – Offer Issued claims that are awaiting signed releases. Release Verify Queue – Offer Issued claims for which the Trust has received signed releases which are awaiting verification by the Trust. Payment Queue – Release Verified claims that are pending payments to be issued by the Trust. Payment Issued Tank – Claims for which checks have been issued by the Trust. Closed Tank – Claims that have been closed due to the claim being Withdrawn or Paid. Hold – A claim that has been placed on an administrative hold and requires research by the Trust. Deferred Tank – Claims that have been deferred are placed in this tank, awaiting a response from the firm. - 16 - External Audit Queue – Claims that have been randomly selected for the Trust External Audit of the exposure information and medical proof are placed in this queue. Entity Barred Queue – This queue is currently not being used by the Trust. SOL Queue – Claims that require research by the Trust for the deadline for filing a claim based on the claimant’s applicable jurisdiction are placed in this queue. Special Project Queue – Claims that are being internally research due to Trust Policy Changes are placed in this queue. Research Queue – Claims that are being researched by the Trust are placed in this queue. IR Missing Index Queue – Claims that are missing jurisdiction or firm index value are placed in this queue. IR Research Queue – IR Claims that need to be researched are placed in this queue. Awaiting Document Tank – On new claim submissions that are awaiting the arrival of documents are placed in this queue. - 17 - Document Terms, Icons and Usage Document ID – The Document ID identifies a specific document record. This ID is created whenever a fax cover sheet is created or a document is uploaded. Once the document has been received by Trust Online, the Document ID will be displayed in a red font. To view the document, click on the Document ID. You may only view documents that have a received date. Document Type – The Document Type identifies a document record that was created by either faxing a cover sheet or uploading documents to Trust Online. Comment – The Comment field is primarily for notes associated with the document record. This field should be used by the Trust and the law firm to differentiate between documents of the same type. Received – The Received field tracks the date that the document was received by the Trust. Once the Received field is populated with the date, then firm users can view the documents by clicking on the Document ID. Edited By – This field tracks the last user that edited the existing document record. Edited – This field tracks the date in which the document record was last edited. Created By – This field tracks the user that originally created the document record. Created – This field tracks the date that the document record was originally created. Icon Text Description Edit Click on the yellow pencil icon to edit the document type. Print To reprint a fax cover sheet click on the print icon. Upload To upload a document to an existing record. Save Click on this icon to save changes to an existing document record. Cancel To cancel changes to an existing document record. - 18 -