1
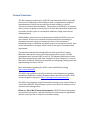
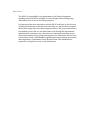
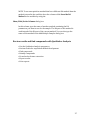
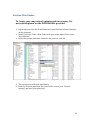
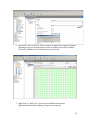
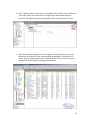
General Overview: ....................................................................................................... 2 New Users: .................................................................................................................................................... 4 NMR Facility Overview ............................................................................................................................ 5 Usage Rules ................................................................................................................................................... 5 Scheduling ..................................................................................................................................................... 6 Billing .............................................................................................................................................................. 7 Operation of 400A and 400B ........................................................................................ 8 Do’s and Don’ts ......................................................................................................................................... 10 Agilent Q-‐LCMS: ......................................................................................................... 11 Operation and Sample Prep ................................................................................................................ 11 Agilent FTIR: ............................................................................................................... 12 Cleaning the ATR module: ................................................................................................................... 12 FITR Operation: ........................................................................................................................................ 13 Agilent Q-‐Tof 6550: .................................................................................................... 15 Agilent Q-‐ToF 6550 tune and run SOP v1.0 ................................................................................. 15 Envision Plate Reader: ............................................................................................... 28 WCAC Ultracentrifuges and Rotors ............................................................................. 33 General Considerations: ....................................................................................................................... 33 Rotor Preparation: .................................................................................................................................. 34 What to do in case of trouble:. ........................................................................................................... 35 Billing Policy ............................................................................................................... 37 WCAC Instrument Rates FY2013-‐14: ........................................................................... 38 He Fill: ........................................................................................................................ 39 General Overview: The West Campus Analytical Core (WCAC) was launched in 2012 to provide the research community at West Campus with a comprehensive analytical instrumentation facility that provides access and training to a broad collection of shared instrumentation. The mission of the WCAC is to support and accelerate on going research projects at both West and Main Campus and to provide suitable space for incremental additions of high-‐value shared instrumentation. Staff members train new users of instruments within the WCAC in one-‐on-‐ one sessions. All users are required to demonstrate basic knowledge of instrument operation prior to unsupervised use of the instrument. Instrument usage is scheduled and monitored via a reservation website, time on the instruments is charged, which varies by the type of instrument and experiment. The main instrumentation lab and staff is located at the West Campus Molecular Innovations Center (600 West Campus Drive) room 109 with instruments also located in MIC room 310, The Advanced Bioscience Center (840 West Campus Drive) and other locations on West Campus. Dr. Terence Wu and Dr. Mousumi Ghosh are responsible for managing, training users and implementing the rules at WCAC. More information regarding the WCAC can be obtained by visiting http://wcac.yale.edu/. The WCAC also publishes a weekly newsletter with information regarding instrument shutdowns, training, demonstrations and other activities. Users are encouraged to sign up at: https://messages.yale.edu/subscribe. The WCAC also organizes regular bimonthly meetings every other Fridays at 10:00 AM in MIC109. This meeting is open to users and user faculty to voice concerns and exchange ideas. Below is a list of WCAC owned instruments: All WCAC shared instrument are outfitted with a place card that identifies the instrument, its capabilities and the contact person to request access and training. Category NMR Biotechnology Mass Spectrometry Optical FACS Instrument Model Location Description Agilent DD2 400 A (G8303A) MIC 109 400 MHz walkup Agilent DD2 400 B (G8303A) MIC 109 400 MHz walkup Agilent DD2 600 w coldprobe MIC 109 600 MHz Perkin Elmer EnVision 2100 MIC 310 Plate Reader GE Typhoon 9000 ABC 2nd FL CR Imager GE Typhoon 9500 MIC 310 Imager LAS 4000 imager MIC 310 Imager BC Optima XE100K MIC 312E Ultracentrifuge Sorvall RC6 ABC 2nd FL CR Centrifuge BC Optima XE100K ABC 2nd FL CR UltraCentrifuge Agilent Bioanalyzer ABC 2nd FL CR Bioanalyzer Agilent LCMS Q ESMS 6120B MIC 109 Agilent Q-LCMS Agilent 6490 QqQ MIC 210 Agilent QQQ-LCMS Inert MSD/DS TRURBO EI 63172A MIC 109 Agient GCMS LTQ Orbitrap Velos MIC 109 LCMS (Orbitrap) Waters Autopure MIC109 LCMS Agilent 6550A QTOF MIC 109 Agilent Q-TOF (LC/Chip Cube) Agilent Cary 300 UV/VIS MIC 109 Spectrophotometer Agilent Cary 660 FTIR MIC 109 FTIR Thermo Nanodrop MIC 310 Micro Spectrophotometer MCP 500 Polarimeter MIC310 Polarimeter BD FACSVerse MIC 113 Flow Cytometer BD FACSAria MIC 113 Cell Sorter Autoclave MIC BSMT Sterillizer Coldrooms MIC BSMT Cold Room Miscellaneous New Users: The WCAC is responsible for the maintenance of all shared equipment including those in MIC310 and ABC. It is also charged with tracking usage data and metrics as well as for billing purposes. It is important that new users meet with the WCAC staff prior to the first use of shared instruments so that we know who they are, and are able to explain the facilities usage rules, how them login procedures. We request that when a new member joins a lab, we are made aware of it through the departments administrative assistant so we can reach out to them and train them on the shared instruments before giving them login access. Alternately the new user is welcome to email a staff member regarding interest in using an instrument and completing a “Instrument Access Request Form. This information is required to set up their access on the instruments. NMR Facility Overview The WCAC NMR Facility currently consists of three NMR spectrometers in MIC (B27) 109. In the future there will be other workstations running the lab standard Red Hat Enterprise Linux and VnmrJ software. Currently users are welcome to install a copy of VNMRJ on their lab computers, or download a free copy of Mestranova from the Universities’ website (http://cic.chem.yale.edu/mnova/). The WCAC operates two 400 MHz NMR spectrometers. Each has an upgraded 400 MHz Oxford Magnet operated through an Agilent console, featuring DD2 technology. Each 400 MHz spectrometer is equipped with an auto-‐switchable probe (Agilent OneProbe®) that can be tuned to 1H, 19F, 13C and 31P. The temperature range is -‐80 ºC to +130 ºC. The 400 MHz-‐A instrument is equipped with a 100-‐slot sample changer, enabling users to submit several samples at once or in queue. This instrument is currently in walk-‐up mode of operation and is meant for quick routine analyses of synthesis products. This instrument is used for routine 1D H/C/F/P. The second 400 MHz instrument (400 MHz-‐B) is currently reserved for longer duration experiments. It is equipped with a 12-‐slot sample changer for queuing up multiple experiments. In addition, one Agilent 600 MHz (MIC room 109) triple resonance, single-‐gradient system with HCN and OneNMR probes with a 14.1 Tesla 54 mm bore Agilent Premium Compact Shield Superconducting Magnet was installed in Nov 2012. The HCN 3mm cold probe is a triple resonance probe tuned to 1H, 13C and 15N, with a temperature range of 0 to 80 ºC and can be used for proton detection and triple resonance experiments. The sensitivity for proton with this probe is the best in our lab. This instrument is typically reserved for long chemical and bio-‐molecular experiments. Usage Rules 1. Use of the spectrometers is restricted to Yale University’s faculty, graduate students, postdoctoral fellows and other authorized persons after successful training and approval. Undergraduates engaged in long term independent research projects under faculty direction would be trained on these instruments upon their supervisor's request. 2. Each group (PI) will be issued an account on the system. Individual operators can log into their group account with their unique password. Please remember to log out of your account when finished setting up/running your experiment. 3. It is the responsibility of all users to learn the capabilities of each instrument to avoid damage and maximize efficient use of the NMR hardware. For example, the allowed temperature range is determined by each probe's design; exceeding it may result in permanent damage. 4. For reservations, go to http://scheduler.yale.edu. Please send Dr. Wu or Dr. Ghosh an email requesting access when you are ready to use the reservation system. This has to be repeated for every new instrument you are planning to use. 5. You are responsible for using a time slot when you’ve reserved it. Always cancel reservations you will not use. Cancellations made 12 hours before start of reserved time will not be charged. 6. All users are encouraged to use remote stations for data analysis. Of course, you can use a spectrometer for data analysis if you are currently using it for acquisition. Research groups are encouraged to purchase a PC workstation, or Macintosh OS X 10.3 computer. The core has a site license for the VnmrJ NMR software. For offline processing, you may request access to a copy vnmrJ software that can be installed in your laboratory. 7. See a WCAC staff member at least 1 day in advance to schedule special experiments that require long acquisition times and/or setup assistance from the NMR staff. Scheduling 400 MHz A with 100 slot sample changer: a. Monday to Friday from 8 am to 8 pm: 30min max. b. Monday to Friday from 8 pm to 8 am: unlimited time. c. Saturday and Sunday: unlimited time. 400 MHz B with 12 slot sample changer: a. Monday to Friday from 9 am to 9 pm: up to a maximum of 5h per user per day. b. Monday to Friday from 9 pm to 9 am: unlimited time. c. Saturday and Sunday: unlimited time. 600 MHz (http://scheduler.yale.edu): a. Currently, you may reserve unlimited time in 30-‐minute blocks, with no maximum. This is likely to change as use increases. b. Remember to alert us if you have a time sensitive sample (e.g. degradation issues) or, if you are not able to reserve time (all booked). Other Issues Please email WCAC staff if you have issues with the NMRs and leave a note on the whiteboard in the NMR instrument room for other users if you find the instrument not functioning properly. Please make use of the NMR logbook provided to write down any major or persistent issues. Feel free to walk into my office and discuss any issues you are having with the instruments and any questions and suggestions you may have. Terence and I are always happy to sit down and troubleshoot with you. For periodic updates regarding the WCAC including NMR services please visit wcac.yale.edu. You may also signup for our weekly newsletter (West Campus Analytical Core Updates) at https://messages.yale.edu/Subscribe/. Billing Users will need to provide a PATEO number when requesting access to the instruments. As of May 2012, our identical walk-‐up systems (400 MHz A and 400 MHz B) the recharge rate is $5/hour based on the experiment acquisition time as measured by the instrument software. For the 600 MHz system the recharge rate is $8/hour and time is accounted based on the time reserved. Billing on the 400 MHz is ongoing from November 2012, billing on the 600 MHz will commence from January 2013. Faculty will be sent a copy of their usage charges on the instruments by the 5th of each month, and will have till the 10th of each month to respond. The charges will be submitted for billing by the 15th of the month. Operation of 400A and 400B 9 Do’s and Don’ts Do: 1. On the 400A , check for the next available slot in the software before inserting your sample. The next open spot on the tray is not necessarily the next available spot. 2. Wipe the spinner with a kimwipe, specially the black band. 3. Make sure the sample is seated properly in the sample gauge, lift up and reseat if necessary. NMR tube bottom should touch the platform. 4. If the sample errors out, you can resubmit the sample (right click on the red spot and hit submit again). 5. Do check to see if the yellow light comes on when the sample is inserted into the magnet. 6. Do remove your samples from the auto sampler and make spinners available for other users. Don’t: 1. Do not use the red stop button to stop an acquisition: Go to "Acquisition" in the drop down menu and choose "Abort Acquisition" if you have to stop your run. 2. Do not remove your samples by clicking eject, stop acquisition (see above) and ensure that the reference sample goes back into the slot. Please let a WCAC staff know if you are not able. 3. Avoid “edits” copy and paste, as it tends to hang up the software. 10 Agilent Q-‐LCMS: The Agilent Single Quad LCMS is no reservation walk-‐up only instrument. It is reserved for walk up 5 min only runs between 12 noon and 3 pm on weekdays. Outside this time window, long runs and batch runs are permitted. To reserve the instrument for after hour runs please go to: http://scheduler.yale.edu A second computer is available in MIC109 for offline data analysis. The Agilent Q-‐Tof instrument is available for single or multiday use. It can be reserved using: scheduler.yale.edu. Masshunter and MPP software suite is available on a second computer for offline data processing. Currently the LCMS usage is charged at $1:00/per sample. Operation and Sample Prep 7. 8. 9. 10. 11. LCMS: 4. 5. 6. 7. 8. Keep the concentration of you solvents below 1mg/ml. Filter, Filter, Filter! Also, make sure that it is not likely to crash during the gradient run. Start with 2 ml injection, you can always go up later. Solvents to stay away from: Anything halogenated (No CHCl3, CH2Cl2). Remember to label your vial and cap it. If you have not used this instrument before, please see Terence or Mousumi first. Fill in the signup sheet next to the instrument completely. Also, please include the method name. Run your method through EZAccess. Data can be analyzed in your lab or in a secondary computer in MIC, please see Terence if you want a copy of the software. If you are planning long runs/overnight batch runs, please send out an email to let others know. Vials: 1. We have a set of recommended vials that we can suggest. 2. Alternatively, look at the sheet taped to the wall and confirm that vials fit the dimension. 3. Always use the vial cap. Finally, if you run into issues let a staff member know, and put an instrument down sign up. 11 Agilent FTIR: i. The FTIR instrument is located in MIC 109. Login is with Yale Net ID and password. You should create a folder with your name inside the data folder for your samples. It is equipped with an ATR with Diamond crystal. ii. The ATR has to be cleaned after each measurement. Keep in mind the film left over is often more reflective than the samples applied due to better contact, which can lead to false spectra. If unsure about the quality of the cleaning, a new background spectrum should be acquired prior to applying the sample to the crystal. iii. The setup should be cleaned using KIMWIPE moistened with iso-‐propyl alcohol. Please do not squirt the alcohol directly on the plate. iv. The applied pressure has to be adjusted to the quantity and nature of the sample: the thicker the sample is the higher pressure should be in order to have better reflectance. Generally 20 mg of solid or 50 ul of liquid sample are sufficient. The high pressure clamp should be turned to its slip-‐clutch limit to achieve maximum pressure (2 clicks). The pressure has to be released in order to be able to remove the clamp. If this is not done, the pin will hit the diamond crystal the next time it is placed on the sample. v. The Agilent Cary 600 Series FTIR spectrometers use a helium-‐neon laser operating in the visible region at 632.8 nanometers. The spectrometer is a Class 2 laser product, powerful enough to warrant caution in its use. Cleaning the ATR module: i. It is expected some residual sample will be left. ii. Much of the formed pellet can be dislodged with a wooden stick. A metal spatula will be potentially too abrasive and damaging to the crystal. iii. With the remaining solid at the edges, apply some isopropanol, dab the top with a kimwipe, and repeat this 4-‐5 times. iv. Also use this to scrub the general area in and around the crystal surface. It is not necessary to do this for more than a second or two. The solvent should not be applied in a way that the setup is soaked since it will leak into the optics as well. v. Remember to wipe the surface of the screw above. 12 FITR Operation: i. ii. iii. Login to the computer with your Yale ID & Password. Launch the Agilent Resolution Pro Software: Click on Collectà Method Editor: Methods have been created using a standard Mid-‐IR configuration , KBr beamsplitter, Mid-‐ IR source and DTGS detector . iv. Choose Method: Main Bench ATR from column on the left. v. Click on Signal monitor button. 13 vi. Check the voltage displayed above the centerburst EVERYTIME, and confirm that the voltage reads above 6.01, keep log. To run your method (liquid sample): 1. Choose Method: Liquid ATR Ge from left column. 2. Run Background. 3. Place a drop (5 0µl) of sample on the crystal. 4. Run Scan 5. The spectrum obtained is Scan –Background. 6. Save the spectra in your folder. The arm does not need to be lowered for the background or liquid sample. To run your method (solid sample): 1. Choose Method: Main Bench ATR from left column. 2. Run Background. 3. Place the powder sample, and lower the arm to ensure good contact.* 4. Run Scan 5. The spectrum obtained is Scan –Background. 6. Save the spectra in your folder. *Alternately, dissolve the solid sample in a volatile solvent, place a drop onto the crystal and let evaporate. Do not lower arm. To finish: Clean the crystal with KIMWIPE moistened with iso-‐propyl alcohol. Let air dry. Logout. 14 Agilent Q-‐Tof 6550: This instrument is located in MIC 109. This instrument can be used with reservations only. To make reservations please see Terence Wu. Agilent Q-‐ToF 6550 tune and run SOP v1.0 Start the Data Acquisition software Note: • The LC modules and the LC/MS instrument are turned on, but the LC pump is not running. • To start the Data Acquisition program, double-‐click the Data Acquisition icon. When Data Acquisition opens, the software engines automatically start. If you need to restart them, right-‐click the Acq System Launcher icon in the system tray and click Start Engines. If you have recently changed LC modules, remember to configure the instrument again. Prepare the LC modules 1 Switch LC Stream to Waste. While you condition or equilibrate the column, you can tune the TOF or Q-‐ TOF MS. During this time you do not want pump effluent going into the TOF or Q-‐TOF MS, so you switch the direction of the LC stream away from the MS ion source and to waste. If you have the LC connected to the DAD, you can still monitor the fluctuations of the VWD or DAD real-‐time chromatogram before a run. a Click the General tab in the TOF or Q-‐TOF tab in the Method Editor window. b In the LC Stream (Seg) group box, click Waste. c Click Apply Now. This button only sends to the current value of the LC eluent to the instrument. If you click Apply, then all of the method parameters are sent to the instrument. 2 Purge the LC pump. 3 Condition or equilibrate the column. After you purge the pump, you set up to condition or equilibrate the column. a Enter LC parameters, and click Apply to download them to the LC. 15 OR, to select an LC conditioning method, select one from the Method list at the top of the Data Acquisition window or from the Method Editor toolbar, or you select one from the list that appears when you click Method > Open. b Right-‐click an LC module in the Instrument Status window to change any non-‐method control parameters, if necessary. c Monitor the baseline and adjust the plot to make sure the column is equilibrated and the baseline stable. 4 Set up to view real-‐time parameter values (actuals). As you prepare for a run and during a run, you want to see the actual values of the instrument parameters. You can do this in the Instrument Status window. a Right-‐click the Actuals window to see the Setup command. b Click Setup to bring up the list of Actuals available for monitoring. If you have configured a TOF instrument, the actuals for the TOF instrument are displayed instead. c Add all the parameter values you intend to monitor. you can customize the color of the background and the text. You can also add minimum and maximum values to use; if the value is not within the given range, then the background of the value is set to red in the Actuals window. d Click OK. Set up real-‐time plot displays. As you condition the column, you set up the displays to monitor the effluent. • Right-‐click the Chromatogram Plot window, and click Change. In the Edit Signal Plot dialog box, you can select multiple display signals and change the display range. Prepare the TOF and Q-‐TOF instrument You need to tune the instrument the first time you use it or after maintenance, service or pump-‐down and restart. You do not need to tune often with standard use. It is recommended that you calibrate the mass-‐axis regularly. Before you run a Set Detector Gain, Standard Tune or Initial Tune, the Instrument Mode must be set to Extended Dynamic Range. After you run one of these autotunes, if you want to acquire data with a different Mass 16 Range or Instrument Mode, change these values to the appropriate values for your analysis. If you change the values in the Instrument State tab after you finish the autotune, you must recalibrate the TOF or Q-‐TOF. If you change the mass range, you must recalibrate the TOF or Q-‐TOF. You can only run Initial Tune, Standard Tune, Set Detector Gain, Quad Tune or Initial Quad Tune with a source that is supported for all Autotunes and if the Instrument Mode is Extended Dynamic Range. These buttons are grayed out if a different Instrument Mode is selected, or if a different source is installed. You can perform a Check Tune, Quick Tune and Check Quad Tune with all instrument states and the following sources: • ESI • AJS ESI (Agilent Jet Stream ESI) • Dual ESI • Dual AJS ESI (Dual Agilent Jet Stream ESI) • MMI • APPI • APCI You cannot do any of the automated tunes if the source is a nanoESI, a Dual nanoESI, an HPLC-‐Chip or a MALDI source. We have the dual AJS ESI source connected most of the time. If Fast Polarity Switching is Enabled, you cannot run any of the Quad Autotune algorithms. Diluting the ESI-‐L Tune Mix With the Dual AJS ESI source, autotune can fail unless you dilute the tuning mix. When tuning in negative ion polarity, dilute the tuning mix to calibrate properly. When tuning in positive ion polarity, dilute the tuning mix if you are not getting proper calibration. Note: Quick Calibration takes approximately 1.5 minutes rather than the longer calibration (approximately 15 minutes). 17 Tune the TOF and Q-‐TOF MS 1 In the Context list, select Tune. The Tune window appears. Only the Instrument Status window, the Actuals window, and the Tune window are available in the Tune context. Note that you tune the TOF separately from the quadrupole. Initial autotunes are appropriate for initial system installations, after removal/replacement of ion optics or mass analyzer components, or if standard tunes cannot complete successfully. If you mark the Adjust the abundance for optimal calibration check box, the system automatically adjusts the fragmentor voltage to reduce the abundance for calibration masses if the calibration masses are detected to be out of the 50 to 650K range. If the fragmentor voltage cannot be adjusted low enough to cause the abundance level to fall below 650K, the system tells you to dilute the calibrant and then to try the calibration or autotune again. 2 (optional) For the G6550A iFunnel Q-‐TOF, clear the Always perform only Quick Calibration check box. No additional dilution for negative mode is necessary if you clear this check box. 3 Click the Autotune tab. 4 Mark the polarity to use when tuning under TOF on the Autotune tab. You can mark Positive, Negative or both. You can also mark FastPolarity Switching. If you mark the Fast Polarity Switching check box, then four different autotunes are performed. • Positive • Negative • Fast Polarity Switching Positive • Fast Polarity Switching Negative 5 Click Check Tune to check the TOF mass calibration and optimization. Then click Start Autotune (Check Tune takes 3 to 5 minutes to complete). You repeat Check Tune after you dilute the calibration solution if the abundances are greater than 480,000 for any of the calibrating ions for the 6550 Q-‐TOF or above approximately 650,000 for other Q-‐TOF and TOF instruments. If Check Tune results are acceptable, then you can skip to step 10 If Checktune results are not acceptable, then continue with step 6. 6 Click Quick Tune to use a limited set of parameters to tune the MS automatically. Then, click Start Autotune (Quick Tune takes 7 to 10 minutes to complete). 18 You repeat Quick Tune after you dilute the calibration solution if the abundances are greater than 480,000 for any of the calibrating ions for the 6550 Q-‐TOF or above approximately 650,000 for other Q-‐TOF and TOF instruments. If Quick Tune results are acceptable, then you can skip to step 11 If Quick Tune results are not acceptable, then continue with step 7. 7 Run a Standard Tune to use even more parameters (10 to 15 minutes): a Click the Instrument State tab. b For the Instrument Mode, click Extended Dynamic Range. c (optional) Mark or clear the Fast Polarity Switching check box. d Click Apply. e Click the Autotune tab. f Mark the polarity (polarities) to use when tuning under TOF on the Autotune tab. g Click Standard Tune. h Click Start Autotune. I f results are acceptable, continue with step 8. If Standard Tune produces unacceptable results you can do an Initial Tune. If this also fails to give acceptable results, please contact Agilent Field Support. If you want use custom tune parameter values, you can also do a Manual Tune. 8 Set the Mass Range and the Instrument Mode that you want to use to acquire data. a Click the Instrument State tab. b Select the appropriate Mass Range. c Click the appropriate Instrument Mode. d Click Apply. Recalibrate, if necessary. 9 Calibration is done when you click the Check Tune button, the Quick Tune button, the Standard Tune button and the Initial Tune button. If you just completed one of these tasks, and if any of the following are true, you only need to recalibrate: • You change the Instrument Mode in the Instrument State tab. • You change the Mass Range in the Instrument State tab. • The peak abundances are above approximately 480,000 for the 6550 Q-‐TOF or above approximately 650,000 for other Q-‐TOF and TOF instruments. You have to dilute the tune calibrant before you recalibrate. You recalibrate to get optimal mass accuracy. 19 a Click the TOF Mass Calibration tab. b Click the desired polarity in the top left corner of the Tune window. c To select a different set of masses, click Load or select or clear individual masses in the list on the left side of the Tune window. d Click the Calibrate button. e If you want to calibrate the TOF analyzer in the opposite polarity, repeat step b through step d. 10 If you have a Q-‐TOF instrument, check the options on the Instrument State tab before you tune the quadrupole. If Fast Polarity Switching is Enabled, you disable it before you run any of the Quad Autotune algorithms. After the Quad tune results are acceptable, you will enable Fast Polarity Switching again and then recalibrate the TOF analyzer. a Click the Instrument State tab. b Select the appropriate Mass Range. c Click the appropriate Instrument Mode. d Select Disabled for Fast Polarity Switching. e If you did not make any changes, skip to step 14. f Click Apply. g Click the TOF Mass Calibration tab. h Click the desired polarity in the top left corner of the Tune window. i To select a different set of masses, click Load or select or clear individual masses in the list on the left side of the Tune window. j Click the Calibrate button. k If you want to calibrate the TOF analyzer in the opposite polarity, repeat step h through step j. l Click the Autotune tab. 11 Run the Check Quad Tune algorithm to check quadrupole optimization (2 to 5 minutes). a Click the Autotune tab. b Click the Check Quad Tune button. If the Check Quad Tune results are acceptable, then skip to step 14. If Checktune results are not acceptable, then continue with step 12. 12 Run the Quad Tune algorithm to optimize the quadrupole using all its parameters (10 to 15 minutes). The source that is used must be supported for all Autotunes when running a Quad Tune. The Dual ESI source is supported for all Autotunes for all instruments. Refer to “Supported sources for all Autotunes” on page 19 for a complete list of sources that are supported for all Autotunes. Also, you cannot run a Quad Tune if Fast Polarity Switching is Enabled. 20 a Click the Instrument State tab. b For the Instrument Mode, click Extended Dynamic Range. c Click Apply. d Click the Autotune tab. e Clear the Fast Polarity Switching check box. f Click Quad Tune. If Quad Tune produces unacceptable results you can do an Initial Quad Tune (50 to 60 minutes). If this also fails to give acceptable results, please contact Terence. If you would like to use custom tune parameter values, you can also do a Manual Tune. 13 Set the Mass Range and the Instrument Mode that you want to use to acquire data. a Click the Instrument State tab. b Select the appropriate Mass Range. c Click the appropriate Instrument Mode. d Click Apply. 14 If you want to use Fast Polarity Switching, enable Fast Polarity Switching on the Instrument State tab and recalibrate If you have a Q-‐TOF instrument, Fast Polarity Switching was disabled before tuning the quadrupole. Follow these steps to enable Fast Polarity Switching: a Click the Instrument State tab. b Select Enabled for the Fast Polarity Switching. c Click the appropriate Instrument Mode. d Click Apply. e Wait 20 minutes for the instrument to equilibrate. f Click the TOF Mass Calibration tab. g Click the desired polarity in the top left corner of the Tune window. h To select a different set of masses, click Load or select or clear individual masses in the list on the left side of the Tune window. i Click the Calibrate button. j If you want to calibrate the TOF analyzer in the opposite polarity, repeat step g through step i. Tune reports are automatically generated at the end of a tune. 21 Calibrate the mass-‐axis During calibration, a sample that contains known masses is infused into the source, and the actual flight times for ions of known masses are measured. These times and exact masses are used to calculate updated calibration coefficients. This process ensures accurate mass assignments for unknowns. Agilent recommends that you do this regularly. Calibration is done when you click the Check Tune button, the Quick Tune button, the Standard Tune button and the Initial Tune button. If you just completed one of these tasks, and if any of the following are true, you only need to recalibrate: • You change the Instrument Mode in the Instrument State tab. • You change the Mass Range in the Instrument State tab. • The peak abundances are above approximately 480,000 for the 6550 Q-‐ TOF. You have to dilute the tune calibrant before you recalibrate. You recalibrate to get optimal mass accuracy. Typical tune mass abundances are in the range of 50,000 to 650,000 counts. 1 In the Combo Bar, select Tune in the Context combo box. 2 Click the TOF Mass Calibration tab. 3 Select the Ion Source and Polarity on the left side of the Tune window. 4 To select a different set of masses, click Load or select or clear individual masses in the list on the left side of the Tune window. 5 Click Calibrate. The TOF or Q-‐TOF Calibration Results dialog box opens. 6 (optional) Repeat step 3 to step 5 for the other polarity. 7 Click Apply to apply the updated calibration coefficients. Switch LC stream to MS After you condition the column and tune the TOF or Q-‐TOF MS, you switch the LC stream from Waste to MS. a In the Context list, click Acquisition. b Make sure that the General tab in the TOF or Q-‐TOF tab is selected in the Method Editor window. c In the LC Stream (Seg) group box, click MS. d Click Apply. Monitor MS baseline and spectral displays • If you did not monitor the LC baseline with a VWD or DAD, make sure that the TOF or Q-‐TOF baseline is stable and no spectra of interfering intensity appear 22 Prepare the TOF and Q-‐TOF instrument • If you did monitor the LC baseline with the DAD, change back to the default TOF or Q-‐TOF displays. a Right-‐click the chromatogram plot, and click Change. b Select the MS signal, and click OK. View the system logbook for events and errors As you prepare the instrument, you may run into an error that you want t troubleshoot. You do this through the System Logbook Viewer. • Click the Log icon in the toolbar of the Data Acquisition window, and view the logged events. • Or right-‐click the icon in the system taskbar. First, click Enable Notification. Then, right-‐click the LOG icon and click Configure. The system can notify you of new errors and warning by showing messages from the taskbar. Set up and run a method An Agilent MassHunter Workstation software method for the Q-‐TOF can contain acquisition parameters, qualitative analysis parameters or both. In the Data Acquisition method, you can specify whether or not to run a Qualitative Analysis method and whether or not to run a Quantitative Analysis automation. You specify whether to copy or link the Qualitative Analysis method and the Quantitative Analysis method to the Data Acquisition method. When you run multiple samples in a worklist with this .m method, you can specify whether to run both data acquisition and data analysis or to only run either data acquisition or data analysis. If you run a single sample in the Data Acquisition program, then both acquisition and data analysis are done. If you select to run both data acquisition and data analysis in a worklist, then the data analysis method automatically follows acquisition if you mark either the Qual Automation check box or the Quant Automation check box in the DA tab in the Method Editor window. You can also run a method to produce only raw data (acquisition only) or reprocess the data with a method containing only qualitative analysis parameters (data analysis only). 23 In this step you learn how to set up the method with acquisition parameters only, with qualitative analysis parameters only and with a combination of acquisition parameters and qualitative analysis parameters. Read and follow the instructions in the online Help for each of the tasks described on the following pages. Set up a method with acquisition parameters • (optional) If you want to download the settings to the instrument, click Apply. • To save the method after entering parameters, click either Method > Save or Method > Save As. • Type the name for the method in the Method field, and click the OK button. Set up and run a method 1 In the Context list, click Acquisition. 2 Enter LC parameter values. Type the values for all of the LC modules configured for the instrument. 3 Set up to change TOF and Q-‐TOF MS parameters with segments and experiments: a Click the TOF or Q-‐TOF tab in the Method Editor. b To add a segment, right-‐click the Time Segment section and click Add Time Segment. The time segment uses those parameter entries with (seg) next to their names. Those parameters can be changed for each time segment. c To add an experiment, right-‐click the Experiment # section, and click Add Experiment. The experiment will use those parameter entries with (Expt) next to their names. Those parameters can be changed for each experiment. d Enter the parameters for each segment and experiment. When you add a new time segment, the parameters for the time segment that is selected are used as the default values for the new time segment. When you add a new experiment, the parameters for the last experiment in the list are used as the default values for the new experiment. See Chapter 3 of the Concepts Guide for an explanation of how and why you use time segments and experiments. 4 Enter TOF or Q-‐TOF MS parameter values: a Click the General tab, and enter any General parameters that you want to change. b Click the Source tab, and enter any Source values you want to change. 24 c Click the Acquisition tab. d Select the mode of operation for the Q-‐TOF LC/MS: MS mode, Auto MS/MS mode or Targeted MS/MS mode. If you have a TOF configured, you can only use MS mode. Different parameters are made available depending on the mode selected. e Enter any values you want to change in the Acquisition tab. f Click the Ref Mass tab to set up the mass calibration. g Click the Chromatogram tab to set up the chromatograms to plot during a run. 5 Set up the data analysis parameters. In the DA tab, you can specify the Qualitative Analysis parameters and Quantitative Analysis parameters. To set up the Qualitative Analysis parameters, do the following: a Click the DA tab in the Method Editor. b In the Qual tab, mark the Qual Automation check box. c Click the Link or Copy button, depending on whether you want to always use the most recent version of the Qualitative Analysis method or copy the current Qualitative Analysis method and save it to the Data Acquisition method for future use. If you click Copy, the method entered in the Change to Method box is copied to the Data Acquisition method when the Data Acquisition method is saved. d Click the button to select the Qualitative Analysis method. To set up the Quantitative Analysis parameters, do the following: a Click the DA tab in the Method Editor. a Click the Quant tab. b In the Quant tab, mark the Quant Automation check box. c Click the Link or Copy button, depending on whether you want to always use the most recent version of the Quantitative Analysis method or copy the current Quantitative Analysis method and save it to the Data Acquisition method for future use. If you click Copy, the method entered in the Change to Method box is copied to the Data Acquisition method when the Data Acquisition method is saved. d Click the button to select the Quantitative Analysis method. Set up and run interactive samples 1 Click the Sample Run window. 2 Enter the information such as the Sample Name, the Data File Name and Path. 3 Enter the Additional Information. You can change the value of the parameters in the Additional Information list. 25 It is now possible to run a Data Analysis method from this window, by selecting Both Acquisition and DA or DA Only for the Method Type. In addition, you have to set Override DA method to indicate the DA (Data Analysis) method to execute. A method can contain data acquisition parameters, qualitative analysis parameters or both. A Data Analysis method is a method that contains data acquisition parameters with either the Qual Automation check box marked on the Qual tab or the Quant Automation check box marked on the Quant tab. 4 To start a single sample run, click the Run button, , in the Sample Run toolbar or the Run button, , in the main toolbar. You can run the single sample in either locked or unlocked mode. When the mode is locked, no one can change the method or sample parameters during a run. You also cannot overwrite this data file in the Data Acquisition program. The button, in the main toolbar indicates that locked mode is on. You can also specify an Override DA Method and select either Both Acquisition and DA or DA Only for the Method Type, and then Data Analysis is run as part of the method. Set up and run worklists 1 Right-‐click the upper left corner of the worklist to display the following menu. 2 Click Add Multiple Samples. 3 Enter all relevant information, and click the Sample Position tab to specify the sample vial locations (make sure the specific sample tray type has been configured by right-‐clicking the autosampler device image). 4 Specify the locations, and click OK. 5 To set up the worklist run, right-‐click the upper left corner, and click Worklist Run Parameters. 6 Type the paths for the method, the Override DA method, and the data files, and click OK. 7 To start the run, click the Start Worklist Run icon, , in the main toolbar or click the Start Worklist run icon, , in the Worklist toolbar. You can run the worklist in either locked or unlocked mode. When the mode is locked, no one can change the method or the worklist while the worklist is running. The button, in the main toolbar indicates that locked mode is on. 26 NOTE: To use an acquisition method that has a different DA method than the method entered in the worklist, show the column called Override DA Method in the worklist by using the Show/Hide/Order Columns dialog box. In this column, type the name of another method containing the DA parameters you want to use for the sample. The DA part of this method is used instead of the DA part of the current method. You can also type the name of this method in the Add Multiple Samples dialog box. Review results and find compounds with Qualitative Analysis • Use the Qualitative Analysis program to: • Review results for acquisition method development • Find compounds • Identify compounds • Do molecular feature extraction • Export results • Print reports 27 Envision Plate Reader: To Create, your run protocol, optimize and run an assay. For more details please see the USER MANUAL provided. 1. Log in with your Yale Net ID and Password, open Envision Software Manager on the computer. 2. Under Protocols, Create a New Folder with your name. Right Click to select “New Protocol”. 3. Follow the prompt and enter a name for the protocol, click OK. 4. The new protocol will open immediately. 5. From the Protocol menu near the center of the screen: go to “General Settings” and enter your plate type. 28 6. Now select “Well Selection”. A new screen will appear with a plate schematic, allowing you to use the drop down tool bar to define your wells as needed. (Controls or Blanks for auto subtraction, if you chose). 7. Right click on “Well Type” to reveal several different activities (Measurement, Kinetics, Shaking, Temperature Control). 29 8. Select “Measurement” in the protocol window and select the correct filter set. To do this, select the small icon to the right of the drop down assay list (circled). Valid Measurements are indicated with an asterix next to them. 9. A list of preloaded read protocols will appear on the left side of the screen. From the list on the left click “measurement technologies” and method of choice. If your measurement is not available in the list, you can create you r own by first duplicating an existing measurement. 30 10. A new window will open for with the measurement parameters. 11. For kinetic runs, choose number of repeats and time intervals per repeat. 12. When finished, select “start” button at the top of the screen. It will take you through the optimization wizard. The optimization protocol standardizes the sample height and gain for your specific assay. 13. The assay wizard will open automatically. Select “optimize existing protocol”, then select “Next”. Select the protocol you want to optimize and follow the directions on the screen 31 14. When complete, your protocol will be optimized and ready to run. 15. After the assay is complete, please reload tray (Load Button on top of screen). Exit the Envision software by closing the full envision software. 16. Log out of your account. 32 WCAC Ultracentrifuges and Rotors This section summarizes Ultracentrifuges and rotors maintained by the WCAC and lists basic rotor and instrument maintenance tips. The operator is strongly urged to strictly follow all instructions in this document. The WCAC is responsible for the following three ultracentrifuges. The rotors available are listed alongside. Before using any instrument for the first time please notify a WCAC staff member. Ultracentrifuge Location Rotors BC Optima L100K ABC 216 SW 32 Ti 90Ti 70Ti 422 Ti BC Optima XE 100 MIC 312E SW-‐55Ti SW-‐28 Thermo Sorval RC6 ABC 216 Fiberlite F14-‐6x250y F12S-‐6x500 LEX F21S-‐8x50y SA-‐512 In case of a spill you should inform a WCAC staff member. In addition, you should immediately start appropriate decontamination procedures for the rotors, centrifuge and accessories such as the vacuum pump. General Considerations: Never use a rotor without a lid. Super-‐speed or General Purpose rotors not tied down securely on the spindle may jump off and cause damage to the drive shaft and the centrifuge chamber. Never attempt to touch or stop a rotor by hand. Failure to do so may damage the surface finish of the rotor and, over time, expose some pointed ends of carbon filaments, which may break through the skin like a wooden splinter. 33 Always check, prior to starting a run, the condition of the segmented over-‐speed disk of an ultra rotor. The over-‐speed disk is located at the bottom of the metallic hub. If the disk is scratched, partially peeled or otherwise damaged, replace the disk with a new one of the same type. Excessive vibration of a high-‐speed centrifuge will indicate a grossly unbalanced rotor. Stop the run immediately, remove all bottles from the rotor and check counterbalancing of the bottles in accordance with the manufacturer of your centrifuge. Most high/super centrifuges require counterbalancing within ±1.0 gram. Ultra speed, fixed angle rotors require counterbalancing better than ±0.5 gram. Do not exceed maximum rotor speed under any circumstance. Speed reduction may be necessary because of weight considerations of tubes, adapters, condition of the rotor, or the density of the solution being centrifuged. Be sure to follow appropriate instructions contained in the rotor manual. Do not put a rotor covered with moisture on the pre-‐cooled drive spindle, or it can freeze into place. Never leave the rotor on the hub for long periods. Keep mating surfaces of the rotor and spindle clean. If any unusual vibrations, sounds or odors occur, turn off power to the centrifuge immediately and do not operate the centrifuge until the cause of the improper behavior is determined. Do not try to lift a rotor by force or by swaying it. If not removed immediately, rotors may stick to the spindles of some high-‐speed centrifuges due to condensation that can quickly freeze over the spindle. Leave the rotor in the centrifuge and wait until the centrifuge comes down to room temperature. Then, try lifting the rotor again. Never use any abrasive tools to clean the rotor. If needed, uses soft brushes and wash only with mild soap or detergent solutions. Also, do not use metal implements to remove tubes. Rotor Preparation: It is always important to visually inspect the rotor and its components before and after each run for unusual nicks, check marks or other abnormalities. Always inspect rotor seals and o-‐rings, and replace damaged o-‐rings before use. TUBE AND BOTTLE PREPARATION: Check the rotor manual for specifications of bottles, sealing caps and screw closures. ROTOR CARE: CLEANING AND DISINFECTING 34 The rotor body does not need washing and cleaning after every run. However, periodic washing under warm water, using a mild detergent solution will help reduce the amount of salt deposits from spills and permit easy placement of sample bottles in the rotor cavities. • Do not use any sharp objects or tools on the rotor and any of its components. Use only soft bristle brush to remove dry salts that might be deposited in the cavities or other locations unreachable by hand. • The rotor contains some anodized metallic components, such as the hub, lid-‐knob and tie-‐down screw. Do not allow any salts or corrosive chemicals to accumulate over these components. Wash them periodically or, as required after each run. • Regularly check the condition of o-‐rings. Replace worn, cracked or damaged o-‐rings. This rotor utilizes o-‐rings for proper sealing of the cavities to maintain atmospheric pressure in the rotor during the run. All rotor o-‐rings and the surfaces of the o-‐ring slots (they are placed in) must be kept clean, and always lightly greased, using a silicon vacuum grease. • Air-‐dry all rotor components; do not wash any rotor components in a dishwasher. Do not soak in detergent solutions for long periods, i.e. overnight. All rotor components, including the o-‐rings may be autoclaved at 121°C for up to an hour. O-‐rings and gaskets may be left on the rotor. The rotor should be placed in the autoclave upside down. Ethanol (70%), or bleach (10%) may also be used. However, ethanol disinfecting should be done away from the centrifuge at a location, i.e., a vent hood, safe for handling flammable liquids. Wash all rotor components thoroughly with water to remove residual ethanol, bleach or other solutions. What to do in case of trouble:. The most common problem is spillage of sample during the run from loosely capped bottles and the resulting imbalance, bent shafts and/or rotor freezing over the spindle. If a bottle develops a significant leak in the middle of the run, there could be some damage to the drive assembly and the centrifuge chamber caused by the grossly unbalanced rotor. It is strongly recommended, therefore, that bottles are re-‐used only for the number of times (or less if subjected to aggressive chemicals) recommended by the manufacturer. Do not try to lift a frozen rotor by excessive force or by swaying it. If not removed 35 immediately, rotors may stick to the spindles of some high-‐speed centrifuges due to condensation that quickly freeze over the spindle. In such a case, leave the rotor in the centrifuge and let the centrifuge chamber come down to room temperature. Then, try lifting the rotor again. If that fails call the instrument manufacturer for advice and send a note to WCAC staff. 36 Billing Policy Use of our three NMR spectrometers is accounted in one of two ways: 1. For our identical walk-‐up systems (400A and 400B) the recharge rate is $5/hour based on the experiment acquisition time as measured by the instrument software. These systems are intended for walk-‐up use and require no advanced reservation, however we encourage users to utilize the 400A for quick experiments (< 30 minutes) and the 400B for longer experiments (> 30 minutes) during daytime hours. Both instruments are available for long experiments after 8:00 pm. 2. For the 600 MHz system an on-‐line reservation system has been implemented to schedule experiments in advance. In this case, the recharge rate is $8/hour and time is accounted based on the time reserved. It is worth noting that the reservations can be canceled without penalty as will be explained in the Usage Guidelines. NMR Only Monthly Charges At the beginning of each month (no later than the 5th) you will receive a list of NMR charges incurred during the previous month. You will have several days to review the pending charges after which they will be processed (no earlier than the10th). This is intended to provide you with an opportunity to review current activity levels in the WCAC. 37 WCAC Instrument Rates FY2013-‐14: Category NMR Instrument Model Reservation Charges(Yale Users) Agilent DD2 400 A (G8303A) 400 MHz walkup $5/h Agilent DD2 400 B (G8303A) 400 MHz walkup $5/h Agilent DD2 600 w coldprobe Reservation $8/h Perkin Elmer EnVision 2100 walkup $20/h GE Typhoon 9000 walkup $20/h GE Typhoon 9500 walkup $20/h LAS 4000 imager walkup $20/h Agilent LCMS Q ESMS 6120B walkup $1/sample Agilent 6490 QqQ Appointment $5/sample Inert MSD/DS TRURBO EI 63172A walkup $1/sample LTQ Orbitrap Velos Appointment See WCAC Staff* Agilent 6550A QTOF Appointment $5/sample Agilent 1100 HPLC w UV detect Appointment $1/sample Agilent 1100 HPLC w UV detect 2 Appointment $1/sample Agilent Cary 300 UV/VIS walkup $5/h Agilent Cary 660 FTIR walkup $5/h Thermo Nanodrop walkup No charge Anton Paar MCP500 walkup $5/h BD FACS Verse walkup $20/h (1 min increments) BD FACS Aria Appointment $25/30 min Biotechnology HPLC/Mass Spectrometry Optical FACS 38 WCAC Data Storage Policy: Data acquired by analytical instruments are currently stored on the instrument’s hard drive and archived periodically. The WCAC is in the process of creating a Data Repository for data transfer and storage, that should be online by summer 2014. 39 He Fill: 1. Before Filling please ensure all tools (transfer lines, gloves, etc.) required are available and the Helium gas has an ample amt to fill (at least 500psi) 2. Read the tag on the Dewar to ensure the tank was filled recently and the amount ordered was delivered 1. Open top valve keeping hands and face away from plume 2. Submerge the thumper tube to bottom of tank, place marker at that point 3. Slowly left tube feeling for changes in the frequency (will get more rapid as the top of the liquid is reached) 4. Place marker there and measure the distance in inches to get the liters (consulting the flip side Helium Calibration Chart) 5. must put the Meter on Fill Mode: [On 600 Meter] hit ‘enter’, ‘minus’, ‘enter’ [On 400’s Meter]: hit the ‘fast rate’ to go into fill mode 6. Hook up (and turn on) Helium cylinder w/ gauge to Dewar to the Vapor-‐ Phase Valve [NOTE: the low pressure release valve should be closed at all times except during transport and the vapor-‐phase valve should be closed at all times except during fills] 1. Remove the black clamp at T-‐joint and stuff hole with Kimwipes 2. Remove black cap on fill tube and insert filling apparatus tube leaving covered 3. Put one end in the Dewar handing the other end to the magnet filler 4. Once the Helium starts coming out of tip as liquid immediately take cap off, insert line into magnet (about 1-‐2” from bottom), remove towel and screw cap to seal 5. On Helium Dewar open the Vapor-‐Phase valve and regulate the flow to about 1.5-‐2psi 6. Keep eye on plume and water droplets heading toward T-‐joint to know when filled (about 10-‐15 min) or when meter reads 100 or when plume gets more condensed and blowing out more 7. Once fill is complete turn off the vapor-‐phase valve on the He Dewar, remove the fill line, put cap back on (not too tight) and insert towel back into T-‐joint hole, once the pipes warm up the clamp can be re-‐attached to the T-‐joint and the normal mode rube can be plugged back into the Helium port and finger tightened 8. Lastly the meter should be changed back (‘enter, ‘minus’, ‘enter’) 1. Loosen black cap but do not uncover 2. Put one end of tube in helium, other end to filler for magnet 40 3. Once the tube is ready for filling, remove cap, insert tube into magnet, open valve and tighten the tube into magnet 4. Once filled (about 15-‐20 min) [or when droplets head toward the T-‐joint or plume blows more condensed]-‐turn vapor phase valve off on He Dewar, remove the fill tube from magnet, replace the cap (not too tight), and turn off the T-‐valve 5. Turn the meter back to normal mode (‘slow rate’) 6. Once the pipes warm up finger tighten the He port cap NET CAPACITY: 30L LIT INC ER HES S 1 0.8 1 0.1 2 2.7 2 0.5 3 5.5 3 4 8.7 4 1.8 5 12 6 7 8 15. 2 18. 5 21. 7 1 5 2.6 6 3.7 7 4.8 8 60 9 25 9 7.2 10 28. 2 11 31 12 13 LIT C ER M S 32. 9 33. 7 1 0 1 1 1 2 1 3 1 4 8.5 9.8 11. 1 12. 3 13. 6 NET CAPACITY: 60L NET CAPACITY: 100L IN LI LI IN LI LI LI CH TE TE CH TE TE TE ES RS CM RS ES RS CM RS CM RS 57. 1 1 1 0.2 1 1 1 0.2 33 5 0.0 59. 2 3.5 2 0.6 2 3.5 2 34 6 5 61. 3 7.3 3 1.3 3 7.3 3 1.3 35 5 63. 4 12 4 2.3 4 12 4 2.3 36 5 65. 5 17 5 3.4 5 17 5 3.4 37 5 67. 6 22 6 4.8 6 22 6 4.8 38 5 27. 27. 69. 7 7 6.3 7 7 6.3 39 1 1 5 32. 32. 71. 8 8 8 8 8 8 40 2 2 5 37. 37. 73. 9 9 9.8 9 9 9.8 41 3 3 5 42. 11. 42. 11. 75. 10 10 10 10 42 3 7 3 7 5 47. 13. 47. 13. 77. 11 11 11 11 43 4 6 4 6 5 52. 15. 52. 15. 79. 12 12 12 12 44 4 6 5 6 5 17. 57. 17. 81. 13 57 13 13 13 45 6 5 6 5 60. 19. 62. 19. 83. 14 14 14 14 46 8 6 6 6 5 41 1 5 1 6 1 7 1 8 1 9 2 0 2 1 2 2 2 3 2 4 2 5 2 6 2 7 2 8 2 9 3 0 3 1 3 2 3 3 14. 9 16. 2 17. 5 18. 7 20 21. 3 22. 6 23. 9 25. 2 26. 4 27. 7 28. 9 30 31 31. 9 31. 9 33. 2 33. 5 33. 7 15 16 63. 4 64. 4 15 16 17 18 19 20 21 22 23 24 25 26 27 28 29 30 31 32 33 34 35 36 37 21. 6 23. 6 25. 6 27. 5 29. 5 31. 5 33. 5 35. 5 37. 5 39. 5 41. 5 43. 5 45. 5 47. 5 49. 5 51. 5 53. 4 55. 2 57 58. 6 60. 1 61. 4 62. 5 15 16 17 18 19 20 21 22 23 24 25 67. 7 72. 8 77. 8 82. 9 15 16 17 18 88 19 93. 1 98. 1 10 2.7 10 6.5 10 9.1 11 0 20 21 22 23 24 25 26 27 28 29 30 31 32 21. 6 23. 6 25. 6 27. 6 29. 5 31. 5 33. 5 35. 5 37. 5 39. 5 41. 5 43. 5 45. 5 47. 5 49. 5 51. 5 53. 5 55. 5 47 48 49 50 51 52 53 54 55 56 57 58 59 60 61 62 63 85. 5 87. 4 89. 4 91. 4 93. 4 95. 3 97. 4 99. 3 10 1.1 10 2.9 10 4.5 10 5.9 10 7.2 10 8.2 10 9.1 10 9.7 11 0 42