1
PostgreSQL 7.2 Developer’s Guide
The PostgreSQL Global Development Group
PostgreSQL 7.2 Developer’s Guide
by The PostgreSQL Global Development Group
Copyright © 1996-2001 by The PostgreSQL Global Development Group
This document contains assorted information that can be of use to PostgreSQL developers.
Legal Notice
PostgreSQL is Copyright © 1996-2001 by the PostgreSQL Global Development Group and is distributed under the terms of the license of the
University of California below.
Postgres95 is Copyright © 1994-5 by the Regents of the University of California.
Permission to use, copy, modify, and distribute this software and its documentation for any purpose, without fee, and without a written
agreement is hereby granted, provided that the above copyright notice and this paragraph and the following two paragraphs appear in all
copies.
IN NO EVENT SHALL THE UNIVERSITY OF CALIFORNIA BE LIABLE TO ANY PARTY FOR DIRECT, INDIRECT, SPECIAL,
INCIDENTAL, OR CONSEQUENTIAL DAMAGES, INCLUDING LOST PROFITS, ARISING OUT OF THE USE OF THIS SOFTWARE
AND ITS DOCUMENTATION, EVEN IF THE UNIVERSITY OF CALIFORNIA HAS BEEN ADVISED OF THE POSSIBILITY OF
SUCH DAMAGE.
THE UNIVERSITY OF CALIFORNIA SPECIFICALLY DISCLAIMS ANY WARRANTIES, INCLUDING, BUT NOT LIMITED TO,
THE IMPLIED WARRANTIES OF MERCHANTABILITY AND FITNESS FOR A PARTICULAR PURPOSE. THE SOFTWARE PROVIDED HEREUNDER IS ON AN “AS-IS” BASIS, AND THE UNIVERSITY OF CALIFORNIA HAS NO OBLIGATIONS TO PROVIDE
MAINTENANCE, SUPPORT, UPDATES, ENHANCEMENTS, OR MODIFICATIONS.
Table of Contents
1. PostgreSQL Source Code ............................................................................................................... 1
1.1. Formatting ............................................................................................................................ 1
2. Overview of PostgreSQL Internals ............................................................................................... 2
2.1. The Path of a Query ............................................................................................................. 2
2.2. How Connections are Established........................................................................................ 2
2.3. The Parser Stage................................................................................................................... 3
2.3.1. Parser ....................................................................................................................... 3
2.3.2. Transformation Process ........................................................................................... 4
2.4. The PostgreSQL Rule System.............................................................................................. 5
2.4.1. The Rewrite System................................................................................................. 5
2.4.1.1. Techniques To Implement Views ................................................................ 5
2.5. Planner/Optimizer ................................................................................................................ 6
2.5.1. Generating Possible Plans ....................................................................................... 6
2.5.2. Data Structure of the Plan........................................................................................ 7
2.6. Executor ............................................................................................................................... 7
3. System Catalogs .............................................................................................................................. 9
3.1. Overview .............................................................................................................................. 9
3.2. pg_aggregate ........................................................................................................................ 9
3.3. pg_attrdef ........................................................................................................................... 10
3.4. pg_attribute ........................................................................................................................ 11
3.5. pg_class .............................................................................................................................. 13
3.6. pg_database ........................................................................................................................ 16
3.7. pg_description .................................................................................................................... 17
3.8. pg_group ............................................................................................................................ 18
3.9. pg_index............................................................................................................................. 18
3.10. pg_inherits........................................................................................................................ 19
3.11. pg_language ..................................................................................................................... 20
3.12. pg_largeobject .................................................................................................................. 21
3.13. pg_listener ........................................................................................................................ 21
3.14. pg_operator ...................................................................................................................... 22
3.15. pg_proc............................................................................................................................. 23
3.16. pg_relcheck ...................................................................................................................... 24
3.17. pg_rewrite ........................................................................................................................ 25
3.18. pg_shadow........................................................................................................................ 26
3.19. pg_statistic ....................................................................................................................... 26
3.20. pg_trigger ......................................................................................................................... 28
3.21. pg_type............................................................................................................................. 29
4. Frontend/Backend Protocol ......................................................................................................... 34
4.1. Overview ............................................................................................................................ 34
4.2. Protocol .............................................................................................................................. 34
4.2.1. Start-up .................................................................................................................. 34
4.2.2. Query ..................................................................................................................... 36
4.2.3. Function Call ......................................................................................................... 37
4.2.4. Notification Responses .......................................................................................... 38
4.2.5. Cancelling Requests in Progress ........................................................................... 38
4.2.6. Termination............................................................................................................ 39
4.2.7. SSL Session Encryption ........................................................................................ 39
4.3. Message Data Types........................................................................................................... 40
iii
4.4. Message Formats................................................................................................................ 40
5. gcc Default Optimizations............................................................................................................ 49
6. BKI Backend Interface................................................................................................................. 50
6.1. BKI File Format ................................................................................................................. 50
6.2. BKI Commands.................................................................................................................. 50
6.3. Example ............................................................................................................................. 51
7. Page Files ....................................................................................................................................... 52
8. Genetic Query Optimization........................................................................................................ 53
8.1. Query Handling as a Complex Optimization Problem ...................................................... 53
8.2. Genetic Algorithms ............................................................................................................ 53
8.3. Genetic Query Optimization (GEQO) in PostgreSQL....................................................... 54
8.3.1. Future Implementation Tasks for PostgreSQL GEQO .......................................... 55
8.4. Further Readings ................................................................................................................ 55
9. Native Language Support ............................................................................................................ 56
9.1. For the Translator ............................................................................................................... 56
9.1.1. Requirements......................................................................................................... 56
9.1.2. Concepts ................................................................................................................ 56
9.1.3. Creating and maintaining message catalogs.......................................................... 57
9.1.4. Editing the PO files................................................................................................ 58
9.2. For the Programmer ........................................................................................................... 58
A. The CVS Repository .................................................................................................................... 61
A.1. Getting The Source Via Anonymous CVS........................................................................ 61
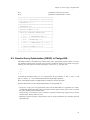
A.2. CVS Tree Organization ..................................................................................................... 62
A.3. Getting The Source Via CVSup ........................................................................................ 63
A.3.1. Preparing A CVSup Client System ...................................................................... 64
A.3.2. Running a CVSup Client ...................................................................................... 64
A.3.3. Installing CVSup .................................................................................................. 66
A.3.4. Installation from Sources...................................................................................... 67
B. Documentation ............................................................................................................................. 69
B.1. DocBook............................................................................................................................ 69
B.2. Toolsets.............................................................................................................................. 69
B.2.1. Linux RPM Installation ........................................................................................ 70
B.2.2. FreeBSD Installation............................................................................................. 70
B.2.3. Debian Packages ................................................................................................... 71
B.2.4. Manual Installation from Source .......................................................................... 71
B.2.4.1. Installing OpenJade .................................................................................. 71
B.2.4.2. Installing the DocBook DTD Kit ............................................................. 72
B.2.4.3. Installing the DocBook DSSSL Style Sheets........................................... 73
B.2.4.4. Installing JadeTeX.................................................................................... 73
B.3. Building The Documentation ............................................................................................ 73
B.3.1. HTML ................................................................................................................... 74
B.3.2. Manpages .............................................................................................................. 74
B.3.3. Hardcopy Generation ............................................................................................ 75
B.3.4. Plain Text Files ..................................................................................................... 76
B.4. Documentation Authoring ................................................................................................. 77
B.4.1. Emacs/PSGML ..................................................................................................... 77
B.4.2. Other Emacs modes .............................................................................................. 78
Bibliography ...................................................................................................................................... 79
iv
List of Tables
3-1. System Catalogs ............................................................................................................................ 9
3-2. pg_aggregate Columns ................................................................................................................ 10
3-3. pg_attrdef Columns ..................................................................................................................... 10
3-4. pg_attribute Columns .................................................................................................................. 11
3-5. pg_class Columns........................................................................................................................ 13
3-6. pg_database Columns.................................................................................................................. 16
3-7. pg_description Columns.............................................................................................................. 17
3-8. pg_group Columns ...................................................................................................................... 18
3-9. pg_index Columns....................................................................................................................... 18
3-10. pg_inherits Columns.................................................................................................................. 19
3-11. pg_language Columns ............................................................................................................... 20
3-12. pg_largeobject Columns............................................................................................................ 21
3-13. pg_listener Columns.................................................................................................................. 21
3-14. pg_operator Columns ................................................................................................................ 22
3-15. pg_proc Columns ...................................................................................................................... 23
3-16. pg_relcheck Columns ................................................................................................................ 25
3-17. pg_rewrite Columns .................................................................................................................. 25
3-18. pg_shadow Columns ................................................................................................................. 26
3-19. pg_statistic Columns ................................................................................................................. 27
3-20. pg_trigger Columns................................................................................................................... 28
3-21. pg_type Columns....................................................................................................................... 29
7-1. Sample Page Layout .................................................................................................................... 52
List of Figures
8-1. Structured Diagram of a Genetic Algorithm ............................................................................... 53
List of Examples
2-1. A Simple Select ............................................................................................................................. 4
v
Chapter 1. PostgreSQL Source Code
1.1. Formatting
Source code formatting uses a 4 column tab spacing, currently with tabs preserved (i.e. tabs are not
expanded to spaces).
For Emacs, add the following (or something similar) to your ~/.emacs initialization file:
;; check for files with a path containing "postgres" or "pgsql"
(setq auto-mode-alist
(cons ’("\\(postgres\\|pgsql\\).*\\.[ch]\\’" . pgsql-c-mode)
auto-mode-alist))
(setq auto-mode-alist
(cons ’("\\(postgres\\|pgsql\\).*\\.cc\\’" . pgsql-c-mode)
auto-mode-alist))
(defun pgsql-c-mode ()
;; sets up formatting for PostgreSQL C code
(interactive)
(c-mode)
(setq-default tab-width 4)
(c-set-style "bsd")
; set c-basic-offset to 4, plus other stuff
(c-set-offset ’case-label ’+)
; tweak case indent to match PG custom
(setq indent-tabs-mode t))
; make sure we keep tabs when indenting
For vi, your ~/.vimrc or equivalent file should contain the following:
set tabstop=4
or equivalently from within vi, try
:set ts=4
The text browsing tools more and less can be invoked as
more -x4
less -x4
1
Chapter 2. Overview of PostgreSQL Internals
Author: This chapter originally appeared as a part of Enhancement of the ANSI SQL Implementation of PostgreSQL, Stefan Simkovics’ Master’s Thesis prepared at Vienna University of
Technology under the direction of O.Univ.Prof.Dr. Georg Gottlob and Univ.Ass. Mag. Katrin Seyr.
This chapter gives an overview of the internal structure of the backend of PostgreSQL. After having
read the following sections you should have an idea of how a query is processed. Don’t expect a
detailed description here (I think such a description dealing with all data structures and functions
used within PostgreSQL would exceed 1000 pages!). This chapter is intended to help understanding
the general control and data flow within the backend from receiving a query to sending the results.
2.1. The Path of a Query
Here we give a short overview of the stages a query has to pass in order to obtain a result.
1.
A connection from an application program to the PostgreSQL server has to be established. The
application program transmits a query to the server and receives the results sent back by the
server.
2.
The parser stage checks the query transmitted by the application program (client) for correct
syntax and creates a query tree.
3.
The rewrite system takes the query tree created by the parser stage and looks for any rules (stored
in the system catalogs) to apply to the querytree and performs the transformations given in the
rule bodies. One application of the rewrite system is given in the realization of views.
Whenever a query against a view (i.e. a virtual table) is made, the rewrite system rewrites the
user’s query to a query that accesses the base tables given in the view definition instead.
4.
The planner/optimizer takes the (rewritten) querytree and creates a queryplan that will be the
input to the executor.
It does so by first creating all possible paths leading to the same result. For example if there is
an index on a relation to be scanned, there are two paths for the scan. One possibility is a simple
sequential scan and the other possibility is to use the index. Next the cost for the execution of
each plan is estimated and the cheapest plan is chosen and handed back.
5.
The executor recursively steps through the plan tree and retrieves tuples in the way represented
by the plan. The executor makes use of the storage system while scanning relations, performs
sorts and joins, evaluates qualifications and finally hands back the tuples derived.
In the following sections we will cover every of the above listed items in more detail to give a better
understanding on PostgreSQL’s internal control and data structures.
2.2. How Connections are Established
PostgreSQL is implemented using a simple "process per-user" client/server model. In this model there
is one client process connected to exactly one server process. As we don’t know per se how many
connections will be made, we have to use a master process that spawns a new server process every
time a connection is requested. This master process is called postmaster and listens at a specified
2
Chapter 2. Overview of PostgreSQL Internals
TCP/IP port for incoming connections. Whenever a request for a connection is detected the postmaster process spawns a new server process called postgres. The server tasks (postgres processes)
communicate with each other using semaphores and shared memory to ensure data integrity throughout concurrent data access. Figure \ref{connection} illustrates the interaction of the master process
postmaster the server process postgres and a client application.
The client process can either be the psql frontend (for interactive SQL queries) or any user application implemented using the libpg library. Note that applications implemented using ecpg (the
PostgreSQL embedded SQL preprocessor for C) also use this library.
Once a connection is established the client process can send a query to the backend (server). The
query is transmitted using plain text, i.e. there is no parsing done in the frontend (client). The server
parses the query, creates an execution plan, executes the plan and returns the retrieved tuples to the
client by transmitting them over the established connection.
2.3. The Parser Stage
The parser stage consists of two parts:
•
The parser defined in gram.y and scan.l is built using the Unix tools yacc and lex.
•
The transformation process does modifications and augmentations to the data structures returned
by the parser.
2.3.1. Parser
The parser has to check the query string (which arrives as plain ASCII text) for valid syntax. If the
syntax is correct a parse tree is built up and handed back otherwise an error is returned. For the
implementation the well known Unix tools lex and yacc are used.
The lexer is defined in the file scan.l and is responsible for recognizing identifiers, the SQL keywords
etc. For every keyword or identifier that is found, a token is generated and handed to the parser.
The parser is defined in the file gram.y and consists of a set of grammar rules and actions that are
executed whenever a rule is fired. The code of the actions (which is actually C-code) is used to build
up the parse tree.
The file scan.l is transformed to the C-source file scan.c using the program lex and gram.y is
transformed to gram.c using yacc. After these transformations have taken place a normal C-compiler
can be used to create the parser. Never make any changes to the generated C-files as they will be
overwritten the next time lex or yacc is called.
Note: The mentioned transformations and compilations are normally done automatically using
the makefiles shipped with the PostgreSQL source distribution.
A detailed description of yacc or the grammar rules given in gram.y would be beyond the scope of
this paper. There are many books and documents dealing with lex and yacc. You should be familiar
with yacc before you start to study the grammar given in gram.y otherwise you won’t understand
what happens there.
3
Chapter 2. Overview of PostgreSQL Internals
For a better understanding of the data structures used in PostgreSQL for the processing of a query we
use an example to illustrate the changes made to these data structures in every stage. This example
contains the following simple query that will be used in various descriptions and figures throughout
the following sections. The query assumes that the tables given in The Supplier Database have already
been defined.
Example 2-1. A Simple Select
select s.sname, se.pno
from supplier s, sells se
where s.sno > 2 and s.sno = se.sno;
Figure \ref{parsetree} shows the parse tree built by the grammar rules and actions given in gram.y
for the query given in Example 2-1 (without the operator tree for the where clause which is shown
in figure \ref{where_clause} because there was not enough space to show both data structures in one
figure).
The top node of the tree is a SelectStmt node. For every entry appearing in the from clause of the
SQL query a RangeVar node is created holding the name of the alias and a pointer to a RelExpr
node holding the name of the relation. All RangeVar nodes are collected in a list which is attached
to the field fromClause of the SelectStmt node.
For every entry appearing in the select list of the SQL query a ResTarget node is created holding
a pointer to an Attr node. The Attr node holds the relation name of the entry and a pointer to a
Value node holding the name of the attribute. All ResTarget nodes are collected to a list which is
connected to the field targetList of the SelectStmt node.
Figure \ref{where_clause} shows the operator tree built for the where clause of the SQL query given
in Example 2-1 which is attached to the field qual of the SelectStmt node. The top node of the
operator tree is an A_Expr node representing an AND operation. This node has two successors called
lexpr and rexpr pointing to two subtrees. The subtree attached to lexpr represents the qualification
s.sno > 2 and the one attached to rexpr represents s.sno = se.sno. For every attribute an Attr
node is created holding the name of the relation and a pointer to a Value node holding the name of
the attribute. For the constant term appearing in the query a Const node is created holding the value.
2.3.2. Transformation Process
The transformation process takes the tree handed back by the parser as input and steps recursively
through it. If a SelectStmt node is found, it is transformed to a Query node that will be the top
most node of the new data structure. Figure \ref{transformed} shows the transformed data structure
(the part for the transformed where clause is given in figure \ref{transformed_where} because there
was not enough space to show all parts in one figure).
Now a check is made, if the relation names in the FROM clause are known to the system. For every
relation name that is present in the system catalogs a RTE node is created containing the relation name,
the alias name and the relation id. From now on the relation ids are used to refer to the relations given
in the query. All RTE nodes are collected in the range table entry list that is connected to the field
rtable of the Query node. If a name of a relation that is not known to the system is detected in the
query an error will be returned and the query processing will be aborted.
Next it is checked if the attribute names used are contained in the relations given in the query. For
every attribute} that is found a TLE node is created holding a pointer to a Resdom node (which
4
Chapter 2. Overview of PostgreSQL Internals
holds the name of the column) and a pointer to a VAR node. There are two important numbers in the
VAR node. The field varno gives the position of the relation containing the current attribute} in the
range table entry list created above. The field varattno gives the position of the attribute within the
relation. If the name of an attribute cannot be found an error will be returned and the query processing
will be aborted.
2.4. The PostgreSQL Rule System
PostgreSQL supports a powerful rule system for the specification of views and ambiguous view updates. Originally the PostgreSQL rule system consisted of two implementations:
•
The first one worked using tuple level processing and was implemented deep in the executor. The
rule system was called whenever an individual tuple had been accessed. This implementation was
removed in 1995 when the last official release of the PostgreSQL project was transformed into
Postgres95.
•
The second implementation of the rule system is a technique called query rewriting. The rewrite
system} is a module that exists between the parser stage and the planner/optimizer. This technique
is still implemented.
For information on the syntax and creation of rules in the PostgreSQL system refer to The PostgreSQL
User’s Guide.
2.4.1. The Rewrite System
The query rewrite system is a module between the parser stage and the planner/optimizer. It processes
the tree handed back by the parser stage (which represents a user query) and if there is a rule present
that has to be applied to the query it rewrites the tree to an alternate form.
2.4.1.1. Techniques To Implement Views
Now we will sketch the algorithm of the query rewrite system. For better illustration we show how to
implement views using rules as an example.
Let the following rule be given:
create rule view_rule
as on select
to test_view
do instead
select s.sname, p.pname
from supplier s, sells se, part p
where s.sno = se.sno and
p.pno = se.pno;
The given rule will be fired whenever a select against the relation test_view is detected. Instead
of selecting the tuples from test_view the select statement given in the action part of the rule is
executed.
5
Chapter 2. Overview of PostgreSQL Internals
Let the following user-query against test_view be given:
select sname
from test_view
where sname <> ’Smith’;
Here is a list of the steps performed by the query rewrite system whenever a user-query against
test_view appears. (The following listing is a very informal description of the algorithm just intended for basic understanding. For a detailed description refer to A commentary on the POSTGRES
rules system).
test_view Rewrite
1.
Take the query given in the action part of the rule.
2.
Adapt the targetlist to meet the number and order of attributes given in the user-query.
3.
Add the qualification given in the where clause of the user-query to the qualification of the query
given in the action part of the rule.
Given the rule definition above, the user-query will be rewritten to the following form (Note that the
rewriting is done on the internal representation of the user-query handed back by the parser stage but
the derived new data structure will represent the following query):
select s.sname
from supplier s, sells se, part p
where s.sno = se.sno and
p.pno = se.pno and
s.sname <> ’Smith’;
2.5. Planner/Optimizer
The task of the planner/optimizer is to create an optimal execution plan. It first combines all possible
ways of scanning and joining the relations that appear in a query. All the created paths lead to the
same result and it’s the task of the optimizer to estimate the cost of executing each path and find out
which one is the cheapest.
2.5.1. Generating Possible Plans
The planner/optimizer decides which plans should be generated based upon the types of indexes
defined on the relations appearing in a query. There is always the possibility of performing a sequential
scan on a relation, so a plan using only sequential scans is always created. Assume an index is defined
on a relation (for example a B-tree index) and a query contains the restriction relation.attribute
OPR constant. If relation.attribute happens to match the key of the B-tree index and OPR is
anything but ’<>’ another plan is created using the B-tree index to scan the relation. If there are
further indexes present and the restrictions in the query happen to match a key of an index further
plans will be considered.
6
Chapter 2. Overview of PostgreSQL Internals
After all feasible plans have been found for scanning single relations, plans for joining relations
are created. The planner/optimizer considers only joins between every two relations for which there
exists a corresponding join clause (i.e. for which a restriction like where rel1.attr1=rel2.attr2
exists) in the where qualification. All possible plans are generated for every join pair considered by
the planner/optimizer. The three possible join strategies are:
•
nested iteration join: The right relation is scanned once for every tuple found in the left relation.
This strategy is easy to implement but can be very time consuming.
•
merge sort join: Each relation is sorted on the join attributes before the join starts. Then the two relations are merged together taking into account that both relations are ordered on the join attributes.
This kind of join is more attractive because every relation has to be scanned only once.
•
hash join: the right relation is first hashed on its join attributes. Next the left relation is scanned and
the appropriate values of every tuple found are used as hash keys to locate the tuples in the right
relation.
2.5.2. Data Structure of the Plan
Here we will give a little description of the nodes appearing in the plan. Figure \ref{plan} shows the
plan produced for the query in example \ref{simple_select}.
The top node of the plan is a MergeJoin node that has two successors, one attached to the field
lefttree and the second attached to the field righttree. Each of the subnodes represents one
relation of the join. As mentioned above a merge sort join requires each relation to be sorted. That’s
why we find a Sort node in each subplan. The additional qualification given in the query (s.sno >
2) is pushed down as far as possible and is attached to the qpqual field of the leaf SeqScan node of
the corresponding subplan.
The list attached to the field mergeclauses of the MergeJoin node contains information about the
join attributes. The values 65000 and 65001 for the varno fields in the VAR nodes appearing in the
mergeclauses list (and also in the targetlist) mean that not the tuples of the current node should
be considered but the tuples of the next "deeper" nodes (i.e. the top nodes of the subplans) should be
used instead.
Note that every Sort and SeqScan node appearing in figure \ref{plan} has got a targetlist but
because there was not enough space only the one for the MergeJoin node could be drawn.
Another task performed by the planner/optimizer is fixing the operator ids in the Expr and Oper
nodes. As mentioned earlier, PostgreSQL supports a variety of different data types and even user
defined types can be used. To be able to maintain the huge amount of functions and operators it
is necessary to store them in a system table. Each function and operator gets a unique operator id.
According to the types of the attributes used within the qualifications etc., the appropriate operator
ids have to be used.
2.6. Executor
The executor takes the plan handed back by the planner/optimizer and starts processing the top node.
In the case of our example (the query given in example \ref{simple_select}) the top node is a MergeJoin node.
7
Chapter 2. Overview of PostgreSQL Internals
Before any merge can be done two tuples have to be fetched (one from each subplan). So the executor
recursively calls itself to process the subplans (it starts with the subplan attached to lefttree). The
new top node (the top node of the left subplan) is a SeqScan node and again a tuple has to be fetched
before the node itself can be processed. The executor calls itself recursively another time for the
subplan attached to lefttree of the SeqScan node.
Now the new top node is a Sort node. As a sort has to be done on the whole relation, the executor
starts fetching tuples from the Sort node’s subplan and sorts them into a temporary relation (in
memory or a file) when the Sort node is visited for the first time. (Further examinations of the Sort
node will always return just one tuple from the sorted temporary relation.)
Every time the processing of the Sort node needs a new tuple the executor is recursively called for
the SeqScan node attached as subplan. The relation (internally referenced by the value given in the
scanrelid field) is scanned for the next tuple. If the tuple satisfies the qualification given by the
tree attached to qpqual it is handed back, otherwise the next tuple is fetched until the qualification is
satisfied. If the last tuple of the relation has been processed a NULL pointer is returned.
After a tuple has been handed back by the lefttree of the MergeJoin the righttree is processed
in the same way. If both tuples are present the executor processes the MergeJoin node. Whenever a
new tuple from one of the subplans is needed a recursive call to the executor is performed to obtain it.
If a joined tuple could be created it is handed back and one complete processing of the plan tree has
finished.
Now the described steps are performed once for every tuple, until a NULL pointer is returned for the
processing of the MergeJoin node, indicating that we are finished.
8
Chapter 3. System Catalogs
3.1. Overview
The system catalogs are the place where a relational database management system stores schema
metadata, such as information about tables and columns, and internal bookkeeping information. PostgreSQL’s system catalogs are regular tables. You can drop and recreate the tables, add columns, insert
and update values, and severely mess up your system that way. Normally one should not change
the system catalogs by hand, there are always SQL commands to do that. (For example, CREATE
DATABASE inserts a row into the pg_database catalog -- and actually creates the database on
disk.) There are some exceptions for esoteric operations, such as adding index access methods.
Table 3-1. System Catalogs
Catalog Name
Purpose
pg_aggregate
aggregate functions
pg_am
index access methods
pg_amop
access method operators
pg_amproc
access method support procedures
pg_attrdef
column default values
pg_attribute
table columns (“attributes”, “fields”)
pg_class
tables, indexes, sequences (“relations”)
pg_database
databases within this database cluster
pg_description
descriptions or comments on database objects
pg_group
groups of database users
pg_index
additional index information
pg_inherits
table inheritance hierarchy
pg_language
languages for writing functions
pg_largeobject
large objects
pg_listener
asynchronous notification
pg_opclass
index access method operator classes
pg_operator
operators
pg_proc
functions and procedures
pg_relcheck
check constraints
pg_rewrite
query rewriter rules
pg_shadow
database users
pg_statistic
optimizer statistics
pg_trigger
triggers
pg_type
data types
More detailed documentation of most catalogs follow below. The catalogs that relate to index access
methods are explained in the Programmer’s Guide.
9
Chapter 3. System Catalogs
3.2. pg_aggregate
pg_aggregate stores information about aggregate functions. An aggregate function is a function that
operates on a set of values (typically one column from each row that matches a query condition) and
returns a single value computed from all these values. Typical aggregate functions are sum, count,
and max.
Table 3-2. pg_aggregate Columns
Name
Type
aggname
name
References
Description
aggowner
int4
pg_shadow.usesysid
Owner (creator) of the
aggregate function
aggtransfn
regproc (function)
pg_proc.oid
Transition function
aggfinalfn
regproc (function)
pg_proc.oid
Final function
aggbasetype
oid
pg_type.oid
The input datatype for
this aggregate function
aggtranstype
oid
pg_type.oid
The type of the
aggregate function’s
internal transition
(state) data
aggfinaltype
oid
pg_type.oid
The type of the result
agginitval
text
Name of the aggregate
function
The initial value of the
transition state. This is a
text field containing the
initial value in its
external string
representation. If the
field is NULL, the
transition state value
starts out NULL.
New aggregate functions are registered with the CREATE AGGREGATE command. See the Programmer’s Guide for more information about writing aggregate functions and the meaning of the
transition functions, etc.
An aggregate function is identified through name and argument type. Hence aggname and aggbasetype are the composite primary key.
3.3. pg_attrdef
This catalog stores column default values. The main information about columns is stored in
pg_attribute (see below). Only columns that explicitly specify a default value (when the table is
created or the column is added) will have an entry here.
Table 3-3. pg_attrdef Columns
Name
Type
References
Description
10
Chapter 3. System Catalogs
Name
Type
References
Description
adrelid
oid
pg_class.oid
The table this column
belongs to
adnum
int2
pg_attribute.attnum
The number of the
column
adbin
text
An internal
representation of the
column default value
adsrc
text
A human-readable
representation of the
default value
3.4. pg_attribute
pg_attribute stores information about table columns. There will be exactly one pg_attribute
row for every column in every table in the database. (There will also be attribute entries for indexes
and other objects. See pg_class.)
The term attribute is equivalent to column and is used for historical reasons.
Table 3-4. pg_attribute Columns
Name
Type
References
Description
attrelid
oid
pg_class.oid
The table this column
belongs to
attname
name
atttypid
oid
attstattarget
int4
Column name
pg_type.oid
The data type of this
column
attstattarget
controls the level of
detail of statistics
accumulated for this
column by ANALYZE.
A zero value indicates
that no statistics should
be collected. The exact
meaning of positive
values is
datatype-dependent. For
scalar datatypes,
attstattarget is
both the target number
of “most common
values” to collect, and
the target number of
histogram bins to
create.
11
Chapter 3. System Catalogs
Name
Type
attlen
int2
References
Description
This is a copy of the
pg_type.typlen for
this column’s type.
attnum
int2
The number of the
column. Ordinary
columns are numbered
from 1 up. System
columns, such as oid,
have (arbitrary) negative
numbers.
attndims
int4
Number of dimensions,
if the column is an array
type; otherwise 0.
(Presently, the number
of dimensions of an
array is not enforced, so
any nonzero value
effectively means “it’s
an array”.)
attcacheoff
int4
Always -1 in storage,
but when loaded into a
tuple descriptor in
memory this may be
updated to cache the
offset of the attribute
within the tuple.
atttypmod
int4
atttypmod records
type-specific data
supplied at table
creation time (for
example, the maximum
length of a varchar
column). It is passed to
type-specific input and
output functions as the
third argument. The
value will generally be
-1 for types that do not
need typmod.
attbyval
bool
A copy of
pg_type.typbyval of
this column’s type
attstorage
char
A copy of
pg_type.typstorage
of this column’s type
12
Chapter 3. System Catalogs
Name
Type
attisset
bool
attalign
char
References
Description
If true, this attribute is a
set. In that case, what is
really stored in the
attribute is the OID of a
tuple in the pg_proc
catalog. The pg_proc
tuple contains the query
string that defines this
set - i.e., the query to
run to get the set. So the
atttypid (see above)
refers to the type
returned by this query,
but the actual length of
this attribute is the
length (size) of an oid.
--- At least this is the
theory. All this is
probably quite broken
these days.
A copy of
pg_type.typalign of
this column’s type
attnotnull
bool
This represents a NOT
NULL constraint. It is
possible to change this
field to enable or
disable the constraint.
atthasdef
bool
This column has a
default value, in which
case there will be a
corresponding entry in
the pg_attrdef
catalog that actually
defines the value.
3.5. pg_class
pg_class catalogues tables and mostly everything else that has columns or is otherwise similar to
a table. This includes indexes (but see also pg_index), sequences, views, and some kinds of special
relation. Below, when we mean all of these kinds of objects we speak of “relations”. Not all fields are
meaningful for all relation types.
Table 3-5. pg_class Columns
Name
Type
relname
name
References
Description
Name of the table,
index, view, etc.
13
Chapter 3. System Catalogs
Name
Type
References
Description
reltype
oid
pg_type.oid
The OID of the data
type that corresponds to
this table, if any (zero
for indexes, which have
no pg_type entry)
relowner
int4
pg_shadow.usesysid
Owner of the relation
relam
oid
pg_am.oid
If this is an index, the
access method used
(btree, hash, etc.)
relfilenode
oid
Name of the on-disk file
of this relation
relpages
int4
Size of the on-disk
representation of this
table in pages (size
BLCKSZ). This is only
an estimate used by the
planner. It is updated by
VACUUM,
ANALYZE, and
CREATE INDEX.
reltuples
float4
Number of tuples in the
table. This is only an
estimate used by the
planner. It is updated by
VACUUM,
ANALYZE, and
CREATE INDEX.
reltoastrelid
oid
pg_class.oid
Oid of the TOAST
table associated with
this table, 0 if none. The
TOAST table stores
large attributes “out of
line” in a secondary
table.
reltoastidxid
oid
pg_class.oid
For a TOAST table, the
OID of its index. 0 if
not a TOAST table.
relhasindex
bool
True if this is a table
and it has (or recently
had) any indexes. This
is set by CREATE
INDEX, but not cleared
immediately by DROP
INDEX. VACUUM
clears relhasindex if it
finds the table has no
indexes.
14
Chapter 3. System Catalogs
Name
Type
References
Description
relisshared
bool
True if this table is
shared across all
databases in the cluster.
Only certain system
catalogs (such as
pg_database) are
shared.
relkind
char
’r’ = ordinary table, ’i’
= index, ’S’ = sequence,
’v’ = view, ’s’ = special,
’t’ = secondary TOAST
table
relnatts
int2
Number of user
columns in the relation
(system columns not
counted). There must be
this many
corresponding entries in
pg_attribute. See
also
pg_attribute.attnum.
relchecks
int2
Number of check
constraints on the table;
see pg_relcheck
catalog
reltriggers
int2
Number of triggers on
the table; see
pg_trigger catalog
relukeys
int2
unused (Not the number
of unique keys)
relfkeys
int2
unused (Not the number
of foreign keys on the
table)
relrefs
int2
unused
relhasoids
bool
True if we generate an
OID for each row of the
relation.
relhaspkey
bool
True if the table has (or
once had) a primary
key.
relhasrules
bool
Table has rules; see
pg_rewrite catalog
relhassubclass
bool
At least one table
inherits from this one
15
Chapter 3. System Catalogs
Name
Type
relacl
aclitem[]
References
Description
Access permissions.
See the descriptions of
GRANT and
REVOKE for details.
3.6. pg_database
The pg_database catalog stores information about the available databases. Databases are created
with the CREATE DATABASE command. Consult the Administrator’s Guide for details about the
meaning of some of the parameters.
Unlike most system catalogs, pg_database is shared across all databases of a cluster: there is only
one copy of pg_database per cluster, not one per database.
Table 3-6. pg_database Columns
Name
Type
datname
name
References
Description
datdba
int4
encoding
int4
Character/multibyte
encoding for this
database
datistemplate
bool
If true then this
database can be used in
the “TEMPLATE”
clause of CREATE
DATABASE to create
the new database as a
clone of this one.
datallowconn
bool
If false then no one can
connect to this database.
This is used to protect
the template0 database
from being altered.
datlastsysoid
oid
Last system OID in the
database; useful
particularly to pg_dump
Database name
pg_shadow.usesysid
Owner of the database,
initially who created it
16
Chapter 3. System Catalogs
Name
Type
References
Description
datvacuumxid
xid
All tuples inserted or
deleted by transaction
IDs before this one have
been marked as known
committed or known
aborted in this database.
This is used to
determine when
commit-log space can
be recycled.
datfrozenxid
xid
All tuples inserted by
transaction IDs before
this one have been
relabeled with a
permanent (“frozen”)
transaction ID in this
database. This is useful
to check whether a
database must be
vacuumed soon to avoid
transaction ID
wraparound problems.
datpath
text
If the database is stored
at an alternative location
then this records the
location. It’s either an
environment variable
name or an absolute
path, depending how it
was entered.
3.7. pg_description
The pg_description table can store an optional description or comment for each database object.
Descriptions can be manipulated with the COMMENT command. Client applications can view the
descriptions by joining with this table. Many builtin system objects have comments associated with
them that are shown by psql’s \d commands.
Table 3-7. pg_description Columns
Name
Type
References
Description
objoid
oid
any oid attribute
The oid of the object
this description pertains
to
classoid
oid
pg_class.oid
The oid of the system
catalog this object
appears in
17
Chapter 3. System Catalogs
Name
Type
References
Description
objsubid
int4
For a comment on a
table attribute, this is
the attribute’s column
number (the objoid and
classoid refer to the
table itself). For all
other object types, this
field is presently zero.
description
text
Arbitrary text that
serves as the description
of this object.
3.8. pg_group
This catalog defines groups and stores what users belong to what groups. Groups are created with the
CREATE GROUP command. Consult the Administrator’s Guide for information about user permission management.
Because user and group identities are cluster-wide, pg_group is shared across all databases of a
cluster: there is only one copy of pg_group per cluster, not one per database.
Table 3-8. pg_group Columns
Name
Type
References
groname
name
Name of the group
grosysid
int4
An arbitrary number to
identify this group
grolist
int4[]
pg_shadow.usesysid
Description
An array containing the
ids of the users in this
group
3.9. pg_index
pg_index contains part of the information about indexes. The rest is mostly in pg_class.
Table 3-9. pg_index Columns
Name
Type
References
Description
indexrelid
oid
pg_class.oid
The oid of the pg_class
entry for this index
indrelid
oid
pg_class.oid
The oid of the pg_class
entry for the table this
index is for
indproc
regproc
pg_proc.oid
The registered
procedure if this is a
functional index
18
Chapter 3. System Catalogs
Name
Type
References
Description
indkey
int2vector
pg_attribute.attnum
This is a vector (array)
of up to
INDEX_MAX_KEYS
values that indicate
which table columns
this index pertains to.
For example a value of
1 3 would mean that
the first and the third
column make up the
index key.
indclass
oidvector
pg_opclass.oid
For each column in the
index key this contains
a reference to the
“operator class” to use.
See pg_opclass for
details.
indisclustered
bool
unused
indisunique
bool
If true, this is a unique
index.
indisprimary
bool
If true, this index
represents the primary
key of the table.
(indisunique should
always be true when
this is true.)
indreference
oid
unused
indpred
text
Expression tree (in the
form of a nodeToString
representation) for
partial index predicate
3.10. pg_inherits
This catalog records information about table inheritance hierarchies.
Table 3-10. pg_inherits Columns
Name
Type
References
Description
inhrelid
oid
pg_class.oid
This is the reference to
the subtable, that is, it
records the fact that the
identified table is
inherited from some
other table.
19
Chapter 3. System Catalogs
Name
Type
References
Description
inhparent
oid
pg_class.oid
This is the reference to
the parent table, which
the table referenced by
inhrelid inherited
from.
inhseqno
int4
If there is more than
one parent for a
subtable (multiple
inheritance), this
number tells the order
in which the inherited
columns are to be
arranged. The count
starts at 1.
3.11. pg_language
pg_language registers call interfaces or languages in which you can write functions or stored pro-
cedures. See under CREATE LANGUAGE and in the Programmer’s Guide for more information
about language handlers.
Table 3-11. pg_language Columns
Name
Type
References
Description
lanname
name
Name of the language
(to be specified when
creating a function)
lanispl
bool
This is false for internal
languages (such as
SQL) and true for
dynamically loaded
language handler
modules. It essentially
means that, if it is true,
the language may be
dropped.
lanpltrusted
bool
This is a trusted
language. See under
CREATE
LANGUAGE what this
means. If this is an
internal language
(lanispl is false) then
this field is
meaningless.
20
Chapter 3. System Catalogs
Name
Type
References
Description
lanplcallfoid
oid
pg_proc.oid
For non-internal
languages this
references the language
handler, which is a
special function that is
responsible for
executing all functions
that are written in the
particular language.
lancompiler
text
not currently used
3.12. pg_largeobject
pg_largeobject holds the data making up “large objects”. A large object is identified by an OID
assigned when it is created. Each large object is broken into segments or “pages” small enough to
be conveniently stored as rows in pg_largeobject. The amount of data per page is defined to be
LOBLKSIZE (which is currently BLCKSZ/4, or typically 2Kbytes).
Table 3-12. pg_largeobject Columns
Name
Type
References
Description
loid
oid
Identifier of the large
object that includes this
page
pageno
int4
Page number of this
page within its large
object (counting from
zero)
data
bytea
Actual data stored in
the large object. This
will never be more than
LOBLKSIZE bytes, and
may be less.
Each row of pg_largeobject holds data for one page of a large object, beginning at byte offset
(pageno * LOBLKSIZE) within the object. The implementation allows sparse storage: pages may be
missing, and may be shorter than LOBLKSIZE bytes even if they are not the last page of the object.
Missing regions within a large object read as zeroes.
3.13. pg_listener
pg_listener supports the LISTEN and NOTIFY commands. A listener creates an entry in
pg_listener for each notification name it is listening for. A notifier scans pg_listener and
updates each matching entry to show that a notification has occurred. The notifier also sends a signal
(using the PID recorded in the table) to awaken the listener from sleep.
21
Chapter 3. System Catalogs
Table 3-13. pg_listener Columns
Name
Type
References
Description
relname
name
Notify condition name.
(The name need not
match any actual
relation in the database;
the term “relname” is
historical.)
listenerpid
int4
PID of the backend
process that created this
entry.
notification
int4
Zero if no event is
pending for this listener.
If an event is pending,
the PID of the backend
that sent the
notification.
3.14. pg_operator
See CREATE OPERATOR and the Programmer’s Guide for details on these operator parameters.
Table 3-14. pg_operator Columns
Name
Type
References
Description
oprname
name
oprowner
int4
oprprec
int2
unused
oprkind
char
’b’ = infix (“both”), ’l’
= prefix (“left”), ’r’ =
postfix (“right”)
oprisleft
bool
unused
oprcanhash
bool
This operator supports
hash joins.
oprleft
oid
pg_type.oid
Type of the left operand
oprright
oid
pg_type.oid
Type of the right
operand
oprresult
oid
pg_type.oid
Type of the result
oprcom
oid
pg_operator.oid
Commutator of this
operator, if any
oprnegate
oid
pg_operator.oid
Negator of this operator,
if any
Name of the operator
pg_shadow.usesysid
Owner (creator) of the
operator
22
Chapter 3. System Catalogs
Name
Type
References
Description
oprlsortop
oid
pg_operator.oid
If this operator
supports merge joins,
the operator that sorts
the type of the left-hand
operand
oprrsortop
oid
pg_operator.oid
If this operator
supports merge joins,
the operator that sorts
the type of the
right-hand operand
oprcode
regproc
Function that
implements this
operator
oprrest
regproc
Restriction selectivity
estimation function for
this operator
oprjoin
regproc
Join selectivity
estimation function for
this operator
3.15. pg_proc
This catalog stores information about functions (or procedures). The description of CREATE FUNCTION and the Programmer’s Guide contain more information about the meaning of some fields.
Table 3-15. pg_proc Columns
Name
Type
References
Description
proname
name
proowner
int4
pg_shadow.usesysid
Owner (creator) of the
function
prolang
oid
pg_language.oid
Implementation
language or call
interface of this
function
proisinh
bool
unused
proistrusted
bool
not functional
proiscachable
bool
Function returns same
result for same input
values
Name of the function
23
Chapter 3. System Catalogs
Name
Type
References
Description
proisstrict
bool
Function returns null if
any call argument is
null. In that case the
function won’t actually
be called at all.
Functions that are not
“strict” must be
prepared to handle null
inputs.
pronargs
int2
Number of arguments
proretset
bool
Function returns a set
(ie, multiple values of
the specified datatype)
prorettype
oid
pg_type.oid
Data type of the return
value (0 if the function
does not return a value)
proargtypes
oidvector
pg_type.oid
A vector with the data
types of the function
arguments
probyte_pct
int4
dead code
properbyte_cpu
int4
dead code
propercall_cpu
int4
dead code
prooutin_ratio
int4
dead code
prosrc
text
This tells the function
handler how to invoke
the function. It might be
the actual source code
of the function for
interpreted languages, a
link symbol, a file
name, or just about
anything else,
depending on the
implementation
language/call
convention.
probin
bytea
Additional information
about how to invoke the
function. Again, the
interpretation is
language-specific.
Currently, prosrc contains the function’s C-language name (link symbol) for compiled functions, both
built-in and dynamically loaded. For all other language types, prosrc contains the function’s source
text.
Currently, probin is unused except for dynamically-loaded C functions, for which it gives the name
of the shared library file containing the function.
24
Chapter 3. System Catalogs
3.16. pg_relcheck
This system catalog stores CHECK constraints on tables. (Column constraints are not treated specially. Every column constraint is equivalent to some table constraint.) See under CREATE TABLE
for more information.
Table 3-16. pg_relcheck Columns
Name
Type
References
Description
rcrelid
oid
pg_class.oid
The table this check
constraint is on
rcname
name
Constraint name
rcbin
text
An internal
representation of the
constraint expression
rcsrc
text
A human-readable
representation of the
constraint expression
Note: pg_class.relchecks needs to match up with the entries in this table.
3.17. pg_rewrite
This system catalog stores rewrite rules for tables and views.
Table 3-17. pg_rewrite Columns
Name
Type
References
rulename
name
Rule name
ev_type
char
Event type that the rule
is for: ’1’ = SELECT,
’2’ = UPDATE, ’3’ =
INSERT, ’4’ =
DELETE
ev_class
oid
ev_attr
int2
The column this rule is
for (currently, always
zero to indicate the
whole table)
is_instead
bool
True if the rule is an
INSTEAD rule
ev_qual
text
Expression tree (in the
form of a nodeToString
representation) for the
rule’s qualifying
condition
pg_class.oid
Description
The table this rule is for
25
Chapter 3. System Catalogs
Name
Type
ev_action
text
References
Description
Query tree (in the form
of a nodeToString
representation) for the
rule’s action
Note: pg_class.relhasrules must be true if a table has any rules in this catalog.
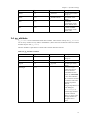
3.18. pg_shadow
pg_shadow contains information about database users. The name stems from the fact that this table
should not be readable by the public since it contains passwords. pg_user is a publicly readable view
on pg_shadow that blanks out the password field.
The Administrator’s Guide contains detailed information about user and permission management.
Because user identities are cluster-wide, pg_shadow is shared across all databases of a cluster: there
is only one copy of pg_shadow per cluster, not one per database.
Table 3-18. pg_shadow Columns
Name
Type
References
Description
usename
name
User name
usesysid
int4
User id (arbitrary
number used to
reference this user)
usecreatedb
bool
User may create
databases
usetrace
bool
not used
usesuper
bool
User is a superuser
usecatupd
bool
User may update
system catalogs. (Even
a superuser may not do
this unless this attribute
is true.)
passwd
text
Password
valuntil
abstime
Account expiry time
(only used for password
authentication)
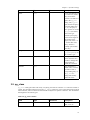
3.19. pg_statistic
pg_statistic stores statistical data about the contents of the database. Entries are created by AN-
ALYZE and subsequently used by the query planner. There is one entry for each table column that
has been analyzed. Note that all the statistical data is inherently approximate, even assuming that it is
up-to-date.
26
Chapter 3. System Catalogs
Since different kinds of statistics may be appropriate for different kinds of data, pg_statistic is
designed not to assume very much about what sort of statistics it stores. Only extremely general
statistics (such as NULL-ness) are given dedicated columns in pg_statistic. Everything else is
stored in “slots”, which are groups of associated columns whose content is identified by a code number
in one of the slot’s columns. For more information see src/include/catalog/pg_statistic.h.
pg_statistic should not be readable by the public, since even statistical information about a table’s
contents may be considered sensitive. (Example: minimum and maximum values of a salary column
might be quite interesting.) pg_stats is a publicly readable view on pg_statistic that only exposes information about those tables that are readable by the current user. pg_stats is also designed
to present the information in a more readable format than the underlying pg_statistic table --- at
the cost that its schema must be extended whenever new slot types are added.
Table 3-19. pg_statistic Columns
Name
Type
References
Description
starelid
oid
pg_class.oid
The table that the
described column
belongs to
staattnum
int2
pg_attribute.attnum
The number of the
described column
stanullfrac
float4
The fraction of the
column’s entries that are
NULL
stawidth
int4
The average stored
width, in bytes, of
non-NULL entries
stadistinct
float4
The number of distinct
non-NULL data values
in the column. A value
greater than zero is the
actual number of
distinct values. A value
less than zero is the
negative of a fraction of
the number of rows in
the table (for example, a
column in which values
appear about twice on
the average could be
represented by
stadistinct = -0.5). A
zero value means the
number of distinct
values is unknown.
stakindN
int2
A code number
indicating the kind of
statistics stored in the
Nth “slot” of the
pg_statistic row.
27
Chapter 3. System Catalogs
Name
Type
References
Description
staopN
oid
pg_operator.oid
An operator used to
derive the statistics
stored in the Nth “slot”.
For example, a
histogram slot would
show the < operator
that defines the sort
order of the data.
stanumbersN
float4[]
Numerical statistics of
the appropriate kind for
the Nth “slot”, or NULL
if the slot kind does not
involve numerical
values.
stavaluesN
text[]
Column data values of
the appropriate kind for
the Nth “slot”, or NULL
if the slot kind does not
store any data values.
For datatype
independence, all
column data values are
converted to external
textual form and stored
as TEXT datums.
3.20. pg_trigger
This system catalog stores triggers on tables. See under CREATE TRIGGER for more information.
Table 3-20. pg_trigger Columns
Name
Type
References
Description
tgrelid
oid
pg_class.oid
The table this trigger is
on
tgname
name
tgfoid
oid
tgtype
int2
Trigger name (need not
be unique)
pg_proc.oid
The function to be
called
Bitmask identifying
trigger conditions
28
Chapter 3. System Catalogs
Name
Type
References
Description
tgenabled
bool
True if trigger is
enabled (not presently
checked everywhere it
should be, so disabling
a trigger by setting this
false does not work
reliably)
tgisconstraint
bool
True if trigger is a RI
constraint
tgconstrname
name
tgconstrrelid
oid
tgdeferrable
bool
True if deferrable
tginitdeferred
bool
True if initially deferred
tgnargs
int2
Number of argument
strings passed to trigger
function
tgattr
int2vector
Currently unused
tgargs
bytea
Argument strings to
pass to trigger, each
null-terminated
RI constraint name
pg_class.oid
The table referenced by
an RI constraint
Note: pg_class.reltriggers needs to match up with the entries in this table.
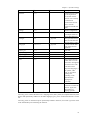
3.21. pg_type
This catalog stores information about datatypes. Scalar types (“base types”) are created with CREATE TYPE. A complex type is also created for each table in the database, to represent the row
structure of the table.
Table 3-21. pg_type Columns
Name
Type
References
Description
typname
name
typowner
int4
typlen
int2
Length of the storage
representation of the
type, -1 if variable
length
typprtlen
int2
unused
Data type name
pg_shadow.usesysid
Owner (creator) of the
type
29
Chapter 3. System Catalogs
Name
Type
References
Description
typbyval
bool
typbyval determines
whether internal
routines pass a value of
this type by value or by
reference. Only char,
short, and int
equivalent items can be
passed by value, so if
the type is not 1, 2, or 4
bytes long, PostgreSQL
does not have the option
of passing by value and
so typbyval had better
be false. Variable-length
types are always passed
by reference. Note that
typbyval can be false
even if the length would
allow pass-by-value;
this is currently true for
type float4, for
example.
typtype
char
typtype is b for a
base type and c for a
complex type (i.e., a
table’s row type). If
typtype is c,
typrelid is the OID of
the type’s entry in
pg_class.
typisdefined
bool
True if the type is
defined, false if this is a
placeholder entry for a
not-yet-defined type.
When typisdefined is
false, nothing except the
type name and OID can
be relied on.
typdelim
char
Character that separates
two values of this type
when parsing array
input. Note that the
delimiter is associated
with the array element
datatype, not the array
datatype.
30
Chapter 3. System Catalogs
Name
Type
References
Description
typrelid
oid
pg_class.oid
If this is a complex
type (see typtype),
then this field points to
the pg_class entry
that defines the
corresponding table. A
table could theoretically
be used as a composite
data type, but this is not
fully functional.
typelem
oid
pg_type.oid
If typelem is not 0
then it identifies another
row in pg_type. The
current type can then be
subscripted like an array
yielding values of type
typelem. A “true”
array type is variable
length (typlen = -1),
but some fixed-length
(typlen > 0) types
also have nonzero
typelem, for example
name and oidvector.
If a fixed-length type
has a typelem then its
internal representation
must be N values of the
typelem datatype with
no other data.
Variable-length array
types have a header
defined by the array
subroutines.
typinput
regproc
Input function
typoutput
regproc
Output function
typreceive
regproc
unused
typsend
regproc
unused
31
Chapter 3. System Catalogs
Name
Type
typalign
char
References
Description
typalign is the
alignment required
when storing a value of
this type. It applies to
storage on disk as well
as most representations
of the value inside
PostgreSQL. When
multiple values are
stored consecutively,
such as in the
representation of a
complete row on disk,
padding is inserted
before a datum of this
type so that it begins
on the specified
boundary. The
alignment reference is
the beginning of the
first datum in the
sequence.
Possible values are:
• ’c’ = CHAR alignment, i.e., no alignment needed.
’s’ = SHORT
alignment (2 bytes
on most machines).
•
’i’ = INT alignment (4 bytes on
most machines).
•
’d’ = DOUBLE
alignment (8 bytes
on many machines,
but by no means all).
•
Note: For types
used in system
tables, it is critical
that the size and
alignment defined
in pg_type agree
with the way that
the compiler will
lay out the field in
a struct
representing a
table row.
32
Chapter 3. System Catalogs
Name
Type
typstorage
char
References
Description
typstorage tells for
variable-length types
(those with typlen
= -1) if the type is
prepared for toasting
and what the default
strategy for attributes
of this type should
be. Possible values
are • ’p’: Value must
always be stored plain.
• ’e’: Value can
be stored in a “secondary” relation (if
relation has one, see
pg_class.reltoastrelid).
’m’: Value can be
stored compressed
inline.
•
’x’: Value can
be stored compressed inline or in
“secondary”.
•
Note that ’m’ fields can
also be moved out to
secondary storage, but
only as a last resort
(’e’ and ’x’ fields are
moved first).
typdefault
text
typdefault is NULL
for types without a
default value. If it’s not
NULL, it contains the
external string
representation of the
type’s default value.
33
Chapter 4. Frontend/Backend Protocol
Note: Written by Phil Thompson (<[email protected]>). Updates for protocol 2.0
by Tom Lane (<[email protected]>).
PostgreSQL uses a message-based protocol for communication between frontends and backends. The
protocol is implemented over TCP/IP and also on Unix domain sockets. PostgreSQL 6.3 introduced
version numbers into the protocol. This was done in such a way as to still allow connections from
earlier versions of frontends, but this document does not cover the protocol used by those earlier
versions.
This document describes version 2.0 of the protocol, implemented in PostgreSQL 6.4 and later.
Higher level features built on this protocol (for example, how libpq passes certain environment variables after the connection is established) are covered elsewhere.
4.1. Overview
A frontend opens a connection to the server and sends a start-up packet. This includes the names of the
user and of the database the user wants to connect to. The server then uses this, and the information in
the pg_hba.conf file to determine what further authentication information it requires the frontend
to send (if any) and responds to the frontend accordingly.
The frontend then sends any required authentication information. Once the server validates this it
responds to the frontend that it is authenticated and sends a message indicating successful start-up
(normal case) or failure (for example, an invalid database name).
In order to serve multiple clients efficiently, the server launches a new “backend” process for each
client. This is transparent to the protocol, however. In the current implementation, a new child process
is created immediately after an incoming connection is detected.
When the frontend wishes to disconnect it sends an appropriate packet and closes the connection
without waiting for a response from the backend.
Packets are sent as a data stream. The first byte determines what should be expected in the rest of
the packet. The exceptions are packets sent as part of the startup and authentication exchange, which
comprise a packet length followed by the packet itself. The difference is historical.
4.2. Protocol
This section describes the message flow. There are four different types of flows depending on the state
of the connection: start-up, query, function call, and termination. There are also special provisions for
notification responses and command cancellation, which can occur at any time after the start-up phase.
4.2.1. Start-up
Initially, the frontend sends a StartupPacket. The server uses this info and the contents of the
pg_hba.conf file to determine what authentication method the frontend must use. The server then
34
Chapter 4. Frontend/Backend Protocol
responds with one of the following messages:
ErrorResponse
The server then immediately closes the connection.
AuthenticationOk
The authentication exchange is completed.
AuthenticationKerberosV4
The frontend must then take part in a Kerberos V4 authentication dialog (not described here, part
of the Kerberos specification) with the server. If this is successful, the server responds with an
AuthenticationOk, otherwise it responds with an ErrorResponse.
AuthenticationKerberosV5
The frontend must then take part in a Kerberos V5 authentication dialog (not described here, part
of the Kerberos specification) with the server. If this is successful, the server responds with an
AuthenticationOk, otherwise it responds with an ErrorResponse.
AuthenticationCleartextPassword
The frontend must then send a PasswordPacket containing the password in clear-text form. If
this is the correct password, the server responds with an AuthenticationOk, otherwise it responds
with an ErrorResponse.
AuthenticationCryptPassword
The frontend must then send a PasswordPacket containing the password encrypted via crypt(3),
using the 2-character salt specified in the AuthenticationCryptPassword packet. If this is the
correct password, the server responds with an AuthenticationOk, otherwise it responds with an
ErrorResponse.
AuthenticationMD5Password
The frontend must then send a PasswordPacket containing the password encrypted via MD5,
using the 4-character salt specified in the AuthenticationMD5Password packet. If this is the
correct password, the server responds with an AuthenticationOk, otherwise it responds with an
ErrorResponse.
AuthenticationSCMCredential
This method is only possible for local Unix-domain connections on platforms that support SCM
credential messages. The frontend must issue an SCM credential message and then send a single
data byte. (The contents of the data byte are uninteresting; it’s only used to ensure that the server
waits long enough to receive the credential message.) If the credential is acceptable, the server
responds with an AuthenticationOk, otherwise it responds with an ErrorResponse.
If the frontend does not support the authentication method requested by the server, then it should
immediately close the connection.
After having received AuthenticationOk, the frontend should wait for further messages from the
server. The possible messages from the backend in this phase are:
BackendKeyData
This message provides secret-key data that the frontend must save if it wants to be able to issue cancel requests later. The frontend should not respond to this message, but should continue
listening for a ReadyForQuery message.
35
Chapter 4. Frontend/Backend Protocol
ReadyForQuery
Start-up is completed. The frontend may now issue query or function call messages.
ErrorResponse
Start-up failed. The connection is closed after sending this message.
NoticeResponse
A warning message has been issued. The frontend should display the message but continue
listening for ReadyForQuery or ErrorResponse.
The ReadyForQuery message is the same one that the backend will issue after each query cycle.
Depending on the coding needs of the frontend, it is reasonable to consider ReadyForQuery as starting
a query cycle (and then BackendKeyData indicates successful conclusion of the start-up phase), or to
consider ReadyForQuery as ending the start-up phase and each subsequent query cycle.
4.2.2. Query
A Query cycle is initiated by the frontend sending a Query message to the backend. The backend then
sends one or more response messages depending on the contents of the query command string, and
finally a ReadyForQuery response message. ReadyForQuery informs the frontend that it may safely
send a new query or function call.
The possible response messages from the backend are:
CompletedResponse
An SQL command completed normally.
CopyInResponse
The backend is ready to copy data from the frontend to a table. The frontend should then send
a CopyDataRows message. The backend will then respond with a CompletedResponse message
with a tag of COPY.
CopyOutResponse
The backend is ready to copy data from a table to the frontend. It then sends a CopyDataRows
message, and then a CompletedResponse message with a tag of COPY.
CursorResponse
Beginning of the response to a SELECT, FETCH, INSERT, UPDATE, or DELETE query.
In the FETCH case the name of the cursor being fetched from is included in the message.
Otherwise the message always mentions the “blank” cursor.
RowDescription
Indicates that rows are about to be returned in response to a SELECT or FETCH query. The
message contents describe the layout of the rows. This will be followed by an AsciiRow or
BinaryRow message (depending on whether a binary cursor was specified) for each row being
returned to the frontend.
EmptyQueryResponse
An empty query string was recognized.
ErrorResponse
An error has occurred.
36
Chapter 4. Frontend/Backend Protocol
ReadyForQuery
Processing of the query string is complete. A separate message is sent to indicate this because the
query string may contain multiple SQL commands. (CompletedResponse marks the end of processing one SQL command, not the whole string.) ReadyForQuery will always be sent, whether
processing terminates successfully or with an error.
NoticeResponse
A warning message has been issued in relation to the query. Notices are in addition to other
responses, i.e., the backend will continue processing the command.
The response to a SELECT or FETCH query normally consists of CursorResponse, RowDescription, zero or more AsciiRow or BinaryRow messages, and finally CompletedResponse. INSERT,
UPDATE, and DELETE queries produce CursorResponse followed by CompletedResponse. COPY
to or from the frontend invokes special protocol as mentioned above. All other query types normally
produce only a CompletedResponse message.
Since a query string could contain several queries (separated by semicolons), there might be several
such response sequences before the backend finishes processing the query string. ReadyForQuery is
issued when the entire string has been processed and the backend is ready to accept a new query
string.
If a completely empty (no contents other than whitespace) query string is received, the response is
EmptyQueryResponse followed by ReadyForQuery. (The need to specially distinguish this case is
historical.)
In the event of an error, ErrorResponse is issued followed by ReadyForQuery. All further processing
of the query string is aborted by ErrorResponse (even if more queries remained in it). Note that this
may occur partway through the sequence of messages generated by an individual query.
A frontend must be prepared to accept ErrorResponse and NoticeResponse messages whenever it is
expecting any other type of message.
Actually, it is possible for NoticeResponse to arrive even when the frontend is not expecting any kind
of message, that is, the backend is nominally idle. (In particular, the backend can be commanded to
terminate by its parent process. In that case it will send a NoticeResponse before closing the connection.) It is recommended that the frontend check for such asynchronous notices just before issuing
any new command.
Also, if the frontend issues any LISTEN commands then it must be prepared to accept NotificationResponse messages at any time; see below.
Recommended practice is to code frontends in a state-machine style that will accept any message type
at any time that it could make sense, rather than wiring in assumptions about the exact sequence of
messages.
4.2.3. Function Call
A Function Call cycle is initiated by the frontend sending a FunctionCall message to the backend. The
backend then sends one or more response messages depending on the results of the function call, and
finally a ReadyForQuery response message. ReadyForQuery informs the frontend that it may safely
send a new query or function call.
The possible response messages from the backend are:
37
Chapter 4. Frontend/Backend Protocol
ErrorResponse
An error has occurred.
FunctionResultResponse
The function call was executed and returned a result.
FunctionVoidResponse
The function call was executed and returned no result.
ReadyForQuery
Processing of the function call is complete. ReadyForQuery will always be sent, whether processing terminates successfully or with an error.
NoticeResponse
A warning message has been issued in relation to the function call. Notices are in addition to
other responses, i.e., the backend will continue processing the command.
A frontend must be prepared to accept ErrorResponse and NoticeResponse messages whenever it
is expecting any other type of message. Also, if it issues any LISTEN commands then it must be
prepared to accept NotificationResponse messages at any time; see below.
4.2.4. Notification Responses
If a frontend issues a LISTEN command, then the backend will send a NotificationResponse message
(not to be confused with NoticeResponse!) whenever a NOTIFY command is executed for the same
notification name.
Notification responses are permitted at any point in the protocol (after start-up), except within another
backend message. Thus, the frontend must be prepared to recognize a NotificationResponse message whenever it is expecting any message. Indeed, it should be able to handle NotificationResponse
messages even when it is not engaged in a query.
NotificationResponse
A NOTIFY command has been executed for a name for which a previous LISTEN command
was executed. Notifications may be sent at any time.
It may be worth pointing out that the names used in listen and notify commands need not have anything to do with names of relations (tables) in the SQL database. Notification names are simply arbitrarily chosen condition names.
4.2.5. Cancelling Requests in Progress
During the processing of a query, the frontend may request cancellation of the query. The cancel
request is not sent directly on the open connection to the backend for reasons of implementation
efficiency: we don’t want to have the backend constantly checking for new input from the frontend
during query processing. Cancel requests should be relatively infrequent, so we make them slightly
cumbersome in order to avoid a penalty in the normal case.
To issue a cancel request, the frontend opens a new connection to the server and sends a CancelRequest message, rather than the StartupPacket message that would ordinarily be sent across a new
38
Chapter 4. Frontend/Backend Protocol
connection. The server will process this request and then close the connection. For security reasons,
no direct reply is made to the cancel request message.
A CancelRequest message will be ignored unless it contains the same key data (PID and secret key)
passed to the frontend during connection start-up. If the request matches the PID and secret key
for a currently executing backend, the processing of the current query is aborted. (In the existing
implementation, this is done by sending a special signal to the backend process that is processing the
query.)
The cancellation signal may or may not have any effect --- for example, if it arrives after the backend
has finished processing the query, then it will have no effect. If the cancellation is effective, it results
in the current command being terminated early with an error message.
The upshot of all this is that for reasons of both security and efficiency, the frontend has no direct way
to tell whether a cancel request has succeeded. It must continue to wait for the backend to respond
to the query. Issuing a cancel simply improves the odds that the current query will finish soon, and
improves the odds that it will fail with an error message instead of succeeding.
Since the cancel request is sent across a new connection to the server and not across the regular
frontend/backend communication link, it is possible for the cancel request to be issued by any process,
not just the frontend whose query is to be canceled. This may have some benefits of flexibility in
building multiple-process applications. It also introduces a security risk, in that unauthorized persons
might try to cancel queries. The security risk is addressed by requiring a dynamically generated secret
key to be supplied in cancel requests.
4.2.6. Termination
The normal, graceful termination procedure is that the frontend sends a Terminate message and immediately closes the connection. On receipt of the message, the backend immediately closes the connection and terminates.
An ungraceful termination may occur due to software failure (i.e., core dump) at either end. If either
frontend or backend sees an unexpected closure of the connection, it should clean up and terminate.
The frontend has the option of launching a new backend by recontacting the server if it doesn’t want
to terminate itself.
For either normal or abnormal termination, any open transaction is rolled back, not committed. One
should note however that if a frontend disconnects while a query is being processed, the backend will
probably finish the query before noticing the disconnection. If the query is outside any transaction
block (BEGIN ... COMMIT sequence) then its results may be committed before the disconnection
is recognized.
4.2.7. SSL Session Encryption
Recent releases of PostgreSQL allow frontend/backend communication to be encrypted using SSL.
This provides communication security in environments where attackers might be able to capture the
session traffic.
To initiate an SSL-encrypted connection, the frontend initially sends an SSLRequest message rather
than a StartupPacket. The server then responds with a single byte containing Y or N, indicating that
it is willing or unwilling to perform SSL, respectively. The frontend may close the connection at this
point if it is dissatisfied with the response. To continue after Y, perform an SSL startup handshake
(not described here, part of the SSL specification) with the server. If this is successful, continue with
sending the usual StartupPacket. In this case the StartupPacket and all subsequent data will be SSLencrypted. To continue after N, send the usual StartupPacket and proceed without encryption.
39
Chapter 4. Frontend/Backend Protocol
The frontend should also be prepared to handle an ErrorMessage response to SSLRequest from the
server. This would only occur if the server predates the addition of SSL support to PostgreSQL. In
this case the connection must be closed, but the frontend may choose to open a fresh connection and
proceed without requesting SSL.
An initial SSLRequest may also be used in a connection that is being opened to send a CancelRequest
message.
While the protocol itself does not provide a way for the server to force SSL encryption, the administrator may configure the server to reject unencrypted sessions as a byproduct of authentication
checking.
4.3. Message Data Types
This section describes the base data types used in messages.
Intn(i)
An n bit integer in network byte order. If i is specified it is the literal value. Eg. Int16, Int32(42).
LimStringn(s)
A character array of exactly n bytes interpreted as a null-terminated string. The zero-byte is
omitted if there is insufficient room. If s is specified it is the literal value. Eg. LimString32,
LimString64("user").
String(s)
A conventional C null-terminated string with no length limitation. If s is specified it is the literal
value. Eg. String, String("user").
Note: There is no predefined limit on the length of a string that can be returned by the
backend. Good coding strategy for a frontend is to use an expandable buffer so that anything
that fits in memory can be accepted. If that’s not feasible, read the full string and discard
trailing characters that don’t fit into your fixed-size buffer.
Byten(c)
Exactly n bytes. If c is specified it is the literal value. Eg. Byte, Byte1(’\n’).
4.4. Message Formats
This section describes the detailed format of each message. Each can be sent by either a frontend (F),
a backend (B), or both (F & B).
AsciiRow (B)
Byte1(’D’)
Identifies the message as an ASCII data row. (A prior RowDescription message defines the
number of fields in the row and their data types.)
40
Chapter 4. Frontend/Backend Protocol
Byten
A bit map with one bit for each field in the row. The 1st field corresponds to bit 7 (MSB)
of the 1st byte, the 2nd field corresponds to bit 6 of the 1st byte, the 8th field corresponds
to bit 0 (LSB) of the 1st byte, the 9th field corresponds to bit 7 of the 2nd byte, and so on.
Each bit is set if the value of the corresponding field is not NULL. If the number of fields is
not a multiple of 8, the remainder of the last byte in the bit map is wasted.
Then, for each field with a non-NULL value, there is the following:
Int32
Specifies the size of the value of the field, including this size.
Byten
Specifies the value of the field itself in ASCII characters. n is the above size minus 4.
There is no trailing zero-byte in the field data; the front end must add one if it wants
one.
AuthenticationOk (B)
Byte1(’R’)
Identifies the message as an authentication request.
Int32(0)
Specifies that the authentication was successful.
AuthenticationKerberosV4 (B)
Byte1(’R’)
Identifies the message as an authentication request.
Int32(1)
Specifies that Kerberos V4 authentication is required.
AuthenticationKerberosV5 (B)
Byte1(’R’)
Identifies the message as an authentication request.
Int32(2)
Specifies that Kerberos V5 authentication is required.
AuthenticationCleartextPassword (B)
Byte1(’R’)
Identifies the message as an authentication request.
41
Chapter 4. Frontend/Backend Protocol
Int32(3)
Specifies that a cleartext password is required.
AuthenticationCryptPassword (B)
Byte1(’R’)
Identifies the message as an authentication request.
Int32(4)
Specifies that a crypt()-encrypted password is required.
Byte2
The salt to use when encrypting the password.
AuthenticationMD5Password (B)
Byte1(’R’)
Identifies the message as an authentication request.
Int32(5)
Specifies that an MD5-encrypted password is required.
Byte4
The salt to use when encrypting the password.
AuthenticationSCMCredential (B)
Byte1(’R’)
Identifies the message as an authentication request.
Int32(6)
Specifies that an SCM credentials message is required.
BackendKeyData (B)
Byte1(’K’)
Identifies the message as cancellation key data. The frontend must save these values if it
wishes to be able to issue CancelRequest messages later.
Int32
The process ID of this backend.
Int32
The secret key of this backend.
42
Chapter 4. Frontend/Backend Protocol
BinaryRow (B)
Byte1(’B’)
Identifies the message as a binary data row. (A prior RowDescription message defines the
number of fields in the row and their data types.)
Byten
A bit map with one bit for each field in the row. The 1st field corresponds to bit 7 (MSB)
of the 1st byte, the 2nd field corresponds to bit 6 of the 1st byte, the 8th field corresponds
to bit 0 (LSB) of the 1st byte, the 9th field corresponds to bit 7 of the 2nd byte, and so on.
Each bit is set if the value of the corresponding field is not NULL. If the number of fields is
not a multiple of 8, the remainder of the last byte in the bit map is wasted.
Then, for each field with a non-NULL value, there is the following:
Int32
Specifies the size of the value of the field, excluding this size.
Byten
Specifies the value of the field itself in binary format. n is the above size.
CancelRequest (F)
Int32(16)
The size of the packet in bytes.
Int32(80877102)
The cancel request code. The value is chosen to contain 1234 in the most significant 16
bits, and 5678 in the least 16 significant bits. (To avoid confusion, this code must not be the
same as any protocol version number.)
Int32
The process ID of the target backend.
Int32
The secret key for the target backend.
CompletedResponse (B)
Byte1(’C’)
Identifies the message as a completed response.
String
The command tag. This is usually a single word that identifies which SQL command was
completed.
For an INSERT command, the tag is INSERT oid rows, where rows is the number of
rows inserted, and oid is the object ID of the inserted row if rows is 1, otherwise oid is
0.
43
Chapter 4. Frontend/Backend Protocol
For a DELETE command, the tag is DELETE rows where rows is the number of rows
deleted.
For an UPDATE command, the tag is UPDATE rows where rows is the number of rows
updated.
CopyDataRows (B & F)
This is a stream of rows where each row is terminated by a Byte1(’\n’). This is then followed by
the sequence Byte1(’\\’), Byte1(’.’), Byte1(’\n’).
CopyInResponse (B)
Byte1(’G’)
Identifies the message as a Start Copy In response. The frontend must now send a CopyDataRows message.
CopyOutResponse (B)
Byte1(’H’)
Identifies the message as a Start Copy Out response. This message will be followed by a
CopyDataRows message.
CursorResponse (B)
Byte1(’P’)
Identifies the message as a cursor response.
String
The name of the cursor. This will be “blank” if the cursor is implicit.
EmptyQueryResponse (B)
Byte1(’I’)
Identifies the message as a response to an empty query string.
String("")
Unused.
ErrorResponse (B)
Byte1(’E’)
Identifies the message as an error.
String
The error message itself.
44
Chapter 4. Frontend/Backend Protocol
FunctionCall (F)
Byte1(’F’)
Identifies the message as a function call.
String("")
Unused.
Int32
Specifies the object ID of the function to call.
Int32
Specifies the number of arguments being supplied to the function.
Then, for each argument, there is the following:
Int32
Specifies the size of the value of the argument, excluding this size.
Byten
Specifies the value of the field itself in binary format. n is the above size.
FunctionResultResponse (B)
Byte1(’V’)
Identifies the message as a function call result.
Byte1(’G’)
Specifies that a nonempty result was returned.
Int32
Specifies the size of the value of the result, excluding this size.
Byten
Specifies the value of the result itself in binary format. n is the above size.
Byte1(’0’)
Unused. (Strictly speaking, FunctionResultResponse and FunctionVoidResponse are the
same thing but with some optional parts to the message.)
FunctionVoidResponse (B)
Byte1(’V’)
Identifies the message as a function call result.
Byte1(’0’)
Specifies that an empty result was returned.
45
Chapter 4. Frontend/Backend Protocol
NoticeResponse (B)
Byte1(’N’)
Identifies the message as a notice.
String
The notice message itself.
NotificationResponse (B)
Byte1(’A’)
Identifies the message as a notification response.
Int32
The process ID of the notifying backend process.
String
The name of the condition that the notify has been raised on.
PasswordPacket (F)
Int32
The size of the packet in bytes.
String
The password (encrypted, if requested).
Query (F)
Byte1(’Q’)
Identifies the message as a query.
String
The query string itself.
ReadyForQuery (B)
Byte1(’Z’)
Identifies the message type. ReadyForQuery is sent whenever the backend is ready for a
new query cycle.
RowDescription (B)
Byte1(’T’)
Identifies the message as a row description.
46
Chapter 4. Frontend/Backend Protocol
Int16
Specifies the number of fields in a row (may be zero).
Then, for each field, there is the following:
String
Specifies the field name.
Int32
Specifies the object ID of the field type.
Int16
Specifies the type size.
Int32
Specifies the type modifier.
SSLRequest (F)
Int32(8)
The size of the packet in bytes.
Int32(80877103)
The SSL request code. The value is chosen to contain 1234 in the most significant 16 bits,
and 5679 in the least 16 significant bits. (To avoid confusion, this code must not be the
same as any protocol version number.)
StartupPacket (F)
Int32(296)
The size of the packet in bytes.
Int32
The protocol version number. The most significant 16 bits are the major version number.
The least 16 significant bits are the minor version number.
LimString64
The database name, defaults to the user name if empty.
LimString32
The user name.
LimString64
Any additional command line arguments to be passed to the backend child process by the
server.
LimString64
Unused.
47
Chapter 4. Frontend/Backend Protocol
LimString64
The optional tty the backend should use for debugging messages. (Currently, this field is
unsupported and ignored.)
Terminate (F)
Byte1(’X’)
Identifies the message as a termination.
48
Chapter 5. gcc Default Optimizations
Note: Contributed by Brian Gallew (<[email protected]>)
Configuring gcc to use certain flags by default is a simple matter of editing the
/usr/local/lib/gcc-lib/platform/version/specs file. The format of this file pretty
simple. The file is broken into sections, each of which is three lines long. The first line is
"*section_name:" (e.g. "*asm:"). The second line is a list of flags, and the third line is blank.
The easiest change to make is to append the desired default flags to the list in the appropriate section.
As an example, let’s suppose that I have linux running on a ’486 with gcc 2.7.2 installed in the default
location. In the file /usr/local/lib/gcc-lib/i486-linux/2.7.2/specs, 13 lines down I find the following
section:
- ----------SECTION---------*cc1:
- ----------SECTION----------
As you can see, there aren’t any default flags. If I always wanted compiles of C code to use "-m486
-fomit-frame-pointer", I would change it to look like:
- ----------SECTION---------*cc1:
- -m486 -fomit-frame-pointer
- ----------SECTION----------
If I wanted to be able to generate 386 code for another, older linux box lying around, I’d have to make
it look like this:
- ----------SECTION---------*cc1:
%{!m386:-m486} -fomit-frame-pointer
- ----------SECTION----------
This will always omit frame pointers, any will build 486-optimized code unless -m386 is specified on
the command line.
You can actually do quite a lot of customization with the specs file. Always remember, however, that
these changes are global, and affect all users of the system.
49
Chapter 6. BKI Backend Interface
Backend Interface (BKI) files are scripts in a special language that are input to the PostgreSQL backend running in the special “bootstrap” mode that allows it to perform database functions without a
database system already existing. BKI files can therefore be used to create the database system in the
first place. (And they are probably not useful for anything else.)
initdb uses a BKI file to do part of its job when creating a new database cluster. The input file used
by initdb is created as part of building and installing PostgreSQL by a program named genbki.sh
from some specially formatted C header files in the source tree. The created BKI file is called postgres.bki and is normally installed in the share subdirectory of the installation tree.
Related information may be found in the documentation for initdb.
6.1. BKI File Format
This section describes how the PostgreSQL backend interprets BKI files. This description will be
easier to understand if the postgres.bki file is at hand as an example. You should also study the
source code of initdb to get an idea of how the backend is invoked.
BKI input consists of a sequence of commands. Commands are made up of a number of tokens,
depending on the syntax of the command. Tokens are usually separated by whitespace, but need not
be if there is no ambiguity. There is no special command separator; the next token that syntactically
cannot belong to the preceding command starts a new one. (Usually you would put a new command
on a new line, for clarity.) Tokens can be certain key words, special characters (parentheses, commas,
etc.), numbers, or double-quoted strings. Everything is case sensitive.
Lines starting with a # are ignored.
6.2. BKI Commands
open tablename
Open the table called tablename for further manipulation.
close [tablename]
Close the open table called tablename. It is an error if tablename is not already opened. If
no tablename is given, then the currently open table is closed.
create tablename (name1 = type1 [, name2 = type2, ...])
Create a table named tablename with the columns given in parentheses.
The type is not necessarily the data type that the column will have in the SQL environment;
that is determined by the pg_attribute system catalog. The type here is essentially only used
to allocate storage. The following types are allowed: bool, bytea, char (1 byte), name, int2,
int2vector, int4, regproc, text, oid, tid, xid, cid, oidvector, smgr, _int4 (array),
_aclitem (array). Array types can also be indicated by writing [] after the name of the element
type.
Note: The table will only be created on disk, it will not automatically be registered in the
system catalogs and will therefore not be accessible unless appropriate rows are inserted in
pg_class, pg_attribute, etc.
50
Chapter 6. BKI Backend Interface
insert [OID = oid_value] (value1 value2 ...)
Insert a new row into the open table using value1, value2, etc., for its column values and
oid_value for its OID. If oid_value is zero (0) or the clause is omitted, then the next
available OID is used.
NULL values can be specified using the special key word _null_. Values containing spaces
must be double quoted.
declare [unique] index indexname on tablename using amname (opclass1 name1 [, ...])
Create an index named indexname on the table named tablename using the amname access
method. The fields to index are called name1, name2 etc., and the operator classes to use are
opclass1, opclass2 etc., respectively.
build indices
Build the indices that have previously been declared.
6.3. Example
The following sequence of commands will create the test_table table with the two columns cola
and colb of type int4 and text, respectively, and insert two rows into the table.
create test_table (cola = int4, colb = text)
open test_table
insert OID=421 ( 1 "value1" )
insert OID=422 ( 2 _null_ )
close test_table
51
Chapter 7. Page Files
A description of the database file default page format.
This section provides an overview of the page format used by PostgreSQL tables. User-defined access
methods need not use this page format.
In the following explanation, a byte is assumed to contain 8 bits. In addition, the term item refers to
data that is stored in PostgreSQL tables.
Table 7-1 shows how pages in both normal PostgreSQL tables and PostgreSQL indexes (e.g., a B-tree
index) are structured.
Table 7-1. Sample Page Layout
Item
Description
itemPointerData
filler
itemData...
Unallocated Space
ItemContinuationData
Special Space
“ItemData 2”
“ItemData 1”
ItemIdData
PageHeaderData
The first 8 bytes of each page consists of a page header (PageHeaderData). Within the header, the first
three 2-byte integer fields (lower, upper, and special) represent byte offsets to the start of unallocated
space, to the end of unallocated space, and to the start of special space. Special space is a region at
the end of the page that is allocated at page initialization time and contains information specific to an
access method. The last 2 bytes of the page header, opaque, encode the page size and information on
the internal fragmentation of the page. Page size is stored in each page because frames in the buffer
pool may be subdivided into equal sized pages on a frame by frame basis within a table. The internal
fragmentation information is used to aid in determining when page reorganization should occur.
Following the page header are item identifiers (ItemIdData). New item identifiers are allocated from
the first four bytes of unallocated space. Because an item identifier is never moved until it is freed,
its index may be used to indicate the location of an item on a page. In fact, every pointer to an item
(ItemPointer) created by PostgreSQL consists of a frame number and an index of an item identifier.
An item identifier contains a byte-offset to the start of an item, its length in bytes, and a set of attribute
bits which affect its interpretation.
The items themselves are stored in space allocated backwards from the end of unallocated space.
Usually, the items are not interpreted. However when the item is too long to be placed on a single
page or when fragmentation of the item is desired, the item is divided and each piece is handled as
distinct items in the following manner. The first through the next to last piece are placed in an item
continuation structure (ItemContinuationData). This structure contains itemPointerData which points
to the next piece and the piece itself. The last piece is handled normally.
52
Chapter 8. Genetic Query Optimization
Author: Written by Martin Utesch (<[email protected]>) for the Institute of Automatic
Control at the University of Mining and Technology in Freiberg, Germany.
8.1. Query Handling as a Complex Optimization Problem
Among all relational operators the most difficult one to process and optimize is the join. The number
of alternative plans to answer a query grows exponentially with the number of joins included in it.
Further optimization effort is caused by the support of a variety of join methods (e.g., nested loop,
hash join, merge join in PostgreSQL) to process individual joins and a diversity of indexes (e.g.,
R-tree, B-tree, hash in PostgreSQL) as access paths for relations.
The current PostgreSQL optimizer implementation performs a near-exhaustive search over the space
of alternative strategies. This query optimization technique is inadequate to support database application domains that involve the need for extensive queries, such as artificial intelligence.
The Institute of Automatic Control at the University of Mining and Technology, in Freiberg, Germany,
encountered the described problems as its folks wanted to take the PostgreSQL DBMS as the backend
for a decision support knowledge based system for the maintenance of an electrical power grid. The
DBMS needed to handle large join queries for the inference machine of the knowledge based system.
Performance difficulties in exploring the space of possible query plans created the demand for a new
optimization technique being developed.
In the following we propose the implementation of a Genetic Algorithm as an option for the database
query optimization problem.
8.2. Genetic Algorithms
The genetic algorithm (GA) is a heuristic optimization method which operates through determined,
randomized search. The set of possible solutions for the optimization problem is considered as a
population of individuals. The degree of adaptation of an individual to its environment is specified by
its fitness.
The coordinates of an individual in the search space are represented by chromosomes, in essence a
set of character strings. A gene is a subsection of a chromosome which encodes the value of a single
parameter being optimized. Typical encodings for a gene could be binary or integer.
Through simulation of the evolutionary operations recombination, mutation, and selection new generations of search points are found that show a higher average fitness than their ancestors.
According to the comp.ai.genetic FAQ it cannot be stressed too strongly that a GA is not a pure
random search for a solution to a problem. A GA uses stochastic processes, but the result is distinctly
non-random (better than random).
Figure 8-1. Structured Diagram of a Genetic Algorithm
53
Chapter 8. Genetic Query Optimization
P(t)
P”(t)
generation of ancestors at a time t
generation of descendants at a time t
+=========================================+
|>>>>>>>>>>> Algorithm GA <<<<<<<<<<<<<<|
+=========================================+
| INITIALIZE t := 0
|
+=========================================+
| INITIALIZE P(t)
|
+=========================================+
| evaluate FITNESS of P(t)
|
+=========================================+
| while not STOPPING CRITERION do
|
|
+-------------------------------------+
|
| P’(t) := RECOMBINATION{P(t)}
|
|
+-------------------------------------+
|
| P”(t) := MUTATION{P’(t)}
|
|
+-------------------------------------+
|
| P(t+1) := SELECTION{P”(t) + P(t)} |
|
+-------------------------------------+
|
| evaluate FITNESS of P”(t)
|
|
+-------------------------------------+
|
| t := t + 1
|
+===+=====================================+
8.3. Genetic Query Optimization (GEQO) in PostgreSQL
The GEQO module is intended for the solution of the query optimization problem similar to a traveling salesman problem (TSP). Possible query plans are encoded as integer strings. Each string represents the join order from one relation of the query to the next. E. g., the query tree
/\
/\ 2
/\ 3
4 1
is encoded by the integer string ’4-1-3-2’, which means, first join relation ’4’ and ’1’, then ’3’, and
then ’2’, where 1, 2, 3, 4 are relation IDs within the PostgreSQL optimizer.
Parts of the GEQO module are adapted from D. Whitley’s Genitor algorithm.
Specific characteristics of the GEQO implementation in PostgreSQL are:
•
•
•
Usage of a steady state GA (replacement of the least fit individuals in a population, not wholegenerational replacement) allows fast convergence towards improved query plans. This is essential
for query handling with reasonable time;
Usage of edge recombination crossover which is especially suited to keep edge losses low for the
solution of the TSP by means of a GA;
Mutation as genetic operator is deprecated so that no repair mechanisms are needed to generate
legal TSP tours.
54
Chapter 8. Genetic Query Optimization
The GEQO module allows the PostgreSQL query optimizer to support large join queries effectively
through non-exhaustive search.
8.3.1. Future Implementation Tasks for PostgreSQL GEQO
Work is still needed to improve the genetic algorithm parameter settings. In file
backend/optimizer/geqo/geqo_params.c,
routines
gimme_pool_size
and
gimme_number_generations, we have to find a compromise for the parameter settings to satisfy
two competing demands:
•
•
Optimality of the query plan
Computing time
8.4. Further Readings
The following resources contain additional information about genetic algorithms:
1.
2.
3.
•
The Hitch-Hiker’s Guide to Evolutionary Computation1 (FAQ for comp.ai.genetic2)
•
Evolutionary Computation and its application to art and design3 by Craig Reynolds
•
Fundamentals of Database Systems
•
The design and implementation of the POSTGRES query optimizer
http://surf.de.uu.net/encore/www/
news://comp.ai.genetic
http://www.red3d.com/cwr/evolve.html
55
Chapter 9. Native Language Support
9.1. For the Translator
PostgreSQL programs (server and client) can issue their messages in your favorite language -- if the
messages have been translated. Creating and maintaining translated message sets needs the help of
people who speak their own language well and want to contribute to the PostgreSQL effort. You do
not have to be a programmer at all to do this. This section explains how to help.
9.1.1. Requirements
We won’t judge your language skills -- this section is about software tools. Theoretically, you only
need a text editor. But this is only in the unlikely event that you do not want to try out your translated
messages. When you configure your source tree, be sure to use the --enable-nls option. This will
also check for the libintl library and the msgfmt program, which all end users will need anyway. To
try out your work, follow the applicable portions of the installation instructions.
If you want to start a new translation effort or want to do a message catalog merge (described later),
you will need the programs xgettext and msgmerge, respectively, in a GNU-compatible implementation. Later, we will try to arrange it so that if you use a packaged source distribution, you
won’t need xgettext. (From CVS, you will still need it.) GNU gettext 0.10.36 or later is currently
recommended.
Your local gettext implementation should come with its own documentation. Some of that is probably
duplicated in what follows, but for additional details you should look there.
9.1.2. Concepts
The pairs of original (English) messages and their (possibly) translated equivalents are kept in message catalogs, one for each program (although related programs can share a message catalog) and for
each target language. There are two file formats for message catalogs: The first is the “PO” file (for
Portable Object), which is a plain text file with special syntax that translators edit. The second is the
“MO” file (for Machine Object), which is a binary file generated from the respective PO file and is
used while the internationalized program is run. Translators do not deal with MO files; in fact hardly
anyone does.
The extension of the message catalog file is to no surprise either .po or .mo. The base name is either
the name of the program it accompanies, or the language the file is for, depending on the situation.
This is a bit confusing. Examples are psql.po (PO file for psql) or fr.mo (MO file in French).
The file format of the PO files is illustrated here:
# comment
msgid "original string"
msgstr "translated string"
msgid "more original"
msgstr "another translated"
"string can be broken up like this"
...
56
Chapter 9. Native Language Support
The msgid’s are extracted from the program source. (They need not be, but this is the most common
way.) The msgstr lines are initially empty and are filled in with useful strings by the translator. The
strings can contain C-style escape characters and can be continued across lines as illustrated. (The
next line must start at the beginning of the line.)
The # character introduces a comment. If whitespace immediately follows the # character, then this
is a comment maintained by the translator. There may also be automatic comments, which have a
non-whitespace character immediately following the #. These are maintained by the various tools that
operate on the PO files and are intended to aid the translator.
#. automatic comment
#: filename.c:1023
#, flags, flags
The #. style comments are extracted from the source file where the message is used. Possibly the
programmer has inserted information for the translator, such as about expected alignment. The #:
comment indicates the exact location(s) where the message is used in the source. The translator need
not look at the program source, but he can if there is doubt about the correct translation. The #,
comments contain flags that describe the message in some way. There are currently two flags: fuzzy
is set if the message has possibly been outdated because of changes in the program source. The
translator can then verify this and possibly remove the fuzzy flag. Note that fuzzy messages are not
made available to the end user. The other flag is c-format, which indicates that the message is a
printf-style format template. This means that the translation should also be a format string with the
same number and type of placeholders. There are tools that can verify this, which key off the c-format
flag.
9.1.3. Creating and maintaining message catalogs
Okay, so how does one create a “blank” message catalog? First, go into the directory that contains the
program whose messages you want to translate. If there is a file nls.mk, then this program has been
prepared for translation.
If there are already some .po files, then someone has already done some translation work. The files are
named language.po, where language is the ISO 639-11 two-letter language code (in lower case),
e.g., fr.po for French. If there is really a need for more than one translation effort per language then
the files may also be named language_region.po where region is the ISO 3166-12 two-letter
country code (in upper case), e.g., pt_BR.po for Portuguese in Brazil. If you find the language you
wanted you can just start working on that file.
If you need to start a new translation effort, then first run the command
gmake init-po
This will create a file progname.pot. (.pot to distinguish it from PO files that are “in production”.
What does the T stand for? I don’t know.) Copy this file to language.po and edit it. To make it
known that the new language is available, also edit the file nls.mk and add the language (or language
and country) code to the line that looks like:
AVAIL_LANGUAGES := de fr
(Other languages may appear, of course.)
1.
2.
http://lcweb.loc.gov/standards/iso639-2/englangn.html
http://www.din.de/gremien/nas/nabd/iso3166ma/codlstp1/en_listp1.html
57
Chapter 9. Native Language Support
As the underlying program or library changes, messages may be changed or added by the programmers. In this case you do not need to start from scratch. Instead, run the command
gmake update-po
which will create a new blank message catalog file (the pot file you started with) and will merge it
with the existing PO files. If the merge algorithm is not sure about a particular message it marks it
“fuzzy” as explained above. For the case where something went really wrong, the old PO file is saved
with a .po.old extension.
9.1.4. Editing the PO files
The PO files can be edited with a regular text editor. The translator should only change the area
between the quotes after the msgstr directive, may add comments and alter the fuzzy flag. There is
(unsurprisingly) a PO mode for Emacs, which I find quite useful.
The PO files need not be completely filled in. The software will automatically fall back to the original
string if no translation (or an empty translation) is available. It is no problem to submit incomplete
translations for inclusions in the source tree; that gives room for other people to pick up your work.
However, you are encouraged to give priority to removing fuzzy entries after doing a merge. Remember that fuzzy entries will not be installed; they only serve as reference what might be the right
translation.
Here are some things to keep in mind while editing the translations:
•
Make sure that if the original ends with a newline, the translation does, too. Similarly for tabs, etc.
•
If the original is a printf format string, the translation also needs to be. The translation also needs
to have the same format specifiers in the same order. Sometimes the natural rules of the language
make this impossible or at least awkward. In this case you can use this format:
msgstr "Die Datei %2$s hat %1$u Zeichen."
Then the first placeholder will actually use the second argument from the list. The digits$ needs
to follow the % and come before any other format manipulators. (This feature really exists in the
printf family of functions. You may not have heard of it because there is little use for it outside
of message internationalization.)
•
If the original string contains a linguistic mistake, report that (or fix it yourself in the program
source) and translate normally. The corrected string can be merged in when the program sources
have been updated. If the original string contains a factual mistake, report that (or fix it yourself)
and do not translate it. Instead, you may mark the string with a comment in the PO file.
•
Maintain the style and tone of the original string. Specifically, messages that are not sentences
(cannot open file %s) should probably not start with a capital letter (if your language distinguishes letter case) or end with a period (if your language uses punctuation marks).
•
If you don’t know what a message means, or if it is ambiguous, ask on the developers’ mailing list.
Chances are that English speaking end users might also not understand it or find it ambiguous, so
it’s best to improve the message.
58
Chapter 9. Native Language Support
9.2. For the Programmer
This section describes how to support native language support in a program or library that is part of
the PostgreSQL distribution. Currently, it only applies to C programs.
Adding NLS support to a program
1.
Insert this code into the startup sequence of the program:
#ifdef ENABLE_NLS
#include <locale.h>
#endif
...
#ifdef ENABLE_NLS
setlocale(LC_ALL, "");
bindtextdomain("progname", LOCALEDIR);
textdomain("progname");
#endif
(The progname can actually be chosen freely.)
2.
Wherever a message that is a candidate for translation is found, a call to gettext() needs to be
inserted. E.g.,
fprintf(stderr, "panic level %d\n", lvl);
would be changed to
fprintf(stderr, gettext("panic level %d\n"), lvl);
(gettext is defined as a no-op if no NLS is configured.)
This may tend to add a lot of clutter. One common shortcut is to
#define _(x) gettext((x))
Another solution is feasible if the program does much of its communication through one or a few
functions, such as elog() in the backend. Then you make this function call gettext internally
on all input values.
3.
Add a file nls.mk in the directory with the program sources. This file will be read as a makefile.
The following variable assignments need to be made here:
CATALOG_NAME
The program name, as provided in the textdomain() call.
AVAIL_LANGUAGES
List of provided translations -- empty in the beginning.
GETTEXT_FILES
List of files that contain translatable strings, i.e., those marked with gettext or an alternative solution. Eventually, this will include nearly all source files of the program. If this list
gets too long you can make the first “file” be a + and the second word be a file that contains
one file name per line.
59
Chapter 9. Native Language Support
GETTEXT_TRIGGERS
The tools that generate message catalogs for the translators to work on need to know what
function calls contain translatable strings. By default, only gettext() calls are known. If
you used _ or other identifiers you need to list them here. If the translatable string is not the
first argument, the item needs to be of the form func:2 (for the second argument).
The build system will automatically take care of building and installing the message catalogs.
To ease the translation of messages, here are some guidelines:
•
Do not construct sentences at run-time out of laziness, like
printf("Files where %s.\n", flag ? "copied" : "removed");
The word order within the sentence may be different in other languages.
•
For similar reasons, this won’t work:
printf("copied %d file%s", n, n!=1 ? "s" : "");
because it assumes how the plural is formed. If you figured you could solve it like this
if (n==1)
printf("copied 1 file");
else
printf("copied %d files", n):
then be disappointed. Some languages have more than two forms, with some peculiar rules. We
may have a solution for this in the future, but for now this is best avoided altogether. You could
write:
printf("number of copied files: %d", n);
•
If you want to communicate something to the translator, such as about how a message is intended
to line up with other output, precede the occurrance of the string with a comment that starts with
translator, e.g.,
/* translator: This message is not what it seems to be. */
These comments are copied to the message catalog files so that the translators can see them.
60
Appendix A. The CVS Repository
The PostgreSQL source code is stored and managed using the CVS code management system.
At least two methods, anonymous CVS and CVSup, are available to pull the CVS code tree from the
PostgreSQL server to your local machine.
A.1. Getting The Source Via Anonymous CVS
If you would like to keep up with the current sources on a regular basis, you can fetch them from our
CVS server and then use CVS to retrieve updates from time to time.
Anonymous CVS
1.
You will need a local copy of CVS (Concurrent Version Control System), which you can get from
http://www.cyclic.com/ or any GNU software archive site. We currently recommend version 1.10
(the most recent at the time of writing). Many systems have a recent version of cvs installed by
default.
2.
Do an initial login to the CVS server:
$ cvs -d :pserver:[email protected]:/projects/cvsroot login
You will be prompted for a password; just press ENTER. You should only need to do this once,
since the password will be saved in .cvspass in your home directory.
3.
Fetch the PostgreSQL sources:
cvs -z3 -d :pserver:[email protected]:/projects/cvsroot co P pgsql
which installs the PostgreSQL sources into a subdirectory pgsql of the directory you are currently in.
Note: If you have a fast link to the Internet, you may not need -z3, which instructs CVS to use
gzip compression for transferred data. But on a modem-speed link, it’s a very substantial win.
This initial checkout is a little slower than simply downloading a tar.gz file; expect it to take
40 minutes or so if you have a 28.8K modem. The advantage of CVS doesn’t show up until you
want to update the file set later on.
4.
Whenever you want to update to the latest CVS sources, cd into the pgsql subdirectory, and
issue
$ cvs -z3 update -d -P
This will fetch only the changes since the last time you updated. You can update in just a couple
of minutes, typically, even over a modem-speed line.
5.
You can save yourself some typing by making a file .cvsrc in your home directory that contains
cvs -z3
update -d -P
61
Appendix A. The CVS Repository
This supplies the -z3 option to all cvs commands, and the -d and -P options to cvs update. Then
you just have to say
$ cvs update
to update your files.
Caution
Some older versions of CVS have a bug that causes all checked-out files to be
stored world-writable in your directory. If you see that this has happened, you
can do something like
$ chmod -R go-w pgsql
to set the permissions properly. This bug is fixed as of CVS version 1.9.28.
CVS can do a lot of other things, such as fetching prior revisions of the PostgreSQL sources rather
than the latest development version. For more info consult the manual that comes with CVS, or see
the online documentation at http://www.cyclic.com/.
A.2. CVS Tree Organization
Author: Written by Marc G. Fournier (<[email protected]>) on 1998-11-05
The command cvs checkout has a flag, -r, that lets you check out a certain revision of a module. This
flag makes it easy to, for example, retrieve the sources that make up release 6_4 of the module ‘tc’ at
any time in the future:
$ cvs checkout -r REL6_4 tc
This is useful, for instance, if someone claims that there is a bug in that release, but you cannot find
the bug in the current working copy.
Tip: You can also check out a module as it was at any given date using the -D option.
When you tag more than one file with the same tag you can think about the tag as “a curve drawn
through a matrix of filename vs. revision number”. Say we have 5 files with the following revisions:
file1
file2
file3
1.1
1.2*-
1.1
1.2
1.1
1.2
file4
file5
1.1 /--1.1*
-1.2*-
<-*-
TAG
62
Appendix A. The CVS Repository
1.3
1.4
\- 1.3*\
1.3
/ 1.3
1.4 / 1.4
\-1.5*1.5
1.6
then the tag TAG will reference file1-1.2, file2-1.3, etc.
Note: For creating a release branch, other then a -b option added to the command, it’s the same
thing.
So, to create the 6.4 release I did the following:
$ cd pgsql
$ cvs tag -b REL6_4
which will create the tag and the branch for the RELEASE tree.
For those with CVS access, it’s simple to create directories for different versions. First, create two
subdirectories, RELEASE and CURRENT, so that you don’t mix up the two. Then do:
cd RELEASE
cvs checkout -P -r REL6_4 pgsql
cd ../CURRENT
cvs checkout -P pgsql
which results in two directory trees, RELEASE/pgsql and CURRENT/pgsql. From that point on,
CVS will keep track of which repository branch is in which directory tree, and will allow independent
updates of either tree.
If you are only working on the CURRENT source tree, you just do everything as before we started
tagging release branches.
After you’ve done the initial checkout on a branch
$ cvs checkout -r REL6_4
anything you do within that directory structure is restricted to that branch. If you apply a patch to that
directory structure and do a
cvs commit
while inside of it, the patch is applied to the branch and only the branch.
63
Appendix A. The CVS Repository
A.3. Getting The Source Via CVSup
An alternative to using anonymous CVS for retrieving the PostgreSQL source tree is CVSup. CVSup
was developed by John Polstra (<[email protected]>) to distribute CVS repositories and other file
trees for the FreeBSD project3.
A major advantage to using CVSup is that it can reliably replicate the entire CVS repository on your
local system, allowing fast local access to cvs operations such as log and diff. Other advantages
include fast synchronization to the PostgreSQL server due to an efficient streaming transfer protocol
which only sends the changes since the last update.
A.3.1. Preparing A CVSup Client System
Two directory areas are required for CVSup to do it’s job: a local CVS repository (or simply a directory area if you are fetching a snapshot rather than a repository; see below) and a local CVSup
bookkeeping area. These can coexist in the same directory tree.
Decide where you want to keep your local copy of the CVS repository. On one of our systems we
recently set up a repository in /home/cvs/, but had formerly kept it under a PostgreSQL development
tree in /opt/postgres/cvs/. If you intend to keep your repository in /home/cvs/, then put
setenv CVSROOT /home/cvs
in your .cshrc file, or a similar line in your .bashrc or .profile file, depending on your shell.
The cvs repository area must be initialized. Once CVSROOT is set, then this can be done with a single
command:
$ cvs init
after which you should see at least a directory named CVSROOT when listing the CVSROOT directory:
$ ls $CVSROOT
CVSROOT/
A.3.2. Running a CVSup Client
Verify that cvsup is in your path; on most systems you can do this by typing
which cvsup
Then, simply run cvsup using:
$ cvsup -L 2 postgres.cvsup
where -L 2 enables some status messages so you can monitor the progress of the update, and postgres.cvsup is the path and name you have given to your CVSup configuration file.
3.
http://www.freebsd.org
64
Appendix A. The CVS Repository
Here is a CVSup configuration file modified for a specific installation, and which maintains a full
local CVS repository:
# This file represents the standard CVSup distribution file
# for the PostgreSQL ORDBMS project
# Modified by [email protected] 1997-08-28
# - Point to my local snapshot source tree
# - Pull the full CVS repository, not just the latest snapshot
#
# Defaults that apply to all the collections
*default host=cvsup.postgresql.org
*default compress
*default release=cvs
*default delete use-rel-suffix
# enable the following line to get the latest snapshot
#*default tag=.
# enable the following line to get whatever was specified above or by default
# at the date specified below
#*default date=97.08.29.00.00.00
# base directory where CVSup will store its ’bookmarks’ file(s)
# will create subdirectory sup/
#*default base=/opt/postgres # /usr/local/pgsql
*default base=/home/cvs
# prefix directory where CVSup will store the actual distribution(s)
*default prefix=/home/cvs
# complete distribution, including all below
pgsql
#
#
#
#
individual distributions vs ’the whole thing’
pgsql-doc
pgsql-perl5
pgsql-src
The following is a suggested CVSup config file from the PostgreSQL ftp site4 which will fetch the
current snapshot only:
# This file represents the standard CVSup distribution file
# for the PostgreSQL ORDBMS project
#
# Defaults that apply to all the collections
*default host=cvsup.postgresql.org
*default compress
*default release=cvs
*default delete use-rel-suffix
*default tag=.
# base directory where CVSup will store its ’bookmarks’ file(s)
*default base=/usr/local/pgsql
4.
ftp://ftp.postgresql.org/pub/CVSup/README.cvsup
65
Appendix A. The CVS Repository
# prefix directory where CVSup will store the actual distribution(s)
*default prefix=/usr/local/pgsql
# complete distribution, including all below
pgsql
#
#
#
#
individual distributions vs ’the whole thing’
pgsql-doc
pgsql-perl5
pgsql-src
A.3.3. Installing CVSup
CVSup is available as source, pre-built binaries, or Linux RPMs. It is far easier to use a binary than to
build from source, primarily because the very capable, but voluminous, Modula-3 compiler is required
for the build.
CVSup Installation from Binaries
You can use pre-built binaries if you have a platform for which binaries are posted on the PostgreSQL
ftp site5, or if you are running FreeBSD, for which CVSup is available as a port.
Note: CVSup was originally developed as a tool for distributing the FreeBSD source tree. It is
available as a “port”, and for those running FreeBSD, if this is not sufficient to tell how to obtain
and install it then please contribute a procedure here.
At the time of writing, binaries are available for Alpha/Tru64, ix86/xBSD, HPPA/HP-UX 10.20,
MIPS/IRIX, ix86/linux-libc5, ix86/linux-glibc, Sparc/Solaris, and Sparc/SunOS.
1.
2.
Retrieve the binary tar file for cvsup (cvsupd is not required to be a client) appropriate for your
platform.
a.
If you are running FreeBSD, install the CVSup port.
b.
If you have another platform, check for and download the appropriate binary from the
PostgreSQL ftp site6.
Check the tar file to verify the contents and directory structure, if any. For the linux tar file at
least, the static binary and man page is included without any directory packaging.
a.
If the binary is in the top level of the tar file, then simply unpack the tar file into your
target directory:
$ cd /usr/local/bin
$ tar zxvf /usr/local/src/cvsup-16.0-linux-i386.tar.gz
$ mv cvsup.1 ../doc/man/man1/
5.
6.
ftp://ftp.postgresql.org/pub
ftp://ftp.postgresql.org/pub
66
Appendix A. The CVS Repository
b.
3.
If there is a directory structure in the tar file, then unpack the tar file within /usr/local/src
and move the binaries into the appropriate location as above.
Ensure that the new binaries are in your path.
$ rehash
$ which cvsup
$ set path=(path to cvsup $path)
$ which cvsup
/usr/local/bin/cvsup
A.3.4. Installation from Sources
Installing CVSup from sources is not entirely trivial, primarily because most systems will need to
install a Modula-3 compiler first. This compiler is available as Linux RPM, FreeBSD package, or
source code.
Note: A clean-source installation of Modula-3 takes roughly 200MB of disk space, which shrinks
to roughly 50MB of space when the sources are removed.
Linux installation
1.
Install Modula-3.
a.
Pick up the Modula-3 distribution from Polytechnique Montréal7, who are actively
maintaining the code base originally developed by the DEC Systems Research Center8.
The PM3 RPM distribution is roughly 30MB compressed. At the time of writing, the
1.1.10-1 release installed cleanly on RH-5.2, whereas the 1.1.11-1 release is apparently
built for another release (RH-6.0?) and does not run on RH-5.2.
Tip: This particular rpm packaging has many RPM files, so you will likely want to place
them into a separate directory.
b.
Install the Modula-3 rpms:
# rpm -Uvh pm3*.rpm
2.
Unpack the cvsup distribution:
# cd /usr/local/src
# tar zxf cvsup-16.0.tar.gz
7.
8.
http://m3.polymtl.ca/m3
http://www.research.digital.com/SRC/modula-3/html/home.html
67
Appendix A. The CVS Repository
3.
Build the cvsup distribution, suppressing the GUI interface feature to avoid requiring X11 libraries:
# make M3FLAGS="-DNOGUI"
and if you want to build a static binary to move to systems that may not have Modula-3 installed,
try:
# make M3FLAGS="-DNOGUI -DSTATIC"
4.
Install the built binary:
# make M3FLAGS="-DNOGUI -DSTATIC" install
68
Appendix B. Documentation
PostgreSQL has four primary documentation formats:
•
Plain text, for pre-installation information
•
HTML, for on-line browsing and reference
•
Postscript, for printing
•
man pages, for quick reference.
Additionally, a number of plain-text README-type files can be found throughout the PostgreSQL
source tree, documenting various implementation issues.
The documentation is organized into several “books”:
•
Tutorial: introduction for new users
•
User’s Guide: documents the SQL implementation
•
Reference Manual: reference pages for programs and SQL commands
•
Administrator’s Guide: installation and server maintenance
•
Programmer’s Guide: programming client applications and server extensions
•
Developer’s Guide: assorted information for developers of PostgreSQL proper
All books are available as HTML and Postscript. The Reference Manual contains reference entries
which are also shipped as man pages.
HTML documentation and man pages are part of a standard distribution and are installed by default.
Postscript format documentation is available separately for download.
B.1. DocBook
The documentation sources are written in DocBook, which is a markup language superficially similar
to HTML. Both of these languages are applications of the Standard Generalized Markup Language,
SGML, which is essentially a language for describing other languages. In what follows, the terms
DocBook and SGML are both used, but technically they are not interchangeable.
DocBook allows an author to specify the structure and content of a technical document without worrying about presentation details. A document style defines how that content is rendered into one
of several final forms. DocBook is maintained by the OASIS1 group. The official DocBook site2 has
good introductory and reference documentation and a complete O’Reilly book for your online reading
pleasure. The FreeBSD Documentation Project3 also uses DocBook and has some good information,
including a number of style guidelines that might be worth considering.
1.
2.
3.
http://www.oasis-open.org
http://www.oasis-open.org/docbook
http://www.freebsd.org/docproj/docproj.html
69
Appendix B. Documentation
B.2. Toolsets
The following tools are used to process the documentation. Some may be optional, as noted.
DocBook DTD4
This is the definition of DocBook itself. We currently use version 3.1; you cannot use later or
earlier versions. Note that there is also an XML version of DocBook -- do not use that.
ISO 8879 character entities5
These are required by DocBook but are distributed separately because they are maintained by
ISO.
OpenJade6
This is the base package of SGML processing. It contains an SGML parser, a DSSSL processor
(that is, a program to convert SGML to other formats using DSSSL stylesheets), as well as a
number of related tools. Jade is now being maintained by the OpenJade group, no longer by
James Clark.
DocBook DSSSL Stylesheets7
These contain the processing instructions for converting the DocBook sources to other formats,
such as HTML.
DocBook2X tools8
This optional package is used to create man pages. It has a number of prerequisite packages of
its own. Check the web site.
JadeTeX9
If you want to, you can also install JadeTeX to use TeX as a formatting backend for Jade. JadeTeX
can create Postscript or PDF files (the latter with bookmarks).
However, the output from JadeTeX is inferior to what you get from the RTF backend. Particular
problem areas are tables and various artifacts of vertical and horizontal spacing. Also, there is no
opportunity to manually polish the results.
We have documented experience with several installation methods for the various tools that are needed
to process the documentation. These will be described below. There may be some other packaged
distributions for these tools. Please report package status to the docs mailing list and we will include
that information here.
B.2.1. Linux RPM Installation
Many vendors provide a complete RPM set for DocBook processing in their distribution, which is usually based on the docbook-tools10 effort at Red Hat Software. Look for an “SGML” option while installing, or the following packages: sgml-common, docbook, stylesheets, openjade (or jade).
Possibly sgml-tools will be needed as well. If your distributor does not provide these then you
should be able to make use of the packages from some other, reasonably compatible vendor.
4.
5.
6.
7.
8.
9.
10.
http://www.oasis-open.org/docbook/sgml/
http://www.oasis-open.org/cover/ISOEnts.zip
http://openjade.sourceforge.net
http://docbook.sourceforge.net/projects/dsssl/index.html
http://docbook2x.sourceforge.net
http://jadetex.sourceforge.net
http://sources.redhat.com/docbook-tools/
70
Appendix B. Documentation
B.2.2. FreeBSD Installation
The FreeBSD Documentation Project is itself a heavy user of DocBook, so it comes as no surprise
that there is a full set of “ports” of the documentation tools available on FreeBSD. The following ports
need to be installed to build the documentation on FreeBSD.
• textproc/sp
• textproc/openjade
• textproc/docbook-310
• textproc/iso8879
• textproc/dsssl-docbook-modular
A number of things from /usr/ports/print (tex, jadetex) might also be of interest.
It’s
possible
that
the
ports
do
not
update
the
main
catalog
file
in
/usr/local/share/sgml/catalog. Be sure to have the following line in there:
CATALOG "/usr/local/share/sgml/docbook/3.1/catalog"
If you do not want to edit the file you can also set the environment variable SGML_CATALOG_FILES
to a colon-separated list of catalog files (such as the one above).
More information about the FreeBSD documentation tools can be found in the FreeBSD Documentation Project’s instructions11.
B.2.3. Debian Packages
There is a full set of packages of the documentation tools available for Debian GNU/Linux. To install,
simply use:
apt-get install jade
apt-get install docbook
apt-get install docbook-stylesheets
B.2.4. Manual Installation from Source
The manual installation process of the DocBook tools is somewhat complex, so if you have pre-built
packages available, use them. We describe here only a standard setup, with reasonabley standard
installation paths, and no “fancy” features. For details, you should study the documentation of the
respective package, and read SGML introductory material.
B.2.4.1. Installing OpenJade
1.
The installation of OpenJade offers a GNU-style ./configure; make; make install build
process. Details can be found in the OpenJade source distribution. In a nutshell:
./configure --enable-default-catalog=/usr/local/share/sgml/catalog
make
make install
11. http://www.freebsd.org/doc/en_US.ISO8859-1/books/fdp-primer/tools.html
71
Appendix B. Documentation
Be sure to remember where you put the “default catalog”; you will need it below. You can also
leave it off, but then you will have to set the environment variable SGML_CATALOG_FILES to
point to the file whenever you use jade later on. (This method is also an option if OpenJade is
already installed and you want to install the rest of the toolchain locally.)
2.
Additionally, you should install the files dsssl.dtd, fot.dtd, style-sheet.dtd, and catalog from the dsssl directory somewhere, perhaps into /usr/local/share/sgml/dsssl.
It’s probably easiest to copy the entire directory:
cp -R dsssl /usr/local/share/sgml
3.
Finally, create the file /usr/local/share/sgml/catalog and add this line to it:
CATALOG "dsssl/catalog"
(This is a relative path reference to the file installed in step 2. Be sure to adjust it if you chose
your installation layout differently.)
B.2.4.2. Installing the DocBook DTD Kit
1.
Obtain the DocBook V3.112 distribution.
2.
Create the directory /usr/local/share/sgml/docbook31 and change to it. (The exact location is irrelevant, but this one is reasonable within the layout we are following here.)
$ mkdir /usr/local/share/sgml/docbook31
$ cd /usr/local/share/sgml/docbook31
3.
Unpack the archive.
$ unzip -a ...../docbk31.zip
(The archive will unpack its files into the current directory.)
4.
Edit the file /usr/local/share/sgml/catalog (or whatever you told jade during installation) and put a line like this into it:
CATALOG "docbook31/docbook.cat"
5.
Optionally, you can edit the file docbook.cat and comment out or remove the line containing
DTDDECL. If you do not then you will get warnings from jade, but there is no further harm.
6.
Download the ISO 8879 character entities13 archive, unpack it, and put the files in the same
directory you put the DocBook files in.
$ cd /usr/local/share/sgml/docbook31
$ unzip ...../ISOEnts.zip
7.
Run the following command in the directory with the DocBook and ISO files:
perl -pi -e ’s/iso-(.*).gml/ISO\1/g’ docbook.cat
(This fixes a mixup between the names used in the DocBook catalog file and the actual names of
the ISO character entity files.)
12. http://www.oasis-open.org/docbook/sgml/3.1/docbk31.zip
13. http://www.oasis-open.org/cover/ISOEnts.zip
72
Appendix B. Documentation
B.2.4.3. Installing the DocBook DSSSL Style Sheets
To install the style sheets, unzip and untar the distribution and move it to a suitable place, for example
/usr/local/share/sgml. (The archive will automatically create a subdirectory.)
$ gunzip docbook-dsssl-1.xx.tar.gz
$ tar -C /usr/local/share/sgml -xf docbook-dsssl-1.xx.tar
The usual catalog entry in /usr/local/share/sgml/catalog can also be made:
CATALOG "docbook-dsssl--1.xx/catalog
Because stylesheets change rather often, and it’s sometimes beneficial to try out alternative versions,
PostgreSQL doesn’t use this catalog entry. See Section B.3 for information about how to select the
stylesheets instead.
B.2.4.4. Installing JadeTeX
To install and use JadeTeX, you will need a working installation of TeX and LaTeX2e, including the
supported tools and graphics packages, Babel, AMS fonts and AMS-LaTeX, the PSNFSS extension
and companion kit of “the 35 fonts”, the dvips program for generating PostScript, the macro packages
fancyhdr, hyperref, minitoc, url and ot2enc. All of these can be found on your friendly neighborhood
CTAN14 site. The installation of the TeX base system is far beyond the scope of this introduction.
Binary packages should be available for any system that can run TeX.
Before you can use JadeTeX with the PostgreSQL documentation sources, you will need to increase
the size of TeX’s internal data structures. Details on this can be found in the JadeTeX installation
instructions.
Once that is finished you can install JadeTeX:
$
$
$
$
$
gunzip jadetex-xxx.tar.gz
tar xf jadetex-xxx.tar
cd jadetex
make install
mktexlsr
The last two need to be done as root.
B.3. Building The Documentation
Before you can build the documentation you need to run the configure script as you would when
building the programs themselves. Check the output near the end of the run, it should look something
like this:
checking
checking
checking
checking
checking
for
for
for
for
for
onsgmls... onsgmls
openjade... openjade
DocBook V3.1... yes
DocBook stylesheets... /usr/lib/sgml/stylesheets/nwalsh-modular
sgmlspl... sgmlspl
14. http://www.ctan.org
73
Appendix B. Documentation
If neither onsgmls nor nsgmls were found then you will not see the remaining 4 lines. nsgmls is part
of the Jade package. If “DocBook V3.1” was not found then you did not install the DocBook DTD kit
in a place where jade can find it, or you have not set up the catalog files correctly. See the installation
hints above. The DocBook stylesheets are looked for in a number of relatively standard places, but if
you have them some other place then you should set the environment variable DOCBOOKSTYLE to the
location and rerun configure afterwards.
Once you have everything set up, change to the directory doc/src/sgml and run one of the following
commands: (Remember to use GNU make.)
•
To build the HTML version of the Administrator’s Guide:
doc/src/sgml$ gmake admin.html
•
For the RTF version of the same:
doc/src/sgml$ gmake admin.rtf
•
To get a DVI version via JadeTeX:
doc/src/sgml$ gmake admin.dvi
•
And Postscript from the DVI:
doc/src/sgml$ gmake admin.ps
Note: The official Postscript format documentation is generated differently. See Section B.3.3
below.
The other books can be built with analogous commands by replacing admin with one of developer,
programmer, tutorial, or user. Using postgres builds an integrated version of all 5 books,
which is practical since the browser interface makes it easy to move around all of the documentation
by just clicking.
B.3.1. HTML
When building HTML documentation in doc/src/sgml, some of the resulting files will possibly (or
quite certainly) have conflicting names between books. Therefore the files are not in that directory
in the regular distribution. Instead, the files belonging to each book are stored in a tar archive that is
unpacked at installation time. To create a set of HTML documentation packages use the commands
cd doc/src
gmake tutorial.tar.gz
gmake user.tar.gz
gmake admin.tar.gz
gmake programmer.tar.gz
gmake postgres.tar.gz
gmake install
In the distribution, these archives live in the doc directory and are installed by default with gmake
install.
74
Appendix B. Documentation
B.3.2. Manpages
We use the docbook2man utility to convert DocBook REFENTRY pages to *roff output suitable for
man pages. The man pages are also distributed as a tar archive, similar to the HTML version. To
create the man page package, use the commands
cd doc/src
gmake man
which will result in a tar file being generated in the doc/src directory.
The man build leaves a lot of confusing output, and special care must be taken to produce quality
results. There is still room for improvement in this area.
B.3.3. Hardcopy Generation
The hardcopy Postscript documentation is generated by converting the SGML source code to RTF,
then importing into ApplixWare. After a little cleanup (see the following section) the output is
“printed” to a postscript file.
Several areas are addressed while generating Postscript hardcopy, including RTF repair, ToC generation, and page break adjustments.
Applixware RTF Cleanup
jade, an integral part of the hardcopy procedure, omits specifying a default style for body text. In the
past, this undiagnosed problem led to a long process of Table of Contents (ToC) generation. However,
with great help from the ApplixWare folks the symptom was diagnosed and a workaround is available.
1.
Generate the RTF input by typing (for example):
% cd doc/src/sgml
% make tutorial.rtf
2.
Repair the RTF file to correctly specify all styles, in particular the default style. If the document contains REFENTRY sections, one must also replace formatting hints which tie a preceding
paragraph to the current paragraph, and instead tie the current paragraph to the following one. A
utility, fixrtf is available in doc/src/sgml to accomplish these repairs:
% cd doc/src/sgml
% fixrtf tutorial.rtf
or
% cd doc/src/sgml
% fixrtf --refentry reference.rtf
The script adds {\s0 Normal;} as the zero-th style in the document. According to ApplixWare,
the RTF standard would prohibit adding an implicit zero-th style, though M$Word happens to
handle this case. For repairing REFENTRY sections, the script replaces \keepn tags with \keep.
3.
Open a new document in Applix Words and then import the RTF file.
4.
Generate a new ToC using ApplixWare.
75
Appendix B. Documentation
a.
Select the existing ToC lines, from the beginning of the first character on the first line
to the last character of the last line.
b.
Build a new ToC using Tools.BookBuilding.CreateToC. Select the first three
levels of headers for inclusion in the ToC. This will replace the existing lines imported
in the RTF with a native ApplixWare ToC.
c.
Adjust the ToC formatting by using Format.Style, selecting each of the three ToC
styles, and adjusting the indents for First and Left. Use the following values:
Table B-1. Indent Formatting for Table of Contents
5.
Style
First Indent (inches)
Left Indent (inches)
TOC-Heading 1
0.4
0.4
TOC-Heading 2
0.8
0.8
TOC-Heading 3
1.2
1.2
Work through the document to:
•
Adjust page breaks.
•
Adjust table column widths.
•
Insert figures into the document. Center each figure on the page using the centering margins
button on the ApplixWare toolbar.
Note: Not all documents have figures. You can grep the SGML source files for the string
graphic to identify those parts of the documentation that may have figures. A few figures
are replicated in various parts of the documentation.
6.
Replace the right-justified page numbers in the Examples and Figures portions of the ToC with
correct values. This only takes a few minutes per document.
7.
Delete the index section from the document if it is empty.
8.
Regenerate and adjust the table of contents.
9.
a.
Select the ToC field.
b.
Select Tools->Book Building->Create Table of Contents.
c.
Unbind the ToC by selecting Tools->Field Editing->Unprotect.
d.
Delete the first line in the ToC, which is an entry for the ToC itself.
Save the document as native Applix Words format to allow easier last minute editing later.
10. “Print” the document to a file in Postscript format.
11. Compress the Postscript file using gzip. Place the compressed file into the doc directory.
76
Appendix B. Documentation
B.3.4. Plain Text Files
Several files are distributed as plain text, for reading during the installation process. The INSTALL
file corresponds to the chapter in the Administrator’s Guide, with some minor changes to account for
the different context. To recreate the file, change to the directory doc/src/sgml and enter gmake
INSTALL. This will create a file INSTALL.html that can be saved as text with Netscape Navigator
and put into the place of the existing file. Netscape seems to offer the best quality for HTML to text
conversions (over lynx and w3m).
The file HISTORY can be created similarly, using the command gmake HISTORY. For the file
src/test/regress/README the command is gmake regress_README.
B.4. Documentation Authoring
SGML and DocBook do not suffer from an oversupply of open-source authoring tools. The most
common toolset is the Emacs/XEmacs editor with appropriate editing mode. On some systems these
tools are provided in a typical full installation.
B.4.1. Emacs/PSGML
PSGML is the most common and most powerful mode for editing SGML documents. When properly
configured, it will allow you to use Emacs to insert tags and check markup consistency. You could
use it for HTML as well. Check the PSGML web site15 for downloads, installation instructions, and
detailed documentation.
There is one important thing to note with PSGML: its author assumed that your main SGML
DTD directory would be /usr/local/lib/sgml. If, as in the examples in this chapter,
you use /usr/local/share/sgml, you have to compensate for this, either by setting
SGML_CATALOG_FILES environment variable, or you can customize your PSGML installation (its
manual tells you how).
Put the following in your ~/.emacs environment file (adjusting the path names to be appropriate for
your system):
; ********** for SGML mode (psgml)
(setq
(setq
(setq
(setq
(setq
(setq
(setq
(setq
(setq
(setq
(setq
sgml-omittag t)
sgml-shorttag t)
sgml-minimize-attributes nil)
sgml-always-quote-attributes t)
sgml-indent-step 1)
sgml-indent-data t)
sgml-parent-document nil)
sgml-default-dtd-file "./reference.ced")
sgml-exposed-tags nil)
sgml-catalog-files ’("/usr/local/share/sgml/catalog"))
sgml-ecat-files nil)
(autoload ’sgml-mode "psgml" "Major mode to edit SGML files." t )
and in the same file add an entry for SGML into the (existing) definition for auto-mode-alist:
(setq
15. http://www.lysator.liu.se/projects/about_psgml.html
77
Appendix B. Documentation
auto-mode-alist
’(("\\.sgml$" . sgml-mode)
))
Currently, each SGML source file has the following block at the end of the file:
<!-- Keep this comment at the end of the file
Local variables:
mode: sgml
sgml-omittag:t
sgml-shorttag:t
sgml-minimize-attributes:nil
sgml-always-quote-attributes:t
sgml-indent-step:1
sgml-indent-data:t
sgml-parent-document:nil
sgml-default-dtd-file:"./reference.ced"
sgml-exposed-tags:nil
sgml-local-catalogs:("/usr/lib/sgml/catalog")
sgml-local-ecat-files:nil
End:
-->
This will set up a number of editing mode parameters even if you do not set up your ~/.emacs file,
but it is a bit unfortunate, since if you followed the installation instructions above, then the catalog
path will not match your location. Hence you might need to turn off local variables:
(setq inhibit-local-variables t)
The PostgreSQL distribution includes a parsed DTD definitions file reference.ced. You may find
that when using PSGML, a comfortable way of working with these separate files of book parts is to
insert a proper DOCTYPE declaration while you’re editing them. If you are working on this source, for
instance, it is an appendix chapter, so you would specify the document as an “appendix” instance of a
DocBook document by making the first line look like this:
<!doctype appendix PUBLIC "-//OASIS//DTD DocBook V3.1//EN">
This means that anything and everything that reads SGML will get it right, and I can verify the
document with nsgmls -s docguide.sgml. (But you need to take out that line before building the
entire documentation set.)
B.4.2. Other Emacs modes
GNU Emacs ships with a different SGML mode, which is not quite as powerful as PSGML, but it’s
less confusing and lighter weight. Also, it offers syntax highlighting (font lock), which can be very
helpful.
Norm Walsh offers a major mode specifically for DocBook16 which also has font-lock and a number
of features to reduce typing.
16. http://nwalsh.com/emacs/docbookide/index.html
78
Bibliography
Selected references and readings for SQL and PostgreSQL.
Some white papers and technical reports from the original POSTGRES development team are available at the University of California, Berkeley, Computer Science Department web site1
SQL Reference Books
Judith Bowman, Sandra Emerson, and Marcy Darnovsky, The Practical SQL Handbook: Using Structured Query Language, Third Edition, Addison-Wesley, ISBN 0-201-44787-8, 1996.
C. J. Date and Hugh Darwen, A Guide to the SQL Standard: A user’s guide to the standard database
language SQL, Fourth Edition, Addison-Wesley, ISBN 0-201-96426-0, 1997.
C. J. Date, An Introduction to Database Systems, Volume 1, Sixth Edition, Addison-Wesley, 1994.
Ramez Elmasri and Shamkant Navathe, Fundamentals of Database Systems, 3rd Edition, AddisonWesley, ISBN 0-805-31755-4, August 1999.
Jim Melton and Alan R. Simon, Understanding the New SQL: A complete guide, Morgan Kaufmann,
ISBN 1-55860-245-3, 1993.
Jeffrey D. Ullman, Principles of Database and Knowledge: Base Systems, Volume 1, Computer Science Press, 1988.
PostgreSQL-Specific Documentation
Stefan Simkovics, Enhancement of the ANSI SQL Implementation of PostgreSQL, Department of
Information Systems, Vienna University of Technology, November 29, 1998.
Discusses SQL history and syntax, and describes the addition of INTERSECT and EXCEPT constructs into PostgreSQL. Prepared as a Master’s Thesis with the support of O. Univ. Prof. Dr.
Georg Gottlob and Univ. Ass. Mag. Katrin Seyr at Vienna University of Technology.
A. Yu and J. Chen, The POSTGRES Group, The Postgres95 User Manual, University of California,
Sept. 5, 1995.
Zelaine Fong, The design and implementation of the POSTGRES query optimizer2, University of
California, Berkeley, Computer Science Department.
1.
2.
http://s2k-ftp.CS.Berkeley.EDU:8000/postgres/papers/
http://s2k-ftp.CS.Berkeley.EDU:8000/postgres/papers/UCB-MS-zfong.pdf
79
Bibliography
Proceedings and Articles
Nels Olson, Partial indexing in POSTGRES: research project, University of California, UCB Engin
T7.49.1993 O676, 1993.
L. Ong and J. Goh, “A Unified Framework for Version Modeling Using Production Rules in a
Database System”, ERL Technical Memorandum M90/33, University of California, April, 1990.
L. Rowe and M. Stonebraker, “The POSTGRES data model3”, Proc. VLDB Conference, Sept. 1987.
P. Seshadri and A. Swami, “Generalized Partial Indexes4 ”, Proc. Eleventh International Conference
on Data Engineering, 6-10 March 1995, IEEE Computer Society Press, Cat. No.95CH35724,
1995, p. 420-7.
M. Stonebraker and L. Rowe, “The design of POSTGRES5”, Proc. ACM-SIGMOD Conference on
Management of Data, May 1986.
M. Stonebraker, E. Hanson, and C. H. Hong, “The design of the POSTGRES rules system”, Proc.
IEEE Conference on Data Engineering, Feb. 1987.
M. Stonebraker, “The design of the POSTGRES storage system6”, Proc. VLDB Conference, Sept.
1987.
M. Stonebraker, M. Hearst, and S. Potamianos, “A commentary on the POSTGRES rules system7”,
SIGMOD Record 18(3), Sept. 1989.
M. Stonebraker, “The case for partial indexes8”, SIGMOD Record 18(4), Dec. 1989, p. 4-11.
M. Stonebraker, L. A. Rowe, and M. Hirohama, “The implementation of POSTGRES9”, Transactions
on Knowledge and Data Engineering 2(1), IEEE, March 1990.
M. Stonebraker, A. Jhingran, J. Goh, and S. Potamianos, “On Rules, Procedures, Caching and Views
in Database Systems10”, Proc. ACM-SIGMOD Conference on Management of Data, June 1990.
3.
4.
5.
6.
7.
8.
9.
10.
http://s2k-ftp.CS.Berkeley.EDU:8000/postgres/papers/ERL-M87-13.pdf
http://simon.cs.cornell.edu/home/praveen/papers/partindex.de95.ps.Z
http://s2k-ftp.CS.Berkeley.EDU:8000/postgres/papers/ERL-M85-95.pdf
http://s2k-ftp.CS.Berkeley.EDU:8000/postgres/papers/ERL-M87-06.pdf
http://s2k-ftp.CS.Berkeley.EDU:8000/postgres/papers/ERL-M89-82.pdf
http://s2k-ftp.CS.Berkeley.EDU:8000/postgres/papers/ERL-M89-17.pdf
http://s2k-ftp.CS.Berkeley.EDU:8000/postgres/papers/ERL-M90-34.pdf
http://s2k-ftp.CS.Berkeley.EDU:8000/postgres/papers/ERL-M90-36.pdf
80