1
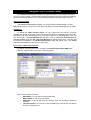
TR510 Control Center for Windows
User’s Manual
Help us improve our documentation!
Send your comments and feedback to [email protected]
Rev A_2 (04/15/2002)
Table of contents
Table of contents ......................................................................................................................................2
Using the TR510 Control Center..............................................................................................................3
System Requirements ...........................................................................................................................3
Installation ............................................................................................................................................3
Running the TR510 Control Center......................................................................................................3
Selecting language................................................................................................................................4
Selecting the COMM port ....................................................................................................................4
Record mode setting .............................................................................................................................4
Setting up the machine (Terminal) numbers.........................................................................................4
Setting up the IP address when you connect TR510 to DS100 ……………………………………….5
Selecting the Terminal..........................................................................................................................5
Setting up time and date .......................................................................................................................5
Setting up display mode .......................................................................................................................5
Setting up the ring table and ring duration ...........................................................................................5
Retrieving and saving the Time and Attendance data ..........................................................................6
Erasing or Recovering the database contents .......................................................................................6
Resetting the TR510 .............................................................................................................................7
Setting Time Scheduler ........................................................................................................................7
Appendix. Creating new language resource file.......................................................................................8
Using the TR510 Control Center
The TR510 Control Center software is a simple and easy-to-use program that allows
you to access the TR510 Time Recorders online and setup the function parameters (Settings)
as well as download and save the Time and Attendance data collected by each Terminal.
System Requirements
The TR510 Control Center software runs under Windows-95/98/2000/NT. At least
7MB free disk space is required on hard disk drive (HDD). Recommended RAM size is 32MB.
Installation
To install the TR510 Control Center, run the “TR510.exe” file from the enclosed
software CD. Simply click on the “Install TR510 Control Center for Windows” link on the CD’s
title HTML page (runs automatically once you insert the CD into the CD-ROM drive). After you
click on this link, a File Download dialog will open. Choose “Run this program from its
current location” and click OK. A Security Warning will appear at this point - just click Yes
to continue the installation. The WinZip self-extractor dialog will appear next - click Install
and follow the installation instructions on the screen.
Running the TR510 Control Center
By default, Control Center icon is created in the Start/Programs/Giga-TMS folder.
After the program startup, the main screen will appear:
Main screen contains four tabs:
• SETTINGS- to set up basic function parameters
• RING TABLE- to edit the ring schedule
• RECORDS- to upload and save the TR510’s Time and Attendance database
contents
• Time Scheduler-to set up time for auto-uploading the records from all TR510s
that are connected to PC.
Selecting language
The TR510 Control Center can support multiple languages through its language
resource files. The language drop-down box on the SETTINGS tab displays all available
languages. Choose the language you want to use and all text strings will be changed
accordingly.
If the desired language is not available, a new language resource file can be easily
created (see Appendix for more details on how to do this).
Selecting the COMM port
Before attempting to communicate with the TR510s, you’ll need to select the COMM
port. Check which COMM port your TR510 Terminal(s) is/are currently connected to and
choose the appropriate port on the SETTINGS tab.
Record mode setting
You can use this function to set the TR510’s LED position to be always on IN, always
on OUT or set by Manual. The TR510 will keep the last of LED position even after the TR510
is powered off.
On the Device List, select a device ID and double click it to establish connection with
TR510. This frame will display or allow you to change the setting if the TR510’s firmware
supports this function. This software can check the TR510 understanding that the TR510 is
supporting this function or not automatically when you log on TR510 to software.
Setting up the machine (Terminal) numbers
The TR510 supports two different interfaces: RS-232 for single-terminal point-to-point
communication with PC and RS-485 for multi-terminal configuration (the latter requires a
special adaptor of CON-485).
Single-terminal configuration does not require machine number setup. Multi-terminal
arrangement requires a unique machine number to be set for each Terminal in order for the
system to work.
Terminals on the multi-terminal network are addressed using their machine numbers.
Each Terminal must have a unique machine number assigned to it. If two different Terminals
on the network are assigned to the same value, then there will be a conflict on the network
and these Terminals will be inaccessible from PC.
Each Terminal on the network is represented by separate entry in the Device List
(SETTINGS tab). After the software installation, the list contains only one entry- 000-default.
000 is a so-called universal machine number- use it only if there is ONE Terminal. If there are
more than one Terminal, it is necessary to create separate entries for each Terminal on the
network. Click on Add button (several times if necessary) to add entries to the Device List.
For example, if your network has 4 Terminals, then your list should have 5 entries (including
the 000-Default entry), as shown on Fig. above.
Each entry consists of a machine number and a Terminal name. Machine numbers are
created in ascending order. Numbers cannot be skipped (i.e. you cannot create Terminal #1,
2, & 4). Terminal names can be edited. To do so, select the entry in the Device List and enter
the new name in the Device name text box.
After the necessary number of entries has been created, you must set the machine
number of each Terminal. There are two ways of doing this:
• Use the Terminal’s IN and OUT buttons to set the machine number (refer to the
TR510 User’s Manual for more details)
• Use the TR510 Control Center to set the machine number.
The first method is easier but only allows you to set the numbers in the 1-10 range. The
second method is somewhat more complicated but it doesn’t have the 10-terminal-only
limitation, so you can use it to set up bigger networks.
To assign the machine number using the TR510 Control Center:
• Connect all TR510 Terminals you are planning to use to the PC one by one (i.e.
one at a time) and repeat the following steps for each Terminal:
4
Double-click on the 000-default item in the Device List. The Terminal
will be selected and all buttons on the screen will be enabled
o Click the Set M# button- the Assign New ID dialog will appear
o Choose the Terminal number/name from the drop-down box and click
OK. The Terminal’s Machine number will be set to the selected value
Put all Terminals back on a single network and make sure that you can
communicate with every Terminal by double-clicking on each entry in the
Device List except the default one. If the software cannot communicate with
the selected Terminal, an error message will display.
o
•
NOTE: The most common problem for multi-terminal configurations is the conflict
between the terminal numbers. Always start by checking the Terminal numbers of each
Terminal when attempting to resolve communication problems (that is…after making sure all
Terminals are on)
Setting up the IP address when you connect TR510 to DS100
Click on the Terminal-0(Default) in the Device List then set IP address ( Which you
set to DS100) on the IP text box. When setting is done, you can Double-click the Terminal-0
to logon the device with the TR510 Control Center software. If this is you first time to connect
TR510 then you must set a new ID with the Device.
Selecting the Terminal
Double-clicking on the Terminal name in the Device List enables communications with
the designated Terminal. Communications with the Terminal is not established until you select
it by double-clicking.
If you only have a single Terminal connected to the PC, you can double click on 000default. Never use 000-default if you have more than one TR510 connected to the PC.
Setting up time and date
Each TR510 Terminal must be set to correct time and date. To do this:
• Double click on the desired Terminal in the Device List- all buttons on the
SETTINGS tab will be enabled
• Click the Set Time - the Set Time and Date dialog will appear
• Set the time and date using one of two options:
o Just type in new values and click OK, or
o Click Sync. (Synchronize) to set the time and date from the computer’s
clock.
Setting up display mode
The TR510 can be used as a wall-mount (default) or desktop device. When used as a
desktop device, it must be rotated to allow for convenient display viewing angle. The text on
o
the LED display must also be rotated 180 . Display mode setting allows you to do this:
• Click the Display button- Display mode dialog will appear.
• Select the desired display mode (desk or wall) and click OK.
Setting up the ring table and ring duration
The ring table feature of the TR510 allows you to define a daily ring (bells) schedule.
You can enter up to 32 times a day at which the ring relay will be activated. Note: the TR510
does not have any internal ringer, only a ring control relay. You must attach an external ringer
(bell) in order to use the ring function (see the TR510 User’s Manual for further details).
To set up the ring table:
• Select the desired Terminal from the Device List
• Click on the RING TABLE tab to open it
• Click Upload button to upload the existing ring table data (if any) - the data will
be displayed in the ring table (sorted in ascending order)
5
•
•
Add desired entries by entering new time values anywhere on the unused table
lines (or modify existing entries by typing over)
When finished, click the Download button - the updated ring table contents will
be saved back into the TR510
Ring duration is set simultaneously for all ring table entries to define how long (in
seconds) the ring will sound each time. Use the Duration button to setup this value.
Maximum allowable duration is 255 seconds.
Several other buttons on the RING TABLE tab provide additional functions:
• Clear button can be used to erase all data in the ring table. This will only erase
the data shown on the screen but not from the TR510’s memory. To delete all
entries from the Terminal’s memory:
o Click the Clear button- the contents of the Ring Table will be erased
o Click the Download button to update the data in the TR510’s memory
• Save and Load buttons allow you to save the contents of the ring table to the
disk file on your PC
Retrieving and saving the Time and Attendance data
The third tab RECORDS - contains all the necessary controls to upload the database
data from the TR510 into the PC and to perform database maintenance. To upload the data:
• Double-click on the desired Terminal in the Device List
• Click on the RECORDS tab
• Click Upload to upload all Time and Attendance records from the TR510 into
the PC
• During the uploading process, the progress bar below the data table displays
the task progress and the total number of records to be uploaded
• Uploaded data will be displayed in the data table in the following format:
o The NO# field- record numbers
o Card No field.- ID-code of the ID-card
o Event field: 0- OUT, 1- IN
o Date and Time fields- date and time of record creation
• Click Save to save the uploaded data into the disk file. Default filename offered
is a string in the following format: “yyyymmdd.txt” (year, month, date).
• Once the data has been safely saved into the file, the data in the TR510’s
memory is erased automatically
• The Software will attempt to open the saved data in the Notepad (if the data is
too big for the Notepad, then in the WordPad). Both are standard Windows
text editors that normally come with every Windows distribution.
Note: there is also an Open button that allows you to load the disk file contents into the
data table.
Erasing or Recovering the database contents
The Database button allows you to delete the database contents (initialize the
database) or perform a database recovery. Both options also repair the database. Use these
functions to restore the normal operation of the corrupted database (Err5 on the TR510’s
display). Note that the TR510 Control Center has no way of knowing whether the database
is corrupted or just contains no records - in either situation, the database will appear to be
empty. You can verify the database status by attempting to add the record (by reading the
User card) on the TR510. If the record is accepted, then the database is OK. If Err5 is
displayed, then the database is damaged and needs repair.
Repairing the database by initializing it makes it immediately available for use. However,
existing records in database will not be retrieved and saved. Database recovery gives you a
chance to retrieve these existing records.
After the recovery, the database appears to be 100% full with records. Some of these
records may be invalid. Expect to retrieve some percentage of invalid data. The records you
are interested in could be overwritten by newer ones at the time of attempted recovery.
6
Hint: the TR510 also features a power-on auto-recovery mechanism. Follow this
procedure when you get the Err5 message:
• First, try to switch the TR510 off and on again - the Terminal will attempt to
auto-repair the Err5 condition automatically
• If this fails (i.e. you still cannot add new records to the database and cannot
load the database contents) then perform the database Recovery
Both Initialization and Recovery functions are accessed by clicking on the Database
button. You’ll be requested to enter the password - use either “0000” or “GIGA” (keep the
passwords confidential so no unauthorized person can delete the data).
The Manage Database dialog will appear after the password entry. Choose your
option and click OK. If you’ve chosen recovery, then the Records tab will display a large
number (>8000) of new records - click Upload to load the data.
Reseting the TR510
The TR510 may be reset to the default factory settings by clicking on the Reset button
(SETTINGS tab). Note: reset will actually take place on the next TR510 power-up.
Reset operation will:
!
Initialize the Terminal’s machine number to 0
!
Set display mode to “Wall”
!
Clear the ring table
!
Initialize the ring duration to 10 seconds
!
Check the time and date and initialize it to 01/01/2000 00:00:00 only if
time/date was invalid
Reset operation will not affect the records stored in database.
Setting Time Scheduler
In this tab, software provides 32 settings for Time scheduler to download records
from all the powered-on TR510s that are connected to PC and displayed on device list
IMPORTANT: Connections must be established with all the TR510 from Settings tab and a
unique number must be assigned to each terminal.(not include 000) First, select the device
ID and double click to update device information into software. Time scheduler will use
“YYYYMM.TXT” (for standard version) or “MM-YYYY.TXT“(for OEM version) as the default
file names. If you wish to use other file name, you can use “Change save path” button to
change. If you don’t rename file name by “Change save path” then software will use the file
name that you used last time to save all records. Therefore if you want to save all records into
another file during time scheduler running then don’t forget to change file name by “change
save path” button.
An event file will also be created to record the events performed by Time Scheduler. Such
events will include: the start time of the Time Schedulers and the TR510 terminals that have
been polled. Software will save all events to a file named “eventyyyymmdd.txt” in the events
folder.
Press Start Button to start Time scheduler when you have performed the above
steps for the TR510’s settings. At the scheduled time, Time Scheduler will detect device
according to the device list. If TR510’s settings are correct and are connected to the PC with
power on then the software uploads and save the records from TR510’s automatically.
7
Appendix. Creating new language resource file
The TR510 Control Center allows for easy localization through language resource
files.
When the TR510 Control Center is installed, it creates a sub-directory named
“Language” in its working directory. Unless you have chosen a different installation directory,
the TR510 Control Center is installed in C:\Program files\Giga-TMS\TR510 Control Center.
“Language” sub-directory is found inside.
After the installations, this sub-directory contains resource files for already supported
languages. To create a new resource file:
• Create a copy of the file named “English.txt” in the same sub-directory, but
under a different name. Never edit “English.txt” itself- make a copy under a
different name and edit this copy instead!
• The filenames of the files is what is displayed in the Language drop-down box
on the SETTINGS tab of the TR510 Control Center. Therefore, the name of
the file you are creating should reflect the actual language supported (i.e.
“Korean.txt”, “Spanish.txt”, etc…)
• Open the file using the Notepad or any other suitable ASCII text editor
• The file consists of lines in the following format: ID=text. ID is the numerical ID
that uniquely identifies the string resource. Make sure that you don’t change it.
Replace the English text after the equal sign with its equivalent in the language
you are creating the support for. Do this for every line in the language resource
file
• When done, save the file and run the TR510 Control Center again. Choose
the language you’ve just created- it should be visible in the Language dropdown box
• Check the results of your translation and make adjustments if necessary.
Follow are the original contents of the “English.txt” file:
1=TR510
20=Arial
21=9
40=Record mode
50=Manual
51=Always OUT
52=Always IN
101=Device List
102=Click to poll
103=Device Name
104=Com Port Select
107=Status
112=Add
113=Add Address
114=Delete
115=Delete Address
116=Set M#
117=Assign new ID
118=The password is incorrect
120=Set Time
121=Set TR510 Time
124=Reset
125=Reset will take place after you switch the Terminal off and back on again
126=Event
127=Set event select mode
131=Clear
132=Clear ring table
137=Bell duration (0-255 sec.)
140=You haven't finished uploading the records, are you sure that you want to save the data and initialize the database anyway?
201=Please enter date(mm-dd-yyyy)
202=Please enter time(hh:mm:ss)
206=Save
207=Save Ring Table to file
8
212=Open
213=Load Ring Table from file
301=NO
302=Hour
303=Minute
304=Duration
305=Set Bell duration
306=Save
307=Save record to file
319=Upload
320=Upload ring table from TR510
321=Download
322=Download ring table to TR510
401=NO#
402=Card No
403=Event
404=Date
405=Time
406=Database
407=Initialize or recover TR510 database
408=Upload
409=Upload record from TR510
412=Sort Asc.
413=Arrange Data in Ascending Order
414=Sort Des.
415=Arrange Data in Descending Order
417=Open
418=Load record from file
500=Not Unit Found
600=Password
601=Please Enter Password:
602=Ok
603=Cancel
700=Assign new ID
701=Select ID address download to TR510
800=Time and Date
801=Sync.
802=Synchronize TR510 time/date with PC
803=Set duration
804=Initialize the database
806=Prepare for Data Recovery
809=Enter desired ring time
811=Display
812=Set display mode
814=Display mode
815=Manage database
816=Choose the display mode of TR510
817=Initialize will clean the machine's record database. Data recovery will prepare the machine's record database in such a way that
you might manually recover some useful information, which is otherwise lost. Because of the side effects of the recovery action, an
initialization is necessary after a recovery is taken place. Please make sure that these actions are necessary before you take any
action.
818=Are you sure that you want to reset the device?
820=Wall Mode
821=Desk Mode
822=ID Digital Set
823=Relay Control Mode
824=For Alarm
825=For Door Lock
900=T.S
901=Start
902=Stop
903=Change path
904=No #
905=Hour
906=Min
907=Time scheduler is running ! Pls. stop it and login device again.
2000=Settings
2001=Ring Table
9
2002=Records
2003=Time Scheduler
8008=Communications with TR510 failed
8009=Please set the device in LOGIN mode then try again
8010=Please check your Device ID selection
8011=Please check your COMM port setting and make sure that your device is at the right port.
8012=Please check the data parameter then try again.
8013=Hour must be between 1 and 23
8014=Minute must be between 1 and 59
8015=The value you entered is not numeric. Please try again.
8016=Time or date is incorrect
8017=Duration must be between 0 and 255
8018=No data is entered. Please choose your option.
8019=The device failed to reply to the computer's command. Either the device is currently offline, or you have selected the wrong
COMM port.
8020=The device failed to reply to the computer's command. The device is either currently offline or having connection problems.
8021=Do you know that you have
8022= records in the database? Are you sure that you want to initialize the database?
8023= records in the database? Are you sure that you want to recover the database?
8024=An error occurred while disabling ring table entries. Please check the device connection again. Or try another device.
8025=An error occurred while setting the ring table entries to the device. Please check the device connection again. Or try another
device.
8026=An error occurred while enabling the ring table entries. Please check the device connection again. Or try another device.
8027=An error occurred while uploading the time entries from the device. Please check the device connection again. Or try another
device.
8028=An error occurred while checking the ring table entry activation. Please check the device connection again. Or try another
device.
8029=An error occurred while getting time from the device. Please check the device connection again. Or try another device.
8030=An error occurred while resetting the device. Please check the device connection again. Or try another device.
8031=An error occurred while polling device
8032=An error occurred while setting the device display to Desk Mode. Please check the device connection again. Or try another
device.
8033=An error occurred while setting the device display to Wall Mode. Please check the device connection again. Or try another
device.
8034=An error occurred while getting the current device time mode. Please check the device connection again. Or try another device.
8035=An error occurred while getting the current device duration. Please check the device connection again. Or try another device.
8036=An error occurred while initializing the device's database. Please check the device connection again. Or try another device.
8037=An error occurred while preparing the device for data recovery. Please check the device connection again. Or try another device.
8038=. Please check the device connection again. Or try another device.
8039=Second must be between 1 and 59
8040=Terminal database is empty (or malfunctioning)
8041=Time that you entered is invalid.
8042=Date that you entered is invalid.
8043=The database is malfunctioning. The data could not be loaded.
9100=Success!!
9101=Error!!
9102=Not Unit Found
10