1
Audionet
PRE I G2
Stereo – Pre - Amplifier
Owner's Manual
How to operate the Audionet PRE 1 G2
Your Audionet PRE 1 G2 is a high performance audio pre-amplifier. This
system is designed for absolute natural music reproduction and for highest
user comfort.
The following will give you all information about how to operate your
PRE 1 G2. Please read this carefully before the first use. Following these
instructions, your PRE 1 G2 will give you long-lasting pleasure and satisfaction.
2
Connecting the system
Power supply
Please connect the power jack (1) at the rear with your wall outlet (Please
refer to page 8). Use the provided power cable or another one allowed for
your home country specifications.
NOTE:
The power specifications (2) on the rear must meet to your home
country specifications.
The mains-button (3) at rear must be switched off. The PRE 1 G2 is
a Class I system and must be earthed. Please ensure that the earthconnection is in best condition. For best performance connect the hot
wire seeing from the front with the left pin.
Ground Connection
With the PRE 1 G2 comes a yellow-green ground cord for optimal
ground connection. Please connect this additional ground cord to the plug
(10) at the back of the PRE 1 G2 and put the plug into a socket near to
the power cord.
Audio sources
The Audionet PRE 1 G2 is a very sensitive system. Please ensure that all
used connector cables are in absolutely best condition.
For connecting or removing audio sources, PRE 1 G2 has to be switched
off (stand by-state) or must be muted.
Inputs
The Audionet PRE 1 G2 has one balanced and five unbalanced high level
RCA inputs (4). Additionally, a true monitor loop is available. Please connect left and right inputs to the corresponding outputs of the designated
high-level source.
3
Outputs
The Audionet PRE 1 G2 has one unbalanced output (5) and one balanced
output for connecting power-amplifiers.
Please connect left and right outputs to the corresponding inputs of your
power amplifier.
Recording systems
Two recording systems can be connected at the same time to PRE 1 G2
for recording and playing back simultaneously.
Rec out
For recording please connect the inputs of your recording system, like
DAT or tape deck with the rec output (6) of your PRE 1 G2. Every time
when the recorder is connected to the rec outputs, please use the inputs
No.5 named "Tape" for playing back.
When input No.5 is selected, the corresponding rec output will be muted.
This is necessary to prevent destructive oscillation of the pre amplifier and
the recorder. Therefore every signal source that should be recorded has to
be connected to the remaining inputs.
Monitor
Your PRE 1 G2 is fitted with a monitor loop. This enables you to listen to
the recorder without interrupting the signal source being recorded. To use
this feature please connect the inputs and outputs of the recorder with the
corresponding monitor output and input (7) of your PRE 1 G2.
Phono
Your PRE 1 G2 can be equipped with an optional phono preamplifier. For
connecting a record player please use the input 6 and the corresponding
ground connector in this case.
Audionet-link
In combination with the Audionet AMP I/AMP II and/or DAC the PRE 1
G2 can switch on and off the whole system. Please connect the Audionet
link (8) on the rear with a Toslink optical fibre cable to the Audionet link
of AMP I and/or DAC.
4
Switching on and off the mains
Your PRE 1 G2 is designed as a stand-by unit. To bring your PRE 1 G2
into the stand-by state, please press the mains power switch (3) on the
rear. The PRE 1 G2 will come up in the stand-by state displaying “ Audionet” .
Switching off the mains at the rear is only necessary in cases of longer
absence like holidays. In this case, please press again the mains power
switch on the rear. Looking from above, the switch now shows you a "0"
and the display turns off.
NOTE:
All systems connected with the outputs must be off and powered
down when PRE 1 G2 is to be switched on or off the mains at the
rear.
5
Operating the system
All functions of your PRE 1 G2 are completely microprocessor controlled. This guarantees highest precision, exclusive functions, easy operation and protection against operational faults.
Switching on and off in the
stand by state
For switching on your PRE 1 G2, please press the power button at the
front panel. The PRE 1 G2 needs 5 seconds for waking up and then
works.
To switch off the PRE 1 G2, please press the power button again and the
PRE 1 G2 needs 5 seconds again for going to sleep storing all your latest
settings.
Setting the volume level
To set the desired volume, please turn the volume knob at the front panel.
Please turn clockwise if higher and counterclockwise if lower volume is
desired.
The PRE 1 G2 shows you the master volume with a range of 86 dB. This
corresponds to -80 dB to +6 dB. At 0 dB the amplitudes of input and
output signal are equal. To adjust the volume offset for each separate
channel, please read “ programming” below.
The volume knob is an incremental impulse unit without a stop.
Selecting the inputs
Please turn the input button at the front panel to select one of the seven
inputs. The PRE 1 G2 sequentially selects the inputs from No. 1 to No. 6.
When changing the input, the PRE 1 G2 regulates the volume down to 80 dB, mutes the outputs, switches the inputs, activates the outputs and
finally regulates volume up to the level before.
6
Monitor loop
To activate the monitor input please push the monitor/set button for a
short time. The originally selected input remains active for recording.
This input can be chanced during the monitor loop is activated, of course.
To come back to the standard input simply press the described button a
second time.
Programming
Your PRE 1 G2 is programmable for functions providing you with new
and easy possibilities to adjust the system to your needs. All individual
settings will be remembered, also when PRE 1 G2 will be switched off the
mains or transported.
You can program the following:
¨ The balance can be adjusted to individual preferences
¨ Inputs, which usually have different signal level, can be adjusted to the
same volume
¨ Inputs can be given an individual name.
¨ The brightness of the display can be adjusted ("Dim Value")
¨ Automatic startup can be switched on or off ("Autostart")
¨ You can choose between two texts being displayed while in stand-by
mode ("Off_Text")
Display
The 2-line alphanumeric display will give you all information you need
about your individual settings:
§
Number of selected input and given name of input or number of selected input and monitor or assigned name
§
Volume and assigned offset, visualized balance setting as well
7
The programming ignition sequence is entered pressing the monitor/set
button longer than one second.
For programming, please do the following:
Balance
1. Push the monitor/set button once for at least one second.
2. Now you are enabled to adjust the stereo balance of your system.
Turning the volume knob clockwise decreases the level of the left
channel, turning counter clockwise will decrease the right channel’s
level. The level of every stereo channel can be decreased up to
9 * 1 dB. The setting is displayed numerically and a symbol.
3. To leave the programming mode, push the monitor/set a short time.
Alternatively you can proceed adjusting to the next step with another
long keypress (go on with (3) in this case):
Volume offset
1. Select the channel to be adjusted
2. Push the set button twice for longer than one second. The display
shows you the channel number and “ offset adjust” .
3. Turn the volume knob to adjust the desired channel level. This is possible within a range of +/- 9 * 1 dB to the master volume
4. To leave the programming mode, push the monitor/set a short time.
Alternatively you can proceed adjusting to the next step with another
long keypress (go on with (3) in this case):
Name programming
1. Select the channel to be given a new name
2. Push the set button twice for at least one second. The display changes
to “ Text” adjustment.
3. For individual naming there are 14 characters per input channel and 12
characters for the monitor loop available. A cursor indicates the current character to be edited. Turn the input switch to move the cursor
in the appropriate direction. Select a character from a character set
consisting of letter, numbers and symbols by turning the volume knob.
4. To leave the programming mode, push the monitor/set a short time.
Alternatively you can proceed adjusting to the next step with another
long keypress (go on with (2) in this case):
8
Set display brightness
1. Push the set button four times for at least one second. The display
changes to “ Set Dim Value” .
2. The
brightness
can
be
adjusted
in
five
OFF, 25%, 50%, 80%, 100% (Default brightness is 50%!)
steps:
3. To leave the programming mode, push the monitor/set a short time.
Alternatively you can proceed adjusting to the next step with another
long keypress (go on with (2) in this case):
If the display brightness is set to "OFF" the following is still displayed:
Set Autostart
§
mute state
§
selecting a new input (displayed for approx. 3 seconds)
§
all programming
1. Push the set button five times for at least one second. The display
changes to “ Set Autostart” . If autostart is set to "OFF" the PRE 1 G2
stays in the standby mode after switching on with the mains switch (3)
until the power button is pushed. If autostart is set to "ON" the PRE 1
G2 starts automatically into the on mode after switching on with the
mains switch (3). Select this option if you use a timer to control the
PRE 1 G2.
2. Select the autostart option by turning the volume knob.
3. To leave the programming mode, push the monitor/set a short time.
Alternatively you can proceed adjusting to the next step with another
long keypress (go on with (2) in this case):
Set Off_Text
1. Push the set button six times for at least one second. The display
changes to “ Set Off_Text” .
2. Now you can choose the text to be displayed when your PRE 1 G2 is
in stand-by mode by turning the volume knob. The possible texts are:
"AUDIONET" or "¤¤".
Push the set button once again to finish programming.
Note:
If no changes are made for 10 seconds, your PRE 1 G2 will automatically exit the programming menu.
9
Using the remote control
All functions of the PRE 1 G2 can be operated by the Audionet remote
control in the same way as described for the front panel.
For setting the volume level, please push + or - of the remote control volume button pair. The button mon corresponds to monitor/set button:
push short for selecting the monitor loop; push long for selecting the programming functions.
Using the remote control the inputs can be selected directly.
Additionally, the following functions are possible:
Mute
PRE 1 G2 has a soft mute function. If desired to mute PRE 1 G2; please
press the mute button on the remote control. When muting, PRE 1 G2
regulates volume down to -80 dB and then switches off the outputs. If
you press the mute button again, PRE 1 G2 activates the outputs and returns to the volume before
Mains phase recognition
If the mains phase is connected incorrect the PRE1 G2 will tell you while
starting up:
"Attention: Mains phase incorrect!"
Switch off your PRE 1 G2 and change the position of the mains plug at
your wall socket. If the mains phase is connected correctly no warning
will appear in the display while starting up.
10
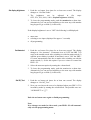
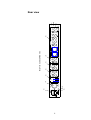
11
(1)
This unit must be earthed.
I
AC: 230/240 V50/60 Hz
0
mains
(3)
(2)
Use dedicated only.
ext. power
out
link
out
(9)
1
2
output
(8)
(5)
out
monitor
in
(7)
6
rec out
5
(6)
Rear View Audionet PRE I G2
1
2
3
input
5
tape
6
(phono)
7
gnd
Made
in Germany
by
IDEKTRON
Idektron GmbH & Co KG, Bochum, Germany: PRE I
4
(4)
Rear view
Technical information
Fundamentals
The circuit is constructed implying the shortest possible signal paths to
ensure best high frequency characteristics. The ground is focused in one
centre point. All construction is optimised in capacity and inductive manner.
The system is supervised and controlled by a powerful microprocessor.
The digital section is separated and shielded from the analog section.
Power-supply
The power supply is provided by a 100 VA toroid transformer. The filter
capacity is as large as 40 000 µF. All supply voltages are cleaned twice,
by pre voltage regulators and local voltage regulators.
Circuit
All amplifiers are optimized using the most modern discrete circuitry. The
volume is regulated by a precision resistor network instead of a simple
and fault susceptible potentiometer.
Features
The PRE 1 G2 is driven by a microcontroller system. Information about
the current state is shown by a 2*16-character display. Input names can be
set individually as well as the volume offset of each input channel. There
is a separate menu available to adjust the balance.
Overall the PRE 1 G2 offers 6 inputs. You can connect two different
power amplifiers as well.
Two high performance outputs and a powerful monitor loop for recording
and controlling purposes are also available.
Optional features are a IR remote control, phono module, 24bit D/A converter and external power supply (Audionet EPS).
12
Technical Data
Function
microprocessor controlled preamplifier
Bandwidth
1 - 3,000,000 Hz (± 3 dB)
THD
> 105 dB (20 Hz to 20 kHz)
SNR
> 110 dB for 5 VRMS
Crosstalk
stereo
btw. Inputs
source/monitor
>100 dB at 1 kHz
>103 dB at 1 kHz
>100 dB at 1 kHz
volume linearity
typ. 0.03 dB
output impedance
22 ohms
output voltage
max. 7 VRMS
output current
max. 30 mA
input voltage
max. 5 VRMS
Inputs
5 high level RCA inputs (gold plated)
1 balanced XLR input (gold plated) (1: GND, 2: Pos, 3: Neg)
1 RCA monitor input (gold plated)
7 pin plug for Audionet EPS
Outputs
1 line out RCA output (gold plated)
1 balanced XLR output (gold plated) (1: GND, 2: Pos, 3: Neg)
1 rec out RCA output (gold plated)
1 RCA monitor output (gold plated)
1 plug for additional ground connection (gold plated)
1 Audionet Link (optical)
Mains
230 V, 50 Hz
power consumption
7 VA Stand by; max. 30 VA
dimensions
430 mm * 70 mm * 310 mm (w * h * d)
weight
8 kg
finish
front: brushed black aluminium, white printing
top: black microlized aluminium
optional
front: brushed nature aluminium, printing: black
options
remote control, phono MM/MC preamplifier, 24bit D/A converter,
external power supply EPS
Subject to modification
13
Security advice
* Avoid packaging material, especially plastic bags, to
come into children’s hands.
* Store and operate the unit in a dry room at a reasonable room temperature
* Avoid moisture or any liquid to get into the unit
* Set up the unit in a free position so that the air is allowed to flow through the unit slits,
* Do not cover, e.g. with a blanket
* Do not open the case. Unauthorized opening will
cause loss of guarantee.
* Use a dry cloth for cleaning
Engineered and produced by:
Idektron GmbH & Co. KG, Herner Str. 299, Gebä ude 6, 44809 Bochum
www.audionet.de
[email protected]
14