1
Stereo Amplifier
User's Manual
1
2
Contents
1
Preface ...................................................................... 5
1.1
Included........................................................................................6
1.2
Transport .....................................................................................6
2
Overview front panel................................................ 7
3
Overview back panel................................................ 8
4
Installation and power supply ................................. 9
4.1
Placement .....................................................................................9
4.2
Mains connection.........................................................................9
4.3
Orientation of mains plug.........................................................10
5
Inputs and outputs ................................................. 11
5.1
Inputs..........................................................................................11
5.2
Speaker terminals .....................................................................11
5.3
Preamplifier Output .................................................................12
5.4
Recording devices......................................................................12
5.5
Phono..........................................................................................12
5.6
Headphones socket ....................................................................13
5.7
Audionet Link............................................................................13
6
Usage....................................................................... 14
6.1
Powering up ...............................................................................14
6.2
Switching on and off .................................................................14
6.3
Mains phase detection...............................................................15
6.4
Using Audionet Link.................................................................15
6.5
Control elements on the front panel ........................................16
6.6
Volume control ..........................................................................16
6.7
Display........................................................................................17
6.8
Input selection ...........................................................................17
6.9
Muting ........................................................................................18
7
Setup menu............................................................. 19
7.1
Select Input ................................................................................20
7.2
Set Output Mode .......................................................................20
3
7.3
Set Display Brightness ..............................................................21
7.4
Set Pre Output Mode....................................................................21
7.5
Set Autostart ..............................................................................22
7.6
Edit Channel Name ...................................................................22
7.7
Set Channel for By-Pass Mode........................................................23
7.8
Overview factory defaults.........................................................24
8
Audionet System Remote Control.........................25
8.1
Key assignment SAM G2..........................................................27
8.2
Screen 1 ......................................................................................28
8.3
Screen 2 ......................................................................................29
9
Special function By-Pass Mode.............................30
10
Protection system...................................................32
11
Technical information.............................................32
11.1
Design .........................................................................................32
11.2
Power Supply.............................................................................32
11.3
Circuitry.....................................................................................33
11.4
Operation ...................................................................................33
12
Security advice........................................................34
13
Technical data .........................................................35
4
1
Preface
The Audionet Team congratulates you on your purchase of this unit.
Audionet components are no marketing products, they are authentic.
Conceived and developed with scientific inspiration, professional engineering expertise and a passion for achieving the perfect sound. They are
unique creations designed to inspire musical enjoyment and have an excellent reputation amongst all connoisseurs throughout the world. Each
and every one of our precision-manufactured devices are individually
crafted at our Bochum works by our experienced and passionate workforce.
But before you start listening to your new Audionet SAM G2, please read
this manual carefully so you are able to use and enjoy all functions of this
unit without drawback on music quality.
5
1.1 Included
Included you will find the following items:
·
the stereo integrated amplifier SAM G2
·
the user's manual (that you are currently reading)
·
one standard mains cord
1.2 Transport
Important
·
Please transport the SAM G2 only in the included package.
·
Always use the plastic bag to prevent scratches on the casing.
·
Please allow the SAM G2 to adapt to the climatic conditions in your
listening room before you switch on the unit for the first time after
transport.
6
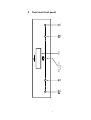
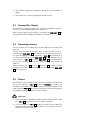
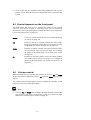
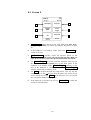
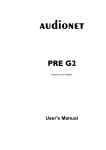
power
key
set
key
IR remote control
receiver
Display
down
key
up
key
2
Overview front panel
7
8
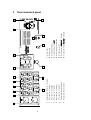
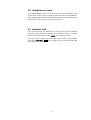
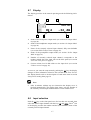
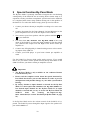
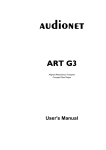
RCA inpt no. 3, left/right
RCA input no. 4, left/riht
RCA input no. 5, left/right
RCA input no. 6, left/right
Speaker terminal, right channel
Speaker terminal, left channel
3
4
5
6
7
8
5
RCA input no. 2, left/right
16
4
2
3
Balanced input (XLR) no. 1, left/right
2
1
1
15
6
7
14
Mains input
13
12
16 Pre amplifer Output, PRE OUT left/right
15 Recording output REC OUT, left/right
14 Headphones socket
13 Earth connector for turntable
12 Audionet Link output OUT
11 Marking mains phase
10 Mains switch
9
8
9
11
10
3
Overview back panel
4
Installation and power supply
Important
·
During connecting and removing of sources or amplifiers to the
SAM G2 all units of your audio system have to be switched off to
prevent damage of the SAM G2 or any of the other connected units.
·
Please make sure that all cables are in absolute best conditions!
Broken shields or short-cut cables could damage the SAM G2
and/or any other connected unit.
4.1 Placement
Important
·
It is recommended to place the SAM G2 into a high quality rack or
onto a stable table.
·
Do not expose the unit to direct sunlight.
·
Do not cover the ventilation slots.
·
Do not place the SAM G2 in close range to heat sources like radiators.
·
Do not place the SAM G2 on top of other units, especially not on top
of power amplifiers, pre amplifiers or similar that produce heat. Both
units could suffer damage from thermal overload.
·
Do not use the unit in places where it is exposed to vibrations.
·
Do not place the unit close to loudspeakers or into the corner of a
room where it is exposed to high levels of sonic energy, which might
reduce the sound quality of the unit.
4.2 Mains connection
The mains input 9 * is on the back panel of the SAM G2. To connect the
unit to mains use the included mains cord. If you prefer to use a different
power cord make sure that it meets the specifications for your home country.
Important
·
*
The electrical specifications of your home country must meet the
electrical specifications printed onto the back panel.
see numbers in section 'Overview back panel' on page 8.
9
·
The SAM G2 is a Class I unit and must be earthed. Please ensure a
stable earth connection. Phase ('hot' pin) is marked on the back panel
('phase') 11 .
·
If you connect the mains cord please make sure that mains switch
10 at the back panel is switched off.
·
Never pull the mains plug while the SAM G2 is switched on! Before you
pull the mains cord off its socket 9 at the back panel, power down the
unit to stand-by mode and switch off the unit using mains switch 10 .
Only in cases of extended absence – like vacations – or if massive trouble
on the mains power is to be expected you should switch off the SAM G2
from the mains using the mains switch 10 . To disconnect the unit completely from mains pull the mains plug.
Tip
·
The use of high quality mains cords (e.g. Audionet P10) could improve sound quality. Ask your local dealer for more information.
4.3 Orientation of mains plug
The correct polarization of mains is important for reasons of audio clarity
and stability. Please connect the mains cord so that the hot pin of the wall
outlet is connected to the pin of the mains input 11 marked 'PHASE' 9 .
Your Audionet SAM G2 is able to detect a wrong polarization of the
mains plug during start-up. If the message
►
Attention:
◄
► Mains phase incorrect ◄
appears in the display, switch off the unit and flip the mains plug in the
wall outlet (see section 'Mains phase detection' on page 15).
10
5
Inputs and outputs
Important
·
During connecting and removing of sources or amplifiers to the
SAM G2 all units of your audio system have to be switched off to
prevent damage of the SAM G2 or any of the other connected
units.
·
Please make sure that all cables are in absolute best conditions!
Broken shields or short-cut cables could damage the SAM G2
and/or any other connected unit.
5.1 Inputs
The SAM G2 is equipped with five RCA inputs 2 to 6 and one balanced (XLR) input 1 for connecting signal sources at line level.
Please connect the left and right input of the same number printed on the
back panel of the SAM G2 to the corresponding output of the source you
would like to connect to the SAM G2.
5.2 Speaker terminals
Connect your speakers to the gold plated terminals 7 and 8 on the
back panel of the SAM G2. You can use banana plugs or spades as well
as simple cable ends. Look out for the correct connection of your speaker
cables. Usually, the terminals of your speakers are marked '+' and '-'. The
SAM G2 uses the same marks.
Note
·
Wrong speaker polarization will result in severe loss of sound quality.
·
In case you would like to bi-wire your speakers please insert the cable to the tweeters from the rear using banana plugs and mount the
cables to the bass speakers from the side. In doubt please ask your
dealer for assistance.
Important
·
Although the SAM G2 has an effective protection system to prevent damage to the circuits, switch off the unit while working on
the speaker and/or audio cables.
11
·
The nominal loudspeaker impedance should be at least 4 Ohms or
higher.
·
Never use force or tools tightening the terminal screws.
5.3
Preamplifier Output
The SAM G2 is equipped with a pair of RCA preamplifier outputs to
connect e.g. an additional amplifier or a subwoofer.
Please use high quality interconnectors to connect the PRE OUT 16 of
your SAM G2 with an additional amplifier or subwoofer.
5.4
Recording devices
You can connect one recording device to the SAM G2 for recording and
playback.
Connect your recording device (like DAT or tape recorder) to the recording output REC OUT 15 of the SAM G2. For playback please connect your recording device only to input no. 5 IN 5 5 of the SAM G2, if
it is also connected to the output REC OUT 15 of your SAM G2. If you
select input no. 5 IN 5 5 the output REC OUT 15 is switched off to
prevent any feedback loops between your recording device and the
SAM G2.
Please use inputs no. 1 1 to no. 4 4 and no. 6 6 to connect sources
you like to record from. With these inputs the recording output REC OUT
15 is always active.
5.5
Phono
The SAM G2 can be upgraded with a phono pre amplifier board. In this
case use the input no. 6 IN 6 6 marked as PHONO to connect your
turntable to the SAM G2. Connect the earth wire of your turntable to the
earth connector GND 13 . For further information on the optional phono
pre amplifier board please refer to its user's manual.
Important
·
If the SAM G2 is upgraded with the optional phono module, input
no. 6 IN 6 11 must only be used to connect a turntable.
·
Never use input no. 6 IN 6 11 for By-Pass mode, if your SAM G2 is
equipped with an optional phono module (see section 'Special function By-Pass Mode' on page 30).
12
5.6 Headphones socket
A 6.3 mm headphones socket is located at the rear of your SAM G2. The
signal at this socket can be switched on and off to allow the headphones
to be plugged in permanently. Switching is easily done on the front panel,
please refer to section 'Set Output Mode' on page 20.
5.7 Audionet Link
For your convenience, the SAM G2 can switch on/off all other Audionet
units (e.g. power amplifiers) connected via Audionet Link by a simple
touch on the remote control or the power key on the front panel.
You only need a simple optical 'Toslink' cable. Connect the Audionet
Link output Link OUT 12 of your SAM G2 to the Audionet Link input
of the unit to be controlled.
13
6
Usage
All functions of the SAM G2 are microprocessor controlled. This guarantees highest precision, exclusive functions, easy handling and protection
against operating errors.
6.1 Powering up
First of all, please make sure your SAM G2 is connected correctly to your
signal sources and mains (see section 'Installation and power supply' on
page 8 and 'Inputs and outputs' on page 11).
The SAM G2 is a stand-by unit. Please operate the mains switch 10 on
the back panel. The display shows a welcome message for a brief moment. After that the SAM G2 is in stand-by mode.
Only in cases of extended absence (like vacations) or if massive trouble
on the mains power is to be expected (e.g. thunder storms) it is recommended to disconnect the SAM G2 from the mains. While the SAM G2 is
in stand-by mode, operate mains switch 10 on the back panel. To disconnect the SAM G2 from mains completely, you have to pull the mains
cord off the mains jack 9 .
Important
·
Before you switch off the SAM G2 from mains, power down and
discharge completely all units connected to the outputs of the
SAM G2.
6.2 Switching on and off
To power up the SAM G2 from stand-by mode, press the power key on
the front panel. The SAM G2 displays the message Waking up.... In
case the mains plug has the incorrect polarization a warning will appear
in the display (see section 'Mains phase detection' on page 15). After that
the unit is in normal operating mode and ready to use.
If you would like to switch off the unit, please press the power key on the
front panel. The display shows the message Going to sleep.. and
unit enters the stand-by mode.
Note
·
Of course, you may switch on/off the SAM G2 with the Audionet
System Remote Control Harmony One. For detailed information
please refer to section 'Screen 2' on page 29
14
6.3
Mains phase detection
The correct polarization of mains is important for reasons of audio clarity
and stability. Please connect the mains cord that the 'hot' pin of the wall
outlet is connected to the pin marked 'phase' 11 of the mains input 9 on
the back panel. The SAM G2 recognizes the incorrect polarization of the
mains plug automatically. Right after switching on the unit from stand-by
mode by pressing the power key on the front panel the following message will appear in the display in case the mains polarization is incorrect:
►
Attention:
◄
► Mains phase incorrect ◄
If you read the above message, switch off the unit by pressing the power
key. Please wait until the display no longer reads Going to sleep....
Disconnect the SAM G2 from mains by operating the mains switch 10 .
Now pull the mains plug and re-insert it into the mains socket rotated by
180°.
If you switch on the unit again, the warning should not appear now.
Important
·
If the SAM G2 issues the mains polarization warning or no warning
at all for both positions of the mains plug, check the connection to
earth of your mains socket and mains cord. You have to ensure a
stable connection to earth for the mains phase detection of the
SAM G2 to work correctly!
6.4
Using Audionet Link
The SAM G2 is equipped with an Audionet Link output Link OUT 12
allowing you to switch on/off further Audionet units (e.g. power amplifiers, CD player or tuner) connected via Audionet Link (also see section
'Audionet Link' on page 13).
If the rest of your Audionet system is connected to your SAM G2 via
Audionet Link, all linked units will be automatically switched on/off as
soon as you switch on/off your SAM G2 using the power key on the
front panel or the Audionet System Remote Control Harmony One.
Note
·
Please read section 'Audionet Link' on page 13. Also, consult the
user's manual of your Audionet components connected via Audionet
Link for further information.
15
·
If you switch off your Audionet chain using Audionet Link, it is important to wait until all devices are shut down before you restart the
system.
6.5 Control elements on the front panel
The front panel has four keys to control the SAM G2 (see section
'Overview front panel' on page 7). With these keys you can control all
functions as well as all setup options to adjust the unit to your preferences
(see section 'Setup menu' on page 19).
power
Use key to switch on/off the unit (see section 'Switching
on and off' on page 14).
set
Push key shortly to navigate through the setup menu.
Keep key pushed for longer than two seconds to exit the
setup menu (see section 'Setup menu' on page 19).
down
Push key to reduce volume, select previous input channel (see section 'Input selection' on page 17) or change
an option of the setup menu (see section 'Setup menu'
on page 19).
up
Push key to increase volume, select next input channel
(see section 'Input selection' on page 17) or change an
option of the setup menu (see section 'Setup menu' on
page 19).
6.6
Volume control
While the SAM G2 is in normal operating mode use keys up and down
on the front panel to adjust the volume. up increases, down decreases the
volume.
The volume control of the SAM G2 runs in a range from –80 dB to +0 dB
relatively to the level of the input signal.
Note
·
Use keys up and down also to change an option from the setup menu
(see section 'Setup menu' on page 19) as well as to select an input
channel (see section 'Input selection' on page 17).
16
6.7
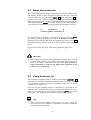
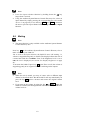
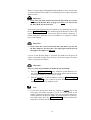
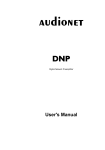
Display
The display provides in the normal operating mode the following information:
1
2
3
INPUT TWO
IN 2
4
-32 dB
6
5
1
Status of the loudspeaker output mode (see section 'Set Output Mode'
on page 20).
2
Status of the headphones output mode (see section 'Set Output Mode'
on page 20).
3
Name of the currently selected input channel, fully user-definable
(see section 'Edit Channel Name' on page 22).
4
Status of the preamplifier output mode (see section 'Set Pre Output
Mode' on page 21).
5
Number of currently selected input channel, corresponds to the
number printed above the input jack on the back panel (see section
'Overview back panel' on page 8).
6
Current volume level in dB relative to the input level (see section
'Volume control' on page 16).
As soon as you enter the setup menu by pushing the set key, the display
changes to show information related to the selected menu item. For further display details refer to the description of each menu item in section
'Setup menu' starting from page 19.
Note
·
After 10 minutes without any user interaction the 'display saver' is
invoked automatically. The display then shows only the number of
the currently selected input channel and the current volume level.
6.8
Input selection
Push the set key on the front panel once for less than two seconds, then
select the desired input channel with the keys up and down. The 2nd line
of the display provides the number and the (user-definable) name of the
currently selected input channel.
17
Note
·
Leave the input selection function by holding down the set key
longer than 2 seconds.
·
Using the Audionet System Remote Control Harmony One, select an
input channel by simply pressing the corresponding key (see section
'Screen 1' on page 28), or use the keys Ch+ and Ch- to switch to
the next or previous input channel without using the Select Input
function.
6.9
Muting
Note
·
The mute function is only available on the Audionet System Remote
Control Harmony One.
Press key
on the Audionet System Remote Control Harmony One to
mute or un-mute your SAM G2.
Just as well as the input selection, the SAM G2 uses 'soft' muting, i.e.
volume is stepped down gently to -80 dB. The display informs the user of
a muted unit with the text MUTE. Even if the brightness level is set to
Off, the text is displayed (see section 'Set Display Brightness' on page
21).
To un-mute the SAM G2 press key
again. Here as well, the volume is
stepped up gently to its original level after switching on the outputs.
Note
·
While the unit is muted, you may of course select a different input
channel as described above. But the SAM G2 will stay muted until you
press the key
again to un-mute and restore the original volume
level.
·
If you turn up the volume by using the key up or Vol+ , while the
SAM G2 is muted, the muting function will be deactivated and the new
volume level set.
18
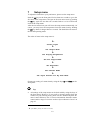
7
Setup menu
To adjust the SAM G2 to your preferences, please use the setup menu.
Push the set key on the front panel for less than two seconds to go to the
first item of the setup menu. Navigate to the next menu item, by pushing
the set key again for less than two seconds. Below is a list of all menu
items of the setup menu.
After the last menu item you will leave the setup menu automatically. Of
course, you may leave the setup menu from each menu item by holding
the set key down for longer than two seconds. The SAM G2 will return to
the normal operating mode.
The order of items in the setup menu is:
ê*1
Select Input
ê
Set Output Mode
ê
Set Display Brightness
ê
Set Pre Output Mode
ê
Set AutoStart
ê
Set Channel Name
ê
Set Input Channel for By Pass Mode
Change any setting of a menu item by using the keys up and down on the
front panel.
Tip
·
*1
All settings of the setup menu can be dealt with by using the keys of
the front panel. However, if you prefer to change settings from the
comfort of your listening chair, please use the Audionet System Remote Control Harmony One. For more information about the remote
control and its usage see section 'Audionet System Remote Control' on
page 25.
ê = push set key shortly (less than two seconds)
19
Note
·
If you make no adjustments for longer than 12 seconds the SAM G2
will automatically leave the setup menu and return to normal operating mode.
·
While you are in the setup menu the display brightness is set to 100%
for better readability. After leaving the setup menu the display
brightness is automatically reset to its user selected level.
·
If you power down the SAM G2 to stand-by mode all settings are
stored automatically in the non-volatile memory of the unit. Even after disconnecting from mains the SAM G2 will still remember your
settings.
In the following all options of the setup menu are explained in detail.
7.1
Select Input
Push the set key on the front panel once for less than two seconds and
select than the desired input channel using the keys up and down. The
display shows the number and the (user-definable) name of the currently
selected input channel. See also section 'Input selection' on page 17.
7.2
Set Output Mode
Push the set key on the front panel twice for less than two seconds to
select the output mode. Now use the keys up and down to select the desired output configuration.
The two symbols
and
in the display show if the speaker and/or the
headphones output is activated.
Speakers only
The headphones output PHONES 14
is disabled.
Headphones only
Only the headphones output PHONES
14 is active. The speaker outputs 7
and 8 are disabled.
Speakers & Headphones The headphones output PHONES 14
and the speaker outputs 7 and 8 are
active.
Note
·
If the option Headphones only is selected, the pre amplifier output PRE OUT 7 will be automatically disabled.
20
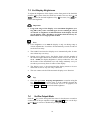
7.3 Set Display Brightness
To adjust the brightness of the display on the front panel of the SAM G2
push the set key three times less than two seconds. Now use keys up and
down to select the desired brightness. Key up increases, key down decreases the brightness.
Important
·
Long-term usage of the display set to maximum brightness (setting 100%) may cause extended signs of wear resulting in a decay
of contrast or brightness of individual dots in the display. Do not
use the display with a brightness set higher than the factory default of 50% over a longer period of time!
Note
·
Is the brightness set to Off the display is only on during setup or
volume adjustments. It switches off automatically several seconds after the last user entry.
·
The SAM G2 activates the 'display saver' automatically after 10 minutes without any user entry.
·
During active 'display saver', the display shows only the number of
the selected input channel and current volume level in the form of
In 4 -47dB. The display brightness is always reduced to 25%, and
the location of the information text will change randomly every 12
seconds to prevent any 'burn-in' effect of the display.
·
The 'display saver' is de-activated and the display returns to its normal mode as soon as any user entry is detected.
·
The user cannot switch off the automatic 'display saver' function!
Tip
·
Get to the option Set Display Brightness at anytime using the
key Dim Display on screen page 2 of the Audionet System Remote Control Harmony One (see section 'Screen 2' on page29). Use
keys Vol- and Vol+ to select desired brightness.
7.4
Set Pre Output Mode
Push the set key on the front panel four times for less than two seconds to
set the mode of the pre amplifier output PRE OUT 7 . Now use the keys
up and down to activate or disable the pre amplifier output.
21
Note
·
The display symbol
·
If the option Headphones only is selected, the pre amplifier output PRE OUT 7 will be automatically disabled.
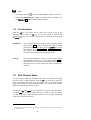
7.5
shows if the preamplifier output is activated.
Set Autostart
Push the set key five times for less than two seconds to get to the
Autostart option. Push the up key on the front panel to activate the
Autostart function. If you like to deactivate the Autostart function push
the down key.
disabled
The Autostart function is disabled. After switching on the
mains switch 10 on the back panel, the SAM G2 enters
the stand-by mode. You have to use the power key on the
front panel or keys Power On or Power Toggle on
the Audionet System Remote Control Harmony One to
switch on the unit into normal operating mode*).
active
The Autostart function is active. As soon as you connect
the SAM G2 to mains (i.e. use the mains switch 10 on
the back panel) the unit starts up automatically to normal
operating mode. Use this setting for timer controlled operations.
7.6
Edit Channel Name
You can assign a fully user-definable name up to 14 characters in length
to each of the six input channels. Push the set key on the front panel six
times. The display will then show the number of the currently selected
input channel and the assigned channel name. The cursor in the display
marks the character you now may alter.
Use the keys up and down on the front panel to select the desired character. Hold set key down for longer than two seconds to move the cursor
one step to the right. After the last position the cursor wraps around and
starts at the first position again.
*)
or switched on/off by Activities on the Audionet System Remote Control; see separate user's
manual Harmony One
22
Tip
·
If you would like to edit the channel name for more than just the currently selected input channel, use keys Ch+ and Ch- of the
Audionet System Remote Control to switch to the desired input
channel. The SAM G2 does not leave the setup menu, and you are
able to edit the channel name for other input channels very easily.
Press key
of the Audionet System Remote Control to advance the
cursor one position to the right.
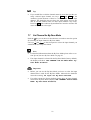
7.7
Set Channel for By-Pass Mode
Push the set key seven times for less than two seconds to enter the option
for selecting the input channel in By-Pass Mode.
Use keys up and down on the front panel to select the input channel you
would like to use in By-Pass Mode.
Note
·
For detailed information about the By-Pass Mode please refer to section 'Special function By-Pass Mode' on page 30.
·
If no input channel is selected for the By-Pass Mode (factory default),
the display will show: SET CHANNEL FOR BY-PASS MODE: ByPass Mode disabled
Important
·
Before you can use the By-Pass Mode you have to select the input
channel that is used for the By-Pass Mode. Otherwise the SAM G2
issues the warning: No input for By-Pass selected.
·
For safety reasons the factory default settings have no input channel
selected for By-Pass Mode (display: SET CHANNEL FOR BY-PASS
MODE: By-Pass Mode disabled).
23
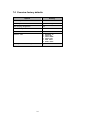
7.8 Overview factory defaults
Option
Setting
Select Input
INPUT TWO -> IN 2
Set Output Mode
Speakers only
Set Display Brightness
50%
Set Pre Output Mode
disabled
Set AutoStart
disabled
Channel name
1:
2:
3:
4:
5:
6:
Set Input Channel for By Pass Mode
By-Pass Mode disabled
24
BALANCED IN
INPUT TWO
INPUT THREE
INPUT FOUR
TAPE INPUT
PHONO INPUT
8
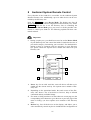
Audionet System Remote Control
Every function of the SAM G2 is accessible via the Audionet System
Remote Harmony One. Additionally, up to 14 other devices can be controlled by the Harmony One.
Press key Devices to enter Device Mode. The display now lists all
devices included in the current configuration of the Harmony One. Select
SAM G2 from the list to set the Harmony One to controlling the
SAM G2. The Device Mode gives you access to all the possible commands to control your SAM G2. The following explains all these commands in detail.
Important
·
During everyday use, you should never need to use the Device Mode
of your Harmony One, but control the SAM G2 (and other devices of
your audio setup) by customizing your Activities. For detailed information on how to customize and use Activities on your Harmony
One please consult the separate user's manual that came with your
Harmony One.
1
2
My Activities:
Mi 14:51
1/2 pages
Listen to CDs
Watch a DVD
3
3
CD with VIPG3
Options
Devices
4
5
1
Power key for use with Activities, turns all devices off that are included into the current Activity. See separate user's manual of Harmony One.
2
Depending on the operational mode, the touch screen of the Harmony One shows a list of Activities or Devices, help or infrared
commands and any available listings.
3
If a menu or listing stretches over more than one screen page, use the
corresponding arrow buttons to go to the next or previous page of the
menu or listing. (see also separate user's manual of the Harmony
One).
4
Devices key, lists all the devices on the display, and allows you to
select and directly control any device included in the configuration of
25
the remote control (see separate user's manual of Harmony One). Select SAM G2 to enter Device Mode for controlling the SAM G2.
5
Activities key: Press this key to view a list of Activities you have
added. Press the button next to the Activity you want to select, and
the Harmony One will control your entertainment system (see separate user's manual of Harmony One).
Important
·
is only available for Activities. In Device
The Power key
Mode the Power key has no function.
·
Even without using an Activity, the user is able to control all
functions of the SAM G2 using the Harmony One in Device Mode.
·
The keys described below to control the SAM G2 refer to the
factory default programming of the Audionet System Remote
Control Harmony One. Understandably, any changes done to this
setup by the user cannot be discussed here.
Tip
·
In order to switch the SAM G2 on/off, without using an Activity,
please use the keys Power Toggle , Power On and / or
Power Off on screen 2 (see section 'Screen 2' on page 29). Of
course, it is possible to control the SAM G2 without any Activity,
but to tap the full potential of the Harmony One you need to configure Activities customized to your needs (please refer to separate
manual of the remote control Harmony One).
Note
·
Please read the separate user's manual to your Audionet System Remote Control Harmony One. Activities, Devices and Device Mode as
well as customizing the remote control are discussed there in detail.
26
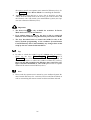
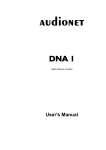
8.1 Key assignment SAM G2
SAM G2:
Mi 14:51
1/2 pages
Balanced
Input
Input Two
Input Three
Input Four
Tape Input
Phono Input
Current
Activity
Devices
1
2
3
4
5
6
7
1
Use key Menu to navigate through the setup menus. This key has
the same function as key set on the front panel (see section 'Setup
menu' on page 19) or key Set on screen page 2 (see section 'Screen
2' in page 29).
2
Vol+ , increases the volume of the SAM G2, also for selecting setup
options or input channels. This key has the same function as key up
on the front panel.
3
Ch+ , switches to the next input channel (see section 'Input selection' on page 17).
27
4
Vol- , decreases the volume of the SAM G2, also for selecting setup
options or input channels. This key has the same function as key
down on the front panel.
5
Ch- , switches to the previous input channel (see section 'Input selection' on page 17).
6
, mutes the SAM G2 (see section 'Muting' on page 18).
7
Digit keys for direct input selection (see section 'Input selection' on
page 17).
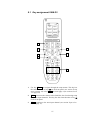
8.2
Screen 1
SAM G2:
Mi 14:51
1/2 pages
1
Balanced
Input
Input Two
2
3
Input Three
Input Four
4
5
Tape Input
Phone Input
6
Current
Activity
Devices
1
Directly selects input channel no. 1.
2
Directly selects input channel no. 2.
3
Directly selects input channel no. 3.
4
Directly selects input channel no. 4.
5
Directly selects input channel no. 5.
6
Directly selects input channel no. 6.
28
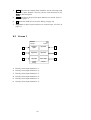
8.3 Screen 2
SAM G2:
Mi 14:51
2/2 pages
1
Dim Display
Power On
2
3
By-Pass
Mode
Power
Toggle
4
5
Set
Power Off
6
Current
Activity
Devices
1
Dim Display jumps directly to the setup menu item Set Display Brightness (see section 'Set Display Brightness' on page
21).
2
If the SAM G2 is in stand-by mode, press key Power On to
switch on the unit.
3
By-Pass Mode switches on/off the By-Pass Mode of the
SAM G2. Please read section 'Special function By-Pass Mode' on
page 30 first, before you use the special function By-Pass Mode.
4
Use Power Toggle to switch on/off the SAM G2. This key has
the same function as the power key on the front panel. If the
SAM G2 is in stand-by mode, Power Toggle switches on the
unit. If the SAM G2 is already switched on, Power Toggle
switches off the unit to stand-by mode.
5
Use Set to navigate through the setup menus. This key has the
same function as the set key on the front panel (see section 'Setup
menu' on page 19) or key Menu of the Harmony One (see section
'Key assignment SAM G2' on page 27).
6
If the SAM G2 is switched on, use key Power Off to switch the
unit off to stand-by mode.
29
9
Special function By-Pass Mode
The By-Pass Mode is primarily intended to integrate the overwhelming
sound quality of the SAM G2 into an existing home cinema setup or to
expand an existing excellent stereophonic system based on the SAM G2
to a complete home cinema setup without missing out on the qualities of
the SAM G2. To realise this kind of setup, please proceed as follows:
1. Connect your home cinema pre amplifier according to its user's manual.
2. Connect the output for the front channels Left and Right not to the
power amplifier but to one of the free inputs of the SAM G2.
3. Now connect your front speakers with the speaker terminals 7 and
8 of your SAM G2.
4. Use menu item Set Channel for By-Pass Mode of the setup
menu of the SAM G2 to select the input channel for By-Pass Mode
you connected the outputs Left and Right of the home cinema pre
amplifier to.
5. Connect now all high quality 2-channel analog sources to the remaining inputs of the SAM G2.
6. Connect your DVD player to your home cinema pre amplifier as
usual.
Use the SAM G2 to listen to high quality analog sources. If you would
like to use your home cinema system activate the By-Pass Mode of the
SAM G2 and use your home cinema pre amplifier as usual.
Important
·
The By-Pass Mode is only available on the Audionet Remote
Control Harmony One.
·
Please read the complete section about the special function ByPass Mode first before you use this function in order to prevent
maloperations and possible damage to your audio system and/or
hearing.
·
By factory default no input channel is selected for the By-Pass
Mode. Use menu option Set Channel for By-Pass Mode to select desired input channel for the By-Pass Mode. If no input
channel is selected and you try to invoke the By-Pass Mode the
SAM G2
issues
the
warning:
No input for ByPass selected (see section 'Set Channel for By-Pass Mode' on page
23).
Is the By-Pass Mode active the volume control of the SAM G2 is bypassed. The SAM G2 passes through the input signal to the speaker outputs with its full level.
30
Please use setup option 'Set Channel for By-Pass Mode' to select which of the
six input channels of the SAM G2 is fed through to the outputs if By-Pass
Mode is active.
Important
·
First, select the input channel used for By-Pass Mode (see section
'Set Channel for By-Pass Mode' on page 23), before you activate the
By-Pass Mode for the first time.
Activate the special function By-Pass Mode of your SAM G2 by pressing
the key By-Pass Mode of the Audionet System Remote Control. The
signal at the input channel selected for By-Pass Mode operations is
passed through the SAM G2 at a level of 0 dB (i.e. no change in volume
level) to the outputs.
Important
·
Please check the correct connection and setup before you use the
By-Pass Mode for the first time. The input signal will be passed
through to the outputs at full level!
As soon as the By-Pass Mode is activated, the SAM G2 will ignore all
control commands coming from the keys on the front panel or remote
control (exceptions see below)!
Important
There are only two possibilities to disable the By-Pass Mode:
1.
Press key By-Pass Mode of the Audionet System Remote Control. The SAM G2 switches back to the input channel selected before
resetting the volume to a safe level of -50 dB.
2.
Push the power key on the front panel or the keys Power Toggle
or Power Off on the Audionet System Remote Control. The
SAM G2 switches off to stand-by mode.
Note
·
If you leave the By-Pass Mode by pushing the power key on the
front panel, this mode will not be saved, i.e. if you switch on the
SAM G2 again, the unit will switch to the last saved input channel selection and not to the By-Pass Mode. If you would like to use the ByPass Mode again, press key By-Pass Mode of the Audionet System Remote Control Harmony One.
31
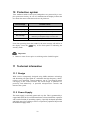
10 Protection system
Your Audionet SAM G2 and your loudspeakers are protected by a complex protection circuitry. In case of a malfunction the display informs the
user about the nature of the detected error in plain text:
Error message
Possible cause
Overload
short circuit or defective speaker
Overheating
ventilation slots covered
High Frequency
defective pre amplifier-stage
DC Voltage
exceeding DC level at the output:
defective pre amplifier-stage or source unit
Power Failure
(temporary) breakdown of mains
Even after powering down the SAM G2, the error message will still be in
the display. Press the power key on the front panel to indicating the
stand-by mode.
Important
·
Remove cause of error prior to switching on the SAM G2 again!
11 Technical information
11.1 Design
With circuits consequently designed using SMD miniature technology
and shortening all signal paths to a minimum the high frequency characteristics were optimized. Ground pathways run in a star-shaped pattern
converging in one central location. The circuit design is optimized capacitively and inductively. A powerful microprocessor controls and
monitors the system.
11.2 Power Supply
The mains supply is extremely potent and very fast. This is guaranteed by a
capped and fused 700 VA toroidal transformer, selected main filter capacitors
with a total of 96.000 μF smoothing capacity, a specially developed input filter
and highly pure silver cabling as well as a capacitively optimized layout with
the shortest of supply routes.
32
11.3 Circuitry
The circuitry of the SAM G2 is complex, technically unique and radically
realized. The input signals are received from gold plated, Teflon isolated cinch
jacks and then fed through gold-doped pure silver solid core signal cabling and
gold-contacted double anchor precision relays, which switch the input signals.
Each channel of the symmetrical input signals is un-balanced separately.
11.4 Operation
The SAM G2 is controlled via a high-performance flash microcontroller.
Software upgrades are very easy. The controller makes for simple operation,
comfortable functions and reassuring stability. The control programme enables
operator-friendly access to comprehensive and practice-oriented functions. For
example, the two pre-stage outputs and headphones output can be switched
electronically. A by-pass mode is available for smart integration of the new
SAM G2 into a home cinema system. The inputs are freely nameable and the
controller even verifies that the mains connection is phase correct. Moreover,
the controller monitors all operating states and deactivates the device as soon
as a critical state has been identified. A large graphics-capable display with
max. 4 x 26 characters informs the operator of all operating states and settings.
The SAM G2 surely is equipped with AudionetLink. This enables the isolated
activation of other Audionet devices via fibre-optics.
You may expand your SAM G2 with the optional Audionet System Remote
Control Harmony One or Phono Module for MM and MC pickups.
33
12 Security advice
Important
·
Avoid packaging material, especially plastic bags, coming into children's hands!
·
Store and operate the unit in a dry room at a reasonable room temperature only!
·
Avoid moisture, any liquids, dirt or small objects getting into the
unit!
·
Set up the unit in a sufficiently ventilated environment!
·
Do not cover the unit!
·
Do not open the unit. Unauthorised opening will void warranty!
·
Do not short-circuit the outputs!
·
During connecting or removing the SAM G2 to/from sources and/or
power/pre amplifiers all units have to be switched off to prevent
damage of the SAM G2 or any of the other connected units.
·
Use dry cloth for cleaning!
We would like to wish you many exciting listening experiences with your
new Audionet product.
If you still have any questions, do not hesitate to ask your Audionet
dealer or contact us directly
34
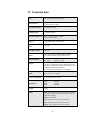
13 Technical data
Type
Analog integrated stereo amplifier
Output power
2 x 115 Watt into 8 Ohms
2 x 210 Watt into 4 Ohms
Frequency response
0 - 500,000 Hz (-3 dB)
Damping factor
typ. 1000 at 100 Hz
Harmonic Distortion
k2 typ. -101 dB, k3 typ. -106 dB,
@1 kHz, 25 W/4 Ohms
THD+N
< -100 dB @1 kHz, 25 W/4 Ohms
SNR
> 103 dB
Filtering Capacity
96,000 µF
Inputs
5 pairs RCA line, gold plated, Teflon insulted
1 pair XLR balanced, gold plated (Neutrik)
Input impedance
Line input
XLR input
10 kOhms
3 kOhms, 170 pF
Outputs
2 pair WBT Nextgen 4mm-jacks, gold-plated
1 pair RCA, gold-plated, Teflon insulated (Pre Out)
1 pair RCA , gold-plated, Teflon insulated (Rec Out)
1 Audionet Link, optical (TosLink)
1 6,3 mm socket for headphones (switchable)
Mains
220 V…240 V, 50…60 Hz
Power consumption
< 1 W Stand-by, max. 30 W
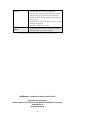
Dimensions
Width
Height
Depth
Weight
14.5 kg
Finish
Front: brushed aluminium, 10 mm, black anodized,
light grey printing or brushed aluminium, silver anodized, black printing
430 mm
120 mm
360 mm
Display: red or blue
Cover: aluminium, 2 mm, black anodized
Plates: aluminium, 8 mm, black anodized
Chassis: 2 mm sheet steel, black varnished
35
Features
Options
-
automatic detection of mains polarization
-
separate power supply for digital and analog sections
-
full DC coupling, no capacitors in the signal path
-
By-Pass function (e.g. for integration into home cinema systems)
-
Audionet Link output for remote control of other
Audionet components
-
Switchable headphones output
-
Audionet System Remote Control (not included)
-
MC/MM phono pre amplifier module
Errors and omissions excepted. Specifications and design are subject to changes without prior notice.
audionet is a trademark of Idektron GmbH & Co KG
Engineered and produced by:
Idektron GmbH & Co. KG, Herner Str. 299, Gebäude 6, 44809 Bochum, Germany
www.audionet.de
[email protected]
36