1
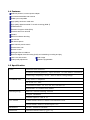
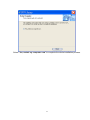
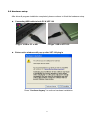
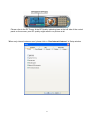
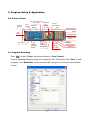
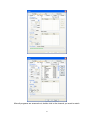
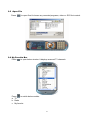
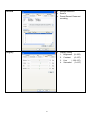
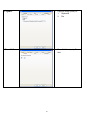
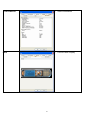
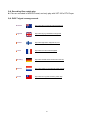
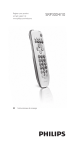
VDT-100 User Manual
1
Copyright Notice
The use manual, including all its contents, is copyrighted by Videa Technology Inc.. All rights are
reserved.
Videa Technology Inc. reserves the right to improve any product description in this user manual in
any time. Specifications are thus subject to change without notice.
No part of this manual may be reproduced, copied, translated, or transmitted in any form or by
any manes without the prior written permission of Videa Technology Inc.. Information provided in
this manual is intended to be accurate & reliable. However, Videa Technology Inc. assumes no
responsibility for its use or for any infringements upon the rights of third parties that may result
from its use.
All the product names or trademarks are the properties of their respective owners.
2
INDEX
1. VDT-100 USB Digital TV Receiver Introduction
1.1 Product Introduction
1.2 Package Contents
1.3 System Requirement
1.4 Features
1.5 Specification
2. Installation Guidance
2.1 Software Installation
2.2 Hardware Setup
3. Program Setup & Application
3.0 Control Panel
3.1 Program Scanning
3.2 EPG (Electronics Program Guide)
3.3 Program Recording
a. Normal Recording
b. Reserved Recording
3.4 Grab Image
3.5 Open File
3.6 My Favorite Bar
3.7 Multi Channel Preview
3.8 Teletext
4. Application Introduction
4.1 Right Click Menu
4.2 Setup Window
5. FAQ
3
1. VDT-100 USB Digital TV Receiver Introduction
1.1 Product Introduction
Watch TV anywhere
Pocket size
Smallest DTV USB receiver
Easy to install
USB 2.0 port compatible
No need extra-extended antenna
Friendly UI
Fashionable exterior
Mobile mode: under 3km/hr moving
z
z
z
z
z
z
z
z
z
1.2 Package content
•
•
•
•
Infrared remote controller
Driver CD
User’s and installation guide
•
•
USB cable
Leather pouch
VDT-100 USB receiver
1.3 System requirement
•
OS: Windows 2000-SP4
Windows XP
•
•
•
•
•
•
•
Desktop or Notebook
CPU: 800MHz or above
Main Memory: 128MB RAM (256MB recommend)
VGA display card with overlay support, at the least 8MB memory
Sound card
USB 2.0 port only
Microsoft DirectX 9.0
4
1.4 Features
USB bus powered, no extra power adaptor
Convenient extendable rod antenna
USB2.0 port compatible
High quality aluminum metal case
High quality digital terrestrial TV & radio receiving (DVB-T)
Portable device
Electronic Program Guide (EPG)
Channels auto scan 6/7/8 M
Teletext
MPEG-II software decoding
Favorite list
Still frame capture
Multi channel preview matrix
Channel auto scan
Remote control
Red-light LEDs for USB link
Real time Digital Video Recording (DVR) and scheduling recording and play
16:9 & 4:3 wide screen
Grab image
Video quality adjustment
Software upgradeable
1.5 Specification
Tuner
Attached Rod Antenna
External antenna(optional), Input Terminal: 75 Ohm MMCX connector
Receiving Frequency: 48.25 ~ 863.25 MHz Tuning Range
COFDM & FEC
Fully DVB-T Compliant
2K or 8K FFT Size
Punctured Codes: 1/2, 2/3, 3/4, 4/5, 5/6 and 7/8
Bandwidth: 6/7/8 MHz Auto Select
Demultiplexing
Max No. Section filtering: 32PIDs
Engine: Hardware
Stream capture: PES & TS
A/V Format
Video format: MPEG-II Main Profile& Main Level
Audio format: MPEG-II Audio layer I & II
Modulation
QPSK, 16QAM or 64QAM
Dimension
95mmx70mmx13mm (L x W x H)
5
2. Installation Guidance
Notice:
Before plugging VDT-100 into USB port, please finish the software installation first.
2.1 Software installation
Insert the driver CD for software installation.
Please follow the instructions.
Select “Program Driver Install” to start installation.
Driver / Program Install:
Press to start driver / program installation
Adobe Reader Download:
Directly link to Adobe Acrobat website to download PDF reader. To view VDT-100 user manual,
PDF reader has to be installed first.
6
User manual:
Press to read VDT-100 user manual
Exit:
Press to exit the installation
Press “Next ” to continue the installation.
7
After reading the license agreement, please select to “I agree to the terms of this license
agreement”.
Type in user information.
Insert “Serial Number” which printed on the CD.
8
Select language.
Press “Next ” to continue the installation process.
9
Setup your Shortcut Folder name
Press “Next ” to continue the installation.
10
Program and driver installation is running.
11
Select “Yes, restart my computer now” to complete the whole installation process.
12
2.2 Hardware setup
After driver & program installation completed, please continue to finish the hardware setup.
z
Connecting USB cable to both PC & VDT-100
“A type” USB to PC or NB
z
“B type” USB to VDT-100
Below notice windows will pop up after VDT-100 plug in
Press “Continue Anyway” to continue hardware installation.
13
Press “Continue Anyway” to complete hardware installation.
*If “New device found” window pops up at the same time. Please press “Cancel” as well.
z
z
Internal Antenna Adjustment
Adjusting the length of the Rod antenna, will affect receiving signal quality.
Antenna
Length
Receiving
Frequency
20cm
350MHz
16cm
450MHz
13cm
550MHz
11cm
650MHz
Using internal antenna:
Fully pull out the antenna.
* The length of the Rod antenna might affect the antenna sensitivity. Please check out the user
manual for more detail setup.
z
Using external antenna:
Open the “Setup” -> ”General” window, tick off “Using internal antenna”.
Then put the antenna back to the original position.
The surround environment may affect the signal reception. (ex: buildings surround)
So please place the antenna close to window side for better sign reception.
14
Please refer to the RF Power & the RF Quality indicating bars at the left side of the control
panel on the screen, poor RF quality might result in no picture at all.
*When only internal antenna used, please tick on “Use Internal Antenna” in Setup window.
15
Enjoy Videa 1 (VDT-100) digitizing your vision.
16
3. Program Setup & Application
3.0 Control Panel
Volume
up/down
Mute
Current program type
Backward
(TY / File)
scan
Pause
Operating
Status
Play
Record
Forward
scan
Channel Change
Recall
Full
Screen
Videa Website
Mutli Channel
Preview
Time Search
Antenna
Sensitivity
Display
Stop
Volume
Teletext
Grab
Image
My Favorite
Steup
Electronic
Program Guide
Open File
Time shift
3.1 Program Scanning
Press
to open “Setup” window and select to “Scan Channel”.
Point to “Country / Area” to select the location the VDT-100 settled. Click “Start” to scan
programs. The “Bandwidth” will be automatically changed to the location that has been
chosen.
17
After all programs are scanned out, double click to the channel you want to watch.
18
3.2 EPG (Electronics Program Guide)
Press
z
to check all channels’ program schedules.
Choose watch channel to get programs’ timetable and program description.
* This function is only available in certain countries.
19
3.3 Program Recording
a. Normal recording:
Press
to start recording
Then press
to view and open the records.
* Records are saved under “my document / DTV / capture”.
b. Reserved recording:
Press
to open “Setup” window and select to “Record”.
Double click the schedule bar to set up channel and recording time.
3.4 Grab image
Press
Then press
to grab pictures from screen.
to view and open the records.
* Records are saved under “my document / DTV / capture”.
20
3.5 Open File
Press
to open files & choose any recorded programs, video or JPG file to watch.
3.6 My Favorite Bar
Press
to open below window. It displays scanned TV channels.
Press
to switch below models.
a. TV
b. Radio
c. My favorite
21
3.7 Multi Channel Preview
Press
to preview multi channels
3.8 Teletext
Press
to start “Teletext” function.
* “Teletext” function is only available in certain areas.
22
4. Application Introduction
4.1 Right Click Menu
Play: Play programs
Pause: Pause the current broadcasting
Stop: Stop the current broadcasting
Record: Record the current broadcast
Mute: Turn off the sound
Forward Scan: Fasten the current broadcasting
Backward Scan: Rewind the current broadcasting
Next CH: Next channel
Previous CH: Previous channel
Recall: Return to previous channel
My Favorite: Favorite channel set up and list
Multi-Channel Preview: Preview multi channels
Audio Selection: Select languages
Time Shift: Start or stop the time shift function
Grab Image: Copy the image and save
Setup: Open the setup window
Show Control Panel: Control panel display
Aspect Ratio: Adjust screen size ratio (4:3 & 16:9)
Screen Size: Adjust screen size (60%, 100%, 150%)
Fullscreen: Make screen in full size
Volume Up: Volume up
Volume Down: Volume down
Minimize Faceplate: Hide the control Panel
About: Version Information
Help: Help window display
Exit: Turn off VDT-100
23
4.2 Setup Window
z
General
z
z
z
z
z
z
Scan Channel
z
z
z
z
z
24
Fullscreen: Screen fully
displayed
Always On Top: Screen
always on top
Enable OSD: Command on
screen
Enable Splash: Screen display
Refresh RF Information:
RF information refresh display
Use Internal Antenna: Only
click for using internal antenna
RF Frequency: Scanning by
1. Country / Area
2. Bandwidth: 6,7,8MHz
3. Range: UHF / VHF
4. Certain frequency: in
range / single
Bandwidth: 6, 7, 8MHz
FFT Mode: Auto / 2 / 8
Scan (Enable Freq. Offset):
Scan frequency detailly.
Scan: Start / Stop
Channel (TV / Radio): Open /
Save / Save as / Delete /
Delete all
Record
z
z
z
Storage Resource
Save to
Preset Record: Reserved
recording
Display
z
Display Setting
1. Brightness (0~255)
2. Contrast
(0~127)
3. Hue
(-128~127)
4. Saturation
(0~127)
25
Capture
z
Capture image (save) to:
1. Clipboard
2. File
Time Shift
z
Time-Shift limit (min): Time
limit
26
Information
Skin
27
z
Status information
z
Control Panel Display
5. FAQ
Q 1. “Capture device Failure” pops up in the screen.
A:1. Please re-plug the USB connector (B type) to the VDT-100.
2. In most cases, the problem is due to the driver installation. You may check the driver
installation in the “Device Manager” of “Windows Control Panel”. In the device category
“Sound, Video and Game Controllers”, there must be a device, which is named “Videa
USB DVB-T device”. If the device is not found, please re-install the driver (refer to Chapter
2.2).
Q 2. Unable to find any channel after auto scanning.
A: 1. Please make sure the area is under DVB-T signal coverage.
*Please refer to DVB-T official website: www.dvb-org
2. Please check antenna by below steps.
a. Make sure internal/external selected correctly (Setup -> General -> “Use Internal”).
Internal antenna may need to be adjusted by its length.
*Please refer to chapter 2.2 internal antenna adjustments.
b. Move the device close to window or in correct position for better signal receiving.
3. Check Country/Area select (Setup -> Scan channel)
4. Select “Enable Freq. Offset” (Setup -> Scan channel) and rescan.
*This function is only suitable in certain countries.
5. Make sure motherboard’s USB 2.0 port driver is the most update version.
Q 3. Channel scanned well, but unalbe watch program
A: 1. Make sure RF power and RF quality bar at “green level”.
2. Make sure Window XP/2K driver update to latest version.
3. Make sure Microsoft DirectX 9.0 had been installed correctly.
*RF power/RF quality bar indicated signal strength, green level means signal received ok.
4. VDT-100’s mobile mode is limited under 3km/hr speed. The signal won’t be acceptable
while speedy moving.
Q 4. Some TV or Radio channels unable found
A: 1. Please rescan or single scan (input missing frequency)
2. Make sure Window XP/2K driver update to latest version.
(Window XP SP2 / Windows 2000 SP4)
Q 5. Video is playing, but sound does not work.
A: Please check the sound card driver and the volume setting.
28
Q 6. While program running, sound works but nothing is displayed in the screen.
A: Please make sure the VGA card & Microsoft DirectX 9.0 has been installed correctly.
Q 7. The receiving signal strength is weak.
A: 1. Make sure device’s position can receive DVBT signal, sometimes need to move antenna
more close to window to get more strong signal.
2. To enlarge receiving signal strength, please connect an external antenna into VDT-100.
Please enquire to the shop where you bought the device.
External Antenna
Plug into VDT-100
* When only external antenna used, please tick off “Use Internal Antenna” in Setup window.
29
Q 8. Recording files unable play.
A: Files are recorded in MPEG2 format, and only play with VDT-100’s DTV Player.
Q 9. DVB-T signal coverage search.
Australia
http://www.dba.org.au/index.asp?sectionID=22
England
http://www.dtg.org.uk/retailer/coverage.html
Finland
http://www.digitv.fi/sivu.asp?path=9;4710
France
http://www.tvnt.net/couverture.php#2
Germany
http://www.ueberall-tv.de/1home/UeF-home.htm
Holland
http://www.digitenne.nl/nodig/postcodecheck.asp
Taiwan
http://www.dvo.org.tw/e-wave/cts_search.asp
30