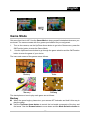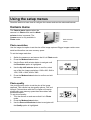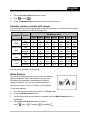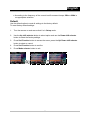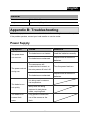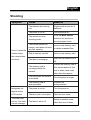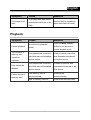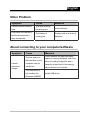
1
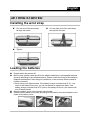
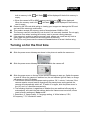
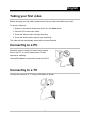
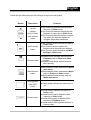
English WEEE Warning Message Symbol for Separate Collection in European Countries This symbol indicates that this product is to be collected separately. The following apply only to users in European countries: z This product is designated for separate collection at an appropriate collection point. Do not dispose of as household waste. z For more information, contact the retailer or the local authorities in charge of waste management. FCC STATEMENT This device complies with Part 15 of the FCC Rules. Operation is subject to the following two conditions: (1) This device may not cause harmful interference, and (2) This device must accept any interference received, including interference that may cause undesired operation. Note: This equipment has been tested and found to comply with the limits for Class B digital devices, pursuant to Part 15 of the FCC rules. These limits are designed to provide reasonable protection against harmful interference in a residential installation. This equipment generates uses and can radiate radio frequency energy and, if not installed and used in accordance with the instructions, may cause harmful interference to radio communications. However, there is no guarantee that interference will not occur in a particular installation. If this equipment does cause harmful interference to radio or television reception, which can be determined by turning the equipment off and on, the user is encouraged to try to correct the interference by one or more of the following measures: • Reorient or relocate the receiving antenna. • Increase the separation between the equipment and receiver. • Connect the equipment into an outlet on a circuit different from that to which the receiver is connected. -1- English Use of shielded cable is required to comply with Class B limits in Subpart B of Part 15 of the FCC rules. Do not make any changes or modifications to the equipment unless otherwise specified in the manual. If such changes or modifications should be made, you could be required to stop operation of the equipment. READ THIS FIRST Notice: 1. Product design and specifications are subject to change without notice. This includes primary product specifications, software, software drivers, and user's manual. This User Manual is a general reference guide for the product. 2. The product and accessories that come with your camera may be different from those described in this manual. This is due to the fact that different retailers often specify slightly different product inclusions and accessories to suit their market requirements, customer demographics, and geographical preferences. Products very often vary between retailers especially with accessories such as batteries, memory cards, cables, pouches, and language support. Occasionally a retailer will specify a unique product color, appearance, and internal memory capacity. Contact your dealer for precise product definition and included accessories. 3. The illustrations in this manual are for the purpose of explanation and may differ from the actual design of your camera. 4. The manufacturer assumes no liability for any errors or discrepancies in this user's manual. 5. For driver updates and revisions to this manual, please refer to our website www.geniusnet.com SAFETY INSTRUCTIONS Read and understand all Warnings and Cautions before using this product. WARNING If foreign objects or water have entered the camera, turn the power OFF and remove the batteries. Continued use in this state might cause fire or electric shock. Consult the store of purchase. -2- English If the camera has fallen or its case has been damaged, turn the power OFF and remove the battery. Continued use in this state might cause fire or electric shock. Consult the store of purchase. Do not disassemble, change or repair the camera. This might cause fire or electric shock. For repair or internal inspection, ask retailer where you purchased it. Use the specified batteries. Use with any other type of batteries might cause explosion or influence the camera’s performance. Do not use the camera in areas near water. This might cause fire or electric shock. Take special care during rain, snow, on the beach, or near the shore. Do not place the camera on inclined or unstable surfaces. This might cause the camera to fall or tilt over, causing injury. Keep the batteries out of the reach of children. Swallowing batteries might cause poisoning. If the battery is accidentally swallowed, immediately consult a physician. Do not use the camera while you are walking, driving or riding a motorcycle. This might cause you to fall over or result in a traffic accident. CAUTION If foreign objects or water have entered the camera, turn the power OFF and remove the batteries. Continued use in this state might cause fire or electric shock. Consult the store of purchase. Do not fire the flash close to anyone’s eyes. This might cause damage to the person’s eyesight. Do not subject the LCD monitor to impact. This might damage the glass on the screen or cause the internal fluid to leak. If the internal fluid enters your eyes or comes into contact with your body or clothes, rinse with fresh water. If the internal fluid has entered your eyes, consult a physician to receive treatment. -3- English A camera is a precision instrument. Do not drop it, strike it or use excessive force when handling the camera. This might cause damage to the camera. Do not use the camera in humid, steamy, smoky, or dusty places. This might cause fire or electric shock. Do not remove the battery immediately after long period of continuous use. The battery becomes hot during use. Touching a hot battery might cause burns. Do not wrap the camera or place it in cloth or blankets. This might cause heat to build up and deform the case, resulting in fire. Use the camera in a well-ventilated place. Do not leave the camera in places where the temperature may rise significantly, such as inside a car. This might adversely affect the case or the parts inside, resulting in fire. Before you move the camera, disconnect cords and cables. Failure to do this might damage cords and cables, resulting in fire and electric shock. Notes on Battery Usage When you use the battery, carefully read and strictly observe the Safety Instructions and the notes described below: Use only the specified battery. Avoid using the battery in extremely cold environments as low temperatures can shorten the battery life and reduce camera performance. Avoid using the batteries in extremely cold environments as low temperatures can shorten the batteries life and reduce camera performance. This low temperature will also influence alkaline batteries performance, therefore Ni- MH rechargeable batteries are highly recommended. When you are using the new rechargeable batteries or a rechargeable battery that has not been used for an extended period of time (the batteries that passed the expiry date are exception) might affect the number of images that can be captured. Therefore, to maximize their performance and lifetime, we recommend that you fully charge the batteries and discharge them for at least one complete cycle before use. The battery may feel warm after long period of continuous use of the camera or the flash. This is normal and not a malfunction. -4- English The camera may feel warm after long period of continuous use. This is normal and not a malfunction. If the battery is not to be used for a long period of time, remove it from the camera to prevent leakage or corrosion. If the batteries are not to be used for a long period of time, store it after no battery power left. If the battery is stored for a long time in a fully charged state, its performance may be impaired. Risk of explosion if battery is replaced by an incorrect type. Dispose of used batteries according to the instructions. Never use batteries of different types (together) or mix old and new batteries. Never use manganese batteries. -5- English CONTENTS INTRODUCTING THE CAMERA____________________________________ 8 System requirements __________________________________________ 8 Features ____________________________________________________ 8 Package Contents_____________________________________________ 9 About the camera ____________________________________________ 10 Front view _______________________________________________________ 10 Back View _______________________________________________________ 11 GETTING STARTED ____________________________________________ 12 Installing the wrist strap _______________________________________ 12 Loading the batteries _________________________________________ 12 Inserting the memory card _____________________________________ 13 Turning on for the first time _____________________________________ 14 Changing modes_____________________________________________ 15 Before you start______________________________________________ 15 Setting the date and time ___________________________________________ 15 Setting the language _______________________________________________ 16 Taking your first still picture_____________________________________ 16 Taking your first video _________________________________________ 17 Connecting to a PC___________________________________________ 17 Connecting to a TV ___________________________________________ 17 USING THE CAMERA___________________________________________ 18 Using the Shutter button _______________________________________ 18 Back View _______________________________________________________ 18 Front view _______________________________________________________ 18 About the indicators __________________________________________ 20 Using the camera LCD display __________________________________ 20 Photo mode_________________________________________________ 21 Icons in Photo mode _______________________________________________ 21 Setting the flash___________________________________________________ 22 Using the Macro feature ____________________________________________ 22 Using the zoom function ____________________________________________ 22 Video Mode_________________________________________________ 23 Icons in Video mode _______________________________________________ 23 Playback mode ______________________________________________ 24 Icons in Playback mode ____________________________________________ 24 Viewing pictures and videos _________________________________________ 24 Using thumbnails mode_____________________________________________ 25 Auto play ________________________________________________________ 25 PC Mode ___________________________________________________ 25 Storage option mode _______________________________________________ 25 Video camera mode _______________________________________________ 26 -6 English Game Mode ________________________________________________ 27 Boxboy _________________________________________________________ 27 Tetris ___________________________________________________________ 28 Memory _________________________________________________________ 28 GoBang _________________________________________________________ 28 Using the setup menus _________________________________________ 30 Camera menu _______________________________________________ 30 Photo resolution __________________________________________________ 30 Photo quality _____________________________________________________ 30 Possible number of shots (still image)__________________________________ 31 White Balance ____________________________________________________ 31 Self-timer ________________________________________________________ 32 EV _____________________________________________________________ 32 Icon Display______________________________________________________ 32 Date Display _____________________________________________________ 33 Movie menu ________________________________________________ 33 Video size _______________________________________________________ 33 Video quality _____________________________________________________ 34 Possible recording time / sec (video clip) _______________________________ 34 White balance ____________________________________________________ 35 EV _____________________________________________________________ 35 Icon display ______________________________________________________ 35 Playback menu ______________________________________________ 36 Delete one _______________________________________________________ 36 Delete all ________________________________________________________ 36 DPOF __________________________________________________________ 37 DPS Direct Print __________________________________________________ 37 Setup menu_________________________________________________ 38 File duplication ___________________________________________________ 38 Time/ Date _______________________________________________________ 38 Formatting _______________________________________________________ 38 Auto-power off ____________________________________________________ 39 OSD Language ___________________________________________________ 40 TV system _______________________________________________________ 40 Frequency _______________________________________________________ 40 Default __________________________________________________________ 41 Installing software and drivers ___________________________________ 42 Drivers_____________________________________________________ 42 Mass storage_____________________________________________________ 42 Computer-based video camera _______________________________________ 42 Installing the driver ________________________________________________ 43 Presto! Video Works 6 ________________________________________ 44 Presto! Mr. Photo 3 ___________________________________________ 44 Appendix A: Specifications______________________________________ 45 Appendix B: Troubleshooting____________________________________ 46 -7 English INTRODUCTING THE CAMERA Read this section to learn about the features and functions of the camera. This chapter also covers system requirements, package contents, and front and rear views. System requirements The camera requires a PC with the following specifications: Windows XP, 2000, ME, 98SE operating system Intel Pentium Ⅲ500 MHz CPU or higher At least 256 MB of RAM or higher Standard USB 1.1 port or higher 4 X CD-ROM drive or higher At least 200MB of available disk space Note:USB 1.1 supports file transfer between the PC and the camera, however a USB 2.0 port supports a much faster connection as compared to a USB 1.1 port. Features The camera’s features and functions include: Digital still camera Digital camcorder Mass storage PC camera Card reader Video games -8 English Package Contents All the following items should be present in the camera package. If any item is missing or appears damaged, contact your dealer immediately. Digital camera CD-ROM (containing the driver) Camera pouch Wrist strap USB/ AV-out cable Batteries User manual Digital Camera CD-ROM (containing the driver) Camera pouch Wrist strap USB/ AV-out cable AAA-size alkaline batteries (2) User manual -9 English About the camera Front view (1) Shutter button (6) Microphone (2) Sliding power (ON/ OFF) cover (7) Tripod socket (3) Self-timer lamp (8) Memory card slot (4) Flash (9) Battery cover (5) Lens -10 English Back View (1) Macro indicator (7) Set/ function button (2) Status indicator (8) Browse button (3) LCD display (9) Mode selector button (4) Up shift selector button (10) Macro catch (5) Down shift selector button (11) USB port cover (6) Wrist strap mount (12) USB socket -11 English GETTING STARTED Installing the wrist strap Put one end of the wrist strap through the mount. Tighten. Put the other end of the wrist strap through the first end. Loading the batteries Please switch the camera off. Before using, please insert two AAA-size alkaline batteries or rechargeable batteries correctly according to the indicated polarity. Please check the charge of the batteries. Replace the batteries if their charge is insufficient, so as to ensure that the camera functions normally. Ú When using your digital camera, if the battery charge is weaker than 2.3V(one mark on the battery level icon), you will not be able to operate the flash; if the battery charge is weaker than 2.2V (red on the battery level icon), the camera will turn off automatically. Open the battery cover in the direction as indicated. Please load the batteries correctly according to the polarity icons as indicated on the inside of the battery cover. -12 English Closing the battery cover Note: Do not apply excessive force on the battery cover as it may cause damage. When using your digital camera, if the battery charge is one mark on the battery level icon, you will not be able to continue operating the flash. Ú When the battery charge turns red, you will not be able to continue to operate “Photo mode” and “Movie mode”. Ú When replacing the batteries, the camera retains the date/ time settings for approximately three minutes. Please check your date/ time settings after the batteries are replaced. Battery status The battery level icon has four types of indications: Full , Half-full , Low , Empty Inserting the memory card Please switch the camera off. 1. Inserting the memory card This is what the memory card slot looks like. Insert the memory card into the slot in the way shown. 2. Removing the memory card Gently press on the memory card The memory card will automatically eject. Pull the card out in the direction indicated. Note: Before using, please insert your SD memory card into the memory card slot on the bottom of the camera. If the card is full or contains other data, you can access Format in “Setup mode” using the Mode Selector button to format your memory card. The digital camera has a built-in memory of 32MB. When a memory card is inserted into the camera, the camera will take it to be the primary storage media. Ú The camera accepts only SD or MMC memory cards. Ú When using SD memory card, please switch the camera off before inserting or removing the SD memory card. Built-in memory and memory card in use display on the camera. Ú When the camera’s built-in memory is in use, -13 will be displayed. When the English built-in memory is full, empty. will flash; will be displayed if the built-in memory is Ú When the camera’s SD or MMC memory card is in use, will be displayed. When the memory card is full, will flash; will be displayed if the memory card is empty. Removing the SD card while taking or viewing your images can damage the SD card and cause the camera to malfunction. This product accepts SD memory cards of sizes between 32MB to 1GB. The memory card will not slide fully into its slot if it is incorrectly inserted. Do not apply excessive force when inserting the memory card to prevent causing damage. If the camera is unable to read the memory card, please use a soft and dry cloth to gently wipe the gold contacts on the card, before re-inserting. If the SD is new, please use the camera’s Format feature to format it before using. Turning on for the first time Slide the power cover sideways as shown in the picture to switch the camera on. Slide the power cover sideways as shown to switch the camera off. Slide the power cover on the top of the camera sideways to start-up, Switch the power on and off. When the camera is switched on, the red indicator light will flash, an image will appear on the LCD display. Ú This camera comes with three power saving options: Off, 1 minute, 3 minutes. If the camera remains on and inactive throughout the preset power saving period, the camera will automatically switch off. To switch it on again, slide the power cover in the “off” and “on” directions successively. Ú The following functions, irregardless of whether they are switched off manually or automatically, will retain the last settings before the camera was turned off, unless reset to factory settings at “Setup mode”: 1. Resolution, 2. Image quality, 3. Language setting, 4. White balance, 5.EV, 6.Frequency, 7. PC connection mode. -14 English Changing modes The camera can be switched to the following operating modes: ”Playback mode”, “Photo mode”, “Movie mode”, “Setup mode”, ”PC mode”, “Games mode” and other features. Press and hold on to the Mode selector button for two seconds to access the modes Main menu. Use the Up/ Down selection buttons to highlight the options then press the Set/ Function button to confirm. Photo mode PC mode Playback mode Setup mode Games mode Mode selector button Video mode Before you start Before you use your camera, there are some basic settings to configure. These settings will be illustrated in the chapters that follow. Setting the date and time 1. Please switch on the camera as shown in “Turning on for the first time”. 2. Press and hold on to the Mode selector button for two seconds to access the modes Main menu. Use the Up/ Down selection buttons to highlight the options then press the Set/ Function button to confirm. 3. Use the Down selection button to select the Date/ Time option then press the Set/ 4. The selection will be highlighted, use the Up/ Down selection buttons to adjust the Function button to confirm. date and time, press the Browse button to change between Year, Month, Day, Hours and Minutes. 5. Press the Set/ Function button to save the new settings. Press Mode selector button to exit the Menu. The new settings will also be saved. Setup mode -15 English Setting the language 1. Please switch on the camera as shown in “Turning on for the first time”. 2. Press and hold on to the Mode selector button for two seconds to access the modes Main menu. Use the Up/ Down selection buttons to highlight the options then press the Set/ Function button to confirm. 3. Use the Up selection button to enter into the second level of the system then use the Down selection button to select Language option. Press the Set/ Function button to confirm. 4. 5. Select the required language using the Up/ Down selection buttons. Press the Set/ Function button to save the new settings. Press Mode selector button to exit the Menu without saving the changes. Setup mode Taking your first still picture Before taking your first still picture, please ensure that you have read “Before you start”. To take a still picture: 1. Switch on the camera and ensure that it is in the Photo mode. 2. Use the LCD to frame the picture. 3. Press the Shutter button to capture the picture. The picture will be automatically saved with a unique filename. -16 English Taking your first video Before shooting your first video, please ensure the you have read “Before you start”. To shoot a video clip: 1. Switch on the camera and ensure that it is in the Video mode. 2. Use the LCD to frame the video. 3. Press the Shutter button to begin recording. 4. Press the shutter button again to stop recording. The video will be automatically saved with a unique filename. Connecting to a PC Read this section carefully to learn how to transfer files to the PC, or use the camera as a PC web camera for meetings. Using USB cables to connect the camera to the PC. Connecting to a TV Connect the camera to a TV using a USB cable as shown. -17 English USING THE CAMERA Using the Shutter button All of the buttons are found on the top or back of the camera. Back View Up shift button Down shift button Set/ function button Browse button Mode selector button Front view Shutter button Sliding power (ON/ OFF) -18 English Please see the table below for the functions of each icon and symbol. Button Description Features Up shift selector button/ Down shift selector button ● Up/ Down shift selector buttons control the zoom in Photo mode. ● Up/ Down shift selector buttons stop the playback of video clips in Video mode. ● Up/ Down shift selector buttons navigate (up/ down) the selection options or navigate (trans-page) selections. Set/ Function button ● Set/ Function button controls the flash in Photo mode. ● Set/ Function button confirms the selection when amending the settings. ● Set/ Function button accesses the Menu settings in Video mode. Browse button ● Browse button activates and exits from Playback mode in Photo and Video modes. ● Browse button allows picture selection when printing. Mode selector button ● Mode selector button accesses the Mode main menu. ● Mode selector button accesses the Menu setup in Photo and Video modes. ● Mode selector button directly exits the Mode main menu. Sliding power (ON/ OFF) cover ● Sliding power switches the camera on or off. Shutter button ● Shutter button captures the picture in Photo mode. ● Shutter button starts/ stops the video capturing in Video mode. ● Shutter button plays or pauses video playback in Playback mode. ● Shutter button allows games selection in Games mode. -19 English About the indicators Please see the table below for the functions of the indicators. Photo mode Self-timer lamp Macro indicator Status indicator Power up Self-timer Macro Shutter button Charging the Flash Ä ~ ¦ ¦ Ä Legend: ¦: LED lights up and goes off Ä: Indicator flashes ~: Constant light : Indicator with dim lights Using the camera LCD display Use the LCD display to compose your pictures and videos, review pictures and videos stored in memory, and navigate the menu system. Icons are also displayed on the LCD display that shows the current configuration. Changing the LCD display You may decide not to display icons on the LCD screen by following the instructions below. 1. Ensure that you are either in Photo mode or Video mode. If you are in neither, please select either mode from the modes Main menu. 2. Press the Mode selector button once to access Quick menu. Select the options using the Up/ Down shift selector buttons. After selecting the icon, use the Shift selector buttons to select ON or OFF. 3. Press the Mode selector button to save the new settings. Press the Browse button to exit the menu, the new settings will be saved. -20 English Photo mode Use Photo mode to capture still pictures and store them in the internal memory or on an icon indicates Photo mode. SD card. Icons in Photo mode Please see the table below for the functions of the icons. Description Icon 1 2 Photo mode. Memory card status. Please read “Inserting the memory card” for details on inserting and removing the memory card. 3 The number of pictures taken. 4 Battery charge status. 5 Digital zoom lever, details on using the zoom can be found in “Using the zoom function”. -21 English 6 Flash mode indicator, details on setting the flash can be found in “Setting the flash”. 7 Time and date display. Setting the flash This camera has three different modes of flash. To change the flash mode, press Set/ Function button. The table shows the current flash configuration. Icon Description Flash is disabled. Automatic flash, which will be activated only when necessary, for example for the use of flash in dim places and when no flash is used in bright places. Forced flash, which will be activated under any circumstance. Using the Macro feature The macro function enables you to capture images of subjects very close to the lens. In Macro mode you can focus on subjects as close as 17 cm. When the Macro mode is not in use, the minimum focal distance is 19 cm. Use Macro mode for subjects 17-19 cm from the camera. To switch the macro function on or off, switch the Macro catch at the side of the camera on or off. When the macro function is turned on, the Macro indicator will light up, otherwise, the indicator will not light. The Macro mode is available in both the Video and Photo modes. Using the zoom function The camera is equipped with 4x digital zoom. This zoom function will only work in Photo mode. Press the Up shift selector button to zoom in. Press the Down shift selector button to zoom out. The digital zoom lever on the left of the LCD display indicates the zoom status. -22 English Video Mode Use Video mode to capture video clips and store them in the internal memory or on an icon indicates Video mode. SD card. Icons in Video mode Use the following diagram to familiarize yourself with the Video mode icons and symbols. Please see the table below for the functions of the icons. Icon Description 1 Video mode. 2 Recording time (Seconds) 3 Status: Recording. 4 Battery charge status. 5 Time and date display. Using the Zoom feature Please see “Using the Macro feature”. -23 English Playback mode Icons in Playback mode Photo Playback Video Playback Thumbnail Playback Please see the table below for the functions of the icons of Playback mode. Icon Description 1 The current number of pictures. 2 Recording time (Seconds). 3 Video Clip Viewing pictures and videos To view pictures and videos: 1. Switch on the camera and ensure that it is in the Playback mode. The most recent picture or video clip will be displayed on the LCD display. 2. Navigate using the Up shift selector/ Down shift selector buttons to select images and video clips stored in the memory card. 3. Press the Mode selector button twice to view the image and video clips’ thumbnails. 4. To playback video clips: 5. Press the Shutter button to playback video. 6. Press the Shutter button another time to pause video playback. 7. Press the Shutter button another time to resume video playback. 8. Press the Up/ Down shift selector button to pause video playback and at the same -24 English time browse the previous or next image or video clip. Using thumbnails mode In Playback mode, in factory settings, display images will fit to screen, but it is also possible to display nine thumbnails on the LCD. To view thumbnails: 1. Switch on the camera and ensure that it is in the Playback mode. The most recent picture or video clip will be displayed on the LCD display. 2. Press Set/ Function button to access the Playback menu. 3. Press Mode selector button twice to display nine thumbnails per screen. 4. Use the Up/ Down shift selector button to select images. A red frame will highlight the selected image. Press the Set/ Function button or Mode selector button to display the selected image (in the red frame) fitted to screen. Auto play The camera includes an auto play function. A slideshow displays each image in turn with a predefined delay between each picture. 1. Switch on the camera and ensure that it is in the Playback mode. The most recent picture or video clip will be displayed on the LCD display. 2. Press Set/ Function button to access the Playback menu. 3. Press Up/ Down shift selector button to select Auto Play option in the menu. 4. Press Set/ Function button to activate the Auto Play feature. 5. The images stored in memory will be displayed one after the other. You can press on any button (except Browse button) to terminate the slideshow. PC Mode You can use USB mode to connect to a host PC. Before connecting to a printer or PC, please see “Installing software and drivers”. After the camera is connected to a computer via the USB cable, the camera can be set to either the USB Mass Storage and Video camera options. Storage option mode The digital camera can act as an external storage or even as a card reader. This camera can be used as an SD card reader with the following settings: 1. Please follow the instructions and install the application as shown in “Installing software and driver”. -25 English 2. Switch on the camera. 3. Press the Mode selector button and use the Up/ Down shift selector buttons to select the PC mode option. 4. Press Set/ Function button to access the selected icon. The options “Storage” or “Video camera” will be displayed on the LCD. 5. Use the Up/ Down shift selector buttons to navigate between the options and highlight “Storage” then press Set/ Function button to confirm and save. 6. When the USB icon showing the connection to the PC is displayed on the LCD, please link the camera with the PC via the USB cable provided. 7. When the set up is completed, an icon will appear under My Computer in the form of a removable hard disk. 8. The newly added hard disk, which is the camera’s built-in SD card reader, is now ready to be used. Video camera mode After the camera is set as a video camera, using Windows XP, it can be used to take photographs, or complement other software, for example: it can be used for video conferencing between concurrent end users. 1. Please follow the instructions and install the application as shown in “Installing software and drivers”. 2. Switch on the camera. 3. Press the Mode selector button and use the Up/ Down shift selector buttons to select the PC mode option. 4. Press Set/ Function button to access the selected icon. The options “Storage” or “Video camera” will be displayed on the LCD. 5. Use the Up/ Down shift selector buttons to navigate between the options and highlight “Video camera” then press Set/ Function button to confirm and save. 6. When the USB icon showing the connection to the PC is displayed on the LCD, please link the camera with the PC via the USB cable provided. 7. Using the software provided, you can now use the video camera function. -26 English Game Mode Got some free time to kill? Use the Game Mode to keep yourself entertained whenever you are bored. The camera comes with four games pre-installed for your enjoyment. 1. Turn on the camera, use the Up/Down Arrow button to go to the Game menu, press the OK/Function button to enter the Game Mode. 2. Use the Up/Down Arrow button to go through the game selection and the OK/Function button to enter the game of your choice. The icons and names of the games are as follows: Boxboy Tetris Memory GoBang The descriptions on how to play each game are as follows: Boxboy When the game begins, please turn your camera 90o clockwise and hold it this way to play the game. Use the Up/Down Arrow button to control the horizontal movements of the boy and the boxes. Use the Browse button to move down and the Mode Selection button to -27 English go up. When you successfully move all the boxes to the positions marked by the little spheres, you can proceed to the next stage. The game consists of 30 stages, and your current stage will be displayed on the top left hand corner of the screen. You can use the OK/Function button to skip the stage or choose any stage you want to play. Press Shutter to exit the game and return to the game menu. Tetris When the game begins, please turn your camera 90o clockwise and hold it this way to play the game. Use the Up/Down Arrow button to move the blocks horizontally; hold the button to make the blocks move faster. You can rotate the blocks with the Mode Selection button and hold the Browse button to make the blocks fall faster. Press the OK/Function button once will pause the game; press it again to resume. The next block to fall will be displayed on the top left hand corner of the screen, and your score will be on the top right hand corner. When a row has been completely filled, it will be removed, and the rows above will descend and your score increases. The game is over when the blocks pile up to the top. Press the OK/Function button to restart when the game is over. Game score: When a row of block is removed your score is increased by one; simultaneously removing 2 rows increases your score by 4; simultaneously removing 3 rows increases your score by 9. The blocks will fall faster when your score reaches the mark of 50, 150, 500 and 1500 points. Press Shutter to exit the game and return to the game menu. Memory When the game begins, please turn your camera 90o clockwise and hold it this way to play the game. You will have 2.5 seconds to memorize the pictures and their position once the game begins. They would then be covered up and the time counter at the bottom right of the screen will start. The goal of the game is to eliminate the pictures by picking them out in pairs within the shortest time possible. Use the Up/Down Arrow button to move the cursor horizontally. The Browse button will move the cursor down while the Mode Selection button will move it up. Press the OK/Function button to reveal the picture you have selected; if the next picture you choose is the same as the first one, then the pair of pictures will be eliminated. If the second picture you choose is different from the first, the next selection you make will cover up the first two pictures and the counter on the bottom left of the screen will increase by 1. The counter represents the number of misses you have made. When all the pictures are eliminated, you will win the game and the word “WIN!” will appear on the screen. Press the OK/Function button to restart when the game is over. Press Shutter to exit the game and return to the game menu. GoBang When the game begins, please turn your camera 90o clockwise and hold it this way to play the game. -28 English The flashing grid displays the position where your piece will be placed. Use the Up/Down Arrow button to move the grid horizontally. Use the Browse button to move it down, and the Mode Selection button to move it up. Place your piece (Black) in the desired grid by pressing the OK/Function button. When you have made your move, your opponent (the camera) will place its piece (White) on the board as well. Win the game by successfully forming a line of five continuous pieces, and you will see “WIN” displayed on the screen; conversely, if your opponent manages to form a straight line with five continuous pieces, you will lose the game and the word “FAIL” will be shown in the screen. When the board has been completely filled with pieces yet neither side was able to form a straight line with five pieces, you will see “DRAW” displayed on the screen. No matter how the game ends, you will be taken back to the Game Menu. The bottom right corner on the screen interface will remind you that you are playing Black and your opponent is playing White. Press the OK/Function button to restart when the game is over. Press Shutter to exit the game and return to the game menu. -29 English Using the setup menus Read this section to learn how to configure the camera and use the advanced features. Camera menu The Camera menu appears when the camera is in Photo mode and the Mode selector button is pressed. The Camera menu is only available in Photo mode. Mode selector button Photo resolution Use the image size option to set the size of the image captured. Bigger images contain more detail and therefore use more memory space. To set the image resolution: 1. Switch the camera on and ensure that it is in Photo mode. 2. Press the Mode selector button. 3. Use the Down shift selector button to navigate until the Resolution option is highlighted. 4. Use the Up shift selector button to confirm, select one of the four image resolutions: 1280 x 960, 2048 x 1536, 2592 x 1944, 4048 x 3040. 5. Press the Mode selector button to confirm and exit the menu. Photo quality Use picture quality option to set the size of the image captured. This camera has two quality options: Fine and Normal. Pictures taken with the Fine option will require significantly more memory space than those taken with the Normal option. To set picture quality: 1. Turn the camera on and ensure that it is in Photo mode. 2. Press the Mode selector button. 3. Use the Down shift selector button to navigate until the Quality option is highlighted. -30 English 4. Use the Up shift selector button to select: 5. Fine 6. Press the Mode selector button to confirm and exit the menu. , Normal . Possible number of shots (still image) The table below shows the approximate number of shots that you can take at each setting based on internal memory and SD memory card. SD Memory Card Resolution Quality 32MB 64MB 1GB 2GB 4048X3040 Fine 14 31 60 125 248 506 942 12MP Normal 27 57 111 231 457 935 1686 2592X1944 Fine 18 39 76 157 312 637 1207 5MP Normal 48 101 194 404 808 1635 3094 2048X1536 Fine 58 122 234 488 979 1979 3463 3MP Normal 77 160 309 639 1269 2584 4881 1280X960 Fine 74 156 293 625 1238 2519 4769 128MB 256MB 512MB 1.3MP 189 396 777 1615 3183 6487 11481 Normal * The above data shows the standard testing results. The actual capacity varies according to the shooting conditions and settings. White Balance Use the white balance option to correct color for different lighting conditions. When white balance is set to Auto, the camera automatically compensates for different lighting conditions. You can also set white balance to any of these options: Sunny, Tungsten, or Fluorescent. To set white balance: 1. Turn the camera on and ensure that it is in Photo mode. 2. Press the Mode selector button. 3. Use the Down shift selector button to navigate until the White balance option is highlighted. 4. Use the Up shift selector button to select: Auto , Sunny , Tungsten , Fluorescent -31 English 5. Press the Mode selector button to confirm and exit the menu. Self-timer The self-timer option can set a delay between the moment you press the shutter and the moment the picture is captured and thus can be used in taking self-portraits or group photographs with yourself included. This function can be set to ON or OFF. If the function is set to ON, the delay is 10 seconds. To set self-timer: 1. Turn the camera on and ensure that it is in Photo mode. 2. Press the Mode selector button. 3. Use the Down shift selector button to navigate until the Self-timer option is highlighted. 4. Use the Up shift selector button to select: 5. ON 6. Press the Mode selector button to confirm and exit , OFF . the menu. EV Use the exposure compensation (EV) setting to change the exposure for your pictures. Usually this value would be set to zero, but you might want to increase the exposure to light up a subject with strong back lighting, or decrease the exposure if taking a picture of something very bright. To set EV: 1. Turn the camera on and ensure that it is in Photo mode. 2. Press the Mode selector button. 3. Use the Down shift selector button to navigate until the EV option is highlighted. 4. Use the Up shift selector button to select: 5. From EV -2.0 to +2.0 EV (0.5 EV/ stop). 6. Press the Mode selector button to confirm and exit the menu. Icon Display Use the display function to control turning the icons on and off in the Photo mode. -32 English To set icon display: 1. Turn the camera on and ensure that it is in Photo mode. 2. Press the Mode selector button. 3. Use the Down shift selector button to navigate until the Icon Display option is highlighted. 4. Use the Up shift selector button to select: Image Only or Full Display 5. Press the Mode selector button to confirm and exit the menu. Date Display Use the time function to control turning the date/ time stamping on or off when taking a picture. To set date display: 1. Turn the camera on and ensure that it is in Photo mode. 2. Press the Mode selector button. 3. Use the Down shift selector button to navigate until the Time display option is highlighted. 4. Use the Up shift selector button to select: ON or OFF. 5. Press the Mode selector button to confirm and exit the menu. Movie menu The Movie menu appears when the camera is in Video mode and the Mode selector button is pressed. The Movie menu is only available in Video mode. Mode selector button Video size Use the video size option to set the size of the video captured. Videos with bigger sizes contain more details and therefore use more memory space. To set the video size: -33 English 1. Switch the camera on and ensure that it is in Video mode. 2. Press the Mode selector button. 3. Use the Down shift selector button to navigate until the Video size option is highlighted. 4. Use the Up shift selector button to confirm, select one of the two video sizes: 640 x 480, 320 x 240. 5. Press the Mode selector button to confirm and exit the menu. Video quality Use video quality option to set the quality of the video captured. This camera has two quality options: Fine and Normal. Videos taken with the Fine option will require significantly more memory space than those taken with the Normal option. To set video quality: 1. Turn the camera on and ensure that it is in Video mode. 2. Press the Mode selector button. 3. Use the Down shift selector button to navigate until the Video quality option is highlighted. , Normal 4. Use the Up shift selector button to select: Fine 5. Press the Mode selector button to confirm and exit the menu . Possible recording time / sec (video clip) Image size Quality 640 x 480 Fine 34sec Normal 54sec Fine 1min Normal 1min 56sec 320 x 240 32 MB 64 MB 1min 14sec 1min 51sec 2min 2sec 3min 56sec SD card capacity 128 256 512 MB MB MB 2min 20sec 3min 52sec 4min 11sec 8min 4min 55sec 7min 40sec 8min 33sec 16min 21sec 9min 37sec 15min 31sec 17min 11sec 32min 57sec 1GB 2GB 19min 23sec 31min 11sec 34min 34sec 51min 23sec. 66min 56sec. 75min 40sec. 129min 17sec. 66min * The data shows the standard testing results. The actual capacity varies according to the shooting conditions and settings -34 English White balance Use the white balance option to correct color for different lighting conditions. When white balance is set to Auto, the camera automatically compensates for different lighting conditions. You can also set white balance to any of these options: Sunny, Tungsten, or Fluorescent. To set white balance: 1. Turn the camera on and ensure that it is in Video mode. 2. Press the Mode selector button. 3. Use the Down shift selector button to navigate until the White balance option is highlighted. 4. Use the Up shift selector button to select: 5. Auto 6. Press the Mode selector button to confirm and exit the menu. , Sunny , Tungsten , Fluorescent EV Use the exposure compensation (EV) setting to change the exposure for your videos. Usually this value would be set to zero, but you might want to increase the exposure to brighten a scene with strong back lighting, or decrease the exposure if shooting a video in a very bright environment. To set EV: 1. Turn the camera on and ensure that it is in Video mode. 2. Press the Mode selector button. 3. Use the Down shift selector button to navigate until the EV option is highlighted. 4. Use the Up shift selector button to select: 5. From EV -2.0 to +2.0 EV (0.5 EV/ stop). 6. Press the Mode selector button to confirm and exit the menu. Icon display Use the display function to control turning the icons on and off in the Video mode. To set icon display: 1. Turn the camera on and ensure that it is in Video mode. 2. Press the Mode selector button. -35 English 3. Use the Down shift selector button to navigate until the Icon Display option is highlighted. 4. Use the Up shift selector button to select: Image Only or Full Display 5. Press the Mode selector button to confirm and exit the menu. Playback menu Use the Playback menu to manage the files stored in the camera memory or on the SD card. Delete one Use the Delete one function to delete files. To delete file: 1. Turn the camera on and ensure that it is in Playback mode. 2. Press the Set/ Function button. 3. Use the Up shift selector button to navigate until the Delete option is highlighted. 4. Use the Down shift selector button to select: Delete one 5. Press the Set/ Function button to proceed with deleting. A confirmation in the form of a dialogue will be displayed. To delete, press OK, else, press Cancel. Note: Once deleted, files cannot be recovered so make sure that you have a backup before you delete. Delete all Use the Delete all function to delete all the files on either the memory card or the camera’s internal memory. To delete all the files: 1. Turn the camera on and ensure that it is in Playback mode. 2. Press the Set/ Function button. 3. Use the Up shift selector button to navigate until the Delete all option is highlighted. 4. Use the Down shift selector button to select: Delete all 5. Press the Set/ Function button to proceed with deleting. A confirmation in the form of a dialogue will be displayed. To delete, press OK, or else, press Cancel. Note: Once deleted, files cannot be recovered so make sure that you have a backup before you delete. -36 English DPOF Use the DPOF (Digital Print Order Format) function to tag pictures stored in your memory card with print information. You can tag all pictures to be printed or select individual pictures. You can also select how many copies print and whether to include the date and time. DPOF requires a memory card. When all images to be printed are tagged, remove the memory card and take it to an image studio for printing, or use it with a DPOF compatible printer. To print images: 1. Turn the camera on and ensure that it is in Playback mode. 2. Press the Set/ Function button to select. 3. Use the Up shift selector button to select the DPOF option. 4. Use the Down shift selector button to select: set all, set single print, date stamp visible or invisible, select set all, press Set/ Function button to confirm and save the DPOF configuration, or press Cancel to the saved DPOF settings. Press Mode selector button to exit menu. To set single print, press Set/ Function button to access single print selection, press Down/ Down shift buttons to determine the number of prints, press Browse button to swap photos, press Set/ Function button to confirm and save the DPOF configuration, or press Mode selector button to exit menu. DPS Direct Print Use USB/ AV cables to connect your camera to a DPS-compatible printer. The camera will be able to directly control the individual images or all the images. While printing, all the print status will be displayed on the LCD, including error messages. DPS direct print 1. Turn the camera on and ensure that it is in Playback mode. 2. Press Set/ Function button to select. 3. Use the Up shift selector button to select the DPS option. 4. Use the Down shift selector button to select and set: print all, select single print, date stamp visible or invisible, select print all, press Set/ Function button to access menu, use Up/ Down shift selector button confirm or cancel. Afterwards, press Set/ Function button to start printing or cancel. To set single print, press Set/ Function button to access the menu, press Up/ Down shift selector to determine the number of prints, press Browse button to swap photos, press Set/ Function button to confirm printing, or press Mode selector button to exit menu. Ú In the DPS menu, the system will prompt you to plug in the USB/ AV cable that is -37 English connected to the printer. Only when the printer supports DPS, then you can use this print interface to print the pictures. Ú In the process of printing, if error messages occur on the LCD display, please refer to the list for troubleshooting in the Appendix. Setup menu In mode main menu, use Up/ Down shift selector buttons, press Set/ Function button to access Setup mode. In this mode, you can manipulate some specific settings and functions. The mode includes two feature options, they are: system features table 1 and system features table 2. File duplication 1. Turn the camera on and ensure that it is in Setup mode. 2. Use the Up shift selector button to select option and use the Down shift selector button to copy the files. 3. Press Set/ Function button to access the menu, press the Up/ Down shift selector button to confirm or cancel. 4. Press Set/ Function button to confirm or cancel. 5. Press Mode selector button to exit. Ú Note: the internal Flash memory’s copy is only compatible with DCF documents. Ú If the external card has a DCIM parent directory and a 100FSCAM child directory, the documents will be duplicated onto the 100FSCAM directory. Either way, the system will first attempt to create a DCIM parent directory with a 100FSCAM child directory, and duplicate the files into 100FSCAM. Ú If there exist same filenames in the folder, the system will give these documents a unique filename before duplicating into the 100FSCAM directory. Time/ Date Please see “Setting date and time”. Formatting Formatting the memory will delete all files that currently reside in the memory card and internal memory. -38 English Ú Before formatting the memory card or the internal memory, please ensure that your files are already backed up. 1. Turn the camera on and ensure that it is in Setup mode. 2. Use the Up shift selector button to select option and use the Down shift selector button to format. 3. Press Set/ Function button to access the menu, press the Up/ Down shift selector button to confirm or cancel. 4. Press Set/ Function button to confirm or cancel. 5. Press Mode selector button to exit. Ú Note: if a memory card is present in the camera, formatting will be carried out on the memory card and not the internal flash memory. Auto-power off This function is seldom used, unless in power-saving mode where the camera will automatically switch itself off to conserve energy. 1. Turn the camera on and ensure that it is in Setup mode. 2. Use the Up shift selector button to select option and use the Down shift selector button to select auto-power off. 3. Press Set/ Function button to access the menu, press the Up/ Down shift selector button to select three minutes, one minute, set to on or off. 4. Press Set/ Function button to confirm. 5. Press Mode selector button to exit. -39 English OSD Language Please read “Setting the language”. TV system Although different countries use different TV systems, setting up the TV systems can help you prevent differences in the display of color TVs that result from dissimilar TV systems. 1. 2. 3. Turn the camera on and ensure that it is in Setup mode. Use the Up shift selector button to select option and use the Down shift selector button to select TV output. Press Set/ Function button to access the menu, press the Up/ Down shift selector button to select NTSC or PAL. 4. Press Set/ Function button to confirm. 5. Press Mode selector button to exit. Frequency The setting of frequency will prevent the occurrence of flashing due to the local frequency rate. For detailed information, please contact your local energy provider. 1. Turn the camera on and ensure that it is in Setup mode. 2. Use the Up shift selector button to select option and use the Down shift selector button to select the frequency. 3. Press Set/ Function button to access the menu, press the Up/ Down shift selector button to select NTSC or PAL. 4. Press Set/ Function button to confirm. 5. Press Mode selector button to exit. -40 English Ú According to the frequency of the current local fluorescent lamps, 50Hz or 60Hz is an appropriate selection. Default Use the default option to reset all settings to the factory default. To reset factory default settings: 1. 2. Turn the camera on and ensure that it is in Setup mode. Use the Up shift selector button to select option and use the Down shift selector button to select the factory settings. 3. Press Set/ Function button to access the menu, press the Up/ Down shift selector button to select or cancel. 4. Press Set/ Function button to confirm. 5. Press Mode selector button to exit. -41 English Installing software and drivers Drivers When the camera is connected to the PC, the camera can be used as either a Mass Storage or a computer-based video camera. Mass storage The digital camera offers Mass Storage function as a card reader device. You can treat this digital camera as an SD card or mass storage device. You will only need to install a driver for the camera if your operating system is Windows 98SE. Windows XP/ME/2000 are plug and play operating systems and do not require a driver to be manually loaded. When the driver has been installed and the camera is connected, the camera memory and any installed mini SD card will appear as Mass Storage in Windows Explorer. Files can be dragged and dropped in the same way as on an ordinary disk. Computer-based video camera You will need to install the driver in order to use the camera as a computer-based video camera or web camera on all the Windows operating systems (Windows XP/ME/2000/98SE). Note: The drivers are compatible with all the operating systems. The digital camera can be used as a computer-based video camera or web camera Please follow the instructions below: 1. 2. Insert the supplied CD-ROM in the CD-ROM drive. If the CD-ROM doesn’t automatically boot, use Windows Explorer to execute the InstallMgr.exe file in the root directory. -42 English This window appears: Install button 1. Click the install button to install the driver. 2. Follow the on-screen instructions. 3. Click Finish to restart the computer and the camera driver installation is completed. Installing the driver 1. 2. Insert the supplied CD-ROM in the CD-ROM drive. If the CD-ROM doesn’t automatically boot, use Windows Explorer to execute the InstallMgr.exe file in the root directory. 3. Click the install button to install the driver. 4. Follow the on-screen instructions. 5. Use “Connecting to the PC” to connect the camera to the computer via the USB cable provided. -43 English Presto! Video Works 6 Presto! Video Works 6 is advanced application software for video editing. Install Presto! Video Works 6: 1. Insert the included CD into the CD-ROM. 2. If the CD does not auto-run, use Windows file manager to run the executable InstallMgr.exe under the root directory on the CD. 3. Press the install button and follow the on screen instructions. 4. After application is started, you can find more information on Presto! Video Works 6 in the help files. Presto! Mr. Photo 3 Presto! Mr. Photo 3 is advanced application software for photo editing. Install Presto! Mr. Photo 3: 1. Insert the included CD into the CD-ROM. 2. If the CD does not auto-run, use Windows file manager to run the executable InstallMgr.exe under the root directory on the CD. 3. Press the install button and follow the on screen instructions. 4. After application is started, you can find more information on Presto! Mr. Photo 3 in the help files. -44 English Appendix A: Specifications General Imaging sensor 1/1.8” 5.17 Mega pixel CMOS sensor Active pixels 5.1 Mega pixels Storage media Built-in 32 MB Flash memory Supports SD/ MMC memory cards (up to 2 GB) Sensor sensitivity Auto Lens Fixed lens, F3.0/8.0,f=8.25mm Focal range Normal: 1.3m ~ infinity Macro: 17 ~ 19 cm Still image Formats: JPEG (DCF, DPOF & EXIF), Direct Print DPI:1280 x 960, 2048 x 1536, 2592 x 1944, 4048 x 3040 (firmware interpolation) Movie clips AVI (Motion JPEG), suitable sound formats Movie:320 x 240 (30fps max), 640 x 480 (23 fps max) PC camera:320 x 240 (15fps max), 640 x 480 (14fps max) Zoom 4x digital zoom TFT screen 2.4-inch High definition TFT display (480x234 plain) Viewfinder Not provided Flash 1.0 ~ 1.5m range Auto/ Off/ Force White balance Auto/ Sunny/ Tungsten/ Fluorescent EV compensation -2.0 EV ~ +2.0 EV (in 0.5 EV stop) Self-timer Off/ 10 seconds Computer interface Web Camera and Mass Storage via USB 2.0 (Full speed) Shutter Mechanical shutter 1/4 ~ 1/500 second Auto power off 1 minute, 3 minutes or Off (User definable) Battery Two AAA-size Alkaline batteries -45 English General Dimension 88.5 x 28.5 x 59 mm Weight Approximately 88 g without batteries Appendix B: Troubleshooting Refer to the symptoms and measures listed below before sending the camera for repairs. If the problem persists, contact your local reseller or service center. Power Supply Symptom The power does not come on. Cause Measure The batteries are not loaded. Load the batteries correctly. The batteries are exhausted. Replace with a new set of batteries. The camera was left The power cuts out during use. unattended and unused, so The batteries are exhausted. It is being used in extreme The batteries run out quickly. Turn the power back on. the auto powers off cuts it off. low temperature. Many shots are being captured in dark places inside, requiring flash. The batteries or Long period of continuous camera feels use of the camera or the warm. flash. -46 Replace with a new set of batteries. English Shooting Symptom Cause Measure The batteries are running Replace with a new set of low. batteries. The power is not on. Turn the power on. The camera is not in shooting mode. memory card does not have shutter button, any free capacity. End of memory card life. the camera does not shoot. The flash is recharging. The memory card is unrecognized by the camera. Insert a new memory card, or delete unwanted files. Insert a new memory card. Wait until the status LED is off. Format the memory card in this camera before its first use or when it was used other than this camera. The auto power off function is activated. Images do not button for two seconds to access playback mode. The internal memory or Even if I press the Press the Mode selector Turn the power on again. The memory card is Remove the write-protected. write-protection. The power is not on. Turn the power on. The lens cover is not open. Open the lens cover. appear on the LCD monitor. The flash does not fire. The flash The flash is set to off. cannot recharge. -47 Switch to another mode other than one of those. English Symptom The image is too dark. Cause Measure The image was captured in a dark place while set to no flash. Set the flash to something other than flash off mode. Playback Symptom Cannot playback. The contents of memory card cannot be replayed. Files cannot be deleted. Cannot format a memory card. Cause Measure It is not set to playback mode. Press the Mode selector button for two seconds to access playback mode. You played back a memory Insert a memory card that card that was not formatted was formatted and stored by this device. on by this device. You played back a memory Loaded a card that was card that was not formatted formatted and stored on by by this device. this device. The memory card is Remove the write-protected. write-protection. End of memory card life. Load a new memory card. -48 English Other Problem Symptom Cause Cannot load the memory The card is facing card. the wrong way. Even when the camera’s buttons are pressed, it does not operate. Measure Insert correctly. The battery is Replace with a new set of running low. batteries. About connecting to your computer/software Symptom Cause The free space on the hard disk in your Cannot computer may be download insufficient. images. Measure Check whether the hard disk has a space for running Windows, and if the drive for loading image files has a capacity at least that of the memory card inserted in the camera. The USB driver is not installed (for Install USB driver. Windows 98/98SE). -49