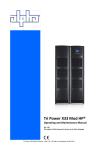
1
Simprop electronic
Walter Claas GmbH & Co KG
Ostheide 5
D - 33428 Harsewinkel
www.simprop.de
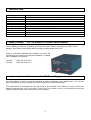
Operating Instructions Battery Manager
Intelli-Control V3
Best.-Nr.:
010 103 6
Technische Änderungen vorbehalten / Technical content subject to change
File:Manual_IntelliControl_V3_030311.doc
1
1.
Contents
1.
CONTENTS ...................................................................................................................................................................2
2.
GENERAL .......................................................................................................................................................................2
3.
TECHNICAL DATA.......................................................................................................................................................3
4.
SUPPLY VOLTAGE - 12V CAR BATTERY OR SUITABLE MAINS ADAPTER ....................................................3
5.
CONNECT THE INTELLI-CONTROL TO THE 12V POWER SUPPLY .....................................................................3
6.
WHICH BATTERIES CAN BE CHARGED? ................................................................................................................4
7.
CONNECTING THE BATTERY ....................................................................................................................................4
8.
OPERATING KEYS / MENU STRUCTURE.................................................................................................................5
8.1. Overview Menu 1 and 2 ...................................................................................................................6
8.2. Overview INFO Menu (Menu 3) ........................................................................................................7
9.
OPERATION – CHARGING / DISCHARGING ............................................................................................................8
9.1.
9.2.
Fully Automatic Programme
--- only for NiCd Batteries --....................................................9
Manual Setting of the Charging Parameters................................................................................11
10.
ERROR MESSAGES.............................................................................................................................................. 13
11.
CHARGING CURRENT RECOMMENDATIONS.................................................................................................. 13
12.
TECHNICAL EXPRESSIONS................................................................................................................................ 14
13.
INTELLI-CONTROL CHARGING CURRENT TABLE............................................................................................. 14
14.
OTHER MATTERS................................................................................................................................................. 15
15.
SAFETY ADVICE
2.
!!! PLEASE TAKE SPECIAL NOTE !!! .................................................... 16
General
Dear customer,
Many thanks for deciding to buy a charger from Simprop electronic. Please read carefully through these
instructions so that you get to know the functions and get safety advice on its use.
These instructions describe the device with software version 3. On powering up the Intelli-Control, the text
"Simprop Intelli-Control V3" appears for 2 seconds.
2
3. Technical Data
Input voltage
Input current
Output
Charging capacity
Charging current
Discharge capacity
Discharge current
Discharge end voltage
LCD
Dimensions
Weight
11 - 15 V DC
max. 12A
1 to 25 NiCd/NiMH cells, 2V to 12V lead-acid, 3.6V to 11.1V Li-Ion batteries
max. 120W
0.1 to 5A dependent on the battery voltage
max. 20W
0.5 to 3A dependent on the battery voltage
0.9V per cell (only for NiCd and MiMH batteries)
2 x 16 characters
145 x 92 x 40mm
600 grams
4. Supply Voltage - 12V Car Battery or Suitable Mains Adapter
The car battery should have a capacity of at least 7Ah. As the battery discharges, the Intelli-Control
displays "Input Power Low Voltage" when the supply voltage drops below 10V.
Using an unsuitably stabilised mains adapter can impair the
functioning of the Intelli-Control and even damage it. Suitable
mains adapters from Simprop:
12V/10A
12V/20A
5.
Order No. 010 101 0
Order No. 010 114 1
Connect the Intelli-Control to the 12V Power Supply
If a mains adapter is used, it should be switched on before connecting up the Intelli-Control. The red and
black insulating ring can be screwed off to allow easier fitting of the pole terminals.
The Intelli-Control is connected the right way round to the terminals of the battery or those of the mains
adapter using pole clips. red = plus, black = minus. Red = plus, black = minus. If connected the wrong way
round, the Intelli-Control does not work but is not damaged.
3
6. Which Batteries Can be Charged?
Each rechargeable battery requires its own charging method. Find out exactly what type of battery you want
to charge. The Intelli-Control V3 can charge the following types:
Nickel-Cadmium batteries are the most common type used in the model field and can be charged and
discharged in automatic mode or manually (cell type: NiCd).
Nickel Metal Hydride batteries
are generally charged/discharged using a manual setting (cell type:
NiMH).
Lead-acid batteries are generally charged using the manual setting (cell type: PB). The discharge function
is blocked for this battery type as they are very sensitive to 100% discharge (mostly with loss of capacity).
Lithium-Ion batteries may only be charged using the manual setting (cell tape: Li-Ion). The discharge
function is blocked here too. The batteries have a very good capacity/weight ratio; are, however, very
sensitive and must be handled with great care. They can be damaged by: overcharging, low discharge,
too large current drain, short-circuit, overheating. It is therefore very important that you use the correct
settings. You can read the description of this in section 9 "Operation – Charging / Discharging".
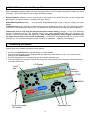
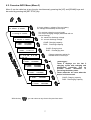
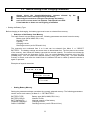
7. Connecting the Battery
Please keep to the following sequence when starting:
• Connect the Intelli-Control to the car battery or mains adapter.
• Stick the banana plugs of the charging cable (the right way round: black = minus, red = plus) into the
sockets of the Intelli-Control.
• Connect the battery to be charged and set up using the operating keys.
• Once the charging is complete, always disconnect the charged battery first, and then the banana plugs –
to avoid a short-circuit.
LC-Display
Ventil
ator
Battery
connector
PLUS
MINUS
Connecting cable
12V supply
Operating keys
4
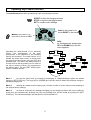
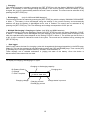
8.
Operating Keys / Menu Structure
The Intelli-Control has three operating keys with the following functions:
START to start the charging process
STOP to stop the charging process
SET to confirm value settings
PLUS to set values or to
move RIGHT in the menu
MINUS to set values or to
move left in the menu LEFT
INFO
by simultaneously pressing the
UP and DOWN keys, the Info
menu appears.
Operating the Intelli-Control V3 is extremely
simple. The arrangement of the keys
corresponds to the positions of the following
menus and functions. The Intelli-Control V3 is
divided into three menu levels. In these levels
you can select the function using the [UP] and
[DOWN] keys. The menus are always built in a
circular form so that by pressing one or other of
the keys a number of times, you come back to
the starting point. The key [SET STOP] starts,
stops or confirms actions.
Simprop Intelli
Control V3.0
Simprop Intelli
Control V3.0
Simprop Intelli
Control V3.0
Menu1
Simprop Intelli
Control V3.0
Simprop Intelli
Control V3.0
Simprop Intelli
Control V3.0
Simprop Intelli
Control V3.0
Simprop Intelli
Control V3.0
Simprop Intelli
Control V3.0
Simprop Intelli
Control V3.0
Menu3
Simprop Intelli
Control V3.0
Simprop Intelli
Control V3.0
Simprop Intelli
Control V3.0
Simprop Intelli
Control V3.0
Simprop Intelli
Control V3.0
Menu2
Simprop Intelli
Control V3.0 Simprop Intelli
Control V3.0
Simprop Intelli
Control V3.0
Simprop Intelli
Control V3.0
Simprop Intelli
Control V3.0
Menu 1
On the first menu level, the charging, discharging or charge/discharge cycles are started
using the [SET STOP] key. The keys [UP] or [DOWN] are used are used to select the particular charge or
discharge programme.
Menu 2
Settings are made here for battery type, sounds, number of cycles memory and resetting to
the original factory settings.
Menu 3
his level is exclusively for detailed information on the charging process and can be called up
at any time by simultaneously pressing the [UP] and [DOWN] keys and be ended by pressing the [SET
STOP] key. The individual displays are described in "Overview Menu 3".
5
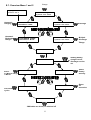
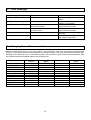
8.1. Overview Menu 1 and 2
Simprop Intelli
Control V3.0
Switch-on menu 2 seconds
Automatic
charging
Automatic
Discharge
Charge
Charge
Manual Charge
0]NiCD 6CL 2400
MANUAL DISCHARGE
0]NiCD 6CL 2400
CHARGE START
AUTOMATIC MODE
Discharge
Multiple
Discharge
Charge
MANUAL CYCLE
0]NiCD 6CL 2400
DISCHARGE START
Automatic Mode
SETTING- MENU 2
Settting battery,
charge current,
discharge current
etc.
>SET BATTERY
Return
to "Manual Charge"
in Menü1
>MAIN - MENU 1
>SELECT BATTERY
>CLEAR MEMORY
>CYCLE
Set number of
cycles
>SOUND
5 Melodies can be set, or switched off
6
Select
battery
memory
Reset
all
memories
8.2. Overview INFO Menu (Menu 3)
Menu 3 can be called up at any time by simultaneously pressing the [UP] and [DOWN] keys and
be ended by pressing the [SET STOP] key.
> IN/OUT VOLTAGE
11.022Vi 5.210Vo
Vi: Input voltage = voltage of the car battery
Vo: Voltage of the battery at the output
Vp: maximm charging current (peak)
Va: current charging volatge (measured with no
current flowing)
Vs: maximum discharge voltage
Vc: current discharge voltage
> CHARGE VOLTAGE
5.201Vp 5.190Va
> DISCH. VOLTAGE
5.201Vs 5.190Vc
> CHAR.
DISC.
CHAR: Charging capacity
DISC: Discahrge capacity
2123mAh
2036mAh
> CHAR.
DISC.
CHAR: Charging time
DISC: Discharging time
0:31:21
0:28:14
Charge parameter setting for
manual mode in memory 5
5] 1:21 4CL 2400
> C:4.0A D:3.0A
0:28:14
1]CHAR. 2123mAh
> DISC. 2036mAh
2]CHAR.
> DISC.
2036mAh
1954mAh
3]CHAR.
> DISC.
2006mAh
1903mAh
4]CHAR.
> DISC.
1930mAh
1851mAh
5]CHAR.
> DISC.
With the key
„Data logger“
These 5 displays are the last 5
cahrging cycles with cahrging and
discharging capacities and so
provide
useful
assistance
in
assessing the battery state.
These memories are reset when the
device is disconnected.
CHAR: Charging capacity
DISC: Discharging capacity
1888mAh
1801mAh
you can return at any time to the previous menu.
7
9.
Operation – Charging / Discharging
The Intelli-Control is a device with a large variety of charging and discharging possibilities. There are 5
charging programmes each of which can be started from Menu 1 using the [SET STOP] key:
Charging programme (Menu 1)
>DISCHARGE AUTOMATIC MODE< Discharge and charge with automatic switch off and
automatic parameter setting.
>CHARGE AUTOMATIC MODE<
Charge with automatic switch off and automatic
parameter setting.
>MANUAL CHARGE<
Charge with automatic switch off and
manual parameter setting.
>MANUAL DISCHARGE<
Discharge with automatic switch off and
manual parameter setting.
>MANUAL CYCLE<
Multiple (1 to 99 times) discharge and charge with
automatic switch off and manual parameter setting.
When charging batteries, it is very important that you, as the user, know which battery types you are using
and which charging currents / discharging currents are allowed. Intelli-Control has ten memories in which
you can store ten battery types. You can, however, also set parameters before each charging process.
When using nicads, you also have the possibility of allowing Intelli-Control to make all the settings
(automatic charge). More about this in section 9.1 "Fully Automatic Programme" or section 9.2 "Manual
Setting of Charging Parameters".
Get acquainted, however, first with section 8 "Operating Keys / Menu Structure". Especially the menus 1
and 2 that are used in "normal" operation.
8
9.1. Fully Automatic Program
!
•
--- only for NiCd Batteries --
The fully automatic programme is only suitable for NiCd batteries.
NiMH, lead-acid and Li-Ion batteries are not to be charged using the
fully automatic programme as they could be damaged by incorrectly
set parameters with the consequent danger of fire and explosion.
!
CHARGING
The fully automatic programme is the simplest way to charge or discharge a battery. After connecting the
charger to the car battery, it is always the fully automatic programme that is preset. To start the charging
process, simply press the [SET STOP] key
Automatic charging:
STOP] key.
connect Intelli-Control to the supply, connect the battery, press the [SET
CHARGE START
AUTOMATIC MODE
C 0MAH 0:00:00
7,26V 0,5A AUTO
As a result, the Intelli-Control immediately begins to charge the battery. In the first three minutes, the
battery is carefully measured (current swings) and the correct current selected automatically. The current is
set such that a gentle but fast as possible charging takes place.
Once the battery is fully charged, this is recognised by Intelli-Control and the charging operation is ended. A
tone is then emitted and at the top left of the display the charge indicator C (for charge) is replaced by F (for
full). If the charging is complete, you can read off the charging time and the charged capacity in the first line
of the display.
•
Discharging / Charging
If the battery is to be discharged before the charging, e.g. to prevent memory effect or determine the size of
the remaining capacity, select the charging programme [DISCHARGE AUTOMATIC].
Automatic discharging / charging: connect Intelli-Control to the supply, connect the battery, press
[DOWN] key then the [SET STOP] key.
CHARGE START
AUTOMATIC MODE
DISCHARGE START
AUTOMATIC MODE
C 0MAH 0:00:00
7,26V 0,5A AUTO
As a result, the Intelli-Control immediately begins to discharge the battery and a "D" (for discharge) appears
in the top left corner of the display. The discharge current is automatically adjusted so that a gentle but as
fast as possible discharging takes place. Once the battery is discharged, a pause of three minutes is made.
The battery is then automatically re-charged. At the end of the charging a tone is emitted and at the top left
of the display the charge indicator C (for charge) is replaced by F (for full). If the charging is complete, you
can read off the charging time and the charged capacity in the first line of the display.
9
LC Display during Charging / Discharging
C=Charge
D=Discharge
F= End / complete
Charging capacity / discharge capacity
C 0MAH 0:00:00
7,26V 0,5A AUTO
Battery voltage
Charging current /
discharge current
Charging time
Automatic mode
Automatic Operation Override
Intelli-Control has as of version 3 an interesting special feature: The automatic operation can be, as it were,
overridden using the [UP] and [DOWN] keys without interrupting the charging process. Pressing one of
these keys causes a selection menu for current adjustment to be opened. The new, desired current value
can be entered here. Pressing the [SET STOP] key confirms this current and returns to the charging menu.
The battery is then charged with this current till the charging is completed.
Automatic Current Setting
The evaluated charging/discharging current is dependent on the cell type, charging cable, plug and socket
connection and charged state. In case of doubt, a lower charging/discharging current is always set to
prevent damage to the battery. The following list gives several hints on avoiding and repairing faults:
Charge current
too low
•
•
•
•
•
Charging
process
broken off
•
•
•
Charging cable has too low cross-sectional area. We recommend a minimum of
0.75mm2.
Plug internal resistance too high. We recommend gold-plated contacts.
Battery has not been charged for some time or has "memory effect"
Wrong battery type connected, e.g. dry batteries, lead-acid, NiMH
Battery defective
Battery defective
With some transmitters, a diode is soldered into the charging cable. The diode does
prevent charging in the wrong direction but makes discharging impossible.
Wrong battery type connected, e.g. dry batteries, lead-acid, NiMH
10
9.2. Manual Setting of the Charging Parameters
!
•
Always check the charging/discharging currents allowed
manufacturer before starting to charge the battery
Incorrectly set currents or cell types can damage the battery,
set it on fire or even cause it to explode. Take special care with
Li-Ion batteries as these are not forgiving of mistakes
by
the
!
Setting the Battery Type
Before charging or discharging, the battery type must be set or selected from memory.
•
Selection of the Battery from Memory
The Intelli-Control has ten battery memories. following parameters are stored in each memory:
Battery type (NiCd, NiMH, PB, Li-Ion)
Number of cells
Capacity
Charging current
Discharge current (not for PB and Li-Ion)
The memories are numbered from 0 to 9 and can be selected from Menu 2 => "SELECT
BATTERY". The battery settings are shown there in abbreviated form. The first place is the number
of the memory, then follows the battery type and the nominal capacity. The second row shows the
charging current and the discharge current. You can switch between memories using the [UP]
[DOWN] keys. You can select the desired memory using [SET STOP] key. The last selected
memory is stored, even after the Intelli-Control is switched off and is called up when the device is
again in operation.
Examples of several memories:
...
5]NICD 24CL 1300
> C:5.0A D:2.0A
6]NIMH 4CL 3000
> C:3.0A D:2.0A
7]PB 12V
> C:3.2A
6000
...
•
Setting Battery Memory
Setting the parameters always overwrites the currently selected memory. The following parameters
can be set for each memory in Menu 2 => "SET BATTERY":
BATTERY TYPE:
BATTERY CELLS:
BATT CAPACITY:
CHARGE CURRENT:
DISCH. CURRENT:
Battery type (NiCd, NiMH, PB, Li-Ion)
Number of cells
Nominal capacity of the battery
Charging current
Discharge current (not for PB and Li-Ion)
11
•
Charging
The charging process is started by pressing the [SET STOP] key with the display "MANUAL CHARGE" in
Menu 1. The battery is then charged using the settings in the current memory. When the battery is fully
charged, the current is automatically switched off and a tone is emitted. The sound can be switched off by
pressing the [SET STOP] key.
•
Discharging
(only for NiCd and NiMH batteries)
The discharge process is started by pressing the [SET STOP] key with the display "MANUAL DISCHARGE"
in Menu 1. The battery is then discharged using the settings in the current memory and automatically
switches off when the battery is discharged and a tone is emitted. The sound can be switched off by
pressing the [SET STOP] key. Die The discharge end-voltage corresponds to 0.85V per cell.
• Multiple Discharging / Charging => Cycles (only NiCd and NiMH batteries)
he multiple charging cycles are started by pressing the [SET STOP] key with the display "MANUAL CYCLE"
in Menu 1. The battery is then discharged using the settings in the current memory and re-charged. How
often this operation takes place depends on the setting "CYCLE" in Menu 2. The number can be set from 1
to 99. A tone is emitted to indicate the end of the cycles. The sound can be switched off by pressing the
[SET STOP] key.
•
Data logger
Intelli-Control stores the last five charging cycles with charged and discharged capacities in the INFO menu
(Menu 3). This can be accessed by simultaneously pressing the [UP] and [DOWN] keys. Then use the [UP]
or [DOWN] key to call up the desired memory. See also "Overview Menu 3“
These displays are of valuable assistance in judging the state of the battery. Once the device is
disconnected, these memories are reset.
LC display on charging, discharging or in cycle:
Charging or discharging capacity
B= Battery-Check
C=Charge
F= End / complete
Charging voltage
Charging time
C 421mAh 0:15:12
4.96V 2.52A 43%
Charging current /
Discharging current
12
Charge status in procent
10.
Error messages
Error message
Output Battery Connect error
Input Power Low Voltage
Output Power Over Voltage
Output Power Over Voltage
Output Battery Reverse Polarity
Input Power Over Voltage
11.
Explanation
Battery is not correctly connected
Possible causes
Break in charging cable or battery
defect
Input voltage is smaller as 10.0V
Car battery is discharged or mains
adapter is overloaded
Battery voltage is too large for the
Actual number of cells does not
set number of cells
agree with the set value
Battery voltage is too low for the set Actual number of cells does not
number of cells
agree with the set value
Battery voltage is reverse connected Polarity of the charging plug
reversed
Input voltage is higher than 15V
Mains adapter is wrongly set or
24V supply in the truck
Charging Current Recommendations
Battery manufacturers are as a rule very careful in any information they issue on charging and discharge
currents. If one kept to these recommendations, the result would be a very long lifetime but a relatively long
charging time of about an hour. In the following table, we would like to give several recommendations that
are a good compromise between lifetime and charging time.
Cell Type
Sanyo 10N RC -270
Sanyo N-500 AR
Sanyo N-600 AA
Sanyo N-700 AR
Sanyo N-1250 SCR
Sanyo N-1300 SC
Sanyo N-1700 SCR
Sanyo RC2000
Sanyo RC2400
Saft Li-Ion 2200 Simpr.
Sanyo RS3300 NiMH
12V 6Ah Lead-acid
Fast Charge
Current
0.8A
1.5A
0.6A
2.0A
5.0A
1.5A
5.0A
5.0A
5.0A
1.5A
3.3A
2.0A
Charge Time
approx.
22min.
24min.
66min.
25min.
18min.
59min.
24min.
28min.
34min.
~ 4hr.
66min.
~ 4 hr.
13
Discharge current
0.5A
2.0A
0.6A
2.0A
3.0A
2.0A
3.0A
3.0A
3.0A
3.0A
-
Discharge Time
approx.
32min.
15min.
60min.
21min.
25min.
39min.
34min.
40min.
48min.
70min
-
12.
Technical Expressions
Word or Abbreviation
NiCd
NiMH
Li-Ion
Pb
Delta Peak
A/V/W
mAh
13.
Explanation
Nickel Cadmium
Nickel Metal Hydride
Lithium Ionen
Plumbum = lead acid battery
Switch-off process for NiCd / NiMH cells by voltage measurement
Ampere / Volt / Watt
Milliamperehour => capacity of the battery
Intelli-Control Charging Current Table
The charging / discharge currents are automatically limited by Intelli-Control in order to prevent an
overheating of the device.
cells
Maximum
charging current
Maximum
discharge current
1
2
4
6
7
8
10
12
14
16
18
20
24
25
1.6A
1.8A
2.6A
5A
5A
5A
5A
5A
5A
5A
4.4A
3.6A
3.5A
3.3A
2.6A
3.0A
3.0A
3.0A
3.0A
2.5A
2.0A
1.7A
1.6A
1.5A
1.2A
1.0A
0.8A
0.8A
14
14.
Other Matters
Manufacturer's declaration in favour of consumers
Simprop products are manufactured or sold by
Company:
SIMPROP electronic
Walter Claas GmbH & Co KG
Ostheide 5, D 33428 Harsewinkel
Should this equipment acquired by a consumer and sold by SIMPROP electronic in the Federal
Republic of Germany (§ 13 BGB) be defective, we undertake to repair the defects in the equipment to
the extent as described below. This manufacturer's declaration does not affect the claims or legal rights
of the consumer in the purchase contract with the seller (dealer).
1. Extent of the Protection
This declaration is only valid when the equipment is unusable or the usability is considerably impaired
(defect) as a consequence of a design, manufacturing or material fault already present in the equipment
at the time of handing over to the consumer. It is not valid especially when the impairment of the
equipment's usability is due to natural wear and tear, improper use (including installation) or external
influences.
24
2. Consumer Claims Based on this Declaration
In the case of a properly validated claim based on this declaration, SIMPROP electronic will either
remove the defect in the equipment (repair) or supply a defect-free equipment solely at its own
discretion. The consumer cannot make any further claims or interpret further rights into this declaration.
3. Period of Validity
This declaration is only valid during the claim period and for claims that have been accepted by
SIMPROP electronic on the basis of this declaration. The claim period is 24 months from the date of
equipment purchase by the consumer from a dealer in the Federal Republic of Germany ("date of
purchase"); it ends, however, in any case, 30 months at the latest after the manufacturing date of the
equipment as printed on the device.
4. Enforcement is wrongly on this Declaration
To establish a claim based on this declaration, the following must be sent in at the cost and risk of the
consumer:
•
the equipment which is the subject of the complaint
•
detailed description of the claimed defect
•
the bill, delivery note or other suitable documents (the original in each case) as proof of date and
place of purchase.
The shipment shall be made to the company address above.
Month
6. Lapsing of Claim Period
If SIMPROP electronic does not acknowledge a properly asserted claim based on this declaration within
the claim period, all claims based on this declaration lapse 6 months after the time of the assertion; not,
however, before the end of the claim period.
7. Law Applying
This declaration and the claims, rights and obligations resulting therefrom are subject solely to German
material law to the exclusion of the standards of international private law and to the exclusion of the UN
purchasing law.
Please note in addition:
A detailed description of the fault can simplify enormously the search for the fault and assists in reducing
the repair costs. So, please include an extensive fault description with every repair and complaint.
15
15.
Safety Advice
!!! Please take special note !!!
Ø
When charging or discharging a battery, never leave the Intelli-Control unsupervised.
Ø
In an unfavourable situation, e.g. charging a defective battery, overheating of the battery can occur
because of incorrect current settings. This gives rise to a danger of fire and explosion.
Ø
Place the Intelli-Control and the battery so that no damage can arise from overheating. (place the
charger and the battery on an electrically non-conducting and non-combustible surface, e.g. tiles or an a
glass plate). Do not place the equipment directly in the sun, the openings in the housing should not be
restricted in any way.
Ø
The battery terminals should not make contact with the housing of the charger, otherwise a short-circuit
could occur. In the case of a battery short-circuit, overheating can cause the battery to catch fire with
the danger of an explosion.
Ø
The following batteries, chargeable batteries, cells may
not be charged with this equipment:
•
Batteries that consist of different cells or of new and old cells.
•
Batteries that are built into equipment.
•
Batteries that are electrically in contact with other parts.
•
Batteries with integral charging and switch-off devices (often in Li-Ion batteries, e.g. in mobile
phones).
•
Defects, mechanically damaged or oxidised batteries
•
Already fully charged or hot batteries.
•
Battery cells connected in parallel or two batteries simultaneously.
•
Batteries that are not expressly approved by the manufacturer for charging currents that occur with
this equipment.
Ø
Only Li-Ion batteries that are expressly declared as drive or receiver batteries can be charged by IntelliControl V3. Li-Ion batteries with built-in charging/safety electronics may not be charged using the
Intelli-Control.
Ø
The current automatically set by the device must be monitored in every case. If the current is greater
than that approved by the manufacturer, the charging process must be stopped immediately. If not, the
battery can be overcharged and, in an unfavourable situation, catch fire or explode.
Ø
With manual current setting: the charging current may never be set higher than that value approved by
the manufacturer.
Ø The setting for the charging current in the Li-Ion and lead-acid charging programme must correspond to
that of the batteries, otherwise there is danger of explosion!.
Ø
Li-Ion and lead-acid batteries may under no circumstances be charged with the automatic
programme – danger of explosion!
Ø
Protect the Intelli-Control against moisture.
Ø
The length of the charging cable should not be more than 25cm – as according to CE.
Ø
The use of a car battery is only allowed when the engine is not running.
Ø
The simultaneous operation of the Intelli-Control and a car battery charging device on a car battery is
not permitted.
Ø
Using an unsuitably stabilised mains adapter can impair the functioning of the Intelli-Control and
damage it (and also damage the battery => fire and explosion danger).
Ø
Defective batteries can be disposed of at your dealer – they are special refuse and do not belong in the
household refuse.
Ø The charging and discharging of single cells in battery packs should only be made using the current
permitted by the manufacturer. With larger currents the spring contacts are often damaged.
16