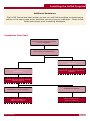
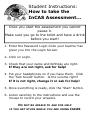
1
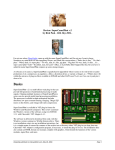
This manual is accompanied by the 2009 InCAS CD-ROM only if there is a plastic pocket adhered over this area. If there is no CD-ROM with this manual, this means that a copy has been provided to your school in a separate 2009 InCAS Manual. Only one copy of the CD-ROM is provided per registered school or campus and can be installed on as many computers as required. InCAS ID Number Program Password (for CD-ROM) is INCASUSER InCAS+ Password (for access to InCAS+) Important— For security purposes you may require your InCAS Password to identify yourself as a genuine InCAS user. Note: The InCAS ID is not the password to use the program. Contents Contents INTRODUCTION Welcome 3 Contact Information 4 For new users 5 Top 10 Tips for InCAS Users 6 PART ONE: USER MANUAL Installing the InCAS Program Some considerations 8 Uninstalling previous software 9 Installing the InCAS software 10 Installation flow-chart 13 Getting to Know InCAS Familiarising with InCAS 14 Understanding what the questions measure 15 Entering Student Information Importing class data 16 Entering individual data 17 Editing student information 18 Creating Assessment Sessions Some considerations 19 Creating assessment sessions for individuals, classes and schools 19 Printing and using „password‟ login codes 21 Implementing the Assessment Some considerations 22 Assessing a student 22 Student instruction poster 23 Submitting Data Transferring data 24 Submitting data to InCAS+ 24 Form: Updating contact details 26 PART TWO: FEEDBACK GUIDE Using the Feedback Guide What is feedback? 28 Understanding the types of feedback 28 Accessing Your Feedback Using InCAS+ 29 Downloading feedback 30 Interpreting the Feedback Standard 32 Age Comparison Chart 34 Custom 36 Planning and Action 40 2009 InCAS Manual 1 Acknowledgements Acknowledgements InCAS Australia thanks the following organisations for their contribution to the 2009 InCAS manual: Centre for Evaluation and Monitoring (CEM), University of Durham, England Copyright Statement This publication is copyright. Schools registered to use InCAS in 2009 may photocopy this publication for the implementation of the InCAS Assessment in their school. For any other purpose, permission must be sought from the InCAS Coordinator at the InCAS Australia Office. 2 2009 InCAS Manual Introduction Welcome to InCAS 2009 This booklet is divided into two parts, to give you guidance on using the InCAS program, and interpreting your InCAS feedback. We advise that you carefully read this manual both prior to and during the assessment process. If you require further clarification about any issues, please get in touch with your InCAS contact. Part One: User Manual Section 1: Introduction Section 2: Installing the InCAS Program Section 3: Getting to know InCAS Section 4: Entering Student Information Section 5: Creating Assessment Sessions Section 6: Implementing the Assessment Section 7: Submitting Data Symbols and Tools used in the Manual The InCAS assessment software has been designed for users with minimal computing experience. If you do experience a problem some solutions are best implemented by you, the actual user. In some circumstances you will require local IT support. In other situations, you may need to contact your InCAS person for assistance. To guide you, symptoms of possible problems are shown at the relevant section accompanied by the relevant symbol. A quick and easy solution to be implemented by the user. Contact your local IT Technician as there could be a problem with the computer. Part Two: Feedback Guide Section 1: Introduction Section 2: Accessing your feedback Section 3: Interpreting the feedback Section 4: Feedback based planning and action Contact your InCAS person. You will require basic familiarity with PC compatible computers to understand this document and to use the PIPS software program. If you are unfamiliar with computers, an explanation of key terms is provided in Tip Boxes throughout the manual, like the one below. Handy Tips Tips can be found in boxes like this one throughout the manual to provide an explanation of relevant computing terms and useful hints. WARNING Warnings must be read and observed by users to prevent serious problems or complications. 2009 InCAS Manual 3 Introduction Contact Information For issues relating to installation and administration of InCAS, or submission and interpreting feedback, contact an InCAS person via one of the following methods: InCAS Office 08 6488 2859 Vivienne Pepper Email [email protected] Jo Faulkner Email [email protected] The postal details for the InCAS Project are as follows: InCAS Australia Graduate School of Education University of Western Australia 35 Stirling Highway Crawley, Perth Western Australia 6009 Please use the following space to record any other important contacts, such as your school‟s InCAS Coordinator: 4 2009 InCAS Manual Introduction For New Users What is InCAS? InCAS stands for Interactive Computerised Assessment System. InCAS is a fully adaptive program, meaning that it presents an assessment tailored to the individual student‟s ability, just like the PIPS Baseline Assessment. Unlike PIPS, InCAS can be used to assess students at any time throughout the year, once per academic year. The program has been specifically designed so students can work through the assessments without the need for close supervision. The items are diagnostic and cover a broad range of areas, including reading skills, maths skills, attitudes and non-verbal ability. Feedback is immediate, provides age equivalent scores and is explicitly linked to practical teaching strategies. Feedback can be used to profile whole schools, year groups, classrooms and individual students. What prior knowledge and skills are required? The user friendly nature of the program means that the student needs only to click on computer screen buttons in order to enter their response. It is helpful for teachers to have familiarity with the assessment prior to students using the program, and this manual provides step by step guidance on getting to know InCAS. Part Two of this booklet provides assistance with interpreting the InCAS Assessment Feedback. Where can I get help? This manual is designed to be self-contained so that you will be able to install the InCAS CD-Rom and use the program. Contact details for further assistance are provided on page 1. Who developed InCAS? The InCAS assessment was developed by the Centre for Evaluation and Monitoring (CEM), University of Durham, England. InCAS has been developed from research across the world into the progress of students in schools. Further information can be found at the CEM website at http://cemcentre.org/ InCAS Australia at The University of Western Australia is authorised by CEM to coordinate the InCAS assessment in Australia. How is InCAS Administered? The assessment is a PC compatible CD-Rom based program. Students can work through the assessment without the need for close supervision, using the mouse to record their responses. The items becomes progressively difficult so that it is extremely rare even for gifted students to reach the ceiling of the assessment. The program is tailored to each student‟s ability and if a student starts to falter in a given section, the program automatically moves on to the next suitable section. In this way the student is not presented with a fixed number of questions that must be attempted, to the detriment of the student who is aware that he or she cannot answer correctly. The assessment is designed to assess students in many different contexts and is not designed to assess students against local curriculum objectives. Students can be assessed at any time of the year, as long as the assessment is administered only once per academic year. 2009 InCAS Manual 5 Introduction Top 10 Tips for InCAS Users 1. Make sure you carefully read and follow the installation instructions on pages 7-12 of this manual. The Installation Flowchart will help you to plan the steps you need to take. 2. Follow the instructions in the manual referring to „Password Login Codes‟. Do not let the word „password‟ confuse you. These codes do not need to be kept secret. The codes are provided as individual logins for students to use to begin each session. The codes are randomly generated, and you will print them out. Follow the instructions provided in this manual to use the „password‟ login codes. 3. To ensure students are not distracted while completing the assessment, provide them with headphones and select a suitable location. 4. The assessment cannot be paused once the student has started. Make sure they have had a drink and gone to the toilet before they begin. 5. Don‟t wait to test all the students before transferring data to a safer location. Transfer the data to the „C Drive‟ or a USB/Pen Drive after each testing session (see page 24). This way you do not lose data if the computer fails to operate properly when you resume testing on another occasion. 6. Once you have completed testing all students, and before you send the data, make a backup copy of the data (refer to page 25), and keep it somewhere safe so that you can restore the data when necessary. 7. When you have successfully made a backup copy of your data you will need to submit your school‟s data. Please refer to pages 24-26 where you will instructed on how to submit the data. 8. To submit your data via InCAS+, you will need your School‟s unique InCAS ID and Password to enter the website. You will find this information at the front of your manual. Please note that this is not the same password used to access the InCAS program. 9. Refer to the Feedback Guide on pages 29-39 once your School has downloaded it‟s InCAS Feedback. These pages provide a step-by-step guide detailing how you should interpret the feedback, using examples to explain what the feedback shows. 10. Use your InCAS Feedback to inform planning and action. To support you in this, Handbooks are available. See the information on page 39. 6 2009 InCAS Manual PART ONE User Manual Installing the InCAS Program Installing the software— Some considerations Consider the following issues before deciding which computer or computers will be used for InCAS. 1. Who will be the best person to supervise students while they complete InCAS? Remember, students should be able to work through the assessment independently, and only require minimal supervision. 2. The computer should be located in a quiet area where students can hear the audio. Alternatively, students could be provided headphones. 3. WARNING InCAS must be installed on a PC compatible computer and meet the minimum specifications. Minimum specifications Specifications How to check Windows 98 or later This information will be displayed as one of the screens when you start the computer. If students will be using a laptop, ensure that a mouse is connected or that the student can navigate adequately using the „touch panel‟. 4. The computer must meet minimum specifications as listed in the adjacent table, or you are likely to experience major problems with using the program. 5. You will need to install the InCAS program of each computer used for testing. 6. (Optional) If you are using multiple computers to assist with completing assessments and your school has a network or „shared‟ drive, you may be able to keep all assessment data together by installing a shared InCAS database. Please refer to the manual (Page 11) for more instructions, and discuss this with your IT administrator before proceeding. You will still need to install InCAS on each computer. 8 Alternatively, right click the „My Computer‟ icon from your desktop and choose „Properties‟. Pentium II 200 or better Right click the „My Computer‟ icon from your desktop and choose „Properties‟. 128 MB installed RAM, 500 MB free hard disk space As above CD-ROM or DVD-ROM drive Check visually for this. Internet Explored version 5 or later. NB. You do not have to be connected to the internet to check these settings. 1. Open Internet Explorer. 2. Choose „Help‟ 3. Choose „ About Internet Explorer‟ 2009 InCAS Manual Installing the InCAS Program STEP 1 Uninstalling Software previous WARNING InCAS If you took part in InCAS in previous years, you must use only the 2009 CD-Rom and Manual this year. The InCAS software is updated each year and you must remove the previous version of the software from the hard drive before installing InCAS 2009. Failure to remove an earlier version of InCAS may cause problems with the correct running of the 2009 InCAS software program. 1. To uninstall any previous versions of the InCAS software follow the instructions below. 2. Using the mouse, click the „Start‟ button. is usually located in the bottom left hand corner of the screen. 3. Move the cursor up to „Control Panel‟. 4. Move your curser to the icon labelled „Add or Remove Programs‟, and double click. 5. A list of all the programs currently installed on your computer will display. 6. Scroll through the list until you find InCAS 2008, then click once on it. This 7. Click on the „Remove‟ button. Click „Yes‟ when asked if your are sure you wish to proceed. 8. InCAS 2008 version has now been removed, and you can commence installation. Tip—Using the mouse Unless stated otherwise you will need to use only the left-hand button of your mouse. Normally you need only „click‟ the mouse once, that is press the left hand button once. If you have to „double-click‟, then press the left hand button twice in quick succession. The position of the cursor on the screen is shown either by a hand, an arrow or, when entering text, a vertical line, which sometimes flashes. When you want to click something, move the cursor to the appropriate position on the screen and then click the mouse. Tip—What is the ‘desktop’ This is the screen your computer „rests‟ at after turning the computer on. The desktop typically shows icons for various software programs available on the computer. Troubleshooting—Uninstalling 2009 InCAS Manual Symptom Explanation The computer will not remove the program. The security settings for your computer may have been modified so that only IT administrators may remove or install software. Action Check with IT to see if you have sufficient „permission‟ to remove or add programs to the computer. Ask IT to provide you with sufficient „permission‟ to uninstall 2008 InCAS software. 9 Installing the InCAS Program STEP 2 Installing the InCAS Software InCAS can be installed on a stand alone machine (a single computer), or on a network (a group of computers working together). 4. Move the cursor to „My Computer‟ and click. 5. Choose the CD Drive. It will be represented by an icon that looks like this. Move your cursor to the icon and double click. 6. In the dialog box that appears, move your cursor to the drop down menu at the bottom of the box (indicated in red). Click on the arrow, and use your cursor to select „All Files‟. 7. Choose the InCAS 2009 icon by moving the cursor to it and double clicking. The icon will look similar to the one below. Either option will require you to install the software on every computer you intend to use to assess students. Step 2 is divided into two sections: SECTION 1: Installing on a single computer SECTION 2: Installing on a network SECTION 1 Installing on a Single Computer Automatic Installation 1. Insert the InCAS CD-ROM in the CD Drive. 2. The program has been designed to automatically install onto your computer. Depending on your computer it may take 30 seconds or so before you see the various screens showing the progress of the installation. 3. Once the software installation is complete y o u will not require the InCAS CD during the assessment. It should be returned to the plastic sleeve for safe keeping. Note: If you cannot locate the InCAS CD-ROM inform your InCAS contact. Manual Installation If InCAS 2009 does not load automatically, it is due to your computer‟s settings and the software can be installed manually following these steps. 1. Insert the InCAS CD-ROM into the CD-ROM drive. 2. Move your cursor to the „Start‟ button and click. Move your cursor to „Run‟ and click. 8. Click on the button to indicate that you accept the Terms and Conditions. Click „OK‟ 3. In the dialog box that pops up, click on „Browse‟ 9. Click „Install‟ on the next box that appears. 10. The program will now install. When p r o m pt ed click on „Finish‟ **Stop here if you are installing on a network** 11. You now need to create a folder to store your InCAS files and information. Navigate to the „All Users‟ folder and open it, then right click the mouse, choose „New‟ „Folder‟ and name your folder „InCAS 2009‟. 10 2009 InCAS Manual Installing the InCAS Program Installing on a Single Computer continued 12. Open the InCAS program. You now need to direct InCAS to the folder you just created. Click on the symbol next to the „Database Folder‟ dialog box and navigate to the folder you wish to use. 13. Enter the password INCASUSER and click on the „Log-In‟ button. 14. Click „Yes‟ in the dialog box that appears. 15. The files have now been created. Troubleshooting—Installing Symptom Explanation The computer will not install the program. As above SECTION 2 Installing on a Network Installing InCAS on a network allows all users to save their assessment data in one central location. There are some important points to consider before deciding to use InCAS on a network. InCAS must still be installed on every individual computer. You will need access to a shared or network drive. You should talk to your IT person before deciding to network InCAS. If after considering these points you decide to install InCAS on a network, follow the instructions below. 1. Follow the instructions on page 10 (stopping after Step 10) to install the program on each computer that will be used for InCAS testing. 2. On your shared drive, you need to create a folder to store your InCAS information and assessment data. To do this: Action Refer to the troubleshooting note regarding security on page 7. There may be a fault with the CD Drive. If possible, insert another CD-Rom into the CD drive to see if you can access the material. As above Move the cursor to the „Start‟ menu, and click on „My Computer‟ b. Select the network drive that all InCAS users have access to. c. Create the folder by selecting „File‟ „New‟ - „Folder‟ from the top of the screen. Name the folder InCAS 2009 IMPORTANT Please write down the exact network path and file name of the shared folder E.g. z:\sharedfolder\InCAS2009 ___:\ _______________________________ There may be a fault with that particular CD. Try installing the CD on another computer. If this is unsuccessful, obtain another CD through your InCAS contact. 2009 InCAS Manual a. 3. Once you have set up a folder in the shared drive, you need to let InCAS know where to store the files and information. This will also need to be completed on each computer. 4. Click on the InCAS shortcut on your desktop, or move your cursor to „Start‟ „All Programs‟ „CEM Centre‟ „InCAS 2009‟ and click. 11 Installing the InCAS Program Installing on a Network continued 5. When InCAS opens you will see the following welcome screen. Troubleshooting—Networking Symptom Explanation The computer will not let me create a folder on the network drive. You may not „permission‟ to create folders on a network drive. Action Check with IT to see if you have ‟permission‟ to create folders on the network drive. I cannot find the You may not shared InCAS have sufficient folder. „permission‟ to view the folder. 6. Check with IT to see if you have „permission‟ to view the shared folder. You need to direct InCAS to the shared file you created and noted down on page 9. You can do this one of two ways. As above a. Click on the symbol next to the „Database Folder‟ dialog box and navigate to the shared drive. The shared InCAS folder may not have been created yet. Hold the cursor over „Start‟ and click search. Type „InCAS 2009‟ (without the quotes) into the search box. b. If the search does not find the file, then the InCAS shared folder has not been created. Type the network path and file name directly into the „Database Folder‟ dialog box. Refer to pages 9-10 on how to create a shared folder. 7. Enter the password INCASUSER and click on the „Log-In‟ button. 8. Click „Yes‟ in the dialog box that appears. 9. The files have now been created. You will only need to follow these actions once on each computer. 12 IMPORTANT You must install the InCAS program on every computer you intend to use for InCAS testing. Follow the instructions above for every computer. 2009 InCAS Manual Installing the InCAS Program Additional Assistance The InCAS Manual has been written so that you will find immediate troubleshooting advice on the same page as the task that you are trying to undertake. Please follow those instructions prior to seeking assistance. Installation Flow Chart Consider issues outlined on page 8 prior to installation Check minimum specifications Computer does not meet minimum specifications Computer meets minimum specifications Contact your IT person to address the problems Uninstall any prior versions of InCAS software (page 7) Installing on a single computer Installing as a network Follow instructions on pages 10 through 11 Follow instructions on pages 11 though 12 2009 InCAS Manual 13 Getting to Know InCAS Familiarising with InCAS Opening InCAS Browsing the Assessment To open the InCAS program, either double click on the icon which is located on your desktop or hold the cursor over „Start‟ „All programs‟ „CEM Centre‟ and click on „InCAS 2009‟. After clicking on the „Browse Assessments‟ button you will see the following screen. It lists each category in which students will be assessed. Select the category you wish to browse by clicking on it, and then clicking „Start‟. The InCAS Admin Menu You will be taken to the InCAS Admin Menu. Edit/View Biographical Data Here you set up and view school, class and student information, and create assessment sessions. You will be presented with another list. This list shows a selection of the items that students may be presented with. Choose an item by clicking on it, then click on „Show Item‟. Back to Log In Screen This button takes you back to Log-In screen, allowing you to enter new passwords to swap between users. Import Data Import biographical data for students, or results of previous InCAS assessments. Transfer Data Transfer biographical and assessment data from the InCAS program to other locations. Browse Assessments Browse a selection of assessment questions in each of the categories. Reports View and print password lists. About InCAS View information about copyright and the creators of InCAS. Exit Close the InCAS program. 14 The item will be presented exactly as the students will see and hear it. You will need to select an answer in order to close the item screen in order to return to the „Browse Items‟ menu. Closing InCAS To close InCAS, click on the Exit button at the bottom of the screen. Students will not be able to exit or pause InCAS while they are undertaking assessments. 2009 InCAS Manual Getting to Know InCAS Understanding What the Questions Measure Picture Vocabulary Spelling Students hear a word and choose the picture that represents that word. The student hears a word and uses the on-screen keyboard to spell it. This category is measuring the student‟s understanding of increasingly difficult words. This category is measuring the student‟s ability to spell increasingly difficult words. Non-Verbal Mental Arithmetic The student sees a collection of shapes in a particular order. They must find the same pattern in a larger collection of shapes. The student is presented with a number problem that they must choose the correct answer for. This category is measuring the student‟s ability to perform increasingly difficult mental calculations. This category is measuring the student‟s ability to reason through increasingly difficult problems. Word Recognition General Maths The student hears a word, and must then identify the written representation of that word on screen. The student sees and hears a mathematical problem. They select the answer from on the screen. This category is measuring the student‟s ability to recognise increasingly difficult written words. This category is measuring the student‟s ability to solve increasingly difficult maths problems. Word Decoding Comprehension The student hears a nonsense word, and chooses the correct written representation of that word. Conditional on scoring well enough in other reading sections, the students must read a passage and select the correct words to complete a sentence. This category is measuring the student‟s ability to „decode‟ or figure out increasingly difficult nonsense words. Attitude to School The student hears and sees a number of statements relating to their feelings about school, and rates them on a sliding scale. This category is measuring the way the student feels about school. 2009 InCAS Manual This category is measuring the student‟s ability to understand what they read. Attitude to Maths & Reading The student hears and sees statements relating to their feelings about maths and reading, and rates them on a sliding scale. This category is measuring the way the student feels about maths and reading. 15 Entering Student Information Entering Student Information 3. Before beginning student assessments, you must create files and assessment sessions for each student. Students will be allocated individual „password‟ logins for each assessment session. These „passwords‟ should be printed out for future use. Once you have completed your data entry, you need to save your file in .CSV format. In Microsoft Excel, go to „File‟ „Save As‟. In the drop down box, choose „CSV (Comma delimited)‟. Type a name for your document and click „Save‟. Student information can be added in two ways and as such, these instructions are divided into two sections. SECTION 1: Importing class data SECTION 2: Entering individual data SECTION 1 Importing Class Data When setting up InCAS with new class information for the first time, it is recommended that you use the Import Data function to save time. Follow these steps to import class data. 1. Open an Excel document and set up the following headings. Reg Year Forename Surname DOB Gender UPN state Postcode EAL DOA 2. 5. Select PIPS CSV from the menu that appears, and click on „Import‟. 6. Find your .CSV file in the box that pops up and click on „Open‟. This is your class-name (eg. Mrs Apple), maximum of 25 characters School year group (eg. 3 Student first name (eg. Adam), maximum of 25 characters Student surname (eg. Smith), maximum of 25 characters Date of birth in dd-MMM-yy format (eg. 01-JAN-09) Male (M) or Female (F) Unique Student Number as issued by schools, or leave blank Maximum of 10 characters English as Additional Language, enter Yes or No Date of admission in dd-MMM-yy format (eg. 01-JAN-09) Enter data for each class you wish to add to InCAS. Your spreadsheet should look like the example below. 16 4 . Open the InCAS Program and login as INCASUSER. Click on the „Import Data‟ button. 2009 InCAS Manual 7. Click Ok on the dialog box that appears to tell you that the data has been successfully imported. 8. You will now need to manually enter the school details, and enter any additional details for students with additional needs. 9. Back at the Admin Menu, click on „Edit/View Biographical Data‟ button. First you will edit the school details. 10. Click on the name of the school you need to edit, and then click on „Edit‟. The following screen will appear. 11. Type in the required information. Fields marked with * are optional. Your InCAS ID will be s e nt to you with your enrolment information. 12. If you have students with additional needs in your classroom, you will need to manually edit their details also. 13. Back at the Admin Menu, click on „Edit/View Biographical Data‟ button. In the „Student‟ field, click on the name of the student you need to edit, then click „Edit‟. 14. For a student with Special Educational Needs, select Yes under the SEN field by clicking in the circle. Students with SEN can be categorised into the following fields by selecting the check boxes: Cognitive and learning difficulties Emotional, behavioural and social difficulties Sensory and physical difficulties Communication and interaction difficulties Deaf (Mild, moderate, severe, profound) 2009 InCAS Manual 15. Once you have completed the details for the student click OK. You can continue to alter as many students as necessary. SECTION 2 Entering individual data 1. Open InCAS and log in as INCASUSER. 2. Click on „Edit/View Biographical Data‟. 3. Click on the name of the school the student belongs to in the white School box. 4. Click on the name of the class the student belongs to in the white Class box. 5. Click on the „New‟ button next to the white Student box. 6. Manually fill in all student details. marked with * are optional. 7. Click „OK‟ to save student information. Fields 17 Entering Student Information Editing Student Information Changing student details 5. Click on the name of the student in the white Student box. If you need to change the personal details of a student (eg. Name, Date of Birth, SEN information), you can do so by going through these steps. 6. In the white box to the right of the „Move‟ button, click on the name of the class you want to move the student to. 7. Click the „Move‟ button. In the example shown below, Sally Strawberry will be moved to Mr Sprout‟s class. 1. Open InCAS and log in as INCASUSER. 2. Click on „Edit/View Biographical Data‟. 3. Click on the name of the school the student belongs to in the white School box. 4. Click on the name of the class the student belongs to in the white Class box. 5. Click on the name of the student in the white Student box. 6. Click on the „Edit‟ button next to the white Student box. 7. Change to details you need to, and click OK to save the information. Deleting a student 1. Open InCAS and log in as INCASUSER. 2. Click on „Edit/View Biographical Data‟. 3. Click on the name of the school the student belongs to in the white School box. 4. Click on the name of the class the student belongs to in the white Class box. 5. Click on the name of the student in the white Student box. 6. Click on the „Delete‟ button next to the white Student box. Moving a student between classes 1. Open InCAS and log in as INCASUSER. 2. Click on „Edit/View Biographical Data‟. 3. Click on the name of the school the student belongs to in the white School box. 4. Click on the name of the class the student belongs to in the white Class box. 18 2009 InCAS Manual Creating Assessment Sessions Creating Assessment Sessions Before assessing students with InCAS you must create assessment sessions for each student. Every session will be assigned a “Password” login code. These should then be printed for future use. The instructions for setting up assessment sessions are divided into three sections. SECTION 2 Creating Assessment Sessions for Individuals, Classes and Schools Individual Student 1. Open InCAS and login as INCASUSER. SECTION 1: Some considerations 2. Click „Edit/View Biographical Data‟ SECTION 2: Creating assessment sessions for individuals, classes and schools 3. Click the name of the school the student belongs to in the white School box. SECTION 3: Printing and using “password” login codes 4. Click the name of the class the student belongs to in the white Class box. SECTION 1 Some Considerations 5. Click on the name of the student in the white Student box. 1. 6. Click on the Assess button to the right of the white Student box. 7. The „Enter Assessment Session Details‟ box will appear. There are a number of options to choose from when setting up assessment sessions. Option Modules Included Time frame Developed ability Picture vocabulary Non-verbal ability Assessed in a single session Reading Word recognition Word decoding Comprehension Spelling Assessed in a single session Individual sessions Select one category at a time to assess These shorter sessions may be appropriate for younger students Each module assessed in a separate session 2. The spelling module may be difficult for young children, so you may wish to omit this module. 3. Take care not to create multiple overlapping sessions for the same student. For example, if you select the Reading assessment, do not create a Word Recognition module for the same student. Refer to the table above. 4. InCAS feedback will include a reading score which is calculated using the Word Recognition, Word Decoding and Comprehension modules. In order to obtain this score, these modules must be completed on the same day. Tip—’Password’ login codes Do not let the word „password‟ confuse you. These codes do not need to be kept secret. The codes are provided as individual logins for students to use to begin each session. The codes are randomly generated, and you will print them out. Follow the instructions provided in this manual to use the „password‟ login codes. 2009 InCAS Manual NOTE If you select a student who only has incomplete biographical data entered, a message box will appear. Follow the instructions on Page 18 to change student details, and add the required information. 8. Click on the assessment you would like the student to undertake. REMEMBER You need to read the important information in Section 1: Some considerations (on Page 19) before you create assessments. 19 Creating Assessment Sessions Individual Student Continued 9. 10. You may type in a unique „Password‟ login code, or you can click the button shown below to randomly generate one. 5. Click on the Assess button to the right of the white Class box. 6. The „Enter Assessment Session Details‟ box will appear. Repeat for each student. You will also need to repeat to create multiple sessions for one student. 7. Click on the assessment you would like the Class to undertake. 8. A password will be automatically generated for each student. You will access these when you print the password list (see Page 21). 9. Repeat for each class. You will also need to repeat to create multiple sessions for one class. Tip— Creating ’Password’ login codes Make sure your „Password‟ login codes follow these rules: 3-7 letters long No digits (1,2,3 etc) or symbols (!,#,@ etc) REMEMBER „Password‟ login codes will be printed out for future reference. They need not be memorised or kept secret. Example The example screenshot below shows the student Candy Carrot in Mr Sprout‟s class has had two assessment sessions created for her. When you click on the student name, existing assessment sessions and their associated ‟Password‟ login codes will be listed in the white Session box. School Sessions 1. Open InCAS and login as INCASUSER. 2. Click „Edit/View Biographical Data‟ 3. Click the name of the school in the white School box. 4. Click on the Assess button to the right of the white School box. 5. The „Enter Assessment Session Details‟ box will appear. 6. Click on the assessment you would like the School to undertake. 7. A password will be automatically generated for each student. You will access these when you print the password list (see Page 21). 8. Repeat for each school. You will also need to repeat to create multiple sessions for one school. Class Sessions 1. Open InCAS and login as INCASUSER. 2. Click „Edit/View Biographical Data‟ 3. Click the name of the school in the white School box. 4. Click the name of the class in the white Class box. 20 2009 InCAS Manual Creating Assessment Sessions SECTION 3 Printing and Using ‘Password’ Login Codes Printing ‘Password’ Login Codes Continued Printing ‘Password’ Login Codes 6. From here you will need to print a copy. Choose „File‟ then „Print‟. Set up the options for your printer as you would for any other document. 7. Your printed copy can now be used by students logging into their assessment sessions. 1. Open InCAS and login as INCASUSER. 2. Click on the „Reports‟ button. 3. Click on Password List in the white Report box. Using ‘Password’ Login Codes When students come to use their „Password‟ login codes, they will enter them into the login screen. This is where you would usually login as INCASUSER. Follow these steps. 4. Click the „Show Report‟ button. 5. The Password List will open in your Internet Browser. In this example, each student from Mr Sprout‟s class will be assessed on Developed Ability. They all have a unique „Password‟ login code. 2009 InCAS Manual 1. Provide the student with their Password Login Code on a post-it note. 2. If you are already logged into the InCAS program, click on the „Back to LogIn Screen‟ button from the main menu. 3. The student should enter the code that corresponds with the assessment that you wish for them to undertake as their login. 4. Click the „Log-In‟ button. *NB Using our previous example, Candy Carrot would enter PBF in order to begin her Developed Ability assessment. 21 Implementing the Assessment Implementing the Assessment SECTION 1: Some considerations Students can only complete each assessment once, and cannot pause or leave and return to the assessment once they have begun. Make sure you have thought about the following before allowing students to begin. 4. Students should click the „Test Sound‟ button to make sure the headphones or speakers are working and the volume is at the correct level. 5. Once the student is happy with the sound level they should click the „Start‟ button. 6. The assessment will begin. The student should listen carefully to questions and instructions, and use the mouse to record their response. 1. Make sure there is sufficient time for the student to complete the session. 2. Make sure the student has had a toilet and drink break before beginning the session. Tip— Student Instructions 3. Make sure the volume is at the correct level by using the „Test Sound‟ button. A poster for you to photocopy and display near computers where students are taking the InCAS assessment is provided on the next page. 4. Students need to listen carefully to the instructions. To minimise distractions, we recommend the use of headphones. Checking completed assessments 5. If the student will be assessed using a laptop, make sure you attach an external mouse if students have trouble navigating with the built in laptop „touch pad‟. Remember, sessions cannot be paused or saved and resumed at a later time. Some sessions are timed, and results will be affected if students leave the computer during the session. SECTION 2: Assessing a Student Once students have begun taking the assessments, you may wish to check from time to time so you know who has completed what, and keep track of what students still need to complete. To do so, simply follow the instructions on page 19 to view the Password List. Any assessment Password Login Codes that remain on this list are yet to be completed. Things you will need: Computer with InCAS installed Student Biographical information entered correctly into the InCAS program Printed Password Login Code list Mouse Headphones (recommended) Sufficient time for student to complete assessment 1. Open the InCAS Program, or if you have already been working with InCAS, click the „Back to Log-in Screen‟ button on the main menu. 2. Students should be given a copy of the „password‟ login code they are to use. You may wish to provide this on a post-it note. 3. Students must check that their Biographical Data appears correctly on the screen. It is essential that Date of Birth is correct, as this is used to calculate the starting point of the assessment. 22 2009 InCAS Manual Student Instructions: How to take the InCAS Assessment... Once you start the assessment you cannot pause it. Make sure you go to the toilet and have a drink before you start! 1. Enter the Password Login Code your teacher has given you into the Login Screen. 2. Click on Login. 3. Check that your name and birthday are right. If they are not right, ask for help! 4. Put your headphones on if you have them. Click the „Test Sound‟ button. Is the volume right? If it is not right, change it or ask for help! 5. Once everything is ready, click the „Start‟ button. 6. Listen carefully to the instructions and use the mouse to record your answers. DO NOT BE AFRAID TO ASK FOR HELP IF YOU GET STUCK WHILE YOU ARE USING INCAS Submitting Data Submitting Data Once all assessments have been completed, you need to submit your data to InCAS+ so it can be analysed and reported to you as comprehensive InCAS feedback. The instructions for submitting data are divided into two sections. SECTION 1: Transferring data SECTION 2: Submitting data to InCAS+ 4. You will need to specify a location for the file to be saved. We recommend creating a file somewhere accessible, and calling it „InCAS Data 2009‟ 5. You can rename the file so the name has meaning to you. We recommend naming it INCAS<ID#>_YY. In our example the file is named INCAS1234567_09 SECTION 1 Transferring Data CHOOSING A TRANSFER METHOD Floppy disk (Drive A) This is not a recommended option. Your InCAS contact cannot access data from a Floppy disk. Floppy disk (Drive A) biographical data only To transfer student information onto a Floppy disk for your own use only. Hard disk (Program folder) Saves your data to the hard drive of your computer. If you use this option, be prepared to write down the file path that InCAS provides. Save dialogue This is the recommended option. The instructions in this manual will step you through this option only. 1. Login as INCASUSER. 2. Click on the „Transfer Data‟ button on the Admin Menu. 3. Click on „Save dialogue‟ and then click the „Transfer‟ button. 24 INCAS1234567_09 6. Click „Save‟, and then click „OK‟ in the dialogue box that appears. 7. The transfer process is now complete. SECTION 2 Submitting data to InCAS+ 1. Open your web browser www.incasproject.org and go to 2. Select „InCAS+ Login‟ from the top of the screen. 3. Enter your Username (InCAS ID) and your InCAS+ Password. This information can be found on the inside cover of your manual. 2009 InCAS Manual Submitting Data IMPORTANT 4. Move your mouse to „Return Data‟ on the top menu, and select „Upload Results‟. If you are using several stand alone computers to conduct your InCAS assessments, you will need to follow the data submission process for each computer. If you are using the network option, you will only need to upload once. Troubleshooting—Submitting Data Problem Solution I have forgotten my InCAS+ password. 5. The upload screen will now load. Click the „Browse‟ button, and find the file you saved when you transferred your data (p24). Contact your InCAS person for a reminder of your password. Tip— Backup Data Make sure you save a back-up copy of your transferred data to a safe location, such as a CD or USB drive. It is expected that all schools will make a backup copy of thier InCAS data. 6. Once you have selected the correct file, click the „Upload‟ button. 7. After a few moments a summary page of your uploaded data will be displayed. Tip— Feedback Data For guidance on retrieving and interpreting your feedback, see Part Two of this manual. 2009 InCAS Manual 25 Form: Updating Contact Details It is essential that you keep your InCAS contact details current so we can communicate important information to you. Please use this form to let us know about any changes in contact details. Please mail or fax it to InCAS Australia. Details are provided on Page 3. School Name School ID # Please make changes to: □ □ □ Principal contact details InCAS Coordinator contact details Other contact details Change of Principal Contact Details First Name Surname Title Email Change of InCAS Co-ordinator Contact Details First Name Surname Title Email Please use this space to provide details of other changes 26 2009 InCAS Manual PART TWO Feedback Guide Using the Feedback Guide What is feedback? Understanding the types of feedback Feedback gives a profile for the whole school, individual classes and individual students. Student reports allow the teacher to see reading, spelling and mathematics abilities in relation to vocabulary, nonverbal ability and attitudes. The analysis of reading and spelling scores will enable a teacher to see which students have good word recognition and decoding skills but perhaps poor understandings of passage text. Other children will be able to read reasonably well but have problems with spelling and so on. The added dimension of picture vocabulary and non-verbal ability enables teachers to see if a student‟s reading is in line with these. This is particularly useful for children for whom English is an additional language. The Students‟ responses for vocabulary, non-verbal ability, reading, spelling, mental arithmetic and general mathematics are converted to age equivalent scores that can be compared to their actual age. Attitudes are reported on a scale of negative through to positive. InCAS allows you to download different types of feedback displayed in different formats. Which types you choose depends on the information you wish to see, and how you wish to use it. The table below outlines the different types of feedback available to you, and directs you to the page you will need to refer to in the manual to obtain and interpret this feedback. SOFTWARE REQUIREMENTS To download and view the feedback, you will need Microsoft Excel and Adobe Acrobat Reader. Adobe Acrobat Reader is available for free download from the Adobe website www.adobe.com Feedback is downloaded from the InCAS+ secure website and can then be printed or saved onto the hard disk of your own computer. This method of feedback delivery has the advantage of making available a large amount of information that is updated on a regular basis. Schools can print school and class summary tables and graphs and then select more detailed reports on particular students. This guidance explains the feedback and how to access it from the InCAS+ secure website. Feedback Type Format To download To interpret Adobe PDF Page 30 Page 32 This option produces box and whisker plots which show how a class or year group is performing. Microsoft Excel Page 31 Page 34 Data is customised according to your specifications, and can be displayed at student, class or year group level. As below Page 30 Page 36 Scores chart This option displays the full profile of a student in graphical format. Adobe PDF Page 30 Page 36 Longitude chart This options shows progress made over a period of time, and is available only after the student has been assessed in their second year of participation. Microsoft Excel Page 30 Page 37 This options shows the differences between chronological age and age equivalent scores, in a tabular format. Microsoft Excel Page 30 Page 38 This option produces the same display as Standard feedback, but in Excel format in order that you may work more easily with the data. Microsoft Excel Page 30 Page 39 Standard Age Comparison Charts Custom Difference table Scores table 28 Description This option produced tables of age equivalent scores grouped first by year group, then by class. 2009 InCAS Manual Accessing the feedback Using InCAS+ 1. Go to www.incasproject.org 2. Enter your Username (InCAS ID) and InCAS+ Password to login to the secure InCAS website. 3. On the main screen you will see a yellow strip across the top with a series of drop down menus. The options in these menus are described below. 4. Before you access your feedback, you may wish to check which students have had data uploaded. Hold the cursor over the Administration tab, and then click on the “Check Student Details” option. 5. You will see a table like the one below with an entry for each class uploaded. Click on the icon in the View column. The date each student completed the assessment will be displayed in another table. 6. To retrieve your feedback results, you will need to use the Results/Analysis form. Username and Password Your username and password should be located at the front of this manual. If you have mislaid your Username and/or password, please contact your InCAS person. Contact details appear on Page 3. Menu Options Administration InCAS+ Log Displays recent activity on your InCAS+ account Delete uploads Deletes all previously uploaded files. This option should be used with care. Display assessments Produces a table to check which assessments students have completed and when Check student details Produces a table to check name, date of birth and identifier information for students Check identifiers Use this table to check the Unique Student Number (UPN) for each student. These details need to be updated before the longitudinal results can be viewed. Return Data Upload results This link is used to upload results from assessments (see Page 23 of the User Manual handbook) Results/Analysis Feedback form To access Standard and Custom feedback Age comparison chart To access Age Comparison Charts Downloads User guide UK version of the User Guide available for download Feedback guidance UK version of the Feedback Guidance available for download Reading handbook Download a paper to support planning and action for reading based on InCAS results Baseline student details Import details for students who have been assessed using PIPS Baseline Assessment Maths handbook Download a paper to support planning and action for maths based on InCAS results 2009 InCAS Manual 29 Accessing the feedback Downloading Feedback This topic is divided into three sections, in order to guide you through downloading the three types of feedback available from InCAS. SECTION 1: Standard Feedback SECTION 2: Custom Feedback SECTION 3: Age Comparison Chart SECTION 2 Custom feedback 1. Hover your cursor over the „Results/Analysis‟ tab and click on the „Feedback Form‟ option. 2. The following table will appear on your screen. Click on „Custom Feedback‟. SECTION 1 Standard feedback 1. Hover your cursor over the „Results/Analysis‟ tab and click on the „Feedback Form‟ option. 3. You will now need to select options to customise your data output. 2. The following table will appear on your screen. Click on „Standard Feedback‟. 4. The first choice you must make is the level of the data. Your options are: Pupil level Feedback is produced for an individual pupil. You will need to repeat the process to generate feedback for multiple pupils. There is an „All Pupils‟ function which you can choose later in the process to generate individual feedback for all of your pupils. 3. The results you obtain will look similar to those shown below. Class level Feedback is produced for all pupils in the class, and can be saved in a single file. This option will take a little longer to download than Pupil level data, as it is a bigger file. Year group/School level Feedback is produced for all pupils in a year group or school, and can be saved in a single file. This option will take a little longer to download than the Class level option, as it is a bigger file. 30 5. Select the level from the drop down box. 6. Select the Academic Year you wish to generate feedback for. 7. Depending on your earlier choice, you may be asked to select a class to view. 2009 InCAS Manual Accessing the feedback If you selected Pupil level, you need to choose a pupil, or the „All Pupils‟ option from the drop down box. If you selected Class, Year or School level, you will need to select the part of the assessment you wish to generate feedback for from the drop down menu. 8. Select the chart or table you wish to generate by clicking the appropriate button. Buttons will be greyed out if the options are not available. SECTION 3 Age comparison chart 1. Hover your cursor over the „Results/Analysis‟ tab and click on the „Age Comparison Chart‟ option. 2. This chart is opened in Excel. You may need to alter your security settings to enable Macros to run. See the tip below 3. The chart that is generated will look similar to the one below. Tip—Viewing feedback in Microsoft Excel To view charts generated in Excel, you need to change your Security Settings to an appropriate level. In Excel 2007, you are given the option to Enable Macros when you open the file. In the earlier versions, go to ToolsMacroSecurity and choose Medium before you download the file. If you have trouble with this process, you may need to ask your IT Person for help. 2009 InCAS Manual 31 Interpreting the feedback Interpreting Standard Feedback How is Standard Feedback presented? Case Study The Standard Feedback is presented as a series of tables. Feedback is produced for all students who completed the InCAS assessment. Feedback is grouped first by Year group and then by Class. Looking at the tables presented to the right, we can profile the student Garth Grape. Feedback is presented in PDF format. What does Standard Feedback mean? Each students‟ name is listed, and next to their Name is their Actual Age at the time of testing, in Years and Months (5:4 means five years and four months). The scores given in the remaining columns are Age Equivalent Scores—they show the age in years and months at which the student performed during the assessment. If a student is performing as expected, their Age Equivalent Score will be the same as their Actual Age. When scores are very low, you will see a value such as <4.00. This means that the score is too low to be represented more accurately than as being lower than 4 years. The only exception to this is the table which represents Attitude scores. Attitudes scores are rated on a scale of 1 to 5. 1 indicates a very negative attitude, while 5 indicates a very positive attitude. Garth Grape Actual age of 7 years and 8 months Reading score is appropriate to his age General maths score is slightly higher than his actual age Developed Ability score is well above his actual age (He performed better on the Non Verbal component rather than the Picture Vocabulary, but both scores were above his actual age) Performed above his actual age for Word Decoding, Word Recognition and Spelling, but slightly below his age in comprehension Performed above his actual age in all facets of Mental Maths except for subtraction, where he performed slightly below his age. Attitudes to Reading, Maths and School are all highly positive This profile provides an overview of Garth‟s strengths and weaknesses. Coupled with a teacher‟s contextual knowledge, areas for extension and areas requiring extra attention can be identified. For example, the teacher may notice that Garth has a strong understanding of the mechanics of language (i.e. Word Decoding and Spelling) but is not as strong when it comes to synthesising these elements to generate meaning (i.e. Comprehension). Results can be used to directly inform individual and class level planning and action. 32 2009 InCAS Manual Interpreting the feedback Reading and General Maths Reading is a composite score calculated from the Word Recognition, Word Decoding and Comprehension scores. Students who do not reach the Comprehension stage of the assessment due to low Word Recognition and Word Decoding scores are credited with the minimum Comprehension score in order to calculate their Reading scores. GenMaths is the overall score from the General Mathematics component. Picture Vocabulary & Non-Verbal (Developed Ability) PicVocab is the overall score from the Picture Vocabulary component. NonVerbal is the overall score from the Non Verbal component. Taken together, these scores indicate Developed Ability. Developed Ability has been defined for Professor Peter Tymms, Director of the CEM Centre, as the ability of children to learn. This ability is developed by children over their lifetime and will continue to develop. Developed ability is calculated by using a combination of items which measure language acquisition and non-verbal ability. Word Recognition, Word Decoding, Comprehension and Spelling WordRecog is the overall score from the Word Recognition component. WordDecod is the overall score from the Word Decoding component. If you have not completed a component with any of the students from your class (for example, if you omitted the Spelling component) the column for that component will not appear. Mental Arithmetic MentArith is the overall score from the Mental Arithmetic component. Mental Arithmetic is further broken down into the four areas of Addition, Subtraction, Multiplication and Division. Each student is presented with a range of Mental Maths questions that give an accurate overall estimation of his/her attainment. However, when the assessment is sub-divided into the four modules described above, the accuracy of each measure is necessarily lower because they are based on much fewer questions. When the confidence interval of a module measure exceeds plus or minus one year, InCAS does not report that score. If this happens an asterisk will appear in the feedback instead. Attitude Attitude scores are reported on a scale of 1 to 5. 2009 InCAS Manual 33 Interpreting the feedback Interpreting Age Comparison Charts How is the Age Comparison Chart presented? Age Comparison Charts are presented as a box-andwhisker plot. Feedback is produced for all pupils who completed the component of the assessment you choose to view. You can choose to view either by Class or Year groups. indicates that they have an extremely low or high score in comparison to the rest of the class. The box-and-whisker part of the chart is plotted on a graph as shown in the diagram below. The box-and-whisker plot is presented in Microsoft Excel. You will need to alter your security settings to enable Macros. Once the chart is displayed, you can customise your feedback by using the drop down menus at the top of the screen. You need to select the assessment component (i.e. Reading, General Mathematics) and the cohort, (i.e. Class or Year group). The drop down menu looks like the one shown below. What does the Age Comparison Chart mean? The box-and-whisker plot shows a „picture‟ for each class or year group. Box-and-whisker plots help the teacher to see: The general starting point of the whole class The homogeneity of the class The varying strengths of the class Individual students who stand out as being exceptional within the class Each pupil‟s score is represented by a small diagonal line, which their name is written next to. The box-andwhisker part of the plot is shown in the diagram and explained below. median half of the students unusual student 25% 25% 25% 25% The box width will vary on your plot. The width of the box shows the range of ages for the middle half of the class or year group. The line in the middle of the box is called the median and represents the middle score for the year or class group. The box holds half the students in your class, and the whiskers normally extend to the highest and lowest scores in the class. Sometimes there is a student outside of the box-and-whisker portion, which 34 The diagonal green line is a reference line of actual Age against Age Equivalent Scores. Students above the green line have Age Equivalent Scores above their actual age. Those below the green line have Age Equivalent Scores below their actual age. It is interesting to see the range of scores for each year group or class and the progression with increasing age. As with other assessments, InCAS has its limits and can only provide reliable age equivalent scores between particular age ranges. For example, it does not make sense to give a child a Reading Age Equivalent Score of 1 year and 8 months. Therefore the red horizontal lines on the Age Comparison Charts represent the upper and lower limits of the range of scores that InCAS can provide. You will see these red lines if the students in your class have extremely high or low scores. Tips—Box-and-Whisker plots In some cases the box-and-whisker part of the chart will be in a solid colour, which will obstruct the names which fall within in the box. To rectify this, right click on the box and choose „Format Shape‟ and choose No Fill. 2009 InCAS Manual Interpreting the feedback Case Study The Age Comparison Chart below shows results for all students who have completed the Word Recognition component of the assessment. It can be seen that Year 3s are depicted in orange and Year 5s are depicted in blue. Word Recognition—All students Hayley is immediately recognisable as a student with an exceptionally low score Students around the bottom of the box-and-whisker (i.e. Dannielle, Caitlin, Jason and Nathan) are achieving well below their actual age Students around the top of the box-and-whisker (i.e. Johnathon, Megan and Thomas) are achieving well above their actual age In Year 3, there is a 4.5 year difference between the highest and lowest Age Equivalent Scores. In Year 5, there is a 7.5 year difference between the highest and lowest Age Equivalent Scores. 2009 InCAS Manual 35 Interpreting the feedback Custom Feedback Custom feedback comes in four formats, depending on the options you select from the InCAS+ website. As such the information on Custom Feedback is divided into four sections. SECTION 1: Scores Chart SECTION 2: Longitude Chart SECTION 3: Difference Table SECTION 4: Scores Table SECTION 1 Scores Chart Case Study The Score Charts below are for the student Garth Grape. Looking at the Score Charts gives us a visual representation of Garth‟s Age Equivalent Scores. We can see that, for example, while Garth is performing slightly higher than his actual age in General Maths, he has an Age Equivalent Score much higher than his actual age for Developed Ability. We can visually see how much weaker his Comprehension Skills are in comparison with his Word Recognition and Decoding skills. How is the Scores Chart presented? The Scores Charts are small graphs which profile individual students‟ scores. A graph is produces for all components of the assessment a student has completed, including the Attitudes section. The Scores chart is presented in PDF format. What does the Scores Chart mean? The little blue squares show the age equivalent scores and the lines above and below are the „confidence intervals‟. These show the range of 1 standard error, within which we are 68% confident the child‟s true score lies. On a different day, a student might have had a few more correct or incorrect responses and achieved a slightly higher or lower score. The confidence intervals give an indication of the range in which a child might score on a different day. The green line is the student‟s actual age at the time of the assessment. If the confidence interval overlaps the green line, the age equivalent score is not significantly different to the student‟s chronological age. There is also a chart for Attitude scores. These are on a scale from negative to positive. As with the cognitive profile charts, the red square represents the attitude score and the lines above and below are the confidence intervals. 36 2009 InCAS Manual Interpreting the feedback SECTION 2 Longitude Chart How is the Longitude Chart presented? The Longitude Chart is presented in Microsoft Excel. Occasionally, a student‟s score on a previous assessment will be higher than his/her latest score. This is usually within the confidence intervals, and so the two scores are not significantly different. Very rarely, this difference will be a significant one and this would tend to apply to students with special educational needs. It may be that the student was lucky in the first assessment, selecting correct multiple choice answers by chance and the later assessment is a more accurate reflection of their achievement or ability. What does the Longitude Chart mean? Case Study The horizontal axis shows the actual age of the student while the vertical axis shows the Age Equivalent Score. The scale on the vertical axis is sometimes shown as half years, sometimes as whole years. This is automatically determined by the program for each student and depends on the difference between the age and the age equivalent scores. Children aged 8 years would be expected to have an Age Equivalent Score of 8 years, children aged 9 years would be expected to have an age equivalent score of 9 years, and so on. The green reference line illustrates this. The black diamonds represent a student‟s Age Equivalent Score at the time of assessment and the bars above and below the diamonds represent the 68% „confidence interval‟ (See „What does the Scores Chart Mean?‟ on Page 36 for further explanation of the „confidence interval‟). The example below shows a Longitude Chart for Reading, (i.e. the composite score derived from Word The Longitude Chart is a graph which shows the progress a student makes over a period of time. The Longitude Chart will only be available once students have been assessed for a second year. The chart becomes valuable as the students are assessed year on year. Longitude Charts are available for Reading, General Mathematics, Mental Arithmetic and Developed Ability. For schools that have assessed their students with the PIPS On-entry Baseline Assessment in previous years, the PIPS Reading and Mathematics scores have been converted to Age Equivalent Scores and are plotted on the Longitude Charts for Reading and General Mathematics respectively to enable progress from the start of school to be monitored. 2009 InCAS Manual Longitude Chart Actual Age at first InCAS assessment—7 years and 3 months Reading Age Equivalent Score approximately 7 years and 6 months - slightly higher than his actual age Actual Age at second assessment—8 years and 3 months Reading Age Equivalent Score approximately 7 years and 9 months—fallen behind the expected level for his actual age Third assessment Reading score was significantly lower than would be expected for his Actual Age Fourth assessment—Reading Age in line with Actual Age 37 Interpreting the feedback SECTION 3 Difference Table How is the Difference Table presented? The Difference Table sets out the difference between the Actual Age and the Age Equivalent Scores at Class or Year Group level. The tables are presented in Microsoft Excel and can be sorted by first name, last name or scores. To sort, click on the blue box at the top of the table and use the drop down menu, pictured below. Some students‟ age equivalent scores fall below the minimum or above the maximum. In these instances, the difference between the chronological age and Age Equivalent Score is denoted by < - (less than) if the age equivalent score is below the minimum, or > (greater than) if above the maximum. Differences tables are not produced for attitudes. Case Study The example Difference Table below shows Achievement scores for three students from a class. The table has been sorted by Reading score, which puts the highest positive difference at the top. Difference Table What does the Difference Table mean? The student‟s Names and Actual Ages are listed. The remaining columns show a + or—value. If a student has an Age Equivalent Score three years above their Actual Age, the value would be +3. If a student has an Age Equivalent Score three years below their Actual Age, the value would be -3. 38 Sally Strawberry is the top reader in the class, with a Reading Age Equivalent Score 9 months above her actual age Sally is not the top in maths. In this sample, Candy Carrot has a Math Age Equivalent Score 1 year and 1 month higher than her Actual Age 2009 InCAS Manual Interpreting the feedback SECTION 3 Scores Table How is the Scores Table presented? What does the Scores Table mean? The Scores Tables are generated in two different formats. Please see advice on Interpreting Standard Data for Class, Year and School level tables. Class, Year and School level These tables are the same as the standard feedback, but are produced in Excel so they can be sorted by name, age or score. Student level tables set out the Actual Age, Age Equivalent Scores and Differences for each assessment component completed. Case Study Student level These tables are more detailed reports into the individual achievement. They are presented in PDF format, and cannot be sorted. 2009 InCAS Manual The example below looks at a Student level Scores Table, and shows a clear profile of the student. 39 Planning and Action Using InCAS feedback for planning and action InCAS testing provides comprehensive information on individual students and classes. Together with your contextual knowledge, this assessment information is highly useful to inform your planning and action at an individual and whole class level. In order to further guide your planning and action, Handbooks are available for the areas of Reading and Mathematics. These handbooks have been written by Christine Merrel and Peter Tymms of the CEM Centre at Durham University. There is no cost associated with obtaining these Handbooks. We recommend you download and refer to these handbooks. They are available from the InCAS+ website. 1. Login to InCAS+. 2. Hover your cursor over „Downloads‟. 3. Click on „Reading Handbook‟ or „Maths Handbook‟. A download will begin. The Handbooks are in PDF format. 40 2009 InCAS Manual Notes 2009 InCAS Manual 41 Notes 42 2009 InCAS Manual Notes 2009 InCAS Manual 43