1
C OVER
Disclaimer
HREF TOOLS CORP. ("HREF") DISCLAIMS ALL WARRANTIES, EXPRESS AND IMPLIED, INCLUDING BUT NOT LIMITED TO THE IMPLIED WARRANTIES OF MERCHANTABILITY AND
FITNESS FOR A PARTICULAR PURPOSE AND NON INFRINGEMENT. IN NO EVENT SHALL
HREF BE LIABLE FOR ANY LOSS OR DAMAGE OF ANY KIND, INCLUDING BUT NOT LIMITED TO INCIDENTAL, INDIRECT, CONSEQUENTIAL OR SPECIAL DAMAGES, ARISING OUT
OF THIS AGREEMENT OF THE DELIVERY, USE, SUPPORT OR OPERATION OF THE SOFTWARE. AMONG OTHER THINGS HREF WILL NOT BE LIABLE FOR ANY LOSS OR DAMAGE
INCLUDING, WITHOUT LIMITATION, DAMAGES FOR LOSS OF GOODWILL, WORK STOPPAGE, COMPUTER FAILURE OR MALFUNCTION, OR ANY AND ALL OTHER COMMERCIAL
DAMAGES OR LOSSES. IN NO EVENT WILL HREF BE LIABLE FOR ANY DAMAGES IN EXCESS
OF HREF's LIST PRICE FOR A LICENSE TO THE PROGRAM EVEN IF HREF SHALL HAVE BEEN
INFORMED OF THE POSSIBILITY OF SUCH DAMAGES, OR FOR ANY CLAIM BY ANY OTHER
PARTY. THIS LIMITATION OF LIABILITY SHALL NOT APPLY TO LIABILITY FOR DEATH OR
PERSONAL INJURY TO THE EXTENT APPLICABLE LAW PROHIBITS SUCH LIMITATION.
FURTHERMORE, SOME STATES DO NOT ALLOW THE EXCLUSION OR LIMITATION OF INCIDENTAL OR CONSEQUENTIAL DAMAGES, SO THIS LIMITATION AND EXCLUSION MAY
NOT APPLY TO YOU.
Copyright
Both the RemBoot software and this manual are Copyright © 2001-2011 HREF Tools Corp. All
Rights Reserved Worldwide.
No part of this manual may be copied, photocopied, reproduced, translated, or reduced to any
electronic medium or machine readable form without prior written consent from HREF Tools
Corp. (“HREF”). The RemBoot Utility and this manual and all related rights in patents, copyrights
and trade secrets are protected by the copyright laws of the United States and international copyright treaties and shall at all times, and throughout the world, remain the property of HREF exclusively. HREF reserves the exclusive copyright and all other rights, title and interest to distribute
RemBoot.
Credits
The RemBoot Utility was originally programmed by Arcady Software, under contract to HREF.
This manual was typeset by Ran Zhang. Text provided by Ann Lynnworth.
Edition
9-November-2011 RemBoot version 4.3, documentation version 2.0
Shareware
Please register your copy of RemBoot. Start at http://www.href.com/rsu
Fonts
This manual uses Berkeley Book font from www.adobe.com for the main text.
http://www.href.com
Contents
iii
CONTENTS
Evaluation................................................................ 5
What is the Remote Reboot Utility?................................... 5
Core Functionality ............................................................ 6
Common Uses of RemBoot ............................................... 6
System Requirements........................................................ 7
Why RemBoot Works When Other Apps Crash................ 7
Security............................................................................. 8
Planning................................................................... 9
Tutorial............................................................................. 9
How to choose a domain name during free evaluation ...... 9
Registering RemBoot ....................................................... 10
Installation............................................................. 11
Overview ........................................................................ 11
Download the Installation Program................................. 12
Running RemBootSetup .................................................. 12
Secure Certificates........................................................... 18
Resource Definition ............................................... 19
Shortcut for RemBoot Login Screen ................................ 19
High-Security Passwords................................................. 19
Operation............................................................... 21
Displaying Remote Reboot Action Form.......................... 21
Log Files ......................................................................... 23
Example Error Log file: ................................................... 24
Customization ....................................................... 25
RemBoot Settings ............................................................ 25
RemBoot Manual
iv
Contents
Application Programming ..................................... 27
Program Service ..................................................... 29
Changing RemBoot's Settings .......................................... 29
Moving RemBoot to a Different Directory ....................... 29
Uninstalling RemBoot ..................................................... 30
Technical Support........................................................... 30
End Use .................................................................. 31
Sharing Server Reboot Responsibility in a 24x7 World ... 31
Making RemBoot Convenient Yet Secure ........................ 32
Index ...................................................................... 33
RemBoot Manual
Contents
v
RemBoot Manual
vi
Contents
RemBoot Manual
Evaluation
5
EVALUATION
In this chapter, we consider information that will influence your selection, acquisition, and
purchase of the Remote Reboot utility from HREF Tools Corp.
What is the Remote Reboot Utility?
The Remote Reboot Utility ("RemBoot") is a software product which runs on a dedicated IP
number and port and, upon authenticated request, reboots the computer. Once installed,
RemBoot is controlled over HTTPS using any web browser. All you need is a connection to
the Internet and your login details to reboot your computer.
RemBoot runs with Secure Socket Layer ("SSL") so that communication between you and
RemBoot is encrypted.
Multiple logins can be defined so that a group of administrators, perhaps living in different
time zones, are able to reboot the server without knowing each other's passwords.
RemBoot Manual
6
Evaluation
Core Functionality
RemBoot provides the following functionality:
• Quick, easy, highly secure reboot of a computer running Microsoft Windows, triggered
from a web browser;
and has the following key features:
• Reboot is activated through any web browser, from anywhere, at any time, after logging
in;
• RemBoot is not dependent on Microsoft IIS, PC Anywhere, VNC or any other product
which may be "hung" when you need to reboot your computer;
• Secure Sockets Layer ("SSL") is used to encrypt all communication between you and
RemBoot;
• Multiple user names and passwords are allowed for shared responsibility;
• At the time of reboot, any running applications are notified of pending shutdown so that
they may exit before computer restarts; and if they don't exit cooperatively within the specified timeout period, they are forced to exit so that absolutely no human intervention is
required on the server;
• You define the IP number and port that RemBoot runs on;
• Log files track the history of usage including any failed login attempts;
• A simple application with text based configuration files (no registry entries);
• Runs as a service which starts when Windows starts (regardless of whether anyone logs
in);
Common Uses of RemBoot
The most common reasons for needing to reboot a computer remotely are:
• applications "hang" on the server and the system needs to be restarted, and you might
be at an airport when you receive the urgent phone call !
• even though your office is just down the hall from the computer center, you'd rather reboot using a web browser than go through the security procedure to get into the server
room, find the right rack, hook up the keyboard, figure out why the monitor isn't working
today, and so on…
• no matter how hard you try, you can not survive being on-call 24x7 and you need to
share the responsibility with another person, in another time zone. You don't want to give
out complete control of the server, you just want to allow reboot when needed.
RemBoot Manual
Evaluation
7
System Requirements
RemBoot requires a computer running Microsoft Windows NT, 2000, XP or 2003. In
terms of disk space, RemBoot needs less than 5 megabytes.
RemBoot runs as a service.
During installation, RemBoot requires a connection to the public internet, so that it can
request a secure certificate from www.href.com.
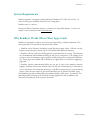
Why RemBoot Works When Other Apps Crash
RemBoot is designed to work in a low-resource and partially crashed environment. This
section provides a few details for the technically curious.
• RemBoot and its libraries (including system libraries) require about 2 Mb on start up.
Requests processing may require up to a few hundred Kb additional memory.
• RemBoot calls the SetProcessWorkingSetSize system function on start up. This function
sets the minimum and maximum working set sizes for its own process. The working set of
a process is the set of memory pages currently visible to the process in physical RAM memory. These pages are resident and available for an application to use without triggering a
page fault.
• RemBoot allocates some memory blocks on start up. As soon as low memory situation
happens, RemBoot releases one of them. After that the size of free memory is increased by
size of this block. Now more free memory is available for processing of a new incoming
request. After the new request is processed, RemBoot tries to allocate this block again.
Also RemBoot provides another method of memory blocks reallocation - by timeout. This
method provides restoring of all the blocks if other applications release memory and
amount of free memory in the system is increased.
RemBoot Manual
8
Evaluation
Security
RemBoot is potentially vulnerable to port scanning for https (not plain http).
We recommend that you run RemBoot on a port other than 443 (the standard https port),
so that (a) you do not create a conflict with an existing web site using SSL and (b) you
make it more difficult for port scanners to locate the entrace to RemBoot.
We also recommend that you customize the login URL during installation. Any hacker
needs to know your server name, port number, complete login path, plus username and
password in order to get in.
We recommend that you use long usernames and passwords, so that it is extremely difficult
for even an automated program to guess a login.
All login attempts are logged, so any attempt at guessing can be detected. The remote user’s
ip number is logged (as of RSU v.9.7).
RemBoot Manual
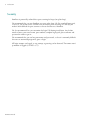
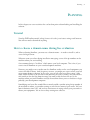
Planning
9
PLANNING
In this chapter, we cover activities that can be done prior to downloading and installing the
software.
Tutorial
View the FREE online tutorial at http://remote-reboot.href.com/rsututor using a web browser.
You will not need to download anything.
How to choose a domain name during free evaluation
When evaluating RemBoot, you must use a domain name -- in order to install it, and to
access the login screen.
Whatever name you select during installation must ping as one of the ip numbers on the
machine where you are installing.
One common choice is “localhost” which means your local computer. That is fne, if you
want to install RemBoot on your own development machine.
However, you might want to make sure that RemBoot works on the actual equipment you
want to be able to reboot. And, for privacy reasons, you might not want to reveal your real
server name during evaluation. In that case, you can edit your hosts file to create a fake
name which resolves to the location of the machine you want to reboot. You then obtain a
trial certificate for that fake domain name. You need to edit the hosts file on (a) the
machine where you install RemBoot and (b) the machine where you use a browser to login,
probably your development computer.
If modifying two hosts files sounds like too much trouble, consider using the ip number of
the machine-to-reboot, or consider trusting us with the real name of your server. We have
been in business since 1995 and we have zero interest in trying tohack your passwords to
reboot your equipment. We are far too busy writing new software.
RemBoot Manual
10 Planning
Registering RemBoot
Please register RemBoot for each server you use it on. Your money enables us to add more
features, and to develop other useful utilities. Registration gives you an SSL certificate customized for your computer valid for five (5) years, and an email notice when new versions
come out. (After five years, RemBoot will keep working and your web browser might give
you a warning about the certificate having expired.)
To register, visit the www.href.com/rsuorder web site and order your license. Mastercard,
Visa, AmEx accepted over the web (on https, of course)..
RemBoot Manual
Installation
11
INSTALLATION
Overview
During Part I, you will install the RemBoot program files and its configuration data. The
following files and directory structures will be set up for you.
Note: RemBoot only uses the Windows registry to facilitate uninstalling itself.
Program Directory
…\RemoteRebootUtility( default location is
c:\Program Files\HREFTools\RemoteRebootUtility )
Libeay32.dll
( part of SSL subsystem, from www.openssl.org )
Openssl.exe
( part of SSL subsystem )
RemBoot.exe
( main program file )
RemBoot.cfg
( the configuration file )
RemBoot-startservice.bat
RemBoot-stopservice.bat
Ssleay32.dll
Cert
( part of SSL subsystem )
( secure certificate files )
*.crt, *.pem
Docs
( documentation files )
readme.txt
RemBoot.hlp
RemBoot-Manual.pdf
Logs
…Errors\
( error log files )
Errors**.log
…History\
( history log files )
History*.log
Web
( Pages seen through web browser )
RSU_Confirm.html
RSU_Error.html
RSU_Login.html
RemBoot Manual
12 Installation
Download the Installation Program
•
If you have not already done so, download the RemBootSetup program from
www.href.com/RSU
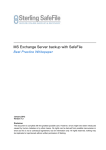
Running RemBootSetup
•
Run the program "RemBootSetup.exe".
The RemBootSetup dialog box will appear:
•
Enter the root path for the RemBoot program files.
You can install to any directory.
•
Click the [Install] button.
RemBoot Manual
Installation
•
13
After the files are copied to your system, the configuration utility will appear:
RemBoot Manual
14 Installation
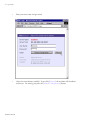
Click the [Next] button and read the following screen very carefully. For further details on
each of the installation choices, open the Help file.
•
Select your installation mode and press [Ok].
Depending on your installation mode, a selection of the following questions will appear for
RemBoot Manual
Installation
15
you to answer. Some data entry tips follow, below..
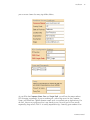
As you fill in the Common Name, Port and Login Path, you will see the remote-reboot
URL changing accordingly. If you are working on a web or ftp server, for the Common
Name, you should use a public domain names such as www.href.com or ftp.href.com. For
the Port, choose any tcp/ip port that is not already in use. Ports 80 and 443 are usually
required by http servers. Port 21 is usually required for ftp. Generally, port numbers over
RemBoot Manual
16 Installation
8000 are available.
If you need to generate a duplicate certificate for some reason, and you receive an error
because your request is literally a duplicate, modify the Organization Section slightly, for
example, by adding the year-month-day, so instead of “Operations” you could enter “Operations 2011-Nov.”
When deciding on your Login Path, use something, without spaces, but potentially with
underlines and dashes, that you think is at least a little non-obvious for a hacker to guess.
The IP Number may be the easiest to enter and the most complex to explain. As of RemBoot v4.3, you can leave the IP Number field BLANK and that tells RemBoot to use the first
ip number on the server. This is essential if the server is in the Amazon cloud or for any
other reason is assigned its number by a dynamic process (i.e. it can change over time). On
the other hand, if the machine binds the number corresponding (via DNS) to your Common Name, then you should enter that ip number.
Later, each time the RemBoot service starts, it wil try to bind to a single ip number and
port. If that fails, it will leave you a clue in an error log file (in a subdirectory below RemBoot.exe) so that you can try another combination of ip number and port.
RemBoot Manual
Installation
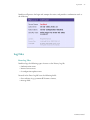
•
17
Enter your settings and information for the secure certificate. Press [F1] for Help on
any question.
Note: The Common Name, port number and login path will be combined to produce the
URL that you will use to gain access to RemBoot to trigger a reboot. For security reasons,
you should NOT use the default values given.):
•
When you are ready, press the [Configure RemBoot] button. If your installation
mode requires a custom secure certificate, then a confirmation dialog will appear:
•
Click [Ok].
The utility will create a secure certificate for you, store that on your system, and save your
configuration settings.
RemBootSetup will then install RemBoot as a Windows service which will automatically
start when Windows starts. You will see the following message
Click [Ok].
RemBootSetup will be finished.
RemBoot Manual
18 Installation
Secure Certificates
OpenSSL is a cryptography toolkit implementing the Secure Sockets Layer (SSL v2/v3) and
Transport Layer Security (TLS v1) network protocols and related cryptography standards
required by them. The files are publicly available through www.openssl.org.
Certificates
Certificates are installed in c:\Program Files\HREFTools\RemoteRebootUtility\Cert\.
There are 4 files in this folder:
CAcert.pem
- contains the content for the Root Certification Authority for the X.509 certif-
icate.
CAcert.crt
- the same file as CAcert.pem.
WSScert.pem
- the X.509 certificate for the machine running RemBoot (created during
installation).
WSSkey.pem
RemBoot Manual
- the private key for the WSScert.pem file (created during installation).
Resource Definition
19
RESOURCE DEFINITION
In this chapter, we discuss making adjustments in the environment or associated computer
hardware and software needed to accommodate RemBoot.
Shortcut for RemBoot Login Screen
After installation, in the docs folder, you will find a readme.txt file which has been modified to contain the URL for logging in to your system.
•
Example: https://localhost:443/RemBoot_Login
You should make yourself at least one bookmark (favorite) containing that URL, so that
you can get to the login screen quickly and easily.
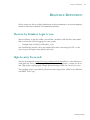
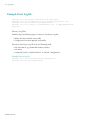
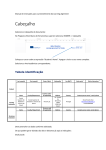
High-Security Passwords
You may be interested in https://www.grc.com/passwords.htm which is a free online password generator. Every time this page is displayed, the server generates a unique set of custom, high quality, cryptographic-strength password strings which are safe for you to use:
This excellent service is provided by Gibson Research Corporation, which has no affiliation
with HREF Tools Corp.
RemBoot Manual
20 Resource Definition
RemBoot Manual
Operation
21
OPERATION
Displaying Remote Reboot Action Form
•
Start your web browser.
•
Request your RemBoot login web address, made of HTTPS, your IP number, your
port, and your virtual path.
Example: https://localhost:443/RemBoot_Login
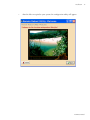
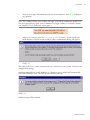
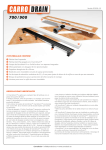
The first time you do this, you will probably see a security alert in the web browser, as
shown below. Do not worry. This alert appears because you have not yet installed the CAcert.crt root certificate.
•
Click [Yes] to proceed without installing the certificate, or click [View Certificate]
and then install the certificate. Either way, you will be able to use RemBoot.
RemBoot Manual
22 Operation
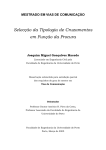
•
Enter your user name and password.
•
Select the action button carefully! If you click [Reboot], the machine will shutdown
and restart. For testing, just press the [Reload Configuration] button.
RemBoot Manual
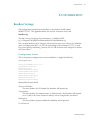
Operation
23
RemBoot will process the login and attempt the action, and provide a confirmation such as
the following:
Log Files
Error Log Files
RemBoot logs the following types of events to the History Log file:
• Authentication errors
• Internal server errors
• A configuration update errors
Records in the Error Log file have the following fields:
• date and time in yyyy-mmm-dd hh:mm:ss format;
• message field.
RemBoot Manual
24 Operation
Example Error Log file:
2001-Oct-18
2001-Oct-18
2001-Oct-18
2001-Oct-18
Boot.cfg'…
11:53:15
11:54:27
12:53:59
13:49:17
User PersonX was not authorized.
PersonA failed to reload configuration file …
Cannot start HTTPS server…
Error in configuration file 'C:\Apps\RemBoot\Rem-
History Log Files
RemBoot logs the following types of events to the History Log file:
• Reboot has been initiated successfully
• Configuration has been updated successfully
Records in the History Log file have the following fields:
• date and time in yyyy-mmm-dd hh:mm:ss format;
• user name;
• "command" field, it could be "Reboot" or "Reload Configuration".
Example History Log file:
2001-Oct-18 11:52:15 PersonA Reload Configuration
2001-Oct-18 12:02:38 PersonB Reboot
RemBoot Manual
Customization
25
CUSTOMIZATION
RemBoot Settings
The configuration information for RemBoot is contained in the file named
REMBOOT.CFG. This appendix defines the sections and entries in that file.
RemBoot.cfg
This file is always located in the same directory as RemBoot.EXE,
e.g. c:\Program Files\HREFTools\RemoteRebootUtility\RemBoot.cfg.
You can open RemBoot.cfg in Notepad. Advanced users may want to know that RemBoot
treats its configuration file as an "INI" file even though a file extension of "CFG" is used.
For easiest viewing and editing, associate the CFG file extension with Notepad or another
ASCII text editor.
[Configuration] Section
This is the primary configuration section for RemBoot. It might look like this:
[Configuration]
ThisServerIPNumber=127.0.0.1
CommonName=localhost
RemBootPort=443
SessionTimeOut=1200000
TerminateWaitTime=5000
LogFolderPath=Logs\
LoginRequest=RSU_Login
MemoryBlockCount=10
MemoryBlockSize=204800
MemoryAllocPeriod=20000
ThisServerIPNumber
This entry defines the IP Number that RemBoot will respond on.
CommonName
This entry defines the common name, or domain name, that RemBoot will respond
on. It is tied to the secure certificate and may not be changed after installation.
RemBootPort
This entry defines the port number that RemBoot will respond on.
SessionTimeOut
RemBoot Manual
26 Customization
This entry is an internal server parameter which determines when a persistent
HTTPS session has expired or become stale. It is measured in milliseconds. The
default, 1200000, equals 20 minutes.
TerminateWaitTime
This entry defines an internal server parameter which is used when a disconnect
event happens.The default wait time of 5000 milliseconds equals 5 seconds.
LogFolderPath
This path is relative to the location of the REMBOOT.EXE program. This is where
history and error log files are stored.
LoginRequest
This entry defines the virtual path to the RemBoot Login form. It may be any "string"
of letters, numbers, and characters, with no spaces. It may be up to 255 characters
long. The longer you make this path, the harder it is for anyone or anything to guess
it.
MemoryBlockCount
This entry defines the number of extra memory blocks that are reserved for use in
case of absolute low memory emergency when RemBoot is trying to respond. The
maximum is 100.
MemoryBlockSize
This entry defines the number of bytes in each memory block.
MemoryAllocPeriod
This entry defines the time interval for memory status check. It is a period of time
when the application tries to fill up reserve memory block array, in milliseconds.
[UserList] Section
This section is used to define the user names and passwords of the people who may reboot
the computer. It might look like this, where the left-of-equals is the user name, and the
right-of-equals is that person’s password:
[UserList]
PersonA=PasswordA
PersonB=PasswordB
RemBoot Manual
Application Programming
27
APPLICATION PROGRAMMING
This section of documentation is reserved for the topic of building chains of transactions
and operational elements into programs and processes that do useful work, for example,
creating macros and/or programming.
Generally, there is no programming associated with RemBoot.
Triggering RemBoot from JavaScript
If you are a web developer, it is possible to embed the necessary form post command into
another javascript, php or WebHub application such that some other action triggers the
reboot. To do this, you would study the normal login screen, and copy all the input fields,
and provide that data through to the action URL specified within the form syntax.
Triggering RemBoot from Servers Alive
For anyone using the Servers Alive monitoring system, this is how you can tell it to trigger
the reboot of a server after a specified number of “DOWN” events:
First, bring up your normal remote reboot login screen in a web browser. Use the View >
Source feature and look for the action attribute of the <form_tag>. Use that as the URL
below.
In Servers Alive, create a monitoring entry as usual. On the Alert tab, enter the following
three values:
URL: https://www.yourdomain.com/etc (from above step)
Data to post: UserName=PersonA&Password=PasswordA&Action=Reboot
( fill in your user name and password based on values in RemBoot.cfg )
Method: POST
More information about Servers Alive can be found at http://www.woodstone.nu/salive
RemBoot Manual
28 Application Programming
RemBoot Manual
Program Service
29
PROGRAM SERVICE
Changing RemBoot's Settings
After installation, you may change the IP number, port, login path and user list by editing
the RemBoot.cfg configuration file and then using the [Reload Configuration] action, or
by stopping and restarting the service. (See Appendix I. RemBoot Configuration File for
details).
Warning: if, after installing, you change the common name to one whose ip# does not
match the prior common name, RemBoot will not restart.
Moving RemBoot to a Different Directory
RemBoot does not use the registry. You can move its directory tree to another area on a
local hard drive without any real problems. Here is the recommended procedure.
1
Stop the service by running RemBoot-stopservice.bat
2
Move all the files to the new location.
3
Start the service by running RemBoot-startservice.bat
Note: if you move RemBoot, the uninstaller will not work because it is tied to the original
location of the files. To uninstall after moving the files, see the Uninstall topic in remboot.hlp for instructions.
RemBoot Manual
30 Program Service
Uninstalling RemBoot
•
Use Control Panel > Add/Remove Programs > Uninstall RemBoot, or run RemBoot-Uninstall.exe. See also : Uninstall topic in remboot.hlp.
Technical Support
HREF Tools Corp. provides FREE technical support for the Remote Reboot Utility. Please
use the web form at http://www.href.com/contact and expect a reply within one business
day. If there are any recent files in your Logs\Errors directory, paste their contents into the
message area on the contact form.
RemBoot Manual
End Use
31
END USE
In this chapter, we will cover specific occupational tasks and activities, which are peculiar
to certain customers' profession or assignment.
Sharing Server Reboot Responsibility in a 24x7 World
RemBoot is designed to make it easy to give responsible people in multiple timezones the
ability to reboot the server if that is suddenly required. Of course, such use needs to be
coordinated among the participants. If you have a web developer in London and another in
Sydney, it is suddenly remarkably easy to know who is in charge during which hours. If all
the developers are in New York, it takes more imagination to develop a fair plan for who is
on call when things go wrong.
Of course, usually nothing goes wrong. Weeks, months can go by without any problems.
And then something bad happens, perhaps some malware or some unexpected Windows
side-effect -- something which causes interference with your usual technique of controlling
the server. At that point, it becomes necessary to reboot using RemBoot.
(As an historical side note, RemBoot was originally developed when PCAnywhere on NT
version 3.51 would tend to lock up or crash on a fairly reguilar basis,. Even without any
malware invasions, it was very common for server owners to need a quick reliable way to
reboot.)
Preparing for this scenario is easy. You need to add names and passwords to RemBoot’s configuration file and reload settings. Here are the exact steps.
1 On the server, edit RemBoot.cfg with Notepad or equivalent. You should find the file
in the same folder where you installed the software,
e.g. c:\Program Files\HREFTools\RemoteRebootUtility\.
2 Find the [UserList] section. You will see that it lists username=password pairs, for
example:
[UserList]
Susan Smith=password1
Jamie Sullivan=password2
Tom Jones=password3
3
Save your changes.
4 At this point, you can either stop and start the service using the two BAT files present
in the same folder, or you can log into RemBoot with a previously valid account, and then
RemBoot Manual
32 End Use
press [Reload Configuration] to make the new list of users valid.
Notifying team members after the reboot
After a reboot, the web page response gives you the name of the server and the date/time of
the reboot. You can copy that information to the clipboard and then quickly paste it into an
email to your team members, so that they know the status of the server.
A history of all reboots (including failed attempts) is kept in the Logs folder.
Making RemBoot Convenient Yet Secure
If you have one server to reboot with RemBoot, all you need is a bookmark (favorite) in
your web browser software, to launch the RemBoot login screen.
If you ever lose that login URL, look on the server. In the docs folder, there is a readme.txt
file which is customized during installation to document the exact login URL for your system.
If you have many servers to reboot with RemBoot, make yourself an HTML file on your
local computer with one link for each server. If you are fairly confident that your local computer’s files are secure, then you can even document the username and password required
for each login on the same page. That way, you can copy the username to the clipboard
before clicking through to the login URL, and then quickly paste in the required detail.
You will be able to securely reboot your server in a matter of seconds.
RemBoot Manual
Indoex
33
INDEX
C
CommonName 25
Configuration section 25
D
Directories
as used by RSU 11
Reload Configuration 22
RemBoot program files 12
RemBoot.cfg 25
RemBoot.exe 11
RemBootPort 25
RemBootSetup.exe 12
RemBoot-startservice.bat 11
RemBoot-stopservice.bat 11
Requirements 7
H
S
History Log 24
HTTPS 21
service 17
SessionTimeOut 25
SSL 5
L
T
Log Files 23, 27
LogFolderPath 26
Login Form 21
LoginRequest 26
TerminateWaitTime 26
ThisServerIPNumber 25
tutorial 9
M
U
MemoryAllocPeriod 26
MemoryBlockCount 26
MemoryBlockSize 26
Uninstalling RemBoot 30
UserList Section 26
R
Registering 10
W
Windows registry 11
RemBoot Manual