1
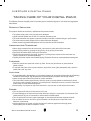
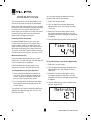
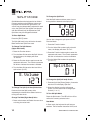
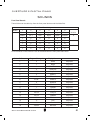
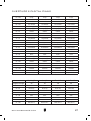
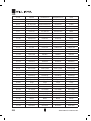
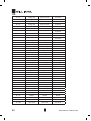
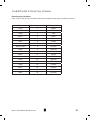
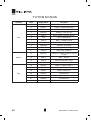
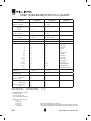
OVE RTU R E 2
digital piano
owner's manual
CAUTION: TO REDUCE THE RISK OF ELECTRIC SHOCK, DO NOT
REMOVE COVER OR BACK. NO USER-SERVICEABLE PARTS INSIDE.
REFER SERVICING TO QUALIFIED SERVICE PERSONNEL
IMPORTANT SAFETY INSTRUCTIONS
• Do not use near water.
• Clean only with a soft, dry cloth.
• Do not block any ventilation openings.
• Do not place near any heat sources such as radiators, heat registers, stoves, or any other apparatus (including
amplifiers) that produces heat.
• Do not remove the polarized or grounding-type plug.
• Protect the power cord from being walked on or pinched.
• Only use the included attachments/accessories.
• Unplug this apparatus during lightning storms or when unused for a long period of time.
• Refer all servicing to qualified service personnel. Servicing is required when the apparatus has been damaged in any
way, such as power-supply cord or plug is damaged, liquid has been spilled or objects have fallen into the apparatus,
the apparatus has been exposed to rain or moisture, does not operate normally, or has been dropped.
FCC STATEMENTS
1. Caution: Changes or modifications to this unit not expressly approved by the party responsible for compliance could
void the user’s authority to operate the equipment.
2. NOTE: This equipment has been tested and found to comply with a Class B digital device, pursuant to Part 15 of the
FCC Rules. These limits are designed to provide reasonable protection against harmful interference in a residential
installation. This equipment generates, uses, and can radiate radio frequency energy and, if not installed and used
in accordance with the instructions, may cause harmful interference to radio communications. However, there is no
guarantee that interference will not occur in a particular installation. If this equipment does cause harmful interference to
radio or television reception, which can be determined by turning the equipment off and on, the user is encouraged to
try to correct the interference by one or more of the following measures:
• Reorient or relocate the receiving antenna.
• Increase the separation between the equipment and receiver.
• Connect the equipment into an outlet on a circuit different from that to which the receiver is connected.
• Consult the dealer or an experienced radio/TV technician for help.
2
O W N E R ' S MAN UAL
OVE RTU R E 2 D I G ITAL P IAN O
ASSEMBLY INSTRUCTIONS
A: M6x55
B: M6x25
C: M4x16
A:
A:
1. Place the four M6x55 screws into the holes in the stand legs,
with the philips slot facing out. Use a screwdriver to align the
threads in the nuts with the openings on the bottom of the
stand legs. Attache the piano base to left and right legs, and
secure using four M6x25 screws.
A:
E: M4x16
F: M6x16
B:
B:
A:
D: M4x20
2. A
ttach the modesty panel to the legs and base, using
three M4x20 screws at the bottom of panel. Use two
M4x16 screws and washers to secure the top of the
modesty panel.
F:
F:
E:
3. Place the main piano section on top of the legs. Slip protruding
tabs into slotted brackets in back. Use two M6x16 screws to
secure the left and right bracket. Attach the headphone holder to
the bottom left of the piano with four M4x16 screws.
W ILLIAM S P IAN OS. CO M
4. P
lug in the pedal cable to the pedal jack and the AC
power cable to the AC 110V ~ 60Hz jack.
3
TABLE OF CONTENTS
IMPORTANT SAFETY INSTRUCTIONS............... 2
MOD FX......................................................... 14-16
ASSEMBLY INSTRUCTIONS................................ 3
ADVANCED FUNCTIONS................................... 16
INTRODUCTION................................................... 4
SONG TUTOR...................................................... 17
TAKING CARE OF YOUR DIGITAL PIANO.......... 5
USB SONG MODE.............................................. 17
TOP PANEL........................................................... 6
MIDI............................................................... 18-19
BACK PANEL ........................................................ 7
SPECIFICATIONS................................................ 20
OPERATIONS.................................................. 8-10
SOUNDS........................................................ 21-25
DEMO SONGS..................................................... 10
MIDI NOTES.................................................. 26-31
RECORDING................................................. 10-11
DEMO SONGS FOR THE VOICES..................... 31
SPLIT MODE....................................................... 12
TUTOR SONGS............................................. 32-33
TUNING................................................................ 13
MIDI IMPLEMENTATION CHART....................... 34
EFFECTS....................................................... 13-14
WARRANTY......................................................... 35
INTRODUCTION
Congratulations! You have just purchased a state of the art digital piano that provides remarkable acoustic
sound and feel. We recommend that you read through this owner's manual carefully, so you can get the most
enjoyment from your new piano.
Features include:
• 88 weighted, velocity-sensitive keys
• 18 main piano and keyboard direct access sounds and 129 sounds selectable by value dial
• Metronome feature with variable tempo to facilitate practice or recording
• USB/MIDI connections and stereo/mono line out jacks, stereo line input jacks
• USB host device jack
BEFORE YOU GET STARTED
Your piano was carefully packed at the factory, and the packaging was designed to protect the unit from
rough handling.
• If the unit is damaged, call Williams Product Support: (888) 241-1582.
• Use the original packing carton when storing or transporting.
• Make sure children are supervised when near the piano or its packaging.
INITIAL OPERATION / QUICK START
• Plug the power cord into a 110V supply.
• Press the power button. The LED will light.
• Press the Voice Select button for the desired voice.
• Adjust the volume control.
4
O W N E R ' S MAN UAL
OVE RTU R E 2 D I G ITAL P IAN O
TAKING CARE OF YOUR DIGITAL PIANO
This Williams Overture 2 digital piano will provide years of musical enjoyment if you follow the suggestions
listed below.
Product Servicing
This product should be serviced by qualified service personnel when:
•The power supply cord or the plug has been damaged.
•Liquid has been spilled into the unit or it has been exposed to rain.
•The instrument does not appear to operate normally or exhibits a marked change in performance.
•The instrument has been dropped or the cabinet has been damaged.
•Please contact [email protected] for parts and service information.
Handling and Transport
•Never apply excessive force to the controls, connectors or other parts of the instrument.
•Always unplug cables by gripping the plug firmly, not by pulling on the cable.
•Disconnect all cables before moving the instrument.
•Physical shocks caused by dropping, bumping, or placing heavy objects on the instrument can
result in superficial or operational damage.
•Carefully check the volume control before playing. Excessive volume can cause permanent hearing loss.
Cleaning
•Clean the cabinet and panel with a soft, dry cloth. Do not use paint thinner or petrochemical
based polishes.
•To maintain the luster of the keys and buttons, wipe with a clean, lightly dampened cloth, and then
polish with a soft, dry cloth.
Location
•To avoid deformation, discoloration, or more serious damage, do not expose the instrument to the following
conditions: Direct sunlight, high temperatures, excessive humidity, excessive dust, strong vibration.
•Leave enough space around the piano for proper ventilation.
•This instrument contains digital circuitry and may cause or be susceptible to interference if placed
too close to radio, television receivers, or mobile phones. If interference occurs, move the instrument
further away from the affected equipment.
•Avoid placing vinyl objects on top of the instrument, vinyl can stick to and discolor the surface.
Power
•Turn the power off when the instrument is not in use.
•To avoid damage to the instrument and other devices to which it is connected, turn the power of all
related devices off prior to connection or disconnection of MIDI cables.
•Turn the power off if the main cable is damaged, or the instrument has been exposed to liquid.
•Do not switch the unit on and off in quick succession, as this places an undue load on the
electronic components.
•Avoid plugging the AC power cord into the same AC outlet as appliances with high power
consumption, such as electric heaters or ovens.
W ILLIAM S P IAN OS. CO M
5
TOP PANEL
LEFT SIDE
Power On/Off
Volume Knob
Controls the overall output volume of the piano.
Metronome
Turns on and off the Metronome.
Transpose
Transposes the key of the piano.
Octave
Transposes the range of the piano keys 1 octave
higher or lower.
Piano Reset
Pressing the Transpose and Octave buttons
simultaneously will reset the transpose and octave
functions to factory settings.
Song
Pressing the Song button and the Voice buttons
selects which Demo song will play.
Play
Pressing Play will playback the song you recorded.
R1
Grand
LCD Display
Shows the current name of the song or voice as well
as the parameter assignments.
Voice Select Buttons/Value Dial
(Pianos, Electric Pianos, Organs, Basses, Keys 1
and 2) Pressing these buttons will switch on the
sound that is associated with the names printed
above them.
Variation Button
This will allow you to switch between the original
and variation sounds. When the blue LED is lighted
the sound will be the first variation sound. When
the Red LED is lighted it will be the second
variation sound.
SPLIT Button
Splits the keyboard between right and left side.
Mod FX Button
Turns on and off the Modulation effect assigned
to the voice.
Chorus Button
Turns on and off the Chorus effect assigned to
the voice.
Reverb Button
Turns on and off the Reverb effect assigned to
the voice.
Duet Button
Sets the keyboard to allow two players to play notes
in the same octaves.
Track / Record
Pressing the Track and Play buttons simultaneously
will start the recording function.
Function Button
Selects various functions in the Piano.
6
Song Tutor Buttons
Song Teaching Mode for the 50 Built-in songs with
right and left hand part mutes.
USB Host Slot
To plug in USB thumb drives and play MIDI files on
the drive.
O W N E R ' S MAN UAL
OVE RTU R E 2 D I G ITAL P IAN O
RIGHT SIDE
BACK PANEL
USB Input
The USB connection is to connect the
Overture 2 to a computer. The USB
connection is Class Compliant so no special
USB drivers are needed on your computer.
Sostenuto, Sustain and Soft Pedal Input
Connects the built-in pedals located at the
bottom of the piano.
Outputs-Stereo/ Mono Line Out ¼” Jacks
The output jacks supply a line-level signal
for external amplification. Use both jacks for
stereo or just the Left jack for mono.
W ILLIAM S P IAN OS. CO M
Headphone
The headphone socket disconnects the
speakers when headphones are connected.
AC Power Socket
Connection for the AC power.
Inputs- 2 RCA jacks
This allows for audio input from an external audio
source such as a MP3 player, computer or tablet
computer. The audio input will be mixed with the
audio output of the piano.
7
OPERATIONS
The Overture 2 has an LCD that allows you to
see the Voice name as well as its parameters.
Most of the front panel buttons are very straight
forward and easy to select for general functions.
In cases where you want to edit settings in
more depth you will need to use the front panel
buttons as well as the Function button and
Value knob to change parameters.
Powering On the Overture 2
Press the POWER button in the upper left
corner of the front panel. This product has a
power standby mode. If the piano turns off
while you are not playing it, this is likely due to
the Power mode being set to Auto Power off.
To correct, press the Function Button, then turn
the Value Dial to “Auto Power” and set to “Off.”
You can also change the Metronome time
signature with the Function Mode.
1. Press the Function button.
2. Turn the Value Dial to select Metronome
signature edit menu. The display will show
“Time Sig”.
3. Press the Function button again to enter
the relative parameter edit menu, and the
parameter will blink to indicate the parameter
is editable.
4. Turn the Value Dial to select a time signature.
Time Sig
Metronome Function
Press the Metronome button to turn on the
metronome. The LED will light. You will hear the
click in headphones or speakers.
Press the Metronome button again to exit
metronome function. The LED will turn off.
To Set The Volume Level Of The Metronome
1. Press the Function button.
To Change Metronome Time Signature
2. Turn the Value Dial to select the Metronome
Volume edit menu. The display will show
“MetroVol”.
1. P
ress and hold the Metronome button for
2 seconds. The LCD display will show the
current metronome signature setting and
then go back to current Voice name.
3. Press the Function button again to enter
the relative parameter edit menu, and the
parameter will blink to indicate the parameter
is editable.
2. T
urn the Value Knob to determine the Metro
time signature while the display shows the
current setting.
4. Turn the Value Dial to select the Metronome
Volume range (0-127).
The default is 4/4 and the following options are
available to toggle through: 2/4, 3/4, 4/4, 5/4,
6/8, 9/8, and 12/8.
8
MetroVol
O W N E R ' S MAN UAL
OVE RTU R E 2 D I G ITAL P IAN O
Tempo Setting
To transpose the full keyboard:
5. Press the Function button.
1. Press the Octave button. The display
will show the current full keyboard Octave
setting (“Main Oct”) and then change to the
current Voice.
6. T
urn the Value Dial to select Tempo edit
menu. The display will show “Tempo”.
7. P
ress the Function button again to enter the
parameter edit menu. The numeric parameter
will blink to indicate the number is editable.
8. Turn the Value Dial to select Tempo (20 - 280).
2. While the Octave screen is on you can turn
the Value Dial to select the Octave. (+ 1 or -1)
Main Oct
Tempo
To transpose the split Keyboard, left hand
Octave:
Transpose Function
This function will transpose the piano keyboard
by +12 or -12 semitones.
To transpose the keyboard
1. P
ress the Transpose button. The display will
show the current Transpose setting and then
change to the current Voice.
2. W
hile the Transpose screen is on you can
turn the Value Dial to select the Transpose
range. (+12 or -12 semitones)
Transpo
Octave
1. Press and hold the Octave button, 2 seconds
longer the display will show "SplitOct”, and
then change to the current Voice.
2. While the screen is on showing “SplitOct”,
turn the Value Dial to select the left hand
(split mode) Octave. (+1 or -1)
SplitOct
Piano Reset
If you want to quickly reset the keyboard to
the normal transposition and Octave ranges
you can do so by pressing the Transpose and
Octave buttons simultaneously.
This function will transpose the piano keyboard
up or down up and down by one octave.
There are two kinds of Octaves. One is for full
keyboard (right hand) octave the other is for
split mode (left hand ) octave.
W ILLIAM S P IAN OS. CO M
9
Voices
The Overture 2 piano has 18 built-in voices.
Each voice may be selected one at a time.
Some can be layered to produce two voices at
once, or assigned to the left or right hands in
the split mode.
4. Turn the Value Dial to select the level of the
voice volume (0-127).
M.Volume
To select a voice, press the Voice Select
button of your choice.
The button will light and the LED will indicate
the selection as shown below. If the sound is a
variation sound the variation light will be on.
DEMO SONGS
Demo Songs
Piano Song
Voice
1
Grand Piano
2
Electric Piano
3
Organ
4
Nylon Guitar
5
Synth
6
Acoustic Bass
7
Bright Piano
To Play A Demo Song
8
Electric Piano 2
Press the Song button and the corresponding Voice
select button. See list below of the demo songs.
9
Cathedral Organ
10
Vibes
Selecting the Voices
11
Strings
The buttons on the right side of the keyboard
in the Voice Select area are for selecting the
Sounds or Voices in the Overture 2.
12
Electric Bass
13
Layer Piano
14
Electric Piano 3
Each Voice has an original and 2 variations or
a different voice. Press the Variation button to
select the Variation voice. There are 3 rows.
Row 1 has no LED light. Row 2 has a blue LED
light and Row 3 has a Red LED light.
15
Church Organ
16
Harpsichord
17
Clavinet
18
Synth Bass
The Overture 2 comes with 18 demo songs one for each sound on the front panel - as well
as the ability for you to play and record your
own song. When you record your own song the
recording will be retained until you either record
a new song or if you reset the Overture 2 back
to factory settings.
Changing the Voice Volume Level
1. Press the Function button.
2. T
urn the Value Dial to select Voice Volume
Level edit menu, the display will show
“M .Volume”.
3. P
ress the Function button again to enter the
parameter edit menu. The numeric parameter
will blink to indicate the number is editable.
10
RECORDING
Recording Your Own Song
You can record one user song with two tracks in
the Overture 2.
1. Press the Track Button and select which track
you want to record to with the Value Dial.
O W N E R ' S MAN UAL
OVE RTU R E 2 D I G ITAL P IAN O
Front Panel Sound Assignments
Variation Bank
Original Voice
Variation Voice 1
Variation Voice 2
Grand
EP 1
Perc
Nylon
Synth
Acoustic
1
2
3
4
5
6
Bright
EP 2
Rock
Vibes
Strings
Fingered
1
2
3
4
5
6
Layered
EP 3
Church
Harpsichord
Clavinet
Syn BS 1
1
2
3
4
5
6
2. Press the Play and Track buttons together to
start recording. Once you start playing, the
display will show a small dot on the screen to
indicate that you are waiting to record. Then,
when you play the keyboard or press the Play
button, the display will show four small dots on
the screen to indicate that you are recording.
3. P
ress the Play and Track buttons together
again or press Play only to stop the recorder.
Then, press Play only to hear your song.
4. R
epeat the steps above to record to the
other track.
Layer Mode
To layer two sounds, press the corresponding
voices simultaneously. Both voice LEDs will
light up to indicate that they are layers.
• Select the desired voice for the layered sound.
Note: Once selected, the button of the layered
voice will blink to indicate that it is from a
different bank, while the voice button LED
remains lit. The Variation button LED will be lit or
unlit to indicate the bank of the original voice.
If one voice is selected from each bank, but they
share the same button, the instrument button
will blink. If two voices are in the same bank are
selected, the buttons should merely light.
To return to normal, single voice mode, press a
single Voice button.
To Change The Layer Volume Level
1. Press the Function button.
To layer two sounds from the second bank (third
bank), simply make sure the variation button
blue LED (red LED) is lit and then press the
corresponding voices simultaneously.
2. Turn the Value Dial to select the Layer
Volume Level edit menu, the display will
show “D .Volume”.
To layer sounds from different banks, do
the following:
3. Press the Function button again to enter
parameter edit menu. The numeric parameter
will blink to indicate the number is editable.
• Press the button of the original voice and the
variation button simultaneously.
• Press the Variation button again to cycle
through to the desired bank of the layered
voice. The Variation button will blink to
indicate which bank is selected.
4. Turn the Value Dial to select the level of the
layer volume. (0-127)
D.Volume
Note: The variation button LED will not blink if
the first bank is selected for the layered sound.
W ILLIAM S P IAN OS. CO M
11
SPLIT MODE
Split Mode allows the keyboard to be divided
into two sections so that different voices may
be played with the left and right hands. The
volume may be independently adjusted for each
voice, the Split Point (the highest note played
with the left hand) may be adjusted and the
Split Voice may be changed as desired.
To Change the Split Point
Hold the Split button and then press a key on
the keyboard to determine the split point.
S.P:E2
To Enter Split Mode
Press the [SPLIT] button.
The Split (left hand) voice will be the Acoustic
Bass and the last Split Point used.
To Change The Split Volume
(Upper And Lower)
1. Press the Function button.
2. T
urn the Value Dial to select the Split Volume
Level edit menu, the display will show
“S .Volume”.
3. P
ress the Function button again to enter the
parameter edit menu. The numeric parameter
will blink to indicate the number is editable.
4. T
urn the Value Dial to select the level of the
split volume. (0-127)
You can also change the split point with the
Function Mode.
1. Press the Function button.
2. Turn the Value Dial to select split point edit
menu, the display will show “S .P:xx”.
3. Press the Function button again to enter the
parameter edit menu. The numeric parameter
will blink to indicate the number is editable.
4. Turn the Value Dial to select the split point.
(A-1 to C-7)
SplitOct
S.Volume
To Change the Split (left hand) Octave
1. Press and hold the [Octave] button, 2 seconds
later the LCD will display “Split Oct”.
To Change The Split (Left Hand) Voice Note
Press and hold the Split button while
depressing the desired Voice Select button or
turning the value knob.
2. When the display is on the split octave
screen, turn the Value Dial to change Split
Octave. (-1 or +1)
To Turn Off Split Mode
Change The Main (Right Hand) Voice
Press the Split button. The LED will turn off as
well as the currently selected voice.
1. P
ress voice buttons will Select the new voice
or turning the value knob.
Duet Mode
In Duet mode, the keyboard is split into two
sections. The left section becomes A2-E6, and
12
O W N E R ' S MAN UAL
OVE RTU R E 2 D I G ITAL P IAN O
the right section becomes F2-C6. The voice of
the two sections is the same.
To turn off the effect press the button of the
desired effect again and the LED light will go off.
In this mode, the right pedal becomes the
sustain pedal for the right section of the
keyboard and the left pedal becomes the
sustain pedal for the left section of the
keyboard. The middle pedal is disabled. This
mode is ideal for teacher/student practices.
Reverb and Chorus settings are set per
Instrument and will be retained even when the
power is turned off.
Press the DUET button and its indicator lights
up to show that the DUET mode is engaged.
Use the voice buttons or the value dial to select
the voice.
1. Press the Function button.
Press the DUET button again to exit the duet
keyboard mode. The indicator will turn off.
3. Press the Function button again to enter the
parameter edit menu. The numeric parameter
will blink to indicate the number is editable.
TUNING
To Change Global Tuning
Reverb
To change the reverb type:
2. Turn the Value Dial to select Reverb Type edit
menu, the display will show “Rev .Type”.
4. Turn the Value Dial to select the Reverb type.
(OFF and R1 to R8)
1. Press the Function button.
2.Turn the Value Dial to select the Tune edit
menu. The display will show “Tune a1”.
3. P
ress the Function button again to enter the
parameter edit menu. The numeric parameter
will blink to indicate the number is editable.
4. T
urn the Value Dial to select the Tuning.
(415Hz to +466Hz)
Tune a1
EFFECTS
The Reverb and Chorus effects may be applied
to each voice individually and will be retained
even when the power is turned off.
To apply either effect, press either button. The
button will light and the effect will be heard
when the piano is played.
W ILLIAM S P IAN OS. CO M
Type #
Type
Type #
Name
Type
Name
R1
Hall1
R5
Room3
R2
Hall2
R6
Stage1
R3
Room1
R7
Stage2
R4
Room2
R8
Plate
To Change Reverb Depth
1. Press and hold the Reverb button, the
display will show current depth of the reverb
and then return to the current Voice after
about 5 seconds.
2. You can turn the Value Dial to select the
depth range. (0-127)
You can also change the Reverb depth with the
Function button:
1. Press the Function button.
2. Turn the Value Dial to select the Reverb depth
edit menu. The display will show “R .Depth”.
13
3. P
ress the Function button again to enter the
parameter edit menu. The numeric parameter
will blink to indicate the number is editable.
2. While the display shows the Chorus depth,
you can turn the Value Dial to select the
depth range. (0-127)
4. Select the depth range. (0-127)
Also you can change the Chorus depth with the
Function Mode:
Chorus
Chorus effects add shimmering movement to a
voice. The setting can be subtle to extreme.
To Change Chorus Type
1. Press the Function button.
2. T
urn the Value Dial to select the Chorus Type
edit menu. The display will show “Chr .Type”.
1. Press the Function button.
2. Turn the Value Dial to select the Chorus depth
edit menu. The display will show “C .Depth”.
3. Press the Function button again to enter the
parameter edit menu. The numeric parameter
will blink to indicate the number is editable.
4. Select the depth range. (0-127)
3. P
ress the Function button again to enter the
parameter edit menu. The numeric parameter
will blink to indicate the number is editable.
C.Depth
4. T
urn the Value Dial to select a Chorus Type.
(OFF and C1 to C8)
Chr.Type
MOD FX
Modulation effects are designed to add unique
playable sound effects to voices.
C1
Chorus1
C5
Chorus5
C2
Chorus2
C6
Chorus6
C3
Chorus3
C7
Chorus7
In addition to the sounds, the Overture 2 has a
new effects section that will allow users to have
more control over their sounds called Mod FX.
These new effects will be inserted into the audio
pathway of the sound to the mixer and will be
preset into the Voice. When you switch on the
specific voice a preset effect will be associated
with the sound. You can then select whether the
effect should be turned off or modified.
C4
Chorus4
C8
Chorus8
The Mod FX Are:
Chorus Type List
Type #
Type
Type #
Name
Type
Name
To Change Chorus Depth
1. P
ress and hold the Chorus button, the
display will show current depth of the chorus
and then return to display current Voice after
about 5 sec.
14
Original Grand
(Tremolo)
EPiano1 (Vibrato)
Variation 1 Bright
(Tremolo)
Variation
2 Layered
(Tremolo)
EPiano2 (Vibrato) EPiano3 (Vibrato)
Perc (Rotary)
Rock (Rotary)
Church (None)
Nylon(Tremolo)
Vibes (None)
Hrpschrd
(Tremolo)
O W N E R ' S MAN UAL
OVE RTU R E 2 D I G ITAL P IAN O
SynBrss1(Tremolo) Strings (Tremolo)
Acoustic (None)
Fingered (None)
3. Press the Function button again to enter the
parameter edit menu. The numeric parameter
will blink to indicate the number is editable.
Clavinet (Tremolo)
Syn BS 1 (None)
4. Turn the Value Dial to select the Speed:
“PEd(pedal)”, ”SLW(slow)”, ”FST(fast)”.
To turn on the Mod FX function for an instrument
press the ModFx button. The effect will become
active and the ModFx LED will light.
RotSpeed
To turn off the ModFx, press the button again.
The LED on the button will turn off.
Rotary
There is a rotary effect, which is designed
for organ voices. To select the speed of the
rotary, press the sustain pedal with your foot.
Holding down the pedal will speed up the rotary
voice to a tremolo. When the pedal is released,
the speed of the tremolo will slow down to a
choral setting.
Rotary Speed Mode
Vibrato
When the Modfx effect is active, the Electric
Piano voices will receive the Vibrato effect.
.
VibDepth
RotSpeed
To Change The Vibrato Depth:
1. Press the Function button.
As a default, the Rotary Speed mode is
assigned to “PEd”. This mode allows you to
change the Rotary Speed by using a foot pedal.
Note that the sustain will not hold the sound
when your hands are off the keys in this mode.
In “SLW” mode, the speed is assigned to be slow.
The sustain pedal will work to sustain the sound.
The last mode is “FST”, the speed is assigned
to be fast. The sustain pedal will also sustain
the sound.
To Change The Rotary Speed Settings In
Function Mode
1. Press the Function button.
2. T
urn the Value Dial to select the Rotary
Speed Mode edit menu, the display will
show “RotSpeed”.
W ILLIAM S P IAN OS. CO M
2. Turn the Value Dial to select the Vibrato depth
edit menu, the display will show “VibDepth”.
3. Press the Function button again to enter the
parameter edit menu. The numeric parameter
will blink to indicate the number is editable.
4. Turn the Value Dial to select the Vibrato Level.
(0 - 127)
To Change Vibrato Speed:
1. Press the Function button.
2. Turn the Value Dial to select the Vibrato Depth
edit menu, the display will show “VibSpeed”.
3. Press the Function button again to enter the
15
parameter edit menu. The numeric parameter
will blink to indicate the number is editable.
4. T
urn the Value Dial to select the Vibrato
Speed. (0 - 127)
EQ Treb
VibSpeed
ADVANCED
FUNCTIONS
EQ BASS Level Setting
1. Press the Function button.
2. Turn the Value Dial to select the EQ Bass edit
menu. The display will show “EQ Bass”.
3. P
ress the Function button again to enter the
parameter edit menu. The numeric parameter
will blink to indicate the number is editable.
4. T
urn the Value Dial to select the EQ Bass
Level. (-12 to +12)
Power Auto Shutting Down On/Off Setting
The Overture 2 has a Power saving function
that will shut off the Piano after 30 minutes of
non-use. The default setting is Off, however if
you find you want this function to work use the
steps below.
AutoPowr
EQ Bass
1. Press the Function button.
2. Turn the Value Dial to select the Power Auto
edit menu. The display will show “AutoPowr”.
EQ Treble Level Setting
1. Press the Function button.
3. Press the Function button again to enter the
parameter edit menu. The numeric parameter
will blink to indicate the number is editable.
2. T
urn the Value Dial to select the EQ Bass edit
menu. The display will show “EQ Treb”.
4. Turn the Value Dial to select the Power Auto
feature on or off.
3. P
ress the Function button again to enter the
parameter edit menu. The numeric parameter
will blink to indicate the number is editable.
4. T
urn the Value Dial to select the EQ Treble
Level. (-12 to +12)
16
O W N E R ' S MAN UAL
OVE RTU R E 2 D I G ITAL P IAN O
Factory Reset
Performing a Factory Reset will clear all
memory and restore all functions to factory
defaults.
SONG TUTOR
The Overture 2 has 50 built-in songs that are
designed to help you learn the left and right
hand parts separately.
To Play a Song and mute the parts use the
steps below.
1. Turn the Power Off.
2. P
ress and hold the transpose and octave
buttons.
3. T
urn the Power on. If the display shows
“Reset Ok”, the action is successful.
Touch Sensitivity
You can change the way the keyboard reacts
to your playing by adjusting the Velocity
curve settings.
1. Press both Right and Left buttons to activate
the Song Tutor mode. The first song will show
up on the display and you will hear a count
off measure then the song will play.
2. To change the song turn the Value dial you
will see the different names show on the
display.
3. To mute the Left or Right hand part press
button for the hand you want to mute. The
LED on the button will turn off.
4. To unmute the part press the button again.
1. Press the Function button.
2. T
urn the Value Dial to select the Velocity
Curve edit menu, the display will show
“VelCurve”.
3. P
ress the Function button again to enter the
parameter edit menu. The numeric parameter
will blink to indicate the number is editable.
4. T
urn the Value Dial to select the Velocity
Curve. (1-4)
Velocity Curve List
1. Fixed Velocity
2. Soft
3. Normal
4. Hard
5. To turn off Song Tutor mode press both
buttons again.
To get the sheet music to these songs go to
www.williamspianos.com.
USB SONG MODE
The Overture 2 can play standard MIDI files
directly from a USB storage drive. USB Drive
should use a Windows FAT 32 format to be read
by the Overture 2. Also all songs should be on
the main directory of the drive. Be sure not to
put the MIDI files inside of folders otherwise the
Overture 2 will not be able to view the files.
To play MIDI files from the USB Drive.
1. Insert the drive into the HOST USB drive slot.
The display will show “Disk In”.
W ILLIAM S P IAN OS. CO M
17
2. P
ress the Song and Track buttons
simultaneously. You will then see the first
Song name on the drive.
3. T
o select the song you want to play turn the
Value dial.
4. P
ress the Play button and the song will start.
In some cases there will be a count-in on the
song (depending on the MIDI file).
5. Press the Play button again to stop the song.
Local On/Off
Turning the Local On/Off function to “Off” will
disconnect the keyboard from the internal
sound engine of the piano. The Overture 2
may then be used as a MIDI controller to
control other MIDI devices or virtual instrument
software running on a computer, without
playing the sounds on the piano. Additionally,
it may be desirable to turn local playing off for
other requirements such as when using MIDI
sequencing software on your computer.
Local On/Off Setting
If you remove the drive the display will show
“Disk Out” to indicate that the drive has
been removed.
MIDI
The Musical Instrument Digital Interface
(MIDI) is an industry-standard protocol that
enables electronic musical instruments such
as keyboards, computers, drum machines,
etc. to communicate, control, and synchronize
with each other. MIDI transmissions consist of
electronic codes that communicate notes to
be played, the instrument, pitch or intensity
with which notes are to be played, and
controlling codes such as volume, vibrato,
cues and clock signals. The Overture 2 has
several functions that facilitate its use as a
MIDI device or controller.
MIDI Channels
The Overture 2 has 16 channels numbered from
1-16. Each channel is responsible for a voice.
When the instrument receives MIDI information
from an external device, the active channel is
determined by the control message.
The transmission channels are fixed as follows:
Channel 1 Master voice (keyboard)
Channel 2 Split voice (keyboard)
Channel 3 Layer voice (keyboard)
18
1. Press the Function button.
2. Turn the Value Dial to select the Local on/off
edit menu. The display will show “Local”.
3. Press the Function button again to enter the
parameter edit menu. The numeric parameter
will blink to indicate the number is editable.
4. Turn the Value Dial to select “on” or “off”.
Local
Multitimbral Mode
The Overture 2 is able to receive MIDI
information on up to 16 channels
simultaneously. If you plan to use your piano
with a multitrack MIDI recording system, you
can record up to 16 different parts using the
Overture 2 voices, each played back individually
on different MIDI channels. To ensure your
recorded part is played back with the correct
voice make sure to press the voice button first
and play your part second.
NOTE: Because the Overture 2 is receiving
playback information via MIDI, the currently
selected voice on the piano may not correspond
to the voice being played back.
O W N E R ' S MAN UAL
OVE RTU R E 2 D I G ITAL P IAN O
Setting The Midi Channel
Memory Autosave
1. Press the Function button.
When modifying the settings of the Williams
Overture 2 the following settings will be
saved after you turn off the keyboard:
Reverb, Chorus (for each voice), Main
Volume, Layer Volume, Split Volume, MIDI
Channel, Velocity Curve, Power Auto Shutting
down ON/OFF, Vibrato Speed, Vibrato Depth,
Rotary Speed mode, EQ bass, EQ treble Split
Octave, and Split Point.
2. T
urn the Value Dial to select the MIDI Channel
edit menu. The display will show “MIDI Ch”.
3. P
ress the Function button again to enter the
parameter edit menu. The numeric parameter
will blink to indicate the number is editable.
4. T
urn the Value Dial to select Midi Channel.
(1-16)
MIDI Ch
These settings can be returned to default by
performing a factory reset. (pg. 16)
MIDI Panic Reset
If your piano gets a MIDI “Stuck Note”, you
can correct it with the following:
1. Press the Function button.
2. T
urn the Value Dial to select the Panic menu.
The display will show “Panic”.
3. P
ress the Function button to activate the
panic function, then return to Main Voice
screen.
Panic
W ILLIAM S P IAN OS. CO M
19
SPECIFICATIONS
20
Keyboard
88 weighted, velocity-sensitive keys
Voices
18 main voices and 129 voices (including GM)
Polyphony
64
Voice Control
Layer, Touch, Split, Metro
Pedals
Sustain, Sostenuto and Soft pedals
Demo Songs
18 demo and 50 Song Tutor songs
MIDI Transmit Settings
Local Control
Connectors
SB, DIN connection cable, 2-1/4" (L/R),
U
2 aux inputs, Phones
Speakers
4 Total - 2 high and 2 low frequency 10 watts
Dimensions
54.7 x 19.3 x 33.8 inches
Weight
117lbs.
Supplied
Owner's Manual, Music Stand
Optional Accessories
Accessories
O W N E R ' S MAN UAL
OVE RTU R E 2 D I G ITAL P IAN O
SOUNDS
Front Panel Sounds
These Voices can be called up from the front panel buttons and the Value Dial.
Front Panel Sound Assignments
Button
1
2
3
4
5
6
Piano
Electric Piano
Organ
Keys 1
Keys 2
Bass
Variation
Grand
EP 1
Perc
Nylon
Synth
Acoustic
0
1
2
3
4
5
6
Bright
EP 2
Rock
Vibes
Strings
Fingered
1
2
3
4
5
6
Layered
EP 3
Church
Harpsichord
Clavinet
Syn BS 1
1
2
3
4
5
6
1
2
All of the Voices in the Overture 2 can be accessed with the front panel Value knob.
Order On Screen
Program Change #
Display Name
1
0
Grand
Keyboard
2
1
Bright
Keyboard
3
2
Rock Pno
Keyboard
4
3
HonkyTnk
Keyboard
5
2/109*
Layered
Keyboard
6
4
EPiano 1
Keyboard
7
5
EPiano 2
Keyboard
8
5/109*
EPiano 3
Keyboard
9
6
Hrpschrd
Keyboard
10
7/109*
Clav Wah
Keyboard
11
7
Clavinet
Keyboard
12
18/111*
Smiley
Keyboard
13
18/112*
Funky B
Keyboard
14
18/113*
Top&Btm
Keyboard
15
16
Drawbar
Keyboard
16
17
Perc
Keyboard
17
18
Rock
Keyboard
18
18/109*
60s Rock
Keyboard
W ILLIAM S P IAN OS. CO M
21
22
19
18/110*
OD Rock
Keyboard
20
19
Church
Keyboard
21
20
Reed
Keyboard
22
21
Accordin
Keyboard
23
22
Harmonca
Keyboard
24
23
Bandonn
Keyboard
25
8
Celesta
Chromatic Percussion
26
9
Glcknspl
Chromatic Percussion
27
10
MusicBox
Chromatic Percussion
28
11
Vibes
Chromatic Percussion
29
12
Marimba
Chromatic Percussion
30
13
Xyloph
Chromatic Percussion
31
14
TurBell
Chromatic Percussion
32
15
Dulcimer
Guitar
33
24
Nylon
Guitar
34
25
Steel
Guitar
35
26
JazzGTR
Guitar
36
27
Clean
Guitar
37
28
Muted
Guitar
38
29
OD GTR
Guitar
39
30
Dist GTR
Guitar
40
31
GTR Harm
Guitar
41
32
Acoustic
Bass
42
33
Fingered
Bass
43
34
Picked
Bass
44
35
Fretless
Bass
45
36
Slap 1
Bass
46
37
Slap 2
Bass
47
38
SynBass1
Bass
48
39
SynBass2
Bass
49
40
Violin
Orchestra
50
41
Viola
Orchestra
51
42
Cello
Orchestra
52
43
STR BS
Orchestra
O W N E R ' S MAN UAL
OVE RTU R E 2 D I G ITAL P IAN O
53
44
Trem STR
Orchestra
54
45
Pizz
Orchestra
55
46
Harp
Orchestra
56
47
Timpani
Orchestra
57
48
Strings
Orchestra
58
49
SlwStrng
Orchestra
59
50
SynStrg1
Orchestra
60
51
SynStrg2
Orchestra
61
52
Choir
Orchestra
62
53
Voices
Orchestra
63
54
SynVox 1
Orchestra
64
55
Orch Hit
Orchestra
65
56
Trumpet
Brass
66
57
Trombone
Brass
67
58
Tuba
Brass
68
59
MuteTrpt
Brass
69
60
Fr Horns
Brass
70
61
Brass
Brass
71
62
SynBrss1
Brass
72
63
SynBrss2
Brass
73
64
Soprano
Wind
74
65
Alto
Wind
75
66
Tenor
Wind
76
67
Baritone
Wind
77
68
Oboe
Wind
78
69
Eng Horn
Wind
79
70
Bassoon
Wind
80
71
Clarinet
Wind
81
72
Piccolo
Wind
82
73
Flute
Wind
83
74
Recorder
Wind
84
75
PanFlute
Wind
85
76
Bottle
Wind
86
77
Shaku
Wind
87
78
Whistle
Wind
W ILLIAM S P IAN OS. CO M
23
24
88
79
Ocarina
Wind
89
80
Sqr Wave
Synthetic
90
81
Saw Wave
Synthetic
91
82
SynCalli
Synthetic
92
83
Chiffer
Synthetic
93
84
Charang
Synthetic
94
85
SynVox 2
Synthetic
95
86
Saw 5th
Synthetic
96
87
Bss&Lead
Synthetic
97
88
New Age
Synthetic
98
89
Warmpad
Synthetic
99
90
Polysyn
Synthetic
100
91
SpaceVox
Synthetic
101
92
BowGlass
Synthetic
102
93
MetalPad
Synthetic
103
94
HaloPad
Synthetic
104
95
SweepPad
Synthetic
105
96
RainPad
Synthetic
106
97
SoundTrk
Synthetic
107
98
Crystal
Synthetic
108
99
Atmosph
Synthetic
109
100
BriteSyn
Synthetic
110
101
Globins
Synthetic
111
102
Echos
Synthetic
112
103
Sci Fi
Synthetic
113
104
Sitar
Ethnic
114
105
Banjo
Ethnic
115
106
Shamison
Ethnic
116
107
Koto
Ethnic
117
108
Kalimba
Ethnic
118
109
Bagpip
Ethnic
119
110
Fiddle
Ethnic
120
111
Shenai
Ethnic
121
112
TinkBell
Percussion
122
113
Agogo
Percussion
O W N E R ' S MAN UAL
OVE RTU R E 2 D I G ITAL P IAN O
123
114
SteelDrm
Percussion
124
115
WoodBlk
Percussion
125
116
Taiko
Synthetic
126
117
Mel Tom
Sound Effect
127
118
Syn Drum
Sound Effect
128
119
Rev Cym
Sound Effect
129
120
Fretnois
Sound Effect
130
121
Breath
Sound Effect
131
122
Seashore
Sound Effect
132
123
Birds
Sound Effect
133
124
Telephon
Sound Effect
134
125
Helicopt
Sound Effect
135
126
Applause
Sound Effect
136
127
Gunshot
Sound Effect
137
0**
Standard
GM Kit
138
8**
Room
GM Kit
139
16**
Power
GM Kit
140
24**
Electro
GM Kit
141
32**
Hip Hop
GM Kit
142
40**
Jazz
GM Kit
143
48**
Brush
GM Kit
144
56**
Latin
GM Kit
145
64**
Orch
GM Kit
146
72**
Techno
GM Kit
147
80**
SFX
GM Kit
*- This sound must have a Bank Select message to play this sound through MIDI.
**- These can only be played on MIDI channel 10 and use the specific MIDI program
change numbers for the kit.
W ILLIAM S P IAN OS. CO M
25
Drum Sounds
Standard_Kit
Room_Kit
Power Kit
Electro Kit
Program Change
0
8
16
24
27 – Eb0
Click
Click
Click
Click
28 – E
Brush Tap
Brush Tap
Brush Tap
Brush Tap
29 – F0
Scratch Push
Scratch Push
Scratch Push
Scratch Push
30 – F#0
Scratch Pull
Scratch Pull
Scratch Pull
Scratch Pull
31 – G0
Stick
Stick
Stick
Stick
32 – G#0
Soft Snare
Soft Snare
Soft Snare
Soft Snare
33 – A0
Bass Drum 1
Bass Drum 1
Bass Drum 1
Bass Drum 1
34 – A#0
Bass Drum 2
Bass Drum 2
Bass Drum 2
Bass Drum 2
35 – B0
Vintage Bass Drum
Vintage Bass Drum
Vintage Bass Drum
Vintage Bass Drum
36 – C1
Studio Bass Drum
Funk
Maple Bass Drum
808 Kick
38 – D1
Funk Snare
Shallow Brass
Maple Snare
808 Snare
39 – D#1
Electro Clap
Electro Clap
Electro Clap
808 Clap
40 - E1
Funk Snare Rim Shot
Shallow Brass RS
Maple Snare RS
808 Rim
41 – F1
Studio Tom Low
Funk Tome Low
Maple Tom Low
Lo Electro Tom
42 – F#1
Hi Hat Closed
Hi Hat Closed
Hi Hat Closed
808 Hat Closed
43 – G1
Studio Tom Mid
Funk Tom Mid
Maple Tom Mid
Mid Electro Tom
44 – G#1
Hi Hat Foot
Hi Hat Foot
Hi Hat Foot
808 Foot
45 – A1
Studio Tom Mid
Funk Tom Mid
Maple Tom Mid
Mid Electro Tom
46 – A#1
Hi Hat Open
Hi Hat Open
Hi Hat Open
808 Hat Open
47 – B1
Studio Tom Hi
Funk Tom Hi
Maple Tom Hi
Hi Electro Tom
48 – C2
Studio Tom Hi
Funk Tom Hi
Maple Tom Hi
Hi Electro Tom
49 – C#2
Crash Cymbal
Crash Cymbal
Crash Cymbal
808 Crash
50 – D2
Studio Tom Hi
Funk Tom Hi
Maple Tom Hi
Hi Electro Tom
51 – D#2
Ride Bow
Ride Bow
Ride Bow
Techno Ride
52 – E2
China Cymbal
China Cymbal
China Cymbal
China Cymbal
53 – F2
Ride Bell
Ride Bell
Ride Bell
Ride Bell
54 – F#2
Tambourine
Tambourine
Tambourine
Tambourine
55 – G2
Splash Cymbal
Splash Cymbal
Splash Cymbal
Splash Cymbal
56 – G#2
Cowbell
Cowbell
Cowbell
Cowbell
57 – A2
Crash Cymbal
Crash Cymbal
Crash Cymbal
Crash Cymbal
58 – A#2
Vibraslap
Vibraslap
Vibraslap
Vibraslap
59 – B2
Ride Bow
Ride Bow
Ride Bow
Ride Bow
60 – C3
Small Bongo
Small Bongo
Small Bongo
Small Bongo
61 – C#3
Large Bongo
Large Bongo
Large Bongo
Large Bongo
62 – D3
Conga Mute
Conga Mute
Conga Mute
Conga Mute
26
O W N E R ' S MAN UAL
OVE RTU R E 2 D I G ITAL P IAN O
63 – D#3
Conga
Conga
Conga
Conga
64 – E3
Tumba
Tumba
Tumba
Tumba
65 – F3
Hi Timbale
Hi Timbale
Hi Timbale
Hi Timbale
66 – F#3
Low Timbale
Low Timbale
Low Timbale
Low Timbale
67 – G3
Small Agogo
Small Agogo
Small Agogo
Small Agogo
68 – G#3
Large Agogo
Large Agogo
Large Agogo
Large Agogo
69 – A3
Cabasa
Cabasa
Cabasa
Cabasa
70 – A#3
Marcas
Marcas
Marcas
Marcas
71 – B3
Whistle
Whistle
Whistle
Whistle
72 – C4
Long Whistle
Long Whistle
Long Whistle
Long Whistle
73 – C#4
Short Guiro
Short Guiro
Short Guiro
Short Guiro
74 – D4
Long Guiro
Long Guiro
Long Guiro
Long Guiro
75 – D#4
Clave
Clave
Clave
Clave
76 – E4
Hi Woodblock
Hi Woodblock
Hi Woodblock
Hi Woodblock
77 – F4
Low Wodblock
Low Wodblock
Low Wodblock
Low Wodblock
78 – F#4
Mute Quica
Mute Quica
Mute Quica
Mute Quica
79 – G4
Quica
Quica
Quica
Quica
80 – G#4
Mute Triangle
Mute Triangle
Mute Triangle
Mute Triangle
81 – A4
Open Triangle
Open Triangle
Open Triangle
Open Triangle
82 – A#4
Cabasa
Cabasa
Cabasa
Cabasa
83 – B4
Shaker
Shaker
Shaker
Shaker
84 – C5
BellTree
BellTree
BellTree
BellTree
85 – C#5
Castanets
Castanets
Castanets
Castanets
86 – D5
Mute Surdo
Mute Surdo
Mute Surdo
Mute Surdo
87 – D#5
Open Surdo
Open Surdo
Open Surdo
Open Surdo
Hip Hop_Kit
Jazz_Kit
Brush Kit
Latin Perc Kit
Program Change
32
40
48
56
27 – Eb0
Click
Click
Click
Click
28 – E0
Brush Tap
Brush Tap
Brush Tap
Brush Tap
29 – F0
Scratch Push
Scratch Push
Scratch Push
Scratch Push
30 – F#0
Scratch Pull
Scratch Pull
Scratch Pull
Scratch Pull
31 – G0
Stick
Stick
Stick
Stick
32 – G#0
Soft Snare
Soft Snare
Soft Snare
Soft Snare
33 – A0
Bass drum 1
Bass drum 1
Bass drum 1
Bass drum 1
34 – A30
Bass drum 2
Bass drum 2
Bass drum 2
Bass drum 2
W ILLIAM S P IAN OS. CO M
27
28
35 – B0
808 Kick
Jazz Bass Drum
Vintage Bass Drum
Surdo
36 – C1
Hip Hop Bass Drum
Jazz Bass Drum
Jazz Bass Drum
Surdo
37 – C#1
808 Snare
Shallow Wood CS
Deep Brass CS
Timbale
38 – D1
Hip Hop Snare
Shallow Wood Snare
Brush Snare
Timbale
39 – D#1
808 Clap
Shallow Wood Snare
Deep Brass Snare
Timbale RS
40 – E1
Hip Hop Snare 2
Shallow Wood RS
Brush Snare RS
Low Maple Tom
41 – F1
Low E Tom
Low Jazz Tom
Low Brush Tom
Shaker
42 – F#1
Hip Hop Hi Hat Closed
Hi Hat Closed
Hi Hat Closed
Tumba
43 – G1
Mid E Tom
Mid Jazz Tom
Mid Brush Tom
Clave
44 – G#1
Hip Hop Foot
Hi Hat Foot
Hi Hat Foot
Bongo
45 – A1
Mid E Tom
Mid Jazz Tom
Mid Brush Tom
Cabasa
46 – A#1
Hip Hop Hi Hat Open
Hi Hat Open
Hi Hat Open
47 – B1
Hi E Tom
Hi Jazz Tom
Hi Brush Tom
Conga
48 – C2
Hi E Tom
Hi Jazz Tom
Hi Brush Tom
Hi Maple Tom
49 – C#2
808 Cymbal
Crash Cymbal
Crash Cymbal
Ride Bow
50 – D2
Hi E Tom
Hi Jazz Tom
Hi Brush Tom
Hi Maple Tom
51 – D#2
Techno Ride
Ride Bow
Ride Bow
Ride Bow
52 – E2
China Cymbal
China Cymbal
China Cymbal
China Cymbal
53 – F2
Ride Bell
Ride Bell
Ride Bell
Ride Bell
54 – F32
Tambourine
Tambourine
Tambourine
Tambourine
55 – G2
Splash Cymbal
Splash Cymbal
Splash Cymbal
Splash Cymbal
56 – G#2
808 Cowbell
Cowbell
Cowbell
Cowbell
57 – A2
Techno Crash
Crash Cymbal
Crash Cymbal
Crash Cymbal
58 – A#2
Vibraslap
Vibraslap
Vibraslap
Vibraslap
59 – B2
Ride Bow
Ride Bow
Ride Bow
Ride Bow
60 – C3
Small Bongo
Small Bongo
Small Bongo
Small Bongo
61 – C#3
Large Bongo
Large Bongo
Large Bongo
Large Bongo
62 – D3
Conga Mute
Conga Mute
Conga Mute
Conga Mute
63 –D#3
Conga
Conga
Conga
Conga
64 – E3
Tumba
Tumba
Tumba
Tumba
65 – F3
Hi Timbale
Hi Timbale
Hi Timbale
Hi Timbale
66 – F#3
Low Timbale
Low Timbale
Low Timbale
Low Timbale
67 – G3
Small Agogo
Small Agogo
Small Agogo
Small Agogo
68 – G#3
Large Agogo
Large Agogo
Large Agogo
Large Agogo
69 – A3
Cabasa
Cabasa
Cabasa
Cabasa
70 - A#3
Marcas
Marcas
Marcas
Marcas
71 – B3
Whistle
Whistle
Whistle
Whistle
72 – C4
Long Whistle
Long Whistle
Long Whistle
Long Whistle
73 – C#4
Short Guiro
Short Guiro
Short Guiro
Short Guiro
O W N E R ' S MAN UAL
OVE RTU R E 2 D I G ITAL P IAN O
74 – D4
Long Guiro
Long Guiro
Long Guiro
Long Guiro
75 – D#4
Clave
Clave
Clave
Clave
76 – E4
Hi Woodblock
Hi Woodblock
Hi Woodblock
Hi Woodblock
77 – F4
Low Woodblock
Low Woodblock
Low Woodblock
Low Woodblock
78 – F#4
Mute Quica
Mute Quica
Mute Quica
Mute Quica
79 – G4
Quica
Quica
Quica
Quica
80 – G#4
Mute Triangle
Mute Triangle
Mute Triangle
Mute Triangle
81 – A4
Open Triangle
Open Triangle
Open Triangle
Open Triangle
82 – A#4
Cabasa
Cabasa
Cabasa
Cabasa
83 - B4
Shaker
Shaker
Shaker
Shaker
84 - C5
BellTree
BellTree
BellTree
BellTree
85 – C#5
Castanets
Castanets
Castanets
Castanets
86 – D5
Mute Surdo
Mute Surdo
Mute Surdo
Mute Surdo
87 – D#5
Open Surdo
Open Surdo
Open Surdo
Open Surdo
Orchestra_Kit
Techno_Kit
Sound Effects Kit
Program Change
64
72
80
27 – Eb0
Click
Click
Click
28 –E0
Brush Tap
Brush Tap
Brush Tap
29 – F0
Scratch Push
Scratch Push
Scratch Push
30 – F#0
Scratch Pull
Scratch Pull
Scratch Pull
31 – G0
Stick
Stick
Stick
32 G#0
Soft Snare
Soft Snare
Soft Snare
33 – A0
Bass drum 1
Bass drum 1
Bass drum 1
34 – A#0
Bass drum 2
Bass drum 2
Bass drum 2
35 – B0
Orchestra Bass Drum
Electro Kick
No Sound
36 – C1
Orchestra Bass Drum
Techno Kick
No Sound
37 – C#1
Shallow Wood Snare CS
Hip Hop Snare
Seashore
38 – D1
Shallow Wood Snare
Techno Snare
Birds
39 – D#1
Shallow Wood Snare
Techno Clap
Telephone
40 – E1
Shallow Wood Snare RS
Techno Snare
Helicopter
41 – F1
Timpani
Simmons Lo Tom
Applause
42 – F#1
Hi Hat Closed
Techno Hi Hat Closed
Gun Shot
43 – G1
Timpani
Simmons Lo Tom
No Sound
44 – G#1
Hi Hat Foot
Techno Hi Hat Foot
No Sound
45 – A1
Vintage Tom
Simmons Mid Tom
No Sound
46 – A#1
Hi Hat Open
Techno Hi Hat Open
No Sound
W ILLIAM S P IAN OS. CO M
29
47 – B1
Vintage Tom
Simmons Hi Tom
No Sound
48 – C2
Vintage Tom
Simmons Hi Tom
No Sound
49 – C#2
Crash Cymbal
Techno Crash
No Sound
50 – D2
Vintage Tom
Simmons Tom Hi
No Sound
51 – D#2
Ride Bow
Ride Bow
No Sound
52 – E2
China Cymbal
Simmons Cymbal
No Sound
53 – F2
Ride Bell
Techno Crash
No Sound
54 – F#2
Tambourine
Tambourine
No Sound
55 – G2
Splash Cymbal
Splash Cymbal
No Sound
56 – G#2
Cowbell
Cowbell
No Sound
Crash Cymbal
Crash Cymbal
Crash Cymbal
57 – A2
30
58 – A#2
Vibraslap
Vibraslap
Vibraslap
59 - B2
Ride Bow
Ride Bow
Ride Bow
60 – C3
Small Bongo
Small Bongo
Small Bongo
61 – C#3
Large Bongo
Large Bongo
Large Bongo
62 – D3
Conga Mute
Conga Mute
Conga Mute
63 – D#3
Conga
Conga
Conga
64 – E3
Tumba
Tumba
Tumba
65 – F3
Hi Timbale
Hi Timbale
Hi Timbale
66 – F#3
Low Timbale
Low Timbale
Low Timbale
67 – G3
Small Agogo
Small Agogo
Small Agogo
68 – G#3
Large Agogo
Large Agogo
Large Agogo
69 – A3
Cabasa
Cabasa
Cabasa
70 – A#3
Maracas
Maracas
Maracas
71 – B3
Whistle
Whistle
Whistle
72 – C4
Long Whistle
Long Whistle
Long Whistle
73 – C34
Short Guiro
Short Guiro
Short Guiro
74 – D4
Long Guiro
Long Guiro
Long Guiro
75 – D#4
Clave
Clave
Clave
76 – E4
Hi Woodblock
Hi Woodblock
Hi Woodblock
77 – F4
Low Woodblock
Low Woodblock
Low Woodblock
78 – F#4
Mute Quica
Mute Quica
Mute Quica
79 – G4
Quica
Quica
Quica
80 – G#4
Mute Triangle
Mute Triangle
Mute Triangle
81 – A4
Open Triangle
Open Triangle
Open Triangle
82 – A#4
Cabasa
Cabasa
Cabasa
83 – B4
Shaker
Shaker
Shaker
84 - C5
BellTree
BellTree
BellTree
85 - C#5
Castanets
Castanets
Castanets
86 – D5
Mute Surdo
Mute Surdo
Mute Surdo
87 – D#5
Open Surdo
Open Surdo
Open Surdo
O W N E R ' S MAN UAL
OVE RTU R E 2 D I G ITAL P IAN O
Demo Songs for the Voices
Each voice on the 18 Direct Access buttons has a separate demo song to profile the sound.
Button
Demo
Display Name
Piano
1
Fantasy
Electric Piano
2
EP Blues
Organ
3
Jazzy
Keys 1
4
Nylon
Keys 2
5
Synth
Bass
6
A Bass
Piano
7
Cabriole
Electric Piano
8
EP Funk
Organ
9
Rock Org
Keys 1
10
Vibey
Keys 2
11
Strings
Bass
12
E Bass
Piano
13
Lush Pno
Electric Piano
14
EP Synth
Organ
15
Fortress
Keys 1
16
JS Bach
Keys 2
17
FunkyClv
Bass
18
Syn Bass
W ILLIAM S P IAN OS. CO M
31
TUTOR SONGS
Difficulty
Hard
Medium
Easy
32
Order
Display Name
File Name
1
Rachmnv
Rachmoninov - Prelude in C# Minor
2
Chopin 1
Chopin - Fantasy Impromptu
3
Bach 1
Bach - C Major Prelude
4
Debussy1
Debussy – Clair de Lune
5
Bach 2
Bach - Italian Concerto (Harpsic)
6
Liszt
Liszt - Liebestraume
7
Bach 3
Bach - C# Major Prelude
8
Beethvn1
Beethoven - Moonlight
9
Debussy2
Debussy - Dr. Gradus
10
Bach 4
Bach - Mighty Fortress (Organ)
11
Bach 8
Bach- Jesu 1 BWV776
12
Beethvn2
Beethoven –Rondo a capriccio OP129
G-major
13
Bach 5
Bach – Bourree
14
Bach 6
Bach-Invention-08 F major
15
Bach 7
Bach- Musette 1
16
Chopin 2
Chopin - Prelude E Minor 1
17
Chopin 3
Chopin - Minuet Waltz
18
Mozart
Mozart - Minuet in F
19
Grnslves
Greensleeves
20
Satie
Gymnopedie
21
AvaMaria
Ava Maria.mid
22
Pachelbl
Johann Pachelbel - Canon
O W N E R ' S MAN UAL
OVE RTU R E 2 D I G ITAL P IAN O
TUTOR SONGS
Difficulty
Rock Blues
Etudes
Order
Display Name
File Name
23
Blues 1
Blues 1
24
Blues 2
Boogie1
25
Blues 3
Boogie2
26
Rock 1
Rock3
27
Rock 2
Rock5
28
Rock 3
Rock1
29
Rock 4
Rock4
30
Rock 5
Rock2
31
Rock 6
Rock6
32
Blues 4
Blues 2
33
Etude 1
34
Etude 2
35
Etude 3
36
Etude 4
37
Etude 5
38
Etude 6
39
Etude 7
40
Etude 8
41
Etude 9
42
Etude 10
43
Etude 11
44
Etude 12
45
Etude 13
46
Etude 14
47
Etude 15
48
Etude 16
49
Etude 17
50
Etude 18
W ILLIAM S P IAN OS. CO M
33
MIDI IMPLEMENTATION CHART
Function
Basic
Channel
Transmitted
Recognized
1–16 CH
X
1–16 CH
1–16 CH
Mode 3
X
**********
Mode 3
X
X
Note
Number: True Voice
0~127
**********
0~127
0~127
Velocity Note ON
Note OFF
O 9nH,v=1~127
O 8nH,v=0
O 9nH,v=1~127
O 9nH,v=0 or 8nh
After Key's
X
X
Pitch Bender
X
O
X
X
X
O
X
X
O
O
O
X
X
X
X
X
O
O
O
O
O
O
O
O
O
O
O
O
O
O (*2)
O (*1)
O
Program
Change: True
O 0–127
0–127
O 0–127
0–127
System Exclusive
X
O
System
:Song Position
:Song Select
Common :Tune
X
X
O
X
X
X
Aux
O
O
X
O
O
O
X
O
Mode
Default
Changed
Default
Messages
Altered
Control Change
0, 32
1
6
7
10
11
64
66
67
80, 81
84
91, 93
98, 99
100, 101
121
:Local ON/OFF
:All Notes OFF
Messages :Active Sense
:Reset
Mode1:OMNI ON, POLY
Mode3:OMNI OFF, POLY
Mode2:OMNI ON,MONO
Mode4:OMNI OFF,MONO
Remarks
Function
Modulation
Data Entry
Volume
Pan
Expresssion
Sustain
Sostenuto
Soft Pedal
DSP Type
Portamento
DSP Depth
NRPN LSB, MSB
RPN LSB, MSB
Reset All Controllers
O: Yes
X: NO
*1: Registered parameter number:
#0: Pitch sensivity
#1: Fine tuning in cents
#2: Coarse tuning in half-tones
*2: NRPN 1220h select IFX type
0: off
1: slow rotary
2: fast rotary
3: auto_pan
4: auto_tremelo
34
NRPN 1230h Enable IFX for current track
NRPN 1237h set global reverb send level if IFX have been enable on this track
NRPN 1238h set global chorus send level if IFX have been enable on this track
O W N E R ' S MAN UAL
OVE RTU R E 2 D I G ITAL P IAN O
WARRANTY
Williams provides the following limited warranty, to the original purchaser: this piano is warranted to
be free from electronic and/or structural defects in materials and workmanship for a period of one
(1) year from the date of original purchase. If this Williams piano is defective, at its option during the
warranty period, subject to the terms of this limited warranty and upon proof of purchase, Williams
will either repair or replace the listed piano with a same or similar model of equal age or newer. Any
repairs or modifications must be completed by Williams and/or an authorized agent of Williams.
The warranty obligations as set forth herein shall be performed free of charge with the exception of
all delivery and shipping expenses. This limited warranty will not apply to this product in the case
of misuse, abuse, neglect, alterations, normal wear and tear or other circumstances not directly
attributed to electronic and/or structural defects in materials or workmanship. Without limiting the
foregoing, this limited warranty will also be inapplicable to products that have not been maintained
or replaced in accordance with the manufacturer’s instruction, or to products from which the serial
number has been removed or altered. If covered defects are found, contact your authorized Williams
dealer with regard to the alleged defect within ten (10) days of discovery of the problem.
The foregoing repair or replacement obligation for defective products shall be the sole and exclusive
remedy of this limited warranty. All warranties including, but not limited to, the express warranty and
the implied warranties of merchantability and fitness for a particular purpose are limited to the one (1)
year warranty period. Some states do not allow limitation on how long an implied warranty lasts, so
the above limitation may not apply to you. There are no express warranties beyond those stated here.
In the event that applicable law does not allow the limitation of the duration of the implied warranties
to the warranty period, then the duration of the implied warranties shall be limited to as long as is
provided by applicable law. No warranties apply after that period. Retailer and manufacturer shall not
be liable for damages based upon inconvenience, loss of use of product, loss of time, interrupted
operation or commercial loss or any other incidental or consequential damages including but not
limited to lost profits, downtime, goodwill, damage to or replacement of equipment and/or property.
1 Year Parts & Labor Warranty
Register online at www.williamspianos.com
W ILLIAM S P IAN OS. CO M
35
williamspianos.com


![Rhapsody 2 Owner`s Manual [US]](http://vs1.manualzilla.com/store/data/005663417_1-92bddf67d752d586c47af9cd7ea47d7e-150x150.png)