1
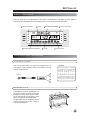
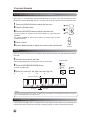
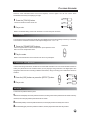
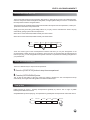
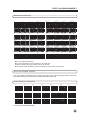
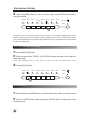
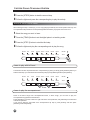
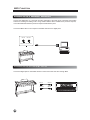
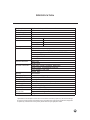
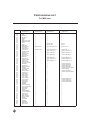
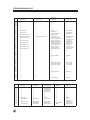
OWNER'S MANUAL
Digital Piano
GM-8825
PRECAUTIONS
PLEASE READ CAREFULLY BEFORE PROCEEDING
*Please keep these precautions in a safe place for future reference.
」
WARNING
Always follow the basic precaution listed below to avoid the possibility of serious injury or even death from
electronic shock, short-circuiting, fire or other hazards. These precautions include, but are not limited to,
the followings:
* Do not open the instrument or attempt to
disassemble the internal parts or modify them in any
way. The instrument contains no user-serviceable
parts. If it should appear to be malfunctioning,
discontinue use immediately and have it inspected by
qualified service personnel.
* Do not expose the instrument to rain, use near water
or in damp or wet conditions, or place containers on it
containing liquids that might spill into any opening.
* If the power cord or plug becomes frayed or
damaged, or if there is a sudden loss of sound during
use of the instrument, or if any unusual smells or
smoke appear to be caused by it, immediately turn off
」
the power, disconnect the power plug from the outlet, and
have the instrument inspected by qualified service
personnel.
* Do not use a voltage other than the indicated power
supply voltage. Use of a voltage other than indicated may
cause fire or electrical shock.
* Before cleaning the instrument, always remove the
power plug from the outlet. Never insert or remove an
power plug with wet hands.
* Check the power plug periodically and remove any dirt
or dust, which may have accumulated on it.
CAUTION
Always follow the basic precaution listed below to avoid the possibility of physical injury or damage to the
instrument or other property. These precautions include, but are not limited to, the followings:
* Do not place the power cord near heat sources such
as heaters or radiators, and do not excessively bend or
otherwise damage the cord, place heavy objects on it,
or place it in a position where anyone could walk on,
trip on, or roll anything over it.
* Do not connect the instrument to an electrical outlet
using a multiple-connector. Doing so can result in
lower sound quality, or possibly cause overheating in
the outlet.
this might discolour the panel or keyboard.
* Before connecting the instrument to other electronic
components, turn off the power for all components.
Before turning the power on or off for all components, set
all volume levels to minimum. Also, be sure to set the
volume of all components at their minimum levels and
gradually raise the volume controls while playing the
instrument to set the desired listening level.
* Unplug the power cords when not using the
instrument, or during electrical storms.
* Do not use the instrument near other electrical products
such as televisions, radios, or speakers, since this might
cause interference which can affect proper operation of
other products.
* When removing the power plug from the instrument
or an outlet, always hold the plug itself but not the cord.
* Do not place the instrument in an unstable position
where it might accidentally fall over.
* Do not expose the instrument to excessive dust or
vibrations, or extreme cold or heat, (such as direct
sunlight, near a heater, or in a car during the day) to
prevent the possibility of panel disfiguration or
damage to the internal components.
* Do not rest your weight on, or place heavy objects on
the instrument, and do not use excessive force on the
buttons, switches and connectors.
* Before moving the instrument, remove all connected
power cords and other cables.
* Do not operate the instrument for a long period of time
at a high or uncomfortable volume level, since this can
cause permanent hearing loss. If you experience and
hearing loss or ringing in the ears, consult a physician.
* When cleaning the instrument, use a soft, dry cloth.
Do not use paint thinners, solvents, cleaning fluids, or
chemical-impregnated wiping cloths. Do not place
vinyl, plastic or rubber objects on the instrument, since
WE CANNOT BE HELD RESPONSIBLE FOR DAMAGE
BY IMPROPER USE OR MODIFICATIONS TO THE
INSTRUMENT, OR DATA THAT IS LOST OR
DESTROYED.
Contents
Setting up
Power connection .....................................
Display indications ...................................
Audio equipment connections ..................
Line Out jacks .......................................
Phones jacks .........................................
Playing demo songs
1
Recording system
1
2
2
2
2
Recording System ................................... 12
Four different ways to record ................ 13
3
Playing demo songs.................................. 3
Playing sounds
4
Sound selection......................................... 4
Dual........................................................... 5
Split........................................................... 5
Touch Sensitive......................................... 5
Transpose................................................. 6
Vibration & Effect................................. 6
Pedals........................................................ 6
12
Data can be recorded to the user song.. 13
Accompaniment recording ....................... 14
Melody recording...................................... 14
Accompaniment and melody recording.... 15
Multi-track recording................................. 15
Play the recording songs........................... 15
Delete track...............................................
3 steps piano teaching system
16
Step 1 Master the timing............................ 16
Step 2 Master the melody.......................... 16
Step 3 Play your song ............................... 17
Learn to play the left hand......................... 17
Auto accompaniment
7
Styles selection ....................................... 7
Start Accompaniment .............................. 8
Variation and Fill-In................................... 8
Stop Accompaniment................................ 8
Fade In/Out............................................... 8
Tempo setting........................................... 9
Auto metronome....................................... 9
Chord fingerings....................................... 9
Playing single-fingering chord.............. 9
Single-fingering.................................... 10
Playing fingering chord......................... 10
The tone C fingering ............................ 10
Status Register
11
Status Register ....................................... 11
Data stored by the Status register........ 11
Registering the panel settings.............. 11
Recall the registered panel settings...... 11
Learn to play the accompaniment.............. 17
MIDI function
18
What is MIDI.............................................. 18
What you can do with MIDI........................ 18
Connecting to a personal computer........... 19
Connecting to other MIDI device................ 19
Appendix
20
Specifications............................................ 20
Sound list................................................... 21
Styles list..................................................... 22
Percussions list......................................... 23
Important Message Section...................... 27
Installation................................................. 28
Congratulations!
You are the proud owner of a fine digital piano. This digital piano combines the
most advanced tone generation technology with digital electronics and
features to give you stunning sound quality with maximum musical enjoyment.
New hammer keyboard gives you a real traditional acoustic piano feeling. In
order to make the most of your piano's features and extensive performance
potential, we urge you to read the manual thoroughly while trying out the
various features described. Keep the manual in a safe place for the future
reference.
Setting up
This section will help you set up the piano and prepare to play. Be sure to go through this section carefully
before turning the power on.
Power Connections
Follow the instructions below according to the power source you intend to use.
1
Make sure that the [POWER] button is set to OFF.
2 Connect the power cords to the digital piano and
plug it into an active outlet.
3 Minimize the volume of the digital piano.
WARNING
Do not use a voltage other than
the indicated power supply
voltage. Use of a voltage other
than indicated may cause fire or
electrical shock.
Unplug the power cord when not
using the instrument, or during
electrical storms.
4 Then turn POWER ON.
When turning the POWER OFF, simply reverse the procedure.
If you DID NOT read the precautions section, please go back and read carefully before processing!
01
Setting up
Display indications
When the power is on, the LCD display on the centre of the digital piano will display as below. Different
information about the digital piano will be displayed when you are playing or operating the piano.
1
Function indication
2
Accomp Vol RHYTHM
5
3
Chord
CHORD
BASS
Teaching System information
Menu/Messege Display
6
PADs
Tempo
PHASE
7
4
Record Information
KEYBOARD
Tracks Volume
Audio equipment connections
L i n e O u t ja c k s
The Line out jacks deliver the output of the digital piano for
connection to a piano amplifier, stereo sound system, a mixing
console, or tape recorder.
LINE OUT
Amplifier
CAUTION
Connect the piano to external
equipment only after turning off
the power for all devices. To
prevent damage to the
s p e a k e r s ,
set the volume of the external
devices at the minimum setting
before connecting them. Failure
to do so may result in electric
P h o n e s ja c k
A standard pair of stereo headphones can
be plugged in here for private or late-night
playing. The internal stereo speaker system
will be automatically shut off when a head
phone is plugged into the PHONES jack.
DO NOT listen with the headphone at high
volume for long periods of time. Doing so
may cause hearing loss.
Phones jack
02
Playing demo songs
In this section, you will learn how to play the demo songs, the digital piano has a large database of demo songs.
Once you have set up your digital piano, try listening the pre-programmed demonstration songs.
The digital piano provides a totally 89 demo songs. You can also use the 3 step piano teaching system to learn
these demo songs, for more information about piano teaching system, please turn to the "3 step piano teaching
system" chapter.
Playing a demo song.
1
2
Press the power button to the "ON" position.
Press the [Demo/Record] button to play the main demo song.
RECORD
PLAY
DELETE
ACCOMP TRACK1
TRACK2
TRACK3
TRACK4
RECORD
DEMO
STEP1
STEP2
STEP3
TRACK2
TRACK3
TRACK4
TEACH
TRACK1
3 Start a demo song
Press the [SONG] and use the [+] button, the [-] button or the number buttons to select a demo song. Or, press
any key on the note keyboard and hold it till press the [Demo/Record] button to start a demo song. Each key on
the note keyboard stands for one demo song.
SOUND 1
SOUND 2
1
2
3
4
5
6
7
8
9
0
STYLE
SONG
4
Enjoy the demo song.
Use the Master volume dial to adjust the volume, simply press the [Demo/Record] button to stop the song.
Master Vol
03
RECORD
PLAY
DELETE
ACCOMP
DEMO
STEP1
STEP2
STEP3
Playing Sounds
The digital piano provides lots of musical instruments. Try out the different voices referring to the sound list at
the end of this manual.
Sound selection
1
Press the [SOUND 1] button.
If you want to select the sound which from 100 to 127,
press the [SOUND 1] button twice.
SOUND 1
SOUND 2
2 Select the sound.
STYLE
Use the [+] button, the [-] button, the number buttons
through [0] - [9] to select the sound, the result will be
showed on the display.
SONG
3 Play a note and adjust the volume.
Master Vol
Example-Select sound NO.68
1
Press the [SOUND 1] button.
SOUND1
SOUND2
1
2
3
4
5
6
7
8
9
0
STYLE
SONG
2
Press the number button [6] and then [8], the desired voice has been reached. Or, use the [+]
button, the [-] button to select the number 68.
3
Play the piano and adjust the volume.
04
Playing Sounds
Dual (Playing two voices simultaneously)
When dual is on, a note played on the keyboard will sound in two voices, voices can be selected by button
[SOUND1] and button [SOUND2]. Sound 1 is the first voice of the layer and the second is called Sound 2.
1 Press the [SOUND1] button to select the first voice.
2 Press the [DUAL] button.
3 Press the [SOUND2] button to select the second voice.
EFFECT
DUAL
TOUCH
Use the [+] button, the [-] button or the number buttons [1] - [9] to select the
SOUND 2.
The sounds available for selection here (Sound 2) are the same as those
available for Sound 1.
4 Play the sound.
5 Use the Balance button to adjust the volume of the second voice.
BALANCE
Split
When you choose the split function, the keyboard will be split into two parts: the right hand part and the left
hand part.
1 Select the sound for the left hand.
Press the [SOUND1] button and select the voice for the left hand.
KEYBOARD MODE
SPLIT
2 Press the [KEYBOARD MODE] button.
S-FINGER
To select the split function.
FINGER
NORMAL
3 Select the sound for the right hand and play the
n
o
t
e
s
.
Split point: Middle C
Sound 1
Sound 2
NOTE
When the keyboard is split into two parts, the Split Point is on the middle C. The left keyboard note pitch is one octave
up; the right keyboard pitch is one octave down.
Touch Sensitive
The keyboard of the digital piano is equipped with a touch response feature that lets you dynamically and
expressively control the level of the voices with your playing strength -- just as the real acoustic instrument.
06
05
Playing Sounds
However, some instruments don't have touch response, such as organs. You can turn off the touch
sensitivefunction while you are playing an organ.
1
EFFECT
Press the [TOUCH] button.
The touch sensitive function will be off.
DUAL
2 Play a note.
TOUCH
NOTE: The default setting of the touch sensitive is on when the piano turned on.
Transpose
The transpose function allows the overall pitch of the digital piano to be transposed up or down by a maximum
of one octave in semitone increments. The transpose range is from -12 to +12.
1
TRANSPOSE
Press the [TRANSPOSE] buttons.
Press the upper button to set the transposition up and press the lower
button to set the transposition down.
2 Play the notes.
NOTE: Press both buttons at the same time to cancel any transpose.
Vibration and Effect
In most of the string instruments, vibration is one of the skills used often. You can use the vibration function to
make your performance more emotional when you are playing a string instrument. The digital piano also
equipped an effect function according to different instruments, using it can help you to create music with more
varieties.
EFFECT
1 Press the [VIB.] buttons or press the [EFFECT] button.
DUAL
2 Play a note.
TOUCH
VIB.
Pedals
There are three pedals under the piano.
1 Sostenuto Pedal(left): when this pedal is trod down,sounding notes before pedal-down will sustain after key
release,those notes played after pedal-down will not sustain.
2 Soft Pedal(middle): when this pedal is trod down,the notes played will sound softly than normal.
3 SustainPedal(right): when this pedal is trod down,all notes played will sustain after key release.
06
Auto accompaniment
The auto accompaniment function puts a full backing band at your fingers. Using it, all you have to do is play
the chords with your left hand as you perform, and the selected accompaniment style matching your music will
automatically play along, instantly following the chords you play. With auto accompaniment, even a
soloperformer can enjoy playing with the backing of an entire band or orchestra.
The digital piano features lots of styles or auto accompaniment patterns in a variety of different musical genres.
Try selecting some of the different styles and play with the auto accompaniment.
Styles selection
1
SOUND1
Press the [STYLE] button.
SOUND2
2 Select the styles.
STYLE
Use the [+] button, the [-] button or the
number buttons [1]-[0] to select the
styles.
SONG
1
2
3
4
5
6
7
8
9
0
Start Accompaniment
There are 4 different ways to start the accompaniments:
1 Press the [START/STOP] button to start accompaniment immediately.
2 Press the [Intro/Ending] button to start the accompaniment immediately from the Intro part, the electronic
piano will play a prelude.
3
Press the [SYNC] button, then press any note of the 34 keys from the left. The accompaniment will begin
with your performance.
4
Press the [SYNC] button, then press [Intro/Ending] button to set intro mode. Then press any note of the 34
keys from the left on the note keyboard. The accompaniment will begin from the Intro part with your
performance.
SYNC
07
START/STOP
A - FILLIN1
B - FILLIN2
INTRO/ENDING
FADE IN/OUT
Auto accompaniment
Variation and Fill-In
There are two main sections,main1 and main2. After power on, light of [A-FILLIN1] is on to indicate that main1
section is ready to be started. Press [B-FILLIN2] button, the light of [B-FILLIN2] is turned on to indicate that
the ready section has been changed to main2.
The fill-in section let you add dynamic variations and breaks in the rhythm of the accompaniment, to make your
performance sound even more professional.
Simply press the [A-FILLIN1], [B-FILLIN2] buttons as you play, and the selected fill-in section will play
automatically, spicing up to the auto accompaniment.
When fill-in1 section is finished, it leads smoothly Into main1 section.
When fill-in2 section is finished, it leads smoothly Into main2 section.
SYNC
START/STOP
A - FILLIN1
B - FILLIN2
INTRO/ENDING
FADE IN/OUT
There are various types of Auto Accompaniment sections that allow you vary the arrangement of the
accompaniment to match the song you are playing. There are: Intro, Fill-in and Ending. By switching among
them as you play, you can easily produce the dynamic elements of a professional-sounding arrangement in
your performance.
Stop Accompaniment
There are 2 different ways to stop the accompaniments:
1
Press the [START/STOP] button to stop the accompaniment.
2 Press the [INTRO/ENDING] button.
This is used for the ending of the song. When the ending is finished, the auto accompaniment stops
automatically. The length of the ending differs from different selected style.
Fade In/Out
[FADE IN/OUT] is used to stat/stop accompaniment gradually by volume. The on- light of [FADE
IN/OUT]means fade in/out is active.
Set [FADE IN/OUT] on before playing accompaniment to gradually start accompaniment until normal volume.
SYNC
START/STOP
A - FILLIN1
B - FILLIN2
INTRO/ENDING
FADE IN/OUT
08
Auto accompaniment
Set [FADE IN/OUT] on when playing accompaniment to gradually stop accompaniment until volume
decreased to zero.
Tempo setting
Each style of the digital piano has been programmed with a
default or standard tempo, however, it can be changed by
the [TEMPO+] and [TEMPO-] buttons. You can change the
tempo to any value from 40 to 240 beats per minute.
TEMPO
Auto Metronome
Press [METRO] Button to set the metronome effect. Three
types of metronome effects can be set automatically
according to the present style, including 2/4, 3/4 and 4/4.
You can also use the Tempo buttons to change the tempo
of metronome. If accompaniment started, metronome will
be invalid automatically.
METRONOME
2/4
3/4
4/4
Chord Fingerings
The way in which your left hand plays the chord is referred
to as "fingering". There are two types of fingering:
Single fingering
SPLIT
S-FINGER
Fingering
FINGER
Press the [KEYBOARD MODE] buttons to select
the fingering mode.
Play singer-finger chord
Using single-finger mode to play chord is simple to produce beautifully orchestrated accompaniment using
major, minor and minor-seventh chords by pressing a minimum number of keys on the Auto Accompaniment
section of the keyboard. The following abbreviated chord fingering are used:
09
Auto accompaniment
Singer Fingering
C
Cm
C7
Cm7
F #/G b
m
F #m/G b
7
F #7/G b
m7
F #m7/G b
C #/D b
C #m/D b
m
7
C #7/D b
m7
C #m7/D b
G
Gm
G7
Gm7
D
Dm
D7
Dm7
G #/A b
m
G #m/A b
7
G #7/A b
m7
G #m7/A b
D #/E b
m
D #m/E b
7
D #7/E b
m7
D #m7/E b
A
Am
A7
Am7
E
Em
E7
Em7
A #/B b
m
A #m/B b
7
A #7/B b
m7
A #m7/B b
F
Fm
F7
Fm7
B
Bm
B7
Bm7
Major: Just press the basic key
Minor: Press the basic key and any black key on its left side.
Seventh: Press the basic key and any white on its left side.
Minor seventh: Press the basic key and one white key, and one black on its left side.
Playing finger chord
This is the default accompaniment mode. When use finger mode to play, the player presses auto chord
keyboard according to the chord relation, the keyboard will accompany well.
The tone C fingering
C
Cm
C7
Cm7
CM7
Caug
C6
Csus4
C(9)
C7(13)
CmM7
Cm7 5
Cdim7
Cm(9)
C7(#11)
Cm7(9)
Cm7(11)
Cm6
Cdim
Cm(#5)
C7(#9)
The rest may be deduced by analogy
10
Status Register
Status Register
Since the digital piano is such a sophisticated instrument with such a variety of controls and functions -- voice,
styles, auto accompaniment, and effect settings, just to name a few -- the Status Register function is one of the
most convenient and powerful of the instrument. It allows you save virtually panel settings to a Register
Memory setting, and then instantly recall your custom panel settings by pressing a single button.
Status Register provides up to 4 memory space, which allows you to recall them during your performance.
DATA stored by the Status Register
Accompaniment volume
Accompaniment section A/B
Touch Sensitive on/off
Effect on/off
SOUND 1
SOUND 2
STYLE
TEMPO
Registering the panel settings
NOTE
1 Set up the panel controls as required.
Any data that was previously
recorded in the Status Register
location you selected will be
erased and replaced by the new
settings.
2 While holding the [SET] button, press one of the
Status Register button: [1] through [4].
SET
1
2
3
4
Recall the Registered Panel Settings
Press the [SET] button and then press one of the Status Registration button:
[1] to [4] to recall the settings.
SET
11
1
2
3
4
Recording System
Recording System
With the powerful and easy-to-use Recording System, you can record your own keyboard performance and
create your own complete, fully orchestrated compositions.
The digital piano provides four different ways to record:
Accompaniment Recording
This records only the auto accompaniment.
Melody Recording.
This records your keyboard performance without the auto accompaniment.
Accompaniment and Melody Recording
This records your keyboard performance along with the auto accompaniment.
Multi-Track Recording.
With this method, you can record up to 5 tracks independently.
Data that can be recorded to user song:
Tempo
Accompaniment style number
Section changes and their timing
Chord changes and their timing
Accompaniment volume
Note ON/OFF (key press and release)
Touch Sensitive ON/OFF
Sound change settings
Effect setting
NOTES:
The following notes and cautions are important for you to keep in mind as you record:
. Using Metronome function can make your recording sessions much more efficient.
Using Status Registration can make your recording sessions much more efficient, since various settings (such as voices, styles, etc.)
can be recalled by a single button press.
Whenever you record, please notify that any previously recorded material in the same track will be erased.
12
Recording System
Accompaniment Recording
1 Select style and fingering mode.
2 Press the [RECORD/TEACH] button to open the record function.
3 While pressing the [RECORD] button press the [STEP3/ACMP] button
RECORD
PLAY
CLEAR
ACCOMP TRACK1
TRACK2
TRACK3
TRACK4
RECORD
DEMO
STEP1
STEP2
STEP3
TRACK2
TRACK3
TRACK4
TEACH
3
2
4
TRACK1
1
Start Recording
Record will start as soon as you start the auto accompaniment.
5
6
Change the accompaniment style when it is needed.
Press the [STEP3/AMCP] button again to stop recording.
Melody Recording
1 Select sound.
2 While pressing the [RECORD/DEMO] button, press one of the [TRACK] buttons.
The performance will be recorded in the track you selected.
3
4
5
Play any notes of the keyboard to start recording.
Change sound when it is needed.
Press the selected track button to stop recording.
RECORD
PLAY
CLEAR
ACCOMP TRACK1
TRACK2
TRACK3
TRACK4
RECORD
DEMO
STEP1
STEP2
STEP3
TRACK2
TRACK3
TRACK4
TEACH
2
13
TRACK1
3
1
Recording System
Accompaniment and Melody Recording
1 Select style and sound.
2 While press the [RECORD] button, press the [ACMP] button and one then of the
[Track1]-[Track4] buttons.
RECORD
PLAY
CLEAR
ACCOMP TRACK1
TRACK2
TRACK3
TRACK4
RECORD
DEMO
STEP1
STEP2
STEP3
TRACK2
TRACK3
TRACK4
TEACH
TRACK1
4
3
2
1
3 Press the [PLAY] button to start recording.
Or play any notes in the keyboard to start recording directly.
4
Press the [ACMP] button or one of the any other selected [TRACK] buttons to stop the
recording
Multi-Track Recording
1
Use the same operation as one of the recording methods explained above.
2 While pressing the [RECORD] button, press one of the track buttons you want record.
RECORD
PLAY
CLEAR
ACCOMP TRACK1
TRACK2
TRACK3
TRACK4
RECORD
DEMO
STEP1
STEP2
STEP3
TRACK2
TRACK3
TRACK4
TEACH
3
2
3
TRACK1
1
Press the [PLAY] button to start recording.
Or play any notes in the keyboard to start recording directly.
RECORD
DEMO
PLAY
CLEAR
ACCOMP TRACK1
TRACK2
TRACK3
TRACK4
RECORD
STEP1
STEP2
STEP3
TRACK2
TRACK3
TRACK4
TEACH
TRACK1
14
Recording System
4
Press the [ACMP] button or one of the any other selected [TRACK] buttons to
stop the recording.
RECORD
PLAY
CLEAR
ACCOMP TRACK1
TRACK2
TRACK3
TRACK4
RECORD
DEMO
STEP1
STEP2
STEP3
TRACK2
TRACK3
TRACK4
TEACH
TRACK1
For instance, after you record your performance into TRACK 1, while holding the [RECORD] press the
[TRACK 2] button to prepare record, press the [TRACK 1] button to play the track 1, meanwhile you can start
your new record with track 2. Once you finish, press [TRACK 2] to stop, your performance recorded in track 2
has been mixed with track 1.
Play the Recording Songs
1 Press the [RECORD] button.
2
Press the track button: [TRACK 1] to [TRACK 4] button according to the tracks you
want to play back.
Press the [ACMP] button if you want to play the auto accompaniment record.
3 Press the [PLAY] button.
RECORD
PLAY
CLEAR
ACCOMP TRACK1
TRACK2
TRACK3
TRACK4
RECORD
DEMO
STEP1
STEP2
STEP3
TRACK2
TRACK3
TRACK4
TEACH
TRACK1
Delete Track
1
While pressing the [CLEAR] button, press the track button, which you want to delete.
2
Press the [ACMP] button while pressing the [CLEAR] button to delete the accompaniment record.
15
3 steps Piano Teaching System
The 3-step Piano Teaching System feature takes you through the three distinct steps described below to help
you learn to play all of the demo songs in the digital piano. In this feature, you can learn to play the right or the
left hand, even another accompaniment in the demo song as well..
Step 1 Master the timing
In this step, pressing any key on the keyboard will play the correct note of the selected song, so you can
concentrate in getting the timing right without worrying about how to play the right note. The melody of the
selected demo song will wait until you press a key before proceeding to the next phrase. The light will flash
above the next key of the melody, so just simply follow the light you will play the correct key of the melody.
1 Press the [SONG] button and select a song to learn.
2 Press the [TEACH] button to open the teaching function.
3 Press the [STEP 1] button to start the first step.
4 Follow the lights and press the corresponding key to play.
NOTES:
Accompaniment waits until
you press any key to play the
note.
If you accidentally press more
than one key in succession, accompaniment is played for the
corresponding number of notes.
Pressing more than one key at
the same time counts as corresponding notes. Pressing a key
while another key is held down is
counted as a single note.
RECORD
PLAY
CLEAR
ACCOMP TRACK1
TRACK2
TRACK3
TRACK4
RECORD
DEMO
STEP1
STEP2
STEP3
TRACK2
TRACK3
TRACK4
TEACH
TRACK1
Step 2 Master the melody
In this step, you will learn the right key to play the melody. the melody still waits until you play the correct note,
and so you can learn at your own pace. The accompaniment will not continue unless you play the correct key of
the melody.
1. Select one demo song you want
to learn.
.
2
Press the [TEACH] button to set the digital piano in a teaching mode.
16
3 steps Piano Teaching System
3
4
.
Press the [STEP2] button to start the second step.
Follow the lights and press the corresponding key to play the melody.
Step 3 Play your song
After following the step 1 and step 2, you can enjoy playing the melody at a normal speed in this step. The
accompaniment will proceed at a normal speed regardless of whether you play the correct note or not.
1. Select the song you want
to learn.
.
2
Press the [TEACH] button to set the digital piano in a teaching mode.
3
Press the [STEP 3] button to start the third step.
4
Follow the lights and play the corresponding note to play the song.
RECORD
PLAY
CLEAR
ACCOMP TRACK1
TRACK2
TRACK3
TRACK4
RECORD
DEMO
STEP1
STEP2
STEP3
TRACK2
TRACK3
TRACK4
TEACH
TRACK1
1
Learn to play with left hand
The left hand can also be performed in the 3 steps teaching system, just simply press [TRACK2] before you
start the each step. If you want to learn the left hand by step 3, press [TRACK2] and then press [STEP3]
RECORD
PLAY
CLEAR
ACCOMP TRACK1
TRACK2
TRACK3
TRACK4
RECORD
DEMO
STEP1
STEP2
STEP3
TRACK2
TRACK3
TRACK4
TEACH
TRACK1
3
2
1
Learn to play the accompaniment
Some of the demo songs have accompaniment tracks, in those songs, you can learn to play the
accompaniment by right hand or the left hand.
Press [TRACK3] if you want to learn the right hand of the accompaniment, and [TRACK4] for the left hand
of the accompaniment.
If you want to learn the right hand of the accompaniment by step 3, press [TEACH], and then press
[TRACK3], and Press [STEP3].
17
MIDI Function
In the lower panel of your digital piano, there are MIDI terminals (MIDI IN, MIDI OUT,). By using the MIDI
functions you can expand your musical possibilities. This section explains what MIDI is, and what it can do, as
well as how you can connect your digital piano to your personal computer.
What's MIDI?
In the now days world, there are two main categories of instruments: acoustic instrument and digital
instrument. Let's consider an acoustic piano or a guitar as representative acoustic instrument. They are easy
to understand. With the piano, every time you press a note, the hammer inside will hit some strings and play the
sound. With the guitar, you directly pluck a string and the note will sound. But how does a digital instrument go
about playing a note?
In the electronic instruments, the sampling note will be previously recorded and stored in the tone generator
section. It will sound based on information received from the keyboard. So then what is the information from the
keyboard that becomes the basis for note production? For example, if you play a "C" quarter note using the
grand piano sound on the digital piano, the electronic instrument puts out information from the keyboard such
as "with what sound", "with which key", "about how strong", "when was it pressed and released". The each
piece of information is changed into a nmber value and sent to the time generator.
MIDI is an acronym that stands for Musical Instrument Digital Interface, which allows electronic musical
instruments to communicate with each other, by sending and receiving compatible Note, Control Change,
Program Change and various other types of MIDI data, or messages.
What you can do with MIDI」
Use the digital piano as a multi tone generator (playing 64 channels at one time).
Use the digital piano as a MIDI keyboard to control other device through MIDI.
Record performance data using the piano Auto Accompaniment function on a external sequencer (such as a
personal computer). After recording, edit the data with the sequencer, then play it again on the digital piano.
Connect the digital piano to personal computer and use the computer software to learn piano, Many
softwares can help you to learn how to play piano more efficiency.
18
MIDI Function
Connecting to a Personal Computer
Connect the digital piano to a computer and take advantage of the wide range of powerful and versatile
software for creating and editing music. Using a MIDI interface device installed in the personal computer,
connect the MIDI terminals of the personal computer and the electric piano.
Connect the MIDI cable on the computer to the MIDI terminal on the digital piano.
MIDI IN
MIDI OUT
MIDI jacks on the rear panel
Connecting to other MIDI device
Connect the digital piano to other MIDI devices to share and control each other through MIDI.
MIDI IN
MIDI OUT
ネシナ
イメ
ヒシナ
メオ
オヨコマ
ヒシナ
ソケ
ネシナコマ
ニヘ
ヒメノ
メノ R1
メノ R2
スラ
ヒカ
クヌ
メオ
ホオ
メノ L
ニコ
1
5
4
6
4/4
ーラ
スラ
オメ
コマ
コマオ
タセ
シナ
9
8
7
スナヒカ
ーラメチ
ミ
3
2
ミケ
チカ
ニヘ
3/4
カヨコマ
ケ
カヨコマ
2/4
オヨコマ
ソ
ラメチ
0
エ
ラカーラ
ミケ
ヒメノ
ラフシメ
チカ
1
3
2
4
5
6
1
OTS
3
2
4
コマオ
ヘイ
ニカ/ ヘヨ
A - ²È
B - ²È
C - ²È
D - ²È
ヌラ/ホラ
オネ/オウ
ヨトスム
ハキ
イヨ 1
イヨ 2
イヨ 3
ノイ 1
ノイ 2
ノイ 3
ノイ 4
ハネ
ハウ
MIDI
ツメ
MIDI OUT
MIDI IN
ヘメ
イメ
エ
ミ
¶ »
19
ツメ
キメ
ヌウ
ーラ
メケ 1
メケ 2
メケ 3
メケ 4
Specification
Keyboard
Touch Sensitive
Polyphony
Number of Voices
Display
Effects
Transpose
Auto Accom.
Chord Controller
Overall controllers
Drums
Teaching System
Song Recording
Demo Songs
MIDI ports
Auxiliary jacks
Foot pedals
Sound System
Dimension
Weight
88 piano -size keys with hammer action
Yes
64
128
LCD
Yes
Split
Yes
Dual
Yes
Reverb
Chorus/Effect
Yes
Yes
Styles: 200
Variations: Intro, Main A/B, Fill-in 1/2
Control: Accompaniment ON/OFF, SYNC, START/STOP,
Intro/Ending
Main A/B
Fill-in x 2
Multi Finger
Single Finger
Piano Teach, Tempo, Transpose, Metronome,
Master Volume, Accompaniment Volume,
Touch Sensitive, Dual, Split,
Record, MIDI
9 Drums Kits
3 steps, 88 teaching songs
5 tracks, up to 6000 notes
89 songs
MIDI in/out
Double Earphones, Line out, Power, Pedal
Sustain pedal, Soft pedal
Amplifiers: 40W+40W
Speakers: 175mm+175mm
Depth x Width x height = 53cm x 138cm x 89cm
63Kg
* Specifications and descriptions in this owner manual are for information purpose only. We reserves the right
To change or modify products or specification at any time without prior notice. Since specifications, Equipment
or options may not be the same in every locale, please check with your digital piano dealer.
20
Sound list
General MIDI 128 Instruments
No.
00
01
02
03
04
05
06
07
08
09
10
11
12
13
14
15
16
17
18
19
20
21
22
23
24
25
26
27
28
29
30
31
32
33
34
35
36
37
38
39
40
41
42
21
Sound Name
PIANO
Grand Piano
Bright Piano
Midi Grand Piano
Honky-Tonk Piano
Digital Piano 1
Digital Piano 2
Harpsichord
Clavi
PERSUSSION
Celesta
Glockenspiel
Music Box
Vibraphone
Marimba
Xylophone
Tubular Bells
Dulcimer
ORGAN
Jazz Organ
Percussion Organ
Rock Organ
Church Organ
Reed Organ
Accordion 1
Harmonica
Accordion 2
GUITAR
Nylon Guitar
Steel Guitar
Jazz Guitar
Clean Guitar
Muted Guitar
OvrdrivenGuitar
Distortion Guitar
Hrmnx Guitar
BASS
Acoustic Bass
Finger Bass
Pick Bass
Fretless Bass
Slap Bas 1
Slap Bas 2
Syn Bass 1
Syn Bass 2
STRINGS
Violin
Viola
Cello
No.
Sound Name
43
44
45
46
47
Contrabass
Tremolo String
Pizzicato String
Harp
Timpani
ENSEMBLE
Strings 1
Strings 2
Str Syn 1
Str Syn 2
Choir Ahs
Voice Ohs
Voice Syn
Orch Hit
BRASS
Trumpet
Trombone
Tuba
Mute Trumpet
French Horn
Brass Section
Brass Syn 1
Brass Syn 2
REED
Sax Soprano
Alto Sax
Tenor Sax
Baritone Sax
Oboe
English Horn
Bassoon
Clarinet
PIPES
Piccolo
Flute
Recorder
Pan Flute
Bottle Blown
Shakuhachi
Whistle
Ocarina
SYNTH LEAD
Square Wave
Sawtooth
Calliope
Chiff
Charang
Voice Lead
5th Lead
48
49
50
51
52
53
54
55
56
57
58
59
60
61
62
63
64
65
66
67
68
69
70
71
72
73
74
75
76
77
78
79
80
81
82
83
84
85
86
No.
87
88
89
90
91
92
93
94
95
96
97
98
99
100
101
102
103
104
105
106
107
108
109
110
111
112
113
114
115
116
117
118
119
120
121
122
123
124
125
126
127
Sound Name
Bass Lead
SYNTH PADS
New Age
Warm Pad
Poly Synth
Choir Pad
Bow Glass
Metal Pad
Halo Pad
Sweep
EFFECTS
Rain Fx
Sndtrk Fx
Crystal Fx
Atmosph Fx
Bright Fx
Goblin Fx
Echo Fx
Sci-Fi Fx
ETHNIC
Sitar
Banjo
Shamisen
Koto
Kalimba
Bagpipe
Fiddle
Shanai
PERCUSSIVE
Tinkle Bell
Agogo
Steel Drm
Woodblk
Taiko Drm
Mldy Tom
Synth Drm
Revrs Cym
SOUNDS
Gtr Noise
Breath
Seashore
Bird Tweet
Telephone
Chopper
Applauce
Gunshot
Styles list
200 popular styles
No.
00
01
02
03
04
05
06
07
08
09
10
11
12
13
14
15
16
17
18
19
20
21
22
23
24
25
26
27
28
29
30
31
32
33
34
35
36
37
38
39
40
41
42
43
44
45
46
47~48
49
Style Name
No.
Style Name
No.
8BEAT POP
8Beat-Pop1
8Beat-Pop2
8Beat-Pop3
8Beat-Pop4
8Beat-Pop5
8Beat-Pop6
8Beat1
8Beat2
8Beat3
8Beat4
8Beat5
8Beat6
8Beat Heat
8Beat-Rock
8Beat-Soft
BALLAD
Ballad
Big Ballad
Rock Ballad1
Rock Ballad2
Piano Ballad1
Piano Ballad2
16Beat Ballad1
16Beat Ballad2
US.Ballad
Guitar Ballad
Organ Ballad
Epic Ballad1
Epic Ballad2
Slow Ballad
Pop Ballad1
Pop Ballad2
Pop Ballad3
R&B Ballad
16BEAT POP
16Beat1
16Beat2
16Beat3
16Beat4
16Beat5
16Beat6
16Beat7
16Beat Pop1
16Beat Pop2
16Beat Pop3
16Beat Pop4
16Beat Funk
Soft Fusion
80'S Fusion
BALLRoom
Tango
Mambo
50
51
52
53
54
55
56
57
58
Cha Cha Cha 1
Cha Cha Cha 2
Rhumba1
Rhumba2
Pasodoble
Samba1
Samba2
Samba3
Jive
BLUES
R&B1
R&B2
Blues1
Blues2
Blues3
Blues4
Soul Blues
Blues Shuffle
Blues Rock1
Blues Rock2
Blues Ballad
Funky Pop
Bluegrass
Soul Shuffle1
Soul Shuffle2
ROCK
Rock 1
Rock 2
Rock 3
Rock 4
Rock 5
Rock Pop1
Rock Pop2
Slow Rock1
Slow Rock2
Rock Roll1
Rock Roll2
Rock Shuffle
Hard Rock
Rk Classic
Folkrock
DISCO
70'S Disco
90'S Disco
Disco Tropic
Disco Beat
Disco Soul1
Disco Soul2
Disco Hands
Disco Queen
Disco Funk1
Disco Funk2
Disco Shuffle
Miami Pop
100
Electro Pop
101
Hit-Hot-Pop1
102
Hit-Hot-Pop2
103
Eurb
104
105
Casa
COUNTRY & WALTZ
Country 8Beat
106
Country Pop1
107
Country Pop2
108
Country Ballad
109
Country Rock
110
Country Shuffle
111
Country Swing
112
Hoedown
113
Two Step
114
Pop Waltz
115
Vienna Waltz
116
Slow Waltz
117
118
Orch Waltz
Jazz Waltz1
119
Jazz Waltz2
120
Waltz Ober Krainer
121
WORLD MUSIC
Polka Pop1
122
Polka Pop2
123
Polka Pop3
124
125
Polk Ober Krainer
126
German
Tarantella
127
Pop Bossa1
128
Pop Bossa2
129
Pop Reggae1
130
Pop Reggae2
131
132
Bossa Noval1
133
Bossa Noval2
Beguine
134
British Pop
135
136
Twist1
137
Twist2
Analog Pop
138
SWING & JAZZ
Swing1
139
Swing2
140
Swing3
141
Fusion Shuffle
142
Gypsy Swing
143
Dixieland1
144
145
Dixieland2
Big Band Boogie
146
Big Band Ballad
147
Big Band1
148
Big Band2
149
59
60
61
62
63
64
65
66
67
68
69
70
71
72
73
74
75
76
77
78
79
80
81
82
83
84
85
86
87
88
89
90
91
92
93
94
95
96
97
98
99
Style Name
No.
Style Name
150
151
152
153
154
155
156
Boogie1
Boogie2
Boogie3
Jazz-Rock
Jazz Ballad
Jazz Samba
Jazz Trio
DANCEFLOOR
Trance1
Trance2
Clubdance
Entrance
Eurobeat
Cool Dance
Funky Trip Hop
Cool Night
House
Modern
Foxtrot1
Foxtrot2
Tip
TRADITIONAL
March1
March2
6/8March1
6/8March2
U.S.March
Military March
Baroque
Sevillianas
Pop1
Pop2
Pop3
Pop4
PIANO
Guitar Waltz
Stride
Boogie4
Swing4
Pianoman
8Beat7
Ballad1
Ballad2
6/8Ballad
Ragtime
March3
6/8March3
Bossa N0Va
Beguine
Samba4
Waltz
Slow Waltz1
Jazz Waltz2
157
158
159
160
161
162
163
164
165
166
167
168
169
170
171
172
173
174
175
176
177
178
179
180
181
182
183
184
185
186
187
188
189
190
191
192
193
194
195
196
197
198
199
22
Percussions list
For MIDI user
27
28
29
30
31
32
33
34
35
36
37
38
39
40
41
42
43
44
45
46
47
48
49
50
51
52
53
54
55
56
57
58
59
60
61
62
63
64
65
66
67
68
69
70
71
72
73
74
75
76
77
78
79
80
81
82
83
84
85
86
87
23
Prog 1
Standard set 1
Prog 2
Standard set 2
Prog 3
Standard set 3
Prog 8
Chinese set
Syn Sound
Slap
Scratch 1
Scratch 2
Sticks
Click
Metronome Click
Metronome Bell
Kick 2
Kick 1
Side Stick
Snare Drum 2
Hand Clap
Snare Drum 1
Low Tom 2
Closed Hi-Hat
Low Tom 1
Pedal Hi-Hat
Mid Tom 2
Open Hi-Hat
Mid Tom 1
High Tom 2
Crash Cymbal
High Tom 1
Ride Cymbal
Chinese Cymbal
Ride Bell
Tambourine
Splash Cymbal
Cowbell
Crash Cymbal
Vibra-Slap
Ride Cymbal
High bongo
Low bongo
Mute conga
High conga
Low conga
High Timbale
Low Timbale
High Agogo
Low Agogo
Cabasa
Maracas
Short Hi Whistle
Long low Whistle
Short Guiro
long Guiro
Claves
Hi Wood Block
Low Wood Block
Mute Cuica
Open Cuica
Mute Triangle
Open Triangle
Shaker
Jingle Bell
BellTree
Castanets
Mute Surdo
open Surdo
<
<
<
<
<
<
<
<
<
<
<
Snare Drum 4
<
Snare Drum 3
<
<
<
<
<
<
<
<
<
<
<
<
<
<
<
<
<
<
<
<
<
<
<
<
<
<
<
<
<
<
<
<
<
<
<
<
<
<
<
<
<
<
<
<
<
<
<
<
<
<
<
<
<
<
<
Kick 70'TH 2
Kick 70'TH 1
<
70'TH Snare Drum 2
<
70'TH Snare Drum 1
70'TH Low Tom 2
<
70'TH Low Tom 1
<
70'TH Mid Tom 2
<
70'TH Mid Tom 1
70'TH High Tom 2
<
70'TH High Tom 1
<
<
<
<
<
<
<
<
<
<
<
<
<
<
<
<
<
<
<
<
<
<
<
<
<
<
<
<
<
<
<
<
<
<
<
<
<
<
<
<
<
<
<
<
<
Kick 2
Kick 1
<
Snare Drum 2
<
Snare Drum 1
Chinese Low Tom 2
<
Chinese Low Tom 1
<
Chinese Mid Tom 2
<
Chinese Mid Tom 1
Chinese High Tom 2
<
Chinese High Tom 1
<
Chinese Cymbal 1
Chinese Cymbal 2
Chinese Cymbal 5
Chinese Cymbal 3
Chinese Cymbal 1 Mute
Chinese Gong
Chinese Cymbal 4
Chinese Cymbal 5 Mute
<
<
<
<
<
Chinese High Drum
Chinese Low Drum
Chinese High Wood
Chinese Low Wood
<
<
<
<
<
<
<
<
<
<
<
<
<
<
<
<
<
<
<
Percussions list
27
28
29
30
31
32
33
34
35
36
37
38
39
40
41
42
43
44
45
46
47
48
49
50
51
52
53
54
55
56
57
58
59
60
61
62
63
64
65
66
67
68
69
70
71
72
73
74
75
76
77
78
79
80
81
82
83
84
85
86
87
Prog 9
Room set 1
Prog 10
Room set 2
Prog 11
Room set 3
Prog 17
Power set 1
Prog 18
Power set 2
<
<
<
<
<
<
<
<
<
<
<
Room Snare 2
<
Room Snare 1
Power Low Tom 2
<
Power Low Tom 1
<
Power Mid Tom 2
<
Power Mid Tom 1
Power High Tom 2
<
Power High Tom 1
<
Chinese Cymbal
Ride Bell
Tambourine
Splash Cymbal
Cowbell
Crash Cymbal
Vibra-Slap
Ride Cymbal
<
<
<
<
<
High Timbale
Low Timbale
High Agogo
Low Agogo
<
<
<
<
<
<
<
<
<
<
<
<
<
Shaker
Jingle Bell
BellTree
Castanets
Mute Surdo
open Surdo
<
<
<
<
<
<
<
<
<
<
<
<
<
<
Room
<
Room
<
Room
<
Room
Room
<
Room
<
<
<
<
<
<
<
<
<
<
<
<
<
<
<
<
<
<
<
<
<
<
<
<
<
<
<
<
<
<
<
<
<
<
<
<
<
<
<
<
<
<
<
<
<
Room
Room
<
Room
<
Room
<
<
<
<
<
<
<
<
<
<
<
<
<
<
<
<
<
<
<
<
<
<
<
<
<
<
<
<
<
<
<
<
<
<
<
<
<
<
<
<
<
<
<
<
<
<
<
<
<
<
<
<
<
<
<
Kick 2
Power Kick 1
<
Power Snare
<
Snare Drum 1
Power Low Tom 2
<
Power Low Tom 1
<
Power Mid Tom 2
<
Power Mid Tom 1
Power High Tom 2
<
Power High Tom 1
<
Chinese Cymbal
<
<
<
<
<
<
<
<
<
<
<
<
<
<
<
<
<
<
<
<
<
<
<
<
<
<
<
<
<
<
<
<
<
<
<
<
<
<
<
<
<
<
<
Power
Power
<
Power
<
Power
<
<
<
<
<
<
<
<
<
<
<
<
<
<
<
<
<
<
<
<
<
<
<
<
<
<
<
<
<
<
<
<
<
<
<
<
<
<
<
<
<
<
<
<
<
<
<
Low Tom 2
Low Tom 1
Mid Tom 2
Mid Tom 1
High Tom 2
High Tom 1
Kick 2
Kick 1
Snare 4
Snare 3
Kick 1
Kick 2
Snare 2
Snare 3
24
Percussions list
27
28
29
30
31
32
33
34
35
36
37
38
39
40
41
42
43
44
45
46
47
48
49
50
51
52
53
54
55
56
57
58
59
60
61
62
63
64
65
66
67
68
69
70
71
72
73
74
75
27
28
29
30
31
32
33
34
35
36
37
38
39
40
25
Prog 24
Electri set 1
Prog 25
Electri set 2
Prog 26
Synth set
Prog 27
Dance set
<
<
<
<
<
<
<
<
Electri
Electri
<
Electri
<
Electri
Electri
<
Electri
<
Electri
<
Electri
Electri
<
Electri
<
<
<
<
<
<
<
<
<
<
<
<
<
<
<
<
<
<
<
<
<
<
<
<
<
<
<
<
<
<
<
<
<
<
<
<
<
<
Power Snare Drum 1
<
<
<
<
<
<
<
<
<
<
<
<
<
<
<
<
<
<
<
<
<
<
<
<
<
<
<
<
<
<
<
<
<
<
<
<
<
<
<
<
<
<
<
Kick 2
Synth Kick
Synth Side Stick
Synth Snare
<
Snare Drum 1
Synth Low Tom 2
Synth Closed Hi-Hat
Synth Low Tom 1
Synth Pedal Hi-Hat
Synth Mid Tom 2
Synth Open Hi-Hat
Synth Mid Tom 1
Synth High Tom 2
Synth Cymbal
Synth High Tom 1
<
<
<
<
<
Synth Cowbell
<
<
<
<
<
Synth Mute conga
Synth High conga
Synth Low conga
<
<
<
<
<
Synth Maracas
<
<
<
<
Synth Claves
<
<
<
<
<
<
<
<
Dance Kick 2
Dance Kick 1
Side Stick
<
<
Dance Snare 1
Low Tom 2
Closed Hi-Hat
Low Tom 1
Pedal Hi-Hat
Mid Tom 2
Open Hi-Hat
Mid Tom 1
High Tom 2
Crash Cymbal
High Tom 1
<
<
<
<
<
Cowbell
<
<
<
<
<
Mute conga
High conga
Low conga
<
<
<
<
<
Maracas
<
<
<
<
Claves
Kick 2
Kick 1
Snare Drum 2
Snare Drum 1
Low Tom 2
Low Tom 1
Mid Tom 2
Mid Tom 1
High Tom 2
High Tom 1
Prog 33
Jazz set
Prog 41
Brush set
Prog 49
Orchestra set
Prog 57
EFX set
Prog 128
Effect set
<
<
<
<
<
<
<
<
Jazz Kick
Kick 70'TH 2
<
Snare Drum 2
<
Snare Drum 1
<
<
<
<
<
<
<
<
<
Kick 70'TH 1
<
Brush Swish
Brush Slap
Brush Swirl
Close Hi Hat
Pedal Hi Hat
Open Hi Hat
Rid Cymbal
<
<
<
<
Kick 2
Concert BD1
<
Snare Drum 2
Castanets
Snare Drum 2
<
<
<
<
<
<
<
<
<
<
<
<
Syn Sound
Slap
<
<
<
<
<
<
<
<
Kick 2
Kick 1
Side Stick
Snare Drum 2
Hand Clap
Snare Drum 1
Percussions list
41
42
43
44
45
46
47
48
49
50
51
52
53
54
55
56
57
58
59
60
61
62
63
64
65
66
67
68
69
70
71
72
73
74
75
76
77
78
79
80
81
82
83
84
85
86
87
88
89
90
91
92
93
94
95
96
97
98
99
100
101
102
103
104
105
106
107
108
Prog 33
Jazz set
Prog 41
Brush set
Prog 49
Orchestra set
Prog 57
EFX set
Prog 128
Effect set
<
<
<
<
<
<
<
<
<
<
<
<
<
<
<
<
<
<
<
<
<
<
<
<
<
<
<
<
<
<
<
<
<
<
<
<
<
<
<
<
<
<
<
<
<
<
<
<
<
<
<
<
<
<
<
<
<
<
<
<
<
<
<
<
<
<
<
<
Brush
<
Brush
<
Brush
<
Brush
Brush
<
Brush
<
<
<
<
<
<
<
<
<
<
<
<
<
<
<
<
<
<
<
<
<
<
<
<
<
<
<
<
<
<
<
<
<
<
<
<
<
<
<
<
<
<
<
<
<
<
<
<
<
<
<
<
<
<
<
<
<
<
Timpani F
Timpani F#
Timpani G
Timpani G#
Timpani A
Timpani A#
Timpani B
Timpani C
Timpani C#
Timpani D
Timpani D#
Timpani E
Timpani F
<
<
<
Orch Cymbal
<
Orch Cymbal
<
<
<
<
<
<
<
<
<
<
<
<
<
<
<
<
<
<
<
<
<
<
<
<
<
<
<
<
Applause
<
<
<
<
<
<
<
<
<
<
<
<
<
<
<
<
<
<
<
<
Scratch 1
Scratch 2
Sticks
Click
Metronome Click
Metronome Bell
Guitar Noise
Guitar Cutting Up
Guitar Cutting Down
String Slap
Key Click
Laughing
Scream
Punch
Heart Beat
Foot Steps1
Foot Steps2
Applause
Door Creaking
Door
Scratch
Wind Chimes
Car Engine
Car Stop
Car Pass
Car Crash
Siren
Train
Jetplane
Helicopter
Starship
Gun Shot
Machine Gun
Lasergun
Explosion
Dog
Horse Gallop
Birds
Rain
Thunder
Wind
Seashore
Stream
Bubble
<
<
<
<
<
<
<
<
<
<
<
<
<
<
<
<
<
<
<
<
<
<
<
<
Low Tom 2
Closed Hi-Hat
Low Tom 1
Pedal Hi-Hat
Mid Tom 2
Open Hi-Hat
Mid Tom 1
High Tom 2
Crash Cymbal
High Tom 1
Ride Cymbal
<
<
Tambourine
<
Cowbell
<
<
<
High bongo
Low bongo
Mute conga
High conga
Low conga
High Timbale
Low Timbale
High Agogo
Low Agogo
Cabasa
Maracas
Short Hi Whistle
Long low Whistle
Vibra-Slap
<
Claves
Laughing
Scream
Punch
Heart Beat
Foot Steps1
Foot Steps2
Applause
Door Creaking
Door
Scratch
Wind Chimes
Car Engine
Car Stop
Car Pass
Car Crash
Siren
Train
Jetplane
Helicopter
Starship
Gun Shot
Machine Gun
Lasergun
Explosion
Dog
Horse Gallop
Birds
Rain
Thunder
Wind
Seashore
Stream
Bubble
Low Tom 2
Low Tom 1
Mid Tom 2
Mid Tom 1
High Tom 2
High Tom 1
26
Important Message Section
SPECIAL MESSAGE SECTION:
This product utilizes an external power
supply (adapter). DO NOT connect the
product to any power supply or adapter
other than the one described in the
manual, on the name plate, or specifically
recommended.
This product should be used only with
the components supplied or: a cart, rack,
or stand that is recommended by us. If a
cart, etc, is used, please observe all
safety markings and instructions that accompany the accessory product.
SPECIFICATIONS SUBJECT TO
CHANGE:
The information contained in this manual is believed to be correct at the time
of printing. However, we reserve the
right to change or modify any of the
specifications without notice or obligation
to update existing units.
IMPORTANT:
The louder the sound, the shorter the
time period before damage occurs.
This product, either alone or combination with an amplifier and headphones or
speakers, may be capable of producing
sound levels that could cause permanent
hearing loss. DO NOT operate for long
periods of time at a high volume level or
at a level that is uncomfortable. If you
experience any hearing loss or ringing
in the ears, you should consult an
audiologist as soon as possible.
NOTICE :
Service charges incurred due to a lack
of knowledge relating to how a function
or effect works (when the unit is operating as designed ) are not covered by the
manufacturer's warranty , and are therefore the owners responsibility.
Please study this manual carefully and
consult your dealer before requesting
service.
ENVIRONMENTAL ISSUES:
We strives to make the product that are
both for user safe and environmentally
friendly. We sincerely believe that our products and the production methods used to
produce meet these goals. In keeping with
both the letter and the spirit of the law, we
want you to read the user's manual carefully.
Disposal Notice:
Should this product become damaged
beyond repair, or for some reason its
useful life is considered to be at the end,
please observe all local, state, and federal
regulations that relate to the disposal of
products that contain lead, batteries, plastic,
etc. If your dealer is unable to assist you,
please contact with us directly.
NAME PLATE LOCATION:
The nameplate is located on the bottom
of the product. The model number, serial
number, power requirements, etc., are
located on this plate. You should record
the model number, serial number, and
the date of purchase in the spaces provided below and retains this manual as a
permanent record of your purchase.
Model:_________________________
Serial No.:______________________
Purchase Date:__________________
Please keep this manual
27
Installation
C
C
C
C
B
B
B
B
C
C
C
C
C
C
C
C
C
C
C
C
C
A
A
C
C
Pedal
A
A
A = M6 x 45mm
B = M6 x 20mm
C = M6 x 16mm
QTY. = 4
QTY. = 4
QTY. = 21


![Overture 2 Owner`s Manual [US]](http://vs1.manualzilla.com/store/data/005690862_1-0f7bb48baaf3473aa086657512069e12-150x150.png)