1
SE9000 Digital Weighing Indicator
User manual
SE9000 Digital Weighing Indicator (Digital Sensor)
1) Brief introduction
SE9000 digital weighing indicator consists of digital sensor and digital meter.
Digital sensor has following characters.
1. Good coherence, all digital sensors have been processed by range
measurement before leaving factory.
2. As good coherence, so sensors can be changed easily and don’t need
calibration again.
3. As good coherence, so don’t need four-corner adjustment in fitting
spot.
4. As each sensor load can be displayed separately, so weighbridge
adjustment in fitting spot is easy and accurate.
5. As the output of weighbridge is the total of all sensors output, so
output signal is strong.
6. Digital sensor communicates with meter using standard asynchronous
serial interface RS-485 communication, so transmission distance is far
(can reach several kilometers) and the anti-interference ability is
strong.
The meter adopts 6 bits 1.2" (character is 30mm high) extremely bright
LED display, clear and bright. Provided with non-stop real time clock, power
failure data safeguard.
Provided with price computing function. Can store 10 unit prices、100 truck
tares and 100 truck gross weights for twice weighing. Can store 360 weighing
records for truck number statistic 、 goods number statistic 、 daily report、
monthly report and some other statistical functions. Also it can produce
record type print and 2~8 binding-bill print. Have many ways of auto
accumulation functions.
Both AC/DC power suppliers are acceptable.
SE9000 digital weighing indicator is a new generation weighing indicator, with
high accuracy and multi-functions. It is an ideal digital instrument in truck
scale、floor scale、 underground scale and hopper scale.
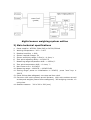
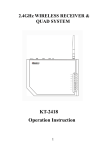
digital sensor weighing system outline
2) Main technical specifications
1.
2.
Power supplier: AC220V, 50Hz (8W) or DC12V/500mA
Working temperature: -10℃~ +40℃
3.
4.
5.
6.
7.
8.
Relative humidity: < 90%
Sensor inspired voltage: 5V
Sensor sensitivity range: 0.5mv/v ~ 4.0mv/ v
Zero point adjusting ability: ± 100% F.S
Measuring range temperature drift: < 10PPm/℃
Zero point temperature drift: < 0.1mv/ ℃
9. Non-linear error < 0.01%F.S
10. Measuring range: -100%F.S ~ 100%F.S+9d
11. Zeroing range: power on initialization: ± 20%F.S; press "zero" key: ±
2%F.S
12. Power failure data safeguard, non-stop real time clock
13. Can store 100 truck numbers as well as tares、100 truck numbers as well
as temporal weights (Power failure safeguard)、360 weighing records、10
unit prices.
14. Outside measure: 310 x 200 x 200 (mm)
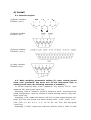
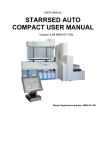
3) Instrument faceplate outlines and explain
Each indicative light explain:
1. zero: When gross weight < 0.3d, this indicative light is on.
2. net weight: In net weight displaying state, this indicative light is on.
3. auto: In auto accumulation state, this indicative light is on.
4. stable: When weighing is stable, this indicative light is on.
5. tare: When tare ≠ 0, i.e. there is tare, this indicative light is on.
6. truck No.: When truck number ≠0, i.e. there is truck number, this
indicative light is on.
7. goods No.: When goods number ≠0, i.e. there is goods number, this
indicative light is on.
8. unit price: When unit price ≠ 0, i.e. there is unit price, this indicative
light is on.
9. When display "OUEr", it means weighing overflow: >100%F.S + 9d
When display "– OUEr", it means weighing underflow: < -20%F.S.
4) Install
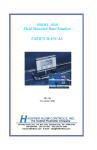
4-1. Interface explain
(1)Sensor interface:
D-SUB-9 ( hole )
(2) Serial interface
D-SUB-9 ( pin )
(3)Printer interface
D-SUB-25 ( hole )
(4) relay interface
D-SUB-9 (hole )
4-2. Basic weighing parameters setting (To enter setting permit
state, hold "password" key when turn on this instrument. Only in
setting permit state, the following operation is available.)
In normal weighing state, Press "password" key, display "PS O", input
password "99", then press "input" key,
displaying "CELL-4" means to choose 4 sensors to work.. According to the
actual configuration, input the number of actual working sensors (≤8), then
press "input" key,
displaying "d 10" means the division unit is10. If need change division unit,
press "(·)" key, then choose one option among 0.001、0.002、0.005、0.01、
0.02、0.05、0.1、0.2、0.5、1、2、5、10、20、50、100、200、500, then press
"input" key,
displaying "n 3000" means the maximum division value is 3000. If need
change the maximum division value, press number key to input new value,
then press "input" key,
displaying "Unt 00" means the weight unit and zero point range. The
rightmost digit (the smallest one) 0 means the weight unit is kg and 1 means
the weight unit is t. The second rightmost digit 0~9 means the range of zero
point. When weight < 0.3d + (0~9), the displaying value is zero. Using
number key to input new value, then press "input" key, end basic parameters
setting, return to weighing state.
4-3. Calibration (only in setting permit state, the following
operation is available.)
In normal weighing state, Press "password" key, display "PS 0", input the
password "98", then press "input" key, displaying "CAL00" means that zero
point calibration can be proceeded.
After confirming there is no load and weighing is stable, press "input" key,
displaying "-------" means that zero point calibration is undergoing. Several
seconds later, display maximum weighing value, means that full scale
calibration can carry on. Now we can load. If it is not full scale calibration, the
load should >10%F.S. Using number key to input actual load weight, when
"stable" indicative light is on, press "input" key, displaying "-------" means
scale calibration is undergoing. Several seconds later end calibration and
return to weighing state.
Explain 1:If only zero point calibration, the operating steps are: In normal
weighing state, press "password" key, display "PS 0", input the password "98",
then press "input" key, display "CAL00". When weighing is stable, press
"input" key, display "-------". Several seconds later, display "30000", now
press "0" key, then press "input" key, end calibration and return to weighing
state.
Explain 2: In calibration process, if scale calibration is wrong (But zero point
calibration is correct), according to normal calibration procedure, need to
unload weight, calibrate again, to avoid the trouble of unload and load, we
can calibrate again without unload weight. The operating steps are: In normal
weighing state, press "password" key, display "PS 0", input the password "98",
then press "input" key, display "CAL00". At this time, please press "zero"
key to skip zero point calibration and enter scale calibration, display
"30000". Now using number key to input actual load weight, press "input" key,
displaying "-------" means that scale calibration is undergoing. Several
seconds later calibration ends, return to weighing state.
4-4. Display A/D value
To check A/D working status and correctness of sensor connection, we can
check A/D code. In normal weighing state, press "password" key, display "PS
0", input the password "92", then press "input" key, displaying "1 15000" (the
display is flicker) means the A/D output value of the number 1 sensor. Press
1-8 key to display the A/D value of the number 1 to number 8 sensors.
Normally A/D value in unload state is around 15000 and in full load state is
around 45000, to exit A/D value displaying state, press "input" key to return
to weighing state.
5) Operating instructions
5-1 Power on
When power on (press switch), software version "Uer1.00" is displayed.
After 1 second, begin display self-test from "000000" to "999999". When
self-test finished, it initiates the zero point and displays zero in normal
situations.
If weight on the weighbridge > 20% F. S, displaying "HHHHHH" means the
zero point is too high. After 1.5 seconds it enters weighing state, the zero
point value is the original one.
If weight on the weighbridge < -20% F.S, displaying "LLLLLL" means the zero
point is too low. After 1.5 seconds, displaying "– OUEr" means underflow.
5-2 Time/ date display and setting
In weighing state, press "time/date" key, displaying "9.26.12" means the
current time. If need modify time, input correct time, then press "input" key,
end time setting.
In weighing state, press "time/date" key twice, display "99.10.26" means
the current date. If need modify date, input correct date, then press "input"
key, end date setting.
5-3 Truck number display and setting
In weighing state, press "truck No./goods No." key, display the original
truck number, and the "truck No." indicative light is on. Input new truck
number, then press "input" key, end truck number setting.
Explain: After setting up truck number, this scale first look for temporary
weight automatically according to this truck number in temporary weight
memory.
If there is a temporary weight of this truck number, then this weight is used
as the current tare. After displaying this tare value for 1.5 second, enter net
weight displaying state.
If there is no temporary weight of this truck number, then look for tare of
this truck number in truck number and tare memory. If found, call out this
tare as current tare, display this tare value for 1.5 second, and then enter the
net weight displaying state.
5-4 Goods number display and setting
In weighing state, press "truck No./goods No." key twice, display goods
number "F1234". Input new goods number, then press "input" key, return to
weighing state.
Note: When print goods number, the print format of 4 digits goods number is
12-34. This format is easy to distinguish goods. For example: in/out、cargo
hole number or shift number can be combined in this 4 digits for later
statistic.
5-5 Zeroing
In weighing state, gross weight is stable and < 2%F.S, press "zero" key,
clear the display to zero. The "zero" indicative light is on, and display switches
to gross weight displaying state.
If weighing is not stable or gross weight >2%F.S, pressing "zero" key will
be no effect.
5-6 Tare usage
<1> clear tare
If "net weight" indicative light is on, pressing "tare" key will clear original
tare. The "net weight" indicative light will be turned off.
<2> tare by actual weight
In gross weight displaying state ("net weight" indicative light is off), if gross
weight is stable and >0, pressing "tare" key will save gross weight as current
tare, clear the display to zero. Also the "net weight" indicative light will be
turned on.
<3> tare by input number
Using number key to input required tare value, pressing "tare" key will save
input value as current tare. Display switches to net weight displaying state.
Also the "net weight" indicative light will be turned on.
5-7 Truck number and tare storage
When truck number ≠0, pressing "store tare" key will save current truck
number and tare to memory for later call out. It can store 100 records of
truck number and tare. If more than 100 records, the earliest data will be
modified and "--oy--" will be displayed for 1.5 seconds.
5-8 Gross /net weight switching
In weighing state, pressing "gross/net" key will switch between gross
weight and net weight displaying state. In net weight displaying state, the
"net weight" indicative light is on. When switch from gross weight to net
weight displaying state, the tare value will be displayed for 1.5 seconds.
5-9 Temporary weight storage
In weighing state, weighing is stable and >0, and truck number ≠0,
pressing "store temp weight" key will save truck number and gross weight to
temporary weight memory for second weighing. Also "--oy--" will be displayed
for 1.5 seconds.
Note: Usage of temporary weight
When weigh a truck, if don’t know the tare, we can input truck number,
then press "store temp. weight" key to save truck number and gross weight.
After this truck load (or unload) and weigh again, we only need input truck
number, the meter will automatically call out the original deposited weight as
current tare. At this time, press "print" key to print and save this record, also
it will clear temporary weight of this truck (temporary weight can be used
only once).
5-10 Print
In manual accumulation state, when "auto" indicative light is off, weighing
is stable and gross weight >0, if press "print" key, the meter will save the
current truck number、goods number、 time、 date、 gross weight、 tare、 net
weight、unit price and amount of money as a weighing record. At the same
time it will print this record according to the original format setting (record
format or binding-bill format). It will also clear truck number and tare. If
there is a temporary weight of this truck, clear this temporary weight, then
display the number of saved records "n 128". After 1.5 seconds, enter
weighing state. If the number of records is bigger than 360, the meter will
display "-FULL-".
In auto accumulation state, pressing "print" key will have no effect.
5-11 Clearance
<1> in normal weighing state, pressing "clear" key will display "CLEAr",
then
press "1" key, delete the last record as well as truck number and tare, and
return to weighing state.
press "9" key, delete all records as well as truck number and tare, and return
to weighing state.
Press other digital keys or "input" key, delete truck number and tare, return
to weighing state.
<2> in other setting state, pressing "clear" key will delete the input data.
5-12 Auto/manual switching
Press "auto/ manual" key, can switch between auto accumulation state and
manual accumulation state. When auto accumulation mode is set to zero,
then it can not be switched to auto accumulation state.
5-13 1/10 high resolution display
In normal weighing state, press "1/10" key, display switches to
high-resolution state. High resolution is 1/10 of normal display, the last
decimal point is bright to distinct the normal display. In high-resolution
displaying state, all kinds of accumulative print functions are prohibited. Press
"1/10" key again, return to normal weighing state.
5-14 Amount of money display and unit price setting
In normal weighing state, press "#/¥" key, display amount of money, 2
seconds later return to normal weighing state. In normal weighing state,
press "#/¥" key twice, display unit price
"y 1.25". After input new unit
price, press "input" key, return to normal weighing state.
5-15 Unit price storage
In normal weighing state, and unit price is not zero, pressing "¥ ←" key will
display "UnP- ". Then pressing "0"~"9" digital keys will save the current unit
price with corresponding number, then return to weighing state.
5-16 Unit price calling out
In normal weighing state, pressing "¥ →" key will display "UnP-". Then
pressing "0"~"9" digital keys will call out the unit price of the corresponding
number as current unit price. After display this unit price for 1.5 seconds,
return to weighing state.
5-17 Statistic function
In normal weighing state, press "statistic" key, display "StltA-"
<1> Press "0" key, print the total accumulative value.
<2> Press "1" key, according to the current date, execute statistic printing.
All the records of that date will be printed out (daily report).
<3> Press "2" key, according to the current truck number, execute statistic
printing. All the records of that truck number will be printed out
<4> Press "3" key, according to the current goods number, execute statistic
printing. All the records of that goods number will be printed out.
<5>
Press "4" key, according to the current year and month, execute
statistic printing. All the records of that year and month will be printed
out (monthly report).
<6> Press "9" key, all the records will be printed out.
<7> Press "5" ~ "8" key or "input" key, return to weighing state.
Explain 1: While print monthly report or daily report, first set up the date to
the statistic date. When finish statistic, change the date to the current date.
Explain 2: While execute truck number or goods number statistic, first set up
truck number or goods number that require statistic, then proceed statistic.
6) Operation of advanced function
6-1 Print format setting
In normal weighing state, press "password" key, display "PS 0", press
"print" key, display "Prt0". The last digit 0: Means record printing format.
1: Means two binding-bill printing format.
2: Means four binding-bill printing format.
3: Means six binding-bill printing format.
4: Means eight binding-bill printing format.
According to actual requirement, input corresponding number, then press
"input" key, return to weighing state.
6-2 auto accumulation mode setting
In normal weighing state, press "password" key, display "PS 0", press
"auto/manual" key, display "AUt0".
The last digit
0: Means manual accumulation, no auto accumulation
function.
1: Means if load (>20d) and is stable, It will automatically
accumulate and print.
2: Means if load (>20d) and is stable, it will save the stable value.
While unloading (<20d), it will accumulate and print using the
last saved stable value.
3: Same as mode 1, but when accumulate and print, it will beep
once to hint the operator.
4: same as mode 2, but when weighing (>20d) changes from
unstable to stable, it will beep once to hint the operator.
Press any key among "0"~"4", then press "input" key, return to weighing
state.
Note: In mode 1 and mode 3, every time after auto accumulation, there
must be an unloading process in which displaying value < 20d, then allow
next auto accumulation.
6-3 Parameter modification
In normal weighing state, press "password" key, display "PS 0", input
password "25.87", then press "input" key, display "167722". This value is
calibration base. Don’t modify this value under common situation. Press
"input" key, display "Pont 0", means unit price multiple rate. It is 0 in normal
situation, but when the weight unit is kg of a truck weighing indicator, if unit
price using kg as unit, it will be 0.2685/kg. Since decimal point is fixed to 2
digits, we can use t as unit and unit price is 268.50/t. In this situation, [Pont]
is set to 3 to adjust the calculating result.
The relation of multiple rate and amount of money is:
Amount of money = weight × unit price / 10
pont
Press "input" key to return to normal weighing state.
Explain: The relation of calibration base and the weighing value is:
Displaying value = calibration base × A/D value / constant
So by modify the calibration base we can change the displaying value of
weight.
When finish calibration, it is a good idea to record this calibration base for
later maintenance.
6-4 sensor output parameters revise
If four-corner error is caused by fitting in spot, we can modify each sensor
output parameter to revise. The modify method is: (Enter setting permit state,
hold "password" key when turn on this instrument. Only in setting permit
state, the following operation is available.)
In normal weighing state, press "password" key, display "PS 0", input
password "96", then press "input" key, displaying "1 1.0000" means the
number 1 sensor parameter is 1.0000. According to measurement result,
modify this parameter. Then press "input" key, displaying "2 1.0000" means
the number 2 sensor parameter is 1.0000. According to measurement result,
modify this parameter. Then press "input" key. Then use the same procedure
to modify all the sensors parameter.
Note: Each sensor parameter is set to 1.0000 when leaving factory.
7) Order guide
7-1 this meter is equipped with standard RS-232 output interface, it
can communicate with computer or connect to large screen display. Our
company has 5 inches character size large screen display (model QLD-5). The
format of serial output is: 1 start bit, 8 data bits, 1 stop bit, no parity bit,
baud rate is among 1200、2400、4800 and 9600.
Data adopt ASCII character, transmission is continuous and single direction.
Format is: = X1,X2,X3,X4,X5,X6,X7,SA,CR
X1 is low digit of data, X2 is high digit of data. Decimal point and sign are
included in X1 ~ X7
SA is status byte:
D7
D0
print 1
0 0 overflow
net weight stable zero point
7-2 large screen display
Can choose our company product QLD-5 (5 digits, character high 130mm)
large screen display.
7-3 Printer:
Can choose printer LQ-300K which include Chinese character library, or other
Chinese printers.
8) Maintenance and announcement
1. To assure display clearly, this instrument is not suitable to work under
direct sunshine.
2. Keep away from water in order to avoid electronic component damage
or electricity leakage.
3. Strictly forbid the strong solvents, such as: (benzene, nitro-type oil etc.)
to clean the outside of this instrument.
4. This instrument must have proper connection with the ground. In order
to avoid damage of amplifier, it is not allowed to turn on this instrument
without connection to load cell. When this instrument is power on, it is
not allowed to plug in or plug out sensor load cell.
5. When displaying "AdEr-2", it means that the number 2 A/D is failure.
Please check A/D board connections are correct and proper. If there is
no problem in connection, it means the sensor has problem. Ask for
help from manufacturer or supplier.
6. One year since the day of the purchase, under proper using condition,
failures beyond human control belong to warranty range.
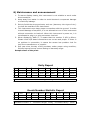
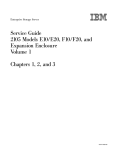
Sample sheet of the print:
Daily Report
No.
1
2
3
Date
99-10-15
99-10-15
99-10-15
Time Truck No. Goods No. Gross Tare
14:53 12345
10-25 4180 1000
14:54 123456 20-30 4180 2000
14:59 12345
10-25 4180 1000
Accumulative Number:3
Net
3180
2180
3180
Unit Price
150.00
150.00
150.00
Money
477.00
327.00
477.00
Accumulative Weight:8540kg Accumulative Money:1281.00
Goods Number Statistic Report
No.
1
2
Date
99-10-15
99-10-15
Time Truck No. Goods No. Gross Tare
14:53 12345
10-25 4180 1000
14:59 12345
20-30 4180 2000
Accumulative Number:2
Net
3180
3180
Unit Price Money
150.00 477.00
150.00 477.00
Accumulative Weight:6360kg Accumulative Money:954.00
Weighing Detail Report
Company Name
No.
5
Truck No. 12345
Date 99-10-15 Goods No. 10-25
Time 14:59
# No.
Shift No.
Unit Price 150.00
Note :
Weight Unit:kg
Gross
Tare
Net
Money
4180
1000
3180
477.00
Operator:
If you have technology question, please contact us.
SENTRONIK
6909 NW 77th Avenue Miami, FL 33166 U.S.A.
Phone: 1(305)600-4300:
:
:
:http://www.lasbasculas.com