1
FeneTech, Inc.
FeneVision® Web Center
User Manual
FeneVision® Web Center
User Manual
February 2010
FeneVision® is a registered trademark of FeneTech, Inc.
FeneTech, Inc.
1455 Danner Drive
Aurora, Ohio 44202
Phone 330-995-2830 • Fax 330-562-8688
www.fenetech.com
FeneTech, Inc.
Copyright(c) 2000 - 2010 FeneTech, Inc.
Page 1 of 51
Table of Contents
OVERVIEW ................................................................................................................................................................................... 3
SYSTEM REQUIREMENTS ............................................................................................................................................................... 3
SETUP............................................................................................................................................................................................. 4
CUSTOMER .................................................................................................................................................................................... 5
TERMS & SHIP VIA ...................................................................................................................................................................... 12
PRICING ....................................................................................................................................................................................... 13
Discount, Markup, and Margin Tables .................................................................................................................................... 14
COMPANY .................................................................................................................................................................................... 16
Information .............................................................................................................................................................................. 16
Users ........................................................................................................................................................................................ 18
MY LOGIN................................................................................................................................................................................... 19
USING WEB CENTER ............................................................................................................................................................... 20
STARTING .................................................................................................................................................................................... 20
DASHBOARD ................................................................................................................................................................................ 21
SEARCHING.................................................................................................................................................................................. 24
QUOTES ....................................................................................................................................................................................... 26
Quote Entry.............................................................................................................................................................................. 26
Alternate Wizard ...................................................................................................................................................................... 37
Quote Maintenance.................................................................................................................................................................. 38
ORDERS ....................................................................................................................................................................................... 40
Order History .......................................................................................................................................................................... 40
Production Status .................................................................................................................................................................... 43
Purchase History ..................................................................................................................................................................... 45
Support Files............................................................................................................................................................................ 50
EXITING ....................................................................................................................................................................................... 50
FeneTech, Inc.
Copyright(c) 2000 - 2010 FeneTech, Inc.
Page 2 of 51
Overview
The FeneVision® Web Center application is a member of the FeneVision® family of software products that are
pioneering the path of visual manufacturing within the fenestration industry. The FeneVision® products are
designed with an open architecture and can easily interface to the user’s existing business systems.
System Requirements
The FeneVision® Web Center application has specific hardware and software requirements, please reference the
FeneVision® Hardware & Software Requirements document.
FeneTech, Inc.
Copyright(c) 2000 - 2010 FeneTech, Inc.
Page 3 of 51
Setup
There are several required and optional features to be setup before using Web Center.
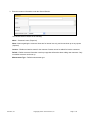
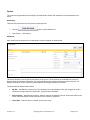
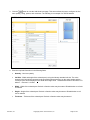
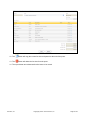
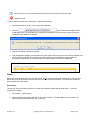
The top portion of the Dashboard contains navigation menus and links described below:
The above navigation menu includes the following items:
Dashboard – Landing page for Web Center.
Search – Displays the Search Screen.
Quotes – Directs the user to a menu of links: Quote Entry and Quote Maintenance.
Orders – Directs the user to a menu of links: Order History and Purchase History.
Support – Display a menu containing a link to Files. (Set-up required)
Setup – Directs the user to a menu of links to setup the application.
My Login – The user can enter their name and change their password.
The setup menu contains links to setup a customer base, payment terms, shipping methods, pricing table and
company information. This section will explain the setup menu options.
FeneTech, Inc.
Copyright(c) 2000 - 2010 FeneTech, Inc.
Page 4 of 51
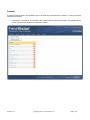
Customer
A customer must be setup in the application prior to an order being entered for the customer. To setup an account
complete the following:
1. Click Setup → Customers. The left side of the screen is where customers are added. The right side of the
screen lists customer details for the selected customer.
FeneTech, Inc.
Copyright(c) 2000 - 2010 FeneTech, Inc.
Page 5 of 51
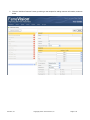
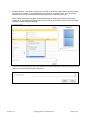
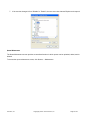
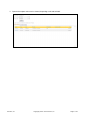
2. Click the “Add New Customer” button, producing a new template for adding customer information, as shown
below.
FeneTech, Inc.
Copyright(c) 2000 - 2010 FeneTech, Inc.
Page 6 of 51
3. Enter the customer information under the General Section.
The General Section consists of the following:
Name – Customer’s name (Required)
Notes –Notes regarding the customer. Notes are for internal use only, and do not show up on any reports.
(Optional)
Inactive – Enables an inactive status for the customer. Quotes can not be added for inactive customers.
Default – Default customer information used to pre-populate information when adding new customers. Only
one default customer can be set up.
Measurement Type – Default measurement type.
FeneTech, Inc.
Copyright(c) 2000 - 2010 FeneTech, Inc.
Page 7 of 51
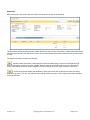
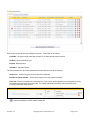
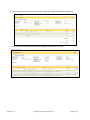
4. Enter information into the Financial Section.
The user can enter information into the following fields:
Categories - Pre-assigned by the manufacturer. Categories contain their own orderable parts and discount
tables. (Optional)
Markup / Margin / Discount - Each product category can have a markup (percent or multiplier based upon
manufacturer settings), margin or discount (percent or multiplier based upon manufacturer settings),
depending on the pricing method specified for the customer. The price to the end customer will apply the
specified value to the part and each option if a table isn’t defined. If a table is defined, this value will be
used for the part given no value is defined in the table for the part, and the value will be used for all options
that have no value defined in the table.
Table – Each product category can have a Markup / Margin / Discount table, depending on the Pricing
Method specified for the customer. (Optional)
Pricing Method - Customer pricing calculation method. The user must select one of these three options
from the dropdown list: (Required)
•
•
•
Markup from Cost
Discount from List
Gross Margin
Terms – Default payment terms selected via the Terms dropdown list. (Optional)
FeneTech, Inc.
Copyright(c) 2000 - 2010 FeneTech, Inc.
Page 8 of 51
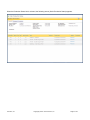
Salesperson – Identifies the default salesperson for the customer through the dropdown list. (Optional)
Tax Percent – Customer tax rates. (Optional)
Tax Title – The title for each tax rate. (Optional)
5. Enter address information into the Billing Address and Shipping Address Sections.
In the billing address section, the user can enter the billing information for the new customer. If the shipping
address is the same as the billing, click the “Same as billing address” checkbox which will become readonly.
6. Whether the “Same as billing address” checkbox is selected or not, the Ship Via will not be read-only. Click
on the apppropriate method using the Ship Via dropdown list.
7. Click the “Add” button. The customer will be added to the list on the left side of the Customer Setup Screen.
If the user does not want to add the customer, click the “Cancel” button. The customer will not be added to
the customer list.
FeneTech, Inc.
Copyright(c) 2000 - 2010 FeneTech, Inc.
Page 9 of 51
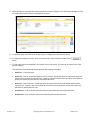
To delete a customer from the existing customer list, complete the following:
1. Find the customer to be deleted in the list on the left side of the customer setup screen.
2. Click the
FeneTech, Inc.
button next to the customer.
Copyright(c) 2000 - 2010 FeneTech, Inc.
Page 10 of 51
To edit a customer, complete the following:
1. Click on the customer in the customer list on the left side of the screen and the following screen will display
on the right.
2. Click the “Edit” button.
3. Make all necessary changes.
4. Click the “Apply” button to save the changes or the “Cancel” button to cancel the changes.
FeneTech, Inc.
Copyright(c) 2000 - 2010 FeneTech, Inc.
Page 11 of 51
Terms & Ship Via
To add payment terms and shipping methods, complete the following:
1. Click on Setup → Terms & Ship Via. On the left side, the user can add, edit, or delete terms. On the right
side, the user can add, edit, or delete the ship via records.
2. In the field under the Terms section, enter the name.
3. Click the “Add” button. These can now be used in order entry or customer setup.
4. Click on the “Edit” button next to the appropriate Term or Shipping Method to edit them.
5. Rename the value.
6. Click on the “Update” button to save or the “Cancel” button to cancel changes.
FeneTech, Inc.
Copyright(c) 2000 - 2010 FeneTech, Inc.
Page 12 of 51
7. Click the
button next to the appropriate value to delete a Term or Shipping Method. The user will be
prompted to validate the deletion.
Pricing
Below are the three types of pricing methods a price table can be setup with:
•
Discount from List - Reduction from manufacturer’s list price. For example, if the manufacturer list price
for a window is $50.00 and the discount is 10%, the price to the end customer will be $45.00.
•
Markup from Cost - Increase from cost (manufacturer’s price to the Web Center user). For example, if the
manufacturer’s price to the Web Center user is $50.00 and the markup is 10%, the price to the end
customer will be $55.00.
•
Gross Margin - Difference between cost and selling price. For example, if the manufacturer’s price to the
Web Center user is $100.00 and the margin is 20%, the price the end customer will be $125.00
FeneTech, Inc.
Copyright(c) 2000 - 2010 FeneTech, Inc.
Page 13 of 51
Discount, Markup, and Margin Tables
To set up pricing tables, complete the following:
1. Click Setup → Pricing → {Discounts / Markups / Margins}.
2. In the example below, category discounts is used as the pricing method. (Follow the same procedure to set
up markup and margin tables.)
3. To add a new discount table, click the
button.
4. Enter the name of the new discount table and choose the product category.
5. Click the “OK” button to add the new table or the “Cancel” button to cancel the changes.
6. When “OK” is selected, the screen will display the parts for the category. The user can fill in the table with
the discount(s), per global option and per part-specific option. Now, the table is available to be assigned to
customers in Customer Setup.
FeneTech, Inc.
Copyright(c) 2000 - 2010 FeneTech, Inc.
Page 14 of 51
7. To edit the name of a discount table, select the
icon. The user will be prompted with the following box:
8. Enter the new name.
9. Click the “OK” button to save or “Cancel” button to delete changes.
10. To delete a table, click the
icon. This will permanently delete the selected table.
11. In the Parts tab, if the option checkbox is checked off for a part then the value entered for the part will be
used for the part’s options unless an overriding value for the option has been entered.
12. Click the Options tab to add pricing to options. For example, if the user wanted to give away Low-E in a
special promotion, the following steps would be completed:
a. Click the Options tab, find the Low-E option and enter 100%. This will give free Low-E to any customer
assigned to the Free Low-E table.
FeneTech, Inc.
Copyright(c) 2000 - 2010 FeneTech, Inc.
Page 15 of 51
b. The green down arrow allows the specified value to be filled down to all parts below the row (if in the
parts tab) or all options below the row (if in the options tab).
Company
This section will show how to enter company information and create users.
Information
To enter information about a company, complete the following:
1. Click Setup → Company → Information.
2. Click the name of the Web Center user’s site in the list on the left side of the screen.
3. Click the “Edit” button on the right side of the page to add information.
FeneTech, Inc.
Copyright(c) 2000 - 2010 FeneTech, Inc.
Page 16 of 51
4. Edit the Company and address information in the provided fields, as needed. Note: this information will be
displayed on the quote report given to the end user.
5. The Default Mfg PO Number and Default Mfg Customer Ref settings are used when the quote is uploaded
to the manufacturer. The PO Number and Customer Ref between the Web Center user and the end
customer are not necessarily the same PO number and Customer Ref between the manufacturer and the
Web Center user.
6. To add a logo, click the “BrowseM” button. Select the logo to be added.
7. Press ‘Upload Logo’ to upload the logo to Web Center. Press ‘Clear Logo’ to remove the logo from Web
Center. The logo will be displayed on reports given to the end customer.
8. Click the “Apply” button to save or the “Cancel” button to delete the changes.
FeneTech, Inc.
Copyright(c) 2000 - 2010 FeneTech, Inc.
Page 17 of 51
Users
To add additional users or change the permissions of a user, complete the following:
1. Click on Setup → Company → Users.
2. Click the “Add New User” button, and then complete the information on the right side of the screen. (User
name, password and permissions are required.)Note: If the Inactive box is checked, the user will not be able
to log into Web Center.
3. The default permission is set to Administrator, equivalent to a standard user with all boxes checked. If a
Standard User is selected, permissions can also be selected. Permissions that can be selected are as
follows:
•
•
•
•
•
•
•
•
FeneTech, Inc.
Create/Modify Customers & Pricing
Create/Modify Quotes
Delete Quotes
Modify Quote Pricing
Upload Quotes
Upload Quotes with Exceptions
View Cost
View Pricing
Copyright(c) 2000 - 2010 FeneTech, Inc.
Page 18 of 51
•
View Quotes of All Users
4. Click the “Add” button.
Note: Users can be edited and deleted. Some users don’t have a delete icon next to them – these users were
created by the manufacturer and therefore cannot be deleted.
My Login
The ‘My Login’ screen allows the currently logged-in user to change their First Name, Last Name, E-Mail Address
and Password.
FeneTech, Inc.
Copyright(c) 2000 - 2010 FeneTech, Inc.
Page 19 of 51
Using Web Center
Once users have been created, the users will be able to enter quotes, upload quotes to the manufacturer, track the
status of open orders, and view their own order and purchase history. This section will explain the steps to complete
these functions.
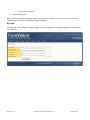
Starting
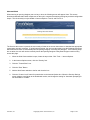
1. Enter the Web Center URL into the address toolbar of a browser window. A login screen, similar to the
one below, will be displayed.
2. Enter the assigned user name and password. The user may also check ‘Remember Me’. This will place
a cookie on the user’s machine that remembers their login information, so they won’t be forced to log
into Web Center again.
3. Click the “Sign In” button.
Note: There are security ramifications of clicking ‘Remember Me’. On a public computer or a computer used by
more than one user, all subsequent users will be able to access Web Center using the original user’s login
information. The manufacturer can hide this checkbox through the Web Center Administrator site.
FeneTech, Inc.
Copyright(c) 2000 - 2010 FeneTech, Inc.
Page 20 of 51
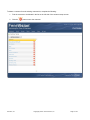
Dashboard
The dashboard screen is the landing page for FeneVision® Web Center. This page provides a quick snapshot to
open orders uploaded to the manufacturer, and non-expired quotes that have not been uploaded.
The top portion of the Dashboard contains navigation menus and links:
In the upper right corner, the login name appears. The “Home” link is used to access the manufacturer’s website. By
clicking the “Sign out” link, the user will log out of Web Center.
The navigation menu includes the following items:
Dashboard – Landing page for Web Center.
Search – Displays the Search Screen.
Quotes – Directs the user to a menu of links: Quote Entry and Quote Maintenance.
Orders – Directs the user to a menu of links: Order History and Purchase History.
Support – Display a menu containing a link to Files. (Set-up required)
Setup – Directs the user to a menu of links to setup the application.
My Login – The user can enter their name and change their password.
FeneTech, Inc.
Copyright(c) 2000 - 2010 FeneTech, Inc.
Page 21 of 51
The Open Orders section of the Dashboard shows all orders pending at the manufacturer:
The Open Orders section displays open orders in FeneVision® CORE. The orders displayed have been uploaded
from Web Center, Remote Order Entry, or originated in FeneVision® CORE.
•
Order – Order number assigned in FeneVision® CORE. Clicking on the order number (blue) link will display
the Order Status page for the order.
•
Date – Date the order was received by the manufacturer.
•
PO Number – Purchase Order number for the order.
•
Customer Ref. – Customer Reference for the order.
•
Total – Total currency amount for the order.
•
My Site – Web Center’s customer’s site. The manufacturer can create customer-level logins for Web
Center. These logins may have more than one site. When a quote is created, the site must be selected if
more than one exists (consider a login for a company that has branches in many cities – they might have
three sites – Columbus, Cincinnati and Cleveland).
•
Received – A checkmark in this column indicates the order was received by the manufacturer.
•
In Process – A checkmark in this column indicates the order was acknowledged by the manufacturer.
•
Shipped - A green checkmark in this column indicates the order was fully shipped. A red checkmark in this
column indicates the order was partially shipped.
FeneTech, Inc.
Copyright(c) 2000 - 2010 FeneTech, Inc.
Page 22 of 51
All columns except “Received” can be sorted by clicking on the column header.
The Quotes section lists all non-expired quotes currently pending in FeneVision® Web Center. These quotes have
not been uploaded to the manufacturer.
The Quotes List displays the following information for a pending Quote:
•
Quote – Quote number. Clicking on the quote number (blue) link will display the Quote Entry page for the
quote.
•
Date - Date the quote was entered.
•
Customer - End customer for the quote.
•
PO Number – Purchase Order number for the quote.
•
Customer Ref – Customer Reference for the quote.
•
My Site – Web Center’s customer’s site.
•
Total - Total currency amount for the quote.
•
Expires – Date the quote must turn into an order to preserve the pricing given at the time the quote was
entered. The manufacturer controls the number of days quotes can exist before they expire through a
setting in the Web Center Administration site.
All columns can be sorted by clicking on the column header.
FeneTech, Inc.
Copyright(c) 2000 - 2010 FeneTech, Inc.
Page 23 of 51
Searching
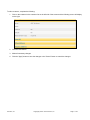
To search for orders or quotes, complete the following:
1. Click the Search menu item.
The default search screen is to search for a quote; however the user may search for an order as well. The
quote search fields include the following:
o
Quote Number – Quote number assigned to the quote.
o
PO Number – Purchase order number on the quote.
o
Customer Ref – Customer reference information on the quote.
o
Address – Any portion of the street of the quote’s shipping address.
o
Phone Number - Any portion of the phone number from the quote’s shipping address.
2. The user may enter information into multiple search fields; however only click one search field to perform the
search.
FeneTech, Inc.
Copyright(c) 2000 - 2010 FeneTech, Inc.
Page 24 of 51
3. Click the “Search” button when ready to find a quote in the system. The following is an example of user
looking for an address containing the number 13.
4. All columns can be sorted by the column header.
Choose between the following search options:
•
If a quote link is selected, the quote entry page for the quote will be displayed.
•
If the “Automatically open Quote Entry if match is found” checkbox is selected, instead of displaying
search results, the quote entry screen will appear when only one match is found.
•
Searching for an order is very similar to searching for a quote. The only exception is that the user can
search on an order number instead of quote number, and it will display the order status page instead of
the quote entry page.
FeneTech, Inc.
Copyright(c) 2000 - 2010 FeneTech, Inc.
Page 25 of 51
Quotes
The customer can generate quotes through FeneVision® Web Center and upload them to the manufacturer as
orders.
Quote Entry
There are two ways that a user can get to the quoting screen:
•
Click the
•
Click Quotes → Quote Entry.
button on the Dashboard, or
Add Quote
Upon entering the quoting screen, the Add Quote screen will appear as shown below.
This screen allows the user to specify information for the quote. The two sections of the Add Quote screen are
Quote Number and Address Information. The Quote Number section provides information about the quote. The
Address Information screen includes the Billing Address and Shipping Address information.
The Quote Number Section fields include:
•
My Site – Identifies the customer site. This dropdown list is only displayed if the user is logged in using a
customer-level login that has multiple sites. (Required when available)
•
End Customer – Identifies end customer. When a customer is selected in the list, all the other fields on the
screen populate with the default information for the customer. (Required)
•
Quote Date – Date the quote is created. (Locked from user)
FeneTech, Inc.
Copyright(c) 2000 - 2010 FeneTech, Inc.
Page 26 of 51
•
Estimated Ship Date – Estimated date the order will ship after it has been uploaded. (Locked from user)
•
Expiration Date – Date the quote will expire. (Locked from user)
•
Measurement Type – Measurement for the quote and will impact the line item dimensions. The two choices
are imperial and metric.
•
Status – Status of the quote. The two status values to choose from are Available and On Hold. Note: On
Hold quotes cannot be uploaded to the manufacturer.
•
Terms – Payment terms.
•
PO Number – Purchase order number for the quote from the end customer. Must be unique.
•
Customer Reference – Text that uniquely identifies the particular quote.
•
Salesperson - Salesperson name. This would be the salesperson assigned to the quote.
•
Quote Contact – Contact name for the Quote.(Required)
•
Margin, Discount, or Markup - Discount, markup or margin for the quote. If specified, it overrides any
values specified for the customer in the Customer Setup webpage.
•
Quote Comment - General comments about the quote Comments will remain on the quote when it is
uploaded to the manufacturer, and also print on reports. (Optional)
•
Quote Notes - Notes regarding the quote. Notes do not remain on the quote when it is uploaded to the
manufacturer. They are for internal use only and do not print on reports. (Optional)
The Address Information section fields include:
•
Billing Address - Automatically filled in when the customer is selected and is configured in the Customer
Setup screen. (Read-Only)
•
Shipping Address - Automatically filled in when the customer is selected, with the address configured in
the Customer Setup screen. Clicking on a field and typing the desired information will override the default
address.
•
Ship Via - Ship Via method for the quote.
•
Shipping Comment - Shipping comments for the quote which will remain on the quote when it is uploaded to the
manufacturer.
When all information is entered, click the “Add” button to save or the “cancel” button to cancel changes.
FeneTech, Inc.
Copyright(c) 2000 - 2010 FeneTech, Inc.
Page 27 of 51
Quote Entry
After selecting the “Add” button, the Quote Entry screen (shown below) will be displayed.
The Quote Entry screen has two sections: Header Information and Line Item Information. Header Information shows
the information entered in the Add Quote screen. Line Item Information is the section where the user will select items
to quote.
The Header Information contains the following:
- Edit the header information. It will display the Edit Quote Header page, similar to the Add Quote Page.
When all information is entered, click the “Update” button to save the information and return to the Quote Entry
screen. Note that the customer can be changed on the quote header only if the quote contains no line items.
- Closes the quote and display the dashboard. Clicking this button will not prevent the quote from being
modified in the future. The user can come back and edit the quote at any time, until it expires or has been uploaded
to the manufacturer.
FeneTech, Inc.
Copyright(c) 2000 - 2010 FeneTech, Inc.
Page 28 of 51
- Display Global Options Changes screen. This allows the user to globally modify (add, edit or remove)
options for all line items and alternate wizard selections on the quote.
- Print the quote report in Adobe Acrobat format (PDF).
- Quote information will be imported into a third party application. The quote export file name will be
{quotenumber}.csv.
The file layout will be as follows:
•
The first record of the file is the header record for the quote.
•
The following records are each line item for the quote.
•
Each file in the file is wrapped in double quotes and separated by a comma.
o Example: "109829","","123 Doors & Windows","1/7/2009"
•
Any double quotes in a string field will have a double quote appended to it.
o Example: original string= 123 Doors & Windows ”Double Quoted”
• output = "123 Doors & Windows “”Double Quoted”””
•
Any line feeds will stay the same.
o Example: original string= 123 Doors & Windows
output = "123 Doors & Windows”
•
If the user or site doesn’t have necessary permissions for a field, then it will fill that field with a blank. If the
user does not have permission to view pricing, then it will fill the field with “”.
FeneTech, Inc.
Copyright(c) 2000 - 2010 FeneTech, Inc.
Page 29 of 51
•
The header record will contain the following columns:
Field
OrderNumber
PONumber
Manufacturer SiteName
OrderDate
CustomerRef
OrderContact
MeasurementType
SalespersonName
ReqDate
Discount /Markup/Margin
Value
OrderNotes
OrderComment
Shipping CompanyName
Shipping Address1
Shipping Address2
Shipping State
Shipping ZipCode
Shipping Phone
Shipping Fax
Shipping ShipVia
Drop Ship
Shipping Comments
SubTotal
TaxTotal
Misc Total
Total
FeneTech, Inc.
Permission Checked
Yes
Yes
Yes
Yes
Yes
Copyright(c) 2000 - 2010 FeneTech, Inc.
Page 30 of 51
•
The detail record will contain the following columns:
Field
LineItem
SubLineItem
Quantity
Part
CallSize
Width
Height
Thickness
Cost
UnitPrice
ExtendedUnitPrice
SqFtPrice
OptionsDescription
IsSurchargePart
Comment
Exception
Permission Checked
Yes
Yes
Yes
Yes
To enter line item information, complete the following:
1. Select a category from the left dropdown list. This will filter the part list to only the parts that exist in the
selected category.
2. Select a part from the right dropdown list.
FeneTech, Inc.
Copyright(c) 2000 - 2010 FeneTech, Inc.
Page 31 of 51
3. Click the
button to view the Add Quote Item page. This screen allows the user to configure the line
item quantity, sizing, options, and comments. The following is an example of a 700-DH window.
4. Enter the required information in the following fields:
•
Quantity - Line item quantity
•
Call Size - Width and height of the ordered part in using the industry standard call size. The value
entered in this field will be converted to the specified measurement type on the quote header and the
converted value will be displayed in the Width and Height fields. The standard format of this field is FIFI
where F = Feet and I = Inches.
•
Width – Width of the ordered part. Decimal or fraction values may be entered. Disabled when a call size
is selected.
•
Height – Height of the ordered part. Decimal or fraction values may be entered. Disabled when a call
size is selected.
•
Thickness – Thickness of the ordered part. Decimal or fraction values may be entered.
FeneTech, Inc.
Copyright(c) 2000 - 2010 FeneTech, Inc.
Page 32 of 51
5. Configure Options. If an option is required, the user will not be able to make further selections until the
required choice is made. In the example below, the screen is a required choice. Once an option is
selected, the user may proceed with further option selections or add the quote item.
NOTE: Shape and Muntin managers are available through the Web Center options wizard. When
configured, an extra button will display in the Input column which will take the user to either the Shape
Manager or Muntin Manager web page.
6. Line item comments, which are any notes needed to be made regarding the part being entered, can be
typed in the Line Item Comment field. (Optional)
FeneTech, Inc.
Copyright(c) 2000 - 2010 FeneTech, Inc.
Page 33 of 51
7. The part being entered includes a link to a larger view. Click the “View Summary” link to see the larger
image and a summary of the options selected.
FeneTech, Inc.
Copyright(c) 2000 - 2010 FeneTech, Inc.
Page 34 of 51
8. When all fields are completed and required options have been configured, the “Add” button will appear. Click
the “Add” button for the line item to be added to the quote.
9. To edit a line item, select the link in the part column, to display the edit quote item screen.
10. To change the quantity of an item, enter the new amount in the provided field and click the
button.
11. To view a line item price breakdown, click the link in the price column. The user can to edit the price of the
part and options.
The Order Item Price Breakdown screen provides the following information
•
Part Price – Price of the part.
•
Item Price – Sum of the part and option prices for the item. Will be the same as overall price when the
ordered part does not have sub line items. However, when the ordered item has sub line items (that are
priced), the overall price will obviously exceed the item price.
•
Item Cost – Cost for the item. Will be the same as overall cost when the ordered part does not have
sub line items. However, when the ordered item has sub line items (that have a cost), the overall cost
will obviously exceed the item cost.
•
Overall Price – Sum of all part and option prices on the ordered item and all sub line items.
•
Overall Cost – Sum of all item costs on the ordered item and all sub line items.
FeneTech, Inc.
Copyright(c) 2000 - 2010 FeneTech, Inc.
Page 35 of 51
12. The
button will copy the current line item and paste it at the end of the quote.
13. The
button will delete the line item from the quote.
14. The up and down arrow buttons allow line items to be moved.
FeneTech, Inc.
Copyright(c) 2000 - 2010 FeneTech, Inc.
Page 36 of 51
Alternate Wizard
When entering an opening designer part or a bay or bow, the following screen will appear. Note: This screen
launches downloads that installs components on the user’s computer that makes opening bay and bow configuration
simple. This functionality is only available on Internet Explorer 7 and 8, and FireFox 3.
The first time this screen is opened, the user needs to follow the on-screen instructions to download the appropriate
components onto their computer. If using Internet Explorer, the user may also wish to use the following instructions
which allow the browser to automatically launch Opening Designer or the Bay Bow Designer. If the following steps
are not taken, the user will need to manually launch the Opening Designer or Bay Bow Designer each time they
access this page.
1. When the Web Center website is open, locate the top tool bar. Click Tools → Internet Options.
2. In the Internet Options screen, click the “Security” tab.
3. Click the “Trusted Sites” icon.
4. Click the “Sites” Button.
5. Add the Web Center website to the list and close the box.
6. Click the “Custom Level” button for trusted sites on the Internet Options box. When the Security Settings
screen displays, scroll down to the Downloads section, and change the setting for ‘Automatic prompting for
file downloads’ to “Enable”.
FeneTech, Inc.
Copyright(c) 2000 - 2010 FeneTech, Inc.
Page 37 of 51
7. If the user has changed it from “Disable” to “Enable”, the user must close Internet Explorer and reopen it.
Quote Maintenance
The Quote Maintenance screen provides a centralized location in which quotes can be uploaded, edited, and/or
deleted.
To access the quote maintenance screen, click Quotes → Maintenance.
FeneTech, Inc.
Copyright(c) 2000 - 2010 FeneTech, Inc.
Page 38 of 51
Several tabs are provided to help manage the quotes. These tabs are as follows:
Available - All quotes except those with a status of ‘On Hold’ that have been entered.
On Hold - Quotes placed on hold.
Expired- Expired quotes.
Uploaded – Uploaded quotes.
The links and buttons in the Order Maintenance Screen allow the user to do following:
Quote Link – Quote entry page for the quote will be displayed.
Red Box on Quote Number – Quote has at least one line item with an exception.
Edit Link – Enter a PO Number and Customer Ref. These values will be uploaded to the manufacturer as the
PO Number and Customer Ref on the order. The default radio button selections can be specified in the
Company Information setup screen.
- Print the quote/order to a PDF (Adobe Acrobat) file.
FeneTech, Inc.
Copyright(c) 2000 - 2010 FeneTech, Inc.
Page 39 of 51
– Copy the quote to a new quote and automatically open up Quote Entry for the new quote.
– Delete the quote.
To upload selected quotes to a manufacturer, complete the following:
1. Click the checkbox to the left of each quote to be uploaded.
button located in the Available Tab of
2. Click the
Quote Maintenance. The manufacture can configure the message the customer will see at this point. See the
screenshot shown below for an example.
3. Click the “OK” button to upload the quote(s).
4. Once the upload is complete, a confirmation screen will appear that lists all quotes successfully uploaded, and
those that failed to upload. The number on the left of the screen is the manufacturer’s order number All
successfully uploaded orders will now display in the ‘Open Orders’ section of the Dashboard.
Orders
Orders are either uploaded quotes by the Web Center user or entered directly by the manufacturer. The customer
will be able to view both types of orders as they are processed by the manufacturer. This section will explain the
tools available to monitor orders.
Order History
The user can view order history, whether or not the order has been placed through Web Center. To do this,
complete the following:
1. Click Orders → Order History.
2. Enter the desired date range, and click on the “Submit” button. This will display a list of all orders and
quotes placed by the Web Center user’s company.
FeneTech, Inc.
Copyright(c) 2000 - 2010 FeneTech, Inc.
Page 40 of 51
3. Open and complete orders can be viewed, depending on the tab selected.
FeneTech, Inc.
Copyright(c) 2000 - 2010 FeneTech, Inc.
Page 41 of 51
4. Click on the order number on the left to view the order status page, shown below. (Read-only)
5. Click on the link next to the ship date to view shipping information for the order.
FeneTech, Inc.
Copyright(c) 2000 - 2010 FeneTech, Inc.
Page 42 of 51
Below is a sample of shipping information:
Production Status
The manufacturer may elect to allow the Web Center users to see Production Status for orders. If this is the case, a
link to Production Status will be displayed between the order header and the line items on the order.
FeneTech, Inc.
Copyright(c) 2000 - 2010 FeneTech, Inc.
Page 43 of 51
When the Production Status link is selected, the following screen (Order Production Status) appears.
FeneTech, Inc.
Copyright(c) 2000 - 2010 FeneTech, Inc.
Page 44 of 51
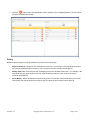
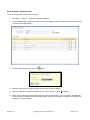
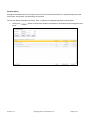
Purchase History
Clicking the Purchase History menu brings up a screen for the total invoiced sales for a specified time period, total
overall sales, item quantity, and percentage of item sales.
The user can display information by Orders, Parts, or Options for designated starting and ending dates.
1. Clicking the
frame.
FeneTech, Inc.
button will summarize customer information for all orders during the designated time
Copyright(c) 2000 - 2010 FeneTech, Inc.
Page 45 of 51
a. Clicking the “P” from the customer column will display ordered part sales screen detailing the part sales
for the selected customer.
b. Clicking the “O” from the customer column will display ordered option sales screen detailing the option
sales for the selected customer.
FeneTech, Inc.
Copyright(c) 2000 - 2010 FeneTech, Inc.
Page 46 of 51
c.
Clicking the “OR” from the customer column will display the orders for the selected customer.
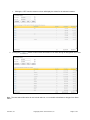
2. Clicking the
button will show sales information for all orders during the designated time frame.
Note: The total sales dollar values do not include sales tax, or non-taxable miscellaneous charges from Order
Status.
FeneTech, Inc.
Copyright(c) 2000 - 2010 FeneTech, Inc.
Page 47 of 51
3. Clicking the
button will display all parts purchased for the chosen dates. This screen displays
the total sales for the given time period and also the percentage of total sales for each part.
a. Clicking a part from the Part column will display ordered option sales screen detailing the options sales
for the selected part.
FeneTech, Inc.
Copyright(c) 2000 - 2010 FeneTech, Inc.
Page 48 of 51
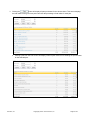
b. Clicking the P will display a screen detailing part sales for the chosen dates for the selected option.
4. Clicking the
button will display a screen detailing option sales for the chosen dates. The screen
displays the total option sales for the given time period and percentage of total sales for each option.
FeneTech, Inc.
Copyright(c) 2000 - 2010 FeneTech, Inc.
Page 49 of 51
a. Clicking the P will display a screen detailing part sales for the chosen dates for the selected option.
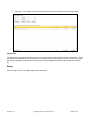
Support Files
The Support Files page allows the Web Center user to download documents and files from the manufacturer. These
files may be downloadable by all Web Center users (perhaps a generic sales brochure), by the customer associated
with the login (perhaps a price book for the customer), or by site (perhaps tax tables for the city the site is located
in).
Exiting
Click the “Sign out” link in the upper right corner of the screen.
FeneTech, Inc.
Copyright(c) 2000 - 2010 FeneTech, Inc.
Page 50 of 51