1
ProStart
Converts OCL to CL
&
RPG II to RPG/400
User’s Guide and Reference Manual
Information in this document is subject to change without notice. Names and data used in examples
are fictitious unless otherwise noted.
No component of ProStart, including the software and the documentation may be reproduced,
disassembled, transmitted, transcribed, stored in a retrieval system, or translated into any language
in any form without the written permission of ASNA (Amalgamated Software of North America).
Revised September, 1998.
If you should find an error in the ProStart software or manual, please notify ASNA.
Amalgamated Software of North America, Inc.
UNITED STATES
14855 Blanco Road Suite 300
San Antonio, TX 78216
(210) 408-0212
(210) 408-0211 Fax
www.asna.com
UNITED KINGDOM
31 Frederick Sanger Road
Surrey Research Park
Guildford
Surrey
GU2 5YD
United Kingdom
Tel: (01483) 570666
International: +44 1483 570666
i
Contents
Chapter 1 - Product Overview ........................................................................................... 1
ProStart Facilitates Faster Conversion ............................................................................ 1
OCL to CL ............................................................................................................... 1
Database................................................................................................................... 2
RPG ......................................................................................................................... 2
ProStart Main Menu ....................................................................................................... 3
Reports Menu ........................................................................................................... 4
Disk File to Program Cross Reference ................................................................ 4
Disk File to Field Cross Reference ..................................................................... 4
Program File to Field Cross Reference ............................................................... 5
Field to Disk File Cross Reference ..................................................................... 5
Disk File "Where Created" Report ...................................................................... 5
Search Menu............................................................................................................. 6
Search for File Reference ................................................................................... 6
Search for Program/Procedure References .......................................................... 7
Conversion Menu ..................................................................................................... 8
1. Generate CL Program Source ........................................................................ 9
2. Convert a System/36 Menu to Native ............................................................ 9
3. Copy ProStart Commands to User Library ..................................................... 9
4. Generate File Definition Source Members ................................................... 10
5. Generate Field Reference File DDS Source ................................................. 10
6. Generate Physical File DDS Source............................................................. 10
7. Generate File Conversion Programs............................................................. 10
8. Generate Display File DDS Source .............................................................. 10
9. Generate RPG/400 Source ........................................................................... 10
Interactive OCL to CL Converter Menu.................................................................. 11
Chapter 2 - Before You Begin .......................................................................................... 13
Application Development Tools ................................................................................... 13
Programming .................................................................................................... 13
Control Language Reference ............................................................................ 13
Languages: ....................................................................................................... 14
ii
Chapter 3 - Installation .................................................................................................... 15
Removing ProStart ....................................................................................................... 16
Chapter 4 - ProStart Trial: A Step-by-Step Review ....................................................... 17
Chapter 5 - Approach to Conversion: Moving from the System/36 Environment......... 19
Phase I: Planning/Scheduling ....................................................................................... 20
Externally Described Files................................................................................ 21
Program Described Files................................................................................... 21
Object Naming Conventions ............................................................................. 23
Phase II: Setting up the Development Library .............................................................. 24
Phase III: Field Reference File and Physical Files ........................................................ 24
Phase IV: Logical Files ................................................................................................ 28
Phase V: Menus............................................................................................................ 28
Phase VI: Display Files ................................................................................................ 28
Phase VII: Control Language Programs (CL Programs) ............................................... 29
Phase VIII: RPG Programs ........................................................................................... 29
Phase IX: Testing ......................................................................................................... 30
Chapter 6 - Generating Reports....................................................................................... 31
Reports Menu ............................................................................................................... 32
File/Field/Program Cross Reference Reports .......................................................... 32
Disk File "Where Created" Report .......................................................................... 33
Chapter 7 - Search Menu ................................................................................................. 35
Search Menu................................................................................................................. 35
1. Analyze Library for Searches ............................................................................ 35
2. Search Libraries................................................................................................. 36
Search for File References ................................................................................ 37
Search for Calls from Procs & Menus............................................................... 41
3. Delete Search Data ............................................................................................ 43
Chapter 8 - Using Conversion Tools ................................................................................ 45
Conversion Menu ......................................................................................................... 45
1. Generate CL Program Source ............................................................................ 46
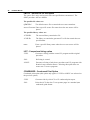
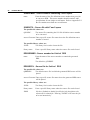
OCLMBR - OCL member(s) to convert ............................................................ 47
OCLFIL - Source file containing OCL.............................................................. 47
CLPFIL - Source file for generated CLP........................................................... 47
FMTFIL - Source file for sort specs ................................................................. 48
LIST - Comparison listing option ..................................................................... 48
CONDENSED - Condensed Print Option ......................................................... 48
JOBD - Job desc (Submits to batch) ................................................................ 49
ALCOPT - Allocate object option .................................................................... 49
iii
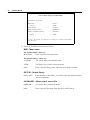
2. Convert Migrated Menus to Native .................................................................... 49
MNU - Menu name........................................................................................... 50
OUTLIB - Output library.................................................................................. 50
OUTMNUSRC - Menu output source file ......................................................... 50
JOBD - Job desc (Submit to batch) ................................................................... 51
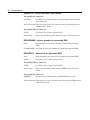
3. Copy ProStart Commands to User Library ......................................................... 51
LIB - Library name........................................................................................... 52
REPLACE - Replace existing objects ............................................................... 52
4. File Definition Source Creation ......................................................................... 52
5. Generate Field Reference File DDS Source ....................................................... 53
S36SRCMBR - Source member containing F and I specs ................................. 54
S36SRCFIL - Source file with F and I specs..................................................... 54
DDSSRCMBR - Source member for field ref DDS .......................................... 54
DDSSRCFIL - Source file for field ref. DDS................................................... 54
6. Generate Physical File DDS Source................................................................... 55
S36SRCMBR - Source members containing F and I specs ................................ 55
S36SRCFIL - Source file with F and I specs..................................................... 56
DDSSRCMBR - Source member for generated DDS ........................................ 56
DDSSRCFIL - Source file for generated DDS .................................................. 56
PRESERVE - Preserve S/36 record layout........................................................ 57
FLDREF - Name of field reference file............................................................. 57
JOBD - Job desc (Submits to batch) ................................................................. 57
7. Generate File Conversion Programs................................................................... 57
S36FIL - S/36 environment file name ............................................................... 58
S40FIL - Externally described file name........................................................... 59
FDFFIL - File definition source file ................................................................. 59
FDFMBR - Member ......................................................................................... 59
RPGMBR - Conversion program name ............................................................. 59
RPGFIL - RPG Source File .............................................................................. 60
JOBD - Job desc (Submit to batch) ................................................................... 60
8. Generate Screen Format DDS Source ................................................................ 61
DDSMDR - Screen member(s) to convert ......................................................... 61
S36FIL - Name of System/36 File .................................................................... 62
DDSFIL - Source File Name............................................................................. 62
JOBD - Job Description Name.......................................................................... 62
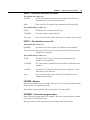
9. Generate RPG/400 Program Source ................................................................... 63
RPGMBR - RPG member(s) to convert ............................................................ 64
S36FIL - Source file containing S36 RPG ........................................................ 64
RPGFIL - Source file for converted RPG.......................................................... 64
EXTDISKF - Externally desc. disk files ........................................................... 65
EXTDSPF - Externally desc. display files ........................................................ 65
EXTPRTF - Externally described printer files .................................................. 65
FLDREF - Name of field reference file (only if EXTPRTF(*YES)).................. 65
iv
PRTFSRC - Source file for printer files (only if EXTPRTF(*YES)) ................. 65
CPYSRCF - Source file for /COPY members ................................................... 65
COMPILE - Compile generated RPG source .................................................... 66
JOBD - Job desc (Submit to batch) .................................................................. 66
Other Considerations: ................................................................................................... 66
Chapter 9 - Interactive OCL to CL Converter................................................................ 67
Using the Interactive Converter .................................................................................... 68
Appendix A - Conversion of OCL.................................................................................... 73
Procedures.................................................................................................................... 73
Operation Control Language (OCL) Commands ........................................................... 78
Procedure Control Expressions ..................................................................................... 84
Substitution Expressions............................................................................................... 84
ASNA Commands Commonly Used Within OCL (relates to RPG III and 400/RPG
products from ASNA)................................................................................................... 93
Appendix B - RPG Conversion ........................................................................................ 96
Auto-Report Option ("UT") Specifications ................................................................... 96
Header Specifications ................................................................................................... 96
File Specifications ........................................................................................................ 96
Input Specifications...................................................................................................... 98
Calculation Specifications ............................................................................................ 98
Output Specifications ................................................................................................... 98
Other Issues.................................................................................................................. 98
Appendix C - ProStart Commands ................................................................................ 100
RTVRCDCNT - Retrieve count of records ................................................................. 100
RTVWSID - Accept AS/400 Display Device ID ......................................................... 101
SORTSUBS - Performs Substitutions within Sort Specifications ................................ 104
Appendix D - Getting to the Native Environment F-A-S-T!!! ...................................... 106
Build Your Database .................................................................................................. 107
Convert OCL to CL .................................................................................................... 107
Convert Your RPG II Code......................................................................................... 108
Menus and Display Files ............................................................................................ 108
What’s Next... ............................................................................................................ 108
v
Appendix E - Internally Describing Physical Files in the AS/400 Native Environment110
Appendix F - Converting Multi-Format Record Files to the Native Environment ...... 114
Index ............................................................................................................................... 122
vi
This Page Intentionally Left Blank
1
C H A P T E R
1
Product Overview
ProStart is a conversion utility that assists programmers in moving RPG applications
from the System/36 (S/36) environment on the AS/400 into the native AS/400
environment.
ProStart Facilitates Faster Conversion
The utility is a set of routines that facilitates faster conversion in the following areas.
OCL to CL
•
Automatic conversion of OCL in S/36 procedures to CL, including:
- Most OCL and procedure commands including EVALUATE.
- Substitution expressions and conditional expressions.
- Sorts, and substitution expressions within sorts.
- CL statements embedded within procedures.
- Four ASNA commands (CRTDTARA, DLTDTARA, DSPDTARA and DSPACTJ)
used with ASNA's '400 RPG'.
- Two System/34 commands (EXTRACT and ORGANIZE).
•
Convenient report presenting the original procedure and new CL program side-byside.
•
Statistical summary report providing analysis of the converted procedures.
•
Automatic conversion of OCL in S/36 menu message members to CL.
•
Interactive converter of OCL to CL as a new training and demonstration tool.
2
ProStart Manual
Database
•
Automatic creation of S/36 file definition source members (F and I specifications)
from RPG source members.
•
Automatic creation of data description specifications for field reference files from
S/36 file definition source members.
•
Automatic creation of data description specifications for physical files from S/36 file
definition source members.
•
User option to create the physical file DDS compressing the data to typical AS/400
layouts or retaining the layout of the original S/36 file.
•
Automatic creation of an RPG program to map data being transferred from the S/36
file to the database file.
•
Automatic creation of data description specifications for display files from screen
formats (S & D specifications).
•
Numerous reports on program, file, and field usage.
•
On-line searches for program and file usage.
•
Automatic conversion of RPG II source members to RPG/400 source members with
optional compile attempts.
•
Optional conversion of display files from program described to externally described.
•
Optional conversion of disk files from program described to externally described.
•
Optional conversion of report output to externally described printer files.
•
An exception report of S/36 to AS/400 conversion problems.
RPG
As a result, ProStart eliminates much of the tedious keypunching of new code, and
reduces the manual changes required to create file and program objects. ProStart
performs all conversion tasks on the AS/400. A System /36 is not required to complete
any part of this conversion.
Note: Differences in the S/36 and AS/400 operating systems prevent a complete
conversion of S/36 applications to native applications. However, ProStart
accelerates the conversion process by eliminating much of the manual work.
After using ProStart to begin the conversion, programmers must review all code
for accuracy and logic, and make revisions wherever necessary.
Chapter 1
Product Overview
3
ProStart Main Menu
ProStart is a set of user options that you select from a menu. Each option selects S/36
source members or procedures from a specified source file and library and recreates
them in a new format in a designated source file and library.
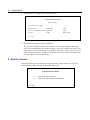
The ProStart Main Menu shown below allows easy access to all features of the product.
Main Menu
1. Reports Menu
2. Search Menu
3. Conversion Tools Menu
4. Interactive OCL to CL Converter
5. Sample Reports Menu
90. Sign Off
The Main Menu includes five menu options:
1.
Reports Menu
Provides audit and analysis reports prior to executing
the conversion.
2.
Search Menu
Provides program and file information in an on-line
search mode.
3.
Conversion Tools Menu
Provides the conversion tools to accelerate the work
effort.
4.
Interactive OCL to CL
Converter
Provides access to a new on-line training and
demonstration tool.
5.
Sample Reports Menu
Provides numerous examples of the different types of
printed output generated by ProStart.
4
ProStart Manual
Reports Menu
The Reports Menu provides options to analyze the application before starting a
conversion.
Reports Menu
1. File/Field/Program Cross Reference Reports
2. File “Where created” Report
F3 = Exit
The File/Field/Program Cross Reference Reports are actually four different reports
providing different views of the same information.
1. Disk File to Program Cross Reference
2. Disk File to Field Cross Reference
3. Program File to Field Cross Reference
4. Field to Disk File Cross Reference
Each report is described on the following pages.
Disk File to Program Cross Reference
All files are sorted by program name within file name and listed to identify where
specific files are accessed.
Features:
•
Next to each file, the programs referencing the file are listed, along with how the file
is used in the program.
•
Asterisks highlight potential problems with any file definitions.
Disk File to Field Cross Reference
All input/output fields of files defined within an RPG source member are associated with
its disk file label, sorted and listed to construct the layout of individual records.
Features:
•
Presentation of field information on the report is similar to the sequence of field
definitions within Input specifications.
•
Blank space between fields and at the end of a record is highlighted as '(Unused)'.
Chapter 1
Product Overview
5
•
Literal written to a record through Output specifications are included under the Field
Name or Value heading.
•
Field lengths and array definitions are noted.
•
Asterisks highlight potential problems (or redefinitions) with any field definitions.
Program File to Field Cross Reference
This report is identical in format to the previous report. The disk file label is replaced
with the program file name to construct the layout of individual records.
Field to Disk File Cross Reference
This report is generated using the RPG source members input/output specifications and
highlights where the same field names are used for different disk file labels.
Features:
•
Field names defined within an application library appear in alphabetic sequence,
with all uses and definitions included.
•
Program name and statement number; allow for easy reference to the original source
code.
•
Array definitions are included on the report as extracted from Extension
specifications.
•
Asterisks highlight potential problems (or redefinitions) with any field name
definitions. (For example, field name CLASS is defined in two files, EMPMAST and
CLASS, where it appears with different field ending positions and decimal
positions).
Disk File "Where Created" Report
This report identifies all instances where a file is created by procedure. Data files,
alternative index files, and the output file from sorts are included. (Alternative index
files and the output file from sorts might be potential candidates for replacement with
logical files.) Where appropriate, file attributes are also included.
Features:
•
Each individual creation of a file is noted, whether by RESTORE, sort output, DFU,
etc.
•
The procedure and program names are identified for each file creation.
6
ProStart Manual
Search Menu
The Search Menu provides options to inquire into program and file interrelationships.
Each option is described in the following pages.
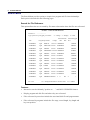
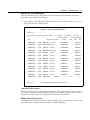
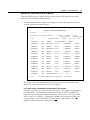
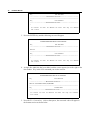
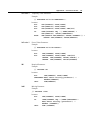
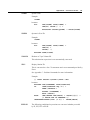
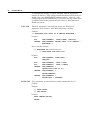
Search for File Reference
This option allows the user to search by file name to determine where the files are referenced.
ProStart - Search for File Reference
Position to . . . - - - - - - - - - Type option for a proc/pgm, press Enter:
2 = Change
5 = Display
Associated file
File
Program/procedure
Usuage
Rln
6 = Print
Associated pgm
Kln
Kst
- EMPMAST
Pgm
EMPLST
- EMPMAST
Pgm
EMPLSTD OCL36
P.EMPMAS
EMP901
- EMPMAST
Pgm
EMP002
P.EMPMAS
EMP002
- EMPMAST
Pgm
EMP004RIG OCL36 P.EMPMAS
EMP901
- EMPMAST
Pgm
EMP006
OCL36
EMP901
- EMPMAST
Pgm
EMP006
OCL36 P.EMP901
EMP006
- EMPMAST
Pgm
EMP008
OCL36 P.EMPMAS
EMP008
- EMPMAST
Pgm
EMP009
OCL36 P.EMPMAS
EMP901
- EMPMAST
Pgm
EMP009
OCL36 P.EMP901
EMP009
- EMPMAST
Pgm
EMPOl
OCL36 P.EMPMAS
EMPOI
- EMPMAST
Pgm
EMP04U
OCL36 P.EMPMAS
EMP901
- EMPMAST
Pgm
EMP04U
OCL36 P.EMPMAS
EMP901
- EMPMAST
Pgm
EMP04U
OCL36 P.EMPMAS
EMP901
- EMPMAST
Pgm
EMPMAST RPG36
F3 = Exit
OCL36 P.EMPMAS
OCL36
EMP901
P.EMPMAS
I
P
256
F11= Display/hide libraries & source files
4
1
F17 = Subset
Features:
•
Interactive search with handy "position to . . .” and ROLL UP/DOWN features.
•
Display program and disk files and where they are referenced.
•
Files referenced in procedures include the associated disk file and program name.
•
Files referenced in programs include the file usage, record length, key length and
key start position.
Chapter 1
Product Overview
•
User-defined selection criteria to view subject of data. Selection criteria includes
file name, type, program or procedural references and library name.
•
User option to select a file entry and edit the associated program through SEU.
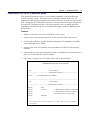
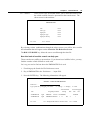
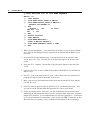
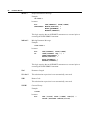
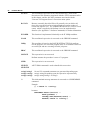
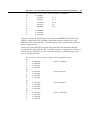
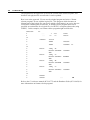
Search for Program/Procedure References
This option allow the user to determine by program (or procedures) where it is called
and which programs it calls.
ProStart - Search for Calls from Procs & Menus
Position to
... ----------
Type option for a proc/menu press Enter:
Member
Mbr type
2 = Change
5 = Display
6 = Print
Call type
Member
Mbr type
Call method
- EMPLST
called by
EMPOLD
MNU36
INCLUDE
- EMPLST
called by
EMPM
MNU36
INCLUDE
- EMPLSTD
OCL36
call to
EMP901
LOAD
- EMPLSTD
OCL36
call to
EMP001
LOAD
called by
EMPOLD
- EMPLSTD
MNU36
INCLUDE
- EMPLST
called by
EMPRPT
MNU36
INCLUDE
- EMPOLD
called by
EMPLOY
MNU36
MENU
MNU36
call to
UPDEMP
INCLUDE
- EIAPOLD
MNU36
call to
UPDCLS
INCLUDE
- EMPOLD
MNU36
call to
EMPEPT
INCLUDE
- EMPOLD
- EMPOLD
MNU36
call to
EMPREORG
INCLUDE
- EMPOLD
MNU36
call to
EMP007
INCLUDE
- EMPOLD
MNU36
call to
EMP009
INCLUDE
- EMPOLD
MNU36
call to
EMP006
INCLUDE
F3 = Exit
F11 = Display/hide libraries & source files
F17 = Subset
7
8
ProStart Manual
Features:
•
Interactive search with handy "position to...” and ROLL UP/DOWN features.
•
Determines which programs, procedures, or menus call this program.
•
Determines which programs, procedures or menus are called by a program.
•
Specifies call method: LOAD, INCLUDE, MENU, JOBQ, EVOKE, RESET.
•
User-defined selection criteria to view subsets of data. Selection criteria includes
program/procedure name, calling methods, and library name.
•
User option to select a program and edit it through SEU.
Conversion Menu
The Conversion Menu provides options to accelerate the conversion from the S/36 to the
native AS/400 environment. Each option is described on the following pages.
Conversion Menu
F3 = Exit
1.
Generate CL Program Source
2.
Convert a System/36 menu to native
3.
Copy ProStart Commands to user library
4.
Generate File Definition Source Members
5.
Generate Field Reference File DDS Source
6.
Generate Physical File DDS Source
7.
Generate File Conversion Program
8.
Generate Screen Format DDS Source
9.
Generate RPG/400 Source
Chapter 1
Product Overview
9
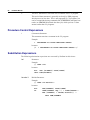
1. Generate CL Program Source
This option allows the user to select one, a set, or all procedures from one source
file, and create control language programs in the target source file. The user also has
the option to generate a report showing the OCL procedure and the newly created CL
program side-by-side in a condensed print format.
Features:
•
Fast creation of CL programs, with significant reduction in keying errors.
•
Creates structured code; provides standard indenting of CL commands as would
be expected through the CL Editor.
•
Arrows at left of the CL statement alert programmer to the line of code requiring
attention.
•
Optional side-by-side report eliminates the hassle of handling two separate
sheets of paper to view both the OCL and CL together.
•
User option to create/not create ALCOBJ and DLCOBJ statements in the
generated CL code.
A second report, the Summary Report, is also generated when you convert
procedures. This summary report lists each procedure and provides line counts on
the converted code.
Features:
•
Lists each member converted along with its member text.
•
Summarizes the number of lines of code that converted completely, partially, or
not at all.
•
Provides programmers with an overview of how much effort remains to complete
the OCL to CL conversion.
2. Convert a System/36 Menu to Native
This option allows programmers to identify a menu from the S/36 environment and
to automatically convert it to a menu with control language replacing OCL in the
message file with CL.
The following options all relate to the creation of the database.
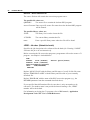
3. Copy ProStart Commands to User Library
This menu option allows users to move the three ProStart commands from the
ESXPRO library to any other library.
10
ProStart Manual
4. Generate File Definition Source Members
This option allows the user to parse through an application library to extract Input
and Output specifications for disk files and to create preliminary file layouts for each
file. The layouts are written to a work library source file as file definition source
members. A programmer can then review the generated source member and make
necessary changes.
5. Generate Field Reference File DDS Source
This option allows the user to specify any file definition source member (such as a
DFU file definition, a /COPY member, or one generated by ProStart) and
automatically add field definition DDS entries to the end of the field reference file.
A user can create the new database layouts in a 400-like manner with all numeric
fields packed and blank fields dropped. Alternately a user can specify that the 400
layout should be identical to the S/36 layout. this latter approach allows the user to
keep the files in the RPG programs program described. 'the externally described
disk file will map exactly to the programs definition.)
6. Generate Physical File DDS Source
This option allows the user to specify any file definition source member and
automatically create a physical file DDS source member.
7. Generate File Conversion Programs
This option allows the user to specify any file definition source member and
automatically create a data conversion program. The input file will be the program
described S/36 file. The output file will be the externally described native physical
file.
8. Generate Display File DDS Source
This option allows you to select one set or all System/36 screen files and convert
them to DDS.
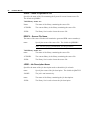
9. Generate RPG/400 Source
This option allows the user to select one, a set, or all RPGII programs from a single
source file, and create RPG/400 source in another source file. The user has the
option of submitting the converted code for a compilation attempt.
In addition to automatically applying the syntactical changes required for the
program to compile in the native environment, this conversion offers the user some
choices. The user can keep the display file program or externally described, the disk
files program or externally described, the printer output program described or
converted to externally described printer file DDS.
Chapter 1
Product Overview
11
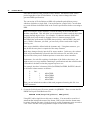
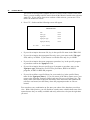
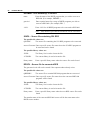
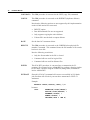
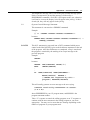
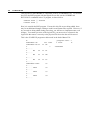
Interactive OCL to CL Converter Menu
This option allows the user to key in a procedural command or a full procedure and
convert it quickly on-line. This option can be particularly helpful when a new CL
program is needed and the programmer does not know how to write the necessary source
code. Keying the OCL through the interactive Converter and converting it will generate
the required CL program skeleton. Using the generated code as a starting point, the
programmer can then clean up the CL program and expand it with any additional code
that is needed.
Features:
•
Ability to enter and convert up to 9999 lines of OCL source.
•
On-line converter presents generated CL on the lower half of the same screen.
•
Creates structured code; provides standard indenting of CL commands as would be
expected through the CL Editor.
•
Arrows at left of the CL statement alert programmer to the line of code requiring
attention.
•
Optional side-by-side report eliminates the hassle of handling two separate sheets of
paper to view both the OCL and CL together.
•
User option to print OCL to CL report side-by-side or top-to-bottom.
ProStart Interactive OCL to CL Converter
Seq
OCL Statement
= = = = = = = = = = = = = = = = = = BEGINNING OF DATA = = = = = = = = = = = = =
0001.00
SAVELIBR ESSEX,999,IBMIRD
--------------------------------------------------------------------------------------------------------Seq
CLP Statement
= = = = = = = = = = = = = = = = = = BEGINNING OF DATA = = = = = = = = = = = = =
0001.00
PGM
0002.00
SAVLIB
LIB(ESSEX) DEV(DKT01) VOL(IBMIRD
0003.00
LABEL(ESSEX) EXPDATE(*PERM) +
0004.00
PRECHK(*YES) DTACPR(*YES)
0005.00
ENDPGM
F1 = Convert F3 = Exit F5 = Refresh
F12=Cancel
F 9 = Print F10 = Top
Fll = Bottom
12
ProStart Manual
This Page Intentionally Left Blank
13
C H A P T E R
2
Before You Begin
The native environment of the AS/400 is very different from the S/36 environment.
Consequently, programmers must anticipate a learning curve as they begin to work on
the new machine. The ProStart manual can help you understand how a conversion is
performed.
However, you will need to learn as much as possible about the AS/400 to fully utilize
the system. Therefore, we encourage you to attend the necessary seminars or courses
offered by IBM to learn more about the system. We also direct users to the many useful
manuals available from IBM. Some of the more valuable reference manuals are listed
below with their order reference numbers.
Application Development Tools
Programming Development Manager User's Guide and Reference (SC09-1173)
Programming
Control Language Programmer's Guide (SC21-8077)
Control Language Reference
Volume 1 (SC21-9775)
Volume 2 (SC21-9776)
Volume 3 (SC21-9777)
Volume 4 (SC21-9778)
Volume 5 (SC21-9779)
Data Description Specifications Reference (SC21-9620)
14
ProStart Manual
Languages:
RPG/400 Reference (SC09-1089)
RPG/400 User's Guide (SC09-1161)
To benefit most from ProStart, we recommend that you read the ProStart User Manual
from cover to cover. Appendix A - Conversion of OCL lists many of the S/36
commands and discusses how ProStart handles the OCL to CL conversion. In addition,
ideas, suggestions, and recommendations are included for many commands to inform
you of some options.
Additional appendices provide approaches to handling various conversion issues that
you are sure to face.
ProStart uses its own printer files for most reports that are generated outside of the
System/36 environment. These printer files may contain attributes that do not match
those of the printers and/or forms that you are using at your installation. You may
change the attributes of all of these printer files at once by entering the following
command:
CHGPRTF FILE (ESXPRO/XJT*) +
PAGESIZE(88) LPI(8) +
CPI (15) OVRFLW (80)
and substituting your own parameters. The above example would be used if you wanted
to print at 8 lines per inch on 14 7/8" x 11" paper in condensed print.
Finally, we recommend that a programmer using this product sign onto the system as the
security officer, QSECOFR, or be granted *ALLOBJ authority.
15
C H A P T E R
3
lnstallation
This section contains instructions for installing the demonstration version, the trial
version and the full ProStart product.
1. If you currently have another version of ProStart (including the demo) installed on
your system, it will be deleted automatically by the load program. You should
insure that no one is using that version at this time. You can verify this by entering
the following command:
WRKOBJLCK OBJ(ESXPRO) OBJTYPE(*L-IB)
If a message appears at the bottom of the next screen saying "There are no locks for
the specified object.” you may proceed. Otherwise, locate the user of ProStart and
have them get out of it while you complete this installation.
2. Insert the tape or first diskette into the appropriate drive on your AS/400 system and
enter the following from any display station:
RSTOBJ
OBJ (LOADPS)
SAVLIB(LOADPS)
DEV(ddddd) RSTLIB(QTEMP)
+
where “ddddd” is the device id of your diskette or tape drive
3. Press ENTER and enter the following:
CALL PGM(QTEMP/LOADPS) PARM(ddddd)
where "ddddd" is the device id of your diskette or tape drive
4. Press ENTER.
The ProStart library will be restored onto your system. Follow any instructions that
are displayed. If you are loading from diskette there will be a message to insert the
second diskette in the drive.
5. When the library is restored, the “Authorization Code Update Program" screen
appears. Enter the authorization code found on the computer printout enclosed with
your package. (If you cannot locate this, call your distributor.)
6. When the LOADPS program has completed, you will be left at the ProStart Main
Menu. You are ready to begin your conversion.
7. Anytime you wish to use ProStart, enter the following command to access the
ProStart Main Menu:
16
ProStart Manual
GO ESXPRO/XJMENU
8. Anytime you wish to enter a new authorization code, key in 99 from the Main Menu.
9. ProStart uses its own printer files. If you encounter difficulties with alignment of
any reports by ProStart it may be that the parameter settings for these printer files do
not match those required for the paper size. You may change these values as needed
by entering the following command:
CHGPRTF
FILE (ESXPRO/XJT*)
LPI (parm2) OVRFLW (parm3)
PAGESIZE(parm1)
parm1
is the number of printed lines per page.
parm2
is the number of lines per inch (usually 6 or 8).
parm3
is the overflow line number. This value is usually set to a value one inch
shorter than the page size. For example, if the page size (parm1) is set to
66 lines per page and the LPI (parm2) is set to 6 lines per inch, OVRFLW
(parm3) should be set for an overflow line number of 60.
You are ready to use ProStart.
Removing ProStart
To Remove the ProStart Demo
1. To remove the ProStart demo, trial or product library, enter the following from any
display station:
DLTLIB LIB(ESXPRO)
2. Press ENTER.
17
C H A P T E R
4
ProStart Trial: A Step-by-Step Review
The ProStart trial diskette and documentation is, actually, the full product diskette and
complete documentation. The trial allows you to use the full product for 3 days to
determine how well it can meet your needs. The trial diskette contains the numerous
sample reports available on the demo diskette. The trial product is fully functional; you
can use every feature and option as frequently as you wish. The only restriction is that
you have 3 days to consider the product against your own applications. (Note the
enclosed "Authorization Sheet” for the trial expiration date).
Here's a recommended approach to reviewing this product within the 3 day
time frame:
1. Read the documentation from cover to cover. This will provide an overview of the
full product.
2. Install the trial (see instructions in section 3) and print the example reports.
From the ProStart Main Menu (XJMENU), select Option 5 - Sample Reports Menu.
You may run any or all of the sample reports. Review these examples of printed
ProStart output.
3. Select a very small application or a small module and set it aside in a separate library
on your AS/400 for your review.
4. Run the analysis reports against the application. Print the analysis reports and
review them. Carefully study the Program File to Field Cross Reference Report.
5. Determine if your own file layouts are correct and complete. If not, or if the
Program File to Field Cross Reference Report presents cleaner file layouts, select
Option 4 from the Conversion Menu to create the F and I specs from your
application and write them automatically to individual source members.
6. Review the layouts and clean up any field name conflicts or discrepancies using
SEU. Generate the database using the file layout source members as input by
selecting Options 5, 6 and 7 from the Conversion Menu. For this trial, we
recommend 'preserving' the S/36 layouts in your database.
7. Convert the S and D specs to display files by selecting Option 8 from the Conversion
Menu.
18
ProStart Manual
8. Convert the RPG II programs to RPG/400 by selecting Option 9 from the Conversion
Menu. We recommend keeping the display and disk files, and report output
internally described. Select the option to submit the programs for the optional
compile attempt.
9. Convert the OCL to CL by selecting Option 1 from the Conversion Menu.
10. Convert the S/36 menus to native by selecting Option 2 from the Conversion Menu.
11. Now you must begin the review, clean-up and testing. Consider tackling this task in
a logical fashion, such as on a "menu option by menu option" or "program-byprogram" basis.
Note: If you have concerns or questions as you review the trial, please call your local
Distributor.
19
C H A P T E R
5
Approach to Conversion: Moving from the
System/36 Environment
Running your applications in the AS/400 native environment offers potential
performance improvements, the availability of a relational database for query, and less
costly development of new or enhanced applications. Generally, the time and effort
required to change to the native environment can be extensive. ProStart provides tools
and instructions that make the process of conversion easier and faster.
To begin, you must be successfully running your applications in the S/36 environment.
(The migration aid available from IBM will quickly take you into the S/36 environment
from the S/36.) Much of the required data will be extracted from the S/36 environment
source members and pulled down into the native environment.
The following outline describes the steps involved in moving from the S/36 environment
into the native environment. Refer to the appropriate page for more information on each
step.
Phase 1:
Planning/Scheduling
Page 20
Phase II:
Setting up the Development Library
Page 24
Phase III:
Field Reference File and Physical Files
Page 24
Phase IV:
Logical Files
Page 29
Phase V:
Menus
Page 29
Phase VI:
Display Files
Page 29
Phase VII:
Control Language Programs
Page 30
Phase VIII: RPG Programs
Page 30
Phase IX:
Page 31
Testing
The following sections describe each phase in detail.
20
ProStart Manual
Phase I: Planning/Scheduling
Before beginning this project, you must define the project limits clearly, and determine
the extent of the conversion effort.
1. Define the application(s) that you want to be converted.
You may choose to convert one, several, or all applications simultaneously. Since
you can successfully execute applications running in the S/36 environment with an
application running in the native environment at the same time, you can choose
which approach makes more sense to you.
For example, Payroll may be a stand-alone application that you can convert as a
single project. (Or it may be the application left behind running in the S/36
environment.) On the other hand, the Order Entry and Inventory Control applications
may be highly integrated and require some file sharing. Converting these together
makes sense.
An RPG/400 program may correctly reference a file that is not externally described.
However, an RPG program running in S/36 environment cannot always reference the
externally defined file without problems.
RPG/400 and the AS/400 write fields to a record without the need of a specific field
ending position. Part of this is due to the nature of databases. In addition, the S/36
assumes all numeric fields are unpacked unless specified otherwise. The DDS
assumes the numeric fields are packed unless specified otherwise. Consequently, it
may be difficult to map the fields (especially key fields) correctly within an S/36
RPG program.
2. Determine whether you want to convert the application to the native environment "as
is" or if you want to enhance the application during the conversion. We recommend
that you convert the application first, and then make any modifications.
3. Define the relationships between the selected applications and others that will not be
converted.
In some applications, users are allowed to jump to menus, or call programs, from
other applications. If you are executing routines in the S/36 environment and are
moving to or calling routines in the native environment, you may experience some
problems. If you execute routines in the native environment, and are moving to or
calling routines in the S/36 environment, you may receive error messages such as
"The S/36 environment operating system is not executing."
4. Review your OCL procedures and create a complete list of all files that must exist in
the native environment. Include certain attributes such as key length for each file.
You may start by reviewing your VTOC. However, many work files may not be
included on the VTOC. Sort files and alternative index files may be created and
deleted within procedures. Therefore, you must check all procedures.
Chapter 5
Approach to Conversion
21
ProStart: To assist you, select Option 2 from the Reports Menu to create the Files
"Where Created" Report which provides a complete list of disk files referenced
within the application. This report allows you to determine the number and location
of the physical files, and also allows you to consider logical files as replacements for
sorts and alternative indexes.
5. Keeping this compiled list of files in mind, consider whether you want to convert the
S/36 files to externally described files using data description specifications or leave
the files program defined.
There are advantages and disadvantages to both alternatives.
Externally Described Files
Creating data files as externally defined provides a relational database defined to be
accessed by Query/400 and SQL400. From a programmer's perspective, the
availability of a relational database eases the input/output definition of files each
time a new program is written.
The key disadvantage of this approach is the time it takes to create the externally
defined files. A significant amount of the conversion effort must be exerted in
creating the relational database and implementing it within the RPG programs.
Program Described Files
The primary advantage in retaining program defined files is time. By eliminating
this step, programmers may focus their time on the creation of RPG/400 and CL
programs. (You may still reference files in the QS36F library with native programs.)
Later you will want to reference (at least some) files as externally defined. At that
time, you will need to initiate a new conversion project.
Many companies have decided that converting to the native environment quickly is
the most appropriate business decision. Refer to Appendix D - “How to get to the
native environment F-A-S-T !!!".
ProStart: Remember that ProStart will assist you in creating entries in the field
reference file, creating physical file source members and generating an RPG
conversion program/file to move the data from the S/36 Environment file to the
native database file.
6. Identify any files that will be shared between the converted and non-converted
applications.
If files are shared between these applications, consider carefully which programs
will be updating the records and which will be reading them.
For example, if Order Entry (being converted) and Accounts Receivable (not being
converted) share the customer master file, you must consider how the two
applications can successfully maintain the single file. Here are two options:
22
ProStart Manual
•
When you convert Order Entry, keep the Customer Master file as a program
described file. Later, when you convert the Accounts Receivable application,
consider converting the customer master file to externally described in both AR
and Order Entry at the same time.
•
Use two customer files, one for Order Entry and another for Accounts
Receivable. Update one version of the file (in S/36 environment) "live" and then
download the information to a database version of the file on a regular,
automatic basis.
7. Once you have defined your files, you must consider the field names. This can be
especially difficult since a single field name like COMP for "company" may appear
in several different files. These files may also be used in the same program, causing
further difficulty with data handling in the native environment.
After assessing the consistency of field naming conventions within your own
libraries, you may discover that the fields are not at all consistent. Seriously
consider keeping all files and fields internally described in existing applications.
Refer to Appendix E - “Internally Describing Physical Files in the AS/400 Native
Environment" for additional information.
ProStart: To assist you, select Option 1 from the Reports Menu to generate file
analysis reports including field-to-file, file-to-field, and file-to-program cross
references.
To assist you further, select Option 1 from the Search Menu to generate the analysis
workfiles by library. Then, on an as-needed basis, you can access the searches online to get program and file information.
8. Review the RPG programs to identify any issues you will have to address in getting
them into the native environment.
A substantial amount of work relates to the syntactical changes to the code.
Remember that redefining the F and I disk file specifications as externally defined
files is optional.
Many companies have decided that converting to the native environment quickly is
the most appropriate business decision. Refer to Appendix D: "How to get to the
native environment F-A-S-T!!!." for more information.
ProStart: Remember that ProStart automatically converts RPG II source code to
RPG/400 source code and submits the programs for optional compile attempts. You
will have the option to decide if you want the display file internally or externally
described, the disk files internally or externally described, and if the report output
should be converted to printer files.
Chapter 5
Approach to Conversion
23
9. As you estimate the scheduling of a project, consider the “cleanliness" of the
application and the code, available documentation, the programmers' skill level, and
your knowledge of the system when creating estimates.
To increase the accuracy of your estimate, you may want to create a pilot conversion
project for pulling a small application or module into the native environment.
Processing this smaller project will help you prepare for the bigger project to follow.
Object Naming Conventions
On a System/36 programmers often name a procedure and the program it calls with
the same name. For example, the procedure PREMPL calls the Employee Master
File maintenance program PREMPL. This naming convention will cause problems
on the AS/400 since all procedures and programs are compiled into program objects,
and each must have a unique name.
There are many different ways to name your source members and objects. For this
conversion, we will suggest two simple and straightforward approaches. Here is a
list of the common object types that you will use in completing your conversion:
*FILE
Files (Physical, Logical, Display)
*LIB
Libraries
*MENU
Menus
*PGM
CL programs, RPG programs, COBOL programs, etc.
An effective method for avoiding naming conflicts within the program object type is
to assign a unique character (or set of characters) to each type of program.
For example, consider the Employee Master File Maintenance procedure and RPG
program. We could place a ‘C’ (for CL program) in the first position of the
procedure names, and an 'R' (for RPG program) in the first position of the program
name. The following new names would result.
PREMPL (procedure)
CPREMPL
PREMPL (RPG program)
RPREMPL
Or, you may prefer to leave the names unchanged except to add a suffix (such as CL)
to the end of the new CL program names, as follows:
PREMPL (procedure)
PREMPLCL
24
ProStart Manual
Phase II: Setting up the Development Library
1. Enter the following command from any command entry line:
CRTLIB yourlib
where "yourlib" is the name of the library you wish to create. For example, if you
are converting the payroll library PRLIB, you might create a new library PRLIB400.
2. Within the new library, create the necessary source files to contain the generated
RPG, CL, sort and DDS source code.
Enter the following command to create your source files:
CRTSRCPF yourlib/source file
where: "yourlib" is the name of the library created above, and "source file" is the
name of the source file you are creating.
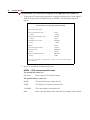
IBM's source file naming conventions are:
QCLSRC
Control language source
QDDSSRC
Data description specification source
QFMTSRC
Sort specification source
QMNUSRC
Native menu DDS and command text source
QRPGSRC
RPG/400 source
We recommend that you use these defaults.
For a more detailed explanation of these commands, reference the IBM Control
Language Programming manuals.
Phase III: Field Reference File and Physical Files
When converting the data files into the native environment, you should create a
relational database of externally described files using data description specifications.
Later, when addressing the RPG programs, you will have a choice of converting files to
externally described or leaving all files program defined.
1. Focus on the Data Description Specifications (DDS)
You might consider the following three approaches (A, B, C) when creating the F
and I specifications (file layouts) to in turn generate the field reference file and the
subsequent physical and logical files. To a large extent, your choice of an approach
will depend upon the state of your RPG source code. The cleaner and more standard
your code specifications, the greater chance you have for using automated
procedures to create the DDS specifications. To determine your best approach, start
by considering any source members that currently describe each file.
Chapter 5
Approach to Conversion
25
If you have accurate file definition source members such as DFU file definitions or
/COPY source members for any files, you may select the third (and easiest)
approach, Path C. If you do not have accurate file definition source members, but
you know of programs that clearly and accurately define the layouts of some files,
you may select the second approach, Path B.
If you have neither of the above, you must select Path A.
ProStart expects that each file layout contains only one file format. If your file
layouts define more than one record format, split them up into individual record
formats before trying to create the DDS source code.
A. Review the input and output specifications of RPG programs referencing each
file to create a composite file layout for each file.
ProStart: To assist you, select Option 4 from the Conversion Tools Menu and
enter the necessary information to generate the file definition source members.
ProStart will automatically parse through all RPG programs and assemble
appropriate file layouts from the input and output specifications to produce the
following output:
An S/36 file definition source member for each file describing the field name and
beginning and ending positions for the field. The source member will include a
file specification with the record length and key information.
Once this is complete, you may review the source members to create final
layouts for each file.
B. Reference existing S/36 RPG programs, and select a specific program where a
particular file is clearly and completely defined in the input specifications. Copy
this portion of the program to a new source member using SEU. If necessary,
review and modify the S/36 source member.
C. Use existing S/36 /COPY members, DFU file definitions or any other file layout
in your source file. If necessary, review and modify them.
With all three paths, you may want to add field level text to the file definition source
members, since it is easier to do it here than adding TEXT statements to the field
reference file later. To add the field level text, simply enter the information in
positions 75-96 on each field level Input specification. (If you decide not to do this,
the text statement in the field reference file will contain the six character field
name.)
You may also want to add a special code to identify which input fields make up the
key, and the sequence of fields within the key. (Electing to do this will provide
automatic creation of key level data description specifications when creating
physical file source members with ProStart.) To designate a key field, enter 'KEY' in
position 1 of the Input specification. If there are multiple key fields and you wish to
sequence them, enter '01' in positions 4-5 for the first key field, '02' for the second,
etc.
26
ProStart Manual
Note that all unused record positions will be omitted. All numeric fields will be
packed regardless of the S/36 definition. You may want to change this in the
generated DDS specifications.
The conversion of file definitions to DDS will not handle packed/binary arrays
which are defined as a single field. Convert defined as a single field. Convert them
to several different individual fields in the F and I specifications before converting to
DDS.
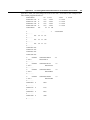
When reviewing the source members, consider breaking out all fields into their
smallest components. This will allow you to sequence or select records by these data
elements through logical views. For example, a 6-character numeric field called
DATEPD (date paid) should be changed to three 2-character numeric fields
DATPDM (date paid-month), DATPDD (date paid-day), and DATPDY (date paidyear). With a 2-character year field, you can easily select records with a logical
view by year.
Also, arrays should be defined with the elements only. Using data structures, you
may define the array that is comprised of the many elements.
Make these changes directly into the S/36 source member. In this way, the reduced
fields will be automatically reflected in the field reference file, and later, in the
physical files when you use ProStart options to create these source members.
Furthermore, for each file requiring a breakdown of the fields or the arrays, you
might create a new copy member containing E specifications and data structures that
"reassembles" the data to what the program expects to see.
For example, the three 2-character fields (DATPDM, DATPDD, DATPDY) should
be defined in a data structure as follows:
I...
I...
I...
I...
I...
DS...
1
1
3
5
60DATEPD
20DATPDM
40DATPDD
60DATPDY
Then you can include the member within each program referencing this file via a
/COPY statement.
2. Create the field reference file source member in QDDSSRC. Here we name the file
PRFRF for Payroll Field Reference File.
ADDPFM FILE(devprlib/qddssrc) MBR(prfrf)
Using SEU, add a single line to this source member. You must add a record level
statement that includes the name of the format. RPG requires that the format name
be unique from the file name. (In the System/36 world, programmers write records to
a file. In the AS/400 world, programmers output records to file formats.)
Chapter 5
Approach to Conversion
27
For information on creating the record level statement, refer to the IBM manual,
Programming: Data Description Specification Reference.
3. Load the field reference file with field names by file.
ProStart: To assist you, select Option 5 from the Conversion Tools Menu to create
entries into your new field reference file. Select the file definition source member of
one file at a time and automatically create data description specifications. (This
option requires the S/36 Environment to exist on your AS/400.)
Review the created specifications. If they are acceptable, continue creating
additional specifications for other files. Note that the entries added to the field
reference file with this option are always added to the end. Therefore, you could
process this command more than one time from the same file definition source
member to produce duplicate fields within your field reference file.
Create the field reference file object. (CRTPF)
4. Create the physical files.
ProStart: To assist you, select Option 6 from the Conversion Tools Menu to select
the file definition source member of one file at a time and automatically create data
description specifications (DDS).
ProStart offers you the option of building your database in a compressed format (all
numeric fields except key fields are packed, all blanks between fields are dropped)
or in a format the 'preserves' the S/36 layout. Refer to Appendix D for more
information.
Using SEU, review this source member. The record level statement that defines the
field reference file name that you have selected is created automatically. The record
level statement that includes the name of the format is created automatically.
If the physical file is an indexed file, and you assigned at least one input
specification with 'KEY' (key designation) in position 1, the key fields will be
defined automatically. Otherwise, you must define the key fields at the end of the
DDS specifications. And if the indexed file has no duplicate keys, adding UNIQUE
as a record level DDS statement will prevent duplicate keys from being allowed.
If your application uses physical files with more than one record format, now is the
time to split those into a separate files. Refer to Appendix F for more information.
For information on creating the record level statement, see the IBM manual,
Programming: Data Description Specification Reference.
Create the physical file object. (CRTPF)
28
ProStart Manual
5. Optionally, you may create the conversion programs to load some test/live data from
the S/36 files into your new relational database files.
ProStart: To assist, you select Option 7 from the Conversion Tools Menu to create
an RPG program that reads an S/36 file and writes records appropriately to the
relational database. (Any numeric fields that contain non-numeric characters will be
initialized to zero to eliminate data decimal errors in the files.) A programmer should
review the code and decide when to perform the actual file transfer. (To execute this
program, a programmer must create an appropriate CL program.)
Phase IV: Logical Files
Once the physical files are in place, you may want to create the logical files. However,
since the logical files will be replacing the sorts and alternative index files, we
recommend that you address these files when you actually work on the programs
referencing the files.
ProStart: To determine where the sorts are performed and where the alternative index
files are created, review the Files “Where Created” Report printed earlier, or select
Option 2 from the Reports Menu.
Phase V: Menus
Create the Menus. Replace the OCL in the message members with CL statements in the
native message file.
ProStart: To assist you, select Option 2 from the Conversion Tools Menu to
automatically convert the menu to the native environment.
Phase VI: Display Files
Create the display files from the existing screen formats.
ProStart: To assist you, select Option 8 from the Conversion Tools Menu to
automatically convert the screen formats to native display files.
Chapter 5
Approach to Conversion
29
Phase VII: Control Language Programs (CL Programs)
Whether you are an experienced S/38 or AS/400 CL programmer or someone who is still
learning, converting OCL to CL is a time-consuming task.
ProStart: To assist you, select Option 1 from the Conversion Tools Menu to convert
either one, a set, or all procedure members in a source file to CL programs. Since you
will need to review the generated CL code, this command allows you to create a listing
of the OCL and CL side-by-side while the code is being generated. You may review the
generated programs from beginning to end, or address them as you address the related
RPG programs.
You might find it useful to create all CL program members at one time leaving them
available for review when you work on the RPG programs. As you address a program,
you can review the files, including the logical files, as possible replacements for sorts
and alternative index files. Then you can modify the CL program that drives the RPG
program.
Phase VIII: RPG Programs
At this point, you must begin converting the RPG programs. This is time to begin tying
the CL programs, externally described data files and RPG programs together. Earlier in
the process we recommended postponing the replacement of BLDINDEX and some sorts
with logical files until later. Now you should look at each BLDINDEX and sort and
determine if a logical view or OPNQRYF (open query file) makes more sense for this
application and program. Your decision will probably require that you implement
changes to both the RPG/400 and CL program.
ProStart: To assist you with the RPG II to RPG/400 conversion, select Option 9 from
the Conversion Tools Menu to generate RPG/400 source members for each RPG II
program. Select the option to submit the code to a compile attempt. Then begin
reviewing the program.
ProStart offers you the option of converting the RPG programs with the display file
internally or externally described, the disk files internally or externally described and the
report output internally described or converted to printer files.
Many companies prefer to make the smallest number of coding changes possible to
speed up the conversion and increase the probability that it will function correctly the
first time. Therefore you may want to keep all files internally described. If your
application uses /COPY members (for file definitions or even subroutines), consider
converting them first to the new RPG source library, selecting the option to not submit
the code for a compile attempt. This will ensure that all copy members are converted
before you convert the RPG Programs with a compile attempt. Refer to Appendix D for
more information.
30
ProStart Manual
Phase IX: Testing
There can be no substitute for a thorough test of the completed application. It is critical
that the CL and RPG/400 programs work correctly with the new relational database files
(including the logical files and sort reformat members replacing alternate index files and
sorts). Once the native AS/400 application has passed the review, you can reconvert
your data files. You are then ready to go "live" with the application.
31
C H A P T E R
6
Generating Reports
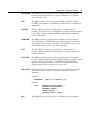
To generate reports using ProStart, you must first bring up the ProStart Main Menu:
To Generate Reports
1. Type the following and press ENTER.
GO ESXPRO/XJMENU
2. The ProStart Main Menu appears, as follows:
Main Menu
1.
Reports Menu
2.
Search Menu
3.
Conversion Tools Menu
4.
Interactive OCL to CL Converter
5.
Sample Reports Menu
90. Sign Off
The Main Menu includes five menu options:
1. Reports Menu
2. Search Menu
3. Conversion Tools Menu
4. Interactive OCL to CL Menu
5. Sample Reports Menu
3. Select Option 1 to invoke the Reports Menu. The Reports Menu appears, as follows:
32
ProStart Manual
Reports Menu
Reports Menu
1.
File/Field/Program Cross Reference Reports
2
File "Where created" Report
F3 = Exit
File/Field/Program Cross Reference Reports
There are four different reports providing different views of the same database. These
reports include:
1. Disk File to Program Cross Reference
2. Disk File to Field Cross Reference
3. Program File to Field Cross Reference
4. Field to Disk File Cross Reference
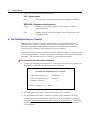
To Generate Cross Reference Reports
1. To generate any or all of these reports, select Option 1 from the Reports Menu to
bring up the next screen. Remember that all reports are run in the S/36 environment.
All source and procedures are assumed to be in QS36SRC and QS36PRC files.
Also, /COPY members must reside in the same library as the source being processed
in order for cross reference reports to consider them.
File/ Field/Program Cross Reports
Library to be processed:
___________________
F3 = Exit
2. Key in the name of the library you wish to process and press ENTER. The following
screen will appear.
Chapter 6
Generating Reports
33
File/Field/Program Cross Reference Reports
Select at least one of the
following to be printed
Disk File to Program:
Disk File to Field:
Program File to Field:
Field Name to File:
Y (Y or N)
Y (Y or N)
Y (Y or N)
Y (Y or N)
Submit to job queue
Y (Y or N)
F3 = Exit
3. Press Y to select the report(s), or N to omit the reports.
4. Enter Y to submit the job to the job queue or N to run interactively. (We recommend
sending all reports to the job queue.) Press ENTER.
Note: If the available disk space is not sufficient to run the cross reference reports,
we recommend that you create a new library that contains only the RPG and
procedure source members (dropping format, message, and COBOL source).
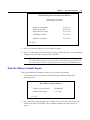
Disk File "Where Created" Report
This report identifies all instances where a file is created by procedure.
1. To select this report, select Option 2 from the Reports Menu to bring up the
following screen.
File "Where Created" Report
Library to be processed:
EXAMPLES
Submit to job queue:
Y (Y or N)
F3 = Exit
2. Key in the library name and enter Y to submit the job to the job queue or N to run
interactively and press ENTER. (We recommend sending all reports to the job
queue.)
34
ProStart Manual
35
C H A P T E R
7
Search Menu
To use the ProStart program and file searches, you must first bring up the ProStart Main
Menu.
Search Menu
1. Type the following and press ENTER.
GO ESXPRO/XJMENU
2. The ProStart Main Menu appears. Select Option 2 to invoke the Search Menu. The
Search Menu appears, as follows:
Search Menu
1. Analyze Library for Searches
2. Search Libraries
3. Delete Search Data
F3 = Exit
1. Analyze Library for Searches
This option allows users to load the cross reference files with the program and file
references for one library at a time. Multiple library references can exist within the files
at the same time. (The analyzer and search routines only work with libraries within the
S/36 environment.)
36
ProStart Manual
1. Select Option 1 to bring up the following screen:
ProStart Library Searches
Analyze Library
Type choices, press Enter.
Library Name. . . . . . . . . . . . > EXAMPLE
Name
Job Desc. (Submits to batch). > QBATCH
Name
Library. . . . . . . . . . . . . . . . . >*LIBL
Name,*LIBL
F3 = Exit
2. Key in the library name and press ENTER.
This job runs in batch and may take 5 minutes to 1 hour depending on the library
size (we recommend that you run this at night). Once the workfiles are loaded, you
will be able to search this library for program or file name references whenever you
wish. Remember that any changes to the library will not be reflected until the next
time this option is run for this library.
2. Search Libraries
This option allows you to initiate the search functions. Select Option 2 to view the
Search Libraries Menu to bring up the following screen.
Search Libraries Menu
1.
Search for File References
2.
Search for Calls form Procs & Menus
F3 = Exit
Chapter 7
Search Menus
37
Search for File References
This option allows users to inquire into the cross reference files that were previously
analyzed to learn about files references.
1. Select Option 1 from the Search Libraries Menu to review file references. A screen
will appear as in the example below.
ProStart - Search for File Reference
Position to . . . - - - - - - - - - Type option for a proc/pgm, press Enter:
2 = Change 5 = Display 6 = Print
Associated file
Associated pgm
Program/procedure
Usuage
Rln
Kln
Kst
File
- EMPMAST
Pgm
EMPLST
- EMPMAST
Pgm
- EMPMAST
P.EMPMAS
EMP901
EMPLSTDOCL36
P.EMPMAS
EMP901
Pgm
EMP002
P.EMPMAS
EMP002
- EMPMAST
Pgm
EMP004RIG OCL36
P.EMPMAS
EMP901
- EMPMAST
Pgm
EMP006
OCL36
P.EMPMAS
EMP901
- EMPMAST
Pgm
EMP006
OCL36
P.EMP901
EMP006
- EMPMAST
Pgm
EMP008
OCL36
P.EMPMAS
EMP008
- EMPMAST
Pgm
EMP009
OCL36
P.EMPMAS
EMP901
- EMPMAST
Pgm
EMP009
OCL36
P.EMP901
EMP009
- EMPMAST
Pgm
EMPOl
OCL36
P.EMPMAS
EMPOI
- EMPMAST
Pgm
EMP04U OCL36
P.EMPMAS
EMP901
- EMPMAST
Pgm
EMP04U OCL36
P.EMPMAS
EMP901
- EMPMAST
Pgm
EMP04U OCL36
P.EMPMAS
EMP901
- EMPMAST
Pgm
EMPMAST
F3 = Exit
OCL36
OCL36
RPG36
I
P
256
4
F11= Display/hide libraries & source files
Top third of the screen...
The screen that appears is made up of three parts. The top third allows you to enter a
file name to position yourself within the subfile (in the middle portion of the screen). It
also describes your options in viewing more detail about a selected file.
Middle third of the screen...
The middle portion displays the data. In this example, the screen contains 2 types of file
references: those from procedures and those from RPG programs.
38
ProStart Manual
Lets look at the information presented on the screen. Each file name that is on the left of
the screen is further defined as a disk or program file name. In addition, the columns to
the right define where the member is found, and the member type. Disk files found in
procedures are associated with the program name and program file. Program files found
in RPG programs are described with the file attributes including record length and key
information.
For example, the last line on the screen includes another reference to the same file,
EMPMASTR. This reference is taken from the RPG program and includes its attributes
as defined within the program (record length, key length and starting position).
You might wish to edit the program that references a particular file on the screen. Just
place a 2 in the input field just before the file on the line with the program or procedure
you wish to edit and press ENTER. SEU will be brought up to allow you to modify the
program or procedure. Or place a 5 in the input field and press ENTER to browse the
program or procedure. Placing a 6 in the input field and striking ENTER will print the
program or procedure to your output queue.
Lower third of the screen...
Before describing how to productively use the data, lets also look at the lower third of
the screen. This area describes the available function keys.
F3 = Exit
Returns the user to the Search Libraries Menu.
F11 = Display/hide
libraries and source files
Folds each line to reveal the Library and source files where
this references was found as shown below.
ProStart - Search for File Reference
Position to . . . - - - - - - - - - Type option for a proc/pgm, press Enter:
File
- EMPMAST
- EMPMAST
- EMPMAST
- EMPMAST
- EMPMAST
- EMPMAST
- EMPMAST
F3 = Exit
2 = Change 5 = Display 6 = Print
Associated file
Associated pgm
Program/procedure
Usuage
Rln
Kln
Kst
Pgm
EMPLST
OCL36 P.EMPMAS
Library/Source file: EXAMPLE
/QS36PRC
Pgm
EMPLSTD OCL36 P.EMPMAS
Library/Source file: EXAMPLE
/QS36PRC
Pgm
EMP002
OCL36 P.EMPMAS
Library/Source file: EXAMPLE
/QS36PRC
Pgm
EMP004RIGOCL36 P.EMPMAS
Library/Source file: EXAMPLE
/QS36PRC
Pgm
EMP006
OCL36 P.EMPMAS
Library/Source file: EXAMPLE
/QS36PRC
Pgm
EMP006
OCL36 P.EMP901
Library/Source file: EXAMPLE
/QS36PRC
Pgm
EMP008
OCL36 P.EMPMAS
Library/Source file: EXAMPLE
/QS36PRC
F11= Display/hide libraries & source files
EMP901
EMP901
EMP002
EMP901
EMP901
EMP006
EMP008
F17 = Subset
Chapter 7
F17 = Subset
Search Menus
39
Takes you to a new screen that allows you to define the subset of all
the search workfile data to be presented on the search screen. The
subset screen is shown below:
Subset File List
File
File type
Pgm/proc
Pgm/proc type
Pgm/proc library
F3 = Exit
*ALL
*ALL
*ALL
*ALL
*ALL
F12 = Cancel
By selecting various combinations through the subset screen, you will be able to tailor
the information that will appear on the Search for File References Screen.
The ROLL UP/DOWN key allows the user to scroll through the data file.
Now lets look at how this search can help you:
These searches use subfiles to present data. If you haven't used subfiles before, you may
find the searches a little different to work with.
Let's say you need to find out where the EMPMASTR file is used.
1. First bring up the Search for File References screen.
2. Key in EMPMASTR in the ‘Position to ... ‘ input field.
3. Press the ENTER key. The following information will appear.
ProStart - Search for File Reference
Position to . . .
-
Type option for a proc/pgm, press Enter:
2 = Change
5 = Display
Associated file
File
Program/procedure
- EMPMASTR
Pgm
EMP04U
- EMPMASTR
Pgm
EMPMAST RPG36
F3 = Exit
Usuage
Associated pgm
Rln
OCL36 P.EMPMAS
I
P
6 = Print
Kln
Kst
EMP901
256
F11= Display/hide libraries & source files
4
1
F17 = Subset
40
ProStart Manual
This search is looking at the complete universe of entries in the reference work files.
That is, you are looking at all file entries from all the libraries loaded to the reference
work files. If you wish to focus in on a subset of this universe, you can use F17 to
define the needed set of data.
4. Press F17 = Subset and the following screen will appear.
Subset File List
F3 = Exit
File
*ALL
File type
*ALL
Pgm/proc
*ALL
Pgm/proc type
*ALL
Pgm/proc library
*ALL
F12 = Cancel
•
If you wish to inquire about one file, key in the specific file name in the 'File' field.
•
If you wish to inquire about program files only, move your cursor to the 'File type'
field, and key in *PGM. If your interest is with disk files only, key in *DISK.
•
If you wish to inquire about one program or procedure, key in the specific program
or procedure name in the 'Pgm/proc' field.
•
If you wish to inquire about a specific type of program or procedure, move to the
'Pgm/proc type' field and key in OCL36 for procedures, RPG36 for RPG II
programs, or RPG for RPG/400 programs.
•
If you wish to define a specific library for your search, key in the specific library
name for the 'Pgm/proc library'. If you are unsure of the library names, move your
cursor to the field after 'Pgm/proc library' and press F4 to get your library list. The
library name entered here represents the library where the source that contained the
reference was located, not the library where the program/procedure or files are
located.
You can also use any combination to fine-tune your subset of the data that you wish to
view. With a little practice, you will find these searches more valuable than some of the
reports because they are readily available and easily tailored to select just the right data
you need.
Chapter 7
Search Menus
41
Search for Calls from Procs & Menus
This option allows users to inquire into the cross reference files that were previously
analyzed to learn about program references.
1. From the Search Libraries Menu, select option 2 to review the program references.
A screen will appear as shown below.
ProStart - Search for File Reference
Position to . . . - - - - - - - - - Type option for a proc/pgm, press Enter:
2 = Change 5 = Display 6 = Print
Associated file
Associated pgm
Program/procedure
Usuage
Rln
Kln
Kst
File
- EMPMAST
Pgm
EMPLST
- EMPMAST
Pgm
EMPLSTD
OCL36
P.EMPMAS
EMP901
- EMPMAST
Pgm
EMP002
OCL36
P.EMPMAS
EMP002
- EMPMAST
Pgm
EMP004RIG
OCL36
P.EMPMAS
EMP901
- EMPMAST
Pgm
EMP006
OCL36
P.EMPMAS
EMP901
- EMPMAST
Pgm
EMP006
OCL36
P.EMP901
EMP006
- EMPMAST
Pgm
EMP008
OCL36
P.EMPMAS
EMP008
- EMPMAST
Pgm
EMP009
OCL36
P.EMPMAS
EMP901
- EMPMAST
Pgm
EMP009
OCL36
P.EMP901
EMP009
- EMPMAST
Pgm
EMPOl
OCL36
P.EMPMAS
EMPOI
- EMPMAST
Pgm
EMP04U
OCL36
P.EMPMAS
EMP901
- EMPMAST
Pgm
EMP04U
OCL36
P.EMPMAS
EMP901
- EMPMAST
Pgm
EMP04U
OCL36
P.EMPMAS
EMP901
- EMPMAST
Pgm
EMPMAST RPG36
256
1
3 = Exit
OCL36P.EMPMAS
I
P
F11= Display/hide libraries & source files
EMP901
4
F17 = Subset
The screen is presented much like the file references screens. The function and
ROLL keys work in the same way as for File searches.
Let's look at the information presented on the screen
“Member" and "Mbr type" appear twice on the screen. The member is a program or
procedure name. The member type defines the member as OCL36 or MNU36 (a
procedure) or with a blank (a compiled program). There is also a Call Type which
will be 'Call to' or 'Called by'. Putting them together, the first member calls to the
second member, or the first member is called by the second member. The “call
method” further describes the calling function.
42
ProStart Manual
Let's say you need to find out where a specific program is used
1. First bring up the Search for Calls from Program & Menus screen.
2. Key the program name in the ‘Position to ... ‘ input field.
3. Press the ENTER key. The data will be refreshed presenting the specified program
name first.
This search is looking at the complete universe of program entries in the reference
work files. By default, you are looking at all program entries from all the libraries
loaded to the reference work files. If you wish to focus in on a subset of this
universe, you can use F17 = Subset to define the needed set of data.
4. Press F17 and the following screen will appear.
Subset Member List
Member
Member type
Member/proc
Member/proc type
Member library
F3 = Exit
*ALL
*ALL
*ALL
*ALL
*ALL
F12 = Cancel
•
If you wish to inquire about one program or procedure, key in the specific
member name in the 'Member' field.
•
If you wish to inquire about members called by menus only, move your cursor to
the 'Member type' field, and key in *MNU36. If you want to see members
called by procedures only, key in *OCL36.
•
If you wish your inquiry to be based upon how the members were called, key in
*TO to select those members that call to the second member, or *BY to select
those members called by the second member.
•
If you wish to select members on the call method, key in *INCLUDE, *LOAD,
*MENU, *JOBQ, *RESET, or *EVOKE as needed.
•
If you wish to define a specific library for your search, key in the specific library
name for the 'Member library'. If you are unsure of the library names, move
your cursor to the field after 'Member library' and press F4 to get your library
list.
Chapter 7
Search Menus
43
You can also use any combination to fine-tune your subset of the data that you wish to
view. With a little practice, you will find these searches more valuable than some of the
reports because they are readily available and easily tailored to select just the right data
you need.
3. Delete Search Data
This option allows users to unload or delete program and file references from the cross
reference files one library at a time. Since multiple library references can exist in the
cross reference files at one time, this allows users to remove entries for a library without
having to rebuild the cross reference file from scratch.
1. Select Option 3 to bring up the following screen:
ProStart Library Searches
Delete Search Data
Type choices, press Enter.
Library Name. . . . . . . . . . . . > EXAMPLE
Name
Job Desc. (Submits to batch). > QBATCH
Name
Library. . . . . . . . . . . . . . . . . >*LIBL
Name,*LIBL
F3 = Exit
2. Key in the library name and press ENTER.
44
ProStart Manual
This Page Intentionally Left Blank
45
C H A P T E R
8
Using Conversion Tools
To use the ProStart Conversion Tools, you must first bring up the ProStart Main Menu:
Conversion Menu
1. To bring up the ProStart Menu, enter the following:
GO ESXPRO/XJMENU
2. Press ENTER. The ProStart Main Menu appears.
3. Select Option 3 - Conversion Tools Menu. The Conversion Tools Menu appears, as
shown below:
Conversion Menu
1.
Generate CL Program Source
2.
Convert a System/36 menu to native
3.
ProStart Commands to user library
4.
Generate File Definition Source Members
5.
Generate Field Reference File DDS Source
6.
Generate Physical File DDS Source
7.
Generate File Conversion Program
8.
Generate Screen Format DDS Source
9.
Generate RPG/400 Source
F3 = Exit
46
ProStart Manual
1. Generate CL Program Source
This option allows the user to select one, a set, or all procedures from one source file and
create control language programs in the target source file. Optionally, a report is
generated presenting the OCL procedure and the newly created CL program side-by-side
in a condensed print format. Note that the generated code will not write over an existing
member of the same name in the file.
Procedure members must have a member type of 'OCL36' or they will be ignored by
ProStart. Sort specifications must be reviewed by a programmer to ensure that the field
positions have not changed if/when the file becomes externally described. This option
processes the member list of the input source file and therefore may appear to run slowly
if the file specified contains a large number of members.
To Generate CL Program Source Code
1. To generate CL program source code, select Option 1 from the Conversion Tools
Menu and press ENTER. The following screen will appear.
Generate CL Program Source (GENCLPSRC)
Type choices, press Enter.
OCL member(s) to convert . . . . . . . . . >
Source file containing OCL . . . . . . . . . > QS36PRC
Library . . . . . . . . . . . . . . . . . . . . >
Source file for generated CPL . . . . . . . >
QCLSRC
Library . . . . . . . . . . . . . . . . . . . . >
Source file for sort specs . . . . . . . . . . . > QFMTSRC
Library . . . . . . . . . . . . . . . . . . . . >
Comparison listing option . . . . . . . . . . >
*YES
Condensed print option . . . . . . . . . . . . > *YES
Job desc. (Submits to batch) . . . . . . . . >
QBATCH
Library . . . . . . . . . . . . . . . . . . . >
*LIBL
Allocate object option . . . . . . . . . . . >
*EXCLONLY
F3 = Exit F4 = Prompt F5 = Refresh F12 = Cancel F13 = How to use this display
F24 = More keys
2. Press F11 and follow the instructions below.
Chapter 8
Using Conversion Tools
47
OCLMBR - OCL member(s) to convert
name:
Enter the name of the OCL procedure that you wish to convert to a
CL program. (For example, PREMPL.)
generic*:
Enter a partial name for a range of procedures you wish to convert
to a CL program. (For example, PR* specifies all procedures with
a prefix of "PR".)
*ALL:
Enter *ALL for all procedures to be converted to a CL program.
Note: Only member types OCL36 will be converted.
OCLFIL - Source file containing OCL
The possible file values are:
QS36PRC:
The default source file containing the S/36 procedure(s) to be
converted.
source file name: Enter a specific source file name where the procedure to be
converted can be found.
The possible library values are:
*LIBL:
The library list is used to locate the file.
*CURLIB:
The current library contains the file.
library name:
Enter a specific library name where the source file is located.
CLPFIL - Source file for generated CLP
The possible file values are:
QCLSRC:
The default source file to contain AS/400 CL programs that are to
be generated.
source file name: Enter a specific source file name where the generated CL program
will be placed.
The possible library values are:
*CURLIB:
The current library contains the file.
library name:
Enter a specific library name where the new CL source file is
located.
48
ProStart Manual
FMTFIL - Source file for sort specs
The source file is only used to put in-line sort specifications encountered. The
SORT procedure will use defaults.
The possible file values are:
QFMTSRC:
The default source file to contain the sort source members.
source file name: Enter a specific source file name where the sort source will be
placed.
The possible library values are:
*CURLIB:
The current library contains the file.
*CLPLIB:
The library to contain the generated CL will also contain the sort
specifications.
name:
Enter a specific library name where the new sort source will be
placed.
LIST - Comparison listing option
*YES:
Generates a listing with the created CL program and the original
procedure.
*NO:
No listing is created.
*ONLY:
Generates a listing of only those procedures and CL programs with
identical source member names. Selecting this option does not
create new CL source programs.
CONDENSED - Condensed Print Option
Condensed print option (this option only applies if *YES or *ONLY was selected on
the previous option).
*YES:
Generates side-by-side OCL to CL condensed print report.
*NO:
Prints the OCL, then the CL on separate pages in a standard (non
condensed) print format.
Chapter 8
Using Conversion Tools
49
JOBD - Job desc (Submits to batch)
Specifies the job description to be used for a batch job.
The possible job description values are:
QBATCH:
Job submitted to batch processing under QBATCH job description.
*NONE:
Job not submitted to batch.
name:
Enter a specific job description under which this job is to be
processed.
The possible library values are:
*LIBL:
The library list is used to locate the job description.
name:
Enter a specific library name where the job description is located.
ALCOPT - Allocate object option
Specifies whether file references should generate ALCOBJ and DLCOBJ commands
at the beginning and end of each CL program.
*EXCLONLY:
ALCOBJ and DLCOBJ commands will only be generated for those
files encountered with a disposition of OLD or NEW.
*FILE:
ALCOBJ commands will be generated for all files encountered in
each procedure and placed at the beginning of each generated CL
program. Corresponding DLCOBJ commands will be generated
and placed at the end of the CL program.
*NONE:
ALCOBJ, DLCOBJ commands will not be generated for any file
encountered in a procedure.
2. Convert Migrated Menus to Native
This option allows users to specify any menu name and automatically create a native
menu in a target library with CL statements replacing OCL commands in the associated
message file.
Note that the generated code will not write over an existing member of the same name in
the file.
To Convert a S/36 Menu to a Menu with Native
1. To convert a S/36 menu to a menu with native, select Option 2 from the Conversion
Tools Menu and press ENTER. The following screen will appear.
50
ProStart Manual
Convert Menu Objects (CVTMNUOBJ)
Type choices, press Enter.
Menu name . . . . . . . . . . . . . . . . . . . .
master
Library . . . . . . . . . . . . . . . . . . .
*LIBL
Output Library
................
example
Menu output source file . . . . . . . . . . . >
QMNUSRC
Job desc. (Submits to batch) . . . . . . . . >
QBATCH
Library . . . . . . . . . . . . . . . . . . . . . >
*LIBL
F3 = Exit F4 = Prompt F5 = Refresh F12 = Cancel F13 = How to use this display
F24 = More keys
2. Press F11 and follow the instructions below.
MNU - Menu name
The possible menu values are:
Menu name:
Enter a specific S/36 menu name.
The possible library values are:
*CURLIB:
The current library contains the menu.
*LIBL:
The library list is used to locate the menu.
name:
Enter a specific library name where the S/36 menu is located.
OUTLIB - Output library
library name:
Enter the name of the library you wish to place the generated menu
and its components.
OUTMNUSRC - Menu output source file
QMNUSRC:
The source file to contain the menu.
name:
Enter a specific file name where the menu will be stored.
Chapter 8
Using Conversion Tools
51
JOBD - Job desc (Submit to batch)
Specifies the job description to be referenced for a batch job.
The possible job description values are:
QBATCH:
Job submitted to batch processing under QBATCH job description.
*NONE:
Job not submitted to batch.
name:
Enter a specific job description under which this job is to be
processed.
The possible library values are:
*LIBL:
The library list is used to locate the job description.
name:
Enter a specific library name where the job description is located.
3. Copy ProStart Commands to User Library
This menu option allows users to move the three ProStart commands from the ESXPRO
library to any other library.
Because ProStart incorporates these commands into the converted CL programs, users
must have access to the commands when executing the CL programs. We recommend
that the commands be moved into a library (such as QGPL) that will be included in the
users library list.
These commands are not proprietary. Therefore, you may use these commands in any of
your own applications. You may even include these commands in software that you
intend to remarket. Refer to Appendix C - ProStart Commands for additional
information.
To Move the ProStart Commands
1. To move the ProStart commands, select Option 3 from the Conversion Tools Menu
and press ENTER. The following screen will appear.
Copy ProStart Cmds to User Lib (CPYPSCMD)
Type choices, press Enter.
Library Name . . . . . . . . . . . . . . . . . >
GPLIB
Replace existing objects . . . . . . . . . >
*YES
F3 = Exit F4 = Prompt F5 = Refresh F12 = Cancel F13 = How to Use this Display
52
ProStart Manual
2. Press F11 and follow the instructions below.
LIB - Library name
name:
Enter the name of the library to contain the ProStart commands.
REPLACE - Replace existing objects
*YES:
Indicates objects will be replaced if they already exist in the
designated library.
*NO:
Indicates objects will not be replaced if they already exist in the
designated library.
4. File Definition Source Creation
Although many of your files may be completely and accurately defined with file
definition source members, you may need to create file layouts for other files. This
option passes through the RPG application library to create file layouts for all files.
These layouts are written to source members in your work library.
Remember that these layouts are generated from the input and output specifications from
the one designated library. If a file is shared between libraries, the file definition may be
incomplete. The layouts must be reviewed by an experienced programmer.
To Create File Definition Source Members
1. To create file definition source members, select Option 4 from the Conversion Tools
Menu and press ENTER. The following screen will appear:
ProStart File Definition Source Creation
Library to be processed:
EXAMPLE
Library to contain sources:
OUTPUT
Submit to job queue:
ENTER = Continue
Y
F3 = Cancel
2. Key in the name of the library from which layouts will be generated.
3. Key in the name of the library where the generated source members will reside.
Source programs to be evaluated are assumed to be in file QS36SRC in the library
specified. Associated procedures should be located in the same library. Similar files
are associated based on their disk file name from the “LABEL” parameter in the //
FILE statements.
Chapter 8
Using Conversion Tools
53
Because the members will be output to QS36SRC file in your designated output
library, we encourage you to designate a temporary work library to avoid any
conflicts with existing source member names. For example, you must be sure the
generated source members do not write over existing source members.
4. Key in ' Y' or 'N' to specify whether this job should be submitted to the job queue for
batch processing. Press ENTER. Review “Approach to Conversion” in Section 5
for further information.
Note: This option runs in the System/36 environment.
5. Generate Field Reference File DDS Source
This menu option allows users to specify any file definition source member (such as a
DFU file definition or a /COPY member) and automatically add field definition entries
to the end of the field reference file. Note that entries will be added and existing entries
will not be overridden.
Arrays that appear in input specifications should be defined as individual elements rather
than as one single field.
To Generate Field Reference File DDS Source Code
1. To generate field reference file DDS source code, select Option 5 from the
Conversion Tools Menu and press ENTER. The following screen will appear.
Generate Field Reference DDS (GENFRFDDS)
Type choices, press Enter.
Source member with F & I specs . . . . .
master
Source file with F & I specs . . . . . . . . >
QS36SRC
Library . . . . . . . . . . . . . . . . . . . . . >
*LIBL
Source mbr for field ref. DDS . . . . . . . >
@FLDREF
Source file for field ref. DDS . . . . . . . >
QDDSSRC
Library . . . . . . . . . . . . . . . . . . . . . >
Job desc. (Submits to batch) . . . . . . . . >
Library . . . . . . . . . . . . . . . . . . . . . >
*LIBL
QBATCH
*LIBL
F3 = Exit F4 = Prompt F5 = Refresh F12 = Cancel F13 = How to Use this display
F24 = More Keys
2. Press F11 and follow the instructions below.
54
ProStart Manual
S36SRCMBR - Source member containing F and I specs
name:
Enter the name of the file definition source member that you wish
to convert to DDS. This source member should contain F and I
specifications for one single record format. Refer to Appendix F if
the file contains more than one record format.
S36SRCFIL - Source file with F and I specs
The possible file values are:
QS36SRC:
The source file containing the S/36 file definition source member
to be converted.
source file name: Enter a specific source file name where the file definition source
member is located.
The possible library values are:
*LIBL:
The library list is used to locate the file.
library name:
Enter a specific library name where the source file can be found.
DDSSRCMBR - Source member for field ref DDS
name:
Enter the name of the source member to contain the generated
DDS.
The default is @FLDREF.
DDSSRCFIL - Source file for field ref. DDS
The possible file values are:
QDDSSRC:
The default source file in which the generated DDS source will be
placed.
source file name: Enter a specific source file name where the generated DDS source
will be placed.
The possible library values are:
*LIBL:
The library list is used to locate the file.
library name:
Enter a specific library name where the source file can be found.
JOBD
Job desc. (Submits to batch) Specifies the job description to be
referenced for a batch job. Entering "*NONE" will cause the job
to be run interactively.
Chapter 8
Using Conversion Tools
55
6. Generate Physical File DDS Source
Selecting this option allows users to specify any file definition source member (such as a
DFU file definition or a /COPY member) and automatically create a physical file source
member.
File definition source members should contain only F and I specifications for one record
format. Arrays that appear in the input specifications should be defined as individual
elements rather than as one field.
Note that generated entries will not replace any pre-existing entries in the member.
To Generate Physical File DDS Source Code
1. To generate physical file DDS source code, select Option 6 from the Conversion
Tools Menu and press ENTER. The following screen will appear.
Generate Field Reference DDS (GENFRFDDS)
Type choices, press Enter.
Source member with F & I specs
master
Source file with F & I specs . . . . . . . .
>
Library . . . . . . . . . . . . . . . . . . . . .
>
QS36SRC
*LIBL
Source mbr for generated DDS . . . . . . >
*S36SRCMBR
Source file for generated DDS . . . . . .
>
QDDSSRC
Library . . . . . . . . . . . . . . . . . . . . .
>
Preserve S/36 record layout . . . . . . . .
>
*LIBR
*YES
Name of field reference file . . . . . . .
>
@FLDREF
Job desc. (Submits to batch) . . . . . . .
>
QBATCH
Library . . . . . . . . . . . . . . . . . . . . .
>
*LIBL
F3 = Exit F4 = Prompt F5 = Refresh F12 = Cancel F13 = How to use this display
F24 = More Keys
2. Press F11 and follow the instructions below.
S36SRCMBR - Source members containing F and I specs
name:
Enter the name of the file definition source member that you wish
to convert to DDS.
This source member should contain F and I specifications for one
single record format. Refer to Appendix F if the file contains more
than one record format.
56
ProStart Manual
S36SRCFIL - Source file with F and I specs
The possible file values are:
QS36SRC:
The source file containing the S/36 file definition source member
to be converted.
source file name: Enter a specific source file name where the file definition source
member can be found.
The possible library values are:
*LIBL:
The library list is used to locate the file.
library name:
Enter a specific library name where the source file can be found.
DDSSRCMBR - Source member for generated DDS
name:
Enter the name of the source member to contain the generated
DDS.
*S36SRCMBR: The name of the source member to contain the generated DDS.
DDSSRCFIL - Source file for generated DDS
name:
Enter the name of the source file to contain the generated DDS.
*LIBL:
The library list is used to locate the file.
The possible library values are:
*LIBL:
The library list is used to locate the file.
library name:
Enter a specific library name where the DDS source file can be
found.
The possible file values are:
QDDSSRC:
The source file containing the generated DDS source code.
source file name: Enter a specific source file name where the generated DDS source
code will be placed.
Chapter 8
Using Conversion Tools
57
PRESERVE - Preserve S/36 record layout
This option determines whether or not the DDS generated will generate file layouts
that match the S/36 file layouts character for character.
*YES
The files generated will match the S/36 file layouts. Filler fields
will be generated to reserve unused space in the record.
*NO
The file layouts will not match the S/36 files. Unused space will be
eliminated from the record and all numeric fields will become
packed.
FLDREF - Name of field reference file
name:
Enter a specific field reference file name to be referenced in the
physical file source specifications.
The default is @FLDREF.
JOBD - Job desc (Submits to batch)
Specifies the job description to be referenced for a batch job. Entering "*NONE"
will cause the job to be run interactively.
7. Generate File Conversion Programs
This option allows users to specify any file definition source member (such as a DFU
file definition or a /COPY member) and automatically create a skeleton data conversion
program. The input file will be the program described S/36 file. The output file will be
the externally described native physical file which must exist as an object prior to
running this option.
The program that is generated will map fields from the input file into the output file on a
field-by-field basis. Therefore the layouts of the two files need not be identical.
However, field names in the output file (externally described) must match the field
names in the file definition source member specified (which becomes part of the
program source).
The generated program is written so that any numeric fields from the input file do not
contain valid numeric data are replaced with zeros. You may wish to modify the
handling of such fields if this is not appropriate. (For example, if your data files
routinely contain numeric fields that are blank filled rather than zero filled.)
S/36 files with more than one record format are not handled automatically. A
programmer will need to modify the conversion program for these files or create his
own. Refer to Appendix F for more information on multi-format files.
58
ProStart Manual
To Generate a File Conversion Program for a Single-Record Format File
1. To generate a file conversion program for a single-record format file, select Option 7
from the Conversion Tools Menu and press ENTER. The following screen will
appear.
Generate File Conversion Pgm (GENCVTPGM)
Type choices, press Enter.
S/36 environment file name . . . . .
armast
Library . . . . . . . . . . . . . . . . . .
QS36F
Externally Described file name . . .
*S36FIL
Library . . . . . . . . . . . . . . . . . . .
arfiles
File definition source file . . . . . . .
>
Library. . . . . . . . . . . . . . . . . . . .
>
Member . . . . . . . . . . . . . . . . . . . .
Library . . . . . . . . . . . . . . . . . . . .
Job desc. (Submits to batch) . . . . .
Library . . . . . . . . . . . . . . . . . . . .
*LIBL
armast
Conversion program name . . . . . . .
RPG Source file . . . . . . . . . . . . . .
QS36SRC
cvarmast
>
QRPGSRC
>
worklib
>
QBATCH
>
*LIBL
F3 = Exit F4 = Prompt F5 = Refresh F12 = Cancel F13 = How to use this display
F24 = More keys
2. Press F11 and follow the instructions below.
S36FIL - S/36 environment file name
The possible file values are:
File name:
Enter a specific S/36 disk file name.
The possible library values are:
QS36F:
This specific library contains the file.
*LIBL:
The library list is used to locate the file.
*CURLIB:
The current library contains the file.
name:
Enter a specific library name where the new formats will be found.
Chapter 8
Using Conversion Tools
59
S40FIL - Externally described file name
The possible file values are:
*S36FIL:
Use the same disk file name for the externally described file as
defined for the S/36 environment disk file.
name:
Enter a specific file name for the externally described disk file.
The possible library values are:
*LIBL:
The library list is used to locate the file.
*CURLIB:
The current library contains the file.
File name:
Enter a specific library name where the new formats will be found.
FDFFIL - File definition source file
The possible file values are:
QS36SRC:
The source file which contains file definition source member.
source file name: Enter a specific source file name where the file definition source
member may be located.
The possible library values are:
*LIBL:
The library list is used to locate the file containing the file
definition source members.
*CURLIB:
The current library contains the file with the file definition source
members.
*S36LIB:
The source file with the file definition source members is in the
same library as the data file.
name:
Enter a specific library name where the file definition source
members will be found.
FDFMBR - Member
Enter the file definition source member name for a set of F and I specifications that
define the S/36 environment input file.
This member should contain F and I specifications for only one file.
RPGMBR - Conversion program name
Enter a specific program name to be assigned. Be sure the program name is unique
to the source file described below.
The generated code will not replace any preexisting code in the member.
60
ProStart Manual
RPGFIL - RPG Source File
The source file that will contain the conversion program source.
The possible file values are:
QRPGSRC:
The source file to contain the skeleton RPG program.
source file name: Enter a specific source file name where the skeleton RPG program
will be located.
The possible library values are:
*LIBL:
The library list is used to locate the file.
*CURLIB:
The current library contains the file.
name:
Enter a specific library name where the file will be found.
JOBD - Job desc (Submit to batch)
Specifies the job description to be referenced for the batch job. Entering “*NONE”
will cause the job to be run interactively.
Before executing the file conversion program, a programmer will need to create a CL
program. An example is included below.
PGM
OVRDBF
FILE (@INPUT)
TOFILE (QS36F/CLASS)
OVRDBF FILE (CLASSPF)
TOFILE(XJMSLIB/CLASSPF)
CALL
PGM(PROGRAM)
ENDPGM
Replace 'QS36F/CLASS' with the library and file name of your S/36 disk file name.
Replace 'XJMSLIB/CLASSPF' with the library and file name of your externally
described file.
Replace 'PROGRAM' with the name of the RPG conversion program (e.g., the
RPGMBR parameter from the command described above).
If you specified date differentiated files be sure there is only one member to be
converted. If a member name is not provided when referencing a file, *FIRST
member will be the default.
For information on keying the CL program, refer to IBM manuals, Application
Development Tools: SEU User's Guide/References.
Chapter 8
Using Conversion Tools
61
8. Generate Screen Format DDS Source
This option allows you to convert System/36 screen format source (S and D
specifications) to native/400 DDS source. The IBM CRTS36SDPF command is used to
perform the conversion. The resulting display file is therefore exactly the same as that
used in the existing System/36 environment application.
To Generate Screen Format Source
1. Select Option 8 from the Conversion Tools Menu and press enter. The following
screen will appear:
Generate Screen Format Source(GENFMISRC)
Type choices, press Enter.
Screen member(s) to convert . . . .
Source file containing S36 S&D .
Library . . . . . . . . . . . . . . . . . . .
ar101fm
>
QS36SRC
>
*LIBL
Source file fore converted DDS . . .
>
Library . . . . . . . . . . . . . . . . . . .
>
Compile generated DDS Source. . .
>
QDDSSRC
*LIBL
*YES
Job desc. (Submits to batch). . . . . .
>
QBATCH
Library . . . . . . . . . . . . . . . . . . .
>
*LIBL
F3 = Exit F4 = Prompt F5 = Refresh F12 = Cancel F13 = How to use this display
F24 = More keys
2. Press F11 and follow the instructions below.
DDSMDR - Screen member(s) to convert
*ALL:
All members of type DSPF36 found in the S36FIL parameter below
are converted.
generic*:
Specify the generic name of the screen format source members to
be converted. A generic name is a set of one or more characters
followed by an asterisk. All members that start with the prefix
described by the characters before the asterisk will be converted.
name:
Specify the name of the file containing the System/36 screen
format source file. The default is QS36SRC.
62
ProStart Manual
S36FIL - Name of System/36 File
Specifies the name of the file containing the System/36 screen format source file.
The default is QS36SRC.
Valid library names are:
Name:
The name of the library containing the source file.
*CURLIB:
The current library is the library containing the source file.
*LIBL:
The library list is used to locate the source file.
DDSFIL - Source File Name
The name of the source file that will contain the generated DDS source member(s).
name:
Specify the name of the source file. The default is QDDSSRC.
Note: Do not specify QS36DDSSRC for this parameter.
Valid library names are:
name:
The name of the library containing the source file.
*CURLIB:
The current library is the library containing the source file.
*LIBL:
The library list is used to locate the source file.
JOBD - Job Description Name
Specifies the name of the job description used to submit this job to batch.
name:
Specify the name of the job description. The default is QBATCH.
*NONE:
The job is run interactively.
name:
The name of the library containing the job descriptions.
*LIBL:
The library list is used to locate the job description.
Chapter 8
Using Conversion Tools
63
9. Generate RPG/400 Program Source
This option allows the user to select one, a set or all RPG II programs from one source
file and create RPG/400 programs in the target source file. Optionally, a user may
submit the converted source program for a compile attempt.
With this command, users may choose to keep the display file program or externally
described, keep the disk files program or externally described, and keep the report output
program described or convert to externally described printer file DDS. (Member types
must be RPG36 or RPT36, or the source will be ignored by ProStart.)
To Generate RPG/400 Program Source Code
1. To generate RPG/400 program source code, enter Option 9 from the Conversion
Tools Menu and press ENTER. The following screen will appear.
Generate RPG program source (GENRPGSRC)
Type choices, press Enter.
RPG member(s) to convert . . . . . . . . .
Source file containing S36 RPG . . . . .
*all
>
QS36SRC
Library . . . . . . . . . . . . . . . . . . . . .
>
*LIBL
Source file for converted RPG . . . . . .
>
QRPGSRC
Library . . . . . . . . . . . . . . . . . . . . .
>
Externally desc. disk files . . . . . . . . .
>
*NO
*LIBL
Externally desc. display files . . . . . .
>
*NO
Create external printer files . . . . . . .
>
*NO
Name of field reference file . . . . . . .
>
@FLDREF
Source file for printer files . . . . . . . .
>
QDDSSRC
Library . . . . . . . . . . . . . . . . . . . .
>
*LIBL
Source file for /COPY members . . . . .
>
QRPGSRC
Library . . . . . . . . . . . . . . . . . . . . . .
>
*LIBL
Compile generated RPG source . . . . .
>
*YES
job desc. (Submits to batch) . . . . . . . .
>
QBATCH
Library . . . . . . . . . . . . . . . . . . . . . .
>
*LIBL
F3 = Exit F4 = Prompt F5 = Refresh F12 = Cancel F13 = How to Use this Display
F24 = More keys
2. Press F11 and follow the instructions below.
64
ProStart Manual
RPGMBR - RPG member(s) to convert
name:
Enter the name of the RPGII program that you wish to convert to
RPG/400. (For example, PREMPL.)
generic*:
Enter a partial name for a range of RPGII programs you wish to
convert to RPG/400. (For example, PR*.)
*ALL:
Enter *ALL for all RPGII programs to be converted to RPG/400.
Note: Only member types RPG36 and RPT36 will be converted.
S36FIL - Source file containing S36 RPG
The possible file values are:
QS36SRC:
The source file containing the S/36 RPG programs to be converted.
source file name: Enter a specific source file name where the S/36 RPG programs to
be converted can be found.
The possible library values are:
*LIBL:
The library list is used to locate the file.
*CURLIB:
The current library is used to locate the file.
library name:
Enter a specific library name where the source file can be found.
RPGFIL - Source file for converted RPG
The generated code will not be created if the output member already exists.
The possible file values are:
QRPGSRC:
The source file to contain RPG/400 programs that are converted.
source file name: Enter a specific source file name where the converted RPG/400
programs will be found.
The possible library values are:
*LIBL:
The library list is used to locate the file.
*CURLIB:
The current library is used to locate the file.
library name:
Enter a specific library name where the new RPG source file can be
found.
The member name of the converted RPG/400 source will be the same name as the
RPGII source member.
Chapter 8
Using Conversion Tools
65
EXTDISKF - Externally desc. disk files
Specifies whether disk files are to reference external file descriptions or remain
program described.
*YES:
Indicates that external descriptions for all disk files will be
referenced by this program.
*NO:
Indicates that disk files are to remain program described.
EXTDSPF - Externally desc. display files
Specifies whether the display files are is to reference the external file descriptions or
remain program described.
*YES:
Indicates display files are externally described.
*NO:
Indicates display files are to remain program described.
EXTPRTF - Externally described printer files
Specifies whether the RPG report output specifications are to remain in the program
or be converted to printer file DDS.
*YES:
Printer output specifications will be converted to externally
described printer file DDS.
*NO:
Indicates printer files will remain program described.
FLDREF - Name of field reference file (only if EXTPRTF(*YES))
The name of the field reference file to contain the field name entries.
PRTFSRC - Source file for printer files (only if EXTPRTF(*YES))
The name of the printer file.
CPYSRCF - Source file for /COPY members
The name of the source file that will be used to locate /COPY members referenced
by the programs converted.
Valid library names are:
Name:
the name of a specific library that will be used to find roll /COPY
members.
*LIBL:
the library list will be used to locate the source files containing
/COPY source members.
*SAME:
The library name that currently appears in the /COPY statements
will remain as they are.
66
ProStart Manual
COMPILE - Compile generated RPG source
*YES:
Indicates that a compile should be attempted. (If *YES is selected
be sure that all necessary libraries containing files and /COPY
members are in the library list.)
*NO:
Indicates that a compile should not be attempted.
JOBD - Job desc (Submit to batch)
Specifies the job description to be referenced for the creation of the RPG/400
programs and the compile attempts.
Other Considerations:
Programs using combined primary workstation files must have their logic changed to
reflect the fact that the system no longer provides a blank workstation record upon
program start up. The simplest way to provide for this is to add a set of output
specifications to output the first record format condition on indicator 1P.
Note: Any calculations conditioned on the record id indicator for the blank record
format will need to be modified because that indicator will never be set on.
An alternative approach is to convert the combined primary file to combined fullprocedural. You must then place an explicit READ statement at the beginning of your
calculation specifications conditions such that it happens every pass through the
calculations except the first.
67
C H A P T E R
9
Interactive OCL to CL Converter
With the 2.0 release of ProStart, a new module has been added to the product. The
interactive OCL to CL Converter is a result of receiving so many favorable comments
about our batch converter and side-by-side OCL to CL report. Several ProStart users
have told us that this handy report was valuable as a learning tool. To provide an easier
way to learn how OCL is converted to CL, we have refashioned the batch converter into
an interactive converter. Now you can quickly see how different OCL commands can be
converted to CL.
What would you do with this module?
•
You may want to use the Interactive converter to find the comparable AS/400 CL
command to a S/36 command.
•
You may want to see how a procedure statement is converted through ProStart.
•
You may want to implement a particular technique through a CL Program. You
know how to accomplish the technique through OCL, but are not sure how to start in
CL.
In all these instances, the interactive converter can save you a tremendous amount of
time as it demonstrates similar code in a new language.
Before describing how to use the interactive converter, here are some
things to remember:
•
Converting from OCL to CL cannot be 100% automatic since the operating systems
of the S/36 and the AS/400 are so different. As a result, there are many areas that
will not convert clean, and others that will not convert at all. Recognize that this
conversion tool can save you a tremendous amount of time, but will not eliminate all
effort on your part to clean up the converted code.
•
If ProStart comes across a procedure statement that cannot be converted, it transfers
the statement into a comment in the CLP. It also places an arrow ( = = = > ) at the
beginning of the comment. You will have to complete the conversion manually.
68
ProStart Manual
•
If ProStart comes across a procedure statement that can be partially converted, the
product will attempt the conversion. In many cases, it will also highlight the line
with a short arrow ( = = > ) at the beginning of the CL statement. You will have to
complete the conversion manually.
Using the Interactive Converter
This new option can be accessed through the ProStart menu.
1. Select Option 4 from the Main Menu. The following screen will appear:
ProStart Interactive OCL to CL Converter
Seq
OCL Statement
= = = = = = = = = = = = = = BEGINNING OF DATA = = = = = = = = = = = = =
---------------------------------------------------------------------------------------------------Seq
CLP Statement
= = = = = = = = = = = = = = BEGINNING OF DATA = = = = = = = = = = = = = =
F1 = Convert
12 = Cancel
F3 = Exit
F5 = Refresh
F9 = Print
F10 = Top F11 = Bottom
To access the interactive converter directly, be sure that the ESXPRO library is
always available to programmers through their library list.
2. Enter the following:
CALL *JMIOC
Lets first look at the screen. The top half of the screen is a work area for you to key
procedure statements or a full procedure. Although only 8 lines can be viewed at
one time, you can roll forward and backward to use up to 9999 input lines. The
bottom half of the screen is used to display the generated CL code. You cannot key
into this portion of the screen. Again, 8 lines are available for your review, and up
to 9999 lines can be accessed in all.
The function keys at the bottom of the screen describe what you can do with the
screens.
Fl = Convert
Reads the keyed information in the top portion of the screen and
converts it into CL, presenting the generated code in the bottom
portion of the screen.
F3 = Exit
Returns you to the ProStart Main Menu.
F5 = Refresh
Redisplays the current screen as it was before you made any
changes.
Chapter 9
Interactive OCL to CL Converter
69
F9 = Print
Allows you to print the OCL and generated CL on a side-by-side
condensed print report.
Fl0 = Top
Moves you to the beginning of the code in the section you are in.
If the cursor is positioned in the top portion of the screen, pressing
F10 will move you to the beginning of the procedure. If the
cursor is positioned in the bottom portion of the screen, pressing
F10 will move you to the beginning of the CL program.
F11 = Bottom
Moves you to the end of the code in the section you are in. If the
cursor is positioned in the top portion of the screen, pressing F11
will move you to the end of the procedure. If the cursor is
positioned in the bottom portion of the screen, pressing F11 will
move you to the end of the CL program.
F12 = Cancel
Returns you to the ProStart Main Menu.
In addition, you must learn how to add or insert, copy, move and delete lines. Our
approach is similar to the approach used in the AS/400 SEU. ProStart allows you to use
single characters to initiate an action. The characters and related action are:
I
Insert or add a single line just after the current line.
Ix
Insert or add 'x' number of lines (1 to 9 lines) just after the current line.
C
Copy this line.
M
Move this line.
D
Delete this line.
A
Used with the Copy and Move functions. 'A' indicates that you wish to place the
Copied or Moved line after the current line.
B
Used with the Copy and Move functions. 'B' indicates that you wish to place the
Copied or Moved line before the current line.
Now lets consider two different examples:
1. You need to learn how to convert the DELETE command into CL.
2. Bring up the ProStart Interactive OCL to CL Converter by selecting option 4 from
the Main Menu. The cursor will appear just under 'Seq at the top of the screen.
Begin by entering “I” to add one line to the top work area.
ProStart Interactive OCL to CL Converter
70
ProStart Manual
Seq
OCL Statement
= = = = = = = = = = = = = = BEGINNING OF DATA = = = = = = = = = = = = = = =
----------------------------------------------------------------------------------------------------Seq
CLP Statement
= = = = = = = = = = = = = = BEGINNING OF DATA = = = = = = = = = = = = = = =
=
F1 = Convert
F12 = Cancel
F3 = Exit
F5 = Refresh
F9 = Print
F10 = Top
F11 = Bottom
3. Press the ENTER key and the following screen will appear.
ProStart Interactive OCL to CL Converter
Seq
OCL Statement
= = = = = = = = = = = = = = BEGINNING OF DATA = = = = = = = = = = = = = = =
0001.00
----------------------------------------------------------------------------------------------------Seq
CLP Statement
= = = = = = = = = = = = = = BEGINNING OF DATA = = = = = = = = = = = = = = =
=
F1 = Convert
F12 = Cancel
F3 = Exit
F5 = Refresh
F9 = Print
F10 = Top
F11 = Bottom
4. A single line (0001.00) has been added, and the cursor appears just to the right of the
line number. Key in the OCL command you wish to convert.
ProStart Interactive OCL to CL Converter
Seq
OCL Statement
= = = = = = = = = = = = = = BEGINNING OF DATA = = = = = = = = = = = = = = = =
0001.00 SAVELIBR ESSEX,999,IBMIRD
-----------------------------------------------------------------------------------------------------Seq
CLP Statement
= = = = = = = = = = = = = = BEGINNING OF DATA = = = = = = = = = = = = = = = =
F1 = Convert
F12 = Cancel
F3 = Exit
F5 = Refresh
F9 = Print
F10 = Top
F11 = Bottom
5. Press the Fl = Convert key. After a short pause, the converted code will appear in
the bottom section as shown below.
Chapter 9
Interactive OCL to CL Converter
71
ProStart Interactive OCL to CL Converter
Seq
OCL Statement
= = = = = = = = = = = = = = BEGINNING OF DATA = = = = = = = = = = = = = = = =
0001.00
SAVELIBR ESSEX,999,IBMIRD
-----------------------------------------------------------------------------------------------------Seq
CLP Statement
= = = = = = = = = = = = = = BEGINNING OF DATA = = = = = = = = = = = = = = = =
0001.00
PGM
0002.00
SAVLIB
LIB( ESSEX DEV (DKT01) VOL(IBMIRD) +
0003.00
LABEL(ESSEX) EXPDATE(*PERM) PRECHK(*YES) +
0004.00
0005.00
DTACPR(*YES)
ENDPGM
F1 = Convert
F12 = Cancel
F3 = Exit
F5 = Refresh
F9 = Print
F10 = Top
F11 = Bottom
6. Before looking at the next example, delete the OCL (with "D”) at the start of each
line, or just key over the OCL.
Let's look at a more elaborate example:
You must write a CL program to execute a task, and you know how you would code the
task in OCL. ProStart can show you one way to address the task.
Again, you might key an "I" to create a new line, but this time you need several lines.
Key "I9" and press ENTER.
1. Only seven lines are displayed; the remaining lines are available by ROLLING
forward when you need them. Key the following procedure.
72
ProStart Manual
* PRINT EMPLOYEE LIST IN LAST NAME SEQUENCE
*
EMP901 ?1?
// LOAD #GSORT
// FILE NAME-INPUT,LABEL-P.EMP901
// FILE NAME-OUTPUT,LABEL-P.EMP004,+
RECORDS-500,EXTEND-10
// RUN
HSORTR
10A
3X 128 N
FNC 129 138
FDC
1 128
// END
// SWITCH 10000000
// LOAD EMP004
// FILE NAME-EMP004SO,+
LABEL-P.EMP004,RETAIN-S
// FILE NAME-COMPMAST,LABEL-P.COMP
// RUN
2. When you get through line 7, press the ROLL forward key to see the next available
lines. Key the remaining procedure using the insert function and the ROLL key as
necessary.
3. Now lets look at some functions keys. Leaving the cursor in the top half of the
screen, press F10 = Top. The first line of the procedure appears in the top of the
screen.
4. Now press F11 = Bottom. The last line of the procedure appears in the top of the
screen.
5. Now you know how to move within the procedure with the ROLL key and the F10
and F11 keys.
6. Press Fl = Convert to generate the CL code. After a short pause, the generated CL
program will appear in the bottom half of the screen.
7. Move your cursor to the bottom half of the screen and test the ROLL keys and the
F10 and F11 keys.
8. Press F9 = Print to print the side-by-side OCL to CL condensed print report. Now
you can review the full procedure and generated CL code at your leisure.
9. As you use the Interactive Converter, you will undoubtedly have questions about
addressing the statements that did not convert, and about other approaches to handle
similar OCL functions. We recommend that you reference Appendix A - Conversion
of OCL in this manual for information. Also reference the IBM CL manuals, as they
should become your primary source for detailed information on the CL language.
73
A P P E N D I X
A
Conversion of OCL
The following is a list of procedures, OCL commands and Procedure Control
Expressions with brief narratives of ProStart's action upon them.
Procedures
Listed below are the most critical OCL statements and IBM procedures with
explanations of how the conversions are handled.
BLDFILE
This IBM procedure is converted into a comment in the CL program.
Externally described files must exist in order for programs which
reference the external descriptions to be compiled. It is therefore
accepted practice to create files once (CRTPF - create physical file) and
leave them on disk at all times. Typically, the file member will also be
added during the creation of the file.
ProStart replaces the DELETE file command with the CLRPFM (clear
physical file member) command. Consequently, the member will always
exist; it will never need to be added. Therefore, a programmer will
probably want to simply delete the commented BLDFILE statement.
BLDINDEX
This IBM procedure is converted into a comment in the CL program.
Externally described files must exist in order for programs which
reference the external descriptions to be compiled. It is accepted practice
to create files once (CRTLF create logical file) and leave them on disk at
all times.
Build DDS (see Data Description Specifications Reference - SC21-9620
for more information) and use CRTLF (create logical file) to create these
logical views.
BLDLIBR
This IBM procedure is converted to the CRTLIB (create library)
command. If a file name is specified, a RSTLIB (restore library)
command is also generated to restore the objects into the newly created
library.
74
ProStart Manual
COPYDATA This IBM procedure is converted to the CPYF (copy file) command.
COPYI1
This IBM procedure is converted to the DUPDKT (duplicate diskette)
command.
Note that the following options are not supported by this implementation
on the AS/400 and are not converted:
•
DELETE option.
•
Date differentiated files are not supported.
•
Only supports copying the entire diskette.
•
Volume ID is not checked on output diskette.
DATE
See the date OCL statement below.
DELETE
This IBM procedure is converted to the CLRPFM (clear physical file
member) command. This command clears the file member of all records
but leaves it on disk.
Note the following restrictions:
•
Only the first member in the file is cleared.
•
Command will not work for logical files.
•
Command will not work for diskette files.
ENTER
This S/36 DFU procedure, is converted into a comment in the CL
program. If you intend to use AS/400 DFU to perform a function similar
to S/36 DFU, consider using the CHGDTA (change data) command to
invoke AS/400 DFU.
EXTRACT
Since this S/34 OCL command will execute successfully in S/36 batch
jobs, ProStart will effectively convert these statements to CPYF CL
statements.
Example:
EXTRACT INPUT,OUTPUT,,OMIT,,l,D
becomes:
CPYF
FROMFILE(*LIBL/INPUT)+
TOFILE(*LIBL/OUTPUT) +
FROMMBR(*FIRST) +
TOMBR(*FIRST) +
INCCHAR(*RCD 1 *NE D)
Appendix A
Conversion of OCL
75
FROMLIBR This IBM procedure is converted into a comment in the CL program.
Consider using the SAVOBJ (save object) command to save program
objects or source files.
INIT
This IBM procedure is converted to the INZDKT (initialize diskette) ,
CLRDKT (clear diskette) or RNMDKT (rename diskette) commands as
appropriate.
INQUIRY
This S/36 DFU procedure is converted into a comment in the CL
program. If you intend to use AS/400 DFU to perform a function similar
to S/36 DFU, consider using the DSPDTA (display data) command to
invoke AS/400 DFU.
LIBRLIBR
This IBM procedure is converted into a comment in the CL program.
Consider using the CRTDUPOBJ (create duplicate object) command to
copy objects from one library to another. The CPYSRCF (copy source
file) command can be used to copy source members.
LIST
This S/36 DFU procedure is converted into a comment in the CL
program. IBM recommends the AS/400 Query product to perform the
equivalent function.
LISTLIBR
This IBM procedure is converted into a comment in the CL program.
Consider using the DSPLIB (display library) command to display or print
the list of all objects in a library. The DSPFD TYPE(*MBRLIST)
(display file description member list option) command can be used to
display or print the list of members in a source file.
ORGANIZE Since this S/34 OCL command will execute successfully in S/36 batch
jobs, ProStart will correctly convert these statements to CPYF CL
statements.
Example:
ORGANIZE
INPUT,,Fl,OUTPUT,,1,D
becomes:
CPYF
QRY
FROMFILE(*LIBL/INPUT) +
TOFILE(*LIBL/OUTPUT) +
FROMMBR(*FIRST) +
TOMBR(*FIRST) +
INCCHAR(*RCD 1 *NE D)
This IBM procedure is converted into a comment in the CL program.
76
ProStart Manual
REMOVE
This IBM procedure is converted into a comment in the CL program.
Consider using the DLTPGM (delete program) command to delete object
programs. The RMVM (remove member) command can be used to delete
source members from a source file.
RENAME
This IBM procedure is converted into a comment in the CL program.
Although the RNMOBJ (rename object) command can be used to
accomplish this, it is not recommended for externally described files. An
externally described file has associated source code. Renaming a file
object may result in losing track of the source that was used to create the
file in the first place.
As an alternative, consider that you can create a single file with multiple
members which can be added, renamed or removed as necessary.
One of the most frequent reasons for renaming a file is to return the file
to its original name after it has been reorganized or copied, omitting
deleted records. This function can be performed by using the DELETE
operation code (within an RPG program) to physically delete undesired
records, and then using the RGZPFM (reorganize physical file member)
command to free the disk space held by these records. This approach
offers the advantage of not affecting logical views over the physical file.
RESTLIBR
This IBM procedure is converted to the CRTLIB (create library)
command and the RSTLIB (restore library) command. The CRTLIB
command is inserted to ensure that the library does not exist prior to
restoring another version. RSTLIB allows restoring to an existing
library.
RESTORE
This IBM procedure is converted to the RSTOBJ (restore object)
command.
Note that the following options may require a programmer’s attention.
Some are not supported on the AS/400 and are not converted:
•
Files can be restored even if they already exist without an error
message.
•
The library name that will contain the file is a required parameter that
is not defaulted by ProStart.
•
Date differentiated files are not supported.
•
Restore of a single file assumes that the label on the diskette or tape
is the same as the file itself. If the defaults are used this value is
likely to be the name of the library in which the file was located
when it was saved.
•
Record select/omit is not supported. Consider using CPYF (copy
file) for this.
•
Changes to file attributes (record length, key ... ) are not supported .
•
Starting date, or starting file name for group saves are not supported.
Appendix A
SAVE
Conversion of OCL
77
This IBM procedure is converted to the SAVOBJ (save object)
command.
Note that the following options require a programmers attention. Some
options are not supported on the AS/400 and are not converted:
SAVELIBR
•
The library name where the file is located is a required parameter that
is not defaulted.
•
Date differentiated files are not supported.
•
all tape devices are changed to "TAP01", all diskette devices to
"DKT01".
•
Retention days are not converted to expiration dates. "*PERM" (nonexpiring) default is assumed.
•
If the S/36 group name is used for SAVE ALL operations, this
parameter will be used for the LABEL parameter of the file on
diskette, otherwise the file name itself will be used.
•
Diskette "ADD" option is not supported.
•
Record select/omit and REORG are not supported.
•
Changes to file attributes (record length, key...) are not supported.
Consider using the CPYF (copy file) command for this.
This IBM procedure is converted to the SAVLIB (save library)
command.
Note that the following options may require a programmer's attention.
Some options are not supported on the AS/400 and are not converted:
•
The System/36 library name default to ?CLIB? is not supported.
•
Retention days are not converted to expiration dates. "*PERM" (nonexpiring) default is assumed.
•
Date compression is assumed.
SET
This IBM procedure is converted into a comment in the CL program.
Consider using the CHGJOB (change job) command for most of the SET
procedure options. The OVRPRTF (override printer file) command can
be used to change various defaults for printer files.
SORT
This IBM procedure is converted to the FMTDTA (format data)
command.
Note that the following option is not supported on the AS/400 and may
require a programmer's attention.
•
JOBQ Y/N option.
78
ProStart Manual
You may wish to consider alternatives to SORT, such as logical files or
use of the OPNQRYF (open query file) command. See the Control
Language Reference (SC21-9778) for more information.
SWITCH
See the SWITCH OCL statement below.
SYSLIST
See the SYSLIST OCL statement below.
TAPEINIT
This IBM procedure is converted to the INZTAP (initialize tape)
command.
TOLIBR
This IBM procedure is converted into a comment in the CL program.
Consider using the RSTOBJ command.
TRANSFER
This IBM procedure is converted into a comment in the CL program.
The CPYFRMDKT (copy from diskette) and CPYTODKT (copy to
diskette) to transfer basic exchange data files between diskette and disk.
UPDATE
This S/36 DFU procedure is converted into a comment in the CL
program. If you intend to use AS/400 DFU to perform a function similar
to S/36 DFU, consider using the CHGDTA (change data) command to
invoke AS/400 DFU.
Operation Control Language (OCL) Commands
DATE
This OCL statement is converted into the CHGJOB DATE(...) (change
job) command.
Note that the scope of this command is different on the AS/400 than on
the S/36. The new date will remain in effect until another CHGJOB
command is executed with the date parameter, or until end of job (sign
off for an interactive job).
EVOKE
This OCL statement is converted into a SBMJOB (submit job) command.
This command is processed in the same fashion as the System/36 JOBQ
statement. Jobs initiated to the job queue may have to wait for long
periods behind other jobs on the job queue. However, you may wish to
create a separate job queue for selected jobs to allow a large number of
jobs to be executing concurrently. Remember that this approach may
degrade overall system performance.
FILE (disk)
This OCL statement is converted into two or four different commands:
ALCOBJ (allocate object) , OVRDBF (override database file), DLTOVR
(delete override), and DLCOBJ (deallocate object). The allocation and
deallocation of files is optional and is dependent on the ALCOPT
parameter in the OCL to CL conversion option.
Appendix A
Conversion of OCL
79
You may choose to allocate/deallocate the files when you execute the
Convert OCL option from the Conversion Menu. The allocation of files
always appears at the beginning of the CL program. The deallocation of
the files always appears at the end of the CL program. Overrides and
delete overrides appear before and after the high level language program
call commands.
Since each allocated file object must be deallocated, any GOTO and
CANCEL/RETURN commands that would route a user out of the
program will actually route the user to the deallocate objects portion of
the program.
File sharing is handled differently on the AS/400. Any files with "DISP" parameters in the S/36 procedure will be handled in the following way
on the AS/400.
S/36 DISP
AS/400 lock state.
SHRMM (SHR)
SHRRM
SHRRR
SHRMR
OLD/NEW (default)
*SHRUPD
*SHRRD
*SHRNUP
*EXCLRD
*EXCL
Example:
// FILE NAME-PREMPL,LABEL-PR.EMPL,DISP-SHRRM
becomes:
ALCOBJ
OVRDBF
[CALL
DLTOVR
DLCOBJ
OBJ(PR.EMPL *FILE *SHRRD *FIRST)
FILE(PREMPL) TOFILE (PR.EMPL)
___________]
FILE(PREMPL)
OBJ(PR.EMPL *FILE *SHRRD *FIRST)
The function of the ALCOBJ command is to ensure that each file
required by the job is available, and to preserve data integrity by
preventing them from being allocated (updated or deleted) by other jobs
during the execution of this job. This function can essentially replace the
"// IF ACTIVE" logic used in most System/36 implementations. Be
careful to ensure that critical jobs (e.g., batch posting jobs, or period-end
jobs) allocate their files in a manner which prevents other jobs from
interfering with their data.
If procedures are nested it is recommended that allocates from called CL
programs be incorporated in the first level program so that any problems
may be caught immediately when the job is initiated.
A matching DLCOBJ command must be performed after the job is
through with a file to release the lock placed on it by the ALCOBJ
command.
80
ProStart Manual
Note that the following options are not supported on the AS/400 and are
not converted:
•
RETAIN-J files.
•
Date differentiated files are not supported.
FILE
This OCL statement is converted into a comment in the (Diskette/ tape
CL program. On the System/36, the diskette and tape drives can only be
accessed via IBM utility programs. These functions must be redesigned
on the AS/400.
F'ORMS
This OCL statement is converted into an OVRPRTF (override printer
file) command.
INCLUDE
If a user procedure is invoked the CALL command is substituted. If an
IBM procedure is invoked, an appropriate command is substituted, or the
statement is converted to a comment.
Example:
PREMPL parml,parm2,parm3
becomes:
CALL
PGM(PREMPL) +
PARM(parml parm2 parm3)
INFOMSG
There is no equivalent function on the AS/400. This statement is
eliminated.
JOBQ
Converted to a SBMJOB (submit job) command.
Example:
// JOBQ ,PROCA,PARM1,PARM2
becomes:
SBMJOB
LIBRARY
CMD('CALL PGM(PROCA) PARM + (PARM1
PARM2)')
This OCL statement is converted into a CHGCURLIB (change current
library) command.
Example:
// LIB NAME-PRLIB
becomes:
CHGCURLIB LIB(PRLIB)
Appendix A
Conversion of OCL
81
Note that the "SESSION-NO" parameter is not supported with this
command. The current library is changed permanently until the next
CHGCURLIB, or CHGLIBL (change library list) command is
encountered, or the user signs off.
LOAD
This OCL statement and its associated // RUN statement are converted
into a CALL command.
Example:
// LOAD PREMPL
.
.
// RUN
becomes:
CALL PGM(PREMPL)
LOCAL
This OCL statement is converted into a CHGDTAARA (change data
area) command.
Example:
// LOCAL BLANK-*ALL
becomes:
CHGDTAARA DTAARA(*LDA (1 1024)) VALUE( )
// LOCAL OFFSET-9,DATA-'ABC'
becomes:
CHGDTAARA DTAARA(*LDA (9 3)) VALUE ('ABC')
LOG
This OCL statement is converted into a comment in the CL program. CL
program logging is not done to a permanent "history" file on the AS/400,
but to a job log. This job log is normally deleted at the end of a job if the
job ends normally. The CHGJOB (change job) or CHGJOBD (change
job description) commands can be used to modify how this is handled,
specifically the LOG and LOGCLPGM parameters.
MEMBER
This OCL statement is converted to an OVRMSGF command.
Example:
// MEMBER USER1-PRMSG
becomes:
OVRMSGF
MSGF(QUSERMSG) TOMSGF(PRMSG)
This command is necessary to override the default message file used for
formatted screens, SUBR23 or ?M__? substitution expressions.
82
ProStart Manual
MENU
This OCL statement is converted to a GO command.
Example:
// MENU PRMENU or MENU PMENU
becomes:
GO MENU(PRMENU)
Unlike the System/36, AS/400 menus are "executable", when the
command to invoke a menu is executed the menu appears immediately
rather than appearing when the current job completes. If a new menu is
to be presented at the end of a CL program, the command should be
executed as the last step in the program. This technique will have an
undesirable effect on performance over the long run.
MSG
This OCL statement is converted to SNDMSG. If the user message
queue is in break mode, the message will appear immediately. Otherwise
the DSPMSG command can be used to display it.
Note that for messages directed to a work station, the work station IDs on
the AS/400 are 10 characters long and probably different than on your
System/36.
NOHALT
This OCL statement is converted into a comment in the CL program.
Consider using the MONMSG command.
OFF
This OCL statement is converted into the SIGNOFF command.
POWER
This OCL statement is converted into a comment in the CL program.
Consider the PWRDWNSYS command.
PRINTER
This OCL statement is converted into an OVRPRTF command.
Example:
// PRINTER NAME-INVOICE,DEVICE-Pl,+
FORMSNO-INVC,ALIGN-YES,COPIES-2
becomes:
OVRPRTF FILE(INVOICE) DEV(P1) ALIGN(*YES) +
FORMTYPE(INVC) COPIES(2)
Appendix A
PROMPT
Conversion of OCL
83
This OCL statement is converted to a SNDRCVF (send receive file)
command with a DCLF (declare file) placed at the start of the program.
Example:
// PROMPT MEMBER-PR999,FORMAT-Sl,LENGTH-'75'
becomes:
DCLF
FILE(PR999)
SNDRCVF DEV(*FILE) RCDFMT(S1) WAIT(*YES)
The CL program will use the external definition of the display file.
Therefore, any output parameters defined in the DDS for the display file
should be loaded using the CHGVAR (change variable) command before
executing this command in the CL program.
Note: If a specific prompt does not require a user to press the ENTER
key to continue, change the SNDRCVF to SNDF. Also, create the
display file using the DFRWRT (*NO) option, or informational
screens may be displayed so quickly as to be unreadable.
REGION
This OCL statement is not applicable on the AS/400 and is dropped.
RESERVE
This OCL statement is not applicable on the AS/400 and is dropped.
RUN
See // LOAD statement.
SESSION
This OCL statement is converted into a comment in the CL program.
SWITCH
This OCL statement is converted into a CHGJOB command.
Example:
// SWITCH 0011XXll
becomes:
CHGJOB SWS(0011XXll)
SYSLIST
This OCL statement is converted into a comment in the CL program.
Outside of the System/36 environment, there is no equivalent to the
System/36 scrolling messages displayed on the work station during job
execution. However, most display (DSPxxx) commands default to
displaying the information on the work station, rather than to the printer
when called interactively.
WAIT
This OCL statement is converted into the DLYJOB (delay job)
command.
WORKSTN
This OCL statement is converted into a comment in the CL program.
84
ProStart Manual
/*
This OCL statement is converted into a comment in the CL program.
This end-of-data statement is generally used only by IBM programs
which process in-line data. This is not supported by CL programs, but
can be accomplished using commands like STRDBRDR (start data base
reader) or SBMDBJOB (submit data base job) which process CL data
streams rather than CL programs.
Procedure Control Expressions
*
(Comment) Statement.
This statement remains a comment in the CL program.
Example:
*
PROCEDURE TO PRINT EMPLOYEE CHECKS
becomes:
/* * PROCEDURE TO PRINT EMPLOYEE CHECKS */
Substitution Expressions
The following substitution expressions are converted by ProStart in this release.
?n?
Parameter.
Example:
// LOAD ?12?
becomes:
DCL VAR (&PARM12) TYPE(*CHAR)
CALL PGM(&PARM12)
?n'value'?.
Default Parameter.
Example:
// LOAD ?12'ESX100'?
becomes:
DCL
IF
VAR(&PARM12) TYPE(*CHAR)
COND(&PARM12 *EQ '') + THEN(CHGVAR +
VAR (&PARM12) + VALUE('ESX100')) +
CALL PGM(&PARM12
Appendix A
?nT'value'?
Conversion of OCL
85
Temporary Value Parameter.
Example:
// EVALUATE P64=?3T'TEMPORARY'?.
becomes:
DCL
DCL
DCL
IF
ELSE
?nF'value'?
VAR(&PARM03) TYPE(*CHAR)
VAR(&WRK001) TYPE(*CHAR)
VAR(&PARM64) TYPE(*CHAR) LEN(012)
COND(&PARM03 *EQ '') THEN(CHGVAR) +
VAR(&WRK001) VALUE('TEMPORARY')
CMD(CHGVAR VAR(&WRK001) VALUE('&PARM03')) +
CHGVAR VAR(&PARM64) VALUE(&WRK001)
Forced Value Parameter.
Example:
// EVALUATE P64=?4F'FORCE'?
becomes:
DCL
DCL
?R?
VAR(&PARM04) TYPE(*CHAR)
VAR(&PARM64) TYPE(*CHAR) LEN(012)
CHGVAR VAR(&PARM04) VALUE('FORCE') +
CHGVAR VAR(&PARM64) VALUE(&PARM04)
Required Parameter.
Example:
// INCLUDE ?R?
becomes:
DCL
VAR(&WRK001) TYPE(*CHAR)
SNDUSRMSG MSG('Enter missing parameter') +
MSGRPY(&WRK001)
CALL
PGM(&WRK001)
?nR?
Missing Parameter.
Example:
// INCLUDE ?12R?
becomes:
DCL
IF
CALL
VAR(&PARM12) TYPE(*CHAR)
COND(&PARM12 *EQ '')THEN(SNDUSRMSG +
MSG('Enter missing (parameter') +
MSGRPY (&PARM12))
PGM (&PARM12)
86
ProStart Manual
?R'mic'?
Required Parameter Message.
Example:
?R'1000'?
becomes:
DCL
VAR(&WRK001) TYPE(*CHAR)
SNDUSRMSG MSGID(USR1000) +
MSGF(QUSERMSG) +
MSGRPY(&WRK001)
This logic requires that an OVRMSGF statement was executed prior to
executing the SNDUSRMSG statement.
?nR'mic'?
Missing Parameter Message.
Example:
?12R'1000'?
becomes:
DCL
IF
VAR(&PARM12) TYPE(*CHAR)
COND(&PARM12 *EQ '') +
THEN(SNDUSRMSG) +
MSGID(USR1000) +
MSGF(QUSERMSG) +
MSGRPY(&PARM12))
This logic requires that an OVRMSGF statement was executed prior to
executing the SNDUSRMSG statement.
?Cn?
Parameter Length.
?C'value'?
This substitution expression is not automatically converted.
?CD?
Return Code.
This substitution expression is not automatically converted.
?CLIB?
Current Library.
Example:
?CLIB?
becomes:
DCL
VAR (&CLIB) TYPE (*CHAR) LEN(10) +
VALUE (RTVJOBA CURLIB(&CLIB)
Appendix A
?DATE?
Conversion of OCL
Program Date.
Example:
?DATE?
becomes:
DCL
?F'S,name'?
VAR(&DATE) TYPE(*CHAR) +
LEN (O6) VALUE (' ') +
RTVJOBA DATE(&DATE)
Allocated File Size.
Example:
EVALUATE P2=?F'S,FILE1'?
becomes:
DCL
DCL
CHGVAR
VAR(&PARM02) TYPE(*CHAR)
VAR(&WKN001) TYPE(*DEC) + LEN(10 0)
RTVRCDCNT + RCDCNT(&WKN001) +
FILE(FILE1)
VAR(&PARM02) +
VALUE(&WKN001)
where RTVRCDCNT is a command provided by Essex.
?F'A,name'? Actual File Size.
Example:
EVALUATE P3=?F'A,FILE2'?.
becomes:
DCL
DCL
CHGVAR
VAR(&PARM03) TYPE (*CHAR)
VAR(&WKN001) TYPE (*DEC) +
LEN(10 0) RTVRCDCNT +
RCDCNT(&WKNO01) FILE(FILE2)
VAR(&PARM03) VALUE(&WKN001)
where RTVRCDCNT is a command provided by Essex.
?FLIB?
This S/36 environment extension for retrieving the S/36 environment
files library is not automatically converted.
87
88
ProStart Manual
?L’position,length'?
Local Data Area.
Example:
IF ?L'1,l'?=2
becomes:
DCL
IF
CALL
ENDDO
?Mmic?
PROC01
VAR(&WRKVAR) TYPE(*CHAR) +
LEN(1) CHGVAR VAR(&WRKVAR) +
VALUE(%SST(*LDA 1 1))
COND(&WRKVAR *EQ '2') +
THEN(DO)
PGM(PROC01)
Message Member.
Example:
?M1000?
becomes:
RTVMSG
MSGID(USR1000) +
MSGF(QUSERMSG) +
MSG(&MSGD)
This logic requires that an OVRMSGF statement was executed prior to
executing the SNDUSRMSG statement.
?MENU?
Current Menu.
This substitution expression is not automatically converted.
?PRINTER? Session Printer.
This substitution expression is not automatically converted.
?PROC?
First Level Procedure.
This substitution expression is not automatically converted.
?SFLIB?
This S/36 environment extension for retrieving the S/36 environment
files library for this current session is not automatically converted.
?SLIB?
Session Library.
This substitution expression is not automatically converted.
?SYSLIST?
System List Device.
This substitution expression is not automatically converted.
Appendix A
?TIME?
Conversion of OCL
89
System Time.
Example:
?TIME?
becomes:
DCL
?USER?
VAR(&TIME) TYPE(*CHAR) +
LEN(06) VALUE (' ') +
RTVSYSVAL SYSVAL(QTIME) + VALUE(&TIME)
Operator's User ID.
Example:
?USER?
becomes:
DCL
VAR(&USER) TYPE(*CHAR) +
LEN(10) +
VALUE(' ')
RTVJOBA USER(&USER)
?VOLID?
Diskette or Tape Volume ID.
This substitution expression is not automatically converted.
?WS?
Display Station ID.
This is converted to a few CL statements and a new command provided by
Essex.
See Appendix C - ProStart Commands for more information.
Example:
// LOCAL OFFSET-1,BLANK-2,DATA-'?WS?
becomes:
RTVJOBA JOB(&JOBNAME) TYPE(&JOBTYPE)
IF
COND(&JOBTYPE *EQ '1') +
THEN (TRVWSID +
DSPDEV (&JOBNAME) +
WSID (&WSID))
ELSE
CMD(CHGVAR VAR(&WSID) + VALUE('$$')) +
/* BATCH JOB ID UNKNOWN */
CHGDTAARA DTAARA(*LDA (1 2)) + VALUE(&WSID)
IF/ELSE:
The following conditional expressions are converted whether preceded
by IF, IFF, IFT or ELSE.
90
ProStart Manual
ACTIVE
This conditional expression is not converted directly. Refer to the
discussion of file allocation associated with the //FILE statement earlier
in this chapter, and the ALCOPT parameter associated with the
"Generate CL Program Source" conversion menu option.
DATAF1
Because externally described files will generally exist on disk at all
times, this expression has been implemented as a test for number of
records not equal to zero. The command RTVRCDCNT (retrieve record
count) which is supplied with ProStart is used to implement this
function. (See Appendix C: ProStart Commands) for further information.
EVOKED
This function is implemented identically to the IF JOBQ condition.
LOAD
This conditional expression is converted to the CHKOBJ command.
JOBQ
This condition is based on the BATCH/INTERACTIVE job attribute.
For the purposes of a converted program, there is no difference between
an evoked job and one executing from the job queue.
PROC
This conditional expression is converted to the CHKOBJ command.
SOURCE
This expression is not converted.
ProStart assumes the procedure is now a CL program.
SUBR
This expression is not converted.
SWITCH
SWITCHN
A RTVJOBA command is used to handle this conversion.
string1/string2
string1=string2
string1>string2
//*
Several CL command statements are generated depending upon
string1=string2 depending upon the expression represented by
string1>string2 string 1 or string2.
This informational message statement is converted to a SNDPGMMSG
command:
Example:
// *'PROCA is running'
becomes:
SNDPGMMSG MSGID(CPF9898) +
MSGF(QCPFMSG) +
TOPGMQ(*EXT)MSGTYPE(*DIAG) +
MSGDTA('PROCA is running')
Appendix A
Conversion of OCL
91
This diagnostic message will be sent to the jobs external message queue.
If this is an interactive job and the message is followed by a
SNDUSRMSG command (// PAUSE) it will appear to the user, otherwise
it will not be seen on the display, but will appear in the job log. If this is
a batch job, they will only appear in the job log.
//**
(System Console Message) Statement.
This statement is converted to a SNDMSG command.
Example:
// ** 'INSERT PAYROLL BACKUPS DISKETTE 1'
becomes:
SNDMSG MSG('INSERT PAYROLL BACKUPS DISKETTE 1') +
TOMSGQ(*SYSOPR)
CANCEL
This OCL statement is converted into a GOTO command which passes
control to the label @EXIT@ prior to the deallocate statements at the end
of the program. After the deallocates are completed, a flag is tested and
the program is canceled by the sending of an escape message to the
previous program.
Example:
CANCEL
becomes:
CHGVAR VAR(&CNLFLAG) VALUE('l')
GOTO
CMDLBL(@EXIT@)
.
.
IF COND(&CNLFLAG) THEN(SNDPGMMSG +
MSGID(CPF9898) MSGDTA +
('CANCEL was requested by this +
program') MSGTYPE(*ESCAPE)
This will usually generate an error message to the user saying:
"CPF9898 received by PPPPPPPPPP at SSSSSS.
(C D I R)”
where PPPPPPPPPP is your CL program name, and SSSSSS is the
program statement number.
Take a "C" response to cancel the calling program, or an "I" response to
continue with the next statement in the calling program as you deem
appropriate. You may receive more than one message depending on the
number of programs in your program stack.
92
ProStart Manual
To eliminate this message you must determine what the appropriate
action to be taken is. If the calling program should not cancel, then you
should remove the SNDPGMMSG command entirely. However, if the
calling program should automatically be canceled, you may wish to pass
a parameter back to that program which it can test to determine that it
should also cancel.
VALUATE
This OCL statement is converted into at least two different CL
statements: DCL (declare) , and CHGVAR (change variable).
Example:
// EVALUATE P20='THIS IS A SAMPLE EVALUATE.'
becomes:
DCL
CHGVAR
VAR(&PARM20) TYPE(*CHAR) LEN(026)
VAR(&PARM20) VALUE('THIS IS A SAMPLE +
EVALUATE.')
Here is another example:
// EVALUATE P13,5=?L'16,5'?
// EVALUATE P14=1024/?13?
becomes:
DCL
DCL
DCL
CHGVAR
CHGVAR
CHGVAR
VAR(&PARM13) TYPE(*DEC) +
LEN(005)
VAR(&PARM14) TYPE (*DEC)
VAR(&WRK001) TYPE (*CHAR)
VAR(&WRK001) +
VALUE(%SST(*LDA 16 5))
VAR(&PARM13) +
VALUE(&WRK001)
VAR(&PARM14) +
VALUE(1024 / &PARM13)
GOTO/TAG These statements are converted into similar commands in the CL
program.
Example:
// GOTO PRINT
// TAG PRINT
becomes:
GOTO CMDLBL(PRINT)
PRINT:
Appendix A
PAUSE
Conversion of OCL
93
This statement is converted to a SNDUSRMSG (send user message)
command in the CL program.
Example:
// PAUSE
becomes:
SNDUSRMSG MSGQ(*)
This message defaults to TYPE(*INQ) which requires a response prior to
resuming program execution. Any response will be accepted.
RESET
This OCL statement is converted into a TFRCTL (transfer control)
command in the CL program. This command requires a variable for the
PARM parameter. If parameters are used, a CHGVAR (change variable)
command must be placed before the TFRCTL to set a variable to the
value to be passed as a parameter to the invoked CL program.
RETURN
This OCL statement is converted to a GOTO command which effectively
cancels the current program. The GOTO command will route this job to
tag @EXIT@ located just before the deallocate commands.
ASNA Commands Commonly Used Within OCL (relates to RPG III
and 400/RPG products from ASNA)
CRTDTARA ProStart converts this statement to a CRTDTAARA statement.
Example:
CRTDTARA DTAARA1,256
becomes:
CRTDTAARA DTAARA(DTAARA1) TYPE(*CHAR) LEN(256)
DLTDTARA ProStart converts this statement to a DLTDTAARA statement.
Example:
DLTDTARA DTAARA1
becomes:
DLTDTAARA DTAARA(DTAARA1)
DSPACTJ
ProStart converts this statement to a WRKACTJOB statement.
Example:
DSPACTJ
becomes:
WRKACTJOB
94
ProStart Manual
DSPDTARA ProStart converts this statement to a DSPDTAARA statement.
Example:
DSPDTARA DTAARA1
becomes:
DSPDTAARA DTAARA(DTAARA1)
Appendix A
This Page Intentionally Left Blank
Conversion of OCL
95
96
A p p e n d i x
B
RPG Conversion
ProStart also accelerates the conversion of RPG II to RPG/400 source members. ProStart
options actually change the source code while generating RPG/400 source members.
This appendix lists these error numbers and includes a brief description of the issue to be
addressed. The issues that are automatically addressed when generating the RPG/400
source code are noted below with an asterisk (*).
Auto-Report Option ("UT") Specifications
U001*
All entries except positions 27 and 28 must be blank.
Header Specifications
H001*
Entries in columns 7-14 are not valid.
H002*
Inquiry option in column 37 is not valid.
H003*
Non print character option in column 45 is not valid.
H004*
Transparency option in column 57 is not valid.
H005*
Program name in columns 75-80 should be left blank. It is best if this is
specified explicitly on the CTRPGPGM command.
H006*
Program name in 75-80 is not the same as the source member name. The
compiled program name may be incorrect.
File Specifications
F001
Device type is not valid. This program may need to be rewritten.
F002
SPECIAL device type may require a user written subroutine to perform I/O
operations.
F003*
Chain and Demand file types must be changed to full-procedural.
Appendix B
RPG Conversion
97
F004
Combined primary WORKSTN file will not receive a blank record on first
cycle as in RPG II. Either create your own loop to replace the RPG cycle, or
output a screen format at 1P detail output time.
F005*
WORKSTN file name must reference actual display file name (e.g.
xxxxxxFM) if externally described. Change this file name.
F006*
WORKSTN file NUM continuation entry is only valid for programs which
explicitly acquire more than one work station. MRT programs are not
supported or in most cases necessary.
F007*
WORKSTN file FMTS continuation entry is not valid. Change the file name
to reflect the actual display file name and remove this statement.
F008*
WORKSTN file CFILE continuation entry is not valid.
F009
WORKSTN file ID continuation entry refers to a 10 character workstation
Id. Make necessary program/design changes.
F010
INFDS data structure status return codes are not identical to System/36.
Refer to the RPG/400 Reference Manual and Users Guide.
F011*
Block length entries, columns 20-23 are not valid.
F012*
Record length entries, columns 24-27 are only valid for program described
files.
F013*
Addrout file record length must be 4.
F014*
"I" in column 31 is not valid for addrout files.
F015*
Mode of processing entry in column 28 is valid only for record address limits
files (very unusual).
F016*
Dual I/O areas ("2" in column 32) is not valid.
F017*
"EXTK" entry in columns 35-38 is not valid.
F018*
Unordered file load entry ("U" in column 66) is not valid. File must exist
before program execution.
F019*
Printer file name must reference an actual printer file. IBM supplied files
QPRINT or QSYSPRT may be used, or OVRPRTF command may precede
the program call in a CL program.
F020*
Externally described files require "E" in position 20 of file statement.
F021
More than one printer file exist in program. Overrides in calling CL program
maybe incorrect.
F022
All numeric fields must be initialized when a record is added to a disk file or
decimal data errors will occur.
98
ProStart Manual
Input Specifications
I001*
File name in columns 7-14 must be blank to reference the LDA.
1002
Numeric fields in data structures are not initialized to zero.
I003*
Field level input records are not necessary for externally described files
unless indicators are used.
Calculation Specifications
C001
Key lists are required for operations on externally described files with
composite keys.
C002
Operation code is not valid.
C003*
EXIT and RLABL operations must be replaced with CALL and PARM
operations. This may require user written programs.
C004
MOVEA operations require the same type of variable (alpha or numeric for
factor 2 and the result field.)
C005
READ operation to full procedural file will reset EOF indicator.
Output Specifications
O001
Output specifications to externally described files requires the format name
in place of the file name.
O002*
Printer file name should be QSYSPRT or QPRINT.
O003*
Record format specifications for externally described WORKSTN files
should reference the format name rather than the file name.
O004*
"Kxxx" entry in positions 40-43 are invalid and should be dropped.
O007*
This function is not supported or is no longer needed.
Other Issues
X001
Unrecognized source member.
X002
"T" specifications are not valid. Function is replaced by controller and line
description objects.
X003
Compile time tables or arrays extending beyond position 80 will be
truncated.
X004
Auto-report "U" specification is not necessary.
Appendix B
RPG Conversion
X005*
AS/400 SEU does not maintain statement numbers in positions 1-5.
X006
The /COPY member was not found in the source file and specified. Check
the conversion exception report for this error to see where the member was
found.
X007
The /COPY member could not be located.
99
100
A P P E N D I X
C
ProStart Commands
ProStart includes three new CL commands.
•
RTVRCDCNT
•
RTVWSID
•
SORTSUBS
Source code for these commands and related objects can be found in source file XJPSRC
in library ESXPRO.
RTVRCDCNT - Retrieve count of records
RTVRCDCNT retrieves the count of records from a file. It is used in the conversion
when ?F,'A,xxxxxxxx'?, ?F,'S,xxxxxxxx'? or IF DATAF1 is encountered in the OCL
statements.
If the file specified does not exist, a value of zero will be returned.
Retrieve Record Count (RTVRCDCNT)
Type choices, press Enter.
CL variable for record .
File name . . . . . . . .
Library . . . . . . . . .
*LIBL
Member name. . . . . . *FIRST
F3 = Exit
RCDCNT
F4 = Prompt
F5 = Refresh F12 = Cancel F13 = How to use this display
CL variable for record count.
Specifies the name of a CL variable which is to receive the value for
the number of records in the specified file. The variable must be
defined as TYPE(*DEC) LEN(10 0).
Appendix C
FILE
ProStart Commands
101
File name.
Specifies the file name whose record count is to be retrieved.
MEMBER
Member name.
Specifies the member name within the file whose record count is to
be retrieved. The default is *FIRST, the first member within the file
(physically not alphabetically).
This command is not proprietary and can be distributed along with
your software. Listed below are the source and object names for the
command.
Object
Type
RTVRCDCNT
CMD
XJMRRC
CLP
XJRRRC
RPG
RTVWSID - Accept AS/400 Display Device ID
The Retrieve Workstation ID command (RTVWSID) accepts an AS/400 display device
id (up to 10 characters in length) and returns the unique 2 character workstation id
assigned by ProStart.
The same 2 character id will be returned every time this command is invoked for a
particular AS/400 device name. Whenever a new device name is encountered, a new
unique 2 character id is assigned and returned.
Retrieve Workstation id. (RTVWSID)
Type choices, press Enter.
Ten Character Device ID
Two Character Device ID
F3 = Exit
F4 = Prompt
F5 = Refresh F12 = Cancel F13 = How to use this display
DSPDEV
The AS/400 device name for which a 2 character workstation
id is desired.
WSID
The name of a 2 byte character variable that will receive the
unique 2 character id assigned to this device name.
102
ProStart Manual
The workstation ID on the System 36 is 2 characters in length; the ID on the AS/400 is
10 characters. If we were to retrieve the AS/400 workstation ID, Job number or any
other object, we could only use 2 of the 10 available characters. This precludes always
having unique WS IDs.
Here is an example:
System 36
AS/400
Y6
Y7
B3
D6
DSP01
DSP02
DSP27
PRINT02
lst 2 characters
DS
DS
DS
PR
The ProStart solution uses a table which identifies each AS/400 device with a unique 2character code. This code is used to differentiate between each unique device.
Y6
Y7
B3
D6
DSP01
DSP02
DSP27
PRINT02
Al
A2
A3
A4
Whenever a workstation ID is requested, a new ESSEX command RTVWSID is called.
It searches the table for the AS/400 device ID. If it is found, the 2 character code is
passed back to the calling CL program and used as the value for ?WS?. If it is not
found, a new, unique 2 character code is assigned and loaded to the table. Then the 2
character code is passed back to the calling CL program and used as the value for ?WS?.
This table is transparent to users and technical support staff. Updating the table is
automatically handled by ProStart without user or technical staff involvement.
Example:
// LOCAL OFFSET-1,BLANK-2,DATA-I?WS?
becomes:
RTVJOBA JOB(&JOBNAME) TYPE(&JOBTYPE)
IF
COND(&JOBTYPE *EQ '1') THEN(TRVWSID +
DSPDEV(&JOBNAME) WSID(&WSID))
ELSE
CMD(CHGVAR VAR(&WSID) VALUE('$$')) +
/* BATCH JOB ID UNKNOWN */
CHGDTAARA DTAARA(*LDA (1 2)) VALUE(&WSID)
Note: The '$$' is used for batch jobs. There is no way to determine the name of the
display station that submitted the job. If this is unsatisfactory, you may consider
passing the workstation ID as a parameter to the batch job.
Appendix C
ProStart Commands
103
Example:
// LOAD TEST
// FILE NAME-WORK,LABEL-WORK.?WS?
// RUN
becomes:
DCL
RTVJOBA
IF
ELSE
CHGVAR
OVRDBF
CALL
DLTOVR
VAR(&WRK001) TYPE(*CHAR)
JOB(&JOBNAME) TYPE(&JOBTYPE)
COND(&JOBTYPE *EQ '1') THEN(TRVWSID +
DSPDEV(&JOBNAME) WSID(&WSID))
CMD(CHGVAR VAR(&WSID) VALUE('$$')) +
/* BATCH JOB ID UNKNOWN*
VAR(&WRK001) VALUE('WORK.' *CAT &WSID)
FILE(WORK) TOFILE(&WRK001)
PGM(TEST)
FILE(WORK)
In this instance, the file may not exist on disk. You may not want to have a file for each
potential workstation residing on disk. You might change the code to keep the file,
WORK, on disk, while adding and removing members from the file differentiated by the
workstation 2 character code.
To accomplish this, you would change one line of code and add two others.
OVRDBF
FILE (WORK) TOFILE (&WRK001)
becomes:
ADDPFM
FILE(WORK) MBR(&WRK001)
OVRDBF
FILE(WORK) TOFILE(WORK) MBR(&WRK001)
...
RMVM FILE(WORK) MBR(&WRK001)
If you do not like the 2 character IDs assigned by ProStart, you might consider writing a
program or using DFU to maintain the table file and assign your own IDs. If you choose
to do this, understand that the utility program used by this command assigns new names
in a sequential fashion, alphabetically. Adding your own IDs that begin with characters
toward the end of the alphabet (e.g. "W__") could cause the command to prematurely
run out of 2 character IDs to assign to newly encountered device names.
104
ProStart Manual
While this command and its components can be copied into any user library via the
"Copy ProStart commands" option on the Conversion Tools Menu, note that the
command will always look for its files in QGPL at execution time. This is to insure that
there is only one table of device names to each 2-character id in use on any AS/400
system.
This command is not proprietary and can be distributed along with your software. Listed
below are the source and object names for the command.
RTVWSID
XJMWSID
XJPWSID
XJLWSID1
XJRWSID
CMD
CLP
PF
LF
RPG
SORTSUBS - Performs Substitutions within Sort Specifications
Retrieve Record Count (SORTSUBS)
Type choices, press Enter.
Sort substitution specs. aaaaaaaaaaaaaaaaaaaaaaaaaaaaaaaaaaaaaaaaaaaaaaaaaaaaaaaa
for more values
aaaaaaaaaaaaaaaaaaaaaaaaaaaaaaaaaaaaaaaa
F3 = Exit F4 = Prompt
F24 = More keys
SUBS
F5 = Refresh F12 = Cancel F13 = How to use this display
A list parameter of up to forty values that win be substituted at
execution time prior to running the FMTDTA command.
Example:
Lets convert the following sort that contains substitution expressions
within the sort specs. The procedure and resulting CL program are
named REPORT. The generated QFMTSRC member is named
REPORT01.
//
//
//
//
LOAD #GSORT
FILE NAME-INPUT,LABEL-SORTIN
FILE NAME-OUTPUT,LABEL-SORTOUT,RECORDS-100
RUN
HSORTR
10A OX 92
N
TEST
I C 15
15EQC?l?
BILLCYL
FNC 17
?2?
COMPANY
FDC 1 92
DATA
// END
becomes:
Appendix C
DCL
DCL
DCL
DCL
TYPE
DCL
CHGVAR
CHGVAR
CHGVAR
CHGVAR
CPYF
SORTSUBS
ProStart Commands
105
VAR(&PARM01) TYPE(*CHAR) LEN(001)
VAR(&PARM02) TYPE(*CHAR) LEN(002)
VAR(&WRK001) TYPE(*CHAR)
VAR(&WKN001) TYPE(*DEC) LEN(10 0) DCL
VAR (&SORT01)
(*CHAR) LEN (3 4)
VAR(&SORT02)
TYPE(*CHAR) LEN(34)
VAR(&WRK001)
VALUE('I C 15 15EQC' +
*CAT &PARM01
*TCAT ' ')
VAR(&SORT01)
VALUE(&WRK001)
VAR(&WRK001)
VALUE('FNC 17 ' +
*CAT &PARM02
*TCAT
VAR(&SORT02)
VALUE(&WRK001)
FROMFILE(PROTEST/QFMTSRC) +
TOFILE(QTEMP/QFMTSRCP) +
FROMMBR(WBT1301) TOMBR(*FIRST) +
MBROPT (*REPLACE) CRTFILE (*YES)
SUBS(&SORT01 &SORT02)FMTDTA +
INFILE((*LIBL/SORTIN *FIRST)) +
OUTFILE(*LIBL/SORTOUT *FIRST) +
SRCFILE(QTEMP/QFMTSRCP) +
SRCMBR (*FIRST) QFMTSRC
Member containing the sort specs:
HSORTR
*1
*2
FDC
10A OX 92 N
BILLCYC
COMPANY
1 92 DATA
TEST
Because these commands are used at execution time, (RTVRCDCNT, RTVWSID and
SORTSUBS) they must be available to your application.
This can be accomplished either by placing them in a common library such as QGPL or
placing them directly into the application library.
Use Option 3 on the Conversion Tools Menu to move the commands.
106
A P P E N D I X
D
Getting to the Native Environment F-A-S-T!!!
Many prospects and customers that we speak with need to move out of the S/36
environment quickly and want to get running in the native environment FAST.
To accomplish this, here's a quick overview of our recommended approach:
1. Build your database of externally described files to duplicate the S/36 file layouts.
Careful attention to this step will ease the effort in the remaining conversion.
2. Convert OCL to CL, running the job overnight. The conversion will be complete
with the side-by-side reports available when you return in the morning.
3. Convert your RPG II code to run in the native environment keeping all files program
described. (Externally describe *NO) Run this job overnight.
4. Clean up and thoroughly test the full application.
This approach converts the applications to the native environment with the fewest
possible changes, thereby reducing the total effort while increasing the likelihood that
changes will not adversely impact the application.
Once your applications are successfully in the native environment, you can step back
and consider your next step from a business (cost/benefit) perspective.
1. Which programs would benefit from referencing the external definitions as described
above?
Remember, the benefits will come as productivity gains in future enhancements or
changes. If the file is not to change much and few programs are being written
against it, it may not pay to convert the programs to reference external file
descriptions.
2. Which RPG programs deserve a redesign or rewrite? Which CL programs?
Here the benefits can be productivity gains as well as improved performance or the
ability to take advantage of new AS/400 capabilities.
Appendix D
Getting to the native environment F-A-S-T!!
107
To the untrained eye, this FAST approach seems ludicrous, yet the fact that the field
names in many homegrown applications in most shops are NOT consistent across the
application suggests that this approach can save considerable time and, in fact,
actually get the application running sooner in native. Refer to Appendix E for more
information.
Here are more details on the steps you would elect to get to the
native environment F-A-S-T !!!
Build Your Database
1. After reading the referenced documentation, select Option I from the Reports Menu
to generate the file layouts in a report and Option 4 from the Conversion Tools Menu
to write them to individual source members.
This will speed your creation of the needed F and I specs. Clean up the
specifications.
2. Generate the field reference file entries by selecting Option 5 from the Conversion
Tools Menu. Select the option to preserve the layout of the S/36 file ('Preserve
*YES').
At this point, you could leave the field names unchanged, provided there are no
duplicate field names across your files. However, you may want to cleanup the field
names in the F and I specs now, thereby saving a cleanup step down the road.
3. Generate the physical file entries by selecting Option 6 from the Conversion Tools
Menu. Select the option to preserve the layout of the S/36 file ('Preserve *YES').
Also key in the name of the field reference file.
4. Generate the conversion programs that will allow you to quickly move the data to
the new database files by selecting Option 7 from the Conversion Tools Menu.
Convert OCL to CL
1. Create the CL programs from the OCL by selecting Option 1 from the Conversion
Tools Menu.
You have some options. You can print the OCL and the CL in one of two ways. If
you have a condensed print printer, print the output side-by side. Otherwise, select
the option (CONDENSED) to print the procedure, followed by the CL program.
2. Set the job to run overnight. You can begin the cleanup and review of the CL when
you return in the morning.
3. Review the OCL to CL Summary Report to get a sense of how much work remains
to be completed.
108
ProStart Manual
Convert Your RPG II Code
1. Convert all the RPG programs overnight by selecting Option 8 from the Conversion
Tools Menu. Select the options to keep all files program described ('Externally
Describe Display Files *NO'; Externally Describe Disk Files *NO'; Externally
Described Printer Files *NO'). Also, submit the programs to optional compile
attempts ('Compile *YES').
If you use copy members, we recommend that you convert these first, with the
option to not compile ('COMPILE (*NO).
2. In the morning, review the summary to see how many programs compiled, and which
ones did not. Also, review the exception report and compilation summary report to
learn which additional changes will be required to make the programs compile
successfully.
Menus and Display Files
1. Select Option 2 from the Conversion Tools Menu for each menu you wish to
convert.
2. Select Option 8 from the Conversion Tools Menu for each Format you wish to
convert to a Display File.
What’s Next...
There is no automated way to complete the conversion of those areas that remain open.
You must manually convert those areas that did not convert automatically.
You should review the generated code to ensure that the new code is faithful to the intent
of the original code. Furthermore, you should always test the applications (CL
programs, RPG programs and database files) before going live.
Appendix D
Getting to the native environment F-A-S-T!!
This Page Intentionally Left Blank
109
110
A P P E N D I X
E
Internally Describing Physical Files in the AS/400
Native Environment
In the last few months, we have heard from many S/36 and AS/400 shops about the
challenges of converting to the native environment. One question is asked repeatedly:
Q. Do I need to modify my existing RPG II programs to incorporate externally
defined files if I want to run jobs in the native environment?
There is tremendous confusion about the requirements for running in the native
environment. In an attempt to shed some light on this topic, and to demonstrate how
you might get to the native environment faster than you first believed, here are some
questions and answers for your consideration.
This Appendix makes the assumption that your files are externally described on
disk. However, you have the option of defining your disk files in the RPG program
as externally described or program described. The following questions and
answers consider this option.
Let's start by addressing the key question ...
Q. Do I need to modify my existing RPG II programs to incorporate externally
defined files if I want to run jobs in the native environment?
A. No. Your RPG programs can execute successfully in the native environment whether
your files are program or externally described. Certainly, you would benefit if all
files are externally described, and each RPG program references the externally
defined files. However, you may keep your programs with internally defined files.
Furthermore, you may have a program where some files are internally described and
others are externally described.
Appendix E
Internally Describing Physical Files in the AS/400 Native Environment
111
Q. Is there a performance penalty if my files remain internally described?
A. None at all. The execution of programs will neither be faster nor slower. Modifying
your applications to use externally described files will provide easier maintenance of
your application and easier access to Query and SQL.
Q. Are there any reasons to keep my files program described?
A. Yes there are.
•
Avoiding field naming conflicts.
Consider that S/36 programmers do not always use the same field name for a
particular field from one program to the next. The result is that one field may be
defined with several different field names across an application. Yet, with ex y
described files, a field's name is unique and must be used consistently throughout
all programs. Therefore, programmers may need to modify the calculations and
output specifications of each program by replacing the old internally described
field name with the new externally described field name.
Unfortunately, this involves more than a global 'search and replace' for field
names. Programmers often define a similar field in two or more files with the
same field name (company number, customer number, etc.). The search will
certainly find the fields quickly, but only a programmer can determine which file
this specific field should reference.
•
Speeding conversion.
The fewer changes you need to make when converting your RPG code, the faster
the RPG conversion will be. If you keep your files internally described, you will
not have to deal with the inconsistent field names that exist for fields from one
program to the next. Consequently, you can simply handle the syntactical
changes that are required, and recompile the programs.
•
Smaller learning curve.
Incorporating externally described files into a program originally written with
internally described files can be extremely challenging. Programmers will find
many new areas of the AS/400 to explore and learn about without also tackling
this sticky issue.
Q. Can I externally describe my files and continue to use the existing program
descriptions?
A. Yes. Be sure that the externally described files retain the same layout as defined in
the RPG programs.
112
ProStart Manual
Q. How would I convert my application to native while keeping my files program
described? Can ESX/ProStart help me?
A. Keeping your files internally described is easy using ProStart. In fact, the issue
deals less with the RPG code than the creation of the database. The bigger question
is 'Can I create my database files with a layout that is identical to the S/36 file
layout?'
ProStart allows you to create your externally described files from F and I
specifications. In a recent release, a new option, PRESERVE, has been added to the
Create Physical Files option. If you elect PRESERVE(*NO), the fields will be
manipulated such that all numeric fields in the S/36 file definition will be packed in
the externally described file, and all blank spaces between fields in the S/36 record
will be dropped. The result is a more compact record than existed on the S/36.
However, if you elect PRESERVE(*YES), the S/36 layout will be preserved exactly,
field by field, in the new externally described file. Numeric fields will remain
unpacked if they were unpacked in the S/36. In fact, any unused space between S/36
fields will have dummy field names assigned and added to described file as position
holders.
Since the externally described file maps exactly to the S/36 layout, you will not need
to modify most file definitions in the RPG programs.
To complete the changes, you must add an OVRDBF and DLTOVR just before and
after the CALL statement to associate the program file name to the externally
described file name. (This accomplishes the same function as the // FILE NAMExxx, LABEL-yyy in procedures.)
Q. What are the required changes to RPG programs'?
A. There are numerous syntactical changes that must be implemented. You can simply
submit each program to a compile attempt, and then clean up the errors. As an
alternative, ProStart will implement most of these syntactical changes automatically.
Any issues or problems that can be identified but not automatically implemented are
noted on an exception report. Then ProStart submits the program for a compile
attempt.
Two other problem areas with RPG conversions are multiple-record format files and
disk file output specifications. If you have a multiple-record format file on the S/36,
you must give it special attention on the AS/400. (Since a physical file can only have
one record layout, the multiple record format file must be broken out into several
different physical files.) Consider creating the several physical files and building a
logical view over these files. Now, your RPG program can read one (logical) file. If
you must write to the logical file, you must also specify which of the logical file
formats are being written. This points the data through the logical view to the
correct physical file. [See 'Converting Multi-Format Record File to the Native
Environment", Appendix F for a more in-depth discussion of this issue.
Writing new records to a disk file on the S/36 is easy; just list the fields that you
wish to write. Correctly writing records to a disk file on the AS/400 is more
specific. Not only do you list the fields that you wish to write, you must also include
Appendix E
Internally Describing Physical Files in the AS/400 Native Environment
113
all numeric fields, initialized correctly, even if no data is being written. If you
overlook this rule, you could easily create decimal data efforts (non-initialized
numeric fields) in your data. [This has been somewhat true for packed fields on the
System/36. Now this is always true for numeric fields on the AS/400.]
Q. But is this approach to conversion really buying me anything?
A. First of all, your files will be externally described, so you can take advantage of
IBM's Query product, SQL and also the OPNQRYF command as an alternative to
sorts. Furthermore, any new programs written within this application can reference
the external file definitions. And since you probably have a backlog of projects, you
can also get back to them faster.
By using ESX/ProStart and this approach to handling files, you will:
•
Convert OCL to CL and save up to 75% of the conversion time.
•
Convert F and I specifications to DDS externally described files with identical file
layouts.
•
Convert RPG programs to compilable programs that will execute in the native
environment.
•
... and be running in the native environment in the fastest way possible.
114
A P P E N D I X
F
Converting Multi-Format Record Files to the Native
Environment
Converting a single format record from the System/36 to a physical file on the AS/400 is
fast and easy when keeping your disk files program described. Implementing it in
existing RPG programs is also straightforward. However, add a second (or third or
fourth) record format to the S/36 file and the conversion effort becomes more time
consuming.
This appendix describes the easiest approach to converting multi-record format files and
illustrates the process with some examples. (For this discussion, we make the assumption
that the files will themselves be externally described while remaining 'program
described' within the programs.)
Here's the task:
Convert an RPG program to run in the native environment. The program reads the Order
Master File containing 4 different record types.
To complete the conversion, we will begin with the file issues, then address any RPG
code changes.
Let's look at the abridged System/36 file layout of the Order Master File containing the 4
record types. The Order Master disk file name is ORDMAST.
F* ORDER MASTER FILE LAYOUT
FORDMAST IP
256 10AI
I* HEADER RECORD
IORDMAST NS 01 11 CH
I
...
1
I
...
3
I
...
8
I
...
11
I
...
12
I
...
17
I .....
1 DISK
20ORCOMP
70ORORD#
100ORLINE
11 ORCODE
160ORCUST
210ORSHIP
Appendix F
Converting Multi-Format Record Files to the Native Environment
I* DETAIL RECORD
IORDMAST NS 02 11 CD
I
...
1
I
...
3
I
...
8
I
...
11
I
...
12
I
...
P
20ORCOMP
70ORORD#
100ORLINE
11 ORCODE
21 ORITEM
22 252ORQTY
I* MISCELLANEOUS CHARGES
IORDMAST NS 03 11 CM
I
...
1
I
...
3
I
...
8
I
...
11
I
...
12
I
...
P
I . . .
I* COMMENTS RECORD
IORDMAST NS
04 11
I
...
I
...
I
...
I
...
I
...
I .....
115
RECORD
20ORCOMP
70ORORD#
100ORLINE
11 ORCODE
31 ORDESC
32 352ORCHG
CC
1
3
8
11
12
20ORCOMP
700RORD#
100ORLINE
11 ORCODE
51 ORCMNT
To externally describe this file, you must first break the four formats into separate
physical files. (For clarity in this example, we are not creating a field reference file.
Instead, the physical file will define each field's attributes).
We are preserving the S/36 layout in the new database file, so that we can keep all disk
files in the RPG program internally described. To keep all field names in your database
unique, you might change any duplicate field names at this time in the F and I specs to
be converted.)
116
ProStart Manual
Here are the four physical file source members.
A* PHYSICAL FILE FOR ORDER MASTER HEADER
A
R ORDERH
A
ORCOMP
2S 0
A
ORORD#
5S 0
A
ORLINE
3S 0
A
ORCODE
1A
A
ORCUST
5S 0
A
ORSHIP
5s 0
A.....
A
K ORCOMP
A
K ORORD#
A
K ORLINE
A* PHYSICAL FILE FOR ORDER MASTER DETAIL
A
R ORDERD
A
ORCOMP
2S 0
A
ORORD#
5S 0
A
ORLINE
3S 0
A
ORCODE
1A
A
ORITEM
10A
A
ORQTY
7P 2
A.....
A
K ORCOMP
A
K ORORD#
A
K ORLINE
A* PHYSICAL FILE FOR ORDER MASTER MISCELLANEOUS CHARGES
A
R ORDERM
A
ORCOMP
2S 0
A
ORORD#
5S 0
A
ORLINE
3S 0
A
ORCODE
1A
A
ORDESC
20A
A
ORCHG
7P 2
A.....
A
K ORCOMP
A
K ORORD#
A
K ORLINE
Appendix F
Converting Multi-Format Record Files to the Native Environment
117
A* PHYSICAL FILE FOR ORDER MASTER COMMENTS
A
R ORDERC
A
ORCOMP
2S 0
A
ORORD#
5S 0
A
ORLINE
3S 0
A
ORCODE
1A
A
ORCMNT
40A
A.....
A
K ORCOMP
A
K ORORD#
A
K ORLINE
The new externally described physical file names are OEPHDR (Order Header File),
OEPDTL (Order Detail File), OEPMSC (Order Miscellaneous Charges Fide), and
OEPCMT (Order Comments File). The third character (P) in each file name indicates
that it is a physical file.
These four physical files taken together will contain the same information that was
contained in the single S/36 data file. If the RPG program is expecting one file and you
have four physical disk files, you can "associate" the files by building a logical view
over the four physical files.
A* LOGICAL FILE THAT VIEWS ORDER MASTER FILES
A*
A
R ORDERH
PFILE (OEPHDR)
A
K ORCOMP
A
K ORORD#
A
K ORLINE
A*
A
R ORDERD
PFILE(OEPDTL)
A
K ORCOMP
A
K ORORD#
A
K ORLINE
A*
A
R ORDERM
PFILE(OEPMSC)
A
K ORCOMP
A
K ORORD#
A
K ORLINE
A*
A
R ORDERC
PFILE (OEPCMT)
A
K ORCOMP
A
K ORORD#
A
K ORLINE
118
ProStart Manual
This logical file (OELORDMS) is comparable to the S/36 ORDMAST file. To associate
the file in the RPG program with the logical file on disk, use the OVRDBF and
DLTOVR CL commands in the CL program, as shown below.
OVRDBF FILE () TOFILE
DLTOVR FILE ()
Now let's consider the RPG program. If records in this file are not being added, there
may be no additional changes relating to multi-record format files required. However, if
any records are being added during processing, you will have to implement some code
changes. You cannot just write to the logical file, you must write to a format in the
logical file that routes it correctly to the physical file where the data will be stored.
This is the S/36 RPG II program to add records in the Order Master File.
H
FORDMAST UP
IORDMAST NS 01
I
I.....
I
NS
02
I.....
I
NS
03
I.....
I
NS
04
I.....
OORDMAST DADD
0.....
0..... DADD
0.....
0
DADD
0.....
0
DADD
0.....
256 10AI
11 CH
1
11 CD
11 CM
11 CC
01
02
03
04
program name-->
1 DISK
A
20ORCOMP
Appendix F
Converting Multi-Format Record Files to the Native Environment
119
And this is what you must change the code to look like. Note that for this example, the
files remain program described.
FORDMAST
IP F 256
10AI
1 DISK
FOEPHDR UF F
256 10AI
1 DISK
FOEPDTL UF F
256 10AI
1 DISK
FOEPMSC UF F
256 10AI
1 DISK
FOEPCMT UF F
256 10AI
1 DISK
IORDMAST
NS
01 11 CH
1
I.....
I
I.....
I
I.....
I
I.....
IOEPHDR
IOEPDTL
IOEPMSC
IOEPCMT
...
NS
02 11 CD
NS
03 11 CM
NS
04 11 CC
1
20ORCOMP
NS
NS
NS
NS
C
ORKEY
C N10
C .....
C
ORKEY
C Nll
C .....
C
ORKEY
C N12
C .....
C
ORKEY
C N13
C .....
OOEPHDR D
0 .....
OOEPDTL D
0 .....
OOEPMSC D
0 .....
OOEPCMT D
0 .....
CHAINOEPHDR
EXCPTHDR
10
CHAINOEPDTL
EXCPTDTL
11
CHAINOEPMSC
EXCPTMSC
12
CHAINOEPCMT
EXCPTCMT
13
HDR
DTC
MSC
CMT
120
ProStart Manual
The program uses the logical file to access the records in the desired sequence, but
chains to each physical file record before it can be updated.
Here is an easier approach. We can use the original program and write a "format
selector program" for use with the logical file. This program, which becomes an
inherent part of the logical file, can specify which record format is to receive the new
record after evaluating the record itself. A format selector program name can be
specified at creation time for a logical file (via CRTLF) or anytime afterwards (using
CHGLF). In this example, our format selector program might look like this:
IRECORD
I
I
C*
C
C
C
C*
C
C
C
C
C
C
C
C
C
C
C
C
C*
C
C
DS
...
...
*ENTRY
RECID
RECID
RECID
RECID
RETRN
SETON
1
11
256
11
DATA
RECID
PLIST
PARM
PARM
RECORD
FORMAT
IFEQ 'H'
MOVEL'ORDERH'
END
IFEQ 'D'
MOVEL'ORDERD'
END
IFEQ 'M'
MOVEL'ORDERM
END
IFEQ 'C'
MOVEL'ORDERC'
END
10
FORMAT
FORMAT
...
FORMAT
FORMAT
LR
Refer to the CL reference manual (SC21-9777) and the Database Guide (SC21-9659) for
more information on format selector programs.
Appendix F
Converting Multi-Format Record Files to the Native Environment
121
Here's a third approach:
We've used the same RPG II program, but we have implemented externally described
files within the code.
FOELORDMSUP E
K
DISK
IORDERH NS
01
IORDERD NS
02
IORDERM NS
03
IORDERC NS
04
OORDERH
D
01
0 .....
OORDERD
D
02
0 .....
OORDERM
D
03
0 .....
OORDERC
D
04
0 .....
With externally described files, you note the file name in the 'F' specifications, and
designate the format name in the 'I' and 'O' specifications. In this example, logical file
OELORDMS contains four different formats; ORDERH, ORDERD, ORDERM and
ORDERC.
This certainly looks cleaner. The code seems to require fewer changes to implement.
However, your ability to apply this approach will depend upon the consistency of the
field names in each program. If the field names in the program are the same as in the
external file definition, you might prefer this latter approach. However, if the fields are
not consistent, the first approach will allow you to more quickly get the program running
without addressing the field name discrepancies.
122
Index
"
"DISP-" parameters, 79
*
*, 85
*ALLOBJ, 14
*EXCL, 79
*EXCLRD, 79
*FILE, 23
*LIB, 23
*MENU, 23
*PERM, 77
*PGM, 23
*SHRNUP, 79
*SHRRD, 79
*SHRUPD, 79
/
/*, 85
// LOAD statement, 84
// PAUSE, 92
// RUN statement, 82
//**, 92
?
?CD?, 87
?CLIB?, 77, 87
?Cn?, 87
?C'value'?, 87
?DATE?, 88
?F'A,name'?, 88
?FLIB?, 88
?F'S,name'?, 88
?L’position,length'?, 89
?MENU?, 89
?Mmic?, 89
?n?, 85
?nR?, 86
?nR'mic'?, 87
?nT'value'?, 86
?n'value'?., 85
?PRINTER?, 89
?PROC?, 89
?R?, 86
?R'mic'?, 87
?SFLIB?, 89
?SLIB?, 89
?SYSLIST?, 89
?TIME?, 90
?USER?, 90
?WS?, 90
?WS?., 103
@
@EXIT@, 92, 94
A
Accept AS/400 display device id, 102
ACTIVE, 91
Actual File Size, 88
ALC, 80
ALCOBJ, 78, 79
ALCOPT, 49, 79
Allocate Object command, 78
Allocated File Size, 88
Analyze library for searches
search menu, 35
Application Development Tools, 13
AS/400 lock state, 79
ASNA commands, 94
Authority
*ALLOBJ, 14
QSECOFR, 14
B
BATCH/INTERACTIVE job, 91
BLDFILE, 73
BLDINDEX, 73
BLDLIBR, 73
Building a Database, 108
C
Calculation specifications
errors, 99
CALL PGM, 15
CANCEL, 92
Change Current Library command, 80
Index
Change Data Area command, 82
Change Data command, 74, 78
Change Job command, 77, 78
Change Job Description command, 82
Change Library List command, 82
Change Variable command, 84, 93, 94
CHGCURLIB, 80
CHGDTA, 74, 78
CHGDTAARA, 82
CHGJOB, 77, 78, 82, 84
CHGJOBD, 82
CHGLIBL, 82
CHGPRTF, 14, 16
CHGVAR, 84, 93, 94
CHKOBJ, 91
CL Program Source
generate, 46
CL variable for record count, 101
Clear Diskette command, 75
Clear Physical File Member command, 74
CLP type, 102
CLPFIL, 47
CLRDKT, 75
CLRPFM, 73, 74
CMD type, 102
comment, 73, 84
Comment, 75, 76, 80
COMPILE, 66
CONDENSED, 48
Control Language Programmer's Guide, 13
Control language source, 24
Conversion
database, 2
OCL to CL, 1
RPG, 2
Conversion Menu, 8, 45
convert a system/36 menu to native, 9
generate cl program source, 9
generate display file dds source, 10
generate field reference file dds source, 10
generate file conversion programs, 10
generate file definition source members, 10
generate physical file dds source, 10
generate rpg/400 source, 10
Conversion overview, 107
Convert a System/36 Menu to Native, 9
Converting
display files, 109
migrated menus to native, 49
multi-record format files, 115
OCL to CL, 108
RPG II code, 109
Converting multi-record format files
sample code, 115
Coping
commands to user library, 51
Copy File command, 74, 77
Copy from Diskette command, 78
Copy to Diskette command, 78
COPYDATA, 74
COPYI1, 74
Copyinglines, 69
CPYF, 74, 75, 77
CPYFRMDKT, 78
CPYSRCF, 65
CPYTODKT, 78
Create Duplicate Object command, 75
Create Library command, 73, 75, 76
Create Logical File command, 73
Creating
externally described files, 21
file definition source members, 52
Cross Reference report
disk file to field, 32
disk file to program, 32
field to disk file, 32
program file to field, 32
Cross Reference Reports, 32
disk file to field, 4
disk file to program, 4
field to disk file, 5
file/field/program, 4
generating, 32
CRTDTAARA, 94
CRTDTARA, 94
CRTDUPOBJ, 75
CRTLF, 73
CRTLIB, 73, 76
CTRPGPGM, 97
Current Library, 87
Current Menu, 89
D
Data description specification source, 24
Data Description Specifications Reference, 13
Database
building, 108
faster conversion, 2
DATAF1, 91
DATE, 74, 78
DCL, 93
DCLF, 84
DDSFIL, 62
DDSMDR, 61
DDSSRCFIL, 54, 56
DDSSRCMBR, 54, 56
Deallocate Object command, 78
Declare command, 93
Declare File command, 84
Default Parameter, 85
Delay Job command, 84
DELETE, 74
Delete Override command, 78
Delete Search Data
search menu, 43
Deleting
lines, 69
program and file references, 43
Development library
123
124
ProStart Manual
setting up, 24
DFRWRT (*NO), 84
Disk File "Where Created" Report, 33
Disk File to field
cross reference reports, 4, 5
features, 4
Disk File to Field
cross reference report, 32
Disk File to program
cross reference reports, 4
features, 4
Disk File to Program
cross reference report, 32
Disk File WhereCreated"
report, 5
Disk Filewhere created
features, 5
Diskette or Tape Volume ID, 90
Display Data command, 75
Display Files
converting, 109
Display Station ID, 90
DLCOBJ, 78, 80
DLTDTAARA, 94
DLTDTARA, 94
DLTLIB, 16
DLTOVR, 78, 113
DLYJOB, 84
DSPACTJ, 94
DSPDEV, 102
DSPDTA, 75
DSPDTAARA, 95
DSPDTARA, 95
DSPMSG, 83
Duplicate Diskette command, 74
E
ENTER, 74
Errors
calculation specifications, 99
file specifications, 97
header specifications, 97, 99
output specifications, 99
UT specifications, 97
ESSEX, 103
ESXPRO library, 68
EVOKE, 78
EVOKED, 91
EXTDISKF, 65
EXTDSPF, 65
Externally described files, 112
Externally Described Files
creating, 21
EXTPRTF, 65
EXTRACT, 74
F
F11 key
bottom, 69
F12 key
cancel, 69
F3 key
exit, 68
F5 key
refresh, 69
F9 key
print, 69
FDFFIL, 59
FDFMBR, 59
Features
disk file to field, 4
disk file to program, 4
disk file wherecreated, 5
field to disk file, 5
generate CL program source, 9
interactive ocl to cl converter, 11
search for file reference, 6
search for program/procedure peferences, 8
summary report, 9
Field naming conflicts, 112
Field reference file and physical files, 24
Field to Disk File
features, 5
Field to Disk File program
cross reference reports, 5
FILE, 80
FILE (disk), 78
File Definition Source Creation, 52
File specifications errors, 97
File/Field/Program
cross reference reports, 4
First Level Procedure, 89
Fl key
convert, 68
Fl0 key
top, 69
FLDREF, 57, 65
FMTDTA, 77
FMTFIL, 48
Forced Value Parameter, 86
Format Data command, 77
FORMS, 80
FROMLIBR, 75
G
Generate CL Program Source, 9, 46
features, 9
Generate Display File DDS Source, 10
Generate Field Reference File DDS Source, 10
Generate File Conversion Programs, 10
Generate File Definition Source Members, 10
Generate Physical File DDS Source, 10
Generate physical file entries, 108
Index
Generate RPG/400 Source, 10
Generating
cross reference reports, 32
field reference File dds source, 53
file conversion programs, 57
physical file dds source, 55
reports, 31
rpg/400 program source, 63
screen format dds source, 61
GO, 83
GOTO, 92, 94
GOTO command, 92
GOTO/TAG, 93
H
Header specifications errors, 97
I
IF/ELSE, 90
INCLUDE, 80
INFOMSG, 80
INIT, 75
Initialize Tape command, 78
Input specifications
errors, 99
INQUIRY, 75
Insert
multiple lines after the current line, 69
single line after the current line, 69
Interactive OCL to CL Converter Menu, 11
features, 11
Internally described files, 112
INZDKT, 75
INZTAP, 78
J
JOBD, 49, 51, 57, 60, 62, 66
JOBQ, 80, 91
L
LIB, 52
LIBRARY, 80
LIBRLIBR, 75
Lines
copying, 69
deleting, 69
inserting, 69
moving, 69
LIST, 48, 75
LISTLIBR, 75
LOAD, 82, 91
LOADPS
program, 15
LOCAL, 82
Local Data Area, 89
LOG, 82
LOGCLPGM, 82
M
Main Menu, 3
MEMBER, 82
Menu
conversion, 8, 45
main, 3
reports, 4
search, 6, 35
MENU, 83
Message Member, 89
Missing Parameter, 86
Missing Parameter Message, 87
MNU, 50
MONMSG, 83
Moving
lines, 69
prostart commands, 51
Moving from the S/36 environment
planning/scheduling, 20
MSG, 83
Multiple lines
insert, 69
Multi-record format files
converting, 115
N
NDRCVF, 84
nF'value'?, 86
NOHALT, 83
O
Object naming conventions, 23
Object types, 23
OCL Commands, 78
OCL to CL
Converting, 108
faster conversion, 1
OCL to CL Converter, 67
OCLFIL, 47
OCLMBR, 47
OFF, 83
OLD/NEW, 79
Open Query File command, 78
Operator's User ID, 90
OPNQRYF, 78
ORGANIZE, 75
OUTLIB, 50
OUTMNUSRC, 50
Output specifications
errors, 99
Override Database File command, 78
Override Print File command, 77
Override Printer File command, 80
125
126
ProStart Manual
OVRDBF, 78, 113
OVRMSGF, 82
OVRPRTF, 77, 80, 83
P
Parameter Length, 87
Parameter., 85
PAUSE, 94
Performs substitutions within sort specifications, 105
Physical file dds source
generating, 55
Planning/Scheduling
moving from the S/36 environment, 20
POWER, 83
PRESERVE, 57
PRINTER, 83
PROC, 91
Procedure Control Expressions, 85
Procedures, 73
Program
LOADPS, 15
Program Date, 88
Program described files, 112
Program Described Files
retaining, 21
Programming Development Manager User's Guide and
Reference, 13
PROMPT, 84
ProStart
removing, 16
Prostart commands
moving, 51
ProStart trial, 17
PRTFSRC, 65
PWRDWNSYS, 83
Q
QCLSRC, 24
QDDSSRC, 24
QFMTSRC, 24
QGPL, 106
QMNUSRC, 24
QPRINT, 99
QRPGSRC, 24
QRY, 75
QSECOFR, 14
QSYSPRT, 99
R
RCDCNT, 101
Records
retrieve count of, 101
REGION, 84
REMOVE, 76
Removing
ProStart, 16
RENAME, 76
Rename Diskette command, 75
Rename Object command, 76
REORG, 77
Reorganize Physical File Member command, 76
REPLACE, 52
Reports
disk file "where created", 33
disk file wherecreated", 5
generating, 31
summary, 9
Reports Menu, 4
Required Parameter Example:, 86
Required Parameter Message, 87
RESERVE, 84
RESET, 94
RESTLIBR, 76
RESTORE, 76
Restore Library command, 76
Restore Object command, 76
Retaining
program described files, 21
Retrieve count of records, 101
Retrieve Record Count command, 91
RETURN, 94
Return Code, 87
RGZPFM, 76
RNMOBJ, 76
ROLL UP/DOWN keys, 39
RPG
faster conversion, 2
RPG II code
converting, 109
RPG type, 102
RPG/400 program source
generating, 63
RPG/400 Reference, 14
RPG/400 source, 24
RPG/400 User's Guide, 14
RPGFIL, 60, 64
RPGMBR, 59, 64
RSTLIB, 73, 76
RSTOBJ, 15, 76
RTVJOBA, 91
RTVJOBA USER(&USER), 90
RTVRCDCNT, 91, 101, 106
RTVWSID, 102, 106
RUN, 84
S
S/36 DISP, 79
S36FIL, 58, 62, 64
S36SRCFIL, 54, 56
S36SRCMBR, 54, 55
S40FIL, 59
Sample code
converting multi-record format files, 115
SAVE, 77
Save Library command, 77
Index
Save Object command, 75, 77
SAVELIBR, 77
SAVLIB, 77
SAVOBJ, 75, 77
SBMJOB, 78, 80
Screen format dds source
generating, 61
Search for File Reference, 6
features, 6
Search for Program/Procedure References, 7
features, 8
Search libraries
search menu, 36
Search menu
analyze library for searches, 35
search libraries, 36
Search Menu, 6, 35
delete search data, 43
Send User Message command, 94
SESSION, 84
Session Library, 89
Session Printer, 89
SET, 77
Setting up
development library, 24
SHRMM (SHR), 79
SHRMR, 79
SHRRM, 79
SHRRR, 79
SIGNO, 83
Single line
insert, 69
SNDF, 84
SNDMSG, 83, 92
SNDPGMMSG, 93
SNDUSRMSG, 92, 94
SORT, 77
Sort specification source, 24
SORTSUBS, 105, 106
SOURCE, 91
Source members
creating, 52
Start Data Base Reader command, 85
STRDBRDR, 85
string1/string2, 91
string1=string2, 91
string1>string2, 91
Submit Data Base Job command, 85
Submit Job command, 78, 80
SUBR, 91
SUBS, 105
Substitution Expressions, 85
Summary Report
features, 9
SWITCH, 78, 84, 91
SWITCHn, 91
SYSLIST, 78, 84
System Console Message Statement, 92
System List Device, 89
System Time, 90
T
TAPEINIT, 78
Temporary Value Parameter, 86
TFRCTL, 94
TOLIBR, 78
Tools
application development, 13
TRANSFER, 78
Transfer Control command, 94
Trial
prostart, 17
Type
CLP, 102
CMD, 102
RPG, 102
TYPE(*INQ), 94
U
UPDATE, 78
User library
copying commands, 51
Using the Interactive Converter, 68
UT specifications errors, 97
V
VALUATE, 93
W
WAIT, 84
WORKSTN, 85
WRKACTJOB, 94
WRKOBJLCK, 15
WSID, 102
X
XJMRRC, 102
XJRRRC, 102
127