1
UM0844
User manual
Getting started with SPEAr® Linux support package (LSP2.3)
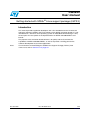
Introduction
This manual provides application developers with a first introduction to the Linux-based
reference software installed in the Flash memory of the SPEAr evaluation boards. It is not
intended to be a tutorial on Linux operating system or embedded software design. It only
covers topics that are specific to the implementation on SPEAr embedded MPUs and
boards.
The purpose of the evaluation board software is to quickly and easily evaluate the
capabilities of SPEAr embedded MPUs, as well as to provide a starting point for the
software development for your own applications.
Note:
October 2010
For information on downloading the SPEAr Linux Support Package (LSP2.3) from
www.st.com, refer to Section 3.5 on page 25
Doc ID 16544 Rev 3
1/38
www.st.com
Contents
UM0844
Contents
1
About this manual . . . . . . . . . . . . . . . . . . . . . . . . . . . . . . . . . . . . . . . . . . . 6
1.1
2
The pre-flashed software . . . . . . . . . . . . . . . . . . . . . . . . . . . . . . . . . . . . . 8
2.1
3
4
Glossary . . . . . . . . . . . . . . . . . . . . . . . . . . . . . . . . . . . . . . . . . . . . . . . . . . . 7
Host PC requirements . . . . . . . . . . . . . . . . . . . . . . . . . . . . . . . . . . . . . . . . 8
2.1.1
Windows PC . . . . . . . . . . . . . . . . . . . . . . . . . . . . . . . . . . . . . . . . . . . . . . 8
2.1.2
Linux PC . . . . . . . . . . . . . . . . . . . . . . . . . . . . . . . . . . . . . . . . . . . . . . . . . 9
2.2
Overview of Flash contents and structure . . . . . . . . . . . . . . . . . . . . . . . . 10
2.3
Booting up to the Linux prompt . . . . . . . . . . . . . . . . . . . . . . . . . . . . . . . . 12
2.4
Using a USB pendrive . . . . . . . . . . . . . . . . . . . . . . . . . . . . . . . . . . . . . . . 13
2.5
Using a MMC/SD Card . . . . . . . . . . . . . . . . . . . . . . . . . . . . . . . . . . . . . . . 14
2.6
Entering the U-Boot resident monitor . . . . . . . . . . . . . . . . . . . . . . . . . . . . 14
2.6.1
Information commands . . . . . . . . . . . . . . . . . . . . . . . . . . . . . . . . . . . . . 14
2.6.2
Environment commands . . . . . . . . . . . . . . . . . . . . . . . . . . . . . . . . . . . . 15
2.6.3
Advanced commands . . . . . . . . . . . . . . . . . . . . . . . . . . . . . . . . . . . . . . 16
2.7
Connecting the evaluation board to a LAN . . . . . . . . . . . . . . . . . . . . . . . . 16
2.8
Updating the pre-flashed software . . . . . . . . . . . . . . . . . . . . . . . . . . . . . . 18
2.8.1
Installing the USB flasher . . . . . . . . . . . . . . . . . . . . . . . . . . . . . . . . . . . 19
2.8.2
Installing the Flash images . . . . . . . . . . . . . . . . . . . . . . . . . . . . . . . . . . 21
2.8.3
Updating the Flash . . . . . . . . . . . . . . . . . . . . . . . . . . . . . . . . . . . . . . . . . 22
The SPEAr Linux Support Package (LSP2.3) . . . . . . . . . . . . . . . . . . . . 23
3.1
Overview . . . . . . . . . . . . . . . . . . . . . . . . . . . . . . . . . . . . . . . . . . . . . . . . . 23
3.2
Licensing . . . . . . . . . . . . . . . . . . . . . . . . . . . . . . . . . . . . . . . . . . . . . . . . . 23
3.3
Host PC requirements . . . . . . . . . . . . . . . . . . . . . . . . . . . . . . . . . . . . . . . 24
3.4
The stmyum tool . . . . . . . . . . . . . . . . . . . . . . . . . . . . . . . . . . . . . . . . . . . . 24
3.5
How to install the SPEAr Linux Support Package (LSP2.3) . . . . . . . . . . . 25
3.5.1
First-time installation . . . . . . . . . . . . . . . . . . . . . . . . . . . . . . . . . . . . . . . 25
3.5.2
Keeping the distribution updated . . . . . . . . . . . . . . . . . . . . . . . . . . . . . . 26
Working at application level (userland) . . . . . . . . . . . . . . . . . . . . . . . . . 27
4.1
Workflow models . . . . . . . . . . . . . . . . . . . . . . . . . . . . . . . . . . . . . . . . . . . 27
4.1.1
2/43
Remote mounting of the root filesystem (NFS) . . . . . . . . . . . . . . . . . . . 27
Doc ID 16544 Rev 3
UM0844
5
6
Contents
4.1.2
Incremental changes to Flash filesystem . . . . . . . . . . . . . . . . . . . . . . . . 28
4.1.3
Flash filesystem full replacement . . . . . . . . . . . . . . . . . . . . . . . . . . . . . . 28
4.2
Command line cross-development . . . . . . . . . . . . . . . . . . . . . . . . . . . . . . 28
4.3
Using the graphical IDE . . . . . . . . . . . . . . . . . . . . . . . . . . . . . . . . . . . . . . 29
4.3.1
Launching ST Workbench . . . . . . . . . . . . . . . . . . . . . . . . . . . . . . . . . . . 29
4.3.2
Testing a simple application example . . . . . . . . . . . . . . . . . . . . . . . . . . 30
4.3.3
Building a project . . . . . . . . . . . . . . . . . . . . . . . . . . . . . . . . . . . . . . . . . . 30
4.4
Userland packages . . . . . . . . . . . . . . . . . . . . . . . . . . . . . . . . . . . . . . . . . . 30
4.5
Rebuilding the root filesystem . . . . . . . . . . . . . . . . . . . . . . . . . . . . . . . . . 30
Working with customized kernels . . . . . . . . . . . . . . . . . . . . . . . . . . . . . 32
5.1
Reconfiguring the kernel . . . . . . . . . . . . . . . . . . . . . . . . . . . . . . . . . . . . . 32
5.2
Rebuilding the kernel . . . . . . . . . . . . . . . . . . . . . . . . . . . . . . . . . . . . . . . . 33
5.3
Workflow models . . . . . . . . . . . . . . . . . . . . . . . . . . . . . . . . . . . . . . . . . . . 33
5.3.1
Booting the kernel on-demand . . . . . . . . . . . . . . . . . . . . . . . . . . . . . . . . 33
5.3.2
Updating the kernel on Flash memory by U-Boot . . . . . . . . . . . . . . . . . 34
Rebuilding the bootloader . . . . . . . . . . . . . . . . . . . . . . . . . . . . . . . . . . . 36
6.1
XLoader . . . . . . . . . . . . . . . . . . . . . . . . . . . . . . . . . . . . . . . . . . . . . . . . . . 36
6.2
U-Boot . . . . . . . . . . . . . . . . . . . . . . . . . . . . . . . . . . . . . . . . . . . . . . . . . . . 36
Appendix A Software license agreement . . . . . . . . . . . . . . . . . . . . . . . . . . . . . . . 38
A.1
Definitions . . . . . . . . . . . . . . . . . . . . . . . . . . . . . . . . . . . . . . . . . . . . . . . . . 38
A.2
License . . . . . . . . . . . . . . . . . . . . . . . . . . . . . . . . . . . . . . . . . . . . . . . . . . . 38
A.3
Ownership and copyright. . . . . . . . . . . . . . . . . . . . . . . . . . . . . . . . . . . . . . 38
A.4
Restrictions . . . . . . . . . . . . . . . . . . . . . . . . . . . . . . . . . . . . . . . . . . . . . . . . 38
A.5
No warranty . . . . . . . . . . . . . . . . . . . . . . . . . . . . . . . . . . . . . . . . . . . . . . . . 39
A.6
Limitation of liabilities . . . . . . . . . . . . . . . . . . . . . . . . . . . . . . . . . . . . . . . . 40
A.7
Termination . . . . . . . . . . . . . . . . . . . . . . . . . . . . . . . . . . . . . . . . . . . . . . . . 40
A.8
Applicable law and jurisdiction . . . . . . . . . . . . . . . . . . . . . . . . . . . . . . . . . 41
A.9
Severability . . . . . . . . . . . . . . . . . . . . . . . . . . . . . . . . . . . . . . . . . . . . . . . . 41
A.10
Waiver . . . . . . . . . . . . . . . . . . . . . . . . . . . . . . . . . . . . . . . . . . . . . . . . . . . . 41
A.11
Relationship of the parties. . . . . . . . . . . . . . . . . . . . . . . . . . . . . . . . . . . . . 41
Revision history . . . . . . . . . . . . . . . . . . . . . . . . . . . . . . . . . . . . . . . . . . . . . . . . . . . . 42
Doc ID 16544 Rev 3
3/43
List of tables
UM0844
List of tables
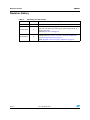
Table 1.
Table 2.
Table 3.
Table 4.
4/43
List of abbreviations . . . . . . . . . . . . . . . . . . . . . . . . . . . . . . . . . . . . . . . . . . . . . . . . . . . . . . . 7
Main toolchain commands . . . . . . . . . . . . . . . . . . . . . . . . . . . . . . . . . . . . . . . . . . . . . . . . . 29
Kernel configuration files . . . . . . . . . . . . . . . . . . . . . . . . . . . . . . . . . . . . . . . . . . . . . . . . . . 32
Document revision history . . . . . . . . . . . . . . . . . . . . . . . . . . . . . . . . . . . . . . . . . . . . . . . . . 42
Doc ID 16544 Rev 3
UM0844
List of figures
List of figures
Figure 1.
Figure 2.
Figure 3.
Figure 4.
Figure 5.
Figure 6.
Figure 7.
Step-by-step approach to using the manual . . . . . . . . . . . . . . . . . . . . . . . . . . . . . . . . . . . . . 6
Tera Term configuration for serial port (Windows PC) . . . . . . . . . . . . . . . . . . . . . . . . . . . . . 9
Minicom serial port configuration (Linux PC) . . . . . . . . . . . . . . . . . . . . . . . . . . . . . . . . . . . 10
Flash memory organization . . . . . . . . . . . . . . . . . . . . . . . . . . . . . . . . . . . . . . . . . . . . . . . . 11
TCL download page . . . . . . . . . . . . . . . . . . . . . . . . . . . . . . . . . . . . . . . . . . . . . . . . . . . . . . 19
USB flasher first screen . . . . . . . . . . . . . . . . . . . . . . . . . . . . . . . . . . . . . . . . . . . . . . . . . . . 21
Partition configuration dialog . . . . . . . . . . . . . . . . . . . . . . . . . . . . . . . . . . . . . . . . . . . . . . . 22
Doc ID 16544 Rev 3
5/43
About this manual
1
UM0844
About this manual
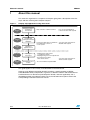
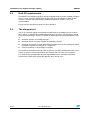
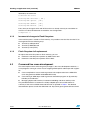
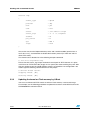
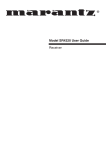
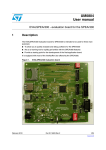
This manual is organized as a sequence of chapters going from a description of the first
steps and then covering more complex subjects.
Figure 1.
Step-by-step approach to using the manual
Section
2
Section
3
Exploring software
pre-flashed
on kit boards
Installing and
learning the STLinux
distribution
Section
4
Working at
application level
Section
5
Working at
kernel level
Section
6
Rebuilding the boot
loaders
- Early evaluation of SPEAr solutions
User can work with Windows
or Linux PC. Base skills required
- Porting own applications to SPEAr kits
- Customizing the contents of
root file system
User must work with Linux PC.
Medium skills required
- Adding built-in Linux features
not enabled by default
- Adapting/tuning some kernel parameters
- Developing new modules
User must work with Linux PC.
and/or device drivers
Advanced skills required
- Boot from NAND and parallel NOR
This guide applies to all currently available SPEAr evaluation boards.
However, each different evaluation board is based on a specific member of SPEAr
embedded MPU family and provides, in general, a different selection and combination of
hardware devices on the board (and companion boards, wherever applicable). For a
detailed description of hardware features for each evaluation board, please refer to the
corresponding evaluation board user manual.
6/43
Doc ID 16544 Rev 3
UM0844
1.1
About this manual
Glossary
Table 1.
List of abbreviations
Term
Definition
API
Application programming interface
ARM
Advanced RISC machine
BSP
Board support package
DDR
Double data rate (RAM)
DHCP
Dynamic host configuration protocol
FAT
File allocation table
FTP
File transfer protocol
GCC
GNU compiler collection
GPL
General public license (GNU)
IDE
Integrated development environment
IP
Internet protocol
LAN
Local area network
LGPL
Lesser GPL
LSP
Linux support package
MAC
Media access control
MTD
Memory technology device
NFS
Network file system
OS
Operating system
RAM
Random access memory
RPM
RPM package manager
RTC
Real time clock
SDK
Software development kit
SRAM
Static RAM
TFTP
Trivial file transfer protocol
UART
Universal asynchronous receiver transmitter
USB
Universal serial bus
Doc ID 16544 Rev 3
7/43
The pre-flashed software
2
UM0844
The pre-flashed software
SPEAr evaluation boards come with default embedded Linux software already stored in
(serial NOR) Flash memory, according to a pre-defined generic configuration. Using a
SPEAr board with pre-flashed software is initially useful to get familiar with the target
hardware platform and the embedded Linux environment.
This activity does not strictly require the installation of the SPEAr Linux Support Package
(LSP2.3) (software development environment). This can be performed later as, described in
Chapter 3 of this document.
Note:
It is highly recommended, as a first step, to check the ST website www.st.com for new
versions of default software Flash images. The procedure for updating the evaluation board
Flash memory is described in Section 2.8 on page 18.
Before powering-on target hardware, hence booting the pre-flashed software, please
carefully check the specific hardware configuration (for example, DIP switches) according to
what is described in the relevant hardware manuals.
2.1
Host PC requirements
2.1.1
Windows PC
In order to control the target hardware, you can use a PC with a Microsoft Windows
operating system (XP, Vista, Windows 7).
The first step is to set up a serial port for interacting with the embedded consoles (Linux
shell or U-Boot boot loader). If a RS232 serial port is not available on the PC, you can use a
USB/RS232 adapter (not provided in the kit).
The second step is to obtain a terminal emulation program. Windows comes with the built-in
HyperTerminal, but any equivalent tool can be used as an alternative. For instance, Tera
Term is an open source free application with more features and higher flexibility, especially
its scripting capability.
You can download and find more technical information about Tera Term on:
http://en.wikipedia.org/wiki/Tera_Term
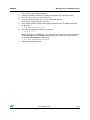
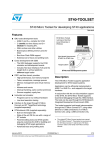
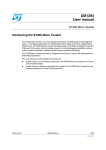
In order to configure the serial port with TeraTerm;
1.
Launch the tool
2.
Click on "Setup > serial port"
The configuration must reflect that shown in Figure 2.
3.
8/43
To save the proper setting, click on "Setup > save setup".
Doc ID 16544 Rev 3
UM0844
The pre-flashed software
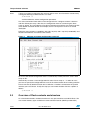
Figure 2.
Tera Term configuration for serial port (Windows PC)
Using HyperTerminal is very similar. To configure the serial port with HyperTerminal:
2.1.2
1.
Enter the "File > Properties" menu
2.
Select the COM port (for example COM1) in the "Connect Using" dialog box
3.
Press the "Configure" button
4.
Enter the 'Port Setting' fields accordingly
5.
To save the current configurations select the "File >Save As" menu item.
Linux PC
As an alternative to Windows, you can use a PC with Linux OS.
In the examples below, a '$' symbol represents a normal user prompt while a '#' symbol
means a root level prompt. Please note that you need read/write access to the PC serial
port. If necessary, check your distribution documentation to enable it (for example, on
Fedora Linux systems you have usually to add your user to the "dialout" system group).
Minicom is one of the most commonly used terminal emulators for Linux. Assuming a
Fedora distribution for the host PC, to check the availability of Minicom, execute the following
command:
$ rpm -q minicom
To install minicom, if not found, execute this command from a root shell:
# yum install minicom
To start minicom, type the command:
$ minicom
To enter the configuration menu for the first time, press the key combination "Ctrl-A" and
then "Z" (in sequence).
Doc ID 16544 Rev 3
9/43
The pre-flashed software
Note:
UM0844
If there is no global configuration file, minicom will not start. You first need to create one by
running the following command from a root shell:
# minicom -s
and then follow the normal configuration procedure.
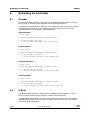
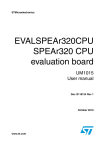
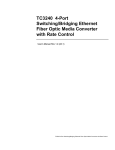
The serial connection information can be configured in the 'configure minicom' submenu
and then 'Serial port setup'. After that, the configuration must be saved using the 'Save
setup as' option. The serial device name to be entered must match the one used for the link
to the SPEAr evaluation board. For example, the first serial port on Linux PC is named
/dev/ttyS0.
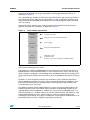
Select the serial speed as 115200 bps with 8 bit, no parity and 1 stop bit (115200 8N1) and
disable both hardware and software flow control.
Figure 3.
Minicom serial port configuration (Linux PC)
To save a new default configuration which is automatically used by minicom, select "Save
setup as dfl".
Alternatively, to create a new configuration file select "Save setup as..". In order to use it,
you have to specify the configuration file name in the command line when invoking minicom.
Please note that by default minicom tries to initialize a "modem" connected to the specific
interface you have chosen. To skip this step you can invoke minicom with the -o option as
follows:
$ minicom -o
2.2
Overview of Flash contents and structure
On all evaluation boards, the default software is only pre-stored into serial NOR Flash. The
use of other memory types available on some evaluation boards (NAND, parallel NOR)
10/43
Doc ID 16544 Rev 3
UM0844
The pre-flashed software
requires the installation and usage of the SPEAr Linux Support Package (LSP2.3), as
described in Section 3.
This subsection only provides an overview of the Flash contents and structuring. Details on
this subject (like offsets and sizes for each partition, as well as differences between serial
NOR, parallel NOR and NAND) is provided in the corresponding SPEAr device datasheet
and user manual.
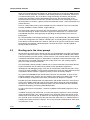
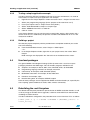
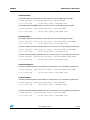
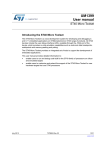
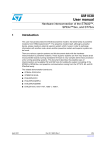
Whatever the Flash memory type, software installed in the SPEAr evaluation boards is
logically structured into 5 partitions, as depicted in Figure 4.
Figure 4.
Flash memory organization
XLoader
U-Boot
U-Boot
Environment
Kernel
Root
Filesystem
2nd-stage boot loader
3rd-stage boot loader and resident monitor
U-Boot settings
Linux kernel with SPEAr BSP
Initialization scripts
Configuration files
Selection of user-space programs and runtime libraries
To understand the rationale behind this Flash memory organization, it is necessary to know
how the overall booting process works.
After power-on, a SPEAr embedded MPU starts to execute an on-chip firmware known as
BootROM (kept in internal SPEAr ROM area, not in Flash memory). This is the first stage.
When a board is configured in Flash booting mode, BootROM terminates by loading a 2nd
stage component (XLoader) from Flash memory to on-chip SRAM and then gives control to
it.
XLoader is a small ST-specific firmware (also available in source code) that executes in
internal SRAM and configures the PLLs and the specific DDR memory available on each
board. Once performed its task, XLoader loads a third stage boot loader (U-Boot) from
Flash and jumps to its entry point.
The widely used open source U-Boot program is used as a third-stage boot loader in the
SPEAr evaluation boards. The U-Boot version provided is extended with support for the
required SPEAr-specific hardware. In addition to its role in the overall booting process, UBoot also operates as a resident monitor. To start the monitor function after power-on, stop
U-Boot execution before Linux is started. U-Boot is mainly in charge of loading and
executing the Linux kernel. This stage is configured in a special Flash partition known as UBoot Environment, basically a collection of parameter/value pairs.
Doc ID 16544 Rev 3
11/43
The pre-flashed software
UM0844
When not interrupted after board power-on, U-Boot loads the Linux kernel to DDR memory
and then starts its execution. The kernel, after further preliminary initialization, mounts the
so-called root filesystem. This is the binary image containing all software and data that
comprise the operating system complementing the kernel. The root filesystem is the
hierarchical file structure that end users see from the familiar Linux shell prompt. For preflashed software, it contains a generic subset of initialization scripts, system commands and
runtime libraries.
There is a wide choice of file system standards for Flash memories in the Linux world (for
example, CRAMFS, JFFS2, YAFFS2, LogFS, UBIFS).
The pre-flashed software is based on the most commonly used standard, namely JFFS2.
The main advantage of JFFS2 is the built-in support for compression. It is also the most
consolidated filesystem, while generally not providing the best performance in terms of
booting time.
By using the SPEAr Linux Support Package (LSP2.3), evaluation boards with NAND Flash
can be also configured to use YAFFS2. YAFFS2 aims at providing better support for NAND
Flash devices and faster boot time. However, YAFFS2 is not yet part of official open source
Linux kernels and requires a dedicated patch, however this patch is already applied to
SPEAr-ported Linux kernels.
2.3
Booting up to the Linux prompt
To boot Linux just power up the board. You then see the bootloader messages and prompt.
If you press a key in this phase, you stop the bootloader execution and display the U-Boot
command prompt (see next section). Instead, wait for a few seconds while the Linux kernel
is loaded and launched. Progress is displayed by a sequence of kernel boot messages. The
root filesystem is mounted automatically, the system shell is run and a prompt appears
when it is ready to accept commands.
The pre-flashed software provides a default set of system commands and runtime libraries.
System commands are the familiar basic utilities mainly provided to support the
development and debugging stages. They are all stored under standard Linux paths. They
may be not strictly needed in a final product, however their small size allows them to be kept
in production devices without a significant penalty in terms of memory footprint.
As is typical for embedded Linux environments, STLinux uses BusyBox, an open source
program combining tiny versions of many common user-space Linux utilities into a single
small executable, an important factor when minimized Flash footprint is required.
BusyBox has been developed with size-optimization and limited resources in mind, for this
reason the available commands typically have fewer options than their full-featured GNU
counterparts. However, the most important options are still available with all the functions
needed for developing and testing embedded products.
As well as the features of BusyBox, a number of additional executable programs are also
included.
In addition to playing with commands, it can be also helpful to explore the Linux standard
/proc pseudo-filesystem. This subtree contains user-accessible entries that pertain to the
runtime state of the kernel and, by extension, the executing processes that run on top of it.
The "pseudo" term is used because the proc filesystem exists only as a reflection of the inmemory kernel data structures it displays. This is why most files and directories within /proc
are zero bytes in size.
12/43
Doc ID 16544 Rev 3
UM0844
The pre-flashed software
In practice, the proc file system is intended to be populated at runtime with system
information and statistics. Proc files may be either read-only or read-write. Each numerically
named directory within /proc corresponds to the process ID (PID) of a process currently
executing on the system. This part of the proc filesystem totally depends on the runtime
state of the target. Each numeric entry contains subfiles that provide process-specific
information. The other (non-numeric) entries describe some aspects of kernel operation.
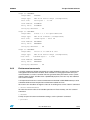
Some of the common user commands performed on the proc filesystem are:
# cat /proc/version
Displays full Linux kernel version information
# cat /proc/sys/kernel/osreleaseDisplays Linux kernel release
# cat /proc/sys/kernel/version
Displays Linux kernel build date and time
# cat /proc/cpuinfo
Displays information about the SPEAr CPU
# cat /proc/meminfo
Displays information about memory usage
# cat /proc/modules
Displays information about kernel extension modules
# cat /proc/mtd
Displays information about Flash partitions
# cat /proc/partitions
Displays other information about Flash partitions
# cat /proc/stat
Displays OS status information
# cat /proc/bus/usb/devices
Displays information about USB Host ports
# cat /proc/net/dev
Reports Ethernet information.
# cat /proc/net/tcp
Reports TCP sockets information.
# cat /proc/net/udp
Reports UDP sockets information.
# cat /proc/net/arp
Reports ARP table.
# cat /proc/net/route
Reports IP routing table.
# cat /proc/kallsyms
Lists all kernel symbols
The standard /proc/bus/usb subtree is also made available. This is used to access USB
Host controllers and plugged devices from user-space applications.
For more details about the functionality provided by pseudo filesystems, please refer to
standard Linux documentation.
2.4
Using a USB pendrive
USB pendrives can be accessed in a standard Linux way, connecting them to a USB host
port and mounting their filesystem under root filesystem. An example of operational
sequence for a standard pendrive connected as "sda" device (only one pendrive present) is
the following:
1.
Plug the pendrive in a USB port. and wait for the Linux kernel to autodetect it (you can
see active kernel messages on the terminal)
2.
Mount the pendrive filesystem:
# mount /dev/sda1 /mnt
Now the pendrive filesystem can be accessed under /mnt directory.
3.
Transfer files as usual (for example, cp command).
4.
When finished, unmount the pendrive:
# umount /mnt
Doc ID 16544 Rev 3
13/43
The pre-flashed software
UM0844
Now you can physically unplug the pendrive
2.5
Using a MMC/SD Card
Some evaluation boards (currently EVALSPEAR300 and EVALSPEAR320PLC) provide a
MMC/SD card reader slot.
An example of operation sequence for a MMC/SD card is the following:
1.
Plug the card into the board slot and wait for the Linux kernel to autodetect it (you can
see active kernel messages on the terminal)
2.
Mount the card's filesystem:
# mount /dev/mmcblk0p1 /mnt
Now the card's filesystem can be accessed under the /mnt directory.
3.
Transfer files as usual (for example, cp command)
4.
When finished, unmount the card:
# umount /mnt
Now you can physically remove the card.
2.6
Entering the U-Boot resident monitor
The U-Boot resident monitor offers an interactive command-line interface that can be used
through the serial console. U-Boot is executed before starting the Linux OS. In order to
interrupt the normal boot process and enter U-Boot operation mode, press a key from the
virtual terminal on the Windows or Linux PC during the initial period (after hardware reset)
when the following message is displayed:
Hit SPACE to stop autoboot: _
To obtain a full list of U-Boot commands available on SPEAr board, enter the "help"
command or simply type the "?" character. When "help" is followed by a command name, a
description of that specific command is displayed.
The following subsections describe basic usage scenarios. Please note that command
results are only shown as examples and can look slightly different depending on the
evaluation board and software version you use.
Detailed documentation about the described commands, as well as additional ones, may be
found on the main U-Boot Web site: http://www.denx.de/wiki/U-Boot
2.6.1
Information commands
To report the U-Boot version currently available on the evaluation board Flash memory,
execute the "version" command:
> version
U-Boot 1.3.1 (Oct
1 2009 - 14:52:19)-SPEAr300-LSP2.1
To list all Flash memory partitions, use the "imls" command:
> imls
*********************
14/43
NOR Flash Images
Doc ID 16544 Rev 3
*********************
UM0844
The pre-flashed software
Image at F8000000:
Image Name:
XLOADER
Image Type:
ARM Linux Kernel Image (uncompressed)
Data Size:
4524 Bytes =
4.4 kB
Load Address: d2800b00
Entry Point:
d2800b00
Verifying Checksum ... OK
Image at F8010000:
Image Name:
U-Boot 1.3.1 for spear300 board
Image Type:
ARM Linux Firmware (uncompressed)
Data Size:
154084 Bytes = 150.5 kB
Load Address: 00700000
Entry Point:
00000000
Verifying Checksum ... OK
Image at F8050000:
Image Name:
Linux-2.6.27-sdk2.0-0.3457
Image Type:
ARM Linux Kernel Image (uncompressed)
Data Size:
1663040 Bytes =
1.6 MB
Load Address: 00008000
Entry Point:
00008000
Verifying Checksum ... OK
2.6.2
Environment commands
A specific subgroup of U-Boot commands very often invoked by end users is related to the
management of environment variables. Such variables are string-type fields that may be
read and written, as well as stored on Flash to guarantee their persistence across system
reboots. Some of these variables have a predefined purpose, but users may also add their
own custom variables.
It is important to know that a current environment maintained in DDR RAM memory can be
sometimes different from the persistent environment stored on Flash.
To create a new variable or change the value of an existing one, run the "setenv" command:
> setenv MYVAR=MYVALUE
To make the current values of all variables persistent in Flash memory, run the "saveenv"
command:
> saveenv
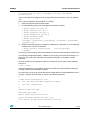
Finally, to report all current environment settings, use the "printenv" command:
> printenv
Doc ID 16544 Rev 3
15/43
The pre-flashed software
UM0844
bootargs=console=ttyS0 mem=128M root=/dev/mtdblock3
rootfstype=jffs2
bootcmd=bootm 0xf8050000
bootdelay=1
baudrate=115200
ethaddr=00:11:22:33:44:55
ipaddr=192.168.1.10
serverip=192.168.1.1
gatewayip=192.168.1.1
netmask=255.255.255.0
stdin=serial
stdout=serial
stderr=serial
verify=n
Environment size: 283/8188 bytes
2.6.3
Advanced commands
More advanced usage of U-Boot includes commands for:
2.7
●
Reading and writing embedded MPU registers and memory areas
●
Executing the contents of an environment variable, handling it as a script (sequence of
U-Boot commands)
●
Checking Ethernet link between the target board and the host PC (ping)
●
Booting the Linux kernel from Ethernet network (by TFTP) instead of using a kernel on
Flash memory (bootm, tftp, tftpboot).
Connecting the evaluation board to a LAN
The evaluation board should be connected to a developer's host PC over a private LAN or
even a point-to-point link. Commonly used private IP addresses (Class C) are in the range
of192.168.0.0 - 192.168.255.255.
Note:
Some SPEAr evaluation boards (currently EVALSPEAR310 and EVALSPEAR320) provide
multiple Ethernet ports. Each port requires a different IP address. The procedure described
below is applicable to a single port, usually the one used for software development.
As an example, let's assume an IPv4 local area network with the following characteristics:
Network IPs:
192.168.1.X
Host PC IP:
192.168.1.1
Evaluation board IP:192.168.1.10
On a Linux PC, you must configure the host address as follows:
16/43
Doc ID 16544 Rev 3
UM0844
The pre-flashed software
# ifconfig eth0 192.168.1.1 broadcast 192.168.1.255 netmask
255.255.255.0
You have the option to configure the IP on the evaluation board side in a static or dynamic
way.
For a static configuration, the procedure is as follows:
1.
Reset the board and enter U-Boot mode
2.
Use the following commands to configure environment variables:
> setenv ipaddr 192.168.1.10
> setenv serverip 192.168.1.1
> setenv gatewayip 192.168.1.1
> setenv netmask 255.255.255.0
> setenv hostname SPEAR
> setenv ip_settings
\$(ipaddr):\$(serverip):\$(gatewayip):\$(netmask):\$(hostname):
\$(netdev):off
3.
Modify the existing "bootargs" variable by adding the "ip" argument, as in the following
example, then save the environment:
> setenv bootargs console=ttyS0 ... ip=$(ip_settings)
> saveenv
In this way, network settings work inside U-Boot and are also automatically passed to Linux.
The dynamic configuration requires a DHCP server running on the LAN (for example, on a
Linux host PC) so that the evaluation board automatically gets an IP address at each
bootstrap.
To check if DHCP server (daemon) support is available on the PC-side, use the following
command:
$ rpm -q dhcp
If the DHCP package is not available, install it on the PC from your distribution media (for
example, Fedora Linux CDROM or website).
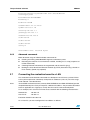
The next step is to create or change the DHCP configuration file /etc/dhcp/dhcpd.conf that
matches a specific network setup, as shown in the following example:
#
# DHCP Server Configuration file.
#
see /usr/share/doc/dhcp*/dhcpd.conf.sample
#
see 'man 5 dhcpd.conf'
#
default-lease-time 600;
max-lease-time 7200;
option subnet-mask 255.255.255.0;
option broadcast-address 192.168.1.255;
allow bootp; #allows kernel download using tftp
Doc ID 16544 Rev 3
17/43
The pre-flashed software
UM0844
ddns-update-style ad-hoc;
subnet 192.168.1.0 netmask 255.255.255.0 {
option routers 192.168.1.1;
option subnet-mask 255.255.0.0;
option domain-name "local.net";
option domain-name-servers ns.local.net;
host SPEAr300 {
hardware ethernet 00:11:22:33:44:55;
fixed-address 192.168.1.10;
option host-name "SPEAR";
next-server
192.168.1.1;
filename "uImage_300.img"; #kernel image filename in tftp path
}
}
With this configuration, the DHCP server replies to a request from a SPEAr evaluation board
with Ethernet MAC address 00:11:22:33:44:55 (just as in the example) by passing the entire
network configuration.
The "allow bootp" and "filename" parameters enable uBoot to download and boot a kernel
image from the host using the TFTP file transfer protocol (you will need a TFTP server on
the host, see below).
In order to apply the new configuration settings, restart he DHCP server. To do this, first
check the status of the DHCP daemon using the following commands from the Linux PC
shell:
# /etc/rc.d/init.d/dhcpd status
If the DHCP daemon is stopped, start it with the following command:
# /etc/rc.d/init.d/dhcpd start
Please be sure to disable your firewall or setup new firewall rules in order to enable
DHCP/TFTP traffic.
2.8
Updating the pre-flashed software
This section focuses on updating the contents of serial NOR Flash with default binary
images available on www.st.com.
Updating the contents of Flash memory on SPEAr evaluation boards is a recommended
step. It is possible to update the pre-flashed software coming by default with a SPEAr
evaluation board without installing the SPEAr Linux Support Package (LSP2.3).
The procedure for the update involves the installation and use of the USB flasher tool
provided by ST. This tool is a graphical interactive application, which can be downloaded
from www.st.com.
18/43
Doc ID 16544 Rev 3
UM0844
The pre-flashed software
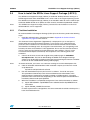
The link for downloading the software can be found on www.st.com on the web page
containing the literature and other resources for the related SPEAr device (product pages).
The product web page also provides a download for updated binary images (for each
evaluation board type) to be used with the USB flasher.
The use of the USB flasher for other purposes and scenarios is intended to be explained by
the help pages embedded in the tool itself.
2.8.1
Installing the USB flasher
The USB flasher tool must be installed on a Windows PC.
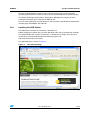
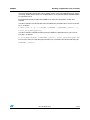
Before setting up the flasher tool, you must download and install an updated TCL package.
The recommended TCL software is ActiveTCL, available free of charge. The latest TCL
version (8.5) can be downloaded from the following supplier site:
http://www.activestate.com/activetcl/
The download page is shown in Figure 5.
Figure 5.
TCL download page
You can now start the procedure to install the USB flasher:
Doc ID 16544 Rev 3
19/43
The pre-flashed software
1.
UM0844
Create a new folder under any path on the PC and extract into it the contents of the
flashing_util.tar.gz file as obtained from ST Web site.
Let's assume for example that the selected folder path is c:\flashing_util
2.
Before power-on, you must configure the evaluation board for USB bootstrap mode.
This is done through DIP switches. Details on switch setting for each evaluation board
can be found on board-specific user manuals.
3.
Connect the evaluation board to the Windows PC using a USB cable. The USB host
port on the PC has to be connected with the USB device connector of the evaluation
board.
4.
Switch on the evaluation board.
After few seconds, the PC asks for a device driver.
5.
6.
Specify the path of the proper .inf file as found under: c:\flashing_util\Setup folder.
–
For EVALSPEAR300, EVALSPEAR310 and EVALSPEAR320PLC evaluation
boards, the file is Spear300.inf.
–
For EVALSPEAR600 evaluation board, the file is Spear600.inf.
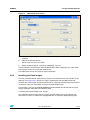
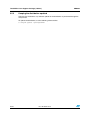
Double click on c:\flashing_util\SPEAr-Utils.tcl file. This the TCL-based application
implementing the USB flasher GUI.
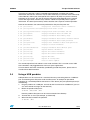
The initial USB flasher screen is shown in Figure 6.
20/43
Doc ID 16544 Rev 3
UM0844
The pre-flashed software
Figure 6.
USB flasher first screen
7.
In the SPEAr Flashing utilities window, select the target device (SPEAr300 in the
example).
8.
Click on the Connect button.
9.
Select the following path: c:\flashing_util\Setup\g_serial.inf
The PC now asks for a new driver.
A new COM port should be now visible inside Windows Device Manager. The same COM
port must be used in next tasks with USB flasher.
The USB flasher tool is now ready for normal operation.
2.8.2
Installing the Flash images
For each evaluation board, default binary images for serial NOR Flash are available on ST
Web site (see Figure 2.8.1 above) for usage in combination with the USB flasher tool.
To install the Flash images, download the ZIP file for a specific evaluation board and extract
its contents under the same folder as the one used for USB Flasher.
For example, if you use the EVALSPEAR300 evaluation board, the ZIP file with the Flash
images should be extracted to the following path:
c:\flashing_util\evalspear300_Flash_images
The subfolder should contain 4 binary images (xloader, U-Boot, kernel and default root
filesystem) as well as a USB flasher configuration file, for example, s300_defconfig.conf
Doc ID 16544 Rev 3
21/43
The pre-flashed software
2.8.3
UM0844
Updating the Flash
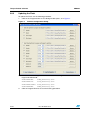
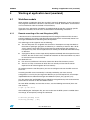
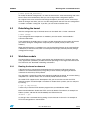
To update the Flash, use the following procedure.
1.
Click on the Program button. A new dialog window opens, as in Figure 7.
Figure 7.
2.
Partition configuration dialog
Click on the Load Configuration button and select the configuration file suitable for the
target evaluation board:
EVALSPEAR300:
s300_defconfig.conf
EVALSPEAR310:
s310_defconfig.conf
EVALSPEAR320PLC: s320_defconfig.conf
EVALSPEAR600:
3.
22/43
s600_defconfig.conf
Click on Program Binaries to start the flashing procedure.
Doc ID 16544 Rev 3
UM0844
The SPEAr Linux Support Package (LSP2.3)
3
The SPEAr Linux Support Package (LSP2.3)
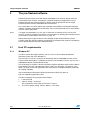
3.1
Overview
The SPEAr Linux Support Package (LSP2.3) provides all the host-side (PC) and target-side
(evaluation board) software components enabling system designers to develop their own
applications for SPEAr-based platforms, as well as to customize the various aspects of the
embedded software architecture.
The components can be summarized as follows:
●
Command-line cross-development toolchain (compiler, linker, building tools, etc.),
running on a Linux x86 PC
●
Graphical IDE (ST Workbench), running on a Linux x86 PC
●
Software for incremental online update of SPEAr Linux Support Package (LSP2.3)
components
●
A set of open source user-space ARM packages (programs and runtime libraries) to be
promptly reused in root filesystems as support to specific applications
●
Linux kernel (2.6.27 or higher), configurable for the different SPEAr evaluation boards;
it includes BSP/device drivers for the SPEAr hardware features
●
U-Boot boot loader, with added support for SPEAr evaluation boards
●
XLoader firmware, configurable for the different SPEAr evaluation boards
Most distribution components are also available as source code (SRPM files).
Full details about STLinux components are reported in other specific documents.
3.2
Licensing
The SPEAr Linux Support Package (LSP2.3) includes a wide number of packages, each
having a relative license. The most common licenses are the GNU Public License (GPL)
and the GNU Lesser Public License (LGPL). Even if there are different versions of the GPL
and the LGPL packages, they are all licensed under Version 2 (or earlier) of the GPL or the
LGPL. The GNU licenses are administered by the Free Software Foundation.
Another commonly used license type is the Berkeley Software Distribution (BSD) developed
by the University of California in order to ensure academic freedom relating to software
works. The remaining packages are covered by a variety of open source licenses, most of
which are simple and straightforward. Further information can be found on the Web sites of
these packages.
While license information is given in good faith, ST cannot guarantee the accuracy of this
information, which has been collated from a variety of open source projects and other
sources. ST hereby expressly disclaims any responsibility for error, omission, or
misinterpretation, and for any or all loss or damages caused by reliance on this license
information. Confirmation of the accuracy of this license information should be confirmed
independently by the licensee. It remains under responsibility of the licensee to ensure that
all software obtained from this site is used in accordance with the appropriate license
conditions, as provided from the original master source.
Doc ID 16544 Rev 3
23/43
The SPEAr Linux Support Package (LSP2.3)
3.3
UM0844
Host PC requirements
The SPEAr Linux Support Package (LSP2.3) for SPEAr family has been qualified on Fedora
Core 11 Linux. Using the SPEAr software with other Linux distributions or older Fedora
versions is feasible, but it could require additional preliminary activities, so it is not
recommended.
Please note that the SELinux option has to be disabled.
3.4
The stmyum tool
Yum is an automatic updater and package installer/remover for RPM Linux host systems
(like Fedora). It automatically computes dependencies and figures out what things should
occur to install packages. Yum has a number of advantages over using RPM directly, such
as:
●
Automatic updates of installed packages
●
Automatic checks for newly available and updated packages
●
Automatic installation of all the dependency packages for each new package installed
installation of groups of packages as a single unit
●
Increased security as all packages are signed.
The SPEAr Linux Support Package (LSP2.3) relies on a slightly customized version of yum,
known as stmyum, to ensure that it does not interfere with any native yum installation.
It is automatically installed under the path /opt/STM/STLinux-X.X/host/bin. The PATH
environment variable must include this directory to be able to use it.
24/43
Doc ID 16544 Rev 3
UM0844
3.5
The SPEAr Linux Support Package (LSP2.3)
How to install the SPEAr Linux Support Package (LSP2.3)
The SPEAr Linux Support Package (LSP2.3) is needed to develop software running on a
SPEAr target boards when embedded Linux is to be used as the target’s operating system.
The SPEAr Linux Support Package (LSP2.3) is not needed in order to use the software preflashed on SPEAr boards or to update the Flash memory with default predefined contents.
Note:
The SPEAr Linux Support Package (LSP2.3) software must be installed on a Linux PC.
Windows® PCs are not supported.
3.5.1
First-time installation
To install the SPEAr Linux Support Package (LSP2.3) for the first time, perform the following
steps:
1.
Note:
This Software License Agreement ("Agreement") is displayed for you to read prior to
downloading and using the Licensed Software. If you choose not to agree with these
provisions, do not download or install the enclosed Licensed Software and the related
documentation and design tools. By using the Licensed Software, you are agreeing to be
bound by the terms and conditions of this Agreement. Do not use the Licensed Software
until you have read and agreed to the following terms and conditions. The use of the
Licensed Software implies automatically the acceptance of the following terms and
conditions.
2.
Note:
Read the software licence agreement provided in Appendix A: Software license
agreement on page 38 of this manual.
Connect to the www.st.com and navigate to the product pages for embedded
microprocessors. The link for downloading the SPEAr Linux Support Package
(LSP2.3) can be found by navigating to the web page containing the literature and other
resources for the related SPEAr device (product pages).
To download the file, you have to use a browser running on the Linux development PC.
3.
Click on link below to download the initial installation script to your Linux PC: install
script download:
ftp://stlinux.com/pub/stlinux/2.3/install
4.
Run the downloaded script on your Linux PC as follows: ./install all-arm-spear
This procedure automatically starts the overall download and installation of the
required software components (remotely available as RPM packages). The entire
procedure takes several minutes, depending on the network speed. The distribution is
installed by default under path /opt/STM.
5.
When the installation is completed, configure the Linux shell environment as follows:
a)
export PATH=$PATH:.:/opt/STM/STLinux-2.3/devkit/arm/bin:/opt/STM/STLinux2.3/host/bin
b)
export CROSS_COMPILE=arm-linux-
In order to preserve this configuration, the same commands should be also be put in a
bash shell initialization file.
Doc ID 16544 Rev 3
25/43
The SPEAr Linux Support Package (LSP2.3)
3.5.2
UM0844
Keeping the distribution updated
After the first installation, any software update for the distribution is performed through the
stmyum tool.
To update the distribution, use the following command line:
# stmyum update <packagename>
26/43
Doc ID 16544 Rev 3
UM0844
Working at application level (userland)
4
Working at application level (userland)
4.1
Workflow models
When working at application level (the so-called "userland") developers are only concerned
with programs and libraries stored in a root filesystem. Instead, boot loaders and the kernel
are assumed to be stable and stored in Flash memory.
There are many approaches (workflows) to modify/extend the root file system for specific
application scenarios; the main ones are described in the following subsections.
4.1.1
Remote mounting of the root filesystem (NFS)
If the board can be connected to the development PC through a Ethernet LAN, the most
practical solution is to leave the root filesystem stored on the PC and remotely mount it on
the target embedded Linux OS through the NFS protocol.
The advantages of this approach are the following:
●
The root filesystem has no global size constraints. Developers can keep hundreds or
thousands of packages (programs and libraries) in a directory of their PC disk. All file
access from the Linux OS running on the board is performed over the network in a
transparent way. Files are not copied to Flash memory, but loaded to DDR RAM strictly
on demand.
●
A program or library can be simply built (compiled and linked) with the output file on the
PC disk; the new version is then available for execution on the board without any need
for manual transfer or board reboot
The drawbacks are:
●
File access by NFS over LAN can be slower than direct Flash memory access
●
There is no early assessment of which files are actually used and of the overall
required size for future migration to Flash memory
To remotely mount the root filesystem, you have to configure and start the NFS server on
Linux PC.
Assuming the NFS server functionality is already provided by your host, the only
configuration is an entry for your target root directory to your /etc/exports file, for example:
/opt/STM/STLinux-2.3/devkit/arm/target 192.168.0.0/24 (rw,no_root_squash,sync)
This line exports the /opt/STM/STLinux-2.3/devkit/arm/target directory with read and writes
permissions to all hosts on the 192.168.0.0 subnet.
To check NFS availability and start the services, use the following commands (from user
root account):
# rpm -q nfs-utils
After modifying the /etc/exports file, you must make sure the NFS system is notified about
the change, for example by running the command:
# service portmap start
Starting portmap: [ OK ]
Doc ID 16544 Rev 3
27/43
Working at application level (userland)
UM0844
followed by the command:
# service nfs start
Starting NFS services: [ OK ]
Starting NFS quotas: [ OK ]
Starting NFS daemon: [ OK ]
Starting NFS mountd: [ OK ]
Every time you change that file and NFS service was already started, you need either to
restart it or to force NFS daemon to reload the new configuration:
# exportfs -a
4.1.2
Incremental changes to Flash filesystem
If the root filesystem is stored on Flash memory, it is possible to transfer files from the PC to
the target board in the following ways:
4.1.3
●
Transfer by USB pendrive
●
Transfer by MMC/SD card
●
Transfer by LAN (TFTP)
Flash filesystem full replacement
To replace the entire filesystem on Flash memory, you can:
4.2
●
Rewrite the root filesystem partition by USB Flasher tool
●
Rewrite the root filesystem partition from U-Boot
Command line cross-development
The most important item concerning host packages is the cross-development toolchain, a
set of programs running on a host PC, but targeting ARM-specific code output with support
for:
●
Cross-compilation of source code to generate native object code for the ARM CPU
cores integrated into SPEAr embedded MPU family
●
Cross-linking of ARM object code to generate executable programs or (dynamically
linkable) shared libraries
●
Managing object code archives, incremental rebuilding and other auxiliary tasks
The provided toolchain is based on the widely adopted open source GNU toolset. A
summary of the main available command-line tools is reported in Table 1. For detailed
documentation please consult the GNU Web site: http://www.gnu.org/manual/manual.html.
28/43
Doc ID 16544 Rev 3
UM0844
Working at application level (userland)
Table 2.
Main toolchain commands
Package
Tool
Description
gcc
C Cross-compiler for ARM
gcov
Code coverage
ar
Archiver
as
Cross-assembler for ARM
gprof
Profiling tool
ld
Cross-linker for ARM
nm
Lists symbols in object files
objcopy
Copies a binary file.
objdump
Displays information from object files.
ranlib
Generates an index to speed access to archives.
readelf
Displays the information about the contents of ELF format files
strip
Remove symbols and sections from files.
GNU Make
make
Incremental build management
GDB
gdb
Debugger
GCC
binutils
4.3
Using the graphical IDE
4.3.1
Launching ST Workbench
ST Workbench is an IDE (Interactive Development Environment) derived from the popular
open source Eclipse tool, specifically targeted at cross compilation for ST products.
After the STLinux installation, it should be located under the path:
/opt/STM/STLinux-2.3/host/stworkbench
You can launch it from terminal or create a desktop launcher. For example, to create a
desktop launcher on a Fedora PC:
1.
Right-click on the Desktop and select "Create Launcher..."
2.
In the "Name" field type "STWorkbench"
3.
In the "Command" field type;
opt/STM/STLinux-2.3/host/stworkbench/stworkbench
4.
Select "OK"
Now double-click on the launcher icon on the desktop to start the application.
The first time you launch STWorkbench you need to configure at least one "workbench", a
directory where your project will be stored: select a directory from the "Select Workspace"
windows that appears. You can mark this as your default workbench that will be
automatically used at startup selecting the "Use this as the default" checkbox.
From the "Welcome" window select the "Workbench" icon to enter the selected workbench.
Doc ID 16544 Rev 3
29/43
Working at application level (userland)
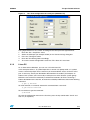
4.3.2
UM0844
Testing a simple application example
In order to check the STLinux installation and start to learn the environment, it is useful to
write and test a simple user-space application. For example:
1.
Right click in the "Project Explorer" window and select "New -> Project" from the menu
2.
Select your programming language (for the purpose of this tutorial we use C)
3.
Insert your Project name in "Project name" field ("Hello")
4.
Select "Hello World ANSI C Project" as Project Type
5.
Select "ARM926 Linux GCC" as toolchain
6.
Click on "Finish"
In the Project Explorer you now see the newly created "Hello" project, with includes and a
source file in the "src" subdirectory. To open the src/Hello.c file double-click on it. It is now
ready to be modified.
4.3.3
Building a project
To build your project completely with the provided cross-compilation toolchain you can do
one of the following:
●
From the STWorkbench menu, select "Project -> Build Project"
- Or -
●
In the Project Explorer window, right click on your project name, then select "Build
Project"
Build messages are displayed in the "Console" tab at the bottom of the screen.
4.4
Userland packages
The general SPEAr Linux Support Package (LSP2.3) comes with a set of user-space
packages prebuilt for the ARM target. This set includes programs and libraries for:
●
Graphics: for example, X Server, SDL, Cairo, DirectFB, GTK+, Qt Embedded
●
Programming language runtimes: for example, micro Perl
●
Connectivity: for example, usblib, Bluetooth (Bluez)
●
Multimedia frameworks: for example, ALSA, GStreamer
●
Database: for example, sqlite
●
Benchmarking tools: for example, IOZONE, netperf
Some of these packages are not supported on SPEAr evaluation boards yet, especially the
ones requiring specific hardware for audio, video, wireless connectivity.
4.5
Rebuilding the root filesystem
The default root filesystem provided as pre-flashed on all SPEAr evaluation boards, as well
as binary image on ST Web site for upgrades, is built for serial NOR Flash and formatted
according to JFFS2 structure.
In order to rebuild this configuration, the procedure to be run on Linux host PC is as follows:
$ mkfs.jffs2 -n -p -l -s 0x200 -e 0x10000 -r $BUSYBOX/_install/ -o
rootfs_nor.img
30/43
Doc ID 16544 Rev 3
UM0844
Working at application level (userland)
The same procedure and results can be directly used in case of parallel NOR Flash, always
assuming JFFS2. Note that there is no dependency on the specific SPEAr embedded MPU
or evaluation board.
For evaluation boards provided with NAND Flash, there are two options: JFFS2 and
YAFFS2.
In order to rebuild a JFFS2 root filesystem for NAND, the procedure to be run on Linux host
PC is as follows:
$ mkfs.jffs2 -n -p -l -s 0x200 -e 0x4000 -r $BUSYBOX/_install/ -o
rootfs_nand_smallpage.img
In order to rebuild a YAFFS2 root filesystem for NAND, the procedure to be run on Linux
host PC is as follows:
$ utils/mkyaffsimage 2 $BUSYBOX/_install/ rootfs_nand_smallpage.img
For all cases above, the root filesystem contents are assumed to be stored under the path:
$BUSYBOX/_install/
Doc ID 16544 Rev 3
31/43
Working with customized kernels
5
UM0844
Working with customized kernels
When working with SPEAr evaluation boards, making modifications to supplied Linux kernel
is only needed when:
●
Changing kernel configuration, by enabling or disabling some options or features
●
Developing new drivers on top of existing ones, in order to interface peripherals that
can be added through custom add-on boards connected to SPEAr evaluation boards
(where applicable)
●
Rewriting partially or totally some existing reference device drivers (for example, for
further optimization or special needs)
●
Developing custom kernel modules
On the other hand, any other usage of kernel-level software with hardware platforms
different from SPEAr evaluation boards is not discussed in this section.
When working at kernel level, developers are concerned with the kernel source code tree
from which a single binary image file must be generated by "rebuilding" the kernel.
The main tasks to be performed are:
●
Kernel reconfiguration
●
Kernel rebuild
●
Kernel loading and execution on a target evaluation board (different possible
workflows)
For general information about Linux kernel, please refer to public Linux documentation.
For information about SPEAr-specific code integrated into Linux kernel, please refer to the
Linux Support Package (LSP) user manual (UM0851).
5.1
Reconfiguring the kernel
The kernel configuration is managed with standard Linux Kernel configuration tools, like
"make menuconfig".
Each SPEAr evaluation board has a default kernel configuration file in the kernel source tree
directory arch/arm/configs, as shown in following table:
Table 3.
Kernel configuration files
Evaluation board
Kernel configuration file
EVALSPEAR300
spear300_defconfig
EVALSPEAR310
spear310_defconfig
EVALSPEAR320PLC
spear320_defconfig
EVALSPEAR600
spear600_defconfig
To configure the kernel using a default configuration (for example, for SPEAr300), enter the
kernel source tree directory and run the commands:
$ make distclean
32/43
Doc ID 16544 Rev 3
UM0844
Working with customized kernels
$ make spear300_defconfig
To modify the default configuration, run from the terminal the "make menuconfig" tool in the
kernel source tree root directory. Now you can change all the configuration options.
To navigate in the menu structure and change the options you need, use the arrows keys.
When all changes are done, you can save the configuration and exit. The new configuration
is saved in a hidden ".config" file. If you like, you can choose another name.
5.2
Rebuilding the kernel
After the configuration step is finished, kernel can be rebuilt with a "make" command:
$ make uImage
If you configured some components as modules, you also need a "make modules"
command afterwards.
Time required for the build process is highly variable, depending on the number of features
you choose during the configuration step and your PC speed (usually it takes some
minutes).
When the build process is completed, you can find the kernel images in the arch/arm/boot
subdirectory of the kernel tree, both as uncompressed (Image) and compressed (zImage,
uImage) kernel image.
5.3
Workflow models
The kernel binary image is always generated on the development PC. However, there are
many approaches (workflows) to make the kernel operating on the target evaluation board.
The main ones are described in following subsections.
5.3.1
Booting the kernel on-demand
If the board can be connected to the development PC through an Ethernet LAN, one
solution is to load the kernel binary image file just after reset by configuring U-Boot for
automatic file transfer by TFTP protocol.
This approach is especially useful when frequently modifying the kernel, for instance during
adaptations to a device drivers that are statically linked with kernel code.
To enable TFTP support on the development PC, you must make sure that the TFTP
daemon program /usr/sbin/in.tftpd is installed. On Fedora Core systems you can verify this
by running:
$ rpm -q tftp-server
If necessary, install the TFTP daemon program from your distribution media.
Most Linux distributions disable the TFTP service by default. To enable it, for example on
Fedora systems, edit the file /etc/xinetd.d/tftp and remove the line
disable = yes
or change it into a comment line by putting a hash character in front of it. An example of
TFTP file configuration is shown below:
Doc ID 16544 Rev 3
33/43
Working with customized kernels
UM0844
service tftp
{
socket_type
= dgram
protocol
= udp
wait
= yes
user
= root
server
= /usr/sbin/in.tftpd
server_args
= -c -v -s /tftpboot
disable
= no
per_source
= 11
cps
= 100 2
flags
= IPv4
}
Also, make sure that the /tftpboot directory exists and is world-readable (permissions at
least "dr-xr-xr-x"), and remember to disable the firewall if present (or make new rules to
allow TFTP traffic).
The firewall can be disabled as in the following example command:
# /etc/init.d/iptables stop
Please note that server_args keeps the default search path for TFTP daemon. It is quite
useful since on TFTP client side (target) we can specify file names omitting this path. After
that you need to restart the xinetd daemon to force it to reload the new configuration. You
need to type the following command from host PC prompt:
# service xinetd restart
Stopping xinetd: [OK]
Starting xinetd: [OK]
5.3.2
Updating the kernel on Flash memory by U-Boot
You can use U-Boot and TFTP transfer to write on Flash memory a new kernel image.
For example, use the following procedure to update the kernel on serial NOR Flash for the
SPEAR300EVAL evaluation board:
34/43
Doc ID 16544 Rev 3
UM0844
Working with customized kernels
1.
Press a key to enter U-Boot autoboot
2.
Configure network parameters (statically or with DHCP, see relevant sections)
3.
Start the TFTP server on the host machine
4.
Place the desired image in the host PC's TFTP root directory
(for example, /tftpboot/uImage_new.img)
5.
From U-Boot console, download the image to RAM (here we use address 0x0) with
TFTP client:
> tftp 0x0 uImage_new.img
6.
Erase the specified kernel area on serial NOR:
> erase 0:5-31
Write the image on serial NOR (you need to know the image size). In this example we
copied 1663104 bytes (0x196080 in hexadecimal) to the start of the kernel area on
serial NOR (0xF8050000 in hexadecimal):
> cp.b 0x0 0xF8050000 0x196080
7.
Reboot the evaluation board
Doc ID 16544 Rev 3
35/43
Rebuilding the bootloader
UM0844
6
Rebuilding the bootloader
6.1
XLoader
The default XLoader provided as pre-flashed on all SPEAr evaluation boards, as well as
binary image on ST Web site for upgrades, is built for serial NOR Flash.
If needed, the XLoader firmware image has to be rebuilt taking into account each specific
embedded MPU and memory types. Therefore, there are many cases and relevant
commands to be run on Linux PC, as described below.
EVALSPEAR300
$ make clean
$ make SOC=SPR300 DDRFREQ=333 DDRSIZE=128M
$ cp obj/xloader_image.bin
./../Flash/xloader/xloader_s300_333DDR.uimg
EVALSPEAR310
$ make clean
$ make SOC=SPR310 DDRFREQ=333 DDRSIZE=128M
$ cp obj/xloader_image.bin
../../Flash/xloader/xloader_s310_333DDR.uimg
EVALSPEAR320PLC
$ make clean
$ make SOC=SPR320 DDRFREQ=333 DDRSIZE=128M
$ cp obj/xloader_image.bin
../../Flash/xloader/xloader_s320_333DDR.uimg
EVALSPEAR600
$ make clean
$ make SOC=SPR600
DDRFREQ=333 DDRSIZE=128M
$ cp obj/xloader_image.bin
../../Flash/xloader/xloader_s600_333DDR_128M.uimg
6.2
U-Boot
The default U-Boot provided as pre-flashed on all SPEAr evaluation boards, as well as
binary image on ST Web site for upgrades, is built for serial NOR Flash.
If needed, the U-Boot firmware image has to be rebuilt taking into account each specific
embedded MPU and Flash memory type. Therefore, there are many cases and relevant
commands as described below.
36/43
Doc ID 16544 Rev 3
UM0844
Rebuilding the bootloader
EVALSPEAR300
To rebuild U-Boot for serial NOR on a Linux host PC, run the following commands:
$ make mrproper; make spear300_config; make ENV=NOR
$ cp u-boot.img ../../Flash/uboot/uboot_s300_NOR.uimg
To rebuild U-Boot for NAND Flash on a Linux host PC, run the following commands:
$ make mrproper; make spear300_config; make ENV=NAND
$ cp u-boot.img ../../Flash/uboot/uboot_s300_NAND.uimg
EVALSPEAR310
To rebuild U-Boot for serial NOR on a Linux host PC, run the following commands:
$ make mrproper; make spear310_config; make ENV=SNOR FLASH=SNOR
$ cp u-boot.img ../../Flash/uboot/uboot_s310_SNOR.uimg
In order to rebuild U-Boot for parallel NOR on a Linux host PC, run the following commands:
$ make mrproper; make spear310_config; make ENV=PNOR FLASH=PNOR
$ cp u-boot.img ../../Flash/uboot/uboot_s310_PNOR.uimg
In order to rebuild U-Boot for NAND Flash on a Linux host PC, run the following commands:
$ make mrproper; make spear310_config; make ENV=NAND FLASH=NAND
$ cp u-boot.img ../../Flash/uboot/uboot_s310_NAND.uimg
EVALSPEAR320PLC
In order to rebuild U-Boot for serial NOR on a Linux host PC, run the following commands:
$ make mrproper; make spear320_config; make ENV=SNOR FLASH=SNOR
$ cp u-boot.img ../../Flash/uboot/uboot_s320_SNOR.uimg
EVALSPEAR600
In order to rebuild U-Boot for serial NOR on a Linux host PC, run the following commands:
$ make mrproper; make spear600_config; make ENV=NOR
$ cp u-boot.img ../../Flash/uboot/uboot_s600_NOR.uimg
In order to rebuild U-Boot for NAND Flash on a Linux host PC, run the following commands:
$ make mrproper; make spear600_config; make ENV=NAND
$ cp u-boot.img ../../Flash/uboot/uboot_s600_NAND.uimg
Doc ID 16544 Rev 3
37/43
Software license agreement
Appendix A
UM0844
Software license agreement
This Software License Agreement ("Agreement") is displayed for you to read prior to
downloading and using the Licensed Software. If you choose not to agree with these
provisions, do not download or install the enclosed Licensed Software and the
related documentation and design tools. By using the Licensed Software, you are
agreeing to be bound by the terms and conditions of this Agreement. Do not use the
Licensed Software until you have read and agreed to the following terms and
conditions. The use of the Licensed Software implies automatically the acceptance of
the following terms and conditions.
A.1
Definitions
Licensed Software: means the enclosed demonstration software and all the related
documentation and design tools licensed in the form of object and/or source code as the
case maybe.
Product: means a product or a system that includes or incorporates solely and exclusively
an executable version of the Licensed Software and provided further that such Licensed
Software executes solely and exclusively on ST products.
A.2
License
STMicroelectronics ("ST") grants you a non-exclusive, worldwide, non-transferable (whether
by assignment, law, sublicense or otherwise), revocable, royalty-free limited license to: (i)
make copies, prepare derivatives works, display internally and use internally the source
code version of the Licensed Software for the sole and exclusive purpose of developing
executable versions of such Licensed Software only for use with the Product; (ii) make
copies, prepare derivatives works, display internally and use internally object code versions
of the Licensed Software for the sole purpose of designing, developing and manufacturing
the Products; (iii) make, use, sell, offer to sell, import or otherwise distribute Products.
A.3
Ownership and copyright
Title to the Licensed Software, related documentation and all copies thereof remain with ST
and/or its licensors. You may not remove the copyrights notices from the Licensed Software.
You may make one (1) copy of the Licensed Software for back-up or archival purposes
provided that You reproduce and apply to such copy any copyright or other proprietary rights
notices included on or embedded in the Licensed Software. You agree to prevent any
unauthorized copying of the Licensed Software and related documentation.
A.4
Restrictions
Unless otherwise explicitly stated in this Agreement, You may not sell, assign, sublicense,
lease, rent or otherwise distribute the Licensed for commercial purposes, in whole or in part
purposes (unless you are an authorized ST distributor provided that all the other clauses of
this DEMO PRODUCT LICENSE AGREEMENT shall apply entirely).
38/43
Doc ID 16544 Rev 3
UM0844
Software license agreement
You acknowledge and agree that any use, adaptation translation or transcription of the
Licensed Software or any portion or derivative thereof, for use with processors
manufactured by or for an entity other than ST is a material breach of this Agreement and
requires a separate license from ST.
No source code and/or object code relating to and/or based upon Licensed Software is to be
made available by You to any third party for whatever reason.
You acknowledge and agrees that the protection of the source code of the Licensed
Software warrants the imposition of security precautions and You agree to implement
reasonable security measures to protect ST's proprietary rights in the source code of the
Licensed Software. You shall not under any circumstances copy, duplicate or otherwise
reproduce the source code of the Licensed Software in any manner, except as reasonably
necessary to exercise Your's rights hereunder and make one back-up copy. You are granted
the right to make one archival or backup copy of the source code of the Licensed Software,
which copy shall be marked as an archival copy and as the confidential information of ST.
Access to the source code of the Licensed Software shall be restricted to only those of Your
employees with a need-to-know for the purpose of this Agreement. You will not under any
circumstances permit the source code of the Licensed Software in any form or medium
(including, but not limited to, hard copy or computer print-out) to be removed from your
official premises as you have informed us. The source code of the Licensed Software must
remain inside your official premises, as you have informed us. You will lock the source code
of the Licensed Software and all copies thereof in a secured storage inside your official
premises at all times when the source code of the Licensed Software is not being used as
permitted under this Agreement. You will inform all Your employees who are given access to
the source code of the Licensed Software of the foregoing requirements, and You will take
all reasonable precautions to ensure and monitor their compliance with such requirements.
You agree to promptly notify ST in the event of a violation of any of the foregoing, and to
cooperate with ST to take any remedial action appropriate to address the violation. You shall
keep accurate records with respect to its use of the source code of the Licensed Software.
In the event ST demonstrates to You a reasonable belief that the source code of the
Licensed Software has been used or distributed in violation of this Agreement, ST may by
written notification request certification as to whether such unauthorized use or distribution
has occurred. You shall reasonably cooperate and assist ST in its determination of whether
there has been unauthorized use or distribution of the source code of the Licensed Software
and will take appropriate steps to remedy any unauthorized use or distribution. You agree
that ST shall have the right (where ST reasonably suspects that the terms and conditions of
this Agreement with reference to Restriction clause have not been complied with) upon
reasonable notice to enter Your's official premises in order to verify your compliance with this
Restriction clause.
A.5
No warranty
The Licensed Software is provided "as is" and "with all faults" without warranty of any kind
expressed or implied. ST and its licensors expressly disclaim all warranties, expressed,
implied or otherwise, including without limitation, warranties of merchantability, fitness for a
particular purpose and non-infringement of intellectual property rights. ST does not warrant
that the use in whole or in part of the Licensed Software will be interrupted or error free, will
meet your requirements, or will operate with the combination of hardware and software
selected by You.
Doc ID 16544 Rev 3
39/43
Software license agreement
UM0844
You are responsible for determining whether the Licensed Software will be suitable for your
intended use or application or will achieve your intended results.
ST has not authorized anyone to make any representation or warranty for the Licensed
Software, and any technical, applications or design information or advice, quality
characterization, reliability data or other services provided by ST shall not constitute any
representation or warranty by ST or alter this disclaimer or warranty, and in no additional
obligations or liabilities shall arise from ST's providing such information or services. ST does
not assume or authorize any other person to assume for it any other liability in connection
with its Licensed Software.
Nothing contained in this Agreement will be construed as : (i) a warranty or representation
by ST to maintain production of any ST device or other hardware or software with which the
Licensed Software may be used or to otherwise maintain or support the Licensed Software
in any manner; and (ii) a commitment from ST and/or its licensors to bring or prosecute
actions or suits against third parties for infringement of any of the rights licensed hereby, or
conferring any rights to bring or prosecute actions or suits against third parties for
infringement. However, ST has the right to terminate this Agreement immediately upon
receiving notice of any claim, suit or proceeding that alleges that the Licensed Software or
your use or distribution of the Licensed Software infringes any third party intellectual
property rights. All other warranties, conditions or other terms implied by law are excluded to
the fullest extent permitted by law.
A.6
Limitation of liabilities
In no event ST or its licensors shall be liable to You or any third party for any indirect,
special, consequential, incidental, punitive damages or other damages (including but not
limited to, the cost of labour, re-qualification, delay, loss of profits, loss of revenues, loss of
data, costs of procurement of substitute goods or services or the like) whether based on
contract, tort, or any other legal theory, relating to or in connection with the Licensed
Software, the documentation or this Agreement, even if ST has been advised of the
possibility of such damages.
In no event shall ST's liability to You or any third party under this Agreement, including any
claim with respect of any third party intellectual property rights, for any cause of action
exceed 100 US$. This section does not apply to the extent prohibited by law. For the
purposes of this section, any liability of ST shall be treated in the aggregate.
A.7
Termination
ST may terminate this license at any time if You are in breach of any of its terms and
conditions. Upon termination, You will immediately destroy or return all copies of the
software and documentation to ST.
40/43
Doc ID 16544 Rev 3
UM0844
A.8
Software license agreement
Applicable law and jurisdiction
In case of dispute and in the absence of an amicable settlement, the only competent
jurisdiction shall be the Courts of Geneva, Switzerland. The applicable law shall be the law
of Switzerland.
A.9
Severability
If any provision of this agreement is or becomes, at any time or for any reason,
unenforceable or invalid, no other provision of this agreement shall be affected thereby, and
the remaining provisions of this agreement shall continue with the same force and effect as
if such unenforceable or invalid provisions had not been inserted in this Agreement.
A.10
Waiver
The waiver by either party of any breach of any provisions of this Agreement shall not
operate or be construed as a waiver of any other or a subsequent breach of the same or a
different provision.
A.11
Relationship of the parties
Nothing in this Agreement shall create, or be deemed to create, a partnership or the
relationship of principal and agent or employer and employee between the Parties. Neither
Party has the authority or power to bind, to contract in the name of or to create a liability for
the other in any way or for any purpose.
Doc ID 16544 Rev 3
41/43
Revision history
UM0844
Revision history
Table 4.
Document revision history
Date
Revision
05-Nov-2009
1
Initial release.
2
Removed section “User-space APIs”.
Replaced “usb_flasher” by “flashing_util” and “flashing_util.zip” by
“flashing_util.tar.gz”.
Updated Figure 2.8.1 and Figure 9.
3
Updated procedure for downloading the SPEAr Linux Support
Package (LSP2.3) in Section 3.5: How to install the SPEAr Linux
Support Package (LSP2.3) on page 25.
Added Appendix A: Software license agreement on page 38
21-May-2010
18-Oct-2010
42/43
Changes
Doc ID 16544 Rev 3
UM0844
Please Read Carefully:
Information in this document is provided solely in connection with ST products. STMicroelectronics NV and its subsidiaries (“ST”) reserve the
right to make changes, corrections, modifications or improvements, to this document, and the products and services described herein at any
time, without notice.
All ST products are sold pursuant to ST’s terms and conditions of sale.
Purchasers are solely responsible for the choice, selection and use of the ST products and services described herein, and ST assumes no
liability whatsoever relating to the choice, selection or use of the ST products and services described herein.
No license, express or implied, by estoppel or otherwise, to any intellectual property rights is granted under this document. If any part of this
document refers to any third party products or services it shall not be deemed a license grant by ST for the use of such third party products
or services, or any intellectual property contained therein or considered as a warranty covering the use in any manner whatsoever of such
third party products or services or any intellectual property contained therein.
UNLESS OTHERWISE SET FORTH IN ST’S TERMS AND CONDITIONS OF SALE ST DISCLAIMS ANY EXPRESS OR IMPLIED
WARRANTY WITH RESPECT TO THE USE AND/OR SALE OF ST PRODUCTS INCLUDING WITHOUT LIMITATION IMPLIED
WARRANTIES OF MERCHANTABILITY, FITNESS FOR A PARTICULAR PURPOSE (AND THEIR EQUIVALENTS UNDER THE LAWS
OF ANY JURISDICTION), OR INFRINGEMENT OF ANY PATENT, COPYRIGHT OR OTHER INTELLECTUAL PROPERTY RIGHT.
UNLESS EXPRESSLY APPROVED IN WRITING BY AN AUTHORIZED ST REPRESENTATIVE, ST PRODUCTS ARE NOT
RECOMMENDED, AUTHORIZED OR WARRANTED FOR USE IN MILITARY, AIR CRAFT, SPACE, LIFE SAVING, OR LIFE SUSTAINING
APPLICATIONS, NOR IN PRODUCTS OR SYSTEMS WHERE FAILURE OR MALFUNCTION MAY RESULT IN PERSONAL INJURY,
DEATH, OR SEVERE PROPERTY OR ENVIRONMENTAL DAMAGE. ST PRODUCTS WHICH ARE NOT SPECIFIED AS "AUTOMOTIVE
GRADE" MAY ONLY BE USED IN AUTOMOTIVE APPLICATIONS AT USER’S OWN RISK.
Resale of ST products with provisions different from the statements and/or technical features set forth in this document shall immediately void
any warranty granted by ST for the ST product or service described herein and shall not create or extend in any manner whatsoever, any
liability of ST.
ST and the ST logo are trademarks or registered trademarks of ST in various countries.
Information in this document supersedes and replaces all information previously supplied.
The ST logo is a registered trademark of STMicroelectronics. All other names are the property of their respective owners.
© 2010 STMicroelectronics - All rights reserved
STMicroelectronics group of companies
Australia - Belgium - Brazil - Canada - China - Czech Republic - Finland - France - Germany - Hong Kong - India - Israel - Italy - Japan Malaysia - Malta - Morocco - Philippines - Singapore - Spain - Sweden - Switzerland - United Kingdom - United States of America
www.st.com
Doc ID 16544 Rev 3
43/43