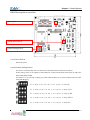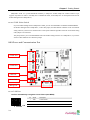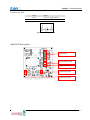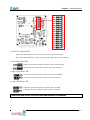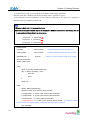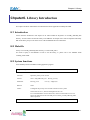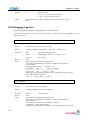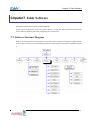
1
Eddy DK Programmer Guide Ver 2.0c 2008. 04. 02 Revision History 1-2 Revision Date Document Version Pages Description Nov ,6 , 2007 2.0a All Initial release by shlee Mar,19 , 2008 2.0b 9-4 Typo corrections by shlee Apr, 02, 2008 2.0c All LemonIDE Windows by shlee Table of Contents Chpater1. Introduction ...............................................................................................1-1 1.1 About this document.........................................................................................1-1 1.2 Who should read this document? .....................................................................1-1 1.3 Document organization ....................................................................................1-2 1.4 Eddy-DK Related Documents...........................................................................1-3 1.5 Technical Support.............................................................................................1-4 Chpater2. Getting Started ..........................................................................................2-1 2.1 What can you do with Eddy-DK?......................................................................2-1 2.2 Eddy-DK Package Contents.............................................................................2-2 2.3 Eddy-DK Board ................................................................................................2-2 2.3.1 Locations of modules ......................................................................................... 2-2 2.3.2 Description on switches...................................................................................... 2-3 2.3.3 Power and Communication Port......................................................................... 2-4 2.3.4 LED Description ................................................................................................. 2-7 2.4 Hardware installation......................................................................................2-10 2.4.1 Eddy-CPU Installation ...................................................................................... 2-10 2.4.2 Eddy-S1/PIN Installation....................................................................................2-11 2.5 Features and functions of Eddy-DK................................................................2-12 2.5.1 Eddy module Main Memory Map...................................................................... 2-13 2.5.2 Eddy Flash Memory Map.................................................................................. 2-14 2.5.3 Eddy directory structure.................................................................................... 2-14 2.5.4 Booting Eddy .................................................................................................... 2-14 Chpater3. Development environment .......................................................................3-1 3.1 Source code directory structure........................................................................3-1 3.2 Language .........................................................................................................3-2 3.3 Development environment ...............................................................................3-2 3.4 Installing to Windows Host ...............................................................................3-2 3.4.1 Installing Cygwin................................................................................................. 3-3 3.4.2 Configuring Windows Environment Variables..................................................... 3-4 3.4.3 Installing Toolchain ............................................................................................. 3-4 3.4.4 Installing Eddy DK Source.................................................................................. 3-5 3.5 Installing to Linux Host .....................................................................................3-6 3.5.1 Installing Toolchain ............................................................................................. 3-6 3.5.2 Installing Eddy DK Source.................................................................................. 3-6 3.6 Removing Development Environment ..............................................................3-7 3.6.1 Removing Windows Development Environment ................................................ 3-7 3.6.2 Removing Linux Development Environment ...................................................... 3-7 Chpater4. Compiling Application ..............................................................................4-1 4.1 Source Code ....................................................................................................4-1 4.2 Writing a Makefile.............................................................................................4-3 I 4.3 Compile ........................................................................................................... 4-4 4.3.1 Compiling on Windows........................................................................................4-4 4.3.2 Compiling on Linux..............................................................................................4-5 4.3.3 Compiling with LemonIDE...................................................................................4-5 4.4 Uploading and executing an application via FTP............................................. 4-5 Chpater5. Creating Firmware .................................................................................... 5-1 5.1 How to create a firmware................................................................................. 5-1 5.2 Firmware update via FTP server ..................................................................... 5-4 Chpater6. Library Introduction ................................................................................. 6-1 6.1 Introduction...................................................................................................... 6-1 6.2 Makefile ........................................................................................................... 6-1 6.3 System functions ............................................................................................. 6-1 6.4 Eddy Environment Function ............................................................................ 6-2 6.5 Serial functions ................................................................................................ 6-6 6.6 Ethernet functions............................................................................................ 6-9 6.7 GPIO Functions ............................................................................................. 6-14 6.8 Debugging Function ...................................................................................... 6-16 Chpater7. Eddy Software........................................................................................... 7-1 7.1 Software Structure Diagram............................................................................. 7-1 7.2 Main Applications............................................................................................. 7-2 7.2.1 eddy.c Application ...............................................................................................7-2 7.2.2 Pinetd.c Application.............................................................................................7-2 7.2.3 Other Applications ...............................................................................................7-2 Chpater8. Handling HTML & CGI .............................................................................. 8-1 8.1 WEB Configuration .......................................................................................... 8-1 8.2 Example HTML code ....................................................................................... 8-1 8.3 Example CGI Code.......................................................................................... 8-2 Chpater9. Appendix ................................................................................................... 9-1 9.1 System recovery.............................................................................................. 9-1 9.1.1 Installing TFTP in Linux environment ..................................................................9-1 9.1.2 Hardware Install and Recovery ...........................................................................9-2 9.1.3 Solving problems during recovery.......................................................................9-7 9.2 Product Specifications ..................................................................................... 9-8 9.3 Ordering information........................................................................................ 9-9 II Chapter1. Introduction Chpater1. Introduction This chapter briefly explains about this manual and introduces the related documents and support. 1.1 About this document This manual explains about how a programmer can develop a customized application for Eddy module and how this application can be uploaded and executed on the module. To help programmers with this work, information on Eddy's operating system and API functions for convenient source writing is supplied. After reading this document, a programmer can write his or her own application and execute it on the module. 1.2 Who should read this document? This document is designed for programmers who wish to develop a new application using Eddy-DK. It is strongly recommended that the programmer read this document before starting any programming work. If you are an administrator or an end user who just needs to apply the module into practical applications, you do not need to read this document. User's Guide will be helpful in that case. This manual deals with the complete process of writing source codes and making a firmware that can be uploaded and executed on Eddy module. 1-1 Chapter1. Introduction 1.3 Document organization Chapter 1. Introduction is a preface with general information and introductory notices. Chapter 2. Getting Started gives brief information needed before starting programming work. Chapter 3. Writing Application explains about the process of writing a customized application and related work.. Chapter 4. Compiling Application deals with the process of compiling your application with Makefile. Chapter 5. Creating Firmware helps you converting a compiled application into a firmware that can be accepted by Eddy module. Chapter 6. Library explains about the library and API functions you can use while programming and application. Chapter 7. Eddy Software shows how to implement simple TCP/IP and serial routines using example source codes that are included in the development kit. Chapter 8. Handling HTML & CGI provides a guide for integrating your own applications with Eddy's web interface. Chapter 9. Appendix provides programming notes and a list of default utilities. 1-2 Chapter1. Introduction 1.4 Eddy-DK Related Documents The following table summarizes documents included in the Eddy-DK document set. Table 1-1 Eddy-Serial DK Related Documents Document Name User Guide Description Integration, configuration, and management of Eddy for the administrator Programmer’s application development guide, including in-depth approach to compiling, linking, and creating firmware Programmer’s Guide API reference is also included with a list of available functions for customized application programming Portview User Manual Guide for SystemBase device server management application Portview COM Port Redirector User Manual Guide for SystemBase COM Port Redirector If you need brief information on Eddy or embedded device servers in general, please visit our corporate website at http://www.sysbas.com/. You can view and/or download documents related to Eddy as well as latest software and firmware updates. Available resources are as follows: Document Name Eddy Spec Sheet Eddy White Paper Eddy Application Notes Description Specifications for Eddy products An introductory reading for anyone new to embedded device server. Deals with background, history, market environment, and technology Application instruction of Eddy described with diagram and image. All documents are updated promptly, so check for the recent document update. The contents in these documents are subject to change without any notice in advance. 1-3 Chapter1. Introduction 1.5 Technical Support There are three ways you can get a technical support from SystemBase. First, visit our website http://www.sysbas.com/ and go to ‘Technical Support’ menu. There you can read FAQ and ask your own question as well. Second, you can e-mail our technical support team. The mail address is [email protected]. Any kind of inquiries, requests, and comments are welcome. Finally, you can call us at the customer center for immediate support. Our technical support team will kindly help you get over with the problem. The number to call is 82-2-855-0501 (Extension number 225). Do not forget to dial the extension number after getting a welcome message. Copyright 2007 SystemBase Co., Ltd. All rights reserved. Homepage: http://www.sysbas.com/ Tel: +82-2-855-0501 Fax: +82-2-855-0580 1601, DaeRyung Post Tower 1, 212-8, Guro-dong, Guro-gu, Seoul, Korea 1-4 Chapter 2. Getting Started Chpater2. Getting Started This chapter explains about packaging and installation, and discusses key features of Eddy-DK. 2.1 What can you do with Eddy-DK? Eddy-DK is designed to help programmers to develop a customized application that can be applied to Eddy module easier and faster. It has been a time-consuming and burdensome work to port an operating system and develop an application on a new hardware. Eddy module and Software Development Kit makes this work easy. Eddy-DK is different with other device servers in which it can run customized applications. Users can upload most existing socket/serial communication applications that are running on the Linux environment. This openness allows users to apply wide variety of functions into the module with relatively less restrictions. Eddy-DK supports IDE (LemonIDE) and SDK environment to help programmers to execute their own applications on the module. Programmers can easily write applications using the Linux environment, with the help of SDK and example source codes. Cross-compiler running on the standard Linux environment helps your applications to run on the Eddy module. Embedded Linux on Eddy can provide stable and rapid environment for your applications 2-1 Chapter 2. Getting Started 2.2 Eddy-DK Package Contents Eddy-DK includes Eddy module. Eddy-DK package contains as follows. Make sure following contents are included in the Eddy Serial DK Package. - 1EA, Eddy-DK board - 2EA , Serial cable - 1EA , LAN cable - 1EA , Power adaptor - 1EA, Jumper cable - 1EA, 10Pin flat cable - 1EA, 16Pin flat cable - 1EA , CD (SystemBase SDK, LemonIDE, compile environment, utilities, manuals) 2.3 Eddy-DK Board 2.3.1 Locations of modules NOTE 1) Only ONE Eddy module can be loaded and tested with Eddy Serial DK at a time. Do not load two or more modules simultaneously. 2) Ensure that the input power supply for Eddy Serial DK is 5.0 V with 400 mA(or higher). 2-2 Chapter 2. Getting Started 2.3.2 Description on switches Reset Switch COM1 Select Switch Product Setting Switch 2.3.2.1. Reset Switch Reboots the system. 2.3.2.2. Product Setting Switch This switch is used when Eddy-CPU is mounted on the development board.to determine its behavior. Product setting switch can be adjusted to make Eddy-CPU mounted development board operate as Eddy-CPU, Eddy-S1/PIN,Eddy-S1/DB9. This feature is to provide usage of Debug port, Status LED and RJ45 port on the development board for easier testing and debugging. Set as shown on the left and it will operate as Eddy-CPU. Set as shown on the left and it will operate as Eddy-S1/PIN. Set as shown on the left and it will operate as Eddy-S1/DB9. Set as shown on the left and it will operate as Eddy-S2M/PIN Set as shown on the left and it will operate as Eddy-DK-C . 2-3 Chapter 2. Getting Started (Eddy-DK-C mode is to provide RS422/485 testability to Eddy-CPU module. Eddy-CPU module within its logic supports only RS232. In order to test Eddy-CPU on RS422/485 mode, mount Eddy-CPU to development board and set Product Setting Switch to Eddy-DK-C.) 2.3.2.3. COM1 Select Switch If you set Product Setting Switch to Eddy-DK-C model, you can use COM PORT 1 for RS232 and RS422/RS485. Set Product Setting Switch to Eddy-DK-C, connect this jumper, and select RS422 or RS485 in web environment setting. However you have to be careful because it will operate in RS232 regardless of the web environment setting if the jumper is not connected. This jumper allows you to use RS422/RS485 when the Product Setting Switch is set as Eddy-DK-C; if you set the switch to other models do not connect this jumper. 2.3.3 Power and Communication Port COM1 Port COM2 Port LAN Port Power Jack Debug Port 2.3.3.1. LAN Port Lan Port automatically recognizes Cross/ Direct.(auto MDIX) 2-4 Pin Signal Description 1 TXD+ Transmit Data + 2 TXD- Transmit Data - 3 RXD+ Receive Data + Chapter 2. Getting Started 6 RXDLED Left Green Right Yellow Receive Data Description Upon 100Base-TX link, it lights. When the data is sent or received, it blinks. Upon 10Base-T link, it lights. When the data is sent or received, it blinks. 2.3.3.2. Serial Port Figure 2-1 Serial port pin description RS232 Pin Signal Description 1 DCD Data Carrier Detection (Input) 2 RXD Receive Data (Input) 3 TXD Transmit Data (Output) 4 DTR Data Terminal Ready (Output) 5 GND Ground 6 DSR Data Set Ready (input) 7 RTS Request to Send (Output) 8 CTS Clear to Send (Input) 9 RI Ring Indicator (Input) RS422 Full Duplex Pin Signal Description 2 RXD+ Receive differential data positive (Input) 3 TXD+ Transmit differential data positive (Output) 6 RXD- Receive differential data negative (input) 7 TXD- Transmit differential data negative (Output) RS485 Half Duplex Pin Signal Description 3 TRX+ Transmit/Receive differential data positive 7 TRX- Transmit/Receive differential data negative 2-5 Chapter 2. Getting Started -When Eddy-CPU is mounted on the development board. COM1 & COM2 function differs based on ‘Product Setting Switch’ settings. When ‘Product Setting Switch’ is set to ‘Eddy-CPU’, COM1 & COM2 ports will operate as RS232 ports.. When ‘Product Setting Switch’ is set to ‘Eddy-S1/PIN’, only COM1 port can be used as RS/232. When ‘Product Setting Switch’ is set to ‘Eddy-S1/DB9’, only COM1 port can be used as RS/232. When ‘Product Setting Switch’ is set to ‘Eddy-DK-C, COM1 will operate as RS 422/485 port and COM2 as RS232 port. - When Eddy-S1/PIN is mounted on the development board Only COM1 port can be used as RS232 port regardless of ‘Product Setting Switch’ settings. - When Eddy-S1/PIN-C is mounted on the development board Only COM1 port can be used as RS422/485 port regardless of ‘Product Setting Switch’ settings. 2.3.3.3. Debug Port You can check debug message or status information with debug port. Please note that ‘Debug Port’can be used only when Eddy-CPU is mounted on the development board. ‘Product Setting Switch’can be set to any mode.In other words, Debug Port will operate as long as Eddy-CPU is mounted on the development board regardless of settings on Product Setting switch. Environment Setting Debug port is configured as follows so user has to set his or her PC serial port connected to debug port as follows. Speed : 115200 bps Data bit : 8 bit Parity bit : Non Parity Stop bit : 1 bit 2-6 Chapter 2. Getting Started 2.3.3.4. Power Jack Contact Polarity Center +5VDC ± 5%(Min. 400mA) Outer Ground Figure 2-2 Power connector 2.3.4 LED Description GPIO LED Power, Ready LED Debug Port LED COM2 Port LED COM1 Port LED 2-7 Chapter 2. Getting Started 2.3.4.1. GPIO LED GPIO ports provided by Eddy are maximum 16. Not all Eddy modules provide GPIO port. Number of port can be limited or sometimes no port is provided at all due to different characteristics of each module, such as using port for internal use.(Active High : 3.3V DC, Active Low : 0 V) Model Eddy-CPU Eddy-DK-C Input Output Ports Available port range Ports 12 GPIO 5 ~16 16 GPIO 1~4 are used internally available to the user 12 set to Eddy-DK-C) GPIO 5 ~16 Eddy-S1/Pin, Eddy-S1/Pin-C Eddy-S1/DB9, Eddy-S1/DB9-C Eddy-S1/DB9-PoE, Eddy-S1/DB9-PoE-C Eddy-WS1-TTL, Eddy-WS1-TTL-C Eddy-WS1-PiN, Eddy-WS1-PiN-C Eddy-WS1-DB9, Eddy-WS1-DB9-C 2-8 GPIO 1 ~ 16 GPIO 1~4 are used internally to support RS422/485 and hence GPIO ports 5~16 is (When Eddy-CPU is mounted and Product Setting Switch is Available port range 12 GPIO 5 ~16 GPIO 1~12 are used internally 4 GPIO 13 ~16 4 GPIO 13 ~16 0 None 0 None 0 None 0 None 4 GPIO 13 ~16 4 GPIO 13 ~16 4 GPIO 13 ~16 4 GPIO 13 ~16 0 None 0 None Chapter 2. Getting Started 2.3.4.2. Power, Ready LED Ready LED: Indicates that the system is operating normally. (Normal: LED blinks) Power LED: Indicates that the 5 V power is being supplied. (Supplying power: Red LED ON) 2.3.4.3. Debug Port LED Debug Port Transmit LED: Shows transmission status of the Debug Port. Debug Port Receive LED: Shows reception status of the Debug Port. 2.3.4.4. COM1 Port LED COM1 Port Transmit LED: Shows transmission status of COM1 Port. COM1 Port Receive LED: Shows reception status of COM1 Port. 2.3.4.5. COM2 Port LED COM2 Port Transmit LED: Shows transmission status of COM2. COM2 Port Receive LED: Shows reception status of COM2 Port. Debug Port LED, COM1 Port LED, COM2 Port LED is only supporting in Eddy-CPU and Eddy-DK-C 2-9 Chapter 2. Getting Started 2.4 Hardware installation 2.4.1 Eddy-CPU Installation Place Eddy CPU module firmly on to Eddy-DK board as shown above. Connect LAN cable to the LAN port. Connect DB9 serial cable to COM 1, COM2, and Debug Port. Configure Product Setting Switch1 to Eddy-CPU mode (Please see 2.3.2.2. Product Setting Switch) After checking that the input power is 5 V, supply the power to the Eddy-DK board. Check the Power LED condition to make sure the operation is normal. If Eddy CPU module is in initialized state, all GPIO LEDs should be ON. If all LEDs are not ON, check and see whether GPIO and Product Setting Switch settings are set properly. 2-10 Chapter 2. Getting Started 2.4.2 Eddy-S1/PIN Installation Place Eddy-S1/PIN module firmly on to Eddy-DK board as shown above. Connect LAN cable to the LAN port of Eddy-S1/PIN. Connect DB9 serial cable to COM 1. Connect Jumper cable to COM1 Select Switch After checking that the input power is 5 V, supply the power to the Eddy-DK board Check the Power LED condition to make sure the operation is normal. If Eddy CPU module is in initialized state, all of the GPIO13 to GPIO16 LEDs should be ON. 2-11 Chapter 2. Getting Started 2.5 Features and functions of Eddy-DK RS232/422/485 serial interface Supports the RS232 serial interface that is most widely used in many industries. Easy and quick system integration Signal lines easily connectable via pin units. Users can program and execute their own application in GUI environment using LemonIDE. User programs can be made into firmware and executed. DK and API provided Libraries and APIs provided for easy use of Eddy hardware functions. 32-bit ARM9 CPU / 4MB Flash / 32MB SDRAM Powerful 32-bit ARM9 CPU operating in 180 MHz with sufficient memory size for any application. 10/100Mbps LAN port Simple & Easy Network Connectivity via stable LAN ports. COM port redirection supported Compatible with the serial port based control programs. TCP/IP programming is not necessary for new applications. 2-12 Chapter 2. Getting Started 2.5.1 Eddy module Main Memory Map 2-13 Chapter 2. Getting Started 2.5.2 Eddy Flash Memory Map Start address (size) Item Description 0x10000000 (4Kbyte) BootStrap Initialize hardware and calls bootloader from flash memory to the RAM and execute the bootloader. 0x10002000 (112Kbyte) Bootloader The Eddy boot loader is stored. 0x1001E000 (1.2Mbyte) Kernel Lemonix OS kernel is stored. 0x1012E000 (2.5MByte) Filesystem Various execution files are stored. 0x103AE000(384Kbyte) Configuration Information for system operating environment is stored. 2.5.3 Eddy directory structure The Eddy file system consists of the following directories: Name /bin, /sbin, Description Access authority Executables and system utilities Read & Write /dev Device file Read & Write /tmp Tmp file system area of 15M bytes. The size of this area is flexible; when application run by Eddy requires more memory, this area can be reduced. Read & Write /lib, /etc We recommend user to use this area for uploading file through FTP. /usr /flash Various program needed for the system and web files Read & Write This is flash area which stores files that have to be remained even if the power is reset, such as environment setting. This area provides 384 K bytes. Read & Write The Eddy’s entire folders are open for read & write. All loaded files are deleted after reboot except the data stored in /flash. 2.5.4 Booting Eddy Eddy user manual provides a step-by-step guide for booting the module. Only Eddy-DK-related topics are 2-14 Chapter 2. Getting Started explained in this guide. Provide power supply to the Eddy module and connect via Telnet Default IP address: 192.168.0.223 Open your telnet client and enter Eddy’s IP address to connect. You need to enter appropriate username and password to login. Please note that this username and password is used as authentication method for Web as well. This means if username or/and password has been modified from the telnet interface, modified values have to be entered to connect to web, and vice versa. Factory default username: Factory default password: eddy 99999999 2-15 Chapter 3. Development environment Chpater3. Development environment This chapter explains about the process of application programming and other important notes. SDK’s directory structures are as follows. Note All material regarding Eddy including documentation, reference sources and utilities are periodically updated to www.embeddedmodule.com without prior notice. Visit and download latest updates at this site. 3.1 Source code directory structure 3-1 Chapter 3. Development environment Firmware directory Kernel image, file system image, and configuration image are stored. Ramdisk directory flash: Configuration information is stored. root: Information for the file system is stored. Tools directory Tools used for creating image files is stored. Src Directory where source codes of the applications included in Eddy are stored.. Detailed description of src directory is at Chapter4. Compiling Application. - Eddy-APPs : Source code of the application run by Eddy is stored. - Other folders contain open sources needed by Eddy. 3.2 Language Eddy-DK application has to be written with C language. All example source codes are written in C language. You can program application with more than one file if you program with C language. If you are accustomed to programming with ANSI C, Eddy application programming shouldn't be any problem. 3.3 Development environment You need a Windows or Linux host system to use Eddy-DK. Tested OS versions are as follows. Windows Linux Red Hat 9.0 Fedora Core 4, 5, 6 Windows XP SP2 SUSE Linux Enterprise Server 10.2 Windows 2000 Ubuntu Linux 6.x, 7.x Windows 2003 Debian Linuv 4.0 CentOS 4.5 Asianux edition 3 3.4 Installing to Windows Host This chapter will describe how to install Eddy development environment on a Windows host. Explanation on this manual is based on Windows XP. In order to use Eddy’s integrated development environment, LemonIDE, refer to “LemonIDE_User_Guide” for detailed instructions. 3-2 Chapter 3. Development environment 3.4.1 Installing Cygwin In order to execute LemonIDE on Windows hosts, libraries from Linux system is required. Cygwin is a virtual Linux program which enables Linux environment to be compatible on Windows hosts and LemonIDE requires Cygwin to be running on Windows host for proper operations. Run Setup.exe from SDK/Windows/Cygwin directory of the CD which is provided with Eddy DK and follow the instructions below. Select directory which Cygwin is installed. Set root directory to c:\cygwin” Select directory where Cygwin install package is located. Set directory to DK CD’s “SDK\Windows\cygwin Select package to install. As shown on the left, install “Devil” package only. Click Default on the left and will change to install. 3-3 Chapter 3. Development environment Cygwin package being installed. Finish setup once Cygwin installation is completed. 3.4.2 Configuring Windows Environment Variables Path will be added in order to reference required Eddy libraries in Windows environment. Select Desktop Æ My Computer Æ Right click Æ Properties Æ Advanced Æ Environment Variables. Select Path from System Variable and add the following line. ;c:\cygwin\bin 3.4.3 Installing Toolchain Toolchain compiles source codes written in Windows environment in order that it is compatible and executable on its target, Eddy. Toolchain install file, “toolchain-windows-arm-411.tgz”, can be found under SDK/Windows folder in Eddy DK’s CD. Copy this file to “C:”, C drive’s root directory, and unzip the file by executing Windows command line program “CMD” as shown below. Toolchain will be installed to “c:\cygwin\opt\lemonix\cdt”. 3-4 Chapter 3. Development environment Note that command is case sensitive. 3.4.4 Installing Eddy DK Source Eddy DK Source will be installed. DK Source file, “eddy_DK_2xx.tar.gz”, can be found under SDK folder in Eddy DK’s CD. Copy this file to “C:”, C drive’s root directory, and unzip the file by executing Windows command line program “CMD” as shown below. DK Source will be installed to c:\eddy_DK_2xx”. Note that command is case sensitive. 3-5 Chapter 3. Development environment 3.5 Installing to Linux Host This chapter will describe how to install Eddy development environment on a Linux host. Explanation on this manual is based on Fedora Core 5. In order to use Eddy’s integrated development environment, LemonIDE, refer to “LemonIDE_User_Guide” for detailed instructions. 3.5.1 Installing Toolchain Toolchain compiles source codes written in Linux environment in order that it is compatible and executable on its target, Eddy. Toolchain install file, “lemonide_linux_10x.tar.gz”, can be found under SDK/linux folder in Eddy DK’s CD. Toolchain will be installed to /opt/lemonix. Note that command is case sensitive. Note Carry out all install procedures with super user privileges. Example below assumes that CDROM is mounted on /mnt/cdrom If CDROM is mounted on a different location, path displayed below will bear difference. # cd / # tar -zxvf /mnt/cdrom/SDK/linux/lemonide*.tar.gz -C / 3.5.2 Installing Eddy DK Source Install Eddy DK’s entire source. Eddy DK Source file, “eddy_DK_2xx.tar.gz”, can be found under SDK/linux folder in Eddy DK’s CD. Install Eddy DK Source as shown below. An eddy_DK_2xx folder will be created after installation. # pwd /home/shlee # tar -zxvf eddy_DK_2*.tar.gz Unzip the file and Eddy_DK_2xx folder will be created and installation is completed. Below displays contents of Eddy_DK_2xx folder. 3-6 Chapter 3. Development environment [root@localhost eddy-DK_2xx]# ls -al Total 32 drwxr-xr-x 6 shlee work 4096 Nov 26 14:43 . drwxrwxr-- 26 shlee work 4096 Nov 30 21:25 .. drwxr-xr-x 4 shlee work 4096 Noc 26 14:46 src -rwxr-xr-x 1 shlee work 2822 Nov 26 14:43 Env.sh -rwxr-xr-x 1 shlee work 171 Nov 26 14:43 Make.check drwxr-xr-x 2 shlee work 4096 Nov 29 17:50 firmware drwxr-xr-x 5 shlee work 4096 Nov 29 17:50 ramdisk drwxr-xr-x 4 shlee work 4096 Nov 26 14:47 tool 3.6 Removing Development Environment Development Environment can be removed by simply deleting the folder where installed files are located. 3.6.1 Removing Windows Development Environment Remove folders where DK Source and Cywin is installed to remove Eddy Development Environment. 3.6.2 Removing Linux Development Environment # rm – rf eddy_DK_xx # rm -rf /opt/lemonix ; Removal of Eddy DK Source ; Removal of Eddy ToolChain 3-7 Chapter4. Compiling Application Chpater4. Compiling Application 4.1 Source Code This manual will use a sample source code that's included in the Eddy- DK to introduce compile process. Program sources introduced here are actual codes that are used in Eddy. However some sources are not provided for the security reasons. Provided program sources can be categorized into Open Source and Eddy-oriented Application Source. Open Sources are as follows. Folder name Description busybox-1.5.0 Linux Utility containing basic command used in shell dropbear-0.50 SSH (Secure Shell) server gdbserver Remote debugging program used in LemonIDE. Source code is not provided; only executable files are provided. mtd-util Management program for mtd area openssl-0.9.7c OpenSSL library, one kind of SSL matrixssl-1-8-3 Matrixssl program, one kind of SSL thttpd-2.25b HTTP server vsftpd-2.0.5/ FTP server ddns-1.8 DDNS server ethtool-6 Test program for Ethernet based network netkit-ftp-0.18 ftp client target-agent Program which upload and execute user program in accordance with LemonIDE. Source code is not provided. ucd-snmp-3.6.2 SNMP program 4-1 Chapter4. Compiling Application When you want to make new application program, we recommend you to refer to the files in the Eddy_APPs folder. In this chapter we will explain with Eddy_APPs directory. Source files inside Eddy_APPs are as follows. File name Description def.c Eddy environment setting program eddy.c Program which is first run after booting Eddy. This program makes Eddy to operate as it is configured in environment setting. pinetd.c Program which is at the highest hierarchy of Eddy; this executes and monitors the programs of lower hierarchy. tcp_client.c Program which connects to the server and exchange data between the serial port and the socket. tcp_server.c Program which waits for the socket connection and exchange data between the serial port and the socket. upgrade.c Program for firmware updating ddns_agent.c Program which gives Eddy IP information to DDNS server detect.c Program which work together with portview’s detector. Refer to the portview manual. loopback.c Loopback test program for the serial port. portview.c Agent of Portview, which is a NMS program for windows, provided by SystemBase. tcp_broadcast.c This supports maximum of five client connection with multi TCP server function, and broadcast serial data to all client. tcp_multiplex.c This supports maximum of five client connection with multi TCP server function, and transfer serial data to each client. udp.c UDP server and client program which exchange data between UDP socket and the serial port. 4-2 gpio.c Example program for GPIO port rt-test.c Test program for Delay Time /include Directory containing header files needed for applications. /SB_APIs Directory containing library provided by Eddy /web Directory containing CGI source and htm code of web run at Eddy Chapter4. Compiling Application 4.2 Writing a Makefile In order to compile an application, Makefile should be created or modified and all compile information should be correctly defined. The following shows a Makefile of the sample program at /src/Eddy_APPs/. The figure below shows part where the environment setting values needed at compiling process are configured. It contains environment values needed when running Make command. When the user wants to compile, add the name at “TARGET” inside red box marked below. For example, you can add Hello_World. First you can make Hello_World.c as follows. 1 #include <stdio.h> 2 3 int main() 4{ 5 printf("hello world !!!\n"); 6 return 0; 7} 8 CROSS LDFLAGS IFLAGS CFLAGS DEST DEST_ETC = /opt/lemonix/cdt/bin/arm-linux+= -L/opt/lemonix/cdt/lib -L/opt/lemonix/cdt/bin += -I/opt/lemonix/cdt/include -I./include = -O2 -g -Wall -Wno-nonnull = ../../ramdisk/root/sbin = ../../ramdisk/root/etc CC STRIP AR = = = $(CROSS)gcc $(CROSS)strip $(CROSS)ar TARGET = Hello_World ddns_agent udp def pinetd tcp_server tcp_client tcp_multiplex tcp_broadcast detect portview upgrade eddy loopback rt-test LIBS = -lrt SB_APIs/SB_APIs.a 4-3 Chapter4. Compiling Application The figure below shows part that is executed when running make command. It shows that Hello_World is added also as an example. all : $(TARGET) udp : udp.o rm -f $@ $(CC) $(CFLAGS) $(LDFLAGS) $(IFLAGS) -o $@ $ [email protected] $(LIBS) $(STRIP) $@ def : def.o rm -f $@ $(CC) $(CFLAGS) $(LDFLAGS) $(IFLAGS) -o $@ $ [email protected] $(LIBS) $(STRIP) $@ Hello_World : Hello_World.o Rm -f $@ $(CC) $(CFLAGS) $(LDFLAGS) $(IFLAGS) -o $@ $ [email protected] $(STRIP) $@ Next shows part that is executed when running make clean command and make release command. Make clean command deletes object files inside the current folder. Make release command moves executable files to where it is set as DEST in environment setting. clean: rm *.bak *.o release: cp -f $(TARGET) $(DEST) cp -f sb_default_config $(DEST_ETC) 4.3 Compile Written source codes will be compiled to work on Eddy. 4.3.1 Compiling on Windows Compiling on Windows environment is simple. Type in “make” command through cmd(command prompt) in directory where Makefile is located. As shown below, if successfully compiled, execution file named Hello_World will be created. Of course, as this file was cross-compiled, it can not run on Windows environment. Upload this file to Eddy with a FTP to execute this file on Eddy, (Files uploaded with FTPs are not permanently saved on Eddy.). This will be further explained on next chapter, Chpater 5 Creating Firmware. 4-4 Chapter4. Compiling Application C:\eddy_DK_2xx[\src/Eddy_APPs> make hello_world /opt/lemonix/cdt/bin/arm-linux-gcc -O2 -g -Wall -Wno-nonnull -c -o Hello_World.o Hello_World.c /opt/lemonix/cdt/bin/arm-linux-gcc -L/opt/lemonix/cdt/lib -L/opt/lemonix/cdt/bin Hello_World.o -o Hello_World C:\eddy_DK_2xx[\src/Eddy_APPs> C:\eddy_DK_2xx[\src/Eddy_APPs> ls Hello_world SB_APIs tcp_client tcp_multiplex.o def.c eddy kt.c pinetd portview.o tcp_client.c . . . 4.3.2 Compiling on Linux To compile a source file on Linux environment, type in “make” command in directory where Makefile is located. As shown below, if successfully compiled, execution file named Hello_World will be created. Of course, as this file was cross-compiled, it can not run on Linux environment. Upload this file to Eddy with a FTP to execute this file on Eddy, (Files uploaded with FTPs are not permanently saved on Eddy.). This will be further explained on next chapter, Chpater 5 Creating Firmware. [shlee@localhost Eddy_APPs]$make /opt/lemonix/cdt/bin/arm-linux-gcc -O2 -g -Wall -Wno-nonnull -c -o Hello_World.o Hello_World.c /opt/lemonix/cdt/bin/arm-linux-gcc -L/opt/lemonix/cdt/lib -L/opt/lemonix/cdt/bin Hello_World.o -o Hello_World [shlee@localhost Eddy_APPs]$ ls Hello_World* tcp_client* SB_APIs/ def.c* tcp_multiplex.o tcps* eddy* upgrade* kt.c pinetd* portview.o server* . . . 4.3.3 Compiling with LemonIDE LemonIDE is an IDE(Integrated Development Environment) based on Eclipse platform and provides an intuitive GUI interface. LemonIDE can be used in both Windows and Linux environments. Source coding, compile, remote debugging and creating a firmware image can all be carried out with LemonIDE. Refer to “LemonIDE_User_Guide” for detailed information on LemonIDE. 4.4 Uploading and executing an application via FTP In order to execute user's application on the Eddy, you can create a firmware and write it on the Eddy’s flash memory. This is not a good idea for the frequent debugging purpose since it's a time consuming process. Therefore, during the development process, it is better to simply upload your application to the RAM file system through FTP Server. The uploaded file will run directly on the module, making it a simple and quick solution for the frequent 4-5 Chapter4. Compiling Application debugging. But when Eddy is reset or restarted, the program will be lost. In order to permanently store the program, you have to create a firmware. Power on Eddy and connect via Telnet. (See Eddy User Guide for details) Eddy login: eddy Password: 99999999 # cd /tmp ; after connection, move to /tmp Now connect via FTP to upload sample program to Eddy. ID and password used for connecting to Eddy’s ftp server are same as ones used for telnet connection. The following example shows how the application 'Hello_World' is uploaded on to /tmp directory on Eddy. Please make sure that the transfer mode is set as binary. Use “put <filename>” command for uploading. Below example displays how to access and upload a program to Eddy using an FTP on Linux environment. On Windows, use FTP in cmd(command prompt) to upload a program. [shlee@localhost Eddy_APPs]$ ftp 192.168.0.223 Name (192.168.0.223:shlee): eddy 331 Please specify the password. Password: 230 Login successful. ftp> cd /tmp ftp> bin ftp> put Hello_World 8914 bytes sent in 0.00027 seconds (3.3e+04 Kbytes/s) ftp> bye [shlee@localhost Eddy_APPs]$ When the transfer is finished you can see the files at telnet terminal. Uploaded files needs execute permission in order to run. You can do so by issuing ‘chmod’ command After changing to executable mode, run “./Hello_World”. 4-6 Chapter4. Compiling Application # ls Hello_World login.id thttpd.pid utmp thttpd.log login.pw thttpd.log login.pw . . . # # chmod 777 Hello_World # # ls Hello_World login.id thttpd.pid utmp . . . # # ./Hello_World hello world !!! 4-7 Chapter 5. Creating Firmware Chpater5. Creating Firmware In the previous chapter we explained how to make and compile application program with sample program. This chapter introduces methods to create a firmware that permanently saves the application into the Eddy module. 5.1 How to create a firmware Firmware image can be created in Eddy_DK_2xx/ramdisk folder. Makefile in Eddy_DK_2xx/ramdisk can be altered so that execution file is added to release part to using “Make release” command, or execution file can be copied to ramdisk/root/sbin using cp command. Copy the execution file to Eddy_DK_2xx/ramdisk/root/sbin. Below displays “Hello_World” sample program copied to Eddy_DK_2xx/ramdisk/root/sbin. [shlee@localhost Eddy-DK_20a]$ ls Env.sh* Make.check* firmware/ ramdisk/ src/ tool/ [shlee@localhost Eddy-DK_20a]$ cd ramdisk/root/sbin/ [shlee@localhost sbin]$ ls Hello_World com_redirect* reboot@ setconsole@ ifdown@ klogd@ fdisk@ halt@ swapon@ tae* losetup@ switch_root@ tcp_broadcast* 이 modprobe@ portview* 제 [shlee@localhost sbin]$ pwd ifconfig@ insmod@ loopback* tcp_server* vconfig@ def* mkswap@ udhcpc@ detect* pivot_root@ fsck@ help@ mdev@ pinetd* freeramdisk@ hdparm@ rmmod@ ifup@ start-stop-daemon@ kt* lsmod@ /home/eddy_project/Eddy-DK_20a/ramdisk/root/sbin 상 [shlee@localhost sbin]$ 5-1 Chapter 5. Creating Firmware To create a firmware image, move to Eddy_DK_2xx/ramdisk to make changes on Makefile. Makefile resides under “Ramdisk”( /DK Source/ Ramdisk) which is registered as a project. Version information, amount of Ramdisk to be used, application information to be copied can be configured in Makefile. Following is Makefile provided in DK. Note DK Source is distributed in Linux compatible format. Thus some commands in Makefile may not be recognized in Windows environment. In such cases, add .exe to unrecognized utilities in Makefile as shown below. ../tool/genext2fs Æ ../tool/genext2fs.exe ../tool/mkimage Æ ../tool/mkimage.exe ../tool/mkfs.jffs2 Æ ../tool/mkfs.jffs2.exe IMAGE=ramdisk FW_NAME = eddy-fs-20a.bin Æ Firmware image name and version info. CONFIG_NAME = eddy-cf-20a.bin Æ Default operating environment info. of Eddy FIRMWARE_DIR = ../firmware Æ Directory to save firmware image to be created ## Check environments #include ../Make.check config: @echo -n "Checking ramdisk skeleton files..." @if [ ! -f "$(ROOT_FS_SKEL)" ] ; then \ echo "fail"; \ exit 0;\ fi @echo "ok"; \ install: #@echo "Making ramdisk image..." #$(TOOL) -b 8192 -d root -D device_table.txt ramdisk #../tool/genext2fs -U -b 5110 -d root -D device_table.txt ramdisk #../tool/genext2fs -U -b 7158 -d root -D device_table.txt ramdisk #../tool/mkcramfs -q -D device_table.txt root ramdisk ../tool/genext2fs.exe -U -b 10240 -d root -D device_table.txt ramdisk Æ Configures ramdisk size to 10,240 K and register device of Eddy/dev, referring to Device_table.txt.. gzip -vf9 ramdisk 5-2 Chapter 5. Creating Firmware test -f ramdisk.gz ../tool/mkimage.exe -A arm -O linux -T ramdisk -C gzip -a 0 -e 0 -n $(FW_NAME) -d ./ramdisk.gz $(FW_NAME) test -f $(FW_NAME) mv $(FW_NAME) $(FIRMWARE_DIR)/ cfg: ../tool/mkfs.jffs2.exe -q -l -o $(CONFIG_NAME) -d flash -p – f Æ Create image of Eddy’s initial execution configuration file residing under Flash folder. test -f $(CONFIG_NAME) mv $(CONFIG_NAME) $(FIRMWARE_DIR)/ release: Æ Register application to be copied to Eddy so it can be copied to proper directory cp -f ../src/busybox-1.5.0/busybox root/bin cp -f ../src/dropbear-0.50/dropbear root/usr/local/sbin cp -f ../src/dropbear-0.50/dropbearkey root/usr/local/sbin cp -f ../src/ethtool-6/ethtool root/usr/local/sbin cp -f ../src/thttpd-2.25b/thttpd root/usr/local/sbin cp -f ../src/ucd-snmp-3.6.2/agent/snmpd root/usr/local/sbin cp -f ../src/ucd-snmp-3.6.2/agent/snmpd.conf root/etc cp -f ../src/netkit-ftp-0.18/ftp/ftp root/usr/local/bin . Makefile options are as follows. Make release ; copy module in release to ramdisk area Make cfg ; create firmware image of Eddy enviromental files in ramdisk/flash Make install ; create a firmware image of Eddy’s Filesystem If changes to Makefile are complete, use “make install” command to create firmware image. Firmware will be created in “FIRMWARE_DIR” directory defined in Makefile. On Windows, use cmd(command prompt) to carry out procedures explained on Linux. 5-3 Chapter 5. Creating Firmware [shlee@localhost ramdisk]$ make install #@echo "Making ramdisk image..." ../tool/genext2fs -U -b 10240 -d root -D device_table.txt ramdisk gzip -vf9 ramdisk ramdisk: 79.9% -- replaced with ramdisk.gz test -f ramdisk.gz ../tool/mkimage -A arm -O linux -T ramdisk -C gzip -a 0 -e 0 -n eddy-fs-20a.bin -d ./ramdisk.gz eddy-fs20a.bin Image Name: eddy-fs-20a.bin Created: Thu Nov 1 13:39:02 2007 Image Type: ARM Linux RAMDisk Image (gzip compressed) Data Size: 2104223 Bytes = 2054.91 kB = 2.01 MB Load Address: 0x00000000 Entry Point: 0x00000000 test -f eddy-fs-20a.bin cp eddy-fs-20a.bin ../firmware/ [shlee@localhost ramdisk]$ cd ../firmware/ [shlee@localhost firmware]$ ls eddy-fs-20a.bin [shlee@localhost firmware]$ As shown in the picture above, a new firmware file “eddy-fs-20a.bin” has been created. Now you have to upload the firmware image to Eddy via Web or FTP, save it to Eddy’s flash memory, and reset Eddy. Then Eddy will run with uploaded firmware settings. 5.2 Firmware update via FTP server Upload created firmware file to Eddy and save it in Flash Memory. Firmware upgrade can be carried out by 1) through a FTP, 2) through a Web browser and 3) through a bootload. Upgrading firmware procedures through a Web browser is described in “Eddy-Serial-User_Guide”. And upgrading firmware procedures through bootload is described in “9.1 System Recovery” of this manual. This chapter will introduce upload method using a FTP. On Windows, FTP can be used in cmd(command prompt) to carry out upload process. Upload the created firmware eddy-fs-20a.bin to the /tmp directory of Eddy, using an FTP. (See Chapter 4.4 for more information) 5-4 Chapter 5. Creating Firmware [shlee@localhost firmware]$ ftp 192.168.0.223 Connected to 192.168.0.223. Name (192.168.0.223:shlee): eddy 331 Please specify the password. Password: 230 Login successful. ftp> cd /tmp 250 Directory successfully changed. ftp> bin 200 Switching to Binary mode. ftp> put eddy-fs-20a.bin local: eddy-fs-20a.bin remote: eddy-fs-20a.bin 227 Entering Passive Mode (192,168,0,223,195,50) 150 Ok to send data. 226 File receive OK. 2104287 bytes sent in 0.47 seconds (4.3e+03 Kbytes/s) ftp> by 221 Goodbye. [shlee@localhost firmware]$ Use Telnet to check eddy-fs-20a.bin is in the /tmp directory. Use “upgrade eddy-fs-20a.bin” command to update the firmware. # pwd /tmp # ls eddy-fs-20a.bin eddy-fs-20a.bin # # upgrade eddy-fs-20a.bin FileSystem Erase ... 2388341 Bytes FileSystem Write ... eddy-fs-20a.bin, 2388341 Bytes ..................................................................................................................... Flash Write OK ..................................................................................................................... Flash Verify OK Update Complete please reboot the system! 5-5 Chapter 5. Creating Firmware In order for the updated firmware to take effect, you need to reboot the module. After rebooting you can see sample program running as shown below. Eddy login: eddy Password: # cd /sbin # ls Hello_World ifconfig com_redirect ifdown nameif pinetd … hwclock # ./Hello_World hello world !!! 5-6 modprobe swapon switch_root sysctl Chapter 6. Library Chpater6. Library Introduction This chapter introduces useful libraries and API functions that are applicable with Eddy-Serial DK. 6.1 Introduction All the functions introduced in this chapter are all APIs included in SB_APIs.a of /src/Eddy_APPs/SB_APIs directory. You also need to mention this library in the Makefile. All sample source codes accompanied with EddyDK use this library, and you can see the source codes and Makefile for more information. 6.2 Makefile Library is in /src/Eddy_APPs/SB_APIs/ directory, as a form of SB_API.a. You need to specify in the Makefile in order to use this library, so please refer to the Makefile inside /src/Eddy_APPs/ folder. 6.3 System functions Timer and delay functions needed for making application program. SB_SetPriority Function Specifies priority level of task. Format Void SB_SetPriority (int Priority_Level); Parameter Priority_level Returns None Notice Configures the priority level of task execution to the system. Low (1) ~ High (99) The lowest level is 1, whereas the highest level is 99. It is recommended to set level below 50; when a certain task’s level is set above 50, that task will be executed prior to others, possibly affecting other tasks’ operation. SB_GetTick 6-1 Chapter 6. Library Function Returns time measured after Eddy has been booted in msec. Format Unsigned long SB_GetTick (Void); Parameter None Returns 0 ~ 4,294,967,295 Notice Returned value is system tick counter in msec unit. After it reaches the maximum value 0xffffffff of unsigned long type, it starts from zero again – which is about period of 50 days. SB_msleep Function Delays in msec unit. Format void SB_msleep (int msec); Parameter msec Returns none Notice Precisely delays in msec unit. Configure delay time in msec unit. SB_AliveTime Function Returns time measured after Eddy has been booted in day, hour, minute, and second. Format void SB_AliveTime (int *day, int *hour, int *min, int *sec); Parameter *day Days Eddy has been operationg (0 ~ ) *hour Hour (0 ~ 23) *min Minute (0 ~ 59) *sec Second (0 ~ 59) Returns None Notice 6.4 Eddy Environment Function Environment functions related with Eddy File System which gives information such as Eddy’s version, environment configuration, version, etc. SB_GetModel 6-2 Chapter 6. Library Function Reads model type of Eddy. Format int SB_GetModel Parameter None Returns 0x00 ~ 0x1f Eddy’s model number 0x1f EDDY_CPU 0x00 EDDY_S1_PIN 0x01 EDDY_S1_PIN_C 0x02 EDDY_S1_DB9 0x03 EDDY_S1_DB9_C 0x04 EDDY_S1_POE 0x05 EDDY_S1_POE_C 0x06 EDDY_S2_M 0x07 EDDY_S2_M 0x08 EDDY_WS1_TTL 0x09 EDDY_WS1_TTL_C 0x0a EDDY_WS1_PIN 0x0b EDDY_WS1_PIN_C 0x0c EDDY_WS1_DB9 0x0d EDDY_WS1_DB9_C 0x1e EDDY_DK Notice (Void)); Eddy provides various models with CPU module. It returns 0x1f when the user id developing hardware to mount Eddy-CPU, whereas it returns model number when the user is using model provided by SystemBase. (Please refer to src/include/sb_define.h) SB_GetVersion Function Reads version of O/S, file system, and bootloader ported to Eddy in string type. Format void SB_GetVersion (int type, char *version); Parameter type Specifies version the function will read. ‘B’: Eddy’s bootloader version ‘K’: Eddy’s O/S version ‘F’: Eddy’s file system version Version Pointer where version information string will be stored. Returns None Notice Version information will be read like “1.0a.” BootLoader and O/S will be provided by SystemBase; therefore these cannot be changed. In case file system is programmed by the user, the version can be set by the user. 6-3 Chapter 6. Library When the parameter type other than ‘B’ ,’K’, ‘F’ are called, the function will return “0.00” as version information. SB_ReadConfig Function Reads Eddy’s operating environment configuration file. Format void SB_ReadConfig (char *FileName, Parameter FileName Struct SB_CONFIG *cfg); File name including the path file is located. /etc/sb_config, /etc/sb_default_config /flash/sb_config *cfg Point of the buffer where the environment configuration file is read and saved. Returns None Notice Environment configuration file managed by Eddy is located at /etc, /flash. “/etc/sb_config” file is temporary environment configuration file where the modified configuration is applied when the configuration is changed via web or telnet. Every eddy application will refer to this file for the operation. “/etc/sb_default_config” is configuration file used for Eddy’s factory default configuration which will be applied to Eddy’s environment configuration when factory default command from web or telnet is given. “/Flash/sb_config” is changed to “/etc/sb_config” when the configuration is changed via web or telnet. This file stores modified information even when the Eddy’s power is reset, and helps Eddy to operate as configured by Eddy reading this information when Eddy is first booted. (Please see /Eddy_APPs/include/sb_config.h) SB_WriteConfig Function Saves Eddy’s operating environment configuration information into file. Format void SB_WriteConfig (char *FileName, Parameter FileName Struct SB_CONFIG *cfg); File name including path where the saved file will be located at /etc/sb_config, /flash/sb_config *cfg Returns Notice 6-4 None Struct buffer point which stores the environment configuration information to be saved Chapter 6. Library SB_GetSharedMemory Function Reads pointer of registered shared memory. Format void *SB_GetSharedMemory (int Key_ID, Parameter Key_ID ID of registered shared menory Buffer_Size Size of shared memory used Returns *buffer_address Memory address of shared memory Notice Portview is Windows application developed by SystemBase which can remotely monitor Eddy’s operating condition. In contrast, SNMP server, which provides basically same function as Portview, is industry’s standard monitoring protocol S/W developed by 3Com, Cysco, etc. and sold in hundreds of thousands of U.S. dollars. int Buffer_Size); Returns -1 upon failure. To be compatible with both of the applications, each application in Eddy uses shared memory to store information and send the information to Portview and SNMP. Note that PortView and SNMP Agent has to be set in the environment configuration. SB_SetSharedMemory Function Requests shared memory to be used and read memory pointer. Format void *SB_SetSharedMemory (int Key_ID, Parameter Key_ID ID of shared memory to be registered Buffer_Size Size of shared memory to be used *buffer_address Memory address of shared memory Returns int Buffer_Size); Returns -1 upon failure. Notice In Eddy this function is used for PortView and SNMP agent. User can use this function to access shared memory for other purpose. SB_SetReadyLed Function Contols Ready LED. Format void *SB_SetReadyLed (int OnOff); Parameter OnOff 0: Turn off Ready LED. 1: Turn on Ready LED. 6-5 Chapter 6. Library Returns None Notice Contols Ready LED mounted at each Eddy model. 6.5 Serial functions These functions are used to handle internal serial port and UART. SB_OpenSerial Function Opens serial port. Format int SB_OpenSerial (int Port_No); Parameter Port_No Serial port number 0: First serial port 1: Second serial port (Only available for Eddy-CPU, Eddy-DK) Returns -1 ~ N Opened serial port handle -1: Open error N: Opened serial port handle Notice Eddy provides maximum two serial ports; however for normal model where Eddy-CPU is mounted, Eddy only provides one serial port. DK board has two on-board serial ports. User can use both of the serial ports if the user sets DIP switch on DK board to make it recognized as Eddy-CPU or Eddy-DK. SB_InitSerial 6-6 Function Initialize data communication configuration of serial port. Format Void SB_InitSerial (int Handle, char Speed, char LCR, char Flow); Parameter Handle Serial port handle acquired from OpenSerial Speed Baud rade Chapter 6. Library LCR 0 : 150 BPS, 1 : 300 BPS 2 : 600 BPS 3 : 1200 BPS: 4 : 2400 BPS 5 : 4800 BPS 6 : 9600 BPS 7 : 19200 BPS 8 : 38400 BPS 9 : 57600 BPS 10 : 115200 BPS 11 : 230400 BPS 12 : 460800 BPS 13 : 921600 BPS X X P P S D D (8 bis binary) P P : Parity Bits 0 0 : None, 0 1 : Odd, 1 0, 1 1: Even S : Stop Bits 0 : 1 bits, 1 : 2 bits D D : Data Bits 0 0 : 5 bits, 0 1 : 6 bits 1 0 : 7 bits, 1 1 : 8 bits FlowControl Types of flow control 0: no flow control 1: RTS/CTS flow control 2: Xon/Xoff flow contorl Returns None Notice SB_SetSerialInterface Function Configures interface type of serial port. Format Void Parameter Interface SB_SetSerialInterface (int Interface); Interface ID of RS422/RS485 : RS422 (point to Point) : RS422 (MultiDrop) : RS485 (None_Echo) 4. : RS485 (Echo) Returns None Notice This function is needed only for serial model named “-C”, that is RS422/486 combo model; it is not needed when the user is developing new hardware using Eddy-CPU. DK board has two on-board serial ports. User can use the first serial port for either RS422 or RS485 if the user sets DIP switch on DK board to make it recognized as Eddy-DK. SB_SendSerial 6-7 Chapter 6. Library Function Send data to the serial port. Format Void SB_SendSerial (int handle, char *data, int length); Parameter handle Handle which opened serial port or socket data Pointer of the data to be sent length Length of the data to be sent Returns None Notice When the transmit buffer is full, this function will retry up to 10 time in 20 msec period; it will return after transmission is completed. SB_ReadSerial Function Reads data from the serial port. Format int SB_ReadSerial (int handle, char *data, Parameter handle Handle which opened the serial port. data Buffer pointer where the read data will be saved. length Size(length) of the buffer memory wait_msec Time it will wait for next data reception from reading receive buffer Returns 0~n Size of the read data Notice When wait_msec is set to 0 this function will only read data from serial receive buffer; when set larger than 0, it will read data from serial receive buffer, wait for time specified in msec unit, and then continue reading data from serial port as one packet. int length, int wait_msec); The maximum size of the data is same as buffer’s size, i.e. length. You can use value obtained from SB_GetDelaySerial function or value manually calculated for wait_msec. SB_GetMsr Function Reads MSR register value from serial port Format Char SB_GetMsr (int handle); Parameter handle Handle which opened the serial port. Returns Value MSR Bit Register 값 76543210 Bit0: CTS change Bit1: DSR change Bit2: RI change Bit3: DCD change 6-8 Bit4: CTS (0:Low, 1:High) Bit5: DSR (0:Low, 1:High) Chapter 6. Library Bit6: RI (0:Low, 1:High) Bit7: DCD (0:Low, 1:High) Notice SB_SetRts Function Controls RTS signal line of the serial port. Format Void SB_SetRts (int handle, int value); Parameter handle Handle which opened the serial port. Value 0: off Set RTS signal to low. 1: on Set RTS signal to high. Returns None Notice SB_SetDtr Function Controls DTR signal line of the serial port. Format Void SB_SetDtr (int handle, int value); Parameter handle Handle which opened the serial port. Value 0: off Set DTR signal to low. 1: on Set DTR signal to high. Returns None Notice SB_GetDelaySerial Function Calculate and return input delay time for three bytes data with given serial communication speed in msec unit. Format Void SB_GetDelaySerial (int bps); Parameter Bps Serial communication speed Returns int Input delay time Notice This function can be used to calculate wait_msec of SB_ReadSerial function. When the communication speed is faster than 230400 bps, this function will return 1 since Eddy’s minimum delay is 1 msec. 6.6 Ethernet functions These functions deal with the network-related information of Eddy. These functions are optimized socket API for Eddy, and user can use other API for development by using his or her 6-9 Chapter 6. Library own POSIX compatible standard socket API. SB_GetIp Function Reads IP address assigned to Eddy. Format Unsigned int SB_GetIp (char *interface); Parameter Interface Network interface name. “eth0” for Eddy Serial model “eth1” for Eddy WiFi model. Returns Unsigned int Notice Note that it returns operating IP address, not the IP address configured in Eddy. When Eddy is operating as a DHCP Client, this function read network IP address assigned from DHCP server. Read IP address and returns in unsigned int type. Please see below for transforming IP address into string type. struct in_addr addr; addr.s_addr = SB_GetIp (); printf ("IP Address : %s ", inet_ntoa(addr)); SB_GetMask Function Reads subnet mask address assigned to Eddy. Format Unsigned int SB_GetMack (char *interface); Parameter Interface Interface name to be read “eth0” for Eddy Serial model “eth1” for Eddy WiFi model Returns Unsigned int Returns mask address in unsigned int type Notice Please see SB_GetIp also SB_GetGateway 6-10 Function Reads gate address assigned to Eddy. Format Unsigned int SB_SetGeteway(void); Parameter None Returns Unsinged int Notice Please see SB_GetIp also Returns gate address in unsigned int type Chapter 6. Library SB_ConnectTcp Function Make connection to the server specified as TCP socket. Format Int SB_ConnectTcp (char *IP_Address, int Socket_No, int Wait_Sec, Int Tx_Size, Parameter Returns int Rx_Size); IP_Address IP address to connect in string type Socket_No Socket number of the server to connect Wait_Sec Wait time for connection (in second) Tx_Size Tx buffer size of the socket (in K bytes) Rx_Size Rx buffer size of the socket (in K bytes) -1 ~ N Handle number of the connected socket -1: Connection failure N: Handle number of the connected socket Notice If the connection is not made when this function is called, it will try to reconnect for time specified in wait_sec and return. Tx,Rx_Size are size of the socket buffer size. These can be set from 1 to 64. If it is set to number smaller than 1, size will 4kbytes as default; number larger than 64 will set size of the buffer to 64kbytes as default. SB_ListenTcp Function Wait for connection to TCP socket Format Int Parameter Socket_No TCP socket number to wait for connection Tx_Bytes Tx buffer size of the socket (in K bytes) Rx_Bytes Rx buffer size of the socket (in K bytes) -1 ~ N Handle number of the TCP socket waiting for connection Returns SB_ListenTcp (int Socket_No, Int Tx_Size, int Rx_Size); -1: Socket connection waiting failure N: Handle number of the TCP socket waiting for connection Notice As a non-blocking function, this function requests connection and returns without waiting for connection. SB_AcceptTcp will handle waiting for connection. Tx,Rx_Size are size of the socket buffer size. These can be set from 1 to 64. If it is set to number smaller than 1, size will 4kbytes as default; number larger than 64 will set size of the buffer to 64kbytes as default. SB_AcceptTcp 6-11 Chapter 6. Library Function Waits for network connection of TCP socket handle. Format Int Parameter Socket_No SB_AcceptTcp (int Socket_No, int wait_msec); TCP socket handle number to wait for connection. (Return value of SB_ListenTcp) Returns wait_msec Connection standby time (in msec) -1 ~ N New handle number of connected TCP socket. -1: Socket error 0: Waiting for connection N: New handle number of connected TCP socket. Notice When new handle number is given after connection is made, previous handle that has been waiting will be closed inside this function. SB_AcceptTcpMulti Function Grants network multiple connection of TCP socket handle waiting for connection. Format Int Parameter Socket_No SB_AcceptTcpMulti (int Socket_No, int wait_msec); TCP socket handle number waiting for connection. (Return value of SB_ListenTcp) Returns wait_msec Connection standby time (in msec) -1 ~ N New handle number of connected TCP socket. -1: Socket error 0: Waiting for connection N: New handle number of connected TCP socket. Notice When new handle number is given after connection is made, it will not close previous handle waiting for connection, granting maximum of 1024 socket connection. SB_ReadTcp Function Read data from connected TCP socket. Format Int Parameter Handle Handle number of connected TCP socket Buffer Buffer point where packet data to be read will be saved Buffer_Size Size of the buffer to save -1 ~ N Size of the data read. Returns SB_ReadTcp (int Handle, char *Buffer, int Buffer_Size); -1: Socket error 6-12 Chapter 6. Library 0: No data was read N: Length of the data read Notice When return code is -1, it means the connection is lost with the client so user has to close TCP socket handle. SB_CloseTcp Function Close TCP socket handle. Format Int Parameter Handle Returns None Notice This function shuts down socket handle to finish communication and closes. SB_CloseTcp (int Handle); TCP socket handle number to close SB_BindUdp Function Binds UDP socket. Format Int Parameter Socket_No UDP socket number to bind Returns Handle Handle number bound to UDP socket SB_BindUdp (int Socket_No); -1: Bind failure N: Handle number bound to UDP socket Notice SB_ReadUdp Function Reads data transmitted to UDP socket bound in network. Format Int Parameter Handle Handle number bound to UDP socket Buffer Buffer point where packet data to be read will be saved Buffer_Size Size of the buffer to save -1 ~ N Size of the data read. Returns SB_ReadUdp (int Handle, char *Buffer, int Buffer_Size); -1: Socket error 0: No data was read N: Length of the data read Notice When client sends data to bound UDP socket, this function remembers client’s IP address and socket number for SB_SendUdpServer to use. 6-13 Chapter 6. Library SB_SendUdpServer Function Transmits data to UDP socket. (Server mode) Format Int Parameter Handle Handle number bound to UDP socket Buffer Buffer point where packet data to be sent is saved Data_Size Size of the buffer to send SB_SendUdpServer (int Handle, char *Buffer, int Data_Size); Returns None Notice This function can be called after confirming client’s network information by sending data to UDP socket bound to Eddy from network; that is, user has to call SB_ReadUdp first. When data transmission has to be made first, user has to use SB_SendUdpClient function. SB_SendUdpClient Function Transmit data to UDP socket (Client mode) Format Int SB_SendUdpClient (int Handle, char *Buffer, int Data_Size, Char *IP_Address, int Socket_No); Parameter Handle Handle number bound to UDP socket. Buffer Buffer point where packet data to be sent is saved. Data_Size Size of the buffer to send. IP_Address IP address to send data to. Socket_No Socket number to send data to. Returns None Notice This function can be used when user already knows destination network information to send data to using UDP socket. When data transmission has to be made first, user has to use SB_SendUdpClient function.. 6.7 GPIO Functions The following functions are used to control maximum 16 different GPIO ports that have been installed. Using each GPIO port user can sense 3.3V voltage or control output. SB_SetGpioMode Function 6-14 Configures data communication direction of GPIO port. Chapter 6. Library Format void SB_SetGpioMode (int GpioNo, int Mode); Parameter GpioNo Mode GPIO port number (0 ~ 15) Input/output direction 0 : Input (Senses 3.3V input voltage) 1 : Output (Controls 3.3V output voltage) Returns None Notice There are maximum of 16 GPIO ports provided by Eddy. Number of GPIO ports varies according to the model. Eddy-CPU provides 16 GPIO, whereas Eddy-S1/Pin provides 4, and none from others. SB_SetGpioValue Function Drives 3.3V output to specified GPIO port. Format Void SB_Set_GpioValue (int GpioNo, int value); Parameter GpioNo GPIO port number value GPIO configuration value 0 : low (Stop driving 3.3 V to output) 1 : high (Drive 3.3V to output) Returns None Notice I/O mode (direction) of GPIO port specified in GpioNo has to be in output mode. SB_GetGpioMode Function Reads I/O mode setting of specified GPIO port. Format int SB_GetGpioMode (int GpioNo); Parameter GpioNo GPIO port number Returns 0, 1 GPIO mode value read 0: input (Configured as input mode) 1: Output (Configured as output mode) Notice SB_GetGpioValue Function Reads current status of specified GPIO port. Format int SB_GetGpioValue (int GpioNo); Parameter GpioNo GPIO port number 6-15 Chapter 6. Library Returns 0, 1 GPIO value read 0 : low (3.3V is not present at the port) 1 : high (3.3V is present at the port) Notice I/O mode (direction) of GPIO port specified in GpioNo has to be in input mode. 6.8 Debugging Function Eddy can debug operating condition of each application via Telnet in real time. The following functions are used to print debug log message to Telnet window when SB_DEBUG of each application is set ON. SB_LogDataPrint Function Print each byte of data in hex or ascii code. Format void SB_LogDataPrint (char *RTx, Parameter *RTx Description message of data *Buff Buffer address of data to be printed is saved/ Data_len Size of data. char *buff, int data_len); Returns None Notice Prints messages to telnet which logged in first. The message include Eddy’s tick counter of 1msec unit and printed in following form. SB_LogDataPrint (“Send”, “\t12345\n”, 8); [191020202] Send 8 = 08,1,2,3,4,5,0d,0a -------------- ------- ---------------------------Tick Counter RTx data_Len buff Debugging of each application in Eddy can be configured as follows by using Def command. (Please see def.c) # def po <1/2/all> debug <on/off> SB_LogMsgPrint 6-16 Function Prints in the same format as Printf. Format void SB_LogMsgPrint (const char *Format, . . . ); Parameter *Format Returns None Format of Printf Notice Prints messages to telnet which logged in first. The message include Eddy’s tick counter of 1msec unit and printed in following form. SB_LogMsgPrint (“%s means Real-Time\n”, “Eddy”); [191020202] Eddy means Real-Tile Debugging of each application in Eddy can be configured as follows by using Chapter 6. Library Def command. (Please see def.c) # def po <1/2/all> debug <on/off> 6-17 Chapter 7. Eddy Software Chpater7. Eddy Software This chapter explains software structure ported to Eddy-DK. Source codes for all application except Com_redirect, gdbserver, tae, SB_APIs library are disclosed. These codes may be used as development guide when programming one’s own firmware. 7.1 Software Structure Diagram Eddy.c is the first program that is executed upon boot up. Environment configuration information configured either by web or def.c is then read. All provided Eddy applications were developed by using libraries explained in Chapter 6. 7-1 Chapter 7. Eddy Software 7.2 Main Applications eddy.c and pinetd.c are introduced in this chapter. These two programs play the most important role in Eddy. Other applications can be divided into applications that are run and monitored by pinetd.c and applications that are manually run by users. Please see “4.1 Source Code” for simple functional description of each application. 7.2.1 eddy.c Application Program run at first after Eddy is booted, this reads sb.config which is environment file saved at /flash. When environment file is not present at /flash, it will use /etc/sb_default_config file to reset environment configuration to factory setting. This also copies environment configuration file of /flash to /etc directory so each application can refer to it. This initializes network with configuration information of Sb_config file, and runs various daemon program. 7.2.2 Pinetd.c Application Daemon program in the highest hierarchy of program run by Eddy.c, this checks model of Eddy and configures system environment according to the characteristics of each model. This reads Sb_config environment file to run and monitor each program. This periodically monitors Eddy’s operating status and blinks readyLed so that user can check the status. This also periodically monitors reset switch to read user’s request for reset of factory reset. 7.2.3 Other Applications The following shows applications run according to the protocol of each serial port defined in Sb_config. Tcp_server, tcp_client, com_redirect, tcp_broadcast, tcp_multiplex, udp (udp_server/client) The following shows applications run to handle external network service regardless of serial ports. Portview, detect, ddns_agent The following shows application which user can manually run by connecting via telnet. Def, upgrade, loopback, 7-2 Chapter 8. Handling HTML & CGI Chpater8. Handling HTML & CGI This chapter describes the HTML documents and CGI modules that are used for configuration. Provided CGI source and HTML documents are used by Eddy’s default firmware. Take a look at these sources and modify them as you want. 8.1 WEB Configuration HTML sources run by Eddy are located at src/Eddy_APPs/web/htdocs. CGI sources supporting information needed by HTML is located at src/Eddy_APPs/web/cgi. getagent.c This reads environment configuration file of /etc/sb_config and transfers configuration value to HTML page to show configuration information with browser. setagent.c This reads configuration value modified by user in HTML page and saves to configuration file of /etc/sb_config. 8.2 Example HTML code The following example is part of main.html source. For users cannot program using variables as they would do in C language, HTML processes by using symbols linked with CGI to receive value as shown below. Shown in red are symbol link which transfers value from getagent.c. (network.html source abstract) <tr bgcolor="#FFFFFF"> <td class="content">IP Address</td> <td class="content"><input type="text" size="16" maxlength="16" name="N_IP" value="[v,n_ip]" > <tr bgcolor="#FFFFFF"> <td class="content">Subnet Mask</td> <td class="content"><input type="text" size="16" maxlength="16" name="N_MASK" value="[v,n_mask]" > <tr bgcolor="#FFFFFF"> <td class="content">Gateway</td> <td class="content"><input type="text" size="16" maxlength="16" name="N_GW" value="[v,n_gw]" > <tr bgcolor="#FFFFFF"> <td class="content">DNS</td> 8-1 Chapter 8. Handling HTML & CGI <td class="content"><input type="text" size="16" maxlength="16" name="N_DNS" value="[v,n_dns]" > <tr bgcolor="#FFFFFF"> <td class="content">Telnet Service</td> <td class="content"><select name="N_TELNET"> <option [v, n_telnet_di] value="0">Disable</option> <option [v, n_telnet_en] value="1">Enable</option> </select> <tr bgcolor="#FFFFFF"> <td class="content">Telnet Service</td> <td class="content"><select name="N_WEB"> <option [v, n_web_di] value="0">Disable</option> <option [v, n_web_en] value="1">Enable</option> </select> As shown above there are name and value part for each record to link with CGI. Name stores information modified by user in HTHM so that it can save modified value when the user click on submit button at the lower part of HTML page. Value reads value to getagent.c to display on HTML page and lets user to modify the value she or he wants. 8.3 Example CGI Code Eddy-Serial DK has two CGI programs: getagent.cgi and setagent.cgi. “getagent.c” reads /etc/sb_config file to HTML document to display configuration information, and “setagent.c” saves user-modified information from HTML document back to /etc/sb_config file and ultimately saves to flash/sb_config so the user-modified environment configuration information is stored even if Eddy is reset. The following example shows processing part of getagent.c to display configuration value HTML page of example above. [Source abstract] if (cgiFormStringNoNewlines("N_IP", buff, 16) == cgiFormNotFound) { sprintf(buff, "%d.%d.%d.%d",cfg.system.ip[0], cfg.system.ip[1],cfg.system.ip[2],cfg.system.ip[3]); listPutf(list, "n_ip", buff); } else listPutf(list, "n_ip", buff); if (cgiFormStringNoNewlines("N_MASK", buff, 16) == cgiFormNotFound) { sprintf(buff, "%d.%d.%d.%d",cfg.system.mask[0], cfg.system.mask[1], cfg.system.mask[2],cfg.system.mask[3]); listPutf(list, "n_mask", buff); 8-2 Chapter 8. Handling HTML & CGI } else listPutf(list, "n_mask", buff); if (cgiFormStringNoNewlines("N_GW", buff, 16) == cgiFormNotFound) { sprintf(buff, "%d.%d.%d.%d", cfg.system.gateway[0], cfg.system.gateway[1], cfg.system.gateway[2],cfg.system.gateway[3]); listPutf(list, "n_gw", buff); } else listPutf(list, "n_gw", buff); if (cgiFormStringNoNewlines("N_DNS", buff, 16) == cgiFormNotFound) { sprintf(buff, "%d.%d.%d.%d",cfg.system.dns[0], cfg.system.dns[1], cfg.system.dns[2],cfg.system.dns[3]); listPutf(list, "n_dns", buff); } else listPutf(list, "n_dns", buff); cgiFormInteger("N_TELNET", &value, cfg.system.telnet_server); if (value == 1) { listPutf(list, "n_telnet_di", ""); listPutf(list, "n_telnet_en", "selected"); } else { listPutf(list, "n_telnet_di", "selected"); listPutf(list, "n_telnet_en", ""); } cgiFormInteger("N_WEB", &value, cfg.system.web_server); if (value == 1) { listPutf(list, "n_web_di", ""); listPutf(list, "n_web_en", "selected"); } 8-3 Chapter 8. Handling HTML & CGI else { listPutf(list, "n_web_di", "selected"); listPutf(list, "n_web_en", ""); } The following shows processing part of setagent.c to save user-modified configuration value when the user clicks on “submit” button on HTML page. [Source abstract] value2 = cgiFormStringNoNewlines("N_IP", buff, 16); if (value2 != cgiFormEmpty) convert_address (buff, cfg.system.ip); value2 = cgiFormStringNoNewlines("N_MASK", buff, 16); if (value2 != cgiFormEmpty) convert_address (buff, cfg.system.mask); value2 = cgiFormStringNoNewlines("N_GW", buff, 16); if (value2 != cgiFormEmpty) convert_address (buff, cfg.system.gateway); value2 = cgiFormStringNoNewlines("N_DNS", buff, 16); if (value2 != cgiFormEmpty) convert_address (buff, cfg.system.dns); cgiFormInteger("N_TELNET", &value, cfg.system.telnet_server); cfg.system.telnet_server = value; cgiFormInteger("N_WEB", &value, cfg.system.web_server); cfg.system.web_server = value; 8-4 Chapter 9. Appendix Chpater9. Appendix This chapter explains how to recover Eddy when flash of Eddy is damaged and it cannot be booted. 9.1 System recovery Even if the flash in the user area has been damaged, it does not affect system booting. But if the system continuously reboots due to user program failure, or if the system is inaccessible as a result of wrong IP setting, you have to change the system to factory default status. You can reload firmware from bootloader to change the system to default status. In order to do this, TFTP server has to be installed at the computer with Linux environment. Warning Once the bootloader is damaged, it cannot be recovered. Therefore user should not use command other than ones provided from manual. 9.1.1 Installing TFTP in Linux environment The following explains how to recover system with bootloader in Fedora core 5 operating system. If you are using other operating system, you will need tftp-server and xinetd daemon compatible with that operating system. First check to make sure tftp-server is installed. If you don’t install tftp-server, you should install. After install tftp-server, move provided firmware (firmware folder in SDK folder) to tftpboot folder(usually /tftpboot folder in Fedora core 5). 9-1 Chapter 9. Appendix 9.1.2 Hardware Install and Recovery Connect LAN port of computer and that of DK board using LAN cable. Connect debug port and computer’s serial cable using serial cross cable and use minicom to connect to computer’s serial port. Configure computer’s serial port setting to 115200 bps, 8 data bit, No parity, 1 stop bit and power on Eddy DK. After power on the following messages will be printed to minicom. When these are printed, press enter to enter into bootloader. The below image shows status after entering bootloader. U-Boot 1.2.0 (Oct 3 2007 - 17:07:46) DRAM: 32 MB SST : 39VF3201 Flash: 4 MB In: serial Out: serial Err: serial End of Autonegotiation Hit any key to stop autoboot: 0 U-Boot> You can recover by copying OS, firmware, and config image to flash memory in bootloader. To upgrade OS, firmware, and config image file, you have to configure Eddy’s virtual IP address and TFTP server’s IP address in bootloader. You can use “printenv” command to check the current configuration of Eddy and TFTP server’s IP address configured in bootloader. 9-2 Chapter 9. Appendix U-Boot> printenv Bootstrap_FLASH=0x10000000 bootloader_FLASH=0x10002000 BootEnv_FLASH=0x10001000 OS_FLASH=0x1001E000 FileSystem_FLASH=0x1012E000 Config_FLASH=0x103AE000 Bootstrap_END=0x10000FFF bootloader_END=0x1001DFFF BootEnv_END=0x10001FFF OS_END=0x1012DFFF FileSystem_END=0x103ADFFF Config_END=0x103FFFFF Download_SDRAM=0x20000000 OS_SDRAM=0x20000000 FileSystem_SDRAM=0x20500000 Bootstrap_Version=20a bootloader_Version=20a OS_Version=20a FileSystem_Version=20a Config_Version=20a bootargs=root=/dev/ram rw console=ttyS0,115200,mem=32M bootcmd=cp.b ${OS_FLASH} ${OS_SDRAM} 0x110000; cp.b ${FileSystem_FLASH} ${FileSystem_SDRAM} 0x280000; bootm ${OS_SDRAM} ${FileSystem_SDRAM} bootdelay=1 baudrate=115200 ethaddr=00:05:F4:11:22:33 Config_Size=10000 stdin=serial stdout=serial stderr=serial 위의 이미지 중 붉은 색으로 표시된 부분이 펌웨어 버전 정보이다. 이 두 버전 정보가 일치 하지 OS_Size==20000000 않는 다면 filesize=1f0f07 다음의 과정을 통해서 일치 시킨다. fileaddr=20000000 netmask=255.255.255.0 ipaddr=192.168.0.223 serverip=192.168.0.220 ToFileSystem_Size=0 change Eddy’s temporary IP address and TFTP server’s IP address proceed as follows. 9-3 Chapter 9. Appendix U-Boot> setenv serverip <TFTP server IP address> U-Boot> setenv ipaddr <Eddy IP address> U-Boot> Once the IP information is confirmed start recovery. install bootloader <name of bootloader firmware> ; When recovering bootloader area install os <name of OS firmware> ; When recovering OS area install fs <name of File System firmware> ; When recovering File System area install config <name of Congif firmware> ; When recovering Config area When recovering Config area, MAC address assigned to Eddy is lost. Therefore you must connect via telnet and use def command to change MAC address to one assigned to Eddy(See the label attached to the product) after recovering config area. Proceed as follows and it will recover by downloading image file from TFTP server configured. The next shows OS recovery procedure. U-Boot> install os eddy-os-20a.bin TFTP from server 192.168.0.220; our IP address is 192.168.0.223 Filename 'eddy-os-20a.bin'. Load address: 0x20000000 Loading:####################################################################### ########################################################### done Bytes transferred = 1112284 (10f8dc hex) Erasing sector ........................................................................................................................................................... .......done Erased 272 sectors Copy to Flash... .done Un-Protected 1 sectors Erasing Flash...Erasing sector .done Erased 1 sectors Writing to Flash... .done Protected 1 sectors 9-4 Chapter 9. Appendix The next shows file system recovery procedure. U-Boot> install fs eddy-fs-20a.bin TFTP from server 192.168.0.220; our IP address is 192.168.0.223 Filename 'eddy-fs-20a.bin'. Load address: 0x20000000 Loading:####################################################################### ############################################################################## ############################################################################## ######done Bytes transferred = 2035463 (1f0f07 hex) Erasing sector ........................................................................................................................................................... ....................................................................................................................... done Erased 640 sectors Copy to Flash... Un-Protected 1 sectors Erasing Flash...Erasing sector done Erased 1 sectors Writing to Flash... Flash not Erased Protected 1 sectors Configuration recovery U-Boot> install config eddy-cf-20a.bin TFTP from server 192.168.0.220; our IP address is 192.168.0.223 Filename 'eddy-cf-20a.bin'. Load address: 0x20000000 Loading: ############ done Bytes transferred = 65536 (10000 hex) Erasing sector ..................................................................................done Erased 82 sectors Copy to Flash... .done Un-Protected 1 sectors Erasing Flash...Erasing sector .done Erased 1 sectors Writing to Flash... .done Protected 1 sectors U-Boot> 9-5 Chapter 9. Appendix Once the recovery is done, use “boot” command start booting. U-Boot> boot ## Booting image at 20000000 ... Image Name: Image Type: Data Size: eddy-os-20a.img ARM Linux Kernel Image (uncompressed) 1112220 Bytes = 1.1 MB Load Address: 20008000 Entry Point: 20008000 Verifying Checksum ... OK OK ## Loading Ramdisk Image at 20500000 ... Registering Mac address Once it has been recovered, login screen is displayed. Now type in ID and password as you would access to telnet. Then register deleted Mac address. Input command for Mac address is “def mac xx:xx:xx:xx:xx:xx” It can be saved by “def save” command. Reboot after saving Mac address is printed at the label attached on top of the product. The following shows example of Mac address “00:01:02:03:04:05”. Welcome to the Eddy development environment. Eddy login: eddy Password: # def mac 00:01:02:03:04:05 # def save # def view Flash Write Successfully # def view ============< Welcome to Eddy Configuration Manager >============== BootLoader Version : 2.0a Kernel Version : 2.0a Fimeware Version : 2.0a ------------------------------------------------------------------Device Type : Eddy-CPU Device Name : Eddy Username : eddy Password : 99999999 MAC Address : 00:05:f4:7a:11:04 Network Line : Static IP : : =================================================================== # reboot Recovery will be done by following above steps. Should there have been any problem during recovery, see the next page. 9-6 Chapter 9. Appendix 9.1.3 Solving problems during recovery U-Boot> install os eddy-os-20a.bin TFTP from server 192.168.0.220; our IP address is 192.168.0.223 Filename 'eddy-os-20a.bin'. Load address: 0x20000000 Loading: * When recovery is not proceeded with message shown above, check LAN connection and confirm the IP address of tftp-server PC is configured as 192.168.0.220. (This server IP address is just example, so it can be differ with user tftp-server PC IP address) U-Boot> install fs eddy-fs-123.bin TFTP from server 192.168.0.220; our IP address is 192.168.0.223 Filename 'eddy-fs-123.bin'. Load address: 0x20000000 Loading: * TFTP error: 'File not found' (1) Starting again When recovery is not proceeded with message shown above, check firmware version information or name is correct. Shown in the red box above has to be same with firmware name of PC with tftp-server installed. U-Boot> install os eddy-os-20a.bin TFTP from server 192.168.0.220; our IP address is 192.168.0.223 Filename 'eddy-os-20a.bin'. Load address: 0x20000000 Loading: TTTTTTTTTTTTTTTTTTTTTTTTTTTTTTTTTTTTTTTTTTTTTT#TTT# When recovery is not proceeded with message shown above, it means there is product with same MAC address or IP in the network. Check whether there are other Eddy products in the same network. 9-7 Chapter 9. Appendix 9.2 Product Specifications Item Classification Specification Network LAN port 10/100Mbps RJ-45 Port * 1 GPIO LED (Active High : 3.3V DC, Active Low : 0 V) LED 4 (Eddy-S1/Pin) 16(Eddy-CPU) Status LED Hardware Power input Power consumption 5V DC ( 400mA or higher) 400mA / 2 W Size 115 * 125 mm Weight 100g (without Eddy module mounted) Port 1 (Eddy-S1/Pin) 2 (Eddy-CPU) Interface Selectable RS232/RS422/RS485 Speed Max 921.6 Kbps Signal lines TX, RX, DTR, DSR, CTS, RTS, DCD Serial Overvoltage Serial protection UART Operating temperature Environment Storage Temperature Humidity Certification 9-8 CE Class A, FCC Class A, RoHS compliant 15KV Surge Protection for all signals Uses internal UART of CPU 0 ~ 50˚C -20 ~ 80˚C 5 ~ 95% Non-Condensing Chapter 9. Appendix 9.3 Ordering information The purchase order information for Eddy-Serial products is as follows. Product Name Description Eddy-CPU Programmable embedded CPU module Eddy-S1/PIN RS232 pin header interface 3.3 ~ 5V input voltage Eddy-S1/PIN-C RS422/485 pin header interface 3.3 ~ 5V input voltage Eddy-S1/DB9 RS232 DB9 interface 5V input voltage Eddy-S1/DB9-C RS422/485 DB9 interface 5V input voltage Eddy-S1/DB9-PoE RS232 DB9 interface 5V(power jack) input voltage or PoE Eddy-S1/DB9-PoE-C RS422/485 DB9 interface 5V(power jack) input voltage or PoE Eddy-DK Development Kit for Eddy-Serial module CPU,S1/Pin The purchase order information for Eddy-Memory products is as follows. Product Name Description Eddy-S2M/PIN 2 x RS232 pin header interface, USB Host, MMC 3.3 ~ 5V input voltage Eddy-S2M/PIN-C 2 x RS422/485 pin header interface, USB Host, MMC 3.3 ~ 5V input voltage 9-9