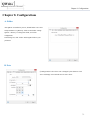
1
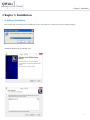
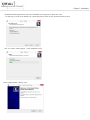
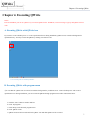
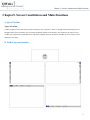
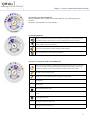
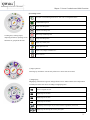
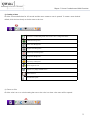
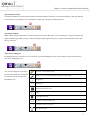
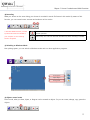
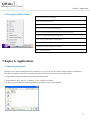
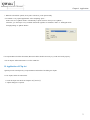
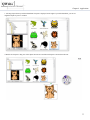
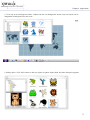
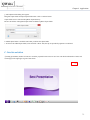
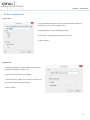
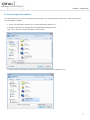
QWrite
Software Manual
Copyright @ BenQ All Rights Reserved.
The contents of this manual can be changed for product enhancement.
Part of or all of this manual cannot be changed or transmitted to other parties without permission of BenQ.
Information of QWrite
The latest information and software will be provided at the BenQ website.
INDEX
Chapter 1. Introduction
………………………………………..4
Chapter 2. Circumstances
……………………………………..5
A. Cautions Before Use ……………………………………..5
B. PC requirements ………………………………………….5
Chapter 3. Installation
…………………………………………6
Chapter 4. Operation of QWrite
………………….9
A. Using Icon ………………………………………………..9
B. Using Program group ……………………………………..9
C. Execute by PointWrite…………………………………….10
Chapter 5. Screen Constitution and Main Functions
………...11
A. Consist of Toolbar ……………………………………….11
B. Toolbar …………………………………………………..11
C. Consist of Toolbar in Floating Mode ……………………12
D. Detailed Description of Tools in Floating Mode ………..12
① Activate Main Menu …………………………………..12
② Choose a Color and Pen Type …………………………13
③ Choose a Mode ………………………………………...13
④ Choose a Transparent Mode, Pen and Diagram Frame…13
⑤ Create a Note …………………………………………..14
⑥ Move a Note …………………………………………...14
⑦ Enlarge a Note …………………………………………14
⑧ Recording ………………………………………………15
⑨ Eraser Tool …………………………………………….15
E. Detailed Description of Tools in Immovable Mode………15
① Activate Main Menu …………………………………..15
② Create a Note ………………………………………….16
③ Choose a Color …………………………………………16
④ Choose a Pen Type …………………………………….17
⑤ Choose a Transparent Mode……………………………17
⑥ Choose a Pen and Diagram Frame ……………………..17
⑦ Choose an Eraser Frame ………………………………18
⑧ Check Note’s Movement and List …………………….18
⑨ Enlarge a Note …………………………………………18
⑩ Recording ……………………………………………..19
⑪ Application of Window …………………………….......19
⑫ Choose Objects…………………………………………19
INDEX
F. Description of Main Menu ………………………….…….20
Chapter 6. Applications ……………………………………..20
A. Application documents …………………………….……..20
B. Application of Clipart ……………………………………..21
C. Check and Delete of Note Movement & List …………….24
D. Save and Print a Note …………………………………….26
E. Save and Open a Presentation ……………………………27
F. Choose Objects ……………………………………………28
G. Eraser Function ………………………………..................30
Chapter 7. Extra Functions ………………………………….31
A. Virtual Keyboard ………………………………………….31
B. Emphasize Screen ………………………………………..31
C. Blind Function ……………………………………………32
Chapter 8. Configuration ………………………...................34
A. Folder ………….....…………….…………………………34
B. Note ………………………………………………………34
C. Dual Display ………………………………………………35
D. Recording ……………………………………....................35
E. Volume …………………………………………………….36
F. Options …………………………………………………….36
G. Information ………………………………………………..37
Chapter 9. Remove Software ………………………………..37
A. Remove from Program Group ……………………………37
B. Remove from Control Panel ……………...........................38
Chapter 10. Notice……………………………………………38
QWrite
Software Manual
Chapter 1. Introduction
Chapter 1. Introduction
‘QWrite ’ is board software optimized to PointWrite. You will have more effective lecture with delicate writing
and various convenient tools of ‘QWrite ’ and PointWrite.
‘QWrite ’ has two representative features.
1. Digital Writing Function
2. Contents Authoring Function
‘QWrite ’ provides fast and stable writing speed as it optimized to PointWrite.
Enjoy powerful presentation, education and contents authoring with ‘QWrite ’.
4
QWrite
Software Manual
Chapter 2. Circumstances
Chapter 2. Circumstances
A. Cautions Before Use
‘QWrite ’ supports Windows XP and Vista, and other OS, Mac, Linux are not supported. It is also operated with PointWrite.
Necessarily, execute this program with PointWrite.(QWrite is executed only when PointWrite is run in your PC. Please execute
PointWrite prior to run QWrite . )
B. PC requirements
Minimum requirement
Recommended Requirement
Pentimum 4, 1GHz
Dual Core
512M Byte
1G Byte
70M Byte
100M Byte
128M Byte
128M Byte
OS
Windows XP, Vista, 7
Windows XP, Vista, 7
Others
Microphone, Speaker
Microphone, Speaker
CPU
RAM
HDD
Graphic Card
5
QWrite
Software Manual
Chapter 3. Installation
Chapter 3. Installation
A. Software Installation
Insert CD that came with PointWrite into CD-ROM drive and click “install QWrite ”, and then please select the installation language.
Installation Wizard pops up and click ‘next’.
6
QWrite
Software Manual
Chapter 3. Installation
At additional function application, click one of the blanks for creating an icon. Then click ‘next’.
→ In this stage, you can create desktop icon or quick launch icon. Select on your preference and click “Next”
Now, it is ready to install ‘QWrite ’. Click ‘installation’ menu.
Install “QWrite Printer” clicking “next”
7
QWrite
Software Manual
Chapter 3. Installation
“QWrite Printer” installation was completed. Please click the Finish button.
The installation is completed. Click ‘Finish’. If you want to finish installation and execute QWrite at once, then click ‘Launch
QWrite ’ and ‘Finish’.
8
QWrite
Software Manual
Chapter 4. Executing QWrite
Chapter 4. Executing QWrite
Notice
Execute PointWrite prior to run. QWrite. If you execute QWrite before PointWrite, an error message is pop up and QWrite will not
work.
A. Executing QWrite with QWrite icon
If you select ‘Create a desktop icon’ or ‘Create a quick launch icon’ during installation, QWrite icon is created on background or
quick launch tray. You may execute the QWrite by clicking one of these icons.
You can check Qwrite icon at desktop of Window.
B. Executing QWrite with program menu
① In case that the QWrite icon is removed in windows background or you did not select ‘Create a desktop icon’ and ‘Create a
quick launch icon’ during installation, you can execute the QWrite through program menu. Follow instructions below.
a. Click the “start’ button on window task bar.
b. Click ‘all programs’.
c. Click ‘BenQ’ in the browsed program menu.
d. Click ‘QWrite’ menu.
e. QWrite menu will be browsed and click ‘QWrite’ icon and then QWrite will be executed.
9
QWrite
Software Manual
Chapter 4. Executing QWrite
C. Execute QWrite with PointWrite menu
① QWrite can be executed by clicking QWrite icon in PoinWrite menu. When PointWrite is executed, PointWrite icon is
created on windows taskbar tray. Click PointWrite icon with PontWrite pen, and PontWrite menu will be browsed. In the menu
you can find QWrite icon and click it. QWrite will be executed.
PointWrite
10
QWrite
Software Manual
Chapter 5. Screen Constitution and Main Functions
Chapter5. Screen Constitution and Main Functions
A. type of Toolbar
Types of Toolbar
Toolbar of QWrite can be located any position according to user’s preference. There are straight toolbar and floating tool bar.
Straight toolbar can be located any side of window and floating toolbar can be floated to any position by the control of user.
Toolbar type and position are selectable in the main menu of QWrite and type & position of toolbar are stored when you quit
QWrite for next usage.
B. Toolbar type and position
11
QWrite
Software Manual
Chapter 5. Screen Constitution and Main Functions
C. Floating toolbar
Floating toolbar comprises 3 sections A, B, C and each section is connected
hierarchically.
A section has two functions.
C
A
B
The first function is to show current tool now in use. If you select Pen tool of object tool,
proper icon will be displayed.
The second function is to browse main menu of QWrite . If you right – button –click in
this area, main menu will be created.
B section :
Tools and functions of QWrite are grouped according to their similarity and in the B section, icon for grouped tools and functions
are listed.
During your usage, Diagram, eraser and mode switching tool are frequently used. For your convenience, these function group can
be switched only by clicking corresponding icon,
In C section, detail function and tools are displayed.
When you click any icon in B section, corresponding icons are appears in section C.
If no selection actions in C section during 5 seconds, C section will be disappears.
D. Description of Tools in Floating Toolbar
① Browsing Main Menu
To activate main menu on floating mode, Press A section for seconds with an
PointWrite pen or click right button of a mouse.
12
QWrite
Software Manual
Chapter 5. Screen Constitution and Main Functions
② Selecting Color and Pen thickness
When you click this icon, 16 kinds of color and 4 thickness of pen will be appeared in
section C.
Click color or pen thickness on your preference.
③ Switching Function
When you press this icon during your presentation using QWrite , Writing mode will be
switched to windows mode so that you can run other application S/W of windows.
In this mode, what you draw, clipart, or diagram can be treated as object. So you can
rotate, enlarge, copy, paste the objects.
You can use Pen and Mouse without switching mode specially.
You can expand Note`s size without any limitation.
④ Choose a Transparent Mode, Pen and Diagram
When clicked, red underline is displayed and switched to transparent mode. In this mode,
every new drawing is overlapped to background, diagram and drawings so that you can
see bottom drawings. If you activate transparent mode, click the icon once more.
Pen tools. You can select pen type.
Brush-pen. You can express thickness according to writing-speed.
Straight line
Rectangular
Rectangular filled with color
Circle
Circle filled with color
Straight line with arrow both ends
Straight line with one arrow end
13
QWrite
Software Manual
Chapter 5. Screen Constitution and Main Functions
⑤ Creating a Note
New note is created. Background color of note is set in “configuration menu”
Chalkboard Background
Music Note Background
English Note Background
Manuscript Note Background
Creating note, creating clipart,
importing document, capturing screen
Graph Note Background
functions are grouped in this icon.
Import any ordinary files.
Insert clipart into note.
Import every images available in P.C.
Show Note List
⑥ Page Up/Down
Note Page Up and down. Activate only when two or more notes are created.
⑦ Magnifying
Magnifying selected note region or enlarge all note area to 100% to 400%. Size and position
of All objects in the note varies according to magnifying ratio.
100
Return to original note size
200
Magnifying note to 200%
300
Magnifying note to 300%
400
Magnifying note to 400%
Magnifying selected region. If you want to return to original size, click “100”
Magnifying and reducing the screen by each grade
14
QWrite
Software Manual
Chapter 5. Screen Constitution and Main Functions
⑧ Recording
What you written on the note during your lecture is recorded in movie file
format in this mode. By means of this function, you can create lecture contents
and make an on-line service.
※ ※ Windows Media Encoder provided by Microsoft should be installed to your
computer to use recording function of QWrite
⑨ Eraser Tool
Tools for erasing object in the note. Erase all and partially are supported.
Erase all objects in the note
Erase object selectively
Erase Region : objects in selected region will be deleted
E. Description of Fixed Toolbar
Toolbar can be positioned 4 sides of window, but shape and function are same.
① Browsing Main Menu
To activate main menu, press the QWrite icon for seconds with PointWrite pen or click right
button of PC mouse.
15
QWrite
Software Manual
Chapter 5. Screen Constitution and Main Functions
② Creating a Note
Click the icon marked below for 0.3 second and the menu creates a note is opened. To create a note checked
default, click the icon shortly or the bar next to the icon.
New note is created. Background color of note is set in “configuration menu”
Chalkboard Background
Music Note Background
English Note Background
Manuscript Note Background
Graph Note Background
Import any ordinary files.
Insert clipart into note.
Import every images available in P.C.
Show Note List
Second menu option.
③ Choose a Color
Click the color icon or a color browsing bar next to the color icon then color menu will be opened.
16
QWrite
Software Manual
Chapter 5. Screen Constitution and Main Functions
④ Pen thickness control
Click the pen thickness icon in the picture and then current pen thickness will appear. To control pen thickness, click pen thickness
control icon next to pen thickness icon. Pen thickness control slide will appears and drag the slider.
⑤ Transparent Mode
When clicked, normal writing mode is switched to transparent mode. In this mode, every new drawing is verlapped to background,
diagram and drawings so that you can see bottom drawings through upper drawing. If you want to release transparent mode, click
the icon once more.
⑥ Select Pen or Diagram
Pen/diagram menu is browsed by two ways. The first is to press Pen/Diagram icon for a while and the second is to click browser
icon next to Pen/Diagram icon.
You can select diagrams or pen in the
Pen tools. You can select pen type.
browsed menu. When pen or diagrams
are selected, selected icon appears in
Pen/Diagram icon.
Brush-pen. You can express thickness according to writing-speed.
Straight line
Rectangular
Rectangular filled with color
Circle
Circle filled with color
Straight line with arrow both ends
Straight line with one arrow end
Second menu option.
17
QWrite
Software Manual
Chapter 5. Screen Constitution and Main Functions
⑦ Choose an Eraser
Press eraser icon for a while and then eraser sub menu will be appeared or clicking browser menu bar next to eraser icon do the same.
After you select the type of eraser in
sub menu, the selected eraser icon will
appear in the eraser icon area.
Erase all objects in the note
Erase object selectively
Erase Region : objects in selected region will be deleted
Second menu option.
⑧ Page Up/Down and Note list
Function to move previous or next page. This function is activated only when two or more notes are created.
Move to previous note
Move to next note
Note list : in the note list window, you can open wanted note by double clicking or delete
note selectively
⑨ Magnifying
Magnifying selected note region or enlarging all note area to 100% to 400%. Size and position of All objects in the note varies
according to magnifying ratio.
18
QWrite
Software Manual
Chapter 5. Screen Constitution and Main Functions
⑩ Recording
What you written on the note during your lecture is recorded in movie file format in this mode. By means of this
function, you can create lecture contents and make an on-line service.
※ Windows Media Encoder provided
by Microsoft should be installed to
Record start icon: when clicked this icon becomes in-active mode for preventing
double operation.
your computer to use recording
Record stop icon: This icon becomes activated only when recording is initiated.
function of QWrite
⑪ Switching to Windows Mode
Not quitting QWrite, you can switch to Windows mode and run other application programs.
Screen Capture
Capture Region
Writing Mode
⑫ Objects control mode
In this mode, what you draw, clipart, or diagram can be treated as objects. So you can rotate, enlarge, copy, paste the
objects.
19
QWrite
Software Manual
Chapter 6. Applications
F. Description of Main Menu
New Lecture : Start new presentation
Open : Open stored lecture notes
Save : Save current presentation
Save as : Save current note with designate name
Save note : Your presentation notes can be saved as picture file format.
Print note : Your presentation notes can be printed.
Tool : selecting virtual keyboard, spotlight, blind.
Toolbar Position : selecting toolbar position in windows frame
Configuration : setting configuration of QWrite
Close : finishing QWrite
Chapter 6. Applications
A. Importing documents
QWrite provides 5 kinds of backgrounds (refer to Chapter5. D-⑤, E-②) for your convenience during presentation. In addition to
this, default 350 number of clipart and your Microsoft Office Documents can be imported for your presentations.
To import Microsoft office documents, follows the instructions hereafter.
a. As described in D-⑤ and E-② of chapter 5, click “import documents”.
b. A dialog box will be appeared as following and the file imported will be opened accordingly.
20
QWrite
Software Manual
Chapter 6. Applications
c. When the selected file opened, click “print” in menu as you do print actually
d. Terminate “every opened applications” after completing “print” .
Printer was set as “QWrite Printer” automatically as photo as below when you use “QWrite ”,
Therefore, you can import every available documents regardless of “Windows mode” or “Intelligent mode”
through printing in “QWrite Printer”
d. To import Microsoft office documents, Microsoft Office should is necessary in your PC and works properly.
You can import “Office-Document” as well as “PDF file”
B. Application of Clip Art
QWrite provides 350 clipart for your presentations and interface for adding user clipart.
To use clipart, follow the instructions.
a. Click the clipart icon. Refer to Chapter5. D-⑤ and E-②.
b. Clipart dialog box is opened.
21
QWrite
Software Manual
Chapter 6. Applications
c. selecting clipart directory and then thumbnail of clipart is displayed on the right. If you click thumbnail, you can see
magnified clipart in preview window.
d. Double click clipart or drag one of the clipart into note area and then and clipart is inserted into the note.
22
QWrite 4
Software Manual
Chapter 6. Applications
e. To set clip art as a background, select a clipart and click ‘set background’ button. Only one clipart can be
designated as background for each note.
f. Adding clipart : Click ‘Add’ button to add user clipart to QWrite clipart folder and then dialog box appears.
23
QWrite
Software Manual
Chapter 6. Applications
g. Add Clipart Folder dialog box appears.
Designate clipart folder and input clipart folder name. Click “Confirm” button.
Clipart folder is now created in the QWrite clipart directory.
Be sure sub folders of designated clipart folder is added to QWrite clipart folder.
h. Added clipart folder is available until when you delete the clipart folder
i. To remove the added clipart folder, select and click ‘delete’. But, the clip art provided by QWrite is not deleted.
C. Note list and delete
① During presentation, number of notes are created or prepared lecture notes are used. You can check total number of notes and
current page in the right upper region of note frame.
24
QWrite
Software Manual
Chapter 6. Applications
② Note List : As explained in Chapter5. D-⑤ and E-⑧, click and check all the notes created until now.
③ To move to selected note, double-click it with PointWrite pen or mouse.
④ To delete note, select note to be deleted and click ‘Delete’ of the box.
⑤ To delete number of notes, use drag function of PointWrite Pen or mouse.
Drag a certain region so that the notes to be deleted are included in the region.
Click ‘Delete’ button.
25
QWrite
Software Manual
Chapter 6. Applications
D. Save and Print Note
① Save Note
a. Your presentation notes can be saved as picture file format. Click main
menu and ‘Save note’. Refer to Chapter5. F-①
b. Designate folder to be saved and input file name
c. Select picture file format and select current note or all
d. Click ‘Confirm’.
② Print Note
a. Your presentation notes can be printed. Click main menu
and ‘Print Note’. Refer to Chapter5. F-①
b. Select printer connected to your computer.
c. Choose notes to be printed. You can select current note, all
notes and selected notes using print option.
d. Click ‘Confirm’
26
QWrite
Software Manual
Chapter 6. Applications
E. Save and Open Presentation
① Your presentation is saved as a file and the file can be used for your other presentation using other PC. Only requirement of
PC is that QWrite is installed.
a. To save your presentation, click the ‘save’ in main menu. Refer Chapter5. F-①.
b. Dialog box will appear. In the dialog box, designate folder and input file name.
Click ‘Save’, then file is saved on the folder in .ist file format.
c. Open the folder in which the presentation is saved. You can find the file with QWrite file icon.
27
QWrite
Software Manual
Chapter 6. Applications
d. To open the presentation, you can use windows search function or ‘open’ menu of QWrite .
When using windows search function, search presentation file in the folder and double click it.
When using ‘Open’ menu of QWrite click ‘Open’ menu. Select file and click ‘Open’ button. Refer to Chapter5. F-①.
② ‘Save As’ menu of QWrite will support you to save current presentation with another name.
③ To start new presentation after finishing current presentation, click ‘New Presentation’ Menu and proceeds a new
presentation. Refer to Chpater5. F-①. Before new presentation is initiated, Dialog box that asks whether to save former
presentation or not. Click ‘Yes’ or ‘No’.
F. Object
Clipart or your drawings can be treated as objects so you can adjust size, rotate, drag as you want.
a. To switch to Object Control Mode, click ‘object control menu’ of toolbar. Refer to Chanpter5. D-② and E-⑫.
b. After entering Object Control Mode, the background color of menu is changed (
object select mode, the button is changed to (
)and the cursor shape becomes is In
).
c. Click the object you want to reshape; supporting lines around the selected object appears like Power Point Object. In this state,
you can reshape the object.
d. The below is sample image for showing reshape object. The original shape of cup is change in this mode.
28
QWrite
Software Manual
Chapter 6. Applications
e. If you want to treat number of objects at the same time, like Power Point, drag some area in which target objects are included
and reshape them.
Several objects are selected at once.
f. QWrite provides object control popup menu. Click right button on the selected object area. Popup menu is appeared and
control the objects.
- Cut: Cut a selected object.
- Copy: Copy a selected to
- Paste: Paste an object copied or cut.
- Delete: Delete selected object.
- Select all: Select all objects in current note.
- Reset to initial shape: Reset the selected object to initial shape.
29
QWrite 4
Software Manual
Chapter 6. Applications
G. Use an Eraser Function
① QWrite provides three types of eraser. Erase All, Erase Object, Erase Region
a. Erase all
Click ‘Erase all’ button[
]. All clip art and writings are erased but background is not erased. Refer to Chapter5. D-⑧, E-
⑦.
b. Erase object
Click ‘Erase object’[
] and click clipart or drawing on the note. The clipart or drawings will be erased respectively. Refer
to Chapter5. D-⑧, E-⑦. Refer to Chapter6. F to select objects.
c. Erase region
Click ‘Erase region’[
] and drag region in which clipart and drawings to be erased are included.
When click ‘Erase region’ and then shape of mouse cursor becomes cross( ). If dragged a region, the selected region is displayed
as dotted rectangular. After dragging, all the objects in the rectangular are disappeared at once.
d. Erase by object menu
As explained in F-①-f, objects can be erased by clicking ‘delete’ function in object menu.
30
QWrite
Software Manual
Chapter 7. Extra Functions
Chapter 7. Extra Functions
QWrite provides several functions to increase efficiencies during your presentation.
A. Virtual Keyboard
① In some cases, you may need to input letters by means of keyboard during you use PointWrite. In this case, you can input
letters using virtual keyboard that will appear on window.
② Click virtual keyboard submenu in main menu of QWrite The virtual keyboard will be appeared on the window. Input
letters by pressing virtual keyboard. Refer to Chapter5. D-①, E-①
Virtual keyboard is activated.
B. Spot Light
① To attract audience’s attention, emphasizing a target part of a note is
necessary. A spot light function is provided in QWrite .
② Spot light function is activated by selecting ‘Spot Light’ function in
Tool of main menu. Refer to Chapter5. D-① and E-①.
③ After spot light function is activated, color of note area becomes transparent dark gray and spot light will appear. You can
move the spot light by dragging with PointWrite Pen.
31
QWrite
Software Manual
Chapter 7. Extra Functions
④ After the spot light function is activated, Spot light control and closing box will appear on right upper corner of note.
Transparency 0% : 0% transparency of gray screen.
Transparency 10% : 10% transparency of gray screen
Transparency 20% : 20% transparency of gray screen
Transparency 30% : 30% transparency of gray screen
Circle : Spot light shape to be circle
Rectangle: Spot light shape to be rectangular
Small : Small size of spot light
Medium : Middle size of spot light
Large : Large size of spot light
C. Blind
① Like a blind in the glass window, Blind of QWrite blinds all screen area and open by dragging from side of window so that
part of note is exposed.
You can open note from any side of windows frame.
② Click Blind function in Tools menu in main menu of QWrite . And then all note is blinded and closing button will appear
on right upper corner. Refer to Chapter5. D-① and E-①
32
QWrite
Software Manual
Chapter 7. Extra Functions
③ Place cursor to any edge of note frame, and then cursor image becomes both end arrow line. In this state, drag cursor. Note
will be opened according to dragging.
33
QWrite
Software Manual
Chapter 8. Configurations
Chapter 8. Configurations
A. Folder
After QWrite is installed in your PC, default folder to save note
and presentation is ‘QWrite Prj’ folder created under “ BenQ/
QWrite ” directory. To change this folder, use Folder
configuration.
In the dialog box, click ‘folder’ and designate folder in your
preference.
B. Note
① Background of color of new note is changed by this function. Click
‘note’ and change color. Default color of note is white.
34
QWrite
Software Manual
Chapter 8. Configurations
C. Dual Display
① To use extended display, dual display should be selected. Dual Display mode enables you to use two wide range of writing
area. To activate this mode, two display, two PointWrite is needed. Ask your PointWrite dealer for more information.
D. Recording
① For accurate recording operation, you can set attributes of
recording function.
Default folder for saving presentation is ‘QWrite Contents’
folder under BenQ folder in root directory. To change folder,
designate folder in the dialog box.
If you want to designate file name before recording, select ‘Ask
File Name before Recording’.
If you check ‘Confirm message before recording’, confirm
dialog box appear before recording.
35
QWrite
Software Manual
Chapter 8. Configurations
E. Volume
Mic and Speaker volume are set in this configuration. Slide volume and sound by dragging slide bar.
F. Option
Two options are provided in the option menu.
① Confirm message at ‘Erase All’: to prevent your mistake,
confirm message box will appear when you click ‘Erase All’
② Set Toolbar location
You can place tool bar in 5 ways. Select toolbar position
according to your preference. This toolbar position is saved
when you check ‘Storing Toolbar position when QWrite is
finished’
36
QWrite
Software Manual
Chapter 9. Uninstall QWrite
G. Version Information
In the information dialog box, you can check QWrite version information. If the version is not the last version, click ‘Update’
button.
Chapter 9. Uninstall QWrite
A. Uninstall QWrite using Windows Program menu
In the programs menu of Windows, you can find BenQ folder.. Click BenQ folder and QWrite folder consecutively, you can
find ‘Uninstall QWrite ’ menu. Click it to uninstall QWrite .
※Files created by users are not deleted even though you uninstalled QWrite. If you want to remove these, use Windows
Search Browser.
37
QWrite
Software Manual
Chapter 10. Notice
B. Uninstall QWrite using Control Panel of Windows
Run ’Program Add/delete’ in the ‘Program Add/delete’ in Windows Control Pannel.
Select QWrite and click ‘Delete’
Chapter 10. Notice
Copyright @ BenQ. All Rights Reserved.
The contents of this manual can be changed for product enhancement.
Part of or all of this manual cannot be changed or transmitted to other parties without permission of BenQ.
Information of QWrite
The late information and software is provided at the BenQ’s website:
38