1
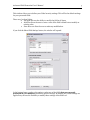
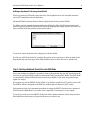
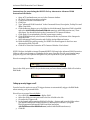
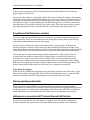
Advanced Field Protection
v.1.0
Another efficient and affordable ACT! Add-On by
http://www.exponenciel.com
Advanced Field Protection User’s Manual
Table of contents
Purpose of the add-on......................................................................................................... 3
How it works ....................................................................................................................... 3
Installation procedure ........................................................................................................ 3
Step 1: Creating protected fields ......................................................................................... 4
Step 2: Setting user permissions for protected fields ......................................................... 4
Defining a drop-down list for your protected fields ....................................................... 6
Step 3: Creating a keyboard shortcut to enter Edit Mode .................................................. 6
Setting up an entry trigger as well ...................................................................................7
Using Advanced Field Protection on a network ................................................................. 8
Warning regarding synchronization.................................................................................. 8
Adding an icon or a menu item to ACT! to launch Advanced Field Protection.................. 8
Animated tutorials – Online help ....................................................................................... 9
Registering Advanced Field Protection .............................................................................. 9
Support ............................................................................................................................... 9
2
Advanced Field Protection User’s Manual
3
Purpose of the add-on
Advanced Field Protection allows to restrict data entry in your ACT! fields to the users of your
choice.
How it works
Advanced Field Protection is very simple. It allows to define which users have the right to
modify each of your ACT! protected fields (see below to find out more about ACT! protected
fields).
Since this add-on is designed to enhance ACT! Protection features, its use is restricted to the
Administrators of the database.
Installation procedure
Download the program file from our download page and double-click it to start the installation.
Follow the instructions and once the installation is completed, run ACT! and open your
database.
An icon should have been added to your Contact toolbar to launch Advanced Field Protection
directly from within ACT!. If the icon installation failed, you will have to instruct Advanced Field
Protection to create it. Here is how to proceed:
While your database is open, click the Windows Start button, go under Programs, locate the
Exponenciel ACT! Add-Ons group and click Advanced Field Protection.
Then go to the Options | Integrate with ACT! menu and add icons or menu items to your ACT!
screens as needed. This way, you will be able to quickly launch the program from within ACT!.
When prompted, accept that ACT! be re-started.
When ACT! re-starts, whatever icons or menu items you asked to be created will be there to
launch Advanced Field Protection.
Advanced Field Protection User’s Manual
4
Step 1: Creating protected fields
Advanced Field Protection enhances the ACT! field protection feature. ACT! allows database
administrators to protect fields from any modifications. This is accomplished through the Define
field window ( do Edit|Define fields to open it).
Unfortunately when a field is protected, nobody can modify it. You have to unprotect it first.
Advanced Field Protection resolves this issue.
So the first step in using Advanced Field Protection is to protect the fields that you want to
protect with Advanced Field Protection ( See the above screen) .
Step 2: Setting user permissions for protected fields
Click the icon on the toolbar to launch Advanced Field Protection. The following window
appears.
Advanced Field Protection User’s Manual
This window allows you to define your Global security settings. This will be the default settings
for your protected fields.
There are 3 levels of rights:
o Full gives the user the ability to modify the field at all times
o Initialize allows the user to enter a value if the field is blank but not modify an
existing value
o None does not allow the user to make any modification.
If you click the Show Field Settings button, the window will expand.
In the bottom frame, you have the option to select any of the fields that are currently
protected in your database and define specific settings. By default, the Global Settings are
applied but you have the flexibility to modify these settings at the field level.
5
Advanced Field Protection User’s Manual
Defining a drop-down list for your protected fields
When you protect a field with a drop-down list, the dropdown list is not accessible anymore
since ACT! completely restricts data entry.
Advanced Field Protection allows to define a drop-down list for protected fields.
To define your list, expand the main window by clicking the Show Field Settings button and
select the protected field to which the list should be attached and simply type the list items one
below another in the drop-down list box shown above.
If you don't want a drop-down list, simply leave the box blank.
As with any ACT! drop-down list, you have the option to force the user to select an item in the
drop-down (the user can't type in the field) and the option to allow the user to edit the list.
Step 3: Creating a keyboard shortcut to enter Edit Mode
Once your settings are defined, you need to create a shortcut that the user will invoke when the
cursor is in a protected field to switch to Advanced Field Protection Edit Mode. This Edit Mode
is controlled by Advanced Field Protection and only available to the users setup with proper
rights (see step 2).
We suggest you use the SHIFT+F2 key which is, by default, unused by ACT! (and is close to the
F2 shortcut which is assigned to the Edit List window and well known to ACT! users).
Unfortunately there is no automatic procedure to assign the SHIFT+F2 shortcut to Advanced
Field Protection Edit Mode so you have to do it manually. Fortunately it is very simple.
If you do not want to use the SHIFT+F2 key but rather another shortcut, follow the procedure
described below and at step 10, press the shortcut you wish to use.
6
Advanced Field Protection User’s Manual
7
Instructions for associating the SHIFT+F2 key shortcut to Advanced Field
Protection Edit Mode:
1.
2.
3.
4.
5.
6.
7.
8.
9.
10.
11.
Open ACT! and make sure you are in the Contacts window.
Do Tools | Customize contacts window.
Click on the Custom Commands tab.
Click New.
Type "Advanced Field Protection" in the Command Name, Description, Tooltip Text and
Menu Text fields.
Click the Browse button, go to the folder in which Advanced Protection Field is installed
and select AdvFieldProtectionEditMode.exe (not AdvFieldProtection.exe). Then
click Open. You should be back to the Customize ACT! Contacts Window.
Click Apply (if you mistakenly click OK, repeat steps 1 and 2).
Click the Keyboard tab, select Custom Command at the very bottom of the Categories
drop-down list.
Select Advanced Field Protection and click the Assign Shortcut button.
Hold the SHIFT key while pressing F2. SHIFT+F2 should appear in the Press new
shortcut key field. Click OK.
Click OK to close the Customize ACT! Contacts Window. You're done!
NOTE: We have included an image file named SHIFT+F6.bmp in the Advanced Field Protection
folder to add to your layouts as a reminder for the user. Open the file with your favorite image
program, copy it to the clipboard and paste it in your layout next to your protected fields.
Here is an example of layout:
Once in the field, press SHIFT+F2 (or the shortcut you have chosen) and the field will switch to
Edit Mode.
Setting up an entry trigger as well
You also have the option to use ACT! trigger features to automatically trigger the Edit Mode
when entering your protected fields.
Here is how to proceed for each fields:
1. Go to the Edit menu and choose Define Field.
2. Select the field you want protected in the list of fields to the left.
3. Go under the Triggers tab.
4. In the Launch when entering field field, click the … button and go to the folder where
you installed Advanced Field Protection (by default this would be C:\Program
Files\Exponenciel\Advanced Field Protection) and select
AdvFieldProtectionEditMode.exe (and not AdvFieldProtection.exe).
5. Click OK.
Advanced Field Protection User’s Manual
8
This way when you enter the field, it will automatically be in Edit Mode if the user has the
proper rights to edit the field.
You may use the trigger in conjunction with the shortcut or without the shortcut. Note though
that if the cursor is in a protected field and you move to the next contact or click somewhere on
the layout, the Edit Mode will close even though the cursor stays in the field. In this case, you
will need to exit and re-enter the field to go into Edit Mode again or to invoke the shortcut as
described above. This could be confusing for certain users. This is the reason why we suggest
you systematically force them to use the shortcut, so that they become accustomed to it.
Using Advanced Field Protection on a network
If you are using Advanced Field Protection on a network, you need to install the program on
each workstation. Don't be concerned about users being able to change the security settings:
only database administrators may run the program.
The first step is to define the settings as described above on one machine. By default, the
Security settings are stored in a file named users.dat located in the Settings sub-folder of the
folder where the program is installed (by default C:\Program Files\Exponenciel\Advanced Field
Protection\Settings) . The drop-down lists are stored in *.dat files located in the same folder.
The second step is to share these settings with all workstations, so that you don't have to
recreate them over and over: make sure the Settings folder is accessible at all time by all
workstations or move it to a location where it will be. Then, for each workstation, run the
program once to indicate where the program should look for the settings files. This is simply
done by choosing Settings Locations under the Options menu: use the 2 Browse buttons. The
Browse button under Authorized Users will allow you to locate the users.dat file.
Note about the trigger:
Make sure that you install the program on each workstation using the exact same path. If you
don't then the path to the trigger file which will be launched when you enter a protected field
will not be consistent and ACT! will generate an error message when it is wrong.
Warning regarding synchronization
Please note that protected fields are and remain fully protected against changes made by
synchronization. Advanced Field Protection does NOT intervene in the synchronization process.
So changes made to one database through Advanced Field Protection will NOT be reflected in
another database after synchronization if the fields of this second database are protected.
Adding an icon or a menu item to ACT! to launch Advanced Field Protection
As with any of our add-ons, go to the Options | Integrate with ACT! menu to display this
window and add icons or menu items as needed. Menu items are added to the Tools menu.
Advanced Field Protection User’s Manual
Animated tutorials – Online help
The Help menu gives you access to our Online Help where you will find a number of animated
tutorials showing how to set up buttons, etc.
Registering Advanced Field Protection
You may buy licenses from Exponenciel. Registration is based on ACT! user names, so you will
have to supply your ACT! username when registering. Once given a registration code, go to the
Help | About menu and type the registration code in the box below your username.
Support
For support, please contact [email protected].
Rev. October 22, 2003 – v. 1.04
9