1
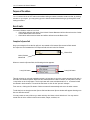
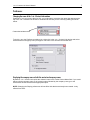
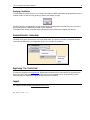
1-to-1 Contact Link
Another efficient and affordable ACT! Add-On by
http://www.exponenciel.com
1-to-1 Contact Link User’s Manual
2
Table of contents
Purpose of the add-on ..................................................................................................................... 3
How it works .................................................................................................................................... 3
Example of a Spouse link............................................................................................................ 3
Steps to create a link ....................................................................................................................... 4
Step 1: create or modify 2 fields.................................................................................................. 4
Step 2: modify your layout........................................................................................................... 4
Step 3: copy the caption of the button to all contacts ................................................................. 4
Step 4: find out the Button field internal ID number .................................................................... 5
Step 5: add the necessary triggers ............................................................................................. 5
Editing a link .................................................................................................................................... 6
Deleting a link .................................................................................................................................. 6
Deleting multiple links at a time ....................................................................................................... 6
Preferences ..................................................................................................................................... 7
Changing the name of the 1-to-1 Contact Link window .............................................................. 7
Displaying the company name or both the contact and company names .................................. 7
Displaying a back button ............................................................................................................. 8
Animated tutorials – Online help...................................................................................................... 8
Registering 1-to-1 Contact Link ....................................................................................................... 8
Support ............................................................................................................................................ 8
1-to-1 Contact Link User’s Manual
3
Purpose of the add-on
1-to-1 Contact Link is an ACT! add-on that allows linking a contact to another contact so that, by clicking
a button on your layout, you may quickly go to the linked contact without having to go through the usual
lookup procedure.
How it works
You need 2 fields to create a 1-to-1 link:
o a field which will store the name of the Linked Contact Nameand will be referred to as the Linked
Contact Name field in this manual.
o a field which will serve as a button and will be referred to as the Button field.
Example of a Spouse link
Here is an example of how the link will look: we created a field named Spouse and a field named
GoToSpouse. We formatted the GoToSpouse field so that it looks like a button.
Button field
Linked Contact
Name field
When we enter the Spouse field, the following window appears.
1-way link button
2-way link button
Through a lookup or using the navigation arrows, we just have to go to the contact we want to link with, in
this case, the contact's spouse. When we have made her/him the active contact, we may either click the
1-way button or the 2-way button. The 2-way button will create a bidirectional link, i.e. a reverse link will
be created in both contacts. This would be the button to click for the "spouse" example.
From now on, clicking the GO button of either contact will automatically take us to the other contact.
To edit the link, we simply enter the Spouse field and the same Spouse window will appear allowing us to
link to a different contact.
You may create as many links as you want and they don't have to be bi-directional. You may want to
create links to link a contact to her/his accountant, lawyer, architect, etc.
1-to-1 Contact Link User’s Manual
4
Steps to create a link
After you installed the program, here are the steps to create a link.
NOTE: you need to be a database administrator to create a link.
Step 1: create or modify 2 fields
You may decide to create new fields or use existing fields. It does not matter. This is done from the ACT!
Define fields window (Edit | Define fields). Here are the requirements for these fields.
Type
# of characters
Default value
Entry rules
Drop-down tab
Linked Contact Name field
Button field
Character
Character
50 (or as you see fit)
22
Leave blank
GO (or whatever you want but
no more than 10 characters)
None
None
All checked box unchecked
All checked box unchecked
Step 2: modify your layout
Now you may want to modify your layout so that the Button field look like a real button:
See our online demos under Help|Online help for more details on how to achieve the look of a button for
the Button Field.
Don't forget to remove the tab order on the 2 fields, ie. click the number at the right of the fields.
The number will disappear which means the fields will not be in the tab order anymore.
Step 3: copy the caption of the button to all contacts
Copy your Button field default value (GO or whatever you chose) in the Button field for all the contacts. To
do this, go to ACT! Edit menu, choose Replace and type the default value in the Button field. Then go to
the Replace menu and choose Apply. When prompted, choose to modify All contacts.
From now on, the caption will show in all contacts and new contacts will automatically inherit it since it is
the default value of the Button Field.
1-to-1 Contact Link User’s Manual
5
Step 4: find out the Button field internal ID number
Each field is identified by ACT! by its internal numeric ID. To know what the ID of your Button field is, run
the actdiag.exe program located in the ACT! folder by double-clicking it in Windows Explorer, then go to
the Reports menu and choose Database Fields Report. You will be prompted to choose a database and
log into it, then asked if you want the report to be displayed in Notepad. Say yes and you’ll get a report
like this:
Database: C:\ My Documents\ACT\Database\ACT6demo.dbf
Record Count: 63
Field Count: 86
Table Name: CONTACT
…
Company
Contact
Address 1
Address 2
Address 3
City
State
Zip
Country
ID/Status
Phone
User 1
User 3
…
25
26
27
28
29
30
31
32
33
34
35
51
52
The field ID is shown next to the field name. If you don't remember the field name of your Button field,
place your cursor in it and then go to the Edit|Define Fields window. The name of the field will be
automatically selected in the left column.
Step 5: add the necessary triggers
Button field trigger:
o go to the Edit|Define fields window
o Select the Button Field name in the list on the left, go under the Triggers tab.
o Click in the Launch when entering field box
o Press the … button that appears to the right of the box and go to the add-on folder (by default this
would be C:\Program Files\Exponenciel\1-to-1 Contact Link)
o Select the GoToContact.exe file and click Open.
Linked Contact Name trigger:
o Now, while you are still in the Edit|Define fields window, select the Linked Contact Name field in
the list on the left
o Click in the Launch when entering field box under the Triggers tab
o Press the … button
o In the same folder as before, select 1-to-1Contact Link.exe and click open.
1-to-1 Contact Link User’s Manual
o
6
The path of the file appears now in the Launch when entering field box. To the end of this path,
insert a space then a forward slash and the field ID of the button field.
The path should look like this:
C:\Program Files\Exponenciel\1-to-1 Contact Link\1-to-1Contact Link.exe /51
Editing a link
To edit a link, simply enter the Linked Contact Name field and the 1-to-1 Contact Link window will appear.
Then create a new link as described in How it works above.
Deleting a link
To delete a link, enter the Linked Contact Name field and the 1-to-1 Contact Link window will appear. Do
a right-click in this window and select Delete the current link in the popup menu.
Deleting multiple links at a time
To delete multiple links at a time, create a lookup of the contacts you want to delete the link for. Then go
to ACT! Edit menu and select Replace. Type <<BLANK>> (CTRL+F5 shortcut) in the Linked Contact
Name field. Type the caption of the button in the Button field. Then go to the Replace menu and choose
Apply. When prompted, choose to modify the Current lookup.
1-to-1 Contact Link User’s Manual
Preferences
Changing the name of the 1-to-1 Contact Link window
Particularly if you set up more than one link, you might want to customize the name that appears at the
top of the 1-to-1 Contact Link window to remember the link that you are currently updating, as shown
below.
Customized window name
To do this, go to the Preferences window (do a right-click in the 1-to-1 Contact Link window and select
Preferences from the popup menu) and type a new name in the Rename the window field.
Displaying the company name or both the contact and company names
By default, 1-to-1 Contact Link copies the contact's name to the Linked Contact Name field. If you would
rather copy the company name or the contact's name followed by the company name, go to the
Preferences window and select the appropriate option.
NOTE: Changing the Display preferences will not affect links that have already been created: it only
affects future links.
7
1-to-1 Contact Link User’s Manual
8
Displaying a back button
You also have the option to have 1-to-1 Contact Link display a Back button after the program takes you to
a linked contact, so that you may quickly go back to the contact of origin.
This Back button is a small always-on-top floating window which position is saved every time you click it.
So you may position it wherever you want in your workplace.
To display a back button, check the Display back button in the Preferences window (see ablove).
Animated tutorials – Online help
The Help menu gives you access to our Online Help where you will find a number of animated tutorials.
To access the Help menu, do a right-click on the 1-to-1 Contact Link window.
Registering 1-to-1 Contact Link
You may buy licenses from Exponenciel. Registration is based on ACT! user names, so you will have to
supply your ACT! username when registering. Once given a registration code, go to the Help | About
menu and type the registration code in the box below your username.
Support
For support, please contact [email protected].
Rev. January 7, 2004 – v. 1.0