1
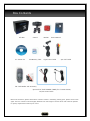
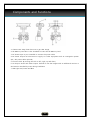
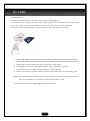
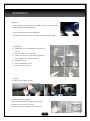
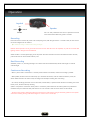
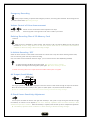
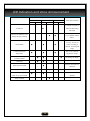
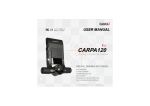
User's Manual 1 Contents 1. Notice-------------------------------------------------------------------------- 3 2. Warning------------------------------------------------------------------------ 4 3. Caution------------------------------------------------------------------------- 5 4. Features------------------------------------------------------------------------ 6 5. Box Contents------------------------------------------------------------------- 7 6. Components and Function---------------------------------------------------- 8 7. SD Card------------------------------------------------------------------------ 9 8. Installation---------------------------------------------------------------------- 10 9. Operation----------------------------------------------------------------------- 12 - Recording - Dual Recording - Continuous Recording - Emergency Recording - Volume Control of Voice Announcement - Deleting Recording Files of SD Memory Card - In Vehicle Recording Off - AV Output (Install Mode) - G-Shock Sensor Sensitivity Adjustment 10. LED Indication and Voice Announcement-------------------------------------- 14 11. Viewer Software Installation---------------------------------------------------- 15 12. Viewer Interface----------------------------------------------------------------- 16 13. Viewer Running----------------------------------------------------------------- 20 14. Firmware Upgrade-------------------------------------------------------------- 21 15. Specifications------------------------------------------------------------------- 21 16. Troubleshooting---------------------------------------------------------------- 22 2 Notice 사용 전 주의사항 Following the safety rules prevent users from damages of property and injury of body caused by misuse of the product. Please read the followings carefully. *The contents of this manual are subject to change without notice for software upgrade or quality improvement. WARNING This information is for preventing bodily harm or even death and user should follow this safety rules. CAUTION This information is for preventing damage or reducing the life time of the products. 3 경 고 Warning 1. Do not install, disassemble or modify the product at your discretion. It might cause product damage, electric shock or fire. When the device is out of order, please contact the local agency for warranty service. 2. Do not operate the device while driving. It might be a cause of car accident. If the device operation is required, stop the car at a safe parking lot and operate the device. 3. Do not use in trouble condition as like smoking, smell something burn. It may cause fire. Stop to use and make inquiries to agency. 4. Do not clean the device with water. The device is not waterproof. It may cause malfunction, electric shock or fire. 5. Unplug product when do not use the device for a long time. It may cause fire by short circuit due to heating. 6. Do not place near of air bag effective range. It may cause malfunction of air bag or accident, injury due to hitting the device by air bag. 7. Keep clean dust on power socket. It may cause electric shock and fire by bad connection. 8. Do not put a pin or needle on the hole or crack in the device body. In case those things are inserted by mistake, stop operating. It may cause electric shock, fire and malfunction. 9. Attach the device on the windshield firmly. Clean the front windshield and attach the device firmly. Otherwise the device may be detached due to temperature, humidity, dust or shock. 9. Use power cable supplied with the device when it is installed. If qualified cable is not used, it might cause electric shock, fire and malfunction. 10. When the device is installed with continuous power cable, only a qualified engineer has to install the device. If the device is not correctly connected, it causes damage to the vehicle and the product. 11. Do not clean exterior with volatility or oily solvent. Neither keeps touching rubber and plastic for long time. It may cause change of surface, fall of paint, malfunction and fire. 12. Do not pull cord with a jerk. Catch a plug and pull. Do not use damaged cord. It may cause cord malfunction, electric shock and fire. 13. Before installation, the engine has to be turned off. It may cause an electric shock or defect. ※ The device has always to be installed at the place where the driver ‟s view is not interrupted. 4 Caution 1. Do not remove the SD memory card while power is on. It causes recording file missing and device malfunction. 2. Do not touch or hold SD memory card with wet hand or oily hand. It may cause malfunction due to SD memory card damage. 3. Do not put a foreign substance into the SD memory card slot of a device. It may cause malfunction or SD memory card insert problem. 4. When power is supplied by the cigar lighter, watch the poor connection in a socket. Poor connection causes data loss and SD memory card damage. 5. Do not clean the device with water, benzene or alcohol. Wipe the device with soft and dry cloth. Otherwise, it may cause device damage. 6. Do not shock a device. The shock to the device might cause damage or malfunction of the device. 7. If the device is required to re-install, adjust the camera angle again. Play the recording file and re-adjust the angle if the camera captures viewing angle wrongly. 8. When a car accident happens, turn the power off and wait until indication LED light is off. Then, remove the SD memory card from the slot. As the recording file can be over written, in case the recording file is not saved in an Event Folder, the SD memory card has to be removed from the device and kept separately. 9. Use a recommended authentic SD memory card. Not using authentic SD memory card might cause data loss. 10. Do not remove the SD memory card or turn the power off while SD memory data is deleted or formatted. 11. Play the recording file regularly to see the video is correctly recorded. And format SD memory card regularly to avoid SD memory card error. 12. While continuous recording, with the battery protection function, the device may stop working earlier as per battery status influenced by personally installed accessories. Battery protection function is built-in to avoid battery discharge. But careful watch is essential with continuous recording as the battery can be discharged fast as per seasonal condition and battery using period. 13. Detecting GPS signal may take time from few seconds to few minutes as per weather and geography condition. 14. In a very dark condition and under no light, the recorded video quality would lower than daytime recording. 15. Dark tinting film on windshield causes bad video recording quality. 16. Metallic tinting on windshield may cause radio block. It causes GPS signal receipt problem. 17. G-shock sensor for event recording is built-in. But if the shock is weak, event recording file may not be created. 18. Power failure from the vehicle due to big accident or shock might cause data loss. 19. Light reflection by GPS screen and indoor lighting might cause after image at night recording. 5 Features Gemini is a recording device installed inside of the vehicle. The device simultaneously records the tele view and wide view of the vehicle foreside or simultaneously does the vehicle inside and outside. The device will record an accident on the road, the damage of the vehicle and so on. Simultaneous 2 channel recording (Tele/Wide or Outside/Inside) Multi-joint structure for the easy adjustment of viewing angle Multi-joint structure for the easy adjustment of viewing angle A/V Output and Extra DC 12V Power Output Battery discharge protection Voice announcement system Simultaneous Recording and Event Recording Using safe and potable SD memory card Detecting impact to a vehicle by G-Shock sensor GPS built-in Captured image printing available 6 Box Contents Gift Box PC Viewer CD Gemini Bracket SD Memory Card User‟s Manual Cigar Power Cable A/V OUT Cable SD Card Reader and Accessory Optional: DC FUZE POWER CABLE (for Constant Power) DC/DC Power Cable Before use the device, please check above contents. If there is something missing parts, please contact sales agent. The box contents could be slightly different from the images as shown above and could be replaced for quality improvement without prior notice. 7 Components and Functions 1. Camera Lens: Keep clean the Lens to get clear image. 2. SD Memory Card Slot: A slot intended to insert the SD Memory Card. 3. DC Power Input: A port intended to connect the power cable. 4. DC Power Output: DC 12V Power to supply to a other equipment such as a navigation system. (DC / DC power cable optional) 5. Function Stick: By moving the stick to left, right, up and down, 6. AV Output: Audio and Video Output Terminal to see the images with an additional monitor or GPS monitor installed by users during installation. 7. LED Light: Red, Green and Blue 8 SD CARD Important Notice -Use the original SD memory card only. If not, data loss may happen. -To remove the SD memory card, turn off the vehicle engine first and wait until the indication LED light is off. Then, remove the SD memory card from the device. If not, it causes data loss. -Timely formatting the SD memory card is required to avoid SD card error and loss. 1. Insert a SD memory card into the card slot. When the card is inserted, the brand label of the card should be upward and the connecting terminal of the card should be downward. 2. Please push the SD memory card fully till the card is held inside. 3. If everything is fine after inserting SD memory card to the device, the voice announcement will be heard and LED indication will be lighting. 4. When a user wants to get SD memory card from the device, push the SD memory card. Caution: Push the SD memory card fully till the card is held inside. If not, it causes malfunction. Do not contaminate the connection terminal of SD memory card. * It is recommended to use original SanDisk SD memory card. 9 Installation ★Caution - Do not install on the rain sensor or radio block as the picture left GPS signal may not be detected. - Check the followings before installation SD Memory Card, DC Cable, AV Cable. Drivers Viewing Angle . 1. Installation 1) Clean dust on the windshield surface as the picture. 2) Strip the tape cover of bracket. 3) Attach the device on the required position. Firmly attach it for safe mounting. 4) Open lens cover. 5) Insert SD Memory Card. 6) Plug the power cord in. 2. Wiring 1) Wiring Cigar Lighter Power *Finish wiring work as the picture bellow. 2) Continuous Power Wiring *Open Fuse Box and find a proper connection terminal to get continuous power. *Continuous power wiring has to be done at 10 Installation professional installation shop. 3. Camera Angle Adjustment 1) Plug in AV-out Cable Yellow: Video Output White: Audio Output Red: Audio Output 2) Move the function stick left and keeps it. Then, power on. (When power is off, install mode will be released.) 3) Adjust the camera viewing angle as bellow ▶ Uninstall the device from a bracket ◀ Slightly pull the device head like picture bellow. Slide the device head upside. 11 Operation Joystick UP LEFT Speaker RIGHT DOWN User can easily understand the status of operations with the voice announcement while the joystick is touched. Recording Insert SD Card and connect the power cord. If everything is fine, LED will light within 3~7 seconds. Then, the unit starts to record two images from two cameras. ♣In vehicle recording is selected. Recording will begin. Remarks: Please push SD card to get the SD card from the unit after LED turns off completely. To push SD card while LED lighting causes a damage of the recorded file. When accident is occurred, please plug out of the power cable from the device and wait until indication LED is off. Then, push the SD Card to remove the SD memory card. Dual Recording Whenever power is on, recording will begin. Tow cameras will record simultaneously tele & wide images or inside & outside images. Continuous Recording - When a power cable is connected to a constant power terminal at the vehicle, continuous recording is possible. - While parked, the device records continuously up to maximum SD memory card size. When the memory is full, the device deletes the file in the order of early recording time and keeps recording with over-writing. - As a battery discharge protection circuit is built inside, vehicle battery is protected while the device is working. And if the battery is low, the device will stop working. (When it is required to connect the device power to continuous power terminal of the vehicle, please visit professional installation shop and check the safety and functions. It is for customer‟s safe use of the device and the vehicle) - The device has a battery discharge protection function. But for safe and long using of the battery, please do not operate continuous recording for long time. Please engine on at least a two or three days. 12 Emergency Recording When prompt recording is required under emergency situation, move the joystick downside. The recording file will be saved in Event folder. ♣Recording will begin. Volume Control of Voice Announcement Volume of voice announcement will be adjusted in five steps. Level 1 ~ Level5 Move the joystick to the right side or left side to volume up and down. Deleting Recording Files of SD Memory Card 3Seconds Move the stick to downside for three seconds. Then the files of SD card will be deleted and SD Card will be formatted. ♣ All data is being deleted. It will take several minutes. Please wait for a few moments. Data deletion is completed. In vehicle recording is selected. Recording will begin. In Vehicle Recording ‘OFF’ When one of the cameras is toward inside of the vehicle and a driver want to stop the camera recording toward inside, user can move the joystick and stop in vehicle recording. Only one camera toward outside will record the image. (Do not use this function with Tele/Wide Type Model) - In Vehicle recording Off: Move the joystick upside. ♣In vehicle recording is released. - In Vehicle recording On: Move the joystick upside again. ♣In vehicle recording is selected. ※ Please move the joystick first to adjust the functions bellow before power is supplied. AV Output (Install Mode) The image captured by camera can be displayed on the extra monitor or GPS monitor through AV output of the device. Move the function stick left and keep it. Then, power on. (When power is off, install mode will be released.) ♣ You are in install mode. TV out is now set. In vehicle recording is selected. Recording will begin.. G-Shock Sensor Sensitivity Adjustment Turn the power off. Move the function stick right side and keep it. Then, power on. (By moving the stick left and right, the sensitivity of G-sensor can be adjusted. ♣ “You are in sensitivity adjustment mode. The current sensitivity is three. Volume switch operation is needed.” When the sensitivity is adjusted, move the stick up side to complete the adjustment. ♣ “The sensitivity adjustment mode is released.” “In vehicle recording is selected. Recording will begin.” 13 LED Indication and Voice Announcement LED RED On BLUE Twinkle On GREEN Twinkle On Voice Announcement Twinkle In vehicle recording is Power ON ● selected. Recording will begin. The storage medium Missing SD Memory Card ● /Being Wrongly inserted ● is not checked. Please insert it.. You are in install mode. TV out is now set. In Install Mode ● ● ● vehicle recording is selected. Recording will begin. G-Shock Sensitivity Adjustment ● Event Recording (G-Shock sensor) Recording Detecting GPS Signal ● ● ● ● ● (used for IR Type model) adjustment mode. ● detected. ● ● released. ● 14 ● In vehicle recording is ● Other troubles Recording will begin. Position information is ● Missing GPS Signal In vehicle recording release You are in sensitivity ● Viewer Software Installation ① ④ Wait until installation is completed. Insert enclosed CD to a PC and click double on Setup.exe. ⑤ Click „Finish‟ ⑥ ② Wait until installation is completed. When Installation is successfully completed, GEMINI directly to the icon will be created. ③ Click „Next‟ 15 Viewer Software Interface 1.. PC Viewer On/Off • Click PC Viewer icon, then PC Viewer will automatically run. 2. Main Screen Speed Play Control and Volume Delete/Capture/Print Tracking Info on Google Map Play List G-Sensor Information 16 3. PC Viewer Function 1) File Open Click to search files. (1) Click „Folder Icon‟ to open files then „File Open‟ pop-up screen will appear. (2) Select Normal Mode or Event Mode to play. (3) Click „[…]‟ to search files then pop-up screen for file search will appear. (4) Find the files to play and click them. 4. PC Viewer Button Function 1) File open • Select files to play at PLAY LIST and click double. 2) File Play (1) When the left screen is clicked double, bigger popup screen will be displayed. Click „X‟ on top right, then popup screen will be disappeared. (2) When the right screen is clicked double, bigger popup screen will be displayed. Click „X‟ on top right, then popup screen will be disappeared. 17 3)Viewer Control Play Progress Bar Play Speed Control 조절 Bar Volume Control • Play Speed Control: 1/6, 1/4, 1/2, Normal, X2, X4, X6 • Volume Control: 10 Steps (Min. 0, Max. 100) Skip Back Stop Play/Pause Skip 1 Frame 5)Print 4)G-Sensor • Print displayed images on screen • X: Left and right of the vehicle • Y: Front and rear of the vehicle • Z: Up and down of the vehicle 18 6)Video Capture • Capturing displayed images on screen • Captured images are saved in the HDD • Saved file name will be “ *.jpg “ (Ex.: File Name_Time_Frame.jpg (ex. a0000001_1:24_32fp.jpg)) 7) Viewer Setting • G-Sensor Sensitivity Control: 0.2 ~ 0.8 (Adjusted by plus or minus 0.1 unit) • Time Zone Setting: Time of User‟s Country on the basis of GMT (GMT+XX:XX) Ex) Republic of Korea on the basis of GMT: GMT+09:00 • Unit of Speed: Set unit of speed (Km/h, Mile/h, Knot) 19 Viewer Running It is easy to understand a video file as the file name includes date and time and as the files are created at each 3 minutes. Type shows „N‟ for normal video file of normal condition, „E‟ for event video file of G-Shock detection and „B‟ for emergency video file of emergency recording by joystick. drf0: Tele Video Recording File (Indoor Video Recording with IR Type Model) drf1: Wide Video Recording File (Outdoor Video Recording with IR Type Model) Viewer Software can play the file only when both drf0 and drf1 exist. Normal Video File (N) Normal video file is created at each 3 minutes under normal driving condition. As the file name is created with the recording date and time, the files can be easily found and sorted. When the SD memory is full, the device deletes the file in the order of early recording time and keeps recording with over-writing. Event Video File (E) Event video file is created when G-Shock senor detects the impact to a vehicle. The video file is saved in separate folder and protected from memory overwriting. Emergency Video File (B) Emergency video file is created when a driver moves the joystick for emergency recording. The video file is saved in separate folder and protected from memory overwriting. 20 Firmware Upgrade ① Remove the SD Memory Card from the device and attach it to the memory card reader. ② Connect the memory card reader to the USB port of the computer. ③ Format SD Memory Card. ④ Download the upgrade file from homepages and unzip the file. ⑤ Copy the unzipped file and paste the file to SD Memory Card. ⑥ Insert SD Memory Card to the device and power on. Caution Do not disconnect the power cable or turn the vehicle‟s engine off while upgrading. Do not remove the SD memory card while upgrading. Specifications Model NCB-D200-IR NCB-D200-TW Image Sensor CMOS 1/4” Effective Pixels 656 X 496 Lens Inside Foreside Wide 168˚(D), 129˚(H), 94˚(V) 116˚(D), 92˚(H), 68˚(V) Outside Foreside Tele 68˚(D), 58˚(H), 42˚(V) 31˚(D), 24˚(H), 18˚(V) Audio Recording MIC built-in Speaker 0.3W Speaker Storage SD Memory Card(2GB ~ 32GB) GPS GPS Module built-in G-Shock 3D G-Shock Sensor built-in Operating Temp. Power -20˚c ~ +70˚c DC 12V ~24V (3.2W) Dimensions Weight DC 12V ~24V (3W) 89mm x 117mm x 52mm 122g 21 121g Troubleshooting Troubles Check Power Trouble 1. Check whether power cable is connected correctly or not. If not, -The power is not turned connect the cable. on. 2. Check whether the fuse of a power cable and the fuse inside of -Voice announcement or a vehicle fuse box are fine. If not, connect the cable. LED is not working. 3. Format SD Memory card and upgrade the firmware. SD Memory Trouble 1. Check whether SD memory card is correctly inserted. If not, -LED is twinkling and the insert the SD memory card correctly. device announces “The 2. If the problem is not solved, format SD memory card. storage medium is not 3. Upgrade the firmware. checked.” GPS Trouble 1. Check whether the device is mounted nearby radio block on -Time displayed on the windshield. If yes, mount the device at the different position. viewer screen is not the 2. If the problem is not solved, format SD memory card. same as actual recording 3. Upgrade the firmware. time. ※ GPS information is not detected in a tunnel, building and -Time is not displayed on the viewer screen. underground. ※ It will take time to get GPS information when the device starts to work after long pause or when the device starts to work in a tunnel, building and underground like radio block location. Viewer Software Trouble PC specification should be higher than followings -When GEMINI.EXE starts, CPU : Pentium4 / 1GHz screen is disappeared. HDD : 500MB -Recording file is not Memory: 512MB RAM played. OS: Win98, ME, XP, Vista Audio Recording Trouble 1. Check whether in vehicle recording is released. If yes, set the in -Audio is not recorded. vehicle recording on. ※ When in vehicle recording is released, voice is not recorded. Voice Announcement 1. Check whether the volume is set low. If yes, set the volume Trouble louder. -Voice announcement is not 2. Check whether the power cable is correctly connected. If not, heard connect the power cable correctly. -Noise is heard with voice announcement. If the troubles are not solved, call to local distributor or installer. 22 MEMO 23 HEADQUARTERS 1156 SATELLITE BLVD #300 SUWANEE GA 30024 [email protected] +1.678.240.2317 WWW.GLONEX.NET USA-WEST COAST [email protected] +1.619.997.6673 USA-NORTH & EAST [email protected] +1.248.860.6983 KOREA [email protected] +82.2.784.3333 EUROPE [email protected] +420.313.101.090 BRAZIL [email protected] +55.15.7811.3789 GERMANY [email protected] +49.211.5570484