1
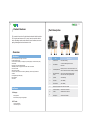
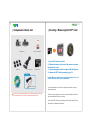
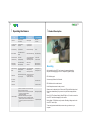
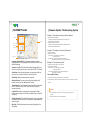
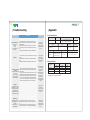
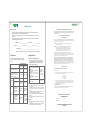
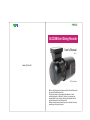
GLOCAM Event Driving Recorder
User’s Manual
Ver. 1.9
www.glonex.net
GC1 as shown.
Before using this product, please read the User’s Manual for
the correct installation and use.
This product does not guarantee the absence of auto
accidents directly or indirectly. Glonex, Inc. assumes no
responsibility for any loss or claims by third parties which
may arise from the use of this product.
Please note that some events may not be marked as event
according to the type of impact.
1
2
Safety Notice
This notice is to prevent danger from electrical shock, fire, explosion, etc.
- When consumer uses this device incorrectly or for any other use than it is intended.
Table of Contents
Read the content below completely.
Safety Notice
2-4
Product Features
5
The contents of this User’s Manual are subject to change without notice.
Part Description
6
For the latest version of the User’s Guide, please refer to www.glonex.net
Components Check List
7
Inserting/Removing the SD Card
8
Operating the Camera
9
Product Description
10-13
Device Status Check
14
Software Instructions
15-17
Firmware Update / Recording System
18
Troubleshooting
19-20
Product Warranty
21-22
Appendix
Product Specifications
20
Memory Calculation
20
3
4
Warning
Do not disassemble the camera. This will void the warranty and
possibly cause failure, electric shock or fire. Please contact Glonex,
Inc. for repair issues.
Do not operate while driving.
Make sure to place it where it will not block the driver’s line of vision
when installing the camera.
Do not move or adjust the camera while driving.
You should have the camera installed by a professional if using the
Harness Power Cable for direct power from the battery.
When installing the camera, be careful not to cut or damage the
power cord.
Caution
1.
Do not pull out the micro SD™ Card when the camera has the power supply
attached. This may damage the card.
2.
Do not use the micro SD™ Card in any other device othrer than a smartphone.
3.
Make sure that your hands are clean and dry before handling the SD™ Card;
do not touch the metal end. Water and dirt can cause contamination of the
card, which may damage it.
4.
Do not insert any other objects other than the micro SD™ Card into the card
slot. This may damage the card slot.
5.
Make sure that the adapter is plugged in securely to the 12-V supply.
Secure contact is necessary for data recording.
6.
Wipe the camera with a soft, dry cloth when cleaning. Do not use water
or chemicals to clean.
7.
Avoid dropping the camera and otherwise subjecting it to severe impact.
This may damage the camera.
8.
Using a defective memory card may cause data loss; it is recommended
that you use a Micro SD™ Card only.
9.
Camera requires a few seconds to activate; unit will beep when recording
has started.
10.
Some vehicles have a metal coating on the windshield. Installing on this
can cause a weak GPS Signal and obscure the lens view.
11.
The contents of these instructions are subject to change without notice.
5
6
Product Features
Part Description
GC-1 records the front view of the vehicle and records audio inside the vehicle.
GC-2 has the same features as GC-1, except it can also record the vehicle’s
interior. Recordings can be used as evidence in case of accidents, can record
parking lot damage and can be a deterrent to theft.
Overview
Hardware
One channel (front view) image / voice store
Exceptional video quality
The front camera records up to 30fps (GC1) and 12fps (GC2), the Rear Camera (GC2)
records 6fps.
Micro SD™ Card (2GB - 8GB) available.
4GB/8GB (CLASS 4 or higher) recommended - 4GB card included.
G-Sensor included.
GPS receiver included
Continuous, Event, Manual, and GPS Log Recording, and GPS Log File features
included.
Parking Mode supported (10fps)
External Button
Voice Alerts
Software
PC Manager:
• Video playback
• Simultaneous pointing on Google Maps
GPS Tracker:
• Routing information
• Tracks driving route
Description
No.
Parts
1
Camera Lens
Front view recording
2
GPS Module
To receive satellite signal for location
information
3
Power/Operate LED
Indicates power is on and controls audio On / Off
Press & hold for Rear Camera On/Off (GC-2 Model)
4
Manual Recording
Button
Press once for Manual Recording On/Off
Press and hold for Parking Mode On/Off
5
Speaker
Voice Message
6
IR Sensor
(GC-2 Model)
7
Rear Camera
(GC-2 Model)
8
Micro SD™ Card Slot SD™ Card to be inserted
9
Power Connection
External Power Connector
10
Cradle
Window Mount for Camera
11
Microphone
Internal Voice Recorder
7
8
Components Check List
GC1
or
Inserting / Removing the SD™ Card
GC2
GLOCAM Camera
Micro-SD™ USB Adapter
1. Insert SD™ Card into the slot.
2. Replace the cap over the end of the camera to protect
the device and card.
Cable Clips
12-V Power Cord
Micro-SD™ Card
3. Connect the power cord into camera - LED will light up.
4. Remove the SD™ Card by pushing to eject it.
Optional
Caution: Make sure that the card is pushed in securely. If it is not
inserted correctly, it may cause a malfunction.
Installation CD
Harness Power Cable
The picture of components may differ from the items included in this package,
Some accessories may be modified or discontinued without notice.
It is recommended that you use Class 4 or higher memory cards for optimal
camera performance.
Caution: Do not let card get wet or dirty. Do not touch metal end of card. These
can cause malfunctions of the card / camera.
Do not use the SD™ Card for any other purpose than with the camera. To do so
may cause loss of data and/or malfunction.
9
10
Product Description
Operating the Camera
Title
T
Operation
Function
Voice Message
Beeps after
“Welcome”
Power connection
to the device
Recording start
The angle of the
front camera
Adjust camera up
and down
The front camera
angle adjustment
Event Recording
Shock detection
Event Record Storage
“Event”
Manual Record
Press Manual Record
Button
Saves Manual Recording
“Manual Recording”
Select the Internal
Voice Recording
Press LED
Button (ON/OFF)
Voice recording (Default)
ON-flashing red LED
OFF-flashing blue LED
“Audio locked”
“Audio unlocked”
Rear Camera
Control (GC2)
Press and hold LED
Button (ON/OFF)
Rear Camera
ON / OFF
Rear Camera “On”
Rear Camera “Off”
Select the Parking
Mode
Press and hold the Manual
Recording Button
(ON/OFF)
Parking Mode ON/OFF
Flashing LED long
Recording with 10fps
“Parking mode On”
“Parking mode Off”
Power OFF
Disconnect the power cable
or turn off engine
Camera will turn off when
the reserve power is
depleted. (About 5 Min.)
Power On
“Insert SD™ Card”
Card Errors
“Check SD™ Card”
Firmware Update
After inserting the micro SD™ Card, power up the camera by attaching
the power cord and plugging it into a 12-V receptacle (Cigarette Lighter).
LED will flash purple.
No insertion
of SD card
1. Save the new firmware to root of micro SD™ Card
2. Insert the SD™Card into the slot.
3. Connect the Power Cord. This will start the update
mode and voice message will state
“Start Program Updating”.
4. LED will flash Red-Blue-Purple during update.
5. When update is complete, voice message will state
“Update Completed”. The LED will flash purple, and
the unit will beep. When this occurs, disconnect the
power.
Recording
“Start Program Updating”
“Update Completed”
Voice message “Welcome” will be heard.
LED will flash red at 1 second intervals.
Unit will beep when camera is ready to record.
When an event is detected by the G-Sensor, the LED light will flash blue and red.
If there is a substantial bump, dip, swerve or stop the voice message will state
“Event”.
Power Off - LED will cease flashing. When LED light is off, it is safe to remove the
micro SD™ Card without damaging it or the camera.
Parking Mode - LED will flash every 4 seconds. Recording is being saved on the
micro SD™ Card at 10fps.
To save any important recorded data, remove card, copy and save to your
computer.
11
12
Recording Images
Parking Mode Recording (10fps)
0.3 MB Camera
Press and hold the “Manual Recording Button”. This reduces the video rate to
10fps which saves SD™ Card storage. Records up to 15 hours with 4GB
micro SD™Card
120° Angle
Event Recording Storage
An extreme motion detected by the G-Sensor will be recorded and stored as
an “Event” file.
Manual Recording Storage
Press the “Manual Recording Button” to manually store images you want to
record separately: these are stored as a“Manual” file. The LED will flash red
and blue when “Manually Recording”.
Constant Recording (when engine is off)
A Harness Power Cord is required to record in “Parking Mode”. This cord
should be professionally installed and draws power directly from the battery.
This will allow continuous 24 hour recording on an 8GB micro SD™ Card and
Parking Mode Recording if needed.
Note: SD™ Card will be overwritten if recording for long periods of time. If you
13
14
Device Status Check
GPS Log Route Tracker
Track driving route through the seperate GPS Tracker Viewer.
Information is stored in the GPS Log file.
Smart Phone Playback
Recorded images can be displayed through smart phones that can play
MP4 (H.264) format.
Parking Mode
The Red LED (Voice Recording “on”) or Blue LED (Voice Recording
“off”) is cross flashing at 3 second intervals. This reduces video rate to
10fps, which saves SD™ Card storage.
Voice Recording ON/OFF
When unit is turned on, the Voice Recording is activated. To turn this
feature off, press the red Voice Recording Button.
Event information
When an event occurs, the time or G-Sensor value is saved into a
separate folder.
Speaker
(Voice Alert)
According to the camera operation, voice alerts will be announced
through the speaker.
Google Maps Integration
By being equipped with the GPS Google Maps Integration Module,
the route taken is recalled by the receiving satellite
Check LED Flashing Display:
Status
Power on/recording starts
Voice Message
Recording starts with a beep
Video is recording
(voice recording ON)
-
Video is recording
(voice recording OFF)
-
LED
Purple
Card inserted incorrectly
Red
Blue
flashing
flashing
flashing
Error in boot
Connect problem of other
hardware or sensor data
No card Inserted
Classification
Insert SD™ Card
Check SD™ Card
Event Recording
(G-Sensor detection)
Event
Manual Recording
(the Manual Recording Button)
Manual Recording
Parking Mode ON
Parking Mode ON
-
flashing
red/blue cross flashing
red/blue cross flashing
Red or blue is cross
flashing long
15
16
PC Requirements
Software Instructions
Orange Folder Icon
Front view image
CPU: Pentium 1GHz or higher, Memory: 512MB RAM or higher
OS: Win98, ME, XP, Vista, and Windows7, Hard Drive: 500MB or higher
File list
Pre-view image
(or Rear-view on
the GC2 Model)
G-Sensor Information
Google-map View
Progressing bar
Playback Controls
Tools
Playback Information
Select Orange Folder Icon:
To view the files on your micro SD Card 1) Select orange folder icon, 2) Select the
removable disk caption in the “Browse for window” 3) Press “OK”. Files will appear in the
“File list” 4) Now you can choose what you want to see.
Playback Information:
Displays the selected file information such as: Vehicle Speed, GPS Data (latitude and
longitude).
Playback Controls
To view any file in the file list, hightlight the file and click play button.
Slide bars allow you to slow down/speed up play and increase/decrease volume.
Enables you to play, stop, fast forward, rewind and pause.
G-Sensor Information (G-Sensor Graph and Value)
To review the acceleration, deceleration and shock information from the G-Sensor: Select
file, press play.
Tools:
Allows the user to capture images, print and operate settings. Also allows video swap in the
GC2 Model.
Preview:
Allows the user to pre-view the selected video on the file list on the GC1 and displays Rear
View on the GC2.
Using the Software
How to playback files:
► Place installation CD into computer drive. (Installation program shortcut will
automatically install on the desktop)
► Click on the “GC1 Manager” or “GC2 Manager” icon to open program.
► Select the orange folder icon.
► Select “Removable Disk” (Micro SD™ Memory Card)
► Click “OK”
► Recorded files are added to the “File List”.
► Select file to view.
► Press “Play” Button.
Map View:
The recorded files are stored by the date and time, and they are listed automatically
such as Event file “Sensor”, Manual file “Manual”, and Normal file “Continuous”.
**PC Manager Version indicates the current version of the software program.
**The user can download software program of firmware update at www.glonex.net
While a file selected from the file list is being played, the user can move to the previous
or next file then:
► Click “Play” Button.
Google Map is used to view this information and can only be viewed when the user is
connected to the internet. GC Manager automatically connects to Google maps.
17
18
GLOCAM Tracker
Firmware Update / The Recording System
Example I – The number of video clips (Event or Manual)
Log data file
Google-map
Path finder of vehicle
Daily trip time
1) Maximum 50 Event recordings
It enables to overwrite from the oldest file when event files are full.
(50 files X 15MB & 1 Event folder)
2) Maximum 20 Manual recordings
It enables to overwrite from the oldest file when manual files are full.
(20 files X 15MB & 1 Manual folder)
Daily trip distance
Example II – The number of video clips (Continuous)
Language Option
Language Selection Button: The program supports for multiplelanguage selections. Use Language Bar and Up/Down Arrows to select
preferred language.
Search for Log File: Click folder button beside language option, then
find the Lx-xxxx Log that you want to view in the micro SD™ Card drive.
Save Button: User can enter information such as purpose of the trip,
make notes, etc. and then save them to a file for later use.
1) Maximum 48 folders
2) 60 files per each folder
Folder name: Dx_Year+Month+Day_Hour+Minute
Dx_20100303_1200
File name: drf[r]_ Month+Day_Hour+Minute+Second.mp4
drf_20100303_120000.mp4, drr_20100303_120000.mp4
Example III – The number of Log files
1) Maximum 72 Log files (3days, 1 day per 24 files)
2) 60 log files per each folder
Folder name: Lx_Year+Month+Day_Hour+Minute
Lx_20100303_120000
File name: log_Year+Month+Day_Hour+Minute+Second.KTL
log_20100303_120000.KTL
How to update Firmware
Print Button: Map or trip information can be printed.
1. Download the latest firmware into the memory card via Glocam.
Navigator Button: The user can control the driving playback with
buttons, such as Play, Stop, Backward and Forward.
2. Insert the Memory Card into the Camera “Card Slot”, then connect the power for automatic
Time Information: Time information indicates the total drive time while
the GPS Tracker is running. GPS Tracker runs for as long as the
camera is recording.
Log Data File: Allows the user to play the selected log file. When
multiple files are selected, all of the files are added to the Log Data File
for viewing.
Driving Information: The selected file is played on the map and reports
total distance, total driving time, total stop duration, average speed and
maximum speed.
Map-View: The file being viewed is also showing driving path on the
Google Map.
update.
Caution
1. Do not disconnect the power cord or turn the engine off while firmware is
updating.
2. Do not remove Micro SD™ Card while updating.
19
20
Troubleshooting
Problem
Camera Power Error
The phone is not
turned on
or the
Voice or LED is not
operating
Card Error
Measures
1) Check that the power cord is securely inserted into the
camera and also securely inserted into the 12-V recepticle
(Cigarette Lighter)
2) Check that the harness power cable (if camera is hard
wired to battery) is securely connected to the vehicle’s fuse
box.
3) Upgrade the firmware after formatting the Memory Card.
Appendix
Remarks
If this problem
persists after
checking, please
contact Glonex for
service.
1) Check that the card is properly inserted into the slot on the
camera.
2) Check that the card is an authenic, recommended SD™
Card.
3) Upgrade the firmware after formatting the Memory Card.
If this problem
persists after
checking, please
contact Glonex for
service.
1) Check if there are any objects obstructing the cameras
ability to receive satellite signals, such as metal coating on
the windshield.
2) Ensure that the location and angle of the unit are correct.
3) Upgrade the firmware after formatting the Memory Card.
Note: GPS may not work properly in closed environments
such as: Tunnels, Parking Garages, around Tall Buildings,
etc. Or if it has not been used in more than 3 days, if this is
the case it may take longer to resume normal operation.
Ensure that you are
not in areas that
could block the
signal. If so,
disconnect the power,
then reconnect.
If this problem
persists after
checking, please
contact Glonex for
service.
Product Specifications
Power Consumption
Weight
1.5W
45g
Camera
Play Error
When the GC1 or GC2
Manager is running and
the performance screen
is not displayed.
PC Manager is opened
but the file doesn’t play
Speaker Error
When playing the Voice
Message and it can’t
be heard.
There is static in the
Voice Message.
If this problem
persists after
checking, please
contact Glonex for
service.
1) Check that the interior video is turned on. The Voice
Message will not work when the interior recording is turned
off.
2) Ensure that the power cord is securely inserted into the
camera and also into the 12-V receptical (Cigarette Lighter).
If this problem
persists after
checking, please
contact Glonex for
service.
Internal GPS Module
Voice REC.
Event
Resolution
Internal MIC
Emergency button
(Collision, Q-accel, &
Q-break detection)
640 x 480
Capacity
TTL Rec. time
GPS Log back data
G-sensor
Storage
Internal 3D
"G" sensor
Memory Card
DC 12V~24V (Cigar jack)
2G
4G
8G
2,048M
4,096M
8,192M
1,948M
3,996M
8,092M
2hour
4hour
7hour
72hour
72hour
72hour
- Micro SD™ Card (2GB~16GB) available
- 4GB/8GB (CLASS 4 or higher) recommended
-20 ~ +50°
Power Supply
Memory Calculation
Memory
GPS is not operating
correctly.
Saved time and date are
not correct.
When the video is
playing, the speed
doesn’t display.
GPS
1Camera / 0.3M pixel CMOS
digital sensor
Temperature
Dimension
GC1: 86.2(W)X56.7(H)X52.4(D)
GC2: 100(W)X56.7(H)X52.4(D)
21
22
Warranty Card
About our service:
WARRANTY, REGISTRATION & TECHNICAL SUPPORT
PLEASE FILL OUT AND RETURN THE PRODUCT REGISTRATION CARD INCLUDED WITH YOUR NEW
GLONEX PRODUCT OR FILL OUT THE PRODUCT REGISTRATION FORM ON THE GLONEX WEB
PAGE AT: http://www.glonex.net.
• Glonex, Inc. warrants our products as follows according to Consumers Conflict Settlement
Standards (Fair Trade Commission Bulletin No. 2008-3).
• When a service is requested, Glonex, Inc. or other appointed servicing company will carry out
the service.
• Warranty related inquiries will be responded to within 7 days and repairs will be provided within
14 days after the date of such request.
BE SURE TO KEEP A COPY OF YOUR SALES RECEIPT!
STANDARD WARRANTY
Product Name: _____________________ Purchase Date: ______________________
Model #: _______________
Serial #: __________________ Price #: ________________
Purchased From: ___________________________________________________
Warranty is Valid for ONE (1) year and product parts are available for TWO (2) years.
Charged Repairs
Free repair services are only limited to the faulty
products purchased within ONE (1) year (warranty
period).
1) Cases not considered as defect:
If you request a repair service for non-defects, you
will be charged for the repair fee,so please read
the instructions carefully. (Non-repairable cases,
based on separate standards).
Defect found within ten (10)
days from date of purchase.
Defect found with performance
of functions during normal
operation within one (1) month
from date of purchase.
Up to 3 defects due
to the same cause.
Repairable More than 4 defects
due to the same
cause.
Non Repairable
Parts for
replacement are
available but not
repairable (within
parts available
period)
Non-repairable due
to unavailability of
parts for
replacement (within
parts available
period)
Warranty Provided
Within
Warranty Period
After
Warranty Period
Replacement or
Refund
Not Applicable
Replacement
Not Applicable
Free Repair
Charged Repair
Replacement or
Refund
Charged Repair
Replacement or
Refund
Replacement
after deducting
fixed price.
Replacement or
Refund
Refund by
adding 10% to
the amount after
deducting fixed
amount.
• Instruction on how to operate the
product or simple adjustment without
diassembling.
• Services related to external antenna
or wired signal.
• Reinstalling the product that was
improperly installed by the sales
representative.
• Cleaning inside of the product or
removing dirt.
• When defect has occurred due to
foreign substance.
PARTS: New or comparable rebuilt parts in exchange for defective parts for ONE (1) YEAR
from date of customer purchase.
LABOR: Glonex, Inc. provides labor warranty for ONE (1) YEAR from date of end-user
purchase. Product must be sent postage prepaid and insured to Glonex, Inc. in
accordance with the warranty procedures outlined below. At completion of the
repair, the consumer will be responsible for return shipping charges from Glonex,
Inc. and for any parts or services no longer covered under warranty.
This warranty does not apply to persons who purchased this product second-hand or used.
This warranty does not include adjustments, parts and/or repairs required by circumstances beyond the
control of Glonex, Inc., including but not limited to fire or other casualty, accident, neglect, abuse, misuse,
lightning strike, or abnormal use that causes damages to the product.
Free Repairs
Types of Problems
Glonex, Inc. at 1156 Satellite Boulevard, Suite 300, Suwanee, GA 30024 USA WARRANTS that your NEW
Product is free of defects of workmanship and materials. If there is a defect or malfunction of this product,
Glonex, Inc. will repair it free of charge as follows:
THERE ARE NO OTHER EXPRESSED WARRANTIES EXCEPT AS STATED HEREIN. AFTER THE
PERIOD OF EXPRESSED WARRANTY SET FORTH HEREIN, THERE ARE NO EXPRESSED OR
IMPLIED WARRANTIES AND THOSE EXCLUDED INCLUDE THOSE OF MECHANTABILITY AND
FITNESS FOR PARTICULAR PURPOSE. Glonex, Inc. shall NOT be held liable for CONSEQUENTIAL
DAMAGES resulting from any failure, defect or malfunction of this product. Some States do not allow
limitation on how long an implied warranty lasts and some States do not allow the exclusion or limitation of
incidental or consequential damages, so the above limitations may not apply to you.
WARRANTY PROCEDURES
1st instance is
free, afterward
any repairs of this
nature will have a
service charge.
Service charge applies
for all instances
2) Defects caused by consumer:
• When defect is caused by negligence, repairs or modification
of the customer.
• When defect is caused by repairs done by a person other
than engineers from Glonex, Inc. or its appointed service
center.
• When defect is caused by wrong electrical capacity. (e.g.:
When using 100V product with 120V power)
• Defects or damages caused by dropping of the product after
installation.
• When defect is caused by using optional parts not authorized
by Glonex, Inc.
3) Others:
• When defect is caused by natural disasters (Lightning Strike,
Fire, Flood, etc.)
• When the product is used with unstable power - power surges.
• When consumable parts are expired (batteries, etc.)
TO OBTAIN SERVICE UNDER THE TERMS OF THIS WARRANTY:
Please do the following:
1. Send a copy of your original sales receipt showing original purchase date along with your mailing
address and a note describing the nature of the problem to:
Glonex, Inc.
1156 Satellite Boulevard
Suite 300
Suwanee, GA 30024
2. You will receive a return authorization number within 7-12 business days from the date your return
request is received if it is determined that there is a basis for a replacement product. The return
authorization form you receive will list the return procedures, applicable charges, if any, and the
correct shipping address for the returned product.
PRODUCT SUPPORT HOTLINE:
For questions on use of this product or this warranty call 678-240-2317, Monday through Friday during
normal business hours. You can also email Glonex, Inc. at: [email protected].
Register Your Product online at:
www.glonex.net
Date of Purchase:_________________ Model: ______________________
Place of Purchase: ______________________________________________
PLEASE KEEP THIS INFORMATION FOR YOUR
RECORDS