1
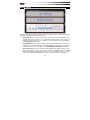
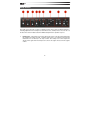
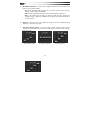
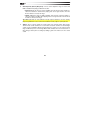
Introduction
Velvet is a virtual instrument that can be used to add the realistic sound of vintage electric
pianos to your recording.
Velvet provides five high-quality models of rare and legendary electric pianos, developed to
deliver unprecedented realism in terms of sound quality and playability.
Using proprietary technology, Velvet provides all the nuanced details that influence the sound
of a vintage electric piano. A built-in preamplifier and custom equalizer, as well as a multi-effect
section with sixteen effects, make Velvet the perfect choice for reproducing all kinds of electric
piano sounds of the past and present in your recording.
2
System Requirements and Product Support
For complete system requirements, compatibility information, and product registration, visit the
AIR website: www.airmusictech.com.
Installation
Windows®
1.
Double-click the .exe installer file you downloaded.
2.
Follow the on-screen instructions.
Note: Velvet uses PACE copy protection, so it will install the PACE InterLok driver on your
system if you do not already have it. As most audio software uses PACE copy protection,
though, this is probably already installed on your system.
Mac OS X
1.
Double-click the .pkg installer file you downloaded.
2.
Follow the on-screen instructions.
3
Using Velvet
Velvet has a straightforward user interface with three separate sections. Each section provides
parameters that affect an electric piano’s sound:
•
Setup Section: This section provides control over the basic sound and behavior of the
selected electric piano model. You can manipulate and tune Velvet in this section—for
example, mix in mechanical noises or adjust the velocity sensitivity. For more information,
see Setup Section of this guide.
•
Preamp/FX Section: This section provides controls to adjust and shape the electric piano
sound using a one-knob Compressor, Tube Drive, Equalizer, and a selection of stomp-box
and studio effects. For more information, see Preamp/EQ and FX Section of this guide.
•
Piano Front Panel: This section provides a Piano Model selector, Master Volume control,
and Tremolo/Autopan controls. You can play Velvet by using MIDI input from a MIDI
keyboard, an Instrument or MIDI track in Pro Tools, or by clicking the 73 keys on screen.
For more information about the Piano Front panel, see the next section of this guide.
4
Piano Front Panel
The Piano Front Panel provides the Piano Model selector, a Master Volume control,
Tremolo/Autopan controls, and a Keyboard Extension switch. The 73 keys in the Keyboard
section correspond to the keys of a MIDI keyboard and their MIDI notes starting from E0 on the
left to E6 on the right. You can play Velvet by clicking the on-screen keys, using MIDI input from
a MIDI keyboard, or from MIDI data in an Instrument or MIDI track in your software.
1.
Model Selector – Velvet contains five different vintage electric piano models. Click the
Model Selector and select a piano model from the pop-up menu.
Note: Loading a piano model may take several seconds. During the loading process,
Velvet and your software may temporarily become unresponsive.
2.
Master Volume – The Volume knob on the Piano Front Panel controls Velvet’s main
output to your audio software.
5
3.
Tremolo Controls – Tremolo is a rhythmic variation in amplitude—a common effect that
was built into many vintage electric pianos. Enabling its stereo mode applies a periodic
variation of position in the stereo field. Velvet provides Tremolo effects for all models by
reproducing the circuits of the Fender Rhodes Suitcase and the Wurlitzer A200.
• On/Off: Enables the Tremolo effect.
• Mono/Stereo: Enables Mono or Stereo Tremolo mode.
• Rate: Adjusts the speed of the Tremolo effect.
• Depth: Adjusts the amount of Tremolo applied to the sound.
4.
Save/Load Section – This section lets you load and save sounds.
• Loading Sounds: To load a sound, click the screen to bring up a categorized list of
Velvet sound patches. You can also use the arrow buttons to the right of the patch
name to quickly shift between sounds.
• Saving Sounds: To save a sound, click the Save button. If you wish to quickly
overwrite the file you are currently working on without changing the file name or
bringing up the file browser, you can do so by shift-clicking the Save button.
5.
Keyboard Extension Switch – The electric pianos in Velvet have the same key range as
the original models (A0–C6 for the A200, E0–E6 for the others) to guarantee authenticity.
The Key Extension switch lets you to play notes outside this range. To do this, set the
switch to the Up position.
6.
Configuration – This button brings up a page containing several global parameters
affecting the operation of Velvet. This is described in detail in the Configuration Page
section of this manual.
6
Setup Section
The Setup section provides controls for adjusting Velvet’s basic setup and playing behavior—
including adjustment of the Pickup level, mechanical noises, and Key release. You can also set
the amount of waveform data loaded into RAM and adjust Velvet’s dynamic response.
1.
Pickup Level – The Pickup Level control adjusts the volume of the line signal captured by
the instrument's pickups. Usually, a vintage electric piano is recorded by connecting the
instrument’s line out directly to an amp or mixer. The Pickup level control adjusts the
amount of this signal. Turn the Pickup Level control to the right to increase the line signal’s
volume.
7
2.
Mechanics – The Mechanics controls adjust the type and amount of mechanical noises
that occur when playing an electric piano (i.e., the sound of keys being pressed, as heard
by the player). These sounds are not captured by the Pickups. Velvet is the first virtual
electric piano that lets you add original mechanical noise to the sound for increased
realism. There are three Mechanics modes:
• Off: Disables mechanical noises.
• On: Enables mechanical noises. Turning the Mechanics knob clockwise increases
the amount of mechanical noises.
• Open: Enables mechanical noise, modelling the sound of an electric piano with the
lid removed. Again, turning the Mechanics knob clockwise increases the amount of
mechanical noise.
Tip: If you set the Mechanics control to On, and turn the Pickup Level control all the way
down, you will hear the sound of a switched-off vintage electric piano.
3.
Key Off – The Key Off controls adjust the type of noise that occurs when releasing keys
and the associated knob sets the volume of the noise. There are three Key Off modes:
• Off Disables key release noise.
• On Enables key release noise.
• Stacc (Staccato) Enables key release noise with a special behavior when short
notes are played. Playing staccato notes on a real electric piano keeps the dampers
from cutting off the note as quickly as normal, resulting in a different release sound.
4.
Condition – This knob has the effect of increasing the “age” of the piano model. Turning
the knob clockwise introduces increasing note-to-note deviations in tuning and dynamic
response, simulating an old electric piano in need of service.
8
5.
Mem (Memory Selector) – Use this control to adjust the amount of waveform data Velvet
loads into your computer’s RAM.
• Eco: Is the smallest possible load size. Eco uses fewer system resources, but also
limits the range of expression available.
• Mid: Provides a good balance between system load and range of expression.
• XXL: Is the default load size. XXL, the largest possible load size, provides the
maximum range of expression available, but also places the greatest demands on
system resources.
6.
Fine Tune – The Fine Tune control adjusts the tuning of Velvet. The maximum tuning
deviation is 2 semitones up or down.
7.
Velo Curve (Velocity Curve) – Use the Velo Curve sliders to adjust Velvet’s velocity
sensitivity. The four sliders from the left to the right represent Velvet’s velocity response
from low to high.
(wide dynamic range)
(no velocity response)
9
(normal response)
8.
Velo Response (Velocity Response) – These controls adjust the range of volume and
timbre available when playing at different velocities.
• Volume: Adjusts the range of volume available. Turn the knob counter-clockwise to
reduce the variation in volume when playing from low to high velocities. Turn the
knob clockwise to increase the range.
• Timbre: Adjusts the range of timbre available. Turn the knob counter-clockwise to
reduce the variation in timbre when playing from low to high velocities. Turn the knob
clockwise to increase the range.
Tip: MIDI keyboards can have different velocity response behavior. Use the Velocity
Response parameters to tune Velvet to the maximum velocity output of your keyboard.
9.
Timbre – These controls change the overall sound of the selected electric piano model.
Turn the knob counter-clockwise for a soft, mellow sound; turn clockwise for a hard, bright
sound. Used in combination with the Velocity Response controls, you can achieve a wide
range of timbral responses. The Vintage Mode switch simulates the sonic characteristcs of
many vintage electric piano recordings by adding a gentle low shelf boost to the overall
sound.
10
Preamp/EQ and FX Section
This area of Velvet can be sub-divided into two sections: Preamp/EQ and FX.
•
Preamp/EQ: These controls adjust Velvet’s sound using a compressor, tube
overdrive, and a three-band equalizer with a sweepable parametric mid-band.
Velvet’s signal passes through the Preamp section before being sent into the FX
section.
•
FX: Velvet provides six categories of classic vintage effects. All of these effects can
be switched on simultaneously, but the parameters of only one effect can be viewed
at the same time. The FX section receives signal from the Preamp/EQ section and
and passes its output to the Master Output Volume on the Piano Front Panel.
1.
Comp (Compressor) – The Compressor control adjusts Velvet’s dynamics using a softknee compressor. Turn the Compressor control to the left to accentuate the attacks, and
to the right to boost the piano’s sustain.
2.
Tube Drive – The Tube Drive control adds harmonics and compression to the signal,
emulating the behavior of a tube preamp responding dynamically to the input level. Turn
the knob clockwise to increase the Tube Drive amount.
11
3.
Equalizer Section Controls – The three-band Equalizer provides a low band, a high
band, and a parametric mid band for adjusting Velvet’s tone. The EQ section can be
engaged or bypassed by clicking the EQ button at the top of this section. The
corresponding light is illuminated when the EQ is active.
4.
EQ Level – The EQ Level control rebalances the volume of Velvet’s signal to compensate
for level changes caused by the Equalizer. Turn this knob counter-clockwise to attenuate,
or clockwise to boost the signal before it is sent to the FX section.
5.
Insert Selector – Velvet has six insert effects that can be independently edited or
switched on and off.
•
To select an insert effect for editing, click the button corresponding to the effect.
•
To switch an effect on or off, click the small light to the right of each button. When an
effect is active, this red light will be illuminated. If an effect is not active, the light will
not be illuminated.
Tip: Click the FX button to quickly switch all insert effects on or off.
6.
Insert Effect Parameters – The knobs and sliders in this area change depending on what
insert is selected above. Each effect can have up to four variations that can be selected
using the vertical slider. The knobs and buttons to the right of the slider can then be used
to fine-tune the effect.
12
Configuration Page
1.
Mechanics Through FX – Velvet gives you the option of either routing mechanical noises
through the FX section or to let mechanical noises bypass the FX section. By default, the
mechanical noises bypass FX section (i.e., this parameter is set Off) as this most closely
models real-world recording conditions. However, if you would like the mechanical noises
of Velvet to also be sent through the FX section, set this menu to On.
13
2.
Pedal Noise – This parameter lets you switch sustain pedal noises on and off. By default,
this parameter is set to On.
3.
Wah Before Fuzz – By default, Velvet routes its signal through distortion insert effects
before the wah effect. Some players prefer to route their piano’s signal through the Wah
first, followed by the distortion. This can be done by setting this parameter to On.
4.
Tremolo Before FX – By default, the tremolo effects of Velvet happen after the FX
inserts. If you would prefer to have the tremolo effects happen before the FX section, set
this parameter to On.
5.
Content Location – Velvet contains a large file called Velvet Data.big that contains all of
the sample data for the modeled instruments. If Velvet is unable to locate this file at
startup (for example, if you have moved the file to a new hard disk), you can manually
locate the new file by clicking here.
14
MIDI Controller Mapping
Velvet lets you assign standard MIDI controllers to virtually any parameter so that you can
control Velvet from a MIDI controller in real time.
To assign a MIDI controller to a parameter:
1.
Right-click (Windows or Mac) or Control-click (Mac) a control.
2.
Do one of the following:
a. Select the desired MIDI controller from the Assign sub-menu.
b. Select Learn and then move the desired control on your MIDI controller. The
parameter is automatically assigned to that control.
To un-assign a MIDI controller:
1.
Right-click (Windows or Mac) or Control-click (Mac) an assigned control.
2.
From the pop-up menu, select Forget.
15
About the Velvet Piano Models
Velvet provides five models of legendary electromagnetic pianos. While Velvet offers a large
range of options for changing and adjusting the sound, choosing the right piano model is the
most important step to achieve the desired sound and feel. Each of the five models has been
accurately replicated from selected originals that have been adjusted and modified to
perfection. Sound character, playing feel, and behavior are all based on the models.
Note that model names of the models do not refer to the exact original pianos that were studied
during the development of Velvet, but rather give you a hint to which kind of Rhodes or
Wurlitzer sound is widely associated with the model.
16
Piano Model: SC73
SC73 creates the typical sound of
the Rhodes Suitcase 73. The
tines are set to a soft character
with lots of body. This model is
ideal for ballads and blends nicely
with other instruments.
Tip: For an accurate suitcase
sound, use the Stereo Tremolo
on the Piano Front panel
(Suitcase tremolo effect) and the
Large setting of the Cab effects
(Suitcase amp/speakers).
Musical styles: Jazz, Pop Ballads
Songs famous for featuring this instrument:
•
Stevie Wonder: "You Are the Sunshine of My Life"
•
Billy Joel: "Just the Way You Are"
•
Miles Davis: "In a Silent Way," Bitches Brew (album)
•
Bill Withers: "Just the Two of Us"
17
Piano Model: MK I
MK I is a model of a very dynamic,
vintage-style reproduction of a
Fender
Rhodes
piano
usually
associated with the Mark I. The tines
were moved close to the pickup for a
full, harmonically rich timbre and a
very hard sound at high velocities.
Tip: Use this model for rhythmic
chords and soloing—especially when
you want the piano to stick out of the
mix or compete against other
instruments.
Musical styles: Jazz Fusion, Jazz Rock
Songs famous for featuring this instrument:
•
Herbie Hancock: Head Hunters (album)
•
Jamiroquai: "Space Cowboy"
•
George Duke: "From Dusk to Dawn"
•
Chick Corea: "Spain"
18
Piano Model: MK II
MK II is a model of the bright
Rhodes piano sound that became
famous in the '80s, usually with a
condenser upgrade/modification
for
a
very
bright
sound
accentuating the metallic attack of
the tines, further improved by
tines set close to the pickups.
This sound is very often referred
to as “Dyno Rhodes,” used by
keyboardists David Foster (often
combined with Grand Piano) and
Robbie Buchanan.
Musical styles: Westcoast, Fusion, Pop
Songs famous for featuring this instrument:
•
Al Jarreau: "I Will Be Here for You"
•
Whitney Houston: "Saving All My Love for You"
•
Chicago: "Bad Advice"
•
Donald Fagen: "Green Flower Street"
19
Piano Model: A200
A200 is a model of a Wurlitzer
electric piano. The Wurlitzer was
originally designed as a portable
and cheap replacement for a real
piano, but its aggressive, powerful
sound character soon made it the
only real competitor to the Rhodes
pianos in pop and rock music.
Many people refer to it as "the
Supertramp sound." The Wurlitzer
can sound very nice and mellow in
ballads, but it really excels in
power
accompaniment
and
rhythmic chords.
Musical styles: Blues, Pop, Rock.
Songs famous for featuring this instrument:
•
Ray Charles: "What’d I Say"
•
Marvin Gaye: "I Heard It Through the Grapevine"
•
Three Dog Night: "Mama Told Me Not to Come"
•
Steely Dan: "Pretzel Logic"
•
Pink Floyd: "Money"
•
Supertramp: "Dreamer"
•
Supertramp: "Logical Song"
20
Piano Model: Model-T
Model-T creates the typical sound
of a small "suitcase-style" piano.
The instrument had a unique tone
due to the ground stainless steel
reeds, a pick-up using variable
capacitance, and leather-faced
activation pads. The instrument
was manufactured from the 1950s
through the early 1980s and was
found on many hit recordings from
the 1960s and 1970s.
Musical styles: Pop, Progressive Rock
Songs famous for featuring this instrument:
•
The Beatles: "I Am the Walrus," "Getting Better," "The Night Before"
•
The Zombies: "She’s Not There"
•
Herb Alpert: "This Guy’s in Love With You"
•
Three Dog Night: "Joy to the World"
21
Support
For technical support, please contact us through the Support page of our website:
www.airmusictech.com/support.
Trademarks and Licenses
Velvet is not connected with, approved by, or endorsed by the owners of the Fender Rhodes
and Wurlitzer trademarks. These names are solely used to identify the electric pianos emulated
by this product. References to artists and bands on the following pages are for informational
purposes only and do not imply an endorsement or sponsorship of Velvet by such artists or
bands.
Mac and OS X are trademarks of Apple Inc., registered in the U.S. and other countries.
Windows is a registered trademark of Microsoft Corporation in the United States and other
countries.
All other product or company names are trademarks or registered trademarks of their
respective owners.
22
airmusictech.com
Manual Version 1.0