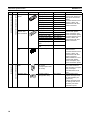
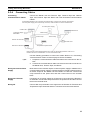
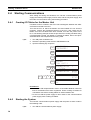
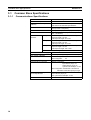
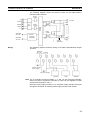
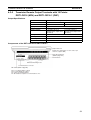
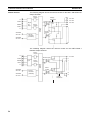
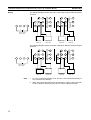
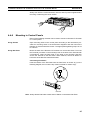
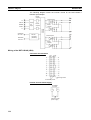
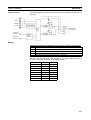
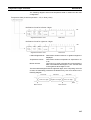
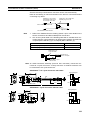
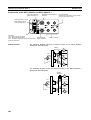
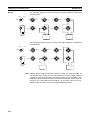
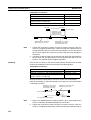
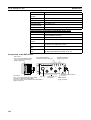
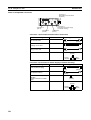
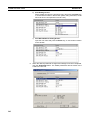
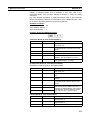
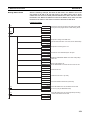
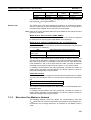
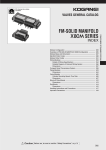
1
Cat. No. W347-E1-06 C200HW-DRT21 CQM1-DRT21 DRT1 Series DeviceNet Slaves OPERATION MANUAL C200HW-DRT21 CQM1-DRT21 DRT1 Series DeviceNet Slaves Operation Manual Revised September 2003 iv Notice: OMRON products are manufactured for use according to proper procedures by a qualified operator and only for the purposes described in this manual. The following conventions are used to indicate and classify precautions in this manual. Always heed the information provided with them. Failure to heed precautions can result in injury to people or damage to property. !DANGER Indicates an imminently hazardous situation which, if not avoided, will result in death or serious injury. !WARNING Indicates a potentially hazardous situation which, if not avoided, could result in death or serious injury. !Caution Indicates a potentially hazardous situation which, if not avoided, may result in minor or moderate injury, or property damage. OMRON Product References All OMRON products are capitalized in this manual. The word “Unit” is also capitalized when it refers to an OMRON product, regardless of whether or not it appears in the proper name of the product. The abbreviation “Ch,” which appears in some displays and on some OMRON products, often means “word” and is abbreviated “Wd” in documentation in this sense. The abbreviation “PLC” means Programmable Controller. “PC” is used, however, in some Programming Device displays to mean Programmable Controller. Visual Aids The following headings appear in the left column of the manual to help you locate different types of information. Note Indicates information of particular interest for efficient and convenient operation of the product. 1,2,3... 1. Indicates lists of one sort or another, such as procedures, checklists, etc. Trademarks and Copyrights COMBICON is a registered trademark of Phoenix Contact GmbH & Co. DeviceNet is a registered trademark of the Open DeviceNet Vendor Association, Inc. PowerTap is a registered trademark of the Allen-Bradley Company, Inc. OMRON, 1998 All rights reserved. No part of this publication may be reproduced, stored in a retrieval system, or transmitted, in any form, or by any means, mechanical, electronic, photocopying, recording, or otherwise, without the prior written permission of OMRON. No patent liability is assumed with respect to the use of the information contained herein. Moreover, because OMRON is constantly striving to improve its high-quality products, the information contained in this manual is subject to change without notice. Every precaution has been taken in the preparation of this manual. Nevertheless, OMRON assumes no responsibility for errors or omissions. Neither is any liability assumed for damages resulting from the use of the information contained in this publication. v vi TABLE OF CONTENTS PRECAUTIONS . . . . . . . . . . . . . . . . . . . . . . . . . . . . . . . . . . . xi 1 Intended Audience . . . . . . . . . . . . . . . . . . . . . . . . . . . . . . . . . . . . . . . . . . . . . . . . . . . . . . . . . xii 2 General Precautions . . . . . . . . . . . . . . . . . . . . . . . . . . . . . . . . . . . . . . . . . . . . . . . . . . . . . . . . xii 3 Safety Precautions . . . . . . . . . . . . . . . . . . . . . . . . . . . . . . . . . . . . . . . . . . . . . . . . . . . . . . . . . xii 4 Operating Environment Precautions . . . . . . . . . . . . . . . . . . . . . . . . . . . . . . . . . . . . . . . . . . . xii 5 Application Precautions. . . . . . . . . . . . . . . . . . . . . . . . . . . . . . . . . . . . . . . . . . . . . . . . . . . . . xiii 6 EC Directives. . . . . . . . . . . . . . . . . . . . . . . . . . . . . . . . . . . . . . . . . . . . . . . . . . . . . . . . . . . . . xiv 7 DeviceNet Manuals . . . . . . . . . . . . . . . . . . . . . . . . . . . . . . . . . . . . . . . . . . . . . . . . . . . . . . . . xv SECTION 1 Features and System Configuration . . . . . . . . . . . . . . . . . . . 1 1-1 Overview of DeviceNet . . . . . . . . . . . . . . . . . . . . . . . . . . . . . . . . . . . . . . . . . . . . . . . . . . . . . 2 SECTION 2 Example System Setup . . . . . . . . . . . . . . . . . . . . . . . . . . . . . . 13 2-1 Basic Procedures and Configuration Examples. . . . . . . . . . . . . . . . . . . . . . . . . . . . . . . . . . . 14 2-2 Preparations . . . . . . . . . . . . . . . . . . . . . . . . . . . . . . . . . . . . . . . . . . . . . . . . . . . . . . . . . . . . . . 15 2-3 Setting and Wiring Hardware . . . . . . . . . . . . . . . . . . . . . . . . . . . . . . . . . . . . . . . . . . . . . . . . 16 2-4 Starting Communications . . . . . . . . . . . . . . . . . . . . . . . . . . . . . . . . . . . . . . . . . . . . . . . . . . . 20 2-5 Checking Operations . . . . . . . . . . . . . . . . . . . . . . . . . . . . . . . . . . . . . . . . . . . . . . . . . . . . . . . 24 SECTION 3 Common Slave Specifications . . . . . . . . . . . . . . . . . . . . . . . . 27 3-1 Common Slave Specifications . . . . . . . . . . . . . . . . . . . . . . . . . . . . . . . . . . . . . . . . . . . . . . . . 28 SECTION 4 General-purpose Slaves . . . . . . . . . . . . . . . . . . . . . . . . . . . . . 31 4-1 Common Specifications for General-purpose Slaves . . . . . . . . . . . . . . . . . . . . . . . . . . . . . . 33 4-2 Connecting Communications Cables to General-purpose Slaves . . . . . . . . . . . . . . . . . . . . . 34 4-3 Transistor Remote I/O Terminals . . . . . . . . . . . . . . . . . . . . . . . . . . . . . . . . . . . . . . . . . . . . . 40 4-4 Transistor Remote I/O Terminals with 3-tier I/O Terminal Blocks . . . . . . . . . . . . . . . . . . . . 62 4-5 Transistor Remote I/O Terminals with Connectors . . . . . . . . . . . . . . . . . . . . . . . . . . . . . . . . 87 4-6 Remote Adapters . . . . . . . . . . . . . . . . . . . . . . . . . . . . . . . . . . . . . . . . . . . . . . . . . . . . . . . . . . 111 4-7 Sensor Terminals . . . . . . . . . . . . . . . . . . . . . . . . . . . . . . . . . . . . . . . . . . . . . . . . . . . . . . . . . . 124 4-8 Analog I/O Terminals . . . . . . . . . . . . . . . . . . . . . . . . . . . . . . . . . . . . . . . . . . . . . . . . . . . . . . 136 4-9 Temperature Input Terminals. . . . . . . . . . . . . . . . . . . . . . . . . . . . . . . . . . . . . . . . . . . . . . . . . 157 4-10 CQM1 I/O Link Unit . . . . . . . . . . . . . . . . . . . . . . . . . . . . . . . . . . . . . . . . . . . . . . . . . . . . . . . 171 vii TABLE OF CONTENTS SECTION 5 Environment-resistive and Waterproof Slaves . . . . . . . . . . 175 5-1 Environment-resistive Slave Specifications. . . . . . . . . . . . . . . . . . . . . . . . . . . . . . . . . . . . . . 176 5-2 Connecting Communications Cables to Environment-resistive Slaves . . . . . . . . . . . . . . . . . 177 5-3 Environment-resistive Terminals (IP66) . . . . . . . . . . . . . . . . . . . . . . . . . . . . . . . . . . . . . . . . 179 5-4 Waterproof Terminals (IP67) . . . . . . . . . . . . . . . . . . . . . . . . . . . . . . . . . . . . . . . . . . . . . . . . . 200 5-5 B7AC Interface Units . . . . . . . . . . . . . . . . . . . . . . . . . . . . . . . . . . . . . . . . . . . . . . . . . . . . . . 215 SECTION 6 Special I/O Slave Units Specifications. . . . . . . . . . . . . . . . . . 229 6-1 C200H I/O Link Units . . . . . . . . . . . . . . . . . . . . . . . . . . . . . . . . . . . . . . . . . . . . . . . . . . . . . . 230 6-2 RS-232C Units. . . . . . . . . . . . . . . . . . . . . . . . . . . . . . . . . . . . . . . . . . . . . . . . . . . . . . . . . . . . 260 SECTION 7 Communications Timing . . . . . . . . . . . . . . . . . . . . . . . . . . . . 299 7-1 Remote I/O Communications Characteristics . . . . . . . . . . . . . . . . . . . . . . . . . . . . . . . . . . . . 300 7-2 Message Communications Time . . . . . . . . . . . . . . . . . . . . . . . . . . . . . . . . . . . . . . . . . . . . . . 309 SECTION 8 Troubleshooting and Maintenance . . . . . . . . . . . . . . . . . . . . 311 8-1 Indicators and Error Processing. . . . . . . . . . . . . . . . . . . . . . . . . . . . . . . . . . . . . . . . . . . . . . . 312 8-2 Troubleshooting . . . . . . . . . . . . . . . . . . . . . . . . . . . . . . . . . . . . . . . . . . . . . . . . . . . . . . . . . . . 313 8-3 Maintenance. . . . . . . . . . . . . . . . . . . . . . . . . . . . . . . . . . . . . . . . . . . . . . . . . . . . . . . . . . . . . . 318 Appendices A Node Address Settings Table. . . . . . . . . . . . . . . . . . . . . . . . . . . . . . . . . . . . . . . . . . . . . . . . . 321 B Using Another Company’s Master Unit . . . . . . . . . . . . . . . . . . . . . . . . . . . . . . . . . . . . . . . . 323 C Connectable Devices and Device Current Consumptions . . . . . . . . . . . . . . . . . . . . . . . . . . 343 D Precautions when Connecting Two-wire DC Sensors . . . . . . . . . . . . . . . . . . . . . . . . . . . . . 353 Glossary . . . . . . . . . . . . . . . . . . . . . . . . . . . . . . . . . . . . . . . . . . 355 Index. . . . . . . . . . . . . . . . . . . . . . . . . . . . . . . . . . . . . . . 357 Revision History . . . . . . . . . . . . . . . . . . . . . . . . . . . . . . . . . . . 359 viii About this Manual: This manual describes the installation and operation of the DeviceNet Slave Units and includes the sections described below. Please read this manual carefully and be sure you understand the information provided before attempting to install and operate the DeviceNet Slave Units. Be sure to read the precautions provided in the first section. The following manuals are also cover information related to DeviceNet applications. Use the DeviceNet Operation Manual together with other required manuals. Manual DeviceNet Operation Manual Contents Cat. No. DeviceNet Masters Operation Manual CS1 Series DeviceNet Unit Operation Manual Describes the configuration and construction of a DeviceNet network, W267 including installation procedures and specifications for cables, connectors, and other connection devices, as well as information on the communications power supply. Describes the models, specifications, functions, and application meth- W379 ods of C200HX/HG/HE, CVM1, and CV-series DeviceNet Master Units. Describes the models, specifications, functions, and application meth- W380 ods of the CS1-series DeviceNet Unit. DeviceNet Slaves Operation Manual (this manual) Describes the models, specifications, functions, and application methods of DeviceNet Slaves. DeviceNet Configurator Operation Manual (Ver. 2) Describes the operation of the DeviceNet Configurator to allocate W382 remote I/O areas according to application needs, as well as procedures to set up a DeviceNet network with more than one master. DeviceNet MULTIPLE I/O Describes the models, specifications, functions, and application methTERMINAL Operation Manual ods of the DeviceNet MULTIPLE I/O TERMINALs. W347 W348 Precautions provides precautions for the correct and safe application of the products. Section 1 provides an overview of the DeviceNet Network, including features, specifications, and the system configurations. Section 2 provides information on hardware aspects of Masters and Slaves connected to a DeviceNet Network to ensure the proper operation of the system. Included are system configuration examples, basic procedures for wiring, mounting and setting Master and Slave Units, connecting cables and power supplies, creating I/O tables, and creating and registering scan lists Section 3 provides specifications that are common to all Slaves. Section 4 provides specifications and describes the components, indicators, switch settings, and other aspects of General-purpose Slaves. Section 5 provides specifications and describes the components, indicators, switch settings, and other aspects of Environment-resistive Slaves. Section 6 provides specifications for the C200H I/O Link Unit and the RS-232C Unit. Section 7 describes the time required for a complete communications cycle, for an output response to be made to an input, to start the system, and to send a message. Section 8 describes error processing, periodic maintenance operations, and troubleshooting procedures needed to keep the DeviceNet Network operating properly. We recommend reading through the error processing procedures before operation so that operating errors can be identified and corrected more quickly. The Appendices provide information on using masters from other companies, node address settings, Slave device protocols necessary for multi-vendor applications, standard models, device current consumptions and connecting 2-wire DC Sensors. !WARNING Failure to read and understand the information provided in this manual may result in personal injury or death, damage to the product, or product failure. Please read each section in its entirety and be sure you understand the information provided in the section and related sections before attempting any of the procedures or operations given. ix PRECAUTIONS This section provides general precautions for using the Programmable Controller (PLC) Systems and related devices. The information contained in this section is important for the safe and reliable application of PLC Systems. You must read this section and understand the information contained before attempting to set up or operate a PLC System. 1 2 3 4 5 6 7 Intended Audience . . . . . . . . . . . . . . . . . . . . . . . . . . . . . . . . . . . . . . . . . . . . . General Precautions . . . . . . . . . . . . . . . . . . . . . . . . . . . . . . . . . . . . . . . . . . . . Safety Precautions. . . . . . . . . . . . . . . . . . . . . . . . . . . . . . . . . . . . . . . . . . . . . . Operating Environment Precautions . . . . . . . . . . . . . . . . . . . . . . . . . . . . . . . . Application Precautions . . . . . . . . . . . . . . . . . . . . . . . . . . . . . . . . . . . . . . . . . EC Directives . . . . . . . . . . . . . . . . . . . . . . . . . . . . . . . . . . . . . . . . . . . . . . . . . DeviceNet Manuals . . . . . . . . . . . . . . . . . . . . . . . . . . . . . . . . . . . . . . . . . . . . . xii xii xii xii xiii xiv xv xi 1 Intended Audience 1 Intended Audience This manual is intended for the following personnel, who must also have knowledge of electrical systems (an electrical engineer or the equivalent). • Personnel in charge of installing FA systems. • Personnel in charge of designing FA systems. • Personnel in charge of managing FA systems and facilities. 2 General Precautions The user must operate the product according to the performance specifications described in the operation manuals. Before using the product under conditions which are not described in the manual or applying the product to nuclear control systems, railroad systems, aviation systems, vehicles, combustion systems, medical equipment, amusement machines, safety equipment, and other systems, machines, and equipment that may have a serious influence on lives and property if used improperly, consult your OMRON representative. Make sure that the ratings and performance characteristics of the product are sufficient for the systems, machines, and equipment, and be sure to provide the systems, machines, and equipment with double safety mechanisms. This manual provides information for programming and operating OMRON PLC Systems. Be sure to read this manual before attempting to use the software and keep this manual close at hand for reference during operation. !WARNING It is extremely important that a PLC System and all PLC Units be used for the specified purpose and under the specified conditions, especially in applications that can directly or indirectly affect human life. You must consult with your OMRON representative before applying a PLC System to the abovementioned applications. 3 Safety Precautions !WARNING Never attempt to disassemble any Units while power is being supplied. Doing so may result in serious electrical shock or electrocution. !WARNING Never touch any of the terminals while power is being supplied. Doing so may result in serious electrical shock or electrocution. 4 Operating Environment Precautions Do not operate the control system in the following places. • Locations subject to direct sunlight. • Locations subject to temperatures or humidity outside the range specified in the specifications. • Locations subject to condensation as the result of severe changes in temperature. • Locations subject to corrosive or flammable gases. • Locations subject to dust (especially iron dust) or salts. • Locations subject to shock or vibration. xii 5 Application Precautions • Locations subject to exposure to water, oil, or chemicals. • Take appropriate and sufficient countermeasures when installing systems in the following locations. • Locations subject to static electricity or other forms of noise. • Locations subject to strong electromagnetic fields. • Locations subject to possible exposure to radioactivity. • Locations close to power supplies. !Caution The operating environment of the PLC System can have a large effect on the longevity and reliability of the system. Improper operating environments can lead to malfunction, failure, and other unforeseeable problems with the PLC System. Be sure that the operating environment is within the specified conditions at installation and remains within the specified conditions during the life of the system. 5 Application Precautions Observe the following precautions when using a PLC System. !WARNING Failure to abide by the following precautions could lead to serious or possibly fatal injury. Always heed these precautions. • Always ground the system to 100 Ω or less when installing the system to protect against electrical shock. • Always turn OFF the power supply to the PLC System before attempting any of the following. Performing any of the following with the power supply turned on may lead to electrical shock: • Mounting or removing any Units (e.g., Power Supply Units, I/O Units, CPU Unit, etc.) or memory cassettes. • Assembling any devices or racks. • Connecting or disconnecting any cables or wiring. !Caution Failure to abide by the following precautions could lead to faulty operation of the PLC System or could damage the PLC or PLC Units. Always heed these precautions. • Use the Units only with the power supplies and voltages specified in the operation manuals. Other power supplies and voltages may damage the Units. • Take measures to stabilize the power supply to conform to the rated supply if it is not stable. • Provide circuit breakers and other safety measures to provide protection against shorts in external wiring. • Do not apply voltages exceeding the rated input voltage to Input Units. The Input Units may be destroyed. • Do not apply voltages exceeding the maximum switching capacity to Output Units. The Output Units may be destroyed. • Always disconnect the LG terminal when performing withstand voltage tests. xiii 6 EC Directives • Install all Units according to instructions in the operation manuals. Improper installation may cause faulty operation. • Provide proper shielding when installing in the following locations: • Locations subject to static electricity or other sources of noise. • Locations subject to strong electromagnetic fields. • Locations subject to possible exposure to radiation. • Locations near to power supply lines. • Be sure to tighten Backplane screws, terminal screws, and cable connector screws securely. • Do not attempt to take any Units apart, to repair any Units, or to modify any Units in any way. !Caution The following precautions are necessary to ensure the general safety of the system. Always heed these precautions. • Provide double safety mechanisms to handle incorrect signals that can be generated by broken signal lines or momentary power interruptions. • Provide external interlock circuits, limit circuits, and other safety circuits in addition to any provided within the PLC System to ensure safety. • Always follow electrical specifications for terminal polarity, communications path wiring, power supply wiring, and I/O jumpers. Incorrect wiring can cause failures. • Although the Environment-resistive Slaves have IP66 or IP67 degree of protection, do not use them in applications where the Slave is always submerged in water. 6 EC Directives DeviceNet products conform to EMS and low-voltage level directives as follows: EMC Directives OMRON devices that comply with EC Directives also conform to the related EMC standards, so that they can more easily be built in to other devices or the overall machine. The actual products have been checked for conformity to EMC standards. Whether they conform to the standards in the system used by the customer, however, must be checked by the customer. EMC-related performance of the OMRON devices that comply with EC Directives will vary depending on the configuration, wiring, and other conditions of the equipment or control panel on which the OMRON devices are installed. The customer must, therefore, perform the final check to confirm that devices and the overall machine conform to EMC standards. Low-voltage Level Directives Always ensure that devices operating at voltages of 50 to 1,000 V AC and 75 to 1,500 V DC meet the necessary safety standard for the PLC (EN61131-2). DeviceNet products that comply with EC Directives must be installed as follows: 1,2,3... xiv 1. DeviceNet Units are designed for installation inside control panels. All DeviceNet Units must be installed within control panels. 7 DeviceNet Manuals 2. Use reinforced insulation or double insulation for the DC power supplies used for the communications power supply, internal circuit power supply, and the I/O power supplies. 3. DeviceNet products that comply with EC Directives also conform to the Common Emission Standard (EN50081-2). Radiated emission characteristics (10-m regulations) may vary depending on the configuration of the control panel used, other devices connected to the control panel, wiring, and other conditions. You must therefore confirm that the overall machine or equipment complies with EC Directives. 4. DeviceNet products that comply with EC Directives have configurations with less than 30 m of I/O wiring, and less than 10 m of power supply wiring. The following examples shows how to reduce noise. 1,2,3... 1. Noise from the communications cable can be reduced by installing a ferrite core on the communications cable within 10 cm of the DeviceNet Master Unit. Ferrite Core (Data Line Filter): LF130B (manufactured by Easy Magnet Co.) Impedance specifications 25 MHz: 105 100 MHz: 190 30 mm 13 mm 32 mm 31.5 mm 2. Wire the control panel with as thick and short cables as possible and ground to 100 Ω min. 3. Keep DeviceNet communications cables as short as possible and ground to 100 Ω min. 7 DeviceNet Manuals The following manuals are available for information relating to DeviceNet. Be sure to thoroughly read and understand the applicable manuals before installing or operating DeviceNet devices and make sure that you are using the most recent version of the manual. DeviceNet Operation Manual (W267) Describes the functions and applications of DeviceNet including available Master Units, their specifications, functions, operating procedures, and applications. Always read this manual thoroughly before installing or operating DeviceNet devices. DeviceNet Slaves Operation Manual (W347) Describes available Slave Units, their specifications, functions, operating procedures, and applications. This manual has been separately produced in response to the increase in Slave Unit models since the production of the DeviceNet Operation Manual (W267). Use this manual in conjunction with the DeviceNet Operation Manual (W267). xv DeviceNet Manuals 7 DeviceNet Configurator Operation Manual (W328) Describes the operating procedures of the DeviceNet Configurator, which is used to freely allocate remote I/O areas, and allows multiple Master Units to be mounted to one PLC or connected to one DeviceNet Network to perform independent remote I/O communications. Refer to this manual when operating a DeviceNet Network with a DeviceNet Configurator. MULTIPLE I/O TERMINAL Operation Manual (W348) Describes available MULTIPLE I/O TERMINALs, their specifications, functions, operating procedures, and applications. This manual has been separately produced in response to the increase in MULTIPLE I/O TERMINAL models since the production of the DeviceNet Operation Manual (W267). Use this manual in conjunction with the DeviceNet Operation Manual (W267). xvi SECTION 1 Features and System Configuration This section provides an overview of the DeviceNet Network, including features, specifications, and the system configurations. 1-1 Overview of DeviceNet. . . . . . . . . . . . . . . . . . . . . . . . . . . . . . . . . . . . . . . . . . 2 1-1-1 DeviceNet Features. . . . . . . . . . . . . . . . . . . . . . . . . . . . . . . . . . . . . . 2 1-1-2 Slaves . . . . . . . . . . . . . . . . . . . . . . . . . . . . . . . . . . . . . . . . . . . . . . . . 8 1-1-3 Slave Mounting and Connection Methods . . . . . . . . . . . . . . . . . . . . 11 1 Section 1-1 Overview of DeviceNet 1-1 Overview of DeviceNet DeviceNet is a multi-bit, multi-vendor network that combines controls and data on a machine/line-control level and that conforms to the DeviceNet open field network specifications. DeviceNet has the following features. 1-1-1 DeviceNet Features Multi-vendor Network The DeviceNet conforms to the DeviceNet open field network specification, which means that devices (Masters and Slaves) produced by other manufacturers can also be connected to the Network. A wide range of field-level applications can thus be supported by combining valve devices, sensors, and other devices. OMRON Master Unit Master from other company DeviceNet Network OMRON Configurator OMRON Slaves Simultaneous Remote I/O and Message Services Slave from other company Remote I/O communications to constantly exchange I/O data between the PLC and Slaves can be executed simultaneously with message communications, to send/receive Master Unit data as required by the application. A DeviceNet Network can thus be installed to flexibly handle applications that require both bit data and message data. Message communications can be achieved either by using OMRON’s FINS commands or by using explicit DeviceNet messages. OMRON Master Unit OMRON Master Unit Message communications DeviceNet Network Slaves Remote I/O communications 2 OMRON Configurator Section 1-1 Overview of DeviceNet Connect Multiple PLCs to the Same Network A Configurator (sold separately) can be used to enable connection of more than one Master to the Network, allowing message communications between PLCs and between multiple groups of PLCs and Slaves. This allows the DeviceNet Network to be used as a common bus to unify controls while reducing wiring. OMRON Master Unit OMRON Master Unit OMRON Master Unit Message communications Message communications DeviceNet Network OMRON Configurator Slaves Slaves Remote I/O communications Multiple Master Units Handle Multi-point Control and Line Expansions Remote I/O communications A Configurator (sold separately) can be used to enable mounting more than one Master Unit to a single PLC, allowing control of many more points. This feature can easily handle line expansions and other applications. OMRON Master Units Slaves Slaves Slave Slave OMRON Configurator OMRON Configurator 3 Section 1-1 Overview of DeviceNet Free Remote I/O Allocation A Configurator (sold separately) can be used to enable flexible allocation of I/ O, i.e., in any area and in any order. This allows I/O allocations that suit the application to simplify programming and enable effective usage of PLC memory areas. OMRON Master Unit Output Area Node 01 Node 03 Node 00 Node 00 Handle Slaves with Different Response Speeds Node 01 Node 02 Input Area Node 04 Node 02 Node 03 Node 04 OMRON Configurator A Configurator (sold separately) can be used to set the communications cycle time, enabling usage of Slaves with slow response times. OMRON Master Unit Set the communications cycle time. Remote I/O communications at a set interval OMRON Configurator Easily Expand or Change Lines with Various Connection Methods Use a multi-drop trunk line, T-branch multi-drop lines, or daisy-chain drop lines. All three connection methods can be combined to flexibly construct a network that meets the needs of the application. Multi-drop trunk line T-branch multi-drop line Drop line 4 Trunk line Daisy-chain drop line Section 1-1 Overview of DeviceNet Overall System Configuration DeviceNet Configurator (computer) DeviceNet Master Unit CV Series: CVM1-DRM21-V1 CS Series: CS1W-DRM21 C200HX/HG/HE/HS: Photoelectric sensors, C200HW-DRM21-V1 proximity sensors, limit switches, etc. Photoelectric sensors, proximity sensors, limit switches, etc. Input Terminal I/O Link Unit CQM1 : T-branch Taps or multidrop connections Input Remote Adapter (used with Input Block) Sensor Terminal Output Remote Adapter (used with Output Block) Output Terminal Solenoids, valves, etc. Solenoids, valves, etc. Photoelectric sensors or proximity sensors with connectors DeviceNet Master Unit Environmentresistant Terminal (inputs,outputs, or mixed I/O) Photoelectric Solenoids, sensors, proximity valves, etc. sensors, limit switches, etc. C200H I/O Link Unit Note A DeviceNet Configurator is required if multiple Master Units are to be connected to one network. Analog Output Terminal Analog Input Terminal 1 to 5 V, 4 to 20 mA, etc. Temperature Input Terminal RS-232C Unit Inputs Outputs Outputs Inputs Solenoids, valves, etc. Thermocouple, temperature-resistance thermometer Bar code reader, etc. MULTIPLE I/O TERMINALs Master Features Master Units Support remote I/O communications between OMRON PLCs (CS Series, CV Series or C200HX/HG/HE/HS) and Slaves. Support message communications between OMRON PLCs, or between an OMRON PLC and Slaves and Masters from other companies. VME Master Boards Support remote I/O communications between a VME System and Slaves. Open Network Controllers Support easy connection to an information system via Ethernet. Configurator Features • • • • Enables free (user-set) allocations to remote I/O. Enables multiple Master Units on a single PLC. Enables multiple Master Units in a single network. The Net-X Server can be used to easily monitor, change, or log I/O data on the DeviceNet. 5 Section 1-1 Overview of DeviceNet Slave Features I/O Terminals • Provide general-purpose inputs, outputs, or both inputs and outputs via 2tier terminal blocks (M3). Available in 8-point and 16-point models with transistor inputs or outputs or in a 16-point model with 8 inputs and 8 outputs. • Provide general-purpose inputs, outputs, or both inputs and outputs via 3tier terminal blocks (M3). Available in 16-point models with transistor inputs or outputs or in a 16-point model with 8 inputs and 8 outputs. • Provide general-purpose inputs, outputs, or both inputs and outputs via a MIL connector. Available in 32-point models with transistor inputs or outputs or in a 32-point model with 8 inputs and 8 outputs. ■ Environment-resistive Slaves Environment-resistant Terminals • Improved I/O Terminals that conform to IP66 for spatter-, water-, and oilresistance. Sensors or valves with round water-proof connectors can be easily connected with no tools. • Available in 8-point or 16-point models with transistor inputs or outputs, and 16-point models with transistor I/O (8 inputs and outputs). • DRT1-@@@@C(-1): IP66 Water-proof Terminals • Improved I/O Terminals that conform to IP67 for water- and oil-resistance. Sensors or valves with round water-proof connectors can be easily connected with no tools. • Available in 4-point or 8-point models with transistor inputs or outputs. • DRT1-@@@@CL(-1): IP67 B7AC Interface Unit • Input Interface Unit that conforms to IP66 for spatter-, water-, and oilresistance. • Provides three FA connector ports for the B7A for 10 input points on each of 3 ports. Remote Adapters • Used in combination with G70D and other I/O Blocks to handle relay outputs, power MOS FET Relay outputs, etc. • Available in 16-point models with transistor inputs or outputs. CQM1 I/O Link Units • More than one I/O Link Unit can be mounted to a CQM1 PLC. • Link 16 inputs and 16 outputs between the PLC and the Master Unit. Sensor Terminals • Accept inputs from photoelectric and proximity sensors with connectors. • Available in 16-point input and 8-point input/8-point output models. • Output signals can be used for sensor teaching and external diagnosis. Analog Input Terminals • Convert analog inputs to binary. • Switchable between 2 and 4 input points using the DIP switch. • Handle inputs of 0 to 5 V, 1 to 5 V, 0 to 10 V, –10 to 10 V, 0 to 20 mA, or 4 to 20 mA. 6 Section 1-1 Overview of DeviceNet Analog Output Terminals • Convert binary data to analog outputs. • Provides outputs of 1 to 5 V, 0 to 10 V, –10 to 10 V, 0 to 20 mA, or 4 to 20mA. • Available in models with a resolution of either 1/6,000 or 1/30,000. Temperature Input Terminals • Temperature data is input as binary data for 4 inputs. • Thermocouple and temperature-resistance thermometer inputs are available. ■ Special I/O Slaves C200H I/O Link Units • Special I/O Slaves that mount to C200HX/HG/HE PLCs and read/write data from the Master Unit to the specified words in the CPU Unit. • Read and write areas specified for up to 512 bits each (32 words each). • Any memory area words can be read or written using DeviceNet explicit messages. RS-232C Units • Special I/O Slaves that provide two RS-232C ports and control I/O from the Master Units. MULTIPLE I/O TERMINALs • Multiple I/O Units can be combined under a Communications Unit and treated as a single Slave. • Special I/O Units, such as Analog I/O Units, and High-speed Counter Units are also available. 7 Section 1-1 Overview of DeviceNet 1-1-2 Slaves DeviceNet Slaves are classified as follows: • General-purpose Slaves Slaves with I/O functions that use a normal connector to connect the communications cable. • Environment-resistive Slaves Slaves with I/O functions that use a round, water-proof connector to connect the communications cable. • Special I/O Slaves Slaves with functions other than I/O functions (such as message communications) that use a normal connector to connect the communications cable. Type Cable Normal square connector General purpose Name Transistor Remote I/O Terminals Transistor Remote I/O Terminals with 3tier I/O Terminal Blocks Appearance I/O points 8 input points, NPN Model DRT1-ID08 8 input points, PNP 16 input points, NPN DRT1-ID08-1 DRT1-ID16 16 input points, PNP 8 output points, NPN DRT1-ID16-1 DRT1-OD08 8 output points, PNP 16 output points, NPN DRT1-OD08-1 DRT1-OD16 16 output points, PNP DRT1-OD16-1 8 input/8 output points, DRT1-MD16 NPN 16 input points, NPN DRT1-ID16T 16 input points, PNP 16 input points, NPN DRT1-ID16T-1 DRT1-ID16TA 16 input points, PNP 16 output points, NPN DRT1-ID16TA-1 DRT1-OD16T 16 output points, PNP 16 output points, NPN DRT1-OD16T-1 DRT1-OD16TA 16 output points, PNP 8 input/8 output points, NPN 8 input/8 output points, PNP 8 input/8 output points, NPN DRT1-OD16TA-1 DRT1-MD16T DRT1-MD16T-1 DRT1-MD16TA 8 input/8 output points, DRT1-MD16TA-1 PNP 8 Features --- Easy wiring (no need to double-wire terminals and wiring locations are easy to understand) Separate power supply not needed for the DRT1@D16TA (same power supply used as communications power supply). Section 1-1 Overview of DeviceNet Type Cable Normal square connectors General purpose Name Transistor Remote I/O Terminals with I/O Connectors I/O points 32 input points, NPN Model DRT1-ID32ML 32 input points, PNP 32 output points, NPN DRT1-ID32ML-1 DRT1-OD32ML 32 output points, PNP 16 input/16 output points, NPN DRT1-OD32ML-1 DRT1-MD32ML 16 input/16 output points, PNP DRT1-MD32ML-1 16 input points, NPN 16 input points, PNP DRT1-ID16X DRT1-ID16X-1 16 output points, NPN 16 output points, PNP DRT1-OD16X DRT1-OD16X-1 Sensor Terminals 16 input points, NPN DRT1-HD16S Temperature Input Terminals 4 thermocouple input points DRT1-TS04T 4 temperature-resistant input points DRT1-TS04P 4 analog input points (4 words) or 2 input points (2 words) (voltage or current) DRT1-AD04 Applicable range: 1 to 5 V, 0 to 5 V, 0 to 10 V, –10 to +10 V, 0 to 20 mA, or 4 to 20 mA input (switchable) Resolution: 1/6,000 4 analog input points (4 words) (voltage or current DRT1-AD04H Applicable range: 1 to 5 V, 0 to 5 V, 0 to 10 V, 0 to 20 mA, or 4 to 20 mA input (switchable) Resolution: 1/30,000 Remote Adapters Analog Input Terminals Appearance 8 input/8 output points, DRT1-ND16S NPN Features Compact: 35 x 60 x 80 mm (WxDxH) Connection to I/O Blocks possible through MIL cables. Separate power supply not needed (same power supply used as communications power supply). Compact: 85 x 50 x 40 mm (WxDxH) Connects to G70D I/O Block for output via relays or power MOS FET relays. Connected to photoelectric and proximity sensors with connectors Thermocouple Temperature-resistant input Analog Output Terminals 2 analog output points DRT1-DA02 (2 words) Applicable range: 1 to 5 V, 0 to 10 V, –10 to +10 V, 0 to 20 mA, or 4 to 20 mA output (switchable) Resolution: 1/6,000 CQM1 I/O Link Units 16 internal input/ 16 internal output points (between CQM1 and Master Unit) Pier-to-pier remote I/O PLC communications CQM1-DRT21 9 Section 1-1 Overview of DeviceNet Type Cable Round communications connectors Environment-resistive Terminals Name Waterproof Terminals Environmentresistive Transistor Terminals Appearance I/O points 4 input points, NPN Model DRT1-ID04CL 4 input points, PNP 8 input points, NPN DRT1-ID04CL-1 DRT1-ID08CL 8 input points, PNP 4 output points, NPN DRT1-ID08CL-1 DRT1-OD04CL 4 output points, PNP 8 output points, NPN DRT1-OD04CL-1 DRT1-OD08CL 8 output points, PNP 8 input points, NPN DRT1-OD08CL-1 DRT1-ID08C 8 output points, NPN 16 input points, NPN DRT1-OD08C DRT1-HD16C 16 input points, PNP 16 output points, NPN DRT1-HD16C-1 DRT1-WD16C 16 output points, PNP DRT1-WD16C-1 8 input/8 output points, DRT1-MD16C NPN Features Better resistance to environment with waterproof, drop-proof construction (IP67). Connects without tools to sensors, valves, and other devices with XS2series connectors. Better resistance to environment with spatterproof, waterproof, dropproof construction (IP66). Connects without tools to sensors, valves, and other devices with XS2series connectors. 8 input/8 output points, DRT1-MD16C-1 PNP Normal square connectors Special I/O Slaves 10 B7AC Interface Unit 10 inputs x 3 ports DRT1-B7AC C200H I/O Link Units 512 input points max. C200HW-DRT21 (32 words) 512 output points max. (32 words) RS-232C Units 16 input points (1 word) (status area) DRT1-232C2 Each Unit connects to three branches. Connects without tools to sensors, valves, and other devices with XS2series connectors. Better resistance to environment with spatterproof, waterproof, dropproof construction (IP66). Pier-to-pier remote I/O PLC communications Max. I/O area: 512 inputs and 512 outputs. User allocations of I/O area. Two RS-232C ports Explicit messages used for data transfers (151 bytes max.) Explicit messages used for settings and control. RS-232C port status reflected in inputs. Section 1-1 Overview of DeviceNet 1-1-3 Slave Mounting and Connection Methods Type Cable Name Normal square connectors General purpose Transistor Remote I/O Terminals Model DRT1-ID08 DRT1-ID08-1 DRT1-ID16 Mounting I/O connections Combined devices DIN Track or screws M3 terminal block, 2 tiers Connected to terminal block Internal I/O power power supply supply M3 termi- M3 terminal block nal block DIN Track or screws M3 terminal block, 3 tiers Connected to terminal block M3 termi- M3 terminal block nal block DRT1-ID16-1 DRT1-OD08 DRT1-OD08-1 DRT1-OD16 DRT1-OD16-1 DRT1-MD16 Transistor Remote I/O Terminals with 3-tier I/O Terminal Blocks DRT1-ID16T DRT1-ID16T-1 DRT1-OD16T DRT1-OD16T-1 DRT1-MD16T DRT1-MD16T-1 DRT1-ID16TA DRT1-ID16TA-1 Same as communications power supply DRT1-OD16TA DRT1-OD16TA-1 DRT1-MD16TA DRT1-MD16TA-1 Transistor Remote I/O Terminals with I/O Connectors DIN Track or directly to wall with mounting bracket MIL connector Cable with MIL Same as connector and communications I/O Block power supply DIN Track or screws Flat cable connector, MIL socket G70D I/O Block Sensor Termi- DRT1-HD16S nals DRT1-ND16S DIN Track or screws I/O connector Sensor or external devices with connector Temperature Input Terminals DIN Track or screws M3 terminal block DIN Track or screws M3 terminal block Remote Adapters DRT1-ID32ML DRT1-ID32ML-1 DRT1-OD32ML DRT1-OD32ML-1 DRT1-MD32ML DRT1-MD32ML-1 DRT1-ID16X DRT1-ID16X-1 DRT1-OD16X DRT1-OD16X-1 Analog Input Terminals DRT1-TS04T DRT1-TS04P DRT1-AD04 DRT1-AD04H Thermometer Temperature resistance input device 0 to 5 V, 1 to 5 V, 0 to 10 V, −10 to 10 V, 0 to 20 mA, 4 to 20 mA MIL connector (for both inputs and outputs) M3 termi- Flat cable nal block connector with MIL socket (for both inputs and outputs) M3 termi- I/O connal block nectors (for both inputs and outputs) M3 termi- None nal block M3 termi- None nal block 11 Section 1-1 Overview of DeviceNet Type Cable Name Model Mounting I/O connections Combined devices Internal power supply I/O power supply Environment-resistive Terminals Normal square connectors Round communications connectors General purpose Analog Output Terminals DRT1-DA02 DIN Track or screws M3 terminal block 1 to 5 V, 0 to 10 V, −10 to 10 V, 0 to 20 mA, 4 to 20 mA M3 termi- None nal block CQM1 I/O Link Units CQM1-DRT21 Directly to PLC None PLC-to-PLC link Supplied from PLC Waterproof Terminals DRT1-ID04CL Screws Round, waterproof connector (XS2 compatible) Cable with XS2 connector on one end and cables with XS2 connector on both ends with sensor with direct connector or relay sensor connector and sensor with pull-out connector Same as Cable with communi- XS2 concations nector power supply DRT1-ID04CL-1 DRT1-ID08CL DRT1-ID08CL-1 DRT1-OD04CL DRT1-OD04CL-1 DRT1-OD08CL Environmentresistive Transistor Terminals DRT1-OD08CL-1 DRT1-ID08C DRT1-OD08C DRT1-HD16C None Cable with XS2 connector DRT1-HD16C-1 DRT1-WD16C DRT1-WD16C-1 DRT1-MD16C B7AC Interface Unit Normal square connector Special I/O Terminals 12 DRT1-MD16C-1 DRT1-B7AC Screws Round, water- B7AC x 3 Units Cable None proof connecwith XS2 (communitor connector cations connections to B7AC via round waterproof connector) C200H I/O Link Units C200HW-DRT21 To Backplane None PLC-to-PLC link Supplied from PLC None RS-232C Units DRT1-232C2 DIN Track or screws Two RS-232 ports Devices with M3 termi- None RS-232C inter- nal block face (e.g., barcode reader) for two ports SECTION 2 Example System Setup This section provides information on hardware aspects of Masters and Slaves connected to a DeviceNet Network to ensure the proper operation of the system. Included are system configuration examples, basic procedures for wiring, mounting and setting Master and Slave Units, connecting cables and power supplies, creating I/O tables, and creating and registering scan lists. 2-1 Basic Procedures and Configuration Examples . . . . . . . . . . . . . . . . . . . . . . . 14 2-1-1 Basic Procedures. . . . . . . . . . . . . . . . . . . . . . . . . . . . . . . . . . . . . . . . 14 2-1-2 System Configuration Example . . . . . . . . . . . . . . . . . . . . . . . . . . . . 15 2-2 Preparations. . . . . . . . . . . . . . . . . . . . . . . . . . . . . . . . . . . . . . . . . . . . . . . . . . . 15 2-3 Setting and Wiring Hardware . . . . . . . . . . . . . . . . . . . . . . . . . . . . . . . . . . . . . 16 2-4 2-5 2-3-1 Mounting and Setting the Master Unit . . . . . . . . . . . . . . . . . . . . . . . 16 2-3-2 Mounting and Setting Slaves . . . . . . . . . . . . . . . . . . . . . . . . . . . . . . 17 2-3-3 Mounting Connecting Devices . . . . . . . . . . . . . . . . . . . . . . . . . . . . . 18 2-3-4 Connecting Cables . . . . . . . . . . . . . . . . . . . . . . . . . . . . . . . . . . . . . . 19 Starting Communications . . . . . . . . . . . . . . . . . . . . . . . . . . . . . . . . . . . . . . . . 20 2-4-1 Creating I/O Tables for the Master Unit . . . . . . . . . . . . . . . . . . . . . . 20 2-4-2 Starting the System . . . . . . . . . . . . . . . . . . . . . . . . . . . . . . . . . . . . . . 20 2-4-3 Creating and Registering Scan Lists. . . . . . . . . . . . . . . . . . . . . . . . . 21 Checking Operations. . . . . . . . . . . . . . . . . . . . . . . . . . . . . . . . . . . . . . . . . . . . 24 2-5-1 Indicator Status . . . . . . . . . . . . . . . . . . . . . . . . . . . . . . . . . . . . . . . . . 24 2-5-2 Reading and Writing Data . . . . . . . . . . . . . . . . . . . . . . . . . . . . . . . . 24 13 Basic Procedures and Configuration Examples 2-1 Section 2-1 Basic Procedures and Configuration Examples The examples shown here provide the basic operating procedures for DeviceNet. 2-1-1 Basic Procedures Use the following procedures to operate the DeviceNet Slave Units. For details on settings and connections, refer to the operation manual for the Master Unit. For further details on Slave Units, refer to SECTION 4 Generalpurpose Slaves to SECTION 6 Special I/O Slave Units Specifications. Preparing the Units 1,2,3... 1. Select the appropriate Units. Refer to page 15. 2. Determine the appropriate wiring method. Refer to page 15. 3. Determine the appropriate method for supplying communications power. Refer to page 15. Setting and Wiring Hardware 1,2,3... 1. Separate and lay the cables. 2. Mount the Master Unit and specify the correct settings. Refer to page 16. 3. Mount the Slave Units and specify the correct settings. Refer to page 17. 4. Mount other devices to be connected to the Network. Refer to page 15. 5. Connect the cables. Refer to page 15. 6. Wire the I/O cables. Refer to page 15. Starting Communications 1,2,3... 1. Create the I/O tables. Refer to page 20. 2. Start up the system. Refer to page 20. 3. Create and register the scan list. Refer to page 21. Checking Operations 1,2,3... 1. Check the status of the indicators on the Unit. Refer to page 24. 2. Check that data is reading and writing properly. Refer to page 24. Note The examples provided in this section show the minimum settings to operate the system. If details on other settings for actual operation are required, refer the operation manual for the Master Unit. For further details on Slave Units, refer to SECTION 4 General-purpose Slaves to SECTION 6 Special I/O Slave Units Specifications. 14 Section 2-2 Preparations 2-1-2 System Configuration Example The following diagram shows the operating procedure using a system configuration example. The system configuration shown here uses Thin Cables. C200H-OD215 Output Unit C200HW-DRM21-V1 Master Unit S82K-05024 24-V DC Power Supply (Node 00) (100 V AC, 50 W) C200HX PLC C200HW-DRT21 I/O Link Unit (Node 07) C200HX PLC H7F 7-segment Display Device DRT1-ID16 Remote I/O Terminal 16 transistor inputs (Node 01) DRT1-OD16 Remote I/O Terminal 16 transistor outputs (Node 02) DCN1-1C T-branch Tap DCN1-3 T-branch Tap with Terminating Resistor DCN1-1C T-branch Tap with Terminating Resistor DRT1-232C2 RS-232C Unit allocated 1 input word (Node 08) DRT1-TS04T Temperature Input Terminal with 4 inputs (allocated 4 words) (Node 03) Power is supplied to each node in the above diagram using the following devices. Internal power: S82K-05024 (100 V AC, 50 W) I/O power: 2-2 S82K-05024 (100 V AC, 50 W) Preparations Selecting Units Select the following Units as shown in 2-1-2 System Configuration Example. Master Unit: C200HW-DRM21-V1 Slave Units: DRT1-ID16 DRT1-OD16 DRT1-TS04T C200HW-DRT21 DRT1-232C2 There is a complete line of OMRON Master Units and Slave Units available that are compatible with DeviceNet. Select Units that suit the needs of the system. For further details on types of Units, refer to 1-1-2 Slaves. Wiring Either Thick Cables or Thin Cables can be used to wire a DeviceNet Network. Flexible branching of cables is possible by using either T-branch Taps or multi-drop connections. Restrictions on the maximum network length and total branch line length depends on the baud rate and type of cable used. For details, refer to the DeviceNet Operation Manual (W267). In 2-1-2 System Configuration Example, Thin Cables are used with T-branch Taps for connecting Slave Units to the trunk line. Communications Power Supply Each node (Master or Slave) must be supplied with a 24-V DC power supply for proper DeviceNet communications. The communications power, however, can be supplied by communications cables and does not require separate wiring. For systems that have a short maximum network length, power can be supplied to all nodes by using one communications power supply. Various conditions, constraints, and measures affect how the communications power is 15 Section 2-3 Setting and Wiring Hardware supplied. In the examples shown here, the power is supplied from one communications power supply, and communications cables are connected using T-branch Taps. Refer to the DeviceNet Operation Manual (W267) for details on methods of supplying communications power. Note Use the OMRON Connectors shown below when using Thick Cables and multi-drop connections for wiring. XW4B-05C4-T-D (Without set screws) 2-3 XW4B-05C4-TF-D (With set screws) Setting and Wiring Hardware Use the following procedures to mount, set, and wire the hardware. 2-3-1 Mounting and Setting the Master Unit Settings The components, functions, and switch settings for the C200HW-DRM21-V1 Master Unit mounted to a C200HX PLC are shown as an example in the following diagram. For information on switch settings and other Master Units, refer to the operation manual for the Master Unit. Front panel Rear panel Indicators Rear-panel DIP switch These pins have the following functions: Pins 1 to 6: Node address Pins 7 and 8: Reserved (Always OFF.) Here, all pins are set to OFF to set the node address to 01 Rotary switch This switch sets the Master's single-digit hexadecimal unit number. Here, set this switch to 0. Front-panel DIP switch These pins have the following functions: Pins 1 and 2: Baud rate Pin 3: Continue/stop communications for error Pin 4: Reserved (Always OFF.) Here, all pins are turned OFF to set the baud rate to 125 Kbps and to continue communications for errors. Communications connector 16 Section 2-3 Setting and Wiring Hardware Mounting 2-3-2 Settings The Master Unit is mounted to the Backplane of the PLC in the same way as other Units are normally mounted. For details on mounting Master Units to PLCs, and mounting control panels to PLCs, refer to the applicable CPU Unit Operation Manual. Mounting and Setting Slaves The following example shows Slave settings. For details on how to set Slaves, refer to SECTION 4 General-purpose Slaves to SECTION 6 Special I/ O Slave Units Specifications. C200HW-DRM21-V1 Master Unit (Node 00) DRT1-ID16 Remote I/O Terminal 16 transistor inputs (Node 01) C200HW-DRT21 I/O Link Unit (Node 07) DRT1-TS04T Temperature Input Terminal with 4 inputs (allocated 4 words) (Node 03) DRT1-OD16 Remote I/O Terminal 16 transistor outputs (Node 01) DRT1-232C2 RS-232C Unit (allocated 1 input word) (Node 08) • DRT-ID16 Remote I/O Terminals (Transistor Inputs) Node Address: 01 Baud Rate: 125 kbps • DRT-OD16 Remote I/O Terminals (Transistor Outputs) Node Address: 02 Baud Rate: 125 kbps Hold/Clear Outputs for Communications Error: Clear • DRT1-TS04T Temperature Input Terminals Node Address: 03 Baud Rate: 125 kbps Temperature Scale: °C Display Mode for 2 Digits Below Decimal Point: Normal mode • C200HW-DRT21 I/O Link Units Node Address: 07 Unit Number: 0 Baud Rate: 125 kbps Write Area Handling for Communications Error: Clear • DRT1-232C2 RS-232C Units Node Address: 08 Baud Rate: 125 kbps 17 Section 2-3 Setting and Wiring Hardware Mounting C200H I/O Link Units C200H I/O Link Units are mounted to C200HX Backplanes in the same way as Units are normally mounted to PLCs. For details on mounting I/O Link Units to PLCs, and mounting control panels to PLCs, refer to the CPU Unit’s Operation Manual. A maximum of 16 C200H I/O Link Units can be mounted to the CPU Rack and Expansion I/O Racks for a C200HX/HG/HE PLC. Remote I/O Terminals and Temperature Input Terminals Remote I/O Terminals and Temperature Input Terminals are mounted using either of the following two methods. • Screw Mounting While referring to the dimensions for each Slave provided in SECTION 4 General-purpose Slaves to SECTION 6 Special I/O Slave Units Specifications, open mounting holes in the control panel and secure the Slave Units to the control panel using M4 screws. The appropriate tightening torque is 0.6 to 0.98 N⋅m. • DIN Track Mounting Secure the bottom of the Slave Unit to a 35-mm DIN track, or secure the Slave Unit to the track between two End Plates. Mounting Examples The following diagram shows all Units except the PLC node mounted to DIN tracks. Master Unit Temperature Input Terminal Output Terminal Input Terminal C200H I/O Link Unit RS-232C Unit 2-3-3 Mounting Connecting Devices Connecting devices that require being mounted are as follows: • T-branch Taps: Secure to the control panel with screws, or mounted to a DIN track. • Terminal-block Terminating Resistors: Secure to the control panel with screws. Open mounting holes in the control panel and secure the device to the control panel with screws. Tighten the M4 screws to a tightening torque of 0.6 to 1.18 N⋅m. The method of mounting devices to DIN track is the same as for Slave Units. Refer to the DeviceNet Operation Manual (W267) for details. 18 Section 2-3 Setting and Wiring Hardware 2-3-4 Connecting Cables Connecting Communications Cables Connect the Master Unit and T-branch Taps, T-branch Taps and T-branch Taps, and T-branch Taps and Slaves with Thin DeviceNet Communications Cables. If Terminating Resistors are connected to T-branch Taps, connect to the T-branch Tap furthest from the power supply. The T-branch Tap, however, must be within 6 m of the furthest node. 24-V DC power supply C200HX PLC C200HX PLC 7-segment display device M7F T-branch Tap T-branch Tap T-branch Tap Remote I/O Terminal RS-232C Unit Temperature Input Terminal Remote I/O Terminal If Terminal-block Terminating Resistors are used, the Terminating Resistor must be connected to the end of a cable within 1 m from the furthest node. Use the following procedure to connect the cables. Refer to 4-2 Connecting Communications Cables to General-purpose Slaves for details. 1,2,3... 1. Prepare the communications cables and attach the connectors to the cables. 2. Connect the communications cable connectors to the node connectors on the Master Unit, T-branch Taps, and Slaves. Wiring the Internal Power Supply Most nodes on the network require an internal power supply in addition to the communications power supply to operate the device. Supply internal power to all nodes except for the Master Unit and C200H I/O Link Unit. Connect M3 crimp terminals to the power lines and then connect them to the terminal block. Wiring the I/O Power Supply If required, an I/O power supply for I/O devices is connected to the Remote I/ O Terminals. Connect M3 crimp terminals to the power lines and then connect them to the terminal block. Wiring I/O Connect M3 crimp terminals to the signal lines of Remote I/O Terminals and Temperature Input Terminals and then connect them to the terminal block. 19 Section 2-4 Starting Communications 2-4 Starting Communications After setting and wiring the hardware, turn ON the communications power supply, the internal power supply of each node, and the I/O power supply, and then start communications using the following procedure. 2-4-1 Creating I/O Tables for the Master Unit I/O tables must be created in the CPU Unit to distinguish between the different Slaves mounted to the PLC. Turn ON the PLC to which the Master Unit and C200H I/O Link Unit are mounted, connect the Peripheral Devices to the PLC, and create the I/O tables. Once the I/O tables have been created, turn OFF the power to the PLC. The following example shows the procedure for creating I/O tables using a Programming Console. For details on creating I/O tables, refer to the Operation Manual for the Peripheral Device being used. 1,2,3... 1. Turn ON power to Master Unit. 2. Switch the operating mode switch to PROGRAM mode. 3. Input the following key sequence. CLR MONTR CLR <PROGRAM> PASSWORD! <PROGRAM> 00000 FUN 00000 FUN (0??) CH 00000IOTBL ?-?U= ? 00000IOTBL WRIT ???? 00000IOTBL WRIT 9713 00000IOTBL OK WRIT SHIFT CHG B 9 7 D 1 BZ 3 WRITE Precautions • Do not turn ON multiple Master Units in a DeviceNet Network until scan lists for all Masters have been registered. Finish creating I/O tables for one Master Unit before creating tables for another Master Unit. • Do not turn ON the power supply to other nodes or the communications power supply when creating I/O tables. 2-4-2 Starting the System Turn ON the communications power supply and the power to other nodes in the following order. 1,2,3... 20 1. Turn ON the communications power supply. Section 2-4 Starting Communications 2. Turn ON the power to each Slave. 3. Turn ON the power to the Master Unit. The power supplies listed above can all be turned ON simultaneously. The external I/O power supply can be turned ON at any time. 2-4-3 Creating and Registering Scan Lists Scan lists are lists that register the information that is transferred between Master Units and Slaves. The Master Unit compares the scan list with the status of the Slave currently being communicated with, so communications with the Slave are always being checked. For details on scan lists and remote I/O communications, refer to the operation manual for the Master Unit. Note When the scan list is disabled, communications are possible with all Slaves on the DeviceNet Network with fixed allocations. Without scan lists, however, the Master Unit cannot check if there is an error in a Slave. For normal operations, always enable the scan lists. Precautions • User I/O Allocations The user can allocated desired words for Slave I/O in the DeviceNet I/O Areas (Input Area, Output Area) in the Master Unit. When user allocations are used, scan lists must be created with a DeviceNet Configurator and registered in the Master Unit. The scan list is enabled as soon as it is registered, and I/O communications start according to the scan list. For details, refer to the DeviceNet Operation Manual (W267) and the DeviceNet Configurator Operation Manual (W328). • Fixed I/O Allocations Slave I/O is allocated in the DeviceNet I/O area (Input Area, Output Area) in the Master Unit in the same order as the Slave node addresses. When fixed allocations are used, the scan lists are automatically created and registered using the software switches. The scan list is enabled as soon as it is registered, and I/O communications start according to the scan list. The registered scan lists can be cleared using the software switches. Note If scan lists are not enabled, operation will be performed on the DeviceNet network according to fixed allocations, but the Master will not be able to recognize errors. Always enable the scan lists during normal operation. Creating and Registering Fixed Allocation Scan Lists The method of creating and registering scan lists for fixed allocation using Programming Console is explained here. For details on operating the Peripheral Device, refer to the Operation Manual for the Peripheral Device being used with the PLC. For details on creating scan lists, refer to the operation manual for the Master Unit. For fixed allocations, the PLC’s Peripheral Device is used to operate the Master Unit’s software switches, monitor the Status Areas (Master Status Area 1 and Registered Slave Data Area), and create and register scan lists. 21 Section 2-4 Starting Communications Creating and Registering Scan Lists Use the following procedure to create, register, and enable the scan lists. • The following procedure shows how to clear scan lists. CLR S C 1 0 0 CHG 2 00000 R c100 0000 WRITE c100 0002 O c100 B200 CHG 1,2,3... 0 WRITE c100 0000 1. Switch the operating mode switch to PROGRAM mode. 2. Display the initial screen. 3. Monitor IR 100 (software switches). 4. Turn ON bit 01(Scan List Clear Bit). 5. Monitor IR 101 (Master Status Area 1) and check that bit 09 (scan list operation end) turns ON. 6. Turn OFF bit IR 10001. • The following procedure shows how to check the registered slave data. Monitor IR 102 to IR 105 (Registered Slave Data Area), and check that bits 00, 01, 02, 03, 07, and 08 are ON. The numbers in the following table indicate the node addresses. In the Registered Slave Data Area, the bits corresponding to the nodes that are communicating properly are ON. Bit IR 102 IR 103 IR 104 IR 105 22 Section 2-4 Starting Communications • The following procedure shows how to create and register scan lists. SHIFT CH 1 0 0 MONTR c100 0000 CHG 1 WRITE c100 0001 c101 9200 CHG 1,2,3... 0 WRITE c100 0000 1. Monitor IR 100 (software switches). 2. Turn ON bit 00 (Scan List Enable Bit). 3. Monitor IR 101 (Master Status Area 1), and check that bit 09 (scan list operation end) turns ON. 4. Turn OFF bit IR 10000. The scan list will be created, registered, and I/O communications will start with the scan list enabled. Software Switches and Status Area The software switches and Status Area are allocated in IR words according to the Master Unit’s unit number as shown in the following diagram. Master Unit Unit No. 0 to 9 First word: 100 + (10 × unit No.) C200HX/HG/HE/HS CPU Unit IR Area IR 100 Unit No. 0 IR 100 IR 101 Unit No. 0 Software switch: 1 word Status Area: 9 words IR 190 Unit No. 9 Unit No. A to F First word: 400 + 110 × (unit No. –10) 10 words IR 109 IR 400 Unit No. A IR 450 Unit No. F DM Area Unit No. 0 Unit No. 1 Unit No. 0 Status Area: 2 words First word: DM 6032 + (2 × unit No.) Unit No. F 23 Section 2-5 Checking Operations The following diagram shows the Status Area configuration for unit number 0. IR Area IR 101 IR 102 Master Status Area 1 (1 word) Registered Slave Data Area (4 words) IR 106 Normal Slave Data Area (4 words) IR 109 DM Area DM 6032 DM 6033 2-5 Master Status Area 2 (1 word) Current Communications Cycle Time (1 word) Checking Operations Use the procedures provided here to check that I/O communications are operating normally. 2-5-1 Indicator Status I/O communications are operating normally if the MS and NS indicators for all nodes are lit in green, and the 7-segment indicator on the front panel of the Master Unit is displaying the node address of the Master Unit as shown in the following diagram (when the Master Unit’s node address is 00), and the scan list is enabled. Master Unit OFF: Scan list enabled Master Unit node address 00 2-5-2 Reading and Writing Data Connect the Peripheral Device for the PLC to the Master Unit, write the Master Unit’s Output Area and are read the Input Area, and check that the data is the same in the Slaves. Refer to the operation manual for the Master Unit for details on Output Area and Input Area addresses and how to allocate Slave I/O. 24 Section 2-5 Checking Operations I/O between Remote I/O Terminals Create ladder programs in the PLC of the Master Unit, and check that when the switch on the DRT1-ID16 Input Terminal turns ON, the indicator on the DRT1-OD16 Output Terminal turns ON. Master Unit DRT1-ID16 Input Terminal Switch1 (bit 00) DRT1-OD16 Output Terminal Indicator (bit 00) Slave Allocations In the system configuration examples in this section, Slave I/O is allocated in the Master Unit’s IR Area for fixed remote I/O communications as shown in the following diagram. Output area IR 50 IR 51 IR 52 IR 53 IR 54 IR 55 IR 56 IR 57 IR 58 IR 59 Displaying Temperature Data with 7-segment Display Not used. Not used. DRT1-OD16 Not used. C200HW-DRT21 Not used. Not used. Input Area IR 350 IR 351 IR 352 IR 353 IR 354 IR 355 IR 356 IR 357 IR 358 IR 359 Not used. DRT1-ID16 Not used. DRT1-TS04T C200HW-DRT21 DRT1-232C2 Not used. Operation can be checked by displaying the temperature data input into the Temperature Input Terminal on the 7-segment display (static, negative logic model) connected to the Output Unit (IR 110) of the Master’s PLC. The temperature data can be converted to BCD data by using the BCD(024) instruction (when the temperature data is negative, it can be converted to positive data using the NEG(160) instruction). For details on using instructions, 25 Section 2-5 Checking Operations refer to the C200HX, C200HG, C200HE Programmable Controllers Operation Manual (W322). 35315 NEG Rightmost bit of temperature data 353 DM1000 35315 MOV (21) 353 DM1000 25315 BCD (24) Normally ON DM1000 110 • Use the MVN(022) instruction to reverse data for displays that require positive logic. • Use the 7SEG(214) instruction in the I/O Unit instructions for dynamic displays. Checking I/O Links for C200H I/O Link Units Read/Write Areas in the C200H I/O Link Unit are allocated by default to the words in the PLC that it is mounted to as follows: Read Area: Write Area: IR 50 (1 word) IR 350 (1 word) The C200H I/O Link Unit’s Read/Write Areas are normally linked to the Input/ Output Areas of the Master (the Input/Output Areas occupied by the C200H I/ O Link Unit in the Master Unit) as shown in the following diagram. Input Area Output area Master Unit IR 057 IR 357 Slave IR 050 C200H I/O Link Unit IR 350 Read Area Write Area Connect the Peripheral Device to the PLC, monitor the changes in current positions, and check that the links are operating normally. 26 SECTION 3 Common Slave Specifications This section provides specifications that are common to all Slaves. 3-1 Common Slave Specifications . . . . . . . . . . . . . . . . . . . . . . . . . . . . . . . . . . . . 28 3-1-1 Communications Specifications . . . . . . . . . . . . . . . . . . . . . . . . . . . . 28 3-1-2 MS and NS Indicators. . . . . . . . . . . . . . . . . . . . . . . . . . . . . . . . . . . . 29 27 Section 3-1 Common Slave Specifications 3-1 3-1-1 Common Slave Specifications Communications Specifications Item Communications protocol Supported connections (communications) Connection forms Baud rate Specification DeviceNet Master-Slave: Remote I/O and explicit messages Both conform to DeviceNet specifications Combination of multi-drop and T-branch connections (for trunk or drop lines) 500 kbps, 250 kbps, or 125 kbps (switchable) Communications media Special 5-wire cables (2 signal lines, 2 power lines, 1 shield line) Communications distances Network length: 100 m max. (100 m max.) Drop line length: 6 m max. Total drop line length: 39 m max. 500 kbps 250 kbps Network length: 250 m max. (100 m max.) Drop line length: 6 m max. Total drop line length: 78 m max. 125 kbps Network length: 500 m max. (100 m max.) Drop line length: 6 m max. Total drop line length: 156 m max. Parentheses indicate the length when Thin Cables are used. Communications power supply Max. number of nodes 11 to 25 V DC 64 nodes (including Configurator when used) Max. number of Masters Without Configurator: 1 With Configurator: Max. number of Slaves 63 Slaves Communications cycle time Without Configurator: Input Slaves (16-pt): 16 Output Slaves (16-pt):16 Cycle time at 500 kbps: 9.3 ms With Configurator: Set between 2 and 500 ms Calculated value takes priority if longer. Max. communications cycle time with multiple Masters Input Slaves (16-pt): 16 Output Slaves (16-pt):16 Max. cycle time at 500 kbps: 18 ms CRC error check Error control checks 28 63 Section 3-1 Common Slave Specifications 3-1-2 MS and NS Indicators This section describes the meaning of MS and NS indicators for the Slave Units. The MS (Module Status) indicator displays the status of a node on the network. The NS (Network Status) indicator displays the status of the entire network. The MS and NS indicators can be green or red and they can be OFF, flashing, or ON. The following table shows the meaning of these indicator conditions. The following diagram shows the indicator panel on a basic Slave Unit. The position and status of the indicators, may change depending on the specific Slave Unit. Indicator MS Color Definition Meaning Normal operating status. Flashing Device Operational Device in Standby Unrecoverable Fault Minor Fault --- OFF No Power Power isn’t being supplied, waiting for initial processing to start, or the Unit is being reset. Green ON Link OK. On-line, Connected. Network is operating normally (communications established) Flashing On-line, Not Connected ON Critical Link Failure Network is operating normally, but communications have not yet been established. A fatal communications error has occurred. Network communications are not possible. Check for a node address duplication or Bus Off error. Flashing Connection Time-out Communications timeout. OFF Not Powered/ Not On-Line Checking for node address duplication on the Master, switch settings are incorrect, or the power supply is OFF. Green Status ON Flashing Red NS Red --- ON Reading switch settings. Unit hardware error: Watchdog timer error. Switch settings incorrect, etc. 29 SECTION 4 General-purpose Slaves This section provides specifications and describes the components, indicators, switch settings, and other aspects of General-purpose Slaves. 4-1 4-2 4-3 Common Specifications for General-purpose Slaves . . . . . . . . . . . . . . . . . . . 33 4-1-1 Current Consumption and Weight . . . . . . . . . . . . . . . . . . . . . . . . . . 33 Connecting Communications Cables to General-purpose Slaves . . . . . . . . . . 34 4-2-1 Connecting Communications Cables . . . . . . . . . . . . . . . . . . . . . . . . 34 4-2-2 Connecting Communications Cables to the Nodes . . . . . . . . . . . . . 37 4-2-3 Mounting Terminating Resistors . . . . . . . . . . . . . . . . . . . . . . . . . . . 39 Transistor Remote I/O Terminals . . . . . . . . . . . . . . . . . . . . . . . . . . . . . . . . . . 40 4-3-1 Node Address, Baud Rate, and Output Hold/Clear Settings . . . . . . 40 4-3-2 Transistor Remote Input Terminals with 8 Points: DRT1-ID08 (NPN) and DRT1-ID08-1 (PNP) . . . . . . . . . . . . . . . . . 41 4-3-3 Transistor Remote Input Terminals with 16 Points: DRT1-ID16 (NPN) and DRT1-ID16-1 (PNP) . . . . . . . . . . . . . . . . . 45 4-3-4 Transistor Remote Output Terminals with 8 Points: DRT1-OD08 (NPN) and DRT1-OD08-1 (PNP). . . . . . . . . . . . . . . . 49 Transistor Remote Output Terminals with 16 Points: DRT1-OD16 (NPN) and DRT1-OD16-1 (PNP). . . . . . . . . . . . . . . . 53 Transistor Remote I/O Terminal with 8 Inputs and 8 Outputs: DRT1-MD16 (NPN) . . . . . . . . . . . . . . . . . . . . . . . . . . . . . . . . . . . . . 56 4-3-7 Mounting in Control Panels . . . . . . . . . . . . . . . . . . . . . . . . . . . . . . . 59 4-3-8 Wiring Internal Power Supplies, I/O Power Supplies, and I/O Lines 60 Transistor Remote I/O Terminals with 3-tier I/O Terminal Blocks . . . . . . . . 62 4-4-1 Node Address, Baud Rate, and Output Hold/Clear Settings . . . . . . 62 4-4-2 Transistor Remote Input Terminals with 16 Points and 3-tier I/O Terminal Blocks: DRT1-ID16T (NPN) and DRT1-ID16T-1 (PNP) . . . . . . . . . . . . . . . 63 Transistor Remote Input Terminals with 16 Points and 3-tier I/O Terminal Blocks: DRT1-ID16TA (NPN) and DRT1-ID16TA-1 (PNP) . . . . . . . . . . . . 67 4-4-4 Transistor Remote Output Terminals with 16 Points and 3-tier I/O Terminal Blocks: DRT1-OD16T (NPN) and DRT1-OD16T-1 (PNP) . . . . . . . . . . . . . 70 4-4-5 Transistor Remote Output Terminals with 16 Points and 3-tier I/O Terminal Blocks: DRT1-OD16TA (NPN) and DRT1-OD16TA-1 (PNP). . . . . . . . . . . 73 Transistor Remote I/O Terminals with 8 Inputs and 8 Outputs and 3-tier I/O Terminal Blocks: DRT1-MD16T (NPN) and DRT1-MD16T-1 (PNP) . . . . . . . . . . . . . 77 Transistor Remote I/O Terminals with 8 Inputs and 8 Outputs and 3-tier I/O Terminal Blocks: DRT1-MD16TA (NPN) and DRT1-MD16TA-1 (PNP) . . . . . . . . . . 81 4-4-8 Mounting in Control Panels . . . . . . . . . . . . . . . . . . . . . . . . . . . . . . . 85 4-4-9 Wiring Internal Power Supplies, I/O Power Supplies, and I/O Lines 86 4-3-5 4-3-6 4-4 4-4-3 4-4-6 4-4-7 31 4-5 Transistor Remote I/O Terminals with Connectors . . . . . . . . . . . . . . . . . . . . . 87 4-5-1 Node Address, Baud Rate, and Output Hold/Clear Settings. . . . . . . 87 4-5-2 Transistor Remote Input Terminals with 32 Points and Connectors: DRT1-ID32ML (NPN) and DRT1-ID32ML-1 (PNP) . . . . . . . . . . . 88 Transistor Remote Output Terminals with 32 Points and Connectors: DRT1-OD32ML (NPN) and DRT1-OD32ML-1 (PNP) . . . . . . . . . . 93 Transistor Remote I/O Terminals with 16 Inputs and 16 Outputs and Connectors: DRT1-MD32ML (NPN) and DRT1-MD32ML-1 (PNP) . . . . . . . . . 98 4-5-5 Mounting in Control Panels . . . . . . . . . . . . . . . . . . . . . . . . . . . . . . . 103 4-5-6 4-5-3 4-5-4 4-6 4-7 4-8 108 111 4-6-1 Node Address, Baud Rate, and Output Hold/Clear Settings. . . . . . . 111 4-6-2 Remote Input Adapters with 16 Points: DRT1-ID16X (NPN) and DRT1-ID16X-1 (PNP). . . . . . . . . . . . . . . 112 4-6-3 Remote Output Adapters with 16 Points: DRT1-OD16X (NPN) and DRT1-OD16X-1 (PNP) . . . . . . . . . . . . . 117 4-6-4 Mounting in Control Panels . . . . . . . . . . . . . . . . . . . . . . . . . . . . . . . 122 4-6-5 Wiring Internal Power Supplies, I/O Power Supplies, and I/O Lines 122 Sensor Terminals . . . . . . . . . . . . . . . . . . . . . . . . . . . . . . . . . . . . . . . . . . . . . . . 124 4-7-1 Node Address, Baud Rate, and Output Hold/Clear Settings. . . . . . . 124 4-7-2 Transistor Input Sensor Terminals with 16 Points: DRT1-HD16S . . 125 4-7-3 Transistor I/O Sensor Terminals with 8 Inputs and 8 Outputs: DRT1-ND16S . . . . . . . . . . . . . . . . . . . . . . . . . . . . . . . . . . . . . . . . . . 129 4-7-4 Mounting in Control Panels . . . . . . . . . . . . . . . . . . . . . . . . . . . . . . . 132 4-7-5 Wiring Internal Power Supplies, I/O Power Supplies, and I/O Lines 133 Analog I/O Terminals . . . . . . . . . . . . . . . . . . . . . . . . . . . . . . . . . . . . . . . . . . . 136 4-8-1 Node Address and Baud Rate Setting . . . . . . . . . . . . . . . . . . . . . . . . 136 4-8-2 Analog Input Terminals: DRT1-AD04 and DRT1-AD04H . . . . . . . 137 4-8-3 Analog Output Terminal: DRT1-DA02. . . . . . . . . . . . . . . . . . . . . . . 149 4-8-4 Mounting in Control Panels . . . . . . . . . . . . . . . . . . . . . . . . . . . . . . . 156 4-8-5 Wiring Internal Power Supplies and I/O Lines . . . . . . . . . . . . . . . . . 156 Temperature Input Terminals. . . . . . . . . . . . . . . . . . . . . . . . . . . . . . . . . . . . . . 157 4-9-1 Node Address and Baud Rate Settings . . . . . . . . . . . . . . . . . . . . . . . 157 4-9-2 Temperature Input Terminals: DRT1-TS04T and DRT1-TS04P . . . 158 4-9-3 Mounting in Control Panels . . . . . . . . . . . . . . . . . . . . . . . . . . . . . . . 169 4-9-4 Wiring Internal Power Supplies and I/O Lines . . . . . . . . . . . . . . . . . 170 4-10 CQM1 I/O Link Unit . . . . . . . . . . . . . . . . . . . . . . . . . . . . . . . . . . . . . . . . . . . . 171 4-10-1 Node Address, Baud Rate, and Output Hold/Clear Settings. . . . . . . 171 4-9 32 Wiring Internal Power Supplies, I/O Power Supplies and I/O . . . . . Remote Adapters . . . . . . . . . . . . . . . . . . . . . . . . . . . . . . . . . . . . . . . . . . . . . . . 4-10-2 CQM1 I/O Link Unit: CQM1-DRT21 . . . . . . . . . . . . . . . . . . . . . . . 173 4-10-3 Mounting to Control Panels . . . . . . . . . . . . . . . . . . . . . . . . . . . . . . . 174 Section 4-1 Common Specifications for General-purpose Slaves 4-1 Common Specifications for General-purpose Slaves The following table lists specifications which are common to all General-purpose Slaves. For details of specifications for each Slave, refer to the following Slave specifications pages. 4-1-1 Item Communications power supply voltage Internal power supply voltage I/O power supply voltage Specifications 11 to 25 V DC (Supplied from the communications connector.) 20.4 to 26.4 V DC (24 V DC, –15 to +10%) 20.4 to 26.4 V DC (24 V DC, –15 to +10%) Noise immunity ±1.5 kVp-p Vibration resistance Shock resistance 10 to 55 Hz, 1.0-mm double amplitude 200 m/s2 Dielectric strength Insulation resistance 500 V AC (between isolated circuits) 20 MΩ min. at 250 V DC (between isolated circuits) Ambient temperature Ambient humidity 0 to 55°C 35% to 85% Operating atmosphere Storage temperature No corrosive gases –20 to 65°C Mounting Mounting strength M4 screw mounting or DIN 35-mm track mounting 50 N Track direction: 10 N Screw tightening torque M2 (Communications connector): M3 (Power supply, I/O terminals): M4 (Mounting Unit): Pulse width: 0.1 to 1 µs Pulse rise time: 1 ns (via noise simulator) 0.25 to 0.3 N⋅m 0.3 to 0.5 N⋅m 0.6 to 0.98 N⋅m Current Consumption and Weight The following table lists the current consumption, weight, and connector lock strength for basic Slaves. Model DRT1-ID08(-1) Communications Internal power power supply supply 30 mA max. 50 mA max. Weight 135 g max. DRT1-ID16 (-1) DRT1-OD08(-1) 30 mA max. 30 mA max. 50 mA max. 50 mA max. 170 g max. 140 g max. DRT1-OD16 (-1) DRT1-MD16 30 mA max. 25 mA max. 50 mA max. 45 mA max. 180 g max. 170 g max. DRT1-ID16T(-1) DRT1-ID16TA(-1) 30 mA max. 50 mA max. DRT1-OD16T(-1) 30 mA max. 90 mA max. 315 g max. (Same as communica- 315 g max. tions power supply) 90 mA max. 315 g max. DRT1-OD16TA(-1) 50 mA max. DRT1-MD16T(-1) 30 mA max. DRT1-MD16TA(-1) 50 mA max. (Same as communica- 315 g max. tions power supply) DRT1-ID32ML(-1) 50 mA max. (Same as communica- 110 g max. tions power supply) DRT1-OD32ML(-1) 90 mA max. (Same as communica- 100 g max. tions power supply) (Same as communica- 315 g max. tions power supply) 90 mA max. 315 g max. 33 Section 4-2 Connecting Communications Cables to General-purpose Slaves Model DRT1-ID16X(-1) Communications Internal power Weight power supply supply 70 mA max. (Same as communica- 110 g max. tions power supply) 30 mA max. 70 mA max. 110 g max. DRT1-OD16X (-1) DRT1-HD16S 30 mA max. 40 mA max. 70 mA max. 60 mA max. 110 g max. 140 g max. DRT1-ND16S DRT1-AD04 40 mA max. 30 mA max. 60 mA max. 80 mA max. 140 g max. 160 g max. DRT1-AD04H DRT1-DA02 30 mA max. 30 mA max. 130 mA max. 140 mA max. 160 g max. 160 g max. DRT1-TS04T DRT1-TS04P 30 mA max. 30 mA max. 130 mA max. 130 mA max. 230 g max. 160 g max. CQM1-DRT21 40 mA max. CPM1A-DRT21 30 mA max. 80 mA max. at 5 V DC 185 g max. (Power supplied from the PLC’s Power Supply Unit.) 50 mA max. at 5 V DC 125 g max. (Power supplied from the PLC’s CPU Unit.) DRT1-MD32ML(-1) 4-2 Connecting Communications Cables to General-purpose Slaves Communications cables are connected to General-purpose Slaves using normal square connectors. 4-2-1 Connecting Communications Cables Use the following procedure to prepare and connect the communications cables to the connectors. Although some connectors are equipped with set screws and some are not, the methods used to connect the cables to the connectors are the same. 1,2,3... 1. Remove about 30 to 80 mm of the cable covering, being careful not to damage the shield weaving underneath. Do not remove more than necessary; removing too much of the covering can result in short circuits. About 30 to 80 mm (Remove as little as possible.) 2. Carefully peel back the weaving. You will find the signal lines, power lines, and the shielding wire. The shielding wire will be loose on the outside of the other lines, but it is harder than the weaving and should be easily identified. Shielding wire 34 Section 4-2 Connecting Communications Cables to General-purpose Slaves 3. Remove the exposed weaving, remove the aluminum tape from the signal and power lines, and strip the covering from the signal and power lines to the proper length for the crimp terminal connectors. Twist together the wires of each of the signal and power lines. Strip to match the crimp terminals 4. Attach the crimp terminals to the lines and then cover any exposed areas of the cable and lines with electricians tape or heat-shrinking tubes. 5. Orient the connector properly, loosen the line set screws, and then insert the lines in order: Black, blue, shield, white, and then red. The wiring method is the same regardless of whether or not the connector is equipped with set screws. Connector without Set Screws Black (–V) Connector with Set Screws Black (–V) Blue (CAN low) Blue (CAN low) Shield Shield White (CAN high) Red (+V) White (CAN high) Red (+V) There are colored stickers provided on the Master Unit and Slaves that match the colors of the lines to be inserted. Be sure that the colors match when wiring the connectors. These colors are as follows: Black Color Signal Power line, negative voltage (–V) Blue --- Communications line, low (CAN low) Shield White Red Communications line, high (CAN high) Power line, positive voltage (+V) Note Be sure the line set screws are sufficiently loosened before attempting to insert the lines. If these screws are not loose, the lines will enter the gaps in the back of the connector and will not lock properly. 35 Section 4-2 Connecting Communications Cables to General-purpose Slaves 6. Tighten the line set screws for each line in the connector. Tighten the screws to a torque of 0.25 to 0.3 N⋅m. You will not be able to tighten these screws with a normal screwdriver, which narrows to a point at the end. You will need a screwdriver that is consistently thin for the entire length. Connector without Set Screws Use a flat-blade screwdriver that is consistently thin at the end. Crimp Terminals We recommend the following crimp terminals. • Phoenix Contact, AI-series Crimp Terminals Crimp terminal Wire Insert the line into the terminal and then crimp. The following crimp tool is also available. Phoenix Contact, ZA3 Crimp Tool The OMRON XW4Z-00C Screwdriver is available for tightening the line set screws. The end of the screwdriver has the following dimensions. Side View Front View 0.6 mm 3.5 mm • Supplying Communications Power Using T-branch Taps Connect the V+ and V– of the power lines to the connectors in the same way as for the communications cables. If the communications power sup- 36 Section 4-2 Connecting Communications Cables to General-purpose Slaves ply is in one location only, connect a shield to the connectors when fixing them, and ground to 100 Ω max. T-branch Tap or Power Supply Tap V+ CAN H Shield CAN L V– Communications power supply Communications cable Ground (100 Ω max.) FG V– V+ Communications power supply Ground (100 Ω max.) Power supply with cable grounded (one location only) 4-2-2 Connecting Communications Cables to the Nodes Align the node connector with the cable connector and fully insert the projecting part of the cable connector into the node connector. Depending on the type of Slave used, the connectors are secured with screws or a connector band, or there is no component for securing the connectors. Always fix securely those connectors that can be secured. Master Temperature Input Terminal Output Terminal Input Terminal C200H I/O Link Unit RS-232C Unit Securing Slave Connectors with Screws Tighten the screws fixing the connectors to a torque of 0.25 to 0.3 N⋅m. Securing Slave Connectors with Connector Bands Use the following procedure to secure connectors with connector bands. 37 Section 4-2 Connecting Communications Cables to General-purpose Slaves 1,2,3... 1. Pull out the connector band from the Slave Unit. Slave Connector band Slave 2. Lift up the connector band. 3. Insert the connector into the Slave Unit. 4. Wrap the connector band around the connector and secure firmly. Note Multidrop connectors cannot be secured. Multi-drop Connections • Multi-drop Connections with Accessory Connector (Thin Cables Only) The connectors provided with the Units can be used for a multi-drop connection as long as thin cables are being used, just insert both lines into the same hole in the connector. Be sure to use crimp connectors on both lines. The following illustration shows a multi-drop connection for a connector without set screws. When connecting two lines to the same hole, first place them together in one pressure-welded terminal as shown below. Pressure-welded terminal for 2 lines Cables Pressure-welded terminal: Pheonix Contacts model AI-TWIN2X0.5-8WH (product number 3200933) Pressure-welding tool: Pheonix Contacts model UD6 (product number 1204436) 38 Section 4-2 Connecting Communications Cables to General-purpose Slaves • Multi-drop Connections with Special Connector (Thin or Thick Cables) A multi-drop wiring connector (sold separately) can be used to wire a multi-drop connector for either thin or thick cables. This multi-drop wiring connector is required to wire a multi-drop connection with thick cables, which are too thick for two lines to fit into the connector provided with the Units. The multi-drop wiring connector cannot always be used with Master Units or the CQM1 I/O Link Units because it may come into contact with the Units mounted next to the Master Unit or the CQM1 I/O Link Unit. If this happens, use a T-branch Tap to wire the connection. 4-2-3 Mounting Terminating Resistors Terminating Resistors must be used at both ends of the trunk line. Terminating Resistors • T-branch Tap Terminating Resistors A terminating resistor is included with the T-branch Tap. Clip the leads on the resistor to about 3 mm and insert it into the T-branch Tap as shown in the following diagram. The resistor can face in either direction. • Terminal-block Terminating Resistors A terminating resistor is built into the Terminal-block Terminating Resistor. To connect the cable to the Terminating Resistor, attach standard M3 crimp terminals to the signal wires and securely screw the terminals to the Terminal-block Terminating Resistor. Tighten to a torque of 0.3 to 0.5 N⋅m. 6.0 mm max. 6.0 mm max. 39 Section 4-3 Transistor Remote I/O Terminals 4-3 4-3-1 Transistor Remote I/O Terminals Node Address, Baud Rate, and Output Hold/Clear Settings This section describes the Slaves’ node address setting, baud rate settings, and hold/clear outputs for communications error setting. These settings are made using the following pins on the DIP switch. Node address setting: Baud rate setting: Pins 1 through 6 Pins 7 and 8 ON Output hold/clear setting:Pin 10 (affects only outputs) 1 2 3 4 5 6 7 8 9 10 Output hold/clear setting for communications errors (for outputs) Node address setting Reserved (Always OFF.) Baud rate setting Node Address Settings The node address of the Remote I/O Terminal is set with pins 1 through 6 of the DIP switch. Any node address within the setting range can be used as long as it isn’t already set on another node. DIP switch setting Node address Pin 6 Pin 5 Pin 4 Pin 3 Pin 2 Pin 1 0 0 0 0 0 0 0 (default) 0 0 0 0 0 0 0 0 0 1 1 0 1 2 : : : : 1 1 1 1 1 1 1 1 0 1 1 0 61 62 1 1 1 1 1 1 63 0: OFF, 1: ON Note 1. Refer to Appendix A Node Address Settings Table for a complete table of DIP switch settings. 2. The Slave won’t be able to participate in communications if the same node address is used for the Master or another Slave node (node address duplication error). Baud Rate Setting Pins 7 and 8 are used to set the baud rate as shown in the following table. Note Pin 7 Pin 8 OFF ON OFF OFF 125 kbps (default) 250 kbps Baud rate OFF ON ON ON 500 kbps Not allowed. 1. Always turn OFF the Slave’s power supply (including the communications power supply) before changing the baud rate setting. 2. Set the same baud rate on all of the nodes (master and slaves) in the Network. Any slaves with baud rates different from the master’s rate won’t be able to participate in communications. Furthermore, a node with an incorrect baud rate may cause communications errors between nodes with correct baud rate settings. 40 Section 4-3 Transistor Remote I/O Terminals Setting Pins 9 and 10 The functions of pins 9 and 10 differ for inputs and outputs, as shown in the following diagram. Input: Not used (Always OFF) Output: Hold/Clear outputs for communications error Reserved: Always OFF Pin 9: Reserved (Always OFF) Pin 10: As follows: Inputs: Outputs: OFF (Clear): No function (Always OFF) Hold/Clear outputs for communications error All output data from the Master will be cleared to 0 when a communications error occurs. ON (Hold): All output data from the Master will be retained when a communications error occurs. Pins 9 and 10 are factory-set to OFF. 4-3-2 Transistor Remote Input Terminals with 8 Points: DRT1-ID08 (NPN) and DRT1-ID08-1 (PNP) Input Specifications Item Specification Model Internal I/O common DRT1-ID08 NPN Input points ON voltage OFF current 8 points (allocated one word in Master) 15 V DC min. (between 15 V DC min. (between each input terminal and V) each input terminal and G) 5 V DC max. (between 5 V DC max. (between each input terminal and V) each input terminal and G) 1 mA max. Input current ON delay time 10 mA max./point 1.5 ms max. OFF delay time Number of circuits 1.5 ms max. 8 points with one common OFF voltage DRT1-ID08-1 PNP 41 Section 4-3 Transistor Remote I/O Terminals Components of the DRT1-ID08 and DRT1-ID08-1 Input indicators Indicate the status of each contact. (Lit when the input is ON.) DeviceNet Indicators (Refer to page 312.) Terminal block DIN track mounting hooks Communications connector DIP switch (Refer to page 40.) Pins 1 to 6: Node address setting Pins 7 and 8: Baud rate setting Pins 9 and 10: Reserved (Always OFF.) Internal Circuits The following diagram shows the internal circuits for the DRT1-ID08 Input Terminal. Photocoupler Photocoupler V+ DRAIN CAN L Physical layer 0 Photocoupler V– SOURCE 24 V DC + SOURCE 24 V DC – 1 Internal circuitry CAN H V 24 V DC V 24 V DC Photocoupler DC-DC converter (Isolated) G G 42 Section 4-3 Transistor Remote I/O Terminals The following diagram shows the internal circuits for the DRT1-ID08-1 Remote Input Terminal. V Photocoupler V 24 V DC Photocoupler 0 V+ DRAIN CAN L Physical layer 1 Photocoupler V– Internal circuitry CAN H Photocoupler G The following diagram shows the wiring of the DRT1-ID08 Remote Input Terminal. SOURCE 24 V DC 24 V DC + – – + NPN output 3-wire sensor (photoelectric or proximity sensor) 2-wire sensor (limit switch) Blue (black) Black (white) I/O power supply Brown (red) + Blue (black) – Brown (white) Internal circuits power supply Blue (black) Wiring Black (white) SOURCE 24 V DC – G DC-DC converter (Isolated) Brown (red) SOURCE 24 V DC + NPN output 3-wire sensor (photoelectric or proximity sensor) 43 Section 4-3 Transistor Remote I/O Terminals The following diagram shows the wiring of the DRT1-ID08-1 Remote Input Terminal. SOURCE 24 V DC 24 V DC + – – + PNP output 3-wire sensor (photoelectric or proximity sensor) Note 2-wire sensor (limit switch) Brown (red) Black (white) Blue (black) Blue (black) Brown (red) I/O power supply Black (white) + Black (blue) – Brown (white) Internal circuits power supply PNP output 3-wire sensor (photoelectric or proximity sensor) 1. The V terminals (terminal numbers 9 and 14) are connected internally, as are the G terminals (terminal numbers 2 and 7). When I/O power is supplied to terminals 9 and 2, power can be supplied to sensors from terminals 14 and 7. When the power supply exceeds 1.2 A, the power supply should not be input through the terminals; an external power supply must be used instead. 2. Wire colors in parentheses are the previous JIS colors for photoelectric and proximity sensors. 44 Section 4-3 Transistor Remote I/O Terminals Dimensions The following diagram shows the dimensions for the DRT1-ID08 and DRT1ID08-1 Remote Input Terminals. All dimensions are in mm. Approx. 73 50 max. (With connector attached) 125 max. 40 max. Mounting holes 40 ± 0.3 Two, 4.2 dia. or M4 115 ± 0.3 4-3-3 Transistor Remote Input Terminals with 16 Points: DRT1-ID16 (NPN) and DRT1-ID16-1 (PNP) Input Specifications Item Specification DRT1-ID16-1 Model DRT1-ID16 Internal I/O common Input points NPN 16 points PNP ON voltage 15 V DC min. (between each input terminal and V) 15 V DC min. (between each input terminal and G) OFF voltage 5 V DC max. (between each input terminal and V) 5 V DC max. (between each input terminal and G) OFF current Input current 1 mA max. 10 mA max./point ON delay time OFF delay time 1.5 ms max. 1.5 ms max. Number of circuits 16 points with one common 45 Section 4-3 Transistor Remote I/O Terminals Components of the DRT1-ID16 and DRT1-ID16-1 Input indicators Indicate the status of each contact. (Lit when the input is ON.) DeviceNet Indicators (Refer to page 312.) Terminal block DIN track mounting hooks Communications connector DIP switch (Refer to page 40.) Pins 1 to 6: Node address setting Pins 7 and 8: Baud rate setting Pins 9 and 10: Reserved (Always OFF.) Internal Circuits The following diagram shows the internal circuits for the DRT1-ID16 Remote Input Terminal. Photocoupler Photocoupler V+ DRAIN CAN L Physical layer 0 Photocoupler V– SOURCE 24 V DC + SOURCE 24 V DC – 46 DC-DC converter (Isolated) Internal circuitry CAN H V 24 V DC V 24 V DC 1 Photocoupler G G Section 4-3 Transistor Remote I/O Terminals The following diagram shows the internal circuits for the DRT1-ID16-1 Remote Input Terminal. V Photocoupler V 24 V DC Photocoupler 0 V+ Physical layer DRAIN CAN L 1 Photocoupler V– Internal circuitry CAN H Photocoupler G SOURCE 24 V DC + G DC-DC converter (Isolated) SOURCE 24 V DC – Wiring The following diagram shows the wiring of the DRT1-ID16 Remote Input Terminal. SOURCE 24 V DC 24 V DC + – – + Internal circuits power supply NPN output 3-wire sensor (photoelectric or proximity sensor) 2-wire sensor (limit switch) Blue (black) Black (white) Brown (red) Blue (black) Brown (white) Blue (black) I/O power supply Black (white) + Brown (red) – NPN output 3-wire sensor (photoelectric or proximity sensor) 47 Section 4-3 Transistor Remote I/O Terminals The following diagram shows the wiring of the DRT1-ID16-1 Remote Input Terminal. SOURCE 24 V DC 24 V DC + – – + Internal circuits power supply PNP output 3-wire sensor (photoelectric or proximity sensor) Note 2-wire sensor (limit switch) Brown (red) Black (white) Blue (black) Brown (red) Black (white) Blue (black) Brown (white) Blue (black) Brown (white) Blue (black) Brown (red) Black (white) Black (blue) Brown (red) I/O power supply Black (white) + Blue (black) – PNP output 3-wire sensor (photoelectric or proximity sensor) 1. Wire colors in parentheses are the previous JIS colors for photoelectric and proximity sensors. 2. The V terminals (terminal numbers 13 and 22) are connected internally, as are the G terminals (terminal numbers 2 and 11). When I/O power is supplied to terminals 13 and 2, power can be supplied to sensors from terminals 22 and 11. When the power supply exceeds 1.2 A, the power supply should not be input through the terminals; an external power supply must be used instead. 48 Section 4-3 Transistor Remote I/O Terminals Dimensions The following diagram shows the dimensions for the DRT1-ID16 and DRT1ID16-1 Remote Input Terminals. All dimensions are in mm. Approx. 73 12 50 max. (With connector attached) 150 max. 40 max. Mounting holes 40 ± 0.3 Two, 4.2 dia. or M4 140 ± 0.3 4-3-4 Transistor Remote Output Terminals with 8 Points: DRT1-OD08 (NPN) and DRT1-OD08-1 (PNP) Output Specifications Item Specification DRT1-OD08-1 Model DRT1-OD08 Internal I/O common Output points NPN PNP 8 points (Master Unit uses one word) Rated output current Residual voltage Leakage current 0.3 A/point, 2.4 A/common 1.2 V max. (at 0.3 A, 1.2 V max. (at 0.3 A, between each output termi- between each output terminal and G) nal and V) 0.1 mA max. ON delay time OFF delay time 0.5 ms max. 1.5 ms max. Number of circuits 8 points with one common 49 Section 4-3 Transistor Remote I/O Terminals Components of the DRT1-OD08 and DRT1-OD08-1 Output indicators Indicate the output status of each contact. (Lit when the output is ON.) DeviceNet Indicators (Refer to page 312.) Terminal block DIN track mounting hooks Mounting screw holes Communications connector DIP switch (Refer to page 40.) Pins 1 to 6: Node address setting Pins 7 and 8: Baud rate setting Pin 9: Reserved (Always OFF.) Pin 10: Hold/Clear outputs for communications error Internal Circuits The following diagram shows the internal circuits for the DRT1-OD08 Remote Output Terminal. Photocoupler Voltage step-down V+ CAN H DRAIN CAN L Photocoupler Physical layer Photocoupler SOURCE 24 V DC – V 24 V DC V 24 V DC 0 1 Internal circuitry V– SOURCE 24 V DC + V 24 V DC Photocoupler DC-DC converter (Isolated) G 50 Section 4-3 Transistor Remote I/O Terminals The following diagram shows the internal circuits for the DRT1-OD08-1 Remote Output Terminal. Photocoupler V 24 V DC V+ DRAIN CAN L Physical layer 1 V– SOURCE 24 V DC + SOURCE 24 V DC – 0 Photocoupler Internal circuitry CAN H Photocoupler Photocoupler DC-DC converter (Isolated) G G Voltage step-down Wiring The following diagram shows the wiring of the DRT1-OD08 Remote Output Terminal. SOURCE 24 V DC 24 V DC + – – + Internal circuits power supply – + I/O power supply Solenoid Valve Solenoid Note The V terminals (terminal numbers 7, 9, and 14) are connected internally. When I/O power is supplied to terminals 9, power can be supplied to output devices from terminals 7 and 14. When the power supply exceeds 1.2 A, the power supply should not be input through the terminals; an external power supply must be used instead. 51 Section 4-3 Transistor Remote I/O Terminals The following diagram shows the wiring of the DRT1-OD08-1 Remote Output Terminal. SOURCE 24 V DC 24 V DC + G – – G + Internal circuits power supply – + I/O power supply Solenoid Valve Solenoid Note The G terminals (terminal numbers 2, 7, and 14) are connected internally. When I/O power is supplied to terminal 2, power can be supplied to output devices from terminals 7 and 14. When the power supply exceeds 1.2 A, the power supply should not be input through the terminals; an external power supply must be used instead. Dimensions The following diagram shows the dimensions for the DRT1-OD08 and DRT1OD08-1 Remote Output Terminals. All dimensions are in mm. Approx. 73 12 50 max. (With connector attached) 125 max. Mounting holes 40 ± 0.3 Two, 4.2 dia. or M4 115 ± 0.3 52 40 max. Section 4-3 Transistor Remote I/O Terminals 4-3-5 Transistor Remote Output Terminals with 16 Points: DRT1-OD16 (NPN) and DRT1-OD16-1 (PNP) Output Specifications Item Specification DRT1-OD16-1 Model DRT1-OD16 Internal I/O common Output points NPN 16 points Rated output current Residual voltage 0.3 A/point, 2.4 A/common 1.2 V max. (at 0.3 A, 1.2 V max. (at 0.3 A, between each output termi- between each output terminal and G) nal and V) Leakage current ON delay time 0.1 mA max. 0.5 ms max. OFF delay time Number of circuits 1.5 ms max. 16 points with one common PNP Components of the DRT1-OD16 and DRT1-OD16-1 Output indicators Indicate the output status of each contact. (Lit when the output is ON.) DeviceNet Indicators (Refer to page 312.) Terminal block DIN track mounting hooks Communications connector DIP switch (Refer to page 40.) Pins 1 to 6: Node address setting Pins 7 and 8: Baud rate setting Pin 9: Reserved (Always OFF.) Pin 10: Hold/Clear outputs for communications error 53 Section 4-3 Transistor Remote I/O Terminals Internal Circuits The following diagram shows the internal circuits for the DRT1-OD16 Remote Output Terminal. Photocoupler Voltage step-down V+ CAN H DRAIN CAN L V 24 V DC Photocoupler Physical layer SOURCE 24 V DC – V 24 V DC Photocoupler 0 1 Internal circuitry V– SOURCE 24 V DC + V 24 V DC Photocoupler DC-DC converter (Isolated) G The following diagram shows the internal circuits for the DRT1-OD16-1 Remote Output Terminal. Photocoupler V+ V 24 V DC Photocoupler CAN H DRAIN CAN L Physical layer Photocoupler SOURCE 24 V DC – 1 Internal circuitry V– SOURCE 24 V DC + 0 Photocoupler DC-DC converter (Isolated) G G Voltage step-down 54 Section 4-3 Transistor Remote I/O Terminals Wiring The following diagram shows the wiring of the DRT1-OD16 Remote Output Terminal. SOURCE 24 V DC 24 V DC + – – + Internal circuits power supply – + I/O power supply Solenoid Valve Solenoid Note The V terminals (terminal numbers 11, 13, and 22) are connected internally. When I/O power is supplied to terminal 13, power can be supplied to output devices from terminals 22 and 11. When the power supply exceeds 1.2 A, the power supply should not be input through the terminals; an external power supply must be used instead. The following diagram shows the wiring of the DRT1-OD16-1 Remote Output Terminal. SOURCE 24 V DC 24 V DC + G – – G + Internal circuits power supply – + I/O power supply Solenoid Valve Solenoid Note The G terminals (terminal numbers 2, 11, and 22) are connected internally. When I/O power is supplied to terminal 2, power can be supplied to output devices from terminals 22 and 11. When the power supply exceeds 1.2 A, the power supply should not be input through the terminals; an external power supply must be used instead. 55 Section 4-3 Transistor Remote I/O Terminals Dimensions The following diagram shows the dimensions for the DRT1-OD16 and DRT1OD16-1 Remote Output Terminals. All dimensions are in mm. Approx. 73 12 50 max. (With connector attached) 40 max. 150 max. Mounting holes 40 ± 0.3 Two, 4.2 dia. or M4 140 ± 0.3 4-3-6 Transistor Remote I/O Terminal with 8 Inputs and 8 Outputs: DRT1-MD16 (NPN) Input Specifications Item 56 Specification Model DRT1-MD16 Internal I/O common Input points NPN 8 points ON voltage OFF voltage 15 V DC min. (between each input terminal and IN V) 5 V DC max. (between each input terminal and IN V) OFF current Input current 1 mA max. 10 mA max./point ON delay time OFF delay time 1.5 ms max. 1.5 ms max. Number of circuits 8 points with one common Section 4-3 Transistor Remote I/O Terminals Output Specifications Item Specification Model DRT1-MD16 Internal I/O common Output points NPN 8 points Rated output current Residual voltage 0.3 A/point, 2.4 A/common 1.2 V max. (at 0.3 A, between each output terminal and OUT G) Leakage current ON delay time 0.1 mA max. 0.5 ms max. OFF delay time Number of circuits 1.5 ms max. 8 points with one common Components 1 3 5 7 9 11 13 15 0 2 4 6 8 10 12 14 I/O Indicators Indicate the status of each input and output. The left half are for inputs; the right half are for outputs. (Lit when the input or output is ON.) DeviceNet Indicators (Refer to page 312.) Terminal block DIN track mounting hooks Communications connector DIP switch (Refer to page 40.) Pins 1 to 6: Node address setting Pins 7 and 8: Baud rate setting Pin 9: Reserved (Always OFF.) Pin 10: Hold/Clear outputs for communications error 57 Section 4-3 Transistor Remote I/O Terminals Internal Circuits The following diagram shows the internal circuits for the DRT1-MD16 Remote I/O Terminal. Physical layer Photo- Transceiver coupler 1 V+ 2 3 V 24 V DC Photocoupler NC DRAIN IN Photocoupler TXD CAN_H 4 0 CAN_L RXD 5 V− Non-isolated power supply 5V Photocoupler 5V @V 5V DC-DC converter (Isolated) SOURCE 24 V DC − 1 Internal circuitry To physical layer SOURCE 24 V DC + . . . . G 1MS 1NS @V Voltage step-down Photocoupler OUT V 24 V DC 0 . . . . Photocoupler . . . 1 G 0V Wiring The following diagram shows the wiring of the DRT1-MD16 Remote I/O Terminal. SOURCE 24 V DC 24 V DC 12 1 14 IN V + 2 OUT 15 1 3 IN G − − IN 13 3 4 0 16 17 5 5 2 18 7 6 4 1 7 6 19 3 8 0 21 5 9 2 24 V DC 20 22 10 4 OUT V 7 11 6 OUT G + Internal circuits power supply − Blue (black) Brown (white) Power supply for inputs Blue (black) Brown (red) + Black (white) − 3-wire sensor with 2-wire sensor NPN output (e.g., limit switch) (photoelectric or proximity sensor) Note 58 + Power supply for outputs Solenoid, valve, etc. 1. IN V is not connected internally to OUT V (terminals 13 and 22), and IN G is not connected internally to OUT G (terminals 2 and 11). Connect them carefully. Section 4-3 Transistor Remote I/O Terminals 2. Line colors have been changed accompanying changes in JIS standards for photoelectric and proximity sensors. Previous colors are given in parentheses. Dimensions The following diagram shows the dimensions for the DRT1-MD16 Remote I/O Terminals. All dimensions are in mm. Approx.73 (With connector attached) DRT1-MD16 No. 50 max. REMOTE TERMINAL 24VDC MS 1 3 5 7 1 3 5 7 0 2 4 6 0 2 4 6 IN OUT NS 2 3 4 5 6 7 0 1 2 3 4 5 6 7 12 0 1 150 max. 40 max. Mounting holes 40±0.3 Two, 4.2 dia. or M4 140±0.3 4-3-7 Mounting in Control Panels Either of the following methods can be used to mount an Remote I/O Terminal in a control panel. Using Screws Open mounting holes in the control panel according to the dimensions provided for mounting holes in the dimensions diagrams and then secure the Remote I/O Terminal with M4 screws. The appropriate tightening torque is 0.6 to 0.98 N⋅m. Using DIN Track Mount the back of the Remote I/O Terminal to a 35-mm DIN Track. To mount the Terminal, pull down on the mounting hook on the back of the Terminal with a screwdriver, insert the DIN Track on the back of the Terminal, and then secure the Terminal to the DIN Track. When finished, secure all Slaves on both ends of the DIN Track with End Plates. 59 Section 4-3 Transistor Remote I/O Terminals Connecting End Plates Hook the bottom of the End Plate onto the DIN Track, as shown at (1) in the following diagram, then hook the top of the End Plate as shown at (2). 2 1 End Plate Note Always attach End Plate to both ends of Slaves connected to DIN Track. Mounting Direction Unless specific restrictions are given for the Slave, it can be mounted in any direction. Any of the following directions are okay. Vertical 4-3-8 Wiring Internal Power Supplies, I/O Power Supplies, and I/O Lines The internal circuit power supplies, I/O power supplies, and I/O lines are all wired to M3 screw terminals. Connect M3 crimp terminals and then connect them to the terminal block. Tighten the screws fixing the crimp terminals to a torque of 0.3 to 0.5 N⋅m. 6.0 mm max. 60 6.0 mm max. Section 4-3 Transistor Remote I/O Terminals Wiring the Internal Power Supply Refer to the wiring details for each Slave for information on the terminal arrangement at the terminal block. The following example shows the internal power supply for a DRT1-ID16 Remote Input Terminal. DRT1-ID16 No. REMOTE TERMINAL 24VDC − Wiring the I/O Power Supply 1 3 5 7 9 11 13 15 0 2 4 6 8 10 12 14 + Refer to the wiring details for each Slave for information on the terminal arrangement at the terminal block. The following example shows the I/O power supply for a DRT1-ID16 Remote Input Terminal. DRT1-ID16 No. REMOTE TERMINAL 24VDC 1 3 5 7 9 11 13 15 0 2 4 6 8 10 12 14 − Wiring I/O + Refer to the wiring details for each Slave for information on the terminal arrangement at the terminal block and external I/O wiring. The following example shows the wiring to input 0 on a DRT1-ID16 Remote Input Terminal. DRT1-ID16 REMOTE TERMINAL 24VDC No. 1 3 5 7 9 11 13 15 0 2 4 6 8 10 12 14 61 Section 4-4 Transistor Remote I/O Terminals with 3-tier I/O Terminal Blocks 4-4 4-4-1 Transistor Remote I/O Terminals with 3-tier I/O Terminal Blocks Node Address, Baud Rate, and Output Hold/Clear Settings This section describes the Slaves’ node address setting, baud rate settings, and hold/clear outputs for communications error setting. These settings are made using the following pins on the DIP switch. Node address setting: Rotary switches Baud rate setting: Pins 1 and 2 Output hold/clear setting:Pin 4 (affects only outputs) Baud rate setting ON Reserved (Always OFF.) Output hold/clear setting for communications errors (for outputs) 1 2 3 4 5 6 7 8 2 3 4 0 1 7 8 2 3 5 6 9 4 9 0 1 Node address setting (×1) Node address setting (×10) Node Address Settings The node address of the Remote I/O Terminal is set with two rotary switches. The 10s digit is set on the left and the 1s digit is set on the right. Any node address within the setting range can be used as long as it isn’t already set on another node. Note The Slave won’t be able to participate in communications if the same node address is used for the Master or another Slave node (node address duplication error). Baud Rate Setting Pins 1 and 2 are used to set the baud rate as shown in the following table. (These pins are factory-set to OFF.) Pin 1 Note Pin 2 Baud rate OFF ON OFF OFF 125 kbps (default) 250 kbps OFF ON ON ON 500 kbps Not allowed. 1. Always turn OFF the Slave’s power supply (including the communications power supply) before changing the baud rate setting. 2. Set the same baud rate on all of the nodes (Master and Slaves) in the Network. Any Slaves with baud rates different from the Master’s rate won’t be able to participate in communications. Furthermore, a node with an incorrect baud rate may cause communications errors between nodes with correct baud rate settings. 62 Section 4-4 Transistor Remote I/O Terminals with 3-tier I/O Terminal Blocks The functions of pins 3 and 4 differ for inputs and outputs, as shown in the following diagram. ON Setting Pins 3 and 4 3 4 Input: Not used (Always OFF) Output: Hold/Clear outputs for communications error Reserved: Always OFF Pin 3: Reserved (Always OFF) Pin 4: As follows: Inputs: Outputs: OFF (Clear): ON (Hold): No function (Always OFF) Hold/Clear outputs for communications error All output data from the Master will be cleared to 0 when a communications error occurs. All output data from the Master will be retained when a communications error occurs. Pins 3 and 4 are factory-set to OFF. 4-4-2 Transistor Remote Input Terminals with 16 Points and 3-tier I/O Terminal Blocks: DRT1-ID16T (NPN) and DRT1-ID16T-1 (PNP) Input Specifications Item Specification DRT1-ID16T-1 Model DRT1-ID16T Internal I/O common Input points NPN 16 points PNP ON voltage 15 V DC min. (between each input terminal and V) 5 V DC max. (between each input terminal and V) 1.0 mA max. 15 V DC min. (between each input terminal and G) 5 V DC max. (between each input terminal and G) OFF voltage OFF current Input current 6.0 mA max./point at 24 V DC 3.0 mA min./point at 17 V DC ON delay time OFF delay time 1.5 ms max. 1.5 ms max. Number of circuits 8 points with two commons 63 Section 4-4 Transistor Remote I/O Terminals with 3-tier I/O Terminal Blocks Components of the DRT1-ID16T and DRT1-ID16T-1 Rotary switches (Refer to page 62.) Set the node address. DIP switch (Refer to page 62.) Pins 1 and 2: Baud rate setting Pins 3 and 4: Reserved (Always OFF.) Input Indicators Indicate the input status of each contact. (Lit when the input is ON.) DeviceNet Indicators (Refer to page 312.) DRT1-ID16T 0 REMOTE TERMINAL DC24V 1 2 3 4 5 6 7 8 9 10 11 12 13 14 15 ON DR0 DR1 NC NC IN MS NS Circuit removal screws. Terminal block Communications connector Internal power supply terminals Internal Circuits DIN track mounting hooks The following diagram shows the internal circuits for the DRT1-ID16T Remote Input Terminal. Photocoupler V1 24 V DC G1 V− V1 CANL Physical layer Photocoupler CANH V+ Internal circuitry DRAIN Photocoupler Input (0 to 7) G1 V2 24 V DC G2 SOURCE 24V DC + SOURCE 24V DC − 64 I/O power supply V2 DC-DC converter (Isolated) Input (8 to 15) Photocoupler G2 I/O power supply Section 4-4 Transistor Remote I/O Terminals with 3-tier I/O Terminal Blocks The following diagram shows the internal circuits for the DRT1-ID16T-1 Remote Input Terminal. Photocoupler I/O power supply V1 24 V DC G1 V− V1 CANL Physical layer DRAIN Input (0 to 7) Photocoupler CANH Internal circuitry V+ G1 Photocoupler V2 24 V DC I/O power supply G2 SOURCE 24 V DC + V2 DC-DC converter (Isolated) SOURCE 24 V DC − Input (8 to 15) G2 Photocoupler Wiring The following diagram shows the wiring of the DRT1-ID16T Remote Input Terminal. − + + − + 0 1 7 V1 V1 V1 V1 G1 G1 G1 G1 − + 8 9 15 V2 V2 V2 V2 G2 G2 G2 G2 − 2-wire sensor 3-wire sensor with (e.g., limit switch) NPN output (photoelectric or proximity sensor) Brown (red) Black (white) Blue (black) Blue (black) Brown (white) Black (white) Brown (red) Blue (black) Blue (black) Brown (white) Internal circuits power supply 2-wire sensor 3-wire sensor with (e.g., limit switch) NPN output (photoelectric or proximity sensor) 65 Section 4-4 Transistor Remote I/O Terminals with 3-tier I/O Terminal Blocks The following diagram shows the wiring of the DRT1-ID16T-1 Remote Input Terminal. − + + − 0 1 7 V1 V1 V1 V1 G1 G1 G1 G1 − + + 8 9 15 V2 V2 V2 V2 G2 G2 G2 G2 − Black (white) Brown (red) Blue (black) 2-wire sensor 3-wire sensor with (e.g., limit switch) PNP output (photoelectric or proximity sensor) 2-wire sensor 3-wire sensor with (e.g., limit switch) PNP output (photoelectric or proximity sensor) Note Blue (black) Brown (white) Black (white) Brown (red) Blue (black) Brown (white) Blue (black) Internal circuits power supply 1. V1 is not connected internally to V2, and G1 is not connected internally to G2. Connect them carefully. 2. Line colors have been changed accompanying changes in JIS standards for photoelectric and proximity sensors. Previous colors are given in parentheses. Dimensions The following diagram shows the dimensions for the DRT1-ID16T and DRT1ID16T-1 Remote Input Terminals. All dimensions are in mm. 180 DRT1-ID16T 0 REMOTE TERMINAL DC24V 1 2 3 4 5 6 7 8 9 10 11 12 13 14 15 ON IN MS NS 50 (54) DR0 DR1 NC NC 0 1 2 3 4 5 6 7 8 9 10 11 12 13 14 15 58 (83) Mounting holes Two, 4.2 dia. or M4 40±0.2 Values in parentheses are reference values. 170±0.2 Note The circuit section can be removed by loosening the circuit removal screws. (Refer to Components of the DRT1-ID16T and DRT1-ID16T-1.) 66 Section 4-4 Transistor Remote I/O Terminals with 3-tier I/O Terminal Blocks Always turn OFF the communications, internal, and I/O power supplies before removing or attaching the circuit section. 4-4-3 Transistor Remote Input Terminals with 16 Points and 3-tier I/O Terminal Blocks: DRT1-ID16TA (NPN) and DRT1-ID16TA-1 (PNP) Input Specifications Item Specification Model Internal I/O common DRT1-ID16TA NPN DRT1-ID16TA-1 PNP Input points ON voltage 16 points 15 V DC min. (between each input terminal and V) 5 V DC max. (between each input terminal and V) 15 V DC min. (between each input terminal and G) 5 V DC max. (between each input terminal and G) OFF voltage OFF current Input current ON delay time 1.0 mA max. 6.0 mA max./point at 24 V DC 3.0 mA min./point at 17 V DC 1.5 ms max. OFF delay time Number of circuits 1.5 ms max. 8 points with two commons Components of the DRT1-ID16TA and DRT1-ID16TA-1 Rotary switches (Refer to page 62.) Set the node address. DIP switch (Refer to page 62.) Pins 1 and 2: Baud rate setting Pins 3 and 4: Reserved (Always OFF.) Input indicators Indicate the input status of each contact. (Lit when the input is ON.) DeviceNet Indicators (Refer to page 312.) DRT1-ID16TA 0 REMOTE TERMINAL DC24V 1 2 3 4 5 6 7 8 9 10 11 12 13 14 15 ON DR0 DR1 NC NC IN MS NS Circuit removal screws. Communications connector Terminal block DIN track mounting hooks 67 Section 4-4 Transistor Remote I/O Terminals with 3-tier I/O Terminal Blocks Internal Circuits The following diagram shows the internal circuits for the DRT1-ID16TA Remote Input Terminal. V1 24 V DC 5 G1 V+ Photocoupler 4 V1 CAN_H 3 DRAIN 2 CAN_L 1 Physical layer 0 to 7 G1 Internal circuitry V− V2 24 V DC G2 Photocoupler V2 DC-DC converter (Isolated) 8 to 15 G2 The following diagram shows the internal circuits for the DRT1-ID16TA-1 Remote Input Terminal. V1 24 V DC 5 G1 V+ 4 V1 CAN_H Photocoupler 3 DRAIN 2 CAN_L 1 0 to 7 Physical layer G1 Internal circuitry V− V2 24 V DC G2 V2 Photocoupler DC-DC converter (Isolated) 8 to 15 G2 The following diagram shows the wiring of the DRT1-ID16TA Remote Input Terminal. V1 G1 G1 G1 G1 − Black (white) Brown (red) Blue (black) + 2-wire sensor 3-wire sensor with (e.g., limit switch) NPN output (photoelectric or proximity sensor) 68 V2 V2 V2 V2 G2 G2 G2 G2 − Brown (red) V1 15 Black (white) V1 9 Blue (black) V1 8 Blue (black) 7 Brown (white) 1 Brown (white) + 0 Blue (black) Wiring 2-wire sensor 3-wire sensor with (e.g., limit switch) NPN output (photoelectric or proximity sensor) Section 4-4 Transistor Remote I/O Terminals with 3-tier I/O Terminal Blocks The following diagram shows the wiring of the DRT1-ID16TA-1 Remote Input Terminal. V1 V1 V1 G1 G1 G1 G1 − 2-wire sensor 3-wire sensor with (e.g., limit switch) PNP output (photoelectric or proximity sensor) Note 15 V2 V2 V2 V2 G2 G2 G2 G2 − Brown (white) Black (white) Brown (red) Blue (black) Blue (black) + Brown (white) + 9 Black (white) V1 8 Brown (red) 7 Blue (black) 1 Blue (black) 0 2-wire sensor 3-wire sensor with (e.g., limit switch) PNP output (photoelectric or proximity sensor) 1. V1 is not connected internally to V2, and G1 is not connected internally to G2. Connect them carefully. 2. Line colors have been changed accompanying changes in JIS standards for photoelectric and proximity sensors. Previous colors are given in parentheses. Dimensions The following diagram shows the dimensions for the DRT1-ID16TA and DRT1-ID16TA-1 Remote Input Terminals. All dimensions are in mm. 180 DRT1-ID16TA 0 REMOTE TERMINAL DC24V 1 2 3 4 5 6 7 8 9 10 11 12 13 14 15 ON IN MS NS 50 0 1 2 3 4 5 6 7 8 9 10 11 12 13 14 15 58 (83) Mounting holes Values in parentheses are reference values. Two, 4.2 dia. or M4 40±0.2 (54) DR0 DR1 NC NC 170±0.2 Note The circuit section can be removed by loosening the circuit removal screws. (Refer to Components of the DRT1-ID16TA and DRT1-ID16TA-1.) 69 Section 4-4 Transistor Remote I/O Terminals with 3-tier I/O Terminal Blocks Always turn OFF the communications, internal, and I/O power supplies before removing or attaching the circuit section. 4-4-4 Transistor Remote Output Terminals with 16 Points and 3-tier I/O Terminal Blocks: DRT1-OD16T (NPN) and DRT1-OD16T-1 (PNP) Output Specifications Item Specification DRT1-OD16T-1 Model DRT1-OD16T Internal I/O common Output points NPN 16 points Rated output current Residual voltage Leakage current 0.5 A/point 1.2 V max. (at 0.5 A, 1.2 V max. (at 0.5 A, between each output termi- between each output terminal and G) nal and V) 0.1 mA max. ON delay time OFF delay time 0.5 ms max. 1.5 ms max. Number of circuits 8 points with two commons PNP Components of the DRT1-OD16T and DRT1-OD16T-1 Rotary switches (Refer to page 62.) Set the node address. DIP switch (Refer to page 62.) Pins 1 and 2: Baud rate setting Pin 3: Reserved (Always OFF.) Pin 4: Hold/Clear outputs for communications error Output indicators Indicate the output status of each contact. (Lit when the output is ON.) DeviceNet Indicators (Refer to page 312.) DRT1-OD16T 0 REMOTE TERMINAL DC24V 1 2 3 4 5 6 7 8 9 10 11 12 13 14 15 ON DR0 DR1 NC HOLD MS NS OUT Circuit removal screws. Communications connector Internal power supply terminals 70 Terminal block DIN track mounting hooks Section 4-4 Transistor Remote I/O Terminals with 3-tier I/O Terminal Blocks Internal Circuits The following diagram shows the internal circuits for the DRT1-OD16T Remote Output Terminal. Voltage step-down V1 24 V DC Photocoupler I/O power supply G1 V− V1 CANL DRAIN Physical layer Output (0 to 7) Photocoupler CANH Photocoupler G1 Internal circuitry V+ V2 24 V DC I/O power supply G2 SOURCE 24 V DC + SOURCE 24 V DC − Voltage step-down DC-DC converter (Isolated) V2 Output (8 to 15) Photocoupler G2 The following diagram shows the internal circuits for the DRT1-OD16T-1 Remote Output Terminal. Voltage step-down V1 24 V DC Photocoupler G1 V− I/O power supply V1 CANL DRAIN Physical layer Output (0 to 7) Photocoupler G1 CANH Internal circuitry V+ Voltage Photocoupler step-down V2 24 V DC G2 SOURCE 24 V DC + SOURCE 24 V DC − I/O power supply V2 DC-DC converter (Isolated) Output (8 to 15) G2 Photocoupler 71 Section 4-4 Transistor Remote I/O Terminals with 3-tier I/O Terminal Blocks Wiring The following diagram shows the wiring of the DRT1-OD16T Remote Output Terminal. − + + − 0 1 7 V1 V1 V1 V1 G1 G1 G1 G1 − + 8 9 15 V2 V2 V2 V2 G2 G2 G2 G2 − + Internal circuits power supply Solenoid, valve, etc. Solenoid, valve, etc. Solenoid, valve, etc. Solenoid, valve, etc. The following diagram shows the wiring of the DRT1-OD16T-1 Remote Output Terminal. − + + − + 0 1 7 V1 V1 V1 V1 G1 G1 G1 G1 − + 8 9 15 V2 V2 V2 V2 G2 G2 G2 G2 − Internal circuits power supply Solenoid, valve, etc. Note Solenoid, valve, etc. Solenoid, valve, etc. Solenoid, valve, etc. 1. V1 is not connected internally to V2, and G1 is not connected internally to G2. Connect them carefully 2. When using inductive loads (such as solenoids or valves), use a load with a built-in diode to absorb reverse power or attach a diode externally. 72 Section 4-4 Transistor Remote I/O Terminals with 3-tier I/O Terminal Blocks Dimensions The following diagram shows the dimensions for the DRT1-OD16T and DRT1OD16T-1 Remote Output Terminals. All dimensions are in mm. 180 DRT1-OD16T 0 REMOTE TERMINAL DC24V 1 2 3 4 5 6 7 8 9 10 11 12 13 14 15 ON OUT MS NS 50 (54) DR0 DR1 NC HOLD 0 1 2 3 4 5 6 7 8 9 10 11 12 13 14 15 58 (83) Mounting holes 40±0.2 Values in parentheses are reference values. Two, 4.2 dia. or M4 170±0.2 Note The circuit section can be removed by loosening the circuit removal screws. (Refer to Components of the DRT1-OD16T and DRT1-OD16T-1.) Always turn OFF the communications, internal, and I/O power supplies before removing or attaching the circuit section. 4-4-5 Transistor Remote Output Terminals with 16 Points and 3-tier I/O Terminal Blocks: DRT1-OD16TA (NPN) and DRT1-OD16TA-1 (PNP) Output Specifications Item Specification DRT1-OD16TA-1 Model DRT1-OD16TA Internal I/O common Output points NPN 16 points Rated output current Residual voltage Leakage current 0.5 A/point 1.2 V max. (at 0.5 A, 1.2 V max. (at 0.5 A, between each output termi- between each output terminal and G) nal and V) 0.1 mA max. ON delay time OFF delay time 0.5 ms max. 1.5 ms max. Number of circuits 8 points PNP 73 Section 4-4 Transistor Remote I/O Terminals with 3-tier I/O Terminal Blocks Components of the DRT1-OD16TA and DRT1-OD16TA-1 Rotary switches (Refer to page 62.) Set the node address. DIP switch (Refer to page 62.) Pins 1 and 2: Baud rate setting Pin 3: Reserved (Always OFF.) Pin 4: Hold/Clear outputs for communications error Output indicators Indicate the output status of each contact. (Lit when the output is ON.) DeviceNet Indicators (Refer to page 312.) DRT1-OD16TA 0 REMOTE TERMINAL DC24V 1 2 3 4 5 6 7 8 9 10 11 12 13 14 15 ON DR0 DR1 NC HOLD OUT MS NS Circuit removal screws. Terminal block Communications connector DIN track mounting hooks Internal Circuits The following diagram shows the internal circuits for the DRT1-OD16TA Remote Output Terminal. Voltage step-down V1 24 V DC Photocoupler G1 I/O power supply V− V1 CANL DRAIN Physical layer Output (0 to 7) Photocoupler CANH Photocoupler G1 Internal circuitry V+ V2 24 V DC G2 Voltage step-down DC-DC converter (Isolated) V2 Output (8 to 15) Photocoupler G2 74 I/O power supply Section 4-4 Transistor Remote I/O Terminals with 3-tier I/O Terminal Blocks The following diagram shows the internal circuits for the DRT1-OD16TA-1 Remote Output Terminal. Voltage step-down V1 24 V DC Photocoupler G1 V− CANL DRAIN I/O power supply V1 Physical layer Output (0 to 7) Photocoupler G1 CANH Internal circuitry V+ Voltage Photocoupler step-down V2 24 V DC I/O power supply G2 V2 DC-DC converter (Isolated) Output (8 to 15) G2 Photocoupler Wiring The following diagram shows the wiring of the DRT1-OD16TA Remote Output Terminal. + 0 1 7 V1 V1 V1 V1 G1 G1 G1 G1 − Solenoid, valve, etc. + Solenoid, valve, etc. 8 9 15 V2 V2 V2 V2 G2 G2 G2 G2 − Solenoid, valve, etc. Solenoid, valve, etc. 75 Section 4-4 Transistor Remote I/O Terminals with 3-tier I/O Terminal Blocks The following diagram shows the wiring of the DRT1-OD16TA-1 Remote Output Terminal. 0 1 7 V1 V1 V1 V1 G1 G1 G1 G1 − + + Solenoid, valve, etc. Note 8 9 15 V2 V2 V2 V2 G2 G2 G2 G2 − Solenoid, valve, etc. Solenoid, valve, etc. Solenoid, valve, etc. 1. V1 is not connected internally to V2, and G1 is not connected internally to G2. Connect them carefully. 2. When using inductive loads (such as solenoids or valves), use a load with a built-in diode to absorb reverse power or attach a diode externally. Dimensions The following diagram shows the dimensions for the DRT1-OD16T and DRT1OD16TA-1 Remote Output Terminals. All dimensions are in mm. 180 DRT1-OD16TA 0 REMOTE TERMINAL DC24V 1 2 3 4 5 6 7 8 9 10 11 12 13 14 15 ON OUT MS NS 50 (54) DR0 DR1 NC HOLD 0 1 2 3 4 5 6 7 8 9 10 11 12 13 14 15 58 (83) Mounting holes Two, 4.2 dia. or M4 40±0.2 Values in parentheses are reference values. 170±0.2 Note The circuit section can be removed by loosening the circuit removal screws. (Refer to Components of the DRT1-OD16TA and DRT1-OD16TA-1.) 76 Section 4-4 Transistor Remote I/O Terminals with 3-tier I/O Terminal Blocks Always turn OFF the communications, internal, and I/O power supplies before removing or attaching the circuit section. 4-4-6 Transistor Remote I/O Terminals with 8 Inputs and 8 Outputs and 3-tier I/O Terminal Blocks: DRT1-MD16T (NPN) and DRT1-MD16T-1 (PNP) Input Specifications Item Specification Model Internal I/O common DRT1-MD16T NPN DRT1-MD16T-1 PNP Input points ON voltage 8 points 15 V DC min. (between each input terminal and V) 5 V DC max. (between each input terminal and V) 1 mA max. 15 V DC min. (between each input terminal and G) 5 V DC max. (between each input terminal and G) OFF voltage OFF current Input current ON delay time 6.0 mA max./point at 24 V DC 3.0 mA min./point at 17 V DC 1.5 ms max. OFF delay time Number of circuits 1.5 ms max. 8 points with one common Output Specifications Item Specification DRT1-MD16T-1 Model DRT1-MD16T Internal I/O common Output points NPN 8 points Rated output current Residual voltage Leakage current 0.5 A/point 1.2 V max. (at 0.5 A, 1.2 V max. (at 0.5 A, between each output termi- between each output terminal and G) nal and V) 0.1 mA max. ON delay time OFF delay time 0.5 ms max. 1.5 ms max. Number of circuits 8 points with one common PNP 77 Section 4-4 Transistor Remote I/O Terminals with 3-tier I/O Terminal Blocks Components of the DRT1-MD16T and DRT1-MD16T-1 Rotary switches (Refer to page 62.) Set the node address. DIP switch (Refer to page 62.) Pins 1 and 2: Baud rate setting Pin 3: Reserved (Always OFF.) Pin 4: Hold/Clear outputs for communications error DeviceNet Indicators (Refer to page 312.) Input indicators Indicate the input status of each contact. (Lit when the input is ON.) DRT1-MD16T 0 REMOTE TERMINAL DC24V 1 2 3 4 5 6 7 0 1 2 3 4 Output indicators Indicate the output status of each contact. (Lit when the output is ON.) 5 6 7 ON DR0 DR1 NC HOLD IN MS NS OUT Circuit removal screws. DIN track mounting hooks Communications connector Internal power supply terminals Output terminal block Input terminal block Internal Circuit The following diagram shows the internal circuits for the DRT1-MD16T Remote I/O Terminal. Photocoupler V1 24 V DC G1 V− CANL DRAIN V1 Physical layer Photocoupler CANH Internal circuitry V+ Photocoupler Voltage step-down Input (0 to 7) G1 V2 24 V DC G2 SOURCE 24 V DC + SOURCE 24 V DC − 78 I/O power supply V2 DC-DC converter (Isolated) Output (0 to 7) Photocoupler G2 I/O power supply Section 4-4 Transistor Remote I/O Terminals with 3-tier I/O Terminal Blocks The following diagram shows the internal circuits for the DRT1-MD16T-1 Remote I/O Terminal. Photocoupler V1 24 V DC I/O power supply G1 V− V1 CANL Physical layer DRAIN Input (0 to 7) Photocoupler CANH Internal circuitry V+ SOURCE 24 V DC + G1 Photocoupler V2 24 V DC Voltage stepdown G2 I/O power supply V2 DC-DC converter (Isolated) SOURCE 24 V DC − Output (0 to 7) G2 Photocoupler Wiring The following diagram shows the wiring of the DRT1-MD16T Remote I/O Terminal. − + + − + 0 1 7 V1 V1 V1 V1 G1 G1 G1 G1 − + 0 1 7 V2 V2 V2 V2 G2 G2 G2 G2 − Brown (red) Black (white) Blue (black) Blue (black) Brown (white) Internal circuits power supply 2-wire sensor 3-wire sensor with (e.g., limit switch) NPN output (photoelectric or proximity sensor) Solenoid, valve, etc. Solenoid, valve, etc. 79 Section 4-4 Transistor Remote I/O Terminals with 3-tier I/O Terminal Blocks The following diagram shows the wiring of the DRT1-MD16T-1 Remote I/O Terminal. − + + − 0 1 7 V1 V1 V1 V1 G1 G1 G1 G1 − + + 0 1 7 V2 V2 V2 V2 G2 G2 G2 G2 − Black (white) Brown (red) Blue (black) Brown (white) Blue (black) Internal circuits power supply Solenoid, valve, etc. 2-wire sensor 3-wire sensor with (e.g., limit switch) PNP output (photoelectric or proximity sensor) Note Solenoid, valve, etc. 1. V1 is not connected internally to V2, and G1 is not connected internally to G2. Connect them carefully 2. When using inductive loads (such as solenoids or valves), use a load with a built-in diode to absorb reverse power or attach a diode externally. 3. Line colors have been changed accompanying changes in JIS standards for photoelectric and proximity sensors. Previous colors are given in parentheses. Dimensions The following diagram shows the dimensions for the DRT1-MD16T and DRT1-MD16T-1 Remote I/O Terminals. All dimensions are in mm. 180 DRT1-MD16T 0 REMOTE TERMINAL DC24V 1 2 3 4 5 6 7 0 1 2 3 4 5 6 7 ON IN MS NS 50 (54) DR0 DR1 NC HOLD 0 1 2 3 4 5 6 7 8 9 10 11 12 OUT 13 14 15 58 (83) Values in parentheses are reference values. Two, 4.2 dia. or M4 40±0.2 Mounting holes 170±0.2 Note The circuit section can be removed by loosening the circuit removal screws. (Refer to Components of the DRT1-MD16T and DRT1-MD16T-1.) 80 Section 4-4 Transistor Remote I/O Terminals with 3-tier I/O Terminal Blocks Always turn OFF the communications, internal, and I/O power supplies before removing or attaching the circuit section. 4-4-7 Transistor Remote I/O Terminals with 8 Inputs and 8 Outputs and 3-tier I/O Terminal Blocks: DRT1-MD16TA (NPN) and DRT1-MD16TA-1 (PNP) Input Specifications Item Specification DRT1-MD16TA-1 Model DRT1-MD16TA Internal I/O common Input points NPN 8 points PNP ON voltage 15 V DC min. (between each input terminal and V) 15 V DC min. (between each input terminal and G) OFF voltage 5 V DC max. (between each input terminal and V) 1.0 mA max. 5 V DC max. (between each input terminal and G) OFF current Input current 6.0 mA max./point at 24 V DC 3.0 mA min./point at 17 V DC ON delay time OFF delay time 1.5 ms max. 1.5 ms max. Number of circuits 8 points with one common Output Specifications Item Specification DRT1-MD16TA-1 Model DRT1-MD16TA Internal I/O common Output points NPN 8 points Rated output current Residual voltage 0.5 A/point 1.2 V max. (at 0.5 A, 1.2 V max. (at 0.5 A, between each output termi- between each output terminal and G) nal and V) Leakage current ON delay time 0.1 mA max. 0.5 ms max. OFF delay time Number of circuits 1.5 ms max. 8 points with one common PNP 81 Section 4-4 Transistor Remote I/O Terminals with 3-tier I/O Terminal Blocks Components of the DRT1-MD16TA and DRT1-MD16TA-1 Rotary switches (Refer to page 62.) Set the node address. (Refer to page 62.) DIP switch Pins 1 and 2: Baud rate setting Pin 3: Reserved (Always OFF.) Pin 4: Hold/Clear outputs for communications error DeviceNet Indicators (Refer to page 312.) Input indicators Indicate the output status of each contact. (Lit when the input is ON.) DRT1-MD16TA 0 REMOTE TERMINAL DC24V 1 2 3 4 5 6 7 0 1 2 3 4 Output indicators Indicate the output status of each contact. (Lit when the output is ON.) 5 6 7 ON DR0 DR1 NC HOLD IN MS NS OUT Circuit removal screws. Communications connector DIN track mounting hooks Input terminal block Internal Circuits Output terminal block The following diagram shows the internal circuits for the DRT1-MD16TA Remote I/O Terminal. V1 24 V DC 5 V+ G1 Photocoupler 4 CAN_H V1 3 DRAIN 2 CAN_L 1 Physical layer 0 to 7 Voltage step-down Internal circuitry V− V2 24 V DC Photocoupler DC-DC converter (Isolated) G1 G2 V2 0 to 7 G2 82 Section 4-4 Transistor Remote I/O Terminals with 3-tier I/O Terminal Blocks The following diagram shows the internal circuits for the DRT1-MD16TA-1 Remote I/O Terminal. V1 24 V DC 5 G1 V+ 4 CAN_H DRAIN 2 CAN_L 1 V1 Photocoupler 3 Physical layer 0 to 7 G1 Internal circuitry V− Voltage stepdown V2 24 V DC G2 V2 DC-DC converter (Isolated) Photocoupler 0 to 7 G2 The following diagram shows the wiring of the DRT1-MD16TA Remote I/O Terminal 1 7 V1 V1 V1 V1 G1 G1 G1 G1 − 0 1 7 V2 V2 V2 V2 G2 G2 G2 G2 − Black (white) Brown (red) Blue (black) + Blue (black) + 0 Brown (white) Wiring 2-wire sensor 3-wire sensor with (e.g., limit switch) NPN output (photoelectric or proximity sensor) Solenoid, valve, etc. Solenoid, valve, etc. 83 Section 4-4 Transistor Remote I/O Terminals with 3-tier I/O Terminal Blocks The following diagram shows the wiring of the DRT1-MD16TA-1 Remote I/O Terminal. 0 1 7 V1 V1 V1 V1 G1 G1 G1 G1 − 1 7 V2 V2 V2 V2 G2 G2 G2 G2 − Black (white) Brown (red) Blue (black) Blue (black) + Brown (white) + 0 Solenoid, valve, etc. 2-wire sensor 3-wire sensor with (e.g., limit switch) PNP output (photoelectric or proximity sensor) Note Solenoid, valve, etc. 1. V1 is not connected internally to V2, and G1 is not connected internally to G2. Connect them carefully 2. When using inductive loads (such as solenoids or valves), use a load with a built-in diode to absorb reverse power or attach a diode externally. 3. Line colors have been changed accompanying changes in JIS standards for photoelectric and proximity sensors. Previous colors are given in parentheses. Dimensions The following diagram shows the dimensions for the DRT1-MD16TA and DRT1-MD16TA-1 Remote I/O Terminals. All dimensions are in mm. 180 DRT1-MD16TA 0 REMOTE TERMINAL DC24V 1 2 3 4 5 6 7 0 1 2 3 4 5 6 7 ON IN MS NS 50 (54) DR0 DR1 NC HOLD 0 1 2 3 4 5 6 7 8 9 10 11 12 OUT 13 14 15 58 (83) Mounting holes Two, 4.2 dia. or M4 40±0.2 Values in parentheses are reference values. 170±0.2 Note The circuit section can be removed by loosening the circuit removal screws. (Refer to Components of the DRT1-MD16TA and DRT1-MD16TA-1.) 84 Section 4-4 Transistor Remote I/O Terminals with 3-tier I/O Terminal Blocks Always turn OFF the communications, internal, and I/O power supplies before removing or attaching the circuit section. 4-4-8 Mounting in Control Panels Either of the following methods can be used to mount an Remote I/O Terminal in a control panel. Using Screws Open mounting holes in the control panel according to the dimensions provided for mounting holes in the dimensions diagrams and then secure the Remote I/O Terminal with M4 screws. The appropriate tightening torque is 0.6 to 0.98 N⋅m. Using DIN Track Mount the back of the Remote I/O Terminal to a 35-mm DIN Track. To mount the Terminal, pull down on the mounting hook on the back of the Terminal with a screwdriver, insert the DIN Track on the back of the Terminal, and then secure the Terminal to the DIN Track. When finished, secure all Slaves on both ends of the DIN Track with End Plates. Connecting End Plates Hook the bottom of the End Plate onto the DIN Track, as shown at (1) in the following diagram, then hook the top of the End Plate as shown at (2). 2 1 End Plate Note Always attach End Plate to both ends of Slaves connected to DIN Track. 85 Section 4-4 Transistor Remote I/O Terminals with 3-tier I/O Terminal Blocks 10 11 12 13 14 15 14 15 13 9 14 8 IN 7 12 6 13 Vertical 8 9 10 11 12 13 14 11 15 0 11 7 12 10 IN 0 6 15 5 14 5 15 MS NS 13 4 14 12 4 13 11 3 12 10 3 11 9 2 10 8 2 9 1 8 7 1 7 6 0 6 5 0 5 4 MS NS 4 3 ON 3 2 ON 1 DR0 DR1 NC NC 2 IN 0 DRT1-ID16T 1 MS NS DR0 DR1 NC NC 0 ON DR0 DR1 NC NC DRT1-ID16T DRT1-ID16T REMOTE TERMINAL DC24V REMOTE TERMINAL DC24V 15 Unless specific restrictions are given for the Slave, it can be mounted in any direction. Any of the following directions are okay. REMOTE TERMINAL DC24V Mounting Direction 2 9 2 8 1 10 9 1 3 8 3 4 7 7 4 5 6 6 5 6 5 5 6 7 3 9 10 1 8 2 3 8 2 4 4 7 11 0 1 9 0 10 ON DR0 DR1 NC NC 15 DRT1-ID16T 14 15 REMOTE TERMINAL DC24V 13 14 IN 12 13 MS NS 11 12 4-4-9 Wiring Internal Power Supplies, I/O Power Supplies, and I/O Lines The internal circuit power supplies, I/O power supplies, and I/O lines are all wired to M3 screw terminals. Connect M3 crimp terminals and then connect them to the terminal block. Tighten the screws fixing the crimp terminals to a torque of 0.3 to 0.5 N⋅m. 6.0 mm max. Wiring the Internal Power Supply 6.0 mm max. Refer to the wiring details for each Slave for information on the terminal arrangement at the terminal block. The following example shows the internal power supply for a DRT1-ID16T Remote Input Terminal DRT1-ID16T 0 REMOTE TERMINAL DC24V 1 2 3 4 5 6 7 8 9 10 11 12 13 14 15 ON DR0 − + Wiring the I/O Power Supply IN MS NS Refer to the wiring details for each Slave for information on the terminal arrangement at the terminal block. The following example shows the I/O power supply for a DRT1-ID16T Remote Input Terminal. DRT1-ID16T 0 REMOTE TERMINAL DC24V 1 2 3 4 5 6 7 8 9 10 11 12 13 14 ON − 86 IN MS NS DR0 + 15 Section 4-5 Transistor Remote I/O Terminals with Connectors Wiring I/O Refer to the wiring details for each Slave for information on the terminal arrangement at the terminal block and external I/O wiring. The following example shows the wiring to input 0 on a DRT1-ID16T Remote Input Terminal. DRT1-ID16T 0 REMOTE TERMINAL DC24V 1 2 3 4 5 6 7 8 9 10 11 12 13 14 15 ON IN MS NS DR0 Brown (white) 4-5 4-5-1 Blue (black) Transistor Remote I/O Terminals with Connectors Node Address, Baud Rate, and Output Hold/Clear Settings This section describes the Slaves’ node address setting, baud rate settings, and hold/clear outputs for communications error setting. These settings are made using the following pins on the DIP switch. Node address setting: Rotary switch on top panel Baud rate setting: Pins 1 and 2 on DIP switch on bottom panel Output hold/clear setting: Pin 4 on DIP switch on bottom panel (affects only outputs) Node address setting (×10) Node address setting (×1) 7 8 4 1 5 6 5 6 O N 0 1 2 3 Bottom panel 9 2 3 7 8 0 1 2 3 4 4 9 Top panel (Illustration shows factory settings: All OFF.) Output hold/clear setting for communications errors (for outputs) only) Reserved: Always OFF Baud rate setting Node Address Settings The node address of the Remote I/O Terminal is set with two rotary switches. The 10s digit is set on the left and the 1s digit is set on the right. Any node address within the setting range can be used as long as it isn’t already set on another node. Note The Slave won’t be able to participate in communications if the same node address is used for the Master or another Slave node (node address duplication error). 87 Section 4-5 Transistor Remote I/O Terminals with Connectors Baud Rate Setting Pins 1 and 2 are used to set the baud rate as shown in the following table. (These pins are factory-set to OFF.) Pin 1 Note Pin 2 Baud rate OFF OFF 125 kbps (default) ON OFF OFF ON 250 kbps 500 kbps ON ON Not allowed. 1. Always turn OFF the Slave’s power supply (including the communications power supply) before changing the baud rate setting. 2. Set the same baud rate on all of the nodes (Master and Slaves) in the Network. Any Slaves with baud rates different from the Master’s rate won’t be able to participate in communications. Furthermore, a node with an incorrect baud rate may cause communications errors between nodes with correct baud rate settings. The functions of pins 3 and 4 differ for inputs and outputs, as shown in the following diagram. ON Setting Pins 3 and 4 3 4 Input: Not used (Always OFF) Output: Hold/Clear outputs for communications error Reserved: Always OFF Pin 3: Reserved (Always OFF) Pin 4: As follows: Inputs: Outputs: OFF (Clear): ON (Hold): No function (Always OFF) Hold/Clear outputs for communications error All output data from the Master will be cleared to 0 when a communications error occurs. All output data from the Master will be retained when a communications error occurs. Pins 3 and 4 are factory-set to OFF. 4-5-2 Transistor Remote Input Terminals with 32 Points and Connectors: DRT1-ID32ML (NPN) and DRT1-ID32ML-1 (PNP) Input Specifications Item DRT1-ID32ML NPN DRT1-ID32ML-1 PNP Input points ON voltage 32 points 15 V DC min. (between each input terminal and V) 5 V DC max. (between each input terminal and V) 1.0 mA max. 15 V DC min. (between each input terminal and G) 5 V DC max. (between each input terminal and G) OFF voltage OFF current Input current 88 Specification Model Internal I/O common Input impedance 6.0 mA max./point at 24 V DC 3.0 mA min./point at 17 V DC 4.4 kΩ ON delay time OFF delay time 1.5 ms max. 1.5 ms max. Section 4-5 Transistor Remote I/O Terminals with Connectors Item Max. simultaneously ON input points 32 points (See note.) Specification Number of circuits 32 points with one common Note All 32 inputs can be ON simultaneously if the Remote I/O Terminal is mounted facing up, but sufficient space will need to be allowed between Units depending on the ambient temperature. Refer to the Dimensions diagram on page page 93 for details. Components of the DRT1-ID32ML and DRT1-ID32ML-1 DeviceNet indicators (Refer to page 312.) Indicate the status of the Slave, communications, and inputs (lit when input is ON). Top panel Front panel Rotary switches (Refer to page 87.) Set the node address. Bottom panel DIN track mounting hooks Communications connector DIP switch (Refer to page 87.) Pins 1 and 2: Baud rate setting Pins 3 and 4: Reserved (Always OFF.) Input connector (MIL) Connects the 32 inputs via a MIL connector. The MIL cable is sold separately. Input Indicators Name I0 to I15 II0 to II15 Meaning Indicate the status of bits (contacts) 0 to 15 in word m. Lit when input is ON; not lit when input is OFF. Indicate the status of bits (contacts) 0 to 15 in word m+1. Lit when input is ON; not lit when input is OFF. Note “m” is the first word allocated to the Remote Input Terminal. 89 Section 4-5 Transistor Remote I/O Terminals with Connectors Internal Circuits The following diagram shows the internal circuits for the DRT1-ID32ML Remote Input Terminal. V− CANL DRAIN V+ Internal circuitry CAN H V Input Photocoupler G Input Photocoupler The following diagram shows the internal circuits for the DRT1-ID32ML-1 Remote Input Terminal. V− CANL DRAIN V+ Internal circuitry CAN H G Input Photocoupler V Input Photocoupler 90 Section 4-5 Transistor Remote I/O Terminals with Connectors Wiring The following diagram shows the wiring of the DRT1-ID32ML Remote Input Terminal. 24 V DC Wd m Wd m 08 39 40 00 Wd m Wd m 09 37 38 01 Wd m Wd m 10 35 36 02 Wd m Wd m 11 33 34 03 Wd m Wd m 12 31 32 04 Wd m Wd m 13 29 30 05 Wd m Wd m 14 27 28 06 Wd m Wd m 15 25 26 07 24 G 22 G 23 V V Wd m+1 00 Wd m+1 01 Wd m+1 02 Wd m+1 03 Wd m+1 04 Wd m+1 05 Wd m+1 06 Wd m+1 07 Wd m+1 08 Wd m+1 09 Wd m+1 10 Wd m+1 11 Wd m+1 12 Wd m+1 13 Wd m+1 14 Wd m+1 15 4 G G 3 2 V V 1 20 18 16 14 12 10 8 6 21 19 17 15 13 11 9 7 5 91 Section 4-5 Transistor Remote I/O Terminals with Connectors The following diagram shows the wiring of the DRT1-ID32ML-1 Remote Input Terminal. 24 V DC Wd m Wd m 08 39 40 00 Wd m Wd m 09 37 38 01 Wd m Wd m 10 35 36 02 Wd m Wd m 11 33 34 03 Wd m Wd m 12 31 32 04 Wd m Wd m 13 29 30 05 Wd m Wd m 14 27 28 06 Wd m Wd m 15 25 26 07 24 G V Wd m+1 00 Wd m+1 01 Wd m+1 02 Wd m+1 03 Wd m+1 04 Wd m+1 05 Wd m+1 06 Wd m+1 07 Wd m+1 08 Wd m+1 09 Wd m+1 10 Wd m+1 11 Wd m+1 12 Wd m+1 13 Wd m+1 14 Wd m+1 15 4 G G 3 2 V V 1 20 18 16 14 12 10 8 6 Note G 23 V 22 21 19 17 15 13 11 9 7 5 1. V terminals are not connected internally, and G terminals are not connected internally. Connect them carefully. 2. Line colors have been changed accompanying changes in JIS standards for photoelectric and proximity sensors. Previous colors are given in parentheses. I/O Allocations The first word allocated to the Remote Input Terminal is referred to as “word m.” Given this, the bit and word allocations to MIL connector pin numbers are as shown in the following diagram. Bit Wd m 15 14 13 12 11 10 9 8 7 6 5 4 3 2 1 0 25 27 29 31 33 35 37 39 26 28 30 32 34 36 38 40 Wd m+1 5 92 7 9 11 13 15 17 19 6 8 10 12 14 16 18 20 16 inputs 16 inputs Section 4-5 Transistor Remote I/O Terminals with Connectors Dimensions The following diagram shows the dimensions for the DRT1-ID32ML and DRT1-ID32ML-1 Remote Input Terminals. All dimensions are in mm. (83) 60 5 80 27.8 Values in parentheses are reference values. 35 Note There are restriction when using the 32-point Transistor Remote Input Terminals with Connectors depending on the ambient operating temperature. • If the Terminals are not mounted facing up, they can be mounted side-byside and all inputs can be turned ON simultaneously at 55°C or less. • If the Terminals are mounted facing up, the distances and temperatures in the graph given below must be maintained to enable turning ON all inputs simultaneously. For example, at an ambient temperature of 55°C, the Terminals must be separated by at least 10 mm. L Distance between Units L (mm) L 30 20 10 0 40 45 50 55 Ambient operating temp. (°C) 4-5-3 Transistor Remote Output Terminals with 32 Points and Connectors: DRT1-OD32ML (NPN) and DRT1-OD32ML-1 (PNP) Output Specifications Item Specification Model Internal I/O common DRT1-OD32ML NPN DRT1-OD32ML-1 PNP Output points Rated output current 32 points 0.3 A/point, 4 A/common (see note) Residual voltage 1.2 V max. (at 0.3 A, 1.2 V max. (at 0.3 A, between each output termi- between each output terminal and G) nal and V) 93 Section 4-5 Transistor Remote I/O Terminals with Connectors Item Leakage current 0.1 mA max. Specification ON delay time OFF delay time 0.5 ms max. 1.5 ms max. Number of circuits 32 points with one common Note Do not allow the total load current to exceed 4 A and do not allow the load current on either the V or G terminal to exceed 1 A. Components of the DRT1-OD32ML and DRT1-OD32ML-1 DeviceNet indicators (Refer to page 312.) Indicate the status of the Slave, communications, and outputs (lit when output is ON). Top panel Front panel Rotary switches (Refer to page 87.) Set the node address. DIN track mounting hooks Communications connector Bottom panel DIP switch (Refer to page 87.) Pins1 and 2: Baud rate setting Pin 3: Reserved (Always OFF.) Pin 4: Hold/Clear outputs for communications error Output connector (MIL) Connects the 32 outputs via a MIL connector. The MIL cable is sold separately. Output Indicators Name Meaning I0 to I15 Indicate the status of bits (contacts) 0 to 15 in word m. Lit when output is ON; not lit when output is OFF. II0 to II15 Indicate the status of bits (contacts) 0 to 15 in word m+1. Lit when output is ON; not lit when output is OFF. Note “m” is the first word allocated to the Remote Output Terminal. 94 Section 4-5 Transistor Remote I/O Terminals with Connectors The following diagram shows the internal circuits for the DRT1-OD32ML Remote Output Terminal. Voltage step-down V− CANL V1 CAN H V+ Internal circuitry DRAIN Output (0 to 7) Photocoupler G Output (8 to 15) Photocoupler The following diagram shows the internal circuits for the DRT1-OD32ML-1 Remote Output Terminal. V− CANL V DRAIN CAN H V+ Internal circuitry Internal Circuits Output (0 to 7) Photocoupler G Voltage step-down Output (8 to 15) Photocoupler 95 Section 4-5 Transistor Remote I/O Terminals with Connectors Wiring The following diagram shows the wiring of the DRT1-OD32ML Remote Output Terminal. 24 V DC L 40 00 Wd m Wd m 08 39 L L Wd m Wd m 38 01 09 37 L L 36 02 Wd m Wd m 10 35 L L Wd m Wd m 34 03 11 33 L L 32 04 Wd m Wd m 12 31 L L 30 05 Wd m Wd m 13 29 L L Wd m Wd m 28 06 14 27 L L 26 07 Wd m Wd m 15 25 L 24 G 22 96 G 23 V V Wd m+1 00 Wd m+1 01 Wd m+1 02 Wd m+1 03 Wd m+1 04 Wd m+1 05 Wd m+1 06 Wd m+1 07 Wd m+1 08 Wd m+1 09 Wd m+1 10 Wd m+1 11 Wd m+1 12 Wd m+1 13 Wd m+1 14 Wd m+1 15 4 G G 3 2 V V 1 L 20 L 18 L 16 L 14 L 12 L 10 L 8 L 6 21 19 L 17 L 15 L 13 L 11 L 9 L 7 L 5 L Section 4-5 Transistor Remote I/O Terminals with Connectors The following diagram shows the wiring of the DRT1-OD32ML-1 Remote Output Terminal. 24 V DC L 40 00 Wd m Wd m 08 39 L L Wd m Wd m 38 01 09 37 L L 36 02 Wd m Wd m 10 35 L L Wd m Wd m 34 03 11 33 L L 32 04 Wd m Wd m 12 31 L L 30 05 Wd m Wd m 13 29 L L Wd m Wd m 28 06 14 27 L L 26 07 Wd m Wd m 15 25 L 24 G 22 Note G 23 V V Wd m+1 00 Wd m+1 01 Wd m+1 02 Wd m+1 03 Wd m+1 04 Wd m+1 05 Wd m+1 06 Wd m+1 07 Wd m+1 08 Wd m+1 09 Wd m+1 10 Wd m+1 11 Wd m+1 12 Wd m+1 13 Wd m+1 14 Wd m+1 15 4 G G 3 2 V V 1 L 20 L 18 L 16 L 14 L 12 L 10 L 8 L 6 21 19 L 17 L 15 L 13 L 11 L 9 L 7 L 5 L 1. The V terminals are connected internally, as are the G terminals. When the power supply exceeds 1.0 A per terminal or the total current drawn by the external loads exceeds 4 A, the output power supply should not be input through the terminals; an external power supply must be used instead. 2. When using inductive loads (such as solenoids or valves), use a load with a built-in diode to absorb reverse power or attach a diode externally. I/O Allocations The first word allocated to the Remote Output Terminal is referred to as “word m.” Given this, the bit and word allocations to MIL connector pin numbers are as shown in the following diagram. Bit Wd m 15 14 13 12 11 10 9 8 7 6 5 4 3 2 1 0 25 27 29 31 33 35 37 39 26 28 30 32 34 36 38 40 Wd m+1 5 7 9 11 13 15 17 19 6 8 10 12 14 16 18 20 16 outputs 16 outputs 97 Section 4-5 Transistor Remote I/O Terminals with Connectors Dimensions The following diagram shows the dimensions for the DRT1-OD32ML and DRT1-OD32ML-1 Remote Output Terminals. All dimensions are in mm. (83) 60 5 80 27.8 35 4-5-4 Values in parentheses are reference values. Transistor Remote I/O Terminals with 16 Inputs and 16 Outputs and Connectors: DRT1-MD32ML (NPN) and DRT1-MD32ML-1 (PNP) Input Specifications Item 98 Specification DRT1-MD32ML-1 Model DRT1-MD32ML Internal I/O common Input points NPN 16 points PNP ON voltage 15 V DC min. (between each input terminal and V) 15 V DC min. (between each input terminal and G) OFF voltage 5 V DC max. (between each input terminal and V) 5 V DC max. (between each input terminal and G) OFF current Input current 1.0 mA max. 6.0 mA max./point at 24 V DC 3.0 mA min./point at 17 V DC Input impedance ON delay time 4.4 kΩ 1.5 ms max. OFF delay time Max. No. of ON inputs 1.5 ms max. 16 points Number of circuits 16 points with one common Section 4-5 Transistor Remote I/O Terminals with Connectors Output Specifications Item Specification DRT1-MD32ML-1 Model DRT1-MD32ML Internal I/O common Output points NPN 16 points Rated output current Residual voltage Leakage current 0.3 A/point, 2 A/common (see note) 1.2 V max. (at 0.3 A, 1.2 V max. (at 0.3 A, between each output termi- between each output terminal and G) nal and V) 0.1 mA max. ON delay time OFF delay time 0.5 ms max. 1.5 ms max. Number of circuits 16 points with one common PNP Note Do not allow the total load current to exceed 2 A and do not allow the load current on either the V or G terminal to exceed 1 A. Components of the DRT1-MD32ML and DRT1-MD32ML-1 DeviceNet indicators (Refer to page 312.) Indicate the status of the Slave, communications, and I/O (lit when I/O is ON, I = inputs, II = outputs). Top panel Front panel Rotary switches (Refer to page 87.) Set the node address. DIN track mounting hooks Communications connector Bottom panel DIP switch (Refer to page 87.) Pins 1 and 2: Baud rate setting Pin 3: Reserved (Always OFF.) Pin 4: Hold/Clear outputs for communications error (for outputs only) I/O connector (MIL) Connects the 16 inputs and 16 outputs via a MIL connector. The MIL cable is sold separately. I/O Indicators Name I0 to I15 II0 to II15 Meaning Indicate the status of bits (contacts) 0 to 15 in word m. Lit when input is ON; not lit when input is OFF. Indicate the status of bits (contacts) 0 to 15 in word n. Lit when output is ON; not lit when output is OFF. Note m: The first word allocated for the Remote I/O Terminal’s IN Area. n: The first word allocated for the Remote I/O Terminal’s OUT Area. 99 Section 4-5 Transistor Remote I/O Terminals with Connectors Internal Circuits The following diagram shows the internal circuits for the DRT1-MD32ML Remote I/O Terminal. V− CANL DRAIN V+ V1 Internal circuitry CAN H Photocoupler Voltage step-down Input G1 V2 Output Photocoupler G2 The following diagram shows the internal circuits for the DRT1-MD32ML-1 Remote I/O Terminal. V− CANL DRAIN G1 V+ Internal circuitry CAN H Input Photocoupler V1 V2 Output Photocoupler G2 Voltage step-down 100 Section 4-5 Transistor Remote I/O Terminals with Connectors Wiring The following diagram shows the wiring of the DRT1-MD32ML Remote I/O Terminal. 24 V DC 40 38 36 34 32 30 28 26 IN 00 IN 01 IN 02 IN 03 IN 04 IN 05 IN 06 IN 07 24 G1 22 V1 L L L L L L L L OUT 20 00 OUT 18 01 OUT 16 02 OUT 14 03 OUT 12 04 OUT 10 05 OUT 8 06 OUT 6 07 IN 08 IN 09 IN 10 IN 11 IN 12 IN 13 IN 14 IN 15 39 37 35 33 31 29 27 25 G1 23 V1 21 OUT 08 OUT 09 OUT 10 OUT 11 OUT 12 OUT 13 OUT 14 OUT 15 19 L 17 L 15 L 13 L 11 L 9 L 7 L 5 L 4 G2 G2 3 2 V2 V2 1 101 Section 4-5 Transistor Remote I/O Terminals with Connectors The following diagram shows the wiring of the DRT1-MD32ML-1 Remote I/O Terminal. 24 V DC 40 38 36 34 32 30 28 26 IN 00 IN 01 IN 02 IN 03 IN 04 IN 05 IN 06 IN 07 24 G1 22 V1 L L L L L L L L Note OUT 00 OUT 18 01 OUT 16 02 OUT 14 03 OUT 12 04 OUT 10 05 OUT 8 06 OUT 6 07 20 IN 08 IN 09 IN 10 IN 11 IN 12 IN 13 IN 14 IN 15 39 37 35 33 31 29 27 25 G1 23 V1 21 OUT 08 OUT 09 OUT 10 OUT 11 OUT 12 OUT 13 OUT 14 OUT 15 19 L 17 L 15 L 13 L 11 L 9 L 7 L 5 L 4 G2 G2 3 2 V2 V2 1 1. The V1 terminals are connected internally, as are the V2 terminals, the G1, and the G2 terminals. (V1 is not connected to V2 and G1 is not connected to G2.) When the power supply exceeds 1.0 A per terminal or the total current drawn by the external loads exceeds 2 A, the output power supply should not be input through the terminals; an external power supply must be used instead. 2. When using inductive loads (such as solenoids or valves), use a load with a built-in diode to absorb reverse power or attach a diode externally. 3. Line colors have been changed accompanying changes in JIS standards for photoelectric and proximity sensors. Previous colors are given in parentheses. I/O Allocations The first word allocated to the Remote I/O Terminal is referred to as “word m.” Given this, the bit and word allocations to MIL connector pin numbers are as shown in the following diagram. Bit 102 Wd m 15 14 13 12 11 10 9 8 7 6 5 4 3 2 1 0 25 27 29 31 33 35 37 39 26 28 30 32 34 36 38 40 16 inputs Wd n 5 16 outputs 7 9 11 13 15 17 19 6 8 10 12 14 16 18 20 Section 4-5 Transistor Remote I/O Terminals with Connectors Dimensions The following diagram shows the dimensions for the DRT1-MD32ML and DRT1-MD32ML-1 Remote I/O Terminals. All dimensions are in mm. (83) 60 5 80 27.8 Values in parentheses are reference values. 35 Note There are restriction when using the 32-point Transistor Remote I/O Terminals with Connectors depending on the ambient operating temperature. • If the Terminals are not mounted facing up, they can be mounted side-byside and all inputs can be turned ON simultaneously at 55°C or less. • If the Terminals are mounted facing up, the distances and temperatures in the graph given below must be maintained to enable turning ON all inputs simultaneously. For example, at an ambient temperature of 55°C, the Terminals must be separated by at least 10 mm. L Distance between Units L (mm) L 30 20 10 0 40 45 50 55 Ambient operating temp. (°C) 4-5-5 Mounting in Control Panels Either of the following three methods can be used to mount an Remote I/O Terminal in a control panel. • Mounting to DIN Track (page 104) • Mounting perpendicular to a panel using a Mounting Bracket (page 105) • Mounting parallel to a panel using a Mounting Bracket (page 106) Note 1. There are restriction when using the 32-point Transistor Remote I/O Terminals with Connectors or 32-point Transistor Remote Input Terminals with Connectors depending on the ambient operating temperature. 103 Section 4-5 Transistor Remote I/O Terminals with Connectors • If the Terminals are not mounted facing up, they can be mounted side-byside and all inputs can be turned ON simultaneously at 55°C or less. • If the Terminals are mounted facing up, the distances and temperatures in the graph given below must be maintained to enable turning ON all inputs simultaneously. For example, at an ambient temperature of 55°C, the Terminals must be separated by at least 10 mm. L Distance between Units L (mm) L 30 20 10 0 40 45 50 55 Ambient operating temp. (°C) 2. Remote I/O Terminals with Connectors cannot be mounted to a control panel with just screws; the SRT2-ATT02 Mounting Bracket B (sold separately) must be used. Mounting to DIN Track Mount the back of the Remote I/O Terminal to a 35-mm DIN Track. To mount the Terminal, pull down on the mounting hook on the back of the Terminal with a screwdriver, insert the DIN Track on the back of the Terminal, and then secure the Terminal to the DIN Track. When finished, secure all Slaves on both ends of the DIN Track with End Plates. Connecting End Plates Hook the bottom of the End Plate onto the DIN Track, as shown at (1) in the following diagram, then hook the top of the End Plate as shown at (2). 2 1 End Plate Note Always attach End Plate to both ends of Slaves connected to DIN Track. 104 Section 4-5 Transistor Remote I/O Terminals with Connectors Mounting Perpendicular to a Panel Using a Mounting Bracket A Remote I/O Terminal with a Connector can be mounted perpendicular to a panel by using the SRT2-ATT02 Mounting Bracket B (sold separately). Panel surface Mounted perpendicular to panel Mounting Bracket B Mounting Method Use the following procedure to mounted the Remote I/O Terminal. 1. Mount the SRT2-ATT02 Mounting Bracket B to the wall using two Phillip’s screws as shown below. Refer to page 107 for mounting dimensions. 2. Mount the Remote I/O Terminal to the Mounting Bracket B. The Mounting Bracket B is shaped like a DIN Track. Use the same mounting procedure as for DIN Track. Mounting Holes and Slave Center Line Two, 3.2 dia. or M3 Center of mounting holes 5 16±0.2 1,2,3... Center of Slave Unit: mm 105 Section 4-5 Transistor Remote I/O Terminals with Connectors Mounting Parallel to a Panel Using a Mounting Bracket A Remote I/O Terminal with a Connector can be mounted parallel to a panel by using the SRT2-ATT02 Mounting Bracket B (sold separately). Note A multi-drop DeviceNet connector cannot be used if the Remote I/O Terminal is mounted parallel to the panel. Panel surface Mounted parallel to a panel Mounting Bracket B Mounting Method Use the following procedure to mounted the Remote I/O Terminal. 1,2,3... 1. Mount the SRT2-ATT02 Mounting Bracket B to the wall using two Phillip’s screws as shown below. Refer to page 107 for mounting dimensions. 2. Mount the Remote I/O Terminal to the Mounting Bracket B. The Mounting Bracket B is shaped like a DIN Track. Use the same mounting procedure as for DIN Track. Mounting Holes and Slave Center Line Center of mounting holes 5 16±0.2 Two, 3.2 dia. or M3 Center of Slave Unit: mm 106 Section 4-5 Transistor Remote I/O Terminals with Connectors Mounting Direction Unless specific restrictions are given for the Slave, it can be mounted in any direction. Any of the following directions are okay. Vertical 45 mm 35 mm Mounted to DIN Track DIN track 4 mm 35 mm Mounted to Perpendicular to a Panel 45 mm Mounting Dimensions Mounting Bracket B 3.3 mm 107 Section 4-5 Transistor Remote I/O Terminals with Connectors 45 mm 35 mm Mounted to Parallel to a Panel Mounting Bracket B 0.1 mm Mounting Bracket Dimensions The dimensions of the SRT2-ATT02 Mounting Bracket B are shown below. 7.3 32.5 Mounting holes 35 16±0.2 Two, 3.2 dia. or M3 4-5-6 Wiring Internal Power Supplies, I/O Power Supplies and I/O Internal power is supplied together with the communications power supply and does not need to be wired separately. I/O power supplies and I/O are wired through the I/O MIL connector. Connecting to I/O Terminals Using OMRON MIL Cables Slave DRT1-ID32ML DRT1-OD32ML 108 The MIL Cables listed in the following table are available to connect OMRON I/O Terminals (e.g., I/O Relay Blocks). Select the MIL Cable that matches the Remote I/O Terminal and the I/O Terminal. MIL Cable G79-I50-25-D1 (50 cm) G79-I75-50-D1 (75 cm) G79-O50-25-D1 (50 cm) G79-O75-50-D1 (75 cm) I/O Relay Block or other I/O Terminal G7TC-ID16 G7TC-IA16 G7TC-OC08/OC16 G70D-SOC16/VSOC16 G70A-ZOC16-3 G70D-FOM16/VFOM16 Remarks Section 4-5 Transistor Remote I/O Terminals with Connectors Slave MIL Cable I/O Relay Block or other I/O Terminal Inputs: G7TC-ID16/IA16 Outputs: G7TC-OC08/OC16 G70D-SOC16/VSOC16 G70A-ZOC16-3 Remarks DRT1-MD32ML G79-M50-25-D1 (50 cm) G79-M75-50-D1 (75 cm) DRT1-ID32ML-1 G79-I50-25-D2 (50 cm) G79-I75-50-D2 (75 cm) G70A-ZIM16-5 --- DRT1-OD32ML-1 G79-O50-25-D1 (50 cm) G79-O75-50-D1 (75 cm) G70A-ZOC16-4 G70D-SOC16-1 --- G79-I50-25-D1 (50 cm) G79-I75-50-D1 (75 cm) G79-M50-25-D2 (50 cm) G79-M75-50-D2 (75 cm) G7TC-OC16-4 M7F Inputs: G70A-ZIM16-5 Outputs: G70A-ZOC16-4 G70D-SOC16-1 --- DRT1-MD32ML-1 I/O are distinguished by color. Input tube color: Red Output tube color: Yellow I/O are distinguished by color. Input tube color: Red Output tube color: Yellow The following cables are also available with a MIL connector on the Remote I/ O Terminal end and loose wires on the other end. MIL Cable Remarks G79-A200C-D1 (2 m) G79-A500C-D1 (5 m) Loose wire size: AWG28 Loose wires are cut. G79-Y100C-D1 (1 m) G79-Y200C-D1 (2 m) G79-Y500C-D1 (5 m) Forked terminals are attached to the loose wires. Forked terminals: 161071-M2 (Nippon Terminal) The MIL pin numbers, loose wire colors, dot markings, and dot colors are listed in the following table. Pin No. Core color Dot marking ■ Dot color Pin No. Core color Black Red 21 22 Light brown Dot marking ■■■ Dot color 1 2 Light brown 3 4 Yellow Black Red 23 24 Yellow Black Red 5 6 Light green Black Red 25 26 Light green Black Red 7 8 Gray Black Red 27 28 Gray Black Red 9 10 White Black Red 29 30 White Black Red 11 12 Light brown Black Red 31 32 Light brown 13 14 Yellow Black Red 33 34 Yellow Black Red 15 16 Light green Black Red 35 36 Light green Black Red 17 18 Gray Black Red 37 38 Gray Black Red 19 20 White Black Red 39 40 White Black Red ■■ ■■■■ Black Red Black Red 109 Section 4-5 Transistor Remote I/O Terminals with Connectors Using Pressure-welded Flat Cable Connectors 1,2,3... Use the following procedure to prepare flat cables with XG4M-4030-T MIL Connectors. 1. Use precision screwdrivers to open the hooks on both ends and separate the contacts from the cover of the MIL socket. There are two tabs on each end of the contact side of the socket. Release both of these at the same time, not one at a time. 2. Place the flat cable between the contacts and cover of the socket, align the contacts, and press on the cover to lock it in place on the contacts. Use a vise or similar device to firmly press the cover on until the tabs are properly joined. Applicable Wires: 1.27-mm pitch flat cable, AWG28 (7-strand wire) UL2651: Standard Cable, UL20012: Stranded Cable, UL20028: Color Coded Cable 3. If required, fold the back over the connector, and insert and lock a strain relief in place. 4. Connect the MIL Connector to a Remote I/O Terminal with a Connector. Using Loose Wires with Pressure-welded Connectors Note 110 Use the following parts to prepare cables. The Socket used depends on the wire size. Part Socket Cable wire size: AWG24 XG5M-4032-N Semi-cover (See note 1.) XG5S-2001 Hood Cover (See note 2.) XG5S-5022 Cable wire size: AWG26 to 26 XG5M-4035-N 1. Two Semi-covers are required for each connector. Section 4-6 Remote Adapters 2. A multi-drop DeviceNet Connector cannot be used if the Hood Cover is used. Refer to the PCB Relays Catalog (X33) for details on the XG5 Loose Wire Pressure-welded Connectors. 4-6 4-6-1 Remote Adapters Node Address, Baud Rate, and Output Hold/Clear Settings This section describes the Slaves’ node address setting, baud rate settings, and hold/clear outputs for communications error setting. These settings are made using the following pins on the DIP switch. Node address setting: Baud rate setting: Pins 1 through 6 Pins 7 and 8 ON Output hold/clear setting:Pin 10 (affects only outputs) 1 2 3 4 5 6 7 8 9 10 Output hold/clear setting for communications errors (for outputs) Node address setting Reserved (Always OFF.) Baud rate setting Node Address Settings Each Slave’s node address is set with pins 1 through 6 of the Slave’s DIP switch. Any node address within the setting range can be used as long as it isn’t already set on another node. Pin 6 DIP switch setting Pin 5 Pin 4 Pin 3 Pin 2 Node address Pin 1 0 0 0 0 0 0 0 0 0 0 0 0 0 0 1 0 (default) 1 0 1 0 2 : : : : 1 1 1 1 0 1 61 1 1 1 1 1 1 1 1 1 1 0 1 62 63 0: OFF, 1: ON Note 1. Refer to Appendix A Node Address Settings Table for a complete table of DIP switch settings. 2. The Slave won’t be able to participate in communications if the same node address is used for the Master or another Slave node (node address duplication error). Baud Rate Setting Pins 7 and 8 are used to set the baud rate as shown in the following table. (These pins are factory-set to OFF.) Pin 7 Pin 8 Baud rate OFF OFF 125 kbps (default) ON OFF OFF ON 250 kbps 500 kbps ON ON Not allowed. 111 Section 4-6 Remote Adapters Note 1. Always turn OFF the Slave’s power supply (including the communications power supply) before changing the baud rate setting. 2. Set the same baud rate on all of the nodes (Master and Slaves) in the Network. Any Slaves with baud rates different from the Master’s rate won’t be able to participate in communications. Furthermore, a node with an incorrect baud rate may cause communications errors between nodes with correct baud rate settings. The functions of pins 9 and 10 differ for inputs and outputs, as shown in the following diagram. ON Setting Pins 9 and 10 9 10 Input: Not used (Always OFF) Output: Hold/Clear outputs for communications error Reserved: Always OFF Pin 9: Reserved (Always OFF) Pin 10: As follows: Inputs: Outputs: OFF (Clear): ON (Hold): No function (Always OFF) Hold/Clear outputs for communications error All output data from the Master will be cleared to 0 when a communications error occurs. All output data from the Master will be retained when a communications error occurs. Pins 9 and 10 are factory-set to OFF. 4-6-2 Remote Input Adapters with 16 Points: DRT1-ID16X (NPN) and DRT1-ID16X-1 (PNP) Input Specifications Item 112 Specification DRT1-ID16X-1 Model DRT1-ID16X Internal I/O common Input points NPN PNP 16 points (Try to use fewer than 8 points over an average 5 minute time span.) ON voltage 15 V DC min. (between each input terminal and V) 15 V DC min. (between each input terminal and G) OFF voltage 5 V DC max. (between each input terminal and V) 5 V DC max. (between each input terminal and G) OFF current Input current 0.8 mA max. 10 mA max./point ON delay time OFF delay time 9 ms max. 14.5 ms max. Number of circuits 8 points with one common Section 4-6 Remote Adapters Components of the DRT1-ID16X and DRT1-ID16X-1 DeviceNet Indicators (Refer to page 312.) MIL socket flat cable connector Connect the input power supply and input devices such as switches and sensors through an MIL-type flat cable connector. Power supply terminals DIN track mounting hooks Communications connector DIP switch (Refer to page 40.) Pins 1 to 6: Node address setting Pins 7 and 8: Baud rate setting Pins 9 and 10: Reserved (Always OFF.) Internal Circuits The following diagram shows the internal circuits for the DRT1-ID16X Remote Input Adapter. Photocoupler Photocoupler V0 24 V DC V+ 0 CAN H 1 DRAIN CAN L Physical Photolayer coupler Photocoupler SOURCE 24 V DC + SOURCE 24 V DC – Internal circuitry V– DC-DC converter (Isolated) G0 Photocoupler V1 24 V DC 8 9 Photocoupler G1 113 Section 4-6 Remote Adapters The following diagram shows the internal circuits for the DRT1-ID16X-1 Remote Input Adapter. Photocoupler V0 Photocoupler 0 V+ CAN H DRAIN Physical layer 1 Photocoupler Photocoupler CAN L SOURCE 24 V DC + SOURCE 24 V DC – Internal circuitry V– DC-DC converter (Isolated) G0 V1 Photocoupler 8 9 Photocoupler G1 Wiring of the DRT1-ID16X (NPN) Connector Pin Allocation TOP VIEW ▲ Triangle mark Connector pin No. Internal Circuits Power Supply SOURCE 24 V DC + – + – Internal circuits power supply 114 Section 4-6 Remote Adapters Input Devices Use a printed circuit board to wire I/O devices to a flat cable MIL plug which can be connected to the Remote Adapter. Brown (red) NPN output 3-wire sensor (photoelectric or proximity sensor) Black (white) Blue (black) Top View Brown (white) Blue (black) 2-wire sensor (limit switch) I/O power supply – + ▲ Triangle mark Connector pin No. Note In accordance with the changes in the standards for photoelectric sensors and proximity sensors, wire colors have been changed. Colors in parentheses are the old wire colors. Wiring of the DRT1-ID16X-1 (PNP) Connector Pin Allocation TOP VIEW ▲ Triangle mark Connector pin No. Internal Circuits Power Supply SOURCE 24 V DC – + + – Internal circuits power supply 115 Section 4-6 Remote Adapters Input Devices Use a printed circuit board to wire I/O devices to a flat cable MIL plug which can be connected to the Remote Adapter. Brown (red) NPN output 3-wire sensor (photoelectric or proximity sensor) Black (white) Blue (black) 2-wire sensor (limit switch) I/O power supply Top View Brown (white) Blue (black) – ▲ Triangle mark + Connector pin No. Note In accordance with the changes in the standards for photoelectric sensors and proximity sensors, wire colors have been changed. Colors in parentheses are the old wire colors. Dimensions The following diagram shows the dimensions for the DRT1-ID16X and DRT1ID16X-1 Remote Input Adapters. All dimensions are in mm. Approx. 73 50 max. (With connector attached) 12 Flat cable length: Approx. 60 85 max. Mounting holes 40 ± 0.3 Two, 4.2 dia. or M4 75 ± 0.3 116 40 max. Section 4-6 Remote Adapters 4-6-3 Remote Output Adapters with 16 Points: DRT1-OD16X (NPN) and DRT1-OD16X-1 (PNP) Output Specifications Item Specification DRT1-OD16X-1 Model DRT1-OD16X Internal I/O common Output points NPN 16 points Rated output current Residual voltage 30 mA/point 1.2 V max. (30 mA DC, 1.2 V max. (30 mA DC, between each output termi- between each output terminal and G) nal and V) Leakage current ON delay time 0.1 mA max. 0.5 ms max. OFF delay time Number of circuits 1.5 ms max. 8 points with one common PNP Components of the DRT1-OD16X and DRT1-OD16X-1 DeviceNet Indicators (Refer to page 312.) MIL socket flat cable connector Connect the output power supply and output devices such as relays and indicators through an MIL-type flat cable connector. Power supply terminals DIN track mounting hooks Communications connector DIP switch (Refer to page 40.) Pins 1 to 6: Node address setting Pins 7 and 8: Baud rate setting Pin 9: Reserved (Always OFF.) Pin 10: Hold/clear outputs for communications error 117 Section 4-6 Remote Adapters Internal Circuits The following diagram shows the internal circuits for the DRT1-OD16X Remote Output Adapter. Voltage step-down Photocoupler Photocoupler V0 24 V DC V+ 0 CAN H DRAIN CAN L 1 Physical Photolayer coupler SOURCE 24 V DC + SOURCE 24 V DC – Internal circuitry V– Photocoupler DC-DC converter (Isolated) G0 Voltage step-down Photocoupler V1 24 V DC 8 9 Photocoupler G1 118 Section 4-6 Remote Adapters The following diagram shows the internal circuits for the DRT1-OD16X-1 Remote Output Adapter. Photocoupler Photocoupler V+ CAN H DRAIN Physical layer CAN L Photocoupler SOURCE 24 V DC + SOURCE 24 V DC – Voltage step-down Internal circuitry V– Photocoupler DC-DC converter (Isolated) Photocoupler Photocoupler Voltage step-down Wiring of the DRT1-OD16X (NPN) Connector Pin Allocation TOP VIEW ▲ Triangle mark Connector pin No. Internal Circuits Power Supply SOURCE 24 V DC – + + – Internal circuits power supply 119 Section 4-6 Remote Adapters Output Devices Use a printed circuit board to wire I/O devices to a flat cable MIL plug which can be connected to the Remote Adapter. TOP VIEW Relay LED indicator I/O power supply – ▲ Triangle mark + Connector pin No. Note The G70D, NPN-output G7TC, and G70A can also be connected to the Remote Adapter, but the PNP-output G7TC and Input G7TC can’t be connected because the power supply’s polarity is reversed. (Reversing the power supply polarity can damage the Remote Adapter.) Wiring of the DRT1-OD16X-1 (PNP) Connector Pin Allocation TOP VIEW ▲ Triangle mark Connector pin No. Internal Circuits Power Supply SOURCE 24 V DC + – + – Internal circuits power supply 120 Section 4-6 Remote Adapters Output Devices Use a printed circuit board to wire I/O devices to a flat cable MIL plug which can be connected to the Remote Adapter. TOP VIEW Relay LED indicator I/O power supply – + ▲ Triangle mark Connector pin No. Note The G70D, NPN-output G7TC, and G70A can also be connected to the Remote Adapter, but the PNP-output G7TC and Input G7TC can’t be connected because the power supply’s polarity is reversed. (Reversing the power supply polarity can damage the Remote Adapter.) Dimensions The following diagram shows the dimensions for the DRT1-OD16X and DRT1-OD16X-1 Remote Output Adapters. All dimensions are in mm. Approx. 73 50 max. (With connector attached) 12 Flat cable length: Approx. 60 85 max. 40 max. Mounting holes 40 ± 0.3 Two, 4.2 dia. or M4 75 ± 0.3 121 Section 4-6 Remote Adapters 4-6-4 Mounting in Control Panels Either of the following methods can be used to mount an Remote Adapter in a control panel. Using Screws Open mounting holes in the control panel according to the dimensions provided for mounting holes in the dimensions diagrams and then secure the Remote Adapter with M4 screws. The appropriate tightening torque is 0.6 to 0.98 N⋅m. Using DIN Track Mount the back of the Remote Adapter to a 35-mm DIN Track. To mount the Adapter, pull down on the mounting hook on the back of the Terminal with a screwdriver, insert the DIN Track on the back of the Terminal, and then secure the Terminal to the DIN Track. When finished, secure all Slaves on both ends of the DIN Track with End Plates. Connecting End Plates Hook the bottom of the End Plate onto the DIN Track, as shown at (1) in the following diagram, then hook the top of the End Plate as shown at (2). 2 1 End Plate Note Always attach End Plate to both ends of Slaves connected to DIN Track. Unless specific restrictions are given for the Slave, it can be mounted in any direction. Any of the following directions are okay. Vertical No. IN No. No. IN DRT1-ID16X DRT1-ID16X NS IN NS MS NS REMOTE ADAPTER 24VDC MS MS DRT1-ID16X REMOTE ADAPTER 24VDC REMOTE ADAPTER 24VDC Mounting Direction No. DRT1-ID16X NS MS Wiring Internal Power Supplies, I/O Power Supplies, and I/O Lines Wiring the I/O Power Supply The internal circuit power supplies, I/O power supplies, and I/O lines are all wired to M3 screw terminals. Connect M3 crimp terminals and then connect them to the terminal block. Tighten the screws fixing the crimp terminals to a torque of 0.3 to 0.5 N⋅m. 6.0 mm max. 122 REMOTE ADAPTER 24VDC IN 4-6-5 6.0 mm max. Section 4-6 Remote Adapters Refer to the wiring details for each Slave for information on the terminal arrangement at the terminal block. The following example shows the internal power supply for a DRT1-ID16X Remote Input Adapter. DRT1-ID16X No. REMOTE ADAPTER 24VDC MS NS + Wiring the I/O Power Supply − The I/O power supply and I/O are wired through the MIL socket on the I/O flat cable connector. An MIL connector for an I/O Relay Block or PCB can be connected. Connecting to I/O Relay Blocks The MIL socket on the flat cable connector on the Remote Adapter can be connected directly to the connector on an OMRON I/O Relay Block.The Remote Adapter-I/O Relay Block combinations that can be connected are listed in the following table. Remote Adapter DRT1-ID16X DRT1-OD16X Note I/O Relay Block G7TC-ID16-5 G7TC-IA16-5 G7TC-OC08 G7TC-OC16 G70D-SOC16 G70D-FOM16 G70A-ZOC16-3 1. Connection is also possible to manifold solenoid valves from Koganei or CKD. 2. The DRT1-ID16X-1 cannot be connected to an I/O Relay Block. Connecting to PCB MIL Connectors The MIL socket on the flat cable connector on the Remote Adapter can be connected to I/O devices connected to a PCB by connecting a MIL connector to the PCB. The PCB MIL connectors that can be used are listed in the following table. MIL Connector XG4A-2031 Remarks DIP straight terminals XG4A-2034 DIP right-angle terminals 123 Section 4-7 Sensor Terminals 4-7 4-7-1 Sensor Terminals Node Address, Baud Rate, and Output Hold/Clear Settings This section describes the Slaves’ node address setting, baud rate settings, and hold/clear outputs for communications error setting. These settings are made using the following pins on the DIP switch. Node address setting: Baud rate setting: Pins 1 through 6 Pins 7 and 8 ON Output hold/clear setting: Pin 10 on DIP switch on bottom panel (affects only outputs) 1 2 3 4 5 6 7 8 9 10 Output hold/clear setting for communications errors (for outputs) Node address setting Reserved (Always OFF.) Baud rate setting Node Address Settings Each Slave’s node address is set with pins 1 through 6 of the Slave’s DIP switch. Any node address within the setting range can be used as long as it isn’t already set on another node. DIP switch setting Node address Pin 6 Pin 5 Pin 4 Pin 3 Pin 2 Pin 1 0 0 0 0 0 0 0 (default) 0 0 0 0 0 0 0 0 0 1 1 0 1 2 : : : : 1 1 1 1 1 1 1 1 0 1 1 0 61 62 1 1 1 1 1 1 63 0: OFF, 1: ON Note 1. Refer to Appendix A Node Address Settings Table for a complete table of DIP switch settings. 2. The Slave won’t be able to participate in communications if the same node address is used for the Master or another Slave node (node address duplication error). Baud Rate Setting Pins 7 and 8 are used to set the baud rate as shown in the following table. (These pins are factory-set to OFF.) Pin 7 Note Pin 8 Baud rate OFF ON OFF OFF 125 kbps (default) 250 kbps OFF ON ON ON 500 kbps Not allowed. 1. Always turn OFF the Slave’s power supply (including the communications power supply) before changing the baud rate setting. 2. Set the same baud rate on all of the nodes (Master and Slaves) in the Network. Any Slaves with baud rates different from the Master’s rate won’t be able to participate in communications. Furthermore, a node with an incor- 124 Section 4-7 Sensor Terminals rect baud rate may cause communications errors between nodes with correct baud rate settings. Setting Pins 9 and 10 The functions of pins 9 and 10 differ for inputs and outputs, as shown in the following diagram. Input: Not used (Always OFF) Output: Hold/Clear outputs for communications error Reserved: Always OFF Pin 9: Reserved (Always OFF) Pin 10: As follows: Inputs: No function (Always OFF) Outputs: Hold/Clear outputs for communications error OFF (Clear): All output data from the Master will be cleared to 0 when a communications error occurs. ON (Hold): All output data from the Master will be retained when a communications error occurs. Pins 9 and 10 are factory-set to OFF. 4-7-2 Transistor Input Sensor Terminals with 16 Points: DRT1-HD16S Input Specifications Item Input points ON voltage OFF voltage Specification 16 NPN points 12 V DC min. (between each input terminal and VCC, the external sensor power supply) 4 V DC max. (between each input terminal and VCC, the external sensor power supply) OFF current Input current 1.0 mA max. 10 mA max./point ON delay time OFF delay time 1.0 ms max. 1.5 ms max. 125 Section 4-7 Sensor Terminals Components DeviceNet Indicators (Refer to page 312.) Power supply terminals I/O indicators Indicate the status of each contact. (Lit when the input or output is ON.) Word address Indicates the word which the sensor uses. I/O connectors Connect the special connectors from the sensors here. (The special connectors are attached to the sensor's cable.) DIN track mounting hooks Communications connector DIP switch (Refer to page 40.) Pins 1 to 6: Node address setting Pins 7 and 8: Baud rate setting Pin 9 and 10: Reserved (Always OFF.) 126 Section 4-7 Sensor Terminals Internal Circuits The following diagram shows the internal circuits for the DRT1-HD16S Sensor Terminal. V G V+ CAN H DRAIN V– SOURCE 24 V DC + SOURCE 24 V DC – Non-isolated power supply IN-A Internal circuitry CAN L IN-B V Terminals for one sensor G Isolated power supply Wiring Terminal Arrangement and Wiring for the Sensor Terminal’s Connector Pin Function 1 IN-A (inputs) 2 3 IN-B (inputs) VCC (V) (external sensor power supply, +terminal) 4 GND (G) (external sensor power supply, –terminal) The bit in the DeviceNet I/O area depends on the word address where the sensor is connected, as shown in the following table. Word address 0 0 IN-A bit 8 IN-B bit 1 2 1 2 9 10 3 4 3 4 11 12 5 6 5 6 13 14 7 7 15 127 Section 4-7 Sensor Terminals Wiring Example SOURCE 24 V DC + – + – Sensor 3-wire sensor (without self-diagnostic output function) Sensor 3-wire sensor (with self-diagnostic output function) Blue (black) Brown (white) Blue (black) Orange (orange) Brown (red) Black (white) Blue (black) Black (white) Brown (red) Internal circuits power supply Sensor 2-wire sensor (without self-diagnostic output function) Note In accordance with the changes in the standards for photoelectric sensors and proximity sensors, wire colors have been changed. Colors in parentheses are the old wire colors. Dimensions The following diagram shows the dimensions for the DRT1-HD16S Input Sensor Terminal. All dimensions are in mm. Approx. 73 12 50 max. (With connector attached) 150 max. 40 ± 0.3 Mounting holes Two, 4.2 dia. or M4 140± 0.3 128 40 max. Section 4-7 Sensor Terminals 4-7-3 Transistor I/O Sensor Terminals with 8 Inputs and 8 Outputs: DRT1-ND16S Specifications Input Specifications Item Input points ON voltage Specification OFF current 8 NPN points 12 V DC min. (between each input terminal and VCC, the external sensor power supply) 4 V DC max. (between each input terminal and VCC, the external sensor power supply) 1.0 mA max. Input current ON delay time 10 mA max./point 1.0 ms max. OFF delay time 1.5 ms max. OFF voltage Output Specifications Item Specification Output points Rated output current 8 NPN points 20 mA max. Residual voltage Leakage current 1 V max. 0.1 mA max. 129 Section 4-7 Sensor Terminals Components DeviceNet Indicators (Refer to page 312.) Power supply terminals I/O indicators Indicate the status of each contact. (Lit when the input or output is ON.) Word address Indicates the word which the sensor uses. I/O connectors Connect the special connectors from the sensors here. (The special connectors are attached to the sensor's cable.) DIN track mounting hooks Communications connector DIP switch (Refer to page 40.) Pins address setting setting Pins 1 to 6: Node address Pins Baud rate rate setting setting Pins 7 and 8: Baud Pin (Always OFF.) OFF.) Pin 9: Reserved (Always Pin o tp ts for forcommunications comm nicationserror error Pin 10: Hold/clear outputs Internal Circuits The following diagram shows the internal circuits for the DRT1-ND16S Sensor Terminal. V G V+ CAN H DRAIN V– SOURCE 24 V DC + SOURCE 24 V DC – 130 Non-isolated power supply IN Internal circuitry CAN L OUT V G Isolated power supply Terminals for one sensor Section 4-7 Sensor Terminals Wiring Terminal Arrangement and Wiring for the Sensor Terminal’s Connector Pin Function 1 2 IN (inputs) OUT (outputs) 3 VCC (V) (external sensor power supply, +terminal) 4 GND (G) (external sensor power supply, –terminal) The bit in the DeviceNet I/O area depends on the word address where the sensor is connected, as shown in the following table. Word address 0 0 IN-A bit 8 IN-B bit 1 2 1 2 9 10 3 4 3 4 11 12 5 6 5 6 13 14 7 7 15 Wiring Example SOURCE 24 V DC + – + – Sensor Sensor with teaching function, Sensor with external diagnostic function Blue Purple Black Brown Pink (gray) Blue (black) Brown (red) Black (white) Internal circuits power supply Sensor Sensor with bank switching function Note In accordance with the changes in the standards for photoelectric sensors and proximity sensors, wire colors have been changed. Colors in parentheses are the old wire colors. 131 Section 4-7 Sensor Terminals Dimensions The following diagram shows the dimensions for the DRT1-ND16S Sensor Terminal. All dimensions are in mm. Approx. 73 12 50 max. (With connector attached) 150 max. 40 max. 40± 0.3 Mounting holes Two, 4.2 dia. or M4 140 ± 0.3 4-7-4 Mounting in Control Panels Either of the following methods can be used to mount an Sensor Terminal in a control panel. Using Screws Open mounting holes in the control panel according to the dimensions provided for mounting holes in the dimensions diagrams and then secure the Sensor Terminal with M4 screws. The appropriate tightening torque is 0.6 to 0.98 N⋅m. Using DIN Track Mount the back of the Remote Adapter to a 35-mm DIN Track. To mount the Adapter, pull down on the mounting hook on the back of the Terminal with a screwdriver, insert the DIN Track on the back of the Terminal, and then secure the Terminal to the DIN Track. When finished, secure all Slaves on both ends of the DIN Track with End Plates. 132 Section 4-7 Sensor Terminals Connecting End Plates Hook the bottom of the End Plate onto the DIN Track, as shown at (1) in the following diagram, then hook the top of the End Plate as shown at (2). 2 1 End Plate Note Always attach End Plate to both ends of Slaves connected to DIN Track. Unless specific restrictions are given for the Slave, it can be mounted in any direction. Any of the following directions are okay. 7 7 7 6 6 6 5 5 5 4 4 4 3 3 3 2 2 2 No. 1 7 7 7 1 6 1 6 6 0 5 0 5 5 0 4 2 2 2 3 3 3 4 4 4 5 5 5 6 6 6 7 7 IN-B 4 4 1 IN-A 3 1 1 DRT1-HD16S 3 0 NS 3 IN 2 0 0 MS 2 2 IN-B IN-A 7 Vertical No. SENSOR TERMINAL 1 1 IN 1 7 0 7 6 0 7 6 5 0 6 5 4 IN-B 5 4 3 IN-A 4 3 2 DRT1-HD16S 3 2 1 NS 2 1 0 DRT1-HD16S 1 0 NS 0 IN-B MS No. IN-A NS MS MS SENSOR TERMINAL DRT1-HD16S SENSOR TERMINAL SENSOR TERMINAL No. IN Mounting Direction IN 4-7-5 Wiring Internal Power Supplies, I/O Power Supplies, and I/O Lines Wiring the I/O Power Supply The internal circuit power supplies, I/O power supplies, and I/O lines are all wired to M3 screw terminals. Connect M3 crimp terminals and then connect them to the terminal block. Tighten the screws fixing the crimp terminals to a torque of 0.3 to 0.5 N⋅m. 6.0 mm max. 6.0 mm max. 133 Section 4-7 Sensor Terminals Refer to the wiring details for each Slave for information on the terminal arrangement at the terminal block. The following example shows the internal power supply for a DRT1-HD16S Remote I/O Terminal. DRT1-HD16S No. SENSOR TERMINAL IN-A 0 1 2 3 4 5 6 7 IN-B 0 1 2 3 4 5 6 7 DRT1-HD NODE ADDRESS ON 1 2 4 8 16 DR 32 0 1 NC NC 0 1 2 5 4 3 6 7 SOURCE SOURCE 24VDC 24VDC + - - + Wiring the I/O Power Supply and I/O Terminals The I/O power supply and I/O wiring are connected through the cables of the sensors and other external devices with cable connectors. Assembling Cable Connectors Use the following information to connect the Cable Connectors to the cables on the sensors or other external devices. • Cable Connectors Cover Plug connector Confirming the Cable Connector and Cable Core Wire Size There are two models of Cable Connector that vary in the applicable cable core wire size. Model XS8A-0441 XS8-1 Marking 0.3 to 0.5 mm2 Applicable core wire size XS8A-0442 XS8-2 0.14 to 0.2 mm2 Confirm that the Cable Connector is the correct one for the core wire of the sensor or other external device. Set the same baud rate on all of the nodes The plug connector of the Connector Cable is marked to identify it. mark XS8-1 Preparing the Sensor or External Device Cable The cable from the sensor or external device (with a connector output transistor) is normally either stripped or semi-stripped. Semi-stripped 134 Stripped Section 4-7 Sensor Terminals The wires cannot be connected in this condition. Cut the stripped portion of wire off and then remove the sheath as shown in the following illustration. Do not strip the core wires. 20 mm min. Inserting Core Wires in the Cable Connector When connecting the sensor, align the senor wires by color with the terminal numbers printed on the cover according to the following tables. • DRT1-HD16S Terminal number 3-wire sensor (without selfdiagnosis output) 2-wire sensor (without selfdiagnosis output) 3-wire sensor (without selfdiagnosis output) 1 2 Black (white) --- Brown (white) --- Black (white) Orange (orange) 3 4 Brown (red) Blue (black) --Blue (black) Brown (red) Blue (black) • DRT1-ND16S Terminal number 1 Sensor with teaching function Sensor with bank switching or with self-diagnosis output function Black (white) Black 2 3 Pink (gray) Brown (red) Purple Brown 4 Blue (black) Blue Note Wire colors in parentheses are the previous JIS colors for photoelectric and proximity sensors. Insert the core wires completely to the back of the cover holes. Assembling the Cable Connectors 1,2,3... 1. Confirm that the core wires and terminal number are aligned properly using the wire colors. Also be sure that the wires are inserted completely to the back of the cover. (The Cover is transparent so that the wires can be easily seen.) 2. As shown in the following diagram, press the covers with the cable wires inserted into it into the plug connector using your hands to temporarily attach it. 3. As shown in the following diagram, use pliers or a similar tool to press the cover completely into the plug connector. Press on the center of the cover 135 Section 4-8 Analog I/O Terminals so that you do not distort it. Press the cover in until there is no gap between the cover and connector plug. Connecting and Disconnecting the Cable Connector Connecting With terminal number 1 toward the front, insert the Cable Connector into the I/ O connector on the Slave until it clicks into place. Disconnecting Lift up on the lock lever as shown in the following diagram and remove the Cable Connector to disconnect it. Lock lever Note Cable Connectors (XS8A-0441/0442) are not provided with the Sensor Terminals and must be purchased separately. 4-8 4-8-1 Analog I/O Terminals Node Address and Baud Rate Setting This section describes the Slaves’ node address setting, baud rate settings, and hold/clear outputs for communications error setting. These settings are made using the following pins on the DIP switch. Pins 1 through 6 Pins 7 and 8 Slave-specific setting: Pins 9 and 10 (Refer to the descriptions of individual Slaves.) ON Node address setting: Baud rate setting: 1 2 3 4 5 6 7 8 9 10 Node address setting Baud rate setting 136 Slave-specific setting: Refer to the description of individual Slaves. Analog I/O Terminals Section 4-8 Node Address Settings Each Slave’s node address is set with pins 1 through 6 of the Slave’s DIP switch. Any node address within the setting range can be used as long as it isn’t already set on another node. Pin 6 DIP switch setting Pin 5 Pin 4 Pin 3 Pin 2 Node address Pin 1 0 0 0 0 0 0 0 0 0 0 0 0 0 0 1 0 (default) 1 0 1 0 2 : : : : 1 1 1 1 0 1 61 1 1 1 1 1 1 1 1 1 1 0 1 62 63 0: OFF, 1: ON Note 1. Refer to Appendix A Node Address Settings Table for a complete table of DIP switch settings. 2. The Slave won’t be able to participate in communications if the same node address is used for the Master or another Slave node (node address duplication error). Baud Rate Setting Pins 7 and 8 are used to set the baud rate as shown in the following table. (These pins are factory-set to OFF.) Pin 7 Note Pin 8 OFF OFF 125 kbps (default) ON OFF OFF ON 250 kbps 500 kbps ON ON Not allowed. 1. Always turn OFF the Slave’s power supply (including the communications power supply) before changing the baud rate setting. 2. Set the same baud rate on all of the nodes (Master and Slaves) in the Network. Any Slaves with baud rates different from the Master’s rate won’t be able to participate in communications. Furthermore, a node with an incorrect baud rate may cause communications errors between nodes with correct baud rate settings. 4-8-2 Analog Input Terminals: DRT1-AD04 and DRT1-AD04H Specifications General Specifications Item Specification DRT1-AD04 Voltage inputs Current inputs DRT1-AD04H Voltage inputs Current inputs Input points Either 4 points or 2 points 4 points (Set with the DIP switch.) (Master Unit uses 4 (Four input words occupied at Master Unit.) input words or 2 input words respectively) Communications power 11 to 25 V DC (supplied from the communications connector) supply voltage Internal power supply voltage 20.4 to 26.4 V DC (24 V DC −15% to 10%) 137 Section 4-8 Analog I/O Terminals Item Specification DRT1-AD04 DRT1-AD04H Current consumption Voltage inputs Current inputs Communications: 30 mA max. Internal circuit: 80 mA max. Voltage inputs Current inputs Communications: 30 mA max. Internal circuit: 130 mA max. Noise immunity ±1.5 kVp-p, pulse width: 0.1 to 1 µs, pulse rise time: 1 ns (via noise simulator) Vibration resistance Shock resistance 10 to 55 Hz, 1.0-mm double amplitude 200 m/s2 Dielectric strength Insulation resistance 500 V AC for 1 min (between insulated circuits) 500 V AC (between insulated circuits) 20 MΩ min. at 250 V DC (between insulated circuits) Ambient operating tem- 0 to 55°C perature Ambient operating humidity Ambient operating environment Ambient storage temperature Mounting method 35% to 85% (with no condensation) Mounting strength 50 N 10 N min. in the DIN Track direction Pull: 50 N Terminal strength Weight Input signal range No corrosive gases. −25 to 65°C M4 screw mounting or 35-mm DIN track mounting Max. signal input 160 g max. 0 to 5 V, 1 to 5 V, 0 to 10 V, or –10 to 10 V ±15 V Input impedance Resolution 1 MΩ min. 1/6000 (full scale) Approx. 250 Ω 1 MΩ min. 1/30000 (full scale) Approx. 250 Ω Accuracy ±0.3% FS ±0.6% FS ±0.4% FS ±0.8% FS ±0.3% FS ±0.6% FS ±0.4% FS ±0.8% FS 25°C 0 to 55°C 0 to 20 mA or 4 to 20 mA ±30 mA 0 to 5 V, 1 to 5 V or 0 to 10 V, ±15 V 0 to 20 mA or 4 to 20 mA ±30 mA Conversion time Converted output data (Binary) 2 ms/input (8 ms/4 points, 4 ms/2 points) Binary (4-digit hexadecimal) Averaging function Open circuit detection Settable (via DIP switch) Provided. Not provided. Provided. Isolation method Photocoupler isolation between analog inputs and communications lines (There is no isolation between analog input signals.) Photocoupler isolation between analog inputs and communications lines Photocoupler isolation between analog input signals. 138 –10- to 10-V range: scale Other signal ranges: 8BB8 to 0 to 0BB8 full 250 ms/4 points Binary (4-digit hexadecimal) 0000 to 7530 (hexadecimal) full scale 0000 to 1770 full scale Section 4-8 Analog I/O Terminals Components of the DRT1-AD04 and DRT1-AD04H DeviceNet Indicators (Refer to page 312.) Rotary switch Sets the input ranges. Open-circuit Indicators (DRT1-AD04H only) (Refer to page 147.) Corresponding indicator lights when open circuit is detected. Terminal block DIN track mounting hooks Communications connector DIP switch Pins 1 to 6: Node address setting (Refer to page 124.) Pins 7 and 8: Baud rate setting (Refer to page 124.) Pin 9: Number of inputs setting (4 points or 2 points) [DRT1-AD04 only] (Refer to page 146.) Pin 10: Averaging function setting [DRT1-AD04 only] (Refer to page 147.) DIP Switch Settings The following diagram shows the functions of the DIP switch on the DRT1AD04 and DRT1-AD04H Analog Input Terminals. Node address setting Baud rate DRT1-AD04 Averaging function setting Number of inputs setting (4 pts. or 2 pts.) DRT1-AD04H Not used. (must be OFF.) 139 Section 4-8 Analog I/O Terminals The following table summarizes the DIP switch settings. (All pins are factoryset to OFF.) Pin(s) Function 1 through 6 Node address setting 7 and 8 9 Baud rate Number of inputs setting (2 or 4) (See page 146 for details.) Averaging function (See page 147 for details.) 10 Settings Setting contents DRT1-AD04 DRT1-AD04H Refer to 4-8-1 Node Address and Baud Rate Setting for details. (Factory-set to OFF.) OFF* 4 points ON 2 points OFF* Averaging is not performed. (Factory setting) Averaging is performed. ON Not used. (Must be OFF.) Not used. (Must be OFF.) * Factory settings. Note Always turn OFF the Slave’s power supply (including the communications power supply) before changing any settings. Rotary Switch Setting Set the input signal range for each input with the rotary switch. Inputs 0 and 2 share the same signal range, as do inputs 1 and 3. The voltage input/current input selection is carried out by connecting the V+ terminal to the I+ terminal. Short-circuit the V+ terminal and I+ terminal when inputting current. Note Always turn OFF the Slave’s power supply (including the communications power supply) before changing any settings. DRT1-AD04 0 1 2 3 7 8 9 4 5 6 The following table shows the rotary switch settings and corresponding input signal range settings. No. 140 Signal range for inputs 0 and 2 Signal range for inputs 1 and 3 0 1 0 to 5 V or 0 to 20 mA 0 to 5 V or 0 to 20 mA 0 to 5 V or 0 to 20 mA 1 to 5 V or 4 to 20 mA 2 3 0 to 5 V or 0 to 20 mA 0 to 5 V or 0 to 20 mA 0 to 10 V –10 to +10 V 4 5 1 to 5 V or 4 to 20 mA 1 to 5 V or 4 to 20 mA 1 to 5 V or 4 to 20 mA 0 to 10 V 6 7 1 to 5 V or 4 to 20 mA 0 to 10 V –10 to +10 V 0 to 10 V 8 9 0 to 10 V –10 to +10 V –10 to +10 V –10 to +10 V Section 4-8 Analog I/O Terminals DRT1-AD04H The following table shows the rotary switch settings and corresponding input signal range settings. No. Internal Circuits 0 Signal range for inputs 0 and 2 0 to 5 V Signal range for inputs 1 and 3 0 to 5 V 1 2 0 to 5 V 0 to 5 V 1 to 5 V 0 to 10 V 3 4 0 to 5 V 0 to 5 V 0 to 20 mA 4 to 20 mA 5 6 1 to 5 V 1 to 5 V 1 to 5 V 0 to 10 V 7 8 1 to 5 V 1 to 5 V 0 to 20 mA 4 to 20 mA 9 A 0 to 10 V 0 to 10 V 0 to 10 V 0 to 20 mA B C 0 to 10 V 0 to 20 mA 4 to 20 mA 0 to 20 mA D E 0 to 20 mA 4 to 20 mA 4 to 20 mA 4 to 20 mA F (Cannot be set.) The following diagram shows the internal circuits for the DRT1-AD04 Analog Input Terminal. DRT1-AD04 Photocoupler V+ V+ CAN H DRAIN CAN L 510 kΩ Physical Photolayer coupler 250 Ω – V+ Internal circuitry SOURCE 24 V DC – Input 0 510 kΩ V– SOURCE 24 V DC + I+ DC-DC converter (Isolated) 510 kΩ 250 Ω 510 kΩ 510 kΩ I+ Input 1 – V+ 250 Ω I+ Input 2 – 510 kΩ V+ 510 kΩ 250 Ω I+ Input 3 – 510 kΩ Analog GND 141 Section 4-8 Analog I/O Terminals Note The DRT1-AD04H has insulation between the inputs, so there is no need for the user to be concerned with the internal circuitry. Terminal Arrangement DRT1-AD04 SOURCE 24 V DC + SOURCE 24 V DC ± + + + + + + + ± ± ± + ± DRT1-AD04H SOURCE 24 V DC + SOURCE 24 V DC − Wiring: DRT1-AD04 and DRT1-AD04 H (Common) Connect the power supply and inputs (voltage input or current input) to the Analog Input Terminal’s terminal block as shown in the following diagram. Internal circuits power supply SOURCE 24 V DC Voltage input connection Current input connection V+ V+ I+ I+ + – – – – + Shield Shield Internal circuits power supply 0V 0V (With current inputs, short-circuit the V+ and I+ terminals.) Do not connect the shield when using shielded cables for the inputs. Input Ranges and Converted Data The Analog Input Terminal converts analog input data to digital values. The digital values depend on the input signal ranges, as shown in the following diagrams. Note When the input exceeds the specified range, the AD conversion data will be fixed at either the lower limit or upper limit. 142 Section 4-8 Analog I/O Terminals DRT1-AD04 –10- to 10-V Inputs The –10- to 10-V range corresponds to the hexadecimal values 8BB8 to 0BB8 (–3000 to 3000). The most significant bit (bit 15) is set to 1 (ON) for negative values and the AD conversion data is set to the absolute values; the rest of the word indicates the absolute value. The entire data range is 8CE4 to 0CE4 (–3300 to 3300). Converted data Hexadecimal (decimal) 0CE4 (3300) 0BB8 (3000) 0000 (0) –11 V –10 V 0V Voltage 10 V 11 V 8BB8 (–3000) 8CE4 (–3300) 0- to 10-V Inputs The 0- to 10-V range corresponds to the hexadecimal values 0000 to 1770 (0 to 6000). The most significant bit (bit 15) is set to 1 (ON) for negative values and the AD conversion data is set to the absolute values; the rest of the word indicates the absolute value. The entire data range is 812C to 189C (–300 to 6300). Converted data Hexadecimal (decimal) 189C (6300) 1770 (6000) 0000 (0) – 0.5 V 812C (–300) 0V 10 V Voltage 10.5 V 0- to 5-V Inputs The 0- to 5-V range corresponds to the hexadecimal values 0000 to 1770 (0 to 6000). The most significant bit (bit 15) is set to 1 (ON) for negative values and the AD conversion data is set to the absolute values; the rest of the word indicates the absolute value. The entire data range is 812C to 189C (–300 to 6300). Converted data Hexadecimal (decimal) 189C (6300) 1770 (6000) 0000 (0) – 0.25 V 812C (–300) 0V Voltage 5 V 5.25 V 143 Section 4-8 Analog I/O Terminals 1- to 5-V Inputs The 1- to 5-V range corresponds to the hexadecimal values 0000 to 1770 (0 to 6000). The most significant bit (bit 15) is set to 1 (ON) for voltages from 0.8 V to 1 V and the AD conversion data is set to the absolute values; the rest of the word indicates the absolute value. The entire data range is 812C to 189C (–300 to 6300). If the input voltage falls below 0.8 V, the open-circuit detection function is activated and the converted data is set to FFFF. Converted data Hexadecimal (decimal) 189C (6300) 1770 (6000) FFFF 0000 (0) 0.8 V 812C (–300) 1V Voltage 5 V 5.2 V 0- to 20-mA Inputs The 0- to 20-mA range corresponds to the hexadecimal values 0000 to 1770 (0 to 6000). The most significant bit (bit 15) is set to 1 (ON) for negative values and the AD conversion data is set to the absolute values; the rest of the word indicates the absolute value. The entire data range is 812C to 189C (–300 to 6300). Converted data Hexadecimal (decimal) 189C (6300) 1770 (6000) 0000 (0) –1 mA 0 mA 812C (–300) Current 20 mA 21 mA 4- to 20-mA Inputs The 4- to 20-mA range corresponds to the hexadecimal values 0000 to 1770 (0 to 6000). The most significant bit (bit 15) is set to 1 (ON) for currents from 3.2 to 4 mA and the AD conversion data is set to the absolute values; the rest of the word indicates the absolute value. The entire data range is 812C to 189C (–300 to 6300). If the input current falls below 3.2 mA, the open-circuit detection function is activated and the converted data is set to FFFF. Converted data Hexadecimal (decimal) 189C (6300) 1770 (6000) FFFF 0000 (0) 812C (–300) 144 3.2 mA 4 mA Current 20 mA 20.8 mA Section 4-8 Analog I/O Terminals DRT1-AD04H 0 to 10 V The 0- to 10-V range corresponds to the hexadecimal values 0000 to 7530 (0 to 30,000). The convertible data range is FA24 to 7B0C (–1,500 to 31,500). When the voltage is negative, the negative number is expressed as a two’s complement. Converted data Hexadecimal (decimal) 7B0C (31500) 7530 (30000) 0000 (0) –0.5 V FA24 (-1500) Voltage 0V 10 V 10.5 V 0 to 5 V The 0- to 5-V range corresponds to the hexadecimal values 0000 to 7530 (0 to 30,000). The convertible data range is FA24 to 7B0C (–1,500 to 31,500). When the voltage is negative, the negative number is expressed as a two’s complement. Converted data Hexadecimal (decimal) 7B0C (31500) 7530 (30000) 0000 (0) –0.25 V FA24 (-1500) Voltage 0V 5 V 5.25 V 1 to 5 V The 1- to 5-V range corresponds to the hexadecimal values 0000 to 7530 (0 to 30,000). The convertible data range is FA24 to 7B0C (–1,500 to 31,500). The 0.8- to 1-V range corresponds to the hexadecimal values FA24 to 7B0C (–1,500 to 0). If the voltage drops below the input range (i.e., if the input voltage drops below 0.8 V), the open-circuit detection function is activated and the data is set to 7FFF. Converted data Hexadecimal (decimal) 7B0C (31500) 7530 (30000) 7FFF 0000 (0) FA24 (–1500) 0.8 V 1V Voltage 5 V 5.2 V 145 Section 4-8 Analog I/O Terminals 0 to 20 mA The 0- to 20-mA range corresponds to the hexadecimal values 0000 to 7530 (0 to 30,000). The convertible data range is FA24 to 7B0C (–1,500 to 31,500). When the current is negative, the negative number is expressed as a two’s complement. Converted data Hexadecimal (decimal) 7B0C (31500) 7530 (30000) 0000 (0) –1 mA FA24 (-1500) Current 0 mA 20 mA 21 mA 4 to 20 mA The 4- to 20-mA range corresponds to the hexadecimal values 0000 to 7530 (0 to 30,000). The convertible data range is FA24 to 7B0C (–1,500 to 31,500). The 3.2- to 4-mA range corresponds to the hexadecimal values FA24 to 0000 (–1,500 to 0). If the current drops below the input range (i.e., if the current voltage drops below 3.2 mA), the open-circuit detection function is activated and the data is set to 7FFF. Converted data Hexadecimal (decimal) 7B0C (31500) 7530 (30000) 7FFF 0000 (0) FA24 (–1500) Number of Inputs Setting (DRT1-AD04 Only) 3.2 mA 4 mA Current 20 mA 20.8 mA The number of inputs can be limited to two by turning ON pin 9 of the DIP switch. Changing the number of inputs from four to two reduces the sampling time from 8 ms/4 inputs to 4 ms/2 inputs, which provides faster conversion. If the number of inputs is two, the number of words allocated to the Input Terminal in the PLC is also reduced to 2 words. When only two inputs are used, inputs 0 and 1 are used (inputs 2 and 3 cannot be used.) 146 Section 4-8 Analog I/O Terminals Averaging Function Setting (DRT1-AD04 Only) With the DRT1-AD04, the averaging function can be enabled for all inputs (0 through 3) by turning ON pin 10 of the DIP switch. The averaging function outputs the average (a moving average) of the last eight input values as the converted value. Use this function to smooth inputs that vary like the one in the following diagram. Actual input Input after averaging Time Note The time required for converted data refreshing remains 2 ms/point when the averaging function is enabled. The first communications data after the power is turned ON will be output after averaging eight samples. Open-circuit Detection Function The open-circuit detection function is activated when the input range is set to 1 to 5 V and the voltage drops below 0.8 V, or when the input range is set to 4 to 20 mA and the current drops below 3.2 mA. When the open-circuit detection function is activated, the converted data is set to FFFF for the DRT1AD04 and 7FFF for the DRT1-AD04H. In addition, with the DRT1-AD04H, the broken wire indicator lights when the open-circuit detection function is activated. The open-circuit detection function is enabled or cleared at the same time as the conversion time. If the input returns to the convertible range, the open-circuit detection is cleared automatically and the output returns to the normal range. Converted Data The converted data is transferred to the Master as shown in the following diagram. DRT1-AD04 Bit First word Sign bit Input 0 converted data First word + 1 Sign bit Input 1 converted data First word + 2 Sign bit Input 2 converted data* First word + 3 Sign bit Input 3 converted data* Note *Not used when there are two input points. At that time only two words are occupied. The sign bit is turned ON to indicate that the converted value is negative; the converted value will be the absolute value (not the two’s complement). 147 Section 4-8 Analog I/O Terminals Example: When –300 is converted, the sign bit (bit 15) is set to 1 and 300 is output as the binary value as 12C hexadecimal. The contents of the word is thus 812C, as shown in the following illustration. 15 14 13 12 11 10 9 8 7 6 5 4 3 2 1 0 1 1 0 0 1 0 1 1 0 0 0 0 8 (163) 0 0 0 0 1 (162) 2 (161) C (160) DRT1-AD04H Bit First word Input 0 converted data First word + 1 Input 1 converted data First word + 2 Input 2 converted data First word + 3 Input 3 converted data If the converted data is a negative number, it is expressed as a two’s complement. The NEG command can be useful to obtain the absolute value from the two’s complement. Conversion Time DRT1-AD04 AD conversion values are refreshed every 2 ms for each input point. DRT1-AD04H AD conversion values are refreshed every 250 ms. It may take up to 650 ms, however, from when the step response is input until AD conversion data of 90% of that value can be transmitted. 148 Section 4-8 Analog I/O Terminals Dimensions The following diagram shows the dimensions for the DRT1-AD04 and DRT1AD04H Analog Input Terminals. All dimensions are in mm. Approx. 73 12 50 max. (With connector attached) 40 max. 150 max. Mounting holes 40 ± 0.3 Two, 4.2 dia. or M4 140± 0.3 4-8-3 Analog Output Terminal: DRT1-DA02 Specifications General Specifications Item Specification Voltage outputs Current outputs Output points Communications power supply voltage 2 points (allocated two words in the Master Unit.) 11 to 25 V DC (supplied from the communications connector) Internal power supply voltage 20.4 to 26.4 V DC (24 V DC −15% to 10%) Current consumption Communications: 30 mA max. Internal circuit: 140 mA max. Noise immunity ±1.5 kVp-p, pulse width: 0.1 to 1 µs, pulse rise time: 1 ns (via noise simulator) Vibration resistance Shock resistance 10 to 55 Hz, 1.0-mm double amplitude 200 m/s2 Dielectric strength Insulation resistance 500 V AC for 1 min (between insulated circuits) 20 MΩ min. at 250 V DC (between insulated circuits) Ambient operating temperature 0 to 55°C Ambient operating humidity 35% to 85% (with no condensation) 149 Section 4-8 Analog I/O Terminals Item Specification Voltage outputs Current outputs Ambient operating environment Ambient storage temperature Mounting method No corrosive gases. Mounting strength 50 N 10 N min. in the DIN Track direction Terminal strength Weight Pull: 50 N 160 g max. −25 to 65°C M4 screw mounting or 35-mm DIN track mounting Output signal range 1 to 5 V, 0 to 10 V, or –10 to 10 V Allowable external out- 1 KΩ min. put load resistance Output impedance 0.5 Ω max. 0 to 20 mA or 4 to 20 mA 600 Ω max. --- Resolution Accuracy 25°C 1/6000 (full scale) ±0.4% FS 0 to 55°C Conversion time ±0.8% FS 4 ms/2 points Conversion output data (Binary) –10- to 10-V range: Other signal ranges: Isolation method Photocoupler isolation between analog outputs and communications lines (There is no isolation between analog output signals.) 8BB8 to 0 to 0BB8 full scale 0000 to 1770 full scale Components DeviceNet Indicators (Refer to page 312.) Rotary switch Sets the output ranges. Terminal block Connect the internal circuits power supply and the analog outputs. DIN track mounting hooks Communications connector DIP switch (Refer to page 40.) Pins 1 to 6: Node address Pins address setting setting Pins 7 and 8: Baud rate Pins rate setting setting Pins 9 and 10: Output Pins O tp t status stat s after aftercommunications comm nicationserror error 150 Section 4-8 Analog I/O Terminals DIP Switch Settings The following diagram shows the functions of the DIP switch. Node address setting Output status after communications error Baud rate The following table summarizes the DIP switch settings. (All pins are factoryset to OFF.) Pin(s) Function Settings 1 through 6 Node address setting 7 and 8 Baud rate Refer to 4-8-1 Node Address and Baud Rate Setting for details. 9 and 10 9 OFF 10 OFF OFF ON ON ON OFF ON Output status at communications error. (See page 154 for details.) Output Clear at “Low” (see below) (Factory setting) Clear at “High” (see below) Hold Hold Outputs for “High” and “Low” Clear Pins 9 and 10 of the DIP switch determine the status of the outputs after a communications error occurs in DeviceNet communications. The following table shows the lower and upper limits of the output ranges for each output signal range setting. Output signal range “Low” “High” –10 to 10 V 0 to 10 V –11 V –0.5 V 11 V 10.5 V 1 to 5 V 0 to 20 mA 0.8 V 0 mA 5.2 V 21 mA 4 to 20 mA 3.2 mA 20.8 mA Note Always turn OFF the Slave’s power supply (including the communications power supply) before changing any settings. Rotary Switch Setting Set the output signal range for each output with the rotary switch. The following table shows the rotary switch settings and corresponding output signal range settings. No. Signal range for output 0 Signal range for output 1 0 1 1 to 5 V 1 to 5 V 1 to 5 V 0 to 10 V 2 3 1 to 5 V 1 to 5 V –10 to 10 V 0 to 20 mA 4 5 1 to 5 V 0 to 10 V 4 to 20 mA 0 to 10 V 6 7 0 to 10 V 0 to 10 V –10 to 10 V 0 to 20 mA 151 Section 4-8 Analog I/O Terminals No. 8 Signal range for output 0 0 to 10 V Signal range for output 1 4 to 20 mA 9 A –10 to 10 V –10 to 10 V –10 to 10 V 0 to 20 mA B C –10 to 10 V 0 to 20 mA 4 to 20 mA 0 to 20 mA D E 0 to 20 mA 4 to 20 mA 4 to 20 mA 4 to 20 mA F (Setting not possible.) Internal Circuits Photocoupler V+ CAN H CAN L Physical Photolayer coupler V– I+ V+ Internal circuitry DRAIN Output 0 – I+ SOURCE 24 V DC + SOURCE 24 V DC – Output 1 V+ DC-DC converter (Isolated) – Analog GND Terminal Arrangement SOURCE 24 V DC + SOURCE 24 V DC − 152 + – + + – + Section 4-8 Analog I/O Terminals Wiring Connect the power supply and outputs (voltage output or current output) to the Analog Output Terminal’s terminal block as shown in the following diagram. Internal circuits power supply Voltage output connection SOURCE 24 V DC V+ – Current output connection V+ I+ – I+ + – – + Internal circuits power supply External device Output Ranges and Converted Data External device + – + – The Analog Output Terminal converts the digital output data to analog values. The analog values depend on the output signal ranges, as shown in the following diagrams. –10- to 10-V Outputs The hexadecimal values 8BB8 to 0BB8 (–3000 to 3000) correspond to an analog voltage range of –10 to 10 V. The entire output range is –11 to 11 V. Voltage 11 V 10 V 8CE4 8BB8 FFFF (–3300) (–3000) 0000 (0) 0V Converted data Hexadecimal 0BB8 0CE4 7FFF (Decimal) (3000) (3300) –10 V –11 V 0- to 10-V Outputs The hexadecimal values 0000 to 1770 (0 to 6000) correspond to an analog voltage range of 0 to 10 V. The entire output range is –0.5 to 10.5 V. Voltage 10.5 V 10 V 0V FFFF 812C (–300) –0.5 V 0000 (0) Converted 1770 189C 7FFF data Hexadecimal (6000) (6300) (Decimal) 153 Section 4-8 Analog I/O Terminals 1- to 5-V Outputs The hexadecimal values 0000 to 1770 (0 to 6000) correspond to an analog voltage range of 1 to 5 V. The entire output range is 0.8 to 5.2 V. Voltage 5.2 V 5V 1V 0.8 V 0V FFFF 812C 0000 (0) (–300) Converted data 1770 189C 7FFF Hexadecimal (Decimal) (6000) (6300) 0- to 20-mA Outputs The hexadecimal values 0000 to 1770 (0 to 6000) correspond to an analog current range of 0 to 20 mA. The entire output range is 0 to 21 mA. Current 21 mA 20 mA 0 mA 0000 (0) FFFF Converted data 1770 189C 7FFF Hexadecimal (Decimal) (6000) (6300) 4- to 20-mA Outputs The hexadecimal values 0000 to 1770 (0 to 6000) correspond to an analog current range of 4 to 20 mA. The entire output range is 3.2 to 20.8 mA. Current 20.8 mA 20 mA 4 mA 0V FFFF Output Status after Communications Error 812C 0000 (0) (–300) Converted data 1770 189C 7FFF Hexadecimal (Decimal) (6000) (6300) Pins 9 and 10 of the DIP switch determine the status of the outputs after a communications error occurs in DeviceNet communications. Hold: Low: High: 154 3.2 mA Maintains the previous output status. Clears to the lower limit of the output signal range. Clears to the upper limit of the output signal range. Section 4-8 Analog I/O Terminals The following table shows the lower and upper limits of the output ranges for each output signal range setting. Converted Data Output signal range –10 to 10 V “Low” “High” –11 V 11 V 0 to 10 V 1 to 5 V –0.5 V 0.8 V 10.5 V 5.2 V 0 to 20 mA 4 to 20 mA 0 mA 3.2 mA 21 mA 20.8 mA Output the converted data to the Master as shown in the following diagram. Bit Sign bit Output 0 converted data First word + 1 Sign bit Output 1 converted data First word The sign bit is turned ON to indicate that the converted value is negative, at which time the converted value will be an absolute value. Dimensions The following diagram shows the dimensions for the DRT1-DA02 Analog Output Unit. All dimensions are in mm. Approx. 73 Unit: mm 12 50 max. (With connector attached) 150 max. 40 max. Mounting holes 40 ± 0.3 Two, 4.2 dia. or M4 140 ± 0.3 155 Section 4-8 Analog I/O Terminals 4-8-4 Mounting in Control Panels Either of the following methods can be used to mount an Analog I/O Terminal in a control panel. Using Screws Open mounting holes in the control panel according to the dimensions provided for mounting holes in the dimensions diagrams and then secure the Analog I/O Terminal with M4 screws. The appropriate tightening torque is 0.6 to 0.98 N⋅m. Using DIN Track Mount the back of the Analog I/O Terminal to a 35-mm DIN Track. To mount the Terminal, pull down on the mounting hook on the back of the Terminal with a screwdriver, insert the DIN Track on the back of the Terminal, and then secure the Terminal to the DIN Track. When finished, secure all Slaves on both ends of the DIN Track with End Plates. Connecting End Plates Hook the bottom of the End Plate onto the DIN Track, as shown at (1) in the following diagram, then hook the top of the End Plate as shown at (2). 2 1 End Plate Note Always attach End Plate to both ends of Slaves connected to DIN Track. Unless specific restrictions are given for the Slave, it can be mounted in any direction. Any of the following directions are okay. Vertical 3 IN 1 No. 3 2 2 1 3 0 2 DRT1-AD04 1 NS IN 0 DRT1-AD04 NS MS No. NS MS ANALOG TERMINAL MS DRT1-AD04 ANALOG TERMINAL ANALOG TERMINAL No. IN Mounting Direction 0 0 MS NS 3 No. ANALOG TERMINAL 2 DRT1-AD04 1 IN 4-8-5 Wiring Internal Power Supplies and I/O Lines The internal circuit power supplies and I/O lines are all wired to M3 screw terminals. Connect M3 crimp terminals and then connect them to the terminal block. Tighten the screws fixing the crimp terminals to a torque of 0.3 to 0.5 N⋅m. 6.0 mm max. 156 6.0 mm max. Section 4-9 Temperature Input Terminals Wiring the Internal Power Supply Refer to the wiring details for each Slave for information on the terminal arrangement at the terminal block. The following example shows the internal power supply for a DRT1-AD04 Analog Input Terminal. DRT1-AD04 No. ANALOG TERMINAL 0 1 2 3 7 8 9 4 5 6 − Wiring I/O + Refer to the wiring details for each Slave for information on the terminal arrangement at the terminal block and external I/O wiring. The following example shows the wiring to input 0 on a DRT1-AD04 Analog Input Terminal. DRT1-AD04 No. ANALOG TERMINAL 0 1 2 3 7 8 9 4 5 6 V+ 4-9-1 Temperature Input Terminals Node Address and Baud Rate Settings This section describes the Slaves’ node address setting, baud rate settings, and hold/clear outputs for communications error setting. These settings are made using the following pins on the DIP switch. Node address setting: Baud rate setting: Pins 1 through 6 Pins 7 and 8 Slave-specific setting: Pins 9 and 10 (Refer to the descriptions of individual Slaves.) ON 4-9 − 1 2 3 4 5 6 7 8 9 10 Node address setting Baud rate setting Slave-specific setting: Refer to the descriptions of individual Slaves. 157 Section 4-9 Temperature Input Terminals Node Address Settings Each Slave’s node address is set with pins 1 through 6 of the Slave’s DIP switch. Any node address within the setting range can be used as long as it isn’t already set on another node. Pin 6 DIP switch setting Pin 5 Pin 4 Pin 3 Pin 2 Node address Pin 1 0 0 0 0 0 0 0 0 0 0 0 0 0 0 1 0 (default) 1 0 1 0 2 : : Note : : 1 1 1 1 0 1 61 1 1 1 1 1 1 1 1 1 1 0 1 62 63 1. Refer to Appendix A Node Address Settings Table for a complete table of DIP switch settings. 2. The Slave won’t be able to participate in communications if the same node address is used for the Master or another Slave node (node address duplication error). Baud Rate Setting Pins 7 and 8 are used to set the baud rate as shown in the following table. (These pins are factory-set to OFF.) Pin 7 Note Pin 8 Baud rate OFF ON OFF OFF 125 kbps (default) 250 kbps OFF ON ON ON 500 kbps Not allowed. 1. Always turn OFF the Slave’s power supply (including the communications power supply) before changing the baud rate setting. 2. Set the same baud rate on all of the nodes (Master and Slaves) in the Network. Any Slaves with baud rates different from the Master’s rate won’t be able to participate in communications. Furthermore, a node with an incorrect baud rate may cause communications errors between nodes with correct baud rate settings. 4-9-2 Temperature Input Terminals: DRT1-TS04T and DRT1-TS04P Specifications General Specifications Item Model Input type Input points DRT1-TS04P Resistance temperature sensor input 4 points (allocated four words in the Master Unit.) Communications power supply voltage 11 to 25 V DC (supplied from the communications connector) Internal power supply voltage Current consumption 20.4 to 26.4 V DC (24 V DC −15% to 10%) Noise immunity ±1.5 kVp-p, pulse width: 0.1 to 1 µs, pulse rise time: 1 ns (via noise simulator) 10 to 55 Hz, 1.0-mm double amplitude Vibration resistance 158 Specification DRT1-TS04T Thermocouple input Communications: 30 mA max. Internal circuit: 130 mA max. Section 4-9 Temperature Input Terminals Item Shock resistance Specification 200 m/s Dielectric strength Insulation resistance 500 V AC for 1 min (between insulated circuits) 20 MΩ min. at 250 V DC (between insulated circuits) 2 Ambient operating temper- 0 to 55°C ature Ambient operating humidity 35% to 85% (with no condensation) Ambient operating environ- No corrosive gases. ment Ambient storage temperature −25 to 65°C Mounting method Mounting strength M4 screw mounting or 35-mm DIN track mounting 50 N 10 N min. in the DIN Track direction Terminal strength Weight Pull: 50 N 230 g max. Input classification R, S, K1, K2, J1, J2, T, E, B, N, L1, L2, U, W, PL II convertible (4-point common input class) (Instruction value ±0.5% or ±2°C, whichever is larger) ±1 digit max. (See note.) Instruction precision 160 g max. Pt100, JPt100 convertible (4-point common input class) (Instruction value ±0.5% or ±1°C, whichever is larger) ±1 digit max. Conversion period Temperature conversion data 250 ms / 4 pts. Binary data (4-digit hexadecimal) Isolation method Photocoupler isolation between temperature inputs and communications lines (Photocoupler isolation between temperature input signals.) Note Less than –100°C of K1, T, N: ±4°C ±1 digit max. U, L1, L2: ±4°C ±1 digit max. Less than 200°C of R, S: ±6°C ±1 digit max. No regulation Less than 400°C of B: W: (Instruction value ±0.5% or ±6°C, whichever is larger) ±1 digit max. PL II: (Instruction value ±0.5% or ±4°C, whichever is larger) ±1 digit max. 159 Section 4-9 Temperature Input Terminals Components of the DRT1-TS04T and DRT1-TS04P DeviceNet Display (Refer to page 312.) Broken wire display The indicator for the relevant number lights when the open-circuit detection function is activated. Rotary switch Sets the input range. Cold Junction Compensator (DRT1-TS04T only) Corrects the input temperature. Do not touch or remove it. Terminal block Connects the operation power supply (the internal circuit power supply) and the temperature sensors. The wiring will vary depending on the model. DIN track mounting rack Communications connector DIP switch 1 to 6: Node address (Refer to page 124.) 7, 8: Baud rate (Refer to page 124.) 9: Temperature unit (5C or 5F) (See below) 10: Display mode for 2 digits below decimal point (See below) DIP Switch Settings The following diagram shows the functions of the DIP switch for the DRT1TS04T and DRT1-TS04P Temperature Input Terminals. Node address Two digits below decimal point Temperature unit Baud rate Pin(s) Function 1 through 6 Node address setting 7 and 8 9 10 Baud rate setting Temperature unit setting Display mode for 2 digits below the decimal (Refer to page 164.) Settings Refer to 4-9-1 Node Address and Baud Rate Settings for details. OFF (factory setting) °C ON OFF (factory setting) °F Normal mode (0 or 1 digit depending on input classification) ON Two digits below decimal point Note Always turn OFF the Slave’s power supply (including the communications power supply) before changing any settings. 160 Section 4-9 Temperature Input Terminals Rotary Switch Setting Set the common input classification and input signal range for each input with the rotary switch. (The input classification and input range cannot be set for 4point classification.) Note Always turn OFF the Slave’s power supply (including the communications power supply) before changing any settings. DRT1-TS04T The following table shows the input classifications and input ranges according to the rotary switch settings. 0 Number R Input classification Range (°C) 0 to 1700 Range (°F) 0 to 3000 1 2 S K1 0 to 1700 –200 to 1300 0 to 3000 –300 to 2300 3 4 K2 J1 0.0 to 500.0 –100 to 850 0.0 to 900.0 –100 to 1500 5 6 J2 T 0.0 to 400.0 –200.0 to 400.0 0.0 to 750.0 –300.0 to 700.0 7 8 E L1 0 to 600 –100 to 850 0 to 1100 –100 to 1500 9 A L2 U 0.0 to 400.0 –200.0 to 400.0 0.0 to 750.0 –300.0 to 700.0 B C N W –200 to 1300 0 to 2300 –300 to 2300 0 to 4100 D E B PL II 100 to 1800 0 to 1300 300 to 3200 0 to 2300 F Cannot be set. DRT1-TS04P The following table shows the input classifications and input ranges according to the rotary switch settings. 0 Number Input classification PT100 Range (°C) –200.0 to 650.0 Range (°F) –300.0 to 1200.0 1 2 to 9 JPT100 Cannot be set. –200.0 to 650.0 –300.0 to 1200.0 161 Section 4-9 Temperature Input Terminals Terminal Arrangement DRT1-TS04T Cold Junction Compensator SOURCE 24 V DC Input 0 Input 0 SOURCE 24 V DC − Input 1 Input 2 Input 1 Input 2 Input 3 Input 3 Note Do not touch or remove the Cold Junction Compensator. DRT1-TS04P SOURCE 24 V DC SOURCE 24 V DC Wiring Input 0 Input 0 Input 1 Input 1 Input 0 Input 1 Input 2 Input 2 Input 3 Input 3 Input 2 Input 3 Connect the inputs to the Temperature Input Terminal’s terminal block as shown in the following diagram, depending on whether thermocouple inputs or resistance temperature sensor inputs are used. Internal circuit power supply Source: 24 V DC DRT1-TS04T Thermocouple input DRT1-TS04P Resistance temperature sensor input Internal circuit power supply Temperature Conversion Data for the DRT1-TS04T and DRT1-TS04P 162 Data that is input is converted to binary data (4-digit hexadecimal) and the Master is notified. If the converted data is a negative number, it is expressed as a two’s complement. Section 4-9 Temperature Input Terminals The four inputs occupy four words at the Master, as shown below. If the input classification is set for up to one digit below the decimal point, a multiple of 10 will be transmitted as binary data. Bit Beginning word Input 0: Temperature conversion data Beginning word + 1 Input 1: Temperature conversion data Beginning word + 2 Input 2: Temperature conversion data Beginning word + 3 Input 3: Temperature conversion data Input classification Unit: 1°C (°F) R, S, K1, J1, E, L1, N, W, B, PL K2, J2, T, L2, U, Pt100, JPt100 Unit: 0.1°C (°F) Note 850° → 0352 (4 digits hex) –200° → FF38 (4 digits hex) x10 500.0° → 5000 → 1388 (4 digits hex) –20.0° → 200 → FF38 (4 digits hex) –200.0° → 2000 → F830 (4 digits hex) 1. For more details regarding temperature conversion data with a unit setting of two digits below the decimal point (unit: 0.01), refer to page 164. 2. If there is a sudden temperature change, condensation may develop inside of the Terminal and cause incorrect values to be displayed. If condensation does develop, leave the Terminal for approximately one hour at a stable temperature before using it. Data Ranges and the Open-circuit Detection Function The following table shows the convertible data ranges according to the number set by the rotary switch. DRT1-TS04T Number Input classification Range (°C) Range (°F) 0 1 R S –20 to 1720 –20 to 1720 –20 to 3020 –20 to 3020 2 3 K1 K2 –220 to 1200 –20.0 to 520.0 –320 to 2320 –20.0 to 920.0 4 5 J1 J2 –120 to 870 –20.0 to 420.0 –120 to 1520 –20.0 to 770.0 6 7 T E –220.0 to 420.0 –20 to 620 –320.0 to 720.0 –20 to 1120 8 9 L1 L2 –120 to 870 –20.0 to 420.0 –120 to 1520 –20.0 to 770.0 A B U N –220.0 to 420.0 –220 to 1320 –320.0 to 720.0 –320 to 2320 C D W B –20 to 2320 80 to 1820 –20 to 4120 280 to 3220 E F PL II Cannot be set. –20 to 1320 –20 to 2320 163 Section 4-9 Temperature Input Terminals DRT1-TS04P Number 0 Input classification Range (°C) Pt100 –220.0 to 670.0 Range (°F) –320.0 to 1220.0 1 2 to 9 JPt100 Cannot be set. –320.0 to 1220.0 –220.0 to 670.0 If the input temperature goes outside of the permissible conversion range, the temperature data is fixed at the upper or lower limit. If the input temperature goes beyond a given constant value, outside of the permissible conversion range, it is determined that the input wiring has been disconnected. The open-circuit detection function is then activated so that the temperature data is set to 7FFF (hexadecimal), and the broken wire indicator on the Temperature Input Terminal lights up. The open-circuit detection function will operate even if there is an error at the Cold Junction Compensator. When the input temperature returns to within the conversion range, the opencircuit detection function is automatically cleared and the conversion data is returned to normal. Temperature Input Terminal’s Display Mode for 2 Digits Below the Decimal Point This section explains the Temperature Input Terminal’s display mode for 2 digits below the decimal point. When the Temperature Input Terminal is in this mode, each single item of temperature data (four integer digits and two digits below the decimal point, in six digits of hexadecimal binary data) is provided to the Master Unit multiplied by 100 with the sign affixed. At that time the temperature data is divided into two parts as shown below, and these parts are alternately transmitted every 125 ms. (The two respective data items are each configured as one word of data.) !Caution In the display mode for 2 digits below the decimal point, temperature data is converted for up to two digits below the decimal point, but the actual resolution is not 0.01°C (°F). Therefore there may be some oscillation or jumping at the 0.01°C (°F) and 0.1°C (°F) digits. Resolutions beyond those prescribed for the normal mode should be treated as reference data. 164 Section 4-9 Temperature Input Terminals The following diagram shows how temperature data is divided and the data configuration. Temperature data (Actual temperature x 100, in binary data) Notification format for leftmost 3 digits Bit Left/right Temp. unit Broken wire Not used. 0: Left 1: Right 0: C° 1: F° 0: OK 1: Error 0 (Fixed) Sign/determination area Data area Notification format for rightmost 3 digits Bit Right/left Temp. unit Broken wire Not used. 0: Left 1: Right 0: C° 1: F° 0: OK 1: Error 0 (Fixed) Sign/determination area Data area Leftmost/rightmost bit: Determines whether leftmost or rightmost digits are displayed. Temperature unit bit: Determines whether temperature is expressed in °C or °F. Broken wire bit: Turns ON (1) to notify of broken wire. At that time the data in the leftmost three digits is “7FF” and the data in the rightmost three digits is “FFF.” The three leftmost digits and three rightmost digits, each comprising one word of data, are alternately provided to the Master every 125 ms as shown in the following diagram. 125 mms Leftmost 3 digits 125 mms Rightmost 3 digits 125 mms Leftmost 3 digits Time Data refresh Data refresh 165 Section 4-9 Temperature Input Terminals Example 1: 1130.25°C Value multiplied by 100: 113025 Notification value: 01B981 (113025 expressed in hexadecimal) Contents of 3 Leftmost Digits Sign/Determin. 11 to 8 7 to 4 Bits Data C Normal Leftmost 3 to 0 Temperature conversion data Data area Sign/determination area Contents of 3 Rightmost Digits Sign/Determin. 11 to 8 7 to 4 Bits Data Rightmost C Normal 3 to 0 Temperature conversion data Sign/determination area Data area Example 2: –100.12°C Value multiplied by 100: –10012 Notification value: FFD8E4 (–10012 expressed in hexadecimal) Contents of 3 Leftmost Digits Sign/Determin. 11 to 8 7 to 4 Bits Data Leftmost C Normal 3 to 0 Temperature conversion data Data area Sign/determination area Contents of 3 Rightmost Digits Sign/Determin. 11 to 8 7 to 4 3 to 0 Bits Data Rightmost C Temperature conversion data Normal Sign/determination area Data area Example 3: –200.12°F Value multiplied by 100: –20012 Notification value: FFB1D4 (–20012 expressed in hexadecimal) Contents of 3 Leftmost Digits Sign/Determin. 11 to 8 7 to 4 3 to 0 Bits Data Leftmost F Normal Temperature conversion data Sign/determination area Data area Contents of 3 Rightmost Digits Sign/Determin. 11 to 8 7 to 4 3 to 0 Bits Data Rightmost F Temperature conversion data Data area Normal Sign/determination area 166 Section 4-9 Temperature Input Terminals Example 4: Input Error (Broken Wire) (Unit:°F) Notification value: 7FFFFF Contents of 3 Leftmost Digits Sign/Determin. Temperature conversion data 11 to 8 7 to 4 3 to 0 Bits Data Leftmost F Error Sign/determination area Data area Contents of 3 Rightmost Digits Sign/Determin. Rightmost Note Temperature conversion data 11 to 8 7 to 4 3 to 0 Bits Data F Error Sign/determination area Data area 1. Data notification is provided in order, from the leftmost digits to the rightmost. When reading data with the program, be sure to read it in that same order. 2. Taking the Programmable Controller’s cycle time and the communications time into consideration, lower the reading cycle to 125 ms or less. If the reading cycle exceeds 125 ms, normal data cannot be read. Sample Program for the DRT1-TS04T and DRT1TS04P The following program is an example of using the Temperature Input Terminal in the display mode for 2 digits below the decimal point. Settings Temperature Input Terminal’s allocated words: 350 to 353 Temperature Input Terminal’s mode: Two digits below decimal point (DIP switch pin 10: ON) Operation The temperature data from the Temperature Input Terminal’s input 0 is stored in words 30 to 32 in binary data multiplied by 100, as shown below. Word Bit 15 to 12 11 to 8 7 to 4 30 x163 x162 x161 31 x167 0 (Fixed) x166 0 (Fixed) x165 0 (Fixed) 32 Temperature unit bit Broken wire bit: 3 2 1 0 x160 0 x164 Temperature Broken wire unit bit bit 0 0: °C; 1: °F 0: Normal; 1: Error The data in words 30 and 31 can be treated as 32-bit binary data. 167 Section 4-9 Temperature Input Terminals Program Example 35015 MOV 350 Leftmost 3 digits notification Stores leftmost 3 digits of data in IR word 040. 040 35015 MOVD 350 Leftmost 3 digits notification #0020 Transfers rightmost 3 bits of data (160 to 162) to word 030. 030 MOVD 350 #0300 Transfers163 data to word 030. 030 MOVD 040 #0011 Transfers 164 and 165 data to word 031. 031 04011 MOVD #00FF When data is negative #0210 If data is negative, stores "FF" in leftmost two digits of word 031. 031 04011 MOVD #0000 When data is positive #0210 If data is positive, stores "00" in leftmost two digits of word 031. 031 XFRB #0210 040 032 168 Transfers the temperature-units bit and broken-wire bit information to word 032. Section 4-9 Temperature Input Terminals Dimensions The following diagram shows the dimensions for the DRT1-TS04T and DRT1TS04P Temperature Input Terminals. All dimensions are in mm. Approx. 73 Unit: mm (With connector installed) 50 max. 12 150 max. 40 max. Mounting Hole Dimensions 40±0.3 Two, 4.2 dia. or M4 140±0.3 4-9-3 Mounting in Control Panels Either of the following methods can be used to mount a Temperature Input Terminal in a control panel. Using Screws Open mounting holes in the control panel according to the dimensions provided for mounting holes in the dimensions diagrams and then secure the Temperature Input Terminals with M4 screws. The appropriate tightening torque is 0.6 to 0.98 N⋅m. Using DIN Track Mount the back of the Temperature Input Terminal to a 35-mm DIN Track. To mount the Terminal, pull down on the mounting hook on the back of the Terminal with a screwdriver, insert the DIN Track on the back of the Terminal, and then secure the Terminal to the DIN Track. When finished, secure all Slaves on both ends of the DIN Track with End Plates. 169 Section 4-9 Temperature Input Terminals Connecting End Plates Hook the bottom of the End Plate onto the DIN Track, as shown at (1) in the following diagram, then hook the top of the End Plate as shown at (2). 2 1 End Plate Note Always attach End Plate to both ends of Slaves connected to DIN Track. Unless specific restrictions are given for the Slave, it can be mounted in any direction. Any of the following directions are okay. Vertical MS DRT1-TS04T 3 2 2 3 0 1 1 0 1 IN 0 2 NS BROKEN WIRE MS DRT1-TS04T 3 0 3 1 NS BROKEN WIRE 2 No. ANALOG TERMINAL ANALOG TERMINAL No. IN Mounting Direction 0 MS NS 2 3 3 0 1 No. ANALOG TERMINAL 2 BROKEN WIRE DRT1-TS04T 1 IN 4-9-4 Wiring Internal Power Supplies and I/O Lines The internal circuit power supplies and I/O lines are all wired to M3 screw terminals. Connect M3 crimp terminals and then connect them to the terminal block. Tighten the screws fixing the crimp terminals to a torque of 0.3 to 0.5 N⋅m. 6.0 mm max. 170 6.0 mm max. Section 4-10 CQM1 I/O Link Unit Wiring the Internal Power Supply Refer to the wiring details for each Slave for information on the terminal arrangement at the terminal block. The following example shows the internal power supply for a DRT1-TS04T Temperature Input Terminal. DRT1-TS04T No. ANALOG TERMINAL BROKEN WIRE A 789 − Wiring I/O 2 3456 BCD F01 3 0 2 E 1 + Refer to the wiring details for each Slave for information on the terminal arrangement at the terminal block and external I/O wiring. The following example shows the wiring to input 0 on a DRT1-TS04T Temperature Input Terminal. DRT1-TS04T No. ANALOG TERMINAL BROKEN WIRE A 0 2 3456 BCD F01 3 2 E 1 789 − + 4-10 CQM1 I/O Link Unit 4-10-1 Node Address, Baud Rate, and Output Hold/Clear Settings This section describes the Slaves’ node address setting, baud rate settings, and hold/clear outputs for communications error setting. These settings are made using the following pins on the DIP switch. Node address setting: Baud rate setting: Pins 1 through 6 Pins 7 and 8 ON Output hold/clear setting:Pin 10 (affects only outputs) 1 2 3 4 5 6 7 8 9 10 Output hold/clear setting for communications errors (for outputs Node address setting Reserved (Always OFF.) Baud rate setting 171 Section 4-10 CQM1 I/O Link Unit Node Address Settings Each Slave’s node address is set with pins 1 through 6 of the Slave’s DIP switch. Any node address within the setting range can be used as long as it isn’t already set on another node. Pin 6 DIP switch setting Pin 5 Pin 4 Pin 3 Pin 2 Node address Pin 1 0 0 0 0 0 0 0 0 0 0 0 0 0 0 1 0 (default) 1 0 1 0 2 : : : : 1 1 1 1 0 1 61 1 1 1 1 1 1 1 1 1 1 0 1 62 63 0: OFF, 1: ON Note 1. Refer to Appendix A Node Address Settings Table for a complete table of DIP switch settings. 2. The Slave won’t be able to participate in communications if the same node address is used for the Master or another Slave node (node address duplication error). Baud Rate Setting Pins 7 and 8 are used to set the baud rate as shown in the following table. (These pins are factory-set to OFF.) Pin 7 Note Pin 8 Baud rate OFF OFF 125 kbps (default) ON OFF OFF ON 250 kbps 500 kbps ON ON Not allowed. 1. Always turn OFF the Slave’s power supply (including the communications power supply) before changing the baud rate setting. 2. Set the same baud rate on all of the nodes (Master and Slaves) in the Network. Any Slaves with baud rates different from the Master’s rate won’t be able to participate in communications. Furthermore, a node with an incorrect baud rate may cause communications errors between nodes with correct baud rate settings. Setting Pins 9 and 10 The functions of pins 9 and 10 differ for inputs and outputs, as shown in the following diagram. Pin 9: Input: Not used (Always OFF) Output: Hold/Clear outputs for communications error Reserved: Always OFF Reserved (Always OFF) Pin 10: As follows: Inputs: Outputs: OFF (Clear): ON (Hold): No function (Always OFF) Hold/Clear outputs for communications error All output data from the Master will be cleared to 0 when a communications error occurs. All output data from the Master will be retained when a communications error occurs. Pins 9 and 10 are factory-set to OFF. 172 Section 4-10 CQM1 I/O Link Unit 4-10-2 CQM1 I/O Link Unit: CQM1-DRT21 Specifications The general specifications for the CQM1-DRT21 I/O Link Unit conform to CQM1 specifications. Item Model number CQM1-DRT21 Number of I/O points Compatible PLCs 16 inputs, 16 outputs (32 I/O points total) All CQM1 PLCs and all CQM1H PLCs. Max. number of Units 11 Units max. with CQM1H-CPU51-E/61-E PLCs (512 points max.) or CQM1H-CPU11-E/21-E PLCs (256 points max.) 7 Units max. with CQM1-CPU4@-EV1 PLCs (256 points max.) Connection to previous models: CQM1-CPU4@-E: 5 Units max. (192 points max.) CQM1-CPU11-E/21-E: 3 Units max. (128 points max.) Communications power: 40 mA max. Internal circuits: 80 mA max. (5 V DC) Current consumption Weight Specification 185 g max. General Specifications Conform to SYSMAC CQM1 specifications. Components Indicators (Refer to page 312.) DIP switch (Refer to page 40.) Pins 1 to 6: Node address Pins 7 and 8: Baud rate Pin 9: Reserved (Always OFF.) Pin 10: Hold/Clear outputs for communications error Communications connector CQM1 Word Allocation In the CQM1 PLCs, an I/O Link Unit is treated just like an I/O Unit with one input word and one output word, so word allocation is identical to a standard I/ O Unit. Words are allocated from the left side of the PLC, beginning with IR 173 Section 4-10 CQM1 I/O Link Unit 001 for inputs and IR 100 for outputs. The following diagram shows a word allocation example. PS: Power supply unit CPU: CPU Unit IN: Input Unit/Terminals OUT: Output Unit DRT: I/O Link Unit Word allocation Inputs IR 000 IR 001 IR 002 Outputs IR 100 IR 101 IR 102 From the Master's output area To the Master's input area Dimensions The following diagram shows the dimensions for the CQM1-DRT21 I/O Link Unit. Refer to the PLC’s Installation Guide for the dimensions of the Unit when it is mounted to the Backplane. (All dimensions are in mm.) (With the cover removed) 4-10-3 Mounting to Control Panels The CQM1 I/O Link Unit is assembled with the rest of the Units in the CQM1 PLC for use as one assembled PLC. The CQM1 I/O Link Unit is connected to the PLC just like any other PLC Unit. Refer to the operation manual for the PLC for details. Note No internal power, I/O power, or I/O wiring is required for the CQM1 I/O Link Unit because it uses internal I/O bits in the CPU Unit to communicate with the master. 174 SECTION 5 Environment-resistive and Waterproof Slaves This section provides specifications and describes the components, indicators, switch settings, and other aspects of Environment-resistive Slaves. 5-1 Environment-resistive Slave Specifications . . . . . . . . . . . . . . . . . . . . . . . . . . 5-1-1 5-2 5-3 Current Consumption, Weight, Degree of Protection. . . . . . . . . . . . 176 Connecting Communications Cables to Environment-resistive Slaves . . . . . 177 5-2-1 Example System Assembly . . . . . . . . . . . . . . . . . . . . . . . . . . . . . . . 179 Environment-resistive Terminals (IP66) . . . . . . . . . . . . . . . . . . . . . . . . . . . . . 179 5-3-1 Node Address and Baud Rate Settings . . . . . . . . . . . . . . . . . . . . . . . 179 5-3-2 Environment-resistive Terminal (IP66) with 8 Transistor Inputs: DRT1-ID08C (NPN). . . . . . . . . . . . . . . . . . . . . . . . . . . . . . . . . . . . . 180 Environment-resistive Terminal (IP66) with 16 Transistor Inputs: DRT1-HD16C (NPN) and DRT1-HD16C-1 (PNP) . . . . . . . . . . . . . 183 Environment-resistive Terminal (IP66) with 8 Transistor Outputs: DRT-OD08C (NPN) . . . . . . . . . . . . . . . . . . . . . . . . . . . . . . . . . . . . . 187 5-3-5 Environment-resistive Terminal (IP66) with 16 Transistor Outputs: DRT1-WD16C (NPN) and DRT1-WD16C-1 (PNP) . . . . . . . . . . . . 189 5-3-6 Environment-resistive Terminal (IP66) with 8 Inputs 8 Outputs: DRT1-MD16C (NPN) and DRT1-MD16C-1 (PNP) . . . . . . . . . . . . 193 5-3-7 Mounting in Control Panels . . . . . . . . . . . . . . . . . . . . . . . . . . . . . . . 197 5-3-8 Wiring Internal Power Supplies, I/O Power Supplies, and I/O Lines 198 Waterproof Terminals (IP67) . . . . . . . . . . . . . . . . . . . . . . . . . . . . . . . . . . . . . 200 5-4-1 Node Address, Baud Rate, and Output Hold/Clear Settings . . . . . . 200 5-4-2 Waterproof Terminal (IP67) with 4 Transistor Inputs: DRT1-ID04CL (NPN) and DRT1-ID04CL-1 (PNP) . . . . . . . . . . . . 202 Waterproof Terminal (IP67) with 8 Transistor Inputs: DRT1-ID08CL (NPN) and DRT1-ID08CL-1 (PNP) . . . . . . . . . . . . 204 5-4-4 Waterproof Terminal (IP67) with 4 Transistor Outputs: DRT1-OD04CL (NPN) and DRT1-OD04CL-1 (PNP). . . . . . . . . . . 207 5-4-5 Waterproof Terminal (IP67) with 8 Transistor Outputs: DRT1-OD08CL (NPN) and DRT1-OD08CL-1 (PNP). . . . . . . . . . . 210 5-4-6 Mounting in Control Panels . . . . . . . . . . . . . . . . . . . . . . . . . . . . . . . 213 5-4-7 Wiring Internal Power Supplies, I/O Power Supplies, and I/O Lines 213 B7AC Interface Units . . . . . . . . . . . . . . . . . . . . . . . . . . . . . . . . . . . . . . . . . . . 215 5-5-1 Node Address and Baud Rate Settings (DIP Switch 1) . . . . . . . . . . 215 5-5-2 Example System Configuration . . . . . . . . . . . . . . . . . . . . . . . . . . . . 217 5-5-3 B7AC Interface Unit: DRT1-B7AC . . . . . . . . . . . . . . . . . . . . . . . . . 217 5-5-4 Mounting in Control Panels . . . . . . . . . . . . . . . . . . . . . . . . . . . . . . . 223 5-5-5 Wiring the Internal Power Supply and Input Lines . . . . . . . . . . . . . 224 5-3-3 5-3-4 5-4 5-4-3 5-5 176 175 Section 5-1 Environment-resistive Slave Specifications 5-1 Environment-resistive Slave Specifications This section shows the specifications that are the same for all Environmentresistive Slaves. Differences for particular Slaves are shown in the explanatory page for each Slave. Item Environment-resistive Slave Specifications 11 to 25 V DC (supplied from the communications connector) Communications power supply voltage Internal power supply voltage 20.4 to 26.4 V DC (24 V DC −15% to 10%) I/O power supply voltage 20.4 to 26.4 V DC (24 V DC −15% to 10%) Noise resistance ±1.5 Vp-p, pulse width 0.1 to 1 µs, rise time 1-ns pulse at startup (by noise simulator) Vibration resistance 10 to 150 Hz, double amplitude 1.0 mm, or 70 m/s2 Shock resistance 200 m/s2 500 V AC (between insulated circuits) Dielectric strength Insulation resistance 20 MΩ min. (between insulated circuits) Ambient temperature Operating: −10 to 55°C Storage: −20 to 65°C Ambient humidity 25% to 85% Ambient environment No corrosive gases. Degree of protection DRT1-@D@@C(-1): IP66 DRT1-@D@@CL(-1): IP67 DRT1-B7AC: IP66 5-1-1 Mounting method For Slaves with IP66 protection: M4 screws (front panel) M5 screws (rear panel) For Slaves with IP67 protection: M5 screws for both front and rear panel Mounting strength Communications connector strength Screw tightening torque 100 N 100 N Round connector (communications connectors, power supply, I/O): 0.39 to 0.49 N⋅m - For Slaves with IP66 protection M4 (mounting unit from front panel): 0.6 to 1.18 N⋅m M5 (mounting unit from rear panel): 1.47 to 1.96 N⋅m - For Slaves with IP67 protection M5 (mounting unit from front panel): 1.47 to 1.96 N⋅m M5 (mounting unit from rear panel): 1.47 to 1.96 N⋅m Current Consumption, Weight, Degree of Protection The power consumption, weight and degree of protection of Environmentresistive Slaves are shown below. Model 176 DRT1-ID04CL(-1) Communications Internal Power Weight Power Supply Supply current current 25 mA max. (See note.) 180 g max. Degree of Protection IP67 DRT1-ID08C DRT1-ID08CL(-1) 30 mA max. 30 mA max. 50 mA max. (See note.) 580 g max. 240 g max. IP66 IP67 DRT1-HD16C(-1) 30 mA max. 50 mA max. 180 g max. IP66 Section 5-2 Connecting Communications Cables to Environment-resistive Slaves Model Communications Internal Power Power Supply Supply current current Weight Degree of Protection DRT1-OD04CL(-1) 35 mA max. DRT1-OD08C 30 mA max. (See note.) 50 mA max. 180 g max. 585 g max. IP67 IP66 DRT1-OD08CL(-1) 40 mA max. DRT1-WD16C(-1) 30 mA max. (See note.) 60 mA max. 240 g max. 590 g max. IP67 IP66 DRT1-MD16C(-1) DRT1-B7AC 50 mA max. 500 mA max. 590 g max. 500 g max. IP66 IP66 30 mA max. 70 mA max. Note In these Slaves, the internal power supply shares the communications power supply. 5-2 Connecting Communications Cables to Environmentresistive Slaves Communications cables are connected to Environment-resistive Slaves (Waterproof Terminals, Environment-resistive Transistor Terminals, and B7AC Interface Units) using round shielded connectors. Thin communications cable is used with the round shielded connectors, so the cable characteristics (such as the power supply wiring limitations due to voltage drop over distance) are the same as regular thin cable. Slaves that use the regular square connectors can also be connected to the Master Unit through a T-branch Tap. System with Slaves using Round Shielded Connectors Only DeviceNet Master Unit DCA1-5CN@@H1 Cable with shielded connector on one end DCN2-1 shielded T-branch connector T-branch Tap DCA1-5CN@@W1 Cable with shielded connectors on both ends DCN2-1 shielded T-branch connector Communications power supply I/O XS2W-D42@-@81-A Cable with shielded socket on one end and plug on the other Sensor with attached connector Environmentresistive Terminal DCN2-1 shielded T-branch connector XS2W-D42@-@81-A Cables with shielded socket on one end and plug on the other I/O Environmentresistive Terminal Sensor with attached connector Power supply DRS2-@ Connector with terminating resistance T-joint XS2F-D42@-@80-@ Cable with connector on one end. XS2R-D427-5 T-joint I/O Power Supply Cables (carry power for internal circuitry) 177 Section 5-2 Connecting Communications Cables to Environment-resistive Slaves System with Slaves using Round Shielded Connectors and Regular Square Connectors DeviceNet Master Unit DCA1-5CN@@H1 Cable with shielded connector on one end DCN2-1 shielded T-branch connector T-branch Tap T-branch Tap Environment-resistive Terminals or other Slaves using shielded connectors Slaves using different kinds of connectors can be connected through a T-branch Slave with normal Tap connector Power supply I/O Power Supply Cable Always use the communications cables listed in the following table to connect Waterproof Terminals, Environment-resistive Transistor Terminals, and B7AC Interface Units. Model DCA1-5CN@@W1 Description Cable with round shielded connectors on both ends DCA1-5CN@@F1 Cable with round shielded connector (female socket) on one end DCA1-5CN@@H1 Cable with round shielded connector (male plug) on one end DCN2-1 Shielded T-branch Connector (for 1 branch line) The blank spaces (@@) in the model numbers indicate the cable length in 0.1m units. For example, add “C5” for a cable 0.5 m long. Note Standard thin DeviceNet cable is used for these cables, so the cables cannot be used in an environment that is subject to spattering unless steps are taken to protect the cables. 178 Section 5-3 Environment-resistive Terminals (IP66) The following connectors with built-in terminating resistors are also available. A Terminating Resistor can be connected to a T-branch Connector. Note Model DRS2-1 Description Shielded Connector (male plug) with Terminating Resistor DRS2-2 Shielded Connector (female socket) with Terminating Resistor 1. Standard thin DeviceNet cable is used for cables with shielded connectors, so maximum current is 3 A. 2. Multi-drop wiring cannot be used with shielded connectors. Use T-branch wiring with DCN2-1 T-branch Connectors and cables that have shielded connectors on both ends. 3. The T-branch Connector’s communications power supply pin has a rated current capacity of 3 A. 4. A cable with a shielded connector (socket) on one end can be used to connect to a regular DCN1-@C T-branch Tap. A cable with a shielded connector (socket) on one end can also be used to connect to the communications power supply from a T-branch Connector. 5-2-1 Example System Assembly Male Male Female DCA1-5CN@@H1 Cable with shielded connector on one end Power Supply Tap Terminating resistor installed Female DCA1-5CN@@W1 Cable with shielded connectors on both ends Female Male Male Female Male Female Female Male Male Female Female Male Male Female DCA1-5CN@@F1 Cable with shielded connector on one end T-branch Tap (with terminating resistor) DCN2-1 shielded T-branch connector Communications power supply Note Tighten the connector by hand to a torque of 0.39 to 0.49 N⋅m. If the connector is not tightened sufficiently, it will not provide the expected environmental resistance and may come loose from vibration. Do not use pliers or other tools to tighten the connectors, because the tools may damage the connectors. 5-3 5-3-1 Environment-resistive Terminals (IP66) Node Address and Baud Rate Settings This section describes the node address settings and baud rate settings that are common to all of the Environment-resistive Terminals. These settings are made on separate switches, as shown in the following diagrams. 179 Section 5-3 Environment-resistive Terminals (IP66) Node address setting: Baud rate setting: Rotary switches DIP switch pins 1 and 2 9 0 1 O N 8 7 1 9 0 1 2 3 6 5 4 2 Baud rate setting 8 7 2 3 6 5 4 Node address setting Note The DRT1-@D@@C(-1) Terminals do not have an “output hold/clear setting” for communications errors. When a communications error occurs with a Terminal that has outputs, the corresponding output data from the Master is cleared to 0 (OFF). Node Address Settings Each Environment-resistive Terminal’s node address is set in two-digit decimal with the rotary switches. The 10’s digit is set on the left rotary switch and the 1’s digit is set on right rotary switch. Any node address within the allowed setting range can be used as long as it isn’t already set on another node. Note The Environment-resistive Terminal won’t be able to participate in communications if the same node address is used for the Master or another Slave node (node address duplication error). Baud Rate Setting DIP switch pins 1 and 2 are used to set the baud rate as shown in the following table. (These pins are factory-set to OFF.) Pin settings Pin 1 Pin 2 Note Baud rate OFF ON OFF OFF 125 kbps (default) 250 kbps OFF ON ON ON 500 kbps Not allowed. 1. Always turn OFF the Slave’s power supply (including the communications power supply) before changing the baud rate setting. 2. Set the same baud rate on all of the nodes (Master and Slaves) in the Network. Any Slaves with baud rates different from the Master’s rate won’t be able to participate in communications. Furthermore, a node with an incorrect baud rate setting may cause communications errors between nodes with correct baud rate settings. 5-3-2 Environment-resistive Terminal (IP66) with 8 Transistor Inputs: DRT1-ID08C (NPN) Input Specifications Item 180 Specification Model Internal I/O common DRT1-ID08C NPN Input points ON voltage 8 points (Uses one word in Master.) 15 V DC min. (between each input terminal and V) OFF voltage OFF current 5 V DC max. (between each input terminal and V) 1 mA max. Input current 6 mA max./point at 24 V DC (between each input terminal and V) Section 5-3 Environment-resistive Terminals (IP66) Item ON delay time 1.5 ms max. Specification OFF delay time Number of circuits 2.5 ms max. 8 points with one common Components of the DRT1-ID08C DeviceNet Indicators Input indicators (Refer to page 312.) DIP switch pins 1 and 2: Indicates the input status of each input. Baud rate (Lit when the input is ON.) Not used (Refer to page 179) Rotary switches 1 and 2: Node address (Refer to page 179) Internal Circuits DeviceNet communications connector Input connector External power supply connector The following diagram shows the internal circuits for the DRT1-ID08C Environment-resistive Terminal. DC-DC converter (Isolated) 0 V (for internal circuits) 24 V CN2 (for inputs) (External power supply connector) 0V (for inputs) Photocoupler Photocoupler 24 V (for internal circuits) CAN H CAN L 4 DRAIN CN1 (Communications connector) coupler 1 V– V+ Internal circuitry Input 0 Physical Photolayer CN3 Photocoupler Input 1 DC-DC converter (Not isolated) CN4 181 Section 5-3 Environment-resistive Terminals (IP66) Wiring Input 2 Input 4 2-wire sensor (limit switch) Blue (black) Brown (white) Input 3 Brown (white) Blue (black) Input 1 Black (white) Input 0 (end surface) Input 6 Input 5 Input 7 Internal power I/O power supply supply NPN output 3-wire sensor (photoelectric or proximity sensor) Note 1. External power supply line 0V and input line G are connected internally, as are external power supply line 24V and input line V. When input power is supplied to external power supply connectors, power can be supplied to sensors from input lines G and V provided that the total current does not exceed 1.0 A. If the total current exceeds 1.0 A, the power must not be supplied from the connector; it must be supplied externally instead. 2. Wire colors in parentheses are the previous JIS colors for photoelectric and proximity sensors. 182 Section 5-3 Environment-resistive Terminals (IP66) Dimensions The following diagram shows the dimensions for the DRT1-ID08C Environment-resistive Terminal. All dimensions are in mm. Four, M5 Mounting Holes When screw mounting from the front When screw mounting from the rear 5-3-3 Mounting screw Four, 4.2 dia. or M4 Nut Mounting screw Four, 5.4 dia. Environment-resistive Terminal (IP66) with 16 Transistor Inputs: DRT1-HD16C (NPN) and DRT1-HD16C-1 (PNP) Input Specifications Item Specification DRT1-HD16C-1 Model DRT1-HD16C Internal I/O common Input points NPN 16 points PNP ON voltage 15 V DC min. (between each input terminal and V) 5 V DC max. (between each input terminal and V) 1 mA max. 15 V DC min. (between each input terminal and G) 5 V DC max. (between each input terminal and G) OFF voltage OFF current Input current 6 mA max./point at 24 V DC 6 mA max./point at 24 V DC (between each input termi- (between each input terminal and V) nal and G) ON delay time OFF delay time 1.5 ms max. 2.5 ms max. Number of circuits 16 points with one common 183 Section 5-3 Environment-resistive Terminals (IP66) Components of the DRT1-HD16C and DRT1-HD16C-1 DeviceNet indicators (Refer to page 312.) Input indicators Indicates the input status of each input. (Lit when the input is ON.) DIP switch pins 1 and 2: Baud rate (Refer to page 179) 0 1 1 2 DR0 DR1 OFF OFF ON OFF OFF ON ON ON DR 0 1 2 3 4 5 6 7 8 9 10 11 12 13 14 15 MS NS Datarate 125kbps 250kbps 500kbps Not in use. 8 7 6 5 4 9 0 1 2 3 9 0 1 6 5 4 2 3 ADR Node Address 8 7 Rotary switches 1 and 2: Node address (Refer to page 179) DeviceNet communications connector Input connector External power supply connector Internal Circuits The following diagram shows the internal circuits for the DRT1-HD16C Environment-resistive Terminal (NPN). DC-DC converter (Isolated) Photocoupler Photocoupler 0 V (for internal circuits) CN2 3 (External power 0V 4 2 24 V supply connector) (for inputs) (for inputs) 1 24 V (for internal circuits) CAN H 4 DRAIN CN1 (Communications connector) 1 CAN L coupler 5 3 V− 2 V+ DC-DC converter (Not isolated) 184 Internal circuitry 4 Input 0 Physical Photolayer 3 G 1 V 2 Input 1 Photocoupler CN3 Section 5-3 Environment-resistive Terminals (IP66) The following diagram shows the internal circuits for the DRT1-HD16C-1 Environment-resistive Terminal (PNP). DC-DC converter (Isolated) Photocoupler 0 V (for internal circuits) 3 CN2 (External power 4 2 0V 24 V (for inputs) (for inputs) supply connector) 1 24 V (for internal circuits) Photocoupler 4 Input 0 DRAIN CAN L Internal circuitry CAN H 4 Physical Photolayer coupler 5 1 3 V− 2 V+ CN1 (Communications connector) 3 G 1 V CN3 2 Input 1 Photocoupler DC-DC converter (Not isolated) The following diagram shows the wiring of the DRT1-HD16C Environmentresistive Terminal (NPN). CN5 4 Input 0 3 G 2 Input 1 4 Input 2 3 G 1 V 1 V 3 G 2 Input 5 4 Input 6 3 G NPN output 3-wire sensor (photoelectric or proximity sensor) CN10 CN2 4 Input 12 3 G 2 Input 9 4 Input 10 3 G 4 2 Input 13 2 Input 11 NPN output 3-wire sensor (photoelectric or proximity sensor) 3 G CN1 (end surface) 3 1 V 1 V 2 Input 7 Blue (black) Brown (white) CN9 1 V 1 V 2 Input 3 Blue (black) CN8 4 Input 8 Brown (red) 1 V 2-wire sensor (limit switch) CN7 4 Input 4 Black (white) 3 G CN6 Brown (red) CN4 Blue (black) CN3 Black (white) Wiring 2 CAN H CAN L 4 5 1 3 DRAIN V− 1 4 Input 14 2 V+ 1 V 2 Input 15 − + − + Internal power I/O power supply supply 185 Section 5-3 Environment-resistive Terminals (IP66) The following diagram shows the wiring of the DRT1-HD16C-1 Environmentresistive Terminal (PNP). CN5 4 Input 0 4 Input 4 3 G 3 G 2 Input 5 4 Input 2 3 G 1 V 1 V 1 V 3 G 3 G Blue (black) 2 Input 13 1 V CN1 (end surface) 3 4 2 CAN H CAN L 4 5 1 3 DRAIN V− 1 4 Input 14 3 G 2 Input 11 PNP output 3-wire sensor (photoelectric or proximity sensor) CN2 1 V 4 Input 10 2 Input 7 Brown (white) Blue (black) 2 Input 3 CN10 4 Input 12 2 Input 9 4 Input 6 3 G Note CN9 1 V Blue (black) 2 Input 1 CN8 4 Input 8 Brown (red) 1 V 2-wire sensor (limit switch) CN7 Black (white) 3 G CN6 2 V+ 1 V 2 Input 15 Brown (red) CN4 Black (white) CN3 − PNP output 3-wire sensor (photoelectric or proximity sensor) + − + Internal power I/O power supply supply 1. External power supply line 0V and input line G are connected internally, as are external power supply line 24V and input line V. When input power is supplied to external power supply connectors, power can be supplied to sensors from input lines G and V provided that the total current does not exceed 1.0 A. If the total current exceeds 1.0 A, the power must not be supplied from the connector; it must be supplied externally instead. 2. Wire colors in parentheses are the previous JIS colors for photoelectric and proximity sensors. Dimensions The following diagram shows the dimensions for the DRT1-HD16C and DRT1-HD16C-1 Environment-resistive Terminals. All dimensions are in mm. 57 196 1 2 3 4 5 6 7 8 9 10 11 12 13 14 15 MS NS 51 0 8 Four, M5 215 Four, 4.2 dia. or M4 45 Mounting screw Nut 28+ --0.3 Mounting Holes When screw mounting from the front 6 205+ --0.3 Mounting screw Four, 5.4 dia. 28+ --0.3 When screw mounting from the rear 205+ --0.3 186 Section 5-3 Environment-resistive Terminals (IP66) 5-3-4 Environment-resistive Terminal (IP66) with 8 Transistor Outputs: DRT-OD08C (NPN) Output Specifications Item Specification Model DRT1-OD08C Internal I/O common Output points NPN 8 points (Uses one word in Master.) Rated output current Residual voltage Leakage current 0.3 A/point, 2.4 A/common 1.2 V max. (at 0.3 A, between each output terminal and G) 0.1 mA max. ON delay time OFF delay time 0.5 ms max. 1.5 ms max. Number of circuits 8 points with one common Components of the DRT1-OD08C DIP switch pins 1 and 2: Baud rate (Refer to page 179) Rotary switches 1 and 2: Node address (Refer to page 179) Not used Output indicators Indicates the output status of each output. (Lit when the output is ON.) DeviceNet indicators (Refer to page 312.) DeviceNet communications connector Output connector External power supply connector 187 Section 5-3 Environment-resistive Terminals (IP66) Internal Circuits The following diagram shows the internal circuits for the DRT1-OD08C Environment-resistive Terminal. DC-DC converter (Isolated) 0 V (for internal circuits) Voltage step-down Photocoupler 0V (for outputs) supply connector) 24 V (for internal circuits) Photocoupler Output 0 Physical layer Photo- DRAIN CN1 (Communications connector) CN3 coupler CAN L Internal circuitry CAN H 24 V CN2 (for outputs) (External power V– Photocoupler V+ Output 1 DC-DC converter (Not isolated) CN4 Wiring Output 0 Output 4 Output 2 Output 1 Output 3 Valve Solenoid (End surface) Output 6 Output 5 Output 7 Internal power I/O power supply supply Note External power supply line 0V and output line G are connected internally, as are external power supply line 24V and output line V. When output power is supplied to external power supply connectors, power can be supplied to output devices from output lines G and V provided that the total current does not exceed 2.4 A. If the total current exceeds 2.4 A, the power must not be supplied from the connector; it must be supplied externally instead. 188 Section 5-3 Environment-resistive Terminals (IP66) Dimensions The following diagram shows the dimensions for the DRT1-OD08C Environment-resistive Terminal. All dimensions are in mm. Four, M5 Mounting Holes Mounting screw When screw mounting Four, 4.2 dia. or M4 from the front When screw mounting from the rear Mounting screw Four, 5.4 dia. 5-3-5 Nut Environment-resistive Terminal (IP66) with 16 Transistor Outputs: DRT1-WD16C (NPN) and DRT1-WD16C-1 (PNP) Output Specifications Item Specification DRT1-WD16C-1 Model DRT1-WD16C Internal I/O common Output points NPN 16 points Rated output current Residual voltage 0.3 A/point, 2.4 A/common 1.2 V max. (at 0.3 A, 1.2 V max. (at 0.3 A, between each output termi- between each output terminal and G) nal and V) Leakage current ON delay time 0.1 mA max. 0.5 ms max. OFF delay time Number of circuits 1.5 ms max. 16 points with one common PNP 189 Section 5-3 Environment-resistive Terminals (IP66) Components of the DRT1-WD16C and DRT1-WD16C-1 DeviceNet indicators (Refer to page 312.) Output indicators Indicates the output status of each output. (Lit when the output is ON.) DIP switch pins 1 and 2: Baud rate (Refer to page 179) 0 1 1 2 DR0 DR1 OFF OFF ON OFF OFF ON ON ON DR 0 1 2 3 4 5 6 7 8 9 10 11 12 13 14 15 MS NS Datarate 125kbps 250kbps 500kbps Not in use. 8 7 6 5 4 9 0 1 2 3 9 0 1 6 5 4 2 3 ADR Node Address 8 7 Rotary switches 1 and 2: Node address (Refer to page 179) Output connector External power supply connector Internal Circuits The following diagram shows the internal circuits for the DRT1-WD16C Environment-resistive Terminal (NPN). DC-DC converter (Isolated) 0 V (for internal circuits) 3 24 V 0V 4 2 CN2 (for outputs) (External (for outputs) Voltage step-down Photocoupler Photocoupler CN1 (Communications connector) coupler 3 V− 2 V+ 1 V 2 Output 1 Photocoupler DC-DC converter (Not isolated) 190 3 G Internal circuitry 1 DRAIN CAN L 5 1 24 V (for internal circuits) power supply connector) 4 Output 0 Physical layer PhotoCAN H 4 DeviceNet communications connector CN3 Section 5-3 Environment-resistive Terminals (IP66) The following diagram shows the internal circuits for the DRT1-WD16C-1 Environment-resistive Terminal (PNP). DC-DC converter (Isolated) 0 V (for internal circuits) 3 24 V CN2 0V 4 2 (for outputs) (External (for outputs) 24 V (for internal circuits) Photocoupler Physical Photolayer 5 1 DRAIN CN1 (Communications connector) coupler CAN L 3 V− 2 V+ 4 Output 0 3 G Internal circuitry CAN H 4 1 V CN3 2 Output 1 Photocoupler DC-DC converter (Not isolated) Wiring Voltage step-down The following diagram shows the wiring of the DRT1-WD16C Environmentresistive Terminal (NPN). CN3 CN4 CN5 1 V 3 G 2 Output 1 3 G CN6 CN7 4 Output 4 4 Output 0 3 G power supply connector) 1 Photocoupler 4Output 2 1 V 3 G 4 Output 6 3 G 2Output 3 CN9 1 V 1 V 3 G 2 Output 9 3 G 2 Output 7 CN10 CN2 4 Output 12 4 Output 8 1 V 2 Output 5 CN8 4 Output 10 3 1 V 4 2 Output 13 1 V 2 Output 11 3 G Solenoid Solenoid 2 CAN H CAN L 4 5 1 3 DRAIN V− 1 Output 414 2 V+ 1 V 2 Output 15 − Valve CN1 (end surface) + − + Internal power I/O power supply supply 191 Section 5-3 Environment-resistive Terminals (IP66) The following diagram shows the wiring of the DRT1-WD16C-1 Environmentresistive Terminal (PNP). CN3 CN4 CN5 1 V 3 G 2 Output 1 3 G CN7 4Output 2 1 V 3 G 2 Output 5 1 V CN8 CN9 4 Output 8 4 Output 4 4 Output 0 3 G CN6 3 G 2Output 3 3 G 2 Output 9 1 V CN2 4 Output 12 1 V 4 Output 6 CN10 3 G 4 2 Output 13 1 V 2 Output 7 3 1 V 4 Output 10 CAN H CAN L 4 5 1 3 DRAIN V− 1 2 V+ 1 V 2 Output 15 − Valve 2 Output 414 3 G 2 Output 11 CN1 (end surface) Solenoid Solenoid + − + Internal power I/O power supply supply Note External power supply line 0V and output line G are connected internally, as are external power supply line 24V and output line V. When output power is supplied to external power supply connectors, power can be supplied to output devices from output lines G and V provided that the total current does not exceed 2.4 A. If the total current exceeds 2.4 A, the power must not be supplied from the connector; it must be supplied externally instead. Dimensions The following diagram shows the dimensions for the DRT1-WD16C and DRT1-WD16C-1 Environment-resistive Terminals. All dimensions are in mm. 57 196 1 2 3 4 5 6 7 8 9 10 11 12 13 14 15 MS NS 51 0 8 Four, M5 215 Four, 4.2 dia. or M4 45 Mounting screw Nut 28+ --0.3 Mounting Holes When screw mounting from the front 6 205+ --0.3 Mounting screw Four, 5.4 dia. 28+ --0.3 When screw mounting from the rear 205+ --0.3 192 Section 5-3 Environment-resistive Terminals (IP66) 5-3-6 Environment-resistive Terminal (IP66) with 8 Inputs 8 Outputs: DRT1-MD16C (NPN) and DRT1-MD16C-1 (PNP) Specifications Input Specifications Item Specification Model Internal I/O common DRT1-MD16C NPN Input points ON voltage 8 points (Uses one word in Master.) 15 V DC min. (between 15 V DC min. (between each input terminal and V) each input terminal and G) 5 V DC max. (between 5 V DC max. (between each input terminal and V) each input terminal and G) 1 mA max. OFF voltage OFF current DRT1-MD16C-1 PNP Input current 6 mA max./point at 24 V DC 6 mA max./point at 24 V DC (between each input termi- (between each input terminal and V) nal and G) ON delay time OFF delay time 1.5 ms max. 2.5 ms max. Number of circuits 8 points with one common Output Specifications Item Components Model DRT1-MD16C Internal I/O common Output points NPN PNP 8 points (Uses one word in Master.) Rated output current Residual voltage 0.3 A/point, 2.4 A/common 1.2 V max. (at 0.3 A, 1.2 V max. (at 0.3 A, between each output termi- between each output terminal and G) nal and V) Leakage current ON delay time 0.1 mA max. 0.5 ms max. OFF delay time Number of circuits 1.5 ms max. 8 points with one common The following diagram shows the main components of the DRT1-MD16C and DRT1-MD16C Environment-resistive Terminals. Input indicators DIP switch pins 1 and 2: Indicates the input status of each contact. Baud rate (Lit when the input is ON.) (Refer to page 179) Rotary switches 1 and 2: Node address (Refer to page 179) Specification DRT1-MD16C-1 Input connector Output indicators DeviceNet indicators Indicates the output status of each contact. (Refer to page 312.) (Lit when the output is ON.) DeviceNet communications Output connector connector External power supply connector 193 Section 5-3 Environment-resistive Terminals (IP66) Internal Circuits The following diagram shows the internal circuits for the DRT1-MD16C (NPN) Environment-resistive Terminal. DC-DC converter (Isolated) 0 V (for inputs and internal circuits) CN2 24 V (for outputs) (External power 0V supply connector) (for outputs) CAN L CAN H V– Physical layer Photocoupler Photocoupler CN3 (Input connector) Photocoupler DC-DC converter (Not isolated) Internal circuitry DRAIN CN1 V+ (Communications connector) 24 V (for inputs and internal circuits) Photocoupler Voltage step-down Photocoupler Output 0 CN7 (Output connector) Photocoupler 194 Output 1 Section 5-3 Environment-resistive Terminals (IP66) The following diagram shows the internal circuits for the DRT1-MD16C-1 (PNP) Environment-resistive Terminal. DC-DC converter (Isolated) 0 V (for inputs and internal circuits) 3 24 V 0V 4 2 (for outputs) (for outputs) 1 CAN H 4 CN1 (Communications connector) 1 3 24 V (for inputs and internal circuits) Photocoupler 4 Input 0 Photocoupler 3 G Photocoupler V− 1 V CN3 (Input connector) 2 Input 1 2 V+ DC-DC converter (Not isolated) Internal circuitry DRAIN CAN L 5 Physical layer Photocoupler CN2 (External power supply connector) Photocoupler 4 Output 0 3 G 1 V CN7 (Output connector) 2 Output 1 Photocoupler Voltage step-down 195 Section 5-3 Environment-resistive Terminals (IP66) Wiring The following diagram shows the wiring of the DRT1-MD16C Environmentresistive Terminal (NPN). Input 0 Input 5 Input 2 Input 7 Black (white) Blue (black) Brown (white) Input 3 Blue (black) Output 1 Input 6 Output 5 Output 2 Solenoid Valve Output 6 Output 7 Internal circuits Output power power supply supply NPN output 3-wire sensor (photoelectric or proximity sensor) 2-wire sensor (limit switch) (End surface) Output 4 Output 3 Brown (red) Input 1 Output 0 Input 4 The following diagram shows the wiring of the DRT1-MD16C-1 Environmentresistive Terminal (PNP). Input CN3 CN4 CN5 4 Input 0 3 G Output CN6 CN7 3 G 2 Input 1 4 Input 2 3 G 1 V 3 G 2 Input 5 4 Input 6 3 G 1 V 2 Input 3 CN9 4 Output 0 4 Input 4 1 V CN8 1 V CN10 CN2 4 Output 4 1 V 3 G 2 Output 1 Output 42 3 G 2 Input 7 3 1 V 4 2 Output 5 1 V 2 Output CN1 (End surface) 2 CAN H CAN L 4 5 1 3 DRAIN V− 1 4 Output 6 3 G 2 V+ 1 V 2 Output 7 2-wire sensor (limit switch) Brown (red) Black (white) Blue (black) Brown (white) Blue (black) 3 − Valve Solenoid + − + Internal circuits Output power power supply supply PNP output 3-wire sensor (photoelectric or proximity sensor) Note 1. External power supply line 0V and input line G are connected internally, as are external power supply line 24V and input line V. When input power is supplied to external power supply connectors, power can be supplied to sensors from input lines G and V provided that the total current does not exceed 1.0 A. If the total current exceeds 1.0 A, the power must not be supplied from the connector; it must be supplied externally instead. 2. External power supply line 0V and output line G are connected internally, as are external power supply line 24V and output line V. When output power is supplied to external power supply connectors, power can be supplied to output devices from output lines G and V provided that the total current 196 Environment-resistive Terminals (IP66) Section 5-3 does not exceed 2.4 A. If the total current exceeds 2.4 A, the power must not be supplied from the connector; it must be supplied externally instead. 3. Wire colors in parentheses are the previous JIS colors for photoelectric and proximity sensors. Dimensions The following diagram shows the dimensions for the DRT1-MD16C and DRT1-MD16C-1 Environment-resistive Terminals. All dimensions are in mm. Four, M5 Mounting Holes When screw mounting from the front When screw mounting from the rear 5-3-7 Four, 4.2 dia. or M4 Four, 5.4 dia. Mounting screw Nut Mounting screw Mounting in Control Panels Use screws to mount an Environment-resistive Terminal in a control panel. These Terminals cannot be mounted on a DIN Track. Attaching the Terminal from the Front The Terminals are tapped with M5 threads, so use M4 screws to clear the threads and attach the Terminal to the control panel from the front. Drill the mounting holes in the control panel according to the dimensions shown in the dimensions diagrams and secure the Terminal with M4 screws. The appropriate tightening torque is 0.6 to 1.18 N⋅m. Attaching the Terminal from the Rear Drill the mounting holes in the control panel according to the dimensions shown in the dimensions diagrams and secure the Terminal with M5 screws. The appropriate tightening torque is 1.47 to 1.96 N⋅m. 197 Section 5-3 Environment-resistive Terminals (IP66) Installation Direction The Terminal can be mounted in any direction. Any one of the following 6 directions is acceptable. Vertical 5-3-8 Wiring Internal Power Supplies, I/O Power Supplies, and I/O Lines Wiring the Internal Power Supply and I/O Power Supply The internal power supply and I/O power supply are supplied from the external power supply connectors. Connect the external power supply to the Terminal with an XS2-series Round Waterproof Connector listed in the following table. Compatible Connectors Connector Cable with connectors on both ends (socket and plug) Model number XS2W-D42@-@81-@ Cable with connector on one end (female socket) Connector socket assembly (female) (Crimp-connector or solder type) T-joint XS2F-D42@-@80-@ XS2C-D4@@ DRT1-OD08C CS2R-D427-5 DRT1-ID08C Shared I/O and internal power supply Shared I/O and internal power supply XS2W-D42@-@81-@ Cables with shielded socket on one end and plug on the other Power supply XS2R-D427-5 T-joint XS2F-D42@-@80-@ Cable with shielded socket on one end Note XS2R-D427-5 T-joint XS2W-D42@-@81-@ Cable with shielded socket on one end and plug on the other 1. Tighten the connector by hand to a torque of 0.39 to 0.49 N⋅m. If the connector is not tightened sufficiently, it will not provide the expected environmental resistance and may come loose from vibration. Do not use pliers or other tools to tighten the connectors, because the tools may damage the connectors. 2. The same I/O power supply can be used for both input and output devices, but the noise from the output devices may cause the input devices to malfunction. Use separate power supplies if possible. I/O Wiring Connect the I/O Wiring to the Environment-resistive Terminal with the XS2series Round Waterproof Connectors listed in the following table. Compatible Connectors 198 Connector Cable with connector on one end (male plug) Model number XS2H-D421-@80-A Cable with connectors on both ends (socket and plug) Connector plug assembly (male) (Crimp-connector or solder type) XS2W-D42@-@81-A XS2G-D4@@ Section 5-3 Environment-resistive Terminals (IP66) Sensors that are pre-wired with a connector can be connected directly. Refer to the Catalog or manual for details on the device’s connections before connecting any device. XS2W-D42@-@81-A Cable with shielded socket on one end and plug on the other XS2H-D421-@80-A Cable with shielded plug on one end Sensor with attached connector XS2G-D4@@ Pre-wired Sensor Pre-wired Sensor with connector Note 1. Refer to the OMRON Sensors Catalog (X42-E1-3) for more details on the sensor connections and Round Waterproof Connectors. 2. One of the Y-joints listed in the following table will be needed when connecting sensors or limit switches to an Environment-resistive Terminal with 16 inputs (DRT1-HD16C(-1)) or 16 outputs (DRT1-WD16C(-1)). Connector Model number Y-joint with plug/socket (with cable) Y-joint with plug/socket (no cable) XS2R-D426-@11F XS2R-D426-1 XS2R-D426-@11F Y-joint with cable Terminal with 16 inputs or 16 outputs XS2R-D426-1 Y-joint without cable Note An XS2G Connector Assembly (screw-in wire connection) cannot be connected to a Y-joint Connector. A crimp-connector or soldered connector can be connected to a a Y-joint Connector. XS2R-D426-@11F Y-joint Connector with Cable Wiring diagram 45.5 15 4.6 dia. CN1 35 1 2 3 4 CN2 6 dia. 18 CN2 8.5 Blue mark 44.7 13.6 1 2 3 4 CN1 L 4 3 2 1 XS2R-D426-1 Y-joint Connector without Cable 7 15 Wiring diagram 27 4.5 dia. CN2 CN0 (37) CN2 4 3 2 1 CN1 4 3 2 1 24.5 18 12.5 CN1 58.3 4 3 CN0 2 1 Blue mark 199 Section 5-4 Waterproof Terminals (IP67) Tighten the connector by hand to a torque of 0.39 to 0.49 N⋅m. If the connector is not tightened sufficiently, it will not provide the expected environmental resistance and may come loose from vibration. Do not use pliers or other tools to tighten the connectors, because the tools may damage the connectors. Always cap unused connectors with an XS2Z-12 Waterproof Cover or XS2Z15 Dust Cover, shown in the following diagram. XS2Z-12 Waterproof Cover XS2Z-15 Dust Cover The connector will meet IP66 standards if a Waterproof Cover is attached. Tighten the connector by hand to a torque of 0.39 to 0.49 N⋅m. Press the Dust Cover onto the connector firmly. The Dust Cover will protect the connector from dust, but does not meet IP66 standards. Maintaining Environmental Resistance • The IP66 environmental resistance level will be lost if the surfaces where the contact block and cover meet are subjected to excessive force. Protect the contact block and cover from excessive force or shock. • The IP66 standard is lower than waterproof standards. Do not submerge the system components. • The body of the components is plastic resin. Do not place objects on the components or allow the components to be stepped on. There are two kinds of wiring for OMRON 2-wire Proximity Switches (prewired with connector). One kind has IEC pin allocation (M1GJ type) and the other has OMRON pin allocation (M1J type). Refer to the following table to determine the appropriate Environment-resistive Terminal to use with each kind of switch. Proximity Switch 5-4 5-4-1 Compatible Terminals IEC pin allocation (M1GJ type) DRT1-HD16C-1 DRT1-MD16C-1 OMRON pin allocation (M1J type) DRT1-ID08C DRT1-HD16C DRT1-MD16C Waterproof Terminals (IP67) Node Address, Baud Rate, and Output Hold/Clear Settings This section describes the node address setting, baud rate setting, and the hold/clear outputs for communications error setting. These settings are common to all of the Waterproof Terminals and are made on the shown in the following diagrams. Node address setting: Baud rate setting: Output hold/clear setting: O N 0 1 1 2 3 4 2 3 7 8 9 5 6 2 3 7 8 0 1 4 9 Rotary switches Pins 1 and 2 Pin 4 (affects only outputs) Output hold/clear setting for communications errors (for outputs) 4 5 6 Reserved (Always OFF.) Node address setting 200 Baud rate setting Section 5-4 Waterproof Terminals (IP67) Node Address Setting Each Waterproof Terminal’s node address is set in two-digit decimal with the rotary switches. The 10’s digit is set on the left rotary switch and the 1’s digit is set on right rotary switch. Any node address within the allowed setting range can be used as long as it isn’t already set on another node. The Waterproof Terminal won’t be able to participate in communications if the same node address is used for the Master or another Slave node (node address duplication error). Note The Slave won’t be able to participate in communications if the same node address is used for the Master or another Slave node (node address duplication error). Baud Rate Setting Pins 1 and 2 are used to set the baud rate as shown in the following table. (These pins are factory-set to OFF.) Pin settings Pin 1 Note Baud rate Pin 2 OFF OFF 125 kbps (default) ON OFF OFF ON 250 kbps 500 kbps ON ON Not allowed. 1. Always turn OFF the Slave’s power supply (including the communications power supply) before changing the baud rate setting. 2. Set the same baud rate on all of the nodes (Master and Slaves) in the Network. Any Slaves with baud rates different from the Master’s rate won’t be able to participate in communications. Furthermore, a node with an incorrect baud rate setting may cause communications errors between nodes with correct baud rate settings. ON The functions of pins 3 and 4 differ for inputs and outputs, as shown in the following diagram. (Pins 3 and 4 are factory-set to OFF.) 3 4 Output Hold/Clear Setting Input: Not used (Always OFF) Output: Hold/Clear outputs for communications error Reserved: Always OFF Pin 3: Reserved (Always OFF) Pin 4: As follows: Inputs: No function (Always OFF) Outputs: Hold/Clear outputs for communications error OFF (Clear): All output data from the Master will be cleared to 0 when a communications error occurs. ON (Hold): All output data from the Master will be retained when a communications error occurs. 201 Section 5-4 Waterproof Terminals (IP67) 5-4-2 Waterproof Terminal (IP67) with 4 Transistor Inputs: DRT1-ID04CL (NPN) and DRT1-ID04CL-1 (PNP) Input Specifications Item Specification DRT1-ID04CL-1 Model DRT1-ID04CL Internal I/O common Input points NPN PNP 4 points (Uses one word in Master.) ON voltage 15 V DC min. (between each input terminal and V) 15 V DC min. (between each input terminal and G) OFF voltage 5 V DC max. (between each input terminal and V) 5 V DC max. (between each input terminal and G) OFF current Input current 1 mA max. 6 mA max./point at 24 V DC 3 mA max./point at 17 V DC (between each input terminal and V) 6 mA max./point at 24 V DC 3 mA max./point at 17 V DC (between each input terminal and G) ON delay time OFF delay time 1.5 ms max. 1.5 ms max. Number of circuits 4 points with one common Components of the DRT1-ID04CL and DRT1-ID04CL-1 DeviceNet indicators (Refer to page 312.) Input indicators Indicate the input status of each contact. (Lit when the input is ON.) Bus DRT1 Rotary Switches 1 and 2: Node address setting (Refer to page 200.) DeviceNet communications connector MS NS IN Internal Circuits I/O PWR DIP switch: Pins 1 and 2: Baud rate setting Pins 3 and 4: Reserved (Always OFF.) (Refer to page 200.) External power supply connector Input connector The following diagram shows the internal circuits for the DRT1-ID04CL Waterproof Terminal (NPN). G 3 4 2 1 V CAN-L 4 V1 5 3 2 V+ DRAIN Internal circuitry CAN-H IN0 G 4 3 1 IN1 G 4 3 1 2 202 V 2 V Section 5-4 Waterproof Terminals (IP67) The following diagram shows the internal circuits for the DRT1-ID04CL-1 Waterproof Terminal (PNP). G 3 4 2 1 CAN-H CAN-L 4 V1 5 3 2 V+ Internal circuitry V IN0 G 4 3 1 V 2 IN1 G DRAIN 4 3 1 V 2 The following diagram shows the wiring of the DRT1-ID04CL Waterproof Terminal (NPN). CAN H CAN L 4 5 1 3 DRAIN V− 3 G 2 NC 2 V+ 3 G 4 Input 0 2 NC 1 V 1 V 1 V 2 3 1 4 4 Input 1 1 V 2 NC 4 Input 3 3 G 2 NC 3 G + 2-wire sensor (limit switch) Brown (red) Blue (black) Blue (black) I/O power supply Brown (white) − 4 Input 2 Black (white) Wiring NPN output 3-wire sensor (photoelectric or proximity sensor) The following diagram shows the wiring of the DRT1-ID04CL-1 Waterproof Terminal (PNP). CAN H CAN L 4 5 1 3 DRAIN V− 3 G 2 NC 2 V+ 2 3 1 4 3 G 4 Input 0 1 V 1 V 1 V 4 Input 1 2 NC Input 2 4 2 NC Input 3 3 G 2-wire sensor (limit switch) Brown (red) Black (white) Blue (black) Brown (white) Blue (black) + I/O power supply Note 4 1 V 3 G − 2 NC PNP output 3-wire sensor (photoelectric or proximity sensor) 1. External power supply line 0V and input line G are connected internally, as are external power supply line 24V and input line V. When input power is 203 Section 5-4 Waterproof Terminals (IP67) supplied to external power supply connectors, power can be supplied to sensors from input lines G and V provided that the total current does not exceed 1.0 A. If the total current exceeds 1.0 A, the power must not be supplied from the connector; it must be supplied externally instead. 2. Wire colors in parentheses are the previous JIS colors for photoelectric and proximity sensors. Dimensions The following diagram shows the dimensions for the DRT1-ID04CL and DRT1-ID04CL-1 Waterproof Terminals. All dimensions are in mm. 45 114 10 MS 54 Bus DRT1 NS IN I/O PWR 30 Mounting holes 10.5±0.1 10.5±0.1 Three, 4.0 dia. or M4 5-4-3 104±0.2 Waterproof Terminal (IP67) with 8 Transistor Inputs: DRT1-ID08CL (NPN) and DRT1-ID08CL-1 (PNP) Input Specifications Item Model DRT1-ID08CL Internal I/O common Input points NPN PNP 8 points (Uses one word in Master.) ON voltage 15 V DC min. (between each input terminal and V) 5 V DC max. (between each input terminal and V) 1 mA max. 15 V DC min. (between each input terminal and G) 5 V DC max. (between each input terminal and G) 6 mA max./point at 24 V DC 3 mA max./point at 17 V DC (between each input terminal and G) ON delay time 6 mA max./point at 24 V DC 3 mA max./point at 17 V DC (between each input terminal and V) 1.5 ms max. OFF delay time Number of circuits 1.5 ms max. 8 points with one common OFF voltage OFF current Input current 204 Specification DRT1-ID08CL-1 Section 5-4 Waterproof Terminals (IP67) Components of the DRT1-ID08CL and DRT1-ID08CL-1 DeviceNet indicators (Refer to page 312.) Input indicators Indicate the input status of each contact. (Lit when the input is ON.) Bus DRT1 Rotary Switches 1 and 2: Node address setting (Refer to page 200.) DeviceNet communications connector MS NS IN External power supply connector Input connector The following diagram shows the internal circuits for the DRT1-ID08CL Waterproof Terminal (NPN). G 3 4 2 1 V CAN-L 4 V1 5 3 2 V+ Internal circuitry CAN-H DRAIN IN0 G 4 3 1 V 2 IN1 G 4 3 1 V 2 The following diagram shows the internal circuits for the DRT1-ID08CL-1 Waterproof Terminal (PNP). G 3 4 2 1 V CAN-H CAN-L 4 V1 5 3 2 V+ DRAIN Internal circuitry Internal Circuits I/O PWR DIP switch: Pins 1 and 2: Baud rate setting Pins 3 and 4: Reserved (Always OFF.) (Refer to page 200.) IN0 G 4 3 1 V 2 IN1 G 4 3 1 V 2 205 Section 5-4 Waterproof Terminals (IP67) Wiring The following diagram shows the wiring of the DRT1-ID08CL Waterproof Terminal (NPN). CAN H CAN L 4 5 1 3 DRAIN V− 3 G 2 NC 2 V+ 2 3 1 3 G 4 Input 0 2 NC 2 NC 3 G 4 Input 4 2 NC 4 Input 6 1 V 1 V 1 V 1 V 1 V 1 V 1 V 1 V 4 2 NC Input 1 4 4 Input 3 3 G 2 NC 4 Input 5 3 G 2 NC 4 Input 7 3 G 2 NC 3 G 2-wire sensor (limit switch) Brown (red) Blue (black) Blue (black) I/O power supply Black (white) + Brown (white) − 3 G 4 Input 2 NPN output 3-wire sensor (photoelectric or proximity sensor) The following diagram shows the wiring of the DRT1-ID08CL-1 Waterproof Terminal (PNP). CAN H CAN L 4 5 1 3 DRAIN V− 3 G 2 NC 2 V+ 4 Input 0 2 NC 1 V 1 4 Input 1 3 G 4 Input 2 2 NC 4 Input 3 3 G 4 Input 4 2 NC 1 V 1 V 2 NC 4 3 G 1 V 1 V 2 3 3 G 4 Input 5 1 V 2 NC 3 G 4 Input 6 1 V 1 V 2 NC 4 Input 7 2 NC 3 G 2-wire sensor (limit switch) Note Brown (red) Black (white) Blue (black) I/O power supply Blue (black) + Brown (white) − 3 G PNP output 3-wire sensor (photoelectric or proximity sensor) 1. External power supply line 0V and input line G are connected internally, as are external power supply line 24V and input line V. When input power is supplied to external power supply connectors, power can be supplied to sensors from input lines G and V provided that the total current does not exceed 1.0 A. If the total current exceeds 1.0 A, the power must not be supplied from the connector; it must be supplied externally instead. 2. Wire colors in parentheses are the previous JIS colors for photoelectric and proximity sensors. 206 Section 5-4 Waterproof Terminals (IP67) Dimensions The following diagram shows the dimensions for the DRT1-ID08CL and DRT1-ID08CL-1 Waterproof Terminals. All dimensions are in mm. 45 160 10 MS 54 Bus DRT1 NS IN I/O PWR 30 Mounting holes 10.5±0.1 10.5±0.1 Three, 4.0 dia. or M5 5-4-4 150±0.2 Waterproof Terminal (IP67) with 4 Transistor Outputs: DRT1-OD04CL (NPN) and DRT1-OD04CL-1 (PNP) Output Specifications Item Specification DRT1-OD04CL-1 Model DRT1-OD04CL Internal I/O common Output points NPN PNP 4 points (Uses one word in Master.) Rated output current Residual voltage 0.5 A/point, 2.0 A/common 1.2 V max. (at 0.5 A, 1.2 V max. (at 0.5 A, between each output termi- between each output terminal and G) nal and V) Leakage current ON delay time 0.1 mA max. 0.5 ms max. OFF delay time Number of circuits 1.5 ms max. 4 points with one common 207 Section 5-4 Waterproof Terminals (IP67) Components of the DRT1-OD04CL and DRT1-OD04CL-1 DeviceNet indicators (Refer to page 312.) Output indicators Indicate the output status of each contact. (Lit when the output is ON.) Bus DRT1 Rotary Switches 1 and 2: Node address setting (Refer to page 200.) DeviceNet communications connector MS NS OUT Internal Circuits I/O PWR DIP switch Pins 1 and 2: Baud rate setting Pin 3: Reserved (Always OFF.) Pin 4: Hold/Clear outputs for communications error (Refer to page 200.) External power supply connector Output connector The following diagram shows the internal circuits for the DRT1-OD04CL Waterproof Terminal (NPN). Voltage step-down 3 G 4 2 V CAN-H CAN-L 4 V1 5 3 2 V+ Internal circuitry 1 DRAIN OUT0 4 G 3 1 V 2 OUT1 4 G 3 1 V 2 The following diagram shows the internal circuits for the DRT1-OD04CL-1 Waterproof Terminal (PNP). Voltage step-down G 3 4 2 V CAN-H CAN-L 4 V1 5 3 2 V+ Internal circuitry 1 OUT0 G 4 3 1 OUT1 DRAIN G 4 3 1 2 208 V 2 V Section 5-4 Waterproof Terminals (IP67) Wiring The following diagram shows the wiring of the DRT1-OD04CL Waterproof Terminal (NPN). CAN H CAN L 4 5 1 3 DRAIN V− 3 G 2 NC 2 V+ 2 3 1 2 NC 1 V 1 V 1 V 2 NC 4 Output 3 3 G − 4 Output 2 1 V 4 Output 1 4 3 G 4 Output 0 2 NC 3 G + I/O power supply Solenoid Valve The following diagram shows the wiring of the DRT1-OD04CL-1 Waterproof Terminal (PNP). CAN H CAN L 4 5 1 3 DRAIN V− 3 G 2 NC 2 V+ 3 G 4 Output 0 2 NC 1 V 1 V 1 V 2 3 1 4 Output 1 4 1 V 2 NC 3 G − 4 Output 2 4 Output 3 2 NC 3 G + I/O power supply Solenoid Valve Note External power supply line 0V and output line G are connected internally, as are external power supply line 24V and output line V. When output power is supplied to external power supply connectors, power can be supplied to output devices from output lines G and V provided that the total current does not exceed 2.0 A. If the total current exceeds 2.0 A, the power must not be supplied from the connector; it must be supplied externally instead. 209 Section 5-4 Waterproof Terminals (IP67) Dimensions The following diagram shows the dimensions for the DRT1-OD04CL and DRT1-OD04CL-1 Waterproof Terminals. All dimensions are in mm. 45 114 10 MS 54 Bus DRT1 NS OUT I/O PWR 30 Mounting holes 10.5±0.1 10.5±0.1 Three, 4.0 dia. or M5 5-4-5 104±0.2 Waterproof Terminal (IP67) with 8 Transistor Outputs: DRT1-OD08CL (NPN) and DRT1-OD08CL-1 (PNP) Output Specifications Item 210 Specification DRT1-OD08CL-1 Model DRT1-OD08CL Internal I/O common Output points NPN PNP 8 points (Uses one word in Master.) Rated output current Residual voltage 0.5 A/point, 2.4 A/common 1.2 V max. (at 0.5 A, 1.2 V max. (at 0.5 A, between each output termi- between each output terminal and G) nal and V) Leakage current ON delay time 0.1 mA max. 0.5 ms max. OFF delay time Number of circuits 1.5 ms max. 8 points with one common Section 5-4 Waterproof Terminals (IP67) Components of the DRT1-OD08CL and DRT1-OD08CL-1 DeviceNet indicators (Refer to page 312.) Output indicators Indicate the output status of each contact. (Lit when the output is ON.) Bus DRT1 Rotary Switches 1 and 2: Node address setting (Refer to page 200.) DeviceNet communications connector MS NS OUT External power supply connector Output connector The following diagram shows the internal circuits for the DRT1-OD08CL Waterproof Terminal (NPN). Voltage step-down 3 G 4 2 V CAN-H CAN-L 4 V1 5 3 2 V+ Internal circuitry 1 DRAIN OUT0 4 G 3 1 V 2 OUT1 4 G 3 1 V 2 The following diagram shows the internal circuits for the DRT1-OD08CL-1 Waterproof Terminal (PNP). Voltage step-down G 3 4 2 V 1 CAN-H CAN-L 4 V1 5 3 2 V+ Internal circuitry Internal Circuits I/O PWR DIP switch Pins 1 and 2: Baud rate setting Pin 3: Reserved (Always OFF.) Pin 4: Hold/Clear outputs for communications error (Refer to page 200.) OUT0 G 4 3 1 V 2 OUT1 DRAIN G 4 3 1 V 2 211 Section 5-4 Waterproof Terminals (IP67) Wiring The following diagram shows the wiring of the DRT1-OD08CL Waterproof Terminal (NPN). CAN H CAN L 4 5 1 3 DRAIN V− 3 G 2 NC 2 V+ 2 3 1 3 G 4 Output 0 2 NC 2 NC 3 G 4 Output 4 2 NC 4 1 V 1 V 1 V 1 V 1 V 1 V 1 V 1 V 4 Output 1 2 NC 4 4 Output 3 3 G − 3 G 4 Output 2 2 NC 4 Output 5 3 G 2 NC Output 6 4 Output 7 3 G 2 NC 3 G + I/O power supply Solenoid Valve The following diagram shows the wiring of the DRT1-OD08CL-1 Waterproof Terminal (PNP). CAN H CAN L 4 5 1 3 DRAIN V− 3 G 2 NC 2 V+ 2 3 1 2 NC 3 G 4 Output 2 2 NC 3 G 4 Output 4 2 NC 4 Output 6 1 V 1 V 1 V 1 V 1 V 1 V 1 V 1 V 4 Output 1 2 NC 4 3 G − 3 G 4 Output 0 4 Output 3 2 NC 3 G 4 Output 5 2 NC 3 G 4 Output 7 2 NC 3 G + I/O power supply Solenoid Valve Note External power supply line 0V and output line G are connected internally, as are external power supply line 24V and output line V. When output power is supplied to external power supply connectors, power can be supplied to output devices from output lines G and V provided that the total current does not exceed 2.4 A. If the total current exceeds 2.4 A, the power must not be supplied from the connector; it must be supplied externally instead. 212 Section 5-4 Waterproof Terminals (IP67) Dimensions The following diagram shows the dimensions for the DRT1-OD08CL and DRT1-OD08CL-1 Waterproof Terminals. All dimensions are in mm. 45 160 10 MS 54 Bus DRT1 NS OUT I/O PWR 30 Mounting holes 10.5±0.1 10.5±0.1 Three, 4.0 dia. or M5 5-4-6 150±0.2 Mounting in Control Panels Use screws to mount a Waterproof Terminal in a control panel. These Terminals cannot be mounted on a DIN Track. Drill the mounting holes in the control panel according to the dimensions shown in the dimensions diagrams and secure the Terminal with M5 screws. The appropriate tightening torque is 1.47 to 1.96 N⋅m. IN Bus DRT1 I/O PWR The Terminal can be mounted in any direction. Any one of the following 6 directions is acceptable. MS NS Vertical Bus DRT1 NS IN I/O PWR MS MS Installation Direction NS Bus DRT1 IN I/O PWR Bus DRT1 I/O PWR MS 5-4-7 NS IN Wiring Internal Power Supplies, I/O Power Supplies, and I/O Lines Wiring the Internal Power Supply and I/O Power Supply The internal power supply shares the communications power supply, so it isn’t necessary to connect a separate internal power supply. To provide the I/O power supply, connect the external power supply to the Terminal with an XS2-series Round Waterproof Connector listed in the following table. 213 Section 5-4 Waterproof Terminals (IP67) Compatible Connectors Connector Cable with connectors on both ends (socket and plug) Model XS2W-D42@-@81-@ Cable with connector on one end (female socket) Connector socket assembly (female) (Crimp-connector or solder type) T-joint XS2F-D42@-@80-@ XS2C-D4@@ DRT1-ID04CL CS2R-D427-5 DRT1-OD04CL I/O power supply I/O power supply XS2W-D42@-@81-@ Cables with shielded socket on one end and plug on the other XS2R-D427-5 T-joint XS2F-D42@-@80-@ Cable with shielded socket on one end Note XS2R-D427-5 T-joint XS2W-D42@-@81-@ Cable with shielded socket on one end and plug on the other 1. Tighten the connector by hand to a torque of 0.39 to 0.49 N⋅m. If the connector is not tightened sufficiently, it will not provide the expected environmental resistance and may come loose from vibration. Do not use pliers or other tools to tighten the connectors, because the tools may damage the connectors. 2. The same I/O power supply can be used for both input and output devices, but the noise from the output devices may cause the input devices to malfunction. Use separate power supplies if possible. I/O Wiring Connect the I/O Wiring to the Environment-resistive Terminal with the XS2series Round Waterproof Connectors listed in the following table. Compatible Connectors Connector Cable with connector on one end (male plug) Model number XS2H-D421-@80-A Cable with connectors on both ends (socket and plug) Connector plug assembly (male) (Crimp-connector or solder type) XS2W-D42@-@81-A XS2G-D4@@ Sensors that are pre-wired with a connector can be connected directly. Refer to the Catalog or manual for details on the device’s connections before connecting any device. XS2W-D42@-@81-A Cable with shielded socket on one end and plug on the other XS2H-D421-@80-A Cable with shielded plug on one end Sensor with attached connector XS2G-D4@@ Pre-wired Sensor with connector Note Pre-wired Sensor 1. Refer to the OMRON Sensors Catalog (X42-E1-3) for more details on the sensor connections and Round Waterproof Connectors. 2. Tighten the connector by hand to a torque of 0.39 to 0.49 N⋅m. If the connector is not tightened sufficiently, it will not provide the expected environ- 214 Section 5-5 B7AC Interface Units mental resistance and may come loose from vibration. Do not use pliers or other tools to tighten the connectors, because the tools may damage the connectors. 3. Always cap unused connectors with an XS2Z-12 Waterproof Cover or XS2Z-15 Dust Cover, shown in the following diagram. XS2Z-12 Waterproof Cover The connector will meet IP67 standards if a Waterproof Cover is attached. Tighten the connector by hand to a torque of 0.39 to 0.49 N⋅m. XS2Z-15 Dust Cover Press the Dust Cover onto the connector firmly. The Dust Cover will protect the connector from dust, but does not meet IP67 standards. Maintaining Environmental Resistance • The IP67 environmental resistance level will be lost if the surfaces where the contact block and cover meet are subjected to excessive force. Protect the contact block and cover from excessive force or shock. • The IP67 standard is not completely waterproof. Do not submerge the system components. • The body of the components is plastic resin. Do not place objects on the components or allow the components to be stepped on. Note There are two kinds of wiring for OMRON 2-wire Proximity Switches (prewired with connector). One kind has IEC pin allocation (M1GJ type) and the other has OMRON pin allocation (M1J type). Refer to the following table to determine the appropriate Waterproof Terminal to use with each kind of switch. Proximity Switch IEC pin allocation (M1GJ type) OMRON pin allocation (M1J type) 5-5 Compatible Terminal DRT1-ID04CL-1 DRT1-ID08CL-1 DRT1-ID04CL DRT1-ID08CL B7AC Interface Units The B7AC Interface Unit acts as an interface between I/O Connector-type B7AC Link Terminal Units and the DeviceNet Master Unit. Up to 3 B7AC Link Terminal Units (3 Units × 10 inputs/Unit) can be connected to the B7AC Interface Unit. The B7AC Interface Unit uses shielded connectors to connect to both the DeviceNet Master Unit and B7AC Link Terminal Units, so the cable connections can be made easily without tools and the connections meet the high IP66 environmental resistance standards. 5-5-1 Node Address and Baud Rate Settings (DIP Switch 1) This section explains the B7AC Interface Unit’s node address and baud rate settings. These settings are made using the following pins on DIP switch 1. 215 Section 5-5 B7AC Interface Units Node address setting: Baud rate setting: SW1 DIP switch 1, pins 1 through 6 DIP switch 1, pins 7 and 8 SW2 ON 1 2 3 4 5 6 7 8 Node address setting DIP switch 1 Pins 1 to 6: Node address setting ON Pins 7 to 8: Baud rate setting DIP switch 2 Pins 1 to 3: B7AC transmission delay 1 2 3 4 5 6 7 8 Pins 4 to 5: Reserved (Always OFF) Pins 6 to 8: B7AC communications error signal setting B7AC B7AC communications transmission error signal setting delay setting Baud rate setting Reserved (Always OFF.) The settings on DIP switch 2 are communications settings for the individual B7AC Interface Unit. Refer to Settings on DIP Switch 2 on page 219 for details on these settings. Node Address Settings The B7AC Interface Unit’s node address is set with pins 1 through 6 of DIP switch 1. Any node address within the setting range can be used as long as it isn’t already set on another node. DIP switch setting Node address Pin 6 Pin 5 Pin 4 Pin 3 Pin 2 Pin 1 0 0 0 0 0 0 0 (default) 0 0 0 0 0 0 0 0 0 1 1 0 1 2 : : : : 1 1 1 1 1 1 1 1 0 1 1 0 61 62 1 1 1 1 1 1 63 0: OFF, 1: ON Note 1. Refer to Appendix A Node Address Settings Table for a complete table of DIP switch settings. 2. The Slave won’t be able to participate in communications if the same node address is used for the Master or another Slave node (node address duplication error). Baud Rate Setting Pins 7 and 8 of DIP switch 1 are used to set the baud rate as shown in the following table. (These pins are factory-set to OFF.) Pin Settings Pin 7 Note Baud rate Pin 8 OFF OFF 125 kbps ON OFF OFF ON 250 kbps 500 kbps (default) ON ON Not allowed. 1. Always turn OFF the Slave’s power supply (including the communications power supply) before changing the baud rate setting. 2. Set the same baud rate on all of the nodes (Master and Slaves) in the Network. Any Slaves with baud rates different from the Master’s rate won’t be able to participate in communications. Furthermore, a node with an incorrect baud rate setting may cause communications errors between nodes with correct baud rate settings. 216 Section 5-5 B7AC Interface Units 5-5-2 Example System Configuration DeviceNet Master Unit DCN2-1 Shielded T-branch connector T-branch Tap DRT1-B7AC B7AC Interface Unit Internal power supply DeviceNet communications cable DCA1-5CN@@W1 Cable with shielded connectors on both ends B7AC-series I/O Connector-type Link Terminal Units (10 points/Unit) Sensors with attached connectors 10 sensors 10 inputs 10 sensors Communications media XS2W-D42@-@81-@ Cables with shielded connector plugs 10 inputs 10 sensors 10 inputs Compatible B7AC Link Terminal Units The following B7AC Link Terminal Units (Sensor I/O Connector type) can be connected to the B7AC Interface Unit. Model 5-5-3 Number of inputs Input format Transmission delay with the B7AC Interface Unit B7AC-T10A1 B7AC-T10A1-A 10 inputs 10 inputs NPN NPN 19.2 ms 19.2 ms or 3 ms (switchable) B7AC-T10A1-B 10 inputs PNP 19.2 ms or 3 ms (switchable) B7AC Interface Unit: DRT1-B7AC Specifications General Specifications Item Model Specification DRT1-B7AC Number of I/O points 30 B7AC inputs max. (up to 3 B7AC Link Terminal Units can be connected with 10 inputs/Unit) Uses two input words in Master. Internal current consumption 24-V DC communications power supply: 70 mA max. 24-V DC internal power supply: 500 mA max. (This is the current when 3 B7AC Link Terminal Units are connected and all inputs are OFF. It does not include the current consumed by connected external devices.) Dielectric strength 500 V AC for 1 min. (between insulated circuits, detected leakage current 1 mA) Internal power supply normal: ±600 V, 10 min., with pulse widths of 100 ns to 1 µs Internal power supply common: ±1.5 kV, 10 min., with pulse widths of 100 ns to 1 µs Noise immunity Vibration resistance Malfunction: 10 to 150 kHz, single amplitude 0.5 mm, or 70 m/s2 Destruction: 10 to 150 kHz, single amplitude 0.75 mm, or 100 m/s2 Shock resistance Malfunction: 200 m/s2 Destruction: 300 m/s2 −10 to 55°C Ambient operating temperature 217 Section 5-5 B7AC Interface Units Item Ambient operating humidity Specification 25% to 85% (with no condensation) Degree of protection IP66 Mounting method M5 screws Mounting strength Communications connector strength Weight 100 N for 10 s 100 N pull for 10 s Approx. 500 g max. Communications Specifications (with B7AC-series Units) Item Specification Number of ports 3 ports for communications with B7AC Link Terminal Units (Round shielded connectors) Number of I/O points 30 inputs (10 inputs/port × 3 ports) Communications Split multiplex transmission in one direction method Transmission delay Standard: 19.2 ms typical (31 ms max.) High-speed: 3 ms typical (5 ms max.) Communications path 0.5 mm VCTF cable, 1 A current max. on +/− lines Communications dis- With standard transmission delay: 50 m max. tance With high-speed transmission delay: 30 m max. Components of the DRT1-B7AC DIP switch 1: Pins 1 to 6: Node address setting Pins 7 and 8: Baud rate setting (Refer to page 215.) B7A ERR OFF 1 2 3 4 5 6 7 8 ON 1 2 3 8 1632 0 1 A B C NCNC A B C 1 2 3 4 5 6 7 8 ON B7A ONNODE ADDRESSDR SPEED ERR A ERR B ERR C MS A NC DIP switch 2: Not used. Pins 1 to 3: B7AC transmission delay setting Pins 4 and 5: Reserved (Always OFF.) Pins 6 to 8: B7AC communications error signal setting (Refer to page 219.) 218 DeviceNet indicators (Refer to page 312.) B7AC-series indicators Indicate the status of each port. NS C B B7AC-series Unit connectors P DeviceNet communications connector External power supply connector Section 5-5 B7AC Interface Units LED Indicators Usage DeviceNet indicators Name MS Status Lit Flashing Lit Flashing Not lit NS Color Green Normal status Red Settings not made. Fatal error --- Non-fatal error Power is not being supplied. Lit Flashing Green Normal status Communications not established (negotiating with Master) Lit Red Fatal communications error (such as a node address duplication error) Non-fatal communications error Not lit Lit --Green Power is not being supplied. Normal status Lit Lit Red Orange Not lit --- Communications error A communications error occurred but the error was resolved later. (See note 1.) Power is not being supplied. A B7AC Link Terminal Unit was not connected when the power was turned ON. (See note 2.) Flashing B7AC-series indicators ERR A ERR B ERR C (for ports A, B, and C) Meaning Note 1. The indicator can be restored to green by resetting the power (turning the power OFF and then ON again.) 2. The indicator will become green or orange if a B7AC-series Unit is connected after the power was turned ON. Depending on the B7AC communications timing at startup, a momentary communications error may occur and cause the indicator to become orange after the error is resolved. It the indicator is orange, it can be restored to green by resetting the power (turning the power OFF and then ON again.) Settings on DIP Switch 2 The settings on DIP switch 2 are B7AC communications settings for the individual B7AC Interface Unit. For details on the DIP switch 1 settings, refer to 5-5-1 Node Address and Baud Rate Settings (DIP Switch 1). SW1 SW2 ON 1 2 3 4 5 6 7 8 Node address setting DIP switch 1 Pins 1 to 6: Node address setting ON Pins 7 to 8: Baud rate setting DIP switch 2 Pins 1 to 3: B7AC transmission delay 1 2 3 4 5 6 7 8 Pins 4 to 5: Reserved (Always OFF) Pins 6 to 8: B7AC communications error signal setting B7AC B7AC communications transmission error signal setting delay setting Baud rate setting Reserved (Always OFF.) 219 Section 5-5 B7AC Interface Units B7AC Transmission Delay Setting (Pins 1 to 3) Pins 1 to 3 set the transmission delay time for communications with the B7AC Link Terminal Unit at each port, as shown in the following table. These pins are set to ON (high-speed) at the factory. Pin 1 Port A OFF ON Pin 2 Port B Pin 3 Port C OFF ON Transmission delay time OFF ON 19.2 ms typical 3 ms typical (factory setting) B7AC Communications Error Signal Setting Pins 6 to 8 specify whether an error signal (notification) will be sent to the Master Unit when an error occurs in B7AC communications through the corresponding port. These pins are set to ON (send error signal) at the factory Pin 6 Port A OFF ON Pin 7 Port B Pin 8 Port C OFF ON B7AC communications error signal setting OFF ON Do not send error signal. Send error signal. (factory setting) If an error occurs in a port and the corresponding pin is ON (send error signal), the B7AC Communications Error Flag will be turned ON in the words allocated in the Master Unit. See I/O Allocation below for details on the location of the B7AC Communications Error Flag. Note 1. Always turn OFF the Unit’s power supply (including the communications power supply) before changing any DIP switch settings. 2. Set the appropriate transmission delay time for the B7AC Link Terminal Unit connected to each port. 3. Always turn OFF the B7AC communications error signal setting for a port if there isn’t a B7AC Link Terminal Unit connected to the port. I/O Allocation The B7AC Interface Unit is allocated two input words in the Master Unit. The following table shows the usage of these two words when word “m+0” is the first word allocated and “m+1” is the second word allocated. Port on B7AC Interface Unit Input connector 0 to 9 Input connector 0 to 5 Word m+0, bits 00 to 09 Word m+0, bits 10 to 15 Port C Input connector 6 to 9 Input connector 0 to 9 Word m+1, bits 00 to 03 Word m+1, bits 04 to 13 9 8 5 4 ERR 3 2 1 7 6 5 4 0 9 8 7 6 5 4 8 7 2 1 0 6 5 4 3 3 2 1 0 Inputs for B7AC Unit connected to port B Inputs for B7AC Unit connected to port C 9 3 Inputs for B7AC Unit connected to port A Inputs for B7AC Unit connected to port B Note 1 Wd m+1 15 14 13 12 11 10 Note 2 Wd m+0 220 I/O bits allocated to Master Unit Port A Port B Bit: Note Connector on B7AC Link Terminal Unit 2 1 0 9 8 7 6 1. Bit 14 of word m+1 is the B7AC Communications Error Flag for the B7AC Interface Unit. This flag will be turned ON if there is a communications error in any one of the ports set to “send error signal” in pins 6 to 8 of DIP switch 2. The flag will be reset to 0 automatically when the communications error is resolved. Section 5-5 B7AC Interface Units 2. This bit is always 0 (OFF). I/O Allocation Example When the Master Unit is mounted in a C200HX/HG/HE PLC and fixed allocation is used for DeviceNet, IR area words IR 350 through IR 399 are allocated to inputs from Slaves with node addresses 0 through 49. If the B7AC Interface Unit’s node address is set to 01, the first allocated word (m+0) will be IR 351. Ports A, B, and C will be allocated the following bits: Port on B7AC Interface Unit Port A Connector on B7AC Link Terminal Unit Input connector 0 to 9 I/O bits allocated to Master Unit IR 35100 to IR 35109 Port B Input connector 0 to 5 Input connector 6 to 9 IR 35110 to IR 35115 IR 35200 to IR 35203 Port C Input connector 0 to 9 IR 35204 to IR 35213 IR 35214 is the B7AC Communications Error Flag for the B7AC Interface Unit. Note If a communications error occurs in communications with a B7AC Link Terminal Unit, normal communications will be restored automatically when the communications error is resolved. The time required to restore communications depends on the error continuation time (time from error occurrence to error resolution), as shown below. • Error continuation time less than 500 ms: The B7AC Communications Error Flag will be turned OFF 500 ms after the error occurred. • Error continuation time greater than 500 ms: The B7AC Communications Error Flag will be turned OFF after the error is resolved. 15 14 13 12 11 10 9 8 7 6 5 4 3 2 1 0 m+0: Wd 351 m+1: Wd 352 0 ERR B7AC Communications Error Flag B7AC Unit connected to port A B7AC Unit connected to port B B7AC Unit connected to port C 221 Section 5-5 B7AC Interface Units Internal Circuits DC-DC converter (Isolated) 24 V (for internal circuits) 1 2 3 Photocoupler Communications connector V− 2 V+ DC-DC converter (Not isolated) Photocoupler Photocoupler CN1 3 B7AC SIG-IN Input A power supply +24 V B7AC trans. delay switch Input A power supply 0 V 1 4 2 B7AC SIG-IN Input B power supply +24 V B7AC trans. delay switch Input B power supply 0 V A Port A connector 1 B 4 2 Port B connector 3 B7AC SIG-IN Input C power supply +24 V B7AC trans. delay switch Input C power supply 0 V 1 4 2 3 222 External power supply connector 3 Photocoupler 1 DRAIN CAN L 5 0 V (for internal circuits) Internal circuitry CAN H 4 Physical layer Photocoupler P 4 C Port C connector Section 5-5 B7AC Interface Units Dimensions The following diagram shows the dimensions for the DRT1-B7AC Interface Unit. All dimensions are in mm. 57 115 8 ERR AERR BERR C MS 51 A NC NS C B P Four, M5 135 6 45 Mounting Holes Four, 4.2 dia. or M4 Mounting screw Nut 28+ --0.5 When mounting from the front with M4 screws and nuts 125+ --0.5 Four, 5.4 dia. Mounting screw 28+ --0.5 When mounting directly from the rear with M5 screws 125+ --0.5 5-5-4 Mounting in Control Panels Use screws to mount a B7AC Interface Unit in a control panel. These Units cannot be mounted on a DIN Track. Attaching the Unit from the Front The Units are tapped with M5 threads, so use M4 screws to clear the threads and attach the Unit to the control panel from the front. Drill the mounting holes in the control panel according to the dimensions shown in the dimensions diagrams and secure the Unit with M4 screws. The appropriate tightening torque is 0.6 to 1.18 N⋅m. Attaching the Unit from the Rear Drill the mounting holes in the control panel according to the dimensions shown in the dimensions diagram and secure the Unit with M5 screws. The appropriate tightening torque is 1.47 to 1.96 N⋅m. 223 Section 5-5 B7AC Interface Units The Unit can be mounted in any direction. Any one of the following 6 directions is acceptable. P C P P Vertical NC C A B B P NC A C 5-5-5 B C B A A NC NC Installation Direction Wiring the Internal Power Supply and Input Lines Wiring the Internal Power Supply Connect the external power supply to the B7AC Interface Unit with an XS2series Round Waterproof Connector listed in the following table. Compatible Connectors Connector Cable with connectors on both ends (socket and plug) Model XS2W-D42@-@81-@ Cable with connector on one end (female socket) Connector socket assembly (female) (Crimp-connector or solder type) T-joint XS2F-D42@-@80-@ XS2C-D4@@ DRT1-B7AC CS2R-D427-5 DRT1-B7AC I/O power supply I/O power supply XS2W-D42@-@81-@ Cables with shielded socket on one end and plug on the other XS2R-D427-5 T-joint XS2F-D42@-@80-@ Cable with shielded socket on one end XS2R-D427-5 T-joint XS2W-D42@-@81-@ Cable with shielded socket on one end and plug on the other Note Tighten the connector by hand to a torque of 0.39 to 0.49 N⋅m. If the connector is not tightened sufficiently, it will not provide the expected environmental resistance and may come loose from vibration. Do not use pliers or other tools to tighten the connectors, because the tools may damage the connectors. Connecting to B7AC Link Terminal Units (Communications Media) 224 Connect the I/O Wiring to the B7AC Interface Unit with the XS2-series Round Waterproof Connectors listed in the following table. Compatible Connectors Connector Cable with connector on one end (male plug) Model XS2H-D42@-@80-@ Cable with connectors on both ends (socket and plug) Connector plug assembly (male) (Crimp-connector or solder type) XS2W-D42@-@81-@ XS2G-D4@@ Section 5-5 B7AC Interface Units Refer to the Catalog or manual for details on the device’s connections before connecting any device. DRT1-B7AC B7AC Interface Unit B7AC-series I/O Connector-type Link Terminal Units (10 points/Unit) Sensors with attached connectors (See note 3.) 10 sensors 10 inputs Communications media XS2W-D42@-@81-@ Cables with shielded connector plugs 10 sensors 10 inputs 10 sensors 10 inputs Note 1. Refer to the OMRON Sensors Catalog (X42-E1-3) for more details on the sensor connections and Round Waterproof Connectors. 2. A separate power supply cannot be connected to a B7AC Link Terminal Unit to supplement the power from the B7AC Interface Unit’s internal power supply. 3. Limit Switches, Proximity Switches, Photoelectric Switches, etc. (Sensors with attached connectors, Pre-wired Sensors with connectors, and regular Pre-wired Sensors can be used. 4. Tighten the connector by hand to a torque of 0.39 to 0.49 N⋅m. If the connector is not tightened sufficiently, it will not provide the expected environmental resistance and may come loose from vibration. Do not use pliers or other tools to tighten the connectors, because the tools may damage the connectors. 5. Always cap unused connectors with an XS2Z-12 Waterproof Cover or XS2Z-15 Dust Cover, shown in the following diagram. XS2Z-12 Waterproof Cover The connector will meet IP66 standards if a Waterproof Cover is attached. Tighten the connector by hand to a torque of 0.39 to 0.49 N⋅m. XS2Z-15 Dust Cover Press the Dust Cover onto the connector firmly. The Dust Cover will protect the connector from dust, but does not meet IP66 standards. Maintaining Environmental Resistance • The IP66 environmental resistance level will be lost if the surfaces where the contact block and cover meet are subjected to excessive force. Protect the contact block and cover from excessive force or shock. • The IP66 standard is lower than waterproof standards. Do not submerge the system components. • The body of the components is plastic resin. Do not place objects on the components or allow the components to be stepped on. 225 Section 5-5 B7AC Interface Units Tables of Compatible Connectors Connector 1 (DeviceNet communications connector) ERR AERR BERR C MS A NC NS C B P Connector 2 (Connector for power supply to internal circuitry) Connector 3 (Port A) Connector 4 (Port B) Connector 5 (Port C) Connector 1 (DeviceNet Communications Connector) Connector type Cable with shielded connectors on both ends Model Plug (male) Cable with shielded connector DCA1-5CN@@F1 (socket) on one end Cable with shielded connector DCA1-5CN@@H1 (plug) on one end Shielded T-branch connector Appearance DCA1-5CN@@W1 Socket (female) Socket (female) Plug (male) DCN2-1 Socket (female) Socket (female) Plug (male) Connector 2 (Connector for Power Supply to Internal Circuitry) Connector type Model Cable with connectors on both XS2W-D42@-@81-@ ends (socket and plug) Cable with connector on one end (female socket) XS2F-D42@-@80-@ Connector socket assembly (female) (Crimp-connector or solder type) T-joint XS2C-D4@@ Appearance Plug (male) Socket (female) Socket (female) XS2R-D427-5 Socket (female) Socket (female) 226 Socket (female) Plug (male) Section 5-5 B7AC Interface Units Connectors 3, 4, and 5 (Connectors for Ports A, B, and C) (Connectors to Connect the B7AC) Connector type Cable with connector on one end (male plug) Model XS2H-D42@-@80-@ Plug (male) Cable with connectors on both XS2W-D42@-@81-@ ends (socket and plug) Connector socket assembly (male) (Crimp-connector or solder type) Appearance Plug (male) Socket (female) XS2G-D4@@ Plug (male) 227 B7AC Interface Units 228 Section 5-5 SECTION 6 Special I/O Slave Units Specifications This section provides specifications for the C200H I/O Link Unit and the RS-232C Unit. 6-1 6-2 C200H I/O Link Units. . . . . . . . . . . . . . . . . . . . . . . . . . . . . . . . . . . . . . . . . . . 230 6-1-1 Communications Cable Connections . . . . . . . . . . . . . . . . . . . . . . . . 230 6-1-2 Node Address Setting (Rear DIP Switch) . . . . . . . . . . . . . . . . . . . . 230 6-1-3 Baud Rate and Hold/Clear Write Area Settings (Front DIP Switch) 231 6-1-4 Specifications . . . . . . . . . . . . . . . . . . . . . . . . . . . . . . . . . . . . . . . . . . 231 6-1-5 Components . . . . . . . . . . . . . . . . . . . . . . . . . . . . . . . . . . . . . . . . . . . 232 6-1-6 Rotary Switch Settings . . . . . . . . . . . . . . . . . . . . . . . . . . . . . . . . . . . 234 6-1-7 Special I/O Area Function and Read/Write Area Allocation . . . . . . 235 6-1-8 Explicit DeviceNet Messages . . . . . . . . . . . . . . . . . . . . . . . . . . . . . . 243 6-1-9 Using Explicit DeviceNet Messages. . . . . . . . . . . . . . . . . . . . . . . . . 250 6-1-10 Dimensions . . . . . . . . . . . . . . . . . . . . . . . . . . . . . . . . . . . . . . . . . . . . 256 6-1-11 Installing in a Control Panel . . . . . . . . . . . . . . . . . . . . . . . . . . . . . . . 256 6-1-12 C200H I/O Link Unit Application Examples . . . . . . . . . . . . . . . . . . 256 RS-232C Units . . . . . . . . . . . . . . . . . . . . . . . . . . . . . . . . . . . . . . . . . . . . . . . . 260 6-2-1 Communications Cable Connections . . . . . . . . . . . . . . . . . . . . . . . . 260 6-2-2 Node Address and Baud Rate Settings . . . . . . . . . . . . . . . . . . . . . . . 260 6-2-3 Specifications . . . . . . . . . . . . . . . . . . . . . . . . . . . . . . . . . . . . . . . . . . 262 6-2-4 Components . . . . . . . . . . . . . . . . . . . . . . . . . . . . . . . . . . . . . . . . . . . 263 6-2-5 Word Allocations for Communications Status . . . . . . . . . . . . . . . . . 265 6-2-6 Using the RS-232C Unit. . . . . . . . . . . . . . . . . . . . . . . . . . . . . . . . . . 266 6-2-7 Explicit DeviceNet Messages . . . . . . . . . . . . . . . . . . . . . . . . . . . . . . 269 6-2-8 Using Explicit DeviceNet Messages. . . . . . . . . . . . . . . . . . . . . . . . . 280 6-2-9 Dimensions . . . . . . . . . . . . . . . . . . . . . . . . . . . . . . . . . . . . . . . . . . . . 285 6-2-10 Mounting in Control Panels . . . . . . . . . . . . . . . . . . . . . . . . . . . . . . . 285 6-2-11 Wiring . . . . . . . . . . . . . . . . . . . . . . . . . . . . . . . . . . . . . . . . . . . . . . . . 286 6-2-12 RS-232C Unit Application Examples. . . . . . . . . . . . . . . . . . . . . . . . 288 6-2-13 Reading RS-232C Unit Parameters . . . . . . . . . . . . . . . . . . . . . . . . . 292 6-2-14 Reading Data Received by RS-232C Unit Ports . . . . . . . . . . . . . . . 294 229 Section 6-1 C200H I/O Link Units 6-1 C200H I/O Link Units The C200H I/O Link Unit is a Special I/O Slave Unit that allows data from any area in the CPU Unit of the PLC to be read or written from the Master Unit. Using the C200H I/O Link Unit, a Slave PLC can be controlled by the Master through the DeviceNet Network. Memory areas being used by other Special I/O Units can also be specified, allowing Special I/O Units mounted to the Slave PLCs to also be controlled indirectly from the Master. 6-1-1 Communications Cable Connections Wire communications cables to the C200H I/O Link Unit using the standard Square Connectors, just like General-purpose Slaves. This section does not explain how to connect communications cables. For details on connecting the cables, refer to 4-2 Connecting Communications Cables to General-purpose Slaves. 6-1-2 Node Address Setting (Rear DIP Switch) The DIP switch on the rear panel of the Unit is used to set the node address for the C200H I/O Link Unit. Node address setting Reserved (Always OFF.) The node address is set with pins 1 through 6 of the DIP switch, as shown in the following table. Any node address within the setting range can be used as long as it isn’t already set on another node. DIP switch setting Node address Pin 6 Pin 5 Pin 4 Pin 3 Pin 2 Pin 1 0 0 0 0 0 0 0 (default) 0 0 0 0 0 0 0 0 0 1 1 0 1 2 : : : : 1 1 1 1 1 1 1 1 0 1 1 0 61 62 1 1 1 1 1 1 63 Any node address within the setting range can be used as long as it is not already set on another node in the network. Note 1. (Refer to Appendix A Node Address Settings Table for a complete table of DIP switch and baud rate settings.) 2. The default setting is 0. Because the node address setting for the C200H I/O Link Unit is made on the rear panel DIP switch, the Unit must be removed before the setting can be changed. For this reason, be sure the setting is correct before configuring the network. 3. Pins 7 and 8 are reserved for system use. They must always be set to OFF. 4. If the same node address is used for two different nodes, a node duplication error will occur. 230 Section 6-1 C200H I/O Link Units 6-1-3 Baud Rate and Hold/Clear Write Area Settings (Front DIP Switch) The DIP switch on the front panel of the Unit is used to set the baud rate and Hold/Clear Write Area data for communications error. The functions and setting for the front panel DIP switch are as shown in the following diagram. Reserved (Always OFF.) Hold/Clear Write Area data for communications error Baud rate Pin Function 1 2 Baud rate 3 Hold/Clear Write Area data for com- OFF: munications error ON: 4 Baud Rate Setting See the next table. Reserved Clear (default) Hold Leave this pin set to OFF. Pins 1 and 2 are used to set the baud rate as shown in the following table. Pin 1 Pin 2 OFF OFF 125 kbps (default) Note ON OFF OFF ON 250 kbps 500 kbps ON ON Not allowed. Baud rate 1. Always turn OFF the Slave’s power supply (including the communications power supply) before changing the baud rate setting. 2. Set the same baud rate on all of the nodes (Master and Slaves) in the Network. Any Slaves with baud rates different from the Master’s rate will not be able to participate in communications, and may cause communications errors to occur between nodes with correct baud rate settings. 6-1-4 Specifications General Specifications Item Model Connectable PLCs Specification C200HW-DRT21 CS1H/G, C200HX/HG/HE(-Z) Communications power 11 to 25 V DC supply voltage (Supplied from the communications connector.) Internal current consumption Mounting Communications: 45 mA max. Internal circuits: 250 mA max. (5 V DC supplied via PLC’s Backplane.) Mounted on a CS1H/G or C200HX/HG/HE Backplane. Weight 250 g max. Note All other specifications except those listed correspond to those of the C200HX/HG/HE PLCs. 231 Section 6-1 C200H I/O Link Units Communications Specifications Item I/O points Specification Input: 512 points max. (32 words) Output: 512 points max. (32 words) Memory areas that can C200HX/HG/HE: be allocated CIO, DM, HR, AR, LR, TIM/CNT, and EM (bank 0 only) CS1H/CS1G: CIO, D, H, T (PVs), and EM (bank 0 only) Default allocation area Write area: One word, IR 350 Read area: One word, IR 50 Maximum message Read: 200 bytes length Write: 200 bytes 6-1-5 Settings Rotary switch: Unit number (Machine No.) Rear panel DIP switch: Node address Front panel DIP switch: Baud rate, Hold/Clear Write Area data for communications error. Indicators MS, NS indicators (2-color): 7-segment display (2-digit:): Dot indicators: Components Front panel Rear panel Indicators DIP switch (Rear panel) Pins 1 to 6: Node address Pins 7 and 8: Reserved (Always OFF.) Rotary switch Sets the Unit No. as a single-digit hexadecimal DIP switch (Front panel) Pins 1 and 2: Baud rate Pin 3: Hold/Clear Write Area data for communications error Pin 4: Reserved (Always OFF.) Communications connector 232 Unit status Node address, error codes Read/Write Area, default settings Section 6-1 C200H I/O Link Units Indicators Indi- Color cator MS Green NS The indicators display the status of the C200H I/O Link Unit and the Network. When the Network is operating normally, the 7-segment display shows the C200H I/O Link Unit’s node address; when an error has occurred, it shows an error code and the faulty node’s node address. Status Definition Meaning ON Device Operational Normal operating status. Red Flashing ON Device in Standby Unrecoverable Fault Reading switch settings. Unit hardware error: Watchdog timer error. --- Flashing OFF Minor Fault No Power Green ON Flashing Link OK. On-line, Connected. On-line, Not Connected Switch settings incorrect, etc. CPU Unit error, power isn’t being supplied, waiting for initial processing to start, or the Unit is being reset. Network is operating normally (communications established) ON Critical Link Failure Flashing Connection Time-out A fatal communications error has occurred. Network communications are not possible. Check for a node address duplication or Bus Off error. Communications timeout. OFF Not Powered/ Not On-Line Checking for node address duplication on the Master, switch settings are incorrect, or the power supply is OFF. Red --- Network is operating normally, but communications have not yet been established. Seven-Segment Display In addition to the MS and NS indicators, a C200H I/O Link Unit has a 2-digit, 7-segment display that normally displays the C200H I/O Link Unit’s node address. When an error occurs, the display will alternate between the error code and the node address of the faulty Slave. The dots at the lower-right of each digit indicate the Read/Write Area setting status (default/user settings). Normal: C200H I/O Link Unit's node address Error: Error code and C200H I/O Link Unit's node address Read/Write Area: Default/user settings Error Status Watchdog timer Display Not lit Memory or system error Error code only Lit Other errors Error code and error node address alternate (see diagram below) 233 Section 6-1 C200H I/O Link Units Dot Indicators Status Read/Write Area default settings Both dots lit. Read/Write Area user settings Both dots not lit. Error code (1 s) OFF (0.3 s) OFF (0.3 s) Error code (1 s) Display OFF (0.3 s) OFF (0.3 s) Faulty node address (1 s) If several errors occur at the same time, the error codes will be displayed in order of node address. 6-1-6 Rotary Switch Settings The rotary switch is used to set the C200H I/O Link Unit’s unit number (Machine No.). MACHINE No. PLC C200HX/HG-CPU5@/6@/8@ (-Z) C200HX/HG-CPU3@/4@(-Z) C200HE (-Z) all models Setting method Set as a one-digit hexadecimal value. Setting range 0 to F 0 to 9 Provided the unit number is not being used by another Special I/O Unit mounted to the same PLC, the settings can be made anywhere within the setting range. Use a small flat-blade screw driver, and take care not to scratch the rotary switch when making the setting. Note 1. Always turn OFF the PLC’s power supply before changing the rotary switch setting. 2. The unit number determines which words will be allocated to the Unit in the Special I/O Area. 3. If the C200H I/O Link Unit and another Special I/O Unit mounted to the same PLC have the same unit number, an error will occur on the PLC and the Unit will not be able to participate in the DeviceNet Network. 4. When a C200H I/O Link Unit and a DeviceNet Master Unit are mounted to the same PLC, set the C200H I/O Link Unit’s unit number higher than the Master Unit’s unit number. When the C200H I/O Link Unit has a higher unit number, it will recognize the Master Unit when the PLC is turned ON, so you can set Read/Write Areas that do not overlap. If the C200H I/O Link Unit is mistakenly given a lower unit number, the Master Unit will recognize the C200H I/O Link Unit when the PLC is turned ON and it will not be possible to use fixed allocation. In this case, you must use the Configurator to customize the Master Unit’s Input/Output Areas so that they do not overlap with the C200H I/O Link Unit’s areas. 234 Section 6-1 C200H I/O Link Units 6-1-7 Special I/O Area Function and Read/Write Area Allocation The C200H I/O Link Unit allows data from any area in the CPU Unit of the PLC to be read or written from the Master Unit, depending on the Special I/O Area settings. In order for the C200H I/O Link Unit and the Master to operate together, the Read/Write Area on the C200H I/O Link Unit and the allocated words on the Master are linked, as illustrated in the following diagram. IN Area OUT Area Master Slave Read Area Write Area C200H I/O Link Unit Note When using the Read Area only, set the size of the Write Area to zero bytes. Similarly, if using the Write Area only, then set the size of the Read Area to zero bytes. Special I/O Area Words and Configuration Words are allocated in the PLC’s Special I/O Area according to the Unit number, as illustrated in the following table. Unit number Special I/O Area words C200HX/HG/HE (-Z) CS1H/G 0 IR 100 to IR 109 CIO 2000 to CIO 2009 1 2 IR 110 to IR 119 IR 120 to IR 129 CIO 2010 to CIO 2019 CIO 2020 to CIO 2029 3 4 IR 130 to IR 139 IR 140 to IR 149 CIO 2030 to CIO 2039 CIO 2040 to CIO 2049 5 6 IR 150 to IR 159 IR 160 to IR 169 CIO 2050 to CIO 2059 CIO 2060 to CIO 2069 7 8 IR 170 to IR 179 IR 180 to IR 189 CIO 2070 to CIO 2079 CIO 2080 to CIO 2089 9 A IR 190 to IR 199 IR 400 to IR 409 CIO 2090 to CIO 2099 CIO 2100 to CIO 2109 B C IR 410 to IR 419 IR 420 to IR 429 CIO 2110 to CIO 2119 CIO 2120 to CIO 2129 D E IR 430 to IR 439 IR 440 to IR 449 CIO 2130 to CIO 2139 CIO 2140 to CIO 2149 F IR 450 to IR 459 CIO 2150 to CIO 2159 In the C200H I/O Link Unit, the Special I/O Area is used as illustrated below. Bit 15 + 0 words + 1 to 4 words + 5 words + 6 to 9 words Bit 0 Software switches Read/Write Setting Area Status Read/Write Reference Area 235 Section 6-1 C200H I/O Link Units Software Switches The functions of the software switches are illustrated in the following diagram. Bit Not used Read/Write Area user settings Read/Write Area default settings Bit 00: Read/Write Area User Settings To enable user settings for the Read and Write Areas, turn ON software switch bit 00. The result of the operation (normal completion or error completion) will be indicated in status bit 09 or bit 10 (first word + 5 words). Before turning OFF software switch bit 00, check whether status bit 09 or bit 10 is ON. The sizes of the Read and Write Areas and the first words in the Read and Write Areas that have been set in the Read/Write Setting Area will be stored in the Master Unit’s non-volatile memory when bit 00 changes from OFF to ON. Note 1. The Read/Write Area user settings software switch is effective only when the PLC is in PROGRAM mode. If used in other operating modes, an error will occur (error code C0 Hex). When a C0 error occurs, switch the PLC to PROGRAM mode and try the operation again. 2. Read/Write Area settings will not become effective by manipulating the software switch alone. After changing the settings, either reset the Unit or restart the PLC to enable the new settings. 3. The Read/Write Area user settings are stored in the C200H I/O Link Unit’s EEPROM memory. Once they have been set, they will not change when the Unit is turned OFF or reset, and data from the set areas can be sent and received from the next time the Unit is started. 4. There is a limit to the number of times data can be written to EEPROM. Do not exceed the EEPROM write life (1 million writes). Bit 01: Read/Write Area Default Settings To return the Read and Write Areas to the default settings, turn software switch bit 01 ON. Note 1. The Read/Write Area default settings software switch is effective only when the PLC is in PROGRAM mode. If used in other operating modes, an error will occur (error code C0 Hex). When a C0 error occurs, switch the PLC to PROGRAM mode and try the operation again. 2. Read/Write Area default settings do not become effective by changing this bit setting alone. The Read/Write Area default settings will not become effective by manipulating the software switch alone. After changing the settings, either reset the Unit or restart the PLC to enable the new settings. 3. The default settings for the Read and Write Areas are as follows: Read Area: IR 50 (No. of words: 1) Write Area: IR 350 (No. of words: 1) 236 Section 6-1 C200H I/O Link Units Read/Write Setting Area The Read/Write Setting Area is configured as shown in the following illustration. After setting data for the Read and Write Areas, turn software switch bit 00 ON, and then restart the Unit to set the Read Area and Write Area. Word Bit 15 +0 +1 Bit 0 Software switch Write Area Setting +2 +3 Read Area Setting +4 Specify the area size, area, and address of the first word for the Read Area and the Write Area. Bit 15 Bit 0 Area Area size Address of first word Area Size: Set in hexadecimal in byte units. The setting range is 0 to 40 Hex (0 to 64 decimal, 0 to 32 words). Area: The area is set as follows: Setting Area Word range 01 Hex IR Area 1 (CIO) Write Area: IR 000 to IR 235 Read Area: IR 000 to IR 235 02 Hex 03 Hex IR Area 2 (CIO) Data Memory Area (DM or D) IR 300 to IR 511 DM 0000 to DM 4095 (C200HE-CPU11-E only) DM 0000 to DM 5999 (All except C200HE-CPU11-E) 04 Hex 05 Hex LR Area HR Area (HR or H) LR 00 to LR 63 HR 00 to HR 99 06 Hex C200HX/HG/HE AR Area (-Z) CS1H/G Holding Area (H) AR 00 to AR 27 (Can be set for Read Area only) H100 or H102 to H127 (Specify the starting word with 00 Hex or 02 to 1B Hex.) 07 Hex C200HX/HG/HE Timer/Counter (-Z) Area (TIM/CNT) CS1H/G Timer Area (T) TIM/CNT 000 to TIM/CNT 511 08 Hex EM Area (bank 0 only) EM 0000 to EM 6143 T 000 to T 511 Address of First Word: The address first word of the memory area is set in hexadecimal. Areas that can be specified differ depending on the model of PLC used and the area. Example: Setting DM 1000 to DM 1015 (16 words = 32 bytes). Bit 15 Bit 0 237 Section 6-1 C200H I/O Link Units Status Area The Status Area indicates the operating status of the C200H I/O Link Unit. The meaning of each bit is as shown in the following diagram. Bit Not used Incorrect Switch Settings/EEPROM Error Node Address Duplication/Bus Off Error Detected PLC Mounting Error Network Power Supply Error Communications Error Hold/Clear Write Area Data for Communications Error Read/Write Area Settings Normal Completion Read/Write Area Settings Error Completion Explicit Connection Established Read/Write Area Default Settings Error I/O Link Executing Bit Name ON OFF 0 Incorrect Switch Settings/ EEPROM Error Flag Turns ON when an incorrect switch setting or an error in EEPROM is detected. Turns OFF when the PLC or C200H I/O Link Unit is restarted. 1 Node Address Duplication/ Bus Off Error Flag Turns OFF when the PLC or C200H I/O Link Unit is restarted. 2 PLC Mounting Error Flag Turns ON when the same node address is set for more than one Unit or a Bus Off (communications are halted by many communications errors) error is detected. Turns ON when a PLC mounting error is detected. (When another Communications Unit is mounted to the same PLC and it’s Read/Write Area settings are set to default.) 3 Network Power Supply Error Flag 6 Communications Error Flag 8 Hold/Clear Write Area Data for Communications Error Flag Read/Write Area Settings Normal Completion Flag 9 10 Read/Write Area Settings Error Completion Flag 12 Explicit Connection Established Flag 13 Read/Write Area Default Settings Flag 14 Error Flag 15 I/O Link Executing Flag 238 Turns OFF when the Read/Write Area is set to user settings and the C200H I/O Link Unit is restarted. Turns ON when power OFF is detected in Turns OFF when the communications the DeviceNet Network. power supply returns to a normal voltage. Turns ON when a DeviceNet communiTurns OFF when communications return cations error is detected. to normal. Turns ON when the Unit is restarted after pin 3 on the front panel DIP switch has been set to ON (Hold). Turns ON when changes to the Read/ Write Area settings have been completed normally using software switch bit 0 or 1. Turns ON when an error has occurred attempting to make changes to the Read/ Write Area settings using software switch bit 0 or 1. Turns OFF when the Unit is restarted after pin 3 on the front panel DIP switch has been set to OFF (Clear). Turns OFF when software switch bits 0 and 1 are both set to OFF. Turns ON when an explicit connection has been established with the Master Unit. Turns ON when Read/Write Area default settings are used. Turns OFF when the explicit connection with the Master Unit is broken. Turns ON when any kind of error occurs. (When Status bits 00, 01, 02, 06, or 10 are ON.) Turns ON when a connection is established with the Master Unit. Turns OFF when all errors have been resolved. (When Status bits 00, 01, 02, 06, and 10 are all OFF.) Turns OFF when a connection with the Master Unit is broken. Turns OFF when software switch bits 0 and 1 are both set to OFF. Turns OFF when Read/Write Area user settings are used. Section 6-1 C200H I/O Link Units Read/Write Reference Area The current setting status of the Read Area and Write Area are indicated as shown in the following diagram. (The Read/Write Area settings are not output to this area unless the C200H I/O Link Unit is restarted after software switch bit 00 is turned ON.) Bit 15 +6 +7 +8 +9 Bit 0 Current Write Area setting Current Read Area setting Data is stored in these words in the same form as it is for the Read/Write Setting Area. Refer to page 237 for details. Setting the Read and Write Areas Use the following procedure to set the Read and Write Areas. Using Control bits This procedure uses the Read/Write Setting Area and the software switch in the C200H I/O Link Unit’s Special I/O Area to set the Read and Write Areas. 1,2,3... 1. Turn ON the power to the PLC to which the C200H I/O Link Unit is mounted and set the PLC to PROGRAM mode. 2. Using a Peripheral Device, such as a Programming Console, set the Read Area and Write Area in the Read/Write Setting Area in Special I/O Area words +2 to +4. Example: Read Area: IR 100 to IR 119, Write Area: DM 0160 to DM 0189. +1 Write Area: 58 bytes, DM Area +2 Write Area: First word address 160 +3 Read Area: 40 bytes, IR Area +4 Read Area: First word address 100 3. Using the Peripheral Device, turn ON software switch bit 00 in Special I/O Area word +0 (Read/Write Area user settings). If it is already ON, turn it OFF and then ON again. 4. Check that Status Area bit 09 in Special I/O Area word +5 is ON (Read/ Write Area Setting Normal Completion Flag). Note At this point, the Read/Write Area settings are written to memory in the C200H I/O Link Unit, but they are not yet effective. Operation will continue using the previous Read/Write Area settings. (The contents of the Read/Write Reference Area will also remain at the previous settings.) 5. Reset the C200H I/O Link Unit, or restart the PLC to which the C200H I/O Link Unit is mounted. Note a) When the C200H I/O Link Unit is mounted in a C200HX/HG/HE PLC, it can be reset by turning ON the corresponding Special I/O Unit Restart Bit in AR 01 or SR 281. When the Unit is mounted in a CS1H/G PLC, it can be reset by turning ON the corresponding Special I/O Unit Restart Bit in A502 to A507. b) When the Unit is restarted, the Read/Write settings will become effective and the number of IN/OUT words for the C200H I/O Link Unit will be set. 6. Correct the C200H I/O Link Unit’s scan list registration in the Master’s scan list. There are two methods of registering the scan list. • Turn ON the Enable Scan List software switch on the Master Unit. 239 Section 6-1 C200H I/O Link Units • Create a scan list and register the Unit using a DeviceNet Configurator. If the scan list is registered correctly, data will automatically be transferred and received between the Master Unit and the C200H I/O Link Unit. For further details on Master Unit operations, refer to the Master Unit’s Operation Manual or the DeviceNet Configurator Operation Manual. 7. When necessary, it is possible to read and write IN/OUT Areas on the Master, and control the PLC (Slave) to which the C200H I/O Link Unit is mounted. By writing data to the C200H I/O Link Unit OUT Area on the Master, data can be written to the Slave’s Write Area, and by reading data from the IN Area, data can be read from the Read Area of the Slave. Note Once the Read and Write Areas has been set, data will be automatically transferred and received when the Master and Slaves are restarted. Using the DeviceNet Configurator The Read/Write Area can be set using the OMRON DeviceNet Configurator (version 2.@ or later). When using a version earlier than 2.@, contact your local sales office before use. (Version information can be confirmed from the Help Menu.) 1,2,3... 1. Connect a DeviceNet Configurator to the DeviceNet Network and go online. 2. Turn ON the power to the PLC to which the C200H I/O Link Unit is mounted, and place the PLC into PROGRAM mode. 3. Locate the C200H I/O Link Unit’s icon in the Network Configuration window and double click the icon. The Device Parameters Editing Screen (Read/Write Area parameter setting screen) will be displayed. 240 Section 6-1 C200H I/O Link Units 4. Either double click on the Read/Write parameter that you want to change or select the desired parameter and press the Enter Key. It will become possible to change the parameter. 5. Set or change parameters. a) Size Setting Screen Input the new value and press the Enter Key, or click another location in the window. 241 C200H I/O Link Units Section 6-1 b) Area Setting Screen Select a data area from the pull-down menu and press the Enter Key, or click another location in the window. (When using a CS1H/G, words AR 00 to AR 27 correspond to H100 to H127.) c) First Word Address Setting Screen Input the new value and press the Enter Key, or click another location in the window. 6. When the desired parameter changes and settings have been completed, click the Download Button. The edited parameters will be written to the C200H I/O Link Unit. 242 Section 6-1 C200H I/O Link Units 7. Click the Reset button to enable the edited parameters. A reset confirmation message will be displayed. Click the Yes button to confirm. When the C200H I/O Link Unit is reset, the corresponding Special I/O Unit Restart Bit in AR 01 of the PLC will be turned ON. If the Read/Write Area sizes have been changed, you must correct the Master’s I/O allocation settings. Note Once the Read/Write Area has been set, data will be automatically transferred and received when the Master and Slaves are restarted. 6-1-8 Explicit DeviceNet Messages Explicit DeviceNet messages (commands) can be sent from the Master to write data to any area of the CPU Unit of the PLC to which the C200H I/O Link Unit is mounted. This section the explicit messages supported by the C200H I/O Link Unit, and provides usage examples. For further details on using explicit messages on the Master Unit, refer to the Master Unit’s Operation Manual. C200H I/O Link Unit Explicit Message List Explicit message BYTE DATA READ BYTE DATA WRITE WORD DATA READ WORD DATA WRITE Error response Function Reads the specified node’s data in bytes. Word data is read from the leftmost bit to the rightmost bit. The maximum data size for read data is 200 bytes. Writes the specified node’s data in byte. Word data is written from the leftmost bit to the rightmost bit. The maximum data size for write data is 200 bytes. Reads the specified node’s data in words. Word data is read from the rightmost bit to the leftmost bit. The maximum data size for read data is 100 words. Writes the specified node’s data in words. Word data is written from the rightmost bit to the leftmost bit. The maximum data size for write data is 100 words. When an error occurs in an explicit message (command), an error response is sent returned by the C200H I/O Link Unit. Page 243 245 247 248 250 Use BYTE DATA READ and BYTE DATA WRITE when sending explicit messages (commands) from an OMRON DeviceNet Master. When using other manufacturer’s DeviceNet Masters to send explicit messages (commands), use WORD DATA READ and WORD DATA WRITE. The number of bytes specified for Class ID and Instance ID differ according to the type of Master used. For an OMRON DeviceNet Master, 2 bytes (4 digits) are specified. For an example of this, see 6-1-9 Using Explicit DeviceNet Messages. BYTE DATA READ BYTE DATA READ will read data from any area of CPU Unit of the PLC to which the C200H I/O Link Unit is mounted. Data is returned from the leftmost bit to the rightmost bit. 243 Section 6-1 C200H I/O Link Units Command Block Class ID Address L No. of read bytes Service code Address H Destination node address Instance ID Response Block Word data H Service code Word data L Source node address Word data H Word data L Read data (Maximum: 200 bytes) No. of received bytes Parameters Destination Node Address (Command) The node address of the C200H I/O Link Unit reading the data, in single-byte (2-digit) hexadecimal. Service Code (Command, Response) In the command, IC Hex is specified. In the response, the leftmost bit is turned ON and 9C Hex is returned. Class ID (Command) Always 2F Hex. Instance ID (Command) Specifies the data area to be read, in hexadecimal, as shown in the following table. 244 Setting 01 Hex IR Area 1 (CIO) Area 02 Hex IR Area 2 (CIO) 03 Hex Data Memory Area (DM or D) 04 Hex LR Area 05 Hex 06 Hex HR Area (HR or H) C200HX/HG/HE AR Area (-Z) CS1H/G Holding Area (H) 07 Hex C200HX/HG/HE Timer/Counter (-Z) Area (TIM/CNT) CS1H/G Timer Area (T) 08 Hex EM Area (bank 0 only) Word range Write Area: IR 000 to IR 235 Read Area: IR 000 to IR 235 IR 300 to IR 511 DM 0000 to DM 4095 (C200HE-CPU11-E only) DM 0000 to DM 5999 (All except C200HE-CPU11-E) LR 00 to LR 63 HR 00 to HR 99 AR 00 to AR 27 (Can be set for Read Area only) H100 or H102 to H127 (Specify the starting word with 00 Hex or 02 to 1B Hex.) TIM/CNT 000 to TIM/CNT 511 T 000 to T 511 EM 0000 to EM 6143 Section 6-1 C200H I/O Link Units Address L, Address H (Command) The address in hexadecimal of the first word of data to be read. Address L: Rightmost 2 digits of the address in 4-digit hexadecimal. Address H: Leftmost 2 digits of the address in 4-digit hexadecimal. When specifying a Holding Area word (H100 or H102 to H127) in a CS1H/G PLC, specify the first word in hexadecimal with 0000 Hex for H100 or 0002 to 001B Hex for H102 to H127. No. of Read Bytes (Command) The number of bytes of read data, in single-byte (2-digit) hexadecimal. The specified range is 01 to C8 Hex (1 to 200 in decimal). No. of Received Bytes (Response) The number of bytes received from the source node address is returned in hexadecimal. Source Node Address (Response) The node address of the C200H I/O Link Unit that returned the response is returned in hexadecimal. Read Data (Response) The specified data (area, words, and number of bytes) is returned from word H (leftmost byte: bits 08 to 15) to word L (rightmost byte: bits 00 to 07). If an odd number of read bytes have been specified, the last byte of data moves into word H. Precautions Actual addresses for Address H and Address L and actual number of bytes to be read differ according to the model of PLC to which the C200H I/O Link Unit is mounted and the memory area. Be sure to specify bytes within the data area range. BYTE DATA WRITE BYTE DATA WRITE will write data to any area in the CPU Unit of the PLC to which the C200H I/O Link Unit is mounted. Write data is specified from the leftmost byte to the rightmost byte. Command Block Word data H Class ID Service code Address L Address H Word data L Destination node address Instance ID Word data H Word data L Write data (Maximum 200 bytes) Response Block Service code Source node address No. of received bytes 245 Section 6-1 C200H I/O Link Units Parameters Destination Node Address (Command) The node address of the C200H I/O Link Unit writing the data in single-byte (2-digit) hexadecimal. Service Code (Command, Response) In the command, IE Hex is specified. In the response, the leftmost bit is turned ON and 9E Hex is returned. Class ID (Command) Always 2F Hex. Instance ID (Command) Specifies the data area to be written, in hexadecimal, as shown in the following table. Setting 01 Hex IR Area 1 (CIO) 02 Hex IR Area 2 (CIO) 03 Hex Data Memory Area (DM or D) 04 Hex LR Area 05 Hex 06 Hex HR Area (HR or H) C200HX/HG/HE AR Area (-Z) CS1H/G Holding Area (H) 07 Hex C200HX/HG/HE Timer/Counter (-Z) Area (TIM/CNT) CS1H/G Timer Area (T) 08 Hex Area EM Area (bank 0 only) Word range Write Area: IR 000 to IR 235 Read Area: IR 000 to IR 235 IR 300 to IR 511 DM 0000 to DM 4095 (C200HE-CPU11-E only) DM 0000 to DM 5999 (All except C200HE-CPU11-E) LR 00 to LR 63 HR 00 to HR 99 AR 00 to AR 27 (Can be set for Read Area only) H100 or H102 to H127 (Specify the starting word with 00 Hex or 02 to 1B Hex.) TIM/CNT 000 to TIM/CNT 511 T 000 to T 511 EM 0000 to EM 6143 Address L, Address H (Command) The address in hexadecimal of the first word of data to be written. Address L: Rightmost 2 digits of the address in 4-digit hexadecimal. Address H: Leftmost 2 digits of the address in 4-digit hexadecimal. Write Data (Command) Specify the data to be written to the specified area and words from word H (leftmost byte: bits 08 to 15) to word L (rightmost byte: bits 00 to 07). If an odd number of read bytes have been specified, the last byte of data moves into word H. No. of Received Bytes (Response) The number of bytes received from the source node address is returned in hexadecimal. Source Node Address (Response) The node address of the C200H I/O Link Unit that returned the response is returned in hexadecimal. Note Actual addresses for Address H and Address L and actual number of bytes to be written differ according to the model of PLC to which the C200H I/O Link 246 Section 6-1 C200H I/O Link Units Unit is mounted and the memory area. Be sure to specify bytes within the data area range. WORD DATA READ WORD DATA READ will read data from any area of the CPU Unit of the PLC to which the C200H I/O Link Unit is mounted. Data is returned from the rightmost byte to the leftmost byte. Command Block Class ID Address L No. of read words Service code Destination node address Address H Instance ID Response Block Service code Word data H Word data H Word data L Word data L Source node address Read data (Maximum: 200 bytes) No. of received bytes Parameters Destination Node Address (Command) The node address of the C200H I/O Link Unit reading the data, in single-byte (2-digit) hexadecimal. Service Code (command, response) In the command, ID Hex is specified. In the response, the leftmost bit is turned ON and 9D Hex is returned. Class ID (Command) Always 2F Hex. Instance ID (Command) Specifies the data area to be read, in hexadecimal as shown in the following table. Setting Area 01 Hex IR Area 1 (CIO) 02 Hex IR Area 2 (CIO) 03 Hex Data Memory Area (DM or D) 04 Hex LR Area 05 Hex 06 Hex HR Area (HR or H) C200HX/HG/HE AR Area (-Z) CS1H/G Holding Area (H) Word range Write Area: IR 000 to IR 235 Read Area: IR 000 to IR 235 IR 300 to IR 511 DM 0000 to DM 4095 (C200HE-CPU11-E only) DM 0000 to DM 5999 (All except C200HE-CPU11-E) LR 00 to LR 63 HR 00 to HR 99 AR 00 to AR 27 (Can be set for Read Area only) H100 or H102 to H127 (Specify the starting word with 00 Hex or 02 to 1B Hex.) 247 Section 6-1 C200H I/O Link Units Setting 07 Hex 08 Hex Area C200HX/HG/HE Timer/Counter (-Z) Area (TIM/CNT) Word range TIM/CNT 000 to TIM/CNT 511 CS1H/G Timer Area (T) EM Area (bank 0 only) T 000 to T 511 EM 0000 to EM 6143 Address L, Address H (Command) The address in hexadecimal of the first word of data to be read. Address L: Rightmost 2 digits of the address in 4-digit hexadecimal. Address H: Leftmost 2 digits of the address in 4-digit hexadecimal. When specifying a Holding Area word (H100 or H102 to H127) in a CS1H/G PLC, specify the first word in hexadecimal with 0000 Hex for H100 or 0002 to 001B Hex for H102 to H127. No. of read words (Command) The number of words of read data, in single-byte (2-digit) hexadecimal. The specified range is 01 to 64 Hex (1 to 100 in decimal). No. of received bytes (Response) The number of bytes received from the destination node address is returned in hexadecimal. Source node address (Response) The node address of the C200H I/O Link Unit that returned the response is returned in hexadecimal. Read data (Response) The specified area type, words, and number of bytes of data are returned from word L (rightmost byte: bits 0 to 7) to word H (leftmost byte: bits 8 to 15). Note Actual addresses for Address H and Address L and actual number of bytes to be read differ according to the model of PLC to which the C200H I/O Link Unit is mounted and the memory area. Be sure to specify data bytes within the data area range. WORD DATA WRITE WORD DATA WRITE will write data to any area of the CPU Unit of the PLC to which the C200H I/O Link Unit is mounted. Write data is specified from the rightmost byte to the leftmost byte. Command Block Class ID Word data L Address L Service code Word data H Destination node address Instance ID Address H Word data L Word data H Write data (Maximum 200 bytes) Response Block Service code Source node address No. of received bytes 248 Section 6-1 C200H I/O Link Units Parameters Destination Node Address (Command) The node address of the C200H I/O Link Unit writing the data, in single-byte (2-digit) hexadecimal. Service Code (Command, Response) In the command, IF Hex is specified. In the response, the leftmost bit is turned ON and 9F Hex is returned. Class ID (Command) Always 2F Hex. Instance ID (Command) Specifies the data area to be written in hexadecimal as shown in the following table. Setting 01 Hex IR Area 1 (CIO) 02 Hex IR Area 2 (CIO) 03 Hex Data Memory Area (DM or D) 04 Hex LR Area 05 Hex 06 Hex HR Area (HR or H) C200HX/HG/HE AR Area (-Z) CS1H/G Holding Area (H) 07 Hex C200HX/HG/HE Timer/Counter (-Z) Area (TIM/CNT) CS1H/G Timer Area (T) 08 Hex Area EM Area (bank 0 only) Word range Write Area: IR 000 to IR 235 Read Area: IR 000 to IR 235 IR 300 to IR 511 DM 0000 to DM 4095 (C200HE-CPU11-E only) DM 0000 to DM 5999 (All except C200HE-CPU11-E) LR 00 to LR 63 HR 00 to HR 99 AR 00 to AR 27 (Can be set for Read Area only) H100 or H102 to H127 (Specify the starting word with 00 Hex or 02 to 1B Hex.) TIM/CNT 000 to TIM/CNT 511 T 000 to T 511 EM 0000 to EM 6143 Address L, Address H (Command) The address in hexadecimal of the first word of data to be written. Address L: Rightmost 2 digits of the address in 4-digit hexadecimal. Address H: Leftmost 2 digits of the address in 4-digit hexadecimal. When specifying a Holding Area word (H100 or H102 to H127) in a CS1H/G PLC, specify the first word in hexadecimal with 0000 Hex for H100 or 0002 to 001B Hex for H102 to H127. Write Data (Command) Specify the data to be written to the specified area and words from word H (leftmost byte: bits 08 to 15) to word L (rightmost byte: bits 00 to 07). No. of Received Bytes (Response) The number of bytes received from the source node address is returned in hexadecimal. Source Node Address (Response) The node address of the C200H I/O Link Unit that returned the response is returned in hexadecimal. Note Actual addresses for Address H and Address L and actual number of words to be written differ according to the model of PLC to which the C200H I/O Link 249 Section 6-1 C200H I/O Link Units Unit is mounted and the memory area. Be sure to specify bytes within the data area range. Error Response When there is an error in the explicit command, the C200H I/O Link Unit will return an error response as illustrated below. Response Block General error code Additional error code (FF Hex: fixed) Source node address No. of received bytes Parameters No. of Received Bytes (Response) The number of bytes received from the source node address is returned in hexadecimal. Source Node Address (Response) The node address of the C200H I/O Link Unit that returned the response is returned in hexadecimal. General Error Code (Response) The error code is returned in single-byte (2-digit) hexadecimal, as shown in the following table. Error code 08 Hex Name Service not supported 15 Hex Too much data 13 Hex Not enough data 20 Hex Invalid parameter 11 Hex Reply data too large 16 Hex Object does not exist Details There is an error in the service code. There is too much data. (The data specified by the data write command exceeds the area range.) There is not enough data (e.g., an odd number of bytes of data was specified for the WORD DATA WRITE command). An error was made specifying the word address. The data specified by the data read command exceeds the area range. There is an error in the Class ID or Instance ID. Additional Error Code (Response) Always FF Hex. 6-1-9 Using Explicit DeviceNet Messages Using CMND to Read Data (CS-series and CV-series) In the following example, the CMND instruction is used to read words CIO 010 to CIO 029 (20 words) on the Slave Unit, from the Master in a CS-series or CV-series PLC. Note If a CS-series PLC is being used, this example is applicable only when a CSseries Master Unit is mounted. Use the IOWR instruction when a C200HX/ 250 Section 6-1 C200H I/O Link Units HG/HE or C200HS Master Unit is mounted. In this case, refer to the DeviceNet Master Unit Operation Manual for details on using the IOWR instruction. For more detailed information on explicit messages, refer to the DeviceNet Master Unit Operation Manual. For information on the CMND instruction, refer to the PLC’s Operation Manual or Programming Manual. Example Conditions Master node address: 63 Slave network address: 1 Slave node address: 2 Example: Using the CMND Instruction Command Words (S: First Command Word) Word Contents (Hex) Meaning S 28 01 S+1 02 1C EXPLICIT MESSAGE SEND command code: 28 01 Hex Slave node address: 2 BYTE DATA READ command service code: 1C Hex S+2 S+3 00 2F 00 01 Class ID: 002F Hex Instance ID: For IR Area 1: 0001 Hex S+4 0A 00 S+5 28 00 Read start address: 10 = 000A Hex Address L: 0A Hex, Address H: 00 Hex No. of bytes of read data: 40 bytes = 28 Hex (The rightmost byte is not used.) D: Response Words (D: First Response Word) Results are stored as shown in the following table. Word D Contents (Hex) 28 01 Meaning EXPLICIT MESSAGE SEND command code: 28 01 Hex Response code (0000 Hex: Normal completion) D+1 00 00 D+2 00 2A No. of received bytes (data length after D+3): 42 bytes D+3 02 9C Slave node address: 2 BYTE DATA READ response service code: 9C Hex D+4 HH LL to to D+23 HH LL Data read from the Slave’s IR10 to IR29. When the BYTE DATA READ command is used from an OMRON Master, data is stored in the Master in the same sequence as the Slave; leftmost byte to rightmost byte. Control Words (C: First Control Word) Word Contents (Hex) Meaning C 00 08 No. of bytes of command data: 11 bytes of command data, S C+1 00 30 C+2 00 01 No. of bytes of response data: 48 bytes of response data, D Destination node network address: 1 251 Section 6-1 C200H I/O Link Units Word Using CMND to Write Data (CS-series and CV-series) C+3 Contents (Hex) 3F FE Meaning Master’s node address: 63 Master’s Unit address: FE Hex C+4 00 00 Response returned, communications port No.: 0, No. of retries: 0 C+5 00 64 Response monitoring time: 10 s In the following example, the CMND instruction is used to write data to words CIO 10 to CIO 29 (20 words) on the Slave Unit from the Master in a CS-series or CV-series PLC. Note If a CS-series PLC is being used, this example is applicable only when a CSseries Master Unit is mounted. Use the IOWR instruction when a C200HX/ HG/HE or C200HS Master Unit is mounted. In this case, refer to the DeviceNet Master Unit Operation Manual for details on using the IOWR instruction. For more detailed information on explicit messages, refer to the DeviceNet Master Unit Operation Manual. For information on the CMND instruction, refer to the PLC’s Operation Manual or Programming Manual. Example Conditions Master node address: 63 Slave network address: 1 Slave node address: 2 Example: Using the CMND Instruction Command Words (S: First Command Word) S Word Contents (Hex) 28 01 Meaning EXPLICIT MESSAGE SEND command code: 28 01 Hex S+1 02 1E S+2 00 2F Slave node address: 2 BYTE DATA WRITE command service code: 1E Hex Class ID: 002F Hex S+3 S+4 00 01 0A 00 S+5 HH LL to to S+24 HH LL Instance ID: For IR Area 1: 0001 Hex Write start address: 10 = 000A Hex Address L: 0A Hex, Address H: 00 Hex Data written to the Slave’s IR10 to IR29. When the BYTE DATA WRITE command is used from an OMRON Master, data is written to the Slave in the same sequence it is stored in the Master; leftmost byte to rightmost byte. D: Response Words (D: First Response Word) Results are stored as shown in the following table. Word 252 Contents (Hex) Meaning D 28 01 EXPLICIT MESSAGE SEND command code: 28 01 Hex D+1 00 00 Response code (0000 Hex: Normal completion) Section 6-1 C200H I/O Link Units D+2 Word Contents (Hex) 00 02 Meaning No. of received bytes (data length after D+3): 2 bytes D+3 02 9E Slave node address: 2 BYTE DATA WRITE response service code: 9E Hex Control Words (C: First Control Word) Word Using the IOWR Instruction to Read Data (C200HX/HE PLCs) C Contents (Hex) 00 32 C+1 00 08 C+2 C+3 00 01 3F FE C+4 00 00 C+5 00 64 Meaning No. of bytes of command data: 50 bytes of command data, S No. of bytes of response data: 8 bytes of response data, D Destination node network address: 1 Master’s node address: 63 Master’s Unit address: FE Hex Response returned, communications port No.: 0, No. of retries: 0 Response monitoring time: 10 s n the example, the IOWR instruction is used to read words IR 010 to IR 029 (20 words) on the Slave Unit, and store them in the Master (C200HX/HG/HE PLCs) from DM 2000 onwards. For more detailed information on explicit messages, refer to the DeviceNet Master Unit Operation Manual. For information on the IOWR instruction, refer to the SYSMAC C200HX/HG/HE PLCs Operation Manual. Example Conditions Master node address: 63 Master’s Unit address: 0 Slave node address: 2 Example: Using the IOWR Instruction C: Control Words (C: First Control Word) Word C Contents (Hex) 3F FE Meaning Master’s node address: 63 Master’s Unit address: FE Hex Source Words (S: First Source Word) Word S Contents (Hex) 82 07 Meaning Response storage words: DM2000 82 Hex: DM Area, 0700 Hex: 2000 words (For more detail, refer to the PLC Operation Manual.) S+1 D0 00 S+2 00 64 Response monitoring time: 10 s S+3 00 0B No. of bytes of command data: 11 bytes (No. of bytes from S+4 onwards.) S+4 28 01 EXPLICIT MESSAGE SEND command code: 28 01 Hex S+5 02 1C Slave node address: 2 BYTE DATA READ response service code: 1C Hex S+6 00 2F Class ID: 002F Hex 253 Section 6-1 C200H I/O Link Units S+7 Word Contents (Hex) 00 01 Meaning Instance ID: For IR Area 1: 0001 Hex S+8 0A 00 S+9 28 00 Read start address: 10 = 000A Hex Address L: 0A Hex, Address H: 00 Hex No. of bytes of read data: 40 bytes = 28 Hex (The rightmost byte is not used.) D: Destination Information Results are stored as shown in the following table. Word D Contents (Hex) 00 10 (0 010) Meaning Master’s Unit address: 0, No. of words of command data: 10 words (specified in BCD) (No. of words from S onwards) Response Storage Words Results are stored as shown in the following table. Using the IOWR Instruction (C200HX/HG/ HE PLCs) to Write Data Word DM 2000 Contents (Hex) 28 01 DM 2001 00 00 DM 2002 00 2A DM 2003 02 9C DM 2004 to DM 2023 HH LL... Meaning EXPLICIT MESSAGE SEND command code: 28 01 Hex Response code (0000 Hex: Normal completion) No. of received bytes (data length after DM 2003): 42 bytes Slave node address: 2 BYTE DATA READ response service code: 9C Hex Data read from the Slave’s IR 010 to IR 029. When the BYTE DATA READ command is used from an OMRON Master, data is stored in the Master in the same sequence as the Slave; leftmost byte to rightmost byte. In the following example, the IOWR instruction is used to write data to words IR 010 to IR 029 (20 words) on the Slave Unit, from the Master (C200HX/HG/ HE PLCs). For more detailed information on explicit messages, refer to the DeviceNet Master Unit Operation Manual or for information on the IOWR instruction, refer to the SYSMAC C200HX/HG/HE PLCs Operation Manual. Example Conditions Master node address: 63 Master’s Unit address: 0 Slave node address: 2 Example: Using IOWR C: Control Words (C: First Control Word) Word C 254 Contents (Hex) 3F FE Meaning Master’s node address: 63 Master’s Unit address: FE Hex Section 6-1 C200H I/O Link Units Source Words (S: First Source Word) Word S Contents (Hex) 82 07 Meaning Response storage words: DM2000 82 Hex: DM Area, 0700 Hex: 2000 words (For more detail, refer to the PLC Operation Manual.) S+1 D0 00 S+2 00 64 Response monitoring time: 10 s S+3 00 32 No. of bytes of command data: 50 bytes (No. of bytes from S+4 onwards.) S+4 28 01 EXPLICIT MESSAGE SEND command code: 28 01 Hex S+5 02 1E Slave node address: 2 BYTE DATA WRITE response service code: 1E Hex S+6 S+7 00 2F 00 01 Class ID: 002F Hex Instance ID: For IR Area 1: 0001 Hex S+8 0A 00 Write start address: 10 = 000A Hex Address L: 0A Hex, Address H: 00 Hex S+9 to HH LL to S_28 HH LL Data written to the Slave’s IR10 to IR29. When the BYTE DATA WRITE command is used from an OMRON Master, data is written to the Slave in the same sequence it is stored in the Master; leftmost byte to rightmost byte. D: Destination Information Results are stored as shown in the following table. Word D Contents (Hex) 00 29 (0 029) Meaning Master’s Unit address: 0, No. of words of command data: 29 words (specified in BCD) (No. of words from S onwards) Response Storage Words Results are stored as shown in the following table. Word Contents (Hex) Meaning DM2000 28 01 EXPLICIT MESSAGE SEND command code: 28 01 Hex DM2001 00 00 DM2002 00 02 DM2003 02 9E Response code (0000 Hex: Normal completion) No. of received bytes (data length after DM2003): 2 bytes Slave node address: 2 BYTE DATA READ response service code: 9E Hex 255 Section 6-1 C200H I/O Link Units 6-1-10 Dimensions (With connector attached) Unit: mm DRT21 130 13 101 35 For dimensions of the Unit when mounted to a Backplane, refer to the SYSMAC C200HX/HG/HE PLC Operation Manual or the SYSMAC CS1G/H PLC Operation Manual. 6-1-11 Installing in a Control Panel The C200H I/O Link Unit must be mounted in the Backplane of a CS1H/G or C200HX/HG/HE PLC. The Unit mounts in the Backplane just like standard Units. Refer to the PLC’s Operation Manual or Installation Guide for details on mounting the Unit in the Backplane and installing the PLC in a control panel. Note The C200H I/O Link Unit uses work words in the PLC (CS1H/G or C200HX/ HG/HE) to exchange I/O data with the Master, so it isn’t necessary to wire an internal power supply, I/O power supply, or I/O lines. 6-1-12 C200H I/O Link Unit Application Examples This section explains the procedure for using explicit messages with a C200H I/O Link Unit. The following system configuration example is used in this example. When explicit messages are used with a C200H I/O Link Unit, the areas in the Slave’s PLC can be read or written. 256 Section 6-1 C200H I/O Link Units C200HW-DRM21-V1 Master Unit (node address 00, unit number 0) 24-V DC power supply C200HW-DRT21 I/O Link Unit (node address 07) C200HX PLC T-branch Tap Terminating Resistor T-branch Tap Reading Data from a Slave Terminating Resistor T-branch Tap With the following program, 10 words (20 bytes) of data is read from DM 1000 of the Slave (PLC to which C200H I/O Link Unit is mounted) when IR 00000 turns ON in the CPU Unit of the Master Unit. The data that is read is stored in the response storage words DM 0104 to DM 0113. Ladder Program 25315 BSET (71) #0000 00001 Clears the response storage words (DM 0100 to DM 0113) when the program starts or data reading starts. DM0100 DM0113 25315 MOV (21) #8200 DM0000 Response storage word: DM 0100 (82 Hex: DM; 0064 Hex: word 100; 00 Hex: Word data) MOV (21) #6400 DM0001 Response monitoring time: 10 s MOV (21) #0064 DM0002 Number of command data bytes: 12 bytes MOV (21) #000B DM0003 EXPLICIT MESSAGE SEND command code (FINS): 2801 Hex MOV (21) #2801 DM0004 Slave node address: 07 BYTE DATA READ command service code: 1C Hex MOV (21) #071C DM0005 257 Section 6-1 C200H I/O Link Units Class ID: 2F Hex MOV (21) #002F DM0006 Instance ID: DM Area (03 Hex) MOV (21) #0003 DM0007 First read address: 03E8 Hex (word 1000) MOV (21) #E803 DM0008 Number of bytes read: 20 bytes (10 words) MOV (21) #1400 DM0009 When IR 00000 turns ON, IR 00001 will turn ON for one cycle (as a differentiated bit). 00000 DIFU (13) 00001 When differentiated bit IR 00001 turns ON, the sequential processing control bit IR 03000 will turn ON. 00001 MOV (21) #0001 030 03000 10112 IOWR #00FE DM0000 When IR 03000 turns ON, the CPU Unit will check that IR 10112 (Unit number 0 Master's Message Communications Execution Enabled Flag) is ON, and message transmission will start. #0010 00FE: Master's node address 00, Master's unit address FE Hex #0000 DM 0000: Command data storage words 0010 Hex: Master's unit number 00, 10 command data words (BCD) 25506 MOV (21) 030 25506 MOV (21) #0001 030 If the Equals Flag is ON (writing to the Master has been completed normally), IR 03000 will be cleared (message transmission completed). If the Equals Flag is OFF (error in writing to the Master), IR 03000 will be turned ON, and the data will be transmitted again. END (01) Note When transmitting explicit messages from an OMRON Master Unit, specify 2 bytes each for the Class ID and the Instance ID. Response When data is read properly, the response will be stored as shown in the following table. 258 Words DM 0100 Contents (Hex) 28 01 Meaning EXPLICIT MESSAGE SEND command code is 28 01 Hex. DM 0101 00 00 Response code is 0000 Hex (normal completion). DM 0102 00 16 Number of bytes received (data length from word DM 0103 onwards) is 22 bytes. DM 0103 07 9C Slave node address is 07. BYTE DATA READ response service code is 9C Hex. DM 0104 to xx xx to Data read from word DM 1000 of Slave. --- DM 0113 xx xx Data read from word DM 1009 of Slave. Section 6-1 C200H I/O Link Units Writing Data to Slave With the following example, DM 0009 to DM 0018 in the Master’s CPU Unit are written to IR 000 to IR 009 (20 bytes) in the Slave (CPU Unit to which C200H I/O Link Unit is mounted) when IR 00002 turns ON in the CPU Unit of the Master Unit. Before IR 00002 turns ON at the Master Unit, make sure that the data to be written to the Slave is stored in DM 0009 to DM 0018. Ladder Program 25315 Clears the response storage words (DM 0100 to DM 0103) when the program starts or data writing starts. BSET(71) #0000 DM0100 00003 DM0103 25315 MOV(21) #8200 DM1000 MOV(21) Response storage word: DM 0100 (82 Hex: DM; 0064 Hex: word 100; 00 Hex: Word data) #6400 DM1001 Response monitoring time: 10 s MOV(21) #0064 DM1002 Number of command data bytes: 30 bytes MOV(21) #001E DM1003 MOV(21) EXPLICIT MESSAGE SEND command code (FINS): 2801 Hex #2801 DM1004 MOV(21) Slave node address: 07 BYTE DATA READ command service code: 1E Hex #071E DM1005 Class ID=2F Hex MOV(21) #002F DM1006 Instance ID: IR Area 1 (01 Hex) MOV(21) #0001 DM1007 First write address: 0000 Hex (word 000) MOV(21) #0000 DM1008 00002 DIFU(13) When IR 00002 turns ON, IR 00003 will turn ON for once cycle (as differentiated bit). 00003 When IR 00003 turns ON, the sequential processing control bit IR 04000 will turn ON. 00003 MOV(21) #0001 040 259 Section 6-2 RS-232C Units 04000 10112 IOWR #00FE DM1000 #0019 When IR 04000 turns ON, the CPU Unit will check that IR 10112 (Unit number 0 Master's Message Communications Execution Enabled Flag) is ON, and message transmission will start. 00FE: Master's node address 00, Master's unit address FE Hex DM 1000: Command data storage words 25506 MOV(21) #0000 040 25506 MOV(21) #0001 040 0019 Hex: Master's unit number 00, 19 command data words (BCD) If the Equals Flag is ON (writing to the Master has been completed normally), IR 04000 will be cleared (message transmission completed). If the Equals Flag is OFF (error in writing to the Master), IR 04000 will be turned ON, and the data will be transmitted again. END(01) Note When transmitting explicit messages from an OMRON Master Unit, specify 2 bytes each for the Class ID and the Instance ID. Response When data is written properly, the response will be stored as shown in the following table. Words 6-2 Contents (Hex) Meaning DM 0100 28 01 EXPLICIT MESSAGE SEND command code is 28 01 Hex. DM 0101 00 00 DM 0102 00 02 DM 0103 07 9E Response code is 0000 Hex (normal completion). Number of bytes received (data length from word DM 0103 onwards) is 2 bytes. Slave node address is 07. BYTE DATA READ response service code is 9E Hex. RS-232C Units The RS-232C Unit is a Special I/O Unit that uses the DeviceNet Network to exchange I/O between the Master Unit and an RS-232C port. Explicit messages are used to set the Unit and perform I/O. There are two RS-232C ports which can be used separately with the RS-232C Unit. 6-2-1 Communications Cable Connections Wire communications cables to the RS-232C Unit using the standard Square Connectors, just like General-purpose Slaves. This section does not explain how to connect communications cables. For details on connecting the cables, refer to 4-2 Connecting Communications Cables to General-purpose Slaves. 6-2-2 Node Address and Baud Rate Settings This section describes the Slaves’ node address setting and baud rate setting. These settings are made using the following pins on the DIP switch. 260 Section 6-2 RS-232C Units Pins 1 through 6 Pins 7 and 8 ON Node address setting: Baud rate setting: 1 2 3 4 5 6 7 8 9 10 Reserved (Always OFF.) Node address setting Baud rate setting Node Address Settings Each Slave’s node address is set with pins 1 through 6 of the Slave’s DIP switch. Any node address within the setting range can be used as long as it isn’t already set on another node. Pin 6 DIP switch setting Pin 5 Pin 4 Pin 3 Pin 2 Pin 1 Node address 0 0 0 0 0 0 0 0 0 0 0 0 0 0 1 0 (default) 1 0 1 0 2 : : Note : : 1 1 1 1 0 1 61 1 1 1 1 1 1 1 1 1 1 0 1 62 63 1. Refer to Appendix A Node Address Settings Table for a complete table of DIP switch settings. 2. The Slave won’t be able to participate in communications if the same node address is used for the Master or another Slave node (node address duplication error). Baud Rate Setting Pins 7 and 8 are used to set the baud rate as shown in the following table. (These pins are factory-set to OFF.) Pin settings Pin 7 Note Baud rate Pin 8 OFF OFF 125 kbps (factory setting) ON OFF OFF ON 250 kbps 500 kbps ON ON Not allowed. 1. Always turn OFF the Slave’s power supply (including the communications power supply) before changing the baud rate setting. 2. Set the same baud rate on all of the nodes (Master and Slaves) in the Network. Any Slaves with baud rates different from the Master’s rate won’t be able to participate in communications, and may cause communications errors to occur between nodes with correct baud rate settings. 261 Section 6-2 RS-232C Units 6-2-3 Specifications General Specifications Item Models Specification DRT1-232C2 Input points Inputs: 2 ports max. (One word is used in the IN Area to detect the communications status.) Communications power 11 to 25 V DC supply voltage (Supplied from the communications connector.) Internal power supply voltage 20.4 to 26.4 V DC (24 V DC, –15 to +10%) Current consumption Communications: 50 mA max. Internal circuits: 100 mA max. Noise immunity Internal power supply normal: ±600 V Internal power supply common: ±1.5 kV Pulse width: 0.1 to 1 µs Pulse rise time: 1 ns (via noise simulator) Vibration resistance 10 to 150 Hz, 1.0-mm double amplitude or 69 m/s2 Shock resistance 200 m/s2 Dielectric strength Ambient temperature 500 V AC, 50/60 Hz for 1 min, leakage current: 1 mA max. (between DC power supply and FG) 20 MΩ min. at 100 V DC (between DC power supply and FG) –10 to 55°C Ambient humidity Operating atmosphere 25% to 85% (with no condensation) No corrosive gases Storage temperature Mounting –25 to 65°C M4 screw mounting or DIN 35-mm track mounting Mounting strength 100 N Track direction: 10 N Terminal strength Weight 100 N 250 g max. Insulation resistance RS-232C Communications Specifications Item 262 Specification Communications method All dual communications, Start-stop synchronization Baud rate Transmission code 19,200/9,600/4,800/2,400/1,200 bps ASCII (7-bit), JIS (8-bit) Parity No. of stop bits Even, odd, none 1 or 2 bits RS-232C ports Connectors 2 ports D-sub 9-pin connector for 2 ports Transmission memory capacity Frame length 1,024 bytes for 2 ports Header code Enable/disable (Header code: 1 byte when enabled.) Delimiter code Enable/disable (Delimiter code: 1 byte when enabled.) 1,024 bytes max. (FIFO) Section 6-2 RS-232C Units Item Flow control Transmission distance 6-2-4 Specification Enable/Disable (RS/CS control only) Flow Control Enabled The RS (Request Send) signal is normally ON, but it turns OFF when the receive buffer reaches 75% of capacity. CS is always checked. Flow Control Disabled The RS (Request Send) signal is always ON. The Receive Buffer Overflow Flag turns ON if the receive buffer overflows. CS is always checked. Note: The CS signal is always checked. Data will not be output if CS is not connected. Short-circuit the RS-CS signals when they are not used. 15 m max. Components RS-232C connector Indicators port 1 RS-232C connector port 2 Power supply DIP switch (Refer to page 260.) terminal Pins 1 to 6: Node address Communications connector Pins 7 and 8: Baud rate Pins 9 and 10: Reserved (Always OFF) Indicators The indicators display the status of the RS-232C Unit and the network. Indicator Color MS Green (Module status) Red --- ON Status Normal Meaning The Unit is operating normally. Flashing Settings incomplete Settings are being read. ON Fatal error Flashing Non-fatal error No power supply A fatal error (hardware error) has occurred. A non-fatal error, such as a switch setting error, has occurred. Unit error, power is not being supplied, the Unit is being reset, or waiting for initial processing to start. OFF 263 Section 6-2 RS-232C Units Indicator Color NS Green (Network status) ON Flashing Red ON Flashing --- OFF ERR Red ON RD1 Orange OFF ON RD2 SD2 Orange Orange Orange Offline/communications connection not yet established Fatal communications error The Network is normal, but the communications connection is not established. Non-fatal communications error Offline/ power OFF Unit error A fatal communications error has occurred. Network communications are not possible. Check for a node address duplication or Bus Off error. A communications error with the Master Unit has occurred. The power supply to the Master Unit is not ON, etc. Unit hardware error. Unit hardware is normal. Data is being received at RS-232C port 1. No data is being received at RS-232C port 1. ON Port 1 transmitting Data is being transmitted from RS-232C port 1. OFF Port 1 not transmitting No data is being transmitted from RS-232C port 1. ON Port 2 receiv- Data is being received at ing RS-232C port 2. OFF Port 2 not receiving Port 2 transmitting Port 2 not transmitting ON OFF 264 Meaning Normal Network status (Communications connection established.) Normal Port 1 receiving Port 1 not receiving OFF SD1 Status Online/communications connection established No data is being received at RS-232C port 2. Data is being transmitted from RS-232C port 2. No data is being transmitted from RS-232C port 2. Section 6-2 RS-232C Units 6-2-5 Word Allocations for Communications Status The RS-232C Unit is allocated one word (16 points) in the IN Area of the Master Unit. This word is configured as illustrated in the following diagram, and is used to communicate the communications status of RS-232C ports 1 and 2 to the Master Unit. Port 2 status Port 1 status Bit Bits 0, 8: Transmission Ready Flag Bits 1, 9: System Parameter Setup Error Flag Bits 2, 10: Receiving Flag Bits 3, 11: Received Flag Bits 4, 12: Parity Error Flag Bits 5, 13: Overrun Error Flag Bits 6, 14: Framing Error Flag Bits 7, 15: Receive Buffer Overflow Flag 0 Bit 8 Name Transmission Ready Flag Function 1 9 PLC Setup Error Flag 0: System parameter setup normal 1: System parameter setup error 2 10 Receiving Flag 0: No data is being received 1: Data is being received 3 11 Received Flag 0: No data in the reception buffer 1: Data in the reception buffer When reading data from other ports (RECEIVE READ DATA command), check to make sure this bit is 1 (ON) before starting. 4 12 Parity Error Flag 5 13 6 14 7 15 0: Transmitting data 1: Transmission enabled (no data transmitted) When writing data to other ports (SEND command), check to make sure this bit is 1 (ON) before starting. 0: No parity error 1: Parity error When a parity error occurs, make sure that the parity setting for the RS-232C Unit and the RS232C device are the same. Overrun Error Flag 0: No overrun error 1: Overrun error When an overrun error occurs, make sure that the baud rate setting for the RS-232C Unit and the RS-232C device are the same. Framing Error Flag 0: No framing error 1: Framing error When a framing error occurs, make sure that the character format setting (data length, parity, No. of stop bits) for the RS-232C Unit and the RS232C device are the same. Receive Buffer 0: No overflow in the reception buffer Overflow Flag 1: Reception buffer overflow (Not possible to read receive data) When the reception buffer overflows it is necessary to either reset or restart the RS-232C Unit, or reset (initialize) the RS-232C port at which the overflow occurred. 265 Section 6-2 RS-232C Units 6-2-6 Using the RS-232C Unit The RS-232C Unit is set and controlled using explicit DeviceNet messages or the DeviceNet Configurator. When the default communications settings for the RS-232C port are not used, the settings must be changed using explicit messages or the DeviceNet Configurator. Making Settings with Explicit Messages 1,2,3... The general operating procedure for the RS-232C Unit is as follows: 1. Turn ON the power to the Master Unit and all Slaves, including the RS232C Unit. 2. When necessary, explicit messages can be sent from the Master to set the parameters of the RS-232C ports 1 and 2 on the RS-232C Unit. Note a) Communications setting do not become effective even after the explicit message has been completed normally. For the settings to be effective, the RS-232C port must be reset using the PORT RESET command, or by restarting the RS-232C Unit. The previous settings will be in effect until the new settings are enabled. b) The communications settings are held internally by the RS-232C Unit, so once they have been set, they will not change when the Unit is turned OFF or reset, and once set, it is not necessary to set the parameters again, unless there are changes to be made. 3. Register the RS-232C Unit in the Master’s scan list. There are two methods of registering on the scan list. • Turn ON the Enable Scan List software switch on the Master Unit. • Create a scan list and registering the Unit using a DeviceNet Configurator. For further details on Master Unit operations, refer to the DeviceNet Master Unit Operation Manual or the DeviceNet Configurator Operation Manual. 4. When necessary, explicit messages can be sent from the Master to control the flow of data through the RS-232C ports 1 and 2 on the RS-232C Unit. Note a) When sending or receiving data through ports 1 and 2, it is necessary to check the status word allocated to the RS-232C Unit for communications status in the Master’s IN Area. b) Ports 1 and 2 can send and receive data independently but because the RS-232C Unit itself can only process one explicit message at a time, even if the SEND/RECV commands to be sent are for another port, always make sure that the previous explicit message has been processed before sending the next message. Making Settings with the DeviceNet Configurator 1,2,3... The communications settings can be made using the OMRON DeviceNet Configurator (version 2.@ or later). When using a version earlier than 2.@, contact your local sales office before use. (Version information can be confirmed from the Help Menu.) 1. Connect a DeviceNet Configurator to the DeviceNet Network and go online. 2. Turn ON the power to the RS-232C Unit. 266 Section 6-2 RS-232C Units 3. Locate the RS-232C Unit’s icon in the Network Configuration window and double click the icon. The Device Parameters Editing Window (Communications Settings parameter setting window) will be displayed. 4. Either double click on the Communications parameter that you want to change or select the desired parameter and press the Enter Key. It will become possible to change the parameter. 267 Section 6-2 RS-232C Units 5. Set or change parameters. • frame format Put check marks next to the items that you want to disable and press the Enter Key, or click another location in the window. • Data size Input the new value and press the Enter Key, or click another location in the window. • Settings other than frame format and Data size Select the desired parameter setting from the corresponding pull-down menu and press the Enter Key, or click another location in the window. (In this example, the character format is being set.) 268 Section 6-2 RS-232C Units 6. When the desired parameter changes and settings have been completed, click the Download Button. The edited parameters will be written to the RS-232C Unit. 7. Click the Reset Button to enable the edited parameters. A reset confirmation message will be displayed. Click the Yes button to confirm. Note 1. When exchanging data through ports 1 and 2, it is necessary to confirm the status of the data transfer (communications status) in the words allocated to the RS-232C Unit in the Master Unit’s Input Area. 2. It is possible to operate ports 1 and 2 independently, but the RS-232C Unit can process only one explicit message at a time. Even if you are going execute a send command or receive command for the other port, confirm that the previous explicit message processing has been completed before executing the next explicit message. 6-2-7 Explicit DeviceNet Messages Explicit DeviceNet messages sent from the Master Unit can be used to control the parameters of the RS-232C Unit’s ports 1 and 2 and to control the flow of data. The RS-232C Unit processes the commands received from the Master Unit and returns responses. Master RS-232C Unit Command Command Response 269 Section 6-2 RS-232C Units RS-232C Unit Explicit Message List The explicit messages that can be processed by the RS-232C Unit are as listed in the following table. For the RS-232C Unit, the service code and the Instance ID determine the processing content and object. The Class ID is always 0094 Hex. Explicit message PARAMETER SET Function Sets the parameters for an RS-232C port. Service code (See note) 10 Hex (90 Hex) Instance ID Page 01 Hex 272 PARAMETER READ Reads the parame- 0E Hex (8E Hex) 01 Hex ters set for an RS-232C port. 275 INITIALIZE PARAMETERS Initializes the parameters for an RS-232C port. 05 Hex (85 Hex) 01 Hex 276 RS-232C DATA SEND Transmits data from an RS-232C port. Reads data received by an RS-232C port. Resets an RS-232C port. When an error occurs in an explicit message (command), an error response is sent from the RS-232C Unit. 10 Hex (90 Hex) Port 1: 02 Hex Port 2: 03 Hex 276 0E Hex (8E Hex) Port 1: 02 Hex Port 2: 03 Hex 277 05 Hex (85 Hex) 278 RS-232C RECEIVE DATA READ PORT RESET Error response --- (94 Hex) Port 1: 02 Hex Port 2: 03 Hex --- 279 Note The parentheses indicate the response values. Explicit Message Format This section explains the common features of explicit commands and responses. Details and usage examples will only be provided however, for those explicit messages that the RS-232C Unit can process. For details on using explicit messages with a Master Unit, refer to the DeviceNet Operation Manual. The number of bytes designated for Class ID, Instance ID, and Attribute ID differ depending on the Master. When sent from an OMRON DeviceNet Master, Class ID and Instance ID are 2 bytes (4 digits), and Attribute ID is 1 byte (2 digits). For an example using this case, see 6-2-8 Using Explicit DeviceNet Messages. Command Block 00 94 Class ID Service Code Destination node address 151 bytes max. Instance ID Attribute ID Data Destination Node Address The node address of the RS-232C Unit controlled by the explicit message (command) in single-byte (2-digit) hexadecimal. 270 Section 6-2 RS-232C Units Service Code, Class ID, Instance ID, Attribute ID The parameters for specifying command, processing object, and processing content. For the RS-232C Unit, however, Class ID is always 94 Hex. Attribute ID is not necessary for some commands. If the specified codes and ID area are outside the permitted range, an error response will be returned (08FF Hex), and the command will not be executed. Data Data set when necessary. A maximum of 151 bytes can be set. Some commands do not require this data. Response Block • The normal response block is shown below. 1,024 bytes max. No. of received bytes Service code Data Source node address • The error response block is shown below. This response block is returned when an error occurs for an explicit message. Error code No. of received Service code bytes (94 Hex: Fixed) Source node address • If an explicit message fails (timeout etc.), an explicit message response will not be returned. When the command has been sent using the FINS command EXPLICIT MESSAGE SEND, only an FINS error response is returned. No. of Received Bytes The number of bytes received from the source node address is returned in hexadecimal. When an error response is returned for an explicit message, the number of bytes is 0004 Hex. Source Node Address The node address of the node from which the command was sent is returned in hexadecimal. Service Code For normal completion, the value when leftmost bit of the service code specified by the command is ON is stored as shown in the table below. Command service code Response service code 10 Hex 0E Hex 90 Hex 8E Hex 05 Hex 85 Hex When an error response is returned for an explicit message, the value is 94 Hex. 271 Section 6-2 RS-232C Units Data Data read when the PARAMETER EAD or RS-232C RECEIVE DATA READ commands are used. The maximum number of bytes is 1,024. Only a maximum of 152 bytes can be read using an OMRON DeviceNet Master. Be sure not to exceed the maximum of 152 bytes. Error Code The explicit message error code. For details see Error Response on page 279. PARAMETER SET Sets the parameters for the specified RS-232C port. Command Block 10 00 94 Class ID Service Code Destination node address 00 01 Instance ID Attribute ID Response Block No. of received Service code bytes Source node address 272 6 bytes max. Set values Section 6-2 RS-232C Units Parameters Attribute ID, Set Values (Command) The parameters and set values are set as shown in the following table. Port Port 1 Parameters Set all parameters Attribute ID 64 Hex Set values ALL PARAMETER SET (See below) Initial values Initial values for each parameter Data bit length, par- 65 Hex ity, No. of stop bits Specify the appropriate set values from the Data bit length: parameters in the table, as single-byte (2-digit) 7 bits hexadecimal. (See note.) Parity: Even No. of stop bits: 2 bits Header code 66 Hex enable/disable, delimiter code enable/disable, flow control enable/disable Specify bit data in single-byte (2-digit) hexadecimal, as shown in the following diagram. Baud rate Specified in single-byte (2-digit) hexadecimal as follows: 00 Hex: 1,200 bps 01 Hex: 2,400 bps 02 Hex: 4,800 bps 03 Hex: 9,600 bps 04 Hex: 19,200 bps 05 to 07 Hex: Not allowed Specifies the header code in single-byte (2digit) hexadecimal. 2,400 bps Specifies the delimiter code in single-byte (2digit) hexadecimal. 03 Hex (ETX code) 67 Hex Header code (only 68 Hex when header code is enabled) Delimiter code (only 69 Hex when delimiter code is enabled) No. of bytes 6A hex received after the delimiter (when the delimiter code is enabled) or the No. of bytes received per frame (when the delimiter code is disabled). Bit Always 0 Header code and delimiter code enabled, flow control disabled Header code: 0: Enabled 1: Disabled Delimiter code: 0: Enabled 1: Disabled Flow control (RS/CS control) 0: Enabled 1: Disabled 02 Hex (STX code) Specifies the number of bytes in single-byte (2- 00 Hex digit) hexadecimal. 273 Section 6-2 RS-232C Units Port Port 2 Parameters Set all parameters Attribute ID 6B Hex Set values ALL PARAMETER SET (See below) Initial values Initial values for each parameter Data bit length, par- 6C Hex ity, No. of stop bits Specify the appropriate set values from the parameters in the table, as single-byte (2-digit) hexadecimal). (See note.) Data bit length: 7 bits Parity: Even No. of stop bits: 2 bits Header code 6D Hex enable/disable, delimiter code enable/disable, flow control enable/disable Specify bit data in single-byte (2-digit) hexadecimal, as shown in the following diagram. Header code and delimiter code enabled, flow control disabled Baud rate 6E Hex Header code (only when header code is enabled) 6F Hex Bit Always 0 Header code: 0: Enabled 1: Disabled Delimiter code: 0: Enabled 1: Disabled Flow control (RS/CS control) 0: Enabled 1: Disabled Specified in single-byte (2-digit) hexadecimal as follows: 00 Hex: 1,200 bps 01 Hex: 2,400 bps 02 Hex: 4,800 bps 03 Hex: 9,600 bps 04 Hex: 19,200 bps 05 to 07 Hex: Not allowed Specifies the header code in single-byte (2digit) hexadecimal. 2,400 bps Delimiter code (only 70 Hex when delimiter code is enabled) Specifies the delimiter code in single-byte (2digit) hexadecimal. 03 Hex (ETX code) No. of bytes 71 hex received after the delimiter (when the delimiter code is enabled) or the No. of bytes received per frame (when the delimiter code is disabled). Specifies the number of bytes in single-byte (2- 00 Hex digit) hexadecimal. 02 Hex (STX code) Note Port 1 and 2 parameter settings for data bit length, parity, and No. of stop bits: Set value 274 Data bit length Parity No. of stop bits 00 Hex 01 Hex 7 7 Even Odd 1 1 02 Hex 03 Hex 7 7 None Even 1 2 04 Hex 05 Hex 7 7 Odd None 2 2 06 Hex 07 Hex 8 8 Even Odd 1 1 08 Hex 09 Hex 8 8 None None 1 2 0A Hex to 0F Hex 7 Even 2 Section 6-2 RS-232C Units ALL PARAMETER SET Writes all the Attribute ID set values to consecutive words, and transmits all the settings at the same time, as shown in the following diagram. Bit First word First word +1 First word +2 First word +3 Data bit length 65 Hex (6C Hex) Attribute code 64 Hex (6 B Hex) Header code enable/disable 66 Hex (6D Hex) Baud rate 67 Hex (6E Hex) Delimiter code 69 Hex (70 Hex) Header code 68 Hex (6F Hex) No. of bytes received after the delimiter /per frame 6A Hex (71 Hex) 00 Hex: Fixed Note The hexadecimal values displayed above are the set values for Attribute ID. The values in parentheses are the Attribute ID values for port 2 • The new set values will become effective if the PORT RESET command is sent or the RS-232C Unit is restarted after the command is completely normally. PARAMETER READ Reads the parameters set for the RS-232C port. If the PARAMETER SET command has not been sent, or the RS-232C Unit has not been reset, this command will read the previously set parameters, not the new settings. (The RS-232C port will also operate according to the previous settings.) Command Block 0E 00 94 Class ID Service Code Destination node address 00 01 Instance ID Attribute ID Response Block 6 bytes max. Service Set values No. of received code bytes Source node address Parameters Attribute ID (Command) Specifies the Attribute ID for reading the set values. For details on what to specify, see PARAMETER SET on page 272. It is also possible to specify all parameters at once (Port 1: 64 Hex, Port 2: 6B Hex). Set Values (Response) Reads the values that are set in Attribute ID and stores them. For details on the meaning of the stored values, see PARAMETER SET on page 272. 275 Section 6-2 RS-232C Units INITIALIZE PARAMETERS Initializes the parameters for the RS-232C Unit. Command Block 05 00 94 Class ID Service Code Destination node address 00 01 Instance ID Response Block No. of received bytes Service code Source node address Initializes all parameters set for the RS-232C Unit and returns the initial values. RS-232C DATA SEND Transmits data to the RS-232C Unit from the specified port. Command Block 10 00 94 Class ID Service Code Destination node address 00 ×× 64 151 bytes max. Instance ID Attribute ID Send data Response Block No. of received Service code bytes Source node address Parameters Instance ID (Command) Specifies the port to which the data is being sent, in hexadecimal as follows: 02 Hex: Port 1 03 Hex: Port 2 Send Data (Command) Specifies the data to be sent from the specified port. Word data is sent from the leftmost bits to the rightmost bits as shown in the following diagram. Bit First word First word +1 First word +2 Note 276 (1) (3) (5) (2) (4) (6) 1. When an odd number of bytes of data are sent, the last data will be set in the last word of the leftmost bits. Section 6-2 RS-232C Units 2. The number of bytes of data to be sent is specified when the parameters for the CMND(194) instruction (CV-series PLCs) or the IOWR instruction (C200HX/HG/HE PLCs) are set (No. of bytes of command data). It is not necessary to set this parameter for explicit messages. 3. Before using this command, be sure that the communications status Transmission Ready Flag (Port 1: bit 00, Port 2: bit 08), allocated in the Master’s IN Area is ON (transmission enabled). If the command is executed while the Flag is OFF (transmitting data), and error will occur (error code 02FF Hex). RS-232C RECEIVE DATA READ Receives data from the specified RS-232C Unit port, and reads the data stored in the reception buffer. Depending on whether or not the header code and delimiter code are enabled or disabled, the data read is treated as shown in the following table. (When the delimiter header is disabled, the number of bytes set in No. of bytes per frame is read.) Header code Disabled Delimiter code Disabled Data read The "No. of bytes per frame" is read from the RS-232C Unit's reception buffer, starting with the first word. First Second Third N bytes Disabled Enabled Disabled Second Second N-1 bytes Enabled Third Data from the RS-232C Unit's reception buffer is read, from the header code to the "No. of bytes per frame." In this case, the data before the header code is discarded First Enabled N bytes Data from the RS-232C Unit's reception buffer is read, from the first word to the delimiter code. (There is no limit to the amount of data read.) First Enabled N bytes N-1 bytes Third N-1 bytes Data from the RS-232C Unit's reception buffer is read, from the header code to the delimiter code. (There is no limit to the amount of data read.) In this case, the data before the header code is discarded. First Second Third Note H: Header code, D: Delimiter code, N: No. of bytes per frame, Shaded area: trashed data. The above explanation is very brief, but if the number. of bytes received after the delimiter code is set, data after the delimiter code can also be read. Command Block 0E 00 94 Class ID Service Code Destination node address 00 ×× 64 Instance ID Attribute ID 277 Section 6-2 RS-232C Units Response Block 1,024 bytes max. No. of received bytes Service code Receive data Source node address Parameters Instance ID (Command) Specifies the port that reads the reception buffer data in hexadecimal as follows: 02 Hex: Port 1 03 Hex: Port 2 Receive Data (Response) Stores the data read from the specified port’s reception buffer. The data is stored in words from the leftmost byte to the rightmost byte as shown in the following diagram. Bit (1) (3) (5) First word First word +1 First word +2 Note (2) (4) (6) 1. RS-232C ports 1 and 2 of the RS-232C Unit each have a reception buffer of 1,024 bytes, and up to a maximum of 1,024 bytes of data can be read from the Master at any given time. From an OMRON DeviceNet Master however, the maximum amount of data that can be read at one time is 152 bytes. Be sure to configure the data so that the 152-byte read data limit is not exceeded. 2. When data is read from an OMRON DeviceNet Master, the number of read bytes is stored as a CMND instruction (CV-series PLCs) or IOWR instruction (C200HX/HG/HE PLCs) parameter, so it will be requested. 3. When an odd number of bytes of data are sent, the last data will be set in the leftmost bits of the last word. 4. Before using this command, be sure that the communications status Received Flag (Port 1: bit 3, Port 2: bit 11) allocated in the Master’s IN Area is ON (data in the reception buffer). If the command is executed while the Flag is OFF (no data in the reception buffer), and error will occur (error code 1800 Hex). PORT RESET Resets the RS-232C Unit’s specified port. To change the parameter settings using the PARAMETER SET command, either reset the port using the PORT RESET command or restart the RS-232C Unit. Command Block 05 00 94 Class ID Service Code Destination node address 278 00 ×× Instance ID Section 6-2 RS-232C Units Response Block No. of received Service code bytes Source node address Parameters Instance ID (Command) Specifies the port to be reset, in hexadecimal as follows: 02 Hex: Port 1 03 Hex: Port 2 Note 1. When the port is reset, the transmission buffer and the reception buffers are cleared and the port’s status is initialized. The parameter settings, however, are maintained. 2. When an error occurs at a port, find the cause of the error and then use this command to reset the port. Error Response If there is an error in the explicit command, the RS-232C Unit will return an error response as illustrated below. Response Block No. of received bytes Error code Service code (94 Hex: fixed) Source node address Parameters No. of Received Bytes (Response) Always 0004 Hex. Source Node Address (Response) The node address of the node that sent the command is returned in hexadecimal. Error Code (Response) The error code is returned in double-byte (4-digit) hexadecimal, as shown in the following table. Error code 02FF Hex Error details The RS-232C port is transmitting data and therefore busy. Appropriate command RS-232C DATA SEND 08FF Hex The service code, Class ID, and Instance ID are not supported. All commands 09FF Hex Data formatting error. PARAMETER SET RS-232C DATA SEND 1800 Hex There is no receive data at the RS-232C RECEIVE DATA READ RS-232C port. There is a parameter setting error between RS-232C devices. 279 Section 6-2 RS-232C Units 6-2-8 Error code 1801 Hex Error details An error frame was received from a RS-232C device. Appropriate command RS-232C RECEIVE DATA READ 19FF Hex Write not possible due to a hardware error etc. PARAMETER SET Using Explicit DeviceNet Messages Using CMND to Change Settings (CS-series and CV-series) The following example shows how to use the CMND instruction to change all the parameters of port 1 of the RS-232C Unit at once from the Master Unit in a CS-series or CV-series PLC. Note If a CS-series PLC is being used, this example is applicable only when a CSseries Master Unit is mounted. Use the IOWR instruction when a C200HX/ HG/HE or C200HS Master Unit is mounted. In this case, refer to the DeviceNet Master Unit Operation Manual for details on using the IOWR instruction. For more detailed information on explicit messages, refer to the DeviceNet Master Unit Operation Manual. For information on the CMND instruction, refer to the PLC’s Operation Manual or Programming Manual. Example Conditions Master node address: 27 Slave network address: 2 Slave node address: 14 Example: Using the CMND Instruction Command Words (S: First Command Word) Word S+2 Contents (Hex) Meaning 28 01 EXPLICIT MESSAGE SEND command code: 28 01 Hex 0E 10 Slave node address: 14 PARAMETER SET command service code: 10 Hex 00 94 Class ID: 0094 Hex S+3 S+4 00 01 64 06 S+5 00 00 S+6 02 03 S+7 00 00 S S+1 Instance ID: 0001 Hex ALL PARAMETER SET Attribute ID: 64 Hex, (8 bits, even parity, 1 stop bit): 06 Hex Header code, delimiter code, and flow control all enabled: 00 Hex, 1,200 bps: 00 Hex. Header code STX: 02 Hex, Delimiter code ETX: 03 Hex. No. of bytes after delimiter = 0 (00 Hex) D: Response Words (D: First Response Word) Results are stored as shown in the following table. Word D D+1 280 Contents (Hex) Meaning 28 01 EXPLICIT MESSAGE SEND command code: 28 01 Hex 00 00 Response code (0000 Hex: Normal completion) Section 6-2 RS-232C Units D+2 Word Contents (Hex) Meaning 00 02 No. of received bytes (data length after D+3): 2 bytes D+3 0E 90 Slave node address: 14 PARAMETER SET response service code: 90 Hex Control Words (C: First Control Word) Word C C+1 Using CMND to Read Data (CS-series and CV-series) Contents (Hex) Meaning 00 0F No. of bytes of command data: S (15 bytes of command data) 00 08 No. of bytes of response data: D (8 bytes of response data) C+2 C+3 00 02 1B FE C+4 00 00 C+5 00 64 Destination node network address: 2 Master’s node address: 27 Master’s Unit address: FE Hex Response returned, communications port No.: 0, No. of retries: 0 Response monitoring time: 10 s The following example shows how to use the CMND instruction to read the RS-232C Unit’s port 1 reception data from the Master Unit in a CS-series or CV-series PLC. An OMRON DeviceNet Master can read a maximum of 152 bytes of data at a time. Note If a CS-series PLC is being used, this example is applicable only when a CSseries Master Unit is mounted. Use the IOWR instruction when a C200HX/ HG/HE or C200HS Master Unit is mounted. In this case, refer to the DeviceNet Master Unit Operation Manual for details on using the IOWR instruction. Before using the RS-232C RECEIVE DATA READ command, be sure that the communications status Received Flag (Port 1: bit 3, Port 2: bit 11), allocated in the Master’s IN Area is ON. For more detailed information on explicit messages, refer to the DeviceNet Master Unit Operation Manual. For information on the CMND instruction, refer to the PLC’s Operation Manual or Programming Manual. Example Conditions Master node address: 27 Slave network address: 2 Slave node address: 14 Example: Using the CMND Instruction Command Words (S: First Command Word) Word S+2 Contents (Hex) Meaning 28 01 EXPLICIT MESSAGE SEND command code: 28 01 Hex 0E 0E Slave node address: 14 RS-232C RECEIVE DATA READ command service code: 0E Hex 00 94 Class ID: 0094 Hex S+3 S+4 00 02 64 00 S S+1 Instance ID: Port 1 = 0002 Hex Attribute ID: 64 Hex 281 Section 6-2 RS-232C Units D: Response Words (D: First Response Word) Results are stored as shown in the following table. Word D+1 Contents (Hex) Meaning 28 01 EXPLICIT MESSAGE SEND command code: 28 01 Hex 00 00 Response code (0000 Hex: Normal completion) D+2 D+3 00 xx 0E 8E D+4 HH LL to to D No. of received bytes (data length after D+3) Slave node address: 14 RS-232C RECEIVE DATA READ response service code: 8E Hex The receive data read from RS-232C port 1 is stored in sequence from the leftmost bit to the rightmost bit. Control Words (C: First Control Word) Word C+1 Contents (Hex) Meaning 00 09 No. of bytes of command data: S (9 bytes of command data) 00 xx No. of bytes of response data: D C+2 C+3 00 02 1B FE Destination node network address: 2 Master’s node address: 27 Master’s Unit address: FE Hex C+4 00 00 Response returned, communications port No.: 0, No. of retries: 0 C+5 00 64 Response monitoring time: 10 s C Using IOWR to Write Data (C200HX/HG/HE PLCs) The following example shows how to use the IOWR instruction to change all the parameters of port 1 of the RS-232C Unit at once from the Master Unit (C200HX/HG/HE PLC). For more detailed information on explicit messages, refer to the Master Unit’s Operation Manual. For information on the IOWR instruction, refer to the SYSMAC C200HX/HG/HE PLCs Operation Manual. Example Conditions Master node address: 27 Master’s Unit address: 5 Slave node address: 14 Example: Using IOWR C: Control Words (C: First Control Word) Word C Contents (Hex) Meaning 1B FE Master’s node address: 27 Master’s Unit address: FE Hex Source Words (S: First Source Word) Word S S+1 282 Contents (Hex) Meaning 82 07 Response storage words: DM2000 82 Hex: DM Area, 07D0 Hex: 2000 words (For more detail, refer to the PLC Operation D0 00 Manual.) S+2 00 64 Response monitoring time: 10 s S+3 00 0F No. of bytes of command data: 15 bytes (No. of bytes from S+4 onwards.) Section 6-2 RS-232C Units S+4 Word Contents (Hex) Meaning 28 01 EXPLICIT MESSAGE SEND command code: 28 01 Hex S+5 0E 10 Slave node address: 14 PARAMETER SET response service code: 10 Hex Class ID: 0094 Hex S+6 00 94 S+7 S+8 00 01 64 06 Instance ID: For IR Area 1: 0001 Hex ALL PARAMETER SET Attribute ID: 64 Hex, (8 bits, even parity, 1 stop bit): 06 Hex. S+9 06 00 Header code, delimiter code, and flow control all enabled: 00 Hex, 1,200 bps: 00 Hex. S+10 02 03 Header code STX: 02 Hex, Delimiter code ETX: 03 Hex. S+11 00 00 No. of bytes after delimiter = 0 (00 Hex) D: Transmission Information (Destination Unit and Number of Words). Word D Contents (Hex) Meaning 05 12 Master’s Unit address: 5, No. of words of command data: 12 words (specified in BCD) (No. of words from S onwards) Response Storage Words Results are stored as shown in the following table. Word DM2000 Using IOWR to Read Data (C200HX/HG/HE PLCs) DM2001 Contents (Hex) Meaning 28 01 EXPLICIT MESSAGE SEND command code: 28 01 Hex 00 00 Response code (0000 Hex: Normal completion) DM2002 00 02 No. of received bytes (data length after DM2003): 2 bytes DM2003 0E 90 Slave node address: 14 PARAMETER SET response service code: 90 Hex The following example shows how to use the IOWR instruction to read the reception data of port 1 of the RS-232C Unit, from the Master Unit (C200HX/ HG/HE PLC). The maximum amount of data that can be read from an OMRON DeviceNet Master at one time is 152 bytes. Before using the RS-232C RECEIVE DATA READ command, be sure that the communications status Received Flag (Port 1: bit 03, Port 2: bit 11), allocated in the Master’s IN Area is ON. For more detailed information on explicit messages, refer to the Master Unit’s Operation Manual. For information on the IOWR instruction, refer to the SYSMAC C200HX/HG/HE PLCs Operation Manual. Example Conditions Master node address: 27 Master’s Unit address: 5 Slave node address: 14 Example: Using IOWR 283 Section 6-2 RS-232C Units C: Control Words (C: First Control Word) Word C Contents (Hex) Meaning 1B FE Master’s node address: 27 Master’s Unit address: FE Hex Source Words (S: First Source Word) Word S S+1 Contents (Hex) Meaning 82 07 Response storage words: DM2000 82 Hex: DM Area, 07D0 Hex: 2000 words (For more detail, refer to the PLC Operation D0 00 Manual.) S+2 00 64 Response monitoring time: 10 s S+3 00 09 No. of bytes of command data: 9 bytes (No. of bytes from S+4 onwards.) S+4 28 01 EXPLICIT MESSAGE SEND command code: 28 01 Hex S+5 0E 0E Slave node address: 14 RS-232C RECEIVE DATA READ response service code: 0E Hex S+6 S+7 00 94 00 02 Class ID: 0094 Hex Instance ID: For port 1: 0002 Hex S+8 64 00 Attribute ID: 64 Hex D: Transmission Information (Destination Unit and Number of Words). Word D Contents (Hex) Meaning 05 09 Master’s Unit address: 5, No. of words of command data: 9 words (specified in BCD) (No. of words from S onwards) Response Storage Words Results are stored as shown in the following table. Word DM2000 284 DM2001 Contents (Hex) Meaning 28 01 EXPLICIT MESSAGE SEND command code: 28 01 Hex 00 00 Response code (0000 Hex: Normal completion) DM2002 DM2003 00 xx 0E 8E DM2004 on HH LL... No. of received bytes (data length after D+3) Slave node address: 14 RS-232C RECEIVE DATA READ response service code: 8E Hex The receive data read from RS-232C port 1 is stored in sequence from the leftmost bit to the rightmost bit. Section 6-2 RS-232C Units 6-2-9 Dimensions Mounting holes Two, 4.2 dia. or M4 Unit: mm 6-2-10 Mounting in Control Panels Either of the following methods can be used to mount an RS-232C Unit in a control panel. Using Screws Drill mounting holes in the control panel according to the dimensions provided for mounting holes in the dimensions diagrams and then secure the RS-232C Unit with M4 screws. The appropriate tightening torque is 0.6 to 0.98 N⋅m. Using DIN Track Mount the back of the RS-232C Unit to a 35-mm DIN Track. To mount the Unit, pull down on the mounting hook on the back of the Unit with a screwdriver, insert the DIN Track on the back of the Unit, and then secure the Unit to the DIN Track. When finished, secure all Slaves on both ends of the DIN Track with End Plates. 285 Section 6-2 RS-232C Units Connecting End Plates Hook the bottom of the End Plate onto the DIN Track, as shown at (1) in the following diagram, then hook the top of the End Plate as shown at (2). 2 1 End Plate Note Always attach End Plate to both ends of Slaves connected to DIN Track. Mounting Direction Unless specific restrictions are given for the Slave, it can be mounted in any direction. Any of the following directions are okay. PORT1 Vertical PORT2 DRT1-232C2 RS232C UNIT SD2 No. No. RD2 SD2 PORT2 SD1 NS RD1 ERR PORT1 MS SD1 SD2 RD2 PORT1 PORT1 SD2 NS RS232C UNIT RD2 RD1 RS232C UNIT MS DRT1-232C2 ERR DRT1-232C2 SD1 PORT2 No. RD1 No. NS RD2 RS232C UNIT SD1 DRT1-232C2 RD1 ERR NS ERR MS MS PORT2 6-2-11 Wiring Internal Power Supply The recommended Power Supply Units are as follows: • S82K-05024 (OMRON) or equivalent. • S82J-@524 (OMRON) or equivalent. Source 24 V DC – + + – Internal power supply Note 1. Always use crimp terminals for wiring. 2. Do not connect wires directly to the terminals. 3. Tighten terminal screws to a torque of 0.3 to 0.5 N • m. 4. Use the following M3 crimp terminals. 6.0 mm max. 286 6.0 mm max. Section 6-2 RS-232C Units RS-232C Connector Pin Arrangement (Same for Ports 1 and 2) Pin No. Symbol Signal name Signal direction RS-232C Unit ↔ External devices 1 2 --RD Not used Receive data --← 3 4 SD --- Send data Not used → --- 5 6 SG --- Signal ground Not used ----- 7 8 RS CS Request send (See note.) Can send (See note.) → ← 9 --- Not used --- Note The CS signal is always checked. Data will not be output if CS is not connected. Short-circuit the RS-CS signals when they are not used. A connection example using applicable connectors and recommended cables is provided below. Refer to the following explanation when creating cables. Applicable Connectors Plug: XM2D-0901 (OMRON, 9-pin female) or equivalent. Hood: XM2S-0913 (OMRON, 9-pin inch-pitch screws) or equivalent. Recommended Cables UL2464 AWG28 × 5P IFS-RVV-SB (UL product, Fujikura) AWG28 × 5P IFVV-SB (Non-UL products, Fujikura) UL2464-SB 5P × AWG28 (UL product, Hitachi) CO-MA-VV-SB 5P × AWG28 (Non-UL product, Hitachi) Connection Example The following diagram gives an connection example. Connection methods however, may differ depending on the connected devices, so refer to the connected device’s instruction manual for further information. Connecting an OMRON V500-R32@ Bar Code Reader RS-232C Unit end Bar Code Reader end Abbreviation Pin No. Pin No. Abbreviation ----- RS-232C interface RS-232C interface ----------Hood metal (9-pin) (9-pin, male) Shield 287 Section 6-2 RS-232C Units 6-2-12 RS-232C Unit Application Examples This section explains the procedure for using explicit messages with an RS232C Unit. The following system configuration example is used in this example. When explicit messages are used with an RS-232C Unit, the communications conditions for ports 1 and 2 on the RS-232C Unit can be set individually, and data can be read or written to the RS-232C Unit. C200HW-DRM21-V1 Master Unit (node address 00, unit number 0) 24-V DC power supply C200HX PLC T-branch Tap Terminating Resistor T-branch Tap Terminating Resistor T-branch Tap Port 1 Port 2 DRT1-232C2 RS-232C Unit (node address 08) Bar Code Bar Code Reader 1 Reader 2 Setting Port Parameters When IR 00000 (port 1 settings) or IR 00001 (port 2 settings) turns ON in the CPU Unit of the Master Unit, the RS-232C Unit’s port parameters will be set. For details on Bar Code Reader settings, refer to the Bar Code Reader’s Operation Manual. Set the port parameters as follows: • Port 1 Parameters Data length: 8 bits Parity: None Stop bits: 1 Header code: Disabled Delimiter code: Enabled Flow control: Enabled Baud rate: 9,600 bps Delimiter code CR code: 0D Hex Number of bytes received after delimiter:0 • Port 2 Parameters 288 Data length: 7 bits Parity: Even Stop bits: 2 Header code: Enabled Delimiter code: Enabled Flow control: Disabled Baud rate: 2,400 bps Header code STX code: 02 Hex Section 6-2 RS-232C Units Delimiter code ETX code: 03 Hex Number of bytes received after delimiter:0 If any of the port parameters are changed, the changed settings will become valid only when the port is reset or the RS-232C Unit is started up again. In the following programming example, the ports are reset after the parameters are set. Ladder Program 25315 Clears the DM Area words being used when the program starts. BSET(71) #0000 DM0000 DM0999 Port 1 and 2 parameter setting common data 25315 MOV(21) #8200 DM0000 MOV(21) Response storage word: DM 0100 (82 Hex: DM; 0064 Hex: word 100; 00 Hex: Word data) #6400 DM0001 Response monitoring time: 10 s MOV(21) #0064 DM0002 Number of command data bytes: 15 bytes MOV(21) #000F DM0003 EXPLICIT MESSAGE SEND command code (FINS): 2801 Hex MOV(21) #2801 DM0004 Slave node address: 08 PARAMETER SET command service code: 10 Hex MOV(21) #0810 DM0005 Class ID: 94 Hex MOV(21) #0094 DM0006 Instance ID: 01 Hex MOV(21) #0001 DM0007 289 Section 6-2 RS-232C Units 25315 Port 1 and 2 resetting common data MOV(21) #8201 DM0400 MOV(21) Response storage words: DM 0450 (82 Hex: DM; 01C2 Hex: word 450; 00 Hex: Word data) #C200 DM0401 Response monitoring time: 10 s MOV(21) #0064 DM0402 Number of command data bytes: 8 bytes MOV(21) #0008 DM0403 MOV(21) EXPLICIT MESSAGE SEND command code (FINS): 2801 Hex #2801 DM0404 MOV(21) Slave node address: 08 RS-232C PORT RESET command service code: 05 Hex #0805 DM0405 Class ID: 94 Hex MOV(21) #0094 DM0406 25315 MOV(21) #6408 Port 1 parameter setting data ALL PARAMETER SET Attribute ID: 64 Hex 8-bit data length, no parity, 1 stop bit: 08 Hex DM0020 MOV(21) #0103 Disabled header code, enabled delimiter code, enabled flow control: 01 Hex 9,600-bps baud rate: 03 Hex DM0021 MOV(21) Delimiter code: CR code (0D Hex) #000D DM0022 MOV(21) Number of transmission bytes after delimiter: 0 #0000 DM0023 Port 2 parameter setting data MOV(21) #6B03 DM0024 MOV((21) #0401 DM0025 MOV(21) #0203 ALL PARAMETER SET Attribute ID: 6B Hex 7-bit data length, even parity, 2 stop bits: 03 Hex Enabled header code, enabled delimiter code, disabled flow control: 04 Hex 2,400-bps baud rate: 01 Hex Header code: STX code (02 Hex) Delimiter code: ETX code (03 Hex) DM0026 Number of transmission bytes after delimiter: 0 MOV(21) #0000 DM0027 290 Section 6-2 RS-232C Units 00000 00001 Writing data from port 1 to command data area XFER(70) #0004 DM0020 DM0008 When IR 00000 turns ON, data held at port 1 will be written to the command data area. MOV(21) #0002 DM0407 DIFU(13) 00002 00000 IR 00002 turned ON for one cycle (as a differentiated bit). Writing data from port 2 to command data area 00001 XFER(70) #0004 DM0024 DM0008 When IR 00001 turns ON, data held at port 2 will be written to the command data area. MOV(21) #0003 DM0407 IR 00003 turned ON for one cycle (as a differentiated bit). DIFU(13) 00003 00002 MOV(21) #0001 00003 When IR 00002 or IR 00003 turns ON, the sequential processing control bit IR 03000 will turn ON. 030 03001 IOWR #00FE DM0400 #0008 25506 MOV(21) #0002 When IR 03001 turns ON, the port reset message will be transmitted. 00FE: Master's node address 00, Master's unit address FE Hex DM 0400: Command data storage words 0008 Hex: Master's unit number 00, 8 command data words (BCD) If the Equals Flag is OFF (error in writing to the Master), IR 03001 will be turned ON, and the data will be transmitted again. 030 25506 MOV(21) #0000 030 03000 10112 MOV(21) #0000 030 IOWR If the Equals Flag is ON (writing to the Master has been completed normally), IR 03001 will be cleared (message transmission completed). When IR 03000 turns ON, the CPU Unit will check that IR 10112 (unit no. 0 Master's Message Communications Enabled Flag) is ON, and the ALL PARAMETER SET message is transmitted. 00FE: Master's node address 00, Master's unit address FE Hex DM 0000: Command data storage words #00FE DM0000 #0012 25506 MOV(21) #0001 030 25506 0012 Hex: Master's unit number 00, 12 command data words (BCD) If the Equals Flag is OFF (error in writing to the Master), IR 03001 will be turned ON, and the data will be transmitted again. If the Equals Flag is ON (writing to the Master has been completed normally), IR 03001 will be turned ON (the port will be reset). MOV(21) #0002 030 END(01) 291 Section 6-2 RS-232C Units Note 1. When transmitting explicit messages from an OMRON Master Unit, specify 2 bytes each for the Class ID and the Instance ID. Set 1 byte as the Attribute ID for the parameter setting command. 2. The parameters that are set are held internally. 3. To enable the parameters that have been set, the RS-232C PORT RESET command has been used in the program examples. The parameters can also be enabled, however, by turning OFF the power to the RS-232C Unit and then turning it ON again. Responses The following responses will be stored if the parameters are set properly. PARAMETER SET Response Words DM 0100 Contents (Hex) 28 01 DM 0101 00 00 DM 0102 00 02 DM 0103 08 90 Meaning EXPLICIT MESSAGE SEND command code is 28 01 Hex. Response code is 0000 Hex (normal completion). Number of bytes received (data length from word DM 0103 onwards) is 2 bytes. Slave node address is 08. PARAMETER SET response service code is 90 Hex. PORT RESET Response Words Contents (Hex) DM 0450 28 01 DM 0451 00 00 DM 0452 00 02 DM 0453 08 85 Meaning EXPLICIT MESSAGE SEND command code is 28 01 Hex. Response code is 0000 Hex (normal completion). Number of bytes received (data length from word DM 0453 onwards) is 2 bytes. Slave node address is 08. PORT RESET response service code is 85 Hex. 6-2-13 Reading RS-232C Unit Parameters With the following example, the port parameters that are set for the RS-232C Unit are all read for the port when IR 00004 (port 1) or IR 00005 (port 2) turns ON in the CPU Unit of the Master Unit. When the RS-232C Unit’s PARAMETER READ command is used, the parameters that are valid at that time will be read. After setting the parameters, the RS-232C Unit must be turned OFF and then ON again, or the ports must be reset for the new parameters to be enabled. 292 Section 6-2 RS-232C Units Ladder Program 25315 BSET(71) #0000 Clears all DM Area words being used when the program starts. M0000 DM0999 25315 MOV(21) #8200 DM0050 MOV(21) Response storage words: DM 0150 (82 Hex: DM; 0096 Hex: word 150; 00 Hex: Word data) #9600 DM0051 MOV(21) Response monitoring time: 10 s #0064 DM0052 MOV(21) Number of command data bytes: 9 bytes #0009 DM0053 MOV(21) #2801 EXPLICIT MESSAGE SEND command code (FINS): 2801 Hex DM0054 MOV(21) #080E Slave node address: 08 PARAMETER READ command service code: 0E Hex DM0055 Class ID: 94 Hex MOV(21) #0094 DM0056 MOV(21) Instance ID: 01 Hex #0001 DM0057 00004 00005 MOV(21) #6400 When IR 00004 turns ON, the ALL PARAMETER READ command for port 1 and Attribute ID (64 Hex) are written as command data. DM0058 00006 IR 00006 is turned ON for one cycle (as a differentiated bit). #6B00 When IR 00005 turns ON, the ALL PARAMETER READ command for port 2 and Attribute ID (6B Hex) are written as command data. DIFU(13) 00004 00005 MOV((21) DM0058 DIFU(13) 00007 IR 00007 is turned ON for one cycle (as a differentiated bit). When IR 00006 or IR 00007 turns ON, the sequential processing control bit IR 03100 turns ON. 00006 MOV(21) #0001 031 00007 293 Section 6-2 RS-232C Units 03100 10112 IOWR #00FE DM0050 When IR 03100 turns ON, the CPU Unit will check that IR 10112 (unit no. 0 Master's Message Communications Enabled Flag) is ON, and message transmission will start. #0009 25506 00FE: Master's node address 00, Master's unit address FE Hex MOV(21) #0000 031 25506 MOV(21) #0001 031 END(01) DM 0050: Command data storage words 0009 Hex: Master's unit number 00, 9 command data words (BCD) If the Equals Flag is ON (writing to the Master has been completed normally), IR 03101 will be cleared (message transmission completed). If the Equals Flag is OFF (error in writing to the Master), IR 03101 will be turned ON, and the data will be transmitted again. Note When transmitting explicit messages from an OMRON Master Unit, specify 2 bytes each for the Class ID and the Instance ID. Set 1 byte as the Attribute ID for the PARAMETER READ command. Response The following response will be stored if the parameters are read properly. Words DM 0150 Contents (Hex) 28 01 Meaning EXPLICIT MESSAGE SEND command code is 28 01 Hex. DM 0151 00 00 Response code is 0000 Hex (normal completion). DM 0152 00 08 Number of bytes received (data length from word DM 0153 onwards) is 8 bytes. DM 0153 08 8E Slave node address is 08. PARAMETER READ response service code is 8E Hex. DM 0154 xx xx DM 0155 xx xx Leftmost byte: Setting for the data bit length Rightmost byte: Setting for the header code enable/disable Leftmost byte: Setting for the baud rate Rightmost byte: Setting for the header code DM 0156 xx xx Leftmost byte: Setting for the delimiter code Rightmost byte: Setting for the number of bytes/frames received after the delimiter 6-2-14 Reading Data Received by RS-232C Unit Ports In the following example, the data received by the Bar Code Reader is stored in the receive buffer of the RS-232C Unit and read to the Master Unit. If there is data already in the receive buffer of the RS-232C Unit, it will be read to the Master Unit. Response data from port 1 is stored in DM 0300 onwards, and response data from port 2 is stored in DM 0350 onwards. In the following program example, however, the data received is no more than 50 words (100 bytes). 294 Section 6-2 RS-232C Units Ladder Program 25315 BSET(71) #0000 Clears all DM Area words being used when the program starts. DM0000 DM0999 25315 MOV(21) #8201 DM0200 Setting data for executing the RECEIVE DATA READ command for port 1 Response storage word: DM 0300 (82 Hex: DM; 012C Hex: word 300; 00 Hex: Word data) MOV(21) #2C00 DM0201 Response monitoring time: 10 s MOV(21) #0064 DM0202 Number of command data bytes: 9 bytes MOV(21) #0009 DM0203 MOV(21) #2801 EXPLICIT MESSAGE SEND command code (FINS): 2801 Hex DM0204 MOV(21) #080E Slave node address: 08 RECEIVE DATA READ command service code: 0E Hex DM0205 Class ID: 94 Hex MOV(21) #0094 DM0206 Port 1 RECEIVE DATA READ Instance ID: 02 Hex MOV(21) #0002 DM0207 Attribute ID: 64 Hex MOV(21) #6400 DM0208 295 Section 6-2 RS-232C Units 25315 Setting data for executing the RECEIVE DATA READ command for port 2 MOV(21) #8201 DM0250 MOV(21) Response storage words: DM 0350 (82 Hex: DM; 015E Hex: word 350; 00 Hex: Word data) #5E00 DM0251 Response monitoring time: 10 s MOV(21) #0064 DM0252 Number of command data bytes: 9 bytes MOV(21) #0009 DM0253 MOV(21) #2801 EXPLICIT MESSAGE SEND command code (FINS): 2801 Hex DM0254 MOV(21) #080E Slave node address: 08 RECEIVE DATA READ command service code: 0E Hex DM0255 Class ID: 94 Hex MOV(21) #0094 DM0256 Port 1 RECEIVE DATA READ Instance ID: 03 Hex MOV(21) #0003 DM0257 Attribute ID: 64 Hex MOV(21) #6400 DM0258 35802 35803 MOV(21) #0001 032 03200 10112 Reading Data Received at Port 1 If SR 35802 (Port 1 RS-232C Receiving Flag) is OFF and SR 35803 (Port 1 RS-232C Received Flag) is ON, the sequential processing control bit IR 03200 will be turned ON. MOV(21) #0000 032 When IR 03200 turns ON, the CPU Unit will check that IR 10112 (unit no. 0 Master's Message Communications Enabled Flag) is ON, and message transmission will start. IOWR #00FE DM0200 #0009 25506 MOV(21) #0001 032 25506 0009 Hex: Master's unit number 00, 9 command data words (BCD) MOV(21) #0000 35810 032 If the Equals Flag is OFF (error in writing to the Master), IR 03200 will be turned ON, and the data will be transmitted again. #0001 If the Equals Flag is ON (writing to the Master has been completed normally), IR 03200 will be cleared (message transmission completed). 35811 MOV(21) 033 296 00FE: Master's node address 00, Master's unit address FE Hex DM 0200: Command data storage words Section 6-2 RS-232C Units 03300 10112 Reading Data Received at Port 2 MOV(21) #0000 033 IOWR #00FE DM0250 #0009 25506 If SR 35810 (Port 2 RS-232C Receiving Flag) is OFF and SR 35811 (Port 2 RS-232C Received Flag) is ON, the sequential processing control bit IR 03300 will be turned ON. When IR 03300 turns ON, the Unit will check that IR 10112 (unit no. 0 Master's Message Communications Enabled Flag) is ON, and message transmission starts. 00FE: Master's node address 00, Master's unit address FE Hex DM 0250: Command data storage words MOV(21) #0001 033 25506 MOV(21) #0000 033 END(01) 0009 Hex: Master's unit number 00, 9 command data words (BCD) If the Equals Flag is OFF (error in writing to the Master), IR 03300 will be turned ON, and the data will be transmitted again. If the Equals Flag is ON (writing to the Master has been completed normally), IR 03300 will be cleared (message transmission completed). Note When transmitting explicit messages from an OMRON Master Unit, specify 2 bytes each for the Class ID and the Instance ID. Set 1 byte as the Attribute ID for the RECEIVE DATA READ command. Responses The following responses will be stored if the data is read properly. Port 1 Response Words Contents (Hex) Meaning DM 0300 28 01 EXPLICIT MESSAGE SEND command code is 28 01 Hex. DM 0301 00 00 DM 0302 xx xx DM 0303 08 8E Response code is 0000 Hex (normal completion). Number of bytes received (data length from word DM 0203 onwards). Slave node address is 08. RECEIVE DATA READ response service code is 8E Hex. DM 0304 on xx xx... Data received from port 1 of the RS232C Unit and read is stored in order from the leftmost byte to the rightmost byte. Port 2 Response Words Contents (Hex) Meaning DM 0350 28 01 EXPLICIT MESSAGE SEND command code is 28 01 Hex. DM 0351 00 00 Response code is 0000 Hex (normal completion). DM 0352 xx xx DM 0353 08 8E Number of bytes received (data length from word DM 0353 onwards). Slave node address is 08. RECEIVE DATA READ response service code is 8E Hex. DM 0354 on xx xx... Data received from port 2 of the RS-232C Unit and read is stored in order from the leftmost byte to the rightmost byte. 297 SECTION 7 Communications Timing This section describes the time required for a complete communications cycle, for an output response to be made to an input, to start the system, and to send a message. 7-1 7-2 Remote I/O Communications Characteristics. . . . . . . . . . . . . . . . . . . . . . . . . 300 7-1-1 I/O Response Time . . . . . . . . . . . . . . . . . . . . . . . . . . . . . . . . . . . . . . 300 7-1-2 Communications Cycle Time and Refresh Time . . . . . . . . . . . . . . . 305 7-1-3 More than One Master in Network . . . . . . . . . . . . . . . . . . . . . . . . . . 307 7-1-4 System Startup Time. . . . . . . . . . . . . . . . . . . . . . . . . . . . . . . . . . . . . 308 Message Communications Time . . . . . . . . . . . . . . . . . . . . . . . . . . . . . . . . . . . 309 299 Section 7-1 Remote I/O Communications Characteristics 7-1 Remote I/O Communications Characteristics This section describes the characteristics of DeviceNet communications when OMRON Master and Slave Units are being used. Use this section for reference when planning operations that require precise I/O timing. The equations provided here are valid under the following conditions: 1,2,3... 1. The Master Unit is operating with the scan list enabled. 2. All of the required Slaves are participating in communications. 3. No errors are being indicated at the Master Unit. 4. Messages are not being produced in the Network (from another company’s configurator, for example). Note The values provided by these equations may not be accurate if another company’s Master or Slave is being used in the Network. 7-1-1 I/O Response Time The I/O response time is the time it takes from the reception of an input signal at an Input Slave to the output of the corresponding output signal at an Output Slave. CV-series PLCs (Asynchronous Mode) The following timing charts show the minimum and maximum I/O response times of the DeviceNet Network for a CV-series PLC operating in asynchronous mode. Minimum I/O Response Time The minimum I/O response time occurs when the DeviceNet Master Unit refreshing is executed just after the input signal is received by the Master and instruction execution is completed within one peripheral servicing cycle. Instruction execution cycle time PLC cycle (instruction execution cycle) Instruction execution PLC cycle (peripheral servicing cycle) Peripheral servicing cycle time Master Unit processing Input Output TPLC2 The Input Slave’s ON (OFF) delay (Minimum value: 0.) TIN: TOUT: The Output Slave’s ON (OFF) delay (Minimum value: 0.) TRT-IN: Input Slave’s communications time/Slave (See page 306.) 300 Section 7-1 Remote I/O Communications Characteristics TRT-OUT: Output Slave’s communications time/Slave (See page 306.) TPLC2:The PLC’s peripheral servicing cycle time The minimum I/O response time (TMIN) is the total of the following terms: TMIN = TIN + TRT-IN + TPLC2 + TRT-OUT + TOUT Note 1. Refer to SECTION 4 General-purpose Slaves, SECTION 5 Environmentresistive and Waterproof Slaves, and SECTION 6 Special I/O Slave Units Specifications for details on Input and Output Slaves’ delay times. 2. Refer to Refresh Time on page 307 and the PLC’s Operation Manual for details on the PLC’s peripheral servicing cycle time. Maximum I/O Response Time The maximum I/O response time occurs with the I/O timing shown in the following diagram. Instruction execution cycle time PLC cycle (instruction execution cycle) Instruction execution Instruction execution PLC cycle (peripheral servicing cycle) Peripheral servicing cycle time Master Unit processing Input Output TPLC2 TIN: TOUT: TRM: TPLC1: TPLC2: TPLC1 TPLC2 The Input Slave’s ON (OFF) delay The Output Slave’s ON (OFF) delay Master Unit’s communications cycle time (See page 305.) The PLC’s instruction execution cycle time The PLC’s peripheral servicing cycle time The maximum I/O response time (TMAX) is the total of the following terms: TMAX = TIN + 2 × TRM + TPLC1 + 2 × TPLC2 + TOUT Note 1. Refer to SECTION 4 General-purpose Slaves, SECTION 5 Environmentresistive and Waterproof Slaves, and SECTION 6 Special I/O Slave Units Specifications for details on Input and Output Slaves’ delay times. 2. Refer to Refresh Time on page 307 and the PLC’s Operation Manual for details on the PLC’s peripheral servicing cycle time. (Look under Asynchronous Operation.) 301 Section 7-1 Remote I/O Communications Characteristics CV-series PLCs (Synchronous Mode) The following timing charts show the minimum and maximum I/O response times of the DeviceNet Network for a CV-series PLC operating in synchronous mode. Minimum I/O Response Time The minimum I/O response time occurs with the I/O timing shown in the following diagram. Cycle time Program execution PLC Program execution Program execution Peripheral servicing Peripheral servicing Master Unit processing Input Output TRT - IN +TPLC0 TPLC0 TIN: The Input Slave’s ON (OFF) delay TOUT: The Output Slave’s ON (OFF) delay TRT-IN: Input Slave’s communications time/Slave (See page 306.) TRT-OUT: Output Slave’s communications time/Slave (See page 306.) TPLC0: The PLC’s cycle time (program execution + peripheral servicing) The minimum I/O response time (TMIN) is the total of the following terms: TMIN = TIN + TRT-IN + 2 × TPLC0 + TRT-OUT + TOUT Note 1. Refer to SECTION 4 General-purpose Slaves, SECTION 5 Environmentresistive and Waterproof Slaves, and SECTION 6 Special I/O Slave Units Specifications for details on Input and Output Slaves’ delay times. 2. Refer to Refresh Time on page 307 and the PLC’s Operation Manual for details on the PLC’s peripheral servicing cycle time. (See under Synchronous Operation.) 302 Section 7-1 Remote I/O Communications Characteristics Maximum I/O Response Time The maximum I/O response time occurs with the I/O timing shown in the following diagram. Cycle time Program execution PLC Program execution Peripheral servicing Program execution Program execution Peripheral servicing Master Unit processing Input Output TRM +TPLC0 TIN: TOUT: TRM: TPLC0: TPLC0 TPLC0 The Input Slave’s ON (OFF) delay The Output Slave’s ON (OFF) delay Master Unit’s communications cycle time (See page 305.) The PLC’s cycle time (program execution + peripheral servicing) The maximum I/O response time (TMAX) is the total of the following terms: TMAX = TIN + 2 × TRM + 3 × TPLC0 + TOUT Note 1. Refer to SECTION 4 General-purpose Slaves, SECTION 5 Environmentresistive and Waterproof Slaves, and SECTION 6 Special I/O Slave Units Specifications for details on Input and Output Slaves’ delay times. 2. Refer to Refresh Time on page 307 and the PLC’s Operation Manual for details on the PLC’s peripheral servicing cycle time. (See under Synchronous Operation.) CS1H/G, C200HS, and C200HX/HG/HE (-ZE) PLCs The following timing charts show the minimum and maximum I/O response times of the DeviceNet Network with a CS1H/G, C200HX/HG/HE(-ZE), or C200HS PLC. 303 Section 7-1 Remote I/O Communications Characteristics Minimum I/O Response Time The minimum I/O response time occurs when the Slave’s I/O refreshing is executed just after the input signal is received by the Master Unit and the output signal is output at the beginning of the next I/O refresh cycle. TPLC PLC Program execution Master Unit processing Input Output (T PLC -TRF) TIN: The Input Slave’s ON (OFF) delay (0 used as the minimum value) TOUT: The Output Slave’s ON (OFF) delay (0 used as the minimum value) TRT-IN: Input Slave’s communications time/Slave (See page 306.) TRT-OUT: Output Slave’s communications time/Slave (See page 306.) TPLC: The PLC’s cycle time TRF: The PLC’s DeviceNet Unit refresh time (See page 307.) The minimum I/O response time (TMIN) is the total of the following terms: TMIN = TIN + TRT-IN + (TPLC – TRF) + TRT-OUT + TOUT Note 1. Refer to SECTION 4 General-purpose Slaves, SECTION 5 Environmentresistive and Waterproof Slaves, and SECTION 6 Special I/O Slave Units Specifications for details on Input and Output Slaves’ delay times. 2. Refer to Refresh Time on page 307 and the PLC’s Operation Manual for details on the PLC’s peripheral servicing cycle time. 304 Section 7-1 Remote I/O Communications Characteristics Maximum I/O Response Time The maximum I/O response time occurs with the I/O timing shown in the following diagram. PLC Program execution Program execution Program execution Master Unit processing Input Output TPLC TIN: TOUT: TRM: TPLC: TRF: TPLC The Input Slave’s ON (OFF) delay The Output Slave’s ON (OFF) delay The communications cycle time for the total Network (See page 305.) The PLC’s cycle time The PLC’s DeviceNet Unit refresh time (See page 307.) The maximum I/O response time (TMAX) is the total of the following terms: TMAX = TIN + 2 × TRM + 2 × TPLC + TRF + TOUT Note 1. Refer to SECTION 4 General-purpose Slaves, SECTION 5 Environmentresistive and Waterproof Slaves, and SECTION 6 Special I/O Slave Units Specifications for details on Input and Output Slaves’ delay times. 2. Refer to Refresh Time on page 307 and the PLC’s Operation Manual for details on the PLC’s peripheral servicing cycle time. 7-1-2 Communications Cycle Time and Refresh Time The communications cycle time, communications time for each Slave, and refresh time are explained in this section. All of these are necessary for calculating the time required for various processes in a DeviceNet Network. Communications Cycle Time The communications cycle time is the time from the completion of a Slave’s remote I/O communications processing until remote I/O communications with the same Slave are processed again. The communications cycle time is used to calculate the maximum I/O response time. The communications cycle time depends on the number of Masters on the Network and on whether or not message communications are being performed. The following equations are valid when there is only one Master Unit. For details on cycle time equations for multiple Master Units, refer to page 307. One Master in Network The following equations show the communications cycle time (TRM) when there is only one Master in the Network. Even if the equation result is less than 2 ms, the minimum communications cycle time (TRM) is 2 ms. 305 Section 7-1 Remote I/O Communications Characteristics TRM = Σ (Communications time for each Slave) + MULTIPLE I/O TERMINAL processing time + Explicit messages processing time + 0.01 × N + 1.0 [ms] Communications time for each Slave: Time required for each Slave Σ (Communications time for each Slave) is the total of the processing time of each Slave in the network. MULTIPLE I/O TERMINAL processing time: 3.5 [ms] Only when Slaves with input, output, or mixed I/O of more than 8 bytes exist. Explicit messages processing time: 0.11 × TB + 0.6 [ms] Explicit message communications execution time TB: Baud rate factor (500 kbps: TB = 2; 250 kbps: TB = 4; 125 kbps: TB = 8) N: Communications Time for each Slave Number of Slaves The following equations show the communications time per Slave (TRT) for each kind of Slave Unit. Output Slaves with 8 Bytes of Output Max. TRT = 0.016 ×TB × SOUT1 + 0.11 × TB + 0.07 [ms] SOUT1: The number of Output Slave output words The baud rate TB: (500 kbps: TB = 2; 250 kbps: TB = 4; 125 kbps: TB = 8) Input Slaves with 8 Bytes of Input Max. TRT = 0.016 ×TB × SIN1 + 0.06 × TB + 0.05 [ms] SIN1: TB: The number of Input Slave input words The baud rate (500 kbps: TB = 2; 250 kbps: TB = 4; 125 kbps: TB = 8) Mixed I/O Slaves with 8 Bytes of I/O Max. TRT = 0.016 × TB × (SOUT2 + SIN2) + 0.11 × TB + 0.07 [ms] SOUT2: The number of Mixed I/O Slave output words The number of Mixed I/O Slave input words SIN2: The baud rate TB: (500 kbps: TB = 2; 250 kbps: TB = 4; 125 kbps: TB = 8) Input Slaves, Output Slaves, or Mixed I/O Slaves with Over 8 Bytes of I/O TRT = TOH + TBYTE-IN × BIN + TBYTE-OUT × BOUT [ms] TOH: TBYTE-IN: BIN: TBYTE-OUT: BOUT: Baud rate 500 kbps 306 The protocol overhead The input byte transmission time The number of input bytes The output byte transmission time The number of output bytes TOH 0.306 ms TBYTE-IN 0.040 ms TBYTE-OUT 0.036 ms Section 7-1 Remote I/O Communications Characteristics Baud rate 250 kbps 125 kbps TOH 0.542 ms 1.014 ms TBYTE-IN 0.073 ms 0.139 ms TBYTE-OUT 0.069 ms 0.135 ms The number of output bytes (BOUT) for Input Slaves is 0, and the number of input bytes (BIN) for Output Slaves is 0. Refresh Time The refresh time is the time required for I/O data to be exchanged between the PLC’s CPU Unit and the DeviceNet Master Unit. The PLC’s cycle time is increased when a Master Unit is mounted, as shown below. Note Refer to the PLC’s Operation Manual for more details on the refresh time and the PLC’s cycle time. Master Unit for CV-series PLCs (CVM1-DRM21) The PLC’s cycle time is increased by 1.1 ms. This is the extra time required for CPU Bus Unit servicing (DeviceNet Master Unit refreshing). Master Unit for CS1H/G, C200HX/HG/HE (-ZE), and C200HS PLCs (C200HW-DRM21) The PLC’s cycle time is increased by the amount shown below. The extra time is required for I/O refreshing. PLC DeviceNet Unit I/O refreshing time (ms) CS1H/G and C200HX/ HG/HE (-ZE) 1.72 + 0.022 × the number of words refreshed C200HS 2.27 + 0.077 × the number of words refreshed The number of words refreshed is the total number of words in the I/O Area that are used by the Slaves, including any unused words between words actually used by the Slaves. For example, if there are only two Input Slaves with node addresses 1 and 5, the 5 input words for nodes 1 through 5 would be refreshed even though the input words for nodes 2, 3, and 4 are unused. If message communications are being performed, just add the number of words used in message communications to the above number of words for whenever messages are being processed. C200H I/O Link Unit The PLC’s cycle time is increased by the amount shown below when a C200H I/O Link Unit is mounted to the PLC. The extra time is required for I/O refreshing. Additional processing time (ms) 1.72 + 0.022 × the number of words refreshed The number of words refreshed is the total number of words allocated to the Read/Write Area. If message communications are being performed, just add the number of words used in message communications to the above number of words for whenever messages are being processed. 7-1-3 More than One Master in Network The following equation shows the remote I/O communications cycle time (TRM) when there is more than one Master in the Network and message communications are not being performed. An example for two Master Units is used. 307 Section 7-1 Remote I/O Communications Characteristics First, the Network is divided into two groups: Master A and the Slaves in remote I/O communications with it and Master B and the Slaves in remote I/O communications with it. Slave A Group A Group B Master A Master B Slave C Slave B Slave D Slaves in remote I/O communications with Master A Slave E Slave F Slaves in remote I/O communications with Master B Note Although in the above diagram the Slaves are separated into two groups for convenience, the actual physical positions in the Network are irrelevant. Next, we can refer to the previous equations and calculate the communications cycle time for each group as if they were separate Networks. Group B Group A Master B Master A Slave A Slave C Slave B Slave D Group A communications cycle time: TRM-A Slave E Slave F Group A communications cycle time: TRM-B In Networks with two Masters, the communications cycle time for the entire Network will be the sum of the communications cycle times for the groups. TRM = TRM-A + TRM-B Although this example shows only two Masters in the Network, the total communications cycle time for any Network can be calculated by dividing it into groups and adding the communications cycle times of all groups. 7-1-4 System Startup Time This section describes the system startup time for a Network operating with the scan list enabled. The system startup time is the delay from the time that the Master Unit is turned ON until remote I/O communications begin. Here, we assume that the scan list is enabled and that remote I/O communications are set to start automatically at startup. System Startup Times The following table shows the system startup times for two cases. In the first case, the Master Unit starts up just after all of the Slaves’ power supplies are turned ON. In the second case, the Master Unit is restarted while communications are in progress. Case The Master is started just after Slave startup. 308 Slave’s indicator status System startup time The NS indicator is OFF or 6 seconds flashing green. Section 7-2 Message Communications Time Case The Master only is restarted. The Slaves only are restarted. Program Example Slave’s indicator status The NS indicator flashes red while the Master is OFF. --- System startup time 8 seconds 10 seconds As shown in the preceding table, it takes time for DeviceNet communications to start up. This programming uses flags in the Master Status Area to prevent the Slaves’ I/O processing from being performed until remote I/O communications start up. Note Refer to the Master Unit’s Operation Manual for details on the Master Status Area 1. This programming is for a CV-series PLC and a Master Unit with a unit number of 00. Remote I/O Communications Flag Error/Communications Stopped Flag 7-2 Slaves' I/O processing Message Communications Time The message communications time is the time required from the time a Master Unit starts to send a message over the Network to another node until the Master Unit completes sending the message (data for SEND(192)/ RECV(193) and FINS commands for CMND(194)/IOWR). If the CPU Unit attempts to send another message or receives a message from another node within the message communications time, the second message or the message being received from another node may be destroyed. Never execute a second communications instruction before the message communications time has elapsed and never send messages to any one node at intervals less than the message communications time. Note 1. If send or receive messages are destroyed, error records will be placed in the error history of the Master Unit. If an error occurs, read the error history using the FINS command or monitor the error history from the Configurator. 2. The following equations can be used to find the approximate message communications time, but this is a typical time, not the maximum time. The message communications time will vary depending on the frequency of message communications, the load on the remote node, the communications cycle time, and other factors. For any one Master Unit, the message communications time can be greatly increased due to heavy loads and the user program must be written to allow for this. The following equation can be used to compute the approximate message communications time. 309 Section 7-2 Message Communications Time Message communications time = Communications cycle time × ((No. of message bytes + 15) ÷ 6 + 1) No. of message bytes: No. of data bytes following the FINS command code The communications cycle time depends on whether or not remote I/O communications are being used. No Remote I/O Communications The following equation can be used to compute the message communications time when remote I/O communications are not being used. Message communications time = 2 ms (see note) + 0.11 × TB + 0.6 [ms] TB: The baud rate (500 kbps: TB = 2; 250 kbps: TB = 4; 125 kbps: TB = 8) Note The minimum remote I/O communications cycle time is 2 ms even if remote I/ O communications are not being used. Remote I/O and Message Communications Performing message communications in addition to remote I/O communications will increase the message communications time. Message communications time= Communications cycle time for remote I/O communications only + 0.11 × TB + 0.6 [ms] TB: 310 The baud rate (500 kbps: TB = 2; 250 kbps: TB = 4; 125 kbps: TB = 8) SECTION 8 Troubleshooting and Maintenance This section describes error processing, periodic maintenance operations, and troubleshooting procedures needed to keep the DeviceNet Network operating properly. We recommend reading through the error processing procedures before operation so that operating errors can be identified and corrected more quickly. 8-1 8-2 8-3 Indicators and Error Processing . . . . . . . . . . . . . . . . . . . . . . . . . . . . . . . . . . . 312 8-1-1 Errors Occurring in the Slave Unit . . . . . . . . . . . . . . . . . . . . . . . . . . 312 8-1-2 C200H I/O Link Unit Seven-segment Display . . . . . . . . . . . . . . . . . 312 Troubleshooting . . . . . . . . . . . . . . . . . . . . . . . . . . . . . . . . . . . . . . . . . . . . . . . 313 8-2-1 Slave Unit Troubleshooting . . . . . . . . . . . . . . . . . . . . . . . . . . . . . . . 313 8-2-2 Analog Input Unit Troubleshooting . . . . . . . . . . . . . . . . . . . . . . . . . 315 8-2-3 Temperature Input Terminal Troubleshooting . . . . . . . . . . . . . . . . . 316 8-2-4 C200H I/O Link Unit Troubleshooting . . . . . . . . . . . . . . . . . . . . . . 316 8-2-5 RS-232C Unit Troubleshooting . . . . . . . . . . . . . . . . . . . . . . . . . . . . 318 Maintenance . . . . . . . . . . . . . . . . . . . . . . . . . . . . . . . . . . . . . . . . . . . . . . . . . . 318 8-3-1 Cleaning . . . . . . . . . . . . . . . . . . . . . . . . . . . . . . . . . . . . . . . . . . . . . . 318 8-3-2 Inspection . . . . . . . . . . . . . . . . . . . . . . . . . . . . . . . . . . . . . . . . . . . . . 318 8-3-3 Replacing Nodes. . . . . . . . . . . . . . . . . . . . . . . . . . . . . . . . . . . . . . . . 319 311 Section 8-1 Indicators and Error Processing 8-1 8-1-1 Indicators and Error Processing Errors Occurring in the Slave Unit The following table lists probable causes and remedies for errors that occur in the Slave Unit. Display/Indicator status MS ON (green) NS ON (green) ON (green) ON (green) ON (red) OFF Flashing (red) Flashing (green) OFF Network status Probable cause and remedy Remote I/O or message commu- Remote I/O communications and/or message communications nications in progress (normal are active on the Network. status) Checking for node address dupli- Checking whether the Unit’s node address has been set on cation another node. Waiting for connection The Unit is waiting for a connection from the Master Unit. Watchdog timer error A watchdog timer error occurred in the Unit. Replace the Unit. OFF Incorrect switch settings A mistake has been made in the switch settings. Check the settings and restart the Slave. ON (green) ON (red) Node address duplication The Slave Unit’s node address has been set on another node. Change the settings to eliminate the duplication and restart the Slave. ON (green) ON (red) Bus Off error detected The communications controller detected a Bus Off status and communications have been stopped. Check the following and restart the Slave: Master/Slave baud rates, for loose or broken cables, for noise, cable lengths, and Terminating Resistors. ON (green) Flashing (red) Communications timeout The connection with the Master Unit timed out. Check the following and restart the Slave: Master/Slave baud rates, for loose or broken cables, for noise, cable lengths, and Terminating Resistors. 8-1-2 C200H I/O Link Unit Seven-segment Display C200H I/O Link Units have a 2-digit, 7-segment display that normally indicates the C200H I/O Link Unit’s node address (decimal value from 00 to 63). When an error occurs, the display will alternate between the error code and the node address of the faulty C200H I/O Link Unit. If more than one error occurs at the same time, the error codes will be displayed in sequence, followed at the end by the faulty Unit’s node address. Normal: C200H I/O Link Unit node address Error: Error code and faulty C200H I/O Link Unit's node address Read/Write Area default/user settings Dot Indicators The dots at the lower-right of each digit are operated by bit 13 (Read/Write Area default setting) of the Status Area (first word of the IR Area + 5 words), and show whether user settings or default settings are being used for the Read/Write Area. The dots are lit when the default settings are used and not lit when the user settings are used. 312 Section 8-2 Troubleshooting Seven-segment Display The 7-segment digits show the C200H I/O Link Unit’s node address during normal operation, but alternate between the error code and the Unit’s node address when an error occurs. The following table outlines the operation of the display. Status Error Display Watchdog timer Memory or system error Other errors Not lit Error code only Lit Error code and error node address alternate (see diagram below) The following diagram illustrates the alternating display of the error code and error node address. Error code (1 s) OFF (0.3 s) OFF (0.3 s) Error code (1 s) OFF (0.3 s) Node address (1 s) OFF (0.3 s) If more then one error occurs at the same time, each error code will be displayed in sequence, followed at the end by the error node address. 8-2 8-2-1 Troubleshooting Slave Unit Troubleshooting Red Indicator (ON or Flashing) Use the following table to troubleshoot problems in a Slave that has a red indicator that is ON or flashing. Error The MS indicator is a constant red. Probable cause The Slave Unit is faulty. Replace the Unit. The MS indicator is flashing red. • Check that the Slave’s baud rate setting is correct. The setting must be 125 kbps, 250 kbps, or 500 kbps. Restart the Unit after changing the baud rate. • Replace the Unit if the MS indicator continues to flash red even though the baud rate setting is correct. 313 Section 8-2 Troubleshooting Error After the MS indicator turns green, the NS indicator does not flash green - it turns red immediately. Probable cause Restart the faulty Slave Unit after checking the following points. • Make sure that the Master and Slaves baud rate settings all match. If they do not match, set all of the baud rates to the same value. • Check for a node address duplication. If necessary change the node address settings so that each node has a unique number. • See the troubleshooting steps below under the error heading: “The NS indicator lights green but turns red after a short time.” • Check whether all of the Slaves’ settings are correct. • If a particular Slave’s NS indicator is always red, replace that Slave. The NS indicator lights green but turns red after • Restart the faulty Slave Unit after checking the following points. a short time • Make sure that there are 121-Ω Terminating Resistors connected at or both ends of the trunk line. Connect 121-Ω Terminating Resistors if The NS indicator lights green but starts flashing the wrong resistance is being used. red after a short time. • Check whether all of the Slaves’ settings are correct. • Check whether the communications cables are connected properly. • Check whether the power supply is set correctly. • Check all the nodes for broken wires in the communications and power supply cables attached to the connectors. • Check whether power is correctly supplied to the network. • If there is nearby equipment that generates electrical noise, take steps to shield the Master, Slaves, and communications cables from the noise. • If an error has occurred with an OMRON Master Unit, refer to the Master Unit’s Operation Manual. If an error has occurred in a Master Unit supplied by another maker, refer to the relevant operation manual. • If a particular Slave’s NS indicator is always red, replace that Slave. Trouble Adding a Slave to the Network Error The NS indicator remains OFF. 314 Use the following table to troubleshoot problems in adding a Slave to the network. Probable cause • Check if the baud rate of the Master Unit coincides with that of the Slave Unit. If the baud rates are different, correct the baud rate of the Slave Unit. • Check that the Slave’s connector is connected correctly. • Check whether the communications power supply is supplying 24 V DC. • Make sure that the Master is operating properly. When using an OMRON Master, refer to the Master Unit’s Operation Manual. When using another company’s Master Unit, refer to that Master’s user’s manual. • Check whether the communications cables are connected properly. • Check whether the power supply is set correctly. • Check for broken wires in the communications and power supply cables attached to the connectors. Section 8-2 Troubleshooting Error The NS indicator continues to flash green. Probable cause • Make sure that the Master is operating properly. When using an OMRON Master, refer to the Master Unit’s Operation Manual. When using another company’s Master Unit, refer to that Master’s operation manual. • Check whether the Slave is registered in the Master’s scan list. If an OMRON Master Unit is being used, a new Slave cannot be added to the network if the Master is operating with the scan list enabled. First perform the clear scan list operation, check that the Slave has joined the network, and then perform the create scan list operation. If another company’s Master Unit is being used, refer to that Master’s operation manual for details on adding a new Slave to its scan list. The NS indicator alternates between being green and flashing green, or alternates between flashing red and flashing green. • When using an OMRON Master, check the following items and perform the necessary error processing steps. → → Register the scan list again. (After performing the clear scan list operation, check that the Slave has joined the network and perform the create scan list operation.) Make sure that the Slave’s allocated I/O area does not overlap with that of another Slave. If there is an overlap, change the Slave’s node address to eliminate it. → Make sure that the allocated I/O area does not exceed the allowed range shown below: C200HW-DRM21-V1 Output: IR 050 to IR 099 Input: IR 350 to IR 399 If the I/O area exceeds this range, change the Slave’s node address to correct the problem. • When using another company’s Master Unit, check that the I/O size registered in the Master’s scan list matches the actual I/O size of the Slave. The I/O size is recorded in the following attributes of the connection object: Interface 2 (Polled I/O Connection) Produced Connection size (Input size) Consumed Connection size (Output size) and: Interface 3 (Bit strobed I/O Connection) Produced Connection size (Input size) See Appendix B Slave Device Protocol for details and register the correct value in the Master’s scan list. Refer to the Master’s manual for details on registering the values. 8-2-2 Analog Input Unit Troubleshooting DRT1-AD04 Error The AD converted data is FFFF. Probable cause The Analog Input Terminal’s open-circuit detection function is activated when the input range is set to 1 to 5 V and the voltage drops below 0.8 V or the input range is set to 4 to 20 mA and the current drops below 3.2 mA. The converted data is set to FFFF when the open-circuit detection function is activated. Check the Analog input’s cables for broken wires or incorrect wiring. When the input signal rises above 0.8 V or 3.2 mA, the converted data will automatically return to its normal range. 315 Section 8-2 Troubleshooting DRT1-AD04H Error Probable cause The AD converted data is 7FFF when the disconnection indicator is lit. 8-2-3 The Analog Input Terminal’s open-circuit detection function is activated when the input range is set to 1 to 5 V and the voltage drops below 0.8 V or the input range is set to 4 to 20 mA and the current drops below 3.2 mA. The converted data is set to FFFF when the open-circuit detection function is activated. The disconnection indicator will be lit at the same time. Check the Analog input’s cables for broken wires or incorrect wiring. When the input signal rises above 0.8 V or 3.2 mA, the converted data will automatically return to its normal range. The disconnection indicator will go out at the same time. Temperature Input Terminal Troubleshooting Use the following table to troubleshoot problems in the Temperature Input Terminal. Error Probable cause The temperature data is 7FFF when the dis- Check the temperature sensor cables for broken wires or incorrect wiring. connection indicator is lit. Check that input cables are wired properly. Check that the cold junction compensator is connected properly (applicable to the DRT1-TS04T only). 8-2-4 C200H I/O Link Unit Troubleshooting When an error occurs in the C200H I/O Link Unit and the error code is displayed by the 7-segment display, use the following table to troubleshoot the problem. If the error code is not shown on the 7-segment display, use the table under the heading Identifying Errors from Symptoms to troubleshoot the problem. Identifying Errors from Seven-segment Display Display C0 C3 Probable cause Possible remedy Attempt was made to set the Link Area when the 1.Turn OFF bit 00 of the software switches. PLC is not in PROGRAM mode. 2.Switch the PLC’s operating mode to PROGRAM mode. 3.Turn ON bit 00 of the software switches again. Invalid setting values in Link Area. 1.Turn OFF bit 00 of the software switches. 2.Check the area settings, address settings, and size settings, and correct if necessary. 3.Turn ON bit 00 of the software switches again. D9 Timeout error in communications with Master Unit. • The Master Unit is not operating. • The cables are not connected properly. • A source of noise is close to the Master Unit. 1.Check the status of the Master Unit. 2.Check that the DeviceNet communications cables are connected properly and that noise preventative measures have been taken. 3.If the error is not cleared after taking the above steps, restart the Unit. E0 The Network’s communications power is not being supplied normally. Check the Network’s power supply and wiring, and restart the Unit. E4 The Unit’s Read/Write Area is set to default set- 1.Check that the area address settings for the SYSMAC tings with other Communications Units conBUS Masters, DeviceNet Masters, and DeviceNet nected. Slaves are not overlapping. 2.Set the Read/Write Area settings using bit 00 of the software switches. (If the settings are overlapping intentionally, the Unit will operate according to the Read/Write Area settings after setting this bit.) 3.Restart the Unit. E6 The CPU Unit is mounted to a C200H or C200HS PLC. 316 Remount the CPU Unit to a C200HE, C200HG, or C200HX PLC, and restart the PLC. Section 8-2 Troubleshooting Display E8 Probable cause Internal non-volatile memory data error Possible remedy 1.Set the Read/Write Area settings using bit 00 of the software switches. 2.Restart the Unit. 3.If the error is not cleared, replace the Unit. F0 Duplicate node address error F1 Bus Off error Reset the node address to a number that is not used by another Unit, and restart the Unit. 1.Check that the DeviceNet communications cables are wired connected, and that noise preventative measures have been taken. 2.Restart the Unit. Master Unit baud rate setting error Make sure that the baud rate settings match and restart the Unit. F3 Front/rear-panel DIP switch setting error • Pin 4 of front-panel DIP switch is ON. • Pins 1 and 2 of front-panel DIP switch are ON. • Pin 7 or 8 on rear-panel DIP switch is ON. • Make sure pin 4 on the front panel, and pins 7 and 8 on the rear panel are turned OFF. • Turn ON or OFF pins 1 and 2 according to the correct baud rate setting. F6 CPU Unit interface error from noise Remove cause of noise and restart the Unit. If the error is not cleared, replace the C200H I/O Link Unit or the CPU Unit. F9 Hardware error 1.Restart the Unit 2.If the error is not cleared, replace the Unit. Identifying Errors from Symptoms Symptom The power is ON, but the Slave Unit’s indicators are all OFF. Probable Cause CPU Unit error caused by noise interference. Possible remedy Restart the Unit. The Read/Write Area’s settings have been set, but data is not being refreshed according to the settings. The settings have not been validated. 1.Turn ON bit 00 of the software switches. 2.Reset the Unit. Restart the PLC or turn ON and OFF the Unit’s Restart Bit. With C200HX/ HG/HE PLCs, these bits are in AR 01. With CS-series PLCs, these bits are in words A502 to A507. Check the area settings of other Communications Units, and correct settings so that data is not written to an area already being used by another Unit. The Unit has not been reset. After setting the areas and operating The area settings are overlapping with the Unit, the data in the output area fre- those of other Communications Units. quently appears as unexpected values. When reading the Slave’s DM Area from the Master, unstable values are returned and the data is unreadable. Attempt was made to access of words from DM 4096 onwards in the C200HE-CPU11 CPU Unit. Access the correct words only. The Explicit Connection Established Flag is ON in the C200H I/O Link Unit’s status words, but Unit is not receiving an explicit message from the Master. The Network cables are disconnected, or the Master Unit’s power supply is OFF. (OMRON Master Units do not have timeouts when explicit message communications are used, so the Explicit Connection Established Flag will not turn OFF even if communications are stopped). Restart the Master Unit, or connect the cables correctly. (Timeouts cannot be set for OMRON Master Units using explicit message communications.) 317 Section 8-3 Maintenance 8-2-5 RS-232C Unit Troubleshooting Symptom Probable cause The RS-232C Unit’s ERR indicator is lit. The RS-232C Unit is damaged. Possible remedy Replace the RS-232C Unit. RS-232C port communications error (the Unit’s RD and SD indicators are not lit). The wiring is incorrect, or the cables are not connected properly. The RS-232C port’s parameters do not match those of the RS-232C Unit. Check the wiring with the RS-232C Unit and correct it if necessary. Reset the RS-232C port’s parameters to match the parameters of the RS232C Unit. Parameter Error Flag (bit 01 or 09) in communications status word is ON. The parameters are set incorrectly. Parity Error Flag (bit 04 or 12) in communications status word is ON. The parity setting does not match the setting in the RS-232C Unit. Overrun Error Flag (bit 05 or 13) in communications status word is ON. The baud rate does not match the setting in the RS-232C Unit. Framing Error Flag (bit 06 or 14) in communications status word is ON. The character block settings (data length, parity, and stop bits) do not match those in the RS-232C Unit. Reset the parameters correctly using the PARAMETER SET command, then execute the RS-232C PORT RESET command or restart the RS-232C Unit. Reset the RS-232C port’s parity setting to match the parity of the RS-232C Unit. Reset the RS-232C port’s baud rate to match the baud rate of the RS-232C Unit. Reset the RS-232C port’s character block (data length, parity, and stop bits) to match the character block of the RS232C Unit. Receive Buffer Error Flag (bit 07 or 15) The receive buffer has overflowed. in communications status word is ON. 8-3 The receive buffer for each of the RS232C Unit’s ports is 1,024 bytes. Increase the reading frequency so that the receive buffer does not overflow. If the receive buffer has overflown, execute the RS-232C PORT RESET command or restart the RS-232C Unit. Maintenance This section describes the routine cleaning and inspection recommended as regular maintenance. 8-3-1 Cleaning Clean the DeviceNet Units regularly as described below in order to keep it in its optimal operating condition. • Wipe the Unit with a dry, soft cloth for regular cleaning. • When a spot cannot be removed with a dry cloth, dampen the cloth with a neutral cleanser, wring out the cloth, and wipe the Unit. • A smudge may remain on the Unit from gum, vinyl, or tape that was left on for a long time. Remove the smudge when cleaning. !Caution Never use volatile solvents such as paint thinner or benzene or chemical wipes. These substances could damage the surface of the Unit. 8-3-2 Inspection Be sure to inspect the system periodically to keep it in its optimal operating condition. In general, inspect the system once every 6 to 12 months, but inspect more frequently if the system is used with high temperature or humidity or under dirty/dusty conditions. 318 Section 8-3 Maintenance Inspection Equipment Prepare the following equipment before inspecting the system. Required Equipment Have a standard and phillips-head screwdriver, multimeter, alcohol, and a clean cloth. Equipment that May be Required Depending on the system conditions, a synchroscope, oscilloscope, thermometer, or hygrometer (to measure humidity) might be needed. Inspection Procedure Check the items in the following table and correct any items that are below standard. Item Standard Equipment Environmental conditions Ambient and cabinet temperature Ambient and cabinet humidity See below. See below. Thermometer Hygrometer Installation Dust/dirt accumulation Are the Units installed securely? None --No looseness --- Are the communications connectors fully inserted? No looseness --- Are the external wiring screws No looseness --tight? Are the connecting cables undam- No damage --aged? 8-3-3 Replacing Nodes The DeviceNet Master Unit and Slave Units make up the network. The entire network is affected when a Unit is faulty, so a faulty Unit must be repaired or replaced quickly. We recommend having spare Units available to restore network operation as quickly as possible. Precautions Observe the following precautions when replacing a faulty Unit. • After replacement make sure that there are no errors with the new Unit. • When a Unit is being returned for repair, attach a sheet of paper detailing the problem and return the Unit to your OMRON dealer. • If there is a faulty contact, try wiping the contact with a clean, lint-free cloth dampened with alcohol. Settings after Replacing Nodes After replacing a Unit, set the new Unit’s switches to the same settings that were on the old Unit. 319 Appendix A Node Address Settings Table This appendix shows all of the node address settings for Slaves that have node addresses set in binary with pins 1 through 6 of the Slave’s DIP switch. There are some differences in the location and orientation of the DIP switches, but the node address is always set in binary. (0: OFF, 1: ON) DIP switch setting Node address DIP switch setting Node address Pin 1 Pin 2 Pin 3 Pin 4 Pin 5 Pin 6 0 0 0 0 0 0 0 Pin 1 Pin 2 Pin 3 Pin 4 Pin 5 Pin 6 0 0 0 0 0 1 32 1 0 0 1 0 0 0 0 0 0 0 0 1 2 1 0 0 1 0 0 0 0 0 0 1 1 33 34 1 0 1 0 0 1 0 0 0 0 0 0 3 4 1 0 1 0 0 1 0 0 0 0 1 1 35 36 1 0 0 1 1 1 0 0 0 0 0 0 5 6 1 0 0 1 1 1 0 0 0 0 1 1 37 38 1 0 1 0 1 0 0 1 0 0 0 0 7 8 1 0 1 0 1 0 0 1 0 0 1 1 39 40 1 0 0 1 0 0 1 1 0 0 0 0 9 10 1 0 0 1 0 0 1 1 0 0 1 1 41 42 1 0 1 0 0 1 1 1 0 0 0 0 11 12 1 0 1 0 0 1 1 1 0 0 1 1 43 44 1 0 0 1 1 1 1 1 0 0 0 0 13 14 1 0 0 1 1 1 1 1 0 0 1 1 45 46 1 0 1 0 1 0 1 0 0 1 0 0 15 16 1 0 1 0 1 0 1 0 0 1 1 1 47 48 1 0 0 1 0 0 0 0 1 1 0 0 17 18 1 0 0 1 0 0 0 0 1 1 1 1 49 50 1 0 1 0 0 1 0 0 1 1 0 0 19 20 1 0 1 0 0 1 0 0 1 1 1 1 51 52 1 0 0 1 1 1 0 0 1 1 0 0 21 22 1 0 0 1 1 1 0 0 1 1 1 1 53 54 1 0 1 0 1 0 0 1 1 1 0 0 23 24 1 0 1 0 1 0 0 1 1 1 1 1 55 56 1 0 0 1 0 0 1 1 1 1 0 0 25 26 1 0 0 1 0 0 1 1 1 1 1 1 57 58 1 0 1 0 0 1 1 1 1 1 0 0 27 28 1 0 1 0 0 1 1 1 1 1 1 1 59 60 1 0 0 1 1 1 1 1 1 1 0 0 29 30 1 0 0 1 1 1 1 1 1 1 1 1 61 62 1 1 1 1 1 0 31 1 1 1 1 1 1 63 321 Appendix B Using Another Company’s Master Unit This appendix explains how to operate an OMRON Slave when the Slave is connected to a Master manufactured by another company. Use Poll Connection with Output Slaves If the Slave has outputs, do not communicate with the Master through a bit strobe connection. There are several DeviceNet I/O communications methods, including poll and bit strobe connections, but DeviceNet specifications allow the bit strobe connection with inputs only. OMRON Master Units conform to these specifications and communicate with Output Slaves through a poll connection, but some other company’s Masters allow bit strobe connections with Output Slaves. Before connecting an OMRON Slave to another company’s Master, verify the Master’s connection specifications. About EDS Files When connecting an OMRON Slave to another company’s Master, it may be necessary to install the OMRON Slave’s EDS file in the other company’s configurator to set the Slave’s information in the Master. With some companies’ Masters, the Slaves can be connected without making settings. With some other companies’ configurators, installing the OMRON Slave’s EDS file in the configurator will allow you to make various parameter settings from the configurator. If you can’t obtain a copy of the EDS file or the other company’s configurator does not support EDS files, it will be necessary to directly input settings such as the connection type and data size. Installing an EDS File EDS files are provided by the manufacturer for each Slave and contain settings such as the Slave’s ID and I/O data sizes. If the EDS file is installed in the configurator, the Slave’s settings can be changed and the I/O size will be input automatically when the Master’s scan list is created. EDS files for the Slaves described in this manual can be downloaded from the product catalog at the following website: http://www.odva.astem.or.jp Locate the EDS file for the desired Slave and install that EDS file in the configurator. Installation procedures vary; refer to the configurator’s manuals for details on the installation procedure. Inputting Settings Directly If you can’t obtain a copy of the EDS file or the other company’s configurator does not support EDS files, it will be necessary to directly input settings such as the connection type and data size. (Always select the connection type that is supported by the Slave.) The following connection types are allowed in DeviceNet communications. Connection type poll bit strobe change of state (COS) cyclic Operation Remarks Data is exchanged in individual command/ --response transmissions from the Master to each Slave. The output data is transferred in commands and the input data is received in responses. The Master broadcasts a command and multiple The command is sent just once, so the cycle time Slaves return input data in their responses. is short, however this method supports a maximum of 8 bytes of input data from Slaves. Data is transmitted when the data has changed in Data is transmitted only when there has been a the Master or Slave. change. Devices that do not need to communicate will not communicate, so the network usage is more efficient. The Master and Slaves transmit input/output data --cyclically (at fixed intervals). 323 Appendix B Using Another Company’s Master Unit Table of Connection Type and Data Size Settings The following table lists the I/O data sizes for each OMRON Slave as well as the supported connection types. (A “Yes” indicates that the connection is supported; a “No” indicates that it is not.) Slave group Model Yes Connection type bit change cyclic strobe of state Yes No No 1 0 DRT1-ID08-1 DRT1-ID16 Yes Yes Yes Yes No No No No 1 2 0 0 DRT1-ID16-1 DRT1-OD08 Yes Yes Yes No No No No No 2 0 0 1 DRT1-OD08-1 DRT1-OD16 Yes Yes No No No No No No 0 0 1 2 DRT1-OD16-1 DRT1-MD16 Yes Yes No No No No No No 0 1 2 1 Transistor Remote I/O Terminals DRT1-ID16T with 3-tier I/O Terminal Blocks DRT1-ID16T-1 Yes Yes Yes Yes No No No No 2 2 0 0 DRT1-ID16TA DRT1-ID16TA-1 Yes Yes Yes Yes No No No No 2 2 0 0 DRT1-OD16T DRT1-OD16T-1 Yes Yes No No No No No No 0 0 2 2 DRT1-OD16TA DRT1-OD16TA-1 Yes Yes No No No No No No 0 0 2 2 DRT1-MD16T DRT1-MD16T-1 Yes Yes No No No No No No 1 1 1 1 DRT1-MD16TA DRT1-MD16TA-1 Yes Yes No No No No No No 1 1 1 1 Yes Yes Yes Yes No No No No 4 4 0 0 DRT1-OD32ML DRT1-OD32ML-1 Yes Yes No No No No No No 0 0 4 4 DRT1-MD32ML DRT1-MD32ML-1 Yes Yes No No No No No No 2 2 2 2 DRT1-ID16X DRT1-ID16X-1 Yes Yes Yes Yes No No No No 2 2 0 0 DRT1-OD16X DRT1-OD16X-1 Yes Yes No No No No No No 0 0 2 2 Sensor Terminals DRT1-HD16S DRT1-ND16S Yes Yes Yes No No No No No 2 1 0 1 Temperature Input Terminals DRT1-TS04T DRT1-TS04P Yes Yes Yes Yes No No No No 8 8 0 0 Analog Input Terminals DRT1-AD04 DRT1-AD04H Yes Yes Yes Yes No No No No 8 8 0 0 Analog Output Terminals CQM1 I/O Link Unit DRT1-DA02 CQM1-DRT21 Yes Yes No No No No No No 0 2 4 2 poll Transistor Remote I/O Terminals DRT1-ID08 Transistor Remote I/O Terminals DRT1-ID32ML with Connectors DRT1-ID32ML-1 Remote Adapters 324 Data sizes IN OUT Appendix B Using Another Company’s Master Unit Slave group Model poll Environment-resistive Transistor Terminals Connection type bit change strobe of state Data sizes IN OUT cyclic DRT1-ID08C DRT1-HD16C Yes Yes Yes Yes No No No No 1 2 0 0 DRT1-HD16C-1 DRT1-OD08C Yes Yes Yes No No No No No 2 0 0 1 DRT1-WD16C DRT1-WD16C-1 Yes Yes No No No No No No 0 0 2 2 DRT1-MD16C DRT1-MD16C-1 Yes Yes No No No No No No 1 1 1 1 DRT1-ID04CL DRT1-ID04CL-1 Yes Yes Yes Yes No No No No 1 1 0 0 DRT1-ID08CL DRT1-ID08CL-1 Yes Yes Yes Yes No No No No 1 1 0 0 DRT1-OD04CL DRT1-OD04CL-1 Yes Yes No No No No No No 0 0 1 1 DRT1-OD08CL DRT1-OD08CL-1 Yes Yes No No No No No No 0 0 1 1 B7AC Interface Unit C200H I/O Link Unit DRT1-B7AC C200HW-DRT21 Yes Yes Yes Yes (See note 1.) No No No No 4 0 to 64 (See note 2.) 0 0 to 64 (See note 2.) RS-232C Unit DRT1-232C2 Yes Yes No No 2 0 Waterproof Terminals Note 1. The bit strobe connection is supported only when the output size is set to 0 bytes and the input size is set to 8 bytes. 2. The data sizes can be changed. 3. The device profiles below contain more detailed DeviceNet specifications if more information needs to be registered in the scan list. Device Profiles for Regular and Environment-resistive Slaves The following device profiles contains more detailed DeviceNet specifications for General-purpose and Environment-resistive Slaves if more information needs to be registered in the scan list.l General data Compatible DeviceNet Specifications Volume I - Release 1.3 Volume II - Release 1.3 (See note) Header name Device protocol name OMRON Corporation Slaves: Generic Manufacturer catalog number Manufacturer revision W347 1.0 Header ID = 47 Protocol number = 0 325 Appendix B Using Another Company’s Master Unit Physical conform- Network current consumption ance data 40 mA max. (24 V DC) for the following Units: CQM1-DRT21, DRT1-HD16S, DRT1-ND16S, and DRT1-OD08CL 30 mA max. (24 V DC) for the following Units: DRT1-ID08(-1), DRT1-ID16(-1), DRT1-OD08(-1), DRT1-OD16(-1), DRT1-ID16T(-1), DRT1-OD16T(-1), DRT1-MD16T(-1), DRT1-WD16C(-1), DRT1-MD16C(-1), DRT1-ID16X(-1), DRT1-OD16X(-1), DRT1-AD04, DRT1-AD04H, DRT1-DA02, DRT1-ID08CL(-1), DRT1-ID08C, DRT1-HD16C(-1), DRT1-TS04T, and DRT1-TS04P 25 mA max. (24 V DC) for the following Units: DRT1-MD16 and DRT1-ID04CL(-1), 50 mA max. (24 V DC) for the following Units: DRT1-ID16TA(-1), DRT1-OD16TA(-1), DRT1-MD16TA(-1), and DRT1-ID32ML(-1), Communications data Connector type 90 mA max. (24 V DC) for the following Unit: DRT1-OD32ML(-1) 70 mA max. (24 V DC) for the following Units: DRT1-MD32ML(-1) and DRT1-B7AC 35 mA max. (24 V DC) for the following Unit: DRT1-OD04CL(-1) Open plug Physical insulation Supported indicators Yes Module, Network MAC ID setting Default MAC ID DIP switch 0 Baud rate setting Supported baud rates DIP switch 125 kbps, 250 kbps, and 500 kbps Predefined Master/Slave connection set Dynamic connection support (UCMM) Group 2 only server No Explicit message fragmentation support Yes Note For Analog Input Terminals, Analog Output Terminals, and Temperature Input Terminals, Volume I is 1.2 and Volume II is 1.1. Object Mounting Identity Object (0x01) Object class Attribute Service Item Object instance 326 Not supported Not supported ID content Attribute Get (read) Set (write) Value 1 Vendor 2 Product type Yes Yes No No 47 0 3 Product code 4 Revision Yes Yes No No See note 2. 1.3 (See note 1.) 5 Status (bits supported) 6 Serial number Yes Yes No No Bit 0 only Unique for each Unit 7 Product name 8 State Yes No No No Same as the model name. --- Appendix B Using Another Company’s Master Unit Item Object instance Service DeviceNet service 05Reset No Parameter option 0EGet_Attribute_Single No Note 1. For Analog Input Terminals, Analog Output Terminals, and Temperature Input Terminals, Revision is 1.2. 2. The product code depends on the Slave. Refer to the following table. Model Product code DRT1-ID08 DRT1-ID08-1 100 106 DRT1-ID16 DRT1-ID16-1 102 108 DRT1-OD08 DRT1-OD08-1 101 107 DRT1-OD16 DRT1-OD16-1 103 109 DRT1-MD16 DRT1-ID16T 168 122 DRT1-ID16T-1 DRT1-OD16T 125 124 DRT1-OD16T-1 DRT1-MD16T 127 123 DRT1-MD16T-1 DRT1-ID16TA 126 142 DRT1-ID16TA-1 DRT1-OD16TA 146 144 DRT1-OD16TA-1 148 DRT1-MD16TA DRT1-MD16TA-1 143 144 DRT1-ID32ML DRT1-ID32ML-1 128 131 DRT1-OD32ML DRT1-OD32ML-1 129 132 DRT1-MD32ML DRT1-MD32ML-1 130 133 DRT1-ID16X DRT1-ID16X-1 104 110 DRT1-OD16X DRT1-OD16X-1 105 111 DRT1-HD16S DRT1-ND16S 2 9 DRT1-TS04T DRT1-TS04P 302 303 DRT1-AD04 DRT1-AD04H 300 304 DRT1-DA02 CQM1-DRT21 301 50 DRT1-ID04CL DRT1-ID04CL-1 134 138 DRT1-ID08CL 136 327 Appendix B Using Another Company’s Master Unit Model DRT1-ID08CL-1 Product code 140 DRT1-ID08C DRT1-HD16C 112 120 DRT1-HD16C-1 DRT1-OD04CL 115 135 DRT1-OD04CL-1 DRT1-OD08CL 139 137 DRT1-OD08CL-1 DRT1-OD08C 141 113 DRT1-WD16C DRT1-WD16C-1 121 116 DRT1-MD16C DRT1-MD16C-1 114 117 DRT1-B7AC 430 Message Router Object (0x02) Object class Attribute Service Not supported Not supported Object instance Attribute Service Not supported Not supported Header specification addition No DeviceNet Object (0x03) Object class Attribute Not supported Service Not supported Item Object instance Attribute Item Object instance Service ID content 1 MAC ID Get (read) Set (write) Yes No --- 2 Baud rate 3 BOI Yes Yes No No --00 (hexadecimal) 4 Bus Off counter 5 Allocation information No Yes No No ----- 6 MAC ID switch changed 7 Baud rate switch changed No No No No ----- 8 MAC ID switch value 9 Baud rate switch value No No No No ----- DeviceNet service 0EGet_Attribute_Single No 4BAllocate_Master/Slave_Connection_Set 4CRelease_Master/Slave_Connection_Set No No Value Parameter option Assembly Object (0x04) Object class Attribute Service Not supported Not supported Attribute 1 Number of members in list 2 Member list No No No No ----- 3 Data 9 Baud rate switch value Yes No No No ----- Item Object instance 1 (Instance type Static I/O) 328 ID content Get (read) Set (write) Value Appendix B Using Another Company’s Master Unit Item Object instance 1 Service (Instance type Static I/O) DeviceNet service 0EGet_Attribute_Single Parameter option No Connection Object (0x05) Object class Item Object instance 1 Attribute Service Not supported Not supported Max. number of active connections 1 Section Instance type Information Explicit Message 1 Production trigger Transport type Cyclic Server ----- Transport class 3 --- Item Object instance 1 ID content Attribute Item Object instance 2 Get (read) Set (write) Yes Yes No No --00 (hexadecimal) 3 Transport class trigger 4 Produced connection ID Yes Yes No No 83 (hexadecimal) --- 5 Consumed connection ID 6 Initial comm. characteristics Yes Yes No No --21 (hexadecimal) 7 Produced connection size 8 Consumed connection size Yes Yes No No 0D00 (hexadecimal) 0D00 (hexadecimal) 9 Expected packet rate 12 Watchdog time-out action Yes Yes Yes No --01 (hexadecimal) 13 Produced connection path length 14 Produced connection path Yes Yes No No 00 (hexadecimal) --- 15 Consumed connection path length 16 Consumed connection path Yes Yes No No 00 (hexadecimal) --- 17 Production inhibit time Yes No 00 (hexadecimal) DeviceNet service Service Value 1 State 2 Instance type Item Object instance 1 Max. number of instances Parameter option 05Reset 0EGet_Attribute_Single No No 10Set_Attribute_Single No Section Instance type Polled I/O Information 1 Max. number of instances Production trigger Transport type Cyclic Server ----- Transport class 2 --- 329 Appendix B Using Another Company’s Master Unit Item Object instance 2 Item Object instance 2 ID content Attribute 1 State Get (read) Yes Set (write) No --- 2 Instance type 3 Transport class trigger Yes Yes No No 01 (hexadecimal) 82 (hexadecimal) 4 Produced connection ID 5 Consumed connection ID Yes Yes No No ----- 6 Initial comm. characteristics 7 Produced connection size Yes Yes No No 01 (hexadecimal) See note. 8 Consumed connection size 9 Expected packet rate Yes Yes No Yes See note. --- 12 Watchdog time-out action 13 Produced connection path length Yes Yes No No 01 (hexadecimal) See note. 14 Produced connection path 15 Consumed connection path length Yes Yes No No See note. See note. 16 Consumed connection path 17 Production inhibit time Yes Yes No No See note. 00 (hexadecimal) DeviceNet service Service Value Parameter option 05Reset No 0EGet_Attribute_Single 10Set_Attribute_Single No No Note These values depend on the type of Slave being used. Refer to the following table. Model Produced Consumed Produced connection connection connection size size path length Produced connection path Consumed connection path length Consumed connection path DRT1-ID08 01H 00H 6 20_04_24_01_30_03 0 --- DRT1-ID08-1 01H 00H 6 20_04_24_01_30_03 0 --- DRT1-ID16 02H 00H 6 20_04_24_01_30_03 0 --- DRT1-ID16-1 02H 00H 6 20_04_24_01_30_03 0 --- DRT1-OD08 00H 01H 0 --- 6 20_04_24_01_30_03 DRT1-OD08-1 00H 01H 0 --- 6 20_04_24_01_30_03 DRT1-OD16 00H 02H 0 --- 6 20_04_24_01_30_03 DRT1-OD16-1 00H 02H 0 --- 6 20_04_24_01_30_03 DRT1-MD16 01H 01H 6 20_04_24_01_30_03 6 20_04_24_01_30_03 DRT1-ID16T 02H 00H 6 20_04_24_01_30_03 0 --- DRT1-ID16T-1 02H 00H 6 20_04_24_01_30_03 0 --- DRT1-OD16T 00H 02H 0 --- 6 20_04_24_01_30_03 DRT1-OD16T-1 00H 02H 0 --- 6 20_04_24_01_30_03 DRT1-MD16T 01H 01H 6 20_04_24_01_30_03 6 20_04_24_01_30_03 DRT1-MD16T-1 01H 01H 6 20_04_24_01_30_03 6 20_04_24_01_30_03 DRT1-ID16TA 02H 00H 6 20_04_24_01_30_03 0 --- DRT1-ID16TA-1 02H 00H 6 20_04_24_01_30_03 0 --- DRT1-OD16TA 00H 02H 0 --- 6 20_04_24_01_30_03 DRT1-OD16TA-1 00H 02H 0 --- 6 20_04_24_01_30_03 DRT1-MD16TA 01H 01H 6 20_04_24_01_30_03 6 20_04_24_01_30_03 DRT1-MD16TA-1 01H 01H 6 20_04_24_01_30_03 6 20_04_24_01_30_03 DRT1-ID32ML 04H 00H 6 20_04_24_01_30_03 0 --- DRT1-ID32ML-1 04H 00H 6 20_04_24_01_30_03 0 --- DRT1-OD32ML 00H 04H 0 --- 6 20_04_24_01_30_03 DRT1-OD32ML-1 00H 04H 0 --- 6 20_04_24_01_30_03 DRT1-MD32ML 02H 02H 6 20_04_24_01_30_03 6 20_04_24_01_30_03 DRT1-MD32ML-1 02H 02H 6 20_04_24_01_30_03 6 20_04_24_01_30_03 330 Appendix B Using Another Company’s Master Unit Model Produced Consumed Produced connection connection connection size size path length Produced connection path Consumed connection path length Consumed connection path DRT1-ID16X 02H 00H 6 20_04_24_01_30_03 0 --- DRT1-ID16X-1 02H 00H 6 20_04_24_01_30_03 0 --- DRT1-OD16X 00H 02H 0 --- 6 20_04_24_01_30_03 DRT1-OD16X-1 00H 02H 0 --- 6 20_04_24_01_30_03 DRT1-HD16S 02H 00H 6 20_04_24_01_30_03 0 --- DRT1-ND16S 01H 01H 6 20_04_24_01_30_03 6 20_04_24_01_30_03 DRT1-TS04T 08H 00H 6 20_04_24_01_30_03 0 --- DRT1-TS04P 08H 00H 6 20_04_24_01_30_03 0 --- DRT1-AD04 04H or 08H 00H 6 20_04_24_01_30_03 0 --- DRT1-AD04H 08H 00H 6 20_04_24_01_30_03 0 --- DRT1-DA02 00H 04H 0 --- 6 20_04_24_01_30_03 CQM1-DRT21 02H 02H 6 20_04_24_01_30_03 6 20_04_24_01_30_03 DRT1-ID04CL 01H 00H 6 20_04_24_01_30_03 0 --- DRT1-ID04CL-1 01H 00H 6 20_04_24_01_30_03 0 --- DRT1-ID08CL 01H 00H 6 20_04_24_01_30_03 0 --- DRT1-ID08CL-1 01H 00H 6 20_04_24_01_30_03 0 --- DRT1-ID08C 01H 00H 6 20_04_24_01_30_03 0 --- DRT1-HD16C 02H 00H 6 20_04_24_01_30_03 0 --- DRT1-HD16C-1 02H 00H 6 20_04_24_01_30_03 0 --- DRT1-OD04CL 00H 01H 0 --- 6 20_04_24_01_30_03 DRT1-OD04CL-1 00H 01H 0 --- 6 20_04_24_01_30_03 DRT1-OD08CL 00H 01H 0 --- 6 20_04_24_01_30_03 DRT1-OD08CL-1 00H 01H 0 --- 6 20_04_24_01_30_03 DRT1-OD08C 00H 01H 0 --- 6 20_04_24_01_30_03 DRT1-WD16C 00H 01H 0 --- 6 20_04_24_01_30_03 DRT1-WD16C-1 00H 01H 0 --- 6 20_04_24_01_30_03 DRT1-MD16C 01H 01H 6 20_04_24_01_30_03 6 20_04_24_01_30_03 DRT1-MD16C-1 01H 01H 6 20_04_24_01_30_03 6 20_04_24_01_30_03 DRT1-B7AC 04H 00H 6 20_04_24_01_30_03 0 --- Item Object instance 3 Section Information Max. number of instances Instance type Production trigger Bit strobed I/O Cyclic 1 --- Transport type Transport class Server 2 ----- 331 Appendix B Using Another Company’s Master Unit Item Object instance 3 Item Object instance 3 ID content Attribute 1 State Get (read) Yes Set (write) No --- 2 Instance type 3 Transport class trigger Yes Yes No No 01 (hexadecimal) 82 (hexadecimal) 4 Produced connection ID 5 Consumed connection ID Yes Yes No No ----- 6 Initial comm. characteristics 7 Produced connection size Yes Yes No No 01 (hexadecimal) See note. 8 Consumed connection size 9 Expected packet rate Yes Yes No Yes 0800H --- 12 Watchdog time-out action 13 Produced connection path length Yes Yes No No 01 See note. 14 Produced connection path 15 Consumed connection path length Yes Yes No No See note. See note. 16 Consumed connection path Yes No See note. DeviceNet service Service Value Parameter option 05Reset No 0EGet_Attribute_Single 10Set_Attribute_Single No No Note These values depend on the type of Slave being used. Refer to the following table. Model Produced Produced connection connection size path length Produced connection path Consumed connection path length Consumed connection path DRT1-ID08 01H 6 20_04_24_01_30_03 0 --- DRT1-ID08-1 DRT1-ID16 01H 02H 6 6 20_04_24_01_30_03 20_04_24_01_30_03 0 0 ----- DRT1-ID16-1 DRT1-OD08 02H 00H 6 0 20_04_24_01_30_03 --- 0 6 --20_04_24_01_30_03 DRT1-OD08-1 DRT1-OD16 00H 00H 0 0 ----- 6 6 20_04_24_01_30_03 20_04_24_01_30_03 DRT1-OD16-1 DRT1-MD16 00H 01H 0 6 --20_04_24_01_30_03 6 0 20_04_24_01_30_03 --- DRT1-ID16T DRT1-ID16T-1 02H 02H 6 6 20_04_24_01_30_03 20_04_24_01_30_03 0 0 ----- DRT1-OD16T DRT1-OD16T-1 00H 00H 0 0 ----- 6 6 20_04_24_01_30_03 20_04_24_01_30_03 DRT1-MD16T DRT1-MD16T-1 01H 01H 6 6 20_04_24_01_30_03 20_04_24_01_30_03 0 0 ----- DRT1-ID16TA DRT1-ID16TA-1 02H 02H 6 6 20_04_24_01_30_03 20_04_24_01_30_03 0 0 ----- DRT1-OD16TA DRT1-OD16TA-1 00H 00H 0 0 ----- 6 6 20_04_24_01_30_03 20_04_24_01_30_03 DRT1-MD16TA DRT1-MD16TA-1 01H 01H 6 6 20_04_24_01_30_03 20_04_24_01_30_03 0 0 ----- DRT1-ID32ML DRT1-ID32ML-1 04H 04H 6 6 20_04_24_01_30_03 20_04_24_01_30_03 0 0 ----- DRT1-OD32ML DRT1-OD32ML-1 00H 00H 0 0 ----- 6 6 20_04_24_01_30_03 20_04_24_01_30_03 332 Appendix B Using Another Company’s Master Unit Model DRT1-MD32ML Produced Produced Produced connection connection connection path size path length 02H 6 20_04_24_01_30_03 Consumed Consumed connection connection path path length 0 --- DRT1-MD32ML-1 DRT1-ID16X 02H 02H 6 6 20_04_24_01_30_03 20_04_24_01_30_03 0 0 ----- DRT1-ID16X-1 DRT1-OD16X 02H 00H 6 0 20_04_24_01_30_03 --- 0 6 --20_04_24_01_30_03 DRT1-OD16X-1 DRT1-HD16S 00H 02H 0 6 --20_04_24_01_30_03 6 0 20_04_24_01_30_03 --- DRT1-ND16S DRT1-TS04T 01H 08H 6 6 20_04_24_01_30_03 20_04_24_01_30_03 0 0 ----- DRT1-TS04P DRT1-AD04 08H 04H or 08H 6 6 20_04_24_01_30_03 20_04_24_01_30_03 0 0 ----- DRT1-AD04H DRT1-DA02 08H 00H 6 0 20_04_24_01_30_03 --- 0 6 --20_04_24_01_30_03 CQM1-DRT21 DRT1-ID04CL 02H 01H 6 6 20_04_24_01_30_03 20_04_24_01_30_03 0 0 ----- DRT1-ID04CL-1 DRT1-ID08CL 01H 01H 6 6 20_04_24_01_30_03 20_04_24_01_30_03 0 0 ----- DRT1-ID08CL-1 DRT1-ID08C 01H 01H 6 6 20_04_24_01_30_03 20_04_24_01_30_03 0 0 ----- DRT1-HD16C DRT1-HD16C-1 02H 02H 6 6 20_04_24_01_30_03 20_04_24_01_30_03 0 0 ----- DRT1-OD04CL DRT1-OD04CL-1 00H 00H 0 0 ----- 6 6 20_04_24_01_30_03 20_04_24_01_30_03 DRT1-OD08CL DRT1-OD08CL-1 00H 00H 0 0 ----- 6 6 20_04_24_01_30_03 20_04_24_01_30_03 DRT1-OD08C DRT1-WD16C 00H 00H 0 0 ----- 6 0 20_04_24_01_30_03 --- DRT1-WD16C-1 DRT1-MD16C 00H 01H 0 6 --20_04_24_01_30_03 0 0 ----- DRT1-MD16C-1 DRT1-B7AC 01H 04H 6 6 20_04_24_01_30_03 20_04_24_01_30_03 0 0 ----- Device Profile for the C200H I/O Link Unit General data Compatible DeviceNet Specifications Volume I - Release 1.3 Volume II - Release 1.3 Header name Device type name OMRON Corporation Slaves: Communication adapter Manufacturer catalog number Manufacturer revision W347 1.0 Header ID = 47 Device type number = 12 333 Appendix B Using Another Company’s Master Unit Physical conform- Network current consumption ance data Connector type Communications data 24 V DC at 45 mA max. Open plug Physical insulation Supported indicators Yes Module, Network MAC ID setting Default MAC ID DIP switch 0 Baud rate setting Supported baud rates DIP switch 125 kbps, 250 kbps, and 500 kbps Predefined Master/Slave connection set Dynamic connection support (UCMM) Group 2 only server No Explicit message fragmentation support Yes Object Mounting Identity Object (0x01) Object class Attribute Service Not supported Not supported Attribute 1 Vendor 2 Product type Yes Yes No No 47 12 3 Product code 4 Revision Yes Yes No No 51 1.3 5 Status (bits supported) 6 Serial number Yes Yes No No Bit 0 only Unique for each Unit 7 Product name 8 State Yes No No No C200HW-DRT21 --- Item Object instance ID content Item Object instance DeviceNet service Service 05Reset 0EGet_Attribute_Single Message Router Object (0x02) Object class Attribute Not supported Object instance Service Attribute Not supported Not supported Service Header specification addition Not supported No DeviceNet Object (0x03) Object class 334 Get (read) Attribute Not supported Service Not supported Set (write) Value Parameter option No No Appendix B Using Another Company’s Master Unit Item Object instance Attribute Item Object instance Service ID content 1 MAC ID Get (read) Set (write) Yes No --- 2 Baud rate 3 BOI Yes Yes No No --00 (hexadecimal) 4 Bus Off counter 5 Allocation information Yes Yes No No ----- 6 MAC ID switch changed 7 Baud rate switch changed No No No No ----- 8 MAC ID switch value 9 Baud rate switch value No No No No ----- DeviceNet service 0EGet_Attribute_Single No 4BAllocate_Master/Slave_Connection_Set 4CRelease_Master/Slave_Connection_Set No No Value Parameter option Connection Object (0x05) Object class Attribute Not supported Service Max. number of active connections Not supported 1 Item Section Object instance 1 Item Object instance 1 Max. number of instances Explicit Message Cyclic 1 --- Transport type Transport class Server 3 ----- Item Object instance 1 Information Instance type Production trigger ID content Attribute Set (write) Get (read) 1 State 2 Instance type Yes Yes No No --0000 (hexadecimal) 3 Transport class trigger 4 Produced connection ID Yes Yes No No 83 (hexadecimal) --- 5 Consumed connection ID 6 Initial comm. characteristics Yes Yes No No --21 (hexadecimal) 7 Produced connection size 8 Consumed connection size Yes Yes No No FE00 (hexadecimal) FE00 (hexadecimal) 9 Expected packet rate 12 Watchdog time-out action Yes Yes Yes No --0100 (hexadecimal) 13 Produced connection path length 14 Produced connection path Yes Yes No No 0000 (hexadecimal) --- 15 Consumed connection path length 16 Consumed connection path Yes Yes No No 0000 (hexadecimal) --- 17 Production inhibit time Yes No 0000 (hexadecimal) DeviceNet service Service Value Parameter option 05Reset No 0EGet_Attribute_Single 10Set_Attribute_Single No No 335 Appendix B Using Another Company’s Master Unit Item Object instance 2 Section Instance type Polled I/O 1 Production trigger Transport type Cyclic Server ----- Transport class 2 --- Item Object instance 2 ID content Attribute Max. number of instances 1 State Get (read) Yes Set (write) No --- 2 Instance type 3 Transport class trigger Yes Yes No No 0100 (hexadecimal) 82 (hexadecimal) 4 Produced connection ID 5 Consumed connection ID Yes Yes No No ----- 6 Initial comm. characteristics 7 Produced connection size Yes Yes No No 01 (hexadecimal) See note. 8 Consumed connection size 9 Expected packet rate Yes Yes No Yes See note. --- 12 Watchdog time-out action 13 Produced connection path length Yes Yes No No 0000 (hexadecimal) 0000 (hexadecimal) 14 Produced connection path 15 Consumed connection path length Yes Yes No No No 0000 (hexadecimal) 16 Consumed connection path 17 Production inhibit time Yes Yes No No No 0000 (hexadecimal) Item Object instance 2 Information DeviceNet service Service Value Parameter option 05Reset 0EGet_Attribute_Single No No 10Set_Attribute_Single No Note The number of bytes in the specified Read Area (Input Area) and Write Area (Output Area) is as follows: Produced connection size: Read Area bytes (default: 0200 (hexadecimal)) Consumed connection size: Write Area bytes (default: 0200 (hexadecimal)) Item Object instance 3 336 Section Information Max. number of instances Instance type Production trigger Bit strobed I/O Cyclic 1 --- Transport type Transport class Server 2 ----- Appendix B Using Another Company’s Master Unit Item Object instance 3 ID content Attribute 1 State Get (read) Yes Set (write) No --- 2 Instance type 3 Transport class trigger Yes Yes No No 0100 (hexadecimal) 82 (hexadecimal) 4 Produced connection ID 5 Consumed connection ID Yes Yes No No ----- 6 Initial comm. characteristics 7 Produced connection size Yes Yes No No 01 (hexadecimal) See note. 8 Consumed connection size 9 Expected packet rate Yes Yes No Yes 0800 (hexadecimal) --- 12 Watchdog time-out action 13 Produced connection path length Yes Yes No No 0000 (hexadecimal) 0000 (hexadecimal) 14 Produced connection path 15 Consumed connection path length Yes Yes No No No 0000 (hexadecimal) 16 Consumed connection path 17 Production inhibit time Yes Yes No No No 0000 (hexadecimal) Item Object instance 3 DeviceNet service Service Value Parameter option 05 Reset No 0E Get_Attribute_Single No 10 Set_Attribute_Single No Note The number of bytes in the specified Read Area (Input Area) is as follows: Produced connection size: Read Area bytes (default: 0200 (hexadecimal)) PLC Object (0x2F) Object class Attribute Not supported Service Not supported Item Object instance 1 (CIO Area 1: IR 000 to IR 235) See note. Service Object instance 2 (CIO Area 2: IR 300 to IR 511) See note. Service Object instance 3 (DM Area: DM 0 to DM 6143) See note. Service Object instance 4 (LR Area: LR 00 to LR 63) See note. Service Object instance 5 (HR Area: HR 00 to HR 99) See note. Service DeviceNet service 1C Block String Read Parameter option Logical Area Address Length 1D Block String N Read 1E Block String Write Logical Area Address Length Logical Area Address 1F Block String N Write 1C Block String Read Logical Area Address Logical Area Address Length 1D Block String N Read 1E Block String Write Logical Area Address Length Logical Area Address 1F Block String N Write 1C Block String Read Logical Area Address Logical Area Address Length 1D Block String N Read 1E Block String Write Logical Area Address Length Logical Area Address 1F Block String N Write 1C Block String Read Logical Area Address Logical Area Address Length 1D Block String N Read 1E Block String Write Logical Area Address Length Logical Area Address 1F Block String N Write 1C Block String Read Logical Area Address Logical Area Address Length 1D Block String N Read 1E Block String Write Logical Area Address Length Logical Area Address 1F Block String N Write Logical Area Address 337 Appendix B Using Another Company’s Master Unit Item Object instance 6 (AR Area: AR 00 to AR 27) See note. Service Object instance 7 (TIM/CNT Area: TIM/CNT 000 to TIM/CNT 511) See note. Service Object instance 8 Service (EM Area: Depends on the model) See note. DeviceNet service 1C Block String Read Parameter option Logical Area Address Length 1D Block String N Read 1E Block String Write Logical Area Address Length Logical Area Address 1F Block String N Write 1C Block String Read Logical Area Address Logical Area Address Length 1D Block String N Read 1E Block String Write Logical Area Address Length Logical Area Address 1F Block String N Write 1C Block String Read Logical Area Address Logical Area Address Length 1D Block String N Read 1E Block String Write Logical Area Address Length Logical Area Address 1F Block String N Write Logical Area Address Note The data areas shown in the table are for C200HX/HG/HE (-ZE) PLCs. Refer to the following table for the equivalent data areas in CS1H/G PLCs. C200HX/HG/HE (-ZE) CIO Area 1 (IR 000 to IR 235) CS1H/G CIO Area 1 (CIO 000 to CIO 235) CIO Area 2 (IR 300 to IR 511) DM Area (DM 0000 to DM 6143) CIO Area 2 (CIO 300 to CIO 511) Data Memory Area (D0000 to D6143) LR Area (LR 00 to LR 63) HR Area (HR 00 to HR 99) No equivalent Holding Area (H000 to H099) AR Area (AR 00 to AR 27) TC Area (TC 00 to TC 511) Holding Area (H100 to H127) (H101 is not allowed.) Timer PV Area (T000 to T511) EM Area (Depends on the model being used.) E Area (Depends on the model being used.) Refresh Object (0x92) Object class Attribute Service Item Object instance 1 (current value) ID and contents Attribute Item Object instance 1 (current value) 338 64: Output refresh bytes 65: Output refresh area type Get (read) Yes Yes Set (write) No No ----- Yes No --- 67: Input refresh bytes 68: Input refresh area type Yes Yes No No ----- 69: Input refresh address Yes No --Parameter option 0EGet_Attribute_Single 01Set_Attribute_Single ID content Attribute Value 66: Output refresh address DeviceNet service Service Item Object instance 2 (set value) Not supported Not supported No No 64: Output refresh bytes Get (read) Yes Set (write) Yes Value --- 65: Output refresh area type 66: Output refresh address Yes Yes Yes Yes ----- 67: Input refresh bytes 68: Input refresh area type Yes Yes Yes Yes ----- 69: Input refresh address Yes Yes --- Appendix B Using Another Company’s Master Unit Item Object instance 2 (set value) DeviceNet service Service Parameter option 0E Get_Attribute_Single No 10 Set_Attribute_Single No 01 Get_Attribute_All No 02 Set_Attribute_All No Note The refresh areas are divided as follows: C200HX/HG/HE (-ZE) CS1H/G CIO Area 1 (IR 000 to IR 235) CIO Area 2 (IR 300 to IR 511) CIO Area 1 (CIO 000 to CIO 235) CIO Area 2 (CIO 300 to CIO 511) DM Area (DM 0000 to DM 6143) LR Area (LR 00 to LR 63) Data Memory Area (D0000 to D6143) No equivalent HR Area (HR 00 to HR 99) AR Area (AR 00 to AR 27) Holding Area (H000 to H099) Holding Area (H100 to H127) (H101 is not allowed.) TC Area (TC 00 to TC 511) Timer PV Area (T000 to T511) EM or E Area (Only valid with PLC’s equipped with Extended Data Memory. Bank 0 only.) Note Device Profile for the RS-232C Unit General data Compatible DeviceNet Specifications Volume I - Release 2.0 Volume II - Release 2.0 Header name Device type name OMRON Corporation Slaves: Generic W347 Manufacturer catalog number Manufacturer revision Physical conform- Network current consumption ance data Connector type Communications data Header ID = 47 Device type number = 0 1.0 24 V DC at 50 mA max. Physical insulation Open plug Yes Supported indicators MAC ID setting Module, Network DIP switch Default MAC ID Baud rate setting 0 DIP switch Supported baud rates Predefined Master/Slave connection set 125 kbps, 250 kbps, and 500 kbps Group 2 only server Dynamic connection support (UCMM) Explicit message fragmentation support Yes Yes Object Mounting Identity Object (0x01) Object class Attribute Not supported Service Not supported 339 Appendix B Using Another Company’s Master Unit Item Object instance Attribute ID content 1 Vendor Get (read) Set (write) Yes No 47 2 Product type 3 Product code Yes Yes No No 0 308 4 Revision 5 Status (bits supported) Yes Yes No No 1.4 --- 6 Serial number 7 Product name Yes Yes No No Unique for each Unit DRT1-232C 8 State No No --- Item Object instance DeviceNet service Service 05Reset 0EGet_Attribute_Single Value Parameter option No No Message Router Object (0x02) Object class Attribute Service Not supported Not supported Object instance Attribute Service Not supported Not supported Header specification addition No DeviceNet Object (0x03) Item Object class Object class ID content Not supported ID content Attribute 1 MAC ID 2 Baud rate Yes Yes No No ----- 3 BOI 4 Bus Off counter Yes Yes No No 00 (hexadecimal) --- 5 Allocation information 6 MAC ID switch changed Yes No No No ----- 7 Baud rate switch changed 8 MAC ID switch value No No No No ----- 9 Baud rate switch value No No --- Get (read) No Value Service Item Object instance Service Yes Set (write) 1 Revision Item Object instance Get (read) Attribute 02 (hexadecimal) Set (write) DeviceNet service 0EGet_Attribute_Single No 4BAllocate_Master/Slave_Connection_Set 4CRelease_Master/Slave_Connection_Set No No Value Parameter option Assembly Object (0x04) Object class Attribute Not supported Service Not supported Item Object instance Attribute Item Object instance 340 ID content 3 Data Get (read) Set (write) Yes No --- DeviceNet service Service 0EGet_Attribute_Single 10Set_Attribute_Single Value Parameter option No No Appendix B Using Another Company’s Master Unit Connection Object (0x05) Object class Attribute Service Not supported Not supported Max. number of active connections 1 Item Section Object instance 1 Max. number of instances Instance type Production trigger Explicit Message Cyclic 1 --- Transport type Transport class Server 3 ----- Item Object instance 1 Information ID content Attribute 1 State Get (read) Yes Set (write) No --- 2 Instance type 3 Transport class trigger Yes Yes No No 0000 (hexadecimal) 83 (hexadecimal) 4 Produced connection ID 5 Consumed connection ID Yes Yes No No ----- 6 Initial comm. characteristics 7 Produced connection size Yes Yes No No 21 (hexadecimal) FFFF (hexadecimal) 8 Consumed connection size 9 Expected packet rate Yes Yes No Yes FFFF (hexadecimal) --- 12 Watchdog time-out action 13 Produced connection path length Yes Yes Yes No 01 (hexadecimal) 00 (hexadecimal) 14 Produced connection path 15 Consumed connection path length Yes Yes No No --00 (hexadecimal) 16 Consumed connection path 17 Production inhibit time Yes Yes No No --00 (hexadecimal) Item DeviceNet service 0EGet_Attribute_Single 10Set_Attribute_Single Value Parameter option Object instance 1 Service No No Item Object instance 2 Section Instance type Polled I/O 1 Production trigger Transport type Cyclic Server ----- Transport class 2 --- Information Max. number of instances 341 Appendix B Using Another Company’s Master Unit Item Object instance 2 ID content Attribute 1 State Get (read) Yes Set (write) No --- 2 Instance type 3 Transport class trigger Yes Yes No No 01 (hexadecimal) 82 (hexadecimal) 4 Produced connection ID 5 Consumed connection ID Yes Yes No No ----- 6 Initial comm. characteristics 7 Produced connection size Yes Yes No No 01 (hexadecimal) 0200 (hexadecimal) 8 Consumed connection size 9 Expected packet rate Yes Yes No Yes 0000 (hexadecimal) --- 12 Watchdog time-out action 13 Produced connection path length Yes Yes No No 00 (hexadecimal) 02 (hexadecimal) 14 Produced connection path 15 Consumed connection path length Yes Yes No No --00 (hexadecimal) 16 Consumed connection path 17 Production inhibit time Yes Yes No No --00 (hexadecimal) Item Object instance 2 DeviceNet service Service Item Item Object instance 3 342 No No Information Max. number of instances Instance type Production trigger Bit strobed I/O Cyclic 1 --- Transport type Transport class Server 2 ----- Item Object instance 3 Parameter option 0EGet_Attribute_Single 10Set_Attribute_Single Section Object instance 3 ID content Attribute Service Value Set (write) Get (read) Value 1 State 2 Instance type Yes Yes No No --01 (hexadecimal) 3 Transport class trigger 4 Produced connection ID Yes Yes No No 82 (hexadecimal) --- 5 Consumed connection ID 6 Initial comm. characteristics Yes Yes No No --02 (hexadecimal) 7 Produced connection size 8 Consumed connection size Yes Yes No No 0200 (hexadecimal) 0800 (hexadecimal) 9 Expected packet rate 12 Watchdog time-out action Yes Yes Yes No --00 (hexadecimal) 13 Produced connection path length 14 Produced connection path Yes Yes No No 06 (hexadecimal) 20_04_24_01_30_03 15 Consumed connection path length 16 Consumed connection path Yes Yes No No 00 (hexadecimal) --- 17 Production inhibit time Yes No 00 (hexadecimal) DeviceNet service 0EGet_Attribute_Single No Parameter option 10Set_Attribute_Single No Appendix C Connectable Devices and Device Current Consumptions Slave Units Basic I/O Slave Units Model DRT1-ID08 Specifications Remote I/O Terminal 8 Transistor inputs (NPN) Manufacturer OMRON DRT1-ID08-1 Remote I/O Terminal 8 Transistor inputs (PNP) OMRON DRT1-ID16 Remote I/O Terminal 16 Transistor inputs (NPN) OMRON DRT1-ID16-1 Remote I/O Terminal 16 Transistor inputs (PNP) OMRON DRT1-OD08 Remote I/O Terminal 8 Transistor outputs (NPN) Remote I/O Terminal 8 Transistor outputs (PNP) Remote I/O Terminal 16 Transistor outputs (NPN) Remote I/O Terminal 16 Transistor outputs (PNP) OMRON DRT1-OD08-1 DRT1-OD16 DRT1-OD16-1 OMRON OMRON OMRON DRT1-MD16 Remote I/O Terminal OMRON 8 Transistor inputs, 8 transistor outputs (NPN) DRT1-ID16T Remote I/O Terminal 16 Transistor inputs (NPN) (3-tier I/O Terminal Block) OMRON DRT1-ID16T-1 Remote I/O Terminal 16 Transistor inputs (PNP) (3-tier I/O Terminal Block) Remote I/O Terminal 16 Transistor outputs (NPN) (3-tier I/O Terminal Block) Remote I/O Terminal 16 Transistor outputs (PNP) (3-tier I/O Terminal Block) Remote I/O Terminal 8 Transistor inputs, 8 transistor outputs (NPN) (3-tier I/O Terminal Block) OMRON DRT1-OD16T DRT1-OD16T-1 DRT1-MD16T OMRON OMRON OMRON DRT1-MD16T-1 Remote I/O Terminal OMRON 8 Transistor inputs, 8 transistor outputs (PNP) (3-tier I/O Terminal Block) DRT1-ID16TA Remote I/O Terminal OMRON 16 Transistor inputs (NPN) (3-tier I/O Terminal Block, internal power supply not required) Remote I/O Terminal OMRON 16 Transistor inputs (PNP) (3-tier I/O Terminal Block, internal power supply not required) DRT1-ID16TA-1 343 Connectable Devices and Device Current Consumptions Model DRT1-OD16TA Specifications Manufacturer Remote I/O Terminal OMRON 16 Transistor outputs (NPN) (3-tier I/O Terminal Block, internal power supply not required) DRT1-OD16TA-1 Remote I/O Terminal OMRON 16 Transistor outputs (PNP) (3-tier I/O Terminal Block, internal power supply not required) Remote I/O Terminal OMRON 8 Transistor inputs, 8 transistor outputs (NPN) (3-tier I/O Terminal Block, internal power supply not required) DRT1-MD16TA DRT1-MD16TA-1 DRT1-ID32ML Remote I/O Terminal OMRON 8 Transistor inputs, 8 transistor outputs (PNP) (3-tier I/O Terminal Block, internal power supply not required) Remote I/O Terminal OMRON 32 Transistor inputs (NPN) with Connectors DRT1-ID32ML-1 Remote I/O Terminal 32 Transistor inputs (PNP) with Connectors OMRON DRT1-OD32ML Remote I/O Terminal 32 Transistor outputs (NPN) with Connectors OMRON DRT1-OD32ML-1 Remote I/O Terminal 32 Transistor outputs (PNP) with Connectors Remote I/O Terminal 16 Transistor inputs, 16 transistor outputs (NPN) with Connectors OMRON DRT1-MD32ML-1 Remote I/O Terminal 16 Transistor inputs, 16 transistor outputs (PNP) with Connectors OMRON DRT1-ID16X Remote Adapter 16 Transistor inputs (NPN) OMRON DRT1-ID16X-1 Remote Adapter 16 Transistor inputs (PNP) OMRON DRT1-OD16X Remote Adapter 16 Transistor outputs (NPN) Remote Adapter 16 Transistor outputs (PNP) Sensor Terminal 8 sensor inputs (NPN) 2 inputs per sensor Sensor Terminal 8 sensor inputs (NPN) 1 input and 1 output per sensor OMRON DRT1-AD04 Analog Input Terminal 4 analog inputs (using 4 words) or 2 analog inputs (using 2 words) (Switchable) OMRON DRT1-AD04H Analog Input Terminal 4 analog inputs (using 4 words) OMRON DRT1-DA02 Analog Output Terminal 2 analog outputs (using 2 words) Temperature Input Terminal Thermocouple thermometer input 4 temperature data inputs (using 4 words) OMRON DRT1-MD32ML DRT1-OD16X-1 DRT1-HD16S DRT1-ND16S DRT1-TS04T 344 Appendix C OMRON OMRON OMRON OMRON OMRON Appendix C Connectable Devices and Device Current Consumptions Model DRT1-TS04P CQM1-DRT21 Specifications Temperature Input Terminal Temperature-resistance thermometer input 4 temperature data inputs (using 4 words) I/O Link Unit suitable for CQM1-series PLC. 16 inputs and 16 outputs Manufacturer OMRON OMRON Environment-resistive Slaves Model Specifications DRT1-ID08C Environment-resistive Terminal 8 Transistor inputs (NPN) Conforms to IEC IP66 OMRON DRT1-HD16C Environment-resistive Terminal 16 Transistor inputs (NPN) Conforms to IEC IP66 OMRON DRT1-HD16C-1 Environment-resistive Terminal 16 Transistor inputs (PNP) Conforms to IEC IP66 Environment-resistive Terminal 8 Transistor outputs (NPN) Conforms to IEC IP66 Environment-resistive Terminal 16 Transistor outputs (NPN) Conforms to IEC IP66 Environment-resistive Terminal 16 Transistor outputs (PNP) Conforms to IEC IP66 OMRON DRT1-OD08C DRT1-WD16C DRT1-WD16C-1 Manufacturer OMRON OMRON OMRON DRT1-MD16C Environment-resistive Terminal OMRON 8 Transistor inputs, 8 transistor outputs (NPN) Conforms to IEC IP66 DRT1-MD16C-1 Environment-resistive Terminal 8 Transistor inputs, 8 transistor outputs (NPN) Conforms to IEC IP66 Waterproof Terminal 4 Transistor inputs (NPN) Conforms to IEC IP67 Waterproof Terminal 4 Transistor inputs (PNP) Conforms to IEC IP67 Waterproof Terminal 8 Transistor inputs (NPN) Conforms to IEC IP67 OMRON DRT1-ID08CL-1 Waterproof Terminal 8 Transistor inputs (PNP) Conforms to IEC IP67 OMRON DRT1-OD04CL Waterproof Terminal 4 Transistor outputs (NPN) Conforms to IEC IP67 OMRON DRT1-OD04CL-1 Waterproof Terminal 4 Transistor outputs (PNP) Conforms to IEC IP67 Waterproof Terminal 8 Transistor outputs (NPN) Conforms to IEC IP67 Waterproof Terminal 8 Transistor outputs (PNP) Conforms to IEC IP67 B7AC Interface Unit OMRON DRT1-ID04CL DRT1-ID04CL-1 DRT1-ID08CL DRT1-OD08CL DRT1-OD08CL-1 DRT1-B7AC OMRON OMRON OMRON OMRON OMRON OMRON 345 Appendix C Connectable Devices and Device Current Consumptions Special I/O Slave Units Model Specifications Manufacturer C200HW-DRT21 I/O Link Unit for C200HE, C200HG, C200HX PLCs (User-set allocations possible) 512 inputs max, 512 outputs max. Read/Write Area can be user-set using explicit DeviceNet messages OMRON DRT1-232C2 RS-232C Unit with 2 RS-232C ports 16 inputs (communications status) RS-232C ports’ parameters can be set, and data can be transmitted to and from external devices using explicit DeviceNet messages OMRON Communications Cables Model Specifications Manufacturer DCA2-5C10 DCA1-5C10 Thick cable: 5 wires, 100 m Thin cable: 5 wires, 100 m OMRON OMRON DVN18-10G DVN18-30G Thick cable: 5 wires, 10 m Thick cable: 5 wires, 30 m Nihon Wire & Cable Nihon Wire & Cable DVN18-50G DVN18-100G Thick cable: 5 wires, 50 m Thick cable: 5 wires, 100 m Nihon Wire & Cable Nihon Wire & Cable DVN18-300G DVN18-500G Thick cable: 5 wires, 300 m Thick cable: 5 wires, 500 m Nihon Wire & Cable Nihon Wire & Cable DVN24-10G DVN24-30G Thin cable: 5 wires, 10 m Thin cable: 5 wires, 30 m Nihon Wire & Cable Nihon Wire & Cable DVN24-50G DVN24-100G Thin cable: 5 wires, 50 m Thin cable: 5 wires, 100 m Nihon Wire & Cable Nihon Wire & Cable DVN24-300G DVN24-500G Thin cable: 5 wires, 300 m Thin cable: 5 wires, 500 m Nihon Wire & Cable Nihon Wire & Cable 1485C-P1-A50 1485C-P1-C150 Thick cable: 5 wires, 50 m Thin cable: 5 wires, 150 m Allen-Bradley Allen-Bradley DCA1-5CN@W1 Cable with round shielded connectors on both ends (one socket and one plug) OMRON DCA1-5CN@F1 Cable with round shielded connector (female socket) on one end Cable with round shielded connector (male plug) on one end OMRON DCA1-5CN@H1 OMRON Note 1. The cables made by Nihon Wire & Cable Company Ltd. are sold through the OMRON 24 Service Co., Ltd. The product specifications are identical to the OMRON cable specifications. 2. The cables made by Allen-Bradley are stiffer than the cables made by OMRON and Nihon Wire & Cable Company Ltd., so do not bend the Allen-Bradley cables as much as the others 346 Appendix C Connectable Devices and Device Current Consumptions Connectors Model Specifications Manufacturer MSTB2.5/5-ST-5.08AU For node connection Phoenix Contact Without connector set screws GmbH & Co. (Included with the DRT1-@D08(-1), DRT1@D16(-1), DRT1-@D16X(-1), DRT1-@D16S(1), DRT1-AD04(H), DRT1-DA02, and DRT1TS04@) XW4B-05C1-H1-D For T-branch Tap and node connection With connector set screws (Included with the DRT1-@D16T(-1), DRT1-@D32ML(-1), CVM1-DRM21-V1, C200HW-DRM21-V1, CQM1-DRT21, and DCN1) For node connection (Multi-drop wiring) Without connector set screws OMRON For node connection (Multi-drop wiring) With connector set screws OMRON XW4B-05C4-T-D XW4B-05C4-TF-D OMRON Crimp Terminals for Communications Cables Model Crimper Remarks Manufacturer TC series: TME TC-0.5 (for thin cable) TME TC-2-11 (power supply wire for thick cable) TME TC-1.25-11 (communications wire for thick cable) NH-32 For single wire insertion Nichifu Co., Ltd. (See note.) AI series: AI-0.5-8WH-B (product number 3201369) AI series: AI-TWIN2×0.5-8WH (product number 3200933) ZA3 For single wire insertion Phoenix Contact GmbH & Co. UD6 (product number For two-wire 1204436) insertion (Multi-drop use) Note The solderless (crimp) terminals made by Nichifu Co., Ltd. are sold through the OMRON 24 Service Co., Ltd. Contact the Nichifu Co., Ltd. directly for details on their products. Specialty Screwdrivers for Connectors Model XW4Z-00C SZF-1 Specifications Manufacturer Special screwdriver for DeviceNet connectors Special screwdriver for DeviceNet connectors OMRON OMRON Tsufo Service Model DRS1-T Specifications Terminal-block Terminating Resistor, 121 Ω Manufacturer OMRON DRS2-1 DRS2-2 Shielded Terminating Resistor (male plug) Shielded Terminating Resistor (female socket) Terminating Resistors Note Also can be used as Terminating Resistor with T-branch Tap. 347 Connectable Devices and Device Current Consumptions Appendix C T-branch Taps Model Specifications Manufacturer DCN1-1C 3 connectors provided (When used on trunk line, 1 drop line can be connected.) Terminating Resistor can be connected. OMRON DCN1-3C 5 connectors provided (When used on trunk line, 3 drop lines can be connected.) Terminating Resistor can be connected. OMRON T-branch Connector Model DCN2-1 Specifications Shielded T-branch Connector (1 branch) Manufacturer OMRON Power Supply Sharing Taps Model 1485T-P2T5-T5 Specifications Manufacturer Required when connecting more than one power Allen-Bradley supply. Countercurrent flow prevention, ground terminal provided DCN1-1P One-branch tap for power supply. Use this tap when connecting a communications power supply. Two connectors and two fuses are standard. OMRON Note The Power Supply Sharing Taps are sold through the OMRON 24 Service Co., Ltd. Connectors for I/O Cable Connections to Sensor Terminals Model XS8A-0441 Specifications Connector marking: XS8-1 Applicable cable wire size: 0.3 to 0.5 mm2 Manufacturer OMRON XS8A-0442 Connector marking: XS8-2 Applicable cable wire size: 0.14 to 0.2 mm2 OMRON Connectors for Environment-resistive Slaves DRT1-@D@@C (-1): I/O Connectors Model XS2G-D4@@ XS2H-D421-@@@ XS2W-D42@-@@@ 348 Description Connector male plug assembly (Crimp-connect or soldered) Cable with connector on one end (Male plug on one end, cable wires on one end) Cable with connectors at both ends (Male plug on one end, female socket on one end) Manufacturer OMRON Appendix C Connectable Devices and Device Current Consumptions DRT1-@D@@C (-1): External Power Supply Connectors Model Description XS2C-D4@@ Female connector socket assembly (Crimp-connect or soldered) XS2F-D42@-@80-A Cable with connector on one end (Female socket on one end, cable wires on one end) Manufacturer OMRON DRT1-@D@@CL (-1): I/O Connectors Model XS2G-D4@@ XS2H-D421-@@@-@ Description Connector male plug assembly (Crimp-connect or soldered) Cable with connector on one end (Male plug on one end, cable wires on one end) Manufacturer OMRON XS2W-D42@-@@@-@ Cable with connectors at both ends (Male plug on one end, female socket on one end) DRT1-@D@@CL (-1): External Power Supply Connectors Model Description Manufacturer XS2C-D4@@ Female connector socket assembly OMRON (Crimp-connect or soldered) XS2F-D42@-@80-@ Cable with connector on one end (Female socket on one end, cable wires on one end) XS2W-D42@-@@@-@ Cable with connectors at both ends (Male plug on one end, female socket on one end) DRT1-B7AC: I/O Connectors Model XS2G-D4@@ Description Connector male plug assembly (Crimp-connect or soldered) Manufacturer OMRON XS2H-D42@-@@@-@ Cable with connector on one end (Male plug on one end, cable wires on one end) XS2W-D42@-@@@-@ Cable with connectors at both ends (Male plug on one end, female socket on one end) DRT1-B7AC: External Power Supply Connectors Model XS2C-D4@@ Description Manufacturer Female connector socket assembly OMRON (Crimp-connect or soldered) XS2F-D42@-@@@-@ Cable with connector on one end (Female socket on one end, cable wires on one end) XS2W-D42@-@@@-@ Cable with connectors at both ends (Male plug on one end, female socket on one end) T-joint Model XS2R-D427-5 Description Shielded T-joint (Use to branch a cable for an Environment-resistive Terminal’s internal power supply.) Manufacturer OMRON Y-joint Plug/Socket Model XS2R-D426-@11F With cable XS2R-D426-1 Without cable Description Manufacturer Use for Environment-resistive Ter- OMRON minals with 16 inputs or 16 outputs. (Branches a single connector’s signals to two connectors.) 349 Appendix C Connectable Devices and Device Current Consumptions Connector Covers for Environment-resistive Slaves Model Description XS2Z-12 XS2Z-15 Manufacturer Waterproof Cover (meets 1P67 standards) Dust Cover OMRON RS-232C Connectors for the RS-232C Unit Name Model Description Manufacturer Plug Hood XM2D-0901 (or equivalent) XM2S-0913 (or equivalent) 9-pin, female 9-pin, SAE screws OMRON Recommended cable UL2464 AWG28×5P IFS-RVV-SB AWG28×5P IFVV-SB UL listed Fujikura UL2464-SB 5P×AWG28 CO-MA-VV-SB 5P×AWG28 UL listed Not UL listed Not UL listed Hitachi Bracket for Remote I/O Terminal with Connector Model SRT2-ATT02 Description Mounting bracket B Manufacturer OMRON MIL Cables for Remote I/O Terminal with Connector Cables with Connectors on Both Ends (40-pin on One End, Two 20-pins on One End) Model Compatible Slaves Compatible Terminals G79-I50-25-D1 (50 cm) G79-I75-50-D1 (75 cm) DRT1-ID32ML DRT1-OD32ML-1 G7TC-ID16, G7TC-IA16 G7TC-OC16-4, M7F G79-I50-25-D2 (50 cm) G79-I75-50-D2 (75 cm) DRT1-ID32ML-1 G70A-ZIM16-5 G79-O50-25-D1 (50 cm) G79-O75-50-D1 (75 cm) DRT1-OD32ML G7TC-OC08/OC16, G70D-SOC16/VSOC16, G70A-ZOC16-3 DRT1-OD32ML-1 G70A-ZOC16-4, G70D-SOC16-1 G79-M50-25-D1 (50 cm) G79-M75-50-D1 (75 cm) DRT1-MD32ML Inputs: G7TC-ID16/IA16 Outputs: G7TC-OC08/ OC16, G7OD-SOC16/VSOC16, G70A-ZOC16-3 G79-M50-25-D2 (50 cm) G79-M75-50-D2 (75 cm) DRT1-MD32ML-1 Inputs: G70A-ZIM16-5 Outputs: G70A-ZOC16-4, G70D-SOC16-1 Manufacturer OMRON Cables with Connector on One End (40-pin on One End, WIres on One End) Model Description G79-A200C-D1 (2 m) Loose wire gauge: 28 AWG G79-A500C-D1 (5 m) (Wires are just cut.) G79-Y100C-D1 (1 m) Fork terminals are attached to all of the loose wires. G79-Y200C-D1 (2 m) Fork terminal model number: 161071-M2 G79-Y500C-D1 (5 m) 350 Manufacturer OMRON Appendix C Connectable Devices and Device Current Consumptions Flat Cable Crimp Connector Model XG4M-4030-T Description For cable with 28 AWG wires Manufacturer OMRON Loose WIre Crimp Connectors Name Model Description Manufacturer Socket XG5M-4032-N XG5M-4035-N For cable with 24 AWG wires For cable with 28 to 26 AWG wires Partial Cover Hood Cover XG5S-2001 XG5S-2002 Two are required for each connector Cannot be used together with DeviceNet Connectors for multi-drop wiring. OMRON Current Consumption Summary Model Internal current consumption Communications current consumption DRT1-ID08 DRT1-ID08-1 50 mA max. 50 mA max. 30 mA max. 30 mA max. DRT1-ID16 DRT1-ID16-1 50 mA max. 50 mA max. 30 mA max. 30 mA max. DRT1-OD08 DRT1-OD08-1 50 mA max. 50 mA max. 30 mA max. 30 mA max. DRT1-OD16 DRT1-OD16-1 50 mA max. 50 mA max. 30 mA max. 30 mA max. DRT1-MD16 DRT1-ID16T 50 mA max. 90 mA max. 25 mA max. 30 mA max. DRT1-ID16T-1 DRT1-ID16TA 90 mA max. (See note.) 30 mA max. 50 mA max. DRT1-ID16TA-1 DRT1-OD16T (See note.) 90 mA max. 50 mA max. 30 mA max. DRT1-OD16T-1 DRT1-OD16TA 90 mA max. (See note.) 30 mA max. 50 mA max. DRT1-OD16TA-1 DRT1-MD16T (See note.) 90 mA max. 50 mA max. 30 mA max. DRT1-MD16T-1 DRT1-MD16TA 90 mA max. (See note.) 30 mA max. 50 mA max. DRT1-MD16TA-1 DRT1-ID32ML (See note.) (See note.) 50 mA max. 50 mA max. DRT1-ID32ML-1 DRT1-OD32ML (See note.) (See note.) 50 mA max. 90 mA max. DRT1-OD32ML-1 DRT1-MD32ML (See note.) (See note.) 90 mA max. 70 mA max. DRT1-MD32ML-1 DRT1-ID16X (See note.) 70 mA max. 70 mA max. 30 mA max. DRT1-ID16X-1 DRT1-OD16X 70 mA max. 70 mA max. 30 mA max. 30 mA max. DRT1-OD16X-1 DRT1-HD16S 70 mA max. 60 mA max. 30 mA max. 40 mA max. DRT1-ND16S DRT1-AD04 60 mA max. 80 mA max. 40 mA max. 30 mA max. 351 Appendix C Connectable Devices and Device Current Consumptions Model Internal current consumption DRT1-AD04H 130 mA max. Communications current consumption 30 mA max. DRT1-DA02 DRT1-TS04T 140 mA max. 130 mA max. 30 mA max. 30 mA max. DRT1-TS04P CQM1-DRT21 130 mA max. 80 mA max. (at 5 V DC, supplied from the PLC’s Power Supply Unit) 30 mA max. 40 mA max. CPM1A-DRT21 50 mA max. (at 5 V DC, supplied from the PLC’s CPU Unit.) 30 mA max. Note The internal power supply and communications power supply are shared. Environment-resistive Slaves Model Internal current consumption Communications current consumption DRT1-ID04CL DRT1-ID04CL-1 (See note.) (See note.) 25 mA max. 25 mA max. DRT1-ID08CL DRT1-ID08CL-1 (See note.) (See note.) 30 mA max. 30 mA max. DRT1-ID08C DRT1-HD16C 50 mA max. 50 mA max. 30 mA max. 30 mA max. DRT1-HD16C-1 DRT1-OD04CL 50 mA max. (See note.) 30 mA max. 35 mA max. DRT1-OD04CL-1 DRT1-OD08CL (See note.) (See note.) 35 mA max. 40 mA max. DRT1-OD08CL-1 DRT1-OD08C (See note.) 50 mA max. 40 mA max. 30 mA max. DRT1-WD16C DRT1-WD16C-1 60 mA max. 60 mA max. 30 mA max. 30 mA max. DRT1-MD16C DRT1-MD16C-1 50 mA max. 50 mA max. 30 mA max. 50 mA max. DRT1-B7AC 500 mA max. 70 mA max. Note The internal power supply and communications power supply are shared. Special-purpose Slaves Model 352 Internal current consumption Communications current consumption C200HW-DRT21 250 mA max. (Supplied from the Backplane) 45 mA max. DRT1-232C2 100 mA max. 50 mA max. Appendix D Precautions when Connecting Two-wire DC Sensors When using a two-wire sensor with a 12-V DC or 24-V DC input device, check that the following conditions have been met. Failure to meet these conditions may result in operating errors. Relation between Slave with Transistor Inputs and Sensor Residual Voltage VON ≤ VCC – VR VCC: I/O power supply voltage (The allowable power supply range is 20.4 to 26.4 V, and thus 20.4 V will be used to allow for the worst possible conditions.) VON: ON voltage for a Slave with Transistor Inputs VR: Sensor’s output residual voltage ON Current for Slave with Transistor Inputs and Sensor Control Output (Load Current) IOUT (min) ≤ ION ≤ IOUT (max.) IOUT: Sensor control output (load current) ION: Slave ON current ION = (VCC – VR – VF)/RIN VF: RIN: Internal residual voltage of Slave Input impedance of Slave When ION is smaller than IOUT (min), connect a bleeder resistor R. The bleeder resistor constant can be calculated as follows: R ≤ (VCC – VR)/(IOUT (min.) – ION) Power W ≥ (VCC – VR)2/R × 4 [allowable margin] 2-wire sensor VR R RIN Slave with Transistor Input VCC Relation between OFF Current of Slave with Transistor Inputs and Sensor Leakage Current IOFF ≥ Ileak IOFF: OFF current of Slave Ileak: Leakage current of Slave Connect a breeder resistor if Ileak is greater than IOFF. Use the following equation to calculate the breeder resistance constant. R ≤ (IOFF x RIN + VF)/(Ileak – VOFF) Power W ≥ (VCC – VR)2/R × 4 [allowable margin] 353 Glossary Busoff A Busoff error occurs when there is an unacceptably high error rate on the communications bus. This error is detected when the internal error counter exceeds a specified value. (The error counter is cleared whenever the Master Unit is started or reset.) CAN Controller Area Network. A communications protocol for a LAN developed for mounting in automobiles. The DeviceNet uses CAN technology. configurator A device used to make system settings, read IDs, read/write parameters, read the network configuration, etc. OMRON provides a DeviceNet Configurator for OMRON Master Units. consumed connection size The size in bytes of the data received through a connection. ODVA Open DeviceNet Vendor Association. A non-profit vendor association responsible for spreading DeviceNet. produced connection size The size in bytes of the data sent through a connection. connection A logical communications channel created to communicate between two nodes. Connections are established and maintained between masters and slaves. device profile A description of the structure and behavior of a device giving the minimum data configurations and operations that the device must support. Device profiles enable common device models, and are also called device models. Device profiles are being studied for sensors, valves, displays, encoders, and other devices. master A node that controls the collection and distribution of data. With the DeviceNet, the predefined master/slave connection set defines the functions provided by all masters. slave A node that provides data in response to requests from masters. With the DeviceNet, the predefined master/slave connection set defines the functions provided by all slaves. 355 Index Numerics 7-segment display meaning, 233, 312 A allocations CQM1 I/O Link Unit, 173 Analog Input Terminals averaging function, 147 components, 139 converted data, 142 converted data storage, 147 dimensions, 149 DIP switch, 139 input ranges, 142 inputs setting number of, 146 internal circuitry, 141 open-circuit detection function, 147 rotary switch, 140 specifications, 137 wiring, 142 Analog Input Units troubleshooting, 315 Analog Output Terminals components, 150 converted data, 153 converted data storage, 155 dimensions, 155 DIP switch, 151 internal circuitry, 152 output ranges, 153 outputs status after communications error, 154 rotary switch, 151 specifications, 149 terminal arrangement, 152 wiring, 153 averaging function Analog Input Terminals, 147 C cleaning, 318 communications, 305 cycle time, 305 communications cycle time, 305 connector pin allocation Remote Adapter 16 output type, 119 converted data Analog Input Terminals, 142 Analog Output Terminals, 153 converted data storage Analog Input Terminals, 147 Analog Output Terminals, 155 CQM1 word allocation I/O Link Units, 173 cycle time, 305 communications, 305 D-E decimal 2-column display mode Temperature Input Terminals, 164 dimensions Analog Input Terminals, 149 Analog Output Terminals, 155 I/O Link Units, 174 Master Units C200HX, C200HG, C200HE, and C200HS PLCs, 256 Remote Adapter 16 input type, 116 16 output type, 121 Sensor Terminals, 128, 132 Temperature Input Terminals, 160, 169 Transistor Remote Terminals transistor input, 45 transistor output, 197 DIP switch Analog Input Terminals, 139 Analog Output Terminals, 151 Temperature Input Terminals, 160 errors indicators Slave Unit, 312 I I/O Link Units components, 173 CQM1 word allocation, 173 dimensions, 174 specifications, 173 I/O response times, 300 maximum C200HX, C200HG, C200HE, and C200HS PLCs, 305 CV-series PLCs in asynchronous mode, 301 CV-series PLCs in synchronous mode, 303 minimum C200HX, C200HG, C200HE, and C200HS PLCs, 304 CV-series PLCs in asynchronous mode, 300 CV-series PLCs in synchronous mode, 302 indicators errors Slave Unit, 312 Master Units CV-series, 233 meaning, 29 input devices Remote Adapter 16 input type, 115, 116 input ranges Analog Input Terminals, 142 inputs setting number of Analog Input Terminals, 146 inspection, 318 internal circuitry Analog Input Terminals, 141 Analog Output Terminals, 152 Sensor Terminals, 127, 130 Transistor Remote Terminals 357 Index transistor input, 42, 46 transistor output, 54 internal circuitry power supply Remote Adapter 16 input type, 114, 115 16 output type, 119, 120 M-P maintenance, 318 Master Units dimensions C200HX, C200HG, C200HE, and C200HS PLCs, 256 indicators CV-series, 233 N nodes number setting table, 321 replacement, 319 O open-circuit detection function Analog Input Terminals, 147 output devices Remote Adapter 16 output type, 120, 121 output ranges Analog Output Terminals, 153 outputs status after communications error Analog Output Terminals, 154 R refresh time, 307 Remote Adapter 16 input type components, 113 dimensions, 116 input devices, 115, 116 internal circuitry power supply, 114, 115 specifications, 112 16 output type connector pin allocation, 119 dimensions, 121 internal circuitry power supply, 119, 120 output devices, 120, 121 rotary switch Analog Input Terminals, 140 Analog Output Terminals, 151 Temperature Input Terminals, 161 S Sensor Terminals components, 126, 130 dimensions, 128, 132 internal circuitry, 127, 130 Slave Units baud rate, 40, 62, 88, 111, 137, 158, 172, 180, 201, 216, 261 358 node number setting range, 40, 62, 87, 111, 124, 180, 201, 216, 230 specifications, 31 troubleshooting, 313 specifications Analog Input Terminals, 137 Analog Output Terminals, 149 communications, 28 I/O Link Units, 173 Remote Adapter 16 input type, 112 Slave Units, 31 Transistor Remote Terminals transistor input, 41 transistor output, 49, 53 system startup times, 308 T-W Temperature Input Terminals decimal 2-column display mode, 164 dimensions, 160, 169 DIP switch, 160 rotary switch, 161 terminal arrangement, 162 wiring, 162 terminal arrangement Analog Output Terminals, 152 Temperature Input Terminals, 162 test, 176 Transistor Remote Terminals transistor input components, 42, 46 dimensions, 45 internal circuitry, 42, 46 specifications, 41 wiring, 47 transistor output components, 50, 53 dimensions, 197 internal circuitry, 54 specifications, 49, 53 wiring, 52, 55 troubleshooting Analog Input Units, 315 Slave Units, 313 wiring Analog Input Terminals, 142 Analog Output Terminals, 153 Temperature Input Terminals, 162 Transistor Remote Terminals transistor input, 47 transistor output, 52, 55 Revision History A manual revision code appears as a suffix to the catalog number on the front cover of the manual. Cat. No. W347-E1-06 Revision code The following table outlines the changes made to the manual during each revision. Page numbers refer to the previous version. Revision code 1 Date October 1998 2 3 October 2000 June 2001 Revised content Original production Reprinted due to error. Major revision to add new Units: DRT1-ID16T (-1), DRT1-ID16TA (-1), DRT1OD16T (-1), DRT1-OD16TA (-1), DRT1-MD16T (-1), DRT1-MD16TA (-1), DRT1MD16, DRT1-ID32ML (-1), DRT1-OD32ML (-1), DRT1-MD32ML (-1), DRT1ID04CL (-1), DRT1-ID08CL(-1), DRT1-HD16C (-1), DRT1-OD04CL (-1), DRT1OD08CL (-1), DRT1-WD16C(-1), DRT1-MD16C-1, and DRT1-B7AC. “CompoBus/D” deleted from manual and “DeviceNet” used instead. Page xiv: Precautions added on terminal polarity and other wiring specifications and Environment-resistive Slaves. Page xi: Manuals added to list. Pages 5 and 6: Callouts and graphics reworked and tables added after. Pages 12 to 14 and elsewhere: References to manuals simplified. Page 14: Connector added. Page 15: “Restrictions to Master Units....” removed. Page 17: Most of 2-3-4 Connecting Cables moved to 4-2 Connecting Cables with some additions. Page 31: Section 3 Common Specifications added from pages 48 and 49 and examples previously in this section moved to new Section 6 Special I/O Slave Units Specifications. Pages 31 on: General-purpose Slaves and Environment Resistive Slaves separated into two sections (with new slaves added). Page 136: Information moved or added to this page. Pages 136, 141, 143, 150 to 161, and 193: Information added on CS-series PLCs. Pages 139 and 145: Note added. Pages 145 to 149: Many changes made. Page 162 and 180 to 184: Additions (some pages from other sections). Page 169: Large addition. Pages 169 to 177: Command formats changed in places. Page 190: Small additions. Page 192: Change to result line of equation. Page 193: Addition on I/O Link Unit. Pages 196 to 202: Deleted. Page 206: 7-2 Error History deleted. Page 209: 7-3-1 Master Unit Troubleshooting deleted. Page 218: Table removed. Page 222: Title changes and pages added. Page 222 to 240: Changes and additions made for new Slaves. Page 240: New appendix added. 359 Revision code 04 Date April 2002 05 October 2002 PC changed to PLC throughout manual. Page 33: First 6 rows of body of bottom table revised. Page 34: Row for DRT1-OD16X and DRT1-OD16X-1 combined and new row added to end of table. Pages 91, 92, 96, 97, 101, 102: Graphic replaced. Page 99: Note changed under and “m+1” changed to “n” in bottom table. Page 102: Bottom graphic altered. Page 108: Models added to table. Pages 176, 177, 351, and 352: Contents of table changed. Page 263: Contents of top table changed. Page 287: Note added to table. 06 September 2003 Page 173: Table changed to include new models. Pages 204, 207, 210, 213: One dimension corrected from “20” to “10” in the diagram. Page 235: Note added regarding Read/Write Area size settings. Page 340: “2.1” corrected to “1.4” as the value of Attribute 4 for the Object instance of Identity Object (0x01). 360 Revised content Page xiii: Minor addition made to warning information. Page xv: Paragraph added to first list. OMRON CORPORATION FA Systems Division H.Q. 66 Matsumoto Mishima-city, Shizuoka 411-8511 Japan Tel: (81)55-977-9181/Fax: (81)55-977-9045 Regional Headquarters OMRON EUROPE B.V. Wegalaan 67-69, NL-2132 JD Hoofddorp The Netherlands Tel: (31)2356-81-300/Fax: (31)2356-81-388 OMRON ELECTRONICS LLC 1 East Commerce Drive, Schaumburg, IL 60173 U.S.A. Tel: (1)847-843-7900/Fax: (1)847-843-8568 OMRON ASIA PACIFIC PTE. LTD. 83 Clemenceau Avenue, #11-01, UE Square, Singapore 239920 Tel: (65)6835-3011/Fax: (65)6835-2711 Authorized Distributor: Cat. No. W347-E1-06 Note: Specifications subject to change without notice. Printed in Japan Cat. No. W347-E1-06 C200HW-DRT21/CQM1-DRT21/DRT1 Series DeviceNet Slaves OPERATION MANUAL