1
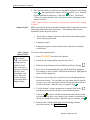
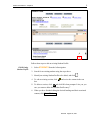
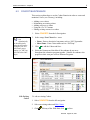
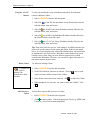
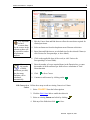
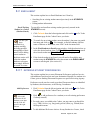
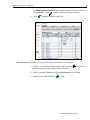
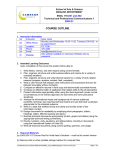
1
HSPnet User Manual – Chapter 6
CHAPATER 6 PLACING AGENCY – STUDENT &
COHORT FUNCTIONS
6.1
STUDENT MAINTENANCE
This section explains how to use the Students function to maintain information
about students in a Program. Student information includes:
• Releasable contact information – student name (to be released to
Receiving Agencies upon confirmation of an accepted Placement Request)
• Non-releasable contact information – student phone, email, and student
number (to be maintained by the school only for acceptable purposes as
outlined in HSPnet policies).
• Student Profile – information to assist in identifying a suitable placement
experience, including a student’s work and educational history, volunteer
history, placement history, etc.
Student Database
Shared Across
Programs in a
Placing Agency
Each educational institution (Placing Agency) maintains a single student
database, to be shared across all Programs offered. For example, a student
enrolled in one program may later enroll in a completely different program, but
the same student record would be used for both. Typically, a student is
uniquely identified in the database by their Student Number.
Students should be added to HSPnet only after a careful search has determined
that the student is not already in the database for that Placing Agency.
Searching to Add
New Students or to
Edit Existing
Students
1. Select STUDENTS from the left navigation.
2. Enter all or part of the student’s last name and/or first name in the Search
Criteria fields, then click Search to find all student names that match. For
example, entering “S” in the last name field would produce a list of all
students with a last name such as Smith, Stother, and Stothers. You may
also enter the student number to locate the desired student information.
3. If the desired student is found (after carefully checking names and student
number to ensure a perfect match) you can edit the student’s information
by clicking
and updating the fields provided.
Revised: August 30, 2007
2
HSPnet User Manual – Chapter 6
4. If the desired student is not found, you can add the student by selecting the
green
and completing the orange “Add New Student” area. Enter the
required information denoted by * and click
to Save. The Search
Criteria will update and the screen will refresh to show all students with a
similar last name.
NOTE: Student number is a mandatory field and also required when entering
in initials.
Student Profiles
HSPnet provides the ability to maintain detailed profiles of students to assist in
identifying suitable placement experiences. The student profile presents
information under categories such as:
•
Add or Upload
Student Profile
To add
multiple
items under a
heading (such as
multiple Goals)
enter each item as
separate content but
select the same
Heading for each
entry. This will
result in multiple
items listed under a
single Heading.
Work and/or volunteer experience related to the educational program
and/or requested placement
•
Languages spoken
•
Student prerequisites such as immunization, criminal record check,
certifications
To create or add a student profile:
1. Select STUDENTS from the left navigation.
2. Search for an existing student using the steps above.
3. When the desired student is found, add their profile by clicking.
4. Select a new section heading from the Add Profile Entry dropdown.
For example, to add “Goals for This Placement Request” highlight this
choice from the dropdown
5. Place the cursor in the text box under the selected Heading and enter
the relevant content. You can either type the content directly into the
text box or you can cut and paste from an existing document in Word
or other text format. When the entry is complete, click
.
6. To add a student’s resume (anonymous or named), click on the
and choose the desired document(s) you would like to attach.
7. Click on the
to edit or add the document selection and the section
will drop down to allow you to browse your computer or network for
the file you would like to upload. When the entry is complete, click
8. When you have finished adding the desired headings and their
associated content, click Close Window.
Revised: August 30, 2007
3
HSPnet User Manual – Chapter 6
Follow these steps to edit an existing Student Profile:
Edit Existing
Student Profile
1. Select STUDENTS from the left navigation.
2. Search for an existing student using the steps above.
3. Identify an existing Student Profile to be edited, and click
4. To edit an existing section, click
box.
.
and revise the content in the text
5. To delete a section, click
and click OK when prompted “Are you you
sure you want to delete this Student Profile entry?”
6. When you have finished editing the desired headings and their associated
content, click Close Window.
Revised: August 30, 2007
4
HSPnet User Manual – Chapter 6
6.2
COHORT MAINTENANCE
This section explains how to use the Cohort Function in order to create and
maintain Cohorts (see Glossary), including:
•
•
•
•
•
Adding a new cohort
Maintaining an existing cohort
Adding courses to a cohort
Using the “Go To” buttons
Editing existing courses in a cohort
1. Select COHORTS from the left navigation.
Cohorts will
sort
alphabetically
or chronologically
using the short name.
Using the year first
will ensure proper
sorting. (ie. 2007 Jan
will sort before 2007
Sept)
Edit Existing
Cohort
2. In the orange New Cohort bar - enter:
• Name - Enter a descriptive long name such as “2007 September
• Short Name - Enter a short name such as “2007Sept”
3. Click
to add the Cohort and Save.
4. Select the Unstructured checkbox if the students do not move
throughout the education program together. Suitable for students who
progress as their own pace such as Distance Programs.
To edit an existing Cohort:
1. Select COHORTS from the left navigation.
2. Select an existing cohort and Edit Cohort.
3. Click
Edit any of the fields then click
to Save.
Revised: August 30, 2007
5
HSPnet User Manual – Chapter 6
Using the “Go To”
buttons
To view the enrollment screen, worksheets and outbox for individual
courses within the Cohort:
1. Select COHORTS from the left navigation.
2. Select the
to “Go To” the enrollment screen already filtered to the
selected cohort, term, and course.
3. Select the to “Go To” the Group Worksheet already filtered to the
selected cohort, term, and course.
4. Select the to “Go To” the Individual Worksheet already filtered to
the selected cohort, term, and course.
5. Select the to “Go To” the Group Worksheet already filtered to the
selected cohort, term, and course.
Tip: These new icons also act as a "task manager" for HSPnet because the
arrows tell you the status of each course and cohort. In the screen sample
below, if a Course displays only a blue (Enrollment) arrow, this means that
no students have yet been sent to a Worksheet or the Outbox. If no green
(Outbox) arrow exists, then you know that no requests have yet been
created in the Worksheet. Therefore, you can tell at a glance the status of
placement requests in each course.
Delete Cohort
A Cohort can
only be
deleted if no
students have been
enrolled.
To delete an existing Cohort:
1. Select COHORTS from the left navigation.
2. Click Edit Cohort for cohort to be deleted. Click the
course to remove all the courses in the Cohort
3. Once all the courses have been removed, click
next to each
to delete the Cohort.
4. When prompted “Are you sure you want to delete this Cohort?” click
OK .
Add Courses to
Cohort
Follow these steps to add courses to a Cohort.
1. Select COHORTS from the left navigation.
2. Click
to add a course. Select the appropriate Term (e.g. SPR03) and
Course (e.g. Nurs320) from the dropdowns.
Revised: August 30, 2007
6
HSPnet User Manual – Chapter 6
It is important
to have
accurate dates
for the courses in the
cohorts as these will
be carried forward to
all placement
requests.
3. Edit the Course Start and End dates to reflect the exact dates required for
clinical practicum.
4. Select an Instructor from the dropdown menu if known at this time.
5. Enter Start and End times to set a default time for the selected Cohort (or
click Various for Preceptorships, or leave blank).
6. Click on the applicable days of the week (or click Various for
Preceptorships, or leave blank).
If you enter
the number
of Shifts
and Hours per shift,
the placement
Duration will be
calculated
automatically.
7. Enter the number of course required hours in the Duration box, or enter
the number of shifts and hours per shift to force calculation of Total
Hours duration.
8. Click
to Save Course.
9. Continue to add courses by clicking on the
Edit Courses in a Follow these steps to edit an existing Course in a Cohort:
Cohort
1. Select COHORTS from the left navigation.
2. Click the Edit Cohort link to enable the edit tools
3. Select an existing Course and edit it by clicking
4. Edit any of the fields then click
.
to Save.
Revised: August 30, 2007
7
HSPnet User Manual – Chapter 6
6.3
ENROLLMENT
This section explains how to Enroll Students in a Cohort by:
• Searching for an existing student entered previously in the STUDENTS
screen;
• Editing student information
Enroll Existing
Student in a Cohort
(Student Search)
To search for and enroll an existing student (prevously entered in the
STUDENTS screen):
1. Click Cohorts from the left navigation and click on the
Enrollment page for the Cohort/Course you desire.
Be sure you
have
searched for a
student carefully,
including possible
misspellings of their
name, before adding
a new student as
duplicate entries will
cause the student
database to become
increasingly difficult
to search over time.
6.3.1
to Go To the
2. To search for an existing student, enter the student’s last name (or partial
last name and click on
. For example, to find all students with last
name of Roberts or Robertson, enter “Rob” in the last name field.
3. In the Find Students to Enroll popup window, click the selection box to
select the desired student, then click Enroll Selected Students to enroll
the selected student and Close Window to close the popup.
4. If the desired student is not found, you will need to first add the new
student using the STUDENTS screen, then return to the ENROLLMENT
screen to search again. (See section 6.1)
ENTERING STUDENT PREFERENCES
This section explains how to enter Placement Preferences (preferred service,
with addition of preferred site and even destination if known) for students in a
Cohort, prior to sending Placement Requests to a specific Receiving Agency.
Preferences can be used to record up to three Placement choices as identified
by Students, their Instructors, or the Placing Coordinator.
Add Preferences
If you would
like to add
preferences for all
students at one time
use the “Edit All”
pencil in the right
column.
1. Click Cohorts from the left navigation and click on the
Enrollment page for the Cohort/Course you desire
to Go To the
2. Click
to add preferences for a student (or to edit existing preferences
if already entered).
3. For each course you added to the Cohort, you may enter a preferred Site
(e.g.. TRH), Service (e.g. Surg) and (optional) Dest (e.g. 6North) from
the dropdown menu.
4. To add additional Preference choices for any Student in a Course, check
Revised: August 30, 2007
8
HSPnet User Manual – Chapter 6
the Show all preferences checkbox in the Current View Filter. For the
desired student, select
to add 2nd and 3rd preference choices.
5. Click
to add the Preference and Save.
Edit Preferences Follow these steps to edit existing Preferences for a Student:
1. Click Cohorts from the left navigation and click on the
Enrollment page for the Cohort/Course you desire.
to Go To the
2. Select an existing Student and edit their Preferences it by clicking
3. Edit any of the fields then click
to Save.
Revised: August 30, 2007
.