1
-
m
::s
c
m
.
VACYUMPUMP
VACUUM PUMP
As a specialized enterprise in making vacuum pumps . We are
always devoting ourselves to satisfying users' need of high-qualifide
products. We ado pt the latest design and technique, to make sure
that our products no t only cost less energy, produce less noise and
last well, but also are the best design for environment protecting
and less pumped gas pollution . Excellent design and making will
bring you more convenience.
n.usab!e range
TW series of single-stage rotary vane vacuum pumps and two-s tage
rotary vane vacuum pumps are used to obtain vacuum by pumping
gas from sealed containers , especially suitable for Refrigeration
repair (use with R12 , R22, and R134a air conditioning systems) ,
medical app liances , printing machinery, vacuum packing , gas
analysis and hot-fo rming plastics .
2.Features
•
IDl~G
Oil Ant1:flQw
b~~k d~§.ign
The gas inlet is specially designed to prevent the oil from flowing
back, preventing the container and the hoses from being polluted.
fmlirQn m ~nt~LQ~§.ign
Th e tank has separating devices at the exhaust port to prevent oil
spraying and to reduce pollution .
AllQy-~l'ym Inum.saslns
Motor using Aluminum alloy casing , have good heat dissipation
qua lities , it will help to keep the pump running more efficiently for a
longer period of time , and has a good appearance quality.
Qy.~r~lLQ~§.ign
The electric components and the pump are overall designed to make
the product compact and lighter.
f~§.Y-tQ..§.t~r tJ~§.t~Lt Q..Q'ym Q
The starter design make the vacuum pump easy to start even in
lower temperatures. This feature allows higher efficiency and faster
pumping .
.!"QW nQi§.e and
viQr~tiQn
An electrometric-coupling insert between the motor and module
results in extremely quiet and smooth operation.
VAC UUM PUMP
VACUU M P UMP
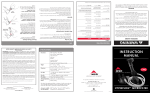
3.Produc t Illustration
5.User's manual ]
• Examine the oil-level before using to make sure the oil-level is not
lower than the oil-level li ne in the sight glass. Do not run pump with
low oil levels. Add oil to bring it up to the oil level lin e.
• Connect the container to be pumped to the gas inlet. The hose
should be short, sea led and free of dust, dirty and heavy condens
-ation. Check for leaks before operating pump
• Take down the exhaust cap(if have),plug in the power supply and
turn the switch on.
• Unplug the vacuum pump, remove the connecting hoses and cover
the ex haust cap ( if have) , a nd cover the oil plug afte r using
,
1
ElECTR ICAL
~s
4 .Main technique parameters
• HSERIES SINGLESTAGEVACUUMPUMP
Model
TW·0.5H
TW·1H
TW-1.5H
TW·2H
TW· 3H
TW·4H
FlowRate
220V/50Hz
1
2
3.2
4.2
6.4
8.4
(CFM)
110V/60Hz
1.2
2.5
3.8
5
7.6
10
(Pa){IMiClOfls)
2/1 5
2/15
2/15
2/15
2/15
2/15
(Pa){IMlcronsl
20/150
20/150
20/150
201150
20/150
1/ 6
1/4
1/4
1/3
~
1440
1440
14411
1770
I
Ultimate
Vacuum I
P ~:~:~ re
~~~as su r e
Power(HPJ
-
20/150
3/4
Rotating Speed
220V/50Hz
1440
1440
1440
(r/min)
11 0V/60Hz
1720
1720
1720
250
230
200
-11211
250
11 20
Oil Capacity(ml)
400
700
Dimensions(mm)
270x120x220
270x120x220
270x 120x220
323x120x235
346x135x245
390x145x2 80
Weight (kg)
6
7.2
7.5
8.8
9.8
15.5
-
-
• HSERIES DOUBLE STAGEVACUUMPUMP
Model
2TW·0.5H
2TW·1H
2TW·l .5H
2TW·2H
2TW·3H
2TW-4H
220V/50 Hz
1
2
3.2
4.2
6.4
8.4
11 0V/60Hz
1.2
2.5
3.8
5
7.6
10
2xl 0·'/l.5
2xl 0·'/1.5
2xl0·'/1.5
2xl0·'/1.5
2xl 0·'/1.5
2xl0-'/1.5
pressure (Pa}{IM,CIOfls)
2/15
2/15
2/15
2/1 5
2/15
2/15
Power (HP)
1/4
1/3
1/3
Y,
3/4
314
Flow Rate
.
(CFM )
I partial
ressure (Pa){ IMicrons)
Ultimate
Vacuum
I lola
Rotating Speed
220V/50H z
1440
1440
1440
1440
1440
1440
Irlmin)
110VI60Hz
1720
1720
1720
1720
1720
1720
250
230
330
280
600
650
325x 120x235
346x135x245
346x135x245
390x1 45x280
390x145x280
10
16
17
OilCapacity(ml)
Dimensions(mm)
325x 120x235
Weight (kg)
7
9
10
---------.~---------
6.Cautions
• Don't pump flammable , explosive or poisonous gases.
• Don't pump gas that can corrode metals and exert chemical charges .
• Don't pump gas containing any dust or moisture .
• The temperature of the pumped gas shouldn't be over 176°F (80 'C),
and the environment temperature should be around 23°F( -5'C) to
140°F (60'C).
· Don't use vacuum pump as a compression pump or conveyer pump.
• Pump can not be operated without oil.
• The operating voltage is between 192 t0248 V, 50H Z . You must use
a grounded outlet.
• When unplugging the pump, pull the plug. Don't unplug unit by
pulling on the wire.
• Keep electrical cord free from all shop equipment , and do not let
pump hang by power cord.
• Don't use damaged plug or outlet.
· Don't plug or pull out the plug with wet hands.
· Don't plug unit in, unplug unit or use switch if there are any flamm
able or explosive gases present.
• Always unplug unit before disassembling.
---------.--------
VACUUM PUMP
VACUUM PUMP
'7 .lnst al l atJQn _
• vVhen in use , the pump sho uld be horizontal and shou ld be positioned
where it is dry, ventilated and fr ee of dus t and othe r contam inants.
• In or de r to ens ure proper air flow, you must maint ain a clea rance
aro und the pump of at least 1Ocm (4i nc hes) .
• To permane ntly mount the vacuum pump, remove the rubber pads
fro m the bottom of the base, and use the existing threaded ho les to
mount unit. Mount with ST4 .2 scre ws .
• When per manently moun ti ng this pu mp, be sure to mai nta in prope r
cleara nces around the unit , especially at th e air inta ke at the end of
the vane shell.
• If a spec ial elec tromag netic valve is needed , it can be insta lled on
the gas inlet.
B.Troubleshooting
--Pro blem
Low Degree
Of Vacuum
Oil Leaks
Oil Spray
Starting
Difficulty
Possible Cause
1.
2.
3.
4.
5.
1.
2.
Co rrection
Lack of oil
Oil 15not clean
The oil intet is blocked
The hoser or gas inlet are clogged
The pump is not suitable for your application
The oil sea l is damaged
The housing gasket is loose or worm out
1.
2.
3.
4.
5.
1.
2.
Add oil to above the oil leve l line
Change the oil
Clean the oil inter or clean the filter
Check the connecting pipes
Get suitable pump for your application
Change oil seal
Change the housing gasket
1. Oil to the oil-leve l line
1. Too much oil
2. The pressure at the gas inlet is too high or it has
pumped too much
2. Change to a bigge r pump
1. The oil temperature is too low
2. Electrical malfunction
3. Foreign matter is in the pump
1. Start the pump several times to try to heat the oil
2. Chec k and have it fixed
3. Check and remove it
-
,9 .M_aint enance
• Keep the pump clean and preve nt foreign matter from entering.
• Keep the oil filled to the oil- level. Don't let pump run withou t oi l.
• Keep the oil clean . If the oil becomes dirty, muddy, or water or other
volatil e substa nces get s in, it will aff ect the perf orm ance of the pump
and the oil sho uld be replaced. Before repl aci ng the oil, start the pump
and have it for about 30 minutes to make the oil thi n. Stop the pump
and drain the oil from the oil drain plug . Then open th e gas inlet and
run ning 1-2 minu tes, during this time, add a small quantity of clean
oil for the gas inlet , that's in order to replace the resi dual oil from the
inside pump . Aft er making sure the pump is cle an, put the drain plug
back in and then fill the clean pump oil from the gas inlet to the oil- leve l.
• To store the pump when not in use for long periods of time , cover the oil
cap and exhaust cap(if have)and store it in a dry place .
• Repair of pump should only be done by a qualified service technician.
II
A ~~"l
ORDERING PART PART DESCRIPTION,
ORDERING PART PART DESCRIPTION ORDERING PART PART DESCRIPTION
valve-coreplate
47
bearing
24
fan co ve r
01
back-pump rotor
48
oil seal
25
screw
02
back-pump plate
49
nu t
26
fan
03
cap board
50
inlet fitting
27
motor cover
04
a-ring
51
oil fitting port
28
screw
05
oil tank
52
a-ring
29
centrifugalswitch base
06
oil
gas
separator
a-ring
53
30
screw
07
a-ring
54
front-pump plate
31
bearing
.
08
oil le ve l
55
frontrotary-vane
32
centrifuga switch
09
screw
56
spring
rotor
33
10
screw
57
front-pump rotor
34
power cable
11
bolt
flat
key
58
35
cable lo cker
12
back·pump
valve core
59
front-pump bod y
bearin g
13
- -3 6
spring
60
3~
__ sc re w
sw it ch
14
- -
valve-core springbracket
61
sc re w
wavefo rm gasket
15
- - f
- 38
screw
valve·core springbrackel
62
stator
39
16
nut
sp ring
63
screw
40
17
rubber
feet
64
from-pu mpvalve core
capacitor-coverbase
41
18
screw
65
valve-core plate
screw
42
19
baseboard
66
middle
fense
capacitor cover
43
20
bearing
pad
67
back rotary-vane
motor aluminum hull
44
21
sc
rew
68
back-pump rotor
capac itor
45
22
screw
handle
23
46
-
-
-
-
-
~
~