1
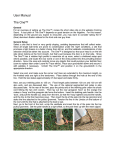
User Manual
Mariposa Plus Ultralight Pack
Unpacking
Your Mariposa Plus package should contain the following items:
A Mariposa Plus pack with the carbon fiber stays and sternum strap already installed.
Two foam shoulder strap inserts.
Two foam waist belt inserts.
Waist belt.
Compression lacing and cord locks (inside the pack).
User Manual
Components
Foam Inserts
If you choose to use the foam for waist belt and shoulder strap padding instead of using sleeping socks,
gloves, or other unused items, insert the foam padding. The shoulder strap foam are designed to be
installed so that the 'notch' corresponds to the Velcro opening. The larger 'tab' should be installed up for
most people. It works well to insert the top portion of the foam into the shoulder strap first, then rotate
and squish to get the rest of the foam in. Since the waist belt foam inserts are used for a variety of packs,
it might be necessary to trim the insert to fit the waist belt. Check before trimming to make sure, and trim
only what you need to have the foam fit into the waist belt. Insert the waist belt foam in a similar manner
to the shoulder strap inserts.
For maximum weight savings, we recommend the use of clothing articles like fleece socks, gloves, extra
socks, etc. If you decide to use the foam inserts, you will want to put them in and leave them, not just
because it takes some effort to get them in and out, but also after repeated insertions, parts of the foam
tabs may start to tear. Please note, the inside of the shoulder straps and waist belts are wicking fabric.
While we have added a backing of silnylon, profuse sweaters in humid climates may want to insert their
unused clothing in ziplock type bags before insertion into the straps to avoid the absorption of unwanted
moisture.
Stays
The carbon fiber stays are designed to help transfer the load to the waist belt. If you take them in and
out, keep in mind there may initially be some carbon fiber dust on them from the manufacturing process.
When installing, if the stays seem to 'hang up' slightly about half an inch before full insertion, jiggle gently
until you can insert them all the way. Close the hook and loop tab securely over the stay tube so the
stays can't work their way out of the tops.
Hydration Bladder Pocket
The Mariposa Plus is equipped with a sleeve on the inside for holding a hydration bladder. Insert your
bladder, then run the drinking tube out either the right or left side drinking tube port. If you have no use
for the sleeve, you can carefully trim it out and save 0.1 oz. The left side pocket is designed to be large
enough to carry a water bladder. To balance out the weight you can usually pack a dense part of your
load, like food, on the opposite side inside the pack. Some people insert their hydration bladders outside
the pack, behind the pad. A good bladder for this is the Platypus 3L Hoser, filled to a maximum of 2 liters.
Sternum Strap
The sternum strap is removable so you can save the weight if you don't use it. The slider has a 'split'
connector that allows it to be removed from the pack. Depending on which side you install where, you
can choose to have the adjustable portion on the right, or the whistle buckle facing up. The strap is
equipped with a shock absorber so as to not hamper breathing and movement.
Waist Belt
The waist belt slides underneath the pad holder pocket through the channel at the bottom of the pack.
There is a channel made of 210 denier double wall ripstop with hook and loop on the inside. The belt will
need to be threaded through the channel until the hook and loop pieces line up with each other. Make
sure you place the waist belt inside the channel and not just underneath the pad pocket mesh so that the
hook and loop on the waist belt will grab onto the hook and loop in the channel. This keeps the waist belt
in place. The pack can also be carried without the waist belt if you’re carrying very light loads and don’t
need the weight distribution to your hips. This takes some time to remove and insert so unless you need
to remove the waist belt, it’s recommended to leave it in place once you install it the first time.
Compression Lacing
The compression lacing is designed to provide some compression for smaller loads. When you receive
the pack, the lacing should be inside the pack with the cord locks. You may want to experiment with
different configurations. There are matching lash loops on the back of the pack for flexibility. Possible
options to try would be lashing across the back and one of the sides to provide additional compression or
lacing up each side to reduce the pack volume.
Ice Axe Holder
To use the ice axe holder, hold the ice axe head up, and put the handle down through the webbing loop.
With the head snugly against the loop, bring the handle up against the back of the pack, and use the
shock cord or other means to secure it against the pack.
'Y' Top Closure
The top closure webbing is designed long, to accommodate a full extension collar, a bear canister, etc.
The 'Y' angle can be adjusted by using the slider. For large heavy loads, such as a bear canister, you will
need to either put the canister inside a fabric cover with lash attachments on it, or epoxy some lash
attachments directly onto the canister. Keep in mind, most canisters on the market will fit inside the pack,
so it may make more sense, if you are short on room, to put softer, lighter portions of your load on top of
the pack.
Recommendations for Use
Initial Packing
To see if the Mariposa Plus will work for you and to maintain your ability to return it for a refund if you
decide it will not, in accordance with our return policy, load it up with your normal gear and try it on around
the house and/or around the block. The main concepts in packing the Mariposa Plus are to maintain a
high center of gravity, and keep items accessed most often nearer the top. First, stow the sleeping bag in
the bottom of the pack. Since the Mariposa Plus seams are not sealed, we recommend using a trash
compactor bag, mylar turkey roasting bag, or a Gossamer Gear pack liner (on the inside of the pack) for
protecting your sleeping bag and clothes. We recommend dispensing with the weight of a stuff sack and
just stowing the sleeping bag directly into the liner in the pack. Packing the sleeping bag on the bottom
helps raise the center of gravity. Next pack your clothes, also within the protective liner. Next put in your
other gear and finally your food. Comfort is improved by keeping hard objects away from your back, but
heavy items are best placed closer to the back to minimize the pull on the shoulders.
Next, pack the shoulder straps and waist belt either with clothing items normally unused during the day,
like sleeping socks, gloves, etc, or with the foam inserts provided. Then insert your sleeping pad in the
pad holders. We recommend a NightLight™ torso pad or a Z-Lite™ pad cut down to six sections (30”) in
length, but almost any pad that is 20" wide will work (note – the Z-LIte™ pad “dimples” do compress with
use, so you will end up periodically replacing the pad).
Before putting the pack on, loosen the shoulder straps and unbuckle the waist belt. Use the haul loop to
lift the pack, and put it on. Tighten the waist belt first, securing the pack around your waist/hips where
you find it most comfortable. Then tighten the shoulder straps. With the pack on, see how it fits your
particular body type and load.
Many components of the Mariposa Plus are designed to be removable. For instance, for extremely light
loads, you may find that the carbon fiber stays provide minimal benefit, at which point you can just
remove them for that trip. The whistle/sternum strap is removable so that if you don't find a need for it,
you can save the weight. If you won't need the shock cord compression strap, it can be removed. The
new waist belt system is removable as well.
On the Trail
For packing, sit on your pad and stow the sleeping bag. When you take off your sleeping socks, stuff
them into the shoulder straps for padding. Note: if you are expecting rain or you sweat heavily, you may
want to put your socks in Ziploc bags before inserting them in the shoulder straps. You may be wearing
your hat and gloves to start, and may have nothing to put in the waist belt. However, if it is cold, you will
be wearing your jacket, which provides padding. If you start out early in the morning, you may be wearing
most of your clothes. Loading your clothing pockets with food for the morning will allow you not to have to
stop to remove food from your pack. An alternative would be to keep food handy in the Mariposa Plus
pockets. When the day warms up and you stop to strip clothing, we recommend putting the clothing
below the food, since the clothing is usually less dense, and packing the clothes below the food will raise
the center of gravity. If your tarp/tent/ground cloth is damp, it can be placed in the large back pocket.
Placing the wet tarp in the outside pocket will keep it away from your dry gear, and it may even dry a little.
The hydration pocket on the inside of the pack is designed to carry a hydration bladder, though it can also
be used to store maps you don't need yet, reading material, snacks you want to keep accessible, first aid
kit, etc. Outlet ports are provided on both sides, so you can use the side that you prefer for the drinking
hose. If you don't use hydration bladders, the lower right side pocket is designed to carry a water bottle
and be accessible without taking off your pack. Obtaining food or other items out of the bottom right
pocket may be more difficult for all but the most limber users, but it still provides a handy ready access for
snacks, your Aquamira® water treatment, camera, etc. The upper right side pocket has very little
capacity, and it designed to store either flat items like maps and permits, or at least thin items, like an
empty water bladder, or “ten essential” items that you want to keep handy. The left pocket can be used
for an additional hydration bottle, fuel bottles, a tent/tarp, larger water bottles, wind shell, etc. The shock
cord compression strap can be used to fasten a jacket or raingear to the back of the pack To carry an ice
axe, use the bottom loop, and swivel the handle up and put it under the shock cord, or lash it to a couple
of the lash loops provided.
Once your pack is packed, you can get up, fold up your pad, and slip it into the back of the pack. To
close the top, pull on the sides of the extension collar like it was the top of a potato chip bag. Fold the
outside quarters in towards the middle at a 45-degree angle, then roll the top of the extension collar away
from the shoulder straps, just like rolling the top of a potato chip bag. Take the "Y" strap and fasten it
over the top of the folded extension collar and fasten. The "Y" strap is designed to help hold additional
loads above the top of the pack, such as a super-comfy pad that you have to have, a bear canister, or
other similar items. For full loads, the drawstring can just be cinched at the top of the extension collar,
and the strap run over the top to keep it from flopping. The drawstring and roll/strap method are designed
as "one or the other" closure systems.
Fit
For the best fit, we recommend loosening the shoulder straps and waist belt each time you take off the
pack. When you put the pack on, fasten the waist belt, hike the pack up on your hips, tighten the waist
belt then tighten the shoulder straps. This will avoid stressing the pack and help it last longer, and get
you the best possible fit each time. Most people find that the best size of pack for them is one that results
in the shoulder straps being level or slightly up from the shoulders. To fine tune the fit, try different
configurations of shoulder strap foam. Some people have found that using socks inside the shoulder
straps gives them a better fit than the foam. Other options including custom trimming the foam, like taking
a slice out so it's not so close to your neck. Other people have found that using two pieces of foam, both
skinnier than the ones provided with the pack, created a shoulder strap configuration that worked for
them.
Care
Your Mariposa Plus pack is constructed of lightweight materials. One of the tradeoffs of designing with
extremely lightweight materials is durability. The design and materials have been tested over hundreds of
trail miles, but your Mariposa Plus pack requires a higher standard of care than other packs. The
Mariposa Plus will not last as long or endure the same abuse as other packs. If you want it to last, you
need to ‘baby’ it. With the best of care it may still need to be repaired or replaced after a few months on
the trail. Each time you head out on a trip, check over your pack carefully and repair or reinforce any
areas showing wear. The ripstop nylon is very susceptible to abrasion. If you put down the pack with the
ripstop nylon on rocks, your pack will shred. Pay attention when you are ducking under barbed wire
fences and squeezing between rocks or through prickly brush. If you do a lot of these activities, the
Mariposa Plus is probably not the pack for you. When you pick up or take off your full pack, always use
the haul loop. When setting it down, be sure that the pack is resting on the heavier oxford material on the
back and the bottom. Never sit or rest on a loaded pack. When carrying a bear canister, be sure to pack
an article of clothing around the canister, so the pack won't be damaged by wearing directly against the
canister.
Note:
Recently we’ve had a few reports of the pad holder mesh causing stains on shirts. Last year we
encountered this issue in less than 1% of the packs sold and have always thought that it had something
to do with specific personal body chemistry which reacts with the dye in the mesh. We have been notified
of several more staining issues this season so we have looked into the production of the mesh and have
been assured that the fabric is colorfast. We are currently searching for either an alternative fabric or
mesh that has been through a more rigorous wash test for the next run of packs. We are also
considering a redesign of the back panel that we may test later in the year. In the interim, the best
solution is to soak the pack in warm/hot water which should leach out any excess dye in the fabric. Do
not put the pack in a washing machine, however.
Personal Customizing/User Tips
There are several things you may want to consider to personalize your pack. For more rainy climes, you
might consider seam-sealing the inside seams. Either McNett SilNet can be purchased, or use a 50/50
mixture of silicon caulking and white gas, and paint it on. If your hiking clothes don’t have a lot of
pockets, you could order some lycra mesh and sew small pockets onto the shoulder or waist straps to
carry small items that you want to have handy. To save weight, you may want to trim the waist belt to
size. Be sure to take into account that you may be wearing additional layers, and don’t cut it too short.
After cutting, seal the end with a flame, and sew back over on itself to prevent it from slipping through the
buckle. Also in the interest of minimizing weight, you are encouraged to trim off straps you don’t use.
Be sure to check the User Tips section on the Gossamer Gear website for suggestions by other users.
Design Insights
The goal of this section is to give you insights as to the various design features of the Mariposa Plus
pack. It may not exactly suit the way you backpack, but may give you ideas, or at least answer some
questions you have about the various aspects of the pack.
Employing "dual use" technology obviously figured highly in the design of the Mariposa Plus. Weight is
minimized by using your sleeping pad as a "frame", and unused socks and clothing as padding for the
shoulder straps and waist belt and a sternum strap that doubles as your emergency whistle. Designing
the pad to be on the outside of the pack allows you to be sitting on it in the cold morning as you are
packing up, as it can be the last thing you pack. It also permits easy removal during the day for sitting on
during rest stops, or lying on for naps, as you wait for your more heavily-laden friends to catch up.
The use of 210 denier double wall ripstop is reserved for areas having stress concentrations or needing
abrasion resistance. The remaining areas of the pack are made out of urethane-coated 2.2 oz. ripstop
nylon to save weight. The bottom portion of the pack is covered with relatively durable pocket mesh, to
provide additional protection.
The Mariposa Plus was designed to provide a sturdier pack capable of carrying a heavier load than the
Mariposa Standard. The Plus utilizes 2.2 oz. ripstop rather than the silicone-coated 1.3 oz. ripstop that
the Mariposa Standard employs. As on the Standard, the sternum strap on the Plus was made
adjustable to help it fit women better. The side pockets were made asymmetrical to keep the benefit of
having a large pocket you could drop things into without having to worry about them falling out, but to add
the benefit of having a small pocket so water bottle users could easily pull out their bottles without taking
off their packs or imposing upon their friends. The flat pocket was added to provide additional
organization options and a consistent level of protection for the pack body. We also added the removable
waist belt this year in order to make the pack a better fit for most people by allowing them the option of
customization.
Since the G4 volume is large, people have a tendency to put too much stuff in them, and end up loading
them beyond the comfort level. Like the Standard Mariposa, the Mariposa Plus was designed with
slightly less volume in the slimmed-down body, but with an enlarged extension collar to help make up
some of the difference. The "Y" strap was designed to help handle the unfortunate but necessary
situation of having to carry a bear canister in some popular areas. It also is handy for carrying rolled
pads, as the "Y" provides three points of contact for stability.
So get out there, and enjoy the lightness of your Mariposa Plus pack! Please forward any suggestions,
and send us any user tips that can be added to the website.
Rev. August 20, 2007